

Page 1
USER’S GUIDE
Sous Vide Professional™
CLASSIC Series Immersion Circulator &
CLASSIC Series Integrated and Economy Bath Systems
PRECISE TEMPERATURE COOKING SYSTEM
110-888 071713
Page 2

CONTENTS.
IMPORTANT SAFEGUARDS.......................................................................................................................2
SAVE THESE INSTRUCTIONS ...................................................................................................................2
INTRODUCTION...........................................................................................................................................3
ADVANTAGES OF SOUS VIDE COOKING................................................................................................3
FEATURES & BENEFITS ............................................................................................................................ 3
CONTROLS & COMPONENTS....................................................................................................................4
Temperature Controller .............................................................................................................................4
Immersion Circulator.................................................................................................................................5
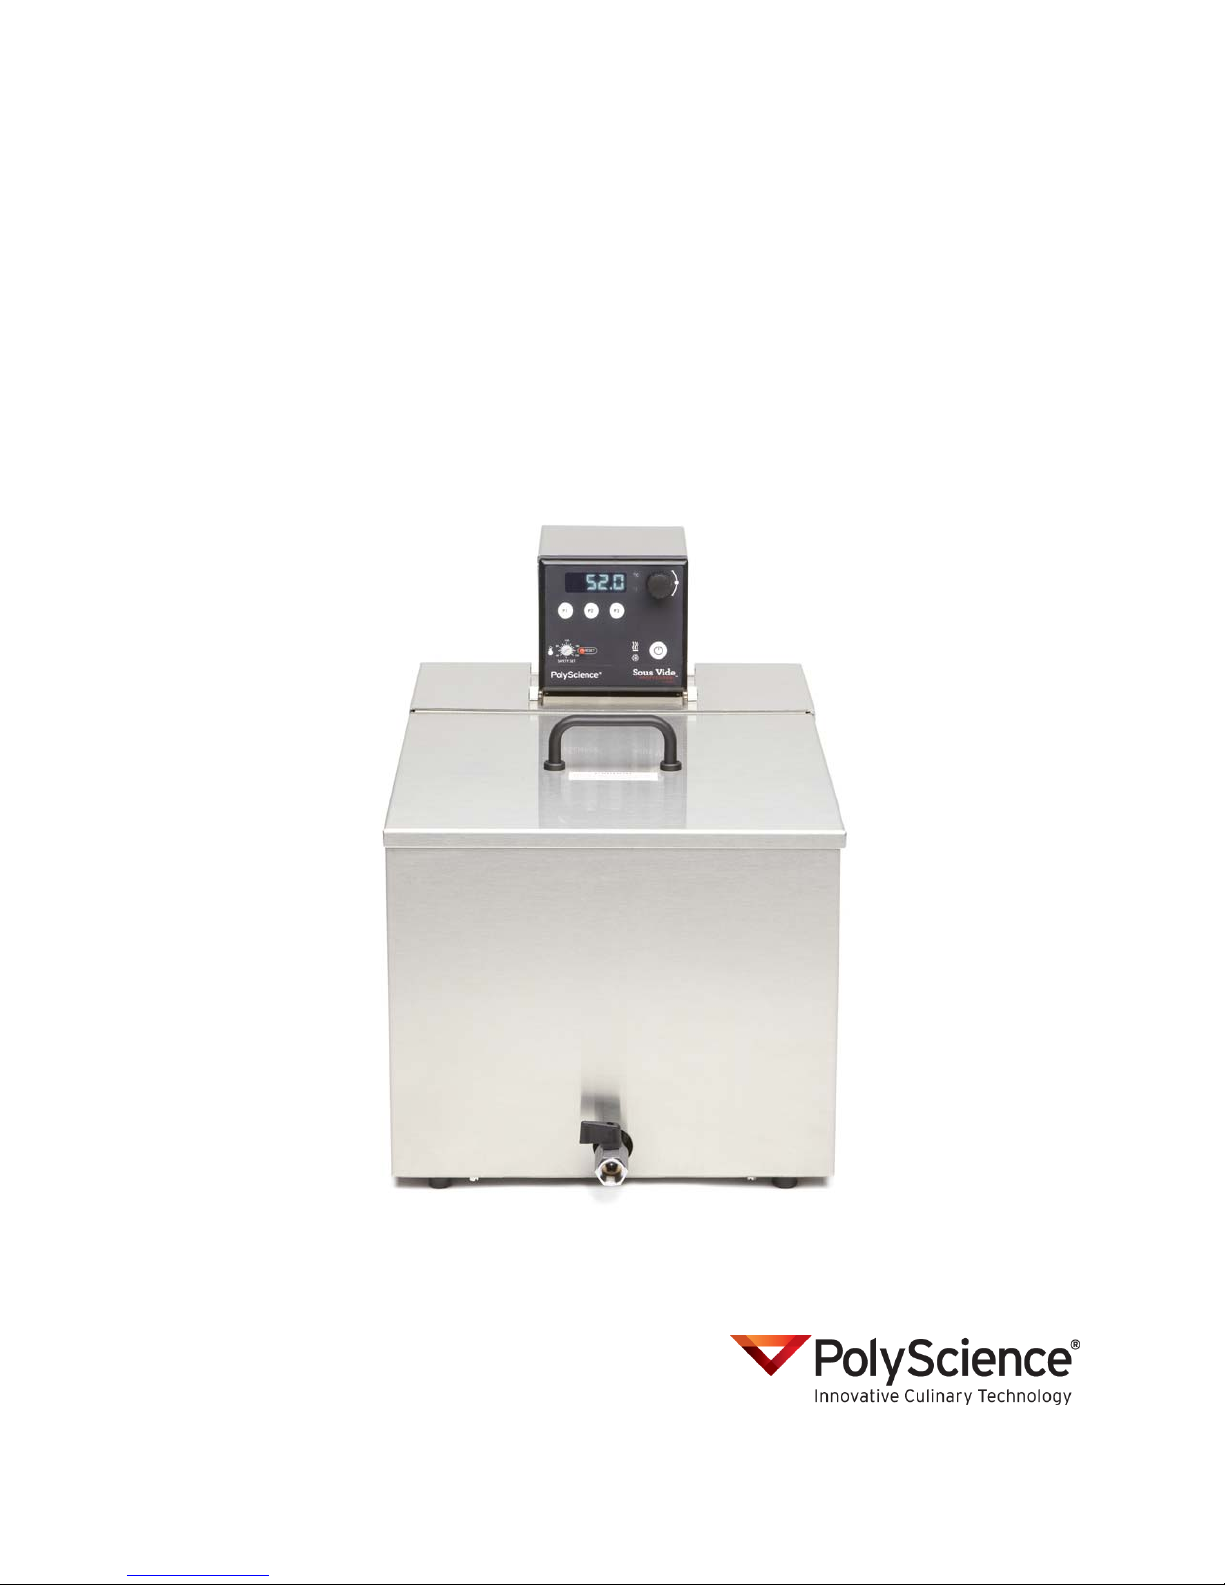
Stainless Steel Integrated Bath System....................................................................................................6
Polycarbonate Economy Bath System......................................................................................................6
QUICK-START ............................................................................................................................................. 7
SET-UP.........................................................................................................................................................9
DAY-T0-DAY OPERATION........................................................................................................................11
Turning the Unit ON.................................................................................................................................11
Setting the Cooking Temperature ...........................................................................................................12
Checking the Cooking Temperature........................................................................................................12
Adjusting the Pump Speed......................................................................................................................12
Creating & Using Temperature Presets..................................................................................................12
LOCAL LOCKOUT.....................................................................................................................................13
CALIBRATION ........................................................................................................................................... 13
LOSS OF POWER......................................................................................................................................13
CLEANING & STORAGE...........................................................................................................................14
Routine Cleaning.....................................................................................................................................14
Removing Scale or Mineral Deposits......................................................................................................14
Removing Food Debris............................................................................................................................15
Draining the Bath Reservoir....................................................................................................................15
RESETTING THE OVER-TEMPERATURE SAFETY................................................................................ 15
TROUBLESHOOTING................................................................................................................................16
SPECIFICATIONS......................................................................................................................................17
WARRANTY ...............................................................................................................................................19
CLASSIC Series 1 www.cuisinetechnology.com
Precise Temperature Cooking Systems
Page 3
IMPORTANT SAFEGUARDS.
When using electrical appliances, basic safety precautions should always be foll owed, including the
following:
1. Do not operate this Cooking System with a damaged power cord or plug, or if it has been
dropped, damaged, or malfunctions. Return the unit to PolyScience for examination and/or repair.
2. Do not let power cord touch hot surfaces or hang over the edge of table or counter.
3. Unplug from electrical outlet when not in use.
4. To avoid the possibility of personal injury, always unplug the Circulator from the electrical outlet
before cleaning the unit.
5. If the power cord falls into liquid, unplug the power cord from the electrical outlet immediately. DO
NOT REACH INTO THE LIQUID.
6. Do not use an extension cord with this Circulator.
7. This Cooking System is intended for indoor use only; do not use outdoors.
8. Do not let the unit’s components come in direct contact with food. All foods to be prepared with
this Cooking System should be placed in FDA approved boilable bags.
9. Carefully review the safety section in included literature.
10. This appliance should not be used by children. To avoid accidental injury, close supervision is
necessary when this appliance is used where children may be present.
11. Do not operate in the presence of explosive and/or flammable fumes.
12. Never operate the Cooking System without the pump/heater housing cover securely in place.
13. Do not use this Cooking System for other than the intended use of preparing foods.
14. Read all instructions carefully.
SAVE THESE INSTRUCTIONS.
WARNING: This Cooking System is equipped with a grounded power cord which must be
plugged into a properly grounded power outlet. Do not use the appliance if the grounding
prong on the plug is missing or damaged or with a grounding adapter. Contact a qualified
electrician if the plug does not fit into the electrical outlet you intend on using.
IMPORTANT: Your Cooking System is equipped with over-temperature protection (Safety
Set). A low-liquid level or failure to set the Safety Set may result in heater burnout and
triac failure. If this safety cannot be reset, the unit must be sent back to PolyScience.
IMPORTANT: COUNTERTOP PROTECTION
Some countertop materials may not be able to withstand the prolonged exposure to heat
required for sous vide cooking. To safeguard against damage to your countertop,
PolyScience recommends that you always place your cooking vessel on a trivet or other
insulating material before you begin heating the cooking liquid.
CLASSIC Series 2 www.cuisinetechnology.com
Precise Temperature Cooking Systems
Page 4

INTRODUCTION.
Thank you for choosing the PolyScience Sous Vide Professional CLASSIC Series Precise Temperature
Cooking System. Properly cared for, it will provide you with the precise and reliable temperature control
you need for low temperature sous vide cooking.
We recommend that you begin using your new appliance immediately to confirm that it is operating
properly. In the unlikely event that the unit was damaged during shipping or does not operate properly,
contact:
PolyScience
6600 W. Touhy Avenue
Niles, IL 60714 USA
Phone: 1.800.229.7569
1.847.647.0611
Email: culinary@polyscience.com
Be sure to activate your new Sous Vide Professional warranty at: www.cuisinetechnology.com
ADVANTAGES OF SOUS VIDE COOKING.
• Significantly reduces shrinkage when cooking meats, fish, or poultry.
• Because food is vacuum sealed in a pouch, nutrients, flavors, and fat cannot escape as it does with
other cooking methods. Sous vide cooking requires less fat and oil, making healthier meals. It also
generally reduces the amount of seasoning (except salt) required.
• Set it and forget it convenience. Once you place the food in the cooking bath, you can leave it to cook
unmonitored and tend to other kitchen tasks.
• Once you’ve established the desired cooking temperature and time for a sous vide dish, you can
repeat it exactly every time.
• Sous vide cooking produces textural qualities that cannot be achieved with other cooking techniques.
FEATURES & BENEFITS.
Your PolyScience Sous Vide Professional Precision Temperature Cooking System combines design
innovation with highly intuitive operation to deliver convenient and accurate temperature control for sous
vide cooking. Here are some of the features that make the Sous Vide Professional so kitchen friendly:
• Extremely easy to use.
• Exceptionally precise – maintains sous vide cooking temperatures up to 302°F / 150°C with ±0.05°C
stability.
• Easy to monitor – large digital display lets you view cooking temperature at a glance.
• Consistent – two-speed circulating pump keeps liquid temperature throughout the cooking bath
uniform, helping ensure that individual portions cook evenly and at the same rate.
• Generous bath opening – provides easy access to food.
Reservoir or Tank cover – minimizes heat loss and evaporation, optimizes tem perature stability.•
• Easy-to-clean – stainless steel reservoir with built-in drain and bridge mounted controller make
thorough cleaning and sanitizing quick and simple.
CLASSIC Series 3 www.cuisinetechnology.com
Precise Temperature Cooking Systems
Page 5

CONTROLS & COMPONENTS.
Temperature Controller.
Digital Display
Preset Temperature
Buttons (P1, P2, P3)
°C LED
Select / Set Knob
(push to set, turn to
adjust)
Safety Set Indicator
Knob
°F LED
Power ON / OFF
Button
Safety Set Reset
Pump Speed Switch Electrical Power
Button
Heating Icon
Switch
Identification Label
CLASSIC Series 4 www.cuisinetechnology.com
Precise Temperature Cooking Systems
Electrical Power
Cornection
Page 6
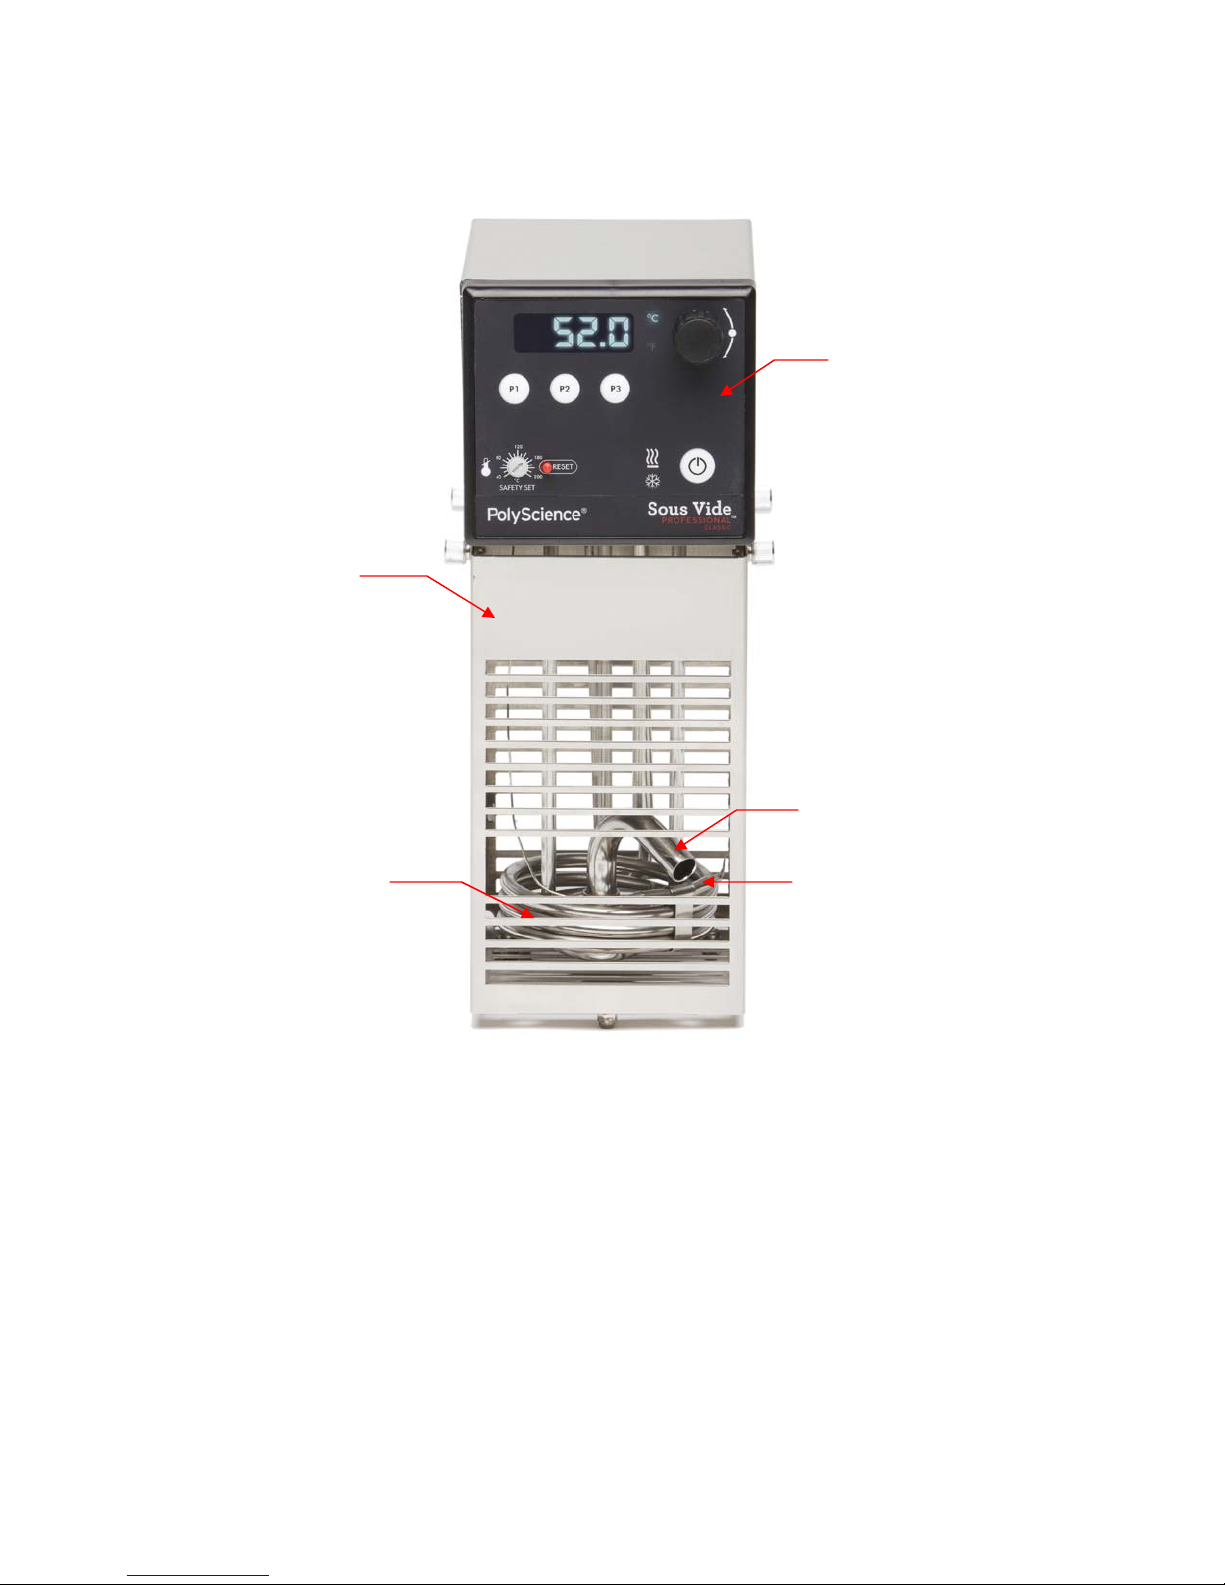
Immersion Circulator.
Protective Cage
Temperature Controller
Pump Outlet
Heater Coils Temperature Sensor
CLASSIC Series 5 www.cuisinetechnology.com
Precise Temperature Cooking Systems
Page 7

Stainless Steel Integrated Bath System.
Stainless Steel
Reservoir
Temperature Controller
Reservoir Cover
Reservoir Drain
Polycarbonate Economy Bath System.
Temperature Controller
Polycarbonate
Tank Cover
Polycarbonate
Tank
CLASSIC Series 6 www.cuisinetechnology.com
Precise Temperature Cooking Systems
Page 8

QUICK START.
See Set-up for additional information.
Attach the unit to the side
of the cooking vessel.
1
2
3
NOTE: This step applies
only to the Immersion
Circulator.
Fill the cooking vessel or
bath reservoir with the
cooking liquid.
Connect the power cord
to an electrical outlet.
Maximum Liquid Level
(1 inch / 2.54 cm below top
of reservoir
)
Minimum Liquid Level
(1 inch / 2.54 cm
above tip of
temperature sensor)
4
5
Place the Power Switch
on the rear of the
Controller in the “ON”
position.
Set the Safety Set
temperature.
I
¨
CLASSIC Series 7 www.cuisinetechnology.com
Precise Temperature Cooking Systems
Page 9

6
7
8
Press the Power Button
on the front of the
Controller.
Press the Select / Set
Knob to access the set
point menu.
Rotate the Select / Set
Knob until the desired
cooking temperature is
displayed.
Press
Press the Select / Set
9
Knob to accept the
displayed cooking
temperature.
Press
CLASSIC Series 8 www.cuisinetechnology.com
Precise Temperature Cooking Systems
Page 10

SET-UP.
Your Sous Vide Professional Bath System is easy to set up.
1. Attach the Immersion Circulator to the cooking vessel (Immersion Circulator only). A mounting
clamp is provided that mounts securely to both flat and rounded tank walls. Allow a minimum of 1.3
cm / 0.5 inch clearance between the bottom of the Circulator’s protective cage and the bottom of the
cooking vessel.
2. Add the cooking liquid to the cooking vessel or bath reservoir. The liquid level should be at least
1 inch (2.54 cm) above the bottom tip of the temperature sensor and no higher than 1 inch (2.54 cm)
below the top of the reservoir.
IMPORTANT: The water level in the reservoir will rise as food is added. Be sure to
allow for this displacement when adding liquid to the reservoir.
Maximum Liquid Level
(1 inch / 2.54 cm below top
of reservoir )
Minimum Liquid Level
(1 inch / 2.54 cm above tip of
temperature sensor)
Temperature Sensor Tip
3. Plug the power cord into a properly grounded electrical outlet.
WARNING: Make certain that the electrical outlet is the same voltage and
frequency as your Circulator. The correct voltage and frequency are indicated
on a label on the back of the unit. The use of extension cords is not
recommended.
4. Place the power switch on the rear of the unit in the “ON” position. Four decimal (….) will
appear on the digital display. Do not he LCD will light and the actual and set point temperature (in °F)
will appear on the display.
5. Set the Safety Set temperature. The Safety Set feature automatically disconnects Controller power
to the heater and pump in the event that the liquid level drops too low or the Controller fails. It is user
adjustable between approximately 104° and 410°F (40° and 210°C). It should be set at least 10°F
(5°C) higher than the Software High Limit Temperature (see page 10). Use a flat blade screwdriver to
rotate the Safety Set Knob to the desired temperature.
CAUTION: Do not force the knob beyond the stops at either end of the
temperature value scale.
CLASSIC Series 9 www.cuisinetechnology.com
Precise Temperature Cooking Systems
Page 11

6. Select the Temperature Unit. Both the actual and desired cooking temperature can be di splayed in
either °F or °C. The factory default setting is °C.
To change from °F to °C, place the Power Switch in the “OFF” position and then press and hold the
P3 Button while turning power back “ON”.
To change from °C to °F, place the Power Switch in the “OFF” position and then press and hold the
P2 Button while turning the power back “ON”.
7. Press the Power Button to turn the Controller “ON”.
8. Set the Software High Limit. This feature provides additional safety and protection by limiting how
high the set point temperature can be set. To avoid an unwanted shutdown while cooking sous vide,
the Software High Limit value should be set at least 5°C (10°F) above the desired cooking
temperature. The Software High Limit temperature is factory set at 152°C (305°F).
To change the Software High Limit temperature setting, press the P2 and P3 Buttons simultaneously
until Hxxx (the current High Limit value) appears on the display. Press and turn Select / Set Knob until
the desired High Limit temperature is displayed. Press the Select / Set Knob to accept the displayed
value.
NOTE: The unit will automatically accept the new value after approximately 10
seconds of inactivity, even if the Select / Set Know is not pressed.
You are now ready to begin cooking with your Sous Vide Professional Bath System.
CLASSIC Series 10 www.cuisinetechnology.com
Precise Temperature Cooking Systems
Page 12

DAY-TO-DAY OPERATION.
Turning the Unit ON.
Place the Power Switch on the rear of the unit in the “ON” position. Four decimal points (….) will appear
on the digital display. The Temperature Controller is now in the Standby mode.
Press the Power Button on the front of the unit; the actual cooking liquid temperature will be displayed
and the liquid will begin circulating. If the set point temperature is above the actual liquid temperature, the
Heating icon will also be lit.
Heating Icon
CLASSIC Series 11 www.cuisinetechnology.com
Precise Temperature Cooking Systems
Page 13

Setting the Cooking Temperature.
Press the Select / Set Knob; the decimal point will begin flashing and the current set point temperature
will be displayed on the digital readout. Rotate the Select / Set Knob until the desired cooking
temperature is displayed and then press the Select / Set Knob again.
NOTE: The unit will automatically accept the new value after approximately 10 seconds of
inactivity, even if the Select / Set Know is not pressed.
IMPORTANT: Always allow the cooking liquid to reach the set point temperature before
adding the sous vide cooking pouches to the reservoir. For optimal heating and
performance, cover the reservoir with the supplied reservoir cover.
NOTE: Cooking temperature may be set and displayed in either °F or °C. See page 10 for
information on changing the temperature unit.
NOTE: If the cooking temperature cannot be raised, it is possible that the Software High
Limit value is set lower than the desired temperature. Reset the Software High Limit value
as required.
Checking the Cooking Temperature.
You can check the cooking temperature at any time by simply pressing the Select / Set Knob. To adjust,
rotate the Select / Set Knob while the decimal point is flashing.
Adjusting the Pump Speed.
The CLASSIC Series Controller features two pump speeds: Low and High. Pump speed is selected using
the Pump Speed Switch on the rear of the Controller. The Low pump speed is recommended when
cooking delicate items, such as eggs; the High pump speed can be used for most other types of foods.
Creating & Using Temperature Presets
The CLASSIC Series Controller features three presets that allow you to select frequently used cooking
temperatures with just the push of a single button.
To create a preset, press the desired Preset Button (P1, P2 or P3); the LED associated with the selected
Preset Button will begin to flash. Rotate the Select / Set Knob until the desired cooking temperature is
displayed and then press the selected Preset Button a second time to enter the displayed set point
temperature.
To cook using a preset, press the Preset Button programmed with that preset cooking temperature. The
LED associated with that button will light continuously. If more than one Preset Button is set at a given
cooking temperature, the LEDs associated those Preset Buttons will all light.
CLASSIC Series 12 www.cuisinetechnology.com
Precise Temperature Cooking Systems
Page 14

LOCAL LOCKOUT.
The CLASSIC Series Temperature Controller’s controls can be locked to help prevent the cooking
temperature from being inadvertently changed.
To activate this feature, press and hold the Select / Set Knob until LLo is displayed (approximately 10
seconds). When locked, the set point decimal will not flash as usual when the Select / Set Knob is
pressed.
To unlock the controls, press and hold the Select / Set Knob until CAn is displayed (approximately 10
seconds).
CALIBRATION.
If desired, the CLASSIC Series Controller’s temperature display can be adjusted to match an external
reference thermometer. Calibration is performed as follows:
Set the unit to the desired cooking temperature.
When the bath has stabilized at the desired cooking temperature, press the P2 and P3 Buttons
simultaneously, release and repeat until the current calibration offset value (oCx.x) appears on the
display. Press P1 and hold until Cal appears on the display (this will take approximately 2 seconds).
The displayed value will begin alternating between the actual cooking liquid temperature and the current
calibration offset value at one second intervals.
Rotate the Select / Set Knob until the display matches the reference thermometer reading. The maximum
adjustment is ±0.9°C.
Press the Select / Set Knob or the P1 Button to accept the entered value. (dONE) will appear briefly on
the display when the new calibration offset is accepted.
NOTE: The calibration offset value will also be automatically accepted after approximately
20 seconds of inactivity, even if the Select / Set Know or P1 Button is not pressed.
LOSS OF POWER.
In the event that electrical power is disrupted during use, your Circulator will return to operation when
power is restored.
CLASSIC Series 13 www.cuisinetechnology.com
Precise Temperature Cooking Systems
Page 15

CLEANING & STORAGE.
WARNING: To avoid the potential for burns, allow the unit and cooking liquid to cool to
room temperature before cleaning.
Always clean and dry your Sous Vide Professional Bath System completely before storing. Be sure to
protect it from contact with equipment or other objects that could damage the digital display.
Routine Cleaning.
Turn the Controller “OFF” by pressing the Power Button and then place the Power Switch on the rea r of
the unit in the “OFF” position. Unplug the power cord from the electrical outlet.
Controller -- Wipe the housing with a clean damp cloth or sponge. Do not use abrasive cleansers as
these could scratch the housing or digital display. Do not allow cleaning liquids or sprays to enter the
Controller vents.
Should the Circulator’s immersed components become coated with grease or other residue due to a
cooking pouch leak or break, run the unit in clean water containing a small amount of non-sudsing
dishwasher detergent for about 10 minutes at 140°F / 60°C. Rinse carefully and dry thoroughly when
done.
Controller Bridge, Bath Reservoir and Cover -- Only mild detergents and water or an approved cleaner
should be used on these surfaces.
CAUTION: Do not use steel wool to clean the Controller Bridge, Bath Reservoir or Cover.
WARNING: Never immerse the Controller’s controls or display in water or other liquids or
place under running water. Do not clean the unit in a dishwasher.
Removing Scale or Mineral Deposits.
Depending on the frequency of use and the hardness of your water, scale and minerals may build up on
the Reservoir’s internal surfaces or the Controller’s heating element and pump impeller. These
components should be inspected periodically for such deposits.
Should cleaning become necessary, fill the Reservoir with either a 15% white vinegar in water solution or
a 10% food-safe calcium/lime/rust remover in water solution and run the Controller at 140°F / 60°C until
the scale is removed. Dry thoroughly when done.
CLASSIC Series 14 www.cuisinetechnology.com
Precise Temperature Cooking Systems
Page 16

Removing Food Debris.
Turn the Controller “OFF” by pressing the Power Button and then place the Power Switch on the rea r of
the unit in the “OFF” position. Unplug the power cord from the electrical outlet.
WARNING: To avoid the potential for burns, allow the Controller to cool to room
temperature before removing it from the bath reservoir.
In the unlikely event that food or other debris becomes lodged in the heater element or pump impeller,
these components can be fully accessed by removing the protective cover on the bottom rear of the unit.
This cover is held in place with two Philips head fasteners.
Use a soft brush to remove any lodged particles. If necessary, soak in clean water to soften before
brushing. DO NOT use hard utensils or abrasive pads to remove trapped food debris.
Draining the Bath Reservoir.
This procedure applies only to Stainless Steel Integrated Bath Systems.
WARNING: To avoid the potential for burns, allow the cooking liquid to cool to room
temperature before draining it from the bath reservoir.
To drain fluid from the bath reservoir, place a suitable container beneath the drain port and ope n the drain
valve.
WARNING: Be sure to close the drain valve before refilling the bath reservoir.
RESETTING THE OVER-TEMPERATURE SAFETY.
The Controller’s automatic over-temperature safety removes power from the heater and pump whenever
the liquid temperature exceeds a factory set temperature. This safety is reset as follows:
1. Press the Power Button on the front panel to place the Controller in the Standby mode.
2. Place the Power Switch on the rear of the unit in the “OFF” position.
3. Unplug the power cord from the electrical outlet.
4. Allow the liquid in the cooking vessel to cool.
5. Press the red Safety Set reset button.
6. Place the Power Switch on the rear of the unit in the “ON” position.
7. Press the Power Button to return to operation.
If the problem persists, contact PolyScience.
Over-Temperature Safety
Reset
CLASSIC Series 15 www.cuisinetechnology.com
Precise Temperature Cooking Systems
Page 17

TROUBLESHOOTING.
Food does not cook uniformly. The food portions are not equal in size and/or the liquid-to-food ratio is
too low.
No or insufficient heating. Allow for sufficient time for the cooking temperature to stabilize when the
cooking temperature is increased. Check to see if the heating icon is flashing. If it is not flashing, check
that the Safety Set temperature and the Software High Limit temperature are higher than the cooking
temperature set point and/or that the cooking temperature set point is higher than the cooking liquid
temperature. If the icon is flashing, check for scale or mineral deposits on the heater.
No or insufficient circulation. Check the cooking liquid level to be sure the pump head is covered with
fluid. Check the Pump Speed Switch on the rear of the Controller to make sure that it is at the desired
speed and is not in between settings. Check the pump impeller for blockages and clean a s re quired.
Cooking temperature set point cannot be maintained. Allow time for cooking liquid to stabilize at the
desired temperature and verify that the reservoir cover is in place.
Digital display is blank. Verify that the power cord is plugged into an operating electrical outlet and that
the Power Switch on the rear of the unit is in the “ON” position. Check for problems with the main
electrical power supply (tripped circuit breaker, etc.).
E-H1 appears on the display. This indicates that the value entered for the Software High Limit
temperature is below the current cooking temperature setting. Either lower the cooking temperature
setting or enter a higher Software High Limit temperature value.
FLt1 appears on the display. This indicates that the Software High Limit value has been exceeded.
Increase the Software High Limit value and then turn electrical power “OFF” and then back “ON” using
the Power Switch on the rear of the unit.
FLt2 appears on the display. This indicates that the EEPROM needs to be reset. Place the Power
Switch in the “OFF” position and then press and hold the P3 Button while returning the Power Switch to
the “ON” position.
FLt3 appears on the display. This indicates that the Safety Set temperature has been exceeded. It may
be caused by a low liquid level, a cooking temperature setting and/or liquid temperature higher than the
Safety Set temperature, or a Controller failure. Check the fluid level in the reservoir and replenish as
required, check the cooking temperature set point and adjust it or the Safety Set temperature as required.
If problem persists, contact PolyScience.
FLt4 appears on the display. This indicates a triac failure or electrical line interference. Connect the unit
to another electrical power source; if problem persists, contact PolyScience.
FLt5 appears on the display. This indicates a temperature sensor failure. Contact PolyScience.
CLASSIC Series 16 www.cuisinetechnology.com
Precise Temperature Cooking Systems
Page 18

SPECIFICATIONS.
All Models
Maximum Temperature: 150°C / 302°F
Temperature Stability: ±0.05°C
Heater Wattage: 1100 W 1600 W
Flow Adjustment: 2-speed Pump
Maximum Pump Output: 12 liters per minute / 3.2 gallons per minute
Electrical Requirements: 120V, 60Hz, 11A 240V, 50Hz, 7.5A
Immersion Circulators
Maximum Fluid Volume 30 liters 45 liters
Overall Dimensions (L x W x H) 8.4 x 5.4 x 12.6 in. / 21.3 x 13.7 x 32.0 cm
Integrated and Polycarbonate Baths
120V, 60Hz 240V, 50Hz
Overall Dimensions
Stainless Steel Integrated Baths
(L x W x H): 28L
45L
Working Access
Stainless Steel Integrated Baths
(L x W x D): 28L
45L
Overall Dimensions
Polycarbonate Economy Baths
(L x W x H): 18L
49L
64L
Working Access
Polycarbonate Economy Baths
(L x W x D): 18L
49L
64L
25.5 x 12.9 x 15.9 in. / 64.8 x 32.8 x 40.4 cm
32.1 x 16.9 x 15.14 in. / 81.5 x 43 x 38.5 cm
12.5 x 12 x 8 in. / 31.8 x 30.5 x 20.3 cm
18 x 16 x 8 in. / 45.7 x 40.6 x 20.3 cm
12 x 18 x 9 in. / 30.5 x 45.7 x 22.9 cm
18 x 26 x 9 in. / 45.7 x 66.0 x 22.9 cm
18 x 26 x 12 in. / 45.7 x 66.0 x 30.5 cm
9 x 8.75 x 8 in. / 22.9 x 22.2 x 20.3 cm
17 x 14.5 x 8 in. / 43.2 x 36.8 x 20.3 cm
19 x 14.5 x 11 in. / 48.2 x 36.8 x 27.9 cm
CLASSIC Series 17 www.cuisinetechnology.com
Precise Temperature Cooking Systems
Page 19

DISPOSAL.
This equipment is marked with the crossed out wheeled bin symbol to indicate that it must not be
disposed of with unsorted waste.
It is your responsibility to correctly dispose of this equipment at lifecycle-end by handing it over to an
authorized facility for separate collection and recycling. By doing so, you will help conserve natural and
environmental resources and you will ensure that your equipment is recycled in a manner that protects
human health.
Please contact PolyScience.
CLASSIC Series 18 www.cuisinetechnology.com
Precise Temperature Cooking Systems
Page 20

WARRANTY.
This limited warranty supersedes all previous warranties on this product. This limited warranty is available
to consumers only. Your are a consumer if you were the original purchaser of the product at retail for
personal, family, or household use. PolyScience agrees to correct for the consumer, either by repair or at
PolyScience’s election, by replacement, any defects in material or workmanship which develop within
twelve (12) months after delivery of this product to the consumer for parts and labor. In the event of
replacement, the replacement unit will be warranted for (A) ninety (90) days from the date of delivery of
the replacement, or (B) the remainder of the original warranty period, whichever is longer.
If the product should require service, contact PolyScience for instructions. When return of the product is
necessary, a return authorization number is assigned and the product should be shipped, transportation
charges pre-paid, to the indicated service center. To insure prompt handling, the return authorization
number must be placed on the outside of the package. A detailed explanation of the defect must be
enclosed with the product.
Notwithstanding the above, this warranty shall not apply if the defect or malfunction was caused by
accident, neglect, unreasonable use, improper service, or other causes not arising out of defects in
material or workmanship.
THERE ARE NO WARRANTIES, EXPRESSED OR IMPLIED, INCLUDING, BUT NOT LIMITED TO,
THOSE OF MERCHANTABILITY OR FITNESS FOR A PARTICULAR PURPOSE, WHICH EXTEND
BEYOND THE DESCRIPTION AND PERIODS SET FORTH HEREIN.
POLYSCIENCE’S SOLE OBLIGATION UNDER THE WARRANTY IS LIMITED TO THE REPAIR OR
REPLACEMENT OF A DEFECTIVE PRODUCT AND POLYSCIENCE SHALL NOT, IN ANY EVENT BE
LIABLE FOR ANY INCIDENTAL OR CONSEQUENTIAL DAMAGES OF ANY KIND RESULTING FROM
USE OR POSSESSION OF THIS PRODUCT.
Some states do not allow (A) limitations on how long an implied warranty lasts, or (B) the exclusion or
limitation of incidental or consequential damages, so the above limitations or exclusions may not apply to
you. This warranty gives you specific legal rights, and you may have other rights that vary from state to
state.
Be sure to activate your warranty at www.cuisinetechnology.com
For recipe ideas, instructional videos, and free downloads visit www.sousvideprofessional.com.
PolyScience Toll-free USA & Canada: (800) 229-7569
6600 W. Touhy Avenue Worldwide: +1 (847) 647-0611
Niles, IL 60714 USA Email: culinary@polyscience.com
CLASSIC Series 19 www.cuisinetechnology.com
Precise Temperature Cooking Systems
 Loading...