

Page 1
110-884 081613
Page 2

Page 3

www.cuisinetechnology.com 2
Contents
Important Safeguards...............................................
Introduction..............................................................
Cooking Sous Vide Safely........................................
Basic Steps of Sous Vide Cooking..........................
Controls & Components...........................................
Set-Up........................................................................
Day-to-Day Operation...............................................
Buttons & Controls................................................
Turning Your Circulator On....................................
Adjusting the Temperature.....................................
Selecting the Temperature Unit..............................
Setting the Timer...................................................
Loss of Power Restart...........................................
Cleaning & Storage...............................................
Troubleshooting........................................................
Technical Specifications...........................................
Disposal....................................................................
Warranty....................................................................
3
5
6
7
9
10
12
12
12
13
14
15
16
16
18
20
20
21
Page 4

3
PolyScience Sous Vide® DISCOVERY
When using electrical appliances, basic safety precautions should
always be followed, including the following:
1. Do not touch hot surfaces. Use handles or knobs.
2. Do not operate this Circulator with a damaged power cord
or plug, or if it has been dropped, damaged or malfunctions.
Return the Circulator to PolyScience for examination and/or
repair.
3. Do not let power cord touch hot surfaces or hang over the edge
of the table or counter.
4. Unplug from electrical outlet when not in use.
5. To avoid the possibility of personal injury, always unplug the
Circulator from the electrical outlet before cleaning the unit.
6. To protect against the risk of electrical shock, submerse
only the heater/pump portion of this circulator in liquid. The
maximum submersion depth is indicated on the housing of the
unit. If the Circulator or power cord falls into liquid, unplug the
power cord from the electrical outlet immediately. DO NOT
REACH INTO THE LIQUID.
7. Do not use an extension cord with this Circulator.
8. This Circulator is intended for indoor use only; do not use
outdoors.
9. Do not let this Circulator come in direct contact with food. All
foods to be prepared with this Circulator should be placed in
FDA approved boilable bags.
10. Carefully review the safety section in included literature.
11. This appliance should not be used by children. To avoid
accidental injury, close supervision is necessary when this
appliance is used where children may be present.
12. Do not operate in the presence of explosive and/or flammable
fumes.
13. Never operate the Circulator without the pump/heater housing
cover securely in place.
IMPORTANT SAFEGUARDS
Page 5

www.cuisinetechnology.com 4
Do not use this Circulator for other than the intended use of
preparing foods.
The use of accessory attachments not recommended by the
appliance manufacturer may cause injuries.
Do not place on or near a hot gas or electric burner, or in a
heated oven.
Extreme caution must be used when moving an appliance
containing hot oil or other hot liquids.
To disconnect, turn any control to Off, then remove plug from
wall outlet.
Household use only.
This appliance is not intended for use by persons (including
children) with reduced physical, sensory or mental capabilities,
or lack of experience and knowledge, unless they have
been given supervision or instruction concerning use of the
appliance by a person responsible for their safety.
Read all instructions carefully.
14.
15.
16.
17.
18.
19.
21.
20.
SAVE THESE INSTRUCTIONS
!
IMPORTANT: Your Sous Vide® DISCOVERY is equipped
with an automatic over-temperature safety that will disable
the heater in the event of a heater fault. If this safety cannot
be reset, the unit must be sent back to PolyScience.
!
IMPORTANT: COUNTERTOP PROTECTION
Some countertop materials may not be able to withstand
the prolonged exposure to heat required for sous
vide cooking. To safeguard against damage to your
countertop, PolyScience recommends that you always
place your cooking vessel on a trivet or other insulating
material before you begin heating the cooking liquid.
WARNING: This Circulator is equipped with a grounded
power cord. Connect the appliance only to earthed
(grounded) power sockets. Do not use the appliance if
the grounding prong on the plug is missing or damaged
or with a grounding adapter. Contact a qualified
electrician if the plug does not fit into the electrical outlet
you intend on using.
Page 6

5
PolyScience Sous Vide® DISCOVERY
INTRODUCTION
Thank you for choosing the PolyScience Sous Vide
®
DISCOVERY Circulator. Properly cared for, it will provide you
with the precise and reliable temperature control you need for
low temperature sous vide cooking.
We recommend that you begin using your Circulator
immediately to confirm that it is operating properly. In the
unlikely event that the unit was damaged during shipping or
does not operate properly, contact:
PolyScience
6600 W. Touhy Avenue
Niles, IL 60714 USA
Phone:
Email:
1.800.229.7569
1.847.647.0611
culinary@polyscience.com
Be sure to activate your new Sous Vide
®
DISCOVERY warranty at
www.cuisinetechnology.com
Page 7
www.cuisinetechnology.com 6
COOKING SOUS VIDE SAFELY
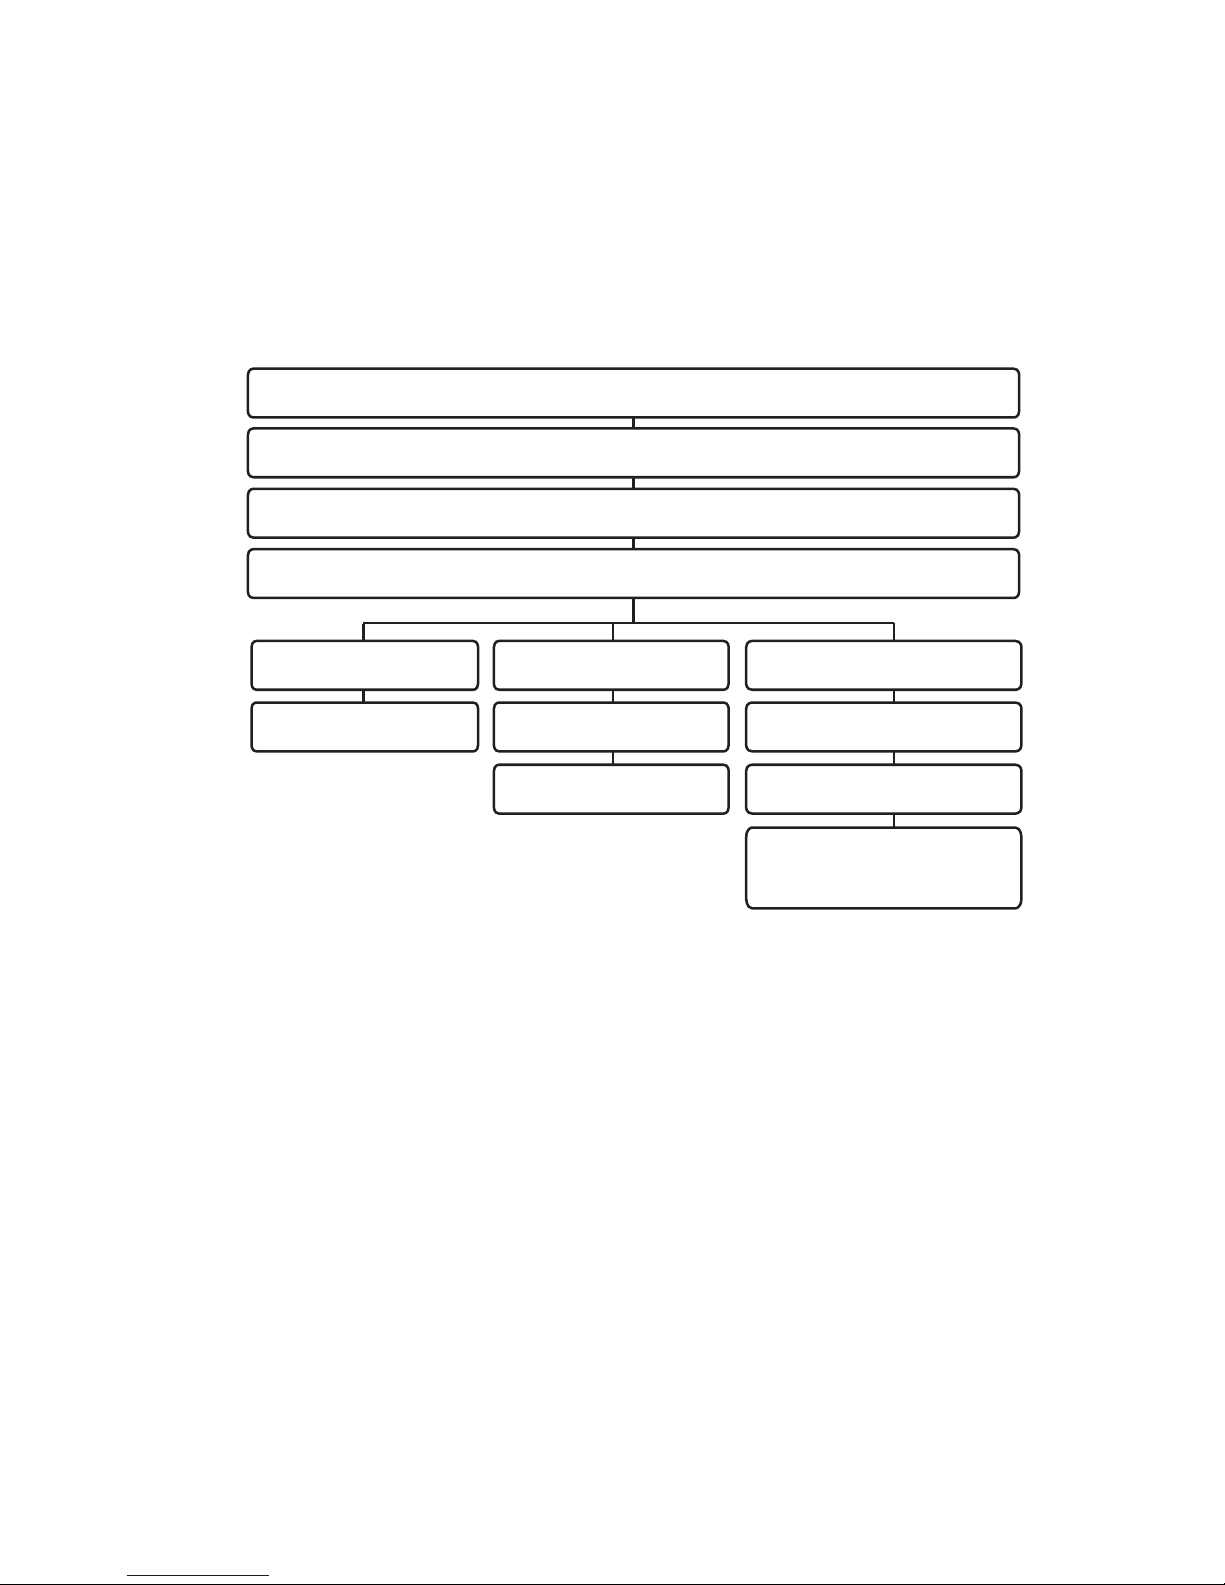
Step-by-Step Overview
The basic steps of Sous Vide cooking are very simple and
straightforward. Food can either be served right after it is
cooked or it can be chilled in the vacuum pouch and reheated
later. Just follow the following 5 easy steps.
Detailed Steps With Important Food-Safety
Recommendations
Sous Vide is a very safe cooking method. As with any other
method, Sous Vide requires standard food safety practices.
However, there are two unique issues that are very important
to understand before you start cooking Sous Vide.
• Vacuum-packaging creates an anaerobic or low-oxygen
environment that can encourage the growth of bacteria
such as salmonella and botulism when food is handled
improperly.
• Food cooked at low temperatures for extended periods
of time can cause bacteria to multiply rapidly. The longer
food is in the “danger zone” — temperatures between
40°F and 140°F (4.4°C to 60°C) — the faster bacteria can
multiply and the more dangerous they can become.
5.
Hold At Minimum
Temperature
Plate & Serve
Sear In Pan
(If Required)
1. Set Up Sous Vide® DISCOVERY & Water Bath
2. Trim, Prepare & Season Ingredients
3. Vacuum Seal Chilled Food
4. Cook at Desired Temperature for Minimum Time
Sear In Pan
(If Required)
Plate & Serve
Chill Pouches In
Ice Bath
Keep Refrigerated At
38°F (3.3°C)
Set Up
Sous Vide
®
DISCOVERY
Reheat Vacuum Sealed
Pouch, Sear In Pan (If
Required), Plate & Serve
Page 8

7
PolyScience Sous Vide® DISCOVERY
1. Set Up Sous Vide DISCOVERY & Water Bath:
• Clamp Sous Vide® DISCOVERY to a stockpot or any other
vessel. Fill with water up to maximum level, indicated on
Sous Vide® DISCOVERY.
• Do not use with more than seven gallons or thirty liters of
water.
• Set Sous Vide® DISCOVERY to the desired temperature.
• Cover bath with lid or plastic wrap for efficient heat-up
time and to avoid evaporation.
2. Trim, Cut & Prepare Ingredients:
• Use only very fresh ingredients from a reputable source.
• The thicker the ingredient, the longer it takes to come to
its cooking temperature.
• Remove or cover pointy bones or anything that could
puncture the plastic pouch.
• Use less seasoning/herbs than you normally would.
• Ensure seasonings and flavors are evenly mixed before
adding to bag. Seasoning and herbs don’t distribute well in
a vacuum-sealed pouch.
• If appropriate for recipe, pre-sear meat and fish to
eliminate surface bacteria.
• If you brine or cure protein before cooking, store food in
the refrigerator.
3. Vacuum-Seal Chilled Food:
• Make sure food is refrigerated at 38°F (3.3°C) or below
until ready to seal.
• Use food-grade plastic bags to seal food.
• To ensure precise and even cooking, arrange pieces of
food in the plastic bag in a single layer.
BASIC STEPS OF
SOUS VIDE COOKING
Page 9

www.cuisinetechnology.com 8
• Determine how tight you want to seal the food. Avoid
compressing delicate ingredients, unless it is your
intention.
• Check vacuum bag for proper seal before cooking.
• After sealing, immediately cook or refrigerate food at 38°F
(3.3°C) or below until ready to cook.
4. Cook At Desired Temperature For Minimum Time
• Insert vacuum-sealed bag only when bath has reached
correct temperature.
• Follow Time and Temperatures Guidelines and consider
increasing cooking 3-4 times of the difference in diameter.
• Recipes and an application to calculate exact time and
temperature can be found at cuisinetechnology.com
• If you cook more than one vacuum bag, make sure they
are not too close to each other.
• Check temperature and sealed vacuum bag frequently
during cooking process. A bag that suddenly begins
to float, inflate, or leak is a sign of food-safety issues.
Discard food and clean tank and Sous Vide® DISCOVERY.
5. Sear In Hot Pan, Plate & Serve
• Always measure the internal temperature of foods before
serving. You can reseal a pouch and continue cooking if
necessary.
• Some foods, such as meats, some fish and vegetable
recipes require a quick sear. The additional flavors created
while searing is called the Maillard reaction. A quick, very
hot sear will only impact the surface while everything else
remains perfectly done.
Page 10

9
PolyScience Sous Vide® DISCOVERY
CONTROLS & COMPONENTS
Cover Plate for
Over-Temperature
Protection Reset
Button
Maximum
Liquid Level Line
Minimum
Liquid Level Line
Front Flow Port
Power Switch
Electrical
Power Cord
Mounting Clamp
Removable
Heater / PumpAccess Cover
Rear Flow Port
Circulating
Heating
Start Button
Stop Button
Menu Button
Decrease
Value Button
Increase
Value Button
Set Point Temperature
or Countdown Timer
alternates while cooking.
Page 11

www.cuisinetechnology.com 10
SET-UP
1. Attach Circulator to cooking vessel.
Mounting clamp attaches
Circulator securely to both
flat- and curved-walled
cooking vessels.
Allow at least 0.5 inch / 1.3 cm
clearance between bottom of
Circulator housing and bottom of
cooking vessel.
Maximum Liquid Level Line
Minimum Liquid Level Line
2. Add water to cooking vessel.
Fill cooking vessel to a depth between Maximum and Minimum
liquid level lines. Be sure to allow for the rise in fluid level
when food is placed in the cooking vessel, and the decreased
level due to evaporation.
WARNING: If the proper fluid level is not
maintained, the heater coil may become exposed
and possibly damaged (fluid level too low) or the
bath may overflow (fluid level too high).
!
Page 12

11
PolyScience Sous Vide® DISCOVERY
3. Plug power cord into a properly grounded electrical
outlet.
4. Place Power Switch in the “On” position.
The actual and set point temperature (in °F) will appear on the
display, indicating that the Circulator is in the Standby mode
and ready for use.
Set Point
Temperature
Actual
Cooking Liquid
Temperature
WARNING: Make certain that the electrical
outlet is the same voltage and frequency as your
Circulator; the correct voltage and frequency are
indicated on the identification label on the back
of the unit. The use of an extension cord is not
recommended.
Page 13

www.cuisinetechnology.com 12
Buttons & Controls
Power
Turns the Circulator On, placing it in Standby
mode. The power switch is located on the rear of
the unit.
Run
Starts active operation. Pump begins running;
cooking liquid also begins heating if the set point
temperature is above the actual temperature of
the liquid.
Stop
Pauses operation (Circulator returns to Standby
mode). Cooking liquid circulation and heating
stop.
Menu
Accesses set point temperature, unit of measure
and timer set-up functions.
Increase
Value
Increases the displayed value of the selected
setting (set point temperature or timer).
Decrease
Value
Decreases the displayed value of the selected
setting (set point temperature or timer).
Turning Your Circulator “On”
Press the button. All characters/symbols on the LCD will
momentarily light and then the actual liquid temperature and
the set point temperature (in °F) are displayed. The Circulator
is now in the Standby mode.
DAY-TO- DAY OPER ATION
When the Circulator is in
the Standby mode, neither
the heating (
) icon nor
the circulating (
) icon
is lit.
Page 14

13
PolyScience Sous Vide® DISCOVERY
Adjusting the Temperature
!
IMPORTANT: The cooking temperature cannot
be increased or decreased while the Circulator is
heating or circulating the cooking liquid. You must
first place it in Standby by pressing
.
This is the temperature at which the cooking liquid will be
maintained. It may be set to one-tenth of a degree over a
range of 41° to 208°F / 5° to +98°C. The factory default is
68°F / 20°C.
1. Press
once for °F or three times for °C; the word SET
will be lit next to the current set point temperature setting.
2. Press
and/or until the desired cooking (set point)
temperature is displayed.
3. Press
to begin cooking at the displayed temperature.
The timer will also start.
The set point temperature and remaining time alternate on
the display when the Circulator is actively running. The unit
will continue circulating the cooking liquid and maintaining it
at the set point temperature until is pressed, even after
the timer reaches 00:00.
!
IMPORTANT: Always allow the cooking liquid to
reach the set point temperature before adding the
sous vide cooking pouches to the cooking vessel.
For optimal heating and performance, cover the
cooking vessel with plastic wrap or a lid. DO NOT
COVER THE CIRCULATOR.
1
3
2
Page 15

www.cuisinetechnology.com 14
1
This feature allows selection of the temperature unit in
which the actual cooking liquid temperature and set point
temperature are displayed. The factory default is °F.
Selecting the Temperature Unit
1. Press once for °F or three times for °C; the word SET
will be lit next to the current set point temperature setting.
Page 16

15
PolyScience Sous Vide® DISCOVERY
!
TIP: Always allow the cooking liquid to reach the
set point temperature before setting the timer.
This will help ensure food is cooked at the desired
temperature for the desired length of time.
Setting the Timer
!
IMPORTANT: The Timer cannot be set while
the Circulator is heating or circulating the
cooking liquid. You must first place it in Standby
by pressing
.
Your Circulator has a built-in timer that can be set for time
periods from 5 minutes to 99 hours. The factory default is
24:00 hours.
1. Press
twice; the word SET will be lit next to the current
timer setting.
2. Press or hold
and/or until the desired time is
displayed.
3. Press
to start the timer and begin cooking at the
desired temperature.
The set point temperature and remaining time alternate on the
display when the Circulator is actively running. When the time
period set has elapsed, the Circulator will beep three times,
go silent for 15-20 seconds, and then repeat. The unit will
continue circulating the cooking liquid and maintaining it at
the set point temperature until is pressed; this also resets
the timer.
1
3
2
Page 17

www.cuisinetechnology.com 16
In the event that electrical power is lost while your Circulator is in
use, it will begin operating automatically once power is restored,
with the temperature displayed in °F and the timer set for 24:00
hours.
Loss of Power Restart
Cleaning & Storage
Always clean and dry your Circulator completely before storing.
Be sure to protect it from contact with equipment or other objects
that could damage the digital display.
Routine Cleaning
Press to put the Circulator in Standby and then place the
Power Switch in the Off position. Unplug the power cord from the
electrical outlet.
WARNING: The unit will start automatically
after a disruption in electrical power.
!
WARNING: To avoid the potential for
burns, allow the Circulator to cool to room
temperature before removing it from the
cooking vessel.
Keeping the unit upright, wipe the housing with a clean damp
cloth or sponge. Do not use abrasive cleansers as these could
scratch the housing or LCD readout.
Should the Circulator’s immersed components become coated
with grease or other residue due to a cooking pouch leak or
break, run the unit in clean water containing a small amount
of non-sudsing dishwasher detergent for about 10 minutes at
140°F / 60°C. Rinse carefully and dry thoroughly when done.
!
CAUTION: Never immerse the Circulator’s
control or display in water or other liquids or
place under running water. Do not clean the
unit in a dishwasher.
ANY OTHER SERVICING SHOULD BE PERFORMED BY AN
AUTHORIZED SERVICE REPRESENTATIVE.
Page 18

17
PolyScience Sous Vide® DISCOVERY
Removing Mineral or Scale Deposits
Depending on the frequency of use and the hardness of your
water, scale and minerals may build up on your Circulator’s
heater element and pump impeller. These components should
be inspected periodically for such deposits by removing the
protective cover on the bottom rear of the unit. This cover is held
in place with two Phillips head fasteners.
Should cleaning become necessary, run the Circulator in either a
15% white vinegar in water solution or a 10% food-safe calcium/
lime/rust remover in water solution at 140°F / 60°C until the scale
is removed. Dry thoroughly when done.
WARNING: To avoid the potential for
burns, allow the Circulator to cool to room
temperature before removing it from the
cooking vessel.
WARNING: Never operate your Circulator
without the protective cover in place.
!
Pump
Impeller
Heater
Element
Page 19

www.cuisinetechnology.com 18
Removing Food Debris
Press to put the Circulator in Standby and then place the
Power Switch in the “Off” position. Unplug the power cord
from the electrical outlet.
In the unlikely event that food or other debris becomes lodged
in the heater element or pump impeller, these components
can be fully accessed by removing the protective cover on the
bottom rear of the unit. This cover is held in place with two
Phillips head fasteners.
Use a soft brush to remove any lodged particles. If necessary,
soak in clean water to soften before brushing. DO NOT use
hard utensils or abrasive pads to remove trapped food debris.
TROUBLESHOOTING
Food does not cook uniformly.
The food portions are not equal in size and/or the liquid-tofood ratio is too low.
Circulator won’t heat or cannot reach the desired cooking
(set point) temperature.
Check to see if the heat symbol ( ) is flashing.
If symbol is flashing and you are cooking at a higher
temperature or using a larger cooking vessel, cover the vessel
with plastic wrap or a lid. DO NOT COVER CIRCULATOR.
If symbol is not flashing, (1) verify that the Circulator is in the
Run mode (
lit) and (2) that the set point temperature is
higher than the actual cooking liquid temperature.
Displayed liquid temperature greatly exceeds set point
temperature.
Check bottom of the Circulator and/or the front and rear flow
ports for blockages and clear as required. If that does not
correct the problem, turn power to the Circulator “Off” and
then back “On”. If problem still persists, the temperature
sensor may be defective and require service.
Page 20

19
PolyScience Sous Vide® DISCOVERY
Digital display is blank
This indicates that either the Circulator is turned “Off,”
electrical power to the unit has been disrupted, or the OverTemperature Safety has tripped due to over-heating.
Verify that the Power Switch on the rear of the Circulator is in
the “On” position and that the power cord is plugged into an
operating electrical outlet. Check for problems with the main
electrical power supply.
If the Circulator is connected to an operating electrical outlet
and the Power Switch is in the “On” position, reset the OverTemperature Safety as follows:
1. Place the Power Switch in the “Off” position.
2. Unplug the power cord from the electrical outlet.
3. Allow the liquid in the cooking vessel to cool.
4. Remove the plate covering the red reset button.
5. Press the red reset button.
6. Replace the cover plate.
7. Plug the power cord back into the electrical outlet.
8. Place the Power Switch in the “On” position.
9. Press
.
If the problem persists, contact PolyScience.
Reset Button
Page 21

www.cuisinetechnology.com 20
This equipment is marked with the crossed out wheeled bin
symbol to indicate it must not be disposed of as unsorted
municipal waste.
It is your responsibility to correctly dispose of this equipment
at lifecycle-end by handing it over to an authorized facility for
separate collection and recycling. By doing so, you will help
to conserve natural and environmental resources and you will
ensure that your equipment is recycled in a manner that protects
human health.
For more information, please contact PolyScience.
DISPOSAL
TECHNICAL SPECIFICATIONS
Page 22

21
PolyScience Sous Vide® DISCOVERY
This limited warranty supercedes all previous warranties on
this product. This limited warranty is available for consumers
only. You are a consumer if you were the original purchaser
of the product at retail for personal, family or household use.
PolyScience agrees to correct for the consumer, either by repair,
or at PolyScience’s election, by replacement, any defects in
material or workmanship which develop within twelve (12) months
after delivery of this product to the consumer for parts and
labor. In the event of replacement, the replacement unit will be
warranted for (A) ninety (90) days from the date of delivery of the
replacement, or (B) the remainder of the original warranty period,
whichever is longer.
If this product should require service, contact PolyScience for
instructions. When return of the product is necessary, a return
authorization number is assigned and the product should be
shipped, transportation charges pre-paid, to the indicated service
center. To insure prompt handling, the return authorization
number should be placed on the outside of the package. A
detailed explanation of the defect must be enclosed with the
product.
Notwithstanding the above, this warranty shall not apply if
the defect or malfunction was caused by accident, neglect,
unreasonable use, improper service or other causes not arising
out of defects in material or workmanship.
THERE ARE NO WARRANTIES, EXPRESS OR IMPLIED,
INCLUDING, BUT NOT LIMITED TO, THOSE OF
MERCHANTABILITY OR FITNESS FOR A PARTICULAR
PURPOSE, WHICH EXTEND BEYOND THE DESCRIPTION AND
PERIODS SET FORTH HEREIN.
WARRANTY
Page 23

www.cuisinetechnology.com 22
Be sure to activate your new PolyScience Sous Vide
®
DISCOVERY warranty at www.cuisinetechnology.com
PolyScience
6600 W. Touhy Avenue
Niles, IL 60714 USA
Toll-free USA and Canada: (800) 229-7569
Worldwide: +1 (847) 647-0611
Email: culinary@polyscience.com
POLYSCIENCE’S SOLE OBLIGATION UNDER THIS
WARRANTY IS LIMITED TO THE REPAIR OR REPLACEMENT
OF A DEFECTIVE PRODUCT AND POLYSCIENCE SHALL
NOT, IN ANY EVENT BE LIABLE FOR ANY INCIDENTAL OR
CONSEQUENTIAL DAMAGES OF ANY KIND RESULTING
FROM USE OR POSSESSION OF THE PRODUCT.
Some states do not allow (A) limitations on how long an implied
warranty lasts, or (B) the exclusion or limitation of incidental or
consequential damages, so the above limitations or exclusions
may not apply to you. This warranty gives you specific rights, and
you may have other rights which vary from state to state.
Page 24

23
PolyScience Sous Vide® DISCOVERY
 Loading...