

Page 1

TEXJET4260/GJET/SUPERJET
Digital Textile Garment Printer
Operation Manual
ENGLISH
Page 2
POLYPRINT SA – TEXJET OPERATION MANUAL V4 EN
- 2 -
No part of this publication may be reproduced mechanically or electronically or in any form without the
prior written permission of Polyprint S.A. The information in this manual is for informational use only,
is subject to change without notice and should not be construed as a commitment by Polyprint S.A.
Polyprint S.A. assumes no responsibility or liability for any errors or inaccuracies that may appear in
this document. Polyprint is a trademark or trade name of Polyprint S.A., Thessaloniki, Greece.
Federal copyright laws permit you to make a backup of software included with TexJet for archival
purposes only. Any other duplication of this software, including copies offered through sale, loan,
rental or gift is a violation of law, and subject to both criminal and civil penalties.
POLYPRINT SA
Digital Textile Printing Solutions
Agiou Dimitriou 190, 54638
Thessaloniki, Greece
Tel. +30 2310 246418
Fax +30 2310 246419
E-mail : [email protected]
www.polyprint.gr
Technical Support
Tel. +30 2310 246418
Operation manual version 4 English
Page 3

POLYPRINT SA – TEXJET OPERATION MANUAL V4 EN
- 3 -
Table of contents
1. Introduction to TexJet
2. Safety Instructions
3. Hardware
3.1. Introduction to equipment
3.2. Unpacking, assembling and setting up the printer
3.3. User handling of the printer
3.4. The preparation of the black textile
3.5. Fixation of the Textile
3.6. Maintenance, Daily, Weekly, Monthly
3.7. Transporting the printer
3.8. Guidelines for Storage and Handling of the Inks
3.9. How to change the platen on the Tray
4. Software
4.1. Computer requirements and prerequisites
4.2. Driver Installation
4.3. Software Installation Version12
4.4. Software Installation Version13
4.4.1. User handling of the Software
4.4.2. Choosing the right printenvironment
4.4.3. Spotting images
4.5. Printjob cancellation
4.6. Color Management
5. Troubleshooting
6. Printer Specification
7. Declaration of Conformity
8. Warranty Terms and Conditions
Page 4

POLYPRINT SA – TEXJET OPERATION MANUAL V4 EN
- 4 -
1. Introduction to TexJet
The TexJet is an inkjet printer that has been made to print on almost any type of
garment or fabric material as cottons, polyester, wool, leather etc, depending on
the inks that are used (Pigment, Disperse, Acid, and Reactive). The TexJet normally
uses pigment inks, which are more convenient to work with the most types of
garment.
TexJet can use up to 8 colors (2xCMYK, CMYK+4xWhite or other combinations).
The system is based on a standard inkjet technology (the Epson 4800 printer is the
heart of the system). The printer has been modified to work with the PolyPrintRIP
software which is included with your TexJet. The printer could work with other RIP
software’s, but only with special settings and under special conditions. Polyprint
cannot guarantee a 100% compatibility with other software’s.
PolyPrintRIP is used to print the white underbase (under the colors) and for
highlight (to boost the white). PolyPrintRIP is only a PC/Windows based program. If
you are a MAC user, you can create the image on a Macintosh and then use a PC as
a workstation to print from. You can create the images in your favorite program
Adobe Photoshop, Adobe Illustrator, or Corel Draw and then simply import them
into PolyPrintRIP to print to shirts.
TexJet prints on 100% cotton with the best results. It will print also on 50%
cotton/50% polyester blends, and many other natural and synthetic materials.
Page 5

POLYPRINT SA – TEXJET OPERATION MANUAL V4 EN
- 5 -
2. Safety Instructions
Read these instructions carefully
before operating the equipment.
Follow the instructions given in this
manual or directly on the machine and
the accessories, to prevent damage to
the equipment or your health.
Warning, Cautions, and Notes
Warnings must be followed carefully
to avoid bodily injury.
Cautions must be observed to avoid
damage to your equipment
Notes contain important information
and useful tips on the operation of
your printer.
When choosing a place for this product
o Place this product on a flat, stable
surface that extends around the
product. The surface should be at
least 85x130cm.
o This product will not operate
properly if it is tilted or at an angle.
o The printer must only be used
indoor
o Avoid places subject to rapid
changes in temperature and
humidity. Also keep this product
away from direct sunlight, strong
light, or heat sources.
o Avoid places subject to shocks and
vibrations.
o Keep this product away from dusty
areas.
o Place this product near a wall
outlet where the plug can be easily
unplugged.
o If you use a stand, the stand must
be able to support at least 125Kg
(275lb).
o Always put the printer into a place
where the lighting is sufficient.
o Operate the machine in an
environment with a temperature
range of 10-30 degrees Celsius.
The humidity must be between 2080% none condensing.
o The printer is not made for kids,
but only for professionals
When setting up this product
o Use the type of power source
indicated on this products label.
o Do not use a damaged or frayed
power cord.
o Connect all equipment to grounded
outlets. Do not use the same outlet
for any other system such as a
copy machine or an air control unit
that turn on and off.
o Do not let the power cord be
damaged.
o
If you are using an extension cord
make sure the power ampere rate
does not exceed the cord ampere
rate of the product.
o Keep electromagnetic devices and
other potential sources with
magnetic fields away from your
product.
o Caution: Do not unplug the printer
to shut is off. Use the power button
instead. Do not unplug the printer
until the power light is off.
o Do not block any of the printer
vents or insert anything foreign in
its slots.
When using this product
o Observe all relevant local, National
and International regulations in
connection with safety and this
machine. This includes electrical,
mechanical and environmental
issues.
o Follow the advised schedule for
maintenance to guarantee smooth
operation of the equipment.
o Do not insert object through the
slots. Take care not to spill liquid
on this product.
o Always make sure that the print
head has a sufficient distance from
material you print on. A direct
contact between the print head and
the printing media may destroy the
print head.
Page 6

POLYPRINT SA – TEXJET OPERATION MANUAL V4 EN
- 6 -
o Whenever performing maintenance
or service make sure to switch off
the machine and to disconnect the
power cord.
o Always keep ink cartridges out of
the reach of children
o When handling inks make sure to
wear gloves and protective
goggles.
o Avoid skin and eye contact with
inks. If ink does get on your skin
wash it thoroughly with soap and
water. If it gets on your eyes flush
them out immediately with water.
o Store the ink and ink cartridges in
a cool dark place.
o Wear safety glasses, coverall
chemical splash goggles and face
shield when splashing or spraying
the pre-treatment on the material
o If you store the cartridge in a cold
environment and are ready to use
them, set them at room
temperature before you use them.
o Do not dismantle the ink
cartridges. This could damage the
printhead.
o Do not touch the IC chip on the
cartridges. Do not spill liquid on it.
This will effect the normal printing
operations.
o If you remove the ink cartridges,
make sure to place them in a bag
individually to keep them away
from dust, dirt and debris.
o Do not attempt to service this
product your self.
o Do not modify the machine without
prior consent of POLYPRINT SA.
o Contact your local dealer in case
you need help.
o The printer should not be disposed
into the normal household waste
stream.
o Do not discard the inks into any
sewers, into any body of water, or
on the ground.
We decline all responsibility of damages resulting by inadequate, neglectful or
improper installation of the equipment as well as by improper utilization or noncompliance with the operational instructions.
We repute that by the time of issuing the present instructions manual, the contents
are correct.
We reserve the right to modify without any notice, the specifications and
performances of the product and the present manual.
Page 7

POLYPRINT SA – TEXJET OPERATION MANUAL V4 EN
- 7 -
3. Hardware
3.1. Introduction to equipment
Work Space and Computer system requirements
Working Space:
Place the printer on a flat horizontal stable table that can carry at least 125kg and
offers sufficient space for operation.
The dimensions of the printer are: 850x1300x450 (WxLxH)
The Computer is not included in the equipment, but necessary to work with this
product.
The System Requirements are:
Windows XP, Windows 2000
Pentium IV, 2GHz min,
512 MB RAM min
40 GB disc space recommended
USB2 interface
2 USB ports free (for dongle and printer)
The system requirements are for using the Polyprint Rip software
Power cable:
Use the type of power source indicated on this products label
Connect the power cable to a standard 220V or either to 110V (for U.S.A.)
Data cable:
Use the USB cable to connect the machine to the computer.
To connect the printer to a USB port, you need a standard shielded USB cable. To
print at full speed it is necessary to use an USB2 interface.
Note: If you use an inappropriate cable or connect peripheral devices between the
printer and the computer, the connection may become unstable.
Computer Graphics DVDs
One of the hardest things to learn for the computer novice is computer graphics. There are number of
excellent CDs or DVDs about computer graphics and how to use Corel Draw, Adobe Illustrator and
Adobe Photoshop. Most of these CDs or DVDs are focused on the screen printing process, but again,
they have excellent sections on how to create designs, how to deal with poor quality original artwork
and more.
Page 8
POLYPRINT SA – TEXJET OPERATION MANUAL V4 EN
- 8 -
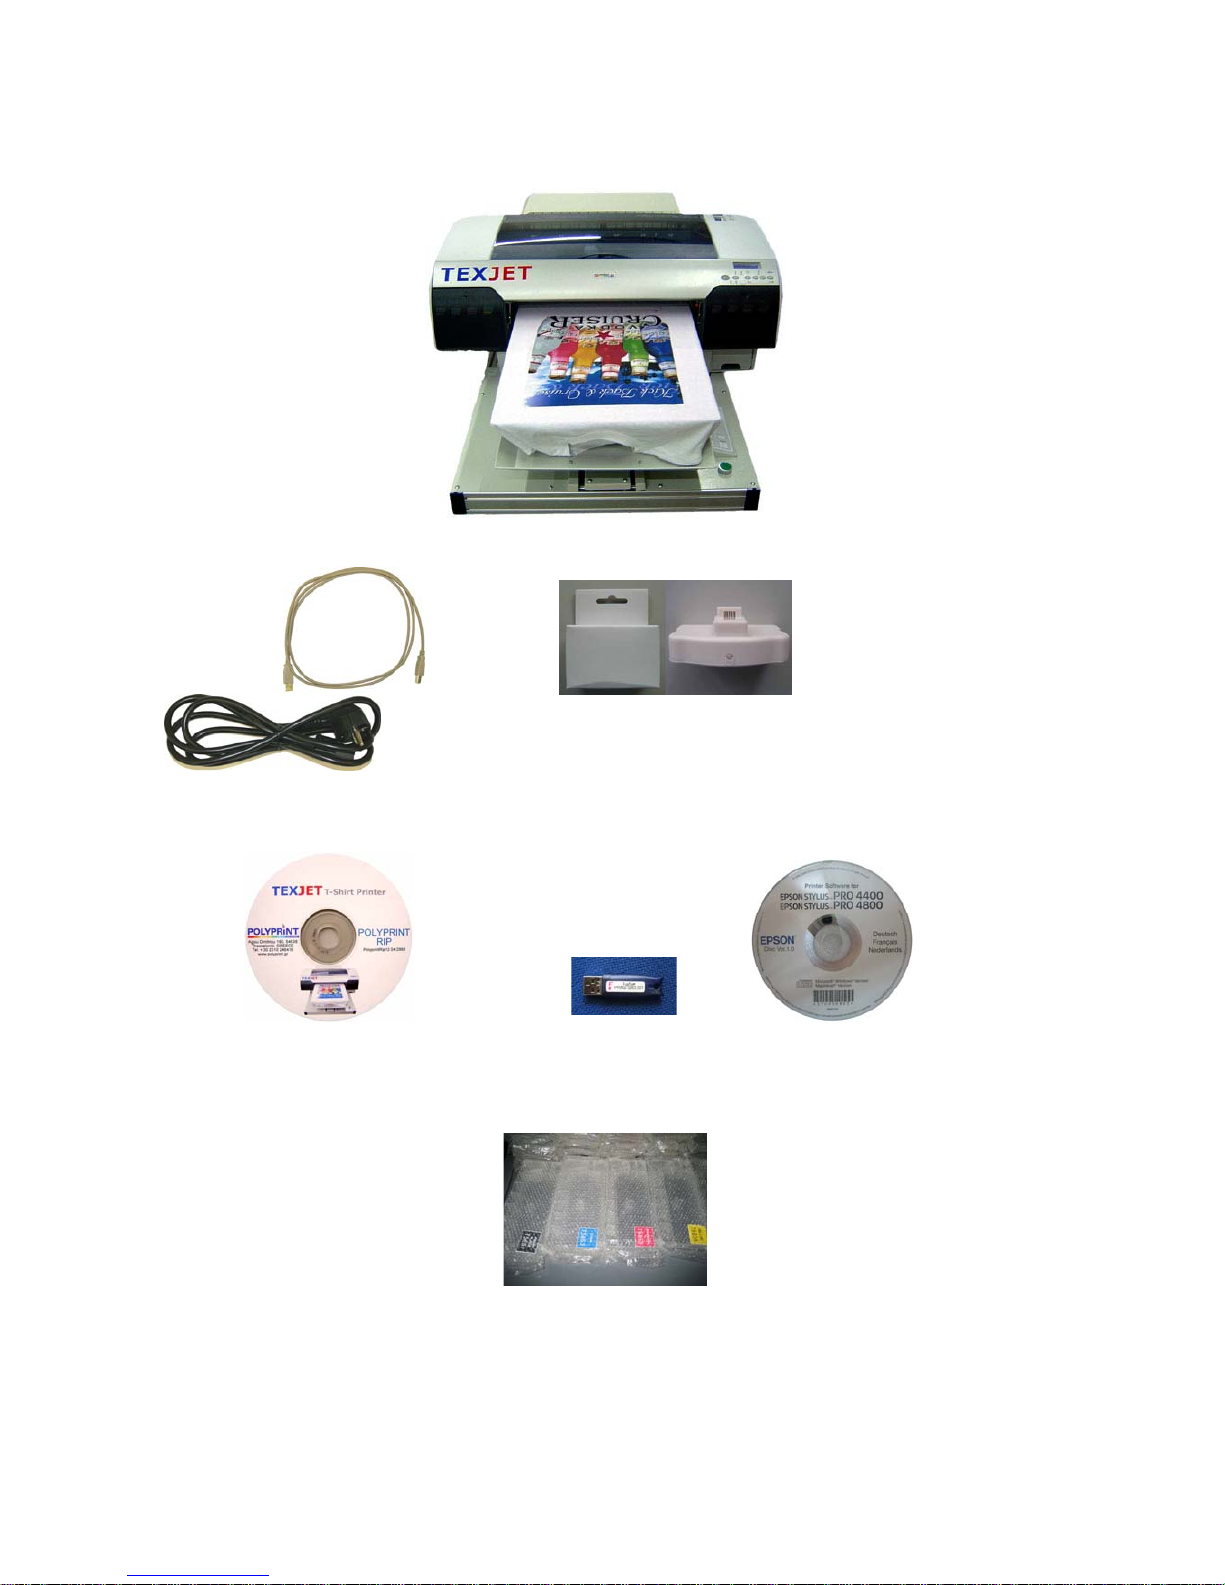
Printer and accessories
TEXJET printer
Short USB cable Chip Resetter 2
Power cables
RIP software CD, profiles and drivers USB Dongle Epson driver CD
8 Cartridges with accessories
Page 9

POLYPRINT SA – TEXJET OPERATION MANUAL V4 EN
- 9 -
Extra necessary equipment and consumables which are not in the
shipment
Equipment for printing
*
• Windows Based Computer. The Computer is not included in the
equipment, but necessary to work with this product.
The System Requirements are:
Windows XP, Windows 2000
Pentium IV, 2GHz min,
512 MB RAM min
40 GB disc space recommended
USB2 interface
2 USB ports free (for dongle and printer)
The system requirements are for using the Polyprint Rip software.
Inks for printing
*
• for light colored shirts printing
o Ink set P100 includes P101Cyan, P102 Magenta, P103Yellow, P104
Black, 105Cleaner
• for light colored and dark colored shirts printing
o Ink Set PD200 includes PD201 Cyan, PD202 Magenta, PD203 Yellow,
PD204 Black, PD205 White, PD206 Precoating, PD207 Cleaner
Equipment for shirt printing and:
• T-Shirt Polo plate 42x50cm
• T-Shirt Mini plate 32x28cm
• T-Shirt plates at many sizes to order. Please ask your dealer for the sizes you
want.
• Collante spray for T-Shirt plates
Equipment for fixing
*
• T-Shirt press
• Heater
Equipment for dark shirt printing:
**
• Liquid spray gun (airbrush, air pump sprayer, fine mist power sprayer), the
spray gun should be a high volume low pressure model.
• Protection paper, package 500 sheets dimension 40Χ60cm.
Software for spotting images:
• Photoshop to spot images
Page 10

POLYPRINT SA – TEXJET OPERATION MANUAL V4 EN
- 10 -
*Necessary to work with this product.
**Necessary to work with this product only if the ink set is PD200
Limited warranty parts and Consumables
Consider that the printer has consumables which need to be exchanged if
necessary. The exchange time depends of the productivity of the printer,
the installed ink and the proper maintenance which is made. We ask you
to perform the maintenance task according to the intervals given in the
description. Following these steps will increase productivity and keep your
service costs low.
Parts with Limited warranty:
• Printhead No Warranty
• All other parts 12 Months
Excluded from the warranty are consumable parts as
Consumables:
• Pump
• Wiper
• Damper
• Cap
• Flushing box
• Waste tank
Page 11
POLYPRINT SA – TEXJET OPERATION MANUAL V4 EN
- 11 -
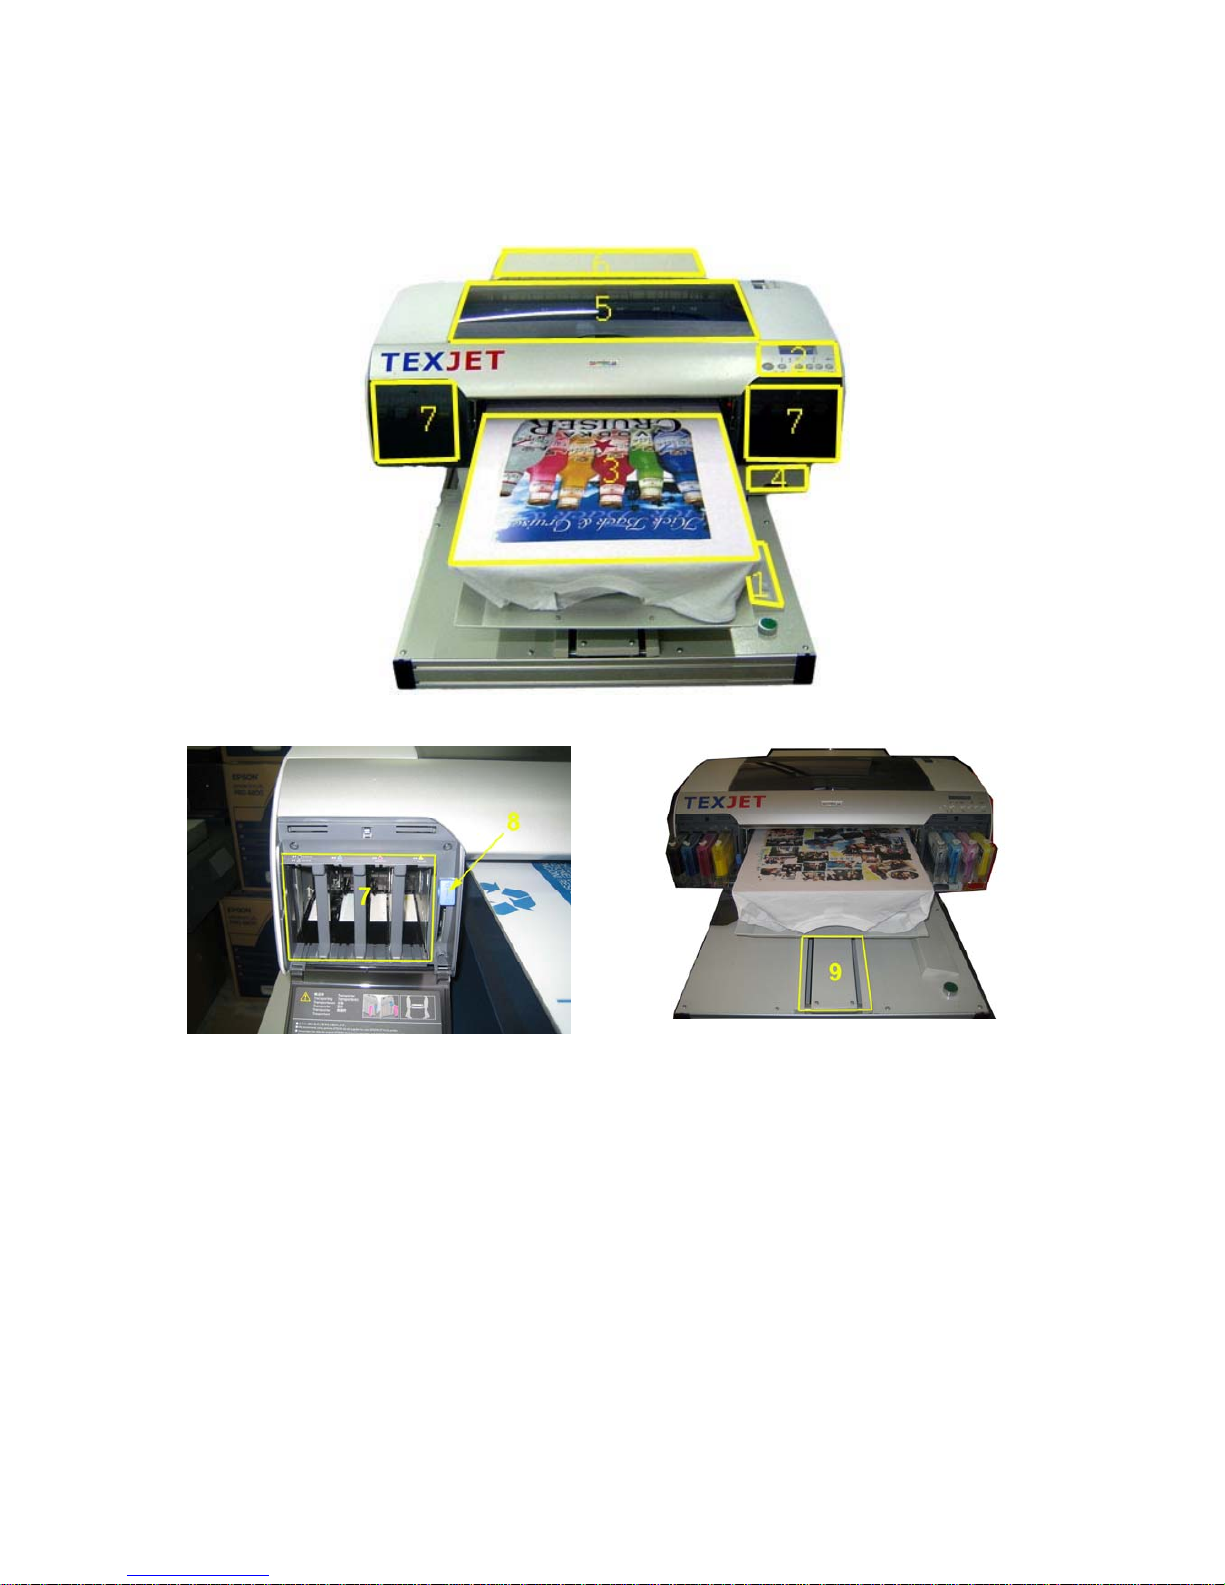
Name and location of the components
1. TEXJET operation panel
2. Epson operation panel
3. T-Shirt plate
4. Waste tank
5. Top cover
6. Back cover
7. Cartridge Slot
8. Ink lever
9. Plate guide
Page 12
POLYPRINT SA – TEXJET OPERATION MANUAL V4 EN
- 12 -
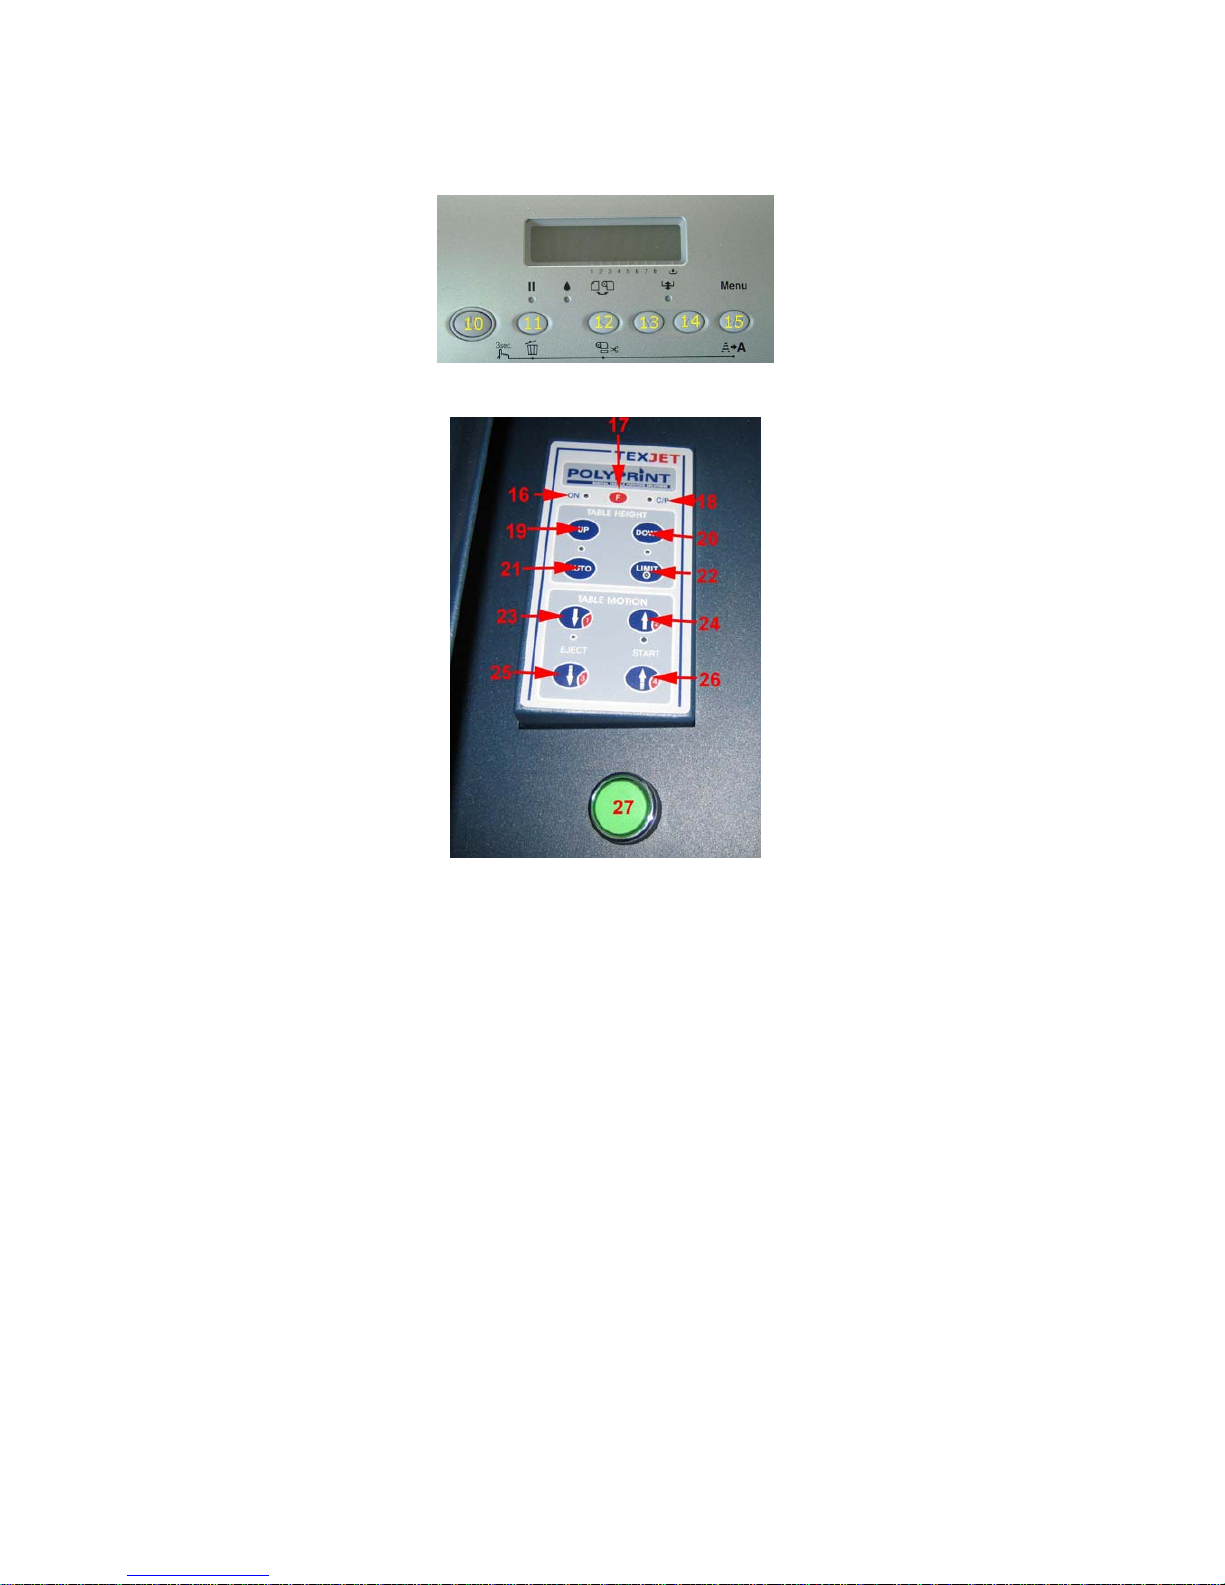
Operating panels
Epson Operating Panel
TEXJET Operating panel
10. Power On/Off
11. Pause button
12. Left arrow
13. Down arrow
14. Up arrow
15. Right arrow / Menu button
16. On LED
17. Function Button
18. Copies and Function LED
19. Move plate up
20. Move plate down
21. Automatic plate height adjustment
22. Plate height limit LED
23. Manual Plate Eject Button
24. Manual Plate Insert Button
25. Eject Button
26. Start Button
27. Green Start Button
Page 13

POLYPRINT SA – TEXJET OPERATION MANUAL V4 EN
- 13 -
3.2. Unpacking the printer
• Open the top cover of the box.
• Remove the items that fix the printer to the box.
Warning: 2 strong persons are needed to lift the product out of the box due
to heavy weight (80kg).
• Take the printer out of the box carefully and place it on a flat horizontal
stable table at least 85x155 cm.
Caution: The printer must be placed on the table in a way that when the
printer’s T-Shirt plate comes out, doesn’t exceed the size of the table where
the printer is placed.
• Make sure that the table is level and can support the weight of the
printer.
Page 14
POLYPRINT SA – TEXJET OPERATION MANUAL V4 EN
- 14 -
Assembling and setting up the printer
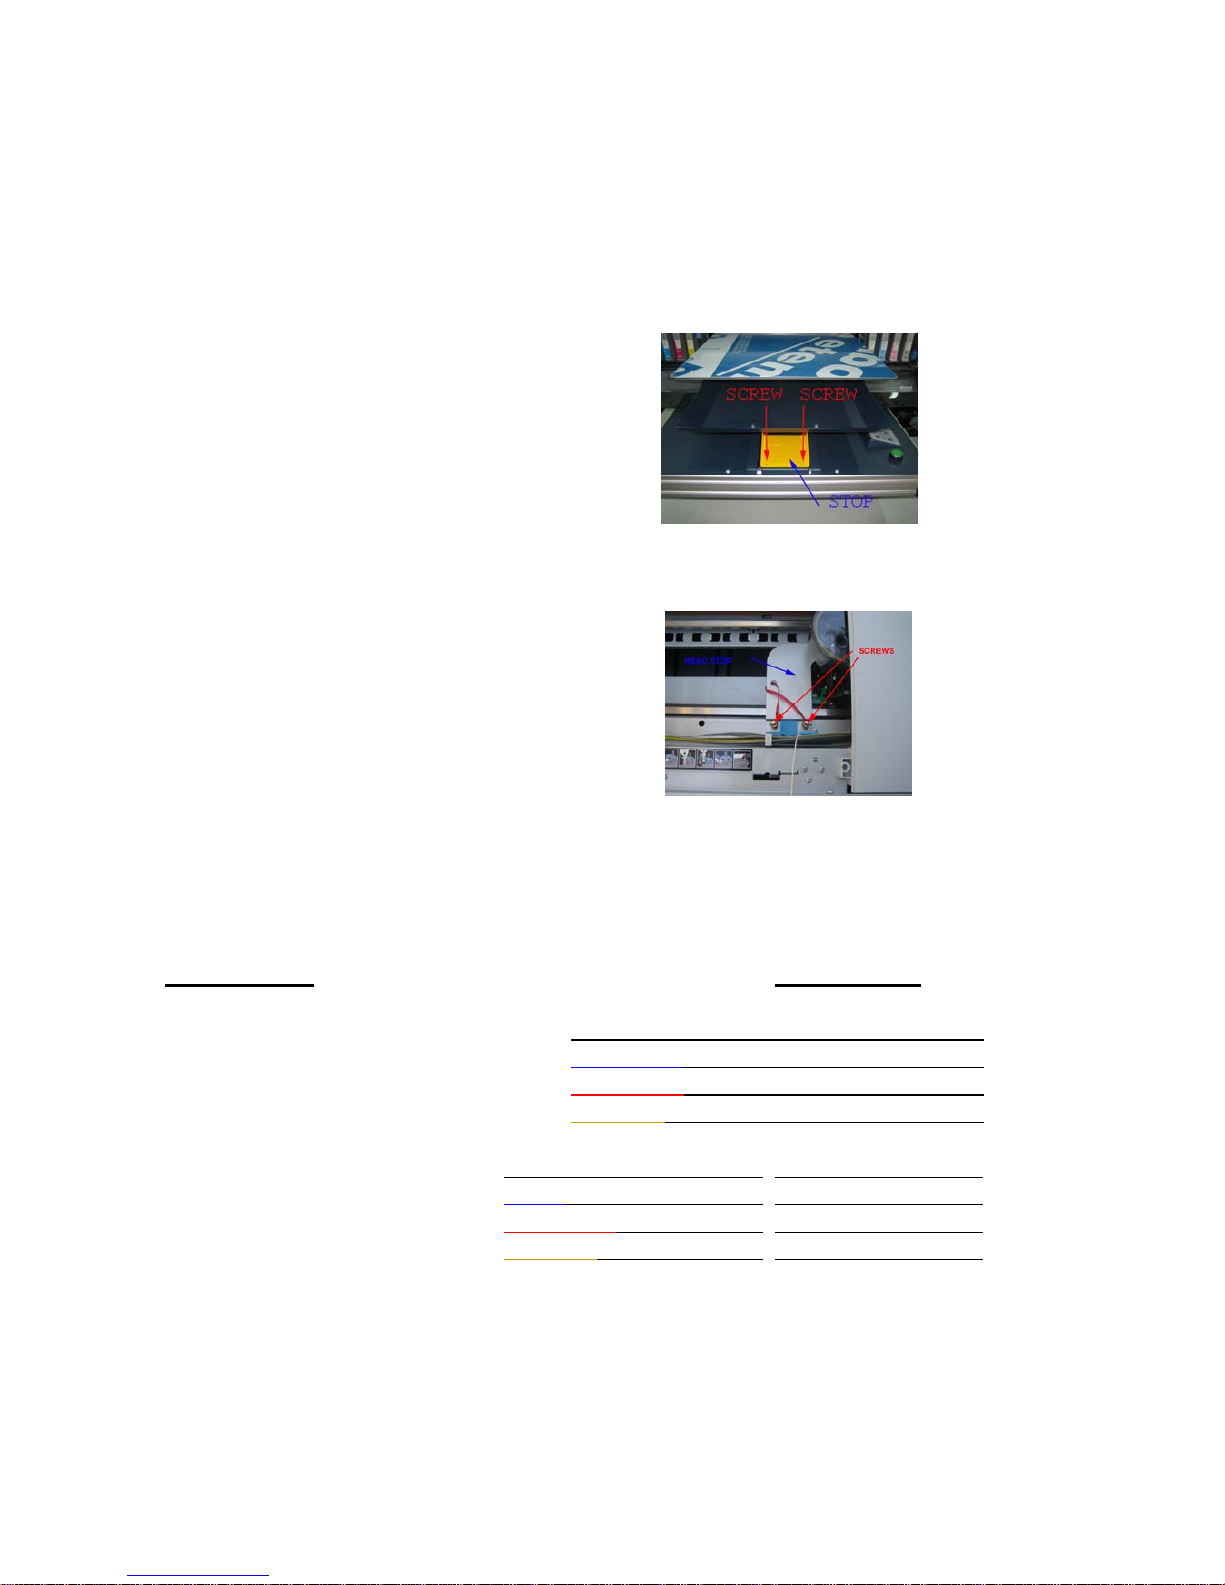
Removing transport fixtures
• Before starting the printer first remove the protective materials
o One is placed for the plate
movement. After removing
this yellow brake, place the 2
screws back to the plate
guide cover again.
o The second brake is placed for
the head movement. Remove
screws and metal part.
Ink configuration
• You have to install the Cartridges on the printer. The Cartridges should be
filled with the following order.
CARTRIDGE INK FILLED
PHOTO BLACK BLACK INK P104, PD204
CYAN CYAN INK P101, PD201
MAGENTA MAGENTA INK P102, PD202
YELLOW YELLOW INK P103, PD203
LIGHT BLACK BLACK INK P104 WHITE INK PD205
LIGHT CYAN CYAN INK P101 WHITE INK PD205
LIGHT MAGENTA MAGENTA INK P102 WHITE INK PD205
LIGHT LIGHT BLACK YELLOW INK P103 WHITE INK PD205
Page 15
POLYPRINT SA – TEXJET OPERATION MANUAL V4 EN
- 15 -
Resetting ink chips and installing ink cartridges
• Before starting the ink filling procedure, reset all the refillable cartridges.
Each time you receive a message that one cartridge is empty, repeat the
resetting. Do the same to the Waste Ink Tank (4).
• To reset the cartridges, place the Chip Resetter towards the Cartridge’s
chip, and hold it until the green light comes out. It takes about 3 sec.
• Put the appropriate cartridge to the printer cartridge slot 7 with the lever
up, according to the stickers on the cartridges and the slots.
Cable connections
• Note: Do not connect the printer with the USB cable to the computer,
before installing the Epson 4800 printer driver
.
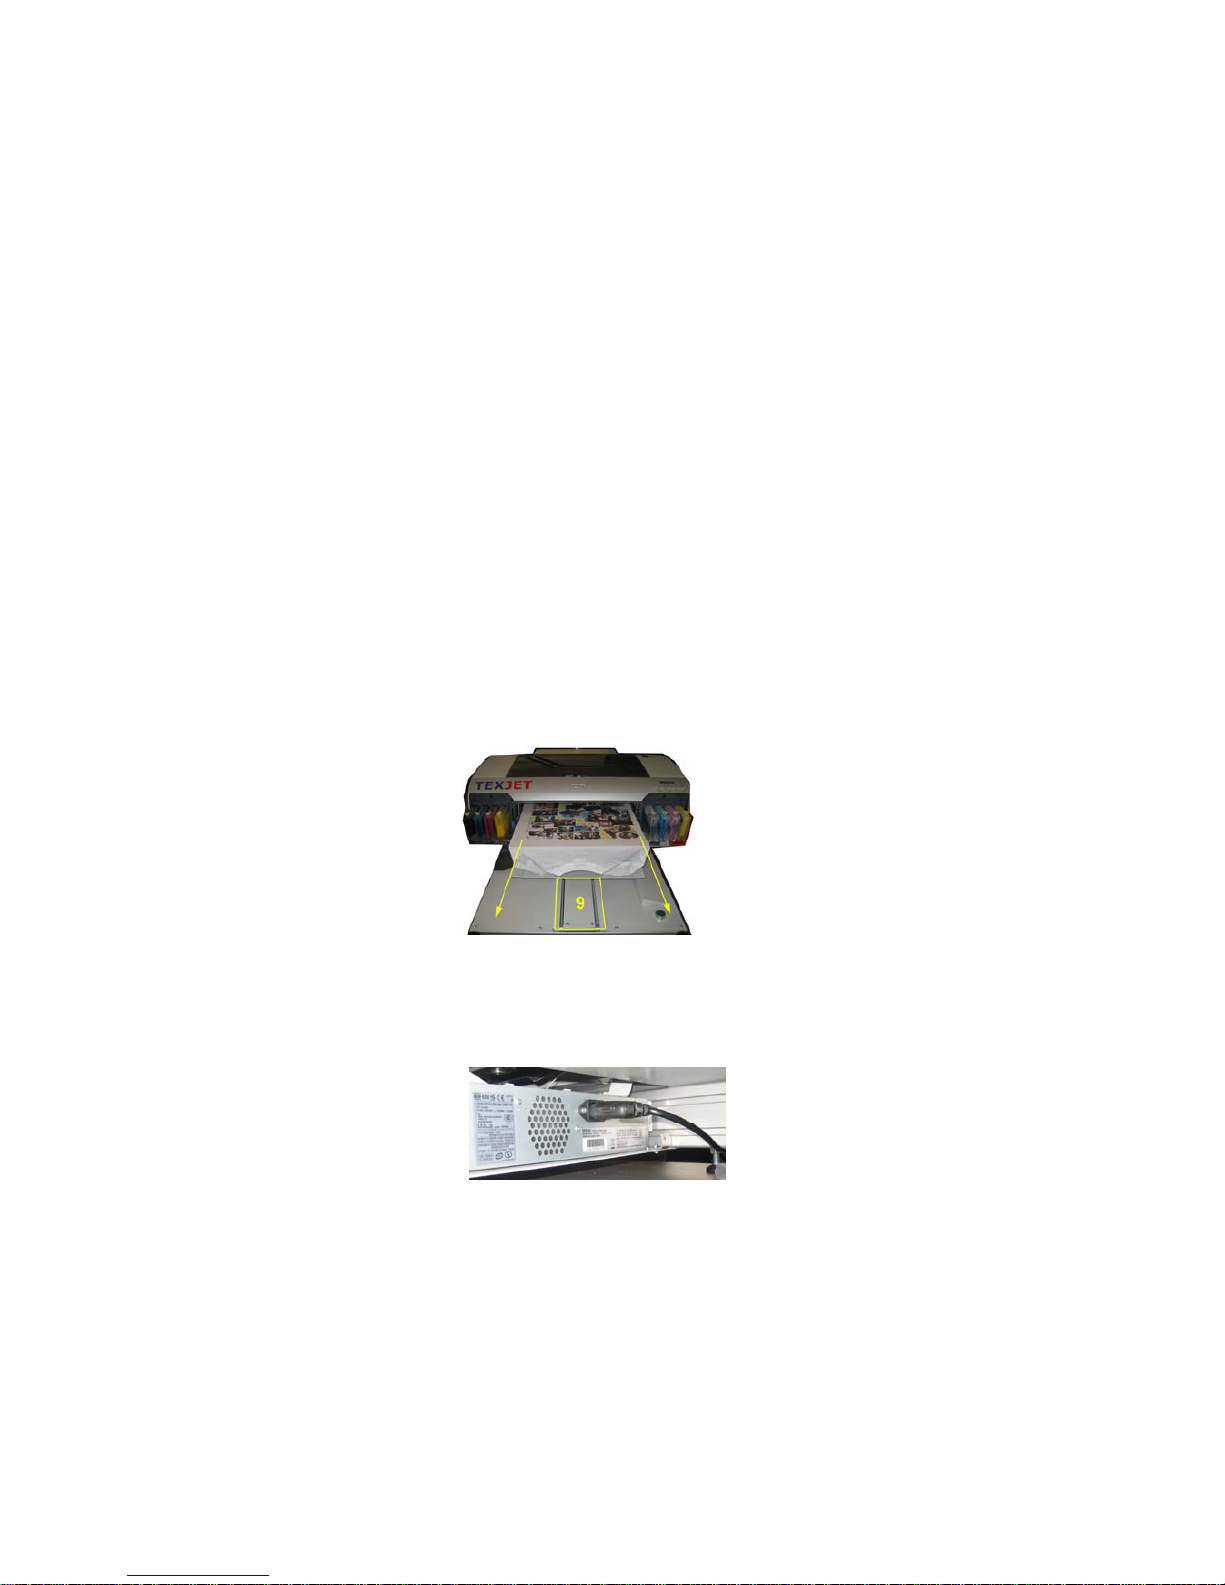
• Before connecting the power cable, move the plate to the front position
manually as shown in the picture. Make sure that the plate guide 9 is
clear
• Connect the power cable and switch on the printer by pressing the button
10 on the Epson panel.
Page 16

POLYPRINT SA – TEXJET OPERATION MANUAL V4 EN
- 16 -
Start-up and loading ink
• The start up procedure will take about 30 seconds. Wait until the
message in the display shows “Ready”.
• Now you have to press the start button 27 and the LED 22, 18 will switch
off.
• On the Epson panel, press the Menu button (15) and by moving ↑ (13) or
↓ (14) go to “Maintenance”. Press button 15 to enter the maintenance
mode and go to “Powerful cleaning”. Press button 15 to enter and
perform the “Powerful cleaning”. Follow the instructions on the Epson
display, by moving the ink levers (8) up and down when requested.
Nozzle Check on paper or transparent polyester
• After the Powerful Cleaning is performed, move the plate to the front
position by pressing button (25) and place a piece of paper on the plate.
• Adjust the plate height by pressing Automatic plate height adjustment
button (21) and wait until it stops with the plate at the front. Press the
start 26 or 27 button to send the plate back.
• If the Epson Panel is not on “ready” and the height limitation LED 22 is
lightning, move the plate down, by pressing the “Go down” button (20)
until the Limit LED 22 switches off and press the Start button 26 or 27
again. Do these steps until you get “ready” on the Epson Panel display.
• Place a piece of paper or clear inkjet film (transparent polyester in case of
white ink) on the media plate.
• Press the menu button (10) and go to “Test print” and perform “Nozzle
check”. The printer will print the pattern shown in the picture that
indicates if all the colors have been filled up correctly.
• If the colors do not look like the picture, and you notice that some of
them are missing, perform the “Powerful Cleaning” one more time.
Nozzle Check
Page 17
POLYPRINT SA – TEXJET OPERATION MANUAL V4 EN
- 17 -
3.3. User handling of the printer
Printing with TexJet
Start-up
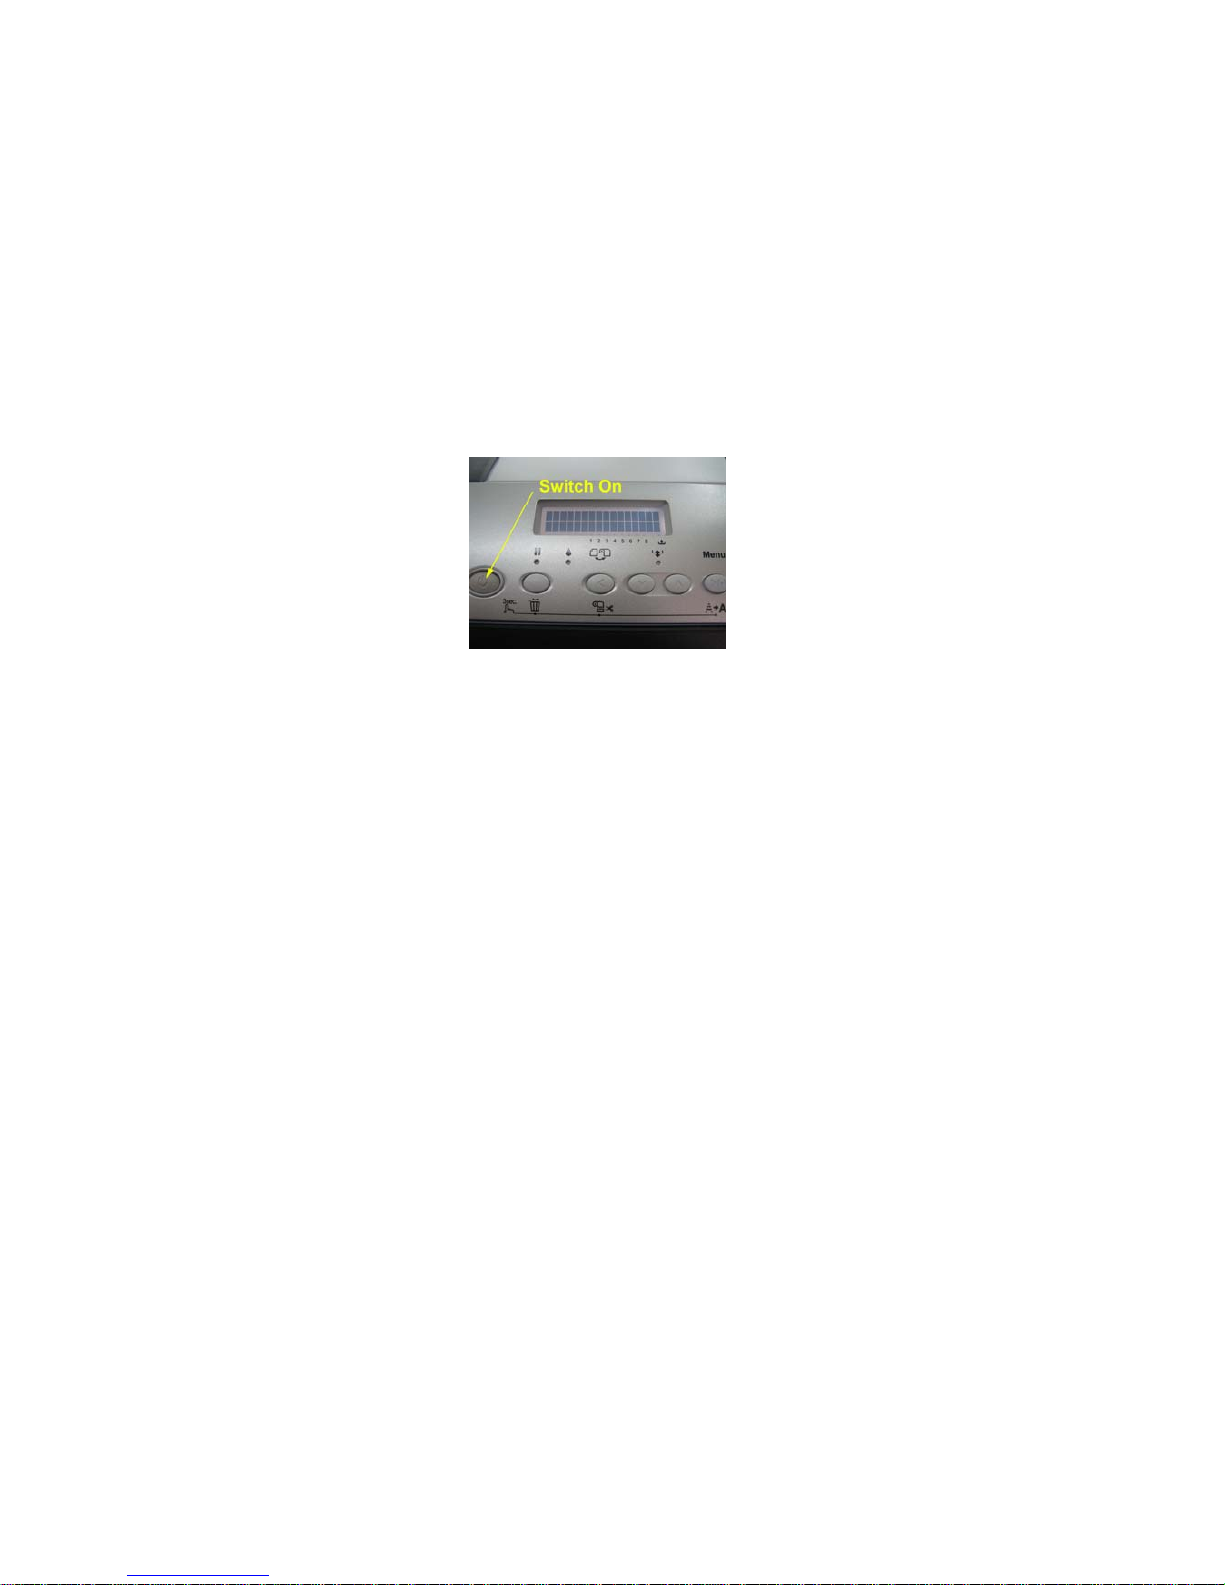
• Switch the printer on by pressing the button 10 on the Epson panel.
• The start up procedure will take around 1Min. Wait until the message in
the display is “Ready”. If you get any other message refer to the
Troubleshooting chapter.
• Now you have to press the start button 27 and the LED 22, 18 will
switches off.
Note: Every time after switching the Printer ON and the start up procedure,
until the message in the display is “Ready”, press the Start button. Although
the message in the Epson display is “Ready” the printer is not ready until
you press the start button ant the LED 22, 18 switch off.
Preparing a shirt and adjusting plate height
• Move the plate to the front position by pressing Eject button (25) and
place a Shirt. You can use spray adhesive on the plate to make it slightly
sticky. This ensures the Shirt lays flat on the media plate.
• Adjust the plate height by pressing Automatic plate height adjustment
button (21) and wait until the machine stops with the plate at the front.
Press the start 26 or 27 button to send the plate back.
• If the Epson Panel is not on “ready” and the height limitation LED 22 is
lightning, move the plate down, by pressing the “Go down” button (20)
until the Limit LED 22 switches off and press the Start button 26 or 27
again. Do these steps until you get “ready” on the Epson Panel display.
• Once the plate height is defined for a kind of T-shirt a readjustment is not
necessary until the T-shirt type changes.
Page 18
POLYPRINT SA – TEXJET OPERATION MANUAL V4 EN
- 18 -
3.4. The preparation of the black textile
Pretreatment on dark and pastel colored textiles
It’s very important how to pre-treat the garment!
Printing to white fabric requires no pre-treatment, however printing to
coloured and black fabrics will require the use of the white ink. The pretreatment is designed to provide a suitable coating to take the printed inks.
Before pre-treating the fabric it should flatten is out under a heat press.
Then the pre-treatment should be applied with a suitable spray gun (we
recommend Wagner W550). One thorough coat applied to the relevant area
of the fabric is enough, (remember to thoroughly clean your spray gun when
you are finished using it). Use a mohair blend roller to flatten the coating
over your textile. This is helping for a better application of the coating. Dry
it for 25 seconds under a heat press without pressure at 150ºC with heat
resistant paper over it (we recommend TexJet Sheets). It will also press the
fabric fibres flat to give a good printing surface. Make sure the textile is
completely dry before printing.
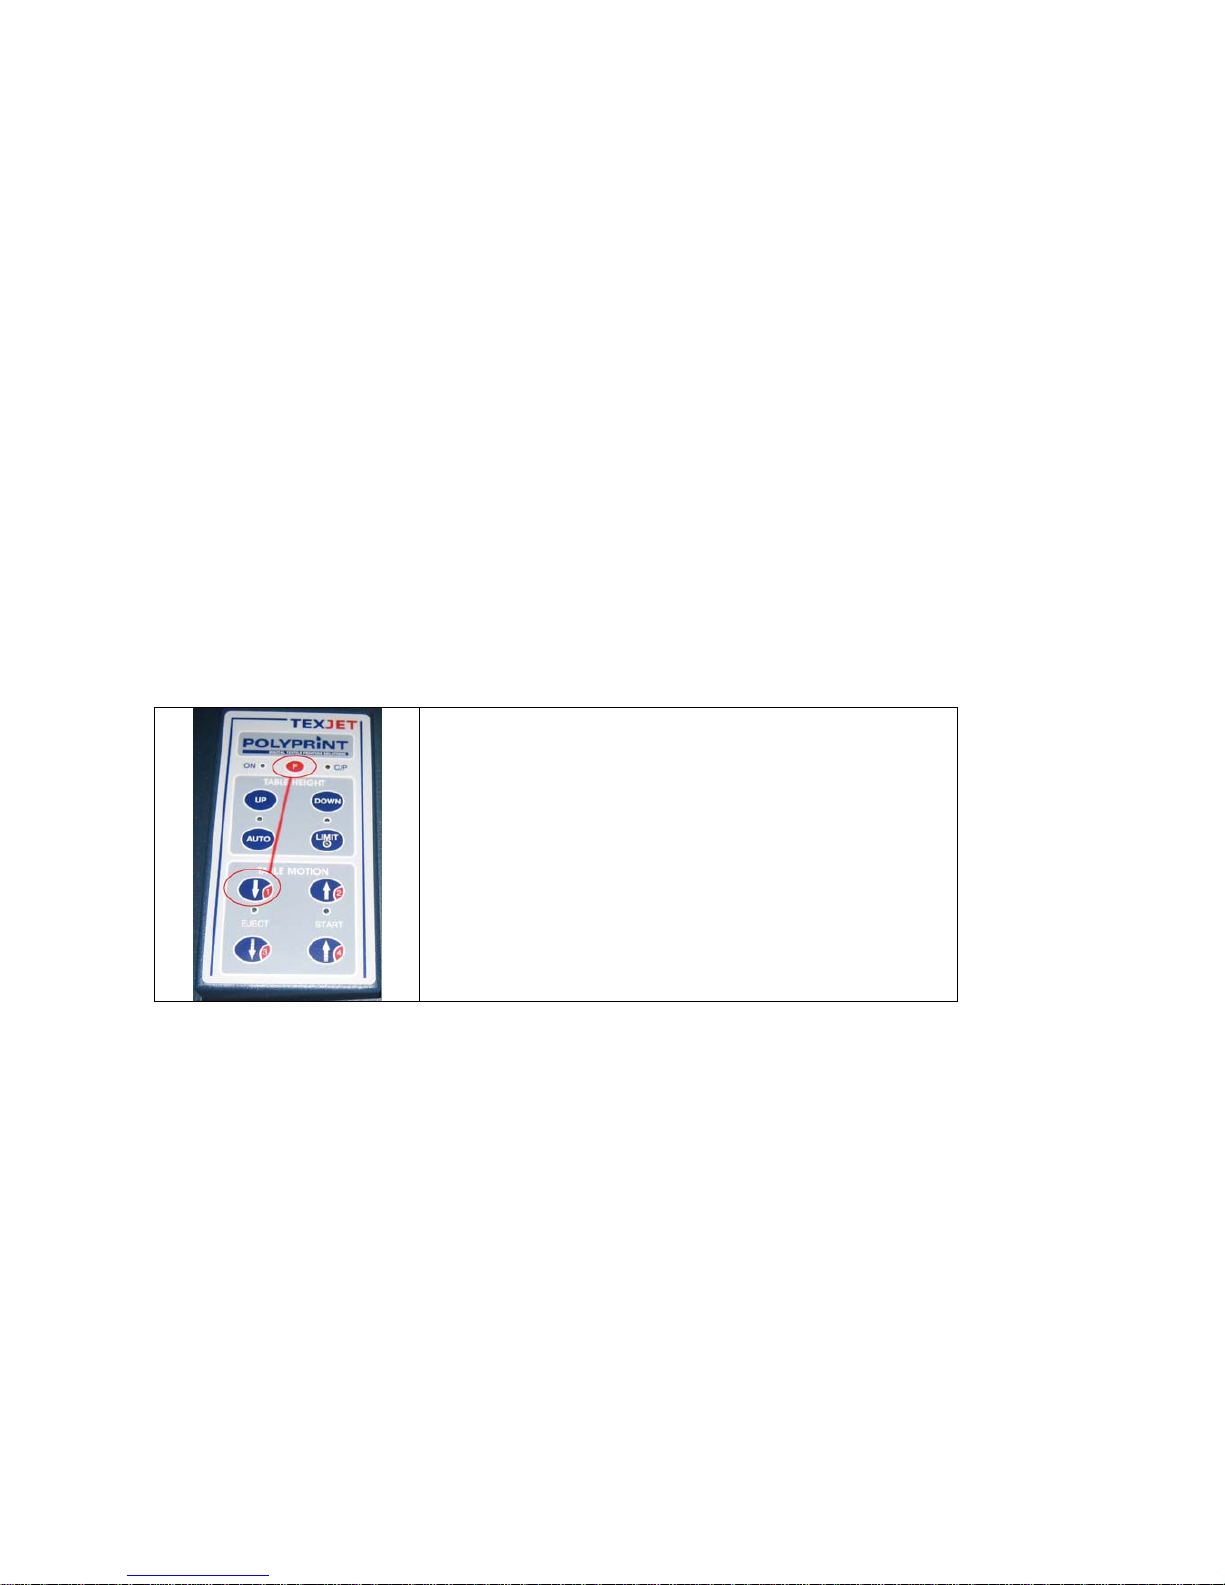
The printer is also equipped with the function for
automatic movement for the T-Shirt tray back after
printing the white underbase.
To activate this function, press F and the number 1.
To cancel this function press F and 4.
When activated, the yellow led is flashing.
The buttons must be pressed for 1sec.
Page 19

POLYPRINT SA – TEXJET OPERATION MANUAL V4 EN
- 19 -
3.5. Fixation of the Textile
The good washability of the garment depends of the proper fixation, also of
the quality of the garments and the proper function of the equipments.
Naturally, the desired end result is that the inks react correctly with the pretreatment to produce a superb print. Ask your supplier if your shirts have
any silicones or softeners on it. These chemicals may reduce the washability,
because the ink cannot react correctly with the fibers. Ask them to provide
you with ready to print shirts. We recommend performing tests before
starting the production.
Caution: The pre-treated fabric must not touch the printer head, as the
ink and pre-treatment will react upon the head surface, potentially blocking
nozzles. In your daily operation of your printer, observe the correct
procedures for the loading of material onto your printer.
Ink fixation for dark textiles: Time / Temperature
The dark printed fabric should get heated or heat pressed (without
pressure), for at least 2,5min at 170ºC or 3,5min at 150 ºC, with heat
resistant paper (we recommend TexJet Sheets) over the fabric.
Ink fixation for white and pastel colored textiles: Time /
Temperature
The white and pastel colored fabric should get heated or head pressed
(without pressure) for at least 2,5min at 170ºC or 3,5min at 150 ºC.
Page 20

POLYPRINT SA – TEXJET OPERATION MANUAL V4 EN
- 20 -
3.6. Maintenace and Utilities
The customer needs to perform maintenance to keep the machine running
reliably. The most technical problems appear on machines that have not
been maintained properly. The garment printer is not a normal ink jet
printer, while printing on to garments, the printer must print a lot more ink
than when printing on paper. This can cause excess ink to get to other parts
of the machine. Also the inks for garments may dry up more easily than the
inks for paper, because of their different chemical structure.
When printing dark garments with white ink, the pre-treatment is sticky. If
it’s sprayed near a machine it can get on the inside parts. White ink and pretreatment make a hard material which is very hard. This can cause many
problems to the printhead. Ink jet printers in general do not like hot dry
room conditions or to be a dirty dusty shop.
Without performing the maintenance there may be errors trough the start up
or in the printing quality or even damage some spare parts. Consider that
the printer has consumables and part of the maintenance is to exchange
them if necessary. We ask you to perform the maintenance task according to
the intervals given in the description. Following these steps will increase
productivity and keep your service costs low. This is an expensive
investment and in order to get the most out of it please take time to learn
about simple steps that will keep your garment printer reliable and
productive.
Page 21
POLYPRINT SA – TEXJET OPERATION MANUAL V4 EN
- 21 -
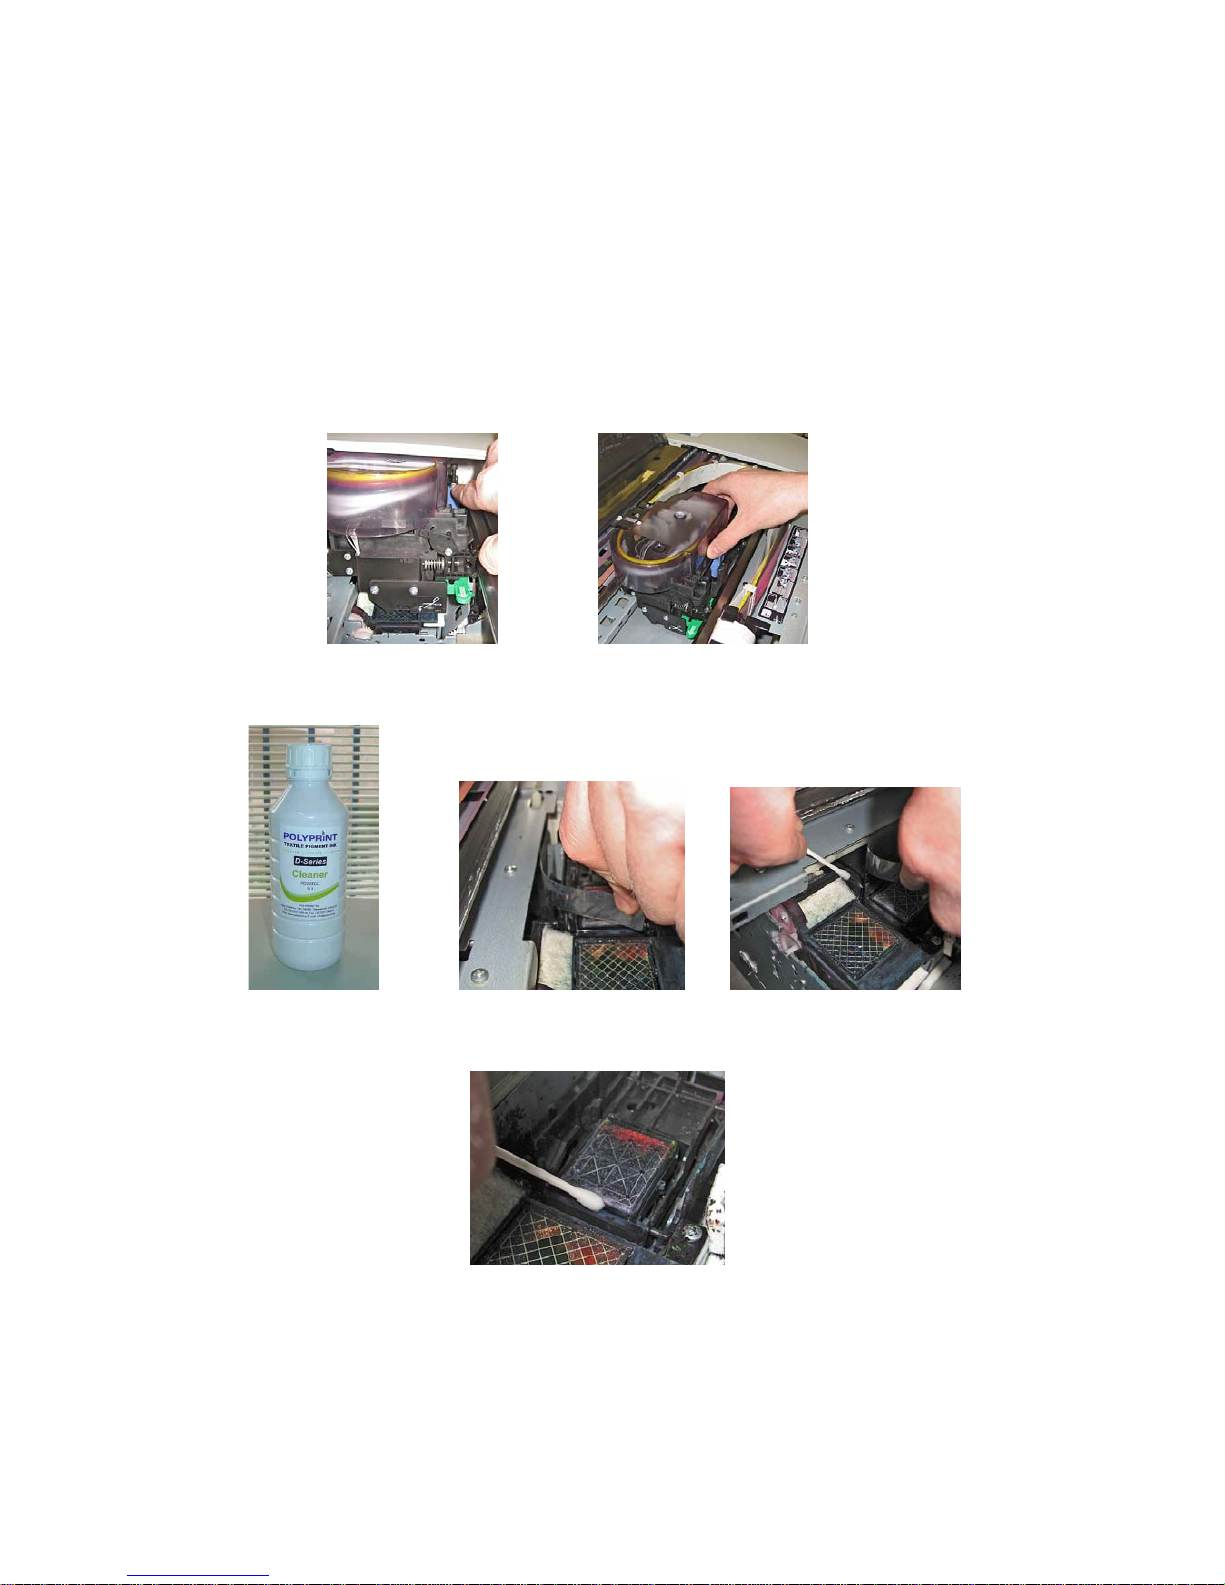
Daily maintenance
This maintenance has to be performed daily at the end of the day. Whenever
performing maintenance or service make sure to switch off the machine and to
disconnect the power cord.
1. Switch the machine off and disconnect the power cord
2. Open the top cover
3. Move the print head out of its parking position by pressing the purple
lever
4. Clean the wiper using a cotton bud and cleaning fluid
5. Clean the sealing of the cap using a bud and cleaning fluid
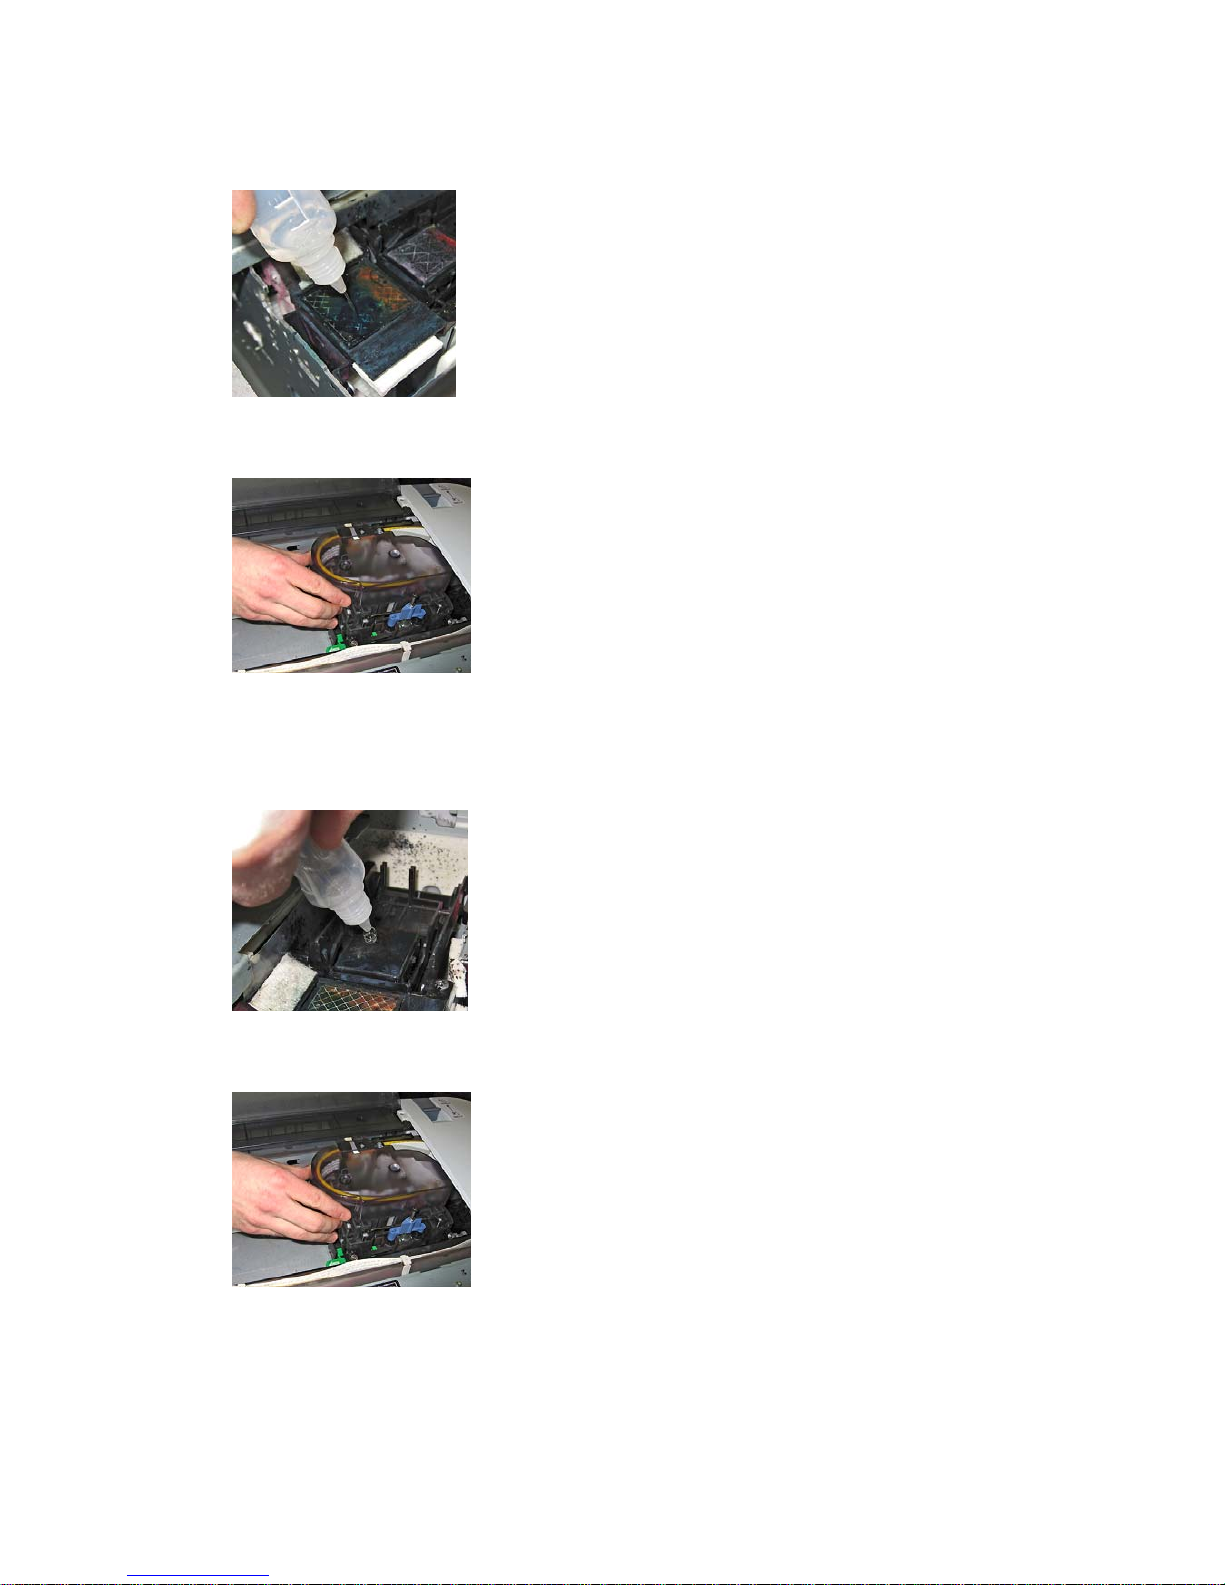
Page 22
POLYPRINT SA – TEXJET OPERATION MANUAL V4 EN
- 22 -
6. Use cleaning fluid on the spray area to wash out the dried ink
7. Move the print head manually into the parking position
Maintenance in absents for few days
1. Fill the capping using cleaning fluid
2. Move the print head manually into the parking position
3. Raise both ink levers to the up position while the printer is switched
off.
Page 23

POLYPRINT SA – TEXJET OPERATION MANUAL V4 EN
- 23 -
Page 24
POLYPRINT SA – TEXJET OPERATION MANUAL V4 EN
- 24 -
Weekly maintenance
It is recommended to perform the weekly maintenance before the
weekend.
1. Perform the daily maintenance as described
2. Remove and empty the waste ink tank
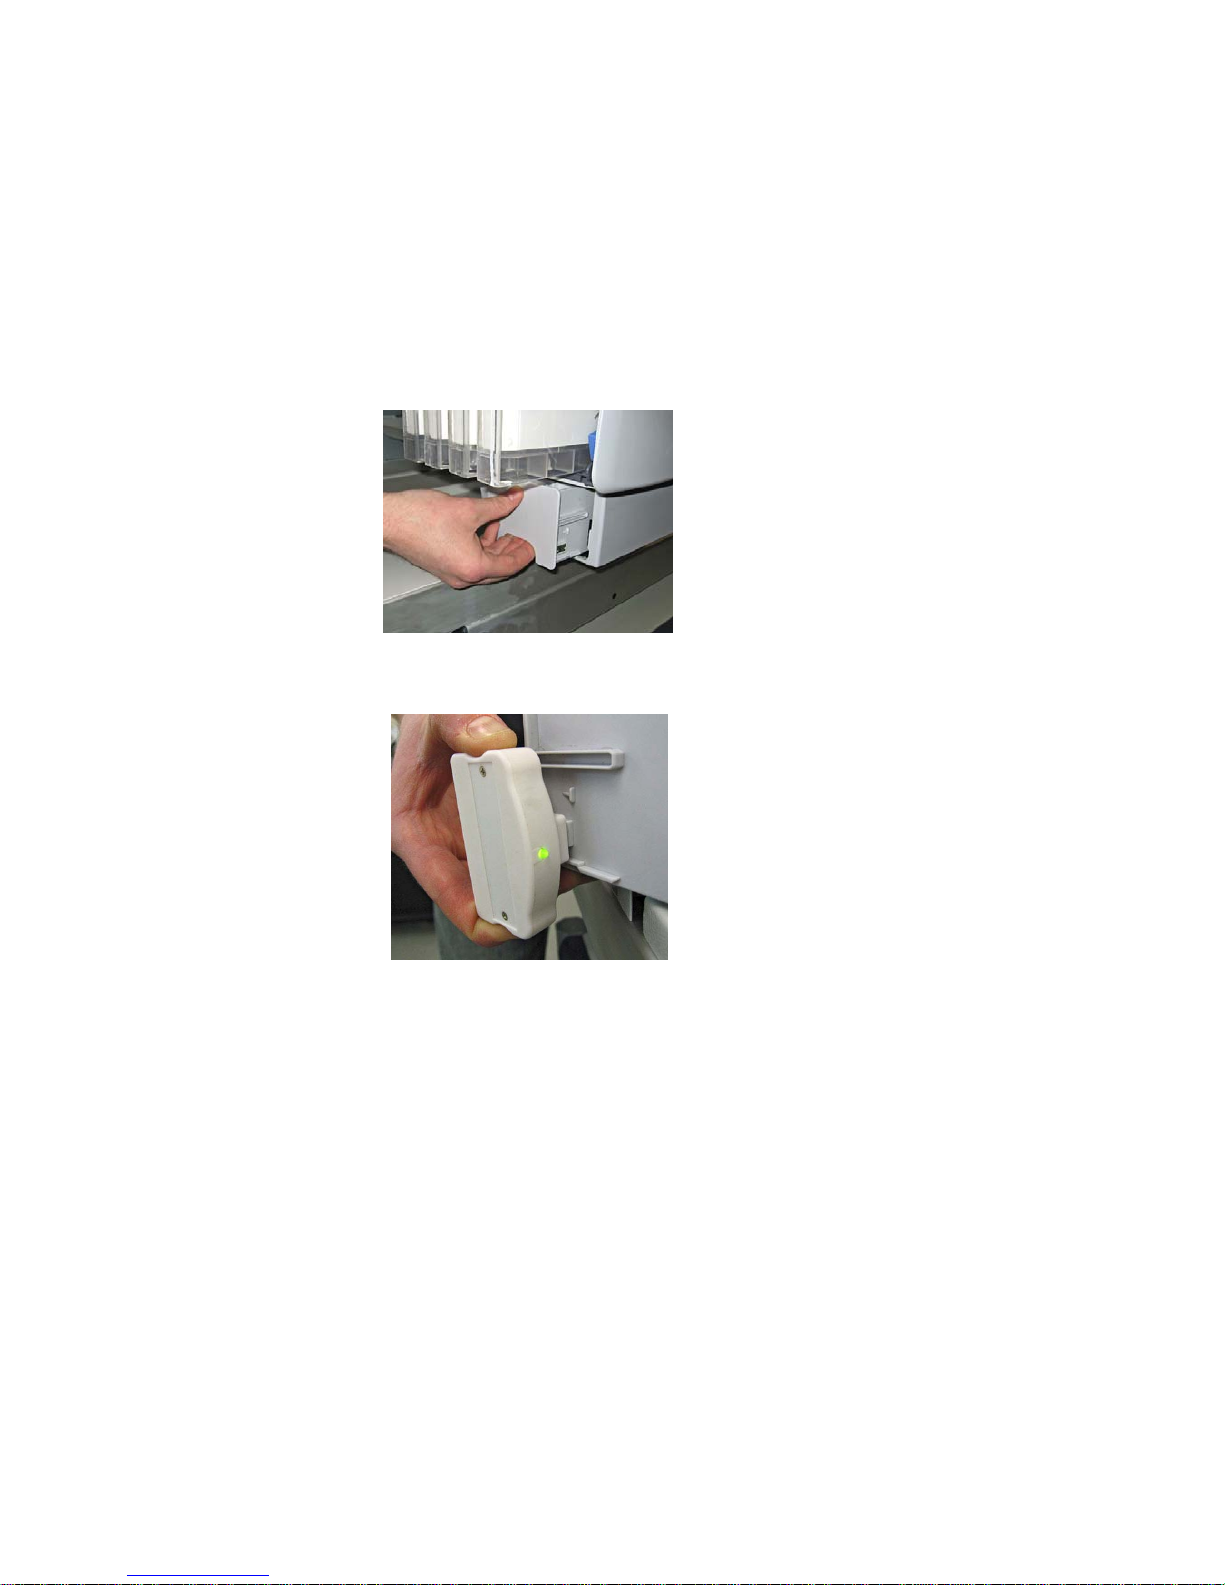
3. Reset the chip on the waste ink tank
4. Fill all inks where necessary.
5. Shake all white ink cartridges
6. Reset all ink chips if necessary
7. Send something to print. The size should be at least A4 with white ink.
Maintenance in absents for long time
We recommend removing the inks from the printer. That means that you will
lose some quantity of ink in the waste tank.
1. Clean all the ink cartridges and place distilled water mixed with the inks
cleaner.
2. Perform several powerful cleanings until all tubes are clear.
3. Empty all the ink cartridges and perform a last powerful cleaning until the
tubes are empty.
4. Switch of the printer and remove the power gable and the data cable.
Page 25

POLYPRINT SA – TEXJET OPERATION MANUAL V4 EN
- 25 -
5. Remove the cartridges and place them in a plastic bag.
6. Empty the Maintenance Tank and put it back empty to the printer.
7. Make a daily and weekly maintenance on the printer.
Caution: Don’t forget to clean with a swab (cleaning tips) and inks
cleaner the cap, wiper and spray pad. Place the inks cleaner in the
cap station of the printer, afterwards the end of your work, in order
to keep the printhead wet
Page 26

POLYPRINT SA – TEXJET OPERATION MANUAL V4 EN
- 26 -
3.7. Transporting the printer
Packaging the printer for transportation
Please make sure you have performed the following procedures before
transporting the printer.
1. Clean all the ink cartridges and place distilled water mixed with the inks
cleaner.
2. Perform several powerful cleanings until all tubes are clear.
3. Empty all the ink cartridges and perform a last powerful cleaning until the
tubes are empty.
4. Switch of the printer and remove the power gable and the data cable.
5. Remove the cartridges and place them in a plastic bag.
6. Empty the Maintenance Tank and put it back empty to the printer.
7. Make a daily and weekly maintenance on the printer.
8. Place the transport brake for the plate and for the printhead.
9. Repack the printer in the box it was shipped in. If you are returning the
printer for repair you do not need to include the inks or any of the
accessories including the USB cable, printer drivers or RIP software. You
should include the power cord.
10. Try to keep the printer level while transporting it.
11. Remember that when using any common carrier, the printer is their and
your responsibility until it is received in good condition at our facility. Make
certain to insure the printer for the full value.
Caution: Don’t forget to empty the Maintenance tank (waste tank) of the
printer, or you may damage the printer.
Moving the printer to another position
Please make sure you have performed the following procedures before
moving the printer.
1. Switch of the printer and remove the power gable and the data cable.
2. Empty the Maintenance Tank and put it back empty to the printer.
3. Place the transport brake for the plate
o Place this product on a flat, stable surface that extends around the
product. The surface should be at least 85x155cm.
o This product will not operate properly if it is tilted or at an angle.
o The printer must only be used indoor
o Avoid places subject to rapid changes in temperature and humidity.
Also keep this product away from direct sunlight, strong light, or heat
sources.
o Avoid places subject to shocks and vibrations.
o Keep this product away from dusty areas.
Page 27

POLYPRINT SA – TEXJET OPERATION MANUAL V4 EN
- 27 -
o Place this product near a wall outlet where the plug can be easily
unplugged.
o If you use a stand, the stand must be able to support at least 125Kg
(275lb).
o Always put the printer into a place where the lighting is sufficient.
o Keep the machine level.
o Operate the machine in an environment with a temperature range of
10-30 degrees Celsius. The humidity must be between 20-80% none
condensing.
o The printer is not made for kids, but only for professionals
Page 28

POLYPRINT SA – TEXJET OPERATION MANUAL V4 EN
- 28 -
3.8. Guidelines for Storage and Handling of the Inks
o When handling inks make sure to wear gloves and protective goggles.
o Avoid skin and eye contact with inks. If ink does get on your skin wash
it thoroughly with soap and water. If it gets on your eyes flush them
out immediately with water.
o Store the ink and ink cartridges in a cool dark place.
o Wear safety glasses, coverall chemical splash goggles and face shield
when splashing or spraying the pre-treatment on the material
o If you store the cartridge in a cold environment and are ready to use
them, set them at room temperature before you use them.
o Do not dismantle the ink cartridges. This could damage the printhead.
o If you remove the ink cartridges, make sure to place them in a bag
individually to keep them away from dust, dirt and debris.
o Do not discard the inks into any sewers, into any body of water, or on
the ground.
o It is recommended to store the ink in a clean, dry area, with
temperatures between 10 and 30 degrees Celsius.
Special Guidelines for Storage and Handling for PD200 Inks
The Polyprint PD200 white Ink and cleaning solution will provide excellent
results when stored and handled properly. The following storage and
handling practices are required to ensure consistent quality and performance
of the white ink:
Product Storage Guidelines:
It is recommended to store the white ink in a clean, dry area, with
temperatures between
10 and 30 degrees Celsius.
Handling of white ink in 1 Liter bottles:
Keep bottles on mechanical roller while storing or vigorously shake bottle
manually every 3-4 days and before filling bulk system.
Shelf life of white ink:
With constant rolling 1 Year
With agitation weekly 6 months
If sedimentation occurs, do not use a paint shaker. This will break the
sediment up and will form particles that can be caught in the print head or
damper and restrict the ink flow. Light swirling or shaking of the bottle will
be enough to agitate the ink into its usable form. Hard material settled on
the bottom of the bottle should not be mixed back in. Soft sediment can be
easily mixed back in with minimum energy stirring or rolling.
Handling of ink in ink cartridges, and printer tubes
Page 29

POLYPRINT SA – TEXJET OPERATION MANUAL V4 EN
- 29 -
Shake ink cartridges vigorously for 3-5 seconds before use and weekly.
When restarting after one or two days we recommend performing one
cleaning cycle before starting production. This will move the tubes in the
machine enough to mix the ink inside the tubes.
Remove white ink during long time of inactivity:
Remove the white ink from bulk system and flush out the print head with
distilled water or flushing solution. The print head should remain filled with
distilled water or flushing solution until printer is ready to be refilled with
white ink.
Page 30
POLYPRINT SA – TEXJET OPERATION MANUAL V4 EN
- 30 -
3.9. How to change the standard platen
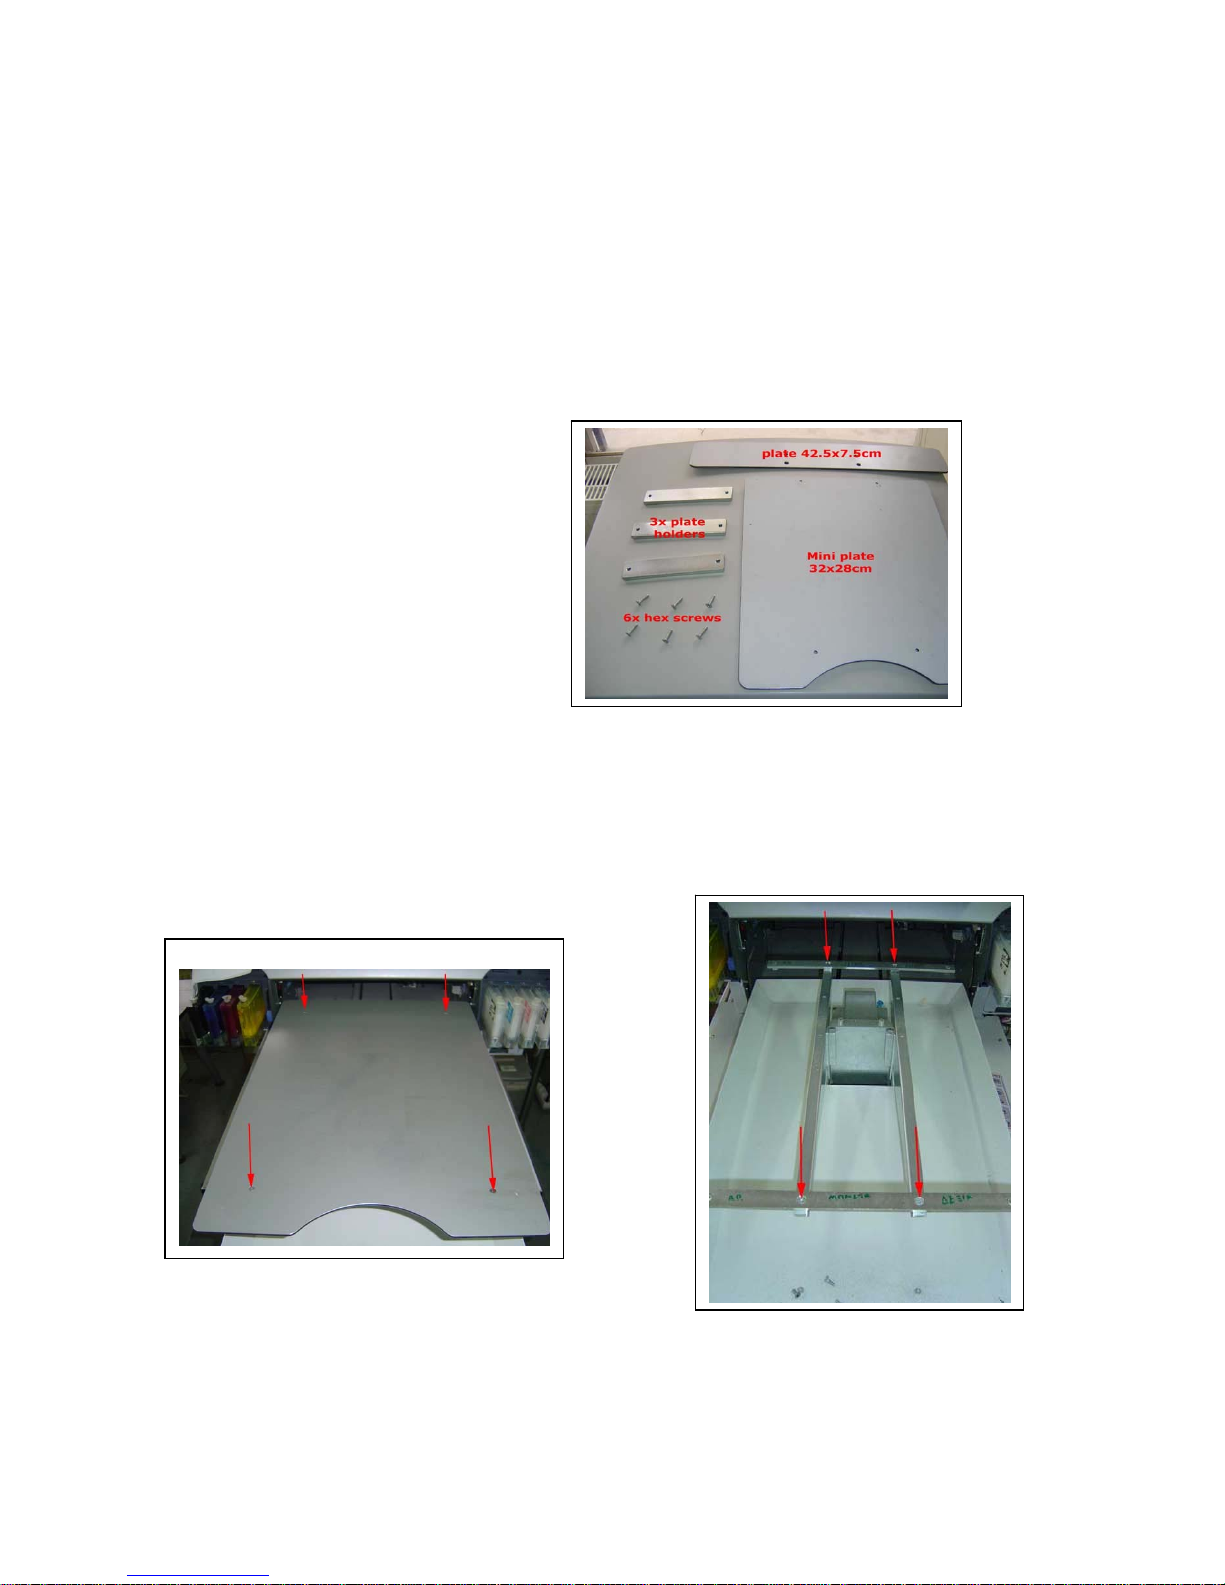
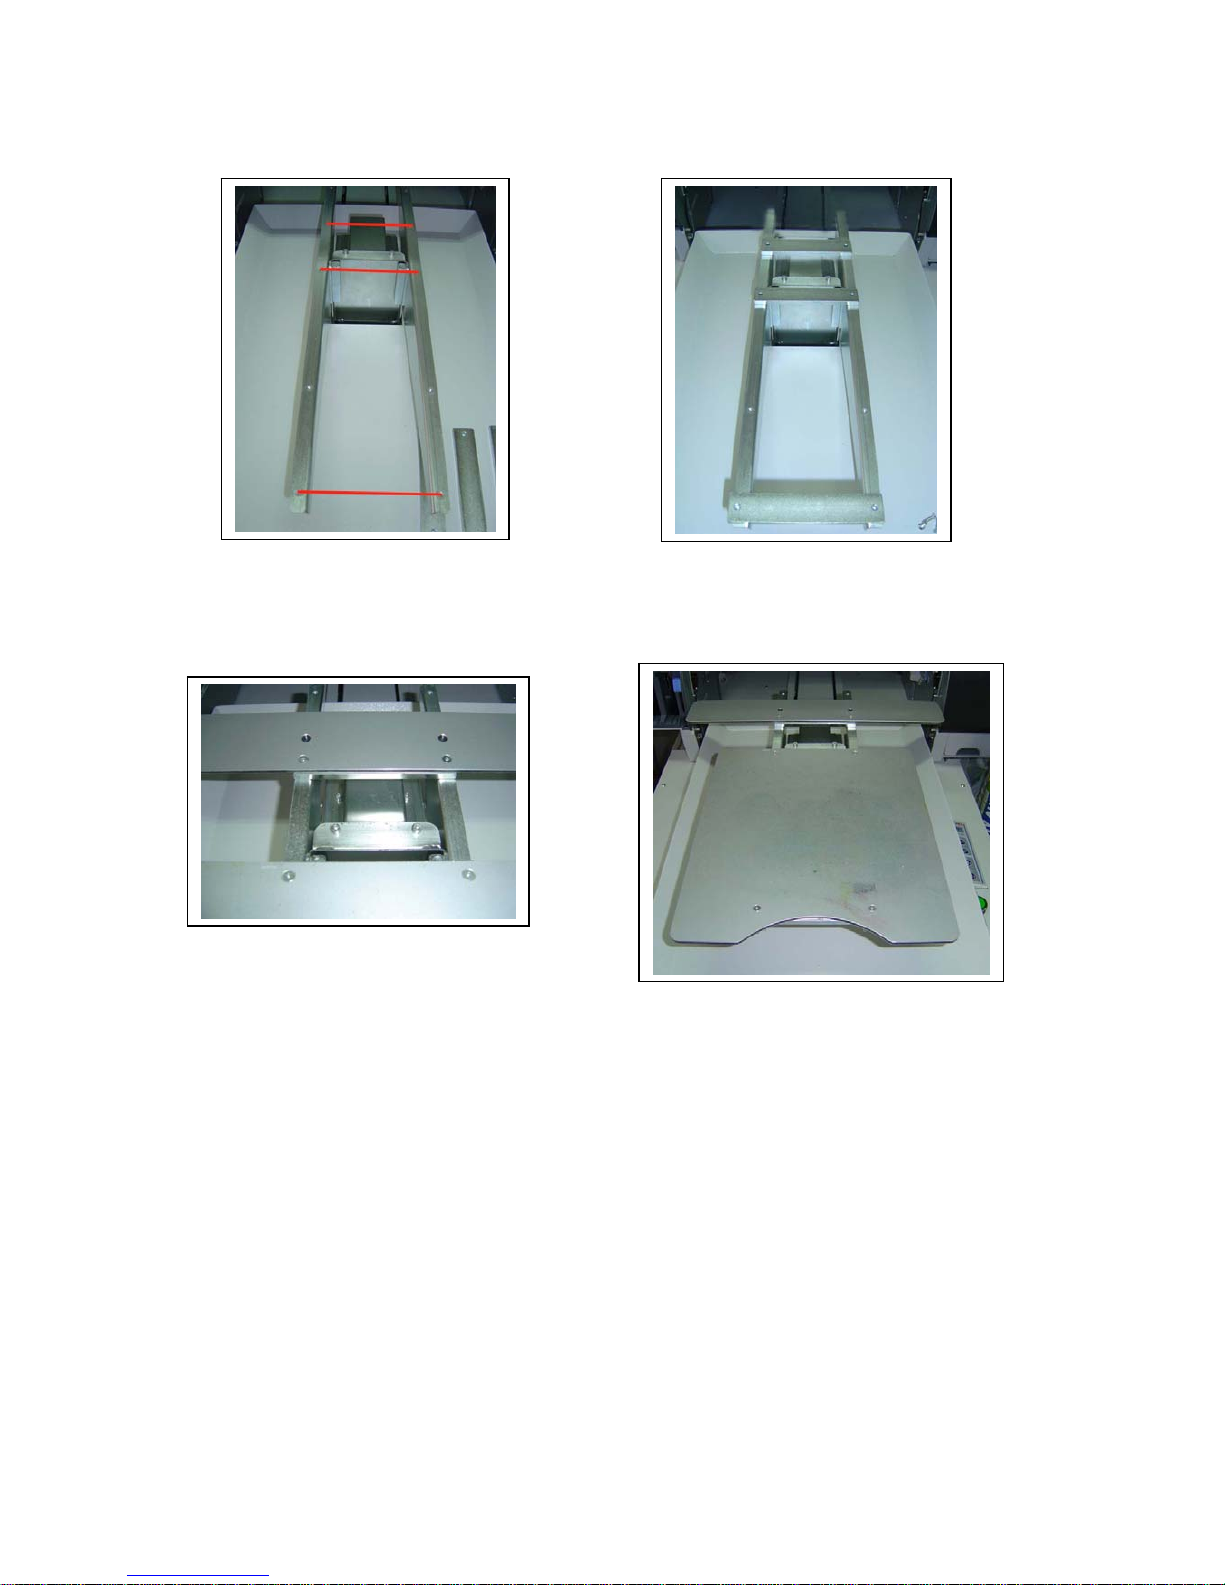
To print small sized t-shirts it’s necessary to use the T-Shirt Mini plate
32x28cm.
Consider that this plate is extra equipment. You need to order it.
T-Shirt Mini plate
In the shipment for the T-Shirt Mini plate should be.
1 plate 32x28cm
1 plate 42.5x7.5cm
3 metal plate holders
6 hexagonal 2,5mm screws
First of all remove from the standard plate the 4 hexagonal 2,5mm screws.
Then remove the 2 horizontal metal pieces by loosen the 4 hexagonal
2,5mm screws.
Page 31
POLYPRINT SA – TEXJET OPERATION MANUAL V4 EN
- 31 -
Place the 3 plate holder to the correct position. Se the photo
Put the plate 42.5x7.5cm in position. Use the bottom holes. Then put the Tshirt Mini plate 32x28cm on position.
Note: After changing the standard plate 42x60cm to the T-shirt Mini plate
32x28cm, never use the auto height function. Make your height adjustments
manually.
T-Shirt polo plate
In the shipment for the T-Shirt Mini plate should be.
1 plate 42x60
1 sticker tape
There are 2 options to place the polo plate.
Page 32

POLYPRINT SA – TEXJET OPERATION MANUAL V4 EN
- 32 -
• The very easy way. You do not need to remove any screws. Cut and
place the sticker in the 4 corners at the bottom of the polo plate. Just
place the polo plate over the standard plate you have fixed.
• Unscrew the plate you have fixed and screw the polo plate like the
standard plate.
Page 33

POLYPRINT SA – TEXJET OPERATION MANUAL V4 EN
- 33 -
4. Software
4.1. Computer requirements and prerequisites
Connecting the printer with your computer
The Computer is not included in the equipment, but necessary to work with
this product.
The System Requirements are:
Windows XP, Windows 2000
Pentium IV, 2GHz min,
512 MB RAM min
40 GB disc space required
The system requirements are for using the Polyprint Rip software.
Note: Do not connect the printer with the USB cable to the computer, before
installing the Epson 4800 printer driver
The available interface varies depending on the Microsoft Windows operating
system:
USB interface and Ethernet interface (option):
Windows XP, Me, 98, and 2000
Mac OS X 10.2 or later
Mac OS 9.x
IEEE1394 interface:
Windows XP, Me, and 2000
Mac OS X 10.2 or later
Mac OS 9.x
Using the built-in USB interface
To connect the printer to a USB port, you need a standard shielded USB
cable. To connect the printer to your computer using the built-in USB
interface, follow the steps bellow.
Note: If you use an inappropriate cable or connect peripheral devices
between the printer and the computer, the connection may become
unstable.
1. Make sure both the printer and the computer are turned off.
2. Connect the USB cable to the printer.
Page 34

POLYPRINT SA – TEXJET OPERATION MANUAL V4 EN
- 34 -
3. Plug the other end of the cable into the USB interface connector of the
computer,
After connecting the printer and the computer with the USB cable, see
“Software Installation”
Page 35
POLYPRINT SA – TEXJET OPERATION MANUAL V4 EN
- 35 -
4.2. Driver installation
Note: Do not connect the printer with the USB cable to the computer, before
installing the Epson 4800 or 4880 printer driver
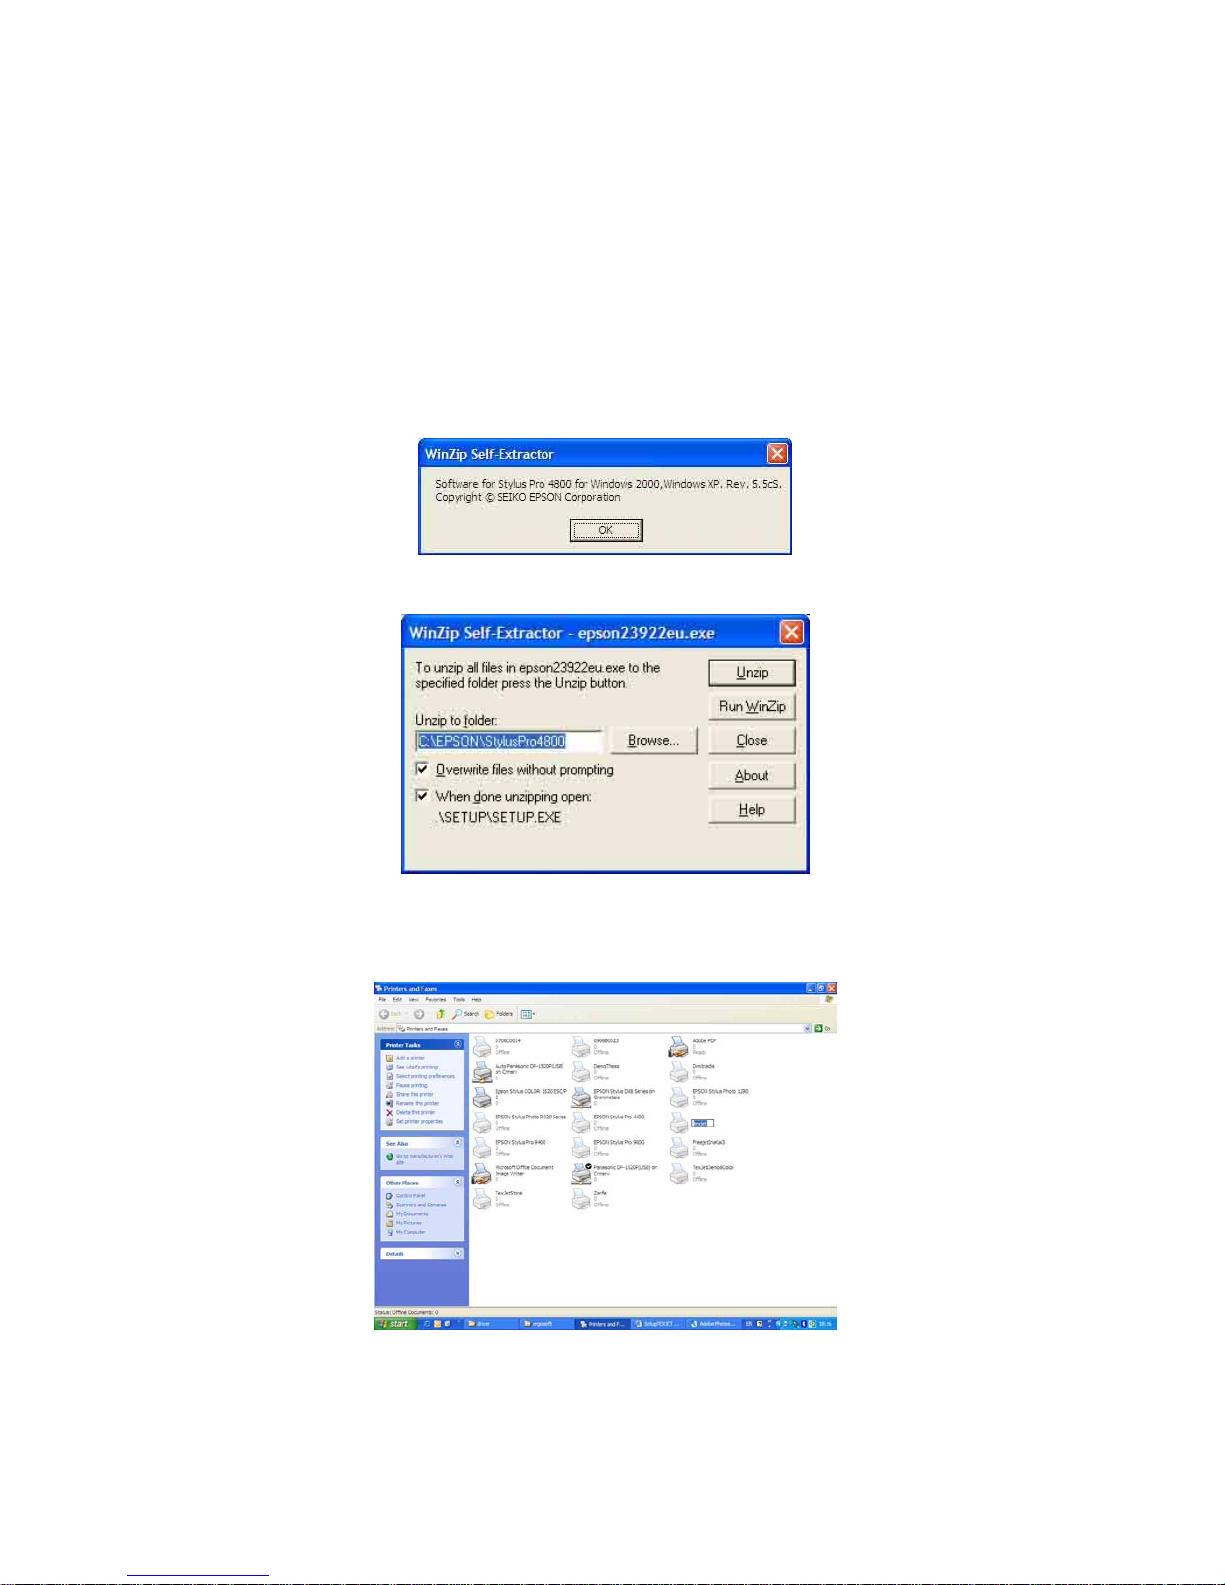
Install to the computer, the printer driver for Epson 4800 or 4880 from the
Polyprint RIP Software CD or the Epson driver CD. Follow the instructions on
the wizard.
Press ok
Unzip
When you are finished a new icon will be created on the operating system
(Windows XP) in the printer and faxes.
Page 36
POLYPRINT SA – TEXJET OPERATION MANUAL V4 EN
- 36 -
4.3. Software installation Version 12
This installation describes the Polyprint Version 12
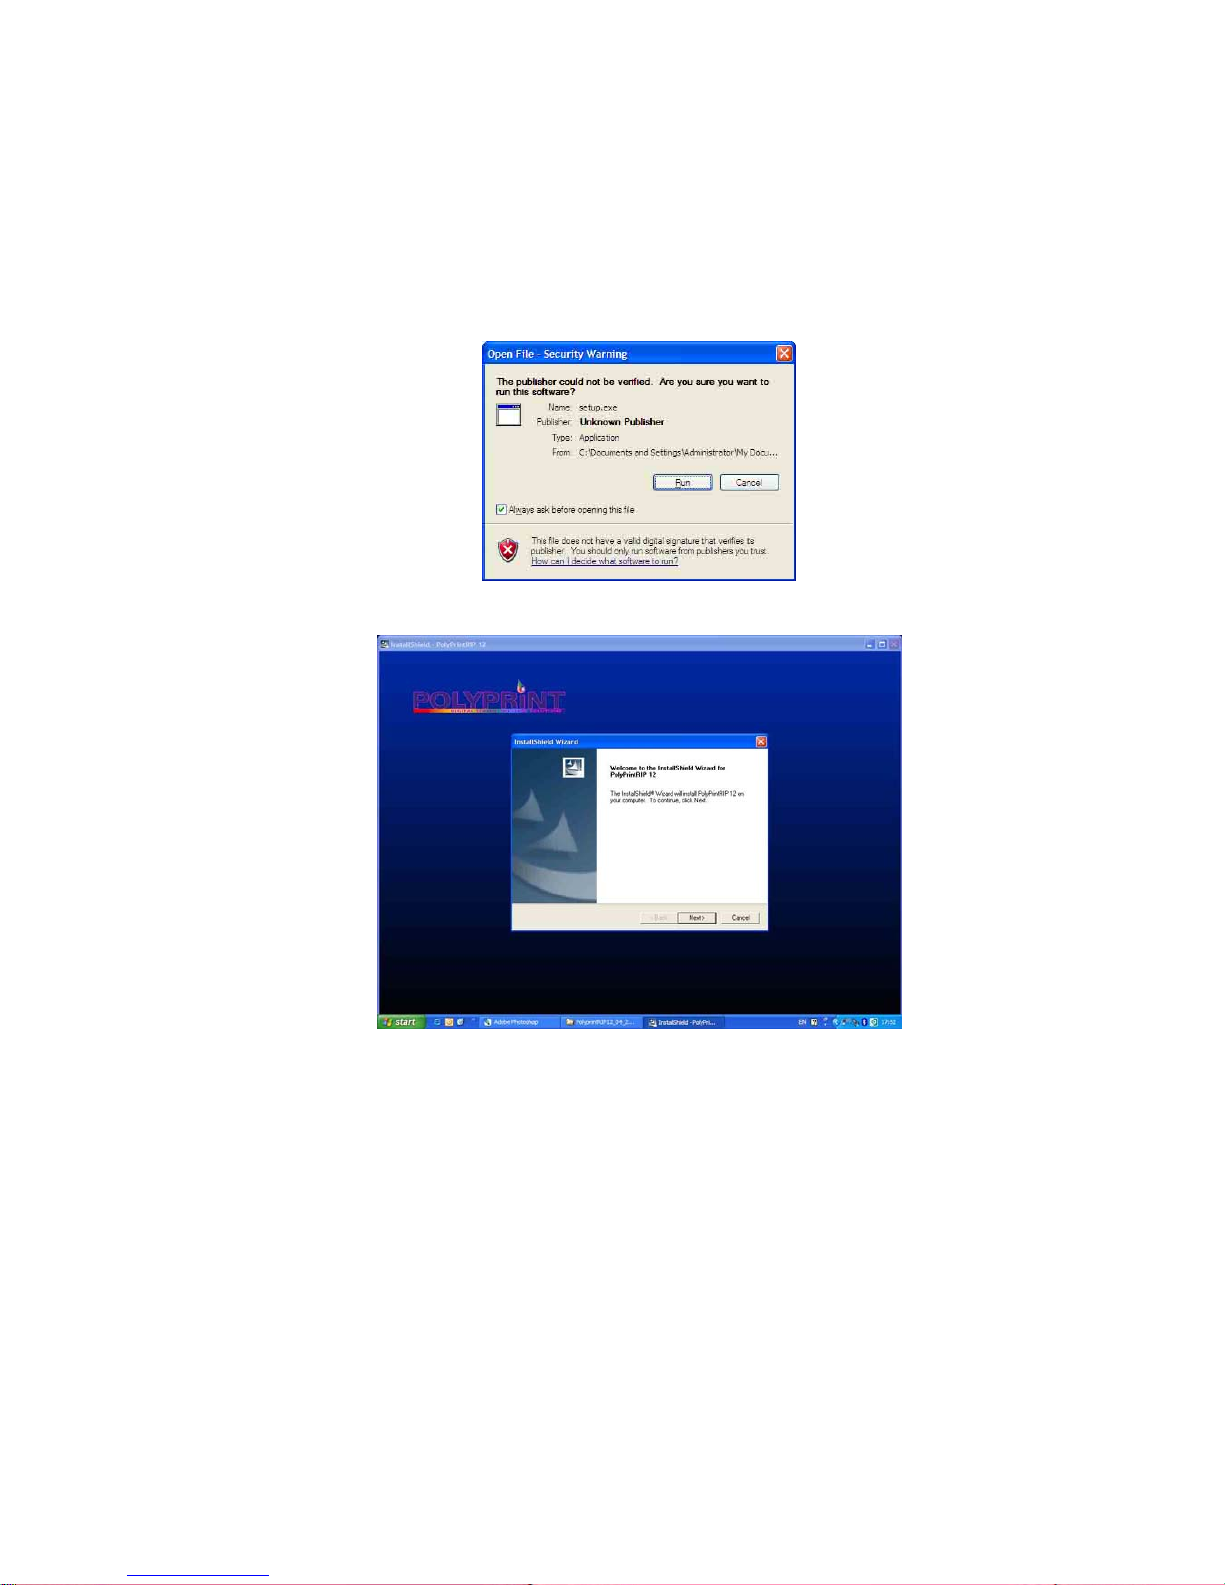
• Installation
Place the Polyprint RIP Software CD if not already done,
o Go to the Polyprint RIP folder and run the Setup.
Press Run
Next
Page 37
POLYPRINT SA – TEXJET OPERATION MANUAL V4 EN
- 37 -
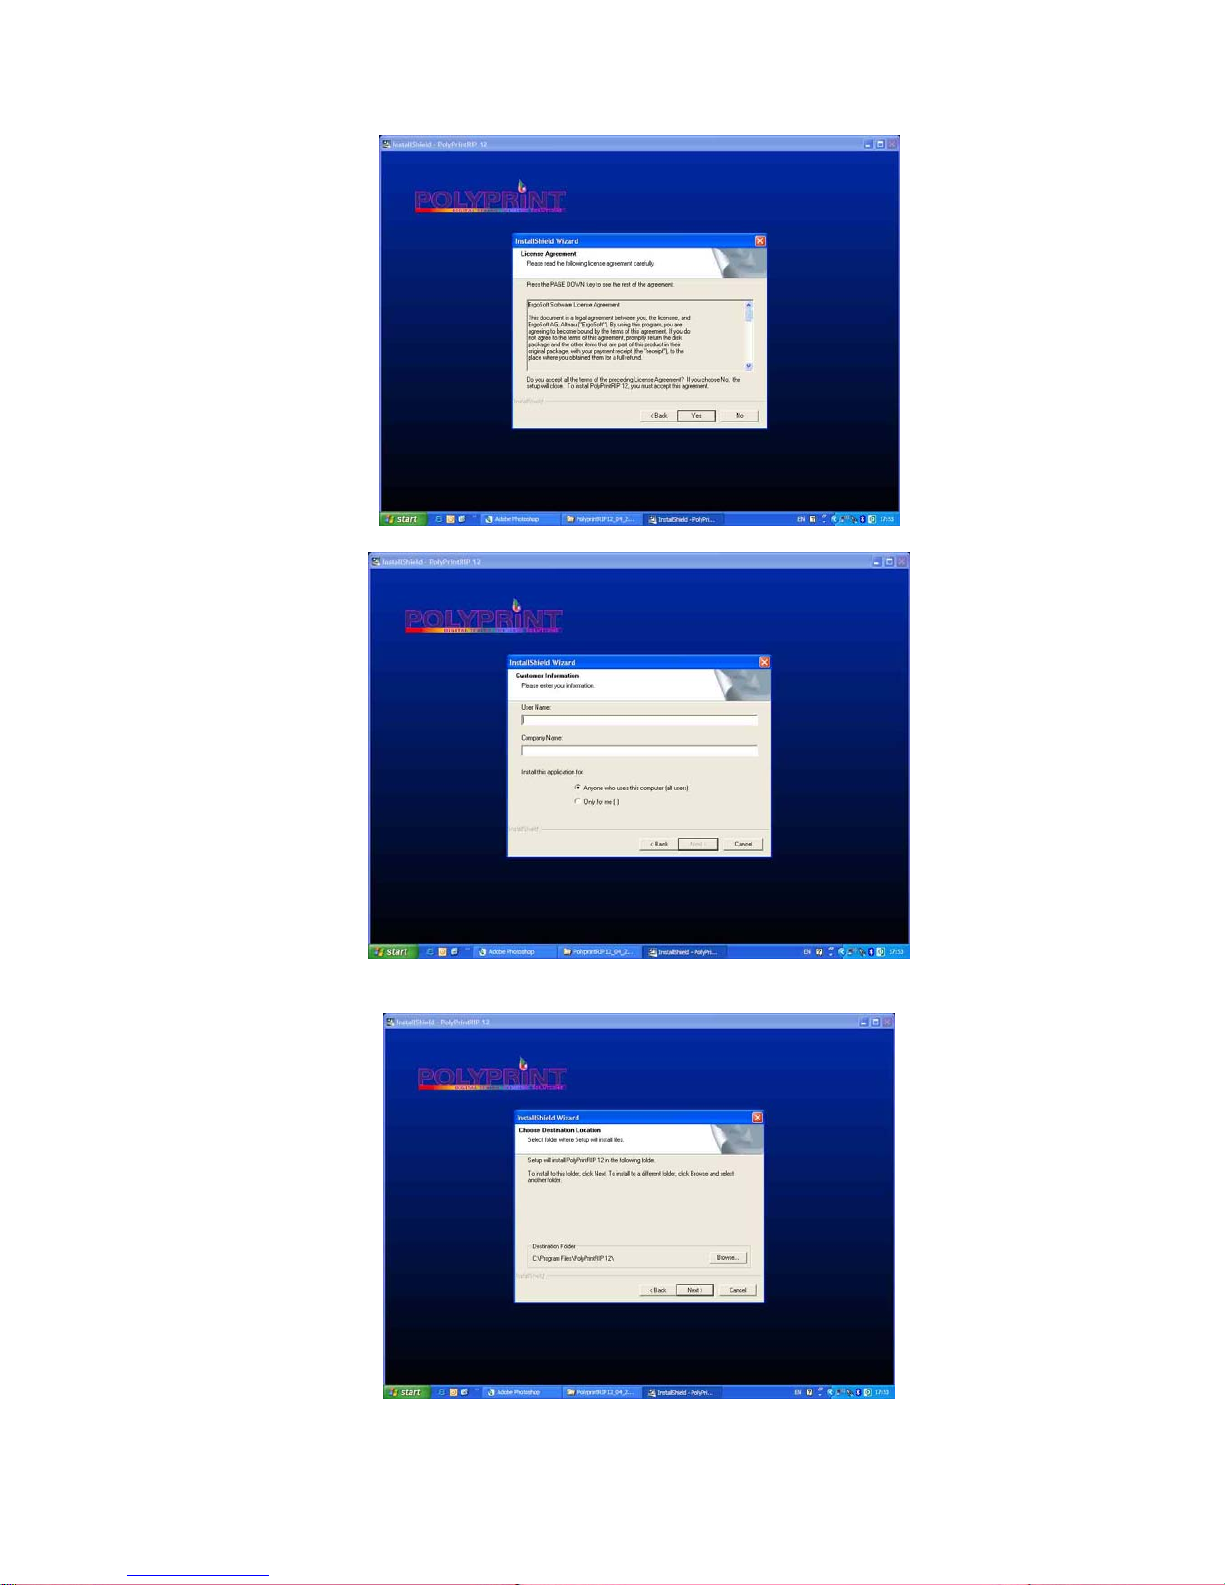
Confirm yes
Insert user name and company name
Insert destination folder
Page 38
POLYPRINT SA – TEXJET OPERATION MANUAL V4 EN
- 38 -
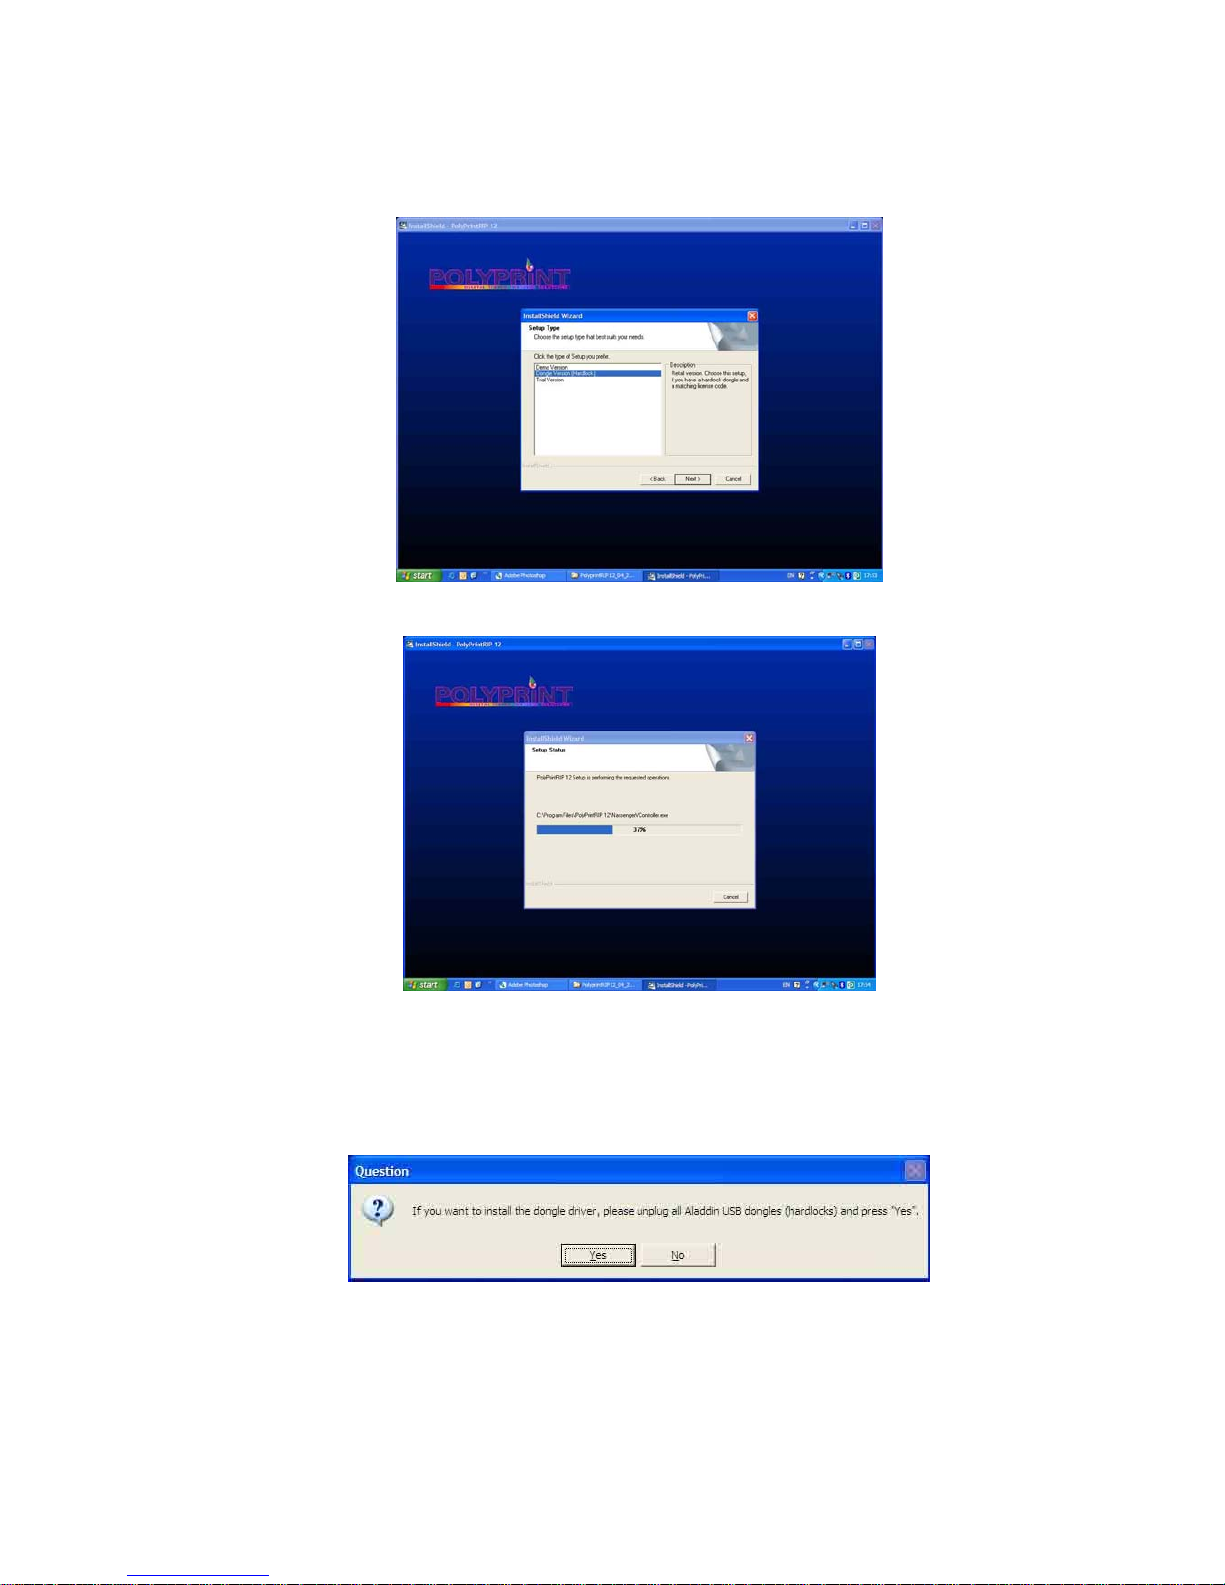
o Install the dongle version.
Select dongle version
Wait
o Do not place the USB dongle until the dongle driver have been
installed
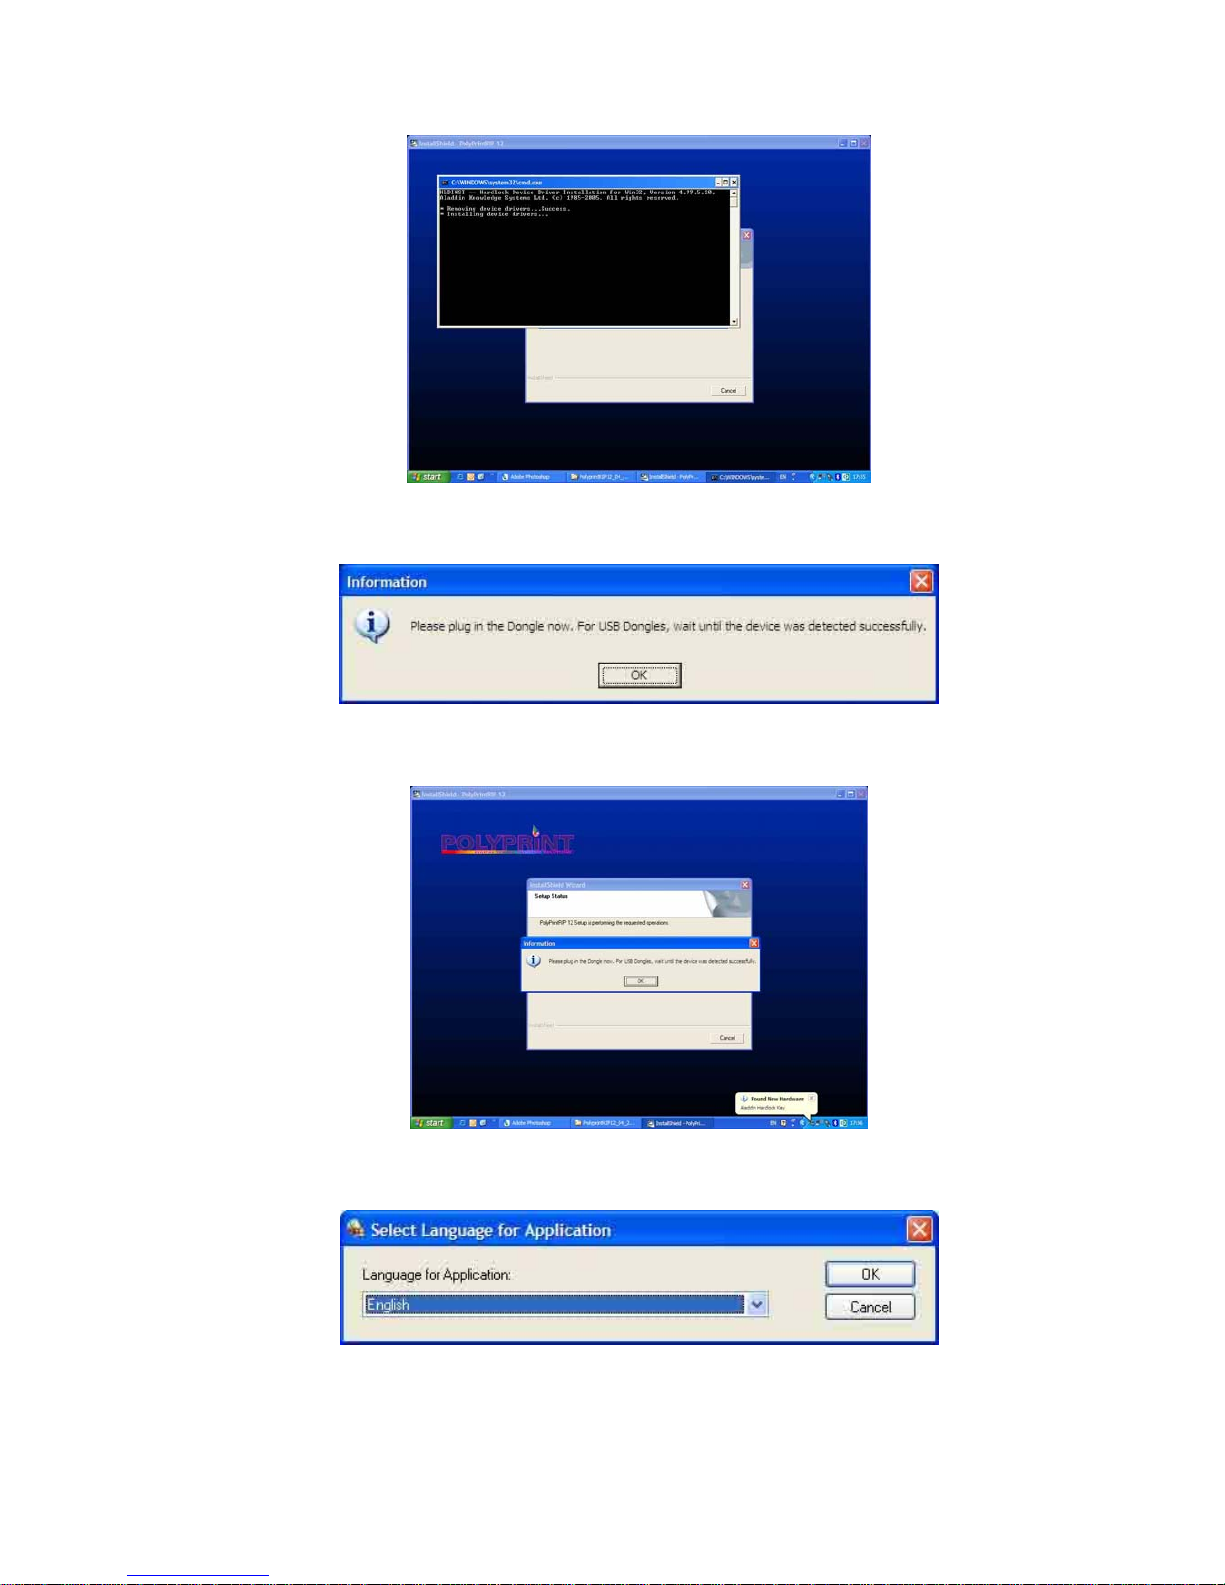
The computer would ask you to install the dongle driver.
Confirm yes
Page 39
POLYPRINT SA – TEXJET OPERATION MANUAL V4 EN
- 39 -
Wait until it’s finished
o After some time the computer will confirm to put the USB dongle.
Press ok
o Place the Dongle.
Press ok
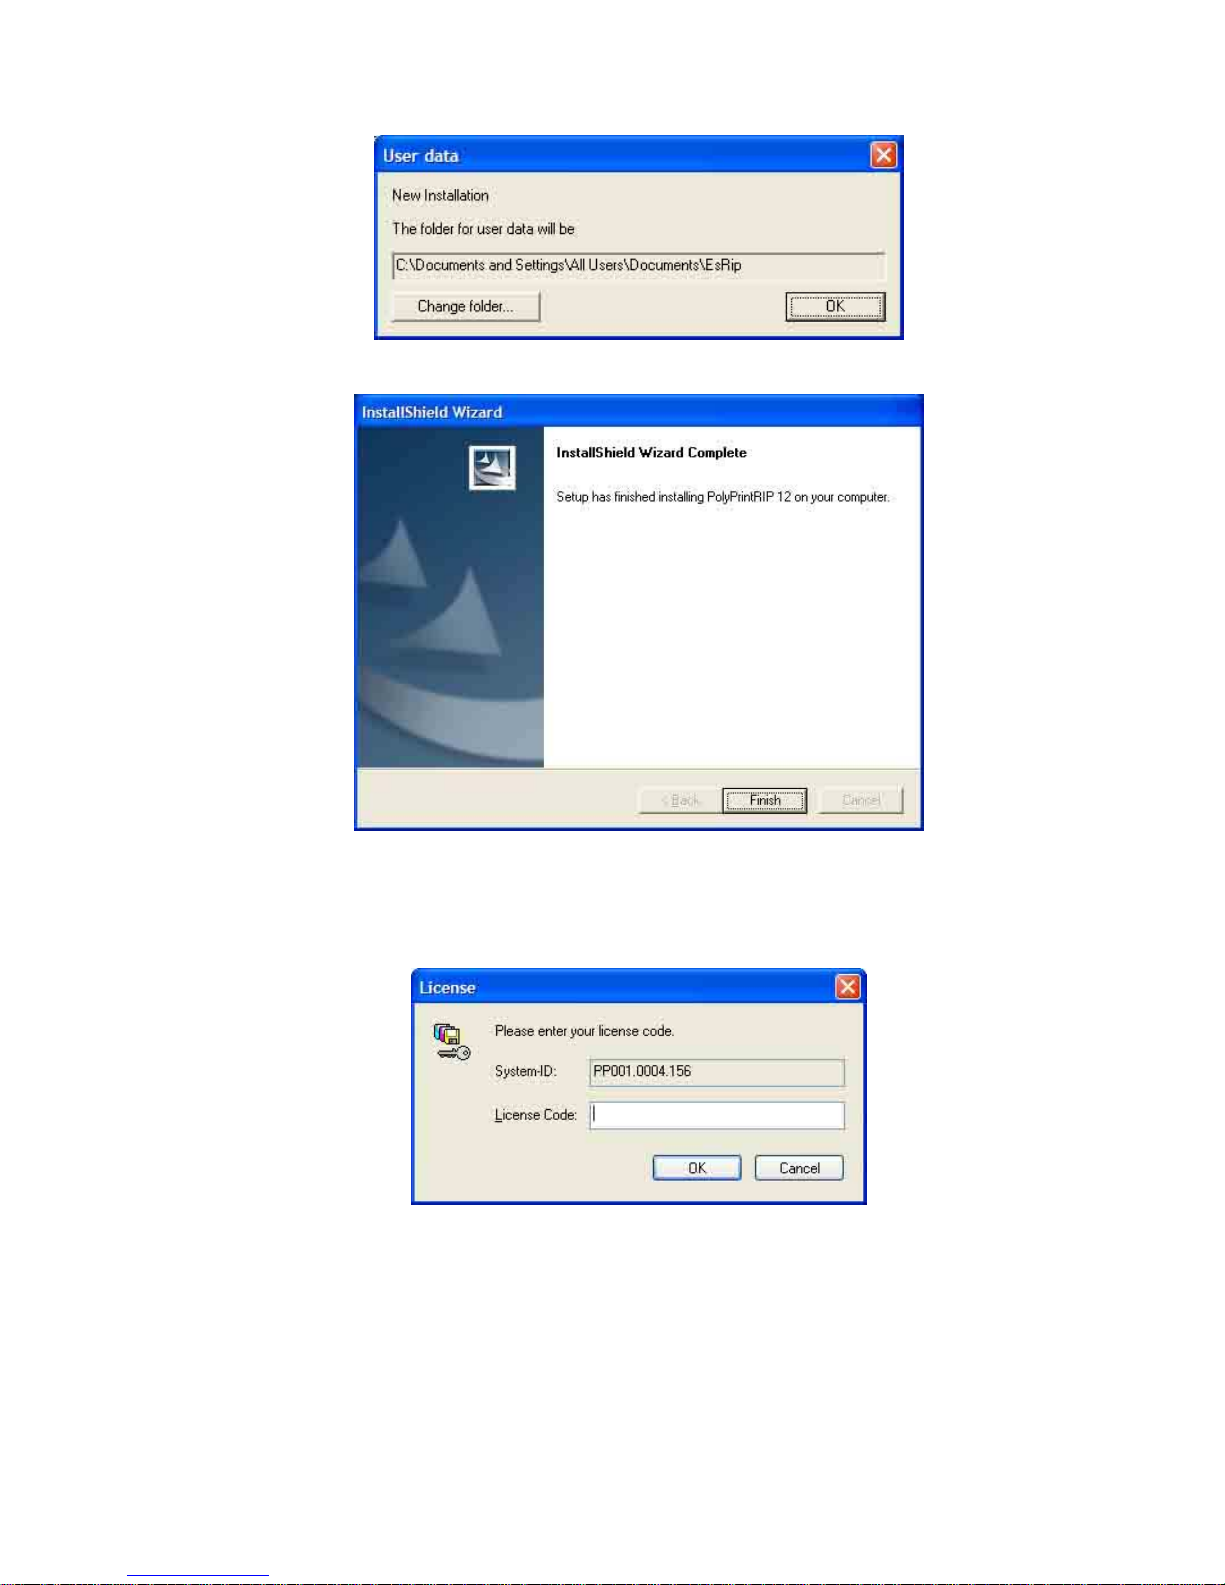
o Finish the installation.
Select language
Page 40
POLYPRINT SA – TEXJET OPERATION MANUAL V4 EN
- 40 -
Press ok to store the folder for user data
Installation Finish
• License code entry: Lunch the Polyprint RIP:
o The computer would ask you for the License code.
o Insert the License code for your dongle key. This code will be sent
to you via e-mail or included in the CD case of Polyprint RIP
software.
Page 41
POLYPRINT SA – TEXJET OPERATION MANUAL V4 EN
- 41 -
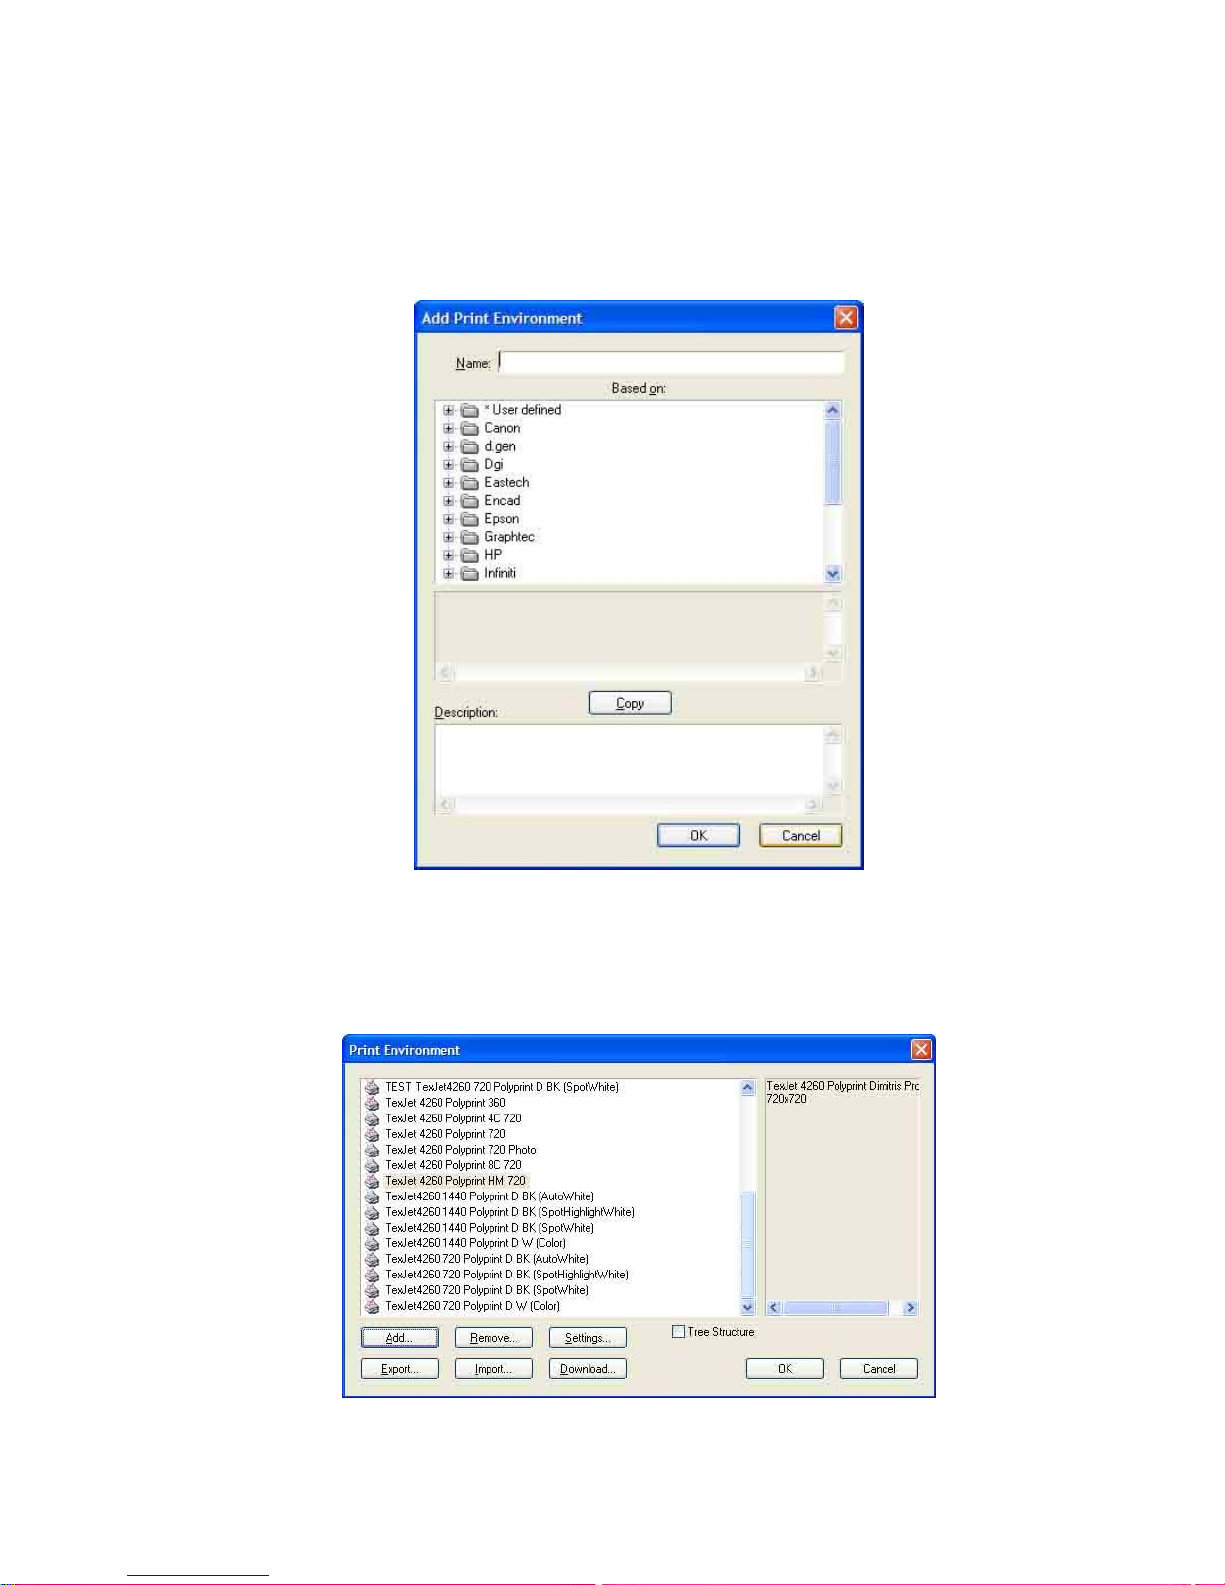
• Import Printenvironments: Insert the printenvironments.
o After lunching Polyprint RIP for the first time, the RIP Software will
inform you that no printenvironment is selected. Without
printenvironment, the RIP software will proceed to add a new one.
Click cancel
o Do not add a new one. Click chancel until you get on the
printenvironment window.
o Click on the import button. Search on the RIP Software CD on the
folder named “printenvironments”. Choose the folder for your ink
set. Select all the printenvironment inside the folder and click ok.
Click import
Page 42
POLYPRINT SA – TEXJET OPERATION MANUAL V4 EN
- 42 -
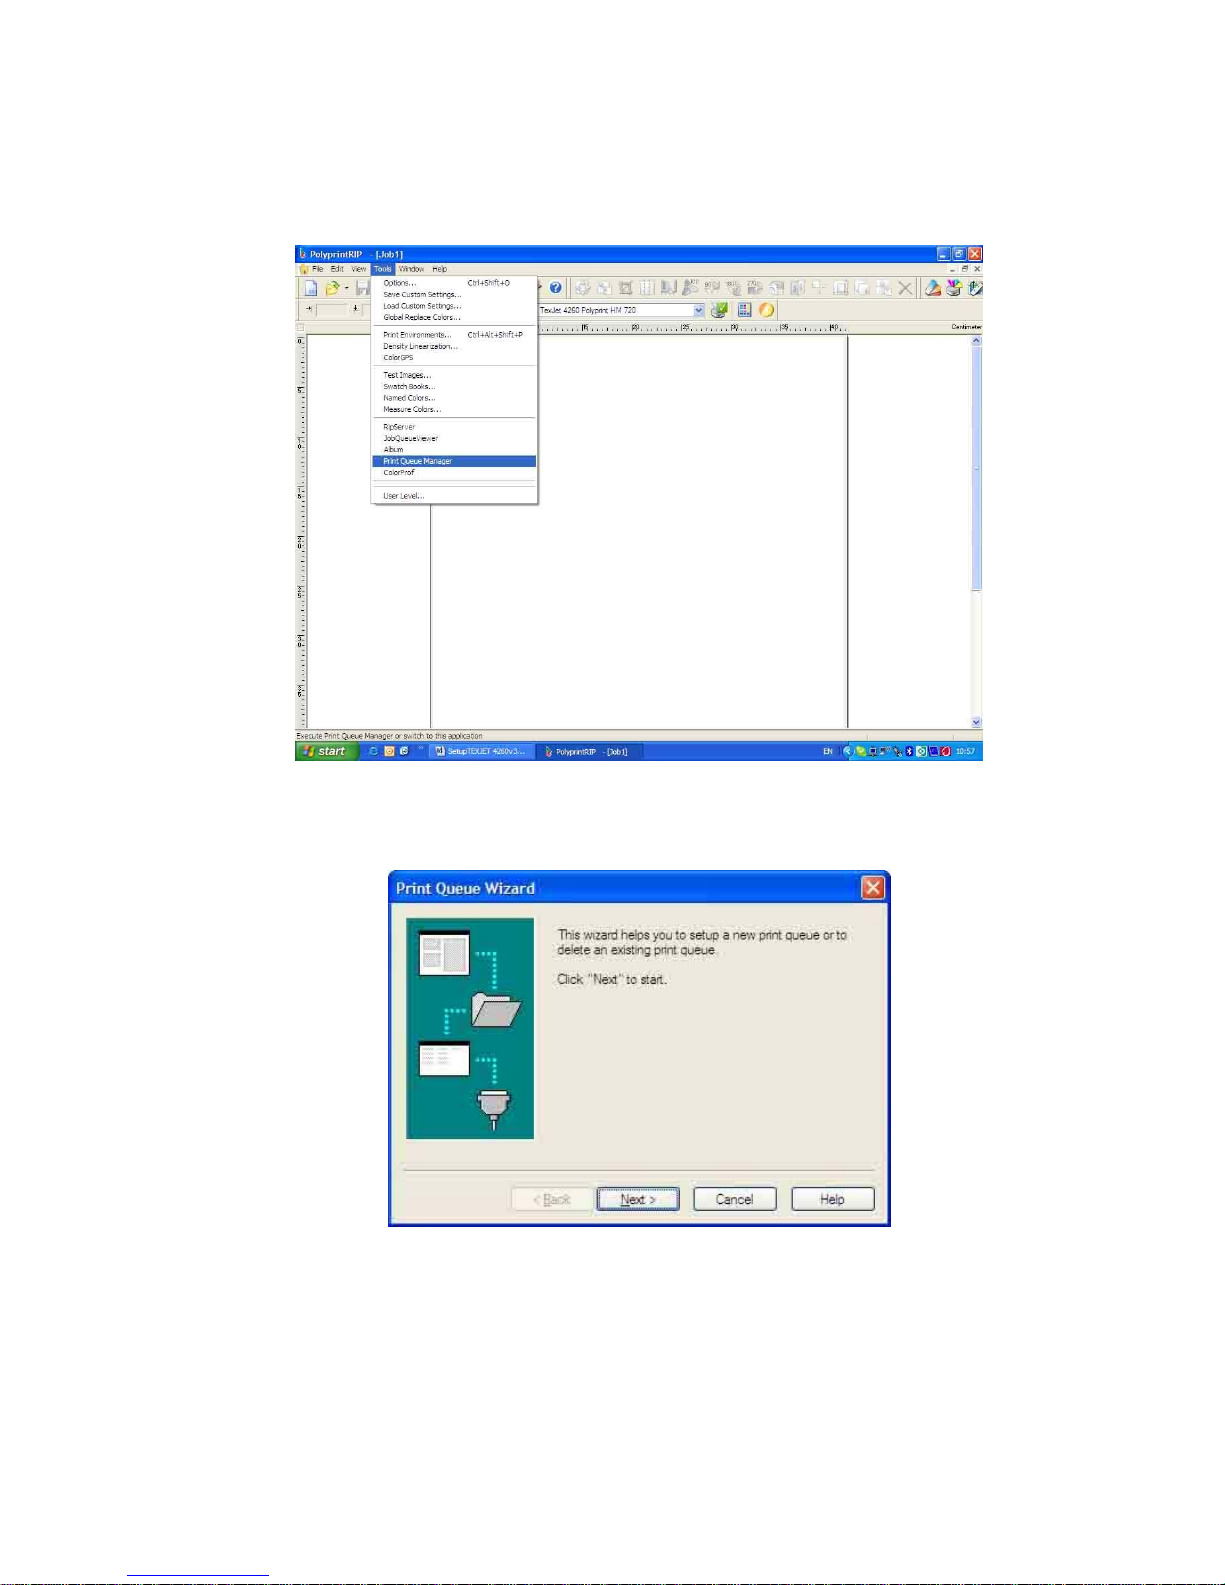
• Create a printqueue:
o From the Polyprint RIP menu go to tools and lunch the
printqueue manager.
Select printqueue manager
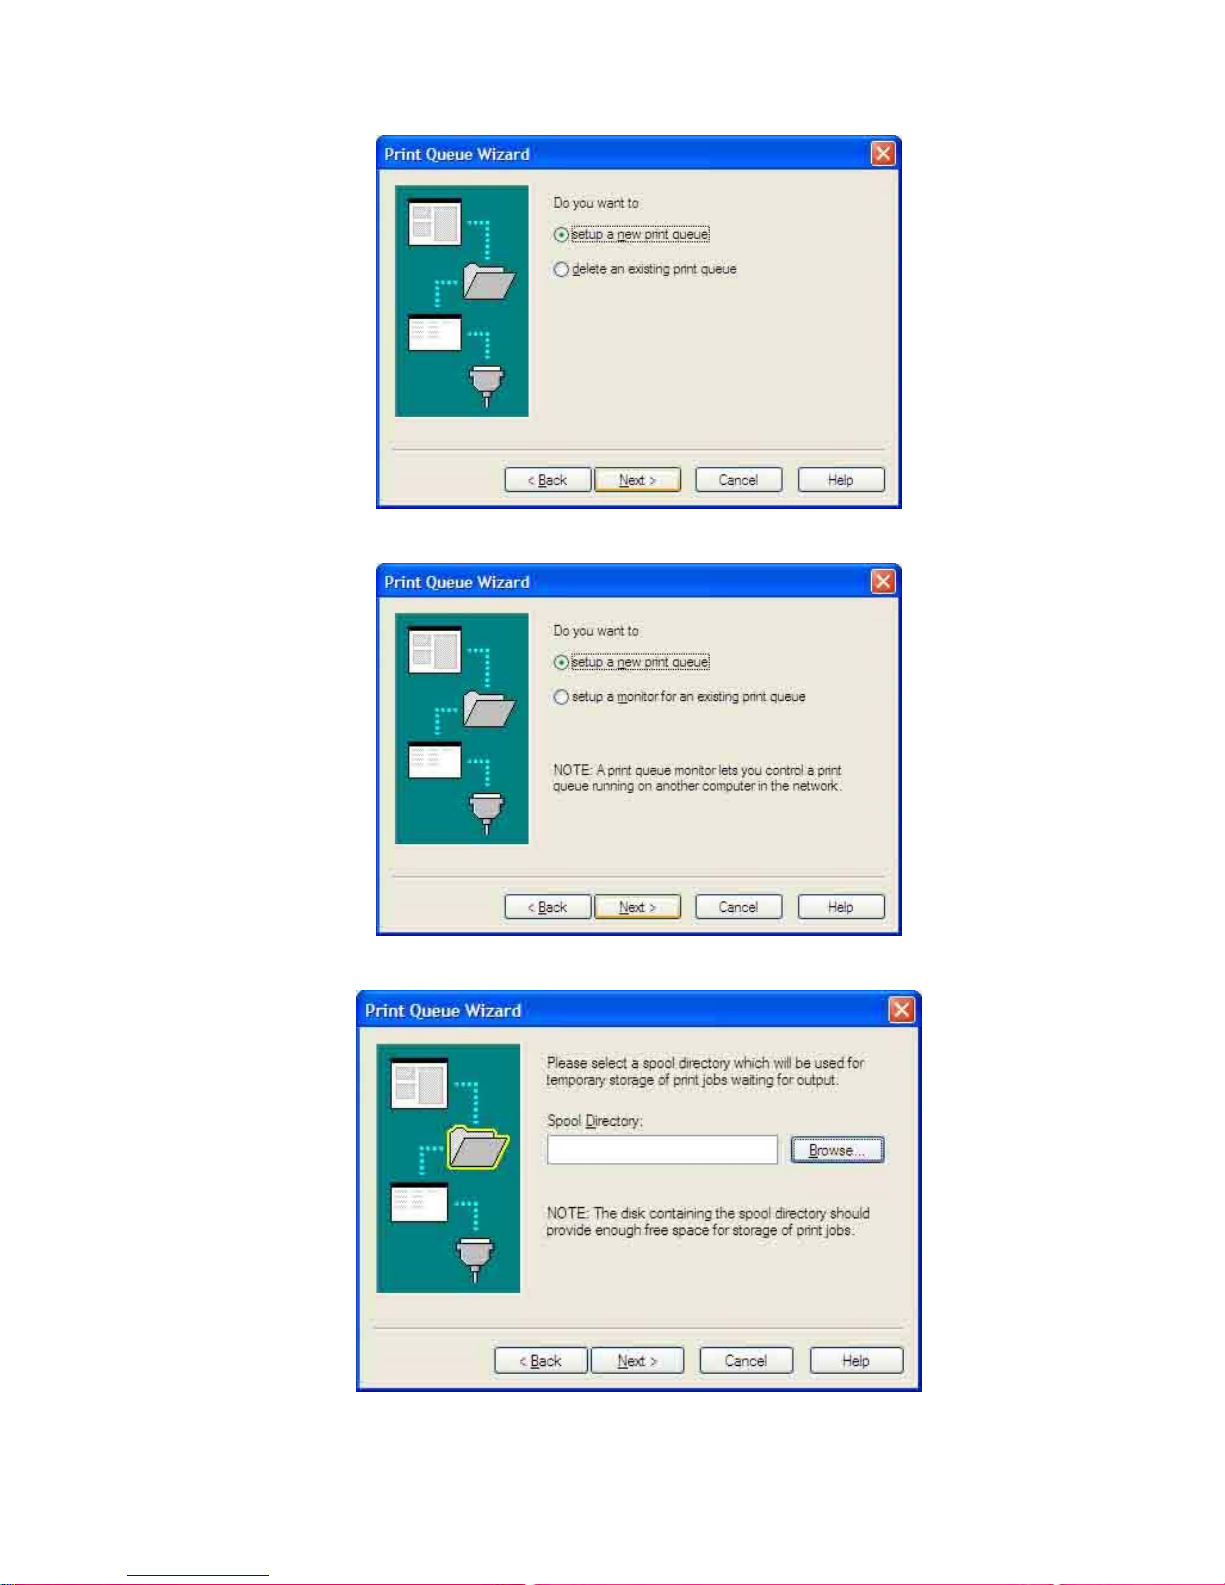
b. Follow the instructions of the printqueue wizard. You have to create
a new printqueue.
Next
Page 43
POLYPRINT SA – TEXJET OPERATION MANUAL V4 EN
- 43 -
Next
Next
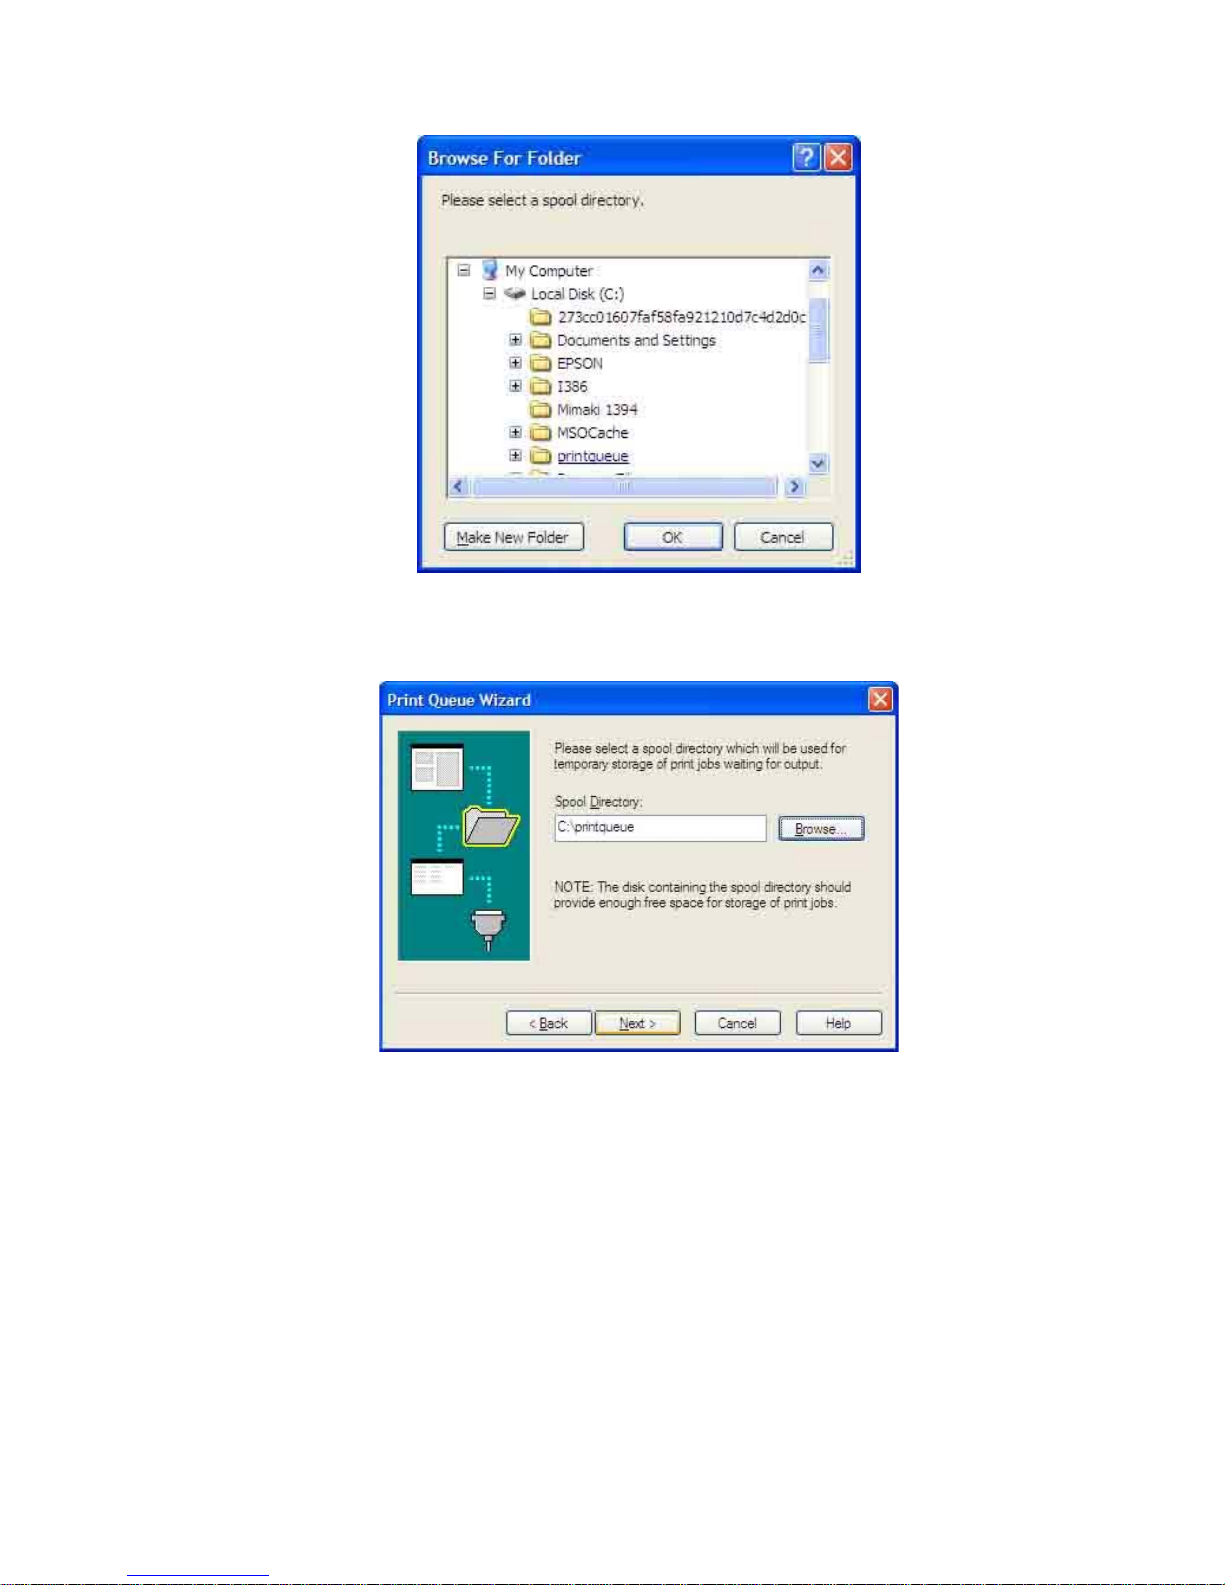
Browse to spool directory
Page 44
POLYPRINT SA – TEXJET OPERATION MANUAL V4 EN
- 44 -
o Make new Folder with the name printqueue “c:\printqueue”
and click ok
C:\printqueue
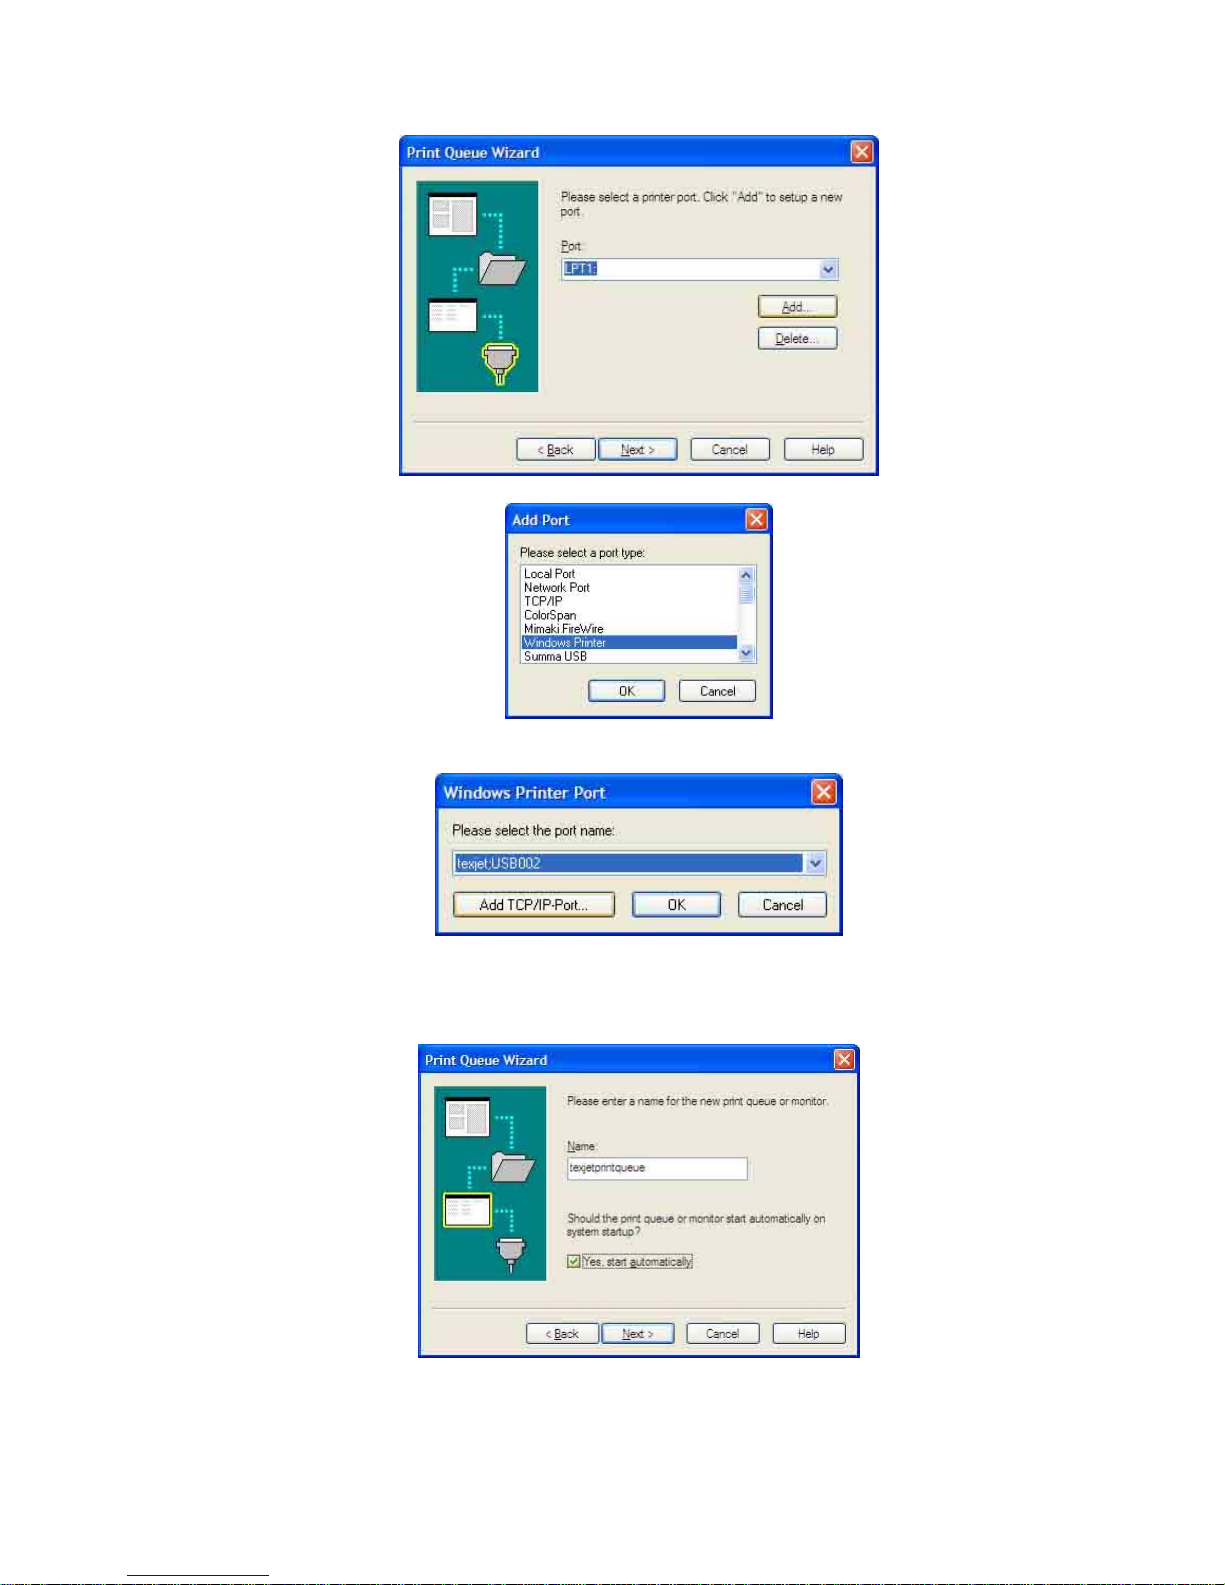
o For port selection add a new port. Go to windows printer and
select the Epson 4800 (TexJet).
Page 45
POLYPRINT SA – TEXJET OPERATION MANUAL V4 EN
- 45 -
Select add
Select windows printer
Select the TexJet and click ok
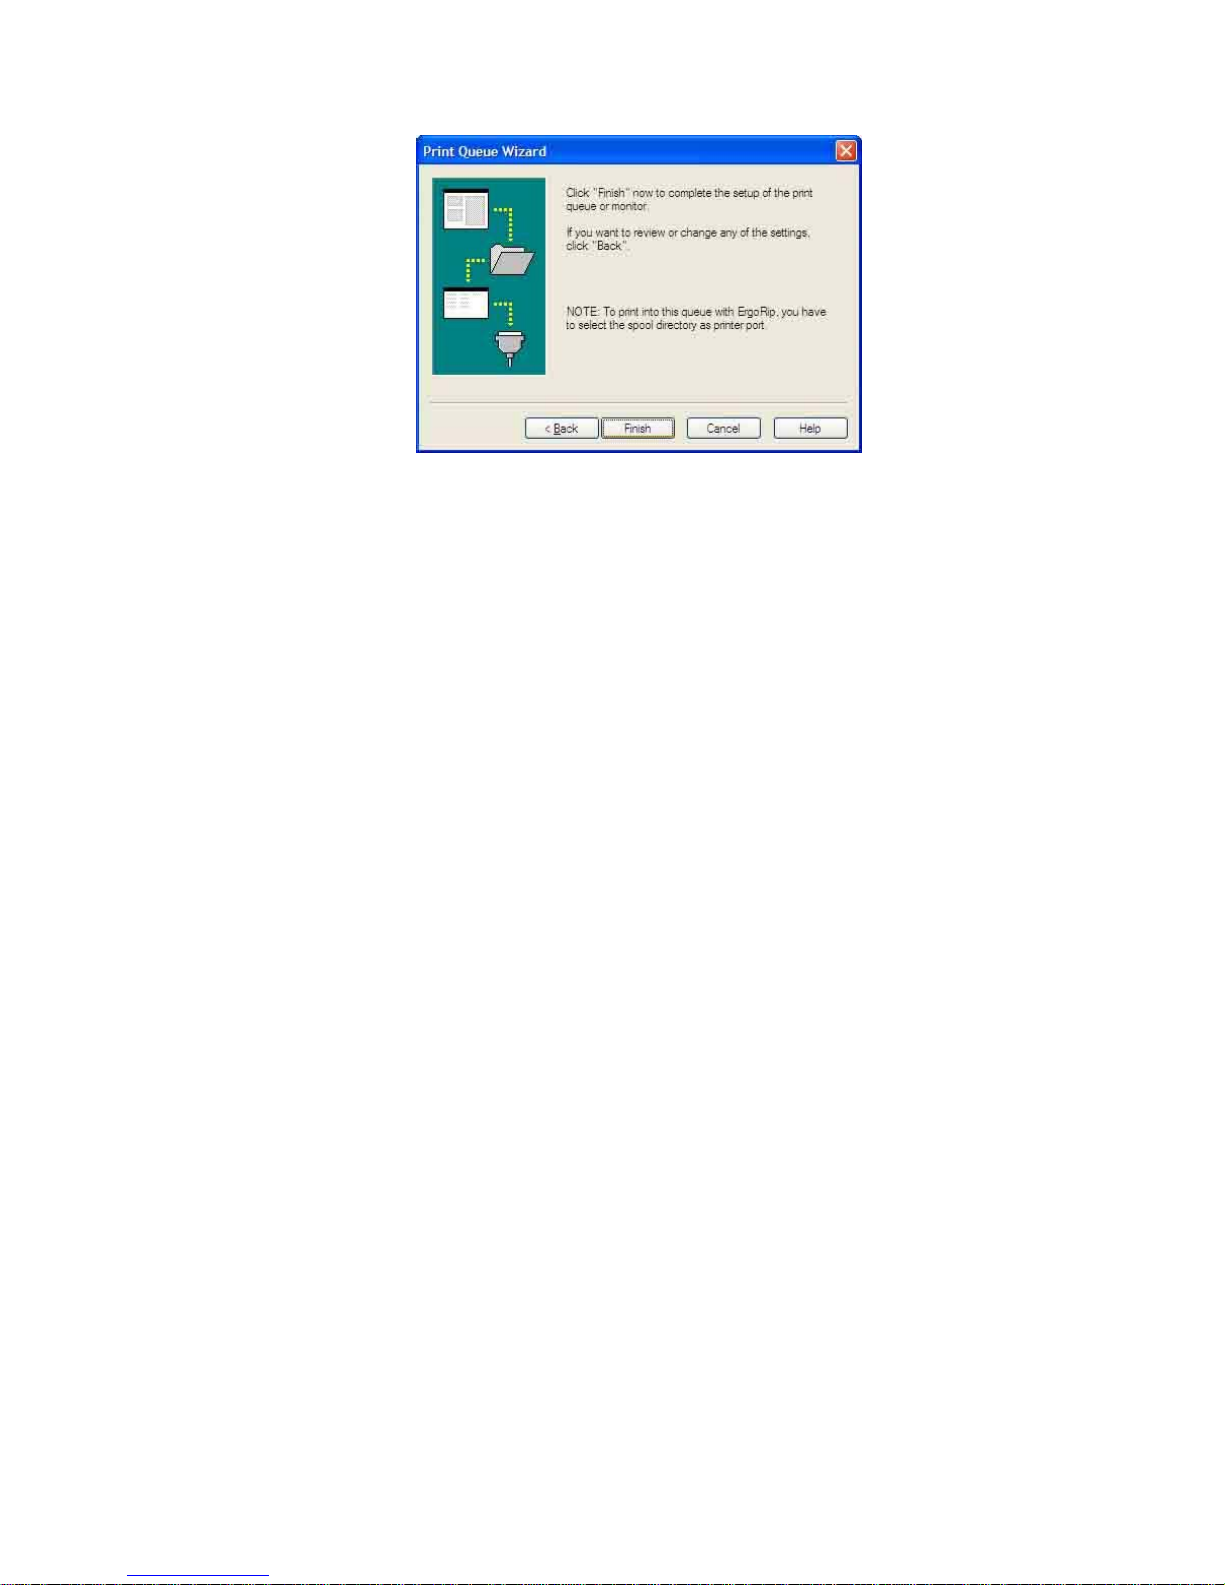
o Give a name to the printqueue (printqueue) (Please use only
Latin vocabulary) and finish the installation.
Give printqueue
Page 46
POLYPRINT SA – TEXJET OPERATION MANUAL V4 EN
- 46 -
Select finish
Page 47
POLYPRINT SA – TEXJET OPERATION MANUAL V4 EN
- 47 -
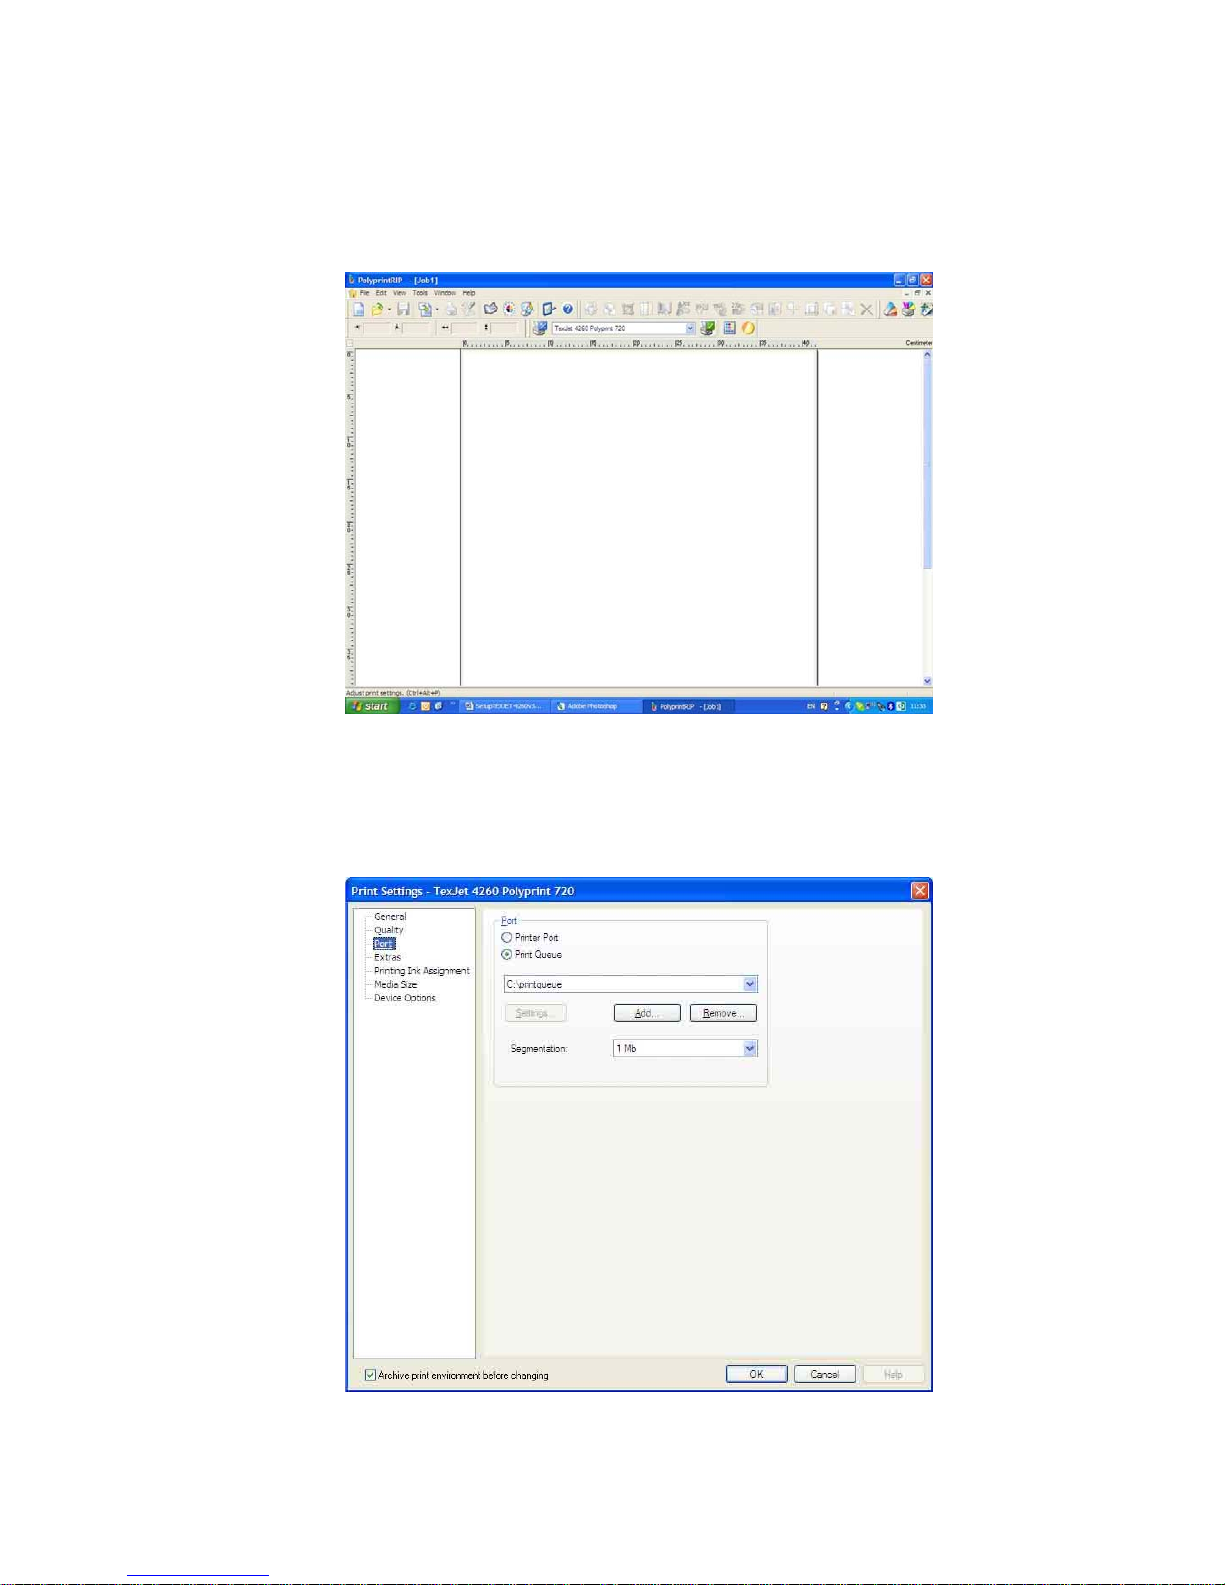
• Check the printenvironment settings:
o Choose a printenvironment from the scroll down window.
(Sample: TexJet Dark Spot 1440W 720C).
o Click on the print settings button which is on the right.
Select print settings
o At the left side of the print settings menu, select port and on the
right side you have to change the selection from “print device” to
“printqueue”. Also select the created spool directory.
“c:\printqueue” in the scroll down window.
Select printqueue
Page 48
POLYPRINT SA – TEXJET OPERATION MANUAL V4 EN
- 48 -
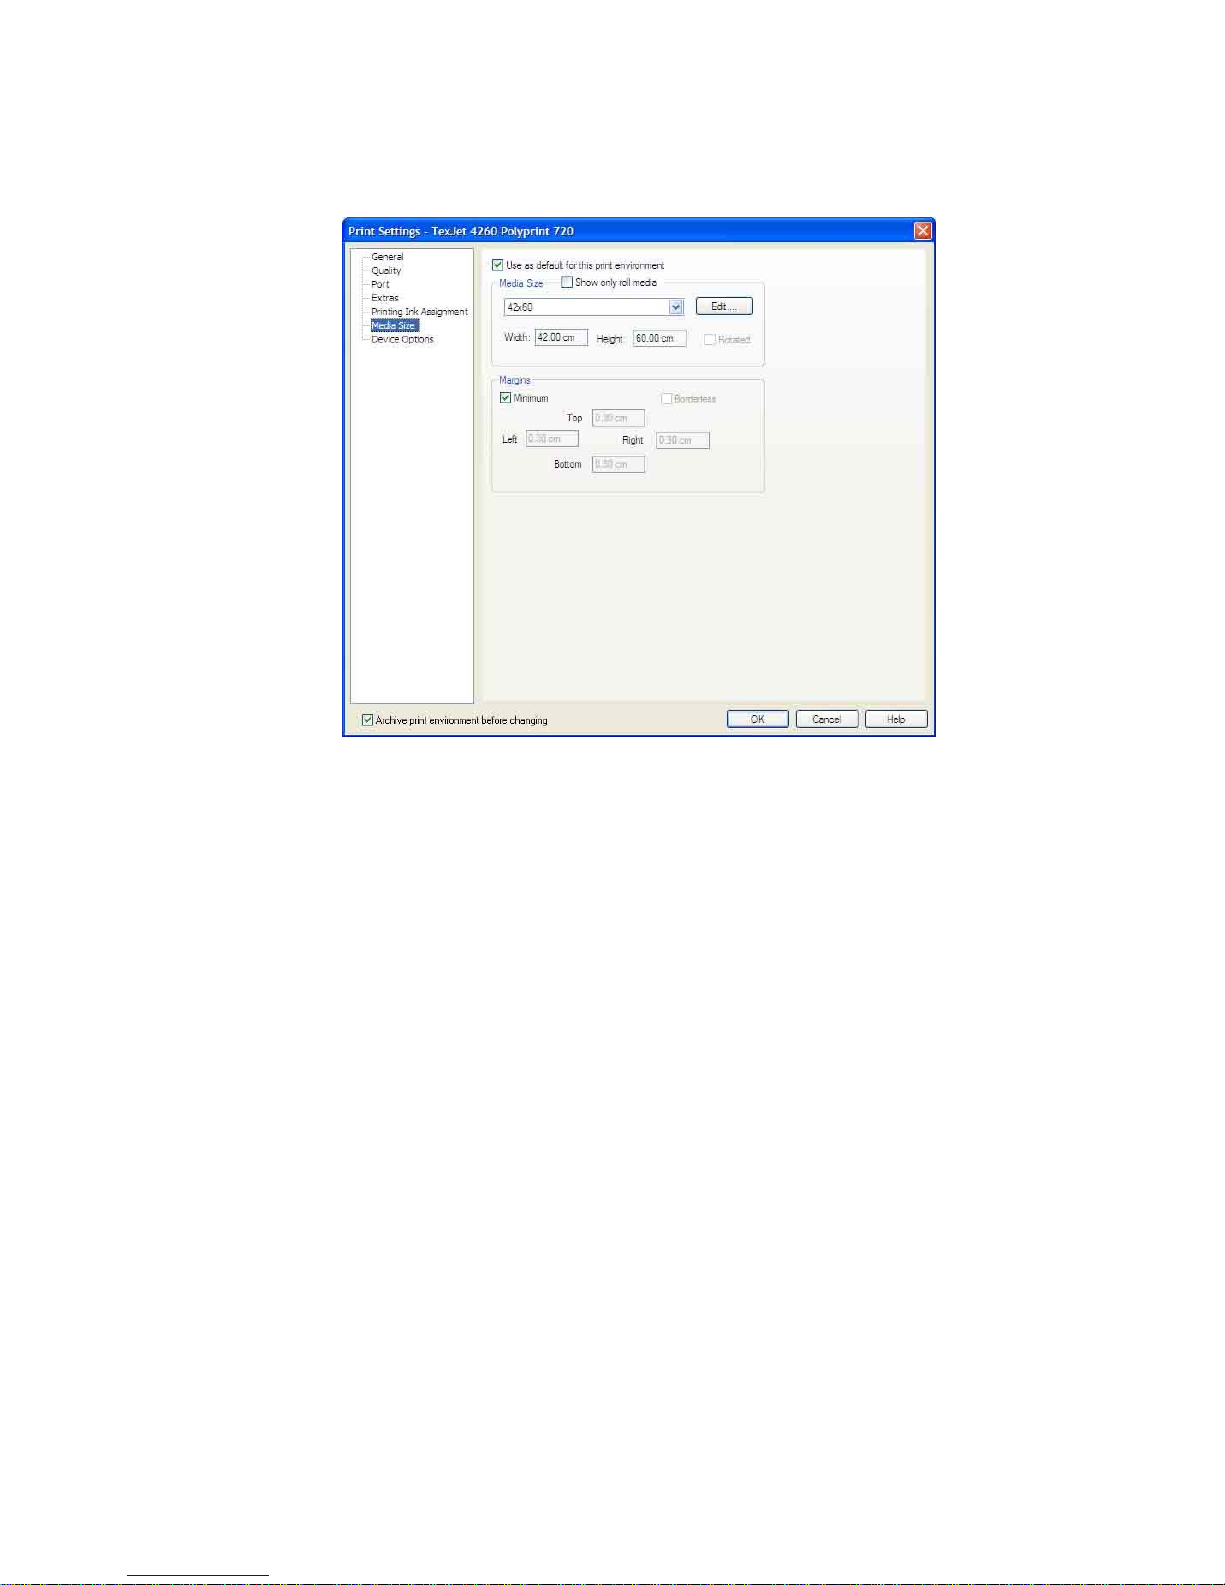
o Also check at left side of the print settings menu, the media size
and define at the right side, the size to “42cm width” and to “60cm
height”.
Edit media size 42x60
o Do this set up for all printenvironments to ensure right function.
Page 49
POLYPRINT SA – TEXJET OPERATION MANUAL V4 EN
- 49 -
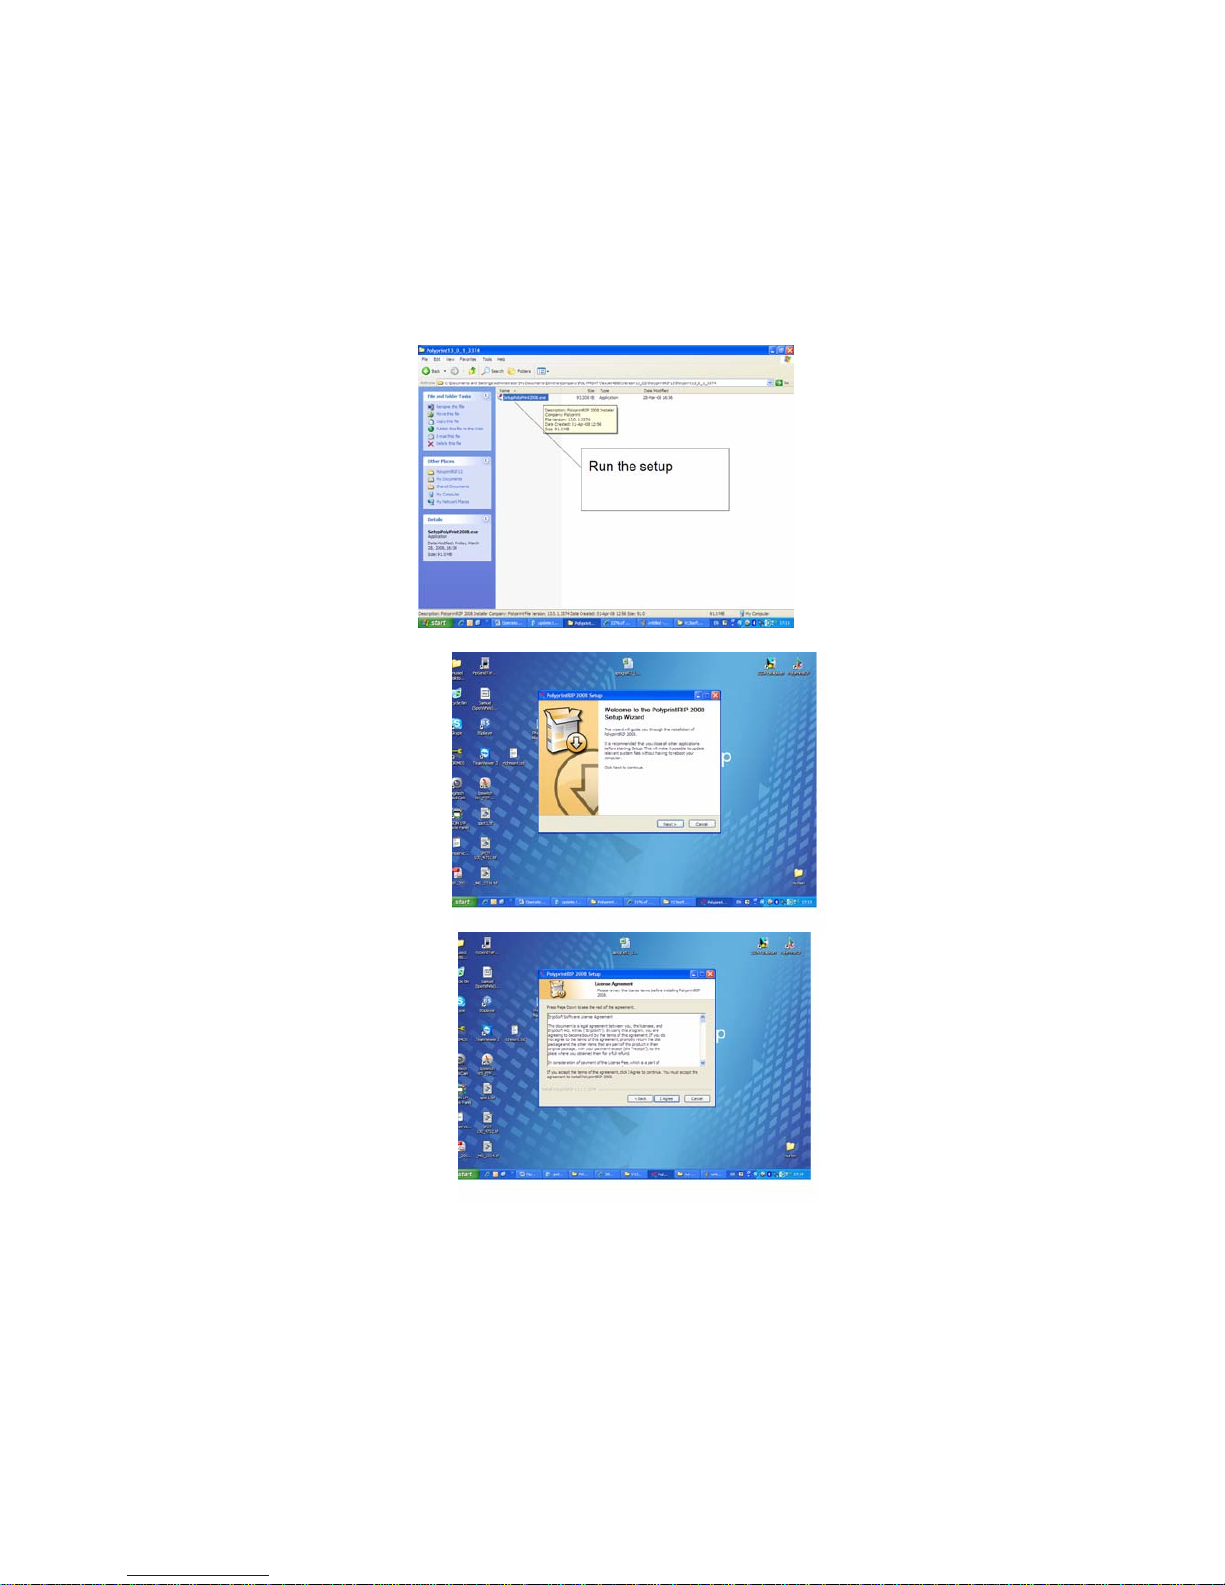
4.4. Software installation Version13
This installation described is for the Version 13
Place the Polyprint RIP Software CD if not already done,
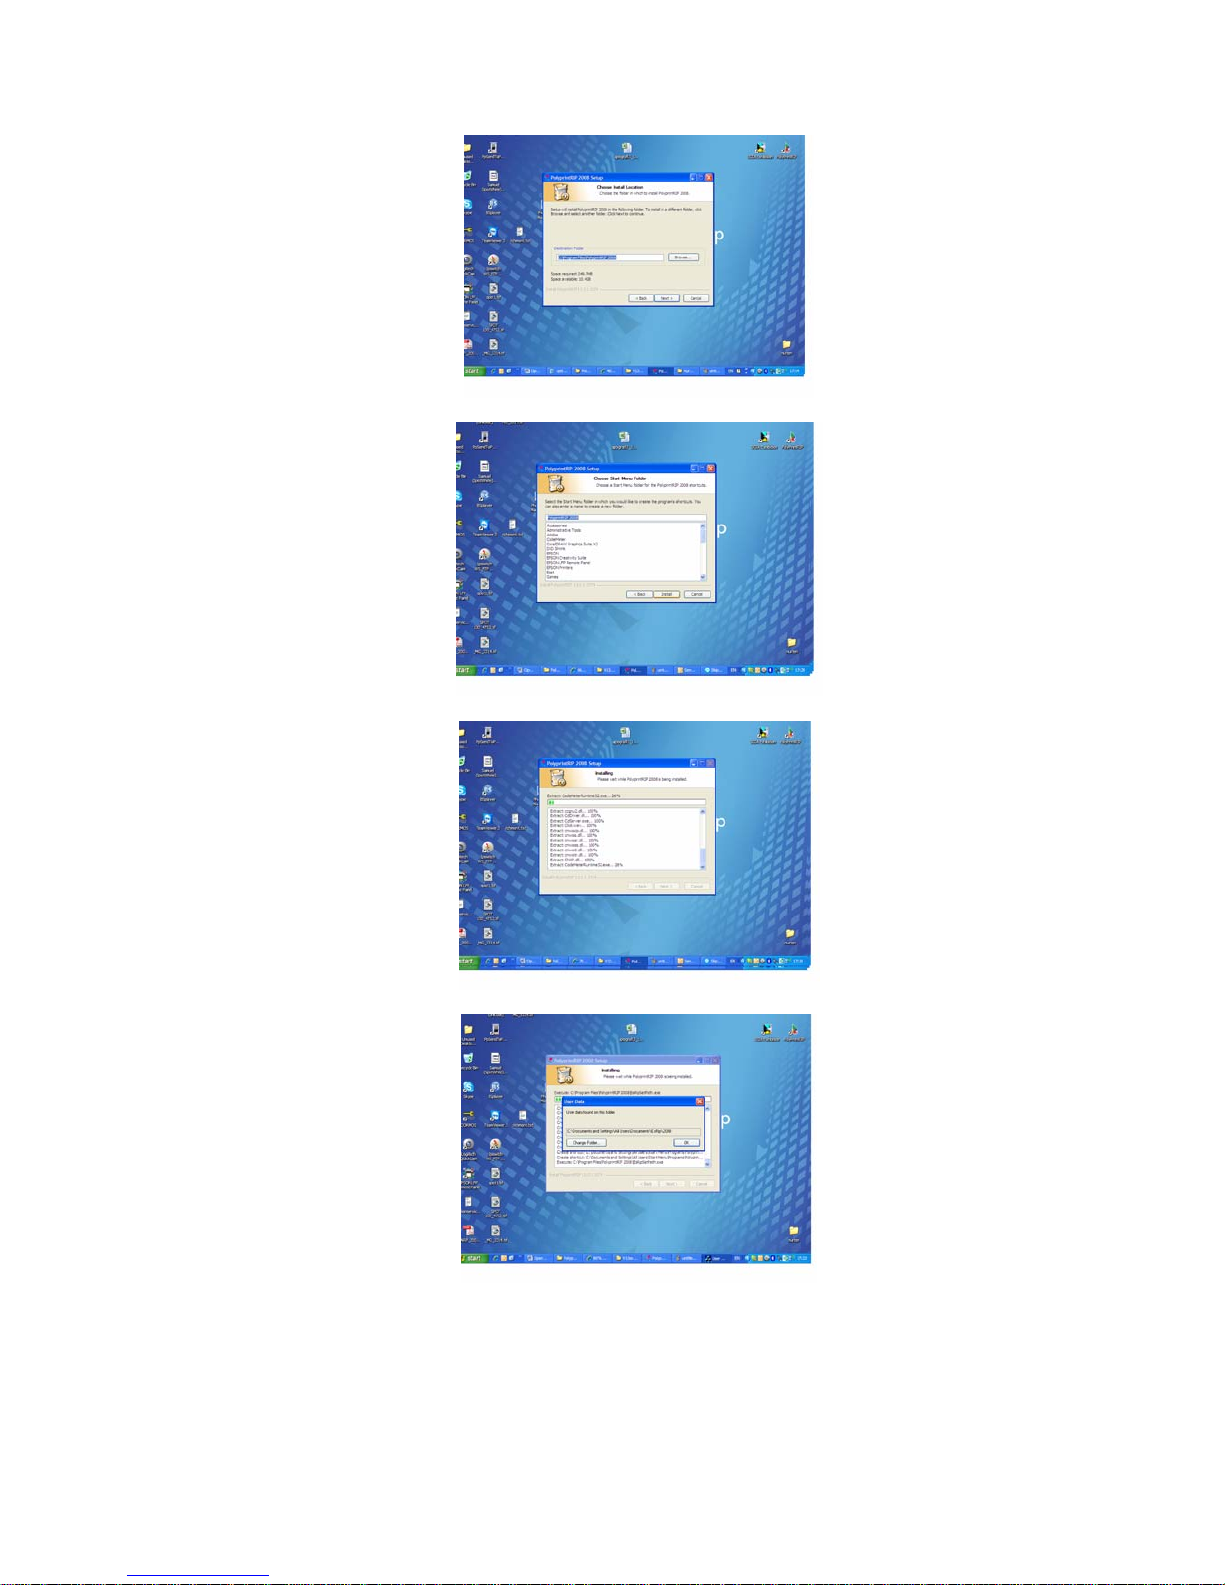
o Go to the Polyprint RIP folder and run the Setup. The Version should be at
least the 13_0_1_3374
Page 50
POLYPRINT SA – TEXJET OPERATION MANUAL V4 EN
- 50 -
Page 51
POLYPRINT SA – TEXJET OPERATION MANUAL V4 EN
- 51 -
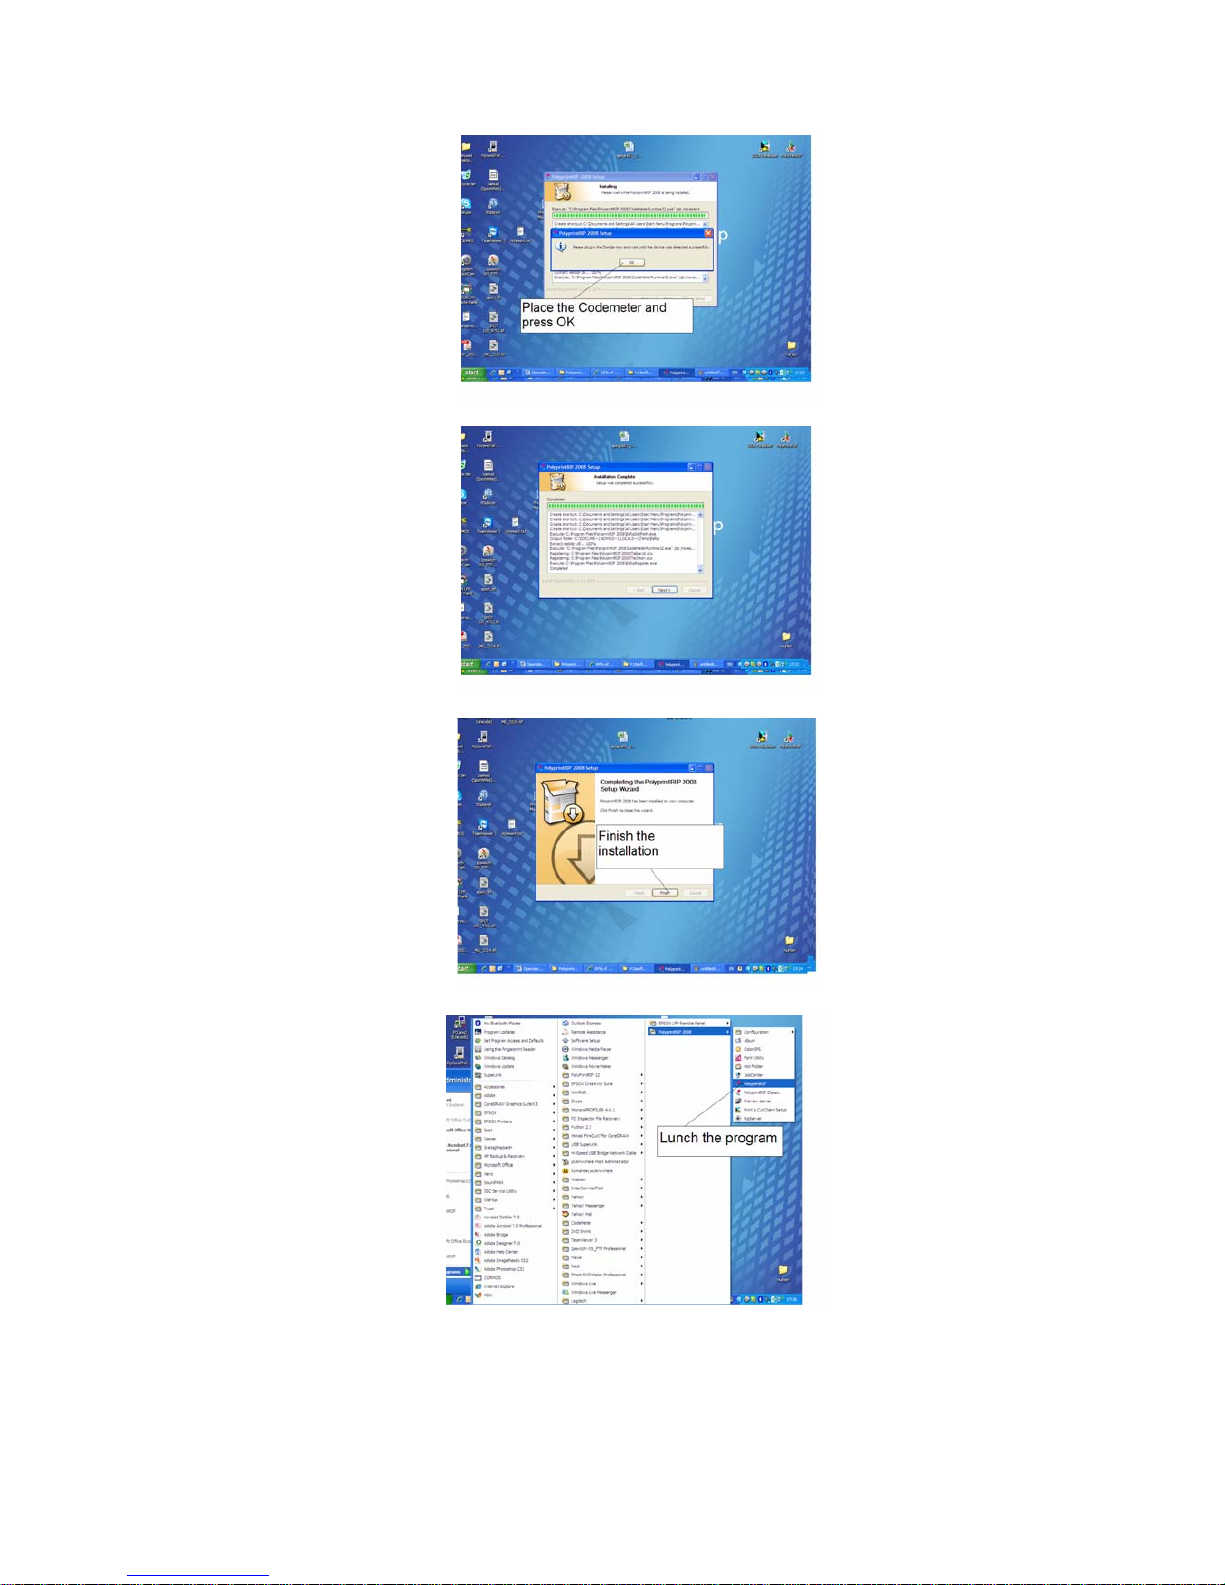
o After Lunching the RIP for the first time a password is requested. You’ll
get this password via e-mail or written on your CD case. In any case you
can request it directly from Polyprint.
Page 52
POLYPRINT SA – TEXJET OPERATION MANUAL V4 EN
- 52 -
Setting up the software
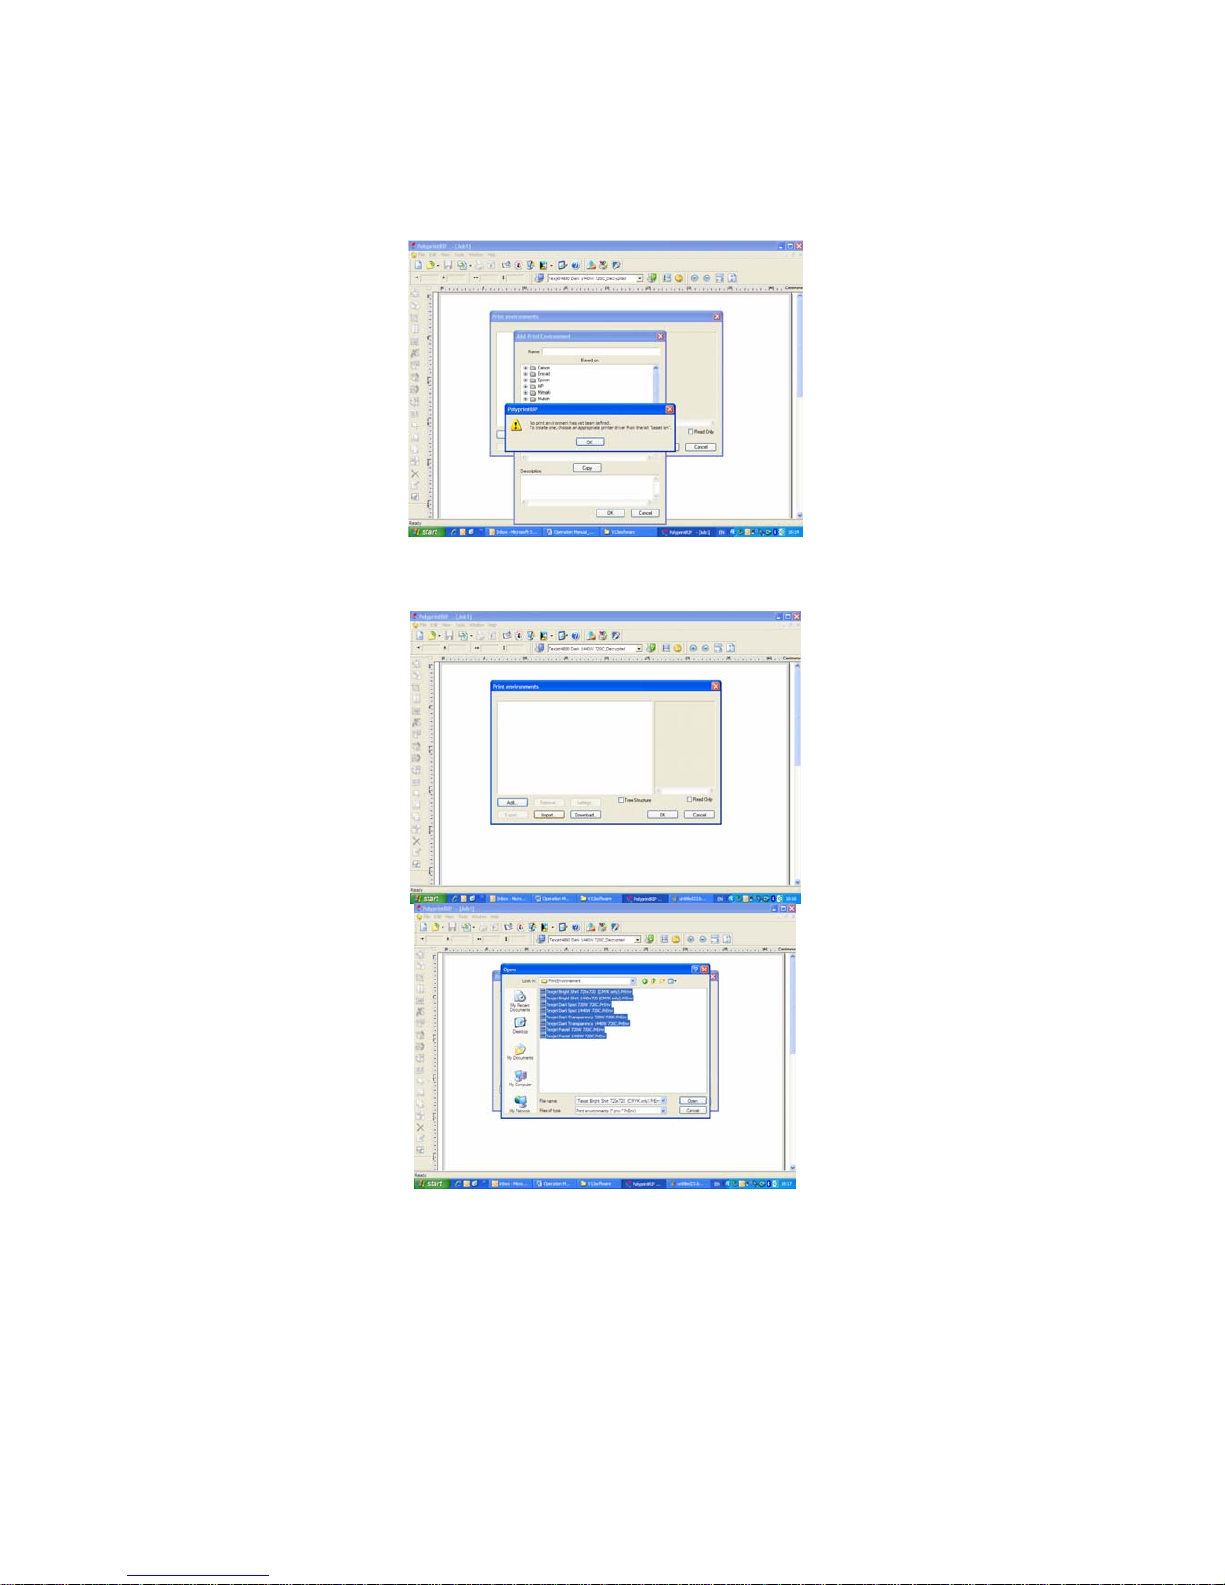
At the first lunch of the software a notice will appear that no printenvironment has
been defined.
Click OK and Cancel on the add printenvironments.
Choose import and import them from the CD folder printenvironments.
After the printenvironments have been imported it’s necessary to check the printer
port and the media size on the settings for each printenvironment.
Page 53
POLYPRINT SA – TEXJET OPERATION MANUAL V4 EN
- 53 -
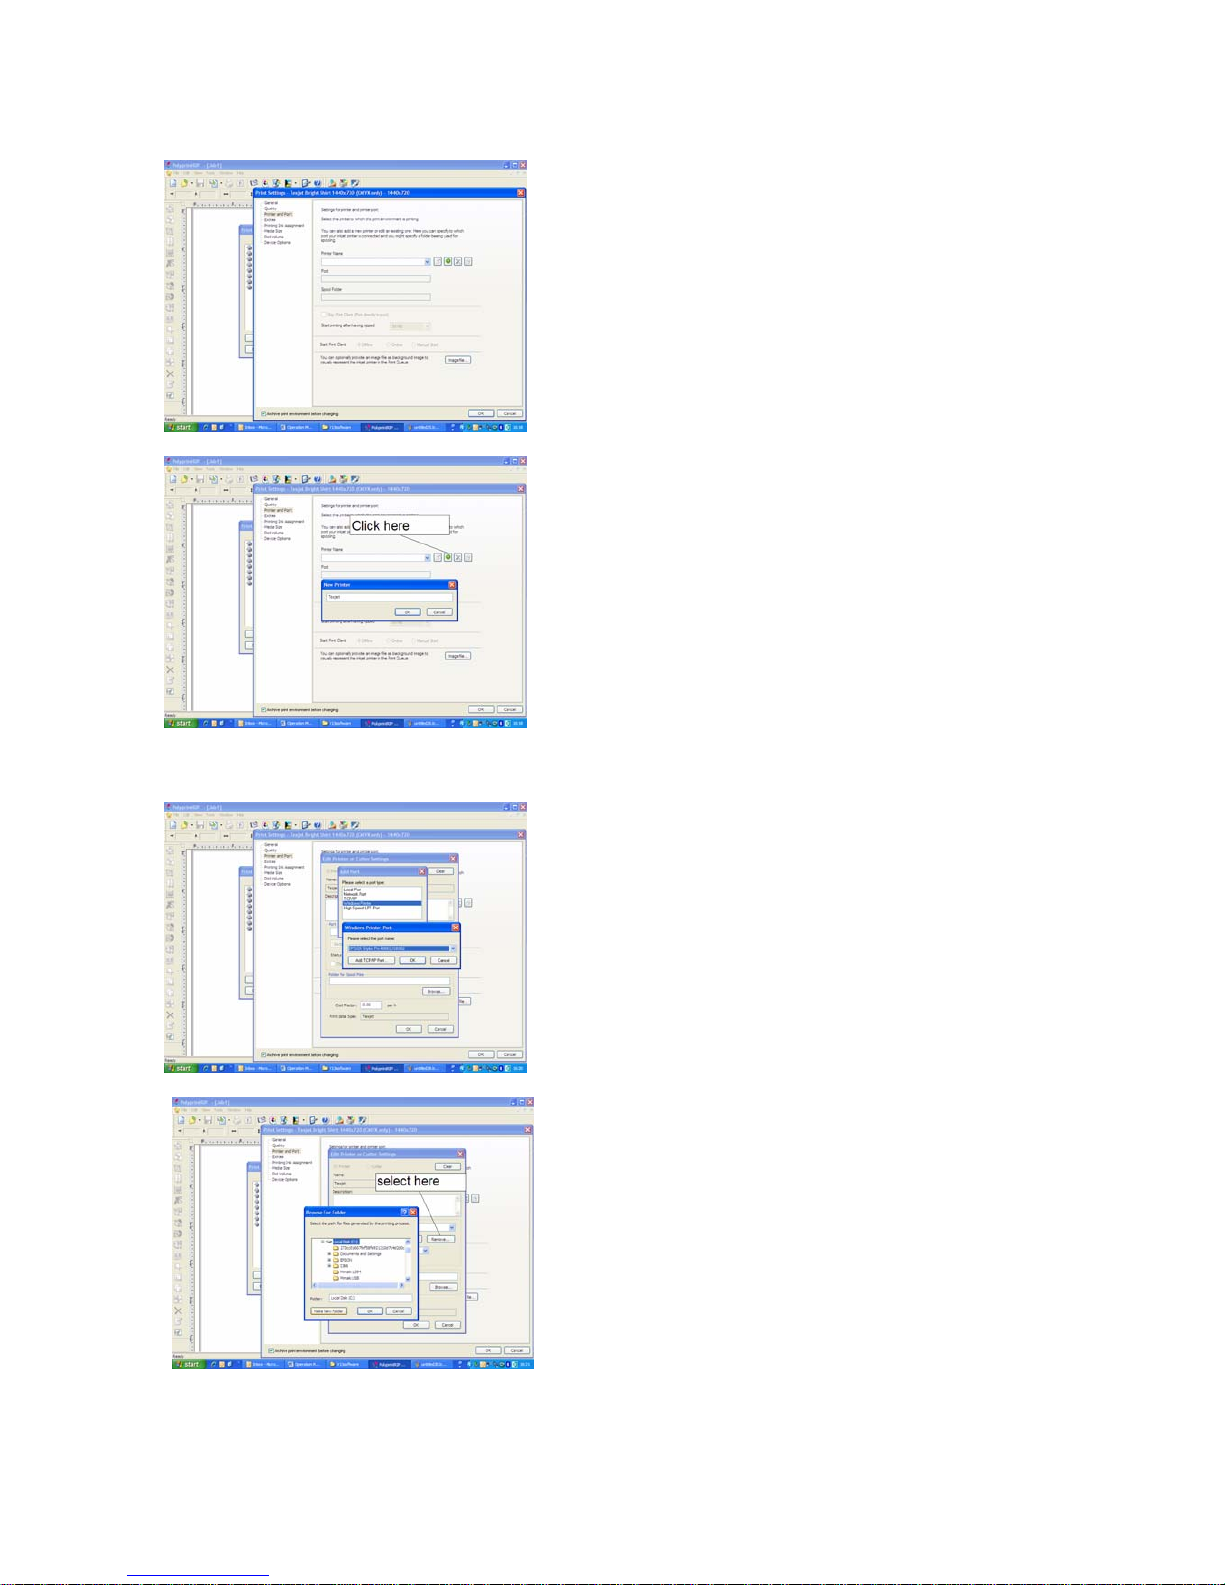
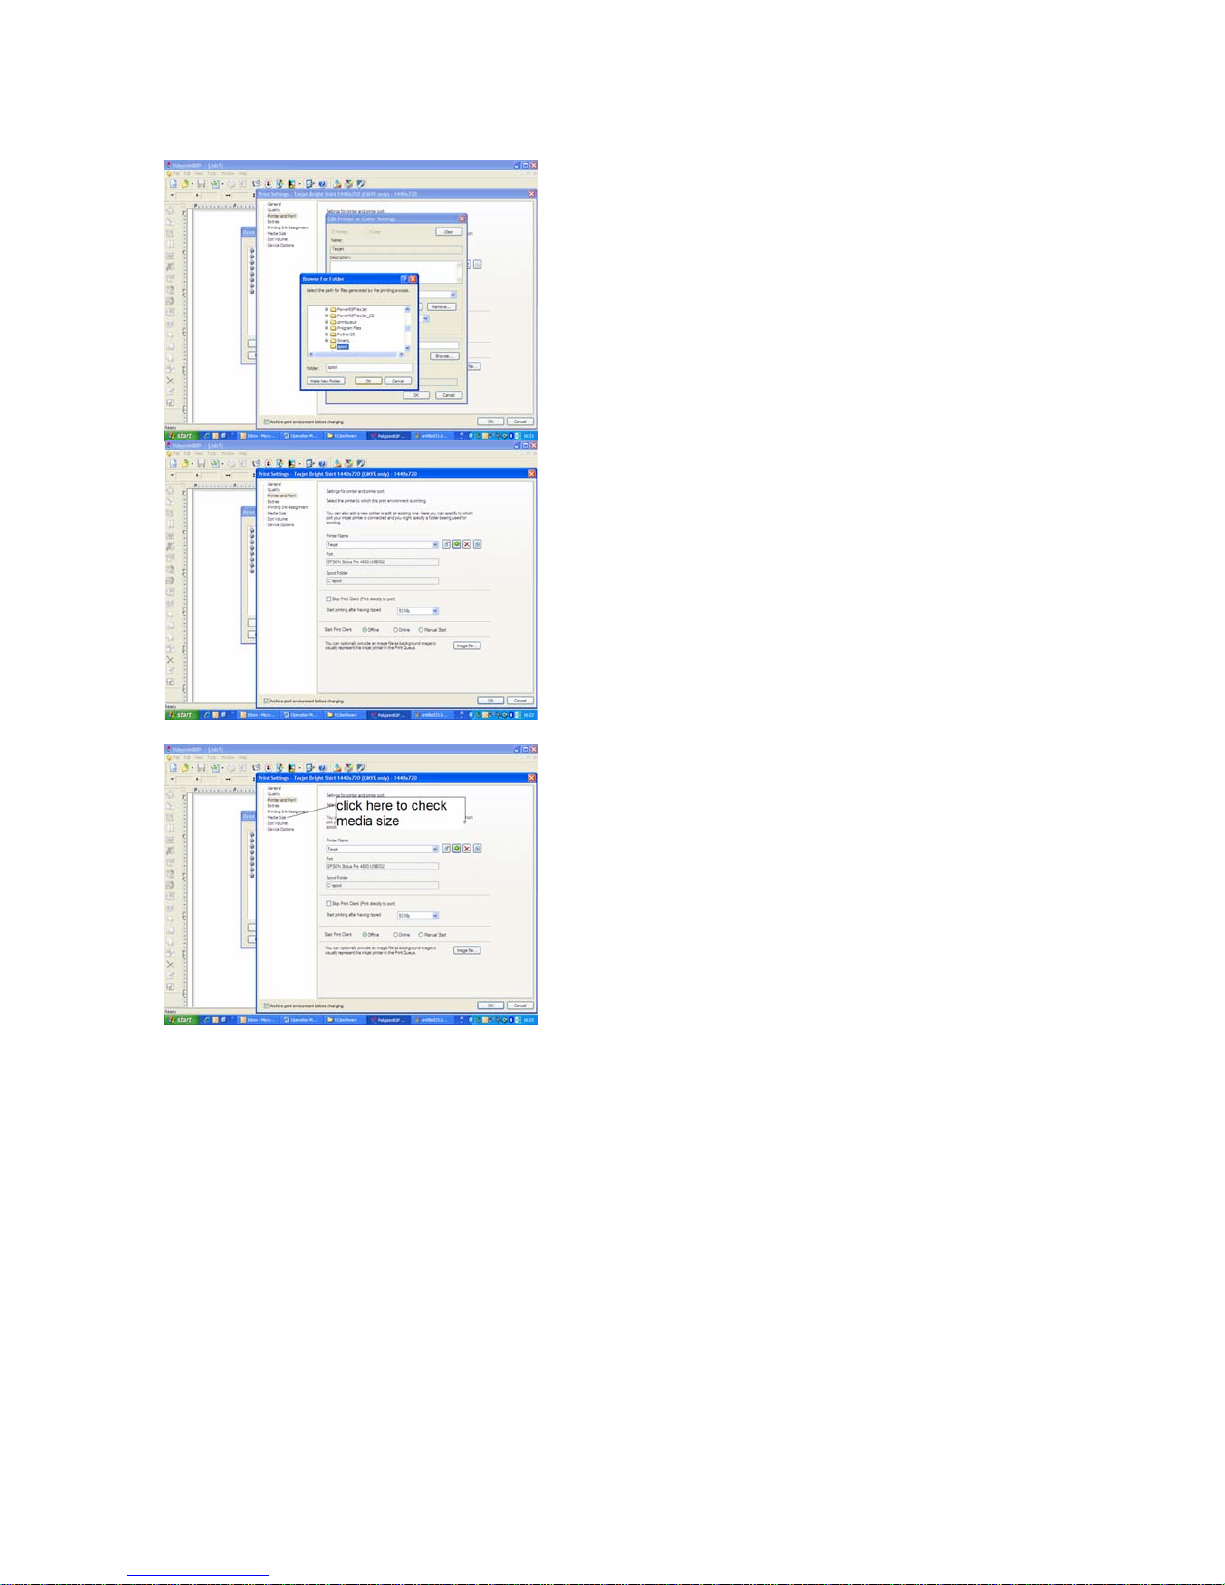
Click on the settings button and select at the left column the printer and port
If there is no printer defined create a new. Give a name for it. Example “TexJet”
Select add and then windows printer. Choose your printer “TexJet”, installed in
printer and faxes. “Epson Stylus 4880”
Select browse to define a folder for your spool files
Page 54
POLYPRINT SA – TEXJET OPERATION MANUAL V4 EN
- 54 -
Create the folder in a drive with enough space for example c:\spool. Then click OK.
Also check the media size to be selected at 42cm width and 60cm height.
After this, the software setup is finished. You can start using the software
Page 55
POLYPRINT SA – TEXJET OPERATION MANUAL V4 EN
- 55 -
4.4.1. User handling of the software
Positioning the image in the RIP software
• Now you are ready to prepare the job on the Computer using the RIP software.
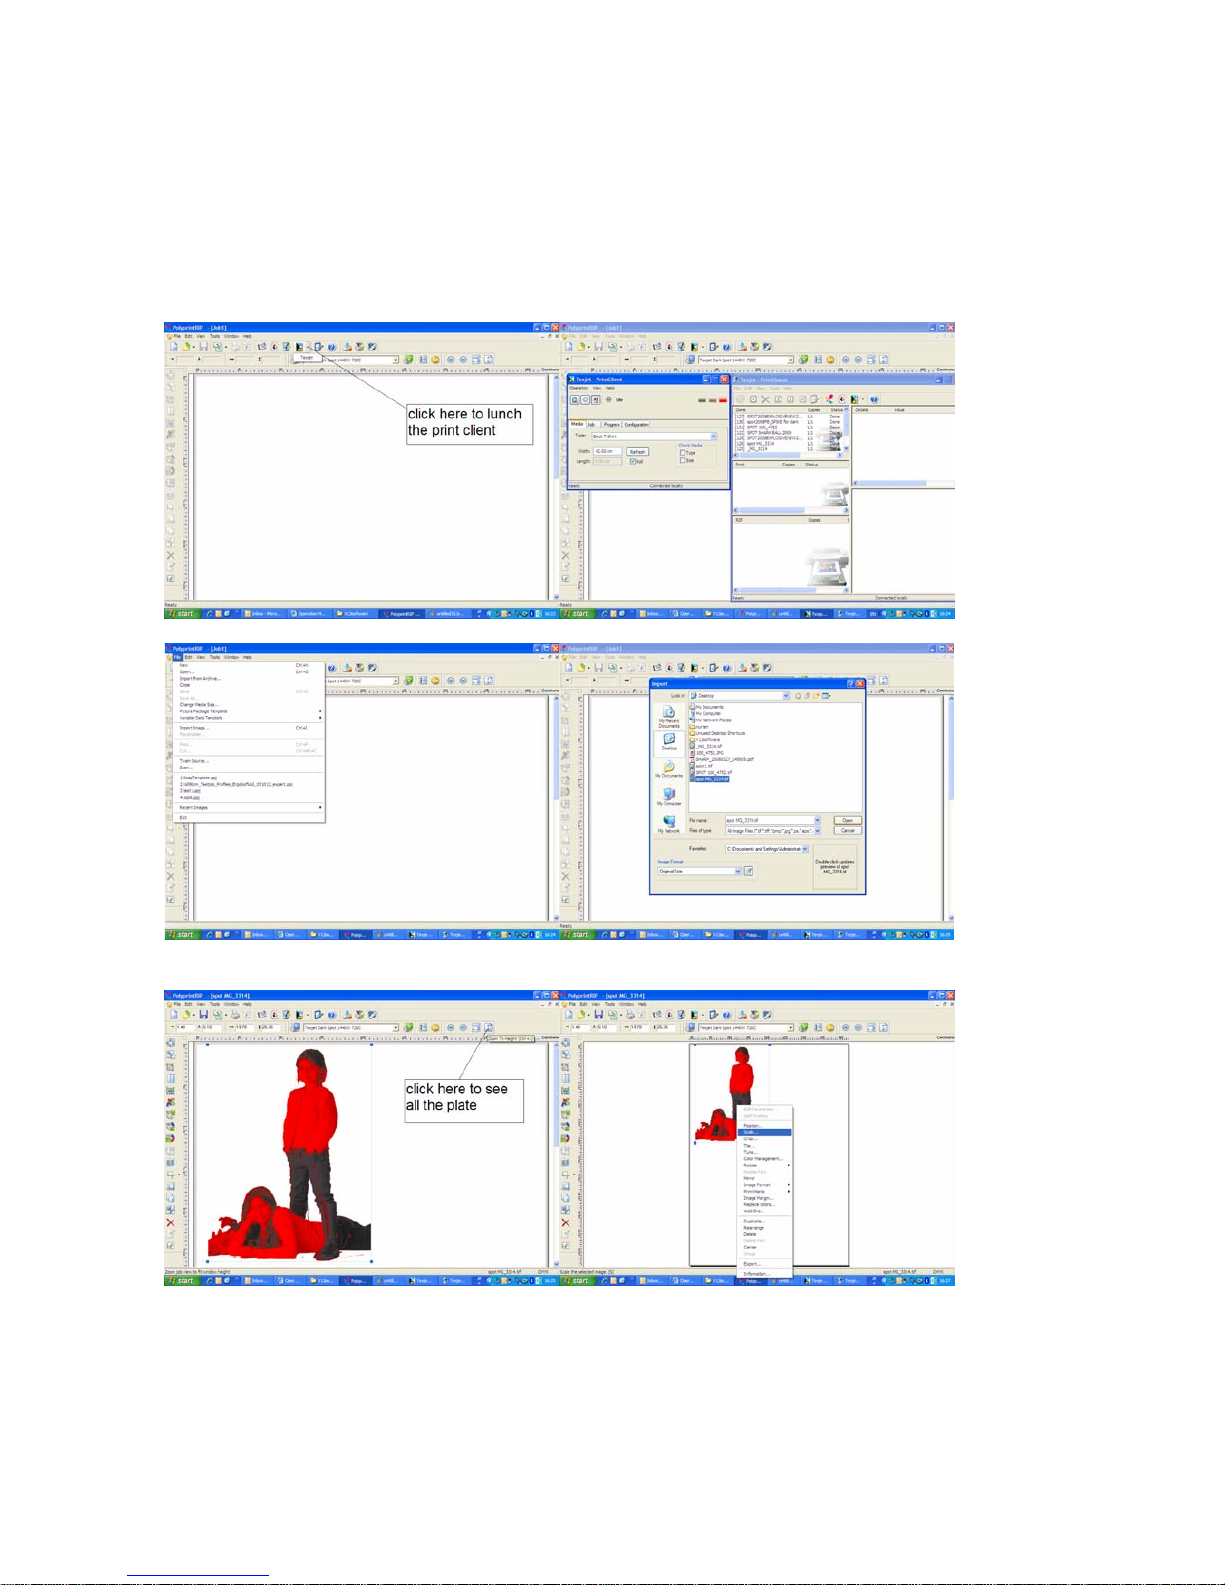
• Launch the Polyprint RIP and the print client software if not done so.
• Import an Image in to the Polyprint RIP, from the Menu>File>Import image.
• Resize the image in the desired size you want to
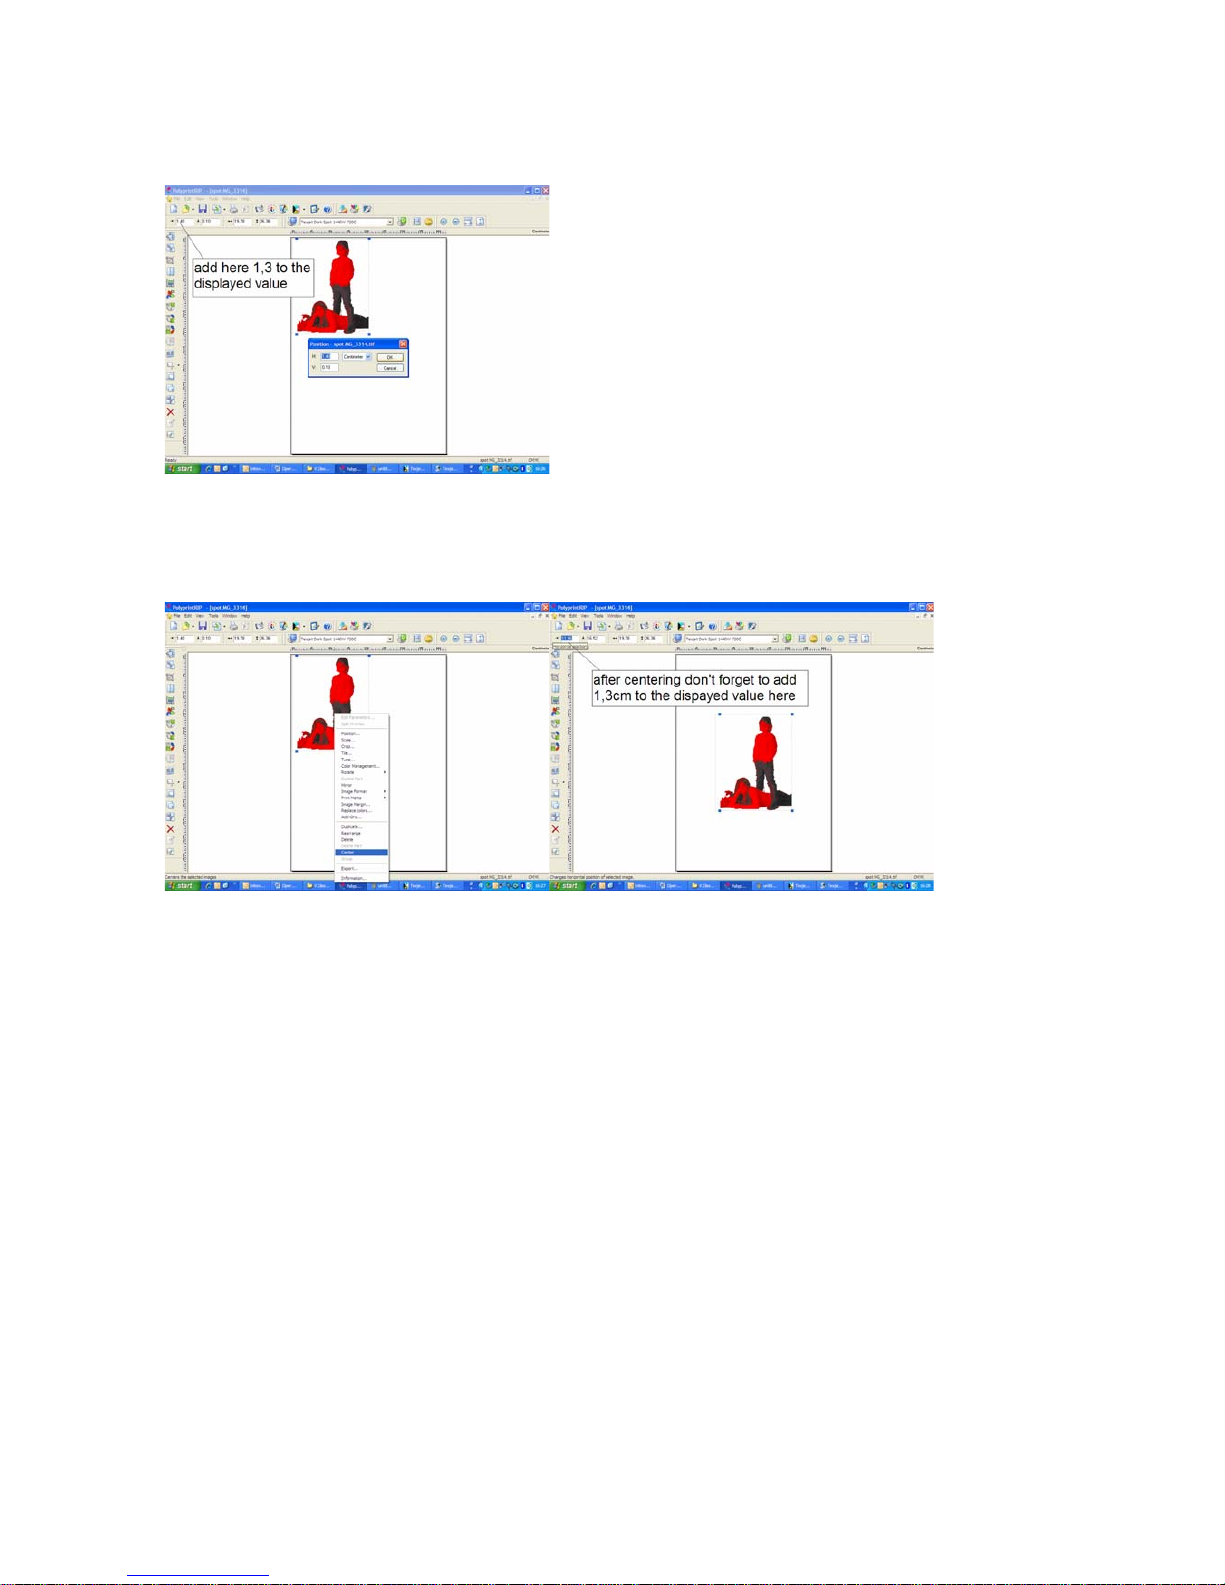
• Measure the exact position for the image you want to print on the Shirt. Import
these values in horizontal and vertical position. Consider that on the Horizontal
Page 56
POLYPRINT SA – TEXJET OPERATION MANUAL V4 EN
- 56 -
you have to add 1,3cm because the plate has 1,3cm gap from the printable
area.
• By right clicking on the image you can also center the image if you want. Notice
that you need to adjust the vertical distance. Consider that after centering the
image you have to add 1,3cm at the horizontal because the plate has 1,3cm gap
from the printable area.
Page 57
POLYPRINT SA – TEXJET OPERATION MANUAL V4 EN
- 57 -
4.4.2. Selecting the appropriate printenvironment
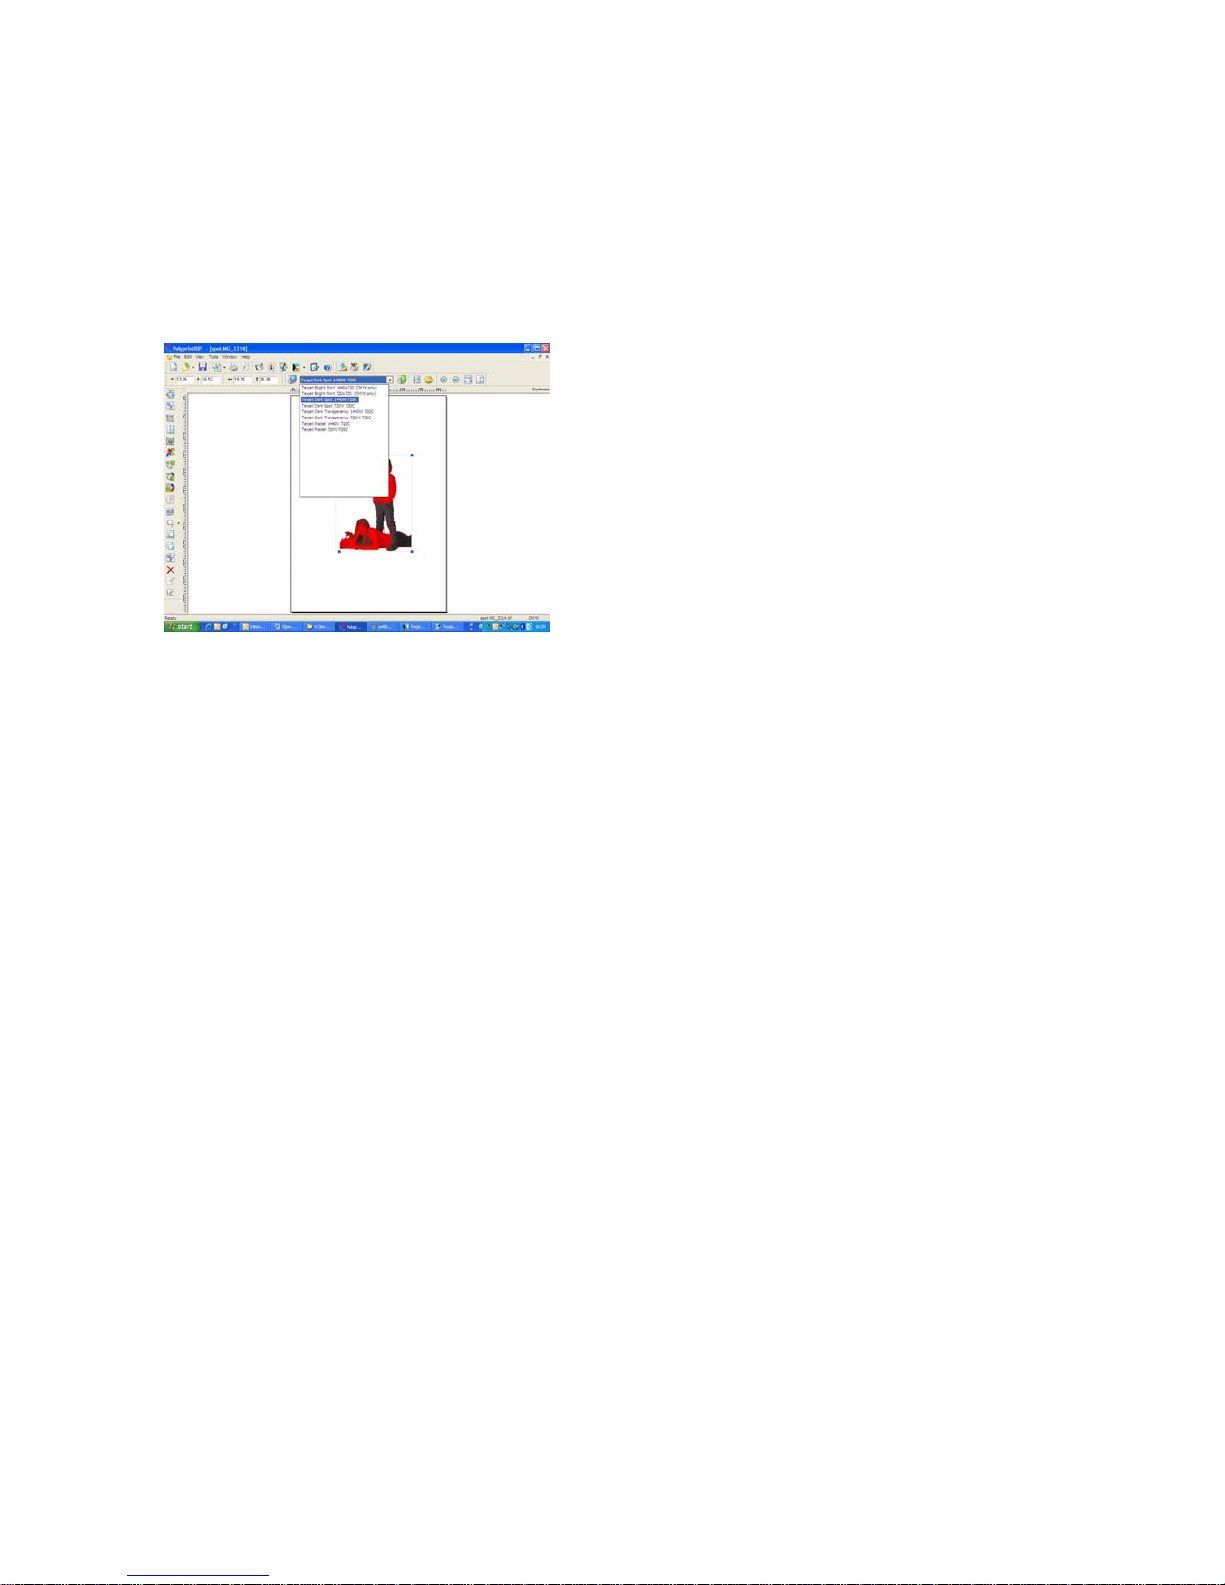
Polyprint printenvironment Naming Conventions
The printenvironment for the PolyPrintRIP software have some pretty long and
potentially confusing names. We have tried to be consistent on these names and be
as descriptive as possible in describing their types.
First the printer type will be listed TexJet
Then the shirt color… (Bright, dark shirt)
The white mask definition (spot, transparency)
Next is the quality resolution (1440, 720). As higher the resolution is, then better
the quality but slower the printout. The good quality is 1440x720 and low quality is
720x720.
TexJet Dark spot 1440W 720C this translates to:
The TexJet printer prints on dark garment with white spot channel definition in
resolution 1440dpi for White and 720dpi for Color.
TexJet Bright shirt 1440x720 (CMYK only) this translates to:
The TexJet printer prints on bright garment with only color printout (no white
generation), in resolution 1440x720dpi.
Printing Dark garment with TEXJET
The dark garments need a white underbase. On the images there is not white mask
information.
The white underbase can be generated in Photoshop. You have to define the white
mask as a spot channel or use a transparent background on the color image. If you
want the white generation automatically generated, just select the environment for
transparency and use your scanned or photographed image as it is, without
defining transparent background or the white mask. You have to consider that the
software will print the white on the image background too.
Page 58
POLYPRINT SA – TEXJET OPERATION MANUAL V4 EN
- 58 -
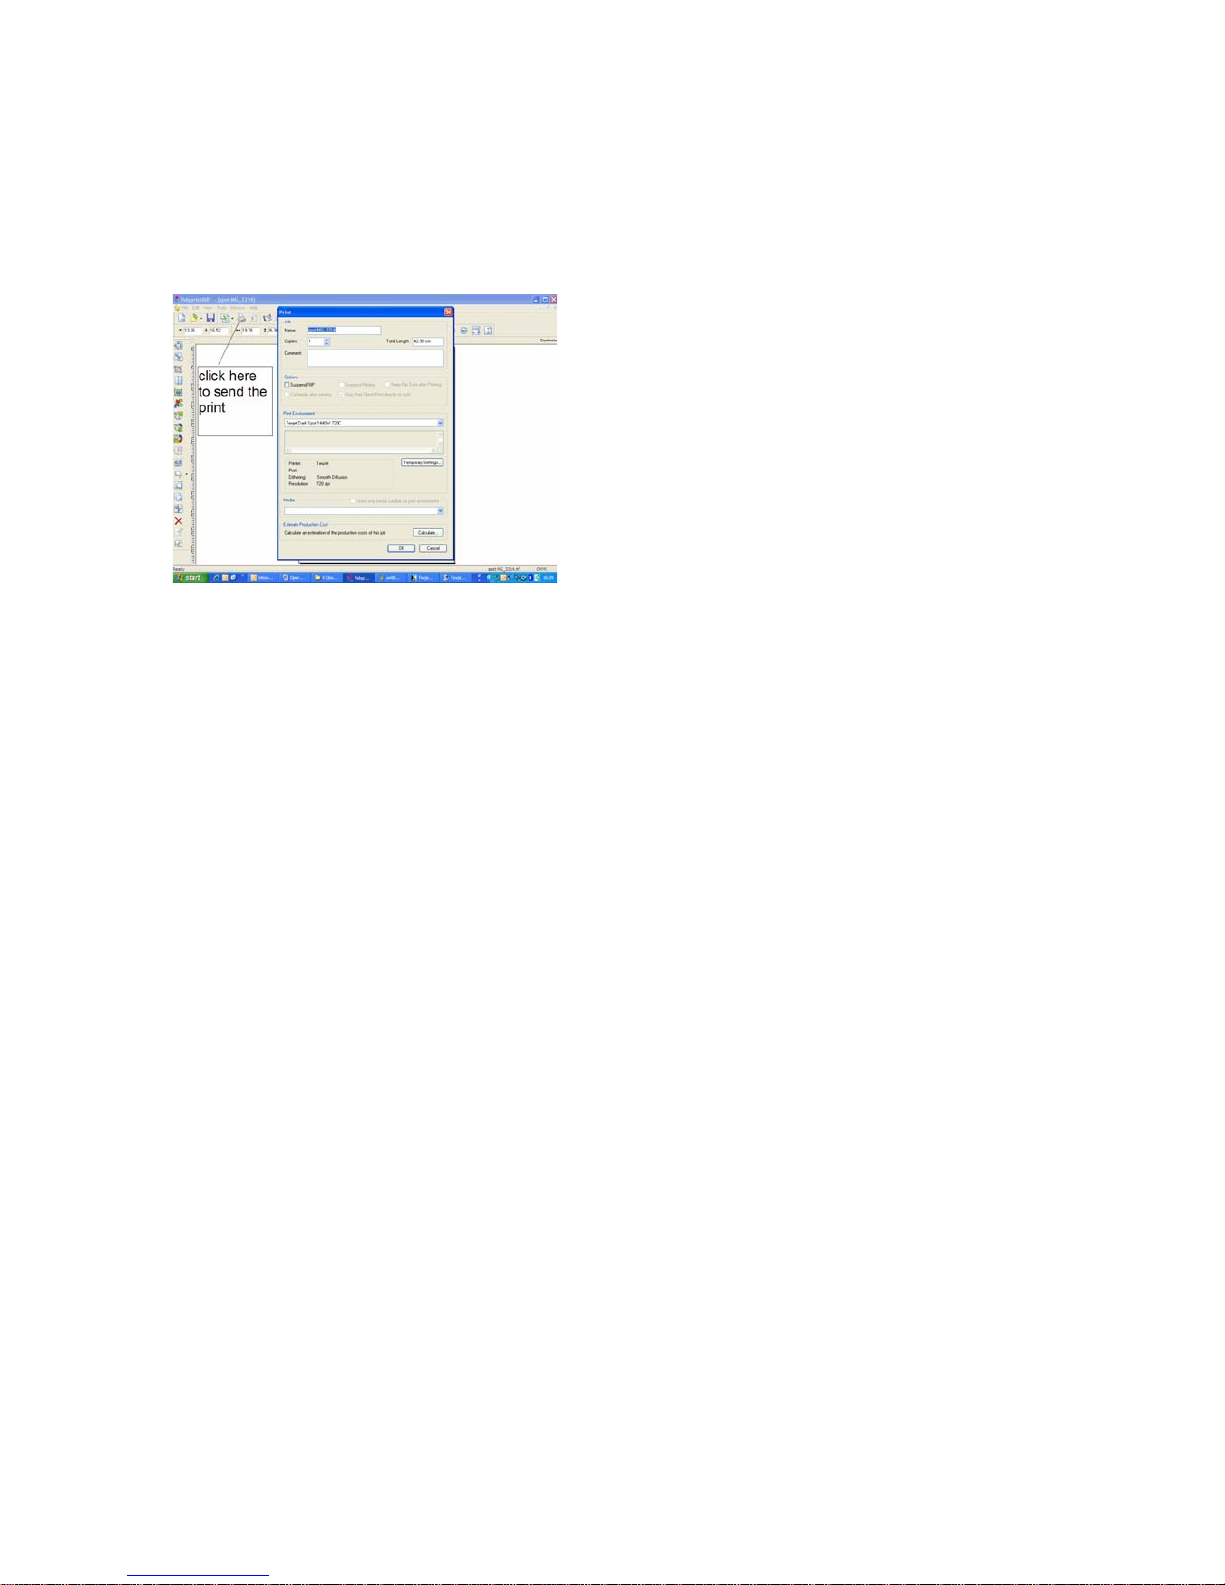
Send the printjob to print
• Select File>Print or click on the printer icon or press ctrl +p to print
• On the print window just select the copies(1,2…) you want and click ok to start
printing
Page 59
POLYPRINT SA – TEXJET OPERATION MANUAL V4 EN
- 59 -
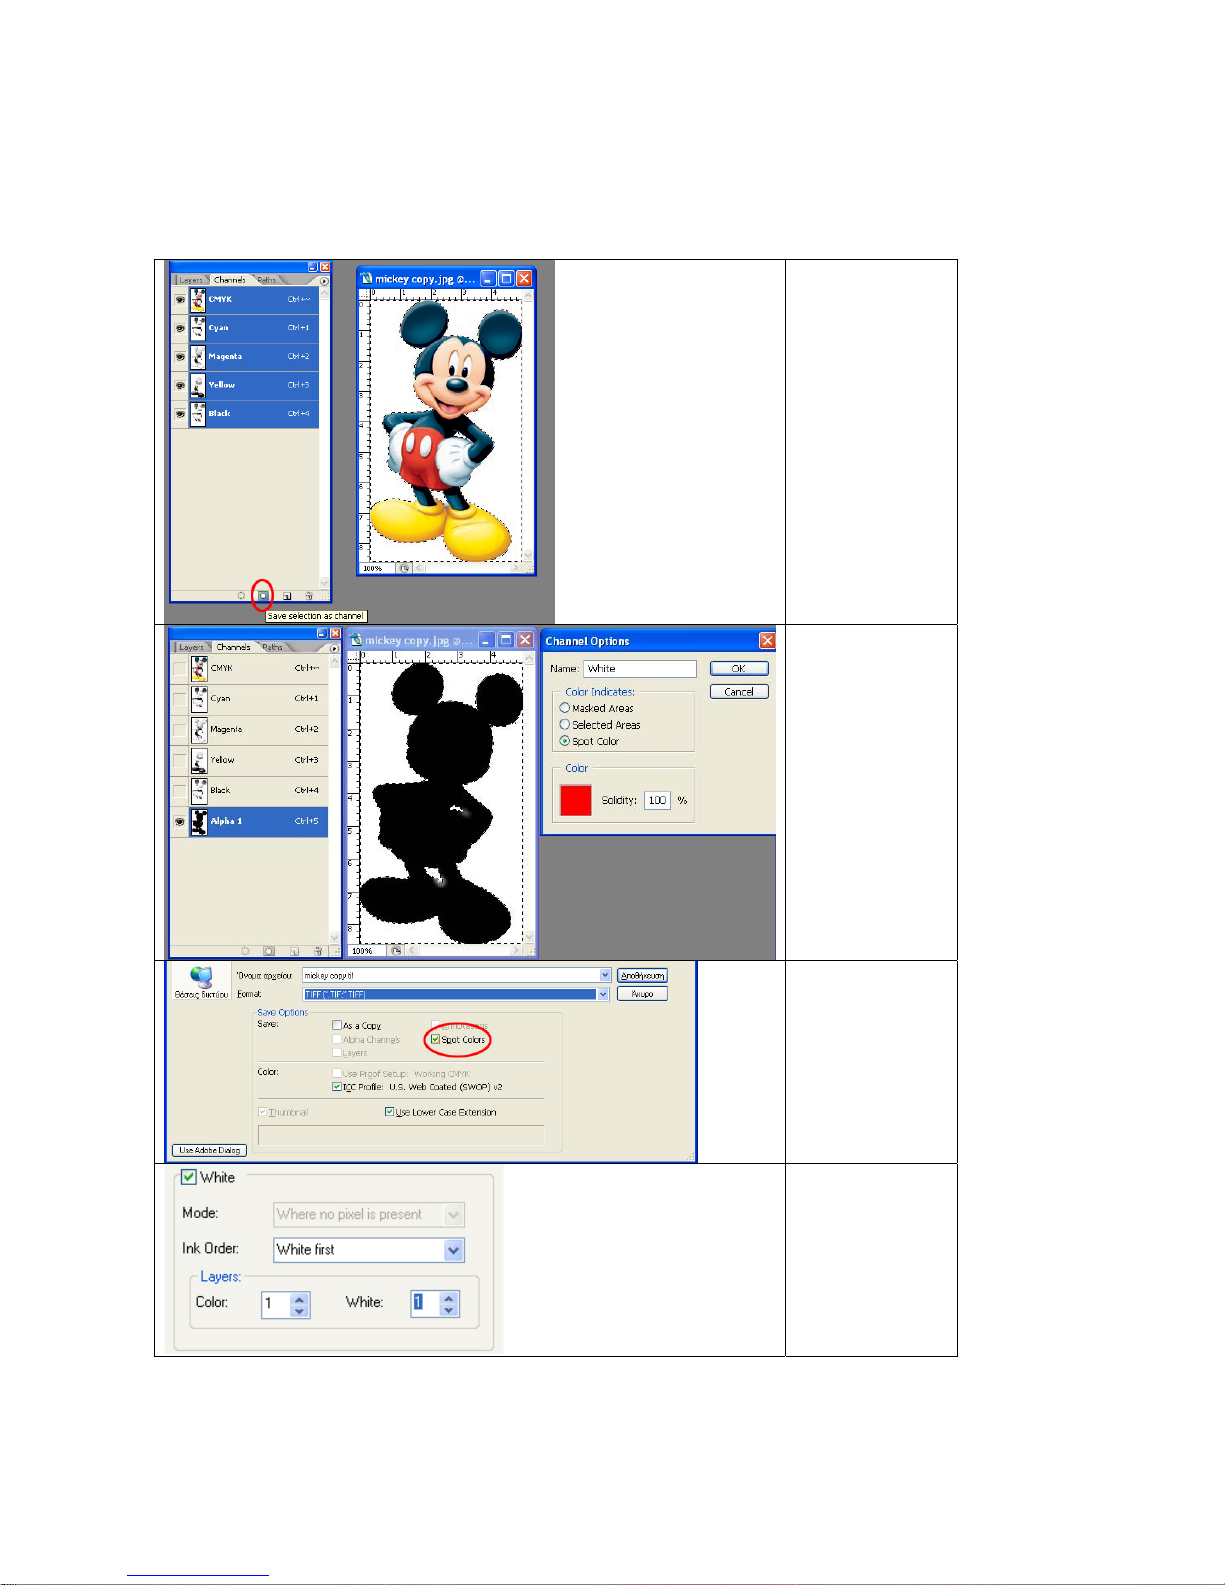
4.4.3. Spotting Image
You can define the white mask as a channel in Photoshop.
Here is the procedure for spotting images.
In Photoshop,
select the area
that you don’t
want to be
printed as white
underbase, go to
channels and
click on “Save
selection as
channel”.
Double click on
the Alpha 1
channel.
Name: White
Select: Spot
Color
Solidity: 100%.
Save the file as
TIFF or
Photoshop DCS
2.0 (eps)
Check Spot
Colors
Change the print
environment to
“Spot white” and
select the
passes.
Page 60

POLYPRINT SA – TEXJET OPERATION MANUAL V4 EN
- 60 -
Printing only White (only white print)
o With spot channels
If you want to print only white, you have to spot your image as explained above
and using the marquee tool cut the color from the color channels (RGB or CMYK).
Note: Don’t delete the color channels
Save the file as explained above. When printing with the RIP software just select
the printenvironment for pastel or dark.
o With transparency
Also you can use the transparency printenvironment. Use a transparent
background and keep the image in white color.
Pastel Printenvironment
On pastel colored shirts you don’t need a white mask under the colors. But if
you still need white ink printout, you can use the pastel printenvironment. Just in
one print in this print color, white will be printed simultaneously with the colors.
4.5. Printjob cancellation
If you want to cancel a printout, you must stop the printer from the “pause”
button on the Epson panel. Then abort the print from the print client and then
reset the printer while pressing for 3 seconds the pause button. After the
printout is canceled in the print client reset the printer once again.
4.6. Color management
In the settings for the input profiles RGB, select “keep embedded profiles” and
Adobe 1998 RBG.
CMYK not checked and none.
In the options of the job composer (Polyprint rip)
Page 61

POLYPRINT SA – TEXJET OPERATION MANUAL V4 EN
- 61 -
5. Troubleshooting
The most technical problems appear on machines that have not been
maintained properly.
Without performing the maintenance there may be errors trough the
start up or in the printing quality or even damage some spare parts.
On this chapter you will find the most common questions and
problems to help you to solve them quickly.
GENERAL PROBLEMS
Problem: After you print the image the color looks great, but after you fix it, the
print looks dull.
Causes and Solutions:
The temperature is set too high on the heat press.
Make sure you test the temperature using heat test strips or a heat gun. If the temperature is too hot,
it could scorch the shirts and the ink.
There is too much pressure being applied to the shirt during fixing.
When heat pressing your shirts, make sure you do not apply too much pressure. You should not have
to put a lot of pressure to clamp the heat press down.
Wrong type of paper used to protect the shirt when using a Heat Press for final fixation.
Make sure the paper that is used for fixing is either a Teflon pad or Silicone treated paper. We
recommend our protective sheets.
Prevention:
Get to know your heat press or dryer. Frequently test the temperature to make sure that what it is set
to is actually the heat temperature.
Problem: The printed colors do not look correct. They do not look like what you
see on your monitor.
Causes and Solutions:
Your print head nozzles could be clogged.
Run a nozzle check on a piece of clear film to see how the nozzles are firing. Do a daily maintenance.
Run a head cleaning and a nozzle check in repetition to see improvement. Use a powerful cleaning and
a nozzle check in repetition to see improvement.
See for printhead clogging problems.
The image is a photo and it has no ICC Profile or has been converted in to CMYK.
Every RGB photo should have an embedded ICC profile. If you are working with one of your graphic
programs to do changes on the photo, do not apply another ICC profile of the working space or not
delete the embedded or not convert it into CMYK. Always use the embedded profile from your device
of your image.
Polyprint RIP uses its own printer profiles to ensure the best printed quality.
On the photo image has been attached another ICC Profile from its embedded.
Picking another profile with a smaller gamut, like sRGB, can limit the number of colors you can print.
Picking a profile with a larger gamut space like Kodak Pro Photo RGB can lead to false expectations or
“neon” like colors on output.
For the RGB, CMYK, and Gray photos you need to select always “Preserve Embedded Profiles”
. This
ensures that Photoshop does not automatically convert or alter your files in any way. The thing to
think about here is that the more you “convert” your files to other spaces the progressively more you
can “degrade” the image.
Your image is a vector image and you have an ICC profile checked in Corel Draw.
When exporting a file from Corel Draw in to a TIFF or JPEG image always uncheck Apply ICC Profile
and save it as CMYK. Vector CMYK images do not need ICC profiles.
The capping station is not working properly.
Clean the capping station, wiper assembly.
Page 62

POLYPRINT SA – TEXJET OPERATION MANUAL V4 EN
- 62 -
Prevention:
Usually when a color prints out wrong it is because a nozzle is clogged. If you are trying to print out
an orange image but all that prints out is yellow, then that means the magenta is clogged and that
pigment can’t mix to produce the orange. The biggest part of your TexJet is to check for is the capping
station. Make sure this ALWAYS stays clean. The print head uses this to dock when the printer is not
in use to ensure the print heads do not dry out. The print head also uses this during a head cleaning.
If the capping station is dirty, the printer can not do a head cleaning properly, thus not working out
the nozzle clog. When building any image inside any software program, make sure you always use an
RGB color mode because this is how your monitor views colors. Never change the embedded profile.
Problem: The printed image is wiping off, washing out, fading badly or bleeding.
Causes and Solutions:
Garment was improperly fixed.
Inks need to be brought up to approx. 150-180 degrees C. for 180 - 240 seconds for white and for
darker garments.
Too much or too little pressure applied when heat pressing.
When pressing the garment in the heat press the top of the heat press should gently rest over the
silicone paper. This allows the moisture of the inks to escape and properly fix.
Temperature of heat press is not correct (Either to hot or too cold).
Make sure the heat press is heating up evenly or correctly. (Should be 150-180 degrees C) You can
test this with a touch less infrared thermometer or heat testing strips.
Pretreatment improperly applied.
Pretreatment may still be wet. Simply fix longer. Poorly pre-treated? Apply more pretreatment on
successive shirts and fix again. To much pretreatment. Use less pretreatment in future. See
pretreatment on dark and colored textiles.
Type of fabric being printed
For best results print onto 100% cotton! With 100% colors will look their best. For 50/50 blends of
cotton and polyester ink needs needed to be fixed quickly to reduce possible bleeding.
How the garment is being washed.
Wash at maximum 60ºC and dry with delicate dryer settings.
Prevention:
Make sure heat press is heating up evenly and correctly. Heat press should lightly press garment. Pretreat evenly and away from printer.
Fix Pre-treat properly.
Problem: The prints are out of register or there are large gaps or laps in the print.
Causes and Solutions:
The bi-directional print mode is enabled.
Change inside your printenvironment in the device settings the option named bi-directional. If you
want to print with bi-directional which is faster you have to consider that even if you do the head
alignment you may have prints out of register, because the distance between printhead and garment
is not always the same.
Encoder strip is dirty and needs to be cleaned.
Clean encoder strip.
The Media comp offset value is wrong.
Change inside your printenvironment in the device settings the value for Media comp offset. At - if
there are gaps and +if there are lapped overprints
There is a communication error between your TexJet and your computer.
Make sure you don't have any jobs in the Polyprint RIP or Epson Queue's, if you do, delete them. Then
power down your TexJet & unplug the power & let it set unplugged for about 30 seconds. Power back
on and try again. You can also make sure you are set to use the correct port within printqueue.
Another possibility is the type of cable you are using. We highly recommend using a USB cable and
the best connection. And, do not use a long cable or switch boxes or hubs.
1. Make sure the port in is set to TexJet... in the queue menu port in the printqueue.
2. Open the Printers & Faxes menu from the Start button in Windows and open your printer, delete
any pending jobs.
3. Power down the TexJet and unplug it for 10 seconds.
Page 63

POLYPRINT SA – TEXJET OPERATION MANUAL V4 EN
- 63 -
Prevention:
Always double check the settings for Polyprint RIP prior to sending a print job to actually print. Clean
the Encoder Strip as needed depending on your production rate. Keep TexJet as clean as possible and
perform normal maintenance. Check the communication between the computer and printer.
Problem: You got the message near cartridge end or mnt (maintenance) near full.
Causes and Solutions:
The cartridge needs a reset.
To reset the cartridges, place the chip resetter towards the cartridge’s chip, and hold it until the green
light comes out. It takes about 3 sec.
The maintenance tank needs to be reset.
Empty first the maintenance tank and then place the chip resetter towards the cartridge’s chip, and
hold it until the green light comes out. It takes about 3 sec
Prevention:
Perform the weekly maintenance.
Problem: The printer is not recognizing a cartridge
Causes and Solutions:
The cartridge needs a reset.
To reset the cartridges, place the chip resetter towards the cartridge’s chip, and hold it until the green
light comes out. It takes about 3 sec.
The cartridge is not fitting correct in the slot.
Lift up the lever, pull out the cartridge and place it again
The cartridge chip is faulty.
Order a cartridge chip replacement.
Prevention:
Perform the weekly maintenance. Never touch the chip on the cartridge. Always keep as spare parts 1
set of replacement chips.
Problem: Lights are flashing on the Control Panel
Causes and Solutions:
Green Power button and Ink lights are flashing.
The cartridges or the maintenance tank need to be resetted.
Green power light flashes.
The printer is receiving data, replacing an ink cartridge, charging ink, or cleaning the printer head.
This is a normal function.
All buttons are flashing.
The printer did a fatal operation. Switch off the printer and start is again. If this happens again at the
start up see for problem solving at start up.
Problem: Lower right ink lever, but the ink lever is down.
Causes and Solutions:
The plate is in front position for placing garment.
The printer is not ready. Place your garment and press the start button to send the plate back to
ready position. This is a normal function.
Page 64

POLYPRINT SA – TEXJET OPERATION MANUAL V4 EN
- 64 -
PRINTING PROBLEMS
Problem: When sending a print command to the TexJet printer the Print Head
moves like it is printing but no ink sprays out.
Causes and Solutions:
The printer needs head cleaning.
Do head cleaning and printing nozzle checks until a decent nozzle check is achieved.
Perform a powerful cleaning circle and check if a decent nozzle check is achieved. If not, see printhead
clogging problems.
The dampers are faulty or exceeded their period of time.
Order replacement dampers
Capping Station Clogged.
The capping station may need cleaning. If the printing head did not seat properly, all of the print
heads could be clogged.
Ink is not flowing from the Cartridge.
The Print Head move like it is printing but no ink sprays out. This is caused by a vacuum is being
created in the Cartridge. Remove the cartridges and clean it, or order a cartridge replacement.
Ribbon cable to the print head is burnt or not connected.
If you accidentally splash or drip ink or cleaning fluid on the gray ribbon cable that connects to the
print heat, it can short out. Check for burn marks on the cable connectors. Check to see that the cable
is connected properly. This can happen if you replaced a print head and did not make sure the cable
was attached properly.
Main Board is bad.
There is a chance the main board in the printer is bad. The board could have a defect. The board
might have gotten ink or cleaning fluid spilled on it from doing a power purge of the print head while
the print head was ON the printer. If ink or cleaning fluid runs down the ribbon cable or drips into the
bed it can short out the main board (or boards).
Problem: The printer is not responding to a print job.
Causes and Solutions:
The printer is not ready to print the job.
Check at your printers display if you get the message ready.
There is a connection problem.
Check your USB connection. Remove the USB cable and put it again.
There is a communication error between your TexJet and your computer.
Make sure you don't have any jobs in the printqueue or Epson Queue's TexJet in printer and faxes, if
you do, delete them. Then power down your TexJet & unplug the power & let it set unplugged for
about 30 seconds. Power back on and try again. You can also make sure you are set to use the correct
port within printqueue. Another possibility is the type of cable you are using. We highly recommend
using a USB cable and the best connection. And, do not use a long cable or switch boxes or hubs.
1. Make sure the port in is set to TexJet... in the queue menu port in the printqueue.
2. Open the Printers & Faxes menu from the Start button in Windows and open your printer, delete
any pending jobs.
3. Power down the TexJet and unplug it for 10 seconds.
Prevention:
Never use a long cable or switch boxes or hubs.
Make sure always to stop your printjob in the correct way without leaving any printjobs in the
printqueue
Problem: There is horizontal banding across print (in one or all colors).
Page 65

POLYPRINT SA – TEXJET OPERATION MANUAL V4 EN
- 65 -
Causes and Solutions:
You are using a 360 dpi Print Mode.
Use a 720dpi Print Mode. A 360 dpi Print Mode is the fastest but lowest quality where head clogs or
misalignment will show as banding.
The capping station is dirty and either not cleaning the print head completely or adding
more debris to the print head and causing print head to become clogged.
Thoroughly clean the capping station. It can be cleaned with swabs and cleaner. Be sure to clean the
plastic around the foam pad as this is where the print head will rest when the printer is not in use.
Also be sure to clean the rubber wiper blades as these wipe excess ink and debris off the print head
and will accumulate said ink and debris.
Ink in the nozzle opening has dried out from exposure to air for an extended period.
Do head cleaning and printing nozzle checks until a decent nozzle check is achieved.
Perform a powerful cleaning circle and check if a decent nozzle check is achieved.
A serious or permanent clog of the head may require replacing the print head. You can try doing a
power flushing using the syringe and Cleaning/Flushing Fluid. You MUST remove the head to do this.
Contact Tech Support for help.
Prevention:
Perform the daily maintenance task according to the intervals given in the description
Run head cleanings before printing in the morning as well as printing a nozzle checks to gauge status
of print head prior to printing onto garments.
Problem: The quality of the printed output is unacceptable when printing images.
The images seem soft and are not clean and sharp. The resolution at the final size
is in 72dpi.
Causes and Solutions:
The resolution of the image is too low.
Resolution at 72dpi is for viewing the image on a computer monitor only. Images which are intended
for printing need to be a high resolution. If the image is not at a resolution between 120dpi and 300
dpi this causes the image not to have a good number of pixels therefore losing detail when the image
is printed out. You can try up sampling the image to a larger resolution but the image still will be
“soft” when printed.
Problem: The print head is leaking ink and dripping ink all over the garments.
Causes and Solutions:
The print head was damaged by crashing into shirt plate, print bed etc.
Order replacement print head.
The capping station is dirty and either not cleaning the print head completely or adding
more debris to the print head and causing fibers and debris to collect ink and ooze or drip
ink.
Thoroughly clean the capping station.
Debris or shirt fibers collected on print head as well as print head carriage.
Using the reflection from the print bed gently clean the bottom of the print head and remove any
debris, dried ink and fibers.
Too much ink in the cartridges
If your cartridges are filled too much with ink, there could be too much pressure in the cartridge ink
lines and the ink is forced out of the print head. The cartridges should be filled below the air hole.
Altitude can have an effect.
High altitudes can also have an effect on the “pressure” in the system. If you are having an unusual
amount of problems and are in high altitudes, don’t fill the system too full and try adjusting the height
of the system.
The printer is not level
Not leveled printer has as result not leveled cartridges. This can also have an effect on the “pressure”
in the system.
Check your printer if it is well leveled.
The dampers are faulty or exceeded their period of time.
Order replacement dampers
Faulty cartridges, call technical support.
Page 66

POLYPRINT SA – TEXJET OPERATION MANUAL V4 EN
- 66 -
Prevention:
Always check height of print head prior to printing.
Clean the capping station on a regular basis.
Clean debris from print head daily.
Keep your printer leveled.
Don’t fill too much the ink cartridges.
Problem: Printhead clogging problems.
Causes and Solutions:
The capping station is dirty and either not cleaning the print head completely or adding
more debris to the print head and causing print head to become clogged.
Thoroughly clean the capping station. It can be cleaned with swabs and cleaner. Be sure to clean the
plastic around the foam pad as this is where the print head will rest when the printer is not in use.
Also be sure to clean the rubber wiper blades as these wipe excess ink and debris off the print head
and will accumulate said ink and debris.
Ink in the nozzle opening has dried out from exposure to air for an extended period.
Do head cleaning and printing nozzle checks until a decent nozzle check is achieved.
Perform a powerful cleaning circle and check if a decent nozzle check is achieved.
A serious or permanent clog of the head may require replacing the print head. You can try doing a
power flushing using the syringe and Cleaning/Flushing Fluid. You must remove the head to do this.
Contact Tech Support for help.
The print head was damaged by crashing into shirt plate, print plate or pre-treated shirt
etc.
Order replacement print head.
Prevention:
Perform the daily maintenance task according to the intervals given in the description
Run head cleanings before printing in the morning as well as printing a nozzle checks to gauge status
of print head prior to printing onto garments.
The pre-treated fabric must not touch the printer head, as the ink and pre-treatment will react upon
the head surface, potentially blocking nozzles. If this happens clean the printhead immediately with
alcohol. In your daily operation of your printer, observe the correct procedures for the loading of
material onto your printer.
Problem: You decided to stop the print, but don’t know how.
Causes and Solutions:
Immediate to stop the printing.
Press the pause button.
To chancel the printing.
Cancel the job from the computer in this order (PolyPrintRIP, the printqueue and the Epson’s queue
TexJet in printer and faxes). Press the reset button on the TexJet until ready is on the display. Check
on the computer if the jobs are deleted. Press the reset button on the TexJet again. Push the eject
button to move the plate to the front.
Page 67

POLYPRINT SA – TEXJET OPERATION MANUAL V4 EN
- 67 -
START UP PROBLEMS
Problem: The plate moves and stops. The red limit light is on.
Causes and Solutions:
The plate height has exceeded its maximum.
Press the down button until the red light switches off.
Problem: Press pause button is on the display
Causes and Solutions:
The printer is still starting up.
Press the pause button or wait. The printer continues the start up and goes on ready. This is a normal
function.
Problem: After the printers start up you get the error message service required
(serv req)
Causes and Solutions:
You pushed to early the start button.
Switch off the printer and start again. Press the start button when the message ready appear on the
display.
The printer did a fatal operation.
Note down the exact message. Switch off the printer and start is again. If this message appears again
at the start up contact your dealer.
Problem: You switch on the printers but the Epson panel is not switching on
Causes and Solutions:
The plate stopped to move because its height has exceeded its maximum.
Press the down button until the red light switches off.
The plate is in a wrong position.
Switch off the printer. Remove the power cable for 1min and pull it back again. Move the plate in a
middle position and switch the printer on again. Press the start button when the message ready
appear on the display.
When switching on the printer, on the plate panel, the power led is in not on and there is no
signal tone.
Switch off the printer. Remove the power cable for 1min and pull it back again. If this happens again
contact your dealer.
Page 68

POLYPRINT SA – TEXJET OPERATION MANUAL V4 EN
- 68 -
6. Printer Specifications
Printing method Inkjet Piezo
Printing dimensions Max (420x600 mm)
T-shirt plates 42x60cm (Standart) / 42x50cm, Mini 32x28,
Polo 42x60.
Dimensions 850x1300x450 mm (WxLxH)
Weight 80Kg
Printing direction Bidirectional or unidirectional
Printing speed Up to 60 T-shirt/ hour (720 dpi 10x10cm
Image)
Head height Max 50mm / Auto height adjustment
Printable textiles Cotton, Polyester, Blends etc
Connectivity USB 2.0, Firewire
Printing resolution Max 2880 dpi (720 dpi recommended)
Inks Water based Textile Pigment (for light colored shirts
P100, for dark and light colored shirts PD200)/
Disperse /Acid/Reactive
Colors 2xCMYK / CMYK + 4xWhite
Ink feeding Refillable and Resetable cartridges
Power AC 230V, 60W / 110V, 30W
Operating system Windows XP, 2000.
Operating conditions Temperature 10-25ºC / Humidity 20-80%RH
These specs are for the machine only. For ink and
pretreatment consult the guidelines for storage and
handling of the inks.
Fixation Inks must be fixed at 160-170ºC 2-5min using heat
press or dryer
Polyprint Rip Version12*
• Rip Software for digital print on the garment.
• The maximum printable size is up to 19’’ (48,26cm)
• Possibility to upgrade the software for use on other printers or large format
plotters.
Polyprint Rip Version13*
• Rip Software for digital print on the garment.
• Possibility to upgrade the software for use on other printers or large format
plotters.
*Necessary to work with this product.
Page 69

POLYPRINT SA – TEXJET OPERATION MANUAL V4 EN
- 69 -
Extra necessary equipment and consumables which are not in the
shipment
Equipment for printing*
• Windows Based Computer. The Computer is not included in the
equipment, but necessary to work with this product.
The System Requirements are:
Windows XP, Windows 2000
Pentium IV, 2GHz min,
512 MB RAM min
40 GB disc space recommended
USB2 interface
2 USB ports free (for dongle and printer)
The system requirements are for using the Polyprint Rip 19” software.
Inks for printing
*
• for light colored shirts printing
o Ink set P100 includes P101Cyan, P102 Magenta, P103Yellow, P104
Black, 105Cleaner
• for light colored and dark colored shirts printing
o Ink Set PD200 includes PD201 Cyan, PD202 Magenta, PD203 Yellow,
PD204 Black, PD205 White, PD206 Precoating, PD207 Cleaner
Equipment for shirt printing and:
• T-Shirt Polo plate 42x50cm
• T-Shirt Mini plate 32x28cm
• T-Shirt plates at many sizes to order. Please ask your dealer for the sizes you
want.
• Collante spray for T-Shirt plates
Equipment for fixing
*
• T-Shirt press
• Heater
Equipment for dark shirt printing:
**
• Liquid spray gun (airbrush, air pump sprayer, fine mist power sprayer), the
spray gun should be a high volume low pressure model with 0,3mm nozzle.
• Protection paper, package 500 sheets dimension 40Χ60cm.
*Necessary to work with this product.
**Necessary to work with this product only if the ink set is PD200
Page 70
POLYPRINT SA – TEXJET OPERATION MANUAL V4 EN
- 70 -
7. Declaration of Conformity
CE DECLARATION OF CONFORMITY
ACCORDING APPENDIX IIA
Machinery Directive 98/37/EEG changed by 98/79/EG
Low Voltage Directive 2006/95/EEG
EMC Directive 89/336/EEG changed by 93/68/EEG
Manufacturer: Name: Polyprint S.A.
Address: Agiou Dimitriou 190
54638, Thessaloniki
Greece
Description of the machine: Name: Digital printer
Type: Texjet 4260
Serial Number:
Year of construction: 2007
We declare by means of Giorgos Beglopoulos , delegated by the company Polyprint
S.A., that the overhead described machine if installed, maintained and used in
according to the operating and maintenance instructions in the operating manual, is
conform with the fundamental safety and health requirements of the directive
“machines” and is conform to the following specifications and norms:
EN 12100- 1 Safety of machinery -Basic concepts, general principles for design
EN 60204- 1 Safety of machinery – Electrical equipment of machinery
E 811 Machineveiligheid - afstanden ter bescherming van de
Page 71

POLYPRINT SA – TEXJET OPERATION MANUAL V4 EN
- 71 -
8. Warranty Terms and Conditions
Duration of Warranty:
Print head: No Warranty
Other parts: 12 months
Limitation of Warranty:
Excluded from warranty are consumable parts as:
Pump
Wiper
Damper
Cap
The warranty does not cover any damage to this product that results from
improper installation, accident, abuse, misuse, natural disaster, insufficient
or excessive electrical supply, abnormal mechanical or environmental
conditions, problematic inks, or any unauthorized disassembly, repair, or
modification. This limited warranty covers only the replacement of defective
parts and inks and does not include labour or other costs caused by the
damage.
POLYPRINT will offer warranty replacement only to official dealers trained on
this equipment.
Start of warranty period:
The warranty period starts upon delivery of the machine.
Warranty claim procedures and requirements:
To receive free warranty replacement parts, POLYPRINT requires a
completed warranty claim which must include the serial number and detailed
information regarding the damaged part.
 Loading...