

Page 1
1
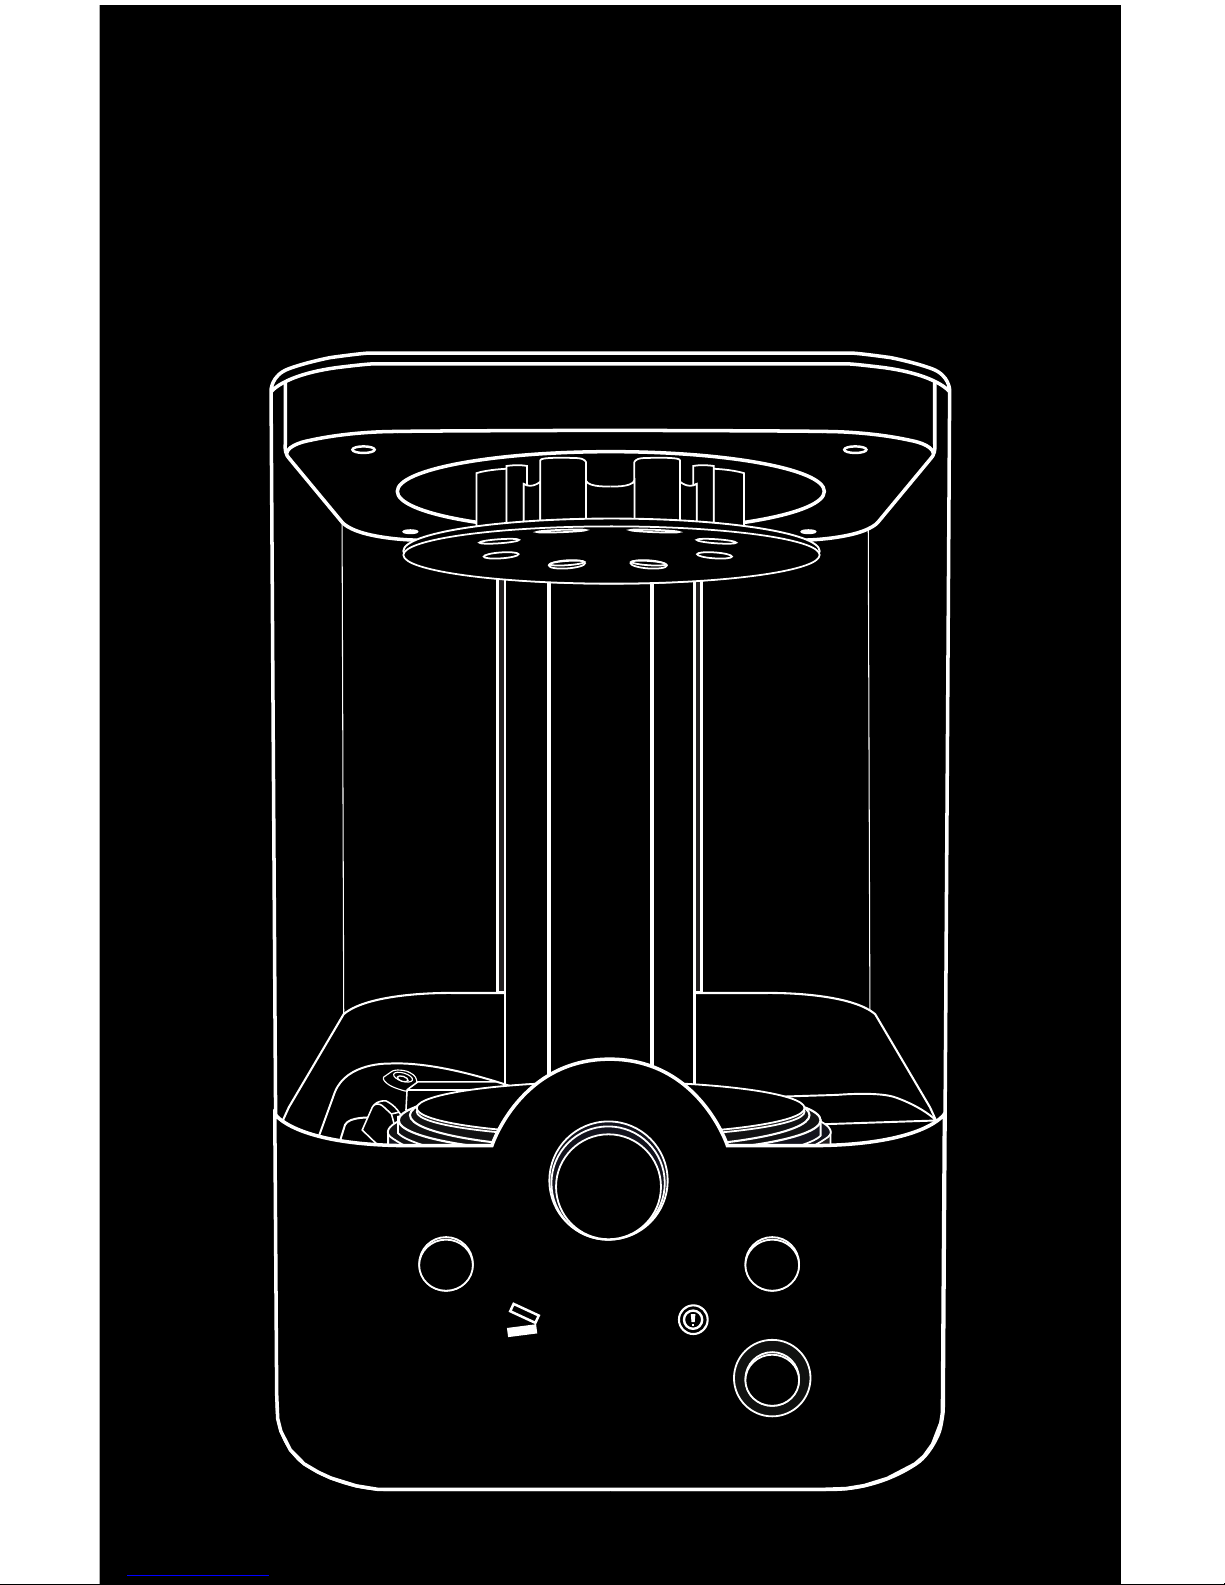
OPEN/CLOSE CHAMBER LIGHTS
ON/OFF
Polysher
Polysher
TM
Operation Manual
Page 2

polysher.polymaker.com
Page 3

3
Introduction
Important Safety Instructions
Specications
Information on Disposal for Users
of Waste Electrical & Electronic Equipment
Package Contents
Essential Parts of the Polysher
TM
Setting up your Polysher
TM
Operating your Polysher
TM
PolySmooth
TM
Maintenance and Troubleshooting
Contact Information
CONTENTS
4
5
6
6
7
8
10
12
14
16
17
Page 4
4
INTRODUCTION
Thank you for purchasing the PolysherTM from Polymaker! With the Polysher
TM
and
PolySmoothTM (purchased separately) you are ready to transcend the quality of
your 3D prints!
PolySmoothTM is an entirely new 3D printing lament. It is extremely easy to
print with (just like PLA), and works on just about any lament-based 3D printer.
The support structure comes off very easily as well, making it ideal for complex
geometries.
The real magic occurs when you put your PolySmoothTM prints into the PolysherTM.
With Polymaker’s unique Micro-Droplet Polishing technology, the layer lines will
magically disappear, leaving you with a truly nished object with shiny, smooth
surfaces.
Page 5
5
Isopropyl alcohol is ammable. Do not use this apparatus in the presence of or near open
ames or sparks. Keep away from heat and sources of ignition.
Use only isopropyl alcohol1 (also known as IPA) with the PolysherTM. Use of any other
solvent or liquid can result in irreversible damage to your PolysherTM and increased risk
of re or explosion. Make sure the IPA you are using is not mixed with another solvents,
always double check the alcohol notice.
Use the PolysherTM in a well-ventilated area. Avoid inhalation of alcohol vapor or mist.
Place the Polysher
TM
on a level surface. Operating the device on an unlevel surface may
result in spills of alcohol.
Avoid prolonged skin contact with isopropyl alcohol. In case of eye contact, follow the
instructions provided by supplier of the alcohol.
Do not ingest isopropyl alcohol. If ingested, seek medical advice immediately and show
the container or the label.
Do not block any ventilation openings.
Only use attachments/accessories specied by the manufacturer.
Refer all servicing to qualied service personnel.
For Use Only with the supplied Power Supply or equivalent power supply acceptable to
the manufacturer.
If you have any question regarding the safety of the PolysherTM, please contact:
1
Isopropyl alcohol with concentrations of no less than 70% can be used. Concentrations of
90% or higher are recommended for better polishing quality.
The distribution and use of isopropyl alcohol may be restricted in certain countries. Please
check your local law and act accordingly.
The PolysherTM requires the use of isopropyl alcohol. Please read this section carefully
before operating your Polysher
TM
for the rst time.
Read these instructions.
Keep these instructions.
Heed all warnings.
Follow all instructions.
IMPORTANT SAFETY INSTRUCTIONS
Page 6
6
INFORMATION ON DISPOSAL FOR USERS
OF WASTE ELECTRICAL & ELECTRONIC
EQUIPMENT
This symbol on the product and/or accompanying documents means that used
electrical and electronic products should not be mixed with general household waste.
For proper treatment, recovery and recycling, please take this product to a designated
collection point where it will be accepted free of charge.
Alternatively, in some countries you may be able to return your products to your local
retailer upon purchase of an equivalent new product.
Disposing of this product correctly will help save valuable resources and prevent any
potential negative effects on human health and the environment, which could otherwise
arise from inappropriate waste handling.
Please contact your local authority for further details of your nearest designated
collection point.
Penalties may be applicable for incorrect disposal of this waste, in accordance with
your national legislation.
SPECIFICATIONS
Technology
Compatible Material
Polishing Liquid
Polishing Time
Product Dimensions
Shipping Box Dimensions
Product Weight
Shipping Weight
Maximum Part Size
Operating Temperature
Storage Temperature
Power Requirements
Micro-Droplet Polishing
PolySmooth
TM
Isopropyl Alcohol, 70% or above [90% or higher recommended]
20 – 40 min typical [varies based on part size, alcohol concentration and ambient temp.]
230 x 300 x 360 mm [9.1 x 11.8 x 14.2 in]
350 x 400 x 460 mm [13.8 x 15.7 x 18.1 in]
4 kg [8.81 lbs]
6.8 kg [15 lbs]
Up to a 150 mm (diameter) x 180 mm (height) cylinder [5.9 in (diameter) x 7.1 in (height)]
15 – 32 °C [59 – 90 °F]
0 – 38 °C [32 – 100 °F]
Power Supply: INPUT: AC 100-240V, 50/60Hz, 0.4A OUTPUT: 5V 2000 mA
ShenZhen Rongweixin Technology Co.Ltd
Polysher
TM
INPUT: 5V 2000mA
Page 7
7
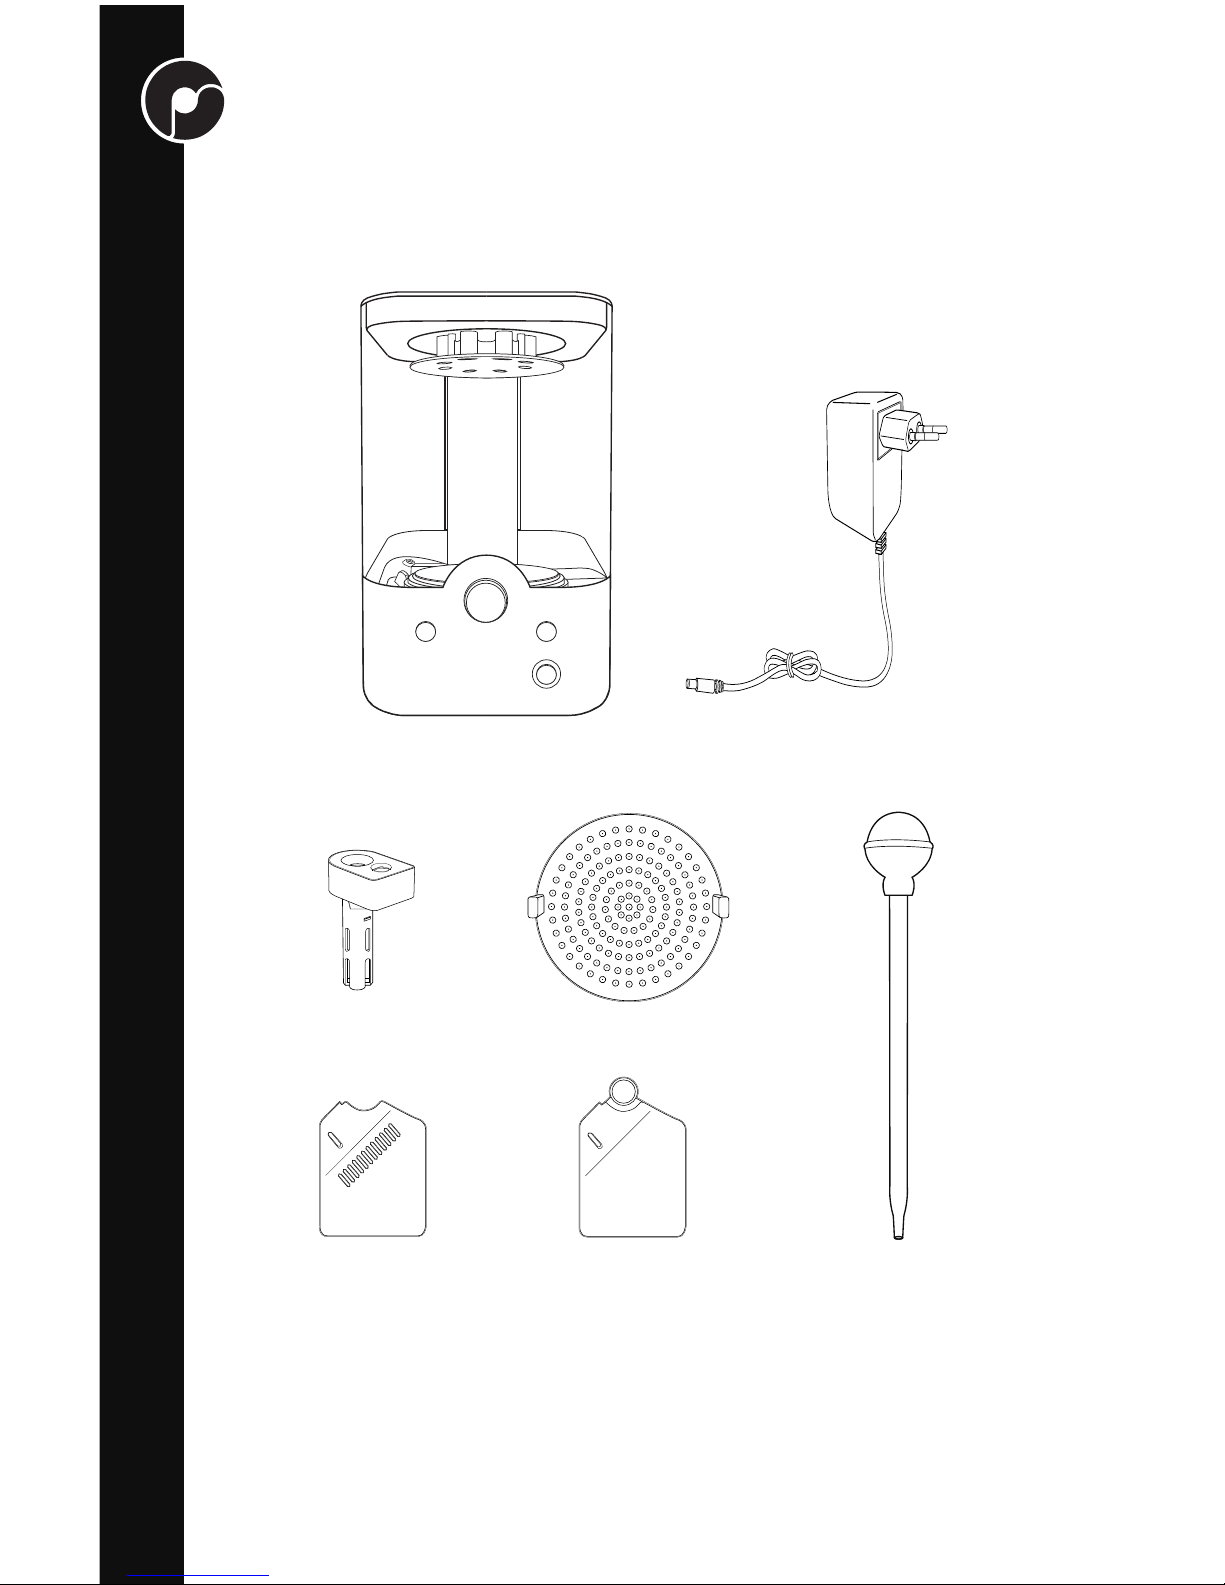
Your PolysherTM package should contain the following:
PACKAGE CONTENTS
OPEN/CLOSE CHAMBER LIGHTS
ON/OFF
Polysher
Polysher
TM
x1 Power Supply x1
Nebulizers x2
Suction pipette x1“Grate” style
reservoir cover x1
Solid reservoir cover x1
Platforms x2
Page 8
8
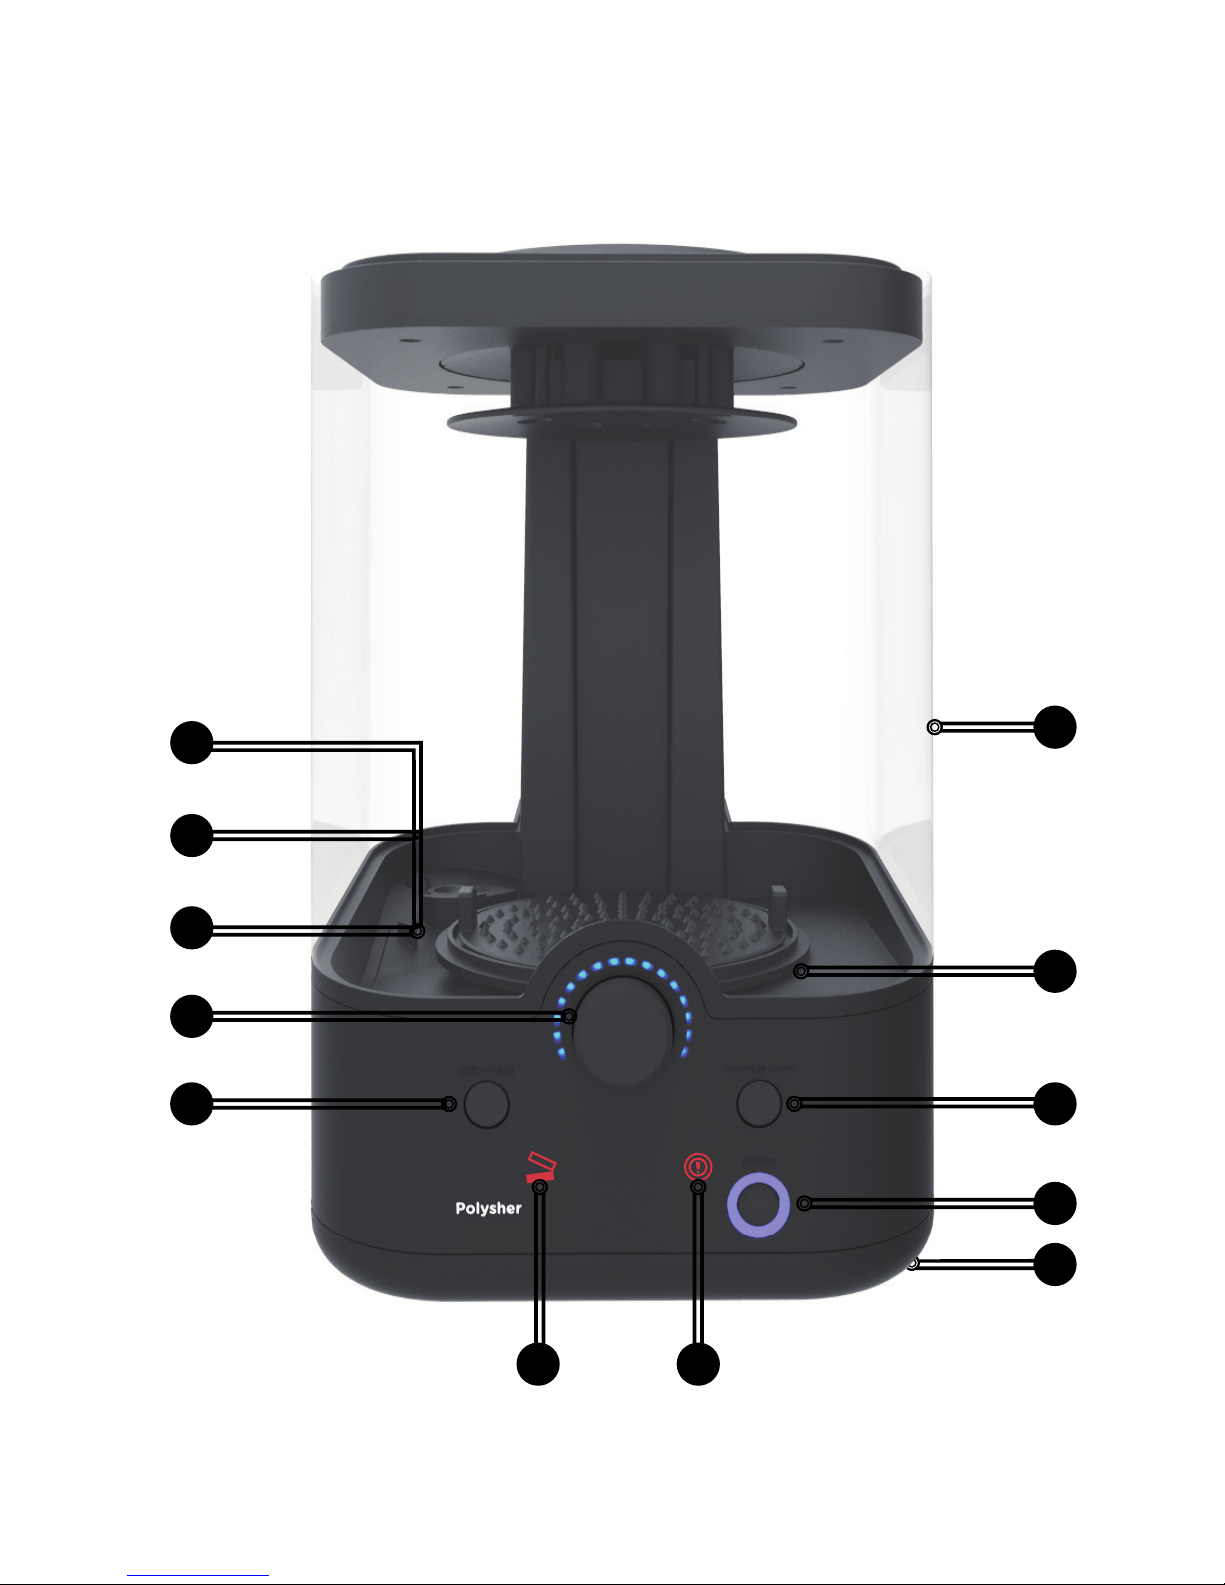
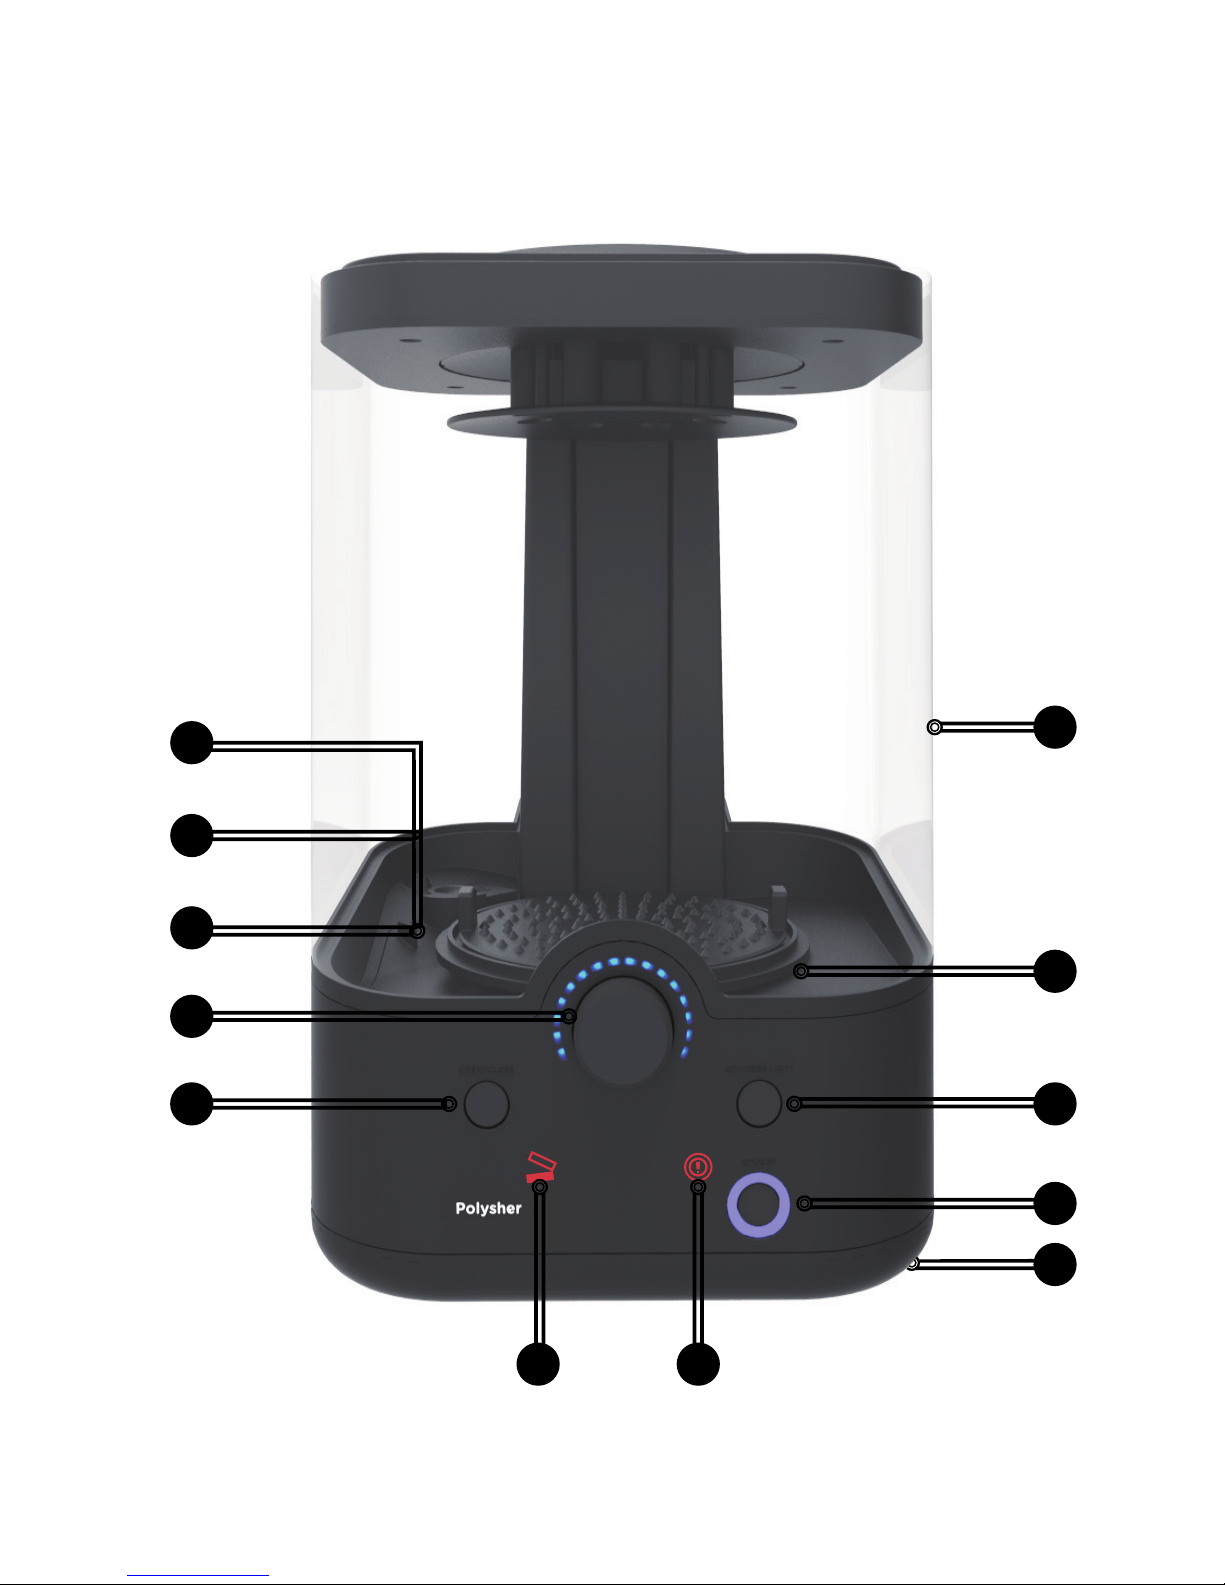
ON/OFF: Press the button to power on the PolysherTM. Long press to turn off the
PolysherTM.
OPEN/CLOSE: Push the button once to raise the platform of the PolysherTM. Press
again to lower the platform. Press again during the movement to stop the action.
Control Dial: Twist the dial clockwise to start a polishing cycle. Dial clicks in 5 minute
increments displayed by the lights above. Twist left to decrease the time or all the way
to stop the polishing cycle. Press dial in during a polishing cycle then twist left or right
to change the nebulizer light color.
Chamber Casing: Provides an air tight enclosure around the PolysherTM while giving
visibility to your part.
Nebulizer: The nebulizer cartridge is where liquid alcohol from the reservoir is
turned into a ne aerosol that polishes your printed part. Inside the cartridge is a
micromachined metal disc that vibrates hundreds of thousands of times per second. A
sponge wick conducts the liquid solvent to the disc. The nebulizer unit can be removed
by gently pulling up. To insert a replacement nebulizer, align the pins and gently press
down.
Reservoir: Collects and stores alcohol feeding the wicking sponge and nebulizer.
Reservoir Cover: Your PolysherTM comes with two reservoir covers. One for use during
operation with slots (“grate” style) to allow alcohol to ow through. The other is for use
during storage to minimize alcohol evaporation.
Turn Table/Platform: Holds your PolySmoothTM part during polishing. Turn Table
rises up with platform to give access to polished parts. To remove the platform, use the
handles on either side.
Chamber Lights: Press once to turn on the chamber lighting. Press again to turn off
the chamber lighting. Chamber lights take 1-2 seconds to fully dim, press the button
during this time to set current illumination.
Nebulizer Warning Light: Indicates a malfunction with the nebulizer, this could
mean: a bad connection between the nebulizer and port, or a broken nebulizer that
needs replacing. A polishing cycle cannot be started while this light is on. See the
Troubleshooting section of this User Manual for instructions on how to correct these
conditions.
Chamber Seal Warning Light: Indicates an air leak in the chamber. Readjust the
chamber casing to ensure that it sits properly on the PolysherTM. A polishing cycle
cannot be started while this light is on.
DC Power In: The port for the DC power cable is located on the back of the PolysherTM.
ESSENTIAL PARTS OF THE POLYSHER
TM
1
2
3
4
5
6
7
8
9
10
11
12
Page 9
OPEN/CLOSE CHAMBER LIGHTS
ON/OFF
5
6
7
3
2
4
8
9
1
1011
12
Page 10
10
SETTING UP YOUR POLYSHER
TM
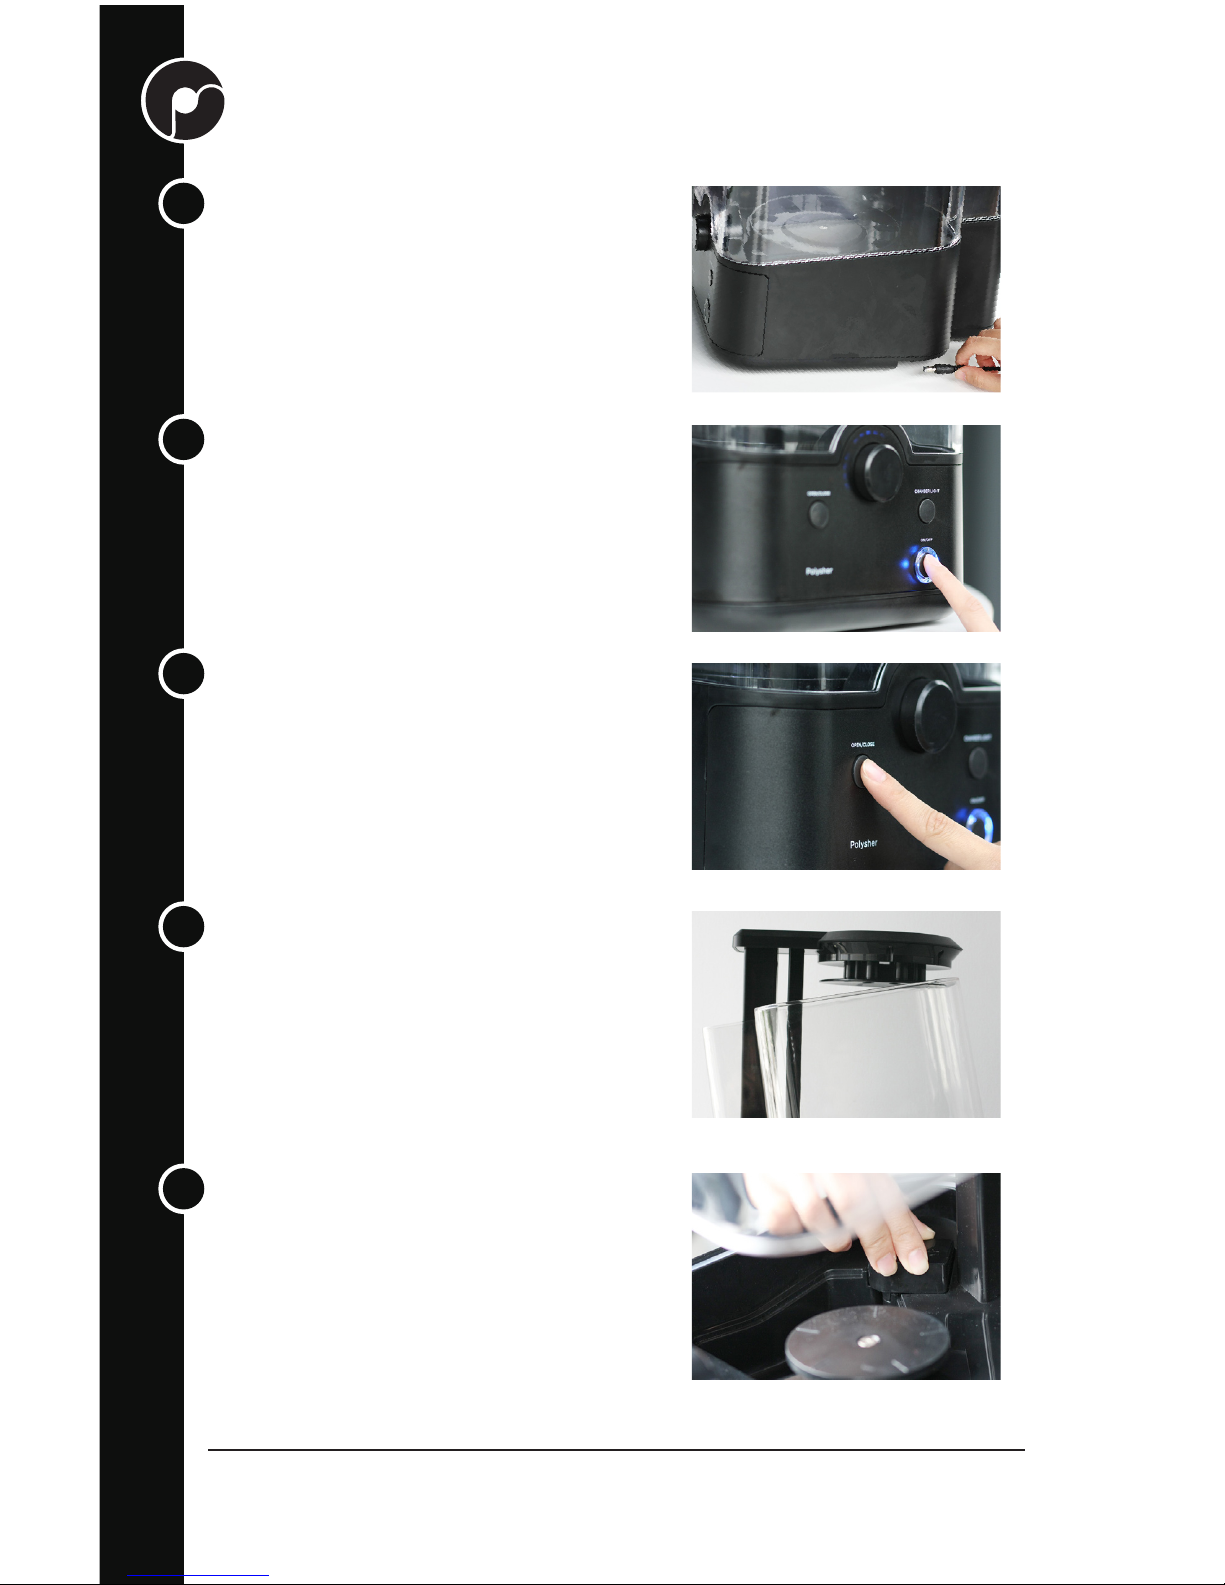
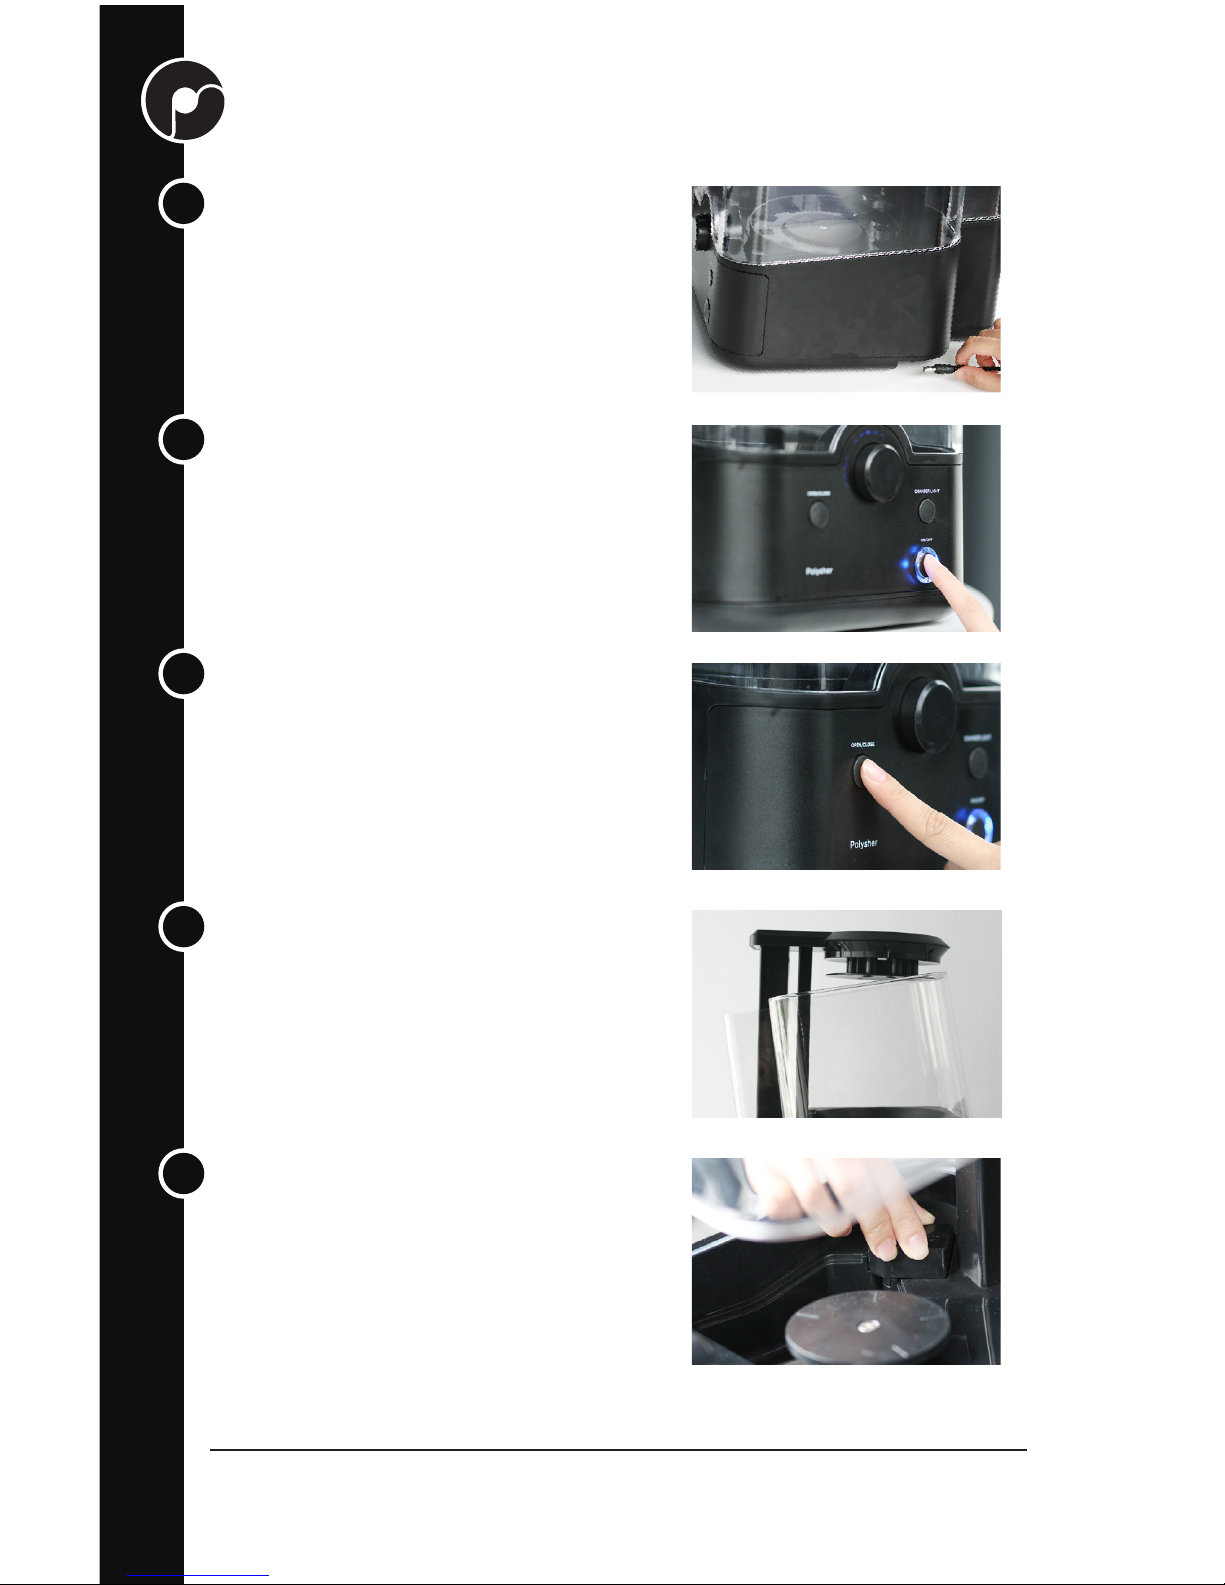
Attach the Power Cable
Ensure to place the Polysher
TM
on a stable
and at surface. The power supply unit
comes with several different plugs. Please
choose the one suited to your country/region.
Attach the power cable to the power port,
which is on the lower back of the PolysherTM.
Power On the Polysher
TM
Connect the power supply to mains power.
Press the On/Off button on the front panel of
the PolysherTM. A greeting tone should sound,
the timer display should ash briey, and the
blue ring around the On/Off button should
illuminate.
Open the Polysher
TM
Press the Open/Close button. The lift
mechanism should rise to its fully-open
position and stop.
Open the Transparent Casing
Lift up the transparent casing and hook it on
the fan brim as shown on the picture.
Install the Nebulizer
Install a Nebulizer by rmly pressing it down
into the socket. Make sure the connection is
satisfactory.
1
2
3
4
5
Page 11
11
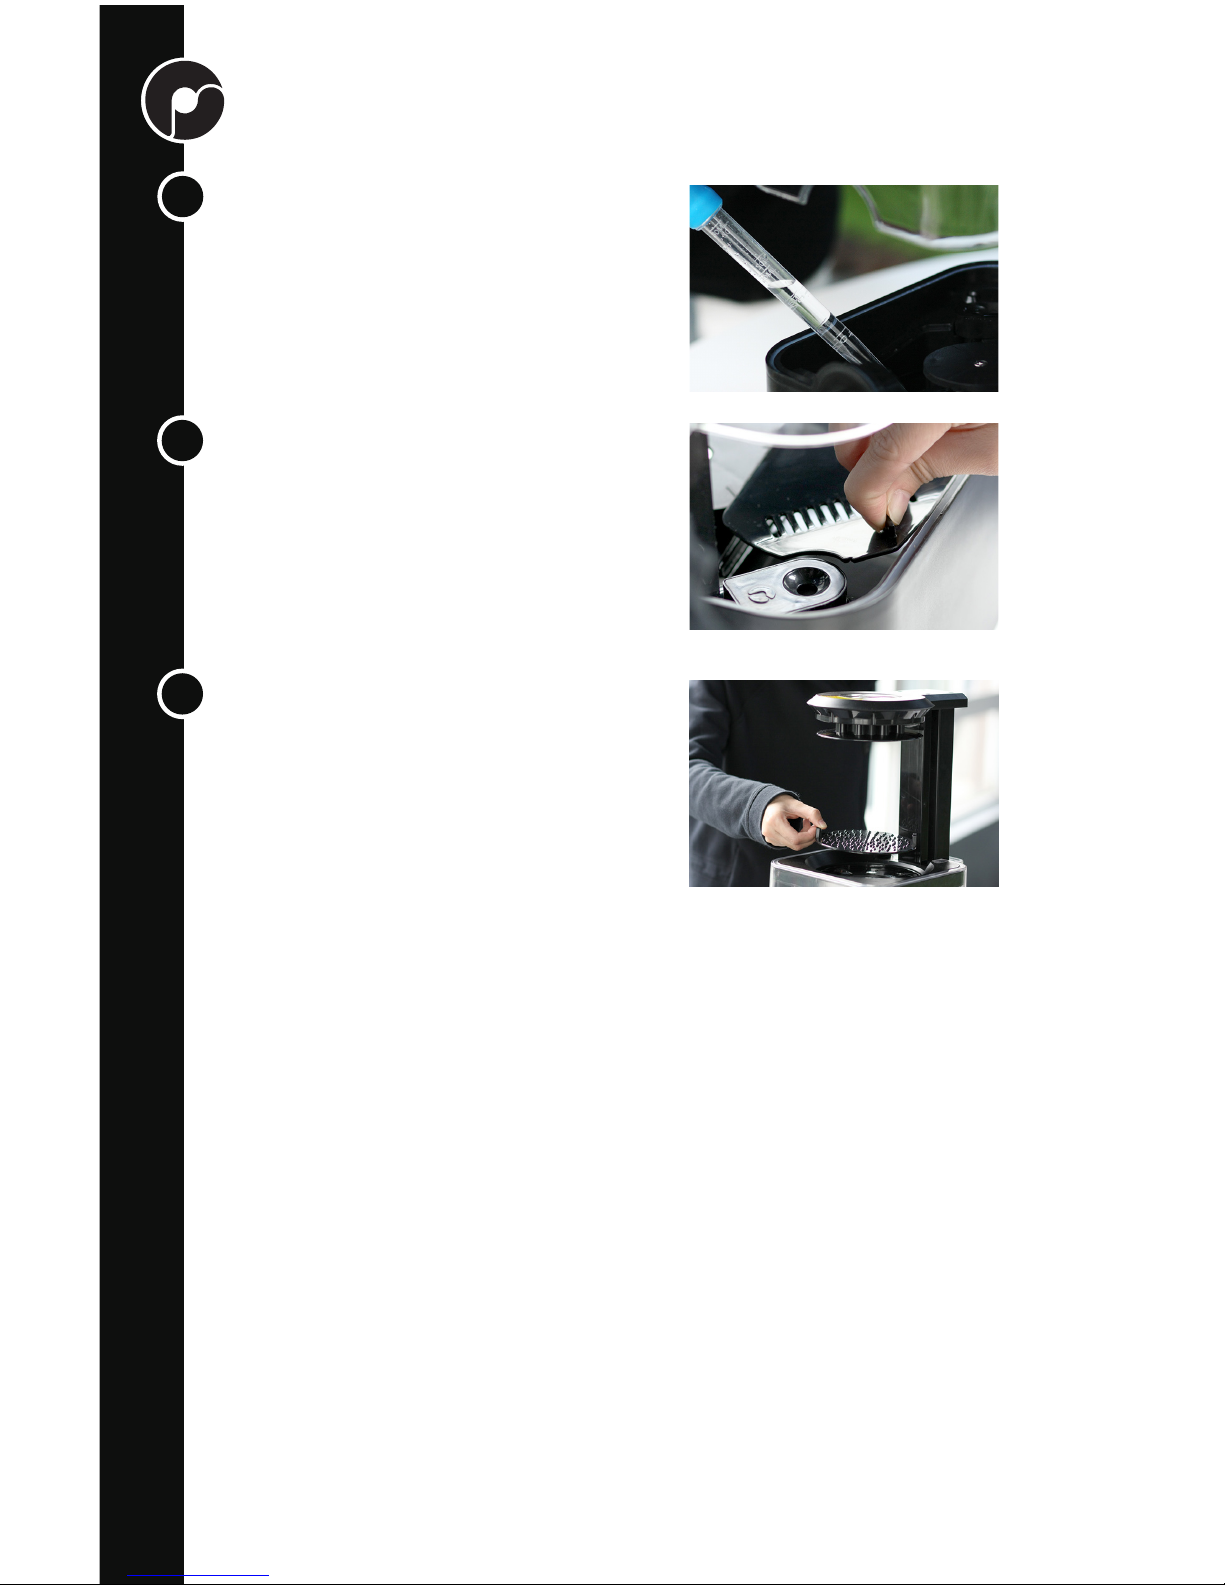
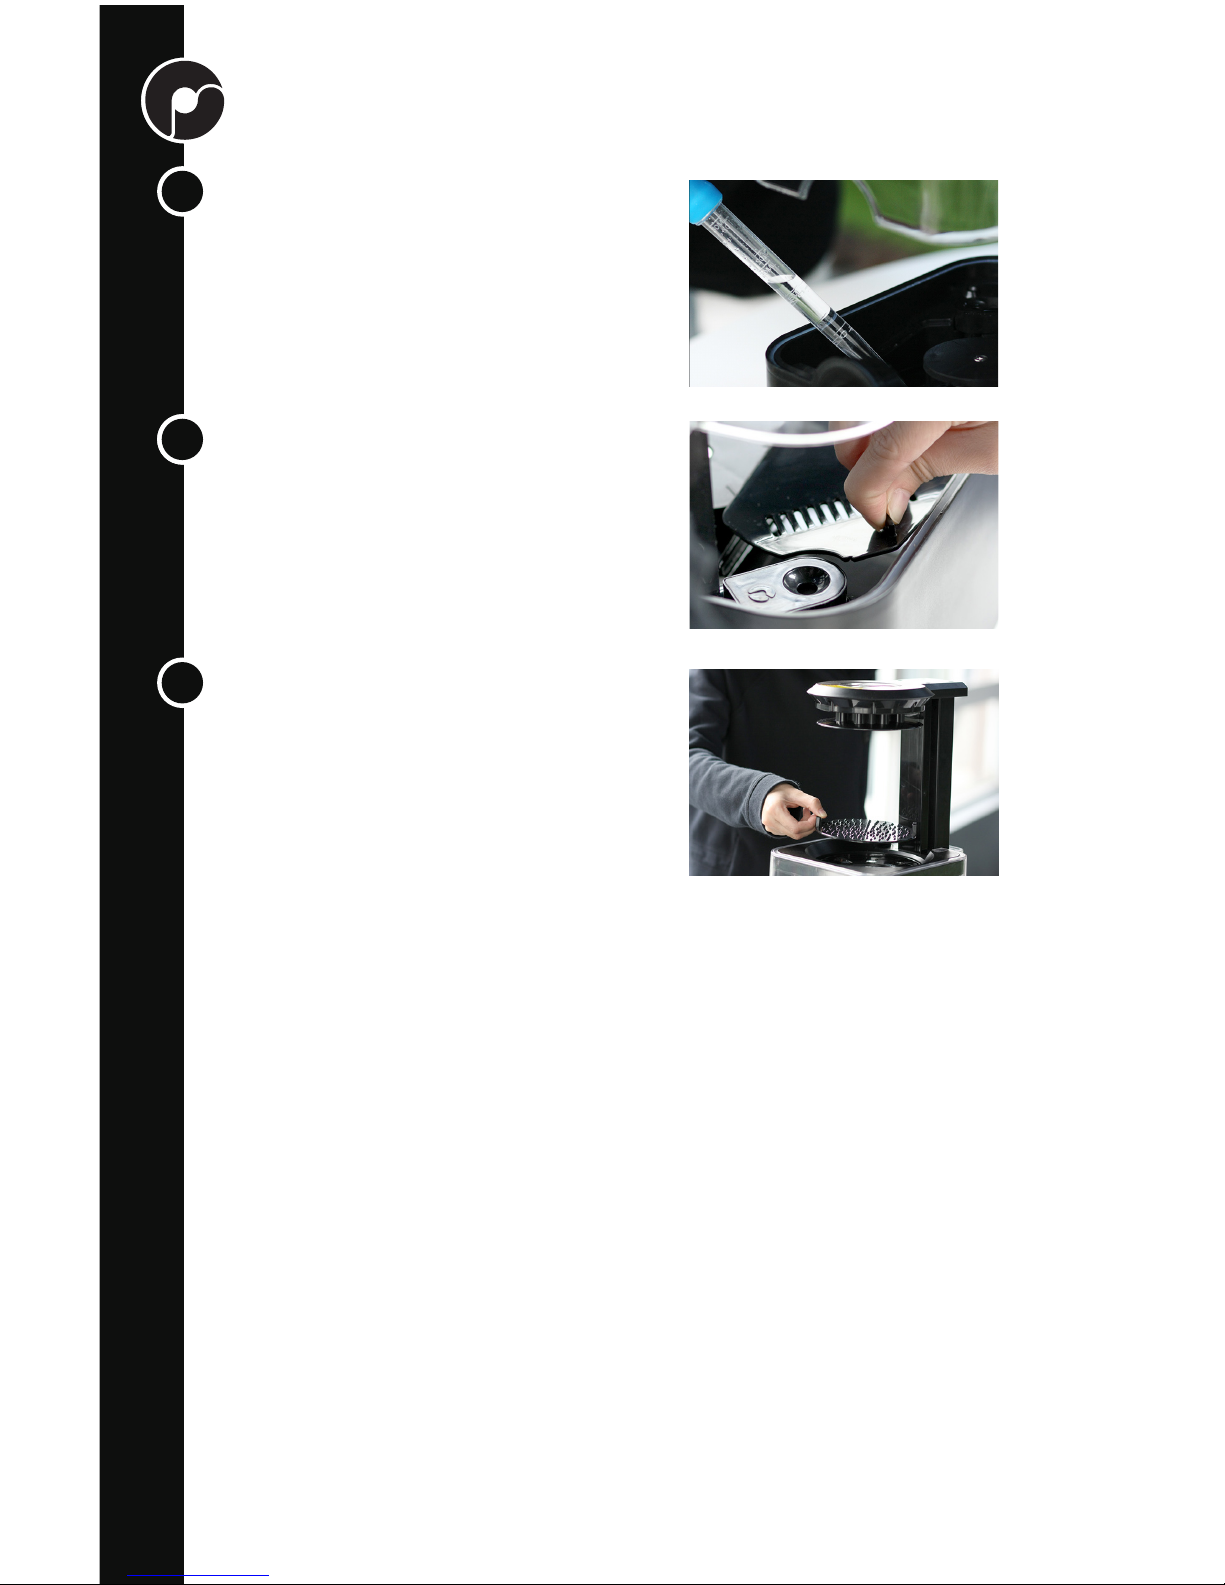
Install the Reservoir Cover
Place the “grate” cover over the reservoir.
Install the Platform
Place the platform on the raised platform tray
when the PolysherTM is fully open. You can
then push the open/close button to lower the
platform into the PolysherTM.
Fill the Reservoir
Fill the reservoir with alcohol to the top edge.
Isopropyl alcohol with concentrations of 70%
or above can be used; concentrations of 90%
or more are recommended3.
6
7
8
Page 12
12
OPERATING YOUR POLYSHER
TM
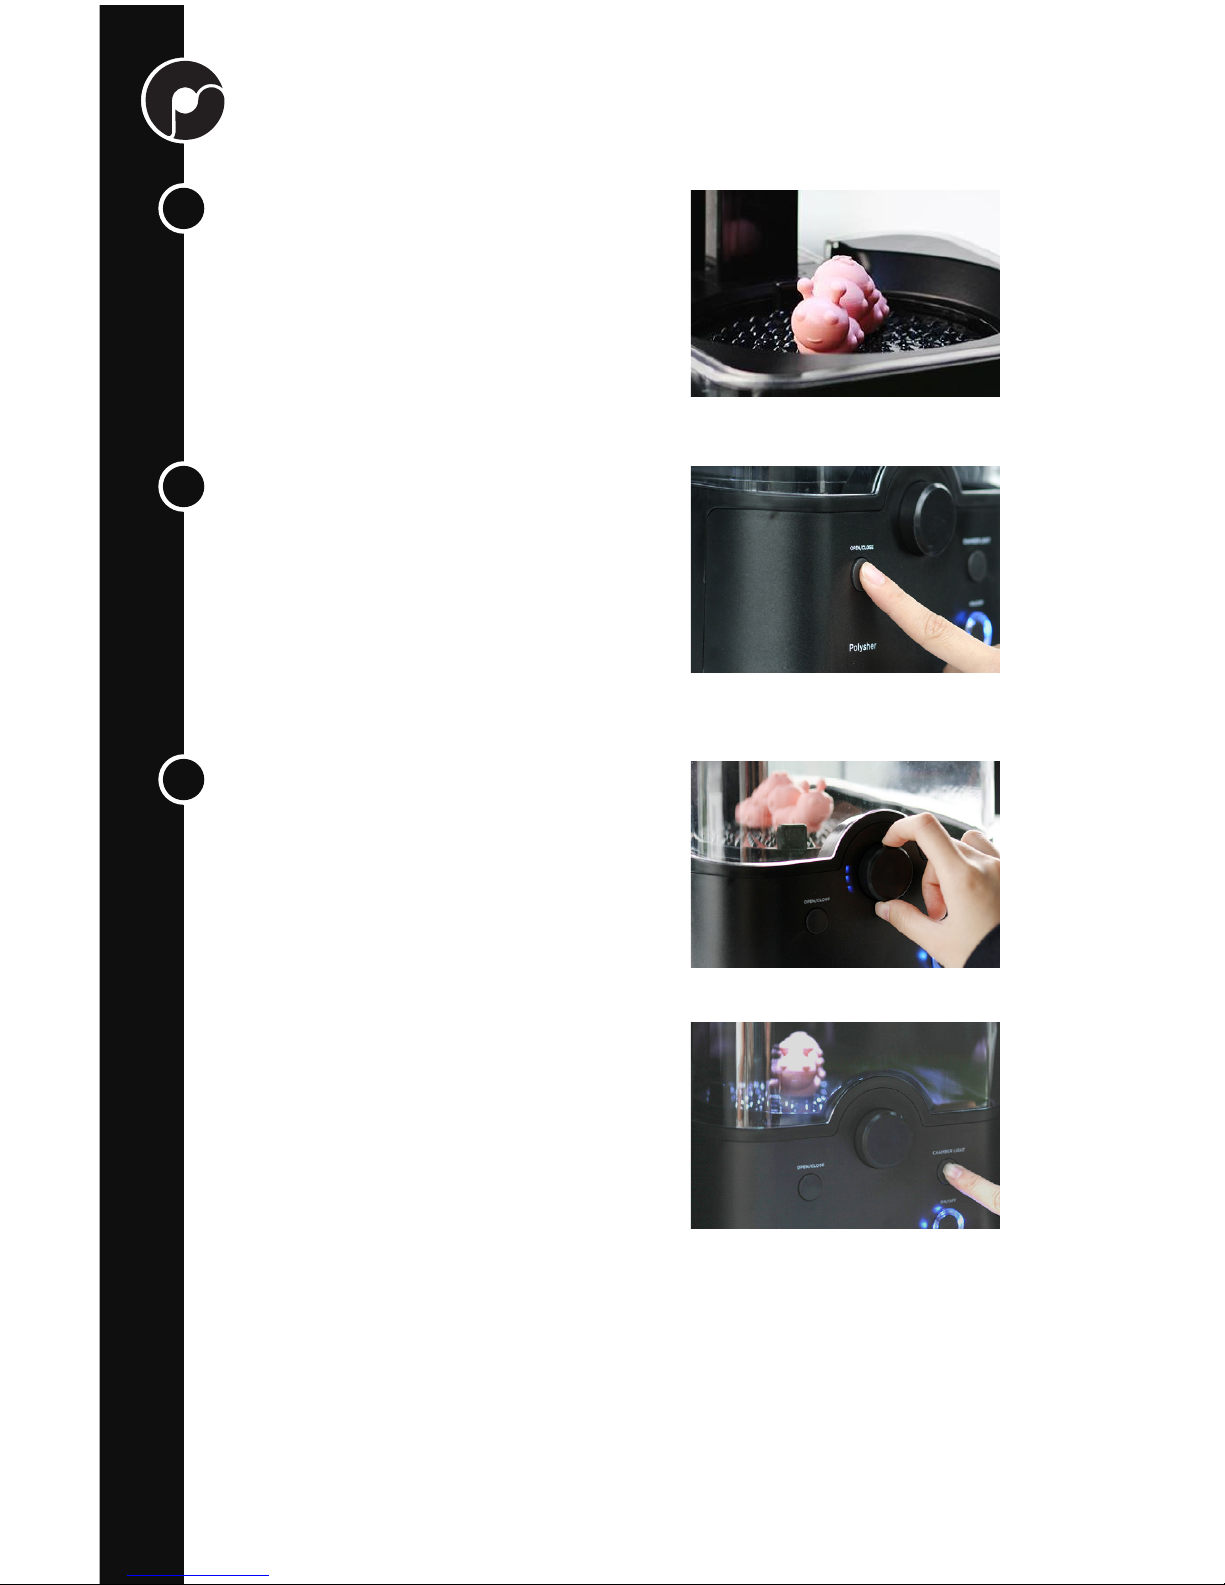
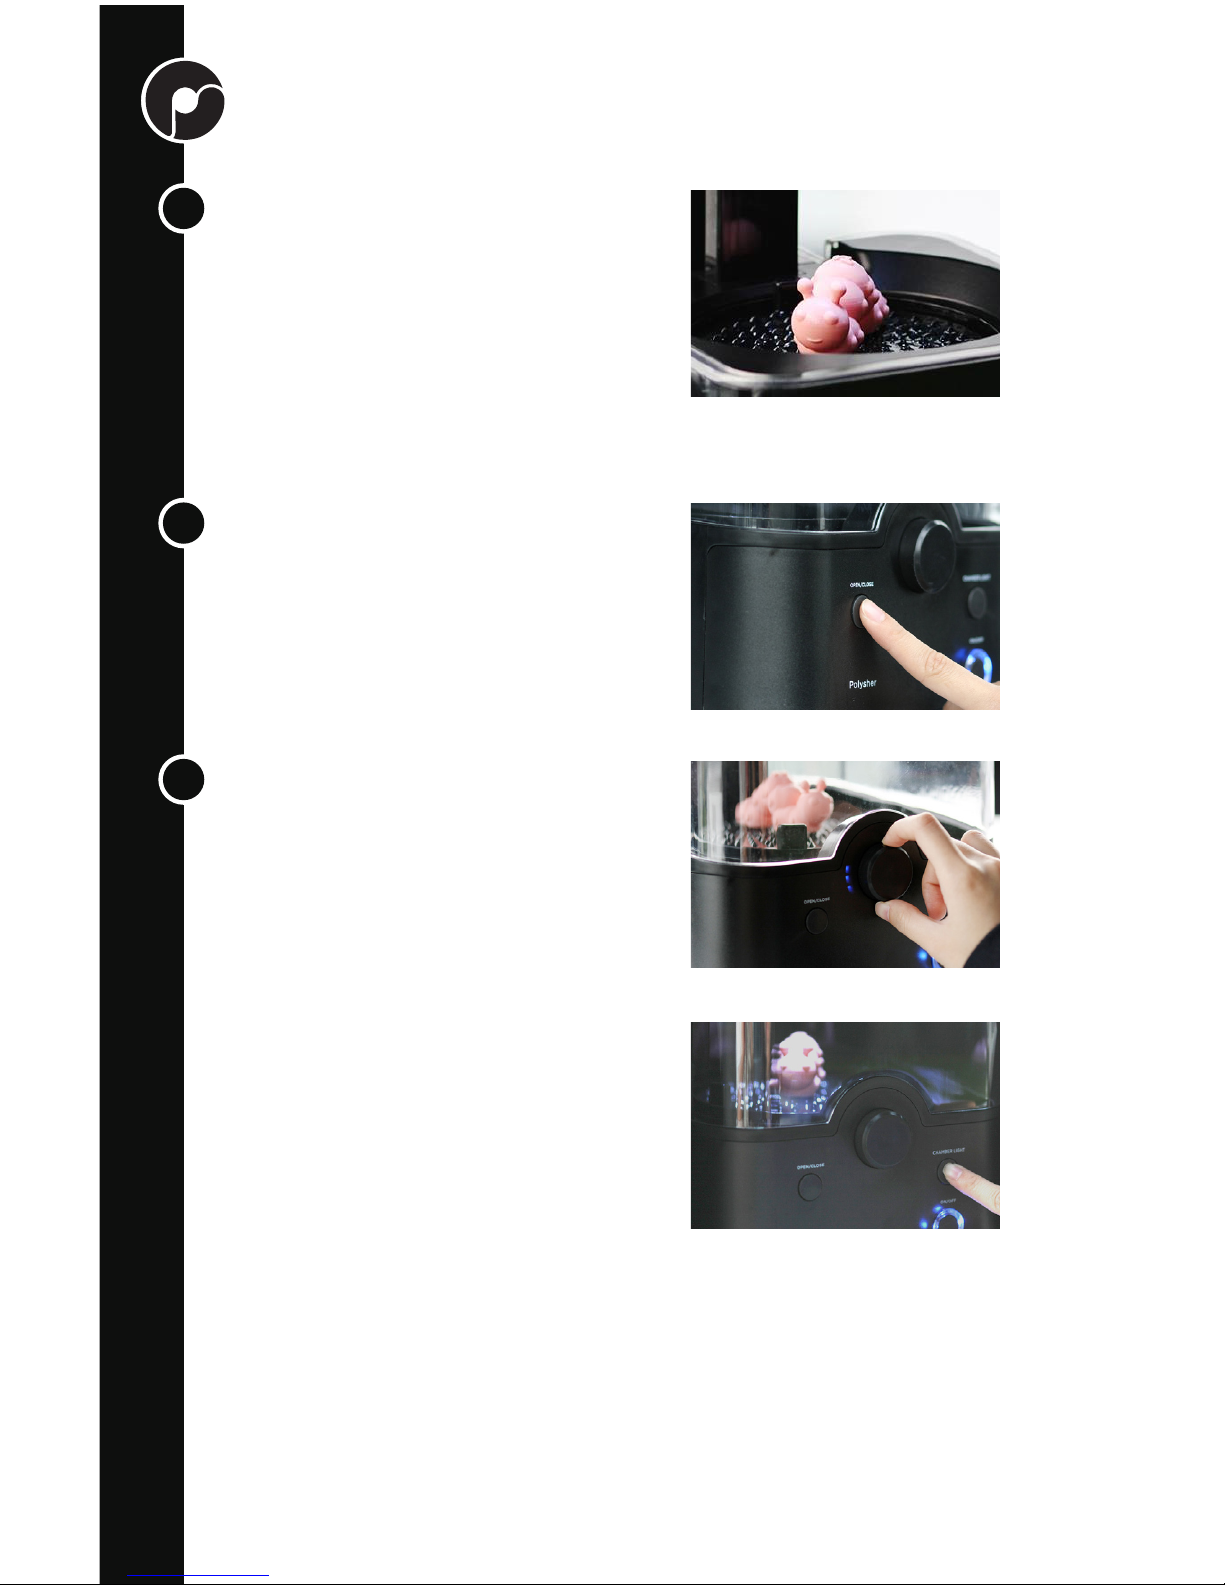
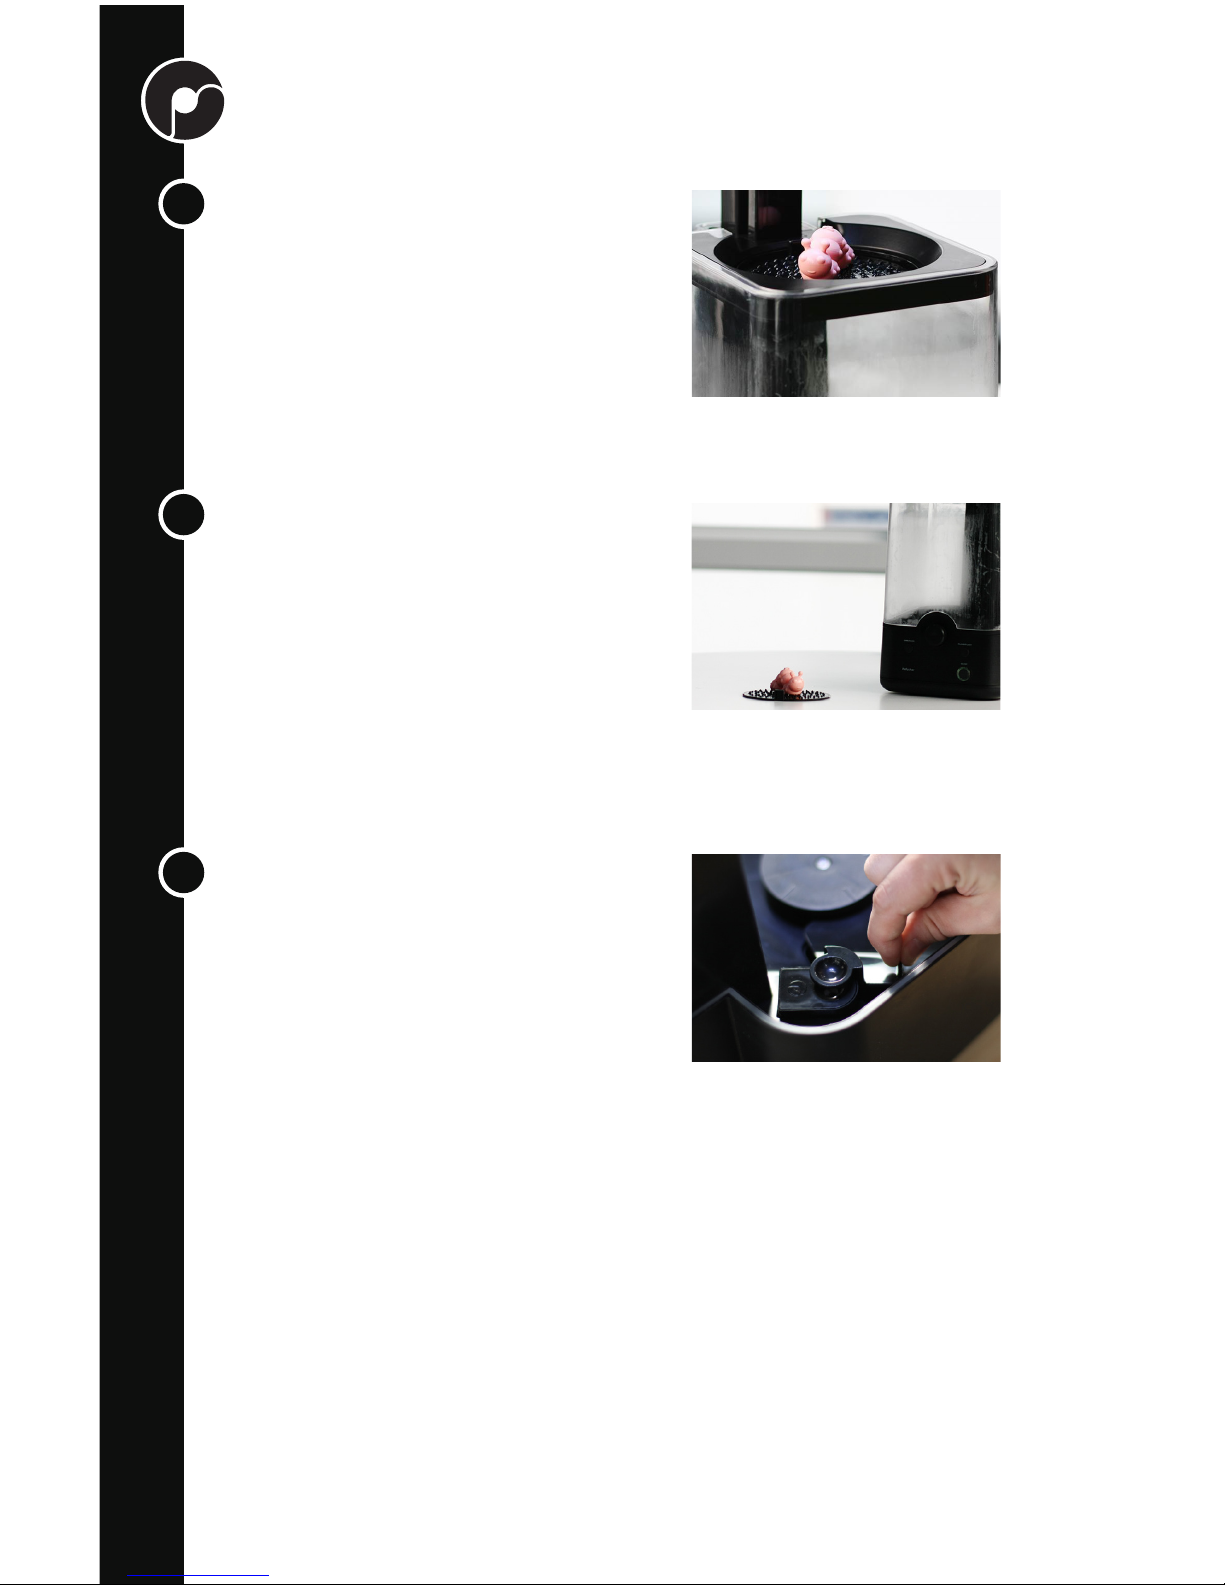
Run the polishing cycle
Rotate the control knob clockwise to the
desired polishing time. A stream of solvent
mist will come from the nebulizer and the
part will begin rotating on the platform. In
a few minutes the mist should ll the entire
chamber. You can adjust the polishing
time any time during the polishing cycle
(remember that each illuminated segment
represents 5 minutes).The optimal time
depends on the concentration of alcohol
used, ambient temperature, the size of your
part, the condition of your nebulizer, etc.
Generally speaking 20-40 minutes is a good
starting range.
You can turn the chamber lighting on and off
by pressing the Chamber Light button. The
color of the mist lighting can also be adjusted
by pressing the control knob and then
rotating it until you see the desired color.
Press the OPEN/CLOSE button
The lift mechanism will lower the part into the
chamber and seal the top of the chamber. The
Chamber Seal warning light should turn off
when the lift mechanism reaches its lower
closed position. If it doesn’t, check to see that
the casing is properly seated.
You can let the PolysherTM run automatically until the timer expires, or you can stop
polishing at any time by rotating the control knob counterclockwise until no time
indicators are shown. In either case, tones will sound to let you know the smoothing
cycle has nished. The PolysherTM will then begin its “clearing cycle” during which
the chamber fan is run at high speed to clear the mist from the chamber.
Place a PolySmooth
TM
print on the
platform
To ensure even polishing, place the part in the
center of the platform.
1
2
3
Page 13
13
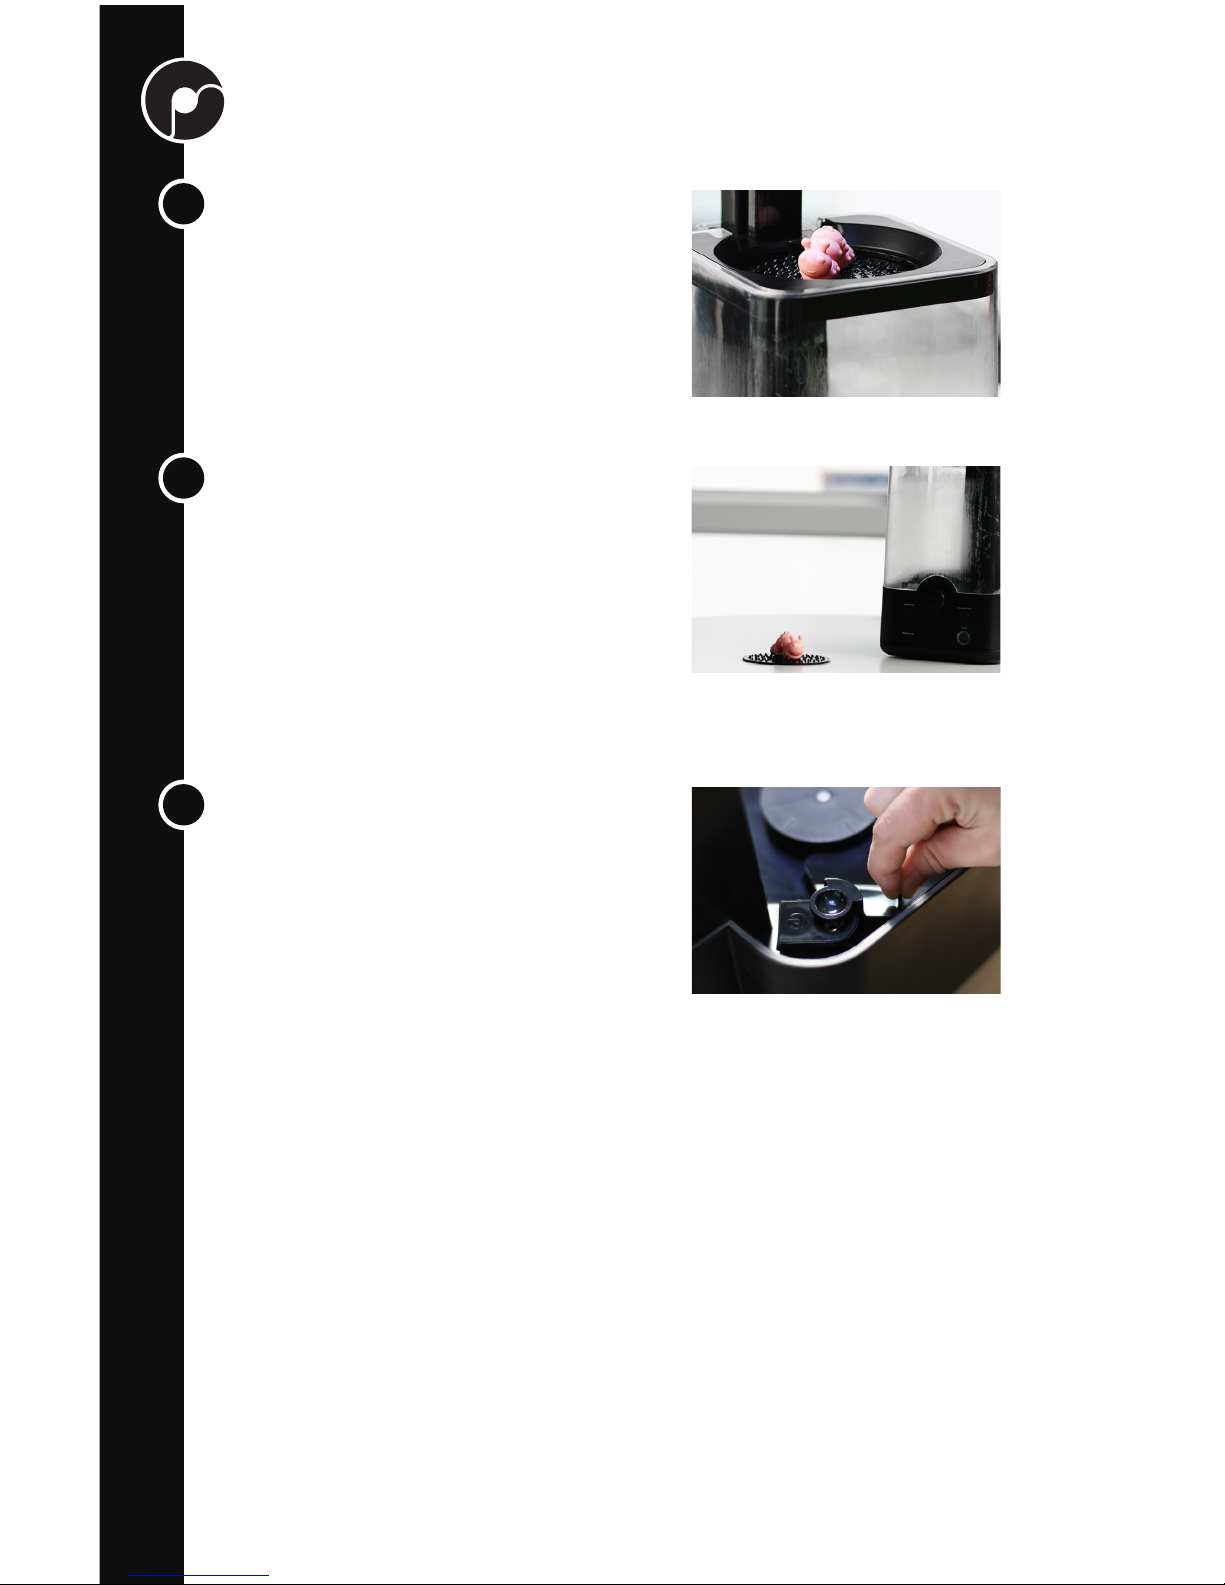
Open the chamber
Once the clearing cycle has completed, you
can press the Open/Close button to raise the
platform and your smoothed part.
Install the Reservoir Cover
If you do not plan to use your PolysherTM
again in the near future, we recommend
exchanging the grate cover with the solid
cover to inhibit solvent evaporation, avoid
vapor buildup in the chamber, and prevent the
nebulizer sponge from drying out.
Dry the part
You can now remove the platform from the
PolysherTM. Do not touch the part yet as the
surface may be sticky and you may leave
nger marks on the part. The part should be
left to dry for about an hour before gentle
handling. You can use the other platform to
polish another part, if needed. The part will
slowly harden after a couple of weeks, to
speed up the process you can use a fan.
4
5
6
Page 14
14
PolySmooth™
Basic Specification
Color
Average Filament Diameter
Recommended Printing Temp
Recommended Printing Speed
Recommended HBP (if equipped) Temp
Instructions
PolySmoothTM can be printed under similar conditions as regular PLA.
Prints made with PolySmooth
TM
can be post-processed using the PolysherTM
(purchased separately) and alcohol to dramatically increase the smoothness of the
surface.
PolySmoothTM works well with commonly available build surfaces. To improve rst
layer adhesion, coat the build surface with a thin layer of PVA glue (using a glue stick),
or heat the HBP (if equipped) up to 70 °C.
PolySmoothTM is sensitive to moisture. It is recommended that the lament, when not
being used, always be stored in the provided resealable bag with the desiccant pack to
minimize moisture absorption and to ensure the best printing performance.
For more details or technical questions regarding the use of our products, please visit
www.polymaker.com or email us at [email protected].
7 different colors
1.75mm or 2.85mm
(< ± 0.05 mm, ~ ± 0.02 mm typical)
190 – 220 C (for both 1.75 and 2.85 mm)
40 – 90 mm/s
Up to 70 °C
1
2
Page 15

15
Key Features
Polyshable:
The rst 3D printable lament engineered for layer free post-processing. We have
specically developed PolySmooth
TM
to work alongside the PolysherTM providing the
solution to dramatically improve the surface quality of 3D printed objects.
Easy to Print:
PolySmooth
TM
is compatible with all lament-based 3D printers and prints under
similar conditions as PLA. Featuring a wide printing temperature range, low odor and
no heated bed required, PolySmoothTM is the perfect companion to your desktop 3D
printer.
Balanced Mechanical Properties:
PolySmoothTM features well balanced mechanical properties, outperforming ABS and
PLA on most attributes.
Optimized for Support:
We have taken our experience from PolySupportTM and engineered PolySmoothTM with
the same support removal properties. Easily break away support from PolySmoothTM’s
surface and once your model is polished there is no scar left on the surface.
Warping Free:
PolySmoothTM exhibits very minimal residual stress when printing which means almost
no warping, making it ideal for printing large parts.
3
Page 16
16
MAINTENANCE & TROUBLESHOOTING
What shall I do if the Nebulizer Warning Light is on?
Check the nebulizer unit to see if it is installed properly. Make sure the
nebulizer is fully seated in its socket.
Draining the reservoir
A 30 mL pipette is provided for removing alcohol from the reservoir. Avoid any heat
source, open ames or sparks when draining the reservoir. The alcohol, unless
contaminated, can be repeatedly used for polishing.
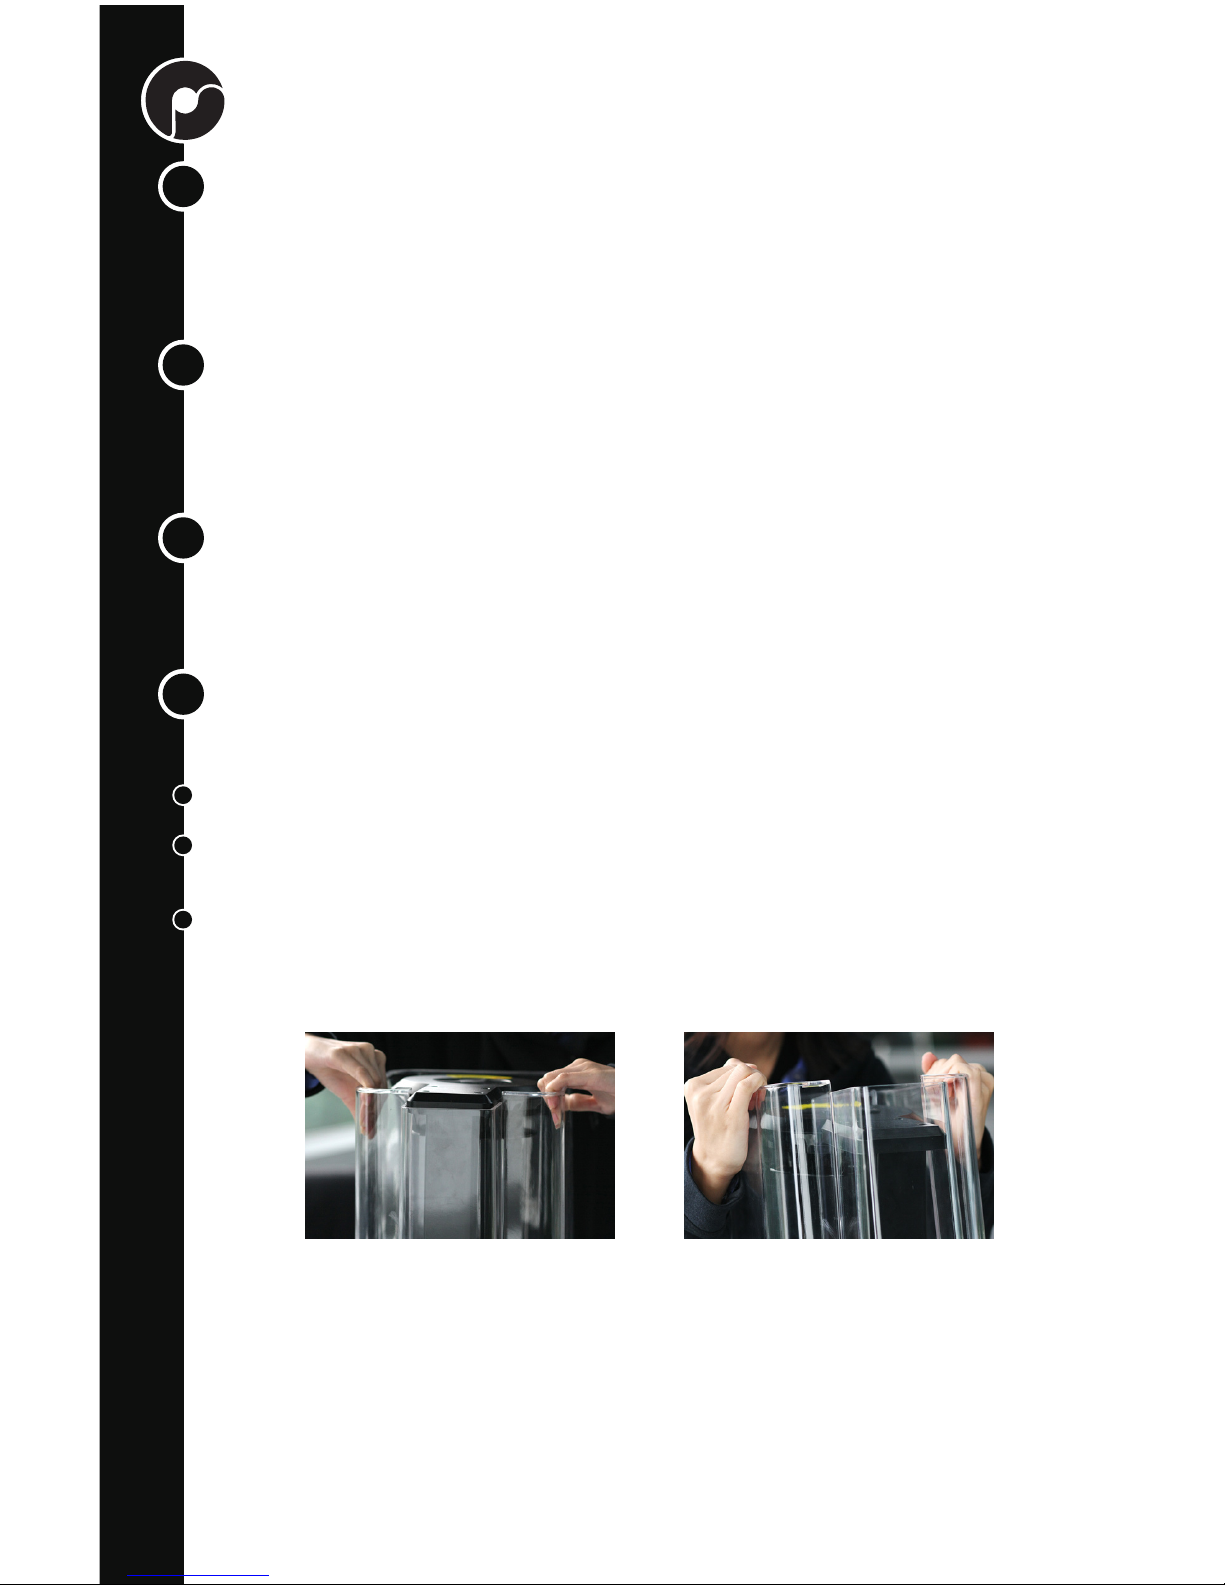
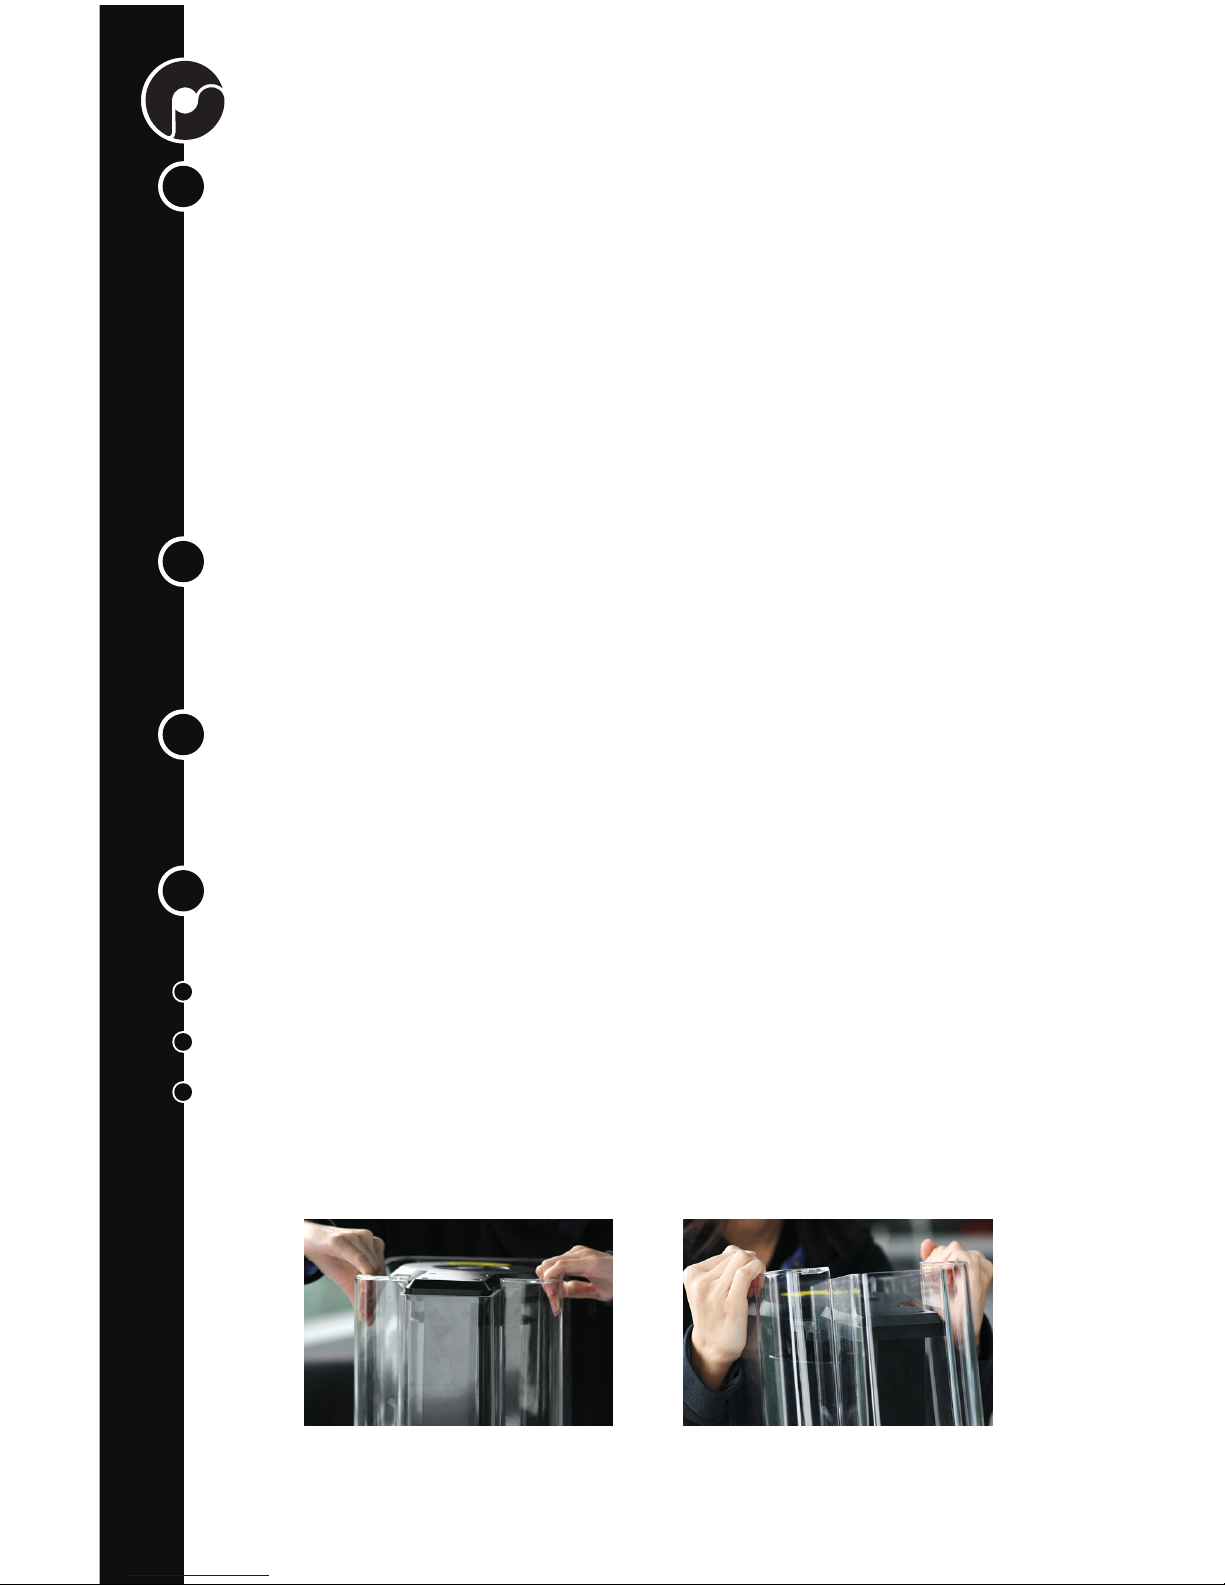
Removing the casing
The PolysherTM can be operated without the need to remove the casing. However, if it
is needed to fully remove the casing, follow the instructions below:
Raise the platform to the upmost position;
Lift the casing all the way up, gently ex the thin section outward and pull it off the
machine;
To put the casing back on, ex the thin section the same way and slide it through the
moving post. Make sure it seats exactly on the rubber seal of the base.
What shall I do if the mist volume is abnormally low?
In a typical polishing cycle, the alcohol mist should ll the entire chamber within
several minutes. If, however, the mist volume is observed to be low, or not reaching
the full height, check the reservoir to see if it is running low or empty, and rell it if
necessary. Low mist volume can also be a sign to replace the nebulizer.
1
2
3
4
Page 17
17
CONTACT INFORMATION
For questions or further information, please contact us at:
647 SongTao Road
Building 1
ZhangJiang High technology parc
Pudong District
Shanghai 200120
China
E-mail: [email protected]
facebook.com/Polymaker.3D
Visit polymaker.com and follow us on our social media channels for
product updates, videos, tutorials and more!
twitter.com/Polymaker_3D
youtube.com/Polymaker
instagram.com/Polymaker_3D
pinterest.com/Polymaker
thingiverse.com/Polymaker_3D
facebook.com/groups/Polymaker
T
Page 18

Page 19
OPEN/CLOSE CHAMBER LIGHTS
ON/OFF
Polysher
Polysher
TM
3D打印件抛光机
使用说明
Page 20

polysher.polymaker.com
Page 21

21
说明书
重要安全提示
规格参数
废弃电子产品处理方式
包装清单
主要部件说明
设置抛光机
开始抛光
PolySmooth
TM
维护及常见问题处理
联系我们
目录
22
23
24
24
25
26
28
30
32
34
35
Page 22
22
说明书
感谢您购买Polymaker 的PolysherTM抛光机!同时使用PolysherTM和PolySmooth
TM
(需另外购买)能将您的3D打印件表面质量提升到前所未有的高度。
PolySmoothTM是一款全新的3D打印线材。它和PLA一样,非常容易打印,可以用
在任何线材挤出式3D打印机上。
PolySmoothTM打印件表面质量的变化是在PolysherTM抛光机里面实现的。Polymaker
独有的微滴抛光技术能够消除打印件上的层纹,让表面光滑闪亮。
Page 23
23
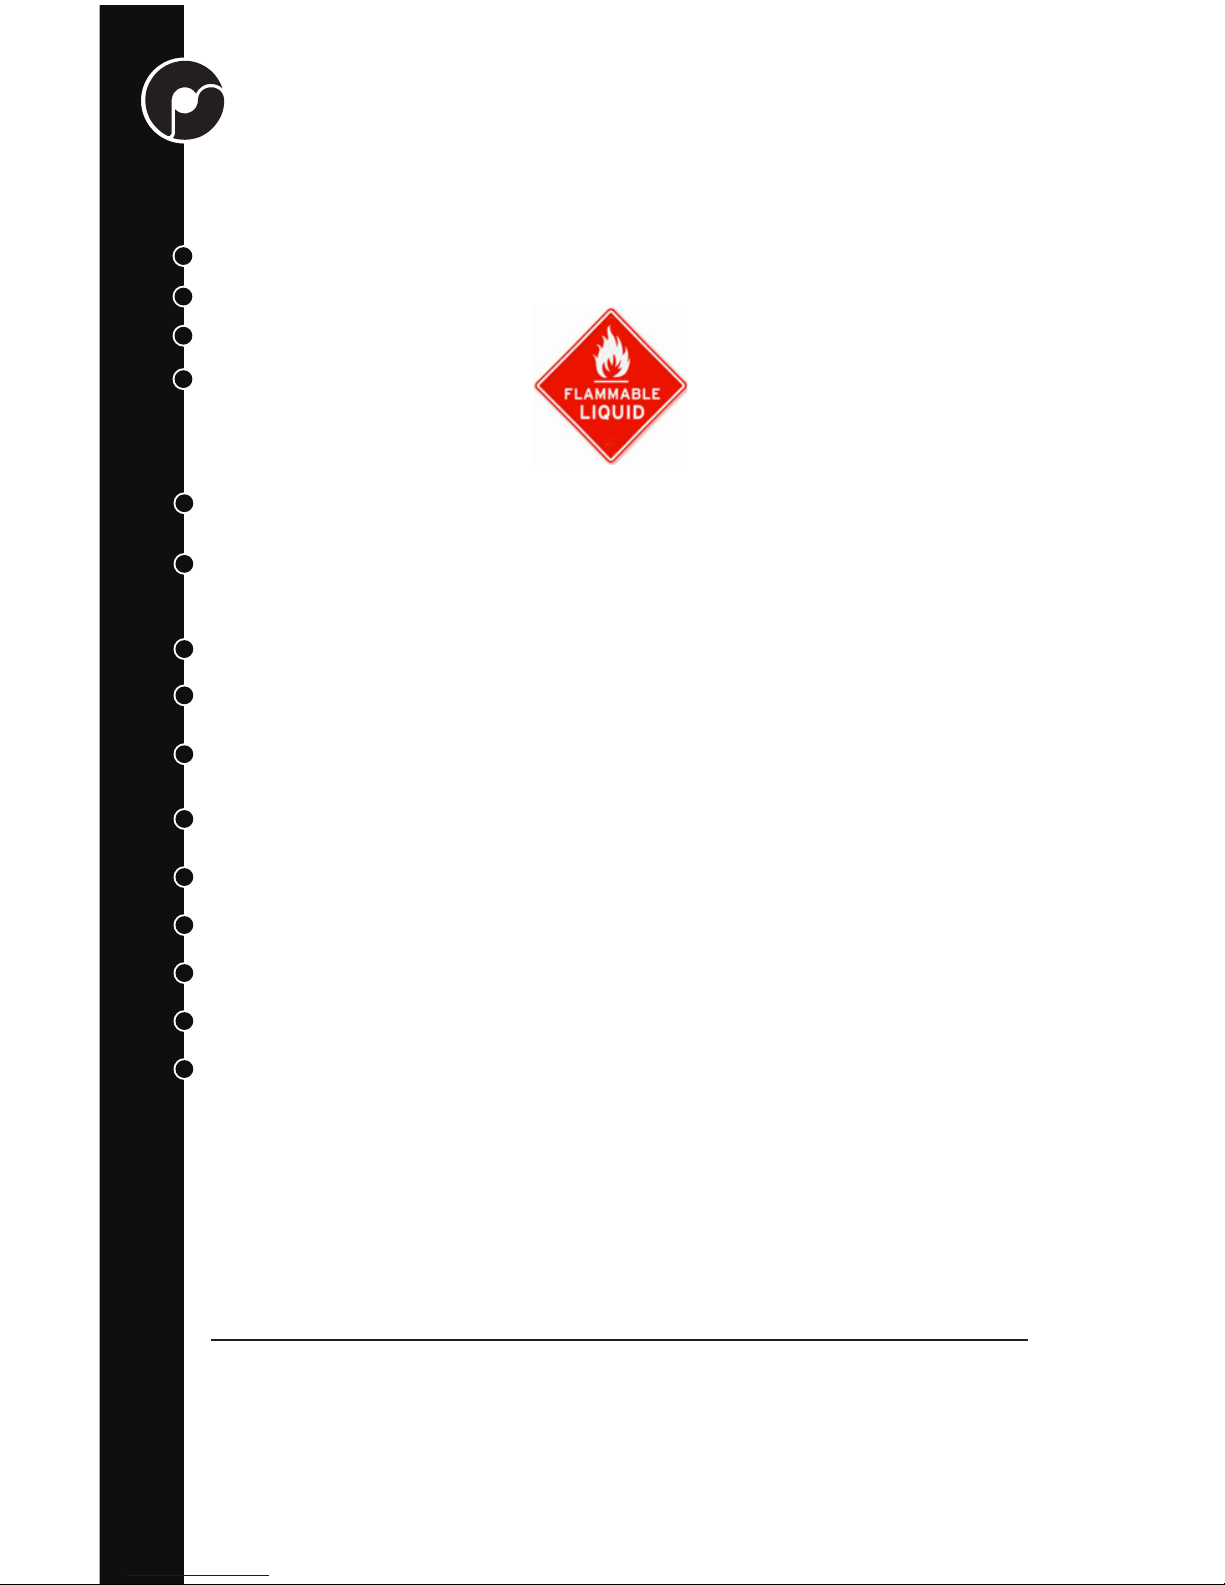
异丙醇是易燃液体。请勿将设备靠近明火、火星、热源及火源。
仅能使用异丙醇在PolysherTM里进行抛光。使用其他任何溶剂或液体会引起该设备不可逆
的损坏,同时会增加着火或爆炸的风险。 确保你使用的IPA不与其他溶剂混合,检查IPA注
意事项 。
请在通风良好的地方使用此设备。防止吸入醇雾。
请将抛光机放置于水平平面上。在非水平平面操作抛光机可能导致醇液泼洒或泄出。
避免长时间皮肤直接接触异丙醇。如果不慎进入眼睛,请先确保摘除隐形眼镜后用清水冲
洗至少15分钟,并及时就医。
请勿吞食异丙醇。如果不慎吞食,请立即就医并告知误食异丙醇。
请勿遮挡抛光机上任何用于通风的设计。
请勿在操作中使用除设备制造商提供的配件/附件意外的部件。
请在经认证的售后部门咨询或寻求维修服务。
请勿使用非设备原装配套或经设备商认证的电源适配器。
任何关于产品使用安全的问题,请发邮件到[email protected]。
我们将及时为您解答。
1
异丙醇在某些国家可能为管制商品。请遵循当地法律规定进行购买。。
2
建议使用浓度70%以上的异丙醇。想达到更好效果,请使用浓度不小于90%的异丙醇。
请使用异丙醇在PolysherTM抛光机里进行抛光。首次使用前,请仔细阅读 以下内容。
请详细阅读操作说明
请保留操作说明以便于查阅
请注意警告信息
请遵照说明进行操作
重要安全提示
Page 24
24
废弃电子产品处理方式
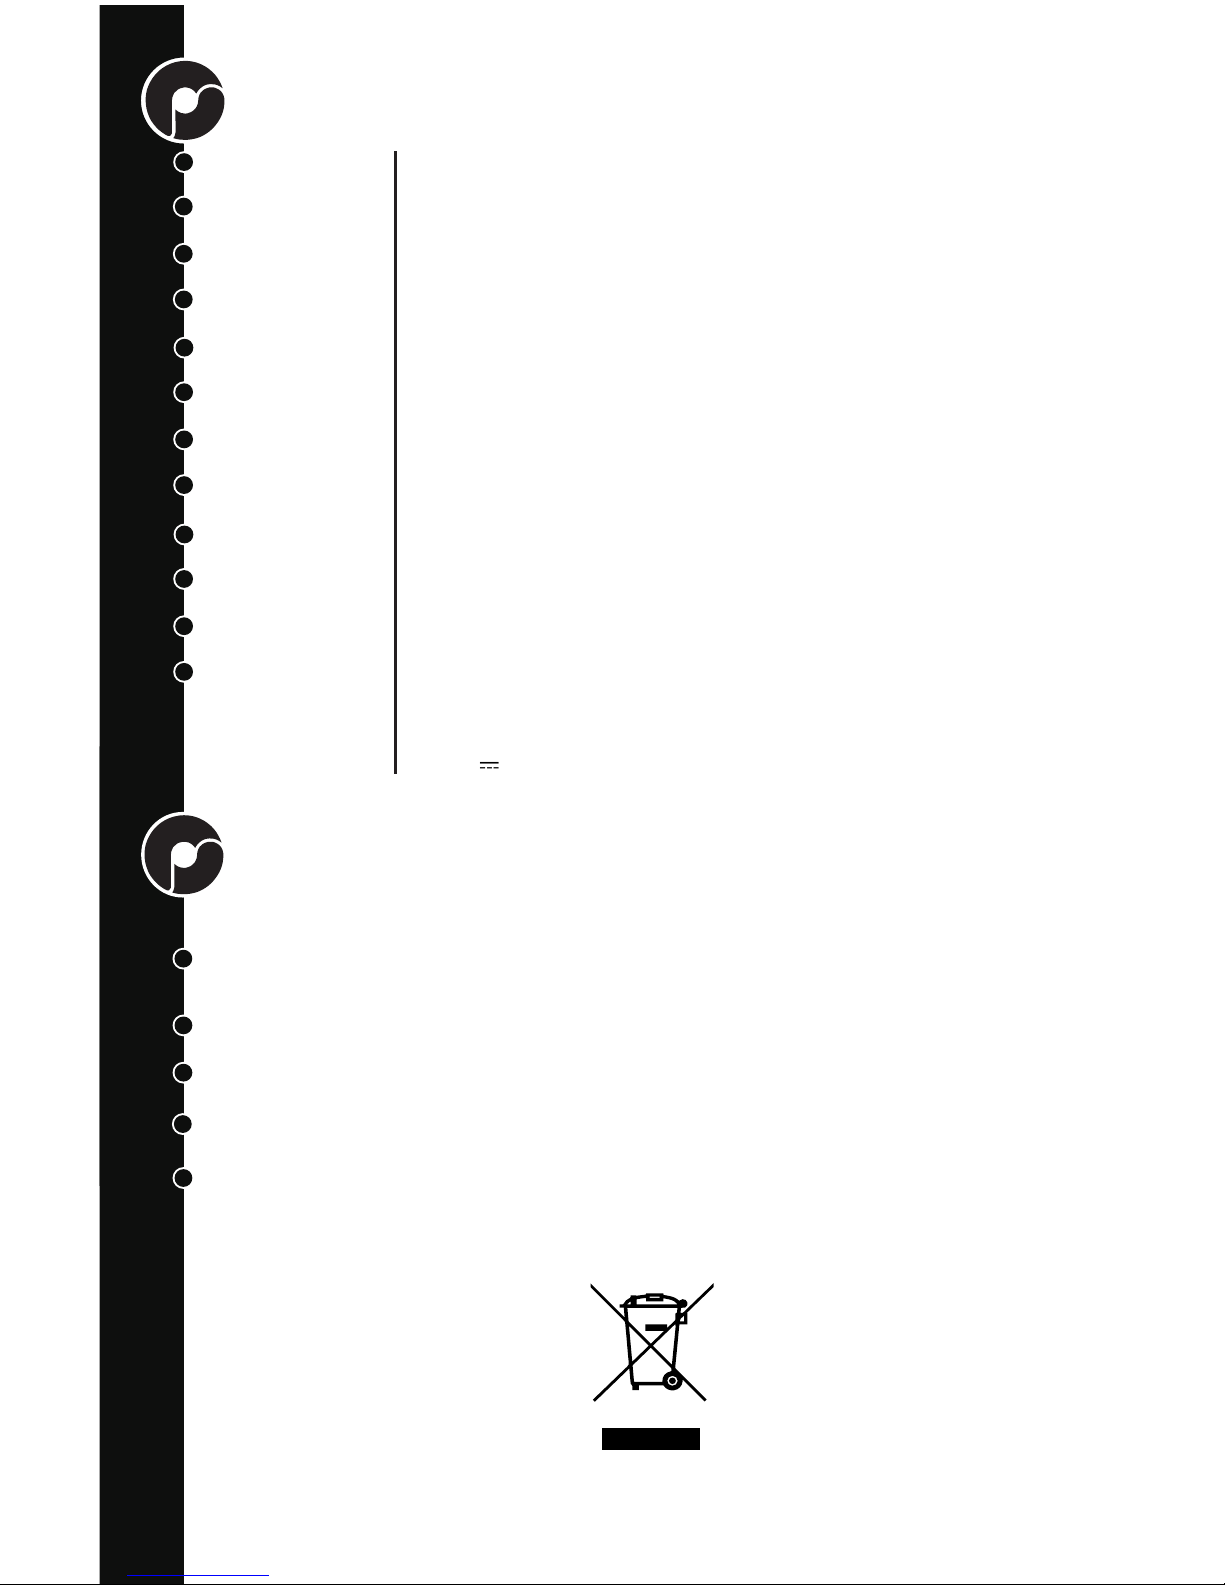
左图标志见于设备机身或说明书,表明该设备不能与生活垃圾一起处理。请咨
询当地垃圾分类站处理此类设备垃圾的方法。
某些国家或区域也可以将旧机器运至经销商做以旧换新处理。
合理处理此类设备垃圾将会减少其对健康及环境带来潜在威胁的风险,反之则会增加风险
请联系当地相关部门咨询垃圾分类细则。
违反当地垃圾分类条款及相关立法,将有可能被追究相应责任并承担处罚。
产品规格
专利技术
可抛光材料
抛光溶剂
抛光时长
机器尺寸
外包装箱尺寸
机器重量
运输重量
最大抛光打印件尺寸
机器运行环境温度
机器存放环境温度
工作电源
微滴抛光
PolySmooth
TM
不低于70%的异丙醇。推荐90%或以上浓度已保证较好抛光效果
建议20-40分钟(或根据模型尺寸、溶液浓度不同进行调整)
230 x 300 x 360 毫米 (长x宽x高)
350 x 400 x 460毫米 (长x宽x高)
4 kg
6.8 kg
150 mm (直径) x 180 mm (高)
15 – 32 °C
0 – 38 °C
电源适配器参数: 输入AC 100-240V, 50/60Hz, 0.4A 输出: 5V 2000 mA
深圳市荣为信科技有限公司
PolysherTM电源要求
输入: 5V 2000mA
Page 25
25
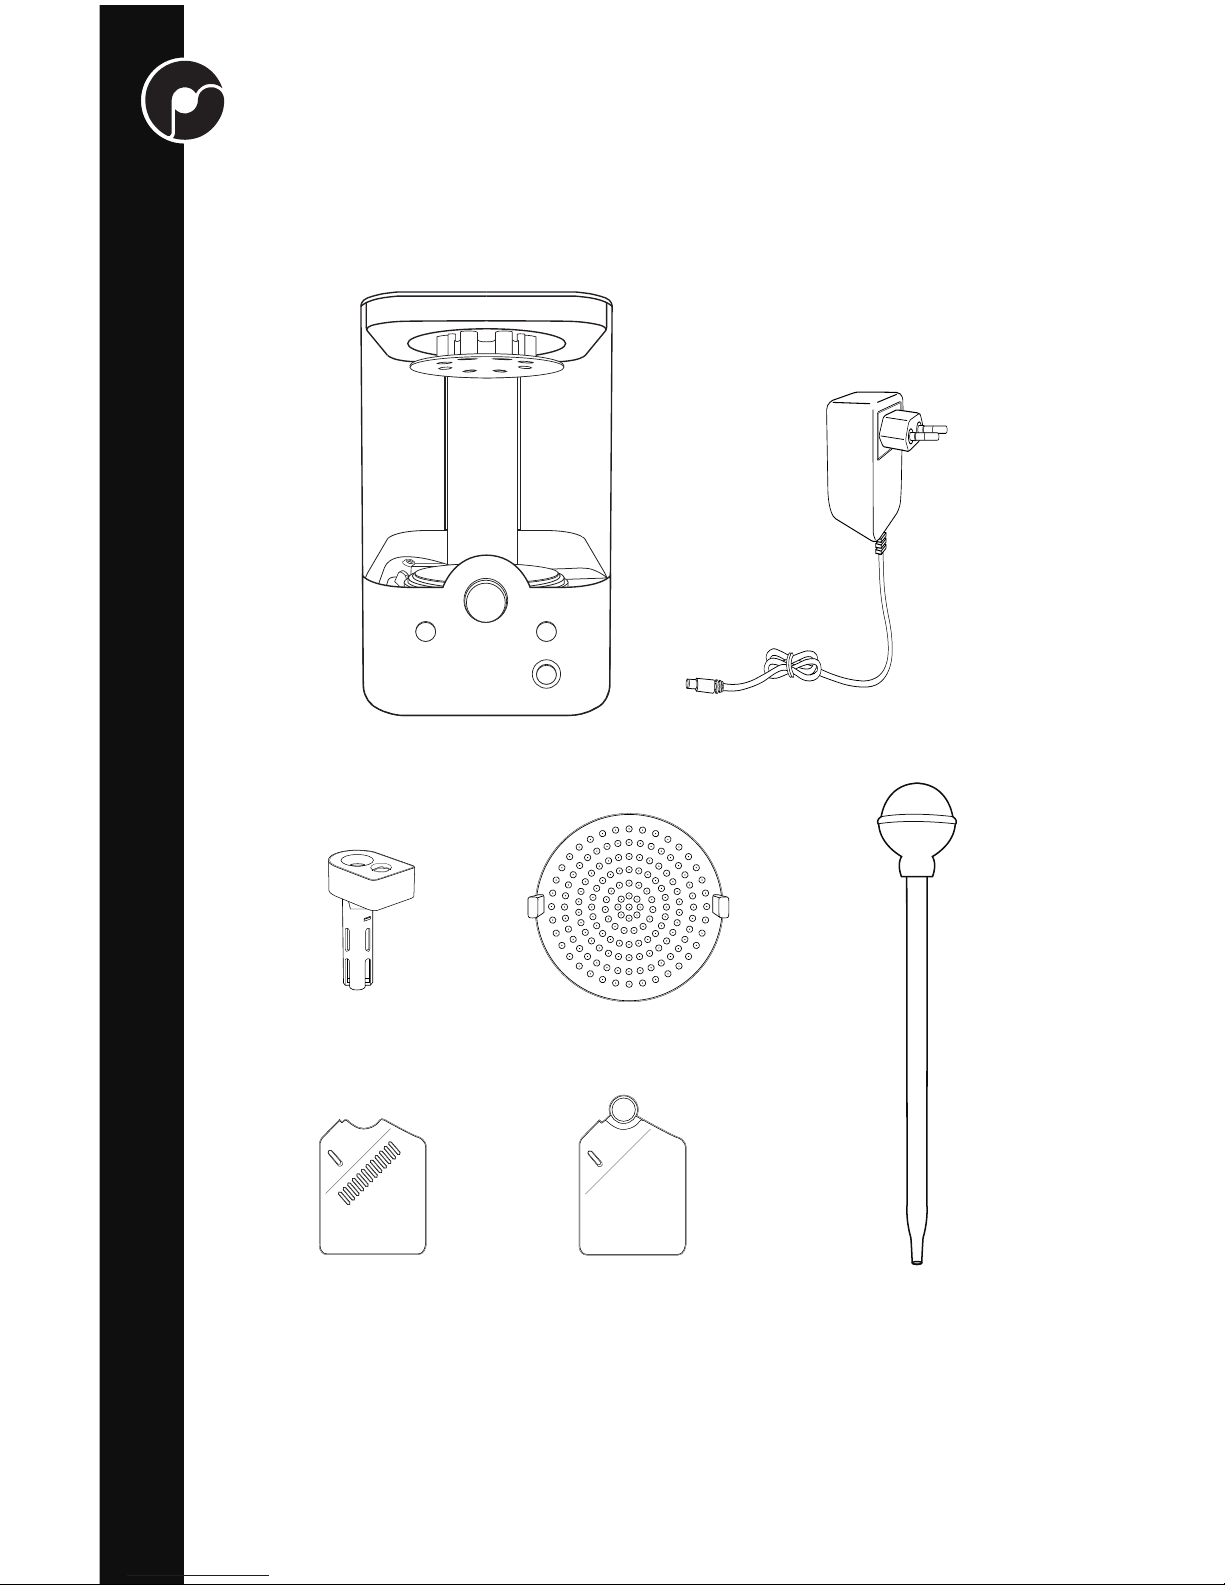
完整的PolysherTM包装里应包括
包装清单
PolysherTM x1 电源适配器 x1
雾化头 x2
胶头吸管 x1
带栅格的醇槽盖 x1 全封闭的醇槽盖 x1
抛光托盘 x2
OPEN/CLOSE CHAMBER LIGHTS
ON/OFF
Polysher
Page 26
26
抛光机电源开关按钮。接通电源后,轻按此键开启抛光机。长按后松开则关闭抛光机。
抬升或下降抛光台。按下按钮,抛光台将升起。全部升起后按下此键将下降抛光台在升降
过程中按下此键,将停止升降。
主控旋钮
顺时旋转旋钮将开始抛光。每一个LED指示灯代表5分钟抛光时间,顺时针或逆时针旋转旋
钮,以增加或减少抛光时间。抛光时,按下旋钮,可通过旋转旋钮来设置不同颜色的雾化
头灯光效果。
外壳
透明外壳便于观察抛光过程并提供气密性,防止醇雾泄露。
雾化头
雾化头用来将醇液转化为醇雾并喷射于抛光机中。雾化头里面放置的海绵从醇槽里吸取醇
液并传导到雾化头顶端的雾化片。雾化片通过每秒上千次的震动将醇液雾化并喷射出来。
雾化头可以更换。轻拔雾化头可以将其拆除。安装雾化头时,请将雾化头底部的四个引脚
对准抛光机底部左上角的四个插孔,轻按稳固即可。
醇槽
储存并回收用于抛光的醇液。
醇槽盖
包装中有两种醇槽盖。一种是带栅格的醇槽盖,便于醇液回流,在抛光过程中使用。另一
种是全封闭的醇槽盖。短期内不使用抛光机并且又不需回收醇液时使用,以最大程度减少
醇液的挥发。
抛光台和抛光托盘
抛光托盘置于抛光台上,用于放置PolySmoothTM的抛光件。抛光台可升降以便放置抛光
件。抛光托盘两边有把手设计,方便取用。
抛光机顶灯开关按下开关,打开或关闭抛光机顶灯。顶灯经过 1-2秒全亮或熄灭,在这个
过程中,按下按钮,可以选择顶灯当下的亮度。
雾化头警告灯
当雾化头警告灯亮起时,无法进行抛光操作。有可能出现以下几种情况:有可能出现以下
几种情况:雾化头接触不良或者雾化头失灵
密封不良警告灯
当密封不良警告灯亮起时,无法进行抛光操作。有可能出现醇雾泄露风险。请检查外壳是
否盖好。
直流电源插孔
PolysherTM抛光机的直流电源插孔位于机体后侧下方。
主要部件说明
1
2
3
4
5
6
7
8
9
10
11
12
Page 27
OPEN/CLOSE CHAMBER LIGHTS
ON/OFF
5
6
7
3
2
4
8
9
1
1011
12
Page 28
28
设置抛光机
接通电源
请选择符合当地插座标准的适配器插头进行使
用。抛光机的电源插孔位于机体后侧下方。
启动抛光机
接通电源后,按下抛光机正面主控面板右下方
的电源键启动抛光机。抛光机启动时会播放启
动提示音,同时环形LED指示灯亮起。
打开抛光机
按下Open/Close升降按钮,抛光台将开始上
升。抛光台上升至最高位时将自动停止。
打开透明腔罩
抬起透明腔罩并将其钩在风扇边缘上,如图所
示 。
安装雾化头
安装时将雾化头下方的四个引脚稳固地插入抛
光腔左上角的插孔中,并用手轻按,以保证接
触良好。
3
高浓度的异丙醇将缩短抛光时间并获得更好的抛光效.果
1
2
3
4
5
Page 29
29
加注醇液
加注醇液。建议加注至醇槽容积80%-90%。建
议使用浓度70%以上的异丙醇。
推荐使 用浓度不小于90%的异丙醇 。
6
安装醇槽盖
醇液加注完毕后,请盖好带栅格的醇槽盖。
安装抛光托盘
请将抛拖盘至于抛光台上。
7
8
Page 30
30
开始抛光
开始抛光
顺时旋转旋钮,抛光开始。此时,雾化头开始
喷出醇雾,抛光托盘开始旋转。若干分钟之
后,醇雾将布满整个腔体。
左右旋转旋钮,可以设置抛光时间,每亮一个
LED指示灯,表示增加5分钟时间。最佳抛光时
间与醇液浓度,环境温度,抛光件尺寸,雾化
头海绵饱和状态等相关。一般来说,第一次可
将抛光时间设定在20-40分钟(点亮4-8个LED
灯)进行试抛。
按下Chamber Light 按扭可点亮抛光腔体顶
灯。按下主控旋钮后,进行左右旋转,可选择
雾化头灯光颜色。
按下升降开关
按下升降开关时,升降台将缓缓下降,直至到
达抛光机底端。此时整个抛光机呈密封状态,
抛光机正面控制面板上密闭不良指示灯熄灭。
若指示灯未熄灭,请检查抛光台是否良好落
位。
可以按照设置好的时间让抛光机自动工作并停止,或者在抛光时随时逆时针旋转主控
旋钮来停止抛光。结束时,会有提示音提示抛光结束。此时,位于抛光机顶端的风扇
将自动开启,启动“清洁”模式,吹散醇雾。
放置一个PolySmoothTM打印件于抛光托盘上。
1
2
3
Page 31
31
升起抛光台
抛光结束后,可按下Open/Close按钮升起抛
光台。
安装全封闭醇槽盖(可选)
如果短期不需使用抛光机,建议将带栅栏醇槽
盖换成全封闭醇槽盖以减少醇液的挥发及雾化
头海绵的干燥。
晾干
当抛光台上升完毕后,可将置有抛光件的抛光
托盘取出,放在一旁进行晾干。此时请不要触
碰抛光件,以免留下指纹。此时可使用另一个
抛光托盘进行抛光。
抛光件需若干小时才能完全干燥。用风扇或真
空干燥箱可加速干燥过程。请避免抛光件接触
热源或者直接烘干。
模型在几周后会慢慢变硬,为了加快这个过
程,你可以使用风扇 。
4
5
6
Page 32
32
基本参数
颜色
平均线径
推荐打印温度
推荐打印速度
加热底板(如有此功能)推荐设置温度
说明
PolySmoothTM 可以在和PLA相似的打印条件下进行打印。
可以在PolysherTM (需另外购买)里用 异丙醇 对PolySmoothTM的打印件进行后处理,以
极大程度提高PolySmoothTM 打印件的表面质量,消除层间纹理。
PolySmoothTM 能在常见打印底板上进行打印。为进提高首层粘合强度,可使用PVA胶棒
涂抹在打印地板上或者将打印底板加温至70 °C。
PolySmooth
TM
线材较易吸潮,建议未打印时,将线材放入自封口袋中密封,以减少材料
对水分的吸收, 确保最好的打印效果。
更多产品使用信息或技术问题,请访问我们的网站www.polymaker.com或者发送到邮箱
[email protected]我们将竭诚为您服务。
7种颜色
1.75 或 2.85 (< ± 0.05 mm, 一般~ ± 0.02 mm)
190 – 220 C (1.75 和 2.85 mm相同)
40 – 90 mm/s
0 - 70 °C
1
2
PolySmooth
TM
Page 33

33
卓越特性
可抛光性
PolySmoothTM是全球第一款能够对其打印件进行“抛光”处理,消除层间纹路的3D 打印
材料。配合Polymaker研发的PolysherTM抛光机使用,能极大提高其打印件的表面质量。
易于打印
PolysmoothTM可以在和PLA一样,甚至更宽泛的的条件下打印。其无异味,不需要加热
底板也能轻松打印的特性,非常适合桌面式3D打印机。
出色的综合力学性能
相比于市场上其他常见材料,PolySmoothTM具有更好的综合力学性能,能充分满足日常
打印的需求。
优化的支撑
Polymaker将研发PolySupportTM时的灵感重新注入到了PolySmoothTM的开发上。打印件
的自身支撑非常容易去掉而且抛光后不会留下任何痕迹。
不易翘曲
PolySmoothTM在打印过程中内应力极小,大大降低了其翘曲的可能性,非常适合打印较
大的部件。
3
Page 34
34
常见问题及解决方案
如果雾化头警告灯亮了,该如何处理?
请检查雾化头是否松动。轻按雾化头,以确保其连接良好。
清理醇槽
包装中带有一只30毫升的胶头吸管用于清理醇槽中剩余的醇液。吸取醇液的过程中,请
勿将热源、明火或者火星靠近醇槽。吸出的醇液若妥善保存,可再次使用。
取下外壳
一般来说,不需将抛光机的外壳取下。若有必要,请遵循以下步骤:
将抛光台升至最高位置
将外壳由下举起至抛光机顶端。两手向外轻轻扩张外壳后端,并同时往上移出。
将外壳放回,先两手向外轻轻扩张外壳后端,并同时往下放入。请确保外壳与抛光机底座
之间的橡皮密封圈接触良好,保证密封效果。
如果喷雾量明显小于正常情况该如何处理?
正常情况下,几分钟之内醇雾就会布满整个抛光机。如果一直未能布满或者醇雾非常稀
薄,请检查醇槽中是否有足够的醇液,并根据情况适量加注。低雾量也意味着需要更换
雾化头 。
1
2
3
4
Page 35
35
联系方式
更多信息欢迎邮件咨询:
E-mail: [email protected]
中国上海浦东新区张江高科技园区
松涛路647号一号楼
facebook.com/Polymaker.3D
欢迎用社交媒体分享您的使用心得:
twitter.com/Polymaker_3D
youtube.com/Polymaker
instagram.com/Polymaker_3D
pinterest.com/Polymaker
thingiverse.com/Polymaker_3D
T
facebook.com/groups/Polymaker
Page 36

www.polymaker.com
www.polymaker.com
 Loading...