

Page 1
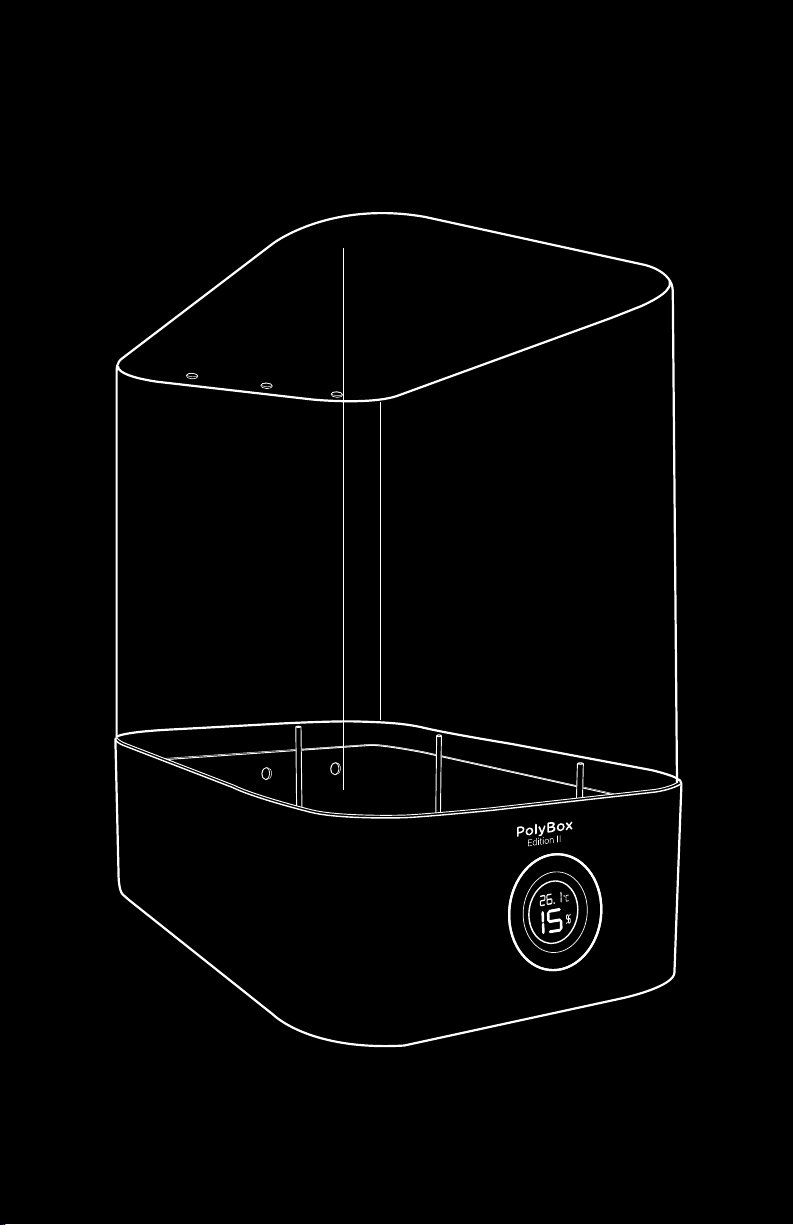
PolyBox
Edition II
TM
Operation Manual
1
Page 2

polybox.polymaker.com
Page 3

CONTENTS
Introduction
Important Safety Instructions
Specications
Information on Disposal for Users of Waste
Electrical & Electronic Equipment
Package contents
Essential Parts of the PolyBox
Setting up your PolyBox
TM
TM
Contact Information
4
5
6
6
7
8
10
12
3
Page 4
INTRODUCTION
Thank you for purchasing the PolyBoxTM from Polymaker! With PolyBoxTM you’ll
experience no more 3D printing problems caused by laments absorbing moisture
such as extreme oozing, rough surface quality, weaker 3D prints, 3D printer
damages and so on!
PolyboxTM includes a built-in high-precision hygrometer and silica gel desiccant
sachets to control and absorb moisture from the air. The humidity within the box
is maintained below 15% to prevent the lament from absorbing moisture during
the storage and even during the 3d printing process. It is specically designed
for Nylon, PVA, PolySmoothTM and other highly hygroscopic 3D printing materials.
However, its good practise to keep all 3D printing laments inside the PolyBox
preserve the optimum printing quality.
PolyBoxTM is compatible with both 1.75mm and 2.85mm laments and can contain
up to two 1kg spools or one 3kg spool!
TM
to
4
Page 5

IMPORTANT SAFETY INSTRUCTIONS
Read these instructions.
Keep these instructions.
Heed all warnings.
Follow all instructions.
PolyBoxTM comes with silica gel desiccant sachets, FDA certied, non-toxic, tasteless,
non-corrosive, non-polluting. Do not use other types of desiccant.
Do not eat the desiccant, if ingested, seek medical advice immediately.
In case of desiccant contact with the eyes, ush with plenty of water and get medical
attention.
TM
PolyBox
may be hazardous if swallowed or may cause choking if ingested or inhaled.
PolyBoxTM contains a high-precision hygrometer including a button battery. Don’t mistake
batteries for pills. Don’t store batteries near pills or in pill bottles. Don’t leave them on
bedside tables or place them loose in your pocket or purse. Look at every medicine you
intend to swallow. Turn on the lights, put on your glasses, read the label and look at the
medicine itself.
Never put batteries in your mouth, to test, to hold, or for any reason. They are slippery and
easily swallowed. Keep out of the reach of children or animals.
contains small parts. Keep out of the reach of children or animals. Small parts
Please dispose of batteries in a designated collection point.
5
Page 6
SPECIFICATIONS
Desiccant type
Humidity range
Accuracy
Resolution
Response
Temperature range
Accuracy
Product size
Package size
Product weight (without
desiccants and wires)
Package weight
Silica gel
2*Desiccant sachets 100g
2 spools ≤ 1kg or 1 spool 3kg
10-99%
±5%
1%
10 seconds
-50~70 °C
±1 °C
LR44*1
315(L)*190(W)*310(H)
196(L)*320(W)*320(H)
1.150kgs
1.700kgs
INFORMATION ON DISPOSAL FOR USERS
OF WASTE ELECTRICAL & ELECTRONIC
EQUIPMENT
This symbol on the product and/or accompanying documents means that used
electrical and electronic products should not be mixed with general household waste.
For proper treatment, recovery and recycling, please take this product to a designated
collection point where it will be accepted free of charge.
Alternatively, in some countries you may be able to return your products to your local
retailer upon purchase of an equivalent new product.
Disposing of this product correctly will help save valuable resources and prevent any
potential negative effects on human health and the environment, which could otherwise
arise from inappropriate waste handling.
Please contact your local authority for further details or your nearest designated
collection point.
Penalties may be applicable for incorrect disposal of this waste, in accordance with
your national legislation.
6
Page 7
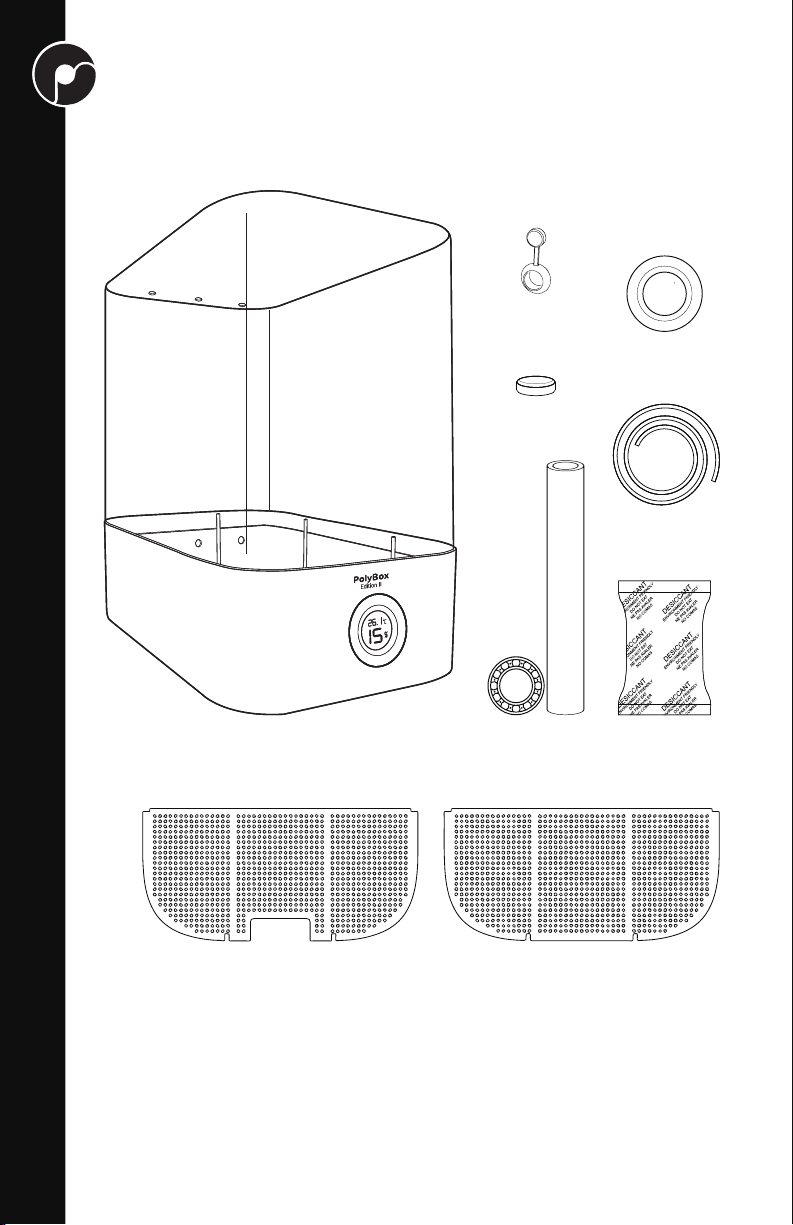
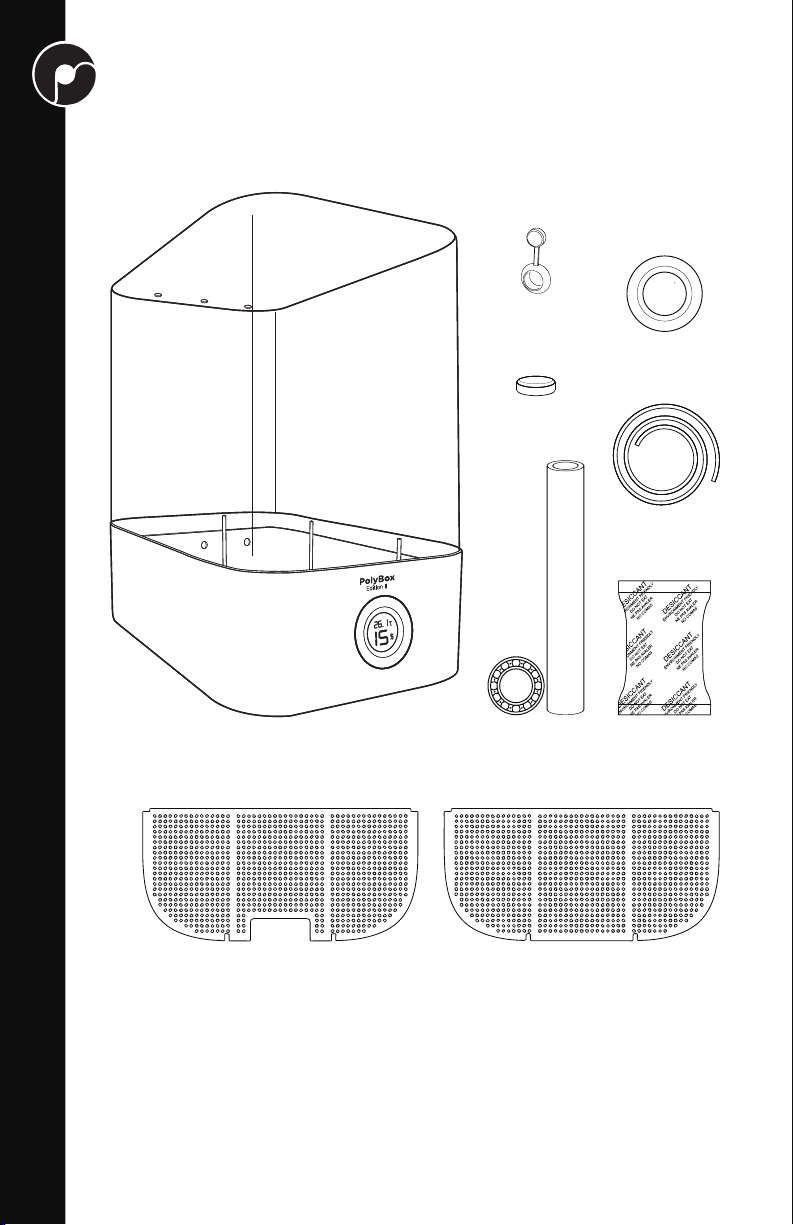
PACKAGE CONTENTS
Your PolyBoxTM package should contain the following:
Rubber Plug
x 6
Battery LR44
x 1
C
26.1
%
15
Thermo-Hygrometer
x 1
PolyBoxTM (cover + base)
x1
Front Grid
x1
Rods x4
Bearings x8
Filament Guide 150cm
x 1
100g Silica
Gel Sachets x2
Back Grid
x1
7
Page 8

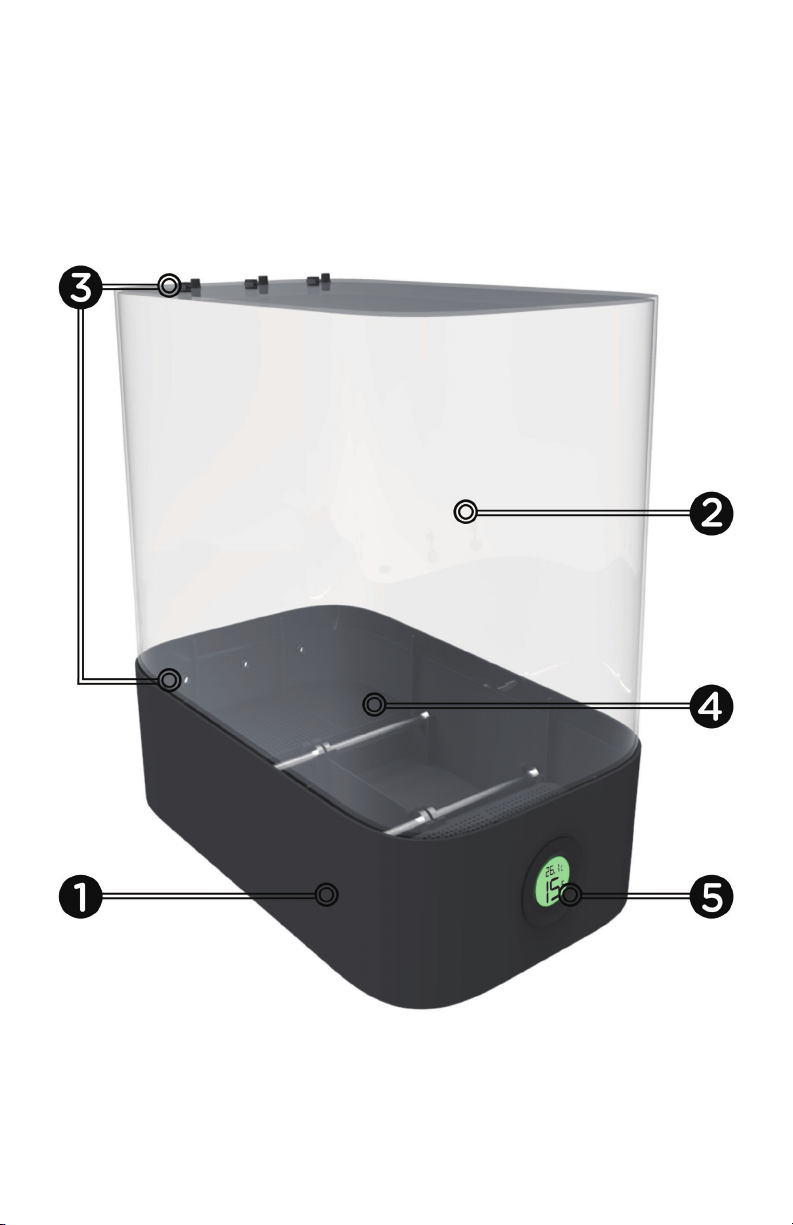
ESSENTIAL PARTS OF THE POLYBOX
Base
1
Cover
2
Rubber Plugs
3
Desiccant Compartments
4
Thermo-Hygrometer
5
TM
8
Page 9
Page 10

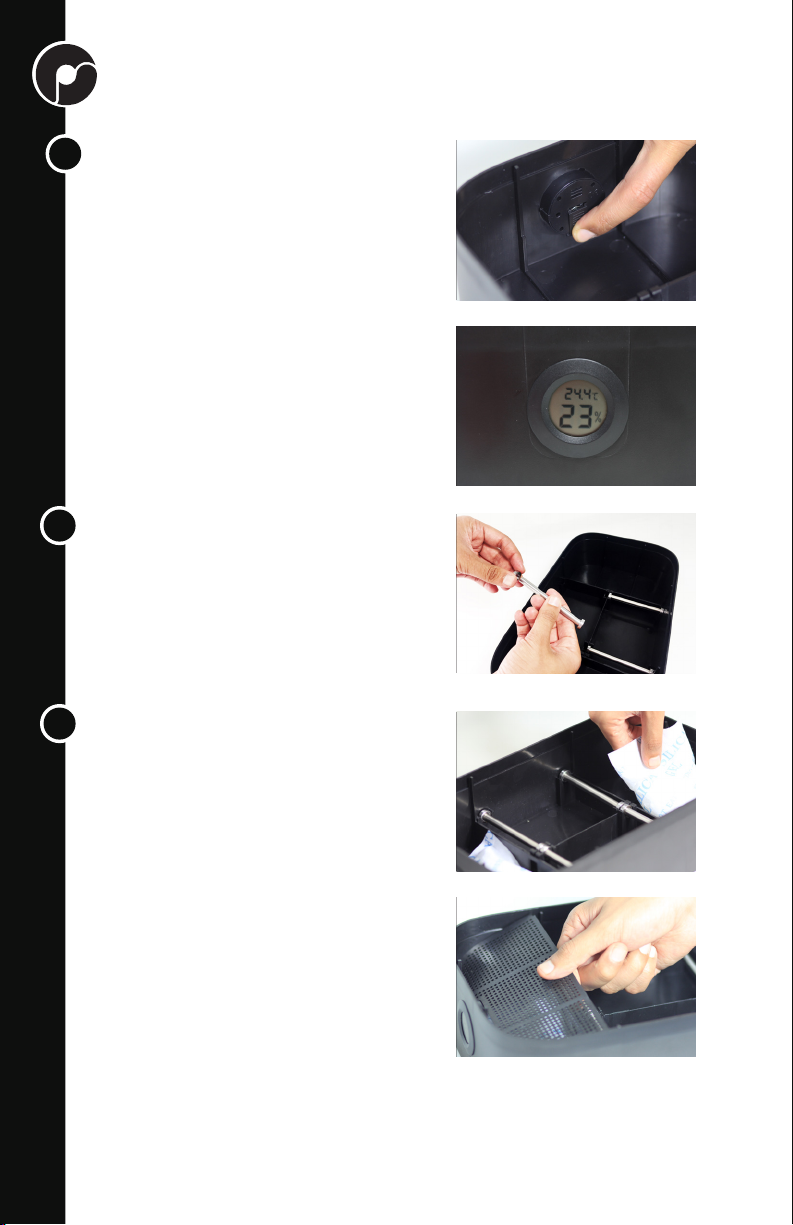
SETTING UP YOUR POLYBOX
To install the hygrometer battery
1
Slide down the hygrometer battery cover.
Remove the battery from the package, insert
it in the designed compartment and put back
the cover.
Check if the front display switches on. When
you notice that the hygrometer display is
fading, replace the button battery 1.5V LR44.
Note: The provided battery will last
approximately 3 months.
To install the rods
2
Slide two bearings onto both ends of the steal
rod, then snap the rod and bearings into the
TM
PolyBox
TM
To install the desiccant sachets
3
Remove the set of desiccants from the
package and check if the sealed bag is intact.
If there are any leaks, please dry the sachets
before using it. The provided desiccant bags
can be dried in a microwave for 4 times 5min
(defrost mode), make sure to ip the bags
upside down between each iteration. Use
oven mitts to touch the desiccant bags.
Note: other types of desiccant may not have
the ability to recover and be reused.
Do not expose the desiccant sachets to the
air for too long. We highly recommend silica
gel for the type of desiccant.
Put the two desiccant bags into the PolyBox™,
one in each compartment.
Close the two compartments with the two
grids.
10
Page 11

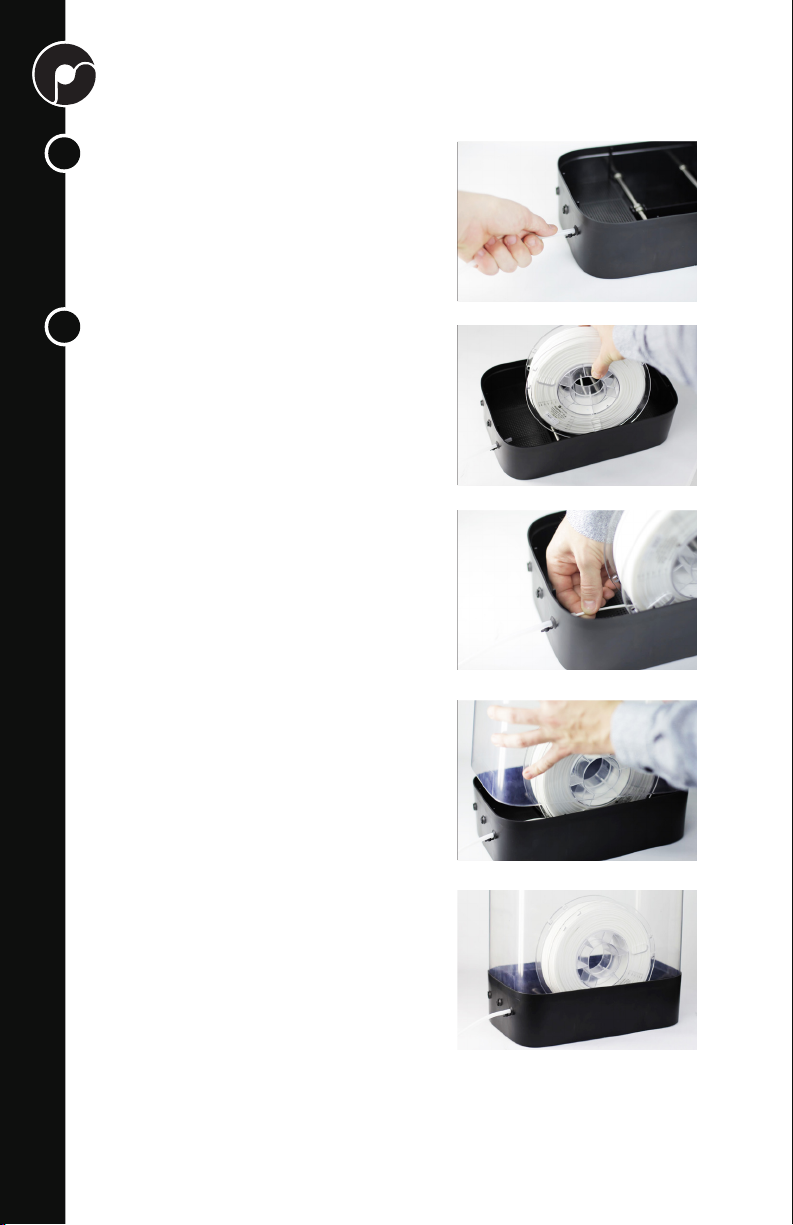
To install the filament guide
4
Cut the lament guide according to your
need (Distance from the PolyBoxTM to the 3D
printer) and insert it in the rubber holes on the
back or on the top.
To place the spool
5
Place the spool in the PolyBoxTM and feed the
lament through the rubber plug.
Note: Make sure the material is fully dried
before putting it in the PolyBoxTM.
Place the cover on the PolyBoxTM.
You should feel a small friction which ensures
the t. Make sure the cover ts correctly in
the base to ensure an airtight environment
for the spools. Do not open the PolyBoxTM too
frequently and close all the unused rubber
plugs to preserve the desiccant.
Gently pull the lament out to check if the
spool rolls smoothly.
After 2 hours you should see the inside
humidity dropping below 15%. The time will
depend on the room humidity. The hygrometer
should always display a humidity level below
15%.
Note : The minimum humidity level that can
be displayed is 10%
If the hygrometer displays a humidity level
above 20%, replace the desiccant.
Be careful, at the end of the spool, the filament might get stuck in the PolyBoxTM and
the 3d printer can drag the PolyBoxTM.
Caution:
11
Page 12

CONTACT INFORMATION
Visit polymaker.com and follow us on our social media channels for
product updates, videos, tutorials and more!
facebook.com/Polymaker.3D
twitter.com/Polymaker_3D
youtube.com/Polymaker
instagram.com/Polymaker_3D
pinterest.com/Polymaker
thingiverse.com/Polymaker_3D
T
facebook.com/groups/Polymaker
For questions or further information, please contact us at:
701 Building
Fudan Science Park
1018 Miyun Road
YangPu District
Shanghai, PRC
E-mail: inquiry@polymaker.com
II
12
Page 13

PolyBox
第二版
TM
使用手册
Page 14

polybox.polymaker.com
Page 15

内容
产品概要
重要安全提示
规格参数
装清单
PolyBox™主要部件
组装PolyBox™
联系方式
16
17
18
19
20
22
24
15
Page 16
产品概要
感谢您购买Polymaker出品的3D打印线材防潮盒(PolyBox™)。PolyBox™可以为您
彻底解决3D打印材料长时间暴露在空气中吸水后造成的各种打印问题。例如多余的拉
丝,模型表面毛糙,层间结合力降低,打印机堵头等现象。
PolyBox™内置高精度温湿度计,利用硅胶干燥剂吸收空气中的水分,使盒内的空气湿
度长期保持在10%以下,能有效防止3D打印线材在打印和储存过程中吸水受潮。特别
适合于Nylon,PVA,PolySmooth等因高吸水率而难以长期储存的3D打印材料。
PolyBox™兼容性强,可以放置2卷1kg以下或1卷3KG级别的线盘,同时兼容1.75mm
和2.85mm线材。
16
Page 17

重要安全提示
PolyBox™自带的干燥剂为硅胶干燥剂,通过FDA认证,无毒无味,无腐蚀,无污染,可与
药品、食品直接接触。请勿使用其他种类干燥剂。
请将干燥剂置于儿童或动物无法接触的地方,请勿食用干燥剂,如误食后请及时就医。
如果硅胶干燥剂不慎入眼,请用大量水冲洗并及时就医。
PolyBox™内包含细小零件,请置于儿童或动物接触不到的地方,若吞食细小零件可能会造
成成噎塞或严重伤害。
PolyBox™内的高精度温湿度计包含一枚纽扣电池,请不要让儿童玩纽扣电池,并让纽扣电
池远离儿童;
为防止意外,请勿将电池置于口中。
在吞食药片时进行确认,以免将纽扣电池误认为药丸或药片而吞食。
请勿随意丢弃纽扣电池。
请勿随意丢弃丢弃电子温湿度计或参见当地电子垃圾分类处理办法。
17
Page 18

规格参数
干燥剂类型
干燥剂规格
支持的3D打印线盘
湿度测量范围
湿度测量准确度
湿度显示分辨率
湿度刷新周期
温度测量范围
温度测量精度
电池规格
产品尺寸
包装尺寸
产品重量
(不含干燥剂和线材)
包装重量
硅胶干燥剂
2组100g*2替换装
2卷1KG以下线盘或1卷3KG线盘
10~99%
±5%
1%
10秒
-50~70℃
±1℃
LR44*1
315(L)*190(W)*310(H)
196(L)*320(W)*320(H)
1.150kgs
1.700kgs
18
Page 19
包装清单
包装清单如下:
橡胶孔塞*6
温湿度计电池
LR44*1
C
26.1
%
15
温湿度计*1
出丝导管150cm*1
PolyBox™
(透明盒盖及底座)*1
干燥剂槽前盖板
x1
19
线盘架轴*4
轴承*4
干燥剂槽后盖板
硅胶干燥剂2组,
每组100g*2
x1
Page 20

底座
1
盒盖
2
导空及橡皮孔盖
3
干燥剂槽
4
温湿度计
5
PolyBox™主要部件
20
Page 21

Page 22
组装PolyBox™
安装PolyBox™温湿度计电池
1
拨下PolyBox™内置的温湿度计电池盖板。
取出包装中的LR44纽扣电池,+级朝外放入温
湿度计中,并盖上盖板。
检查温湿度显示是否正常。温湿度计LCD屏幕
显示暗淡时,请更换电池。电池规格为1.5V
LR441颗。
注意:附送电池预计能使用3个月左右时间。
装入钢管
2
将两个轴承推入一根钢管两端,然后将两个轴
承端分别卡入PolyboxTM的底座上。
放入干燥剂包
3
取出干燥剂,检查干燥剂包装真空度是否完
好,如果漏气请烘干干燥剂后再使用。失效的
硅胶干燥剂可以在80-90°C下烘干8小时后恢
复干燥能力。
注意:其他种类干燥剂可能不具备恢复能力。
请使用硅胶干燥剂,不建议使用其他种类干燥
剂。
在PolyBox™两侧干燥剂槽内各放入1包100g硅
胶干燥剂。
安装干燥剂隔板。
22
Page 23
安装出丝导管
3
请根据您的需要裁剪出丝导管长度,并插入橡
胶塞孔内。
放置3D打印线材
4
将料盘放入PolyboxTM中并将线材穿过橡胶塞
孔。
注意:请确保放入PolyboxTM中的线材是充分干
燥过的。
将透明罩放置回PolyboxTM。在放置透明罩时你
应该会感受到一个小的摩擦以确保安装到位。
确保透明罩和基座安装正确从而保证线材能处
在密封环境中。为了保护干燥剂,不要频繁地
打开PolyboxTM并合上所有未使用的橡胶塞孔。
轻轻地抽出耗材检查抽丝是否顺滑。
2小时候你会发现湿度会降到15%以下。这个时
间将取决于房间的湿度。然后湿度计会始终显
示湿度低于15%。
注意:温湿度计湿度显示最低值为10%。如果
温湿度计湿度显示超过20%,请更换Polybox
内的干燥剂
TM
请注意观察线材使用情况,在线材将近用完时取出。防止线材末端因弯折而卡在出丝
导管内,拖动PolyBox™造成安全事故。
注意:
23
Page 24

联系方式
欢迎用社交媒体分享您的使用心得:
facebook.com/Polymaker.3D
twitter.com/Polymaker_3D
youtube.com/Polymaker
instagram.com/Polymaker_3D
pinterest.com/Polymaker
thingiverse.com/Polymaker_3D
T
facebook.com/groups/Polymaker
更多信息欢迎邮件咨询:
上海市杨浦区密云路1018号复旦科技园701号楼
E-mail: inquiry@polymaker.com
24
Page 25

Page 26

www.polymaker.com
www.polymaker.com
 Loading...