

Page 1
polyend.com
Polyend Preset
Preset Recaller
Made in Poland
and Sequencer
Page 2
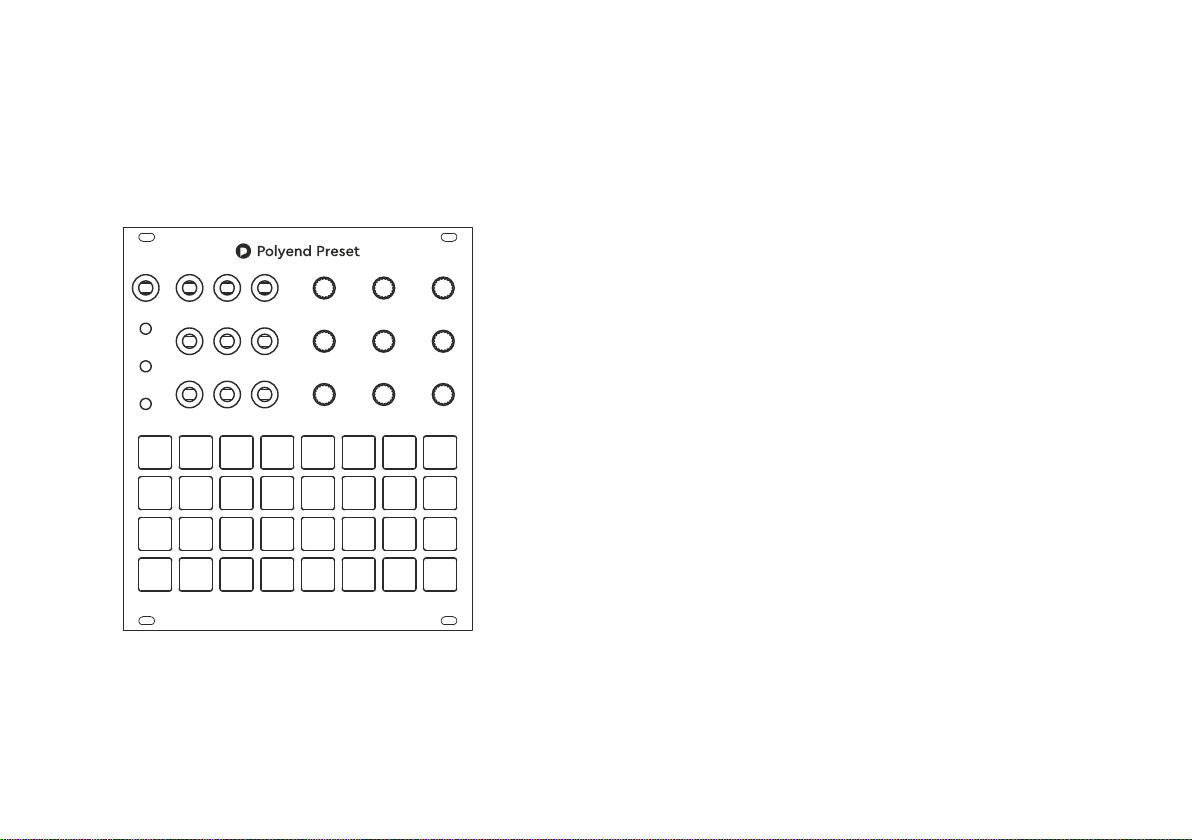
Polyend Preset
Preset Recaller and Sequencer
CV In 1 2 3
Bank
4 5 6
Clear
7 8 9
Rec
1
2
CV in Smoothing Sync
4
Scale Slew Seq length
7
Note display Map display Note voltage
3
5
6
8
9
Introduction
At Polyend, we dig the Eurorack for its endless versatility. Sometimes though,
we feel that thereʼs something missing. Then we start thinking about how to
improve it. Probably everyone whoʼs using the modular systems once faced
a dilemma of not being able to store sets of multiple modules values at the same
time. In other words, they were unable to save and recall their presets in a fast
and convenient way. The pros of being able to do so both in a studio and live
situations are obvious.
The 22 HP interface is simple, clean and streamlined. At first glance, Polyend
Preset module might look like a simple digital preset manager for Eurorack
systems but itʼs much more than this. Its vast implications make it a very smart
companion for your modular system. But letʼs start from the basics. With the use
of 9 LED coloured clickable encoders Preset allows you to store up to 9 different
CV output values in 32 banks of 32 presets (1024 in total!).
These are:
• Notes (1V/Oct),
• gates,
• constant values,
• recorded CV automation (up to 30 seconds each).
Then, of course, you can immediately recall these presets by manually
triggering them via the built-in pads. But thereʼs also the ability to trigger and
sequence the presets with incoming CV. Patches can become more lively and
can be changed quickly in seconds. Feed the Preset with a clock source or LFO,
and it turns into a sequencer. The sequencer of presets.
The Preset adds an entirely new layer of replicability in your modular system,
which is especially useful for live musicians. Program the notes sequences using
one of the 32 build-in musical scales. Record the automation using the
encoders. Or maybe copy an existing LFO or envelope from another module
using the CV input. These all can be later recalled out of one of the 9 Preset
CV outputs. You could build an entire performance with the use of the
Preset module. Each recording of voltage can be up to 30 seconds in length.
Worth mentioning is that everything you do in the Preset is being autosaved.
Thatʼs already a lot of functionality, right? But it's just the beginning.
Page 3
Basic preset operations
Preset has 32 banks of 32 presets. There are two different ways of entering
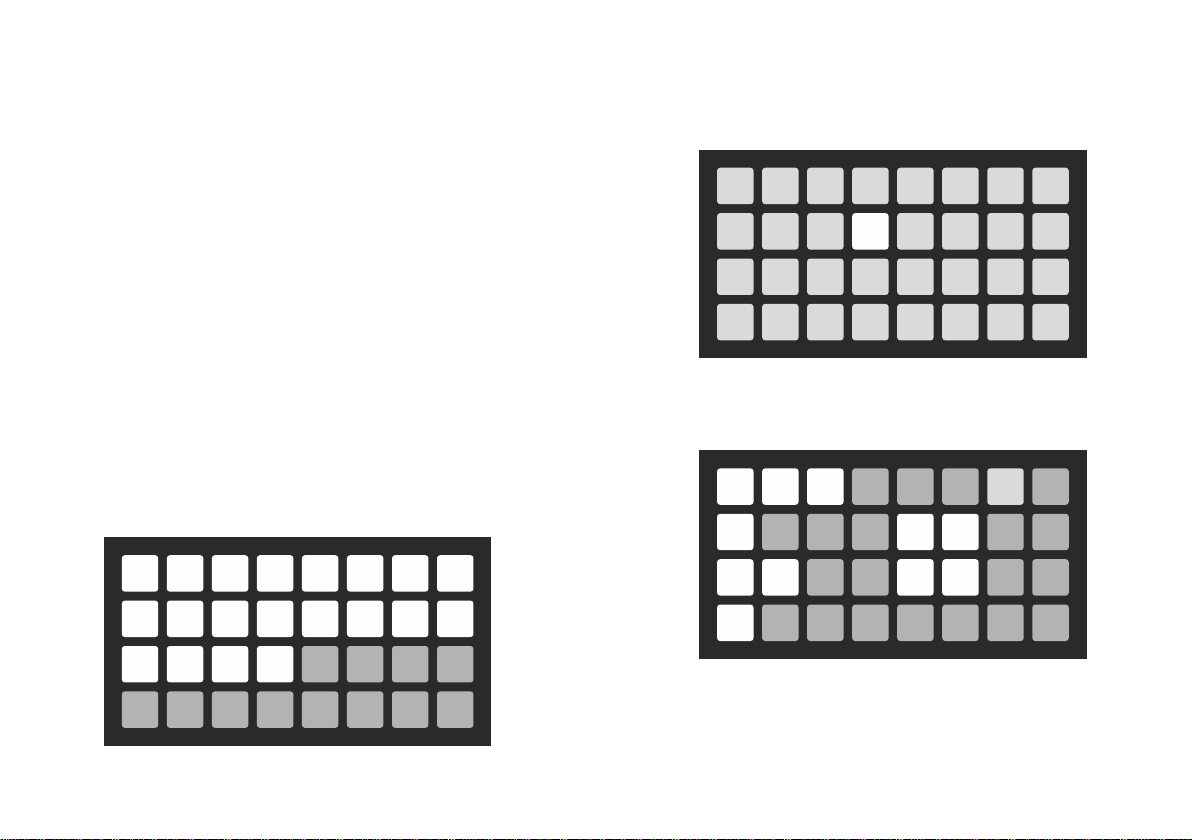
notes and values. The first is by turning the encoder. Youʼll see the values
displayed on the grid pads and on the encoder itself (the brighter the encoder,
the higher the value). The second option is to click and hold the encoder and
pick the desired value from the grid pads.
Itʼs also possible to enter micro-tuning/micro-values. Achieve this by turning
a clicked encoder.
To set the chosen mode of each output, choose a preset by pressing the pad and
click the encoder corresponding to the desired output.
The three available colours of encoders are indicating three different modes:
• Green/Gate mode – sends values from 0V to 10V only when the pad is
pressed. Once released, the Gate outputs 0V.
• Blue/Constant Value mode – sends values from 0V to 10V constantly.
• Cyan/Notes mode – sends quantised constant values that correspond
to the notes in a chosen musical scale. Everything can be sent out in two
different conventions V/Oct or Hz/V.
In the Gate and Constant Value modes, the values will be displayed on the grid
pad.
In the Note mode, the value of note will be displayed on the grid as a symbol
or each pad will indicate different note. To switch between the notes
display modes hold all three function buttons and turn the encoder number 7
(Notes display).
C2
G#2
E3
C4
C#2
A2
F3
C#4
D2
A#2
F#3
D4
D#2
B2
G3
D#4
E2
C3
G#3
E4
F2
C#3
A3
F4
F#2
D3
A#3
F#4
G2
D#3
B3
G4
Picture 2: Note B displayed on the pad (in Chromatic scale)
0V
2,5V
5V
7,5V
Picture 1: Value ~6.1V displayed on the grid
2,5V
5V
7,5V
Picture 3: Note F# displayed as symbol (no micro-tuning)
10V
Page 4

To choose a bank, hold a Bank button and pick one of the 32 pads.
To recall a preset, press the desired pad, itʼs that simple. The presets are being
autosaved every 30 seconds or immediately when youʼre toggling between the
pads/presets.
To clear the bank, press and hold the Clear and Bank buttons and indicate the
desired pad corresponding to a bank (occupied banks will be displayed as lit
pads). Clearing a bank takes approx. 2sec, youʼll see it fading.
To clear a preset,press and hold the Clear button and indicate
the desired pad/preset.
To duplicate the current bank, press and hold the Rec and Bank buttons, and
indicate the destination pad.
To duplicate the current preset, press and hold the Rec button and indicate
the destination pad.
To randomise the current preset values, press and hold the Bank button and
click any of the encoders. Then the values and modes of each encoder/output
will get randomised.
To initialise the encoder/output, click and hold the Clear button and click the
desired encoder. The initial value of an encoder/output is 0V in the mode of
constant values.
To record automation, click and hold Rec button, click the encoder which
youʼd like to automate and start changing its values. The values will start to
record once the first encoder movement is detected. The automation recording
stops as soon as youʼll release the Rec function button. The recorded
automation is visible on the encoder LED.
Your recorded automation is looped. You can speed it up or slow it down. To
achieve this turn the encoder with existing automation to the right - to speed it
up, or to the left - to slow it down (this is indicated on the grid pads). If youʼd like
to recall the original automation speed, just set it to the initial position (no pads
lit on the grid).
In every mode, both notes and automation can also be recorded from the grid
pads. To do that, hold the Rec button, engage the desired encoder/output by
clicking it, and pick the values from the grid pads.
To clear the automation press and hold the Clear button and click the encoder
of which automation youʼd like to get rid.
You can also record the automation from the external sources. To do that set
the CV input to R, press and hold the Rec button and click the desired encoder.
In this mode, you can also use the speed up/slow down function. This way you
can copy any existing LFO or Envelope from any external source.
User Menu parameters
The Polyend Preset module has one user menu available, which consists of 9
items. To enter the menu, hold all three buttons. To change items value turn one
of 9 encoders while holding the three buttons.
The menu parameters:
1. CV in (R/CV/GT):
• R – record an external value (0-10V),
• CV – toggle preset pad with voltage (where 0V is the first preset and 10V
is the last one),
• GT – switches to the next pad whenever CV input receives min. 2,5V.
While playing your sequence in the GT mode, pressing the pad will
retrigger the sequence initial position.
After playing the last preset the system jumps to the first one. This is the best
way to use the Polyend Preset as a sequencer. If the Presets's CV in is set to CV
or GT, Sequence length allows you to narrow down the number of steps in
a sequence.
2. Smoothing (ON/OFF). When toggled on, will smooth out your recorded
automation.
3. Sync (ON/OFF). When on, will start playing the automation from its
beginning whenever the preset pad is triggered. Otherwise, the automation
phase is independent.
4. Scale (1-32). Use the encoder to choose the desired scale — the list of scales
in the appendix.
5. Slew (0-5 seconds). Allows you to morph each of the nine available values
from one preset to another in a chosen amount of time.
Page 5

6. Seq length (1-32). Sets the number of steps in the sequence.
7. Note display (ON/OFF). Allows you to toggle on or off the visible note
display on the grid while choosing the notes. If Note display is turned on, the
micro-scale will be indicated by the last two columns on the grid.
8. Map Display (ON/OFF). When toggled on, the occupied presets or banks will
be constantly displayed on the grid with 30% of backlit.
9. Note voltage (VO/HV). Sets the note output mode to V/Oct or Hz/V.
Firmware update procedure
There might be a firmware update in the future. Please check our website
(http://polyend.com/downloads) for more information. The update procedure
will be described within the upgrade program.
Limited warranty
Polyend warrants this product, to the original owner, to be free of defects in
materials or construction for one year from the date of purchase. Proof of
purchase is necessary when a warranty claim is made. Malfunctions resulting
from improper power supply voltages, backwards or faulty cable connection,
abuse of the product or any other causes determined by Polyend to be the fault
of the user are not covered by this warranty (normal services rates will be
applied). All defective products will be replaced or repaired at the discretion of
Polyend. Products must be returned directly to Polyend with the customer
paying the shipping cost. Polyend implies and accepts no responsibility for
harm to person or apparatus through the operation of this product. Please
contact [email protected] for return to manufacturer authorisation, or any
other technical questions/concerns.
FAQ
Why my sequence is stuck on the first pad?
Check if the Seq length parameter is set to one step.
Can I change a parameter while the sequence is running?
Yes, you can. But it might cause some glitches to the sequence. Once youʼll stop
entering values, the sequence will get back to normal.
Why canʼt I change the encoder mode?
Thereʼs probably recorded automation for this encoder which is locking the
ability to change the mode. Clear the automation and youʼre all set.
What is the order of the values send out from the Presetʼs 9 outputs?
The order goes from output 1 to output 9.
Power consumption
(when all the step and encoder LEDs are lit at the same time)
– 170mA at +12VDC,
– 11mA at -12VDC,
– 0mA at +5V.
Appendix Musical scales:
1.
Chromatic
2.
Minor
3.
Major
4.
Dorian
5.
Lydian
Lydian Minor
6.
Locrian
7.
Phrygian
8.
Phrygian Dominant
9.
Mixlydian
10.
Melodic Minor
11.
12.
Harmonic Minor
13.
BeBop Major
14.
BeBop Dorian
15.
BeBop Mixlydian
16.
Blues Minor
17.
Blues Major
18.
Pentationic Minor
19.
Pentatonic Major
20.
Hungarian Minor
21.
Ukrainian
22.
Marva
23.
Todi
24.
Whole Tone
25.
Diminished
26.
Super Locrian
27.
Hirajoshi
28.
In Sen
29.
Yo
30.
Iwato
31.
Whole Half
32.
Kumoi
 Loading...