

Page 1

USER GUIDE
Polycom® VVX® 1500 Business Media Phone
Software 5.0.0 | August 2013 | 1725-16843-001 Rev E
Polycom, Inc. 1
Page 2

Polycom VVX 1500 Business Media Phone User Guide Version 5.0.0
Copyright ©2013, Polycom, Inc. All rights reserved. No part of this document may be reproduced, translated into
another language or format, or transmitted in any form or by any means, electronic or mechanical, for any purpose,
without the express written permission of Polycom, Inc.
6001 America Center Drive
San Jose, CA 95002
USA
Trademarks
Polycom®, the Polycom logo and the names and marks associated with Polycom products are trademarks and/or
service marks of Polycom, Inc. and are registered and/or common law marks in the United States and various other
countries. All other trademarks are property of their respective owners. No portion hereof may be reproduced or
transmitted in any form or by any means, for any purpose other than the recipient's personal use, without the express
written permission of Polycom.
End User License Agreement
By installing, copying, or otherwise using this product, you acknowledge that you have read, understand and agree to
be bound by the terms and conditions of the End User License Agreement for this product.
Patent Information
The accompanying product may be protected by one or more U.S. and foreign patents and/or pending patent
applications held by Polycom, Inc.
Open Source Software Used in this Product
This product may contain open source software. You may receive the open source software from Polycom up to
three (3) years after the distribution date of the applicable product or software at a charge not greater than the
cost to Polycom of shipping or distributing the software to you. To receive software information, as well as the
open source software code used in this product, contact Polycom by email at OpenSourceVideo@polycom.com.
Disclaimer
While Polycom uses reasonable efforts to include accurate and up-to-date information in this document, Polycom
makes no warranties or representations as to its accuracy. Polycom assumes no liability or responsibility for any
typographical or other errors or omissions in the content of this document.
Limitation of Liability
Polycom and/or its respective suppliers make no representations about the suitability of the information contained in
this document for any purpose. Information is provided “as is” without warranty of any kind and is subject to change
without notice. The entire risk arising out of its use remains with the recipient. In no event shall Polycom and/or its
respective suppliers be liable for any direct, consequential, incidental, special, punitive or other damages whatsoever
(including without limitation, damages for loss of business profits, business interruption, or loss of business
information), even if Polycom has been advised of the possibility of such damages.
Customer Feedback
We are striving to improve our documentation quality and we appreciate your feedback. Email your opinions and
comments to DocumentationFeedback@polycom.com.
Visit the Polycom Support Center for End User License Agreements, software downloads, product documents,
product licenses, troubleshooting tips, service requests, and more.
Polycom, Inc. 2
Page 3

Contents
About This Guide ...................................................................................................... 6
Conventions Used in this Guide ..................................................................................................... 6
Terms and Writing Conventions ..................................................................................................... 6
Information Elements ....................................................................................................................... 8
Typographic Conventions ............................................................................................................... 9
What’s in This Guide? ...................................................................................................................... 9
Getting Started .................................................................................................... 10 1:
Phone Hardware ............................................................................................................................. 10
Phone Keys ..................................................................................................................................... 12
What Displays on the Touch Screen ............................................................................................ 14
Understanding Phone Icons and Status Indicators .................................................................... 18
Navigating Your Phone Interface .................................................................................................. 20
Entering Data and Updating Fields ............................................................................................... 22
Using the Touch Screen Keyboard ................................................................................................ 22
Using the Dialpad Keys on the Phone Console ............................................................................. 24
Tips for When You’re in Video Calls ............................................................................................. 26
Cleaning the Touch Screen ........................................................................................................... 27
Registering the Phone .................................................................................................................... 27
Configuring Your Phone Using the Web Configuration Utility .................................................. 28
Using Basic Features ......................................................................................... 29 2:
Calling and Answering ................................................................................................................... 29
Answering Calls ............................................................................................................................. 30
Placing Calls .................................................................................................................................. 34
Ending Calls ................................................................................................................................... 41
Using a Headset ............................................................................................................................. 42
While Your Phone Rings ................................................................................................................ 43
Ignoring or Silencing Incoming Calls .............................................................................................. 43
Rejecting Incoming Calls................................................................................................................ 44
Forwarding Calls While Your Phone Rings .................................................................................... 44
During Calls ..................................................................................................................................... 44
Holding and Resuming Calls .......................................................................................................... 45
Transferring Calls ........................................................................................................................... 47
Setting Up Conference Calls .......................................................................................................... 48
Customizing Video During Calls .................................................................................................... 53
Changing the Way Calls are Answered ........................................................................................ 55
Forwarding All Calls to Another Party ............................................................................................ 55
Rejecting Calls from a Contact ...................................................................................................... 57
Diverting Calls from a Contact to Another Party ............................................................................ 57
Temporarily Refusing All Calls (Do Not Disturb) ............................................................................ 58
Working with Call Lists .................................................................................................................. 60
Polycom, Inc. 3
Page 4

Polycom VVX 1500 Business Media Phone User Guide Version 5.0.0
Viewing Call Lists ........................................................................................................................... 61
Managing Call Lists ........................................................................................................................ 62
Working with Contact Directory .................................................................................................... 62
Searching Your Local Contact Directory ........................................................................................ 63
Adding Contacts to Your Local Contact Directory ......................................................................... 63
Updating Your Local Contact Directory .......................................................................................... 67
Deleting Contacts from Your Local Contact Directory ................................................................... 67
Working with Corporate Directory ................................................................................................ 67
Searching Corporate Directory ...................................................................................................... 67
Adding Corporate Directory Contacts to Your Local Contact Directory ......................................... 69
Saving Corporate Directory Search Results .................................................................................. 69
Controlling What is Heard.............................................................................................................. 70
Changing the Ring Tone ................................................................................................................ 70
Changing the Speaker Volume ...................................................................................................... 71
Changing the Ringer Volume ......................................................................................................... 72
Muting the Microphone................................................................................................................... 72
Choosing Where You Hear Sound Effects..................................................................................... 72
Managing Speed Dials.................................................................................................................... 73
Adding Speed Dial Keys ................................................................................................................ 73
Updating Speed Dial Keys ............................................................................................................. 74
Accessing Voice and Video Mail ................................................................................................... 74
Working with Multiple and Shared Lines ..................................................................................... 75
Supporting Multiple Lines ............................................................................................................... 76
Supporting Multiple Line Keys Per Line ......................................................................................... 77
Supporting Shared Lines................................................................................................................ 77
Locking and Unlocking the Phone ................................................................................................ 78
About Your User Password ............................................................................................................ 79
Changing Your User Password ...................................................................................................... 79
Locking and Unlocking Your Phone ............................................................................................... 79
Calling and Answering from a Locked Phone ................................................................................ 80
Using the Advanced Features of Your Phone .................................................. 82 3:
Placing Calls Using the H.323 Protocol ........................................................................................ 82
Using Instant Messaging ............................................................................................................... 83
Reading and Managing Instant Messages..................................................................................... 83
Sending Instant Messages ............................................................................................................. 84
Using Buddy Status Lists .............................................................................................................. 85
Updating Your Presence Settings .................................................................................................. 86
Managing Buddies ......................................................................................................................... 87
Integrating with Microsoft Live Communications Server 2005 ....................................................... 91
To view and change your presence, see Updating Your Presence Settings ................................. 91
Working with a Polycom CMA System ......................................................................................... 92
Searching and Dialing from the CMA Directory ............................................................................. 92
Using Buddy Status Lists with a CMA System .............................................................................. 93
About Your Login Credentials ...................................................................................................... 102
Integrating with Microsoft Lync Server 2010 ............................................................................. 104
Recording Calls and Conferences .............................................................................................. 105
Recording Calls ............................................................................................................................ 107
Polycom, Inc. 4
Page 5

Polycom VVX 1500 Business Media Phone User Guide Version 5.0.0
Recording Conferences ............................................................................................................... 108
Pausing and Resuming Recording .............................................................................................. 108
Playing Back Recorded Calls ...................................................................................................... 110
Browsing Recorded Calls ............................................................................................................. 110
Playing Back Recorded Calls ....................................................................................................... 111
Answering a Call While Playing Back Recorded Calls ................................................................ 111
Using the Browser ........................................................................................................................ 112
Using Navigation Soft Keys ......................................................................................................... 113
Using Editing Soft Keys................................................................................................................ 114
Using the Launch Pad .................................................................................................................. 114
Accessing Launch Pad................................................................................................................. 115
Enabling My Info Portal ................................................................................................................ 116
Updating Your Phone’s Configuration ....................................................................................... 118
Restarting Your Phone ................................................................................................................. 118
Customizing the Phone Display ................................................................ ...... 119 4:
Changing the Language ............................................................................................................... 119
Changing the Time and Date Display ......................................................................................... 119
Changing the Brightness of the Touch Screen ......................................................................... 120
Changing the Background Picture ............................................................................................. 122
Using One of Your Own Pictures as the Background Picture...................................................... 123
Displaying Screen Savers ............................................................................................................ 124
Setting Up Screen Savers ............................................................................................................ 124
Stopping and Disabling Screen Savers ....................................................................................... 125
Using Your Phone as a Picture Frame ....................................................................................... 126
Changing When and How Video Displays.................................................................................. 127
Enabling or Disabling Video ......................................................................................................... 128
Changing the Clarity of Near-Site Video ...................................................................................... 131
Changing How You View All Video Calls ..................................................................................... 132
Setting the Call Rate for Video Calls ............................................................................................ 138
Changing Power Saving Settings ............................................................................................... 138
Changing Your Office Hours ........................................................................................................ 139
Changing Timeouts ...................................................................................................................... 139
Changing User Detection Settings ............................................................................................... 140
Getting Help ...................................................................................................... 142 5:
Related Documents ...................................................................................................................... 142
The Polycom Community............................................................................................................. 142
Copyright, Safety, and Regulatory Notices ........................................................ 144
Polycom, Inc. 5
Page 6

Note: Unless Noted, the information in this Guide Applies to Both Phones
As you read this guide, the terms the phone and your phone refer to either the VVX 1500 or the VVX
1500 C phone. Unless specifically noted in this guide—especially with regard to phone graphics—
both phones operate in the same way and the information in this guide applies to both phones.
About This Guide
This guide applies to two phones: the Polycom® VVX® 1500 business media phone and the Polycom
VVX 1500 C Business Media Phone for Cisco United Communications Manager (SIP). You can use this
guide if you have either phone.
This user guide will help you to navigate and use your VVX 1500 or VVX 1550 C phone. It will give you an
overview of your phone, and walk you through tasks so you can successfully use your phone to perform
basic and advanced phone functions.
This guide contains overview information for people who are just starting to learn about their VVX 1500 or
VVX 1500 C phone, or who have experience, but need a quick refresher. It is intended for beginner users,
as well as intermediate and advanced users who want to learn about their phone’s features.
Conventions Used in this Guide
This user guide contains terms, graphical elements, and a few typographic conventions. Familiarizing
yourself with these terms, elements, and conventions will help you successfully perform tasks.
Terms and Writing Conventions
The Phone/your phone These terms refer to either the VVX 1500 or VVX 1500 C phone. Unless
specifically noted in this guide, both phones operate in the same way and the information in this guide
applies to both phones.
Press This action refers to pressing a key on the keypad, a line key, an arrow key, a hard key—
like Hold or Microphone Mute—or pressing a soft key for a second or two.
Select Submenu > Submenu > Submenu This convention describes how to access submenus.
Each submenu name is in boldface and separated by a ‘greater than’ symbol. If the instructions
indicate to select Basic > Preferences > Language, select the Basic submenu, select the
Preferences submenu, and select the Language submenu.
Highlight This action refers to selecting an item on the screen so that its appearance brightens.
Soft keys apply to highlighted items.
Select Selecting an item on the screen refers to using the arrow keys—up, down, left, and right—
to highlight an item. Press the central Select key so that another screen opens.
Views Your phone has four main views: Home, Calls, Active Call, and Lines (the default). A view
is a specific screen on the phone interface that provides unique information and enables you to
perform specific tasks.
Polycom, Inc. 6
Page 7

Polycom VVX 1500 Business Media Phone User Guide Version 5.0.0
Dialpad The dialpad is the area of the keypad you use to enter numbers and characters. The
dialpad consists of all the number keys, as well as the asterisk (*) and pound (#) keys.
Key This term refers to any button on the phone console.
Option An option is one of a series of items you can select for a phone setting, such as Enabled
and Disabled.
Held call This term describes any call (including a conference call) that is on hold. Audio for held
calls cannot be heard.
Active call This term refers to a call (including a conference call) you’re currently in. An active call
has audio associated with it.
Setting The name of a field for which you can define information or choose an option.
Field This term describes the area of the screen next to a setting in which you can enter
information or select an option.
Icon A picture on the screen. There are two types of icons:
An icon that you can select to access a function, feature, setting, or application. For example,
when you’re in Home view, you can select the New Call icon to place a call.
An icon that provides phone information or status only. Selecting this type of icon doesn’t
access another function. For example, your phone may have an icon to indicate you have a
voicemail message simply to notify you of the current status.
Soft key This term describes the context-sensitive keys that display along the bottom of the
screen that update depending on the task you’re performing. To see additional options (if
available), press More. The More soft key is always on the far-right of the soft key area, as shown
next. The additional options display as shown next.
Soft key area The soft key area (shown above) is the area along the bottom of the screen that
displays context-sensitive soft keys.
Status bar The status bar (shown next) is the top-most part of the screen. It displays the time and
date or other messages instead of the date display.
Polycom, Inc. 7
Page 8
Polycom VVX 1500 Business Media Phone User Guide Version 5.0.0
Name
Icon
Description
Note
The Note icon highlights information of interest or important information needed
to be successful in accomplishing a procedure or to understand a concept.
Administrator Tip
The Administrator Tip icon highlights techniques, shortcuts, or productivity
related tips.
Caution
The Caution icon highlights information you need to know to avoid a hazard that
could potentially impact device performance, application functionality, or
successful feature configuration.
Warning
The Warning icon highlights an action you must perform (or avoid) to prevent
issues that may cause you to lose information or your configuration setup,
and/or affect phone or network performance.
Web Info
The Web Info icon highlights supplementary information available online such
as documents or downloads on support.polycom.com or other locations.
Timesaver
The Timesaver icon highlights a faster or alternative method for accomplishing
a method or operation.
Power Tip
The Power Tip icon highlights faster, alternative procedures for advanced
administrators already familiar with the techniques being discussed.
Troubleshooting
The Troubleshooting icon highlights information that may help you solve a
relevant problem or to refer you to other relevant troubleshooting resources.
Settings
The Settings icon highlights settings you may need to choose for a specific
behavior, to enable a specific feature, or to access customization options.
Information Elements
This guide may include any of the following icons to alert you to important information.
Icons Used in this Guide
Polycom, Inc. 8
Page 9

Polycom VVX 1500 Business Media Phone User Guide Version 5.0.0
Convention
Description
Bold
Highlights interface items such as menus, soft keys, file names, and directories.
Also used to represent menu selections and text entry to the phone.
Italics
Used to emphasize text, to show example values or inputs, and to show titles of
reference documents available from the Polycom Support Web site and other
reference sites.
Blue Text
Used for cross references to other sections within this document and for hyperlinks
to external sites and documents.
Courier
Used for code fragments and parameter names.
Typographic Conventions
A few typographic conventions, listed next, are used in this guide to distinguish types of in-text
information.
Typographic Conventions
What’s in This Guide?
This guide is organized into five chapters. The beginning chapters introduce the phone and explain how
to use the phone’s basic features. Later chapters describe advanced features, and how to customize your
phone to suit your needs. The guide also includes safety information.
Chapter 1: Getting Started This chapter contains general information about your phone that you’ll find
helpful before you start using it, including phone hardware and phone views, and how to navigate menus
and enter data. It also describes how to use all the basic features that your phone offers.
Chapter 2: Using Basic Features All the basic features that your phone offers—such as how to add
contacts and favorites, or transfer or forward calls—are described in this chapter.
Chapter 3: Using Advanced Features Advanced features that may not be available on the phone, or
that you may not use on a day-to-day basis, are described in this chapter. Advanced features include
recording calls, locking your phone, monitoring buddies, and accessing a Browser.
Chapter 4: Customizing Your Phone You can customize your phone in many ways, including setting
up a screen saver, or changing the backlight, background picture, or time and date format. Read this
chapter to personalize your phone.
Chapter 5: Getting Help In this chapter, you’ll find links to Polycom or partner documents and Web
sites. In particular, you’ll find links to the Polycom Community, a number of discussion forums you can
use to share ideas with your colleagues.
Polycom, Inc. 9
Page 10
Note: Accessing Features and Options
As you read this guide, keep in mind that certain phone features are configurable by your system
administrator or determined by your phone environment. As a result, some features may not be
enabled or may operate differently on your phone. The examples and figures in this guide may not
directly reflect what displays or is available on your phone screen.
Getting Started 1:
Before you use your Polycom® VVX® 1500 phone, you may wish to take a few moments to become
familiar with its features and user interface. In this chapter, you learn about your phone’s components and
the screen layout. You’ll also learn how to configure your phone remotely using the Polycom Web
Configuration Utility.
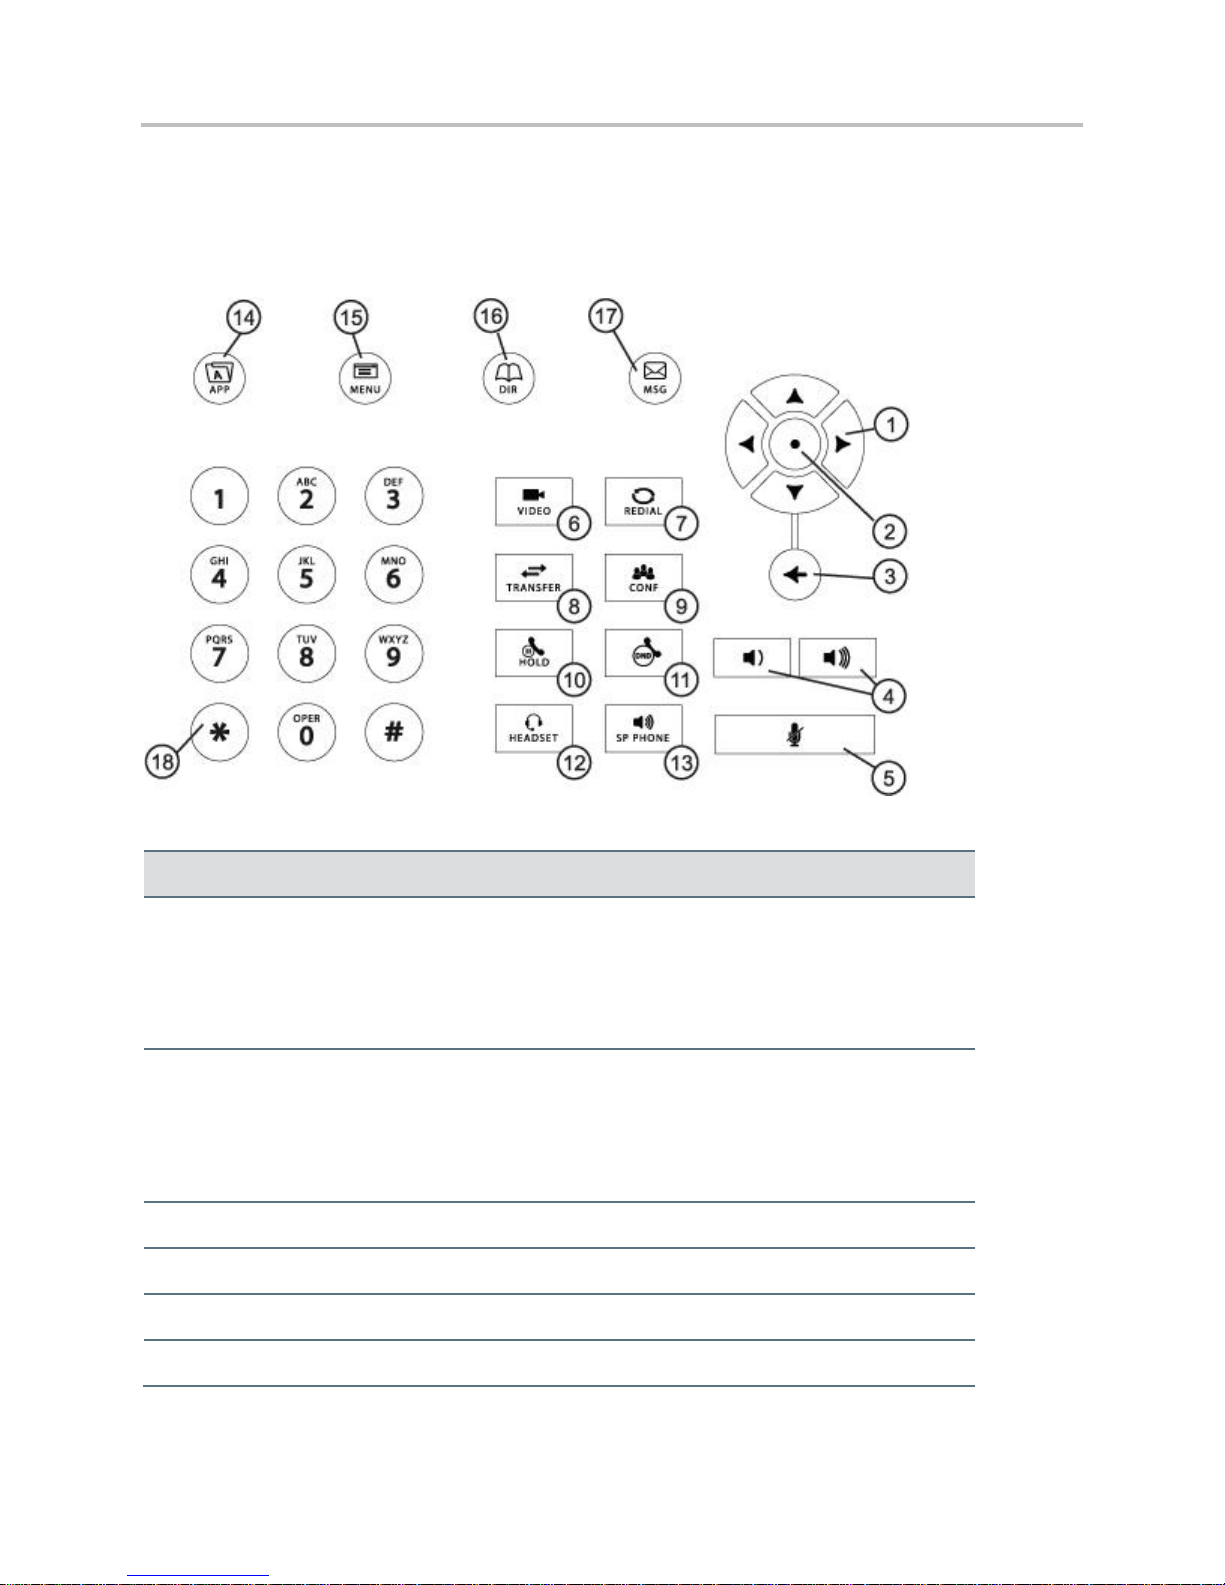
Phone Hardware
The following figure shows the phone’s primary hardware features.
Polycom, Inc. 10
Page 11

Polycom VVX 1500 Business Media Phone User Guide Version 5.0.0
Feature
Description
1
Handset and Cord
Provides audio output for calls that use the handset.
2
Speakerphone
Provides ringer and hands-free (speakerphone)
audio output.
3
Headset Connector
Allows you to connect a headset to the phone
4
USB Connector
Allows you to connect a USB flash drive to display
pictures on your phone, and to record and play back
calls.
5
LED Indicator
The LED flashes red to indicate the following:
The software is booting
A message is waiting
The phone is in power-saving mode (slow-
flashing red)
6
Privacy Shutter Adjuster
Opens and closes the privacy shutter.
7
Camera
Provides near-site video
Note: The camera barrel is located directly behind
the camera lens. It adjusts the camera angle.
Web Info: Attaching Phone Hardware
For information on attaching phone hardware, including how to connect your phone to the network,
see the Quick Start Guide for your phone, available by navigating to your phone’s Support page
from the Business Media Phones Support page.
Polycom, Inc. 11
Page 12
Polycom VVX 1500 Business Media Phone User Guide Version 5.0.0
Key
Description
1
Arrow Keys
Allow you to:
Scroll through lists
Highlight items before you select them
Scroll through active and inactive calls
Left and Right Arrow Keys
Allow you to:
Enable and disable fields
Scroll through values for a field
Position the cursor within text you’re updating
Left Arrow Key
Returns to the previous menu.
Right Arrow Key
Selects a highlighted item.
2
Select Key
Selects a highlighted item.
3
Delete Key
Deletes displayed data.
Phone Keys
The following figure shows the keys on the phone console.
Polycom, Inc. 12
Page 13

Polycom VVX 1500 Business Media Phone User Guide Version 5.0.0
Key
Description
4
Volume Keys
Adjusts the volume of the handset, headset,
speaker, and ringer.
5
Mute Key
Mutes audio transmission locally during calls and
conferences. The key glows red when activated.
6
Video Key
Controls the size, position, and transmission of
video images.
7
Redial Key
Dials the most recently dialed party.
8
Transfer Key
Transfers the current call to another party.
9
Conference Key
Allows connection with another party for a
conference.
10
Hold Key
Holds an active call or resumes a held call.
11
Do Not Disturb Key
Cancels ringing and directs incoming calls to your
mailbox. The key glows red when activated.
12
Headset Key
Allows you to place and receive calls through an
optionally connected headset. The key glows green
when headset mode is selected.
13
Speakerphone Key
Allows for hands-free communication during calls.
The key glows green when speakerphone mode is
selected.
14
Applications Key
Allows you to access the Web browser.
15
Menu Key
Allows you to access local (your phone) and global
(your organization) features.
16
Directories Key
Allows you to access directories (Contact,
Corporate, and CMA) and call lists.
17
Messages Key
Allows you to access and manage instant, voice,
and video messages.
18
Dialpad Keys
Provide the 10 digits, alphabetic characters, and
special characters available in context-sensitive
applications.
Polycom, Inc. 13
Page 14
Polycom VVX 1500 Buisness Media Phone
Key
Description
1
Status bar
Displays the time and date, the phone’s number,
messages, and icons.
The time and date and phone’s number display on
the far-right of the status bar, next to the PIP. If
there are messages to display (for example,
recording, flash drive, or status information), the
messages scroll under the time, along with the
phone number.
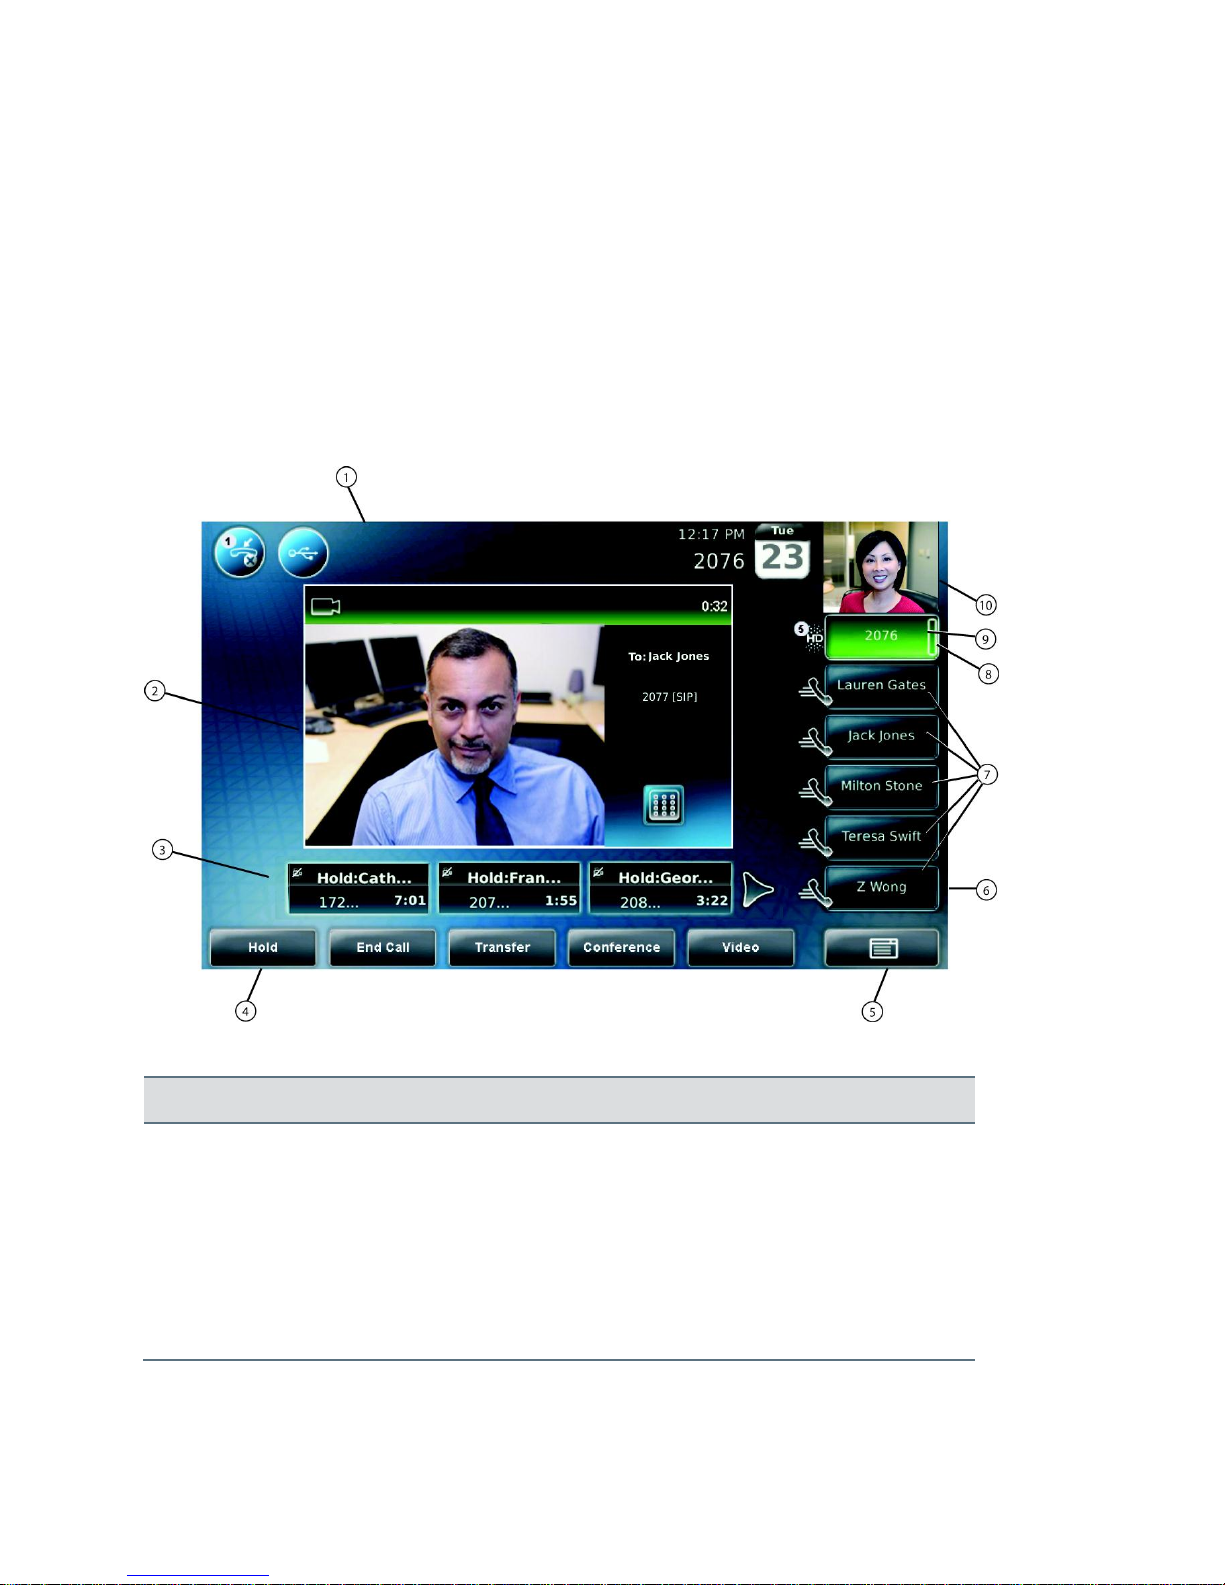
What Displays on the Touch Screen
Your phone displays video in two windows: a small picture-in-picture (PIP) window located on the topright of the touch screen, and a larger window centered in the middle of the touch screen. By default, the
near site displays in the PIP, and the far site displays in the window in the center of the touch screen.
Information about the call, such as the phone number of the party with whom you’re talking and the
duration of the call, appears next to the far site when it is displayed in the window in the center of the
touch screen.
The following figure is an example of what displays on the touch screen during a call.
Polycom, Inc. 14
Page 15

Polycom VVX 1500 Business Media Phone User Guide Version 5.0.0
Key
Description
1
Status bar
(continued)
Icons display along the far-left of the status bar. The
following icons can display:
—Messages waiting
—Missed calls
—Do Not Disturb enabled
—USB flash drive attached and idle
—USB flash drive attached and playing back
—USB flash drive attached and recording
—USB flash drive attached and recording
paused
—Headset attached
—Login credentials locked
2
Active call window
Displays the active call. During a video call, the
active call window can display the near site or the
far site.
3
Inactive call group
Displays calls on hold, as well as incoming calls that
are not immediately answered.
4
Soft keys
Keys on the touch screen that you can tap to access
phone functions. The keys are automatically labeled
to identify their context-sensitive functions.
5
Menu key
Opens the Main Menu.
6
Line Keys and Speed Dial
Keys
See Line Key in this table.
See Speed Dial Keys in this table.
Polycom, Inc. 15
Page 16

Polycom VVX 1500 Business Media Phone User Guide Version 5.0.0
Key
Description
7
Speed Dial Keys
Use these keys to activate up to five speed dials
that can be assigned to your phone. Use a Speed
Dial Key to quickly dial a contact.
Speed Dial Keys display .
8
Line Key
status indicator
A Line Key can have one of the following status
indicators:
Solid green—A dial tone is available, dialing is
in progress, or a call is active.
Flashing green—An incoming call. Or, the far
site has placed a call on hold.
Solid red—A remote shared line is active., or
the buddy associated with the Speed Dial Key
has a status that is either Busy, Offline, or Do
Not Disturb.
Flashing red—You have placed a call (one or
more) on hold (on a private or shared line)., or
the buddy associated with the Speed Dial Key
has a status that is Be Right Back, Away, or
Out to Lunch
Polycom, Inc. 16
Page 17

Polycom VVX 1500 Business Media Phone User Guide Version 5.0.0
Key
Description
9
Line Key
Use these keys to activate up to six lines that can be
assigned to your phone.
When the phone is idle, Line Keys display one of the
following:
—Registered, private lines
—Registered, shared lines
—Unregistered lines
—Lines that have the Always call forwarding
type enabled
—Lines that have Do Not Disturb enabled
Line keys are either blue or green:
Green—Indicates that the Line Key has an
active call or an incoming call. A green Line
Key is associated with the calls that currently
display on the touch screen (active or
inactive).
Blue—Indicates that the Line Key doesn’t
have an active call, or has an incoming call
that has been minimized and placed in the
inactive call group. The calls associated with a
blue Line Key don’t currently display on the
touchscreen.
.
10
Picture-in-Picture window
(PIP)
The small window in the corner of the touch screen that
displays video. By default, the PIP displays the near site.
During a call, you can tap the PIP to toggle it to display
the near site or the far site.
Polycom, Inc. 17
Page 18
Polycom VVX 1500 Business Media Phone User Guide Version 5.0.0
Note: When Call Counters Display
Call counters only display when the icon appears next to the Line Key.
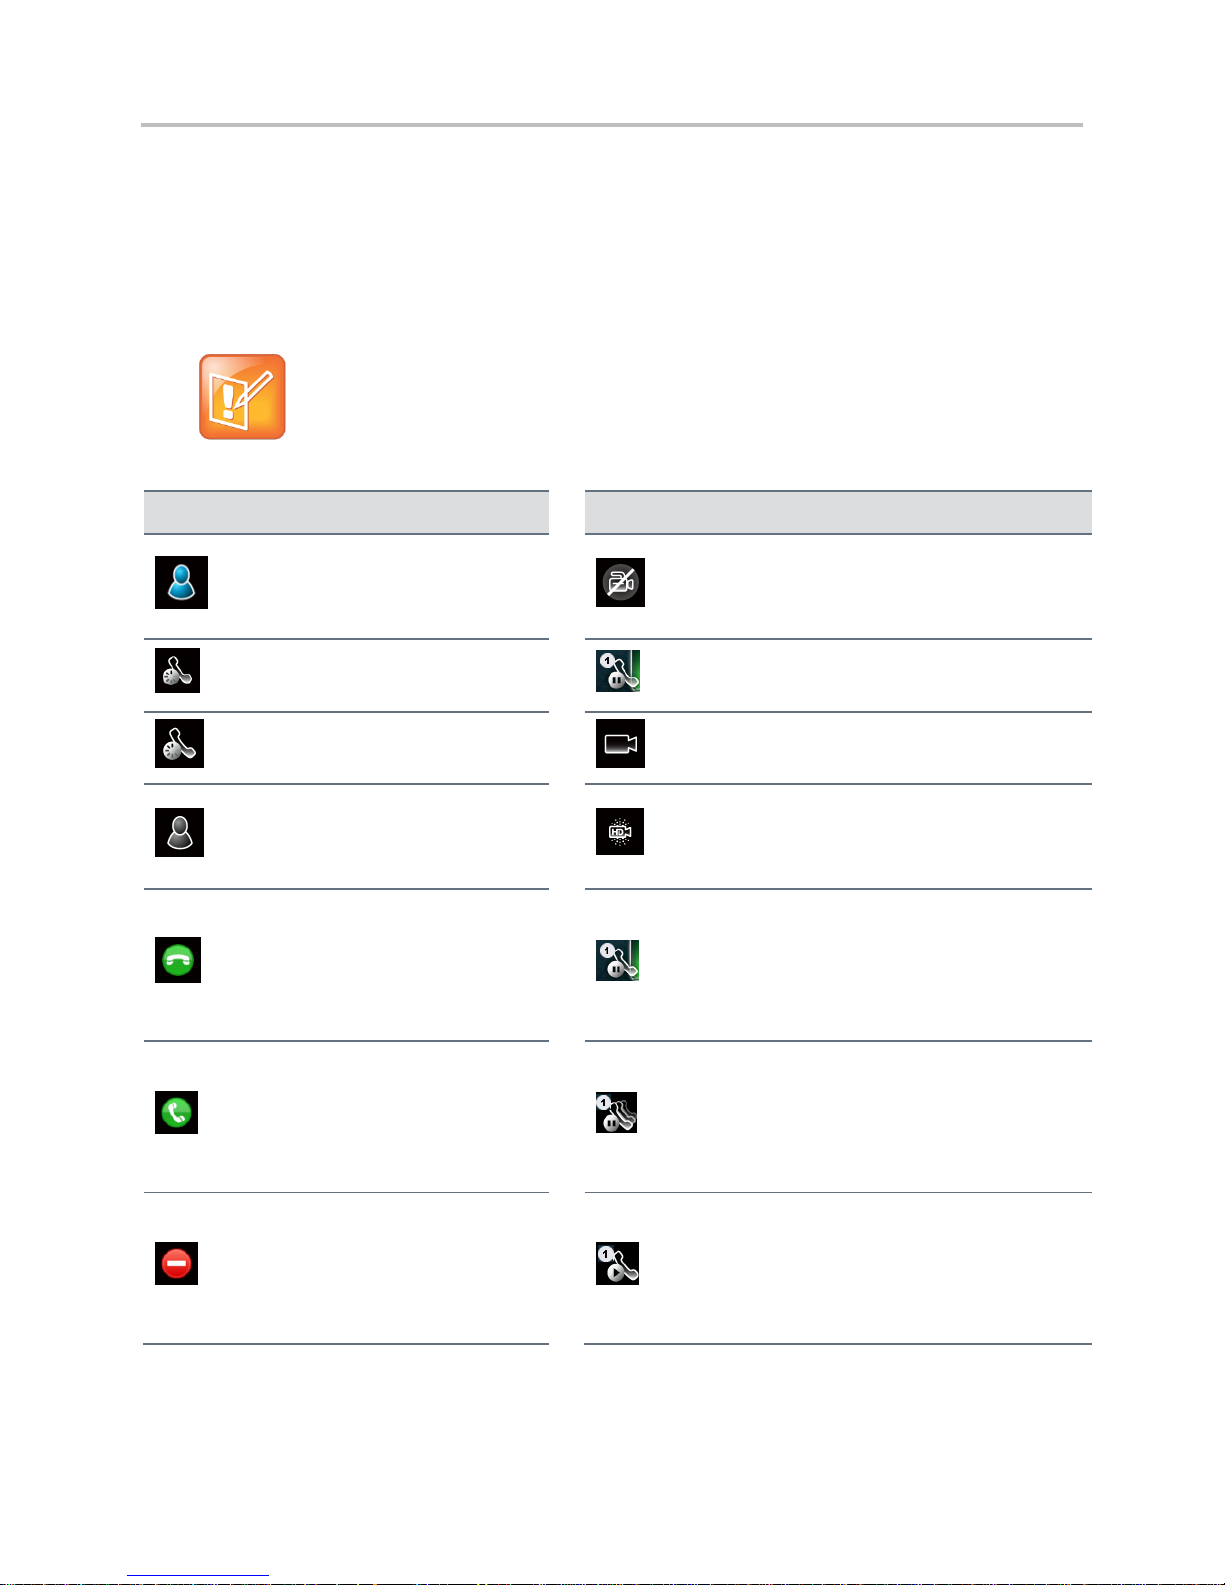
Icon
Description
Icon
Description
Buddy Status (Online)
Busy Lamp Field (BLF)
indicator (line is idle)
Call (audio-only)
Buddy Status (Busy, Do Not
Disturb)
Call with Polycom HD Voice
Buddy Status (Be Right Back,
Away, Out to Lunch)
Call (video)
Buddy Status (Offline)
Busy Lamp Field (BLF)
indicator (line is busy)
Call (video) with Polycom HD Voice
Buddy Status when
provisioned by a Polycom
Converged Management
Application™ (CMA™) system
(Available for a call)
Call on hold (private line)
Buddy Status when
provisioned by a Polycom
CMA system
(On the phone, but available
for a call)
Call on hold (shared line)
Buddy Status when
provisioned by a Polycom
CMA system
(In a call or not accepting
calls)
Call without Polycom HD Voice (private
line)
Understanding Phone Icons and Status
Indicators
The following icons and indicators indicate phone, call, or buddy/contact status, or to indicate that a
feature is enabled.
Polycom, Inc. 18
Page 19
Polycom VVX 1500 Business Media Phone User Guide Version 5.0.0
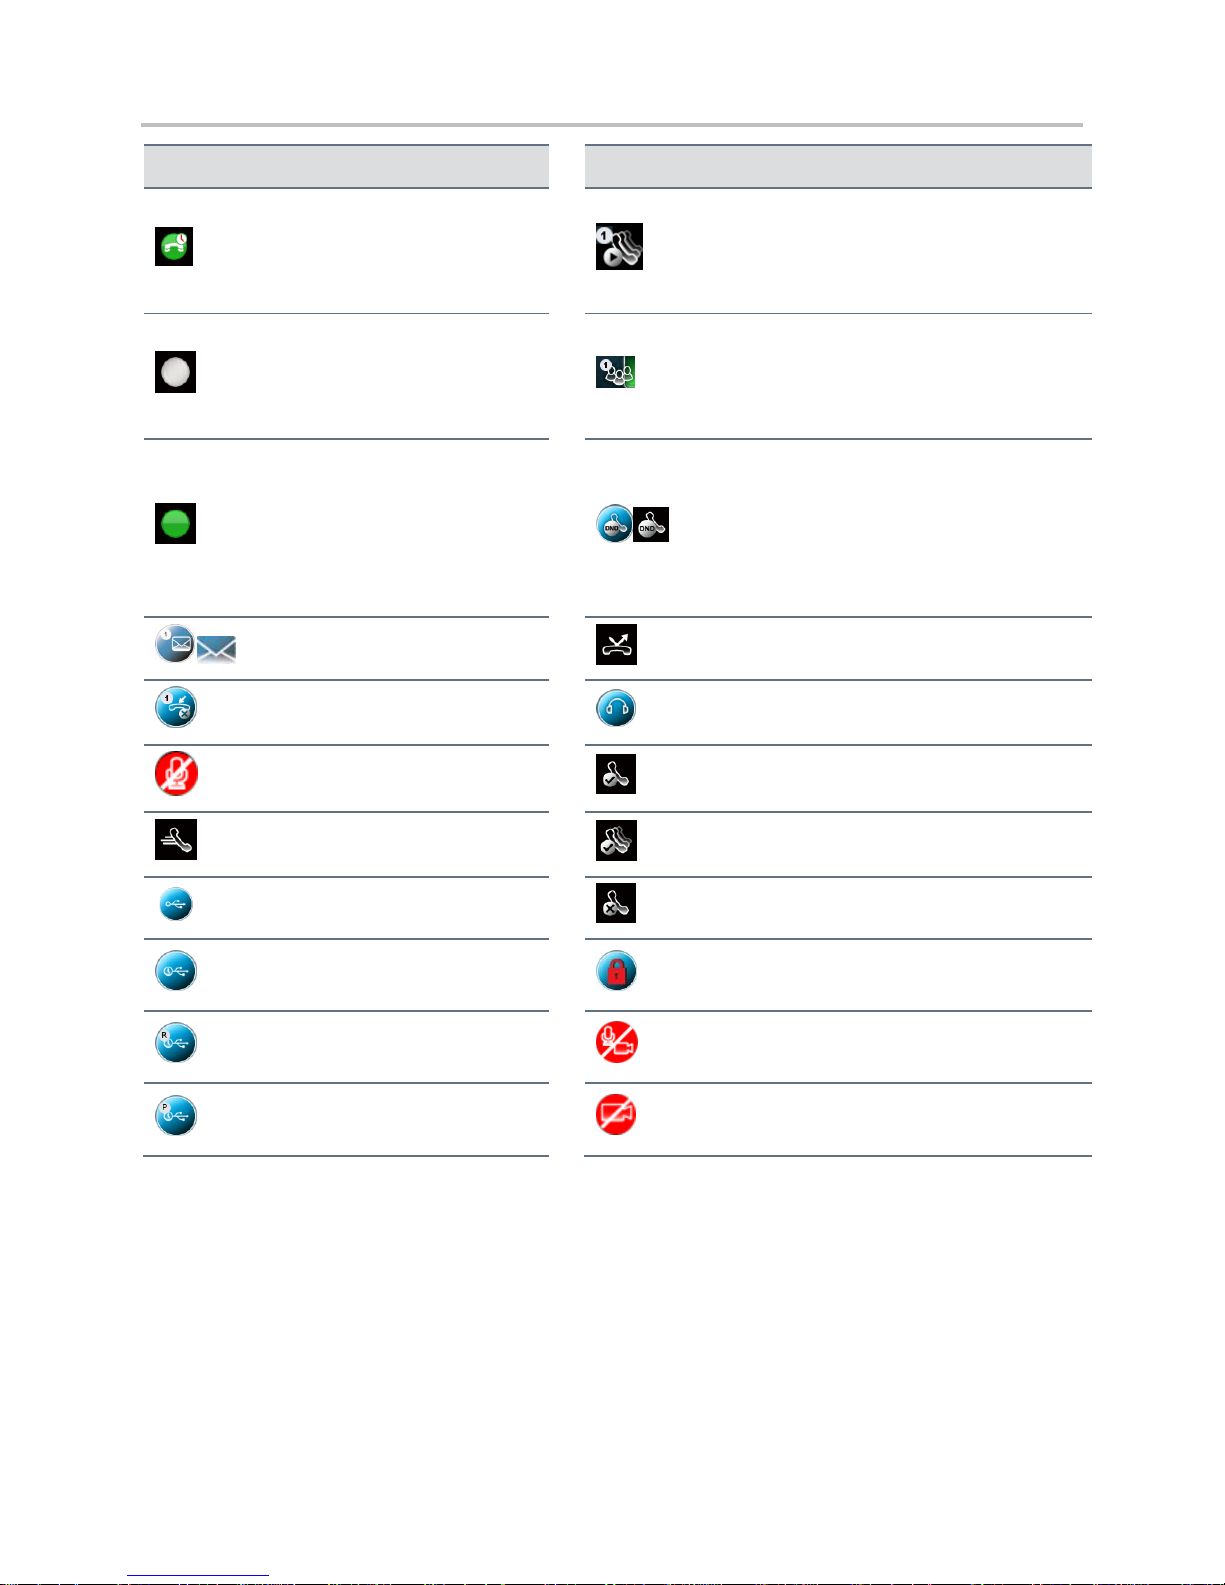
Icon
Description
Icon
Description
Buddy Status when
provisioned by a Polycom
CMA system (Available for a
call, but currently idle or away)
Call (shared line)
Buddy Status when
provisioned by a Polycom
CMA system
(Not available for a call)
Conference call
Buddy Status when
provisioned by a Polycom
CMA system (Invited to join
your Buddy Status list. No
status information is yet
available.)
Do Not Disturb enabled
Message waiting indicators
Forward (Always)
Missed calls indicator
Headset attached
Mute applied
Line (registered, private)
Speed Dial Key
Line (registered, shared)
USB device attached and idle
Line (unregistered)
USB device attached and
playing back
Login credentials locked
USB device attached and
recording
Video stopped
USB device attached and
recording paused
Video stopped
Polycom, Inc. 19
Page 20
Polycom VVX 1500 Business Media Phone User Guide Version 5.0.0
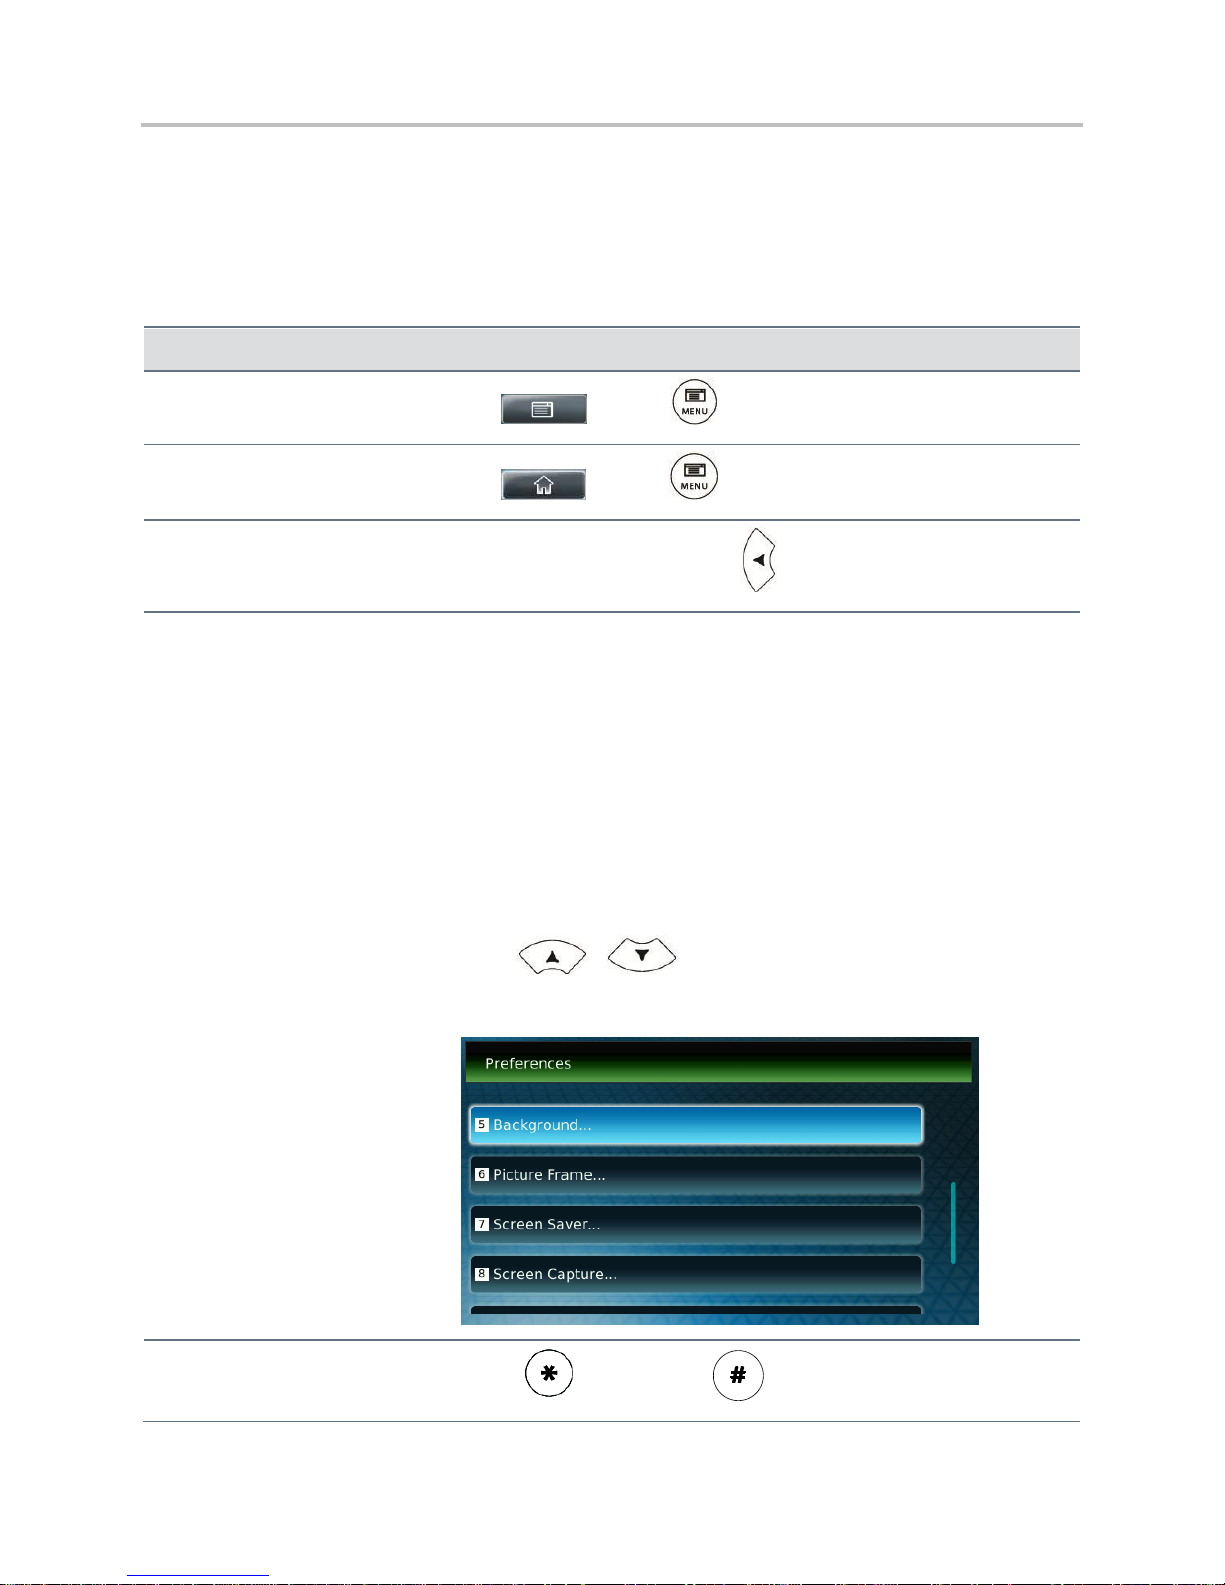
If you want to…
Do this…
Enter the Main Menu
Tap or press .
Return to the idle screen
Tap or press .
Return to the previous menu
Tap the Back soft key or press
Scroll through items
Do one of the following:
Press the area of the touch screen where the list displays, and
then drag your finger up (to move down the list) or down (to
move up the list).
Press the area of the touch screen above the blue scrolling
indicator bar, and then drag your finger up (to move up the
list). Or, press the area of the touch screen below the blue
scrolling indicator bar, and then drag your finger down (to
move down the list). (The location of the scrolling indicator bar is
shown in the figure below.)
Tap (to scroll one-by-one) or press (to scroll continuously)
or .
As you scroll, a scrolling indicator bar to the right of the list shows your
position in the list:
Scroll through items page-bypage
Press to Page Up, or to Page Down.
Navigating Your Phone Interface
The following table shows you how to navigate your phone’s screens, as well as select and highlight
options.
Polycom, Inc. 20
Page 21
Polycom VVX 1500 Business Media Phone User Guide Version 5.0.0
If you want to…
Do this…
Go to the top or bottom of a list
Press the area of the touch screen above or below the scrolling
indicator bar.
Highlight items
Scroll to the item by tapping (to scroll one-by-one) or pressing (to
scroll continuously) or .
Scroll through values for a field
Tap the field’s highlighted grey box. From the drop-down list, tap (to
scroll one-by-one) or press (to scroll continuously) one of the scroll
arrows.
Select a value for a field
From the drop-down list, tap the value.
Select an item
Do one of the following:
Tap the item.
Scroll to the item using or (so the item is
highlighted), and then tap the item, tap the Select soft key, or
press .
Press the dialpad key that corresponds to the item in the
numbered list.
For example, if an item has a number next to it, press the
corresponding number on the dialpad.
Select a soft key
Tap the soft key.
View additional soft keys
Tap the More soft key.
Enable or disable fields
Do one of the following:
Tap the field name, and then tap the field’s highlighted box.
From the drop-down list, tap Enabled or Disabled.
Scroll to the field using or , and then
press or to toggle between Enabled or Disabled.
Polycom, Inc. 21
Page 22
Polycom VVX 1500 Business Media Phone User Guide Version 5.0.0
Entering Data and Updating Fields
You can enter data and edit fields in these two ways:
Using a “keyboard” that displays on the touch screen.
Using the dialpad keys on the phone console.
Using the Touch Screen Keyboard
You can use the touch screen keyboard to quickly update field information.
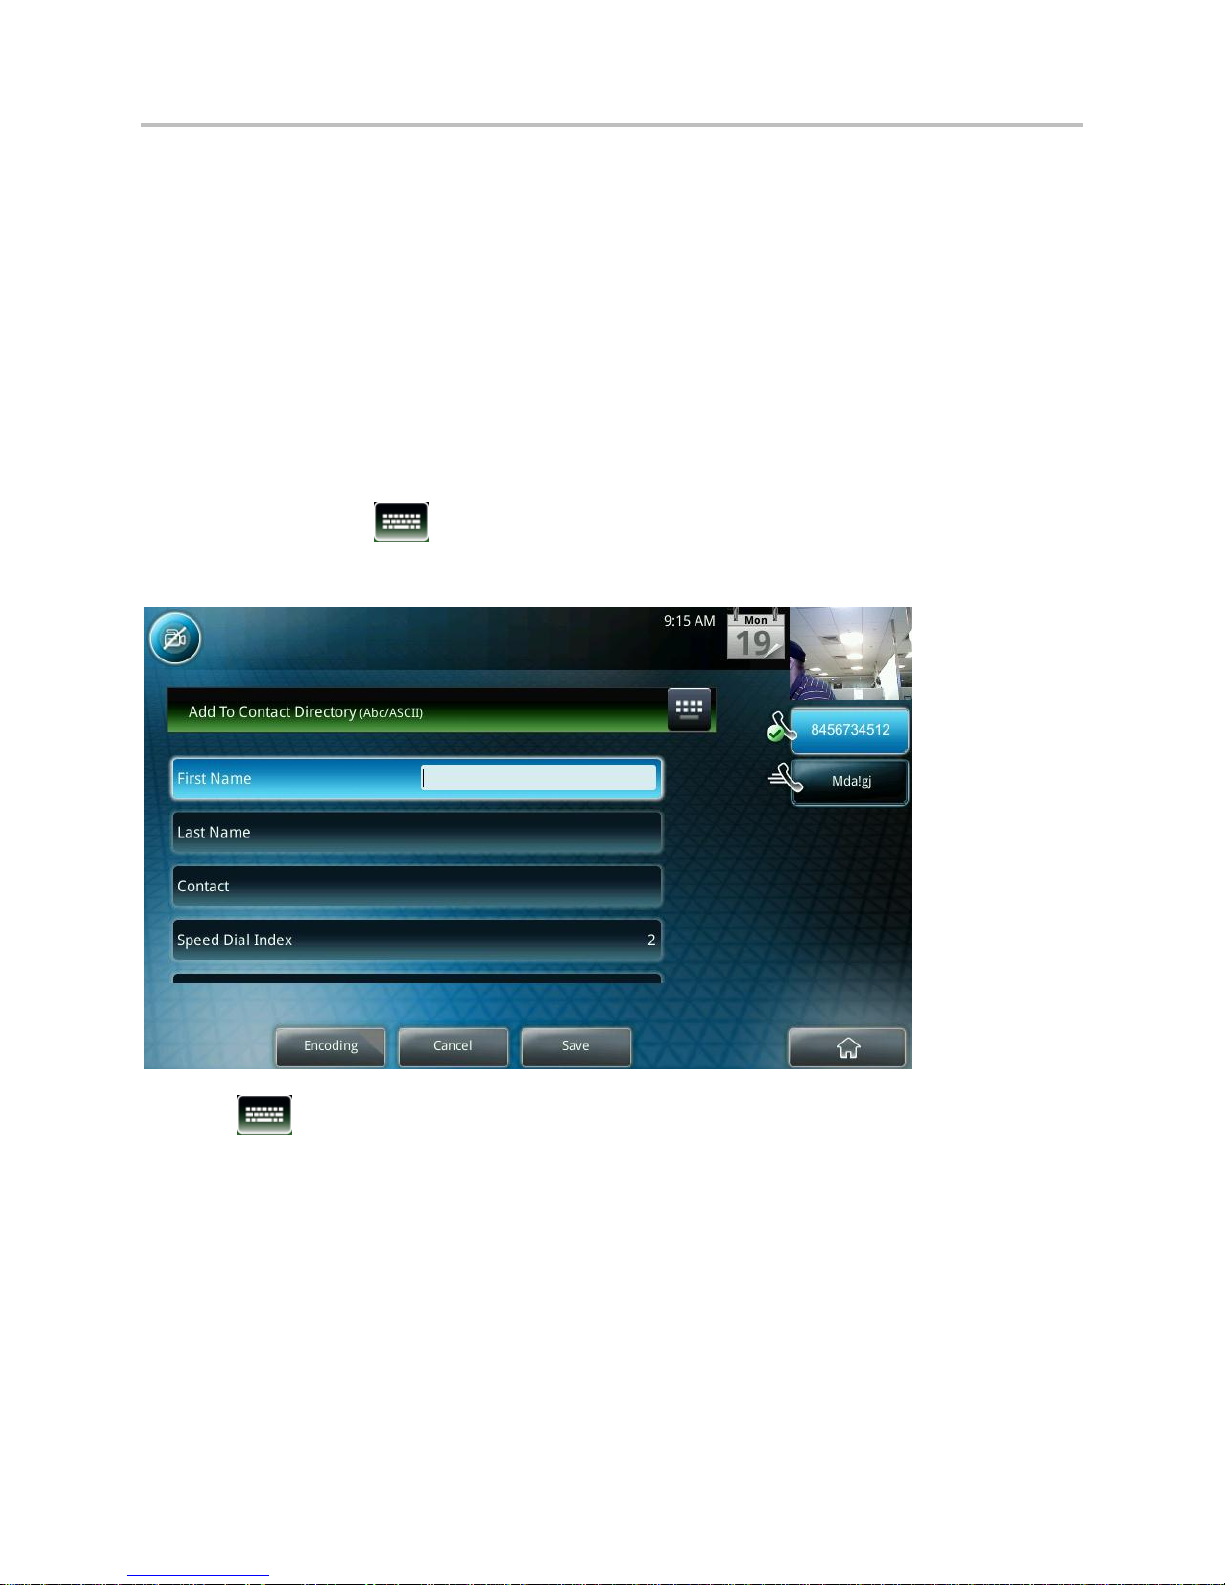
To use the touch screen keyboard to update data:
1 To update a field, tap the field you want to update.
The keyboard icon, , displays next to the screen title.
The following figure shows the keyboard icon next to the screen title.
2 Tap
The keyboard displays on the touch screen.
Polycom, Inc. 22
Page 23

Polycom VVX 1500 Business Media Phone User Guide Version 5.0.0
If you want to…
Do this…
Enter uppercase (A)
characters, lowercase (a)
characters, or a combination of
uppercase and lowercase
characters
1 If a keyboard with characters does not display, tap
(on the keyboard).
2 Tap the abc, ABC, 123, or Abc soft keys to toggle between
lowercase, uppercase, numeric, and titlecase modes.
You can also tap or to toggle between
entering characters in uppercase mode or lowercase mode.
3 Using the keyboard on the touch screen, tap the letter(s) you
want.
Enter numbers
1 If a keyboard with numbers does not display, tap .
2 Using the keyboard on the touch screen, tap the number(s)
you want.
You can also tap the abc, ABC, 123, or Abc soft keys to
toggle between lowercase, uppercase, numeric, and titlecase
modes.
The following figure shows the keyboard that displays on the touch screen when you update a
directory entry.
3 Enter the information. Do the following:
Polycom, Inc. 23
Page 24
Polycom VVX 1500 Business Media Phone User Guide Version 5.0.0
If you want to…
Do this…
Enter special characters
1 If a keyboard with special characters does not display, tap
.
2 Using the keyboard on the touch screen, tap the special
character(s) you want.
Enter text in a particular
character encoding
1 Tap the Latin, Katakana, Unicode, Cyrillic or ASCII soft key
to select the encoding you want. The touch screen’s keyboard
changes to display the encoding you chose.
2 Using the keyboard on the touch screen, tap the character(s)
you want.
Enter a URL
1 Tap the URL soft key.
2 Using the keyboard on the touch screen, tap the character(s)
you want. To access numbers and more special characters,
tap .
Delete data you entered
Tap .
Delete an entire field of data
Double-tap the field of data, so that the data is highlighted. Then,
tap .
To confirm the updates, tap,. .
Using the Dialpad Keys on the Phone Console
You can use the keys on your phone console to update field information.
To use the dialpad keys to enter or edit data:
1 Tap a field to select it.
2 Enter the information. Do the following:
Polycom, Inc. 24
Page 25

Polycom VVX 1500 Business Media Phone User Guide Version 5.0.0
If you want to…
Do this…
Enter only numbers (1),
uppercase (A) characters,
lowercase (a) characters, or
titlecase (Abc) characters
Do one of the following:
Press a dialpad key one or more times to enter the characters
(in either lowercase or uppercase mode) or number that
display on the dialpad key.
or
1 Tap the abc soft key one or more times to toggle between and
select uppercase (ABC soft key), numeric (123 soft key),
titlecase (Abc soft key), and lowercase (abc soft key) modes.
The mode you select displays in the screen title.
2 Press a dialpad key one or more times to enter the characters
or number that display on the key.
For example:
If you’re in ABC mode:
To enter “A,” press once.
To enter “B,” press two times quickly.
To enter “C,” press three times quickly.
To enter “2,” press four times quickly.
If you’re in 123 mode:
To enter “2,” press .
Enter special characters
Do one of the following:
Press the , , or key on the dialpad one or more
times. (Each key provides a different set of special
characters.)
or
1 Tap the ABC, Abc, or 123 soft key so that you’re in either
ABC, Abc, or abc mode. (You can’t access special characters
when you’re in 123 mode.) The mode you select displays in the
screen title.
2 Press the , , or key on the dialpad one or more
times quickly. (Each key provides a different set of special
characters.)
Polycom, Inc. 25
Page 26
Polycom VVX 1500 Business Media Phone User Guide Version 5.0.0
If you want to…
Do this…
Enter text in a a particular
character encoding
1 Tap the Latin, Katakana, Unicode, Cyrillic, or ASCII soft key
to select the encoding you want.
2 Press a dialpad key one or more times to enter the character
you want.
Enter a URL
1 Tap the URL soft key.
2 Press a dialpad key one or more times to enter the number or
character you want. To enter special characters, press the
, , or key on the dialpad one or more times
quickly. (Each key provides a different set of special
characters.)
Delete text you entered
Press or to position the cursor to the right of the text you
want to delete, and then press .
3 Tap the Save soft key.
Tips for When You’re in Video Calls
Use these tips when you’re in a video call or conference:
Check the near-site video to make sure it’s clear, bright, and sharp. For information on adjusting
camera settings, see Changing the Clarity of Near-Site Video.
Use the handset or a headset if you’re in an open environment.
Be aware of latency when speaking.
Avoid bright lights or windows behind you (backlight). If the camera faces a window or bright lights,
you may have to adjust the camera settings. To adjust camera settings, see Changing the Clarity of
Near-Site Video.
Avoid wearing bright colors, all-light or all-dark clothing, or “busy” patterns (such as small checks or
narrow stripes). Light pastels and muted colors look the best on the screen.
In a conference call, mute your microphone when you’re not speaking, especially in noisy
environments.
Avoid tapping the microphone or rustling papers near the microphone.
Make sure that you can see and hear the far-site participants.
Speak in your normal voice without shouting.
Polycom, Inc. 26
Page 27

Polycom VVX 1500 Business Media Phone User Guide Version 5.0.0
Web Info: Top Ten Video Conference Do’s and Don’ts
For the top ten do’s and don’ts for when you’re in a conference call, see Polycom Conference Call
Etiquette.
Use natural gestures when you speak
.
Cleaning the Touch Screen
Periodically, you may need to clean the touch screen. Fingerprints tend to show up more on a color
display.
Before you clean the touch screen, disable the screen so you don’t activate phone features while you
wipe the glass. While the touch screen is disabled, all soft keys are disabled. You can enable the touch
screen again by pressing any key on the phone console.
To answer a call while the touch screen is disabled, pick up the handset. Or, to use the speakerphone,
press , and then tap the Answer soft key.
To clean the touch screen:
1 Tap > Settings > Basic > Screen Clean.
The touch screen is disabled. The message “Touch screen is disabled. Press any key to exit”
displays.
2 Wipe the glass with a clean, lint-free cloth.
3 To enable the touch screen again, press any key on the phone console.
Registering the Phone
Generally, your phone will be deployed with multiple other phones. In this case, your system administrator
will configure the phone parameters beforehand, so that after you set up your phone, the phone will be
registered and ready to use.
If your phone is not part of a large phone deployment, your phone may not be registered after you set it
up. Before you use your phone, you or your system administrator will have to register it.
Polycom, Inc. 27
Page 28

Polycom VVX 1500 Business Media Phone User Guide Version 5.0.0
Web Info: Using the Web Configuration Utility
For detailed information on accessing, navigating, and using the utility, see the Polycom Web
Configuration Utility User Guide.
Configuring Your Phone Using the Web
Configuration Utility
This section explains how to update phone settings from your phone, using the phone’s menu
commands. If you wish, you can also update these settings remotely with the Polycom Web Configuration
Utility.
The phone’s Web Configuration Utility enables you to view and configure phone behavior from a
computer using any compatible Web browser. The utility provides a browser-friendly view of your phone’s
current settings. Using the utility, you can perform many of the same updates from your computer that you
can perform using your phone’s menu system.
You can access the utility using any compatible Web browser installed on a computer that resides on the
same network as your phone. Before you begin, you’ll need to know the IP address of your phone, and
the user password to log in to the utility.
To access the Web Configuration Utility for your phone:
1 Launch a Web browser from a computer on the same network as your phone.
2 In the Address Bar of your Web Browser, enter the IP address of your phone. For example, if your
phone’s IP address is 123.22.3.4, enter this information in the address bar.
3 Press the Enter key.
4 From the Web Configuration Utility login screen, select User, and enter the user password. The
default user password is 123.
5 Click Submit.
The Web Configuration Utility Home screen is displayed.
Polycom, Inc. 28
Page 29
Polycom VVX 1500 Buisness Media Phone
Note: Connecting to Different Types of Video Endpoints
Your phone can exchange video with a video endpoint other than a Polycom VVX 1500 business
media phone. For a list of compatible endpoints, see your system administrator.
Using Basic Features 2:
Calling and Answering
At any time, only one active call can be in progress on your phone. The active call is the call that has
audio or video associated with it. There may be multiple other calls on hold, or in an “Incoming call” or
“Ringing” state.
Your phone can handle a maximum of 24 concurrent calls. At most, your phone can handle one active
call with 23 calls on hold, or 24 calls on hold.
Your phone displays all active incoming and outgoing calls in a large window in the center of the touch
screen. Inactive calls (calls on hold, or incoming calls that you don’t immediately answer) for a particular
Line Key display in a row above the soft keys called the inactive call group.
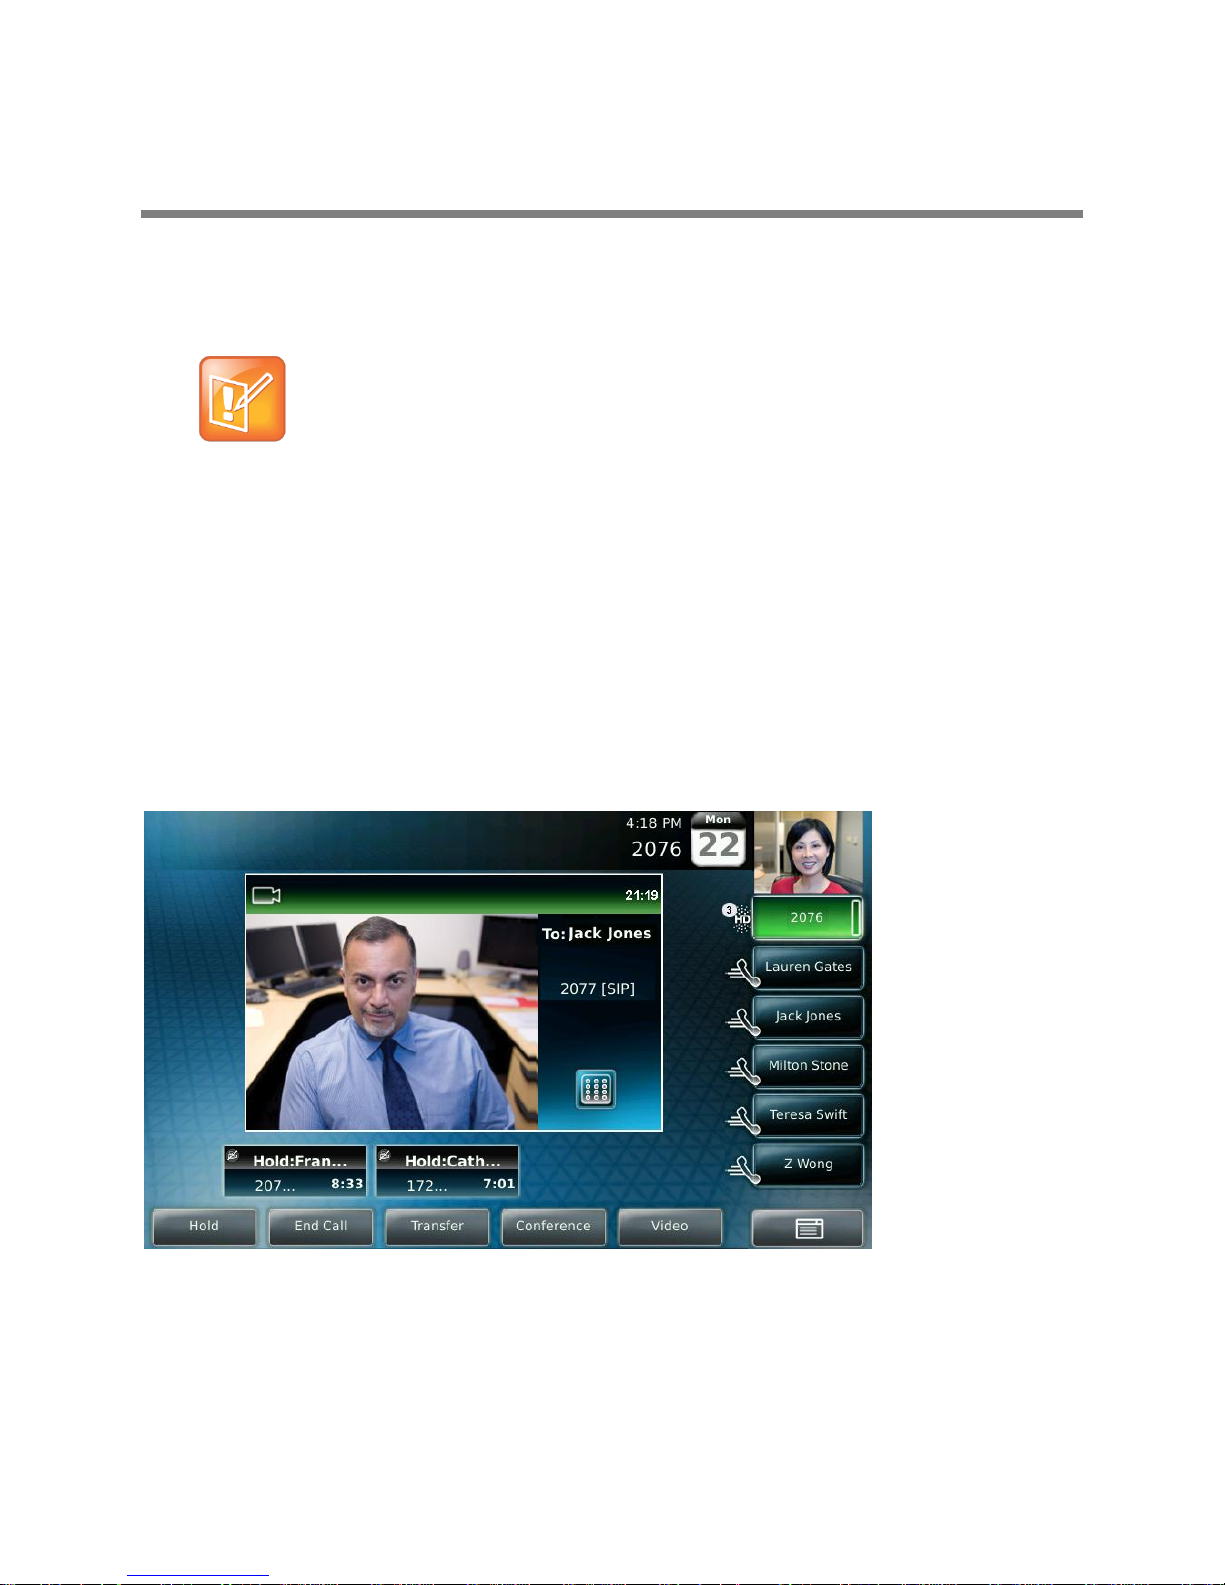
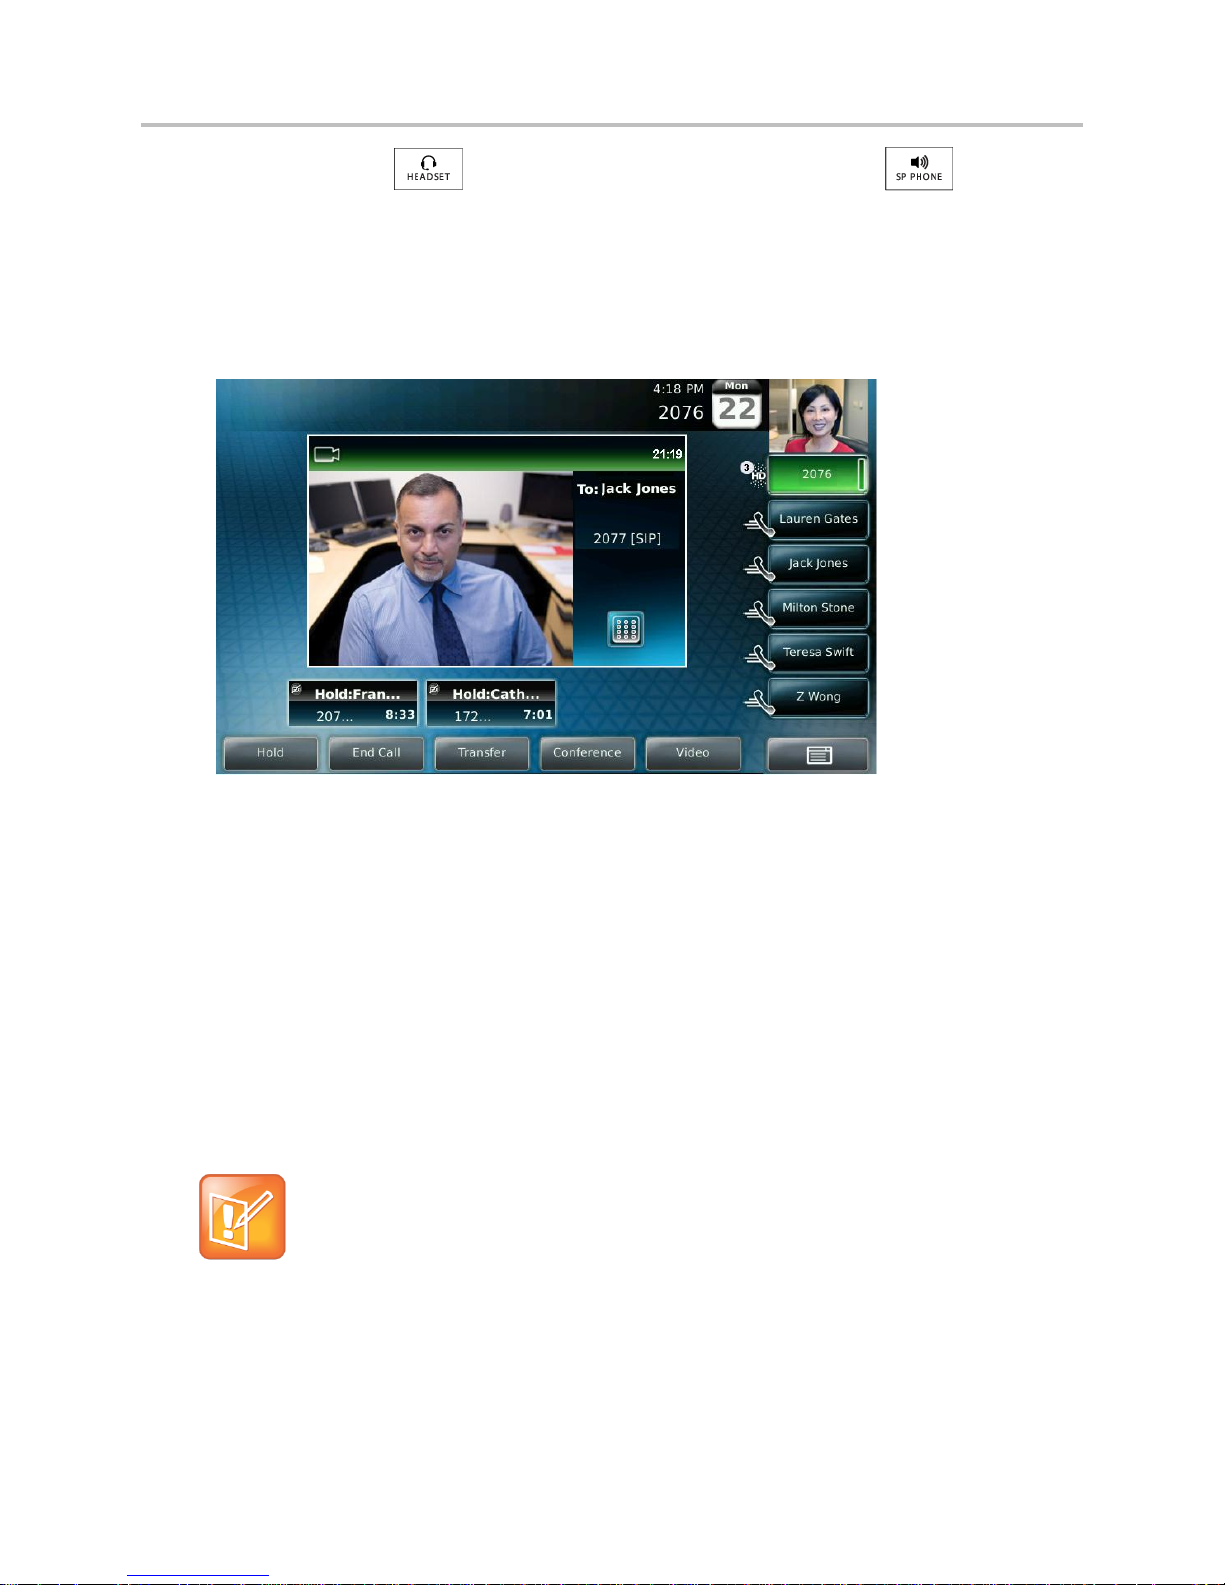
The following figure shows one active call and two calls on hold for Line Key 2076.
Your phone distributes incoming calls for lines that have multiple Line Keys evenly across all Line Keys.
The touch screen only displays calls for one Line Key at one time. The calls that currently display on the
touch screen are associated with the Line Key that is green.
To display and access the calls on another Line Key, tap that Line Key. When you tap a Line Key, the first
call on hold in the inactive call group for that Line Key will automatically resume.
Polycom, Inc. 29
Page 30

Polycom VVX 1500 Business Media Phone User Guide Version 5.0.0
User Tip: Answering Calls on a Locked Phone
If your phone is locked, see Locking and Unlocking Your Phonefor information on answering calls
when your phone is locked.
Note: Configuring Call Indicators
In addition to the usual incoming call indicators (the incoming call window, green Line Key, and
flashing green status indicator), your system administrator can enable your touch screen to flash
bright orange when you have an incoming call. The touch screen will continue to flash until the
incoming call window is minimized.
The number of calls associated with a Line Key is indicated by a counter (for example, ), on the Line
Key.
A Line Key will either be green or blue:
A green line key indicates that the Line Key has an active call or an incoming call. A green Line
Key is associated with the calls that currently display on the touch screen (active or inactive).
A blue line key indicates that the Line Key doesn’t have an active call, or has an incoming call that
has been minimized and placed in the inactive call group. The calls associated with a blue Line Key
don’t currently display on the touch screen.
Line Keys also have a status indicator (a vertical bar on the far-right of the Line Key), . The
status indicator displays in different ways depending on the status of the call. The following is a list of the
ways the status indicator displays and the corresponding call status:
Solid green—A dial tone is available, dialing is in progress, or a call is active.
Flashing green—An incoming call.
Solid red—A remote shared line is active.
Flashing red—A call (one or more) is on hold.
Answering Calls
By default, all incoming calls display in a window in the center of the touch screen. The Line Key
associated with the call glows green, and the Line Key status indicator flashes green. After 10 seconds,
the incoming call window is minimized and placed at the bottom of the touch screen, above the soft keys.
Answering When Not in Another Call
When you’re not in another call, you can answer a call in three ways:
Using the handset
Using the speakerphone
Polycom, Inc. 30
Page 31

Polycom VVX 1500 Business Media Phone User Guide Version 5.0.0
Note: Your Speakerphone May be Disabled
If your speakerphone doesn’t work, your system administrator may have disabled the speakerphone
on your phone. Handle calls using a handset or headset instead.
If your system administrator disables the speakerphone on your phone, “Handsfree mode disabled”
appears on the touch screen after you press .
Using the headset
In all cases, the active call displays on the touch screen, together with the call duration and who the call is
from.
The following figure shows an active video call.
To answer a call using the handset:
» Pick up the handset.
To answer a call using the speakerphone:
With the handset on-hook, do one of the following:
Tap the incoming call window that displays in the middle of the touch screen.
After 10 seconds, the incoming call window is minimized and placed in the inactive call group at the
bottom of the touch screen, and you have to tap the Answer soft key to answer it.
Tap the Answer soft key.
Tap the green Line Key with the status indicator that is flashing green.
Press .
To answer a call using the headset:
Do one of the following:
Polycom, Inc. 31
Page 32

Polycom VVX 1500 Business Media Phone User Guide Version 5.0.0
Note: Changing the Call Waiting Tone
A “beep” is the default call waiting tone. Your system administrator can change the tone to another
sound, or make it silent.
Note: After Ten Seconds the Incoming Call is Inactive
If you wait more than ten seconds, the incoming call window is minimized and placed in the inactive
call group (along the bottom of the touch screen), and the active call reappears in the window in the
center of the touch screen. To answer the incoming call, tap the Line Key with the status indicator
that is flashing green, or tap the Hold soft key to place the active call on hold, and then tap the
Answer soft key.
Press .
If Headset Memory Mode is activated, tap the Line Key with the status indicator that is flashing
green, or tap the Answer soft key.
Answering When in Another Call
If you have an active call and an incoming call arrives (on the same or a different Line Key), the following
happens:
A call waiting tone beeps.
The status indicator on the Line Key associated with the incoming call flashes green.
The call counter for the Line Key associated with the incoming call increments by one (showing the
number of calls associated with the Line Key, including the incoming call).
Caller information for the incoming call displays in a window in the center of the touch screen, and
the Line Key associated with the incoming call glows green. After ten seconds, the window is
minimized and placed in the inactive call group, and the Line Key associated with the call glows
blue (if there is an active call on another Line Key).
To answer an incoming call when you’re in another call:
» Tap the Line Key with the status indicator that is flashing green, or tap the Answer soft key. The
original call is automatically placed on hold, and the incoming call becomes the active call.
Answering on a Shared Line
To answer an incoming call on a shared line:
» Tap the Line Key with the status indicator that is flashing green, or tap the Answer soft key.
Polycom, Inc. 32
Page 33

Polycom VVX 1500 Business Media Phone User Guide Version 5.0.0
Note: After Ten Seconds the Incoming Call is Inactive
After ten seconds, the incoming call window is minimized and placed in the inactive call group (along
the bottom of the touch screen). To answer the incoming call, tap the Line Key with the status
indicator that is flashing green, or tap the Hold soft key to place an active call on hold, and then tap
the Answer soft key.
If you place the call on hold, anyone on another phone configured to use the same shared line can take
the call by tapping the Line Key associated with the held call (represented by a flashing red status
indicator).
For more information about shared lines, including what you can and cannot do with shared lines, see
Supporting Shared Lines.
Answering Calls Automatically
You can enable the phone to automatically answer a call, so you don’t have to tap a soft key, Line Key, or
other key to answer the call. If you enable this feature, the call automatically directs to your speakerphone
after a certain number of rings. Your system administrator sets how many times your phone rings before
the call is auto-answered.
You can choose to mute the phone’s microphone (so the caller cannot hear you), as well as mute video
(so the caller cannot see you), when your phone automatically answers calls. To unmute the call, press
. To transmit video, see Customizing Video During Calls.
If you enable auto answer and an incoming call arrives while you’re already in a call, the incoming call will
be automatically answered if you end the current call or place it on hold. An incoming call is indicated by a
flashing green status indicator on the Line Key.
To enable your phone to automatically answer SIP calls:
1 Tap > Settings > Basic > Preferences > Auto Answer.
2 From the Auto Answer screen, tap Auto Answer SIP Calls.
3 Tap the field’s highlighted grey box.
4 From the drop-down list, tap Yes. (The default setting is No).
5 Tap the Save soft key.
6 Tap to return to the idle screen.
To enable your phone to automatically answer all H.323 calls:
1 Tap > Settings > Basic > Preferences > Auto Answer.
2 From the Auto Answer screen, tap Auto Answer H.323 Calls.
3 Tap the field’s highlighted grey box.
4 From the drop-down list, tap Yes. (The default setting is No).
5 Tap the Save soft key.
6 Tap to return to the idle screen.
Polycom, Inc. 33
Page 34

Polycom VVX 1500 Business Media Phone User Guide Version 5.0.0
Note: Answering Calls on a Locked Phone
If your phone is locked, see Locking and Unlocking Your Phone for information on placing calls
when your phone is locked.
Note: Your Phone May Support Both SIP and H.323 Protocols
Your phone may be set up to handle both SIP and H.323 calls. For more information, see Calling
Using the H.323 Protocol
You can only enable your phone to automatically answer all H.323 calls if your phone supports the H.323
protocol. For more information, see Calling Using the H.323 Protocol.
To mute the microphone for all auto-answered calls
1 Tap Microphone Mute.
2 Tap the field’s highlighted grey box.
3 From the drop-down list, tap Yes. (The default setting is Yes).
4 Tap the Save soft key.
5 Tap to return to the idle screen.
To mute the video when video calls are auto-answered:
1 Tap Video Mute.
2 Tap the field’s highlighted grey box.
3 From the drop-down list, tap Yes. (The default setting is No.)
4 Tap the Save soft key.
5 Tap to return to the idle screen.
Placing Calls
You can place a call in various ways using your phone:
Using the handset
Using the speakerphone
Using the headset
You can dial the number first, and then choose the method to speak to the other party (handset,
speakerphone, or headset), or choose the method first, and then dial the number. You can also place a
call by entering a URL or IP address, by dialing from a list or directory, or using the Speed Dial Key or
Redial key.
During a call, you can alternate between handset, headset, or speakerphone modes by picking up the
handset, or pressing or . For example, if you’re using the handset, you can switch to
Polycom, Inc. 34
Page 35
Polycom VVX 1500 Business Media Phone User Guide Version 5.0.0
Note: Automatically Place a Call
Your system administrator sets up your phone to automatically place the call after you enter a
certain number of digits. If your phone does not automatically place the call after you enter a phone
number, tap the Send soft key.
If the call is placed before you enter all the digits, you have to place the call as follows: enter the
phone number, tap the Dial soft key, and then pick up the handset.
headset mode by pressing , or switch to speakerphone mode by pressing .
Your phone monitors the duration of all calls through a local call timer. You can view the call time for the
active call and for calls on hold.
In the following figure, the active call to Jack Jones has lasted for 21 minutes, 19 seconds. The calls to
Francois and Catherine have lasted for 8 minutes, 33 seconds and 7 minutes, 1 second respectively.
Calling by Dialing Numbers, URLs, or IP Addresses
You can dial numbers, URLs, or IP addresses using your handset, speakerphone, or headset.
Calling Using the Handset
You can use the handset to dial a number, URL, or IP address.
To dial a number using the handset:
Do one of the following:
Pick up the handset, and then enter the phone number.
Enter the phone number, tap the Dial soft key, and then pick up the handset.
Polycom, Inc. 35
Page 36
Polycom VVX 1500 Business Media Phone User Guide Version 5.0.0
Note: Your Speakerphone May Be Disabled
If your speakerphone does not work, your system administrator may have disabled the
speakerphone on your phone. You must handle calls using the handset or a headset.
If your system administrator disables the speakerphone on your phone, “Handsfree mode disabled”
appears on the touch screen after you press .
Note: Automatically Place a Call
Your system administrator sets up your phone to automatically place the call after you enter a
certain number of digits. If your phone does not automatically place the call after you enter a phone
number, tap the Send soft key.
If the call is placed before you enter all the digits, you have to place the call as follows: enter the
phone number, and then tap the Dial soft key, the Line Key, or press .
To dial a URL or IP address using the handset:
1 Pick up the handset.
2 Tap the URL soft key.
3 Enter the URL or IP address. (See Entering Data and Editing Fields.)
4 Tap the Send soft key.
Calling Using the Speakerphone
You can use the speakerphone to dial a number, URL, or IP address.
To dial a number using the speakerphone:
With the handset on-hook, do one of the following:
Tap the New Call soft key or the Line Key, or press to obtain a dial tone. Then, enter the
phone number.
Enter the phone number, and then tap the Dial soft key, the Line Key, or press .
To dial a URL or IP address using the speakerphone:
1 Tap the New Call soft key or the Line Key, or press .
2 Tap the URL soft key.
3 Enter the URL or IP address.
4 Tap the Send soft key.
Polycom, Inc. 36
Page 37
Polycom VVX 1500 Business Media Phone User Guide Version 5.0.0
Note: Automatically Place a Call with Your Headset
If you frequently use a headset and want to make it the default call path, see Enabling Headset
Memory Mode.
Note: Automatically Place a Call
Your system administrator sets up your phone to automatically place the call after you enter a
certain number of digits. If your phone does not automatically place the call after you enter a phone
number, tap the Send soft key.
If the call is placed before you enter all the digits, you have to place the call as follows: enter the
phone number, tap the Dial soft key, and then press .
Calling Using a Headset
You can use the headset to dial a number, URL, or IP address.
To dial a number using the headset:
With the optional headset connected, do one of the following:
Tap the New Call soft key or the Line Key to obtain a dial tone. Then, press , and then
enter the phone number.
Enter the phone number, tap the Dial soft key, and then press .
To dial a URL or IP address using the headset:
1 Tap the New Call soft key or the Line Key to obtain a dial tone.
2 Press .
3 Tap the URL soft key.
4 Enter the URL or IP address.
5 Tap the Send soft key.
Calling from Lists, Directories, and Keys
You can place calls from a call list (missed, placed, or received), directory (local Contact Directory or
Corporate Directory), or from a Speed Dial Key or list using your handset, speakerphone, or headset.
Calling from Call Lists
You can place calls from your missed, placed, and received call lists.
To place a call from a call list:
1 Display a call list. (See Viewing Call Lists.)
Polycom, Inc. 37
Page 38
Polycom VVX 1500 Business Media Phone User Guide Version 5.0.0
Note: Display Your Most Recent Search
If you have enabled your phone to save the results of your last search (or remember the last contact
you selected), your previous search results (or the contact), will display instead of a blank search
screen. To enable this feature, see Saving Corporate Directory Search Results.
Note: Not All Contacts Have Speed Dial Numbers
A contact may not have a speed dial number. To find out what a contact’s speed dial index number
is, or to assign or update a speed dial index number, see Updating Your Local Contact Directory
From the Received Calls, Missed Calls, or Placed Calls screen, press or to scroll to
the person you want to call, and then tap the Dial soft key, pick up the handset, or press .
Calling from Directories
You can place calls from your local Contact Directory or Corporate Directory.
To place a call from the local Contact Directory:
1 Tap > Features > Contact Directory.
2 From the Directory screen, tap the contact you want to call. Or, search for the contact (see
Searching Your Local Contact Directory).
3 To place the call, tap the Dial soft key, pick up the handset, or press .
To place a call from the Corporate Directory:
1 Tap > Features > Corporate Directory.
The Corporate Directory search screen displays.
2 Search for the contact you want to call (see Searching Corporate Directory).
3 Press or to scroll to the contact, and then tap the Dial soft key, pick up the
handset, or press .
Calling by Speed Dialing
You can quickly speed dial a contact by doing one of the following:
Tapping the contact’s Speed Dial Key.
Polycom, Inc. 38
Page 39

Polycom VVX 1500 Business Media Phone User Guide Version 5.0.0
Not all contacts have a Speed Dial Key. For information on
Speed Dial Keys, see Managing Speed DialsManaging Speed Dials.
Placing a call from the Speed Dial Information screen.
To place a call using speed dial:
Do one of the following:
Tap the contact’s Speed Dial Key.
In the following figure, Speed Dial Keys are assigned to Lauren Gates, Jack Jones, Milton Stone,
Teresa Swift, and Z Wong.
From the idle screen, press . From the Speed Dial Information screen, scroll to the
contact. Then, tap the contact, pick up the handset, or press .
(During a call, you cannot access the Speed Dial Information screen by pressing .)
If the contact has a speed dial index number that is equal to or less than 99, enter the speed dial
index number from the idle screen, and then press (on the phone console). From the Speed
Dial Information screen, tap the Dial soft key, pick up the handset, or press .
The call is placed.
Calling by Redialing
To redial a number, press . A call to your last placed call is attempted.
Polycom, Inc. 39
Page 40

Polycom VVX 1500 Business Media Phone User Guide Version 5.0.0
Note: Calling Using H.323 Protocol is an Optional Feature
Handling calls that use the H.323 protocol is an optional feature that your system administrator
enables. Your system may not support it or have an H.323 license. For more information, contact
your system administrator.
If your phone supports the H.323 protocol, be aware of the following limitations:
» You cannot forward or transfer H.323 calls.
» You cannot set up forwarding for lines that just use the H.323 protocol.
» You cannot set up shared lines for lines that use the H.323 protocol.
» You cannot place a call by just entering an H.323 name. To place a call using an H.323 name,
use URL-dialing mode and enter the following format for the URL:
<H.323 name>@<server name>
For example: VVX101@100.100.100.100
Calling Using the H.323 Protocol
Your system administrator can set up your phone so that it can handle calls that use either the SIP or
H.323 protocol, or both protocols. Your phone may be set up so that a line can handle one or both
protocols.
If your phone can handle calls using both protocols, you may be able to choose the protocol to use before
you tap the Dial or Send soft key, or before a call is automatically placed. You may also be able to choose
to allow your phone to automatically select the protocol to use.
If your phone is set up to handle both protocols, you may be able to choose a protocol before you place a
call using one of the following methods:
The soft key method
Soft keys display to allow you to choose the protocol. Tap the Use SIP, Use H.323, or Use Auto
soft key one or more times to toggle between Use SIP (to place a SIP call), Use H.323 (to place an
H.323 call), or Use Auto (to allow your phone to automatically select the protocol to use). The
protocol you select displays in the title bar. Your phone will use the selected protocol for all
subsequent calls, unless you select a different protocol.
Dialog box method
A dialog box displays to allow you to choose the protocol. Tap Use SIP (to place a SIP call) or Use
H.323 (to place an H.323 call).
For dual-protocol phones, the protocol displays next to all call IDs, including the call IDs for conference
call participants and calls on hold. The following figure shows a SIP call placed to Jack Jones.
Polycom, Inc. 40
Page 41

Polycom VVX 1500 Business Media Phone User Guide Version 5.0.0
Note: End a Call by Tapping a Line Key
Your system administrator may have set up your phone so that you can end calls by tapping the
Line Key. If your phone is set up to do this, you can end an active call by tapping the Line Key
associated with the call.
When you place calls from call lists or directories, your phone automatically chooses the protocol to use
based on the information in the call list or directory. When you set up a contact in your Local Contact
Directory, you can specify the protocol the contact uses to handle calls. This allows your phone to
automatically use the correct protocol when you dial the contact.
Ending Calls
To end a call:
Do one of the following:
Tap the End Call soft key.
If you’re in handset mode, replace the handset.
If you’re in speakerphone mode, press .
If you’re in headset mode, press .
Polycom, Inc. 41
Page 42

Polycom VVX 1500 Business Media Phone User Guide Version 5.0.0
Web Info: Supported Headsets
For a list of supported headsets, see Technical Bulletin 37477, SoundPoint IP and Polycom VVX
1500 Headset Compatibility List.
Using a Headset
If you use a headset, you can set up your phone so that all calls use your headset. You can also use the
hookswitch button on your headset to place, answer, and end calls.
Enabling Headset Memory Mode
This feature is useful for permanent or full-time headset users. You can set up your phone so that all
incoming and outgoing calls use your headset. At any time, you can switch to handset or speakerphone
mode.
To use Headset Memory Mode, you must enable, and then activate, Headset Memory Mode. If you
switch to handset or speakerphone mode, you deactivate Headset Memory Mode. To switch back to
Headset Memory Mode, you must activate it again.
To enable Headset Memory Mode:
1 Tap > Settings > Basic > Preferences > Headset > Headset Memory.
2 From the Headset Memory Mode screen, tap Enabled, and then tap the Select soft key.
3 To activate Headset Memory Mode, press twice.
All calls will now go to your headset. If you tap the Line Key with the flashing green status indicator or the
Answer soft key to receive a call, the call will connect to your headset automatically.
If you switch to the speakerphone or the handset, you deactivate Headset Memory Mode (calls no longer
automatically go to your headset, unless you choose this mode). To have calls go to your headset again,
activate Headset Memory Mode by pressing twice.
Polycom, Inc. 42
Page 43

Polycom VVX 1500 Business Media Phone User Guide Version 5.0.0
Web Info: Electronic Hookswitch Supported Headsets
For information on supported headsets to provide electronic hookswitch features to place, answer,
and end calls, see Technical Bulletin 37477, SoundPoint IP and Polycom VVX 1500
Headset Compatibility List.
Using Electronic Hookswitch
If you use a headset that supports electronic hookswitch, you can place, answer, and end calls by
pressing the hookswitch button on your headset.
While Your Phone Rings
While your phone rings, you can do the following:
Temporarily ignore the call before answering it. See Ignoring or Silencing Incoming Calls.
Terminate the call so you can’t answer it. See Rejecting Incoming Calls.
Forward the call to another party. See Forwarding Calls While Your Phone Rings.
Ignoring or Silencing Incoming Calls
Ignore or silence a call to do the following:
Minimize the incoming call window so it doesn’t display in the large window in the center of the
touch screen.
Stop your phone from ringing.
When you ignore or silence a call, you stop your phone from ringing, but you can still answer the call (the
call’s visual notification will still display).
To ignore or silence a call:
» While your phone rings, tap the Ignore soft key (for private lines) or the Silence soft key (for
shared lines).
The incoming call window is minimized and your phone stops ringing.
To answer an ignored or silenced call, tap the Answer soft key, or tap the Line key with the flashing
green status indicator.
To end an ignored call, tap the Reject soft key.
Polycom, Inc. 43
Page 44

Polycom VVX 1500 Business Media Phone User Guide Version 5.0.0
Note: Call Forwarding is an Optional Feature
Your company’s settings may override this feature. For more information, contact your system
administrator.
Call forwarding is not available on shared lines.
You cannot forward calls from endpoints that use the H.323 protocol. In addition, you cannot set up
forwarding for lines that only use the H.323 protocol.
Rejecting Incoming Calls
Reject a call to stop your phone from ringing and end the call so you can’t answer it. Calls you reject
display in your Received Calls list. Rejecting calls is not available for shared lines.
To reject a call:
» While your phone rings, tap the Reject soft key.
The call ends.
Forwarding Calls While Your Phone Rings
You can manually forward a call to another number while your phone rings.
You can also set up your phone to forward all incoming calls to a third party (see Forwarding All Calls to
Another Party), or forward calls from a certain contact to another party (see Diverting Calls from a Contact
to Another Party).
To forward an incoming call to another party:
1 While your phone rings, tap the Forward soft key.
2 Enter the phone number to forward the incoming call to.
(Your phone displays the last number you forwarded calls to.)
3 Tap the Forward soft key.
The incoming call is forwarded to the other party. If call forwarding is disabled, all future calls will not be
forwarded and forwarding will remain disabled.
During Calls
When you’re in a call, you can do the following:
Place the call on hold. See Holding and Resuming Calls.
Transfer the call to another party. See Transferring Calls.
Set up a conference call with the call you’re in and another party. See Setting Up Conference Calls.
Change the way you view video for the call. See Customizing Video During Calls.
Polycom, Inc. 44
Page 45

Polycom VVX 1500 Business Media Phone User Guide Version 5.0.0
Note: Press Mute Instead of Hold While in a Conference Call
The Hold feature typically generates music or a beeping tone. Therefore, avoid placing a conference
call on hold.
If you’re in a conference and don’t want anyone to hear you, press instead of
placing the conference on hold.
Holding and Resuming Calls
To place a call on hold, tap the Hold soft key or press during an active call. When you place a
call on hold, the following happens:
The hold icon, , will display on the Line Key.
The Line Key status indicator will flash red.
The call’s window is minimized and placed in the inactive call group (above the soft keys). The
inactive call window displays “Hold.”
The following figure shows a call on hold. The hold icon and the flashing red status indicator display on
the Line Key.
Tap the Resume soft key, press again, or tap the Line Key, to retrieve the call.
If you have more than one call on hold, tap the call you want to resume, and then tap the Resume soft
key. If you tap the Line Key, the first call in the inactive call group for the Line Key will automatically
resume.
Polycom, Inc. 45
Page 46

Polycom VVX 1500 Business Media Phone User Guide Version 5.0.0
Handling Multiple Calls on Hold
Your phone displays all calls for a Line Key by displaying multiple windows on the screen. The phone only
displays the calls for one Line Key at a time.
The active call (if any) displays in a window in the center of the touch screen. Held calls or incoming calls
display in minimized windows above the phone’s soft keys (the “inactive call group”). The Line Key
associated with the displayed calls is green. The Line Key displays a counter showing the number of calls
for the Line Key. If all the calls for a Line Key are inactive, the status indicator for the Line Key glows red.
If the Line Key has an active call, the status indicator glows green.
The following figure shows four calls on hold for Line Key 2076.
To select a call on hold, tap the call on hold. New soft keys will display that apply to the selected call. To
resume the call, tap the Resume soft key or press .
If there are more than three calls on hold, tap or to display additional calls on hold. You can
also press or to select a call on hold.
To access the calls on another Line Key, tap that Line Key. When you tap a Line Key, the first call on hold
in the inactive call group for that Line Key will automatically resume.
Polycom, Inc. 46
Page 47

Polycom VVX 1500 Business Media Phone User Guide Version 5.0.0
Note: You Cannot Transfer H.323 Calls
Transferring Calls in not supported with H.323 Protocol
Note: Ending a Conference Call
By default, when you end a conference, the other conference call participants remain connected.
However, your system administrator may set up your phone so that when you end a conference, all
connections end.
Transferring Calls
A call can be transferred in one of three ways:
Consultative—The party to whom you want to transfer the call answers their phone before you
transfer the call or hang up. You can consult with them before completing the transfer. You also
have the option of transferring the call before the party answers.
See Performing a Consultative Transfer.
Blind—The call is automatically transferred after you dial the number of the party to whom you want
to transfer the call. You don’t have the option of talking to the party.
See Performing a Blind Transfer.
Attended—Conference call parties are automatically connected to each other after you exit a
conference.
Set up a conference call and then end your participation. For more information, see Ending
Conference Calls.
Performing a Consultative Transfer
Perform a consultative transfer if you want to talk to the party to whom you’re transferring the call. Or, you
can choose not to talk to the party. In this case, you wait for the party’s ring-back sound, and then transfer
the call.
To perform a consultative transfer:
1 During a call, tap the Transfer soft key or press . The active call is placed on hold.
2 From the Transfer to: screen, place a call to the party to whom you want to transfer the call. See
Placing Calls.
3 When you hear the ring-back sound, tap the Transfer soft key or press . If you want to talk
privately to the person to whom you’re transferring the call before the transfer is complete, wait until
the person answers the call, talk to the person, and then tap the Transfer soft key or press
Polycom, Inc. 47
Page 48

Polycom VVX 1500 Business Media Phone User Guide Version 5.0.0
Note: Your Video Conference Can Include Two or More Parties
By default, you can create a conference with two other parties. Depending on your phone system,
you may be able to host a conference with more than two parties. For more information, see your
system administrator.
.After the party answers, tap the Transfer soft key or press .
If you’re using a handset, the transfer can be completed by putting the handset on the cradle.
You can cancel the transfer before the call connects by tapping the Cancel soft key.
Performing a Blind Transfer
When you use a blind transfer, you transfer a call without speaking to the party to whom you’re
transferring the call. The call is automatically transferred as soon as you dial the party’s number.
To perform a blind transfer:
1 During a call, tap the Transfer soft key or press .
2 From the Transfer to: screen, tap the Blind soft key.
3 From the Blind transfer to: screen, place a call to the party to whom you want to transfer the call.
See Placing Calls.
If you want to cancel the transfer (before the call is placed), and return to the original call, tap the
Cancel soft key.
The call automatically transfers to the party you specified.
Setting Up Conference Calls
You can create a conference with two other parties using the phone’s local conference feature. During a
conference call, your phone can exchange video with only one conference participant (even if more than
one participant can send video). The participant with whom you exchange video depends on how you set
up the conference. You also have the option of choosing the participant with whom to exchange video.
During a conference, you have access to the conference management feature. This feature allows you to
manage each participant in the conference call. You can mute, hold, and remove individual participants,
as well as choose the conference participant with whom to exchange video. For more information, see
Managing Conference Call Part.
Hosting Conference Calls
You can set up a conference in one of two ways:
Using the Conference soft key or . The participant with whom you will exchange video is
the participant you most recently added to the conference (if the party can exchange video).
Polycom, Inc. 48
Page 49
Polycom VVX 1500 Business Media Phone User Guide Version 5.0.0
Note: Your Video May Change to a Different Site
If the site for which you view video changes to a different site after you set up a conference, the
message “Video can only be active with one party at a time” displays.
To choose the participant with whom to exchange video, see Managing Conference Call Part.
Note: Single Key Press Conferences
If configured for single key-press conferences, you don’t need to tap the Conference soft key again.
Using the Join soft key, if you have an active call and one call on hold (on the same or another
Line Key). The participant with whom you will exchange video is the party who was previously on
hold (if the party can exchange video).
To set up a conference call using the Conference soft key or dialpad key:
1 Call the first party. See Error! Reference source not found..
2 Tap the Conference soft key or press to create a new call. The active call is placed on
hold.
The Conference with: screen displays.
3 Call the second party. See Error! Reference source not found..
4 When the second party answers, tap the Conference soft key or press again to join all
parties in the conference.
If the second participant can exchange video, you will exchange video with the second participant.
If the second participant cannot exchange video, but the first participant can, you will exchange
video with the first participant.
The Conference window displays.
Polycom, Inc. 49
Page 50

Polycom VVX 1500 Business Media Phone User Guide Version 5.0.0
Note: You Can Only Have One Call on Hold
You can only set up a conference with an active call and a call on hold if you only have one call on
hold. If you have more than one call on hold, you have to set up a conference using the Conference
key or soft key.
To set up a conference call with an active call and a call on hold:
» If you have an active call and a call on hold (either on the same Line Key or a different Line Key),
tap the Join soft key.
The Conference screen displays.
A conference is created with the active call, the call on hold, and yourself. The conference call
takes place on the Line Key from which you handled the last active call.
If the participant who was previously on hold can exchange video, you will exchange video with that
participant. If the participant who was on hold cannot exchange video, you will exchange video with
the other participant.
Holding and Resuming Conference Calls
When you place a conference call on hold, you place all other conference participants on hold.
To place a specific participant on hold, see Managing Conference Call Participants.
To place a conference call on hold:
» During a conference call, tap the Hold soft key.
The other participants in the conference call are placed on hold. The Conference window is minimized
and placed in the inactive call group.
To resume the conference call, tap the Conference window to make sure it is selected, and then tap the
Resume soft key. To end the conference call and place all other conference call participants on hold, tap
the Split soft key.
Polycom, Inc. 50
Page 51

Polycom VVX 1500 Business Media Phone User Guide Version 5.0.0
Note: There are Different Ways to End Conference Calls
Your system administrator may have set up your phone so that you can end active calls by tapping
the Line Key. If your phone is set up to do this, you can end an active conference call by tapping the
Line Key associated with the conference call.
Your system administrator may have set up your phone so that when you tap the End Call soft key,
all connections end.
Conference call participants won’t remain connected if they can’t handle calls using the same
protocol.
Ending Conference Calls
You can end a conference, and your connection to the other participants, by tapping the End Call soft
key. By default, when you tap the End Call soft key, the other participants remain connected.
To end a conference call:
» During a conference call, tap the End Call soft key.
By default, the other parties remain connected.
Splitting Conference Calls into Two Calls on Hold
When a conference is established, a Split soft key is available. When you split a conference, you end the
conference and place all parties on hold. The Split soft key is available during conference calls, and
when a conference call is on hold.
To split a conference call:
» During a conference call, tap the Split soft key. (If a conference call is on hold, tap the conference
call window, and then tap the Split soft key.)
The conference ends, and all calls are split into individual calls and placed on hold.
Managing Conference Call Participants
When you manage conference call participants, you can do the following:
Mute a participant.
Place a participant on hold.
Remove a participant from the conference.
Obtain information about a participant.
Choose the participant with whom to exchange video.
To manage a participant, tap the window of the participant you want to manage. The participant’s window
will be highlighted, and the soft keys will update to show Far Mute, Hold, Remove, Information, and
Back.
The following figure shows the soft keys that display when you manage a conference call participant (in
this case, Jack Jones). If the participant you tapped is not the participant with whom you’re exchanging
video, the Select Video soft key also displays.
Polycom, Inc. 51
Page 52

Polycom VVX 1500 Business Media Phone User Guide Version 5.0.0
To manage a conference call:
1 During a conference call, tap the window of the conference call participant you want to manage.
The soft keys update so you can manage the participant.
You can access the following soft keys:
Far Mute—Mutes the selected participant. The muted participant can hear all participants, but
no participant can hear the muted participant.
Select Video—Selects the conference call participant as the “active” conference participant.
This is the participant with whom you will exchange video.
(The Select Video soft key does not display if you’re currently exchanging video with the
selected participant, or if the participant is not calling from a video endpoint.)
Hold—Places a selected conference participant on hold. The held party cannot hear any
participant, and no participant can hear the held party.
Remove—Removes the selected conference participant from the conference, ends the
conference call, and creates an active call between you and the other participant.
Information—Provides additional information about the selected conference participant.
Back—Displays the conference call soft keys again (Hold, End Call, Manage, Split, Video).
2 Do one of the following:
To mute the conference participant, tap the Far Mute soft key.
The muted party can hear all participants, but no participant can hear the muted party. The far
mute icon, , displays in the muted party’s window.
(If you press instead of tapping the Far Mute soft key, all other participants
can hear each other, but they cannot hear you. The red mute icon, , displays next to nearsite video.)
To un-mute the muted party, tap the UnMute soft key.
Polycom, Inc. 52
Page 53

Polycom VVX 1500 Business Media Phone User Guide Version 5.0.0
Note: Customize Your Phone’s Settings for all Video Calls
In addition to customizing video during a call, you can set up your phone to handle video for all calls
in specific ways (for example, how to display all incoming video calls, or how to stop the
transmission of near-site video for all calls).. For more information, see Changing When and How
Video Displays.
To select the conference participant as the “active” participant (the participant with whom you
will exchange video), tap the Select Video soft key.
To place the conference participant on hold, tap the Hold soft key.
The held party cannot hear any participant, and no participant can hear the held party.
To return the participant to the conference, tap the Resume soft key.
(If the held party taps the Hold soft key or presses on their phone, the participant will
still be held within the conference even if you tap the Resume soft key.)
To place a conference call on hold, see Holding and Resuming Conference Calls.
To remove the conference participant from the conference, tap the Remove soft key.
Handling Video During Conference Calls
During a conference call that includes a video endpoint, you can tap the Video soft key (if you aren’t
managing a conference participant) or press to display soft keys that allow you to start and stop
near-site video, display video on the full screen, or swap the windows that near-site and far-site video
display in. For more information, see Customizing Video During Calls.
Customizing Video During Calls
During a video call, you can:
Start and stop the transmission of near-site video
Swap the windows video displays in
View video on the full screen
To handle video during a call:
» During a video call, tap the Video soft key or press to display the soft keys that allow you
to access video features. (The Video soft key is only available when a video call is active. If you
press during an audio-only call, the video soft keys will not display.)
The following video soft keys display:
Polycom, Inc. 53
Page 54

Polycom VVX 1500 Business Media Phone User Guide Version 5.0.0
Note: Disable Video for all Calls
If you want, you can disable video across all calls, not just for the current call. For information on
disabling video for all calls, see Enabling or Disabling Video.
You cannot start and stop far-site video. If your phone receives far-site video, it will always display it.
Note: Display Video on the Full Screen
You don’t have to access the video soft keys to display video on the full screen. During a video call,
tap the window in the center of the touch screen to display the site on the full screen. To display the
site in the center of the touch screen again, tap the touch screen outside of the PIP.
Stop Video/Start Video—Starts and stops the transmission of near-site video. When you tap
the Stop Video soft key, the far-site will no longer see you, and the stop video icon, ,
displays next to the near site, in either the PIP or in the larger window in the center of the touch
screen.
Full Screen—Displays the video that is in the center of the screen on the full screen. The PIP
still displays in the corner, but the soft keys are hidden. (Depending on the video endpoint, you
may or may not see the black bars.)
To display the site in the center of the touch screen and to access soft keys again, tap the touch
screen outside of the PIP. (If you tap the PIP, you will just swap the windows the sites display in.)
Swap—Switches the windows the sites display in. For example, the site in the PIP will display in
the window in the center of the touch screen, and the site in the window in the center of the
touch screen will display in the PIP. When the near site displays in the window in the center of
the touch screen, “Local camera” displays next to it.
Polycom, Inc. 54
Page 55

Polycom VVX 1500 Business Media Phone User Guide Version 5.0.0
Note: Swap Your Video Screen
During a video call, you can tap the PIP to swap the site windows. To swap windows again, tap the
PIP again.
You can also set up your phone to automatically display the far site on the full screen. For more
information, see Changing How You View All Video Calls
Note: Call Forwarding is an Optional Feature
Your company’s settings may override this feature. For more information, contact your system
administrator.
Call forwarding is not available on shared lines.
You cannot forward calls from endpoints that use the H.323 protocol. In addition, you cannot set up
forwarding for lines that only use the H.323 protocol.
Back—Displays the call soft keys again.
For more information on using video and updating video settings, see Changing When and How Video
Displays.
Changing the Way Calls are Answered
Forwarding All Calls to Another Party
You can set up your phone to forward all calls to another number. Your phone will forward calls even if
you enable the Do Not Disturb feature. (You can also forward calls on a call-by-call basis. For more
information, see Forwarding Calls While Your Phone Rings.)
To forward all calls to another party:
1 Do one of the following:
Tap > Features > Forward.
From the idle screen, tap the Forward soft key.
If your phone is set up with a single line, the Forwarding Type Select screen displays.
If your phone is set up with multiple lines, the Line Select screen displays. Tap the line for which
you want to forward calls. The Forwarding Type Select screen displays.
2 From the Forwarding Type Select screen, tap the forwarding type you want. The options are:
Always—To forward all incoming calls.
No Answer—To forward all unanswered incoming calls.
Busy—To forward calls that arrive when you’re already in a call.
3 Do one of the following:
If you selected Always, enter a number to forward all future incoming calls to.
If you selected No Answer, do the following:
Polycom, Inc. 55
Page 56

Polycom VVX 1500 Business Media Phone User Guide Version 5.0.0
Note: Enter a URL or IP Address
You can also enter a URL or an IP address. For more information on using a URL or an IP address,
see Placing Calls.
i. In the Contact field, enter a number to forward all unanswered incoming calls to.
ii. Tap the Forward After Rings field, and then enter how many rings to wait before
forwarding the call (one ring is approximately six seconds). A value of 2 is recommended.
If you selected Busy, enter a number to forward all future incoming calls to when you’re already
in another call.
4 Tap the Enable soft key to confirm call forwarding.
If you chose to always forward calls, the Line Key displays the forwarding icon, , to indicate that
the Always forwarding type is enabled. If you enabled the Busy or No Answer forwarding type, the Line
Key icon does not change.
The following figure shows Line 2076 with the Always forwarding type enabled.
To disable call forwarding:
1 Do one of the following:
Tap > Features > Forward.
From the idle screen, tap the Forward soft key.
If your phone is set up with a single line, the Forwarding Type Select screen displays.
If your phone is set up with multiple lines, the Line Select screen displays. Tap the line for which
you want to disable call forwarding. The Forwarding Type Select screen displays.
2 From the Forwarding Type Select screen, tap the forwarding type you want to change, and then tap
the Disable soft key.
Polycom, Inc. 56
Page 57
Polycom VVX 1500 Business Media Phone User Guide Version 5.0.0
Note: You Cannot Reject Calls on Shared Lines
You can’t reject calls on shared lines. You can only silence them. For more information, see
Supporting Shared Lines.
Note: You Cannot Transfer Calls Using H.323 Protocol
You cannot transfer calls from endpoints that use the H.323 protocol.
Rejecting Calls from a Contact
You can send all incoming calls from a particular contact to your voice and video mail system. (If you
don’t have one set up, the call will still ring on your phone.)
To send incoming calls from a contact to your mail system:
1 Tap > Features > Contact Directory.
2 From the Directory screen, tap the contact whose information you want to update, and then tap the
Edit soft key.
3 From the Edit Contact screen, tap the Auto Reject field, and then tap the field’s highlighted grey
box. From the drop-down list, tap Enabled.
4 Tap the Save soft key.
5 Tap to return to the idle screen.
Diverting Calls from a Contact to Another Party
You can transfer all incoming calls from a particular contact to a third party.
To divert incoming calls from a contact to a third party:
1 Tap > Features > Contact Directory.
2 From the Directory screen, tap the contact for whom you want to transfer calls.
3 From the Edit Contact screen, do the following:
Tap the Divert Contact field, and then enter the number of the party to whom you want to divert
the call.
Tap the Auto Divert field, and then tap the field’s highlighted grey box. From the drop-down list,
tap Enabled.
4 Tap the Save soft key.
5 Tap to return to the idle screen.
Polycom, Inc. 57
Page 58

Polycom VVX 1500 Business Media Phone User Guide Version 5.0.0
Note: Do Not Disturb is an Optional Feature
Do Not Disturb is an optional feature that your system administrator sets up. Your system may not
support it. For more information, contact your system administrator.
Note: Do Not Disturb on Shared Lines
Enabling Do Not Disturb on shared lines disables ringing only. You will still see a visual notification
of the call and have the option to answer the call.
Temporarily Refusing All Calls (Do Not Disturb)
You can prevent your phone from ringing and displaying an incoming call window.
When you enable Do Not Disturb:
The Do Not Disturb icon, , displays on the status bar and on each Line Key.
The Do Not Disturb message scrolls under the time.
The Do Not Disturb key, , glows red.
All calls you receive while Do Not Disturb is enabled will be logged in your Missed Calls list (see
Viewing Call Lists). Missed calls will be identified by the missed call icon, , on the status bar.
(If you have chosen to forward your calls to another number, calls will be sent to that number if you
enable the Do Not Disturb feature.)
The following figure shows the Do Not Disturb icon on the status bar and Line Key, and the “Do Not
Disturb” message that scrolls under the time.
Polycom, Inc. 58
Page 59

Polycom VVX 1500 Business Media Phone User Guide Version 5.0.0
Note: Do Not Disturb Applies to All Phone Lines
By default, the Do Not Disturb feature applies to all lines on your phone. For more information,
contact your system administrator.
Note: You Can Enable or Disable Do Not Disturb for All Phone Lines
You can automatically enable or disable Do Not Disturb for all lines. To automatically enable Do Not
Disturb for all lines, tap the Set All soft key. To automatically disable the feature for all lines, tap the
Clear All soft key. After you tap the Set All or Clear All soft key, the idle screen displays.
To enable Do Not Disturb:
» Press .
To disable Do Not Disturb:
» Tap or press .
Multiple Lines and Do Not Disturb
Your system administrator can enable your phone so that you can enable Do Not Disturb on a line-by-line
basis. The Do Not Disturb icon, , will display on each Line Key for which Do Not Disturb is enabled.
To enable Do Not Disturb for a particular line:
1 Press .
Polycom, Inc. 59
Page 60

Polycom VVX 1500 Business Media Phone User Guide Version 5.0.0
Note: You Can Enable or Disable Do Not Disturb for All Phone Lines
You can automatically enable or disable Do Not Disturb for all lines. To automatically enable Do Not
Disturb for all lines, tap the Set All soft key. To automatically disable the feature for all lines, tap the
Clear All soft key. After you tap the Set All or Clear All soft key, the idle screen displays.
2 From the Line Select screen, tap the line for which you want to apply Do Not Disturb.
3 From the Do Not Disturb screen, tap the Enable soft key.
The Do Not Disturb icon, , displays on each Line Key for the line you selected.
The following figure shows Do Not Disturb enabled for one line only.
To disable Do Not Disturb for a particular line:
1 Tap or press .
2 From the Line Select screen, tap the line for which you want to disable Do Not Disturb.
3 From the Do Not Disturb screen, tap the Disable soft key.
Working with Call Lists
Your phone maintains lists of missed, received and placed calls. Each list can hold up to 100 entries.
If you miss one or more calls, the status bar will display an icon, , with a counter indicating the
number of new missed calls you have. To view information about the missed call(s), tap the icon on the
touch screen, or navigate (see Viewing Call Lists), to your Missed Calls list. After you view the missed
calls, the icon on the touch screen disappears.
The following figure shows the missed calls icon on the touch screen.
Polycom, Inc. 60
Page 61

Polycom VVX 1500 Business Media Phone User Guide Version 5.0.0
To View this Call List…
Do this…
Received Calls
Press .
Missed Calls
Press .
or
If you haven’t viewed the missed call yet,
tap the missed call icon, , that
displays on the status bar on the touch
screen.
Placed Calls
Press .
Viewing Call Lists
You can access any call list from the Call Lists menu, or you can quickly access missed calls from the idle
screen.
To view a call list:
» Do one of the following:
Tap > Features > Call Lists > Missed Calls, Received Calls, or Placed Calls.
From the idle screen, use these shortcuts:
Polycom, Inc. 61
Page 62

Polycom VVX 1500 Business Media Phone User Guide Version 5.0.0
Note: Automatically Clear All Calls
To automatically clear all calls in all call lists, you can restart the phone. See Restarting Your Phone.
Managing Call Lists
You can clear all the records in a call list, or just one record. You can also choose a record in a list and
return the call, store the call details in your local Contact Directory, or view detailed information about the
particular call.
To manage a call list:
1 Tap > Features > Call Lists.
2 From the Call Lists screen, do one of the following:
To clear the records in a call list, tap Clear, and then tap either Missed Calls, Received Calls
or Placed Calls.
A message displays indicating that the call list is cleared. For example, “Missed Calls Cleared!”
To view and manage the calls in a call list, tap either Missed Calls, Received Calls or Placed
Calls. Your call list information displays.
Press or to scroll to a call. You can do the following:
To place the call, tap the Dial soft key.
To edit the phone number (if necessary) before you place the call or store the call details in your
Contact Directory, tap the Edit soft key.
To return to the Call Lists menu, tap the Back soft key.
To remove the call from the list, tap the Clear soft key.
To store the contact in your local Contact Directory, tap the Save soft key.
To view information about the call, such as the phone number, the time and duration of the call,
and the name of the caller, tap the Information soft key.
3 Tap to return to the idle screen.
Working with Contact Directory
You can store a large number of contacts in your phone’s local Contact Directory. Contact your system
administrator for the exact number.
With Contact Directory, you can do the following:
Dial contacts. See Calling from Directories.
Search for contacts. See Searching Your Local Contact Directory.
If you can update Contact Directory, you can also do the following:
Polycom, Inc. 62
Page 63

Polycom VVX 1500 Business Media Phone User Guide Version 5.0.0
Note: Protocols Display in the Directory
If a protocol is specified for a contact, the protocol type will display in the directory. For example, if
Lauren Gates uses the SIP or H.323 protocol, the directory entry will look like this: Lauren Gates
(1951 SIP) or Lauren Gates (1951 H323).
Add contacts manually, from call lists, or from a Corporate Directory. See Adding Contacts to Your
Local Contact Directory.
Update contact information. See Updating Your Local Contact Directory.
Delete contacts. See Deleting Contacts from Your Local Contact Directory.
Searching Your Local Contact Directory
Search for a contact by scrolling through the directory, or entering specific search criteria.
To search for a contact:
1 Do one of the following:
Tap > Features > Contact Directory.
Press , and then tap Contact Directory.
2 From the Directory screen, tap the Search soft key. Then, enter the first few characters of the
contact’s first or last name, and then tap the Search soft key again.
The screen displays a list of successful matches.
3 Tap to return to the idle screen.
Adding Contacts to Your Local Contact Directory
You can add contacts to your local Contact Directory in the following ways:
Manually (if you have permission to update your local Contact Directory). See Adding Contacts
Manually.
From a call list. Adding Contacts from Call Lists.
From a Corporate Directory (if this is set up on your phone). See Adding Corporate Directory
Contacts to Your Local Contact Directory.
Adding Contacts Manually
You can update your local Contact Directory manually, instead of importing contact information from a call
list or a Corporate Directory.
Polycom, Inc. 63
Page 64

Polycom VVX 1500 Business Media Phone User Guide Version 5.0.0
Note: Your Phone May Not Display All the Following Fields
Your phone may not display all the following fields. For more information, see your system
administrator.
To add a contact manually:
1 Tap > Features > Contact Directory.
2 From the Directory screen, tap the Add soft key.
3 From the Add To Directory screen, enter the contact information:
(Optional.) In the First Name field, enter the first name of the contact (see Entering Data and
Updating Fields).
You can enter a maximum of 32 characters.
(Optional.) Tap the Last Name field, and then enter the last name of the contact (see Entering
Data and Updating Fields).
You can enter a maximum of 32 characters.
(Required.) Tap the Contact field, and then enter the contact’s phone number.
You can enter a maximum of 128 characters. The phone number must be unique, and must not
already exist in the directory. If you save an entry with a non-unique phone number, the entry
will not be saved.
(Optional.) Tap the Speed Dial Index field, and then update the speed dial index number.
The speed dial index number is automatically assigned to the next available index value. If you
want, you can change the speed dial index value. The speed dial index value can be any value
between the next available number and a maximum value of 9999.
If you assign a speed dial index number that is already taken, the message “Speed dial index
already exists” displays.
Contacts with a speed dial index number can be automatically assigned to a Speed Dial Key for
one-touch dialing. For more information, see Managing Speed Dials.
(Optional.) Tap the Label field, and then enter a label for the contact. You can enter a maximum
of 32 symbols, letters, or numbers.
If you specify a label, the label will be the first item that displays for the contact in the Contact
Directory and on the Speed Dial Information screen (before the contact’s first and last names, if
specified). The label will also display on the contact’s Speed Dial Key.
In the following figure, the label “Manager” has been assigned to Lauren Gates. As a result,
Lauren Gates’ Speed Dial Key displays “Manager” instead of “Lauren Gates.”
Polycom, Inc. 64
Page 65
Polycom VVX 1500 Business Media Phone User Guide Version 5.0.0
Note: A Mail System is Required for Auto Reject
If you don’t have a mail system set up, enabling the Auto Reject field will have no effect. Each time
the contact calls, your phone will ring (unless you choose to divert the contact’s calls, or enable call
forwarding or Do Not Disturb on your phone).
(Optional. This field only displays if your phone supports the H.323 protocol. For more
information, see Placing Calls Using the H.323 Protocol.) Tap the Protocol Type field, and then
tap the field’s highlighted grey box. From the drop-down list, tap SIP, H.323, or Unspecified.
(The default setting is Unspecified.)
If you select SIP, the phone will attempt to use the SIP protocol to place calls to this contact.
“SIP” will display next to the contact on the Directory screen and Speed Dial Information
screens.
If you select H.323, the phone will attempt to use the H.323 protocol to place calls to this
contact. “H323” will display next to the contact on the Directory screen and Speed Dial
Information screens.
If you select Unspecified, the phone will automatically choose the protocol to use to place calls
to this contact.
(Optional.) Tap the Ring Type field, and then tap the field’s highlighted grey box. From the
drop-down list, tap the ring type you want to use for the contact.
(Optional.) Tap the Divert Contact field, and then enter the phone number of the third party to
which you want this contact’s calls sent.
You can enter a maximum of 32 characters.
(Optional.) Tap the Auto Reject field, and then tap the field’s highlighted grey box. From the
drop-down list, tap Enabled or Disabled. (The default setting is Disabled.)
If you set the Auto Reject field to enabled, each time the contact calls, the call will be directed to
your mail system (if one is set up).
Polycom, Inc. 65
Page 66

Polycom VVX 1500 Business Media Phone User Guide Version 5.0.0
Note: Check the Contact Directory After You Save a Contact
You may want to go to the Contact Directory to see if the contact was saved correctly and to add
any missing contact information. To find a contact in your Contact Directory, see Searching Your
Local Contact Directory. To update missing contact information, see Adding Contacts Manually
(step 3).
(Optional.) Tap the Auto Divert field, and then tap the field’s highlighted grey box. From the
drop-down list, tap Enabled or Disabled. (The default setting is Disabled.)
If you set the Auto Divert field to enabled, each time the contact calls, the call will be directed to
the third party you specified in the Divert Contact field.
(Optional.) Tap the Watch Buddy field, and then tap the field’s highlighted grey box. From the
drop-down list, tap Enabled or Disabled. (The default setting is Disabled.)
If you set the Watch Buddy field to enabled, you can monitor the contact’s status. For more
information on monitoring status, see
Using Buddy Status Lists.
(Optional.) Tap the Block Buddy field, and then tap the field’s highlighted grey box. From the
drop-down list, tap Enabled or Disabled. (The default setting is Disabled.)
If you set the Block Buddy field to enabled, the contact cannot monitor your status. For more
information on monitoring status, see
Using Buddy Status Lists.
4 Tap the Save soft key.
5 Tap to return to the idle screen.
Adding Contacts from Call Lists
You can save call information from a call list to your local Contact Directory. The contact’s first and last
names (if available) and contact number are saved.
To add a contact from a call list:
1 Display a call list. (See Viewing Call Lists.)
2 Press or to scroll to the call you want to save to your local Contact Directory,
and then tap the Save soft key.
The message “Saved” displays.
If the contact already exists in your local Contact Directory, “Contact already exists” displays.
3 Tap to return to the idle screen.
Polycom, Inc. 66
Page 67

Polycom VVX 1500 Business Media Phone User Guide Version 5.0.0
Updating Your Local Contact Directory
You can update information for contacts in your local Contact Directory.
To update a contact:
1 Tap > Features > Contact Directory.
2 From the Directory screen, tap the contact whose information you want to update. Or, search for the
contact (see Searching Your Local Contact Directory).
3 Tap the Edit soft key.
4 From the Edit Contact screen, update the contact information.
For information on the fields you can update, see Adding Contacts Manually (step 3).
5 Tap the Save soft key.
6 Tap to return to the idle screen.
Deleting Contacts from Your Local Contact Directory
You can delete contacts from your local Contact Directory.
To delete a contact:
1 Tap > Features > Contact Directory.
2 From the Directory screen, tap the contact you want to delete. Or, search for the contact (see
Searching Your Local Contact Directory).
3 Tap the Delete soft key.
The contact is deleted from the directory.
4 Tap to return to the idle screen.
Working with Corporate Directory
If your system administrator sets up Corporate Directory on your phone, you may have read-only access
to portions of your Corporate Directory. You cannot update the contacts in your Corporate Directory. Your
system administrator determines which contacts you can see.
From Corporate Directory, you can do the following:
Dial contacts. See Calling from Directories.
Search for contacts. See Searching Corporate Directory.
Add contacts to your local Contact Directory. See Adding Corporate Directory Contacts to Your
Local Contact Directory.
Searching Corporate Directory
Polycom, Inc. 67
Page 68

Polycom VVX 1500 Business Media Phone User Guide Version 5.0.0
Note: Your Phone Can Save Searches
Each time you access Corporate Directory, the search screen displays, unless you enable your
phone to remember the last search you performed or the last person you selected. To enable this
feature, see Saving Corporate Directory Search Results.
Note: Your Most Recent Saved Search Displays
If you have enabled your phone to save the results of your last search (or remember the last contact
you selected), your previous search results (or the contact), will display instead of a blank search
screen. To enable this feature, see Saving Corporate Directory Search Results.
Note: Clear Your Previous Search
If you want to erase all your search criteria and enter new criteria before you submit your search, tap
the Clear soft key.
When you access Corporate Directory, a search screen displays so you can search for a specific contact.
You can perform a quick search or an advanced search.
To search for a contact in the Corporate Directory:
1 Do one of the following:
Tap > Features > Corporate Directory.
Press , and then tap Corporate Directory.
The Corporate Directory search screen displays.
2 From the Corporate Directory search screen, perform a quick search or an advanced search.
A quick search allows you to search using the contact’s last name (if the directory is alphabetized
by last name) or first name (if the directory is alphabetized by first name). An advanced search
uses any combination of the contact’s first and last names, phone numbers, address, and title.
Do one of the following:
To perform a quick search, in the Search box, enter the first few characters of the contact’s first
or last name (depending on how the directory is organized), and then tap the Submit soft key.
The screen displays a list of contacts, starting with any successful matches.
To perform an advanced search, tap the AdvFind soft key. From the Advanced Find screen,
enter your search criteria, and then tap the Submit soft key. The screen displays any successful
matches.
3 Tap to return to the idle screen.
Polycom, Inc. 68
Page 69

Polycom VVX 1500 Business Media Phone User Guide Version 5.0.0
Note: Your Most Recent Saved Search Displays
If you have enabled your phone to save the results of your last search (or remember the last contact
you selected), your previous search results (or the contact), will display instead of a blank search
screen. To enable this feature, see Saving Corporate Directory Search Results.
Note: Check the Contact Directory After You Save a Contact
You may want to go to the Contact Directory to see if the contact was saved correctly and to add
any missing contact information. To find a contact in your Contact Directory, see Searching Your
Local Contact Directory. To update missing contact information, see Adding Contacts Manually (step
3).
Adding Corporate Directory Contacts to Your Local Contact
Directory
You can save any contact listed in your Corporate Directory to your local Contact Directory. The contact’s
first and last names (if available) and contact number are saved.
To add a contact to your local Contact Directory:
1 Tap > Features > Corporate Directory.
The Corporate Directory search screen displays.
2 Search for the contact. (See Searching Corporate Directory.)
3 Tap the contact’s entry.
4 From the Contact screen, tap the Save soft key to save the contact to the local Contact Directory.
“Saved” displays on the screen. Only the first name, last name, and phone number are saved.
If the contact already exists in your local Contact Directory, “Contact already exists” displays.
5 Tap to return to the idle screen.
Saving Corporate Directory Search Results
You can enable your phone to save Corporate Directory search results, and to remember the last person
you viewed in the directory. Whenever you re-display Corporate Directory, the results of your last search,
or the last person you selected, will display. If you don’t enable your phone to save search results, each
time you access Corporate Directory, a blank search screen will display.
To save Corporate Directory search results:
1 Tap > Settings > Basic > Preferences >
Corporate Directory > View Persistency.
2 Tap Enabled, and then tap the Select soft key.
Polycom, Inc. 69
Page 70

Polycom VVX 1500 Business Media Phone User Guide Version 5.0.0
3 To save the new setting, tap the Back soft key.
To view a blank search screen again:
1 Tap > Settings > Basic > Preferences >
Corporate Directory > View Persistency.
2 Tap Disabled, and then tap the Select soft key.
3 To save the new setting, tap the Back soft key.
Controlling What is Heard
You can change what you hear by doing the following:
Changing the Ring Tone
Changing the Speaker Volume
Changing the Ringer Volume
Muting the Microphone
Choosing Where You Hear Sound Effects
Changing the Ring Tone
You can select from many different ring types to distinguish lines or to distinguish your phone from your
neighbor’s phone. You can also set distinctive incoming ring tones for contacts in your local directory so
you can identify callers when your phone rings.
Changing the Ring Tone for Your Phone
You can choose a distinctive ring tone for your phone to identify it when it rings. Or, you can choose
distinctive ring tones for different lines on your phone.
To select a ring tone for your phone or a specific line:
1 Tap > Settings > Basic > Ring Type.
The Ring Type screen displays.
(If multiple lines are configured on your phone, the Line Select screen displays instead, and you
have to select the line to which to apply the ring type. Then, the Ring Type screen displays.)
2 From the Ring Type screen, tap the ring type you want, and then tap the Select soft key. To hear
the ring type before you change it, tap the Play soft key.
The default ring type is Low Trill.
3 Tap to return to the idle screen.
Setting Ring Tones for Contacts
Polycom, Inc. 70
Page 71

Polycom VVX 1500 Business Media Phone User Guide Version 5.0.0
Note: Setting Ring Tones is an Optional Feature
Your company’s settings may override this feature. For more information, contact your system
administrator.
Note: Headset and Handset Volume Returns to Preset Levels After Your Call Ends
To conform to regulatory requirements, handset and headset volume will return to a preset level
after each call, but your system administrator can change this. Speakerphone volume settings will
be maintained across calls.
You can set a distinctive ring tone for each contact in your Contact Directory so you can distinguish
callers.
To set a distinctive ring tone for a contact:
1 Tap > Features > Contact Directory.
2 From the Directory screen, tap the contact for whom you want to assign a distinctive ring tone, and
then tap the Edit soft key.
3 From the Edit Contact screen, tap the Ring Type field, and then tap the field’s highlighted grey box.
From the drop-down list, tap the ring type you want to assign to the contact.
4 Tap the Save soft key.
5 Tap to return to the idle screen.
Changing the Speaker Volume
You can change the volume of what you hear during a call.
To adjust the speaker volume:
» During a call, press either or to lower or raise the speaker volume.
Polycom, Inc. 71
Page 72

Polycom VVX 1500 Business Media Phone User Guide Version 5.0.0
Changing the Ringer Volume
You can change the volume of your phone’s ring tone.
To adjust the ringer volume:
» When your phone is idle, press either or to lower or raise the ringer volume.
Muting the Microphone
Mute the microphone so that the other party (or parties) cannot hear you. Microphone Mute applies to all
modes (handset, headset, and speakerphone). You can still hear all other parties while mute is enabled.
To mute the microphone:
» During a call (including a conference call), press .
The Mute key, , glows red, and displays next to near-site video. The other party
(or parties) cannot hear you.
To turn off Microphone Mute:
» Press again.
The red light behind the Mute key, , turns off, and no longer displays next to nearsite video. The other party (or parties) can hear you.
Choosing Where You Hear Sound Effects
You can choose whether you hear sound effects (all phone sounds except call audio) from the handset,
headset, or speaker. For example, you can configure your phone to ring on your headset, instead of the
speaker. By default, all sound effects are heard from the speaker.
To choose where you hear sound effects:
1 Tap > Settings > Basic > Preferences > Audible Ringer.
2 From the Audible Ringer screen, select where you want to hear sound effects:
To hear sound effects only from the phone’s loudspeaker, select Speaker.
To hear sound effects only from the handset, select Handset.
To hear sound effects only from the headset, select Headset.
To hear sound effects only from the device you’re currently using to hear call audio, select Active.
The default destination is Speaker.
3 Tap to return to the idle screen.
Polycom, Inc. 72
Page 73
Polycom VVX 1500 Business Media Phone User Guide Version 5.0.0
Managing Speed Dials
You can associate contacts with Speed Dial Keys for single touch dialing of frequently used numbers.
Speed Dial Keys display .
The following figure shows a phone with two Line Keys (2076 and 1948), and four Speed Dial Keys
(assigned to Lauren Gates, Jack Jones, Milton Stone, and Teresa Swift).
When a new entry is added to the Contact Directory, it is automatically assigned a speed dial index
number, as well as the next available position under the Line Key(s). The phone populates all available
positions with the contacts that have the lowest speed dial index numbers.
Speed Dial Keys display consecutively according to the speed dial index number (the lowest speed dial
index number displays first). To re-order Speed Dial Keys, see Updating Speed Dial Keys.
For information on assigning or updating speed dial index numbers, see Updating Your Local Contact
Directory. For information on placing calls using speed dials, see Calling by Speed Dialing.
Adding Speed Dial Keys
Each time you add a contact to your Contact Directory, a speed dial index number is automatically
assigned to the contact. If a position is available under the Line Key(s), the contact is automatically
assigned to it, and you can place a call to the contact by tapping the Speed Dial Key.
To assign a new Speed Dial Key:
1 Tap > Features > Contact Directory.
2 Tap the Add soft key.
3 Add contact information for the new contact (see Adding Contacts to Your Local Contact Directory).
Polycom, Inc. 73
Page 74

Polycom VVX 1500 Business Media Phone User Guide Version 5.0.0
Note: Assign Speed Dial Values Consecutively
Polycom recommends that you assign speed dial index values consecutively.
For example, if you assign the third position to the speed dial index value “2,” assign the fourth
position to the speed dial index value “3.”
Note: Voice and Video Mail is an Optional Feature
Voice and video mail is an optional feature that your system administrator sets up. Your system may
not support it.
Screen options may vary with your application. Voice/video mail may be accessible with a single key
press.
The speed dial index can be any unused value between the next available number and a maximum
value of 9999. If you assign a speed dial index number that is already taken, the message “Speed
dial index already exists” displays.
Tap the Save soft key.
4 Tap to return to the idle screen.
Updating Speed Dial Keys
Update a Speed Dial Key to remove or re-order the Speed Dial Keys on your phone. You update a Speed
Dial Key by updating a contact’s speed dial index number. If you delete a speed dial index number for a
contact, the contact’s Speed Dial Key is replaced by the contact who has the closest speed dial index
number.
To update a speed dial index for an existing contact:
1 Tap > Features > Contact Directory.
2 From the Directory screen, tap the contact whose speed dial index you want to update, and then
tap the Edit soft key.
3 From the Edit Contact screen, tap the Speed Dial Index field, and then enter or update the speed
dial index number.
The speed dial index can be any value between the next available index value and a maximum
value of 9999.
4 Tap the Save soft key.
5 Tap to return to the idle screen.
Accessing Voice and Video Mail
Polycom, Inc. 74
Page 75

Polycom VVX 1500 Business Media Phone User Guide Version 5.0.0
You can access voice and video mail messages from your phone. Your mail is saved in a centralized
location.
Your phone may indicate mail by the following:
An icon, , on the status bar. The icon has a counter indicating the number of messages you
haven’t heard yet.
An icon, , next to the Line Key.
A fast flashing LED indicator.
An audible alert (if your phone is on-hook).
You can temporarily remove all message indicators by accessing the Messages screen and tapping the
Clear soft key. After a period of time (about two hours), the message indicators will display again.
To access voice or video messages:
1 Do one of the following:
To review new messages, tap > Message Center.
or
To review old messages, tap > Features > Messages > Message Center. Or,
press , and then tap Message Center.
The Messages screen displays.
(If multiple lines are set up on your phone, the Line Select screen displays instead, and you have to
tap the line for which to listen to messages. Then, the Messages screen displays.)
2 From the Messages screen, tap the Connect soft key, and then follow the voice or visual prompts
on the screen.
(If you want to temporarily clear all message indicators without listening to your mail, tap the Clear
soft key.)
3 Tap to return to the idle screen.
To access voice or video messages:
» Press , and then follow the prompts to access your message(s).
Working with Multiple and Shared Lines
Your system administrator can customize your phone so that you have more than one Line Key. Your
phone can also share a line with another phone.
Polycom, Inc. 75
Page 76

Polycom VVX 1500 Business Media Phone User Guide Version 5.0.0
Line Key Icon
Displays for…
Registered, private lines.
Registered, shared lines.
Unregistered lines.
Lines that have the Always call forwarding type
enabled.
Lines that have Do Not Disturb enabled.
Supporting Multiple Lines
Your phone can support up to six different lines. Lines are assigned to the Line Keys on your phone.
Typically, the top-most Line Key is reserved for the principal directory number (DN) of the phone.
When the phone is idle, Line Keys can display the following icons. (For information on icons that display
when the phone has a call, see Understanding Phone Icons and Status Indicators.)
Your phone can handle a maximum of 24 calls, distributed across all lines. If your phone has two lines,
and one line has 24 calls, your phone cannot accept any other calls.
You can set up any available key (that is, one that is not assigned to a line) as a Speed Dial Key. Speed
Dial Keys display .
The following figure shows a phone set up with one phone line (2076). Since one Line Key is taken, there
are five keys available that you can assign as Speed Dial Keys. In this example, five Speed Dial Keys are
set up.
Polycom, Inc. 76
Page 77

Polycom VVX 1500 Business Media Phone User Guide Version 5.0.0
Note: Shared Lines is an Optional Feature
Shared lines is an optional feature and may not be supported on your particular system. For more
information, contact your system administrator.
Note: Call Forwarding and Do Not Disturb on Shared Lines
Call Forwarding is not available on shared lines. In addition, you cannot set up shared lines for lines
that use the H.323 protocol.
Enabling Do Not Disturb on shared lines disables ringing only. You will still see a visual notification
of the call and have the option to answer the call.
Supporting Multiple Line Keys Per Line
Your system administrator can assign each phone line to a single Line Key, or to multiple Line Keys.
Incoming and outgoing calls for a phone line will be distributed evenly across all Line Keys that are
assigned to the phone line. For example, if you have two Line Keys set up as 1952, and you have an
active call for 1952 on the first Line Key, an incoming call for 1952 will go to the second Line Key.
Your phone can be set up to have a combination of lines with a single Line Key and lines with multiple
Line Keys.
Supporting Shared Lines
Your system administrator can set up your phone to support shared lines. If two phones share a line, an
incoming call to that number will cause both phones to ring. The call can be answered on either phone,
but not on both. Calls on shared lines can be transferred, placed on hold, or added to a conference.
If you have an incoming call on a shared line, you can tap the Silence soft key to stop your phone from
ringing. The call’s visual notification will still display.
Polycom, Inc. 77
Page 78

Polycom VVX 1500 Business Media Phone User Guide Version 5.0.0
Line Key Icon
Shared line Status
Line Key Status Indicator
Idle
(No indicator)
Active call
Solid red
Call or calls on hold
Flashing red
Note: Looking Your Phone is an Optional Feature
Locking your phone is a feature that your system may not support. For more information, see your
system administrator.
Your system administrator can set up your phone to automatically lock if the phone hasn’t been
used for a certain period of time, as well as block the phone’s browser while the phone is locked.
The following table shows the Line Key icons and status indicators that display for shared lines.
If you have an incoming call on a shared line and none of the phones are answered, the call displays in
the missed calls log on all the phones. If you have an incoming call on a shared line and you or any of the
other phones answer the call, the call is not logged as missed on any phone. Your Administrator can
configure the phones so that if you have an incoming call on a shared line and one phone answers, the
other phones log the call as a received call.
Locking and Unlocking the Phone
Lock your phone to do the following:
Prevent unauthorized outgoing calls.
Allow only authorized people to answer calls.
Prevent people from viewing or modifying phone displays or information (for example, menus,
directory lists, call records, and Speed Dial Keys).
When your phone is locked:
You can only make an outgoing call to a number from a list of authorized numbers.
You have to enter a password to answer incoming calls.
All keys and soft keys are disabled, except those that allow you to unlock the phone, make an
authorized call, redial a number, or view the browser (if enabled).
You unlock the phone by entering your user password. If your phone restarts for any reason while it is
locked, it will be locked when the phone starts up again (unless your phone is configured to start up
unlocked).
Polycom, Inc. 78
Page 79

Polycom VVX 1500 Business Media Phone User Guide Version 5.0.0
Note: You Need the Administrative Password to Change Your Password
To change your user password, you need to enter the administrator password. For more
information, see your system administrator.
When your phone is locked, the messages “The phone is locked” and “Authorized calls only” scroll on the
status bar. Messages that displayed before the phone was locked don’t display.
About Your User Password
You are assigned a user password so you can answer calls from your locked phone and unlock the
phone. By default, your user password is 123. You can change your user password at any time.
Changing Your User Password
By default, your user password is 123. Change your user password so it’s unique to your phone.
To change your user password:
1 Tap > Settings > Advanced.
2 From the Password screen, enter the administrator password, and then tap the Enter soft key.
3 From the Advanced screen, select Change User Password.
4 From the Change User Password screen, enter your password information, and then tap the Enter
soft key.
Locking and Unlocking Your Phone
You can choose how you want your phone to handle incoming calls when it is locked. If you set up your
phone to allow incoming calls when it is locked (the default setting), incoming calls will ring on your
phone, and you can answer calls by entering your user password. If you set up your phone to ignore
incoming calls, Do Not Disturb will be applied to all lines on your phone, and your phone will not ring.
To lock your phone:
1 Tap > Settings > Basic > Lock Phone.
2 From the Lock Phone screen, select how you want incoming calls handled when your phone is
locked.
Allow ringing when locked—Select this option if you want your phone to ring when you have
an incoming call. If you choose this option, you can answer a call by entering your password.
DND when locked—Select this option if you don’t want your phone to ring. You won’t have the
option to answer incoming calls. All incoming calls will go to your mail system (if enabled) and
display in your Missed Calls list.
The default setting is Allow ringing when locked.
Polycom, Inc. 79
Page 80

Polycom VVX 1500 Business Media Phone User Guide Version 5.0.0
Note: Do Not Disturb on Locked Shared Lines
Enabling DND when locked on shared lines disables ringing only. You will still see a visual
notification of the call and have the option to answer it.
Note: Using the Lock Soft Key
Your phone may be set up so that you can quickly lock it by tapping the Lock soft key from the idle
screen. If you do this, however, you cannot choose how to handle incoming calls. Your phone will
use the default setting (Allow ringing when locked), or the last setting you selected.
3 Tap the Lock soft key.
Your phone is locked.
To unlock your phone:
1 From the idle screen, tap the Unlock soft key.
2 From the Unlock the Phone screen, enter your password, and then tap the Enter soft key.
(For information on your user password, including what to do if you forget your user password, see
About Your User Password.)
The phone unlocks.
Calling and Answering from a Locked Phone
From a locked phone, anyone can dial the standard emergency number (for example, 911), and up to five
authorized numbers that an administrator can set up. You cannot call any other numbers from a locked
phone.
If you set up your phone so you can answer incoming calls when your phone is locked, you can answer
calls by entering your user password.
To call an authorized number from a locked phone:
» Do one of the following:
Tap the New Call soft key. From the Place an Authorized Call screen, select the number you want
to call, and then tap the Dial soft key.
The following figure shows an example of the Place an Authorized Call screen.
Polycom, Inc. 80
Page 81

Polycom VVX 1500 Business Media Phone User Guide Version 5.0.0
or
Place a call to an authorized number by using the handset, headset, or speakerphone. For
information on using the handset, headset, or speakerphone to place a call, see Placing Calls.
If you try to place a call to an unauthorized number, the message “Unauthorized number” displays.
(To view a list of authorized numbers that you can call, tap the New Call soft key from the idle
screen when your phone is locked.)
The call is placed.
To answer a call on a locked phone:
1 While the phone rings, tap the Answer soft key.
2 From the Answer the Call screen, enter your password, and then tap the Enter soft key.
(If you press the Cancel soft key instead, the Answer the Call screen disappears and the incoming
call window displays again.)
(For information on your user password, including what to do if you forget your user password, see
About Your User Password.)
The call connects.
Polycom, Inc. 81
Page 82

Note: H.323 Protocol is an Optional Feature
Handling calls that use the H.323 protocol is an optional feature that your system administrator
enables. Your system may not support it or have an H.323 license. For more information, contact
your system administrator.
If your phone supports the H.323 protocol, be aware of the following limitations:
Using the Advanced Features of Your 3:
Phone
This chapter shows you how to use the advanced features of your Polycom VVX 1500 C Business Media
Phone for Cisco Unified Communications Manager (SIP) Polycom VVX 1500 business media phone.
Placing Calls Using the H.323 Protocol
Your system administrator can set up your phone so that it can handle calls that use either the SIP or
H.323 protocol, or both protocols. Your phone may be set up so that a line can handle one or both
protocols.
If your phone can handle calls using both protocols, you may be able to choose the protocol to use before
you tap the Dial or Send soft key, or before a call is automatically placed. You may also be able to
choose to allow your phone to automatically select the protocol to use.
If your phone is set up to handle both protocols, you may be able to choose a protocol before you place a
call using one of the following methods:
Soft key method
Soft keys display to allow you to choose the protocol. Tap the Use SIP, Use H.323, or Use Auto
soft key one or more times to toggle between Use SIP (to place a SIP call), Use H.323 (to place an
H.323 call), or Use Auto (to allow your phone to automatically select the protocol to use). The
protocol you select displays in the title bar. Your phone will use the selected protocol for all
subsequent calls, unless you select a different protocol.
Dialog box method
A dialog box displays to allow you to choose the protocol. Tap Use SIP (to place a SIP call) or Use
H.323 (to place an H.323 call).
For dual-protocol phones, the protocol displays next to all call IDs, including the call IDs for conference
call participants and calls on hold. The following figure shows a SIP call placed to Jack Jones.
Polycom, Inc. 82
Page 83

Polycom VVX 1500 Business Media Phone User Guide Version 5.0.0
Note: Instant Messaging is and Optional Feature
Instant messaging is an optional feature that your system administrator enables. Your system may
not support it.
Screen options may vary with your application.
When you place calls from call lists or directories, your phone will automatically choose the protocol to
use based on the information in the call list or directory. When you set up a contact in your Local Contact
Directory, you can specify the protocol the contact uses to handle calls. This allows your phone to
automatically use the correct protocol when you dial the contact.
Using Instant Messaging
You can send and receive instant messages using your phone. Instant messaging is supported in realtime.
Your phone may indicate instant messages by the following:
An icon, , on the status bar. The icon has a counter indicating the number of unviewed
messages you have.
An icon, , next to the Line Key.
A fast flashing LED indicator.
An audible alert (if your phone is on-hook).
Reading and Managing Instant Messages
Messages display in the order they are received (the first message received displays first).
Polycom, Inc. 83
Page 84
Polycom VVX 1500 Business Media Phone User Guide Version 5.0.0
Note: Instant Message Screen Options May Vary
Screen options may vary with your application.
Instant messaging may be accessible with a single key press. Contact your system administrator
about this option.
To read instant messages:
1 Do one of the following :
Tap > Instant Messages.
Tap > Features > Messages > Instant Messages.
Press , and then tap Instant Messages.
The Instant Messages screen displays.
(If multiple lines are configured on your phone, the Line Select screen displays instead, and you
have to select the line to retrieve messages from. Then, the Instant Messages screen displays.)
2 From the Instant Messages screen, you can do the following:
To view a specific message, tap the Next or Previous soft key. The first message received
displays first.
To create a new message, tap the New soft key (see Sending Instant Messages).
To reply to the message, tap the Reply soft key (see Sending Instant Messages, step 3).
To delete the message, tap the Delete soft key.
3 Tap to return to the idle screen.
Sending Instant Messages
When you send a message, you can either select a message from a preset list of short messages (for
example, “Call me“ and “Can’t chat now”), or you can use the dialpad to enter a custom message.
To send an instant message:
1 Do one of the following:
Tap > Instant Messages.
Tap > Features > Messages > Instant Messages.
Press , and then tap Instant Messages.
The Instant Messages screen displays.
Polycom, Inc. 84
Page 85
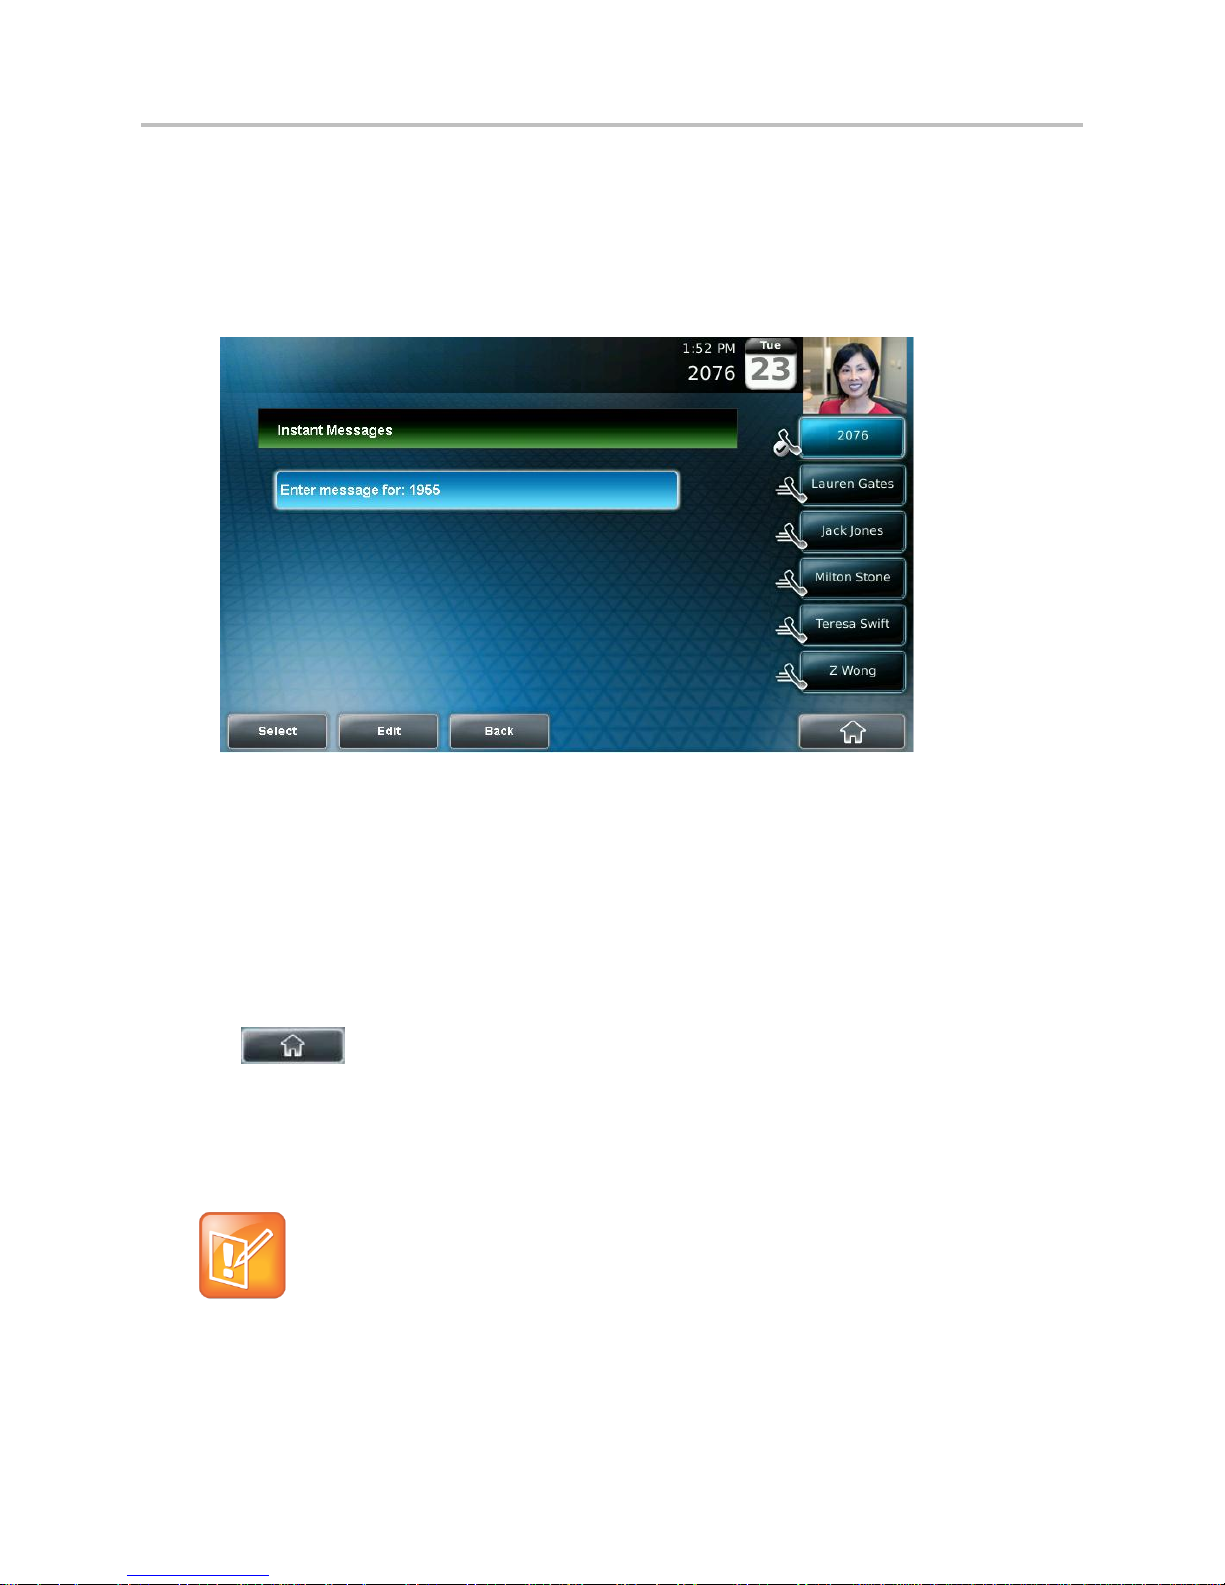
Polycom VVX 1500 Business Media Phone User Guide Version 5.0.0
Note: Monitoring Contacts’ Status’ is an Optional Feature
Monitoring the status (presence) of contacts is an optional feature that your system administrator
enables. Your system may not support it. For more information, contact your system administrator.
If your phone is provisioned by a Polycom® Converged Management Application™ (CMA™) system,
your phone handles presence and Buddy Status lists differently than what is described in this
section. For information on monitoring the status of CMA contacts, see Using Buddy Status Lists
with a CMA System.
(If multiple lines are configured on your phone, the Line Select screen displays instead, and you
have to select the line to send the message from. Then, the Instant Messages screen displays.)
2 From the Instant Messages screen, tap the New soft key, enter the phone number, URL, or IP
address to send the message to, and then tap the Ok soft key.
The phone number, URL, or IP address you entered displays on the screen.
3 Do one of the following:
To choose a pre-scripted message, tap the Select soft key. From the Message Select screen,
tap the message you want.
or
To compose a custom message, tap the Edit soft key, and then enter your message. (For
information on entering data, see Entering Data and Updating Fields.)
4 Tap the Send soft key.
5 Tap to return to the idle screen.
Using Buddy Status Lists
Polycom, Inc. 85
Page 86

Polycom VVX 1500 Business Media Phone User Guide Version 5.0.0
Note: You May be Able to Monitor Up to 48 Buddies
Depending on the types of phones you monitor, and how they are configured, you may be able to
monitor up to 48 buddies.
A Buddy Status list is a list of users/devices whose status, or “presence,” is shown. Users update their
presence setting (for example, “Be right back,” “Out to lunch,” or “Busy”), and you can view their status in
real time from your phone’s Buddy Status screen, or from the idle screen (if your buddy has a Speed Dial
Key on your phone). If you like, you can block others from monitoring your status.
You can watch the status of up to eight other phones. These phones form your Buddy Status list. Your
phone can be monitored by up to eight other phones.
If your phone is configured to work with Microsoft Office Live Communications Server 2005, the behavior
of presence settings and Buddy Status lists is different. For more information, see Integrating with
Microsoft Live Communications Server 2005, or contact your system administrator.
Updating Your Presence Settings
Your presence setting indicates your status (either online, busy, be right back, away, out to lunch, offline,
or do not disturb). Update your presence setting so that other users can monitor your status from their
phones.
When you select a presence setting other than Online, the setting scrolls under the time display on the
status bar on your phone.
To update your presence settings:
1 Do one of the following:
From the idle screen, tap the My Status soft key.
Tap > Features > Presence > My Status.
2 From the My Status screen, tap the status you want, and then tap the Select soft key.
This affects information sent to phones watching you. Presence information will also be sent to
watching phones when you go off-hook or enable Do Not Disturb.
3 Tap to return to the idle screen.
The status you selected displays on the status bar (unless you selected Online).
The following figure shows what the touch screen looks like when you assign a presence status (in this
case, “Busy”). If you assign the status “Online” (the default status), the presence status doesn’t display on
the screen.
Polycom, Inc. 86
Page 87
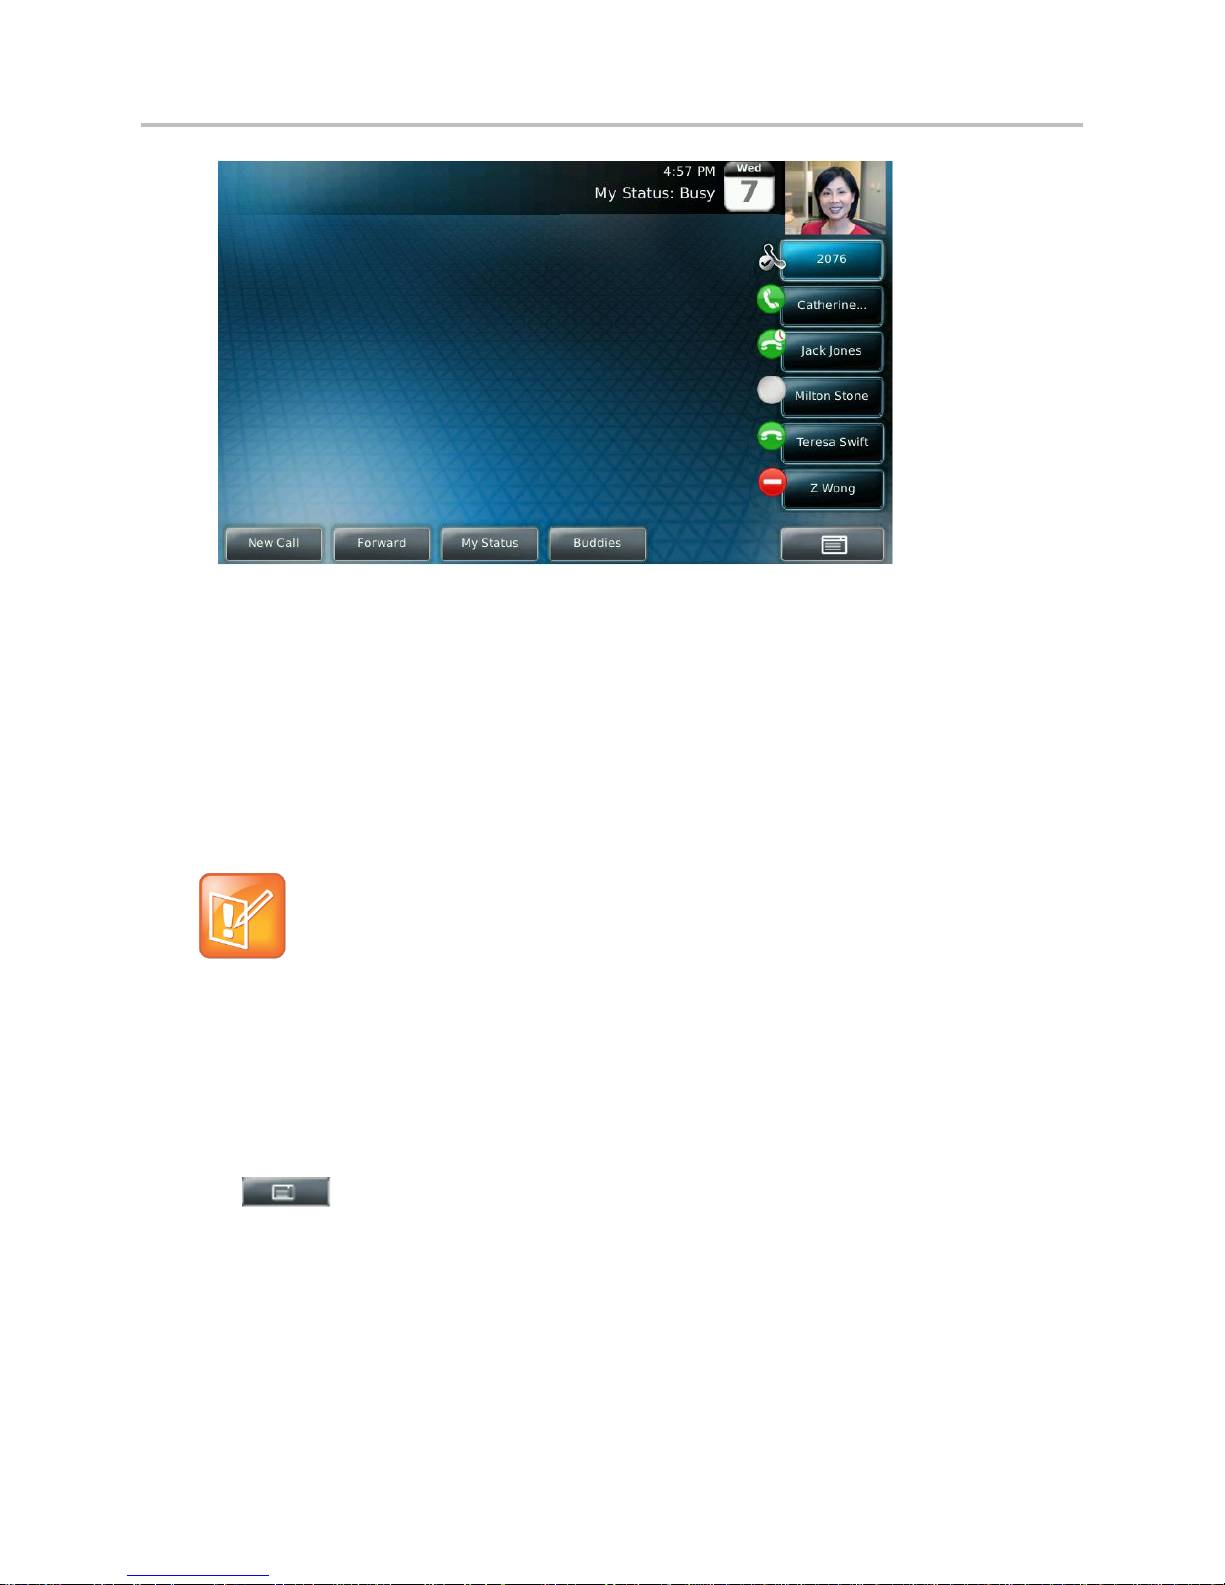
Polycom VVX 1500 Business Media Phone User Guide Version 5.0.0
Note: Managing Buddies with Microsoft Live Communications Server 2005
If your call server is Microsoft Live Communications Server 2005, see Integrating with Microsoft Live
Communications Server 2005
Managing Buddies
Manage your buddies by selecting the contacts whose presence you want to monitor. These contacts
form your Buddy Status list. You add contacts to your Buddy Status list from your local Contact Directory.
When you select a buddy, a Speed Dial Key is automatically assigned to the buddy (if one is available),
and the Speed Dial Key will display the buddy’s status. If the contact you choose as a buddy already has
a Speed Dial Key, the contact’s Speed Dial Key will display the buddy’s status.
Updating Your Buddy Status List
Update your Buddy Status list by updating the contacts in your local Contact Directory.
To update your Buddy Status list:
1 Tap > Features > Contact Directory.
2 From the Directory screen, tap the contact you want to start or stop monitoring, and then tap the
Edit soft key.
3 From the Edit Contact screen, tap the Watch Buddy field, and then tap the field’s highlighted grey
box. From the drop-down list, tap Enabled or Disabled.
When Watch Buddy is enabled, the contact is added to your Buddy Status list and you can monitor
the contact’s status.
Polycom, Inc. 87
Page 88
Polycom VVX 1500 Business Media Phone User Guide Version 5.0.0
Note: Who Can Monitor Your Status
To view a list of contacts that can and cannot monitor your status, do the following:
To view contacts that cannot view your status, tap > Features > Presence > Blocked
List.
To view contacts that can view your status, tap > Features> Presence> Watcher List.
When Watch Buddy is disabled, the contact is removed from your Buddy Status list and you cannot
monitor the contact’s status.
The default for Watch Buddy is Disabled.
4 Tap the Save soft key.
5 Tap to return to the idle screen.
If you enable the Watch Buddy setting for a contact, the contact will display in your Buddy Status list, and
on the idle screen (if your buddy has a Speed Dial Key). To view your Buddy Status list, tap the Buddies
soft key from the idle screen.
Blocking and Unblocking Contacts from Viewing Your Status
Block a contact in your Contact Directory if you don’t want the contact to view your status. If you unblock
a contact, the contact can add you to their Buddy Status list and view your status.
To block or unblock a contact from viewing your status:
1 Tap > Features > Contact Directory.
2 From the Directory screen, tap the contact you want to block or unblock.
3 From the Edit Contact screen, tap Block Buddy, and then tap the field’s highlighted grey box. From
the drop-down list, tap Enabled or Disabled.
When Block Buddy is enabled, the contact cannot watch your status. The contact will display in
your Blocked List.
When Block Buddy is disabled, the contact can watch your status. The contact will display in your
Watcher List.
The default for Block Buddy is Disabled.
4 Tap the Save soft key.
5 Tap to return to the idle screen.
Polycom, Inc. 88
Page 89

Polycom VVX 1500 Business Media Phone User Guide Version 5.0.0
Note: Use Your Blocked List to Unblock a Contact
You can use your Blocked List to unblock a contact, rather than updating the Contact Directory. Tap
> Features > Presence > Blocked List. From the Blocked List screen, tap the contact
you want to unblock, and then tap the Unblock soft key. The contact can now watch your phone,
and will display in your Watcher List.
Buddy Status
Speed Dial Key Icon
Status Indicator
Online
(No indicator)
Busy/Do Not Disturb
Solid red
Away/Be Right Back
Out to Lunch
Flashing red
Offline
Solid red
6 Monitoring Buddies.
You can monitor the status of all the contacts in your Buddy Status list from the idle screen (if your buddy
has a Speed Dial Key), or from the Buddy Status list.
Monitoring Buddies from the Idle Screen
Your phone automatically assigns a buddy to a Speed Dial Key (if one is available). The Speed Dial Key
displays an icon and status indicator (a vertical bar on the far-right of the key) that indicate the buddy’s
status.
The following table shows the presence icons and status indicators that display on the Speed Dial Key to
indicate a buddy’s status.
The following figure shows a phone that is monitoring two buddies: Lauren Gates and Jack Jones. Lauren
Gates is Online, and Jack Jones is either Away, Out to Lunch, or Be Right Back.
Polycom, Inc. 89
Page 90

Polycom VVX 1500 Business Media Phone User Guide Version 5.0.0
Monitoring Buddies from the Buddy Status List
If you can’t monitor all your buddies from the idle screen (because you have more buddies than available
Speed Dial Keys), use the Buddy Status list.
To monitor a buddy from your Buddy Status list:
» Do one of the following:
From the idle screen, tap the Buddies soft key.
Tap > Features > Presence > Buddy Status.
The Buddy Status screen displays, listing the status of all your buddies.
Polycom, Inc. 90
Page 91

Polycom VVX 1500 Business Media Phone User Guide Version 5.0.0
Integrating with Microsoft Live Communications Server 2005
Your system administrator can configure your phone to work with Microsoft Live Communications Server
2005 and communicate with others using Microsoft Office Communicator and Windows Messenger. From
your phone, you can invite, join, control, and monitor integrated multipoint audio and video conferences.
Any contact you add through your Buddy Status list will appear as a contact in Microsoft Office
Communicator and Windows Messenger. Any contact you add as a contact in Microsoft Office
Communicator and Windows Messenger will appear in your Buddy Status list. You can access your
Privacy List on the phone to allow or disallow your contacts from monitoring your presence.
To view and change your presence, see Updating Your
Presence Settings
For more information on integrating with Microsoft Live Communications Server 2005, contact your
system administrator.
To add a contact to your Buddy Status list:
1 Tap > Features > Presence > Buddy Status.
2 Tap the Add soft key.
3 Enter the phone number of the contact.
4 Tap the Submit soft key.
5 Tap to return to the idle screen.
To view and change your privacy list:
1 Tap > Features > Presence > Buddy Status > Privacy List.
2 Tap the contact whose access you want to update.
3 Tap the Edit soft key.
4 Tap the Access field, and then tap the field’s highlighted grey box. From the drop-down list, tap
Enabled or Disabled.
When Access is enabled, you allow the contact to see your presence.
When Access is disabled, you prevent the contact from seeing your presence.
The default for Access is Disabled.
5 Tap to return to the idle screen.
For more information, see the Microsoft Office Communicator and Windows Messenger documentation.
Polycom, Inc. 91
Page 92

Polycom VVX 1500 Business Media Phone User Guide Version 5.0.0
Note: Polycom® Converged Management Application™ (CMA™) is an Optional Feature
system
A Polycom® Converged Management Application™ (CMA™) system is an optional scheduling and
endpoint management system that your system administrator may set up. Your system may not
support it.
Note: Resubmit Your Login Credentials
If you’re unable to access the CMA features on your phone, you may have to re-submit your login
credentials. For more information, see About Your Login Credentials.
Working with a Polycom CMA System
Your phone may be provisioned by a Polycom CMA system so that you can:
Search for and dial people in a CMA Directory. For more information, see Searching and Dialing
from the CMA Directory.
Monitor the status of people in a CMA Directory. For more information, see Using Buddy Status
Lists with a CMA System.
Searching and Dialing from the CMA Directory
If your phone is provisioned by a CMA system, you have access to a CMA Directory that lists people and
groups in your organization. You can search for and dial people from this directory.
To search and dial from the CMA Directory:
1 Do one of the following:
Tap > Features > CMA Directory.
or
Press , and then tap CMA Directory.
2 From the Search CMA screen, perform a quick search or group search to find a person.
A quick search allows you to search using the person’s first or last name (depending on how the
directory is organized). A group search allows you to search for all the groups in an organization
(for example, HR, Administration, Payroll, etc.), and then view the people that belong to each
group.
To perform a quick search, start typing a name, and then tap the Submit soft key. The screen
displays a list of people, starting with any successful matches.
Polycom, Inc. 92
Page 93

Polycom VVX 1500 Business Media Phone User Guide Version 5.0.0
Note: If Your Phone is Not Provisioned by a CMA System
If your phone isn’t provisioned by a CMA system, your phone handles presence and Buddy Status
lists differently than what is described in this section. For information on monitoring the status of
contacts when your phone isn’t provisioned by a CMA system, see Using Buddy Status Lists.
Note: Buddy Status Lists Use All Available Speed Dial Keys
Buddy Status list entries are assigned all available Speed Dial Keys, even if a Speed Dial Key is
being used for a non-CMA contact.
Buddy Status list entries don’t display in your Speed Dial Information list.
If your search returns too many results to display, the message “Too many results received. Enter
more characters” displays. To limit your search results, enter more characters in the Search box,
and then tap the Submit soft key.
or
To perform a group search, tap the Groups soft key. From the Groups screen, tap the group
you want to view. All the people in the group will display.
To find a specific person in a group, enter specific characters in the Search box, and then tap the
Submit soft key.
(If you tap the Submit soft key and the message “Directory Server not responding” displays,
access to the CMA Directory is temporarily unavailable and you won’t be able to complete your
search.)
3 If the person you want to dial is not already highlighted, scroll to the person using or
, and then tap the Dial soft key.
(If you tap the Dial soft key and the message “Resource unavailable” displays, the endpoint you’re
trying to dial is currently offline and unavailable for a call.)
(If you tap the Dial soft key and the message “Directory Server not responding” displays and “CMA
Directory not registered” scrolls on the status bar, access to the CMA Directory is unavailable and
the call won’t be placed.)
Using Buddy Status Lists with a CMA System
The CMA system provides a presence service that allows you to view the status (for example, “available”
or “busy”) of contacts in a Buddy Status list that you set up. Your Buddy Status list is your personal space
for storing information about the people and systems you communicate with most frequently. You invite
people in the CMA Directory to join your Buddy Status list. If the person’s system supports sharing
presence, the person receives an invitation to be in your Buddy Status list.
Entries in your Buddy Status list are automatically assigned a Speed Dial Key (if your phone has Speed Dial Keys
available), which also displays an icon to indicate the buddy’s status.
Polycom, Inc. 93
Page 94

Polycom VVX 1500 Business Media Phone User Guide Version 5.0.0
Inviting People in the CMA Directory to Your Buddy Status List
When you invite a person or system from the CMA Directory to your Buddy Status list, the person (if their
system supports sharing presence) automatically displays in your Buddy Status List and on a Speed Dial
Key (if available).
Depending how the person’s system is configured, the following happens:
If the person’s system is configured to accept invitations automatically, the person’s status displays
(one of , , , , or ). As well, you’re automatically added to the person’s
status list.
(For information about the icons that display to indicate buddy status, see Seeing Who’s Available.)
If the person’s system isn’t configured to accept invitations automatically, the name in your Buddy
Status list is identified with the Invited icon, . Then, one of the following will happen:
If the person accepts your invitation, your Buddy Status list and Speed Dial Keys update to show
the person’s status. As well, you’re automatically added to the person’s status list.
If the person rejects your invitation, the person’s name is removed from your Buddy Status list and
any Speed Dial Keys, and you aren’t added to the person’s status list.
When you invite a person to your Buddy Status list, all the person’s endpoints (for example, “VVX,”
“HDX,” “CMA Desktop,” etc.) are added to your list. Each endpoint displays as a separate entry in your list
and occupies a different Speed Dial Key.
You can add up to 64 people to your Buddy Status list. Your Buddy Status list displays contacts
alphabetically (using the first letter that displays for the buddy’s name). Each entry displays the buddy’s
name, device type, and presence icon.
To invite a person or system in the CMA Directory to your Buddy Status list:
1 Do one of the following:
Tap > Features > CMA Directory.
Press , and then tap CMA Directory.
From the idle screen, tap the Buddies soft key. From the Buddy Status screen, tap the Add soft
key.
2 From the Search CMA screen, perform a quick search or group search to find the person you want
to add to your Buddy Status list.
A quick search allows you to search using the person’s first or last name (depending on how the
directory is organized). A group search allows you to search for all the groups in an organization
(for example, HR, Administration, or Payroll), and then view the people that belong to each group.
To perform a quick search, start typing a name, and then tap the Submit soft key. The screen
displays a list of people, starting with any successful matches. If the contact you want to add
isn’t already highlighted, scroll to the person using or .
Polycom, Inc. 94
Page 95

Polycom VVX 1500 Business Media Phone User Guide Version 5.0.0
Note: Buddies Must Be Removed Separately from Your Local Contact Directory
Any entries for the buddy that appear in your local Contact Directory must be removed separately.
If your search returns too many results to display, the message “Too many results received. Enter
more characters” displays. To limit your search results, enter more characters in the Search box,
and then tap the Submit soft key.
To perform a group search, tap the Groups soft key. From the Groups screen, tap the group
you want to view. All the people in the group will display. If the contact you want to add isn’t
already highlighted, scroll to the contact using or .
To find a specific person in a group, enter specific characters in the Search box, and then tap the
Submit soft key.
(If you tap the Submit soft key and the message “Directory Server not responding” displays,
access to the CMA Directory is temporarily unavailable.)
3 Tap the Add Contact soft key.
An invitation is sent to the person.
If the message “Contact does not support presence. Save to local Contact Directory?” displays after you
press the Add Contact soft key, you can’t add the person to your Buddy Status list, but you can add the
person to your local Contact Directory. To add the person to your local Contact Directory, tap the Yes soft
key. The message “Saved” displays.
If the person already exists in your local Contact Directory, “Contact already exists” displays. (If your local
Contact Directory is read-only, you can’t add the contact, and the message “Local contact directory is
read-only” displays.)
You cannot add yourself to your Buddy Status list. If you try to add yourself, the message “You cannot
add yourself to your buddies list” displays.
Removing Buddies from Your Buddy Status List
When you remove a buddy from your Buddy Status list, you remove all the buddy’s endpoints from the list
and all the buddy’s Speed Dial Keys. As well, you remove yourself from your buddy’s status list.
To remove a buddy from your Buddy Status list:
4 From the idle screen, do one of the following:
Tap the Buddies soft key.
Tap > Features > Presence > Buddy Status.
5 From the Buddy Status screen, press or to select the buddy you want to
remove from the list, and then tap the Delete soft key.
Polycom, Inc. 95
Page 96
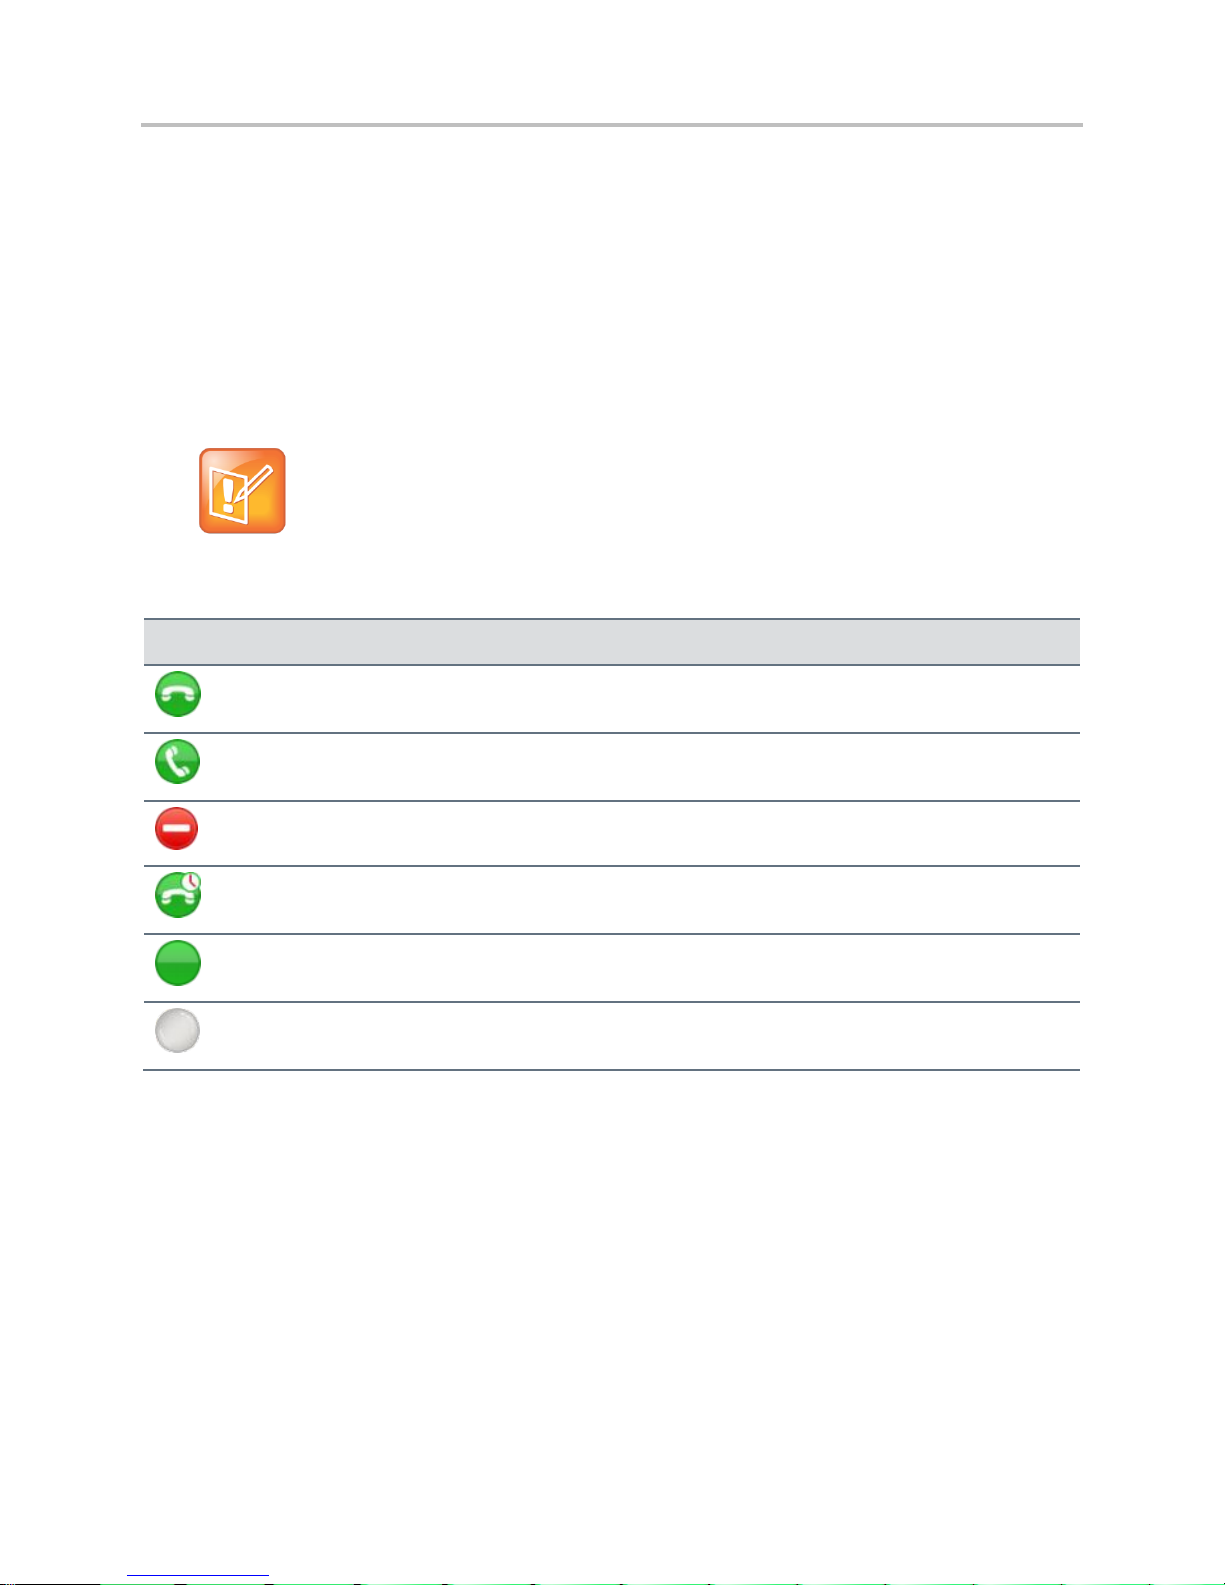
Polycom VVX 1500 Business Media Phone User Guide Version 5.0.0
Note: Buddies with Multiple Endpoints
If a buddy you’re monitoring has more than one endpoint, and one endpoint changes to “Offline,”
then that buddy’s endpoint will be removed from your Buddy Status list. When the status changes,
the buddy’s endpoint will display in your Buddy Status list again.
Buddy’s Icon
Buddy Status
Available for a call.
On the phone, but available for a call.
In a call or not accepting calls (Do Not Disturb).
Available for a call, but currently idle or away.
Invited to join your Buddy Status list. No status
information is yet available.
Offline and not available for a call.
The buddy’s name is removed from your Buddy Status list, and you’re removed from the buddy’s status
list.
Seeing Who’s Available
You can view the status of your buddies from the idle screen (if your buddy has a Speed Dial Key), or
from your Buddy Status list. Buddies have an icon beside their Speed Dial Key and beside their name in
the Buddy Status list that indicates their availability for a call.
The following table shows the icons that indicate a buddy’s status.
Viewing Buddies from the Idle Screen
Your phone automatically assigns a buddy to a Speed Dial Key (if one is available). The Speed Dial Key
displays an icon that indicates the buddy’s status. Buddies are assigned Speed Dial Keys in the order in
which they appear in your Buddy Status list. For example, the first contact in your Buddy Status list is
assigned the first available Speed Dial Key.
The following figure shows a phone that is monitoring five buddies from their Speed Dial Keys. The
buddies have the following status:
Catherine is on the phone, but can accept another call.
Jack Jones is available for a call, but is currently idle or away.
Polycom, Inc. 96
Page 97

Polycom VVX 1500 Business Media Phone User Guide Version 5.0.0
Milton Stone is offline and unavailable for a call.
Teresa Swift is available for a call.
Z Wong is busy and not accepting calls.
Viewing Buddies from the Buddy Status List
If you can’t monitor all your buddies from the idle screen (because you have more buddies than available
Speed Dial Keys), use the Buddy Status list.
To view a buddy from your Buddy Status list:
» From the idle screen, do one of the following:
Tap the Buddies soft key.
Tap and then select Features > Presence > Buddy Status.
The Buddy Status screen displays, listing all your buddies and their status.
The following figure shows a Buddy Status list.
Polycom, Inc. 97
Page 98

Polycom VVX 1500 Business Media Phone User Guide Version 5.0.0
Note: Accepting an Invitation
When you accept an invitation (either automatically or through a prompt), the person who sent the
invitation automatically populates your Buddy Status list and an available Speed Dial Key. If the
person who sent the invitation has multiple devices, all devices will display in your Buddy Status list,
and each device will display on a separate Speed Dial Key (if available).
Choosing How You Accept Invitations
Each time a person adds you to their status list, your phone receives an invitation. You can set up your
phone to automatically accept all invitations, or prompt you to accept or reject each invitation.
If you set up your phone to automatically accept all invitations, anyone who wants to monitor your status
can do so, without your permission. If you set up your phone to prompt you when an invitation arrives,
you can accept or reject each invitation that arrives.
By default, your phone prompts you to accept or reject each invitation. For information on how to handle
invitations, see Accepting and Rejecting Invitations.
To choose a method to accept invitations:
1 Tap > Settings > Basic > Preferences > Presence.
2 From the Presence screen, select one of the following options:
Prompt—Choose this option if you want to view each invitation and accept or reject each one. If
you choose this option, each time a person adds you to their status list, you’ll receive an
invitation that you can accept or reject. If you accept, your status will update on the person’s
status list, and the person will join your Buddy Status list. If you reject, you’ll be removed from
the person’s status list.
Automatic—Choose this option if you want to automatically accept all invitations. If you choose
this option, you’ll automatically join the status list of any person who wants to monitor you, and
the person who sent the invitation will automatically join your Buddy Status list.
Polycom, Inc. 98
Page 99
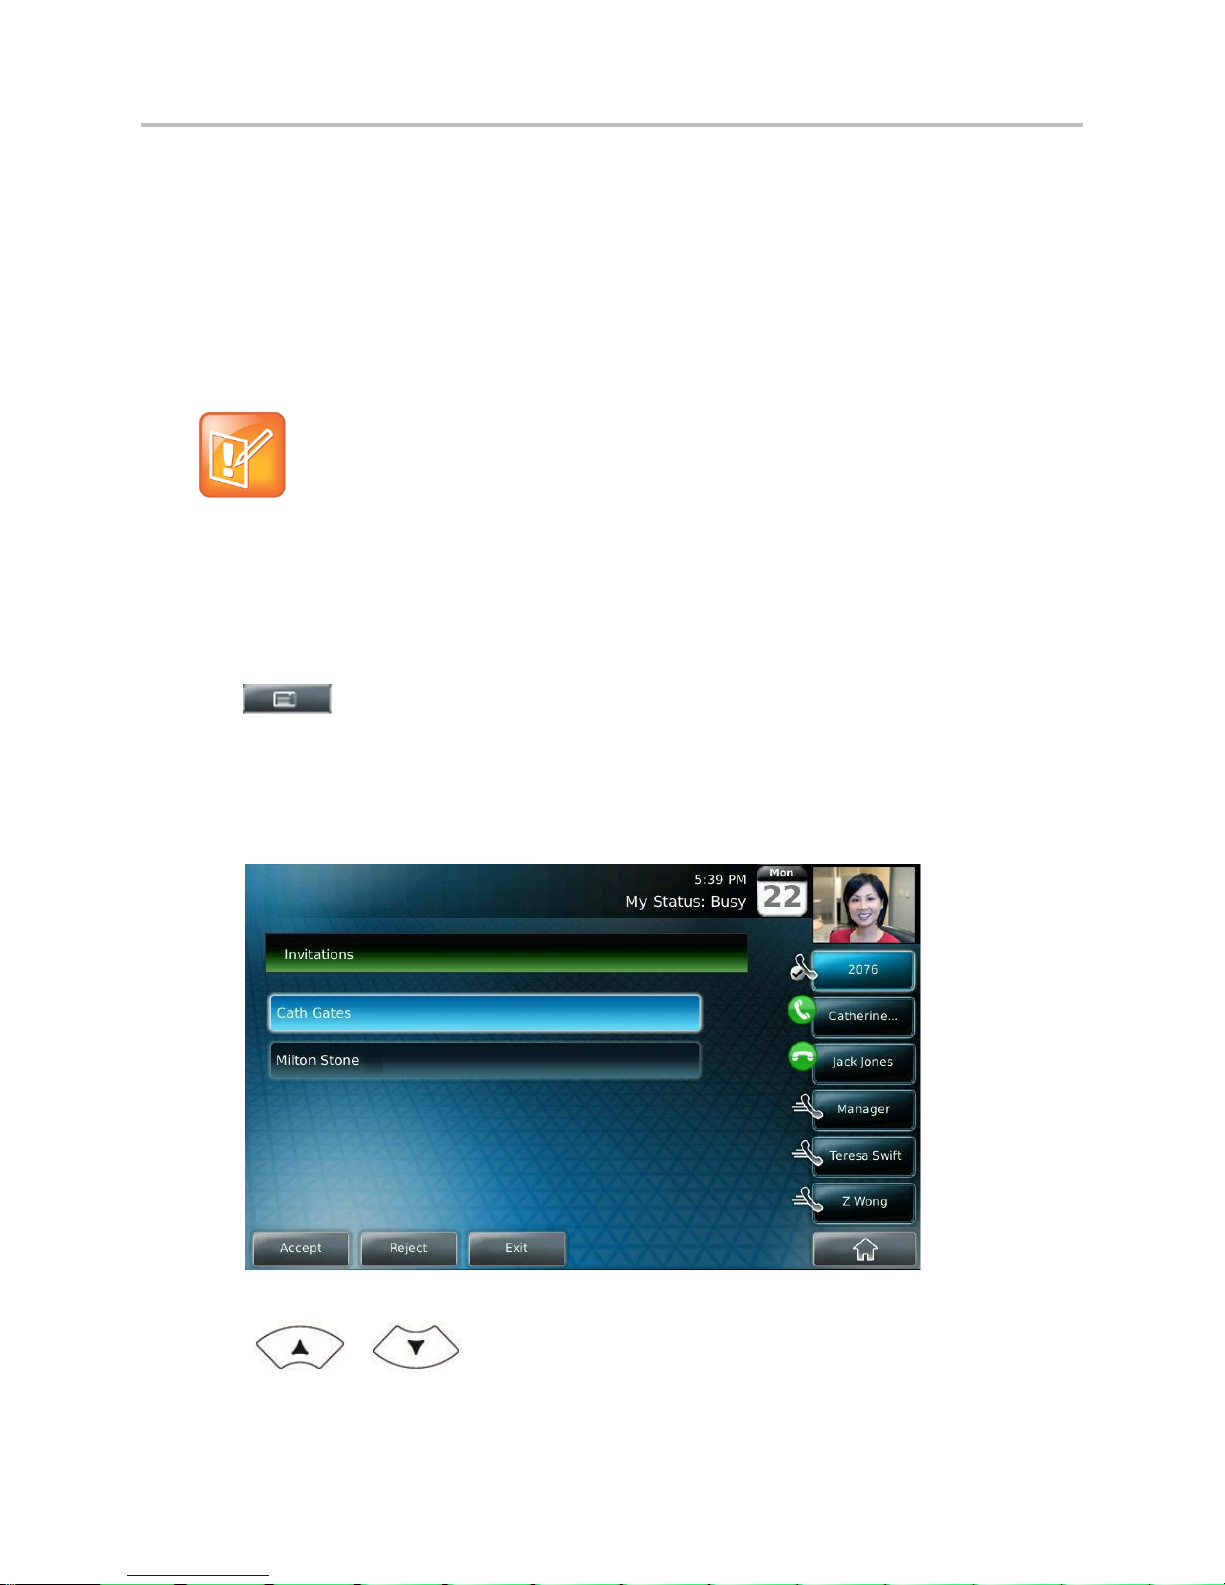
Polycom VVX 1500 Business Media Phone User Guide Version 5.0.0
Note: When the Invitations Menu Item and Soft Key Displays
The “Invitations” menu item and soft key only display when you have one or more invitations.
Accepting and Rejecting Invitations
If your phone is set up to prompt you each time an invitation arrives (see Choosing How You Accept
Invitations), you can either accept or reject invitations from people who have added you to their status
lists.
You can access a list of invitations from the “Invitations” menu item or from an “Invitations” soft key that
displays on the idle screen. When you tap the soft key or access the menu item, a list of invitations
displays that you can either accept or reject.
To accept or reject an invitation:
» From the idle screen, do one of the following:
Tap the Invitations soft key (you may have to tap the More soft key to see it).
Tap > Features > Presence > Invitations.
The Invitations screen displays.
In the following figure, two people, Cath Gates and Milton Stone, have invited you to join their
status lists.
3 Press or to select the person whose invitation you want to accept or reject,
and then tap the Accept or Reject soft key.
Polycom, Inc. 99
Page 100

Polycom VVX 1500 Business Media Phone User Guide Version 5.0.0
Note: Certain Status Information is Automatically Sent to Buddies
Your phone also sends certain status information to your buddies automatically (such as if you’re in
a call, enabled Do Not Disturb on your phone, or your phone is offline because you restarted it). For
example, if you enable Do Not Disturb on your phone, your availability automatically updates to “Do
Not Disturb.”
If you select the option “Do Not Disturb,” and then enable and disable Do Not Disturb on your phone,
your status will change to Online.
Status you
choose
What the status means
What displays on your
buddy’s phone
Online
You’re available for a call.
Busy
You’re not accepting calls.
(Your phone will still ring,
unless you’ve enabled
forwarding or Do Not Disturb.)
Be right back
You’re available for a call, but
you’re currently idle or away
from your phone.
Away
You’re available for a call, but
you’re currently idle or away
from your phone.
If you accept the invitation, the person can monitor your status, and the person populates your
Buddy Status list and a Speed Dial Key (if available).
If you reject the invitation, you’re removed from the person’s status list. The person doesn’t join
your Buddy Status list.
Updating Your Status
Update your status so that your buddies can monitor your status from their phones. You can choose one
of the following status options: online, busy, be right back, away, out to lunch, or do not disturb. Your
phone sends status to your buddies based on the option you choose.
When you select a status setting other than Online, the setting scrolls under the time display on the status
bar.
The following table shows the status you can set, what the status means, and what displays on your
buddies’ phones.
Polycom, Inc. 100
 Loading...