

Page 1

WebOffice
Release Notes
Version 7.0.1
January 2005
DOC2063G
Page 2

Copyright © 2004 Polycom, Inc.
All Rights Reserved
All text and figures included in this publication are the exclusive property of Polycom, Inc., and may not be copied, reproduced or used in
any way without the express written permission of Polycom, Inc. Information in this document is subject to change without notice.
This document also contains registered trademarks and service marks that are owned by their respective companies or organizations.
If you have any comments or suggestions regarding this document, please send them via e-mail to info@polycom.com.
Catalog No. DOC2063G
Version 7.0.1
Notice
While reasonable effort was made to ensure that the information in this document was complete and accurate at the time of printing,
Polycom, Inc. cannot assure the accuracy of such information. Changes and/or corrections to the information contained in this document
may be incorporated into future issues.
Page 3

Table of Contents
Version 7.0.1 Package Contents ..........................................................1
System Requirements .....................................................................................................1
Server Requirements ..............................................................................................1
Recommended Requirements .......................................................................... 1
Minimum Requirements ..................................................................................2
Client Software Requirements .........................................................................2
Web Client Software Requirements .................................................................2
Meeting Conference Requirements .......................................................................3
Installing Polycom WebOffice server ..................................................4
Activating WebOffice ....................................................................................................4
New Installation .............................................................................................................7
Update an Existing 6.X Version ..................................................................................12
Uninstalling Polycom WebOffice Server ....................................................................17
Polycom WebOffice License Upgrade ........................................................................19
WebOffice and MGC Configuration....................................................20
WebOffice MGC Settings ............................................................................................20
WebOffice and MGC Configuration ....................................................................21
Configuring the WebOffice Server ..............................................................................22
Configuring the MGC Unit to use an External Database Application for MGC Version
6.0 .................................................................................................................................27
Setting the External Database Access Flag ..........................................................27
Configuring the XML Configuration File ............................................................29
Configuring the MGC Unit to use an External Database Application for MGC Versions
6.01 and Higher ............................................................................................................31
Configuring IVR Message Services to Verify Participant Passwords .........................35
Version 7.0.1 - New Features List....................................................... 46
Version 7.0.1 - WebOffice General Features .....................................47
WebOffice Video Plug-in ............................................................................................47
Requirements ........................................................................................................48
Downloading the WebOffice Video Plug-In Software ........................................48
"View Only" Mode ........................................................................................51
Using a Web Camera or a ViaVideo Endpoint ..............................................52
Windows Messenger Integration Mode ....................................................................... 54
Initiating WebOffice Functionalities in Windows Messenger .............................55
Initiating Audio, Video and Data Conferences ....................................................57
Accepting a Conference Invitation in Windows Messenger ..........................58
Joining a Conference as a Dial-out Participant ..............................................59
Initiating the Conference Organizer ..................................................................... 61
Changing Conference and User Properties ..........................................................63
Associating an Endpoint with Windows Messenger .....................................64
Defining the Server for Windows Messenger Mode ............................................65
I
Page 4

Polycom Web
Office
Release Notes Version 7.0.1
Creating Accounts for Window Messenger Users ............................................... 66
Direct Video Call ......................................................................................................... 70
Placing a Call (Point-to-Point) ............................................................................. 70
Answering a Call .................................................................................................. 73
Dial Out .......................................................................................................................75
Defining the Default Dialing Settings .................................................................. 75
Modifying the Default Dialing Mode from the Conference Organizer ............... 78
Accepting a Dial-out Conference Invitation ........................................................ 82
Dial-Out Permissions ........................................................................................... 83
Selecting the Call Type: IP or ISDN ........................................................................... 86
Conference Organizer .................................................................................................. 87
Launching the Conference Organizer Window ................................................... 87
Starting a New Conference from the Conference Organizer ............................... 88
Defining the Dialing Mode from the Conference Organizer ............................... 90
Using the Bulk Accounts Generator Tool ..................................................... 66
Distributing and Installing the Installation File ............................................. 68
Ending a Call ................................................................................................. 73
Manually ........................................................................................................ 73
Missed Calls .................................................................................................. 74
Automatically ................................................................................................ 74
Version 7.0.1 - Limitations, Corrections and Pending Issues ......... 94
Version 7.0.1 System Limitations ............................................................................... 94
II
Page 5

Version 7.0.1 Package Contents
The Polycom WebOffice Version 7.0.1 software and documentation CD includes the
following items:
• Polycom WebOffice software:
— Polycom WebOffice Server
— Polycom WebOffice Administrator Web Support
• Documentation:
— Polycom WebOffice 7.0.1 Administrator's Guide
— Polycom WebOffice 7.0.1 User's Guide
— Polycom WebOffice 7.0.1 Release Notes
System Requirements
Server Requirements
Version 7.0.1 Package Contents
Recommended Requirements
Following are the Polycom WebOffice Server recommended requirements:
• Pentium-4 1GHz and higher (dual processor recommended)
• 1024 MB RAM
• Internet Connection - LAN to router connected to the Internet at 1.5 Mbps or higher
• 100 Mbps PCI network adapter providing LAN connection
• 40 GB on disk (required for System/SW/Session, and for Offices data + spare),
preferably high speed SCSI supporting 160 Mbps transfer rate (3x18GB full RAID
recommended)
• Software
— Windows 2000 Server, Windows 2003 Server
• Environment
— Firewall protection - usually TCP port 80 (HTTP) and ICMP are to be open for
inbound traffic toward the server with state-full inspection activated
— Optional - working in TCP mode port 83
1
Page 6

Polycom Web
Office
Release Notes Version 7.0.1
Minimum Requirements
Following are the Polycom WebOffice Server minimum requirements:
• Minimum Server Specs for WebOffice License levels:
— 5 Licenses - Pentium-III 700 MHz, 500 MB RAM and 10 GB hard disk with
512 Kbps connection
— 25 Licenses - Dual Pentium-III 500 MHz, 1 GB RAM and 40-GB hard disk with
1.0 Mbps connection
— 100 Licenses - Pentium-4 1.2 GHz, 1 GB RAM and 60-GB hard disk with
RAID 0, 1.0 Mbps or higher connection
— 250 Licenses - Dual Pentium-4 2.x GHz, 2 GB of RAM and 100-GB hard disk
with RAID, 1.5 Mbps connection
— 500 or more - Dual Pentium-4 with highest speed, 2 GB of RAM minimum and
20-GB install disk and 100-GB data disk with the data disk RAID 5 Striped, with
1.5 Mbps or higher connection
• Software
— Windows 2000 Server
• Environment
— Firewall protection - only TCP port 80 (or any other port the server was
configured to work with) (HTTP) and ICMP are to be open for inbound traffic
towards the server with state-full inspection activated
Client Software Requirements
Following are the Polycom WebOffice Client software recommended requirements:
• Standard Pentium-III 600 (or higher) Windows PC
• Software
— Windows 2000/XP
— IE 4.0 and higher / Netscape 7 and higher
• Environment
— 128 MB RAM and higher
— Internet connection - 128 Kbps and higher
Web Client Software Requirements
Following are the Polycom WebOffice Web Client software minimum requirements:
• Software
— Windows 2000/ME/XP, Mac or Linux
— Windows OS: IE 5.0 and higher / Netscape 7.0 and higher
— Mac OS: IE for Mac 5.2 and higher / Netscape 7.1 and higher
— Linux OS: Netscape 7.1 and higher
• Environment
— Internet connection
2
Page 7

Meeting Conference Requirements
Following are the Polycom WebOffice configuration requirements for audio and video
meetings:
• Audio conference
— MGC VoicePlus or Voyant OCI
— WebCommander - optional but recommended when working with MGC unit
version 5.0 and lower
• Point-to-Point video conference
— ViaVideo I and II, software version 4.0 and higher / ViewStation endpoints.
ViewStation models include ViewStation FX, ViewStation EX, ViewStation FS
4000 - software version 5.1 and higher, and ViewStation VSX 7000 - software
version 5.0 and higher.
— Gatekeeper (PathNavigator is recommended) - optional but recommended
• Multipoint video conference
— Polycom MGC version 6.1 higher
— ViaVideo I and II, software version 4.0 and higher / ViewStation endpoints.
ViewStation models include ViewStation FX, ViewStation EX, ViewStation FS
4000 - software version 5.1 and higher, and ViewStation VSX 7000 - software
version 5.0 and higher.
— WebCommander - optional but recommended when working with MGC unit
version 5.0 and lower
— Gatekeeper (PathNavigator is recommended) - needed for IP
Version 7.0.1 Package Contents
3
Page 8
Polycom Web
Office
Release Notes Version 7.0.1
Installing Polycom Web
Activating Web
Office
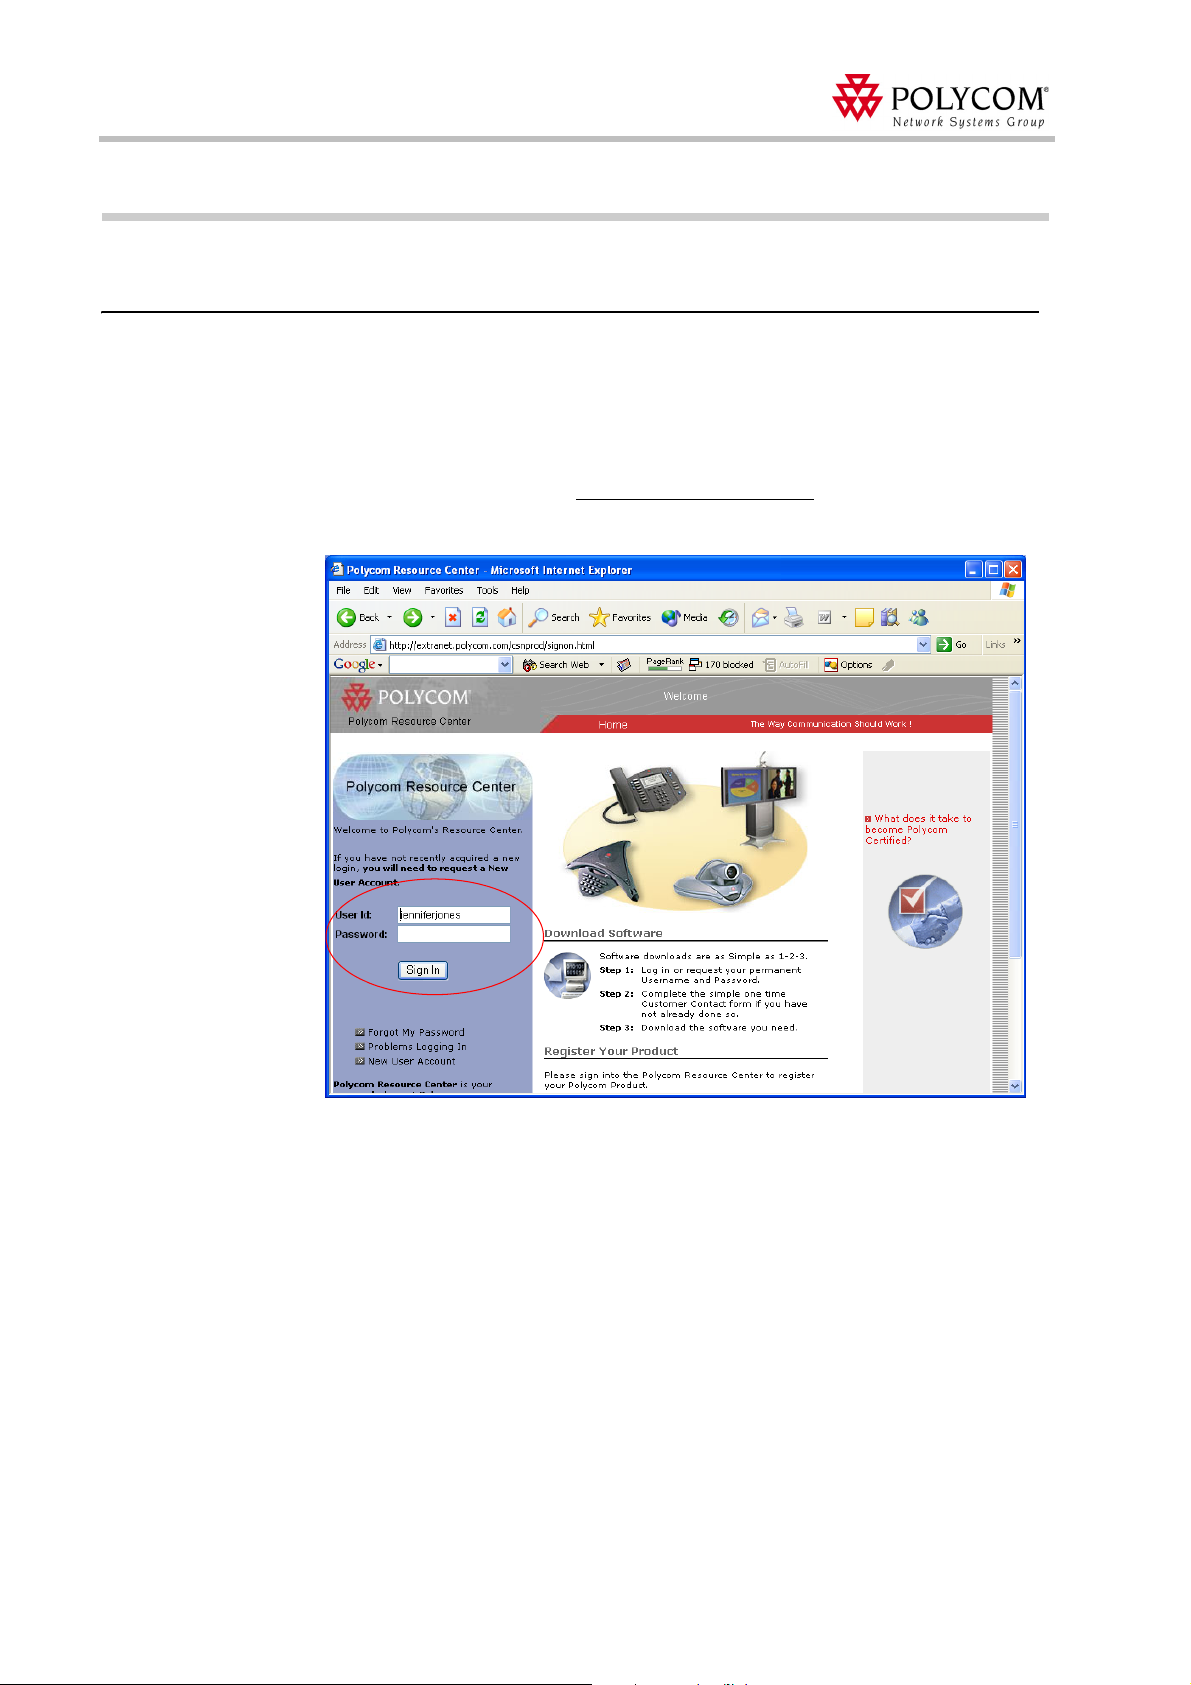
The activation key code to activate Polycom WebOffice is received directly from the
Polycom Web site. The activation key code must then be entered in the WebOffice
Administrator's page to activate WebOffice. This procedure must be performed prior to
using WebOffice.
To activate your Polycom WebOffice:
1. Access the Polycom Web site http://extranet.polycom.com
2. If necessary, create a New User Account. If you already have a user account, log in.
Office
server
.
4
Page 9
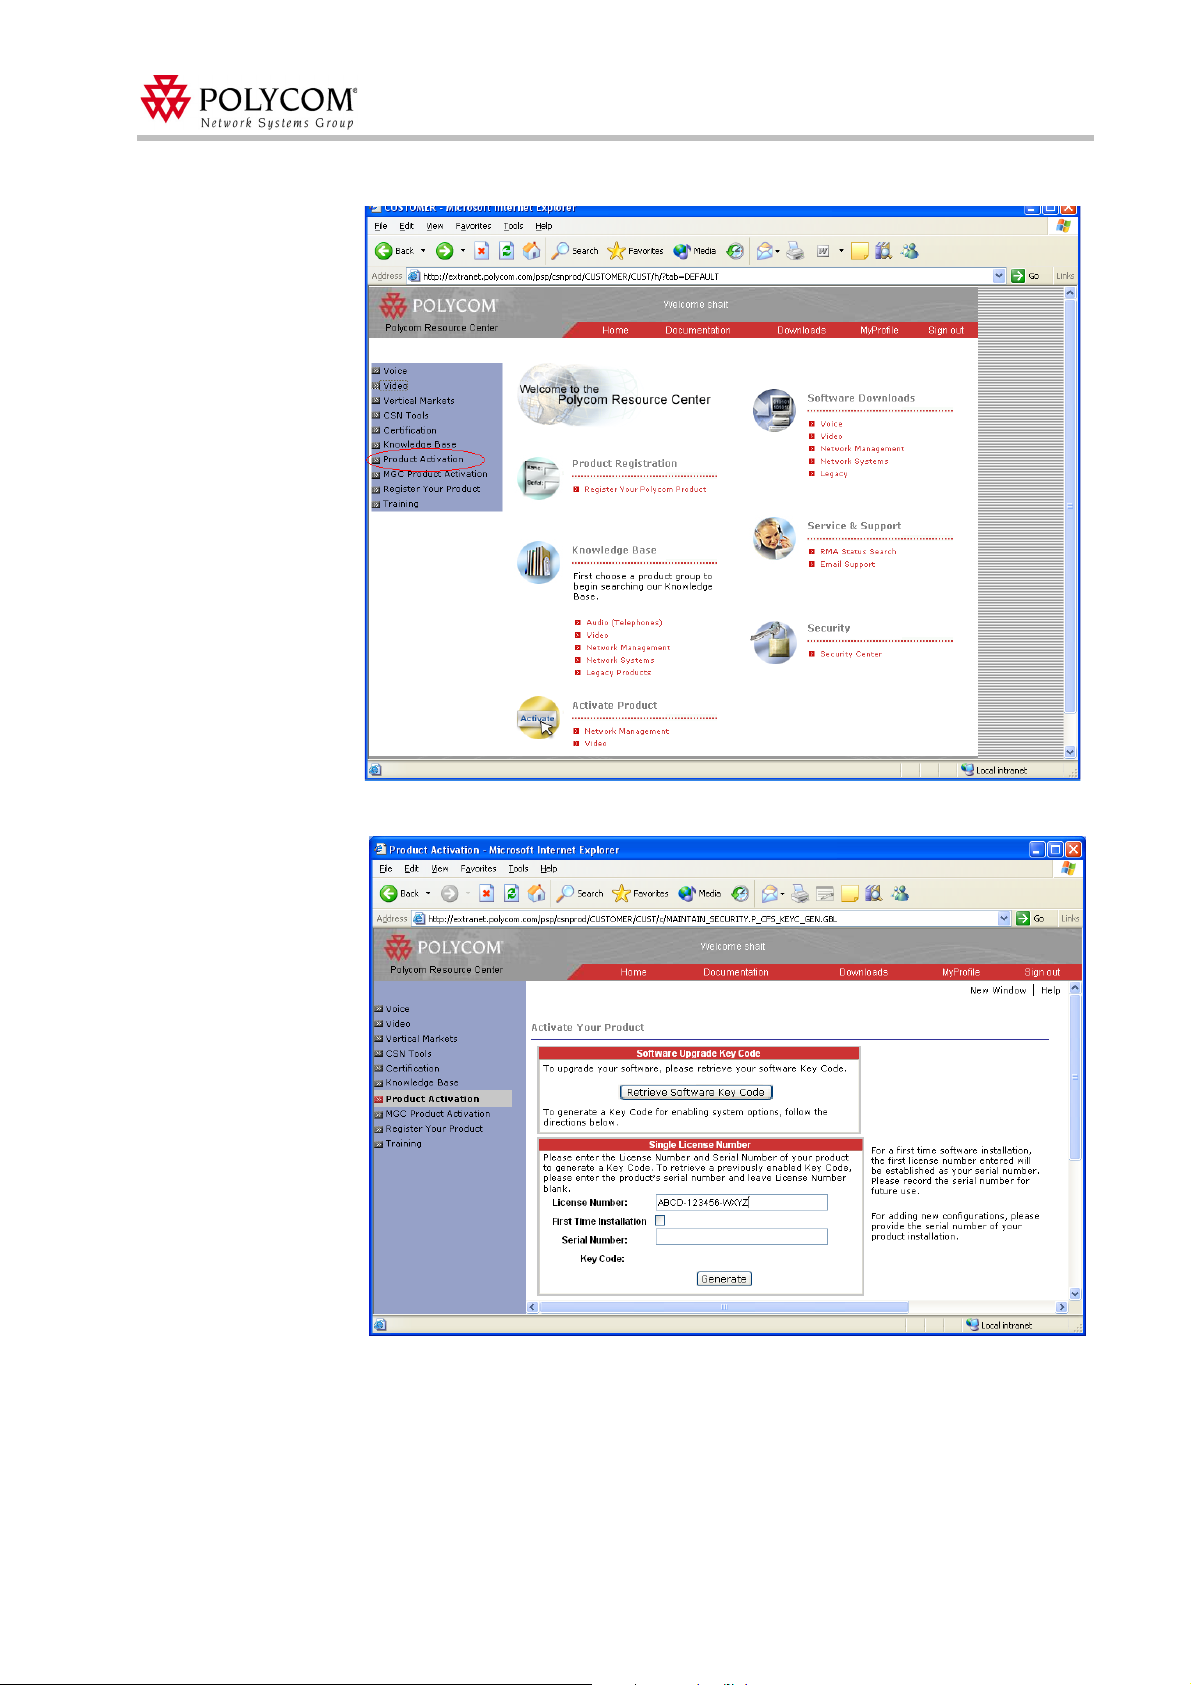
3. Click the Product Activation link.
Installing Polycom WebOffice server
The Product Activation page opens.
4. Under Single License Number enter the License Number that is located on the back
label of your WebOffice CD ROM.
5. Press the TAB key.
6. License number will be identified and First Time Installation checkbox will appear.
7. Check First Time Installation checkbox and Serial Number will appear.
5
Page 10
Polycom Web
Office
Release Notes Version 7.0.1
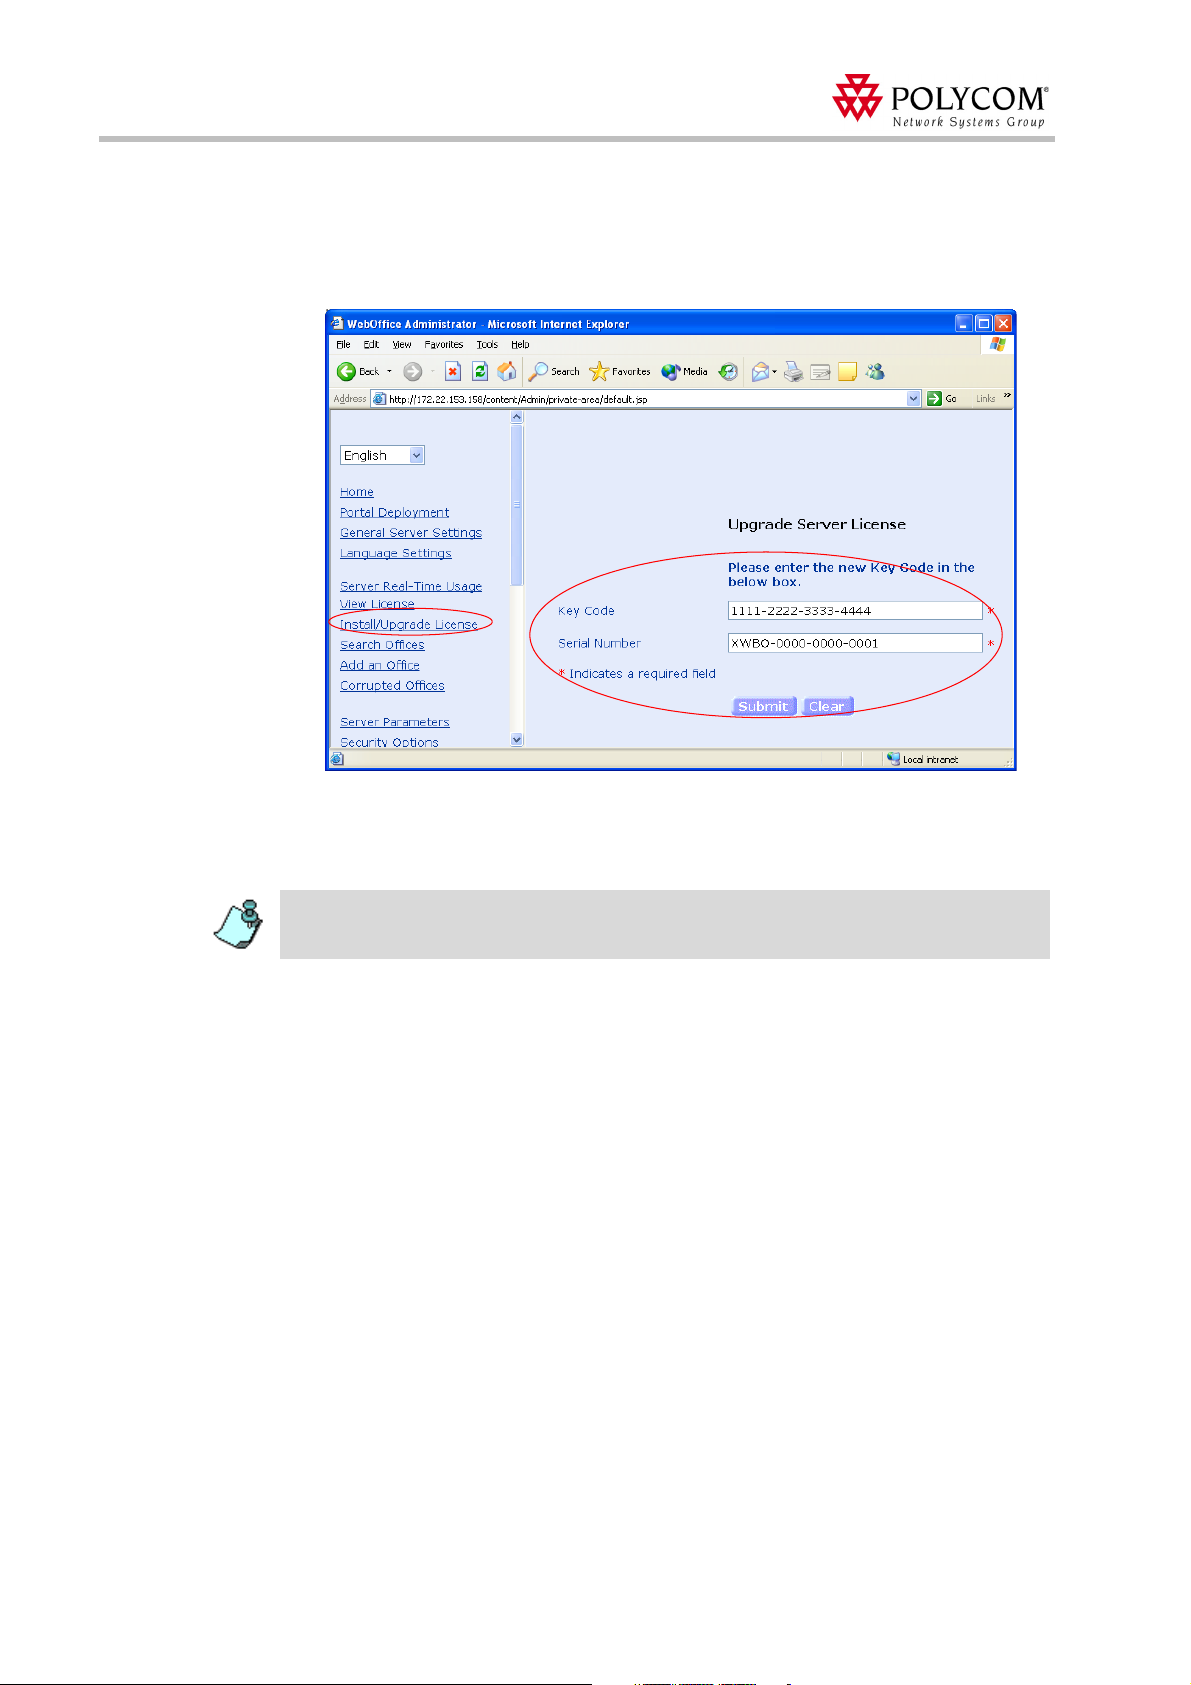
8. Click the Generate button and Key Code will be obtained.
9. Open your WebOffice Administrator’s tool.
10. In the Main Menu pane, click Install/Upgrade License.
The Install/Upgrade License page opens.
11. In the Key Code box and the Serial Number, enter the activation key code and serial
number received from the Polycom Web site.
12. Click Submit to complete the WebOffice activation.
To upgrade your Web
and repeat the above procedure.
Office
license (add more offices, etc.) you must receive a new Key Code
6
Page 11
New Installation
To install the Polycom WebOffice software package for the first time:
1. Insert the CD into the CD drive.
2. From the Start menu, select Run.
3. Enter D:/Setup, where D is the CD drive name, and then click OK.
Installation Wizard
Follow the on screen instructions to complete the installation process.
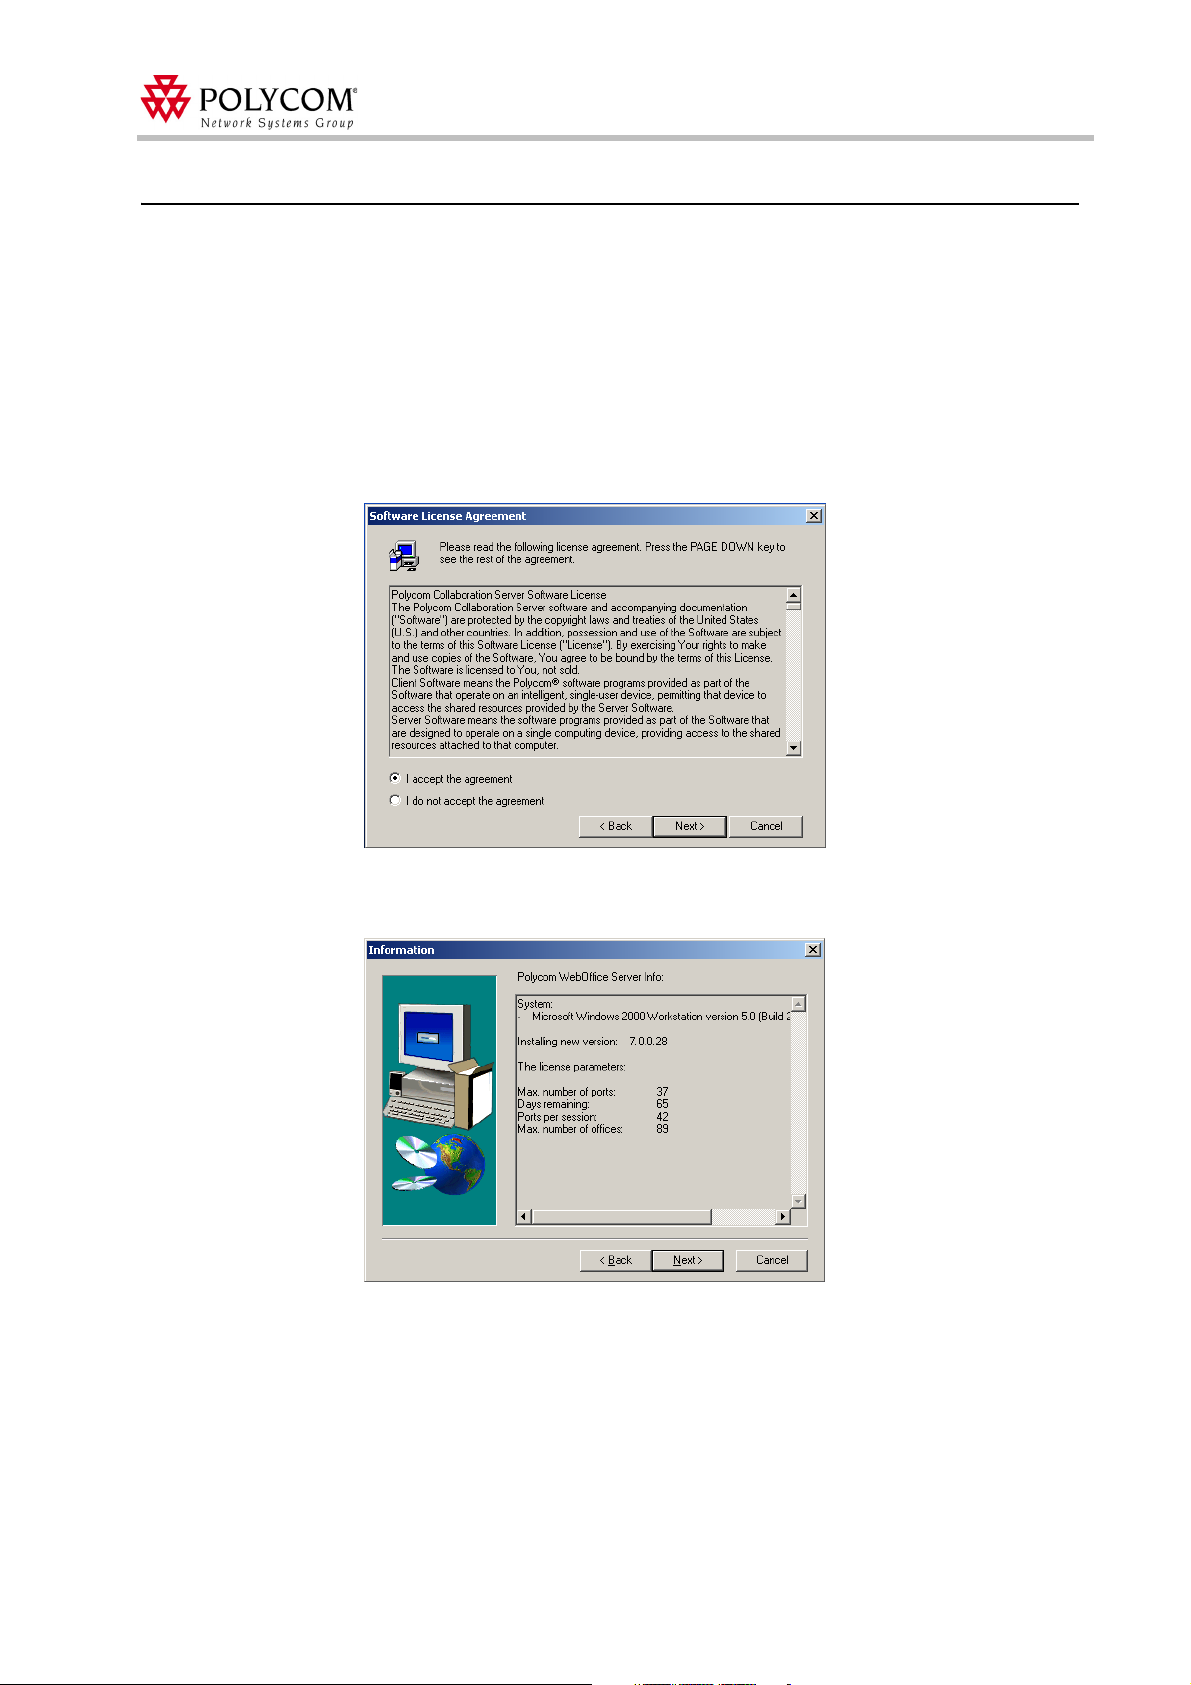
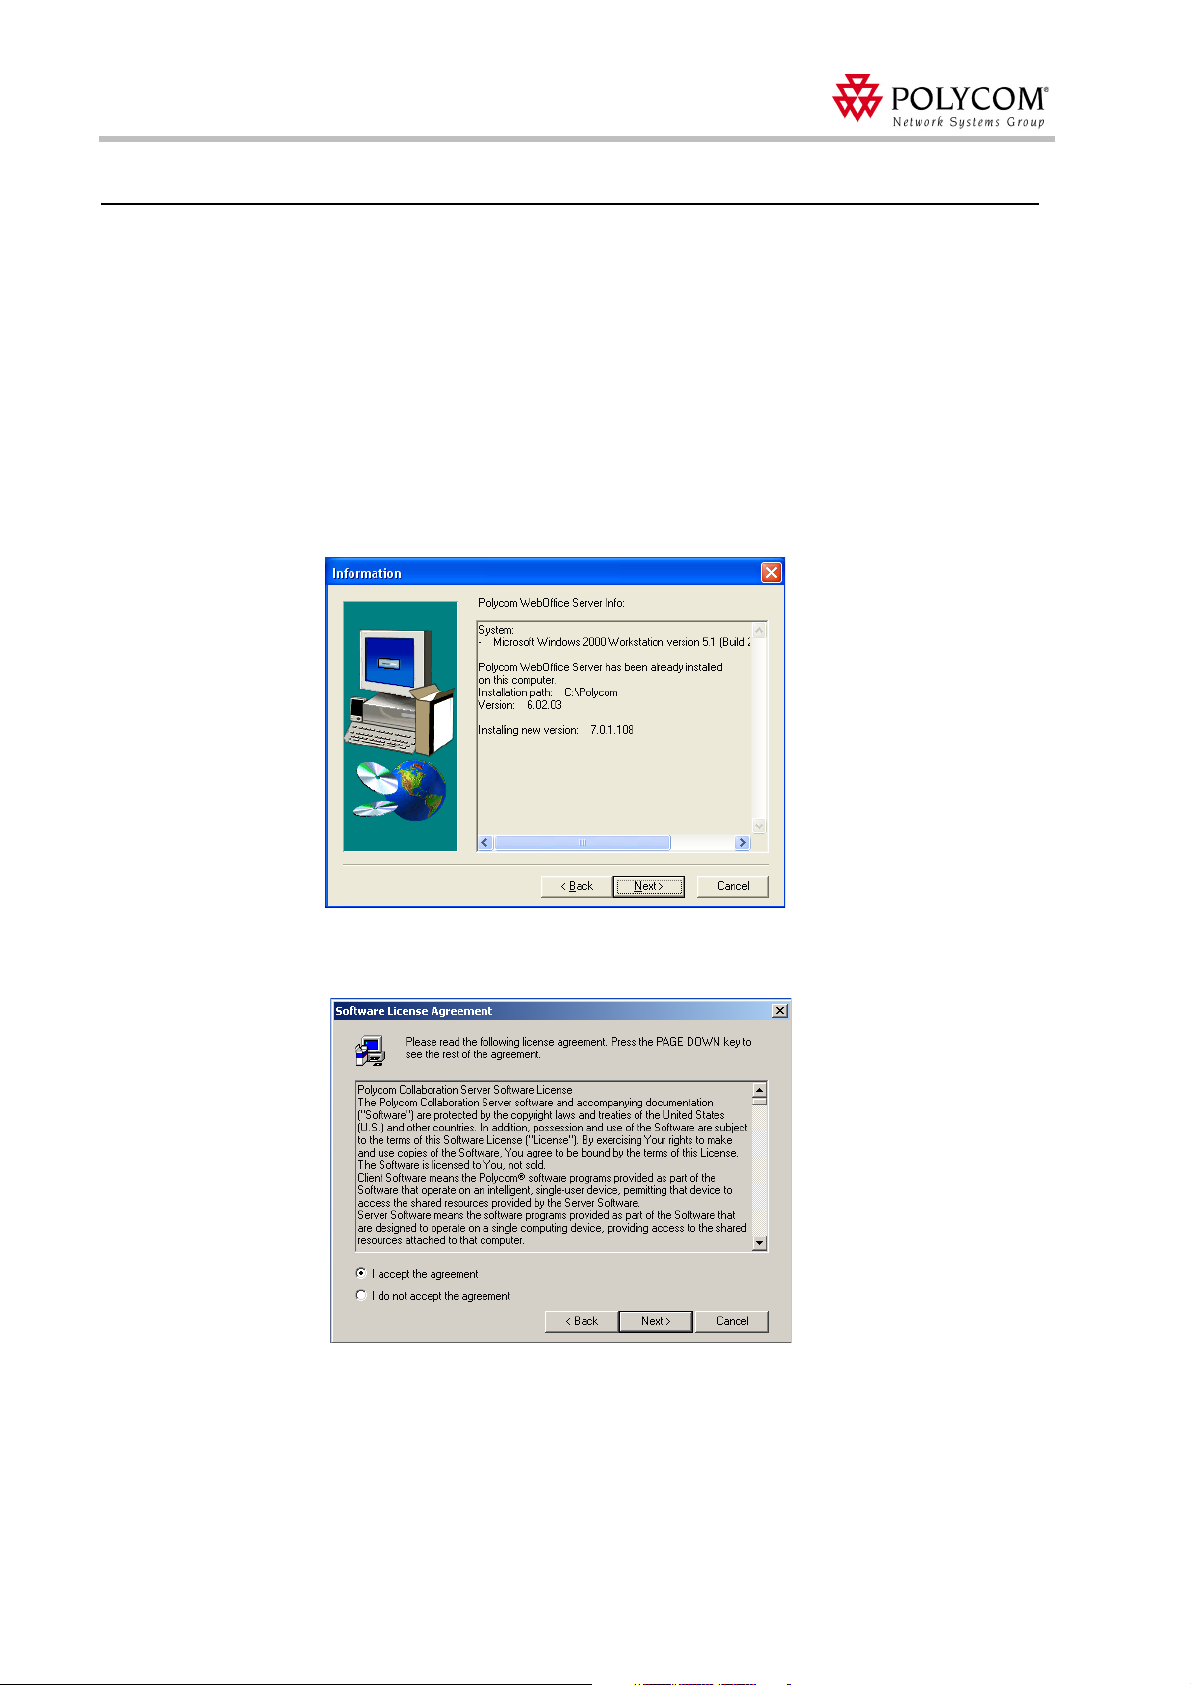
1. In the Software License Agreement window, select I accept the agreement and click
Next to accept and continue.
Installing Polycom WebOffice server
2. Click Next.
The Information window opens detailing your server information.
7
Page 12
Polycom Web
Office
Release Notes Version 7.0.1
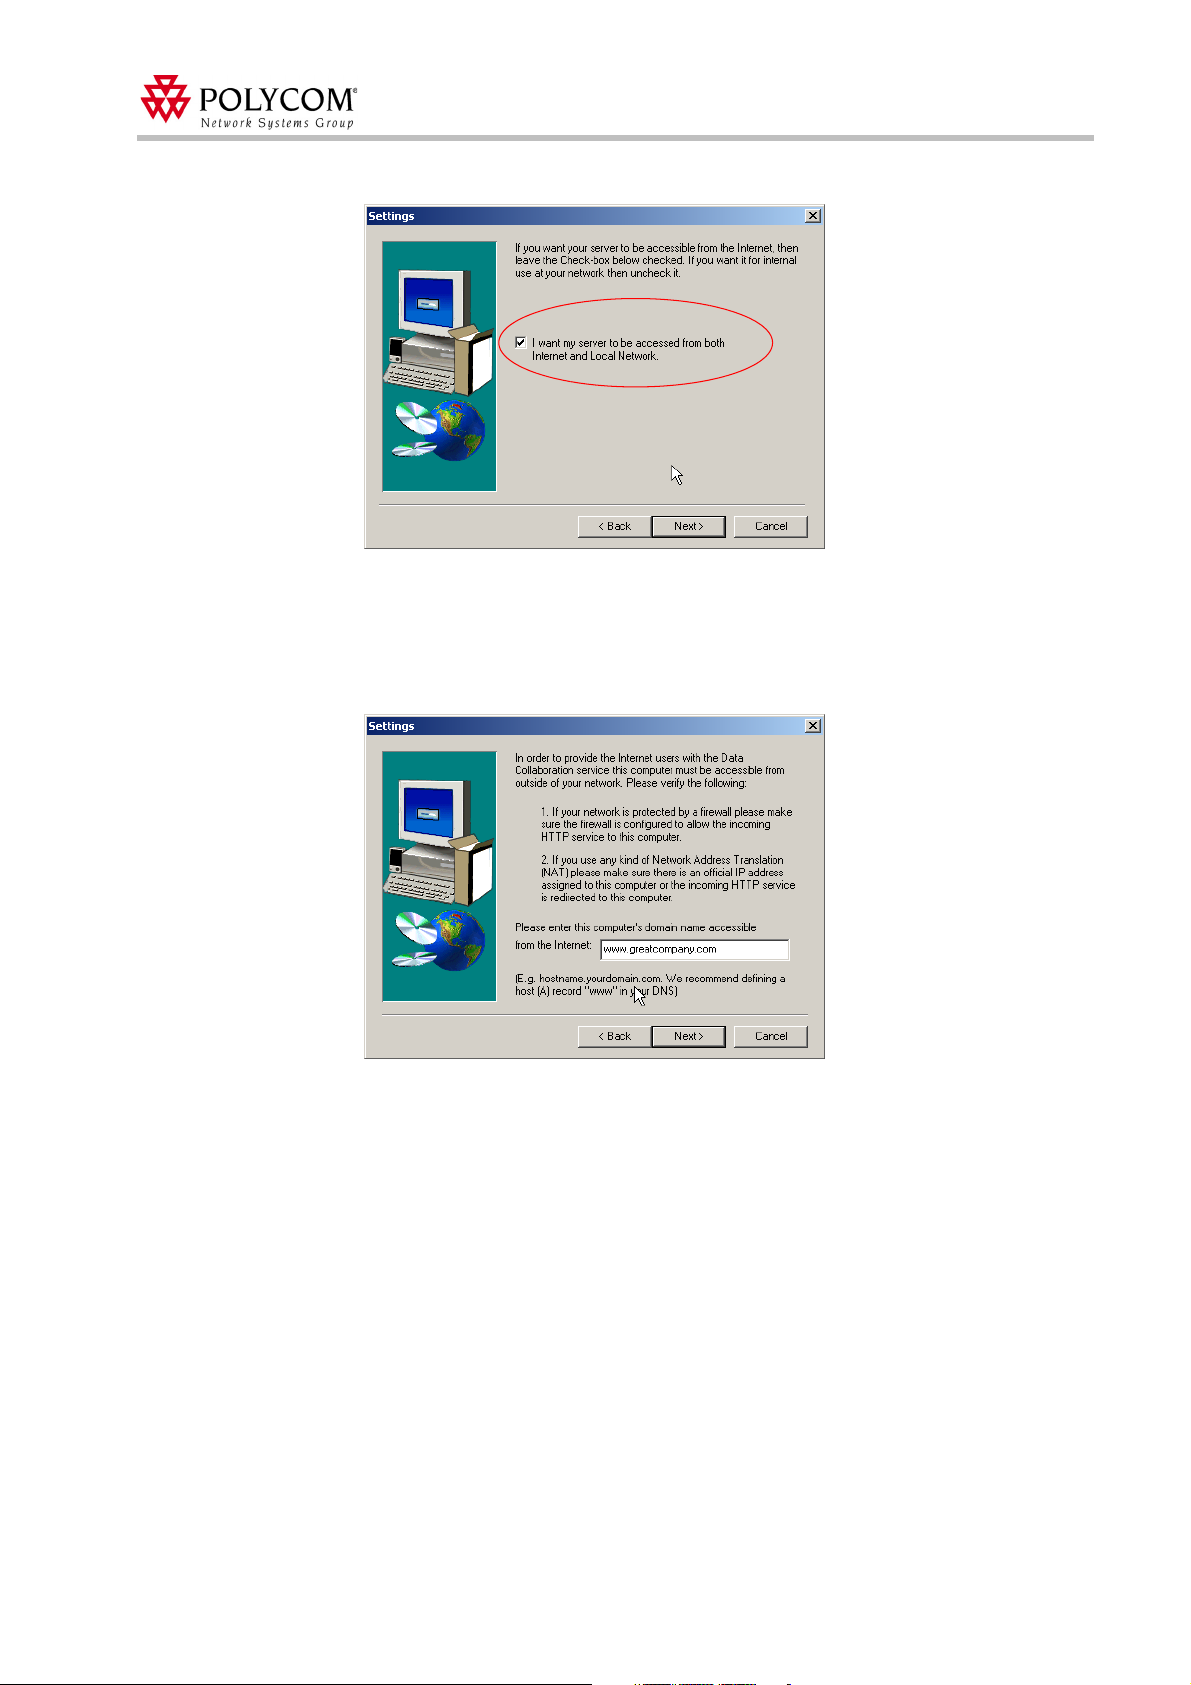
3. Click Next.
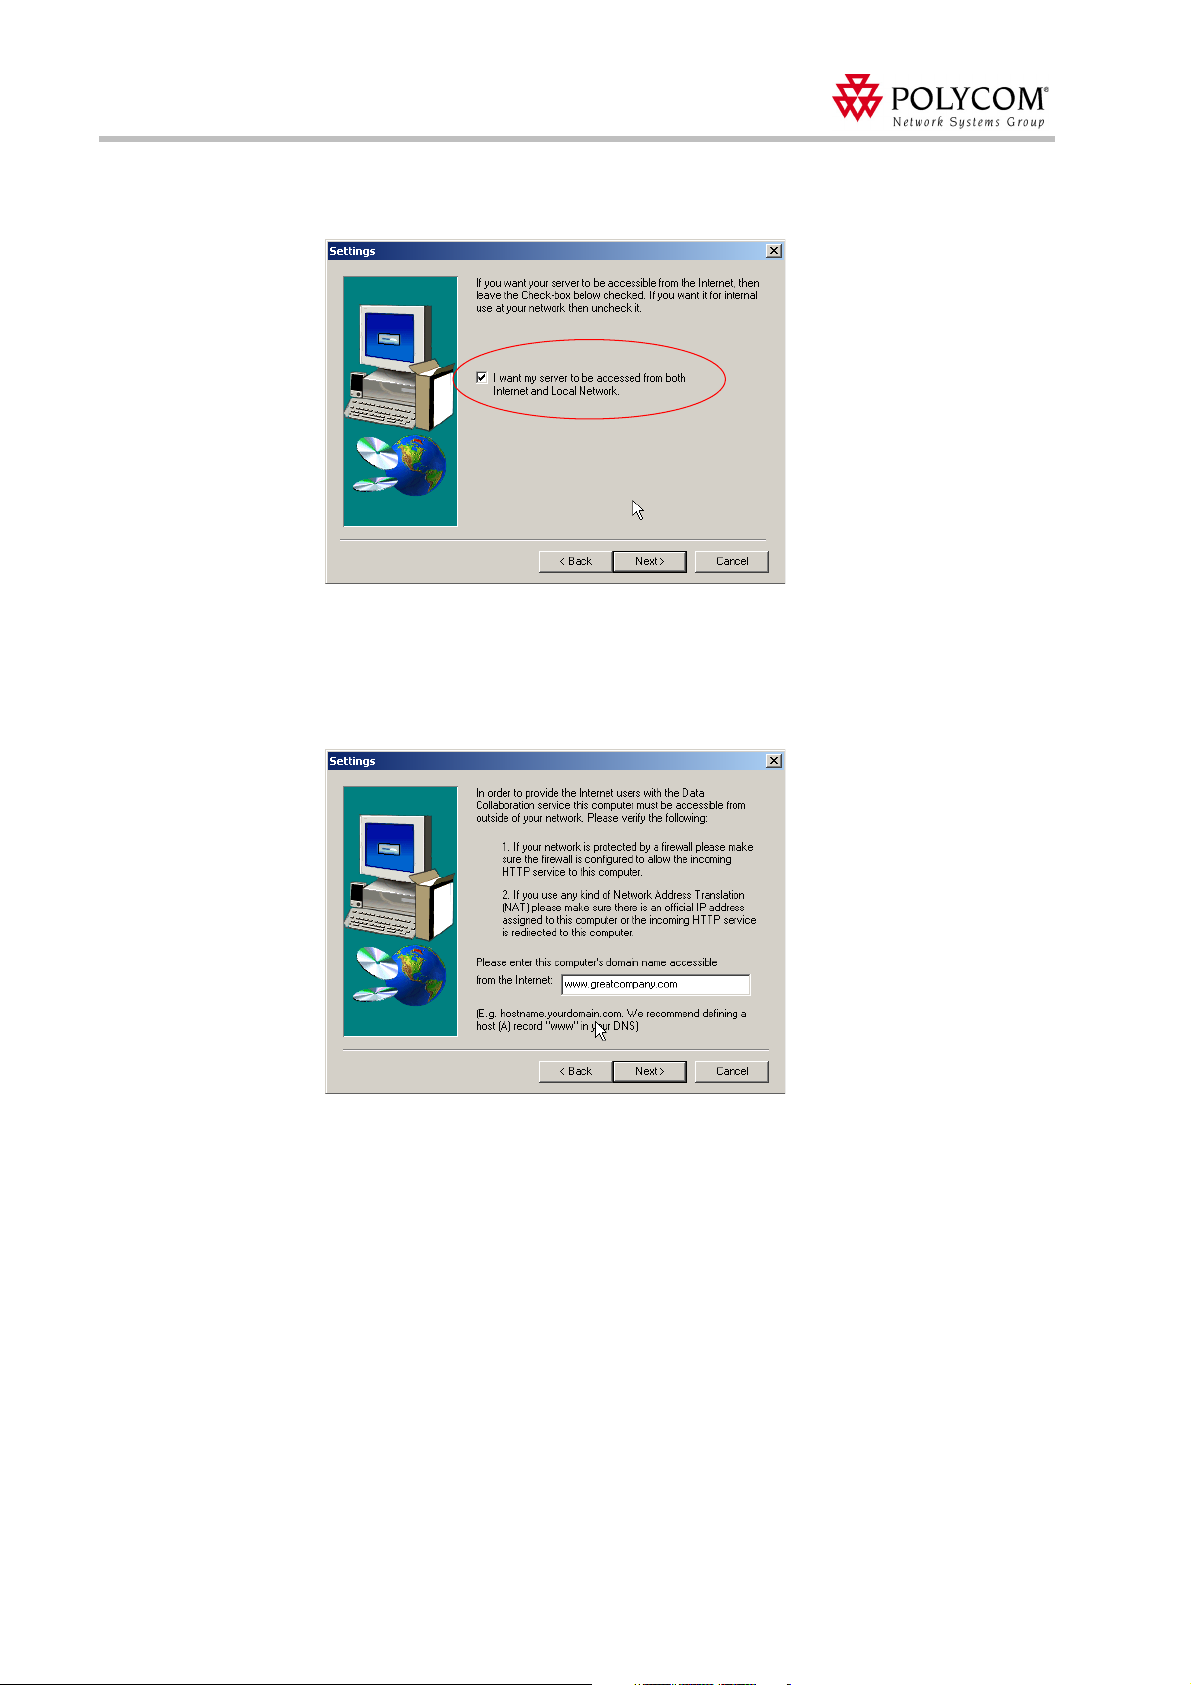
The Settings window opens.
4. The check box I want my server to be accessed from both Internet and Local
Network is selected by default. This allows your WebOffice server act as both an
Intranet (internal to the resident LAN) and Internet server (default installation). If this
check box is cleared, the WebOffice server acts as an internal LAN server only.
The next Settings window opens.
8
Page 13
Installing Polycom WebOffice server
5. If you have chosen to install the WebOffice Server as an Internet server, you are
prompted to enter the URL. The URL follows the format www.polycom.com. This is a
typical URL structure, derived from the combination of the host and domain name.
Click Next to continue.
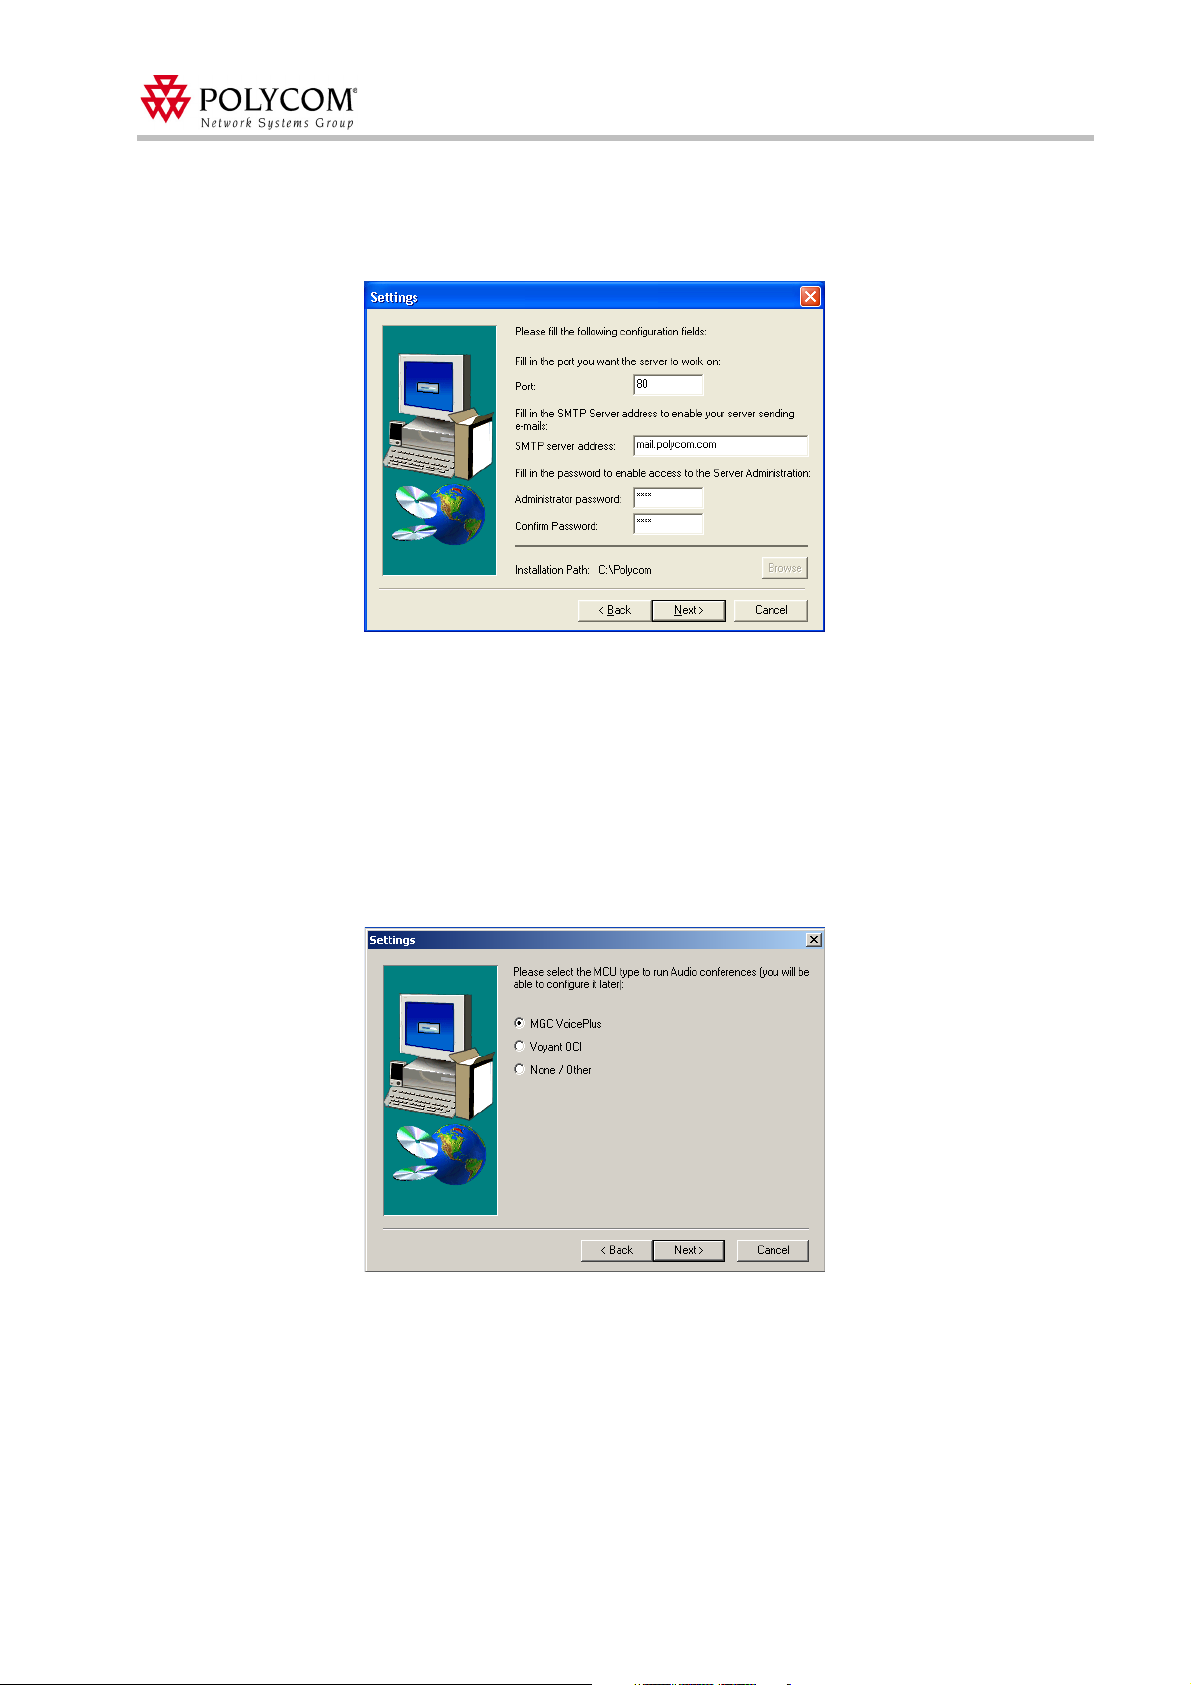
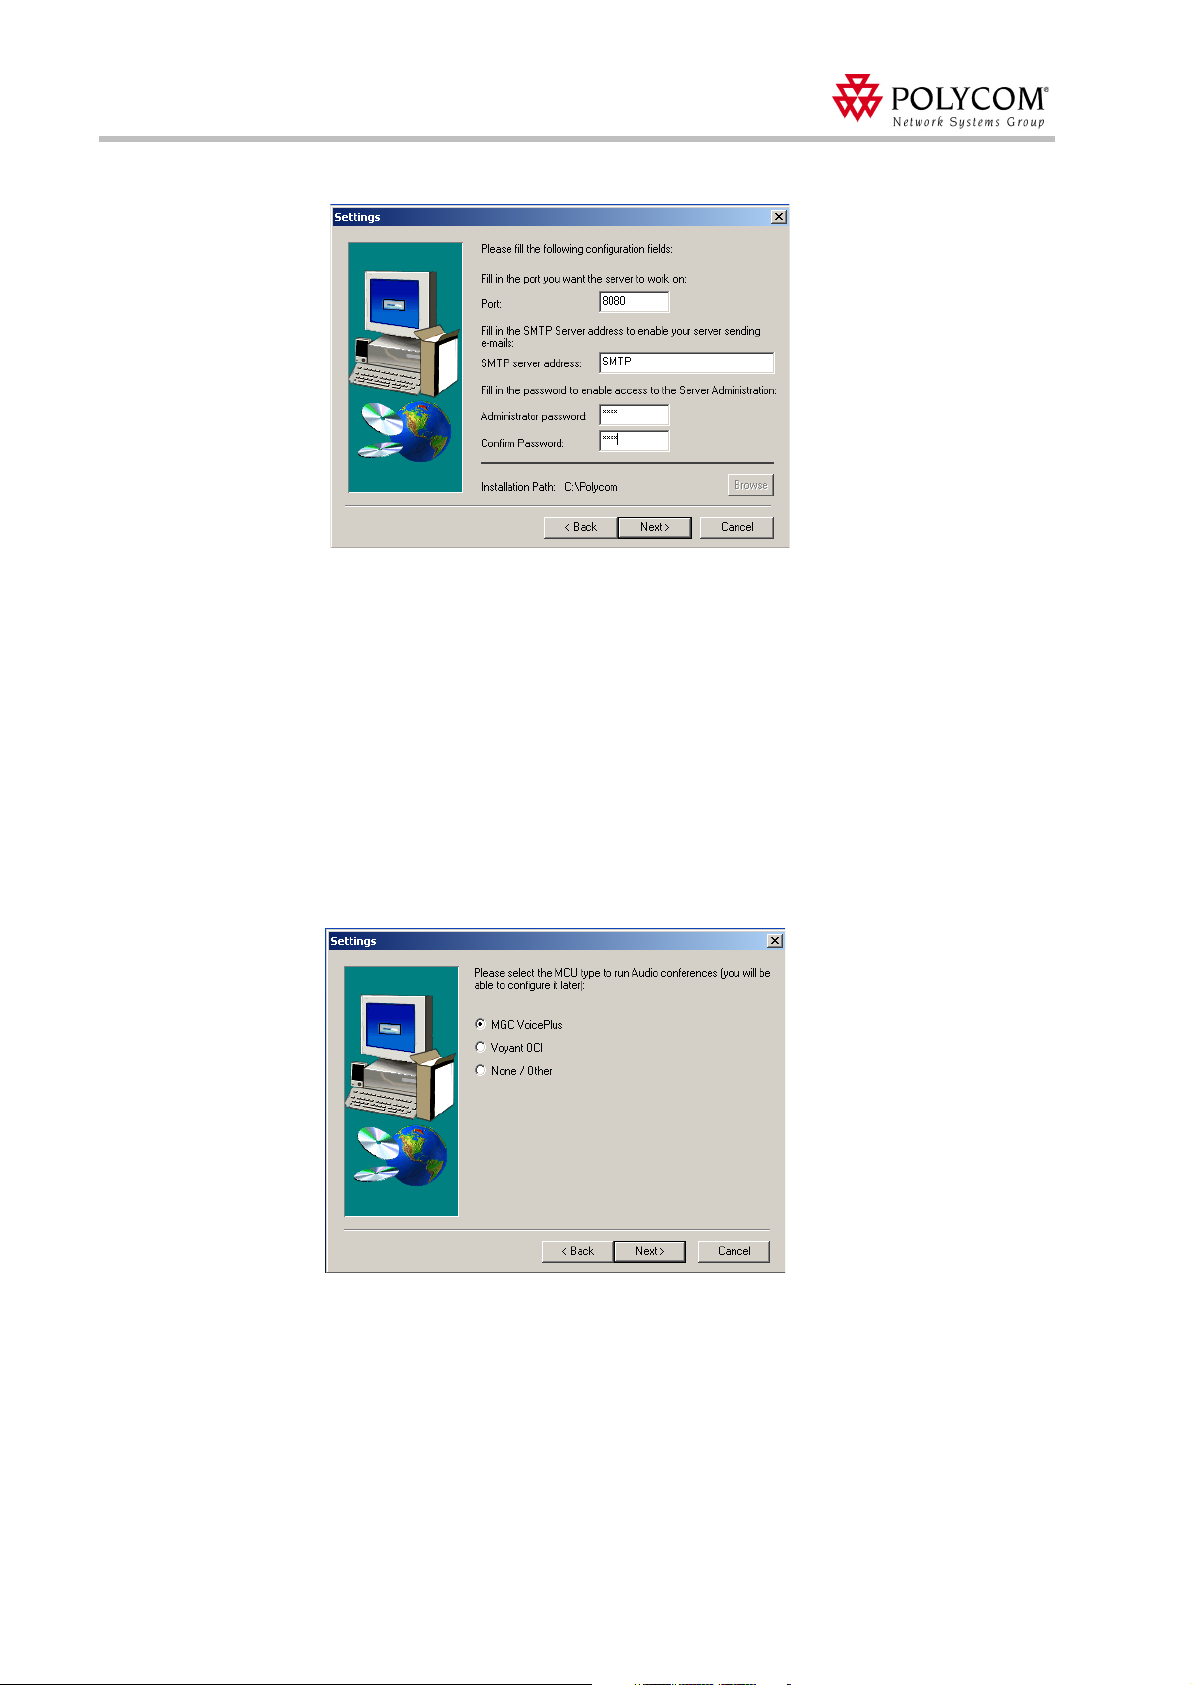
6. The default port is 80. If you need to use a different port for HTTP, enter the port
number. Any port can be used assuming that no other process is using this port.
7. Enter the SMTP server address. This can be a URL or an IP number.
8. Enter the administrator password. Re-enter your password for confirmation. This is the
username for controlling the WebOffice Instant Messaging Service from the Web. This
Web interface enables the server administrator to add, remove and administer offices
and users.
9. Select the target path for the installation and click Next to continue.
The following Settings window opens.
Select the MCU that will be used to run audio conferences; MGC VoicePlus, Voyant
OCI or None/Other. Click Next to continue.
This option can be changed by the Administrator in the Administrator’s Tool - Portal
Deployment.
9
Page 14
Polycom Web
Office
Release Notes Version 7.0.1
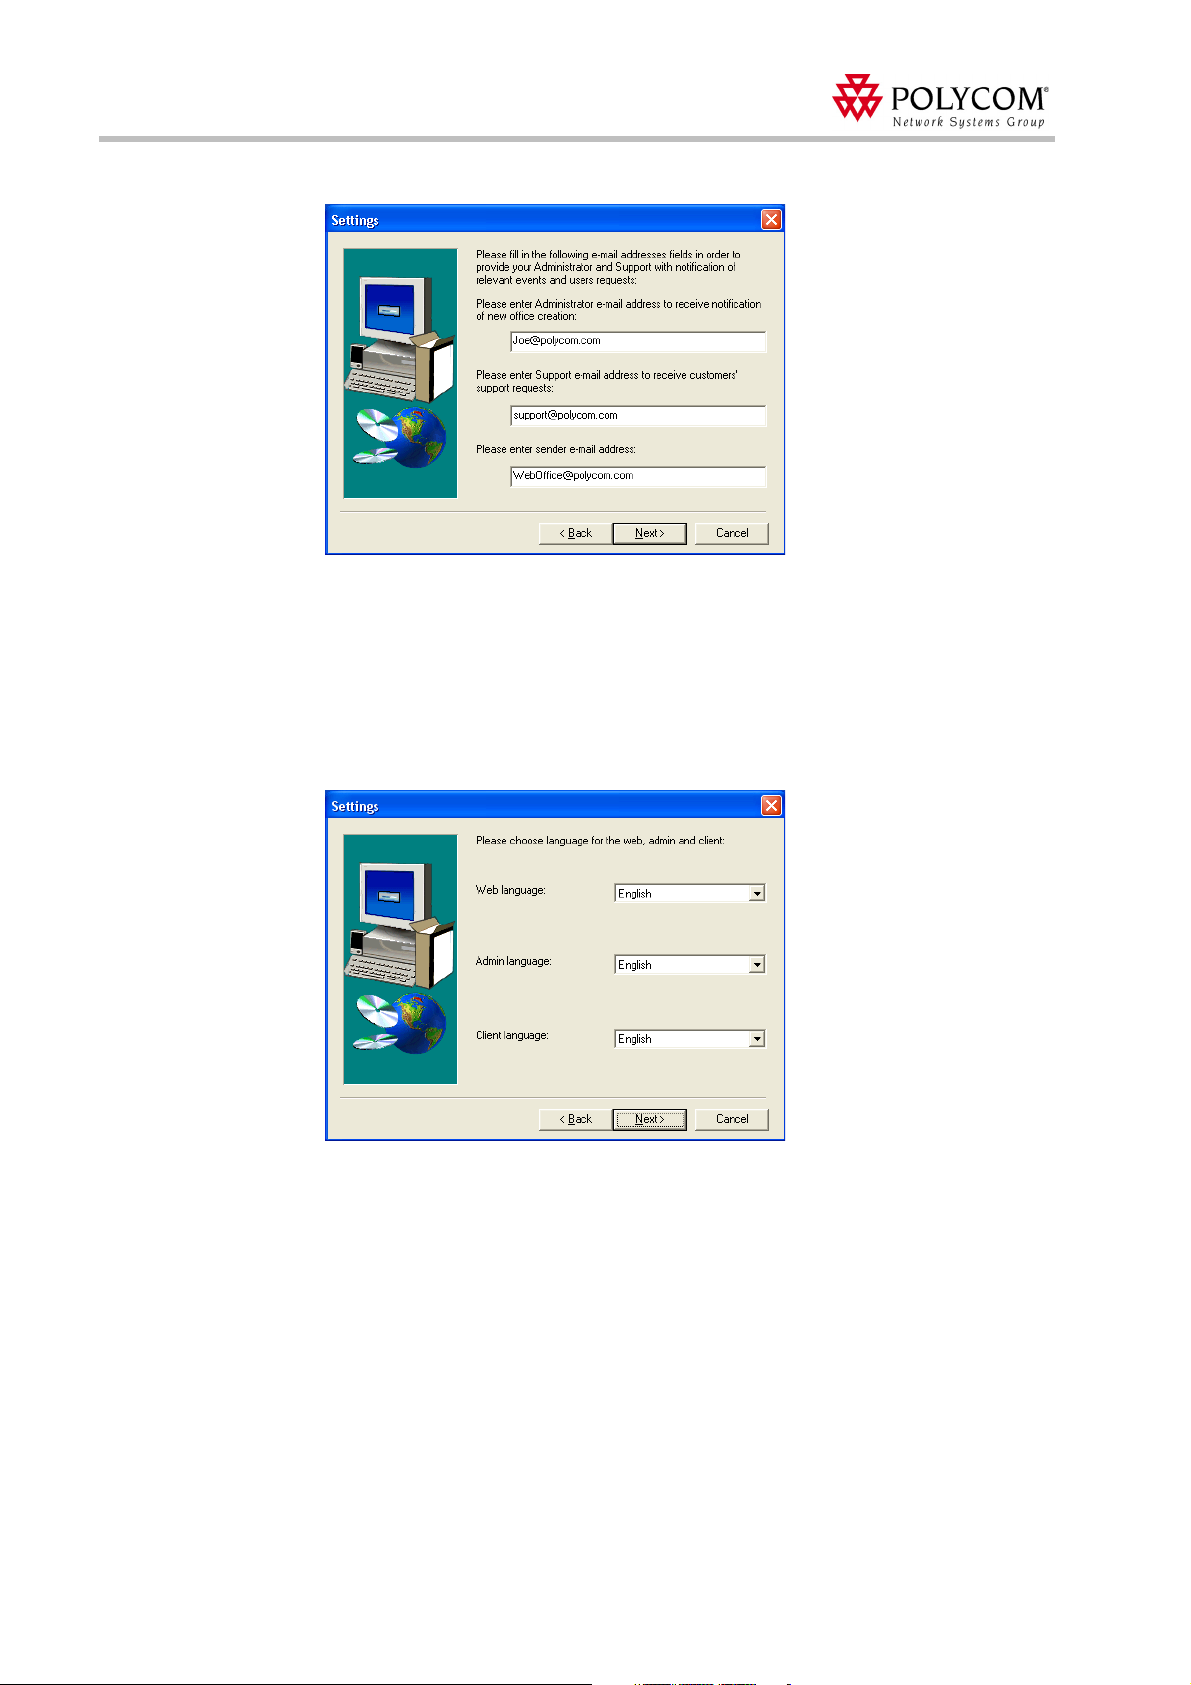
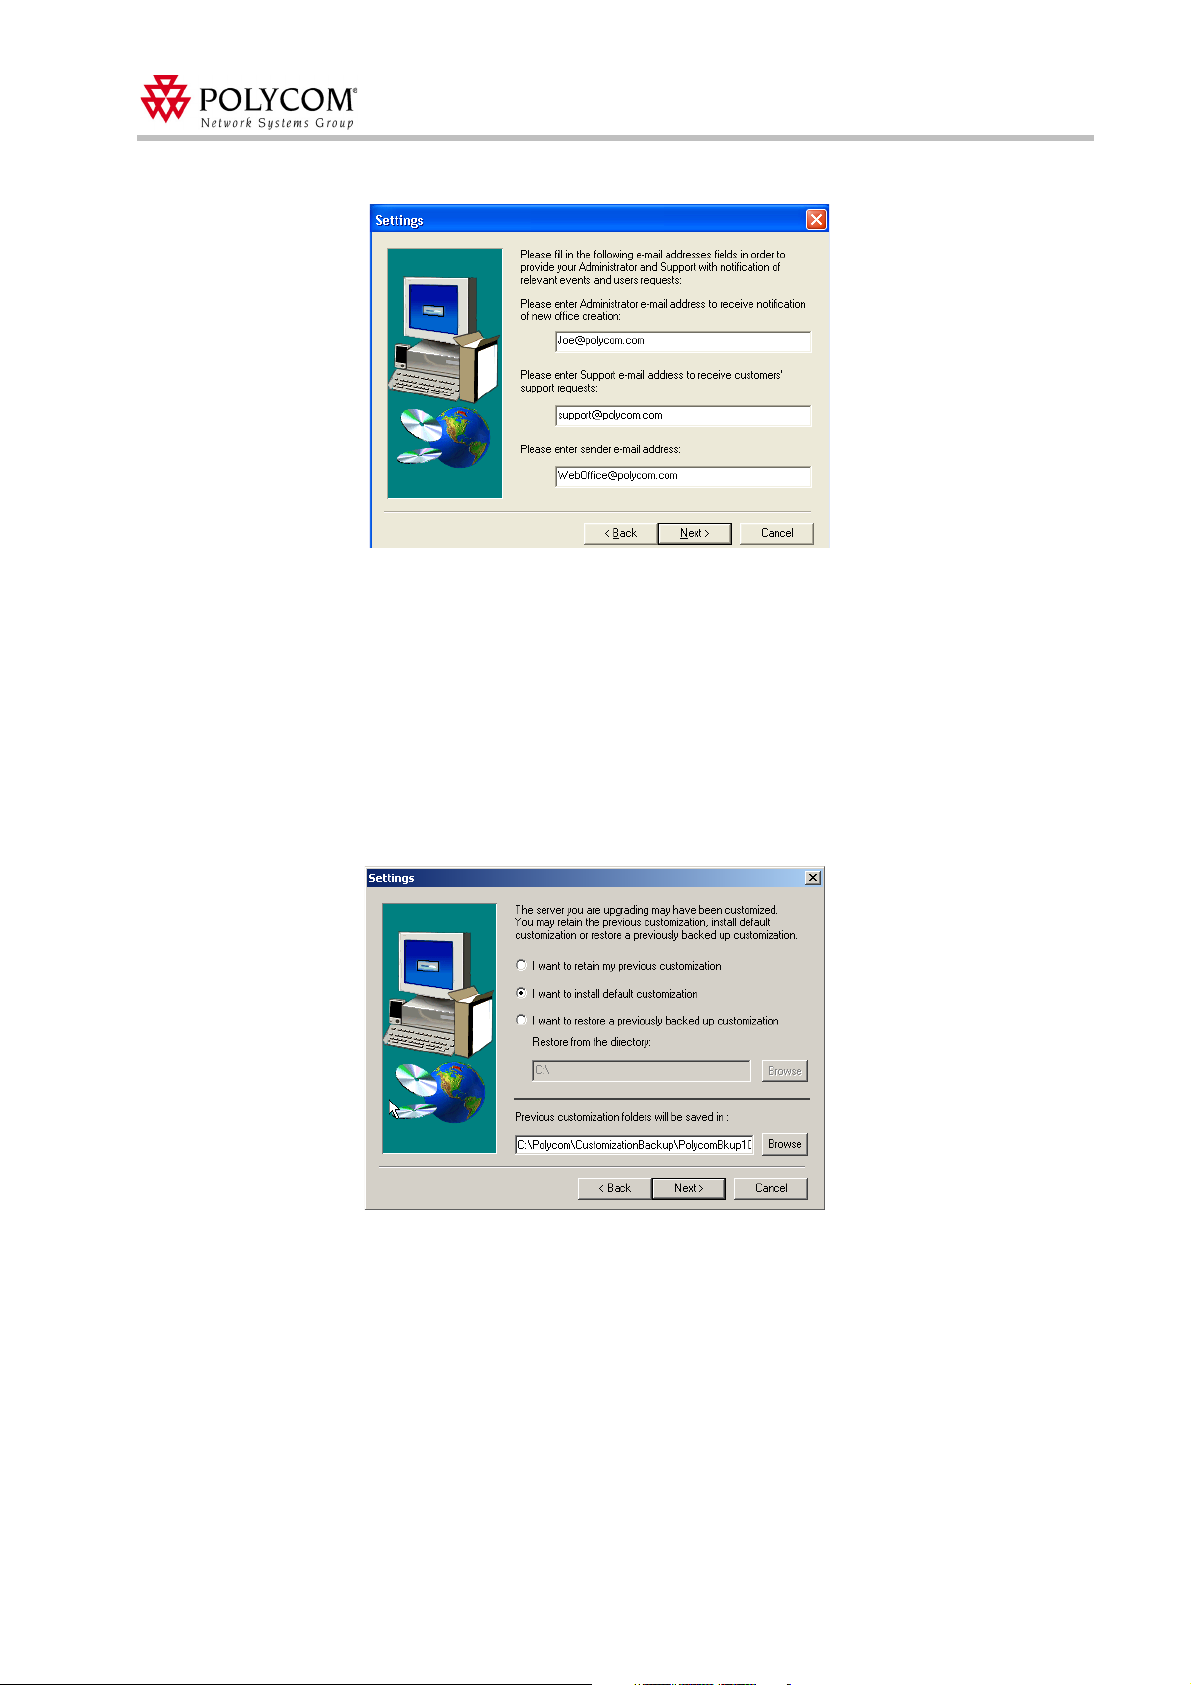
The following Settings window opens.
10. Enter the WebOffice Administrator e-mail address. The administrator receives e-mail
from the server every time an office is created.
11. Enter the WebOffice Support e-mail address. This is the address that will receive
e-mails from users seeking support.
12. Enter the WebOffice Sender e-mail address. This is the e-mail address that is shown in
the Reply To line of sent e-mails. Click Next to continue.
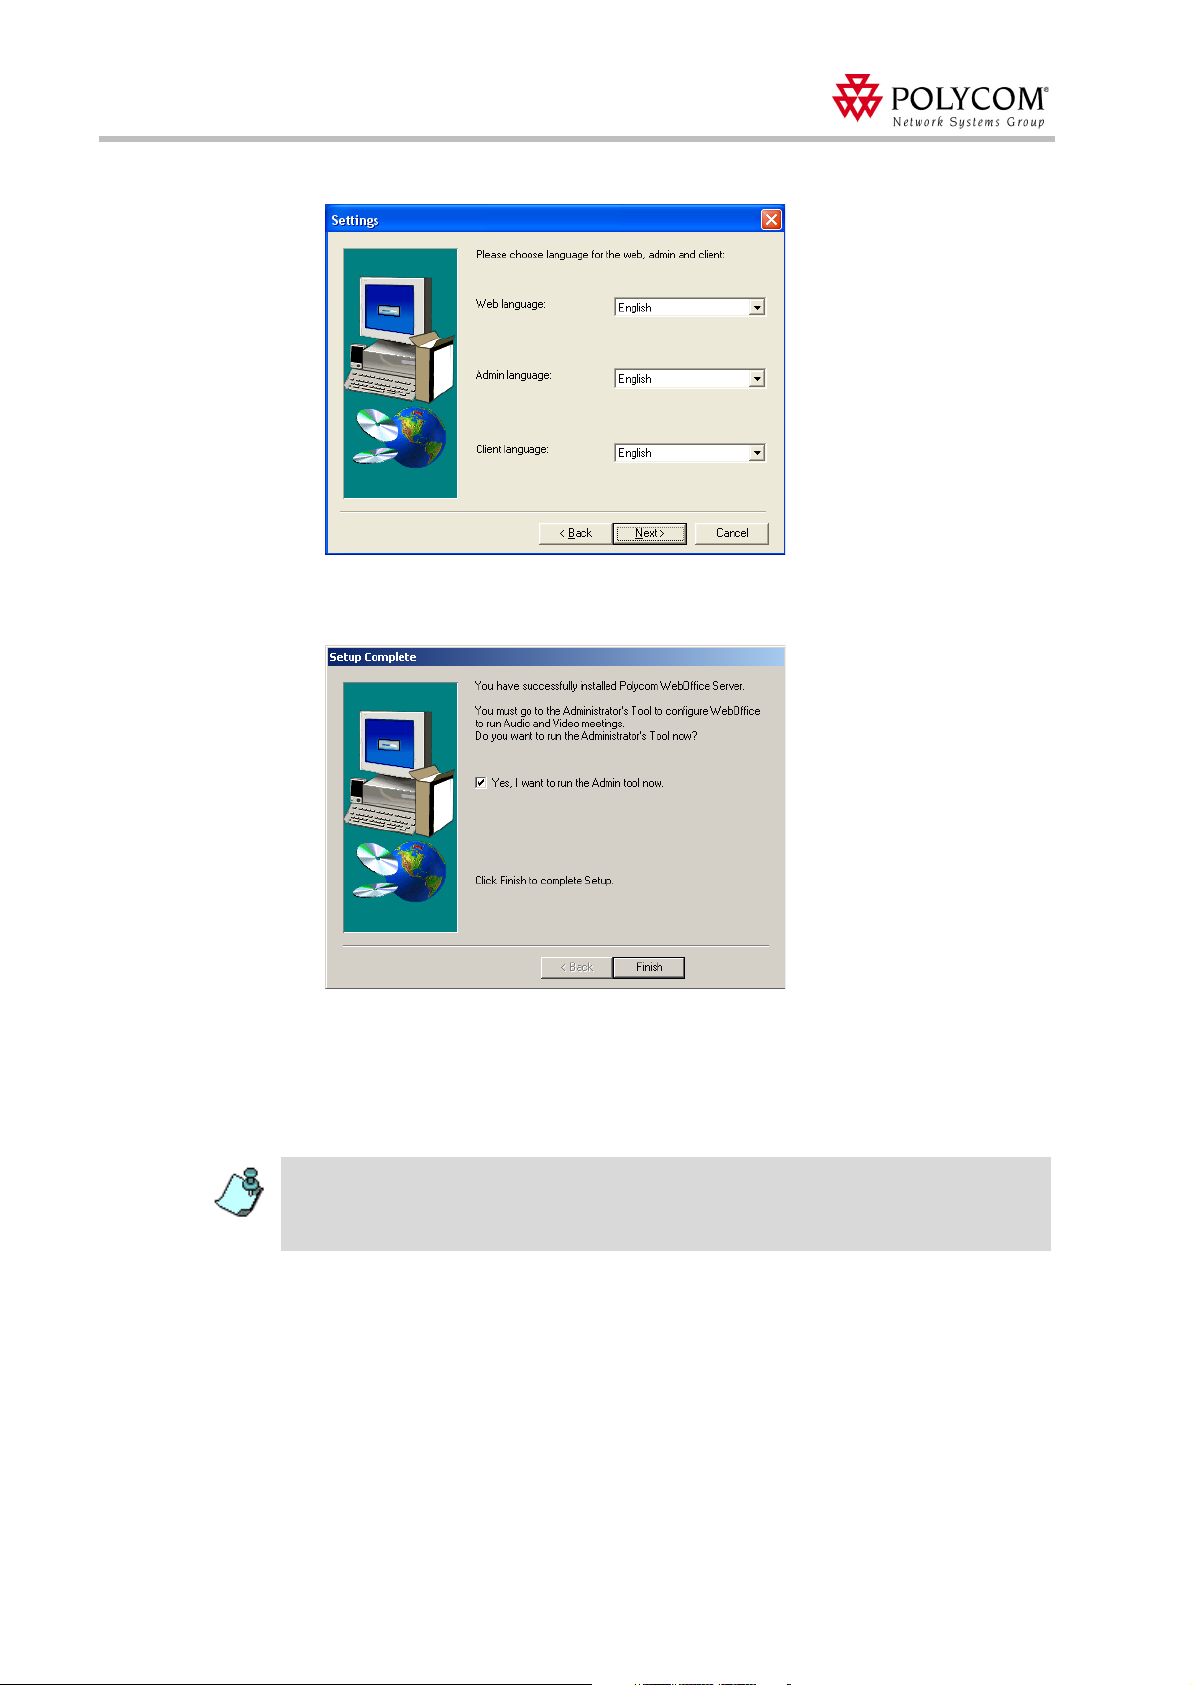
The languages selection window opens.
13. Click Next to continue.
10
Page 15
Installing Polycom WebOffice server
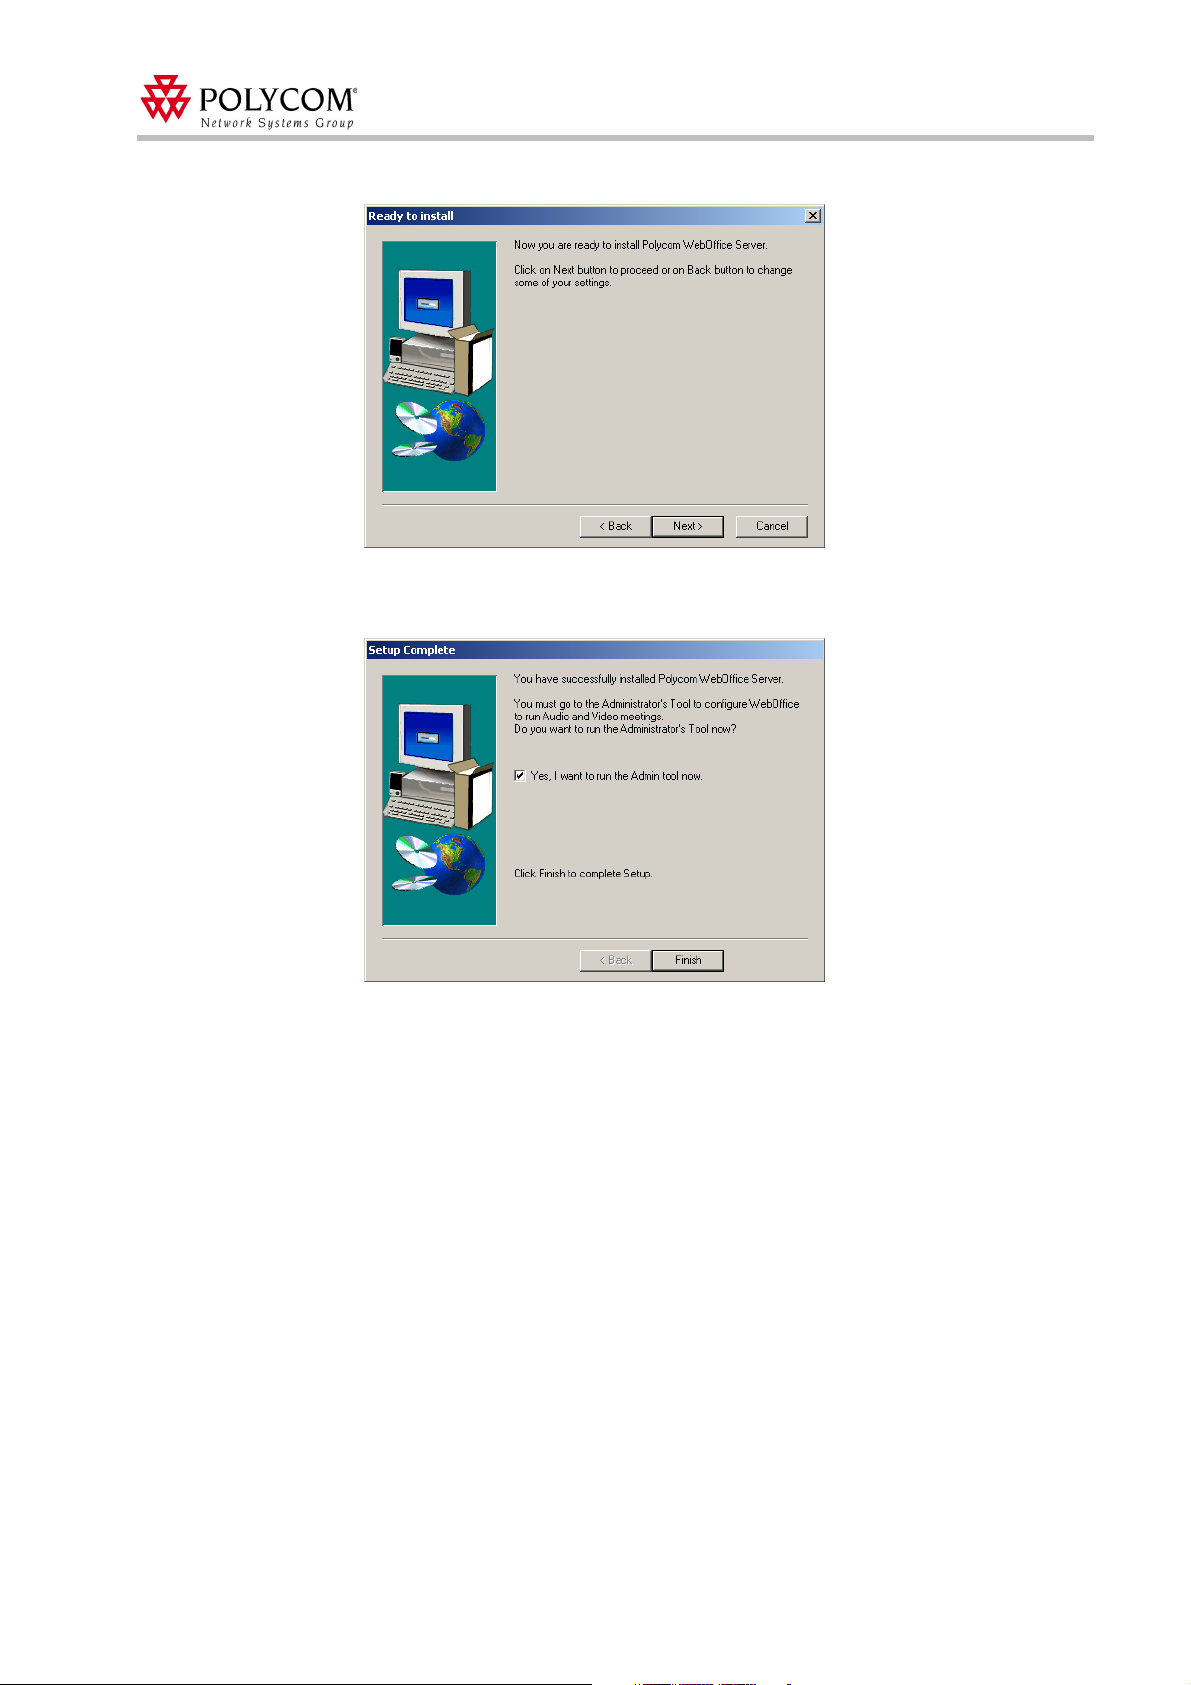
The Ready to Install window opens.
14. Click Next to install the Polycom WebOffice server.
When the installation is complete the Setup Complete window opens.
15. Click Finish to complete the installation process.
You must go to the Administrator's Tool to configure WebOffice to properly run audio
and video meetings. If you want to go directly the Administrator’s Tool, select the Ye s ,
I want to run the Admin tool now check box, and click Finish to complete the
installation process.
11
Page 16
Polycom Web
Office
Release Notes Version 7.0.1
Update an Existing 6.X Version
The following section describes how to update an existing 6.X version of WebOffice to
version 7.0.1.
To update an existing Polycom WebOffice software package:
1. Insert the CD into the CD drive.
2. From the Start menu, select Run.
3. Enter D:/Setup, where D is the CD drive name, and then click OK.
Installation Wizard
Follow the on screen instructions to complete the installation process.
1. The following Setup window opens, indicating that an older version of WebOffice
exists on your computer. Click Next to continue with the installation.
The Software License Agreement window opens.
2. Select I accept the agreement and click Next to accept and continue.
3. Click Next.
12
Page 17
Installing Polycom WebOffice server
The Settings window opens.
4. The check box I want my server to be accessed from both Internet and Local
Network is selected by default. This allows your WebOffice server act as both an
Intranet (internal to the resident LAN) and Internet server (default installation). If this
check box is cleared, the WebOffice server acts as an internal LAN server only.
The next Settings window opens.
5. If you have chosen to install the WebOffice server as an Internet server, you are
prompted to enter the URL. The URL follows the format www.polycom.com. This is a
typical URL structure, derived from the combination of the host and domain name.
Click Next to continue.
13
Page 18
Polycom Web
Office
Release Notes Version 7.0.1
The next Settings window opens.
6. The parameters are taken from the old installation and entered by default in the fields.
If you do not want to change the parameters, click Next to continue and proceed with
Step 11.
7. The default port is 80. If you need to use a different port for HTTP, type the port
number. Any port can be used assuming that no other process is using this port.
8. Enter the SMTP server address. This can be a URL or an IP number.
9. Enter the administrator password. Re-type your password for confirmation. This is the
username for controlling the WebOffice Instant Messaging Service from the Web. This
Web interface enables the server administrator to add, remove and administer offices
and users.
10. Select the target path for the installation and click Next to continue.
The next Settings window opens.
11. Select the MCU that will be used to run audio conferences; MGC VoicePlus, Voyant
OCI or None/Other. Click Next to continue.
14
This option can be changed by the Administrator in the Administrator’s Tool - Portal
Deployment.
Page 19
Installing Polycom WebOffice server
The next Settings window opens.
12. The parameters are taken from the old installation and entered by default in the fields.
If you do not want to change the parameters, click Next to continue and proceed with
Step 15.
13. Enter the WebOffice Administrator e-mail address. The administrator receives e-mail
from the server every time an office is created.
14. Enter the WebOffice Support e-mail address. This is the address that will receive
e-mails from users seeking support.
15. Enter the WebOffice Sender e-mail address. This is the e-mail address that is shown in
the Reply To line of sent e-mails. Click Next to continue.
The next Settings window opens.
16. To maintain your previous WebOffice customization, select I want to retain my
previous customization.
To install the default customization, select I want to install default customization
(default).
To restore a previously backed up customization, select I want to restore a previously
backed up customization, and browse to the directory where the customization is
saved.
17. Click Next to continue.
15
Page 20
Polycom Web
Office
Release Notes Version 7.0.1
The languages selection window opens.
18. Click Next to install the Polycom WebOffice server.
When the installation is complete the Setup Complete window opens.
16
19. Click Finish to complete the installation process.
20. You must go to the Administrator's Tool to configure WebOffice to properly run audio
and video meetings. If you want to go directly the Administrator’s Tool select the Yes ,
I want to run the Admin tool now check box, and click Finish to complete the
installation process.
The
Administrator's Tool
Admin site in your Web browser. The syntax is as follows:
http://<WebOffice_URL>/content/Admin
where <WebOffice_URL> is your organization’s Web
can be accessed at anytime by entering the address of the Web
Office
URL.
Office
Page 21
Installing Polycom WebOffice server
Uninstalling Polycom Web
During the installation process, uninstall files are placed in the WebOffice folder. These
files are used to aid the Windows operating system in uninstalling the application.
To uninstall the WebOffice Software package:
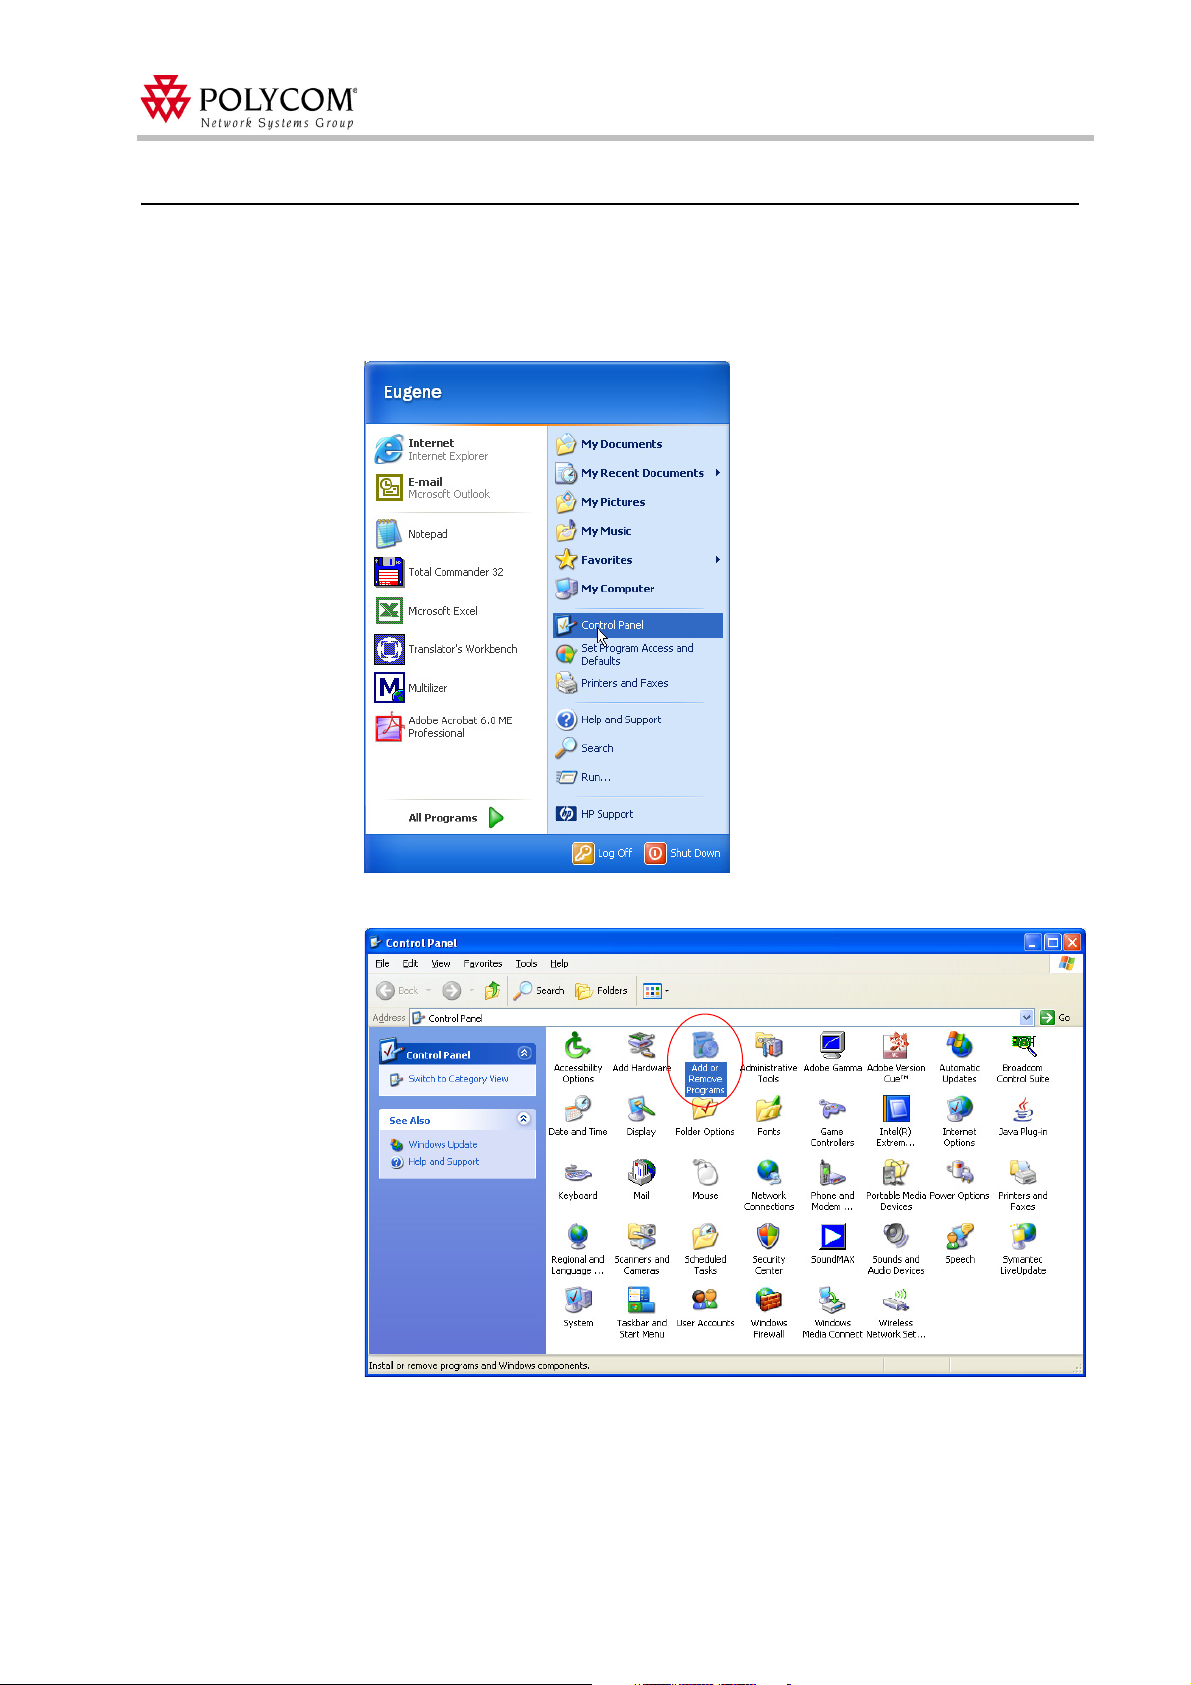
1. On the Start-Programs menu click Settings, and then click Control Panel.
Office
Server
The Control Panel window opens.
2. Click the Add/Remove Programs icon.
17
Page 22
Polycom Web
Office
Release Notes Version 7.0.1
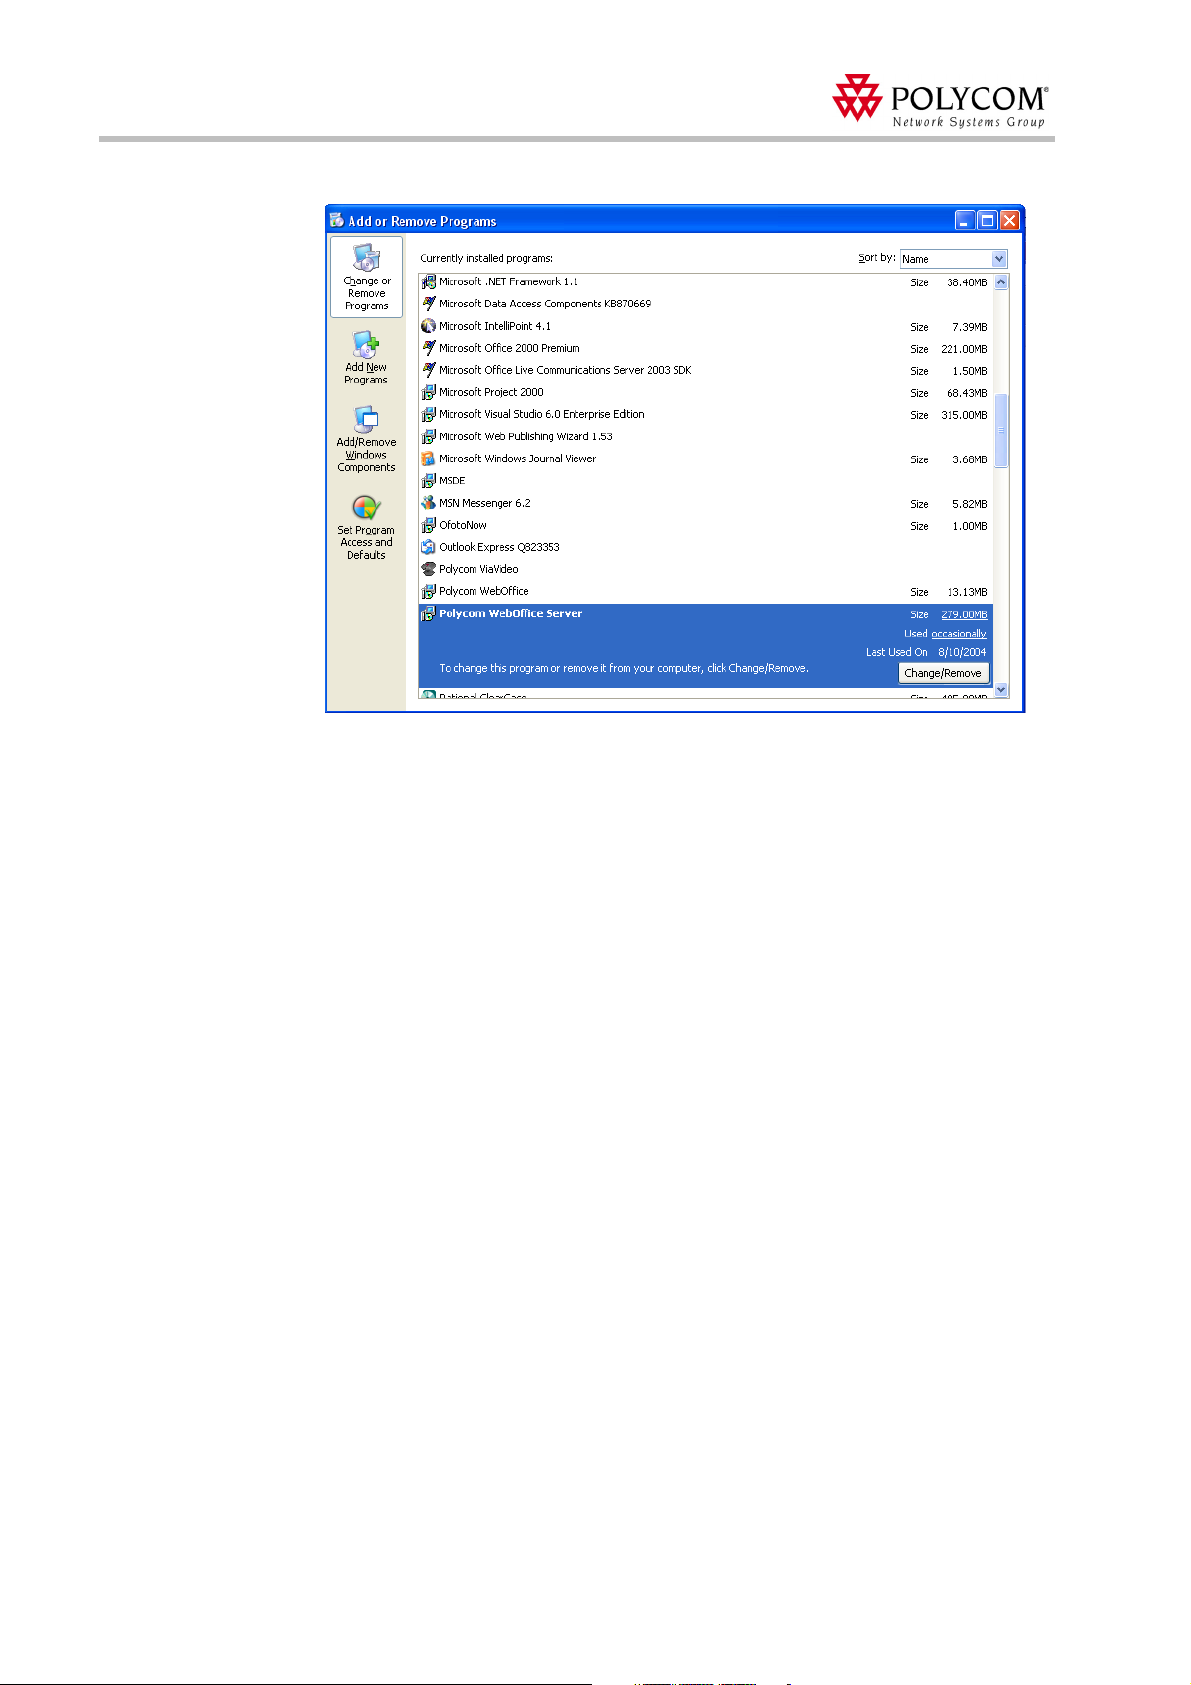
The Add/Remove Programs window opens.
3. Select Polycom WebOffice Server from the list of installed software, and click the
Change/Remove button.
4. The WebOffice software is uninstalled.
18
Page 23

Installing Polycom WebOffice server
Polycom Web
To upgrade your existing Polycom WebOffice Server license, (add more offices, etc.), you
must receive a new Serial Number and repeat the steps in “Activating WebOffice” on
page 4.
Office
License Upgrade
19
Page 24
Polycom Web
Office
Release Notes Version 7.0.1
Web
Web
Office
Office
and MGC Configuration
This section explains the MGC settings for WebOffice to work with MGC version 6.01.
MGC Settings
There are two WebOffice working modes with the MGC unit:
• Via WebCommander server
• Direct Management Mode
The working mode is defined by the WebOffice Administrator in the Administrator’s Tool.
If your MGC Unit is version 5.0 or lower, you cannot work in MCU Direct Management mode,
only in WebCommander mode.
When working in the Direct Management mode, when you launch an audio or video
conference running on the MGC unit, you have to configure WebOffice to work with the
MGC unit.
The MGC unit works with the WebOffice server as an external database application that is
used for personal recognition of all conference participants and their attached endpoints.
For certain Web
Mute/Unmute, the Web
Office
Web
work in MCU Direct Management mode without IVR Message Services, the Personal Layout,
Active Speaker and Mute/Unmute features will be disabled.
When an Audio or Video conference is started from WebOffice, the WebOffice server
generates a list of passwords for each conference participant. These passwords are sent
from the MGC unit to the WebOffice server for validation. (The password displayed in
MGC Manager conference properties is different than the password WebOffice displays in
the meeting.) The WebOffice server returns to the MGC unit permission to add the
participants to the conference, and also send their names to the MCU. These names are also
used in the MGC Manager/WebCommander applications to list the participants by their
names. The participants are then added to the conference along with their names.
A guest password is also generated when the conference is started. This password is
displayed to the conference organizer (WebOffice owner) and to all connected participants.
This password can be used by participants who are disconnected, and be given to guests to
manually dial-in to the conference. Participants using the manual password to connect to
the conference are identified as ‘guest’ (without a user name).
The process is as follows:
1. The WebOffice conference is started by the WebOffice client.
2. The WebOffice server automatically generates a list of passwords for all invited
buddies connecting to the conference.
Office
features to be enabled, such as Personal Layout, Active Speaker and
Office
server must work in MCU Direct Management mode, and the
server must serve as an external database application with the MGC unit. If you
20
3. The WebOffice server sends a request to the MGC unit to start a conference.
4. The MGC unit starts a conference and tells the WebOffice server the conference
number.
5. The WebOffice server sends the conference number and personal passwords to the
WebOffice clients connected to the conference.
Page 25

Web
Office
WebOffice and MGC Configuration
6. The WebOffice clients dial to the MCU and automatically enter the passwords.
7. The MGC unit sends back a list of passwords to the WebOffice server to identify the
connected participants.
and MGC Configuration
To enable the MGC unit to use WebOffice as the external database application for
authentication, the following operations must be performed:
1. Configure the WebOffice server to work in Direct Management mode, and to use IVR
Message Services. This is done by the WebOffice Administrator from the WebOffice
Administrator’s Tool.
2. Configure the MGC unit to use the external database application. For MGC version
6.0, you must set the appropriate flag in the system configuration file, configure an
XML file with details about the external database application (WebOffice server), and
send the file to the MCU.
For MGC versions 6.01 and higher, you must set the appropriate flags in the system
configuration file.
3. Configure the IVR Message Service used by the WebOffice server. The configurations
are performed using the MGC Manager.
21
Page 26

Polycom Web
Office
Release Notes Version 7.0.1
Configuring the Web
Configuring the WebOffice server to work in Direct Management mode, and to work with
IVR Message Services is done by the WebOffice Administrator from the WebOffice
Administrator’s Tool.
To configure the WebOffice server:
1. Open the WebOffice Administrator’s Tool.
2. In the Main Menu pane, click Video/Audio Parameters.
Office
Server
3. In the Select box, make sure MCU Direct Management is selected (this is the default
mode).
4. In the MCU’s List, click the Add button to add a new MCU.
22
Page 27
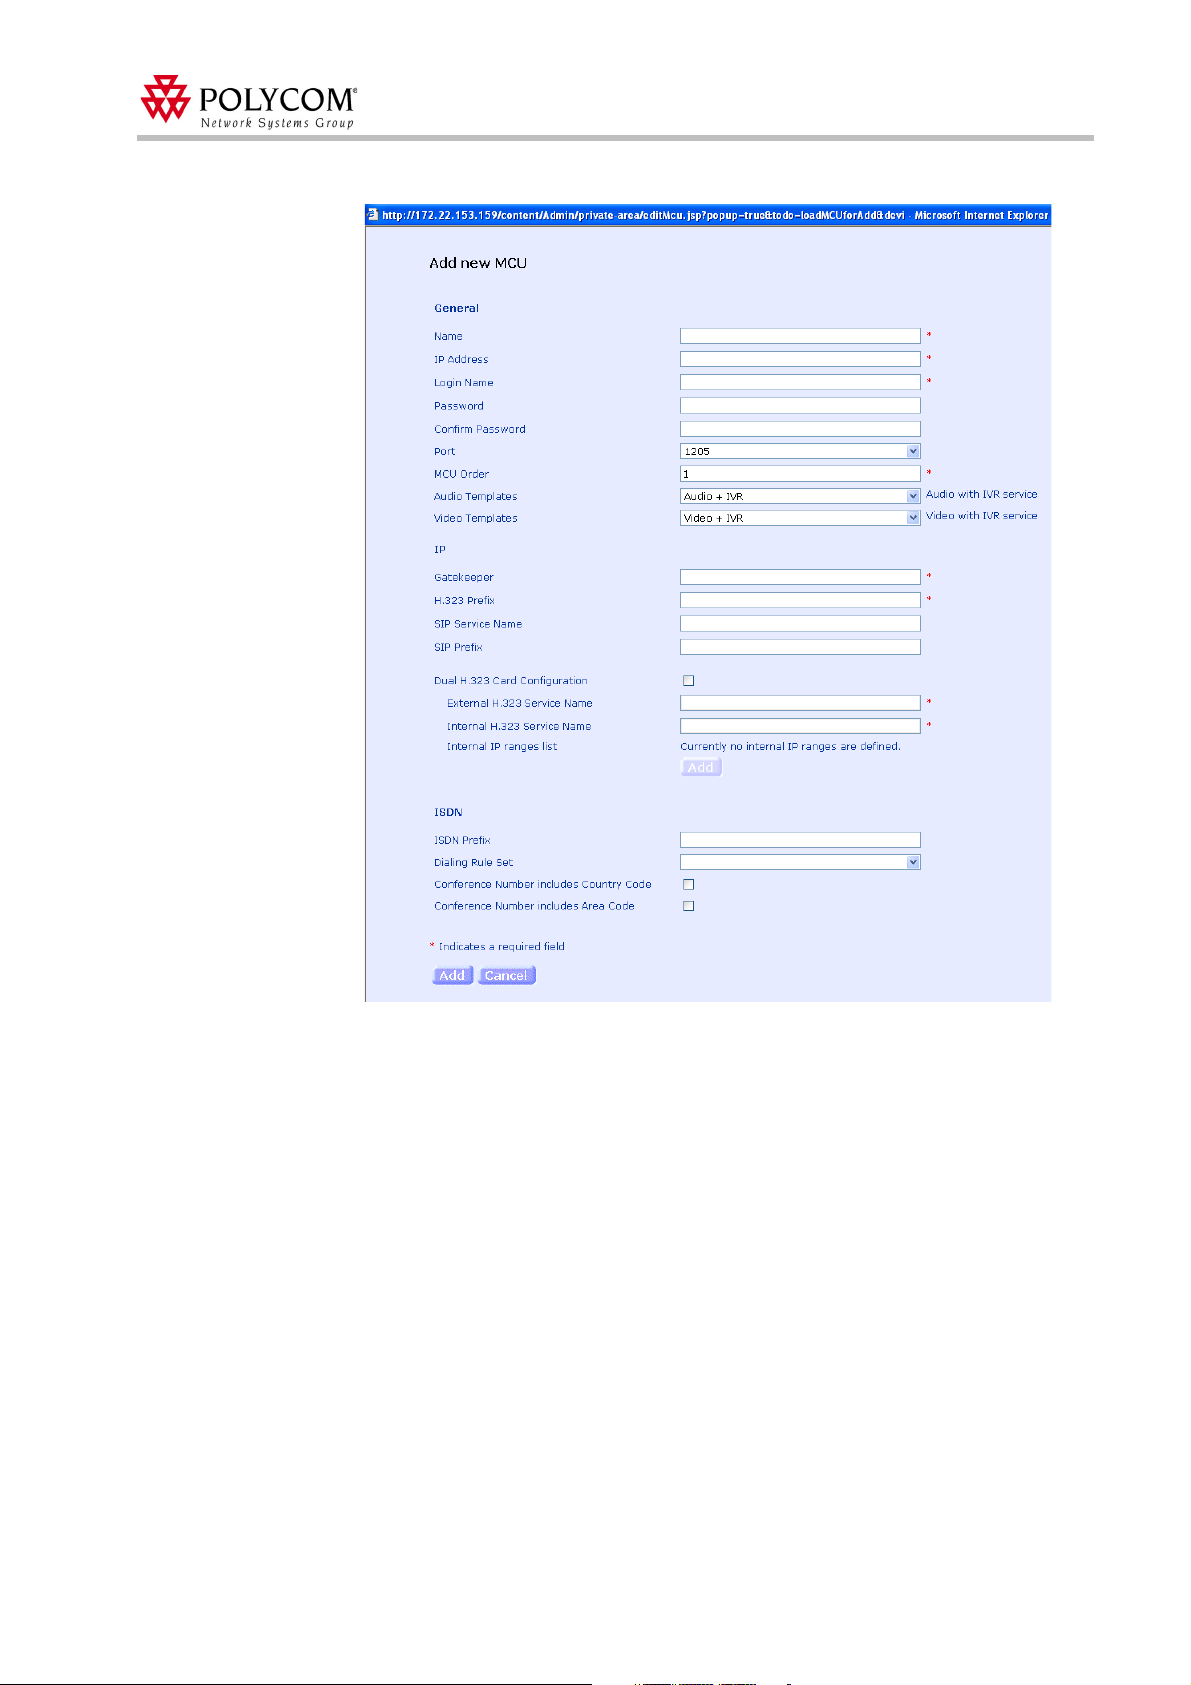
The Add New MCU dialog box opens.
WebOffice and MGC Configuration
23
Page 28
Polycom Web
Office
Release Notes Version 7.0.1
5. Define the following parameters:
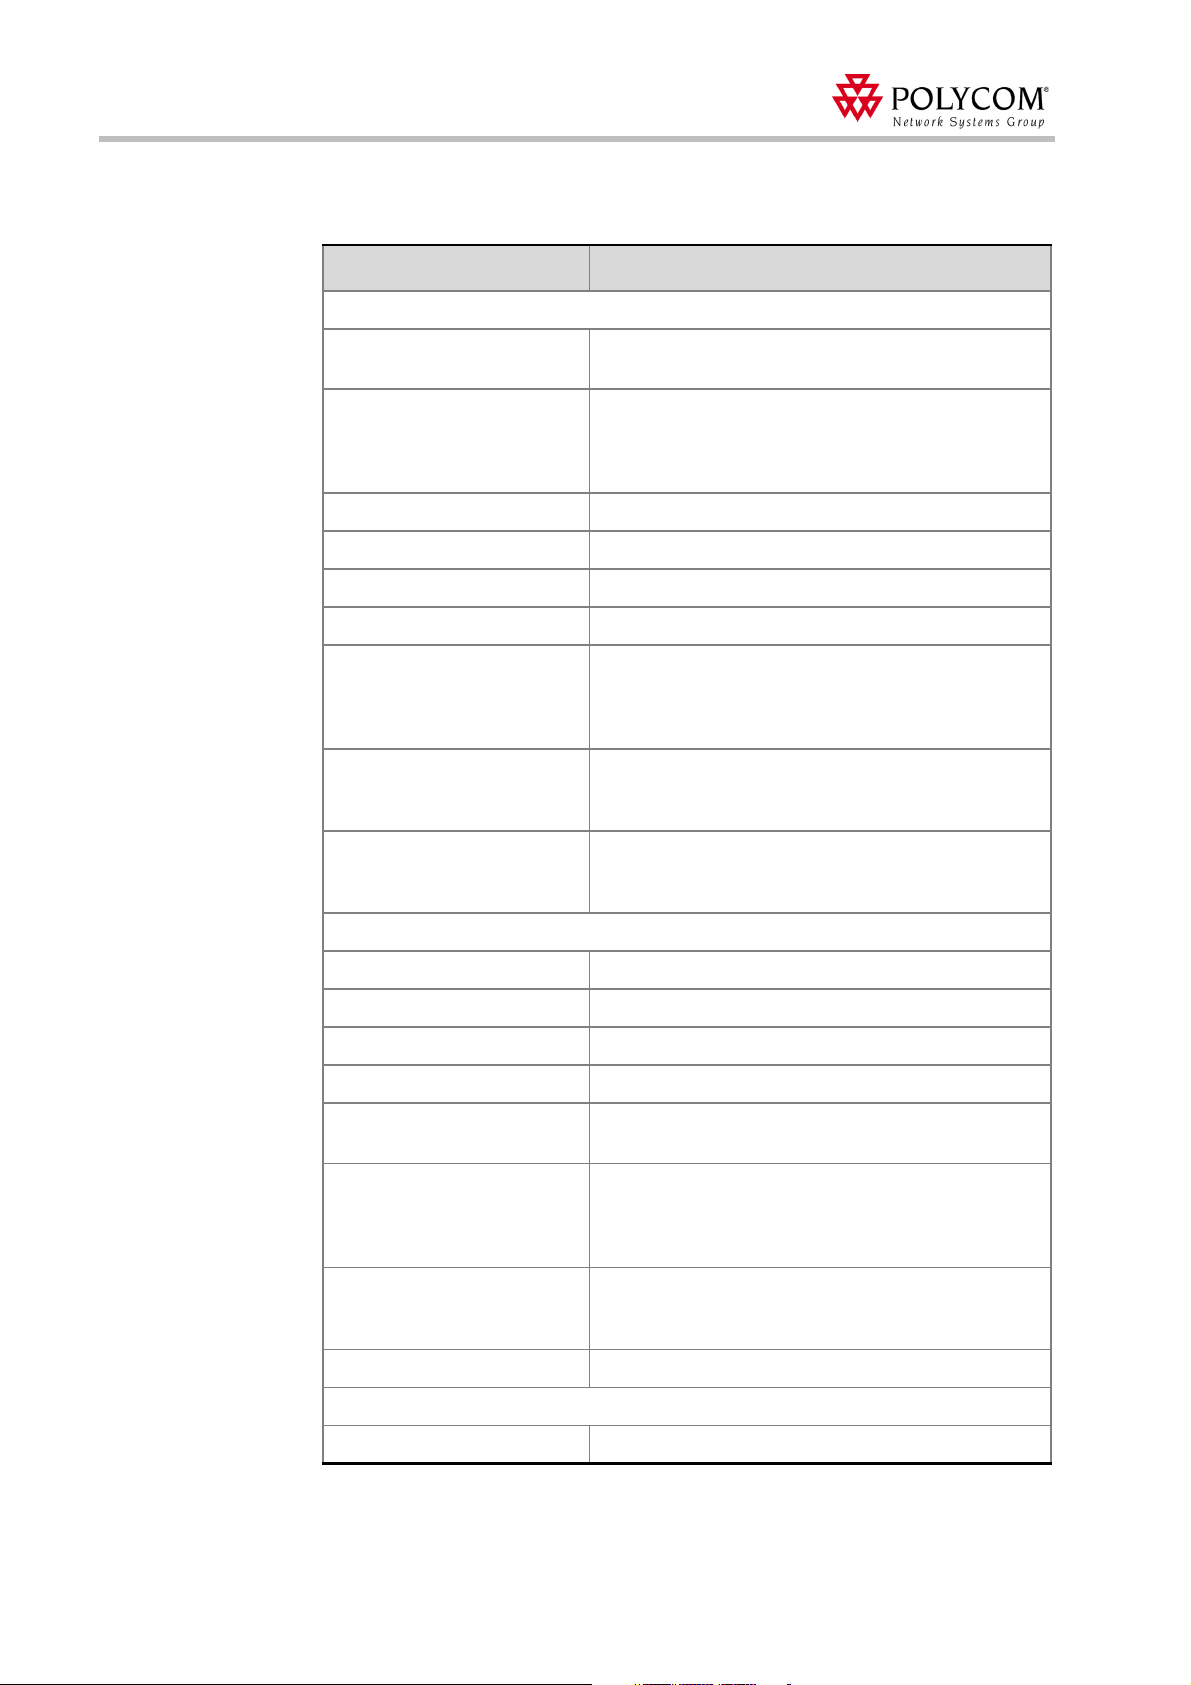
Table 1: Add New Device - MCU Field
Field Description
General
Name The name of the MCU. Specify a name that clearly
IP Address The IP address of the MCU. The IP address of the
Login Name The MCU login name. The default is Polycom.
Password The MCU password. The default is Polycom.
identifies the MCU.
MCU should be obtained from your network
administrator and should be identical to the one
configured in the MCU during the first entry settings.
Confirm Password Confirm the Web
Port The MCU port.
MCU Order This number indicates the order in which the MCU will
appear in the list. When MCU Hunting is set to Auto,
the system searches the MCU list for the first MCU that
has enough resources to run the conference.
Audio Templates Select the template that has been configured to work
with IVR Message Services. By default this is Audio +
IVR.
Video Templates Select the template that has been configured to work
with IVR Message Services. By default this is Video +
IVR.
IP
Gatekeeper The MCU Gatekeeper address.
H.323 Prefix The H.323 prefix for the MCU.
SIP Service Name The SIP service name (optional).
SIP Prefix Currently not relevant.
Dual H.323 Card
Configuration
Select this check box if there is more than one H.323
card
Office
password.
24
External H.323 Service Name Specify the external service name as seen in the MGC
Manager. This is relevant if you have more than one
H.323 card and one of them is external (using a valid
IP and pointing to the Internet or other network).
Internal H.323 Service Name Specify the internal service name as seen in the MGC
Manager. This is relevant if you have more than one
H.323 card and one of them is internal.
Internal IP ranges list The range of the IP within your network.
ISDN
ISDN Prefix The ISDN prefix for the MCU.
Page 29
WebOffice and MGC Configuration
Table 1: Add New Device - MCU Field
Field Description
Dialing Rule Set The Dialing Rule Set for ISDN calls. This is applicable
only if an ISDN prefix is specified.
Conference Number includes
country code
Conference Number includes
area code
Specifies if the conference number includes a prefix
with the country code. This is applicable only if an
ISDN prefix is specified in “ISDN Prefix” above.
Specifics if the conference number includes a prefix
with the area code. This is applicable only if an ISDN
prefix is specified in “ISDN Prefix” above.
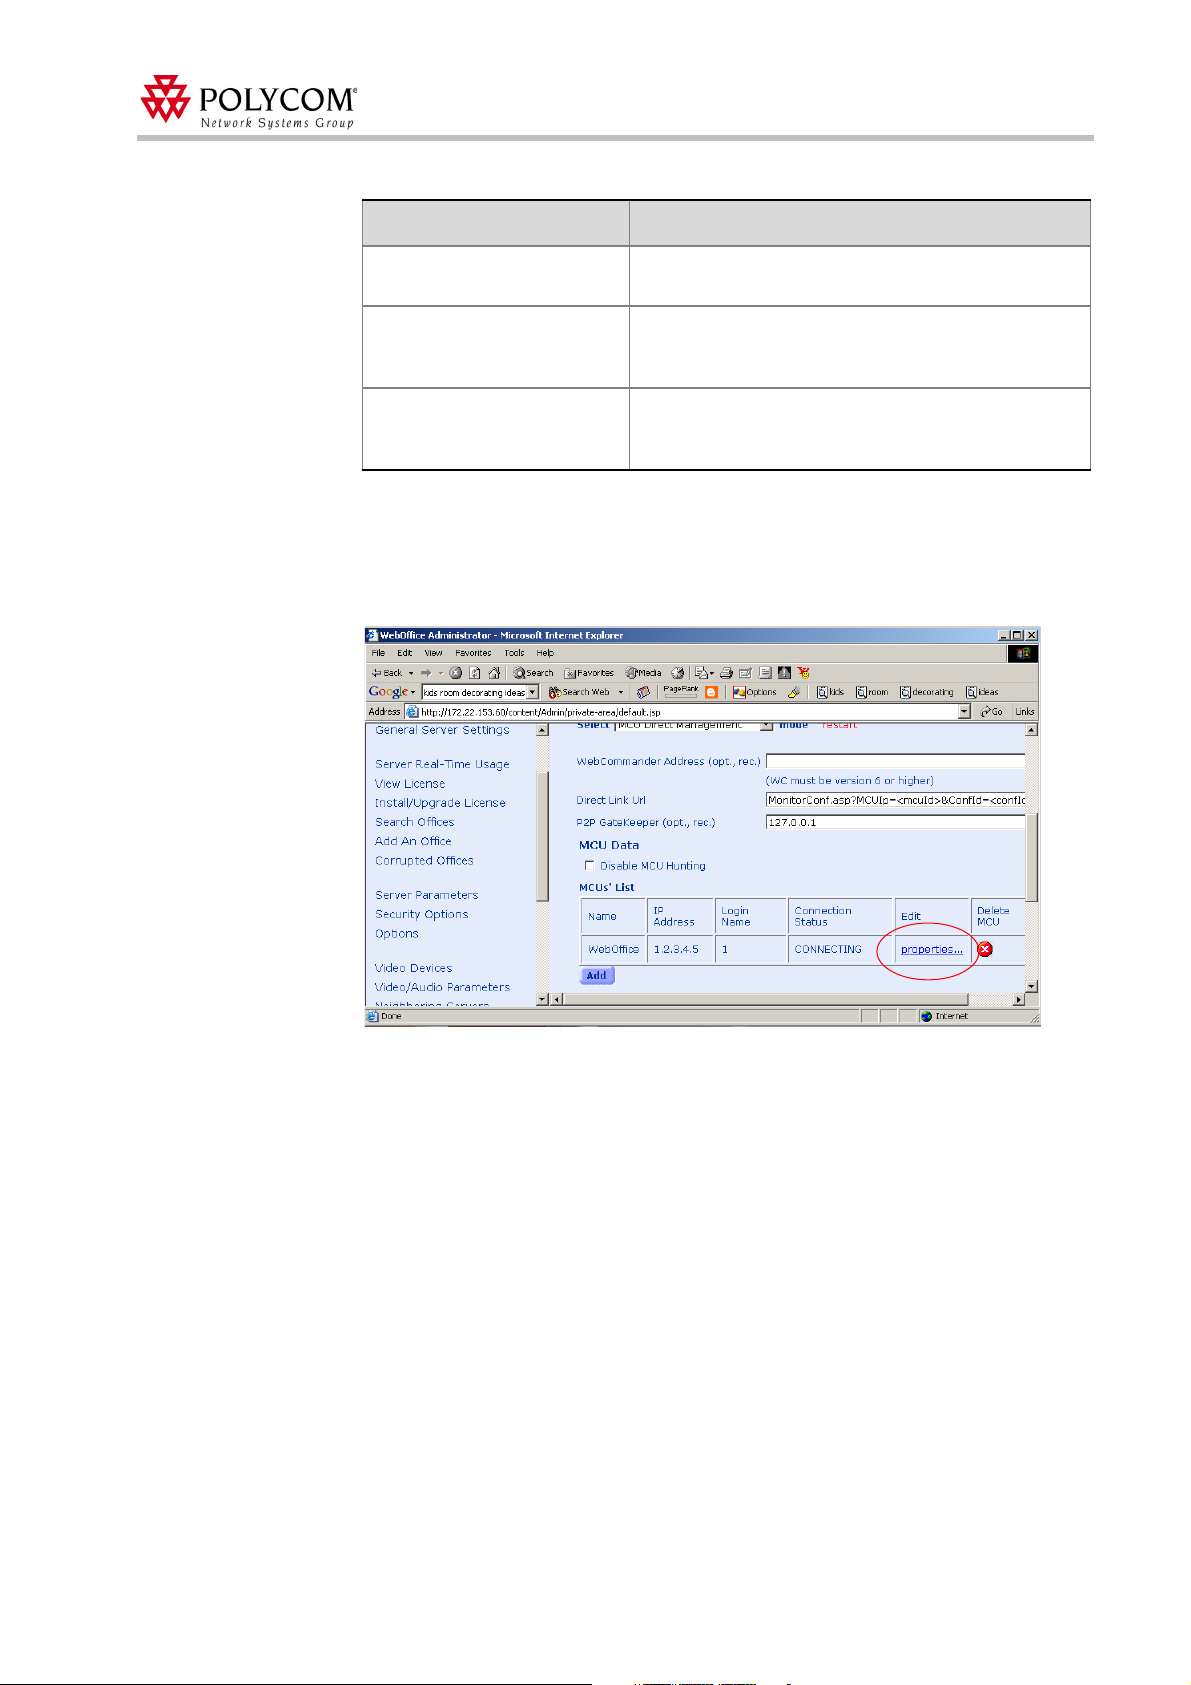
6. Click Add.
7. The MCU is added to the MCU’s List.
8. To update an existing MCU, click on the Properties link of the MCU to be used with
the WebOffice server.
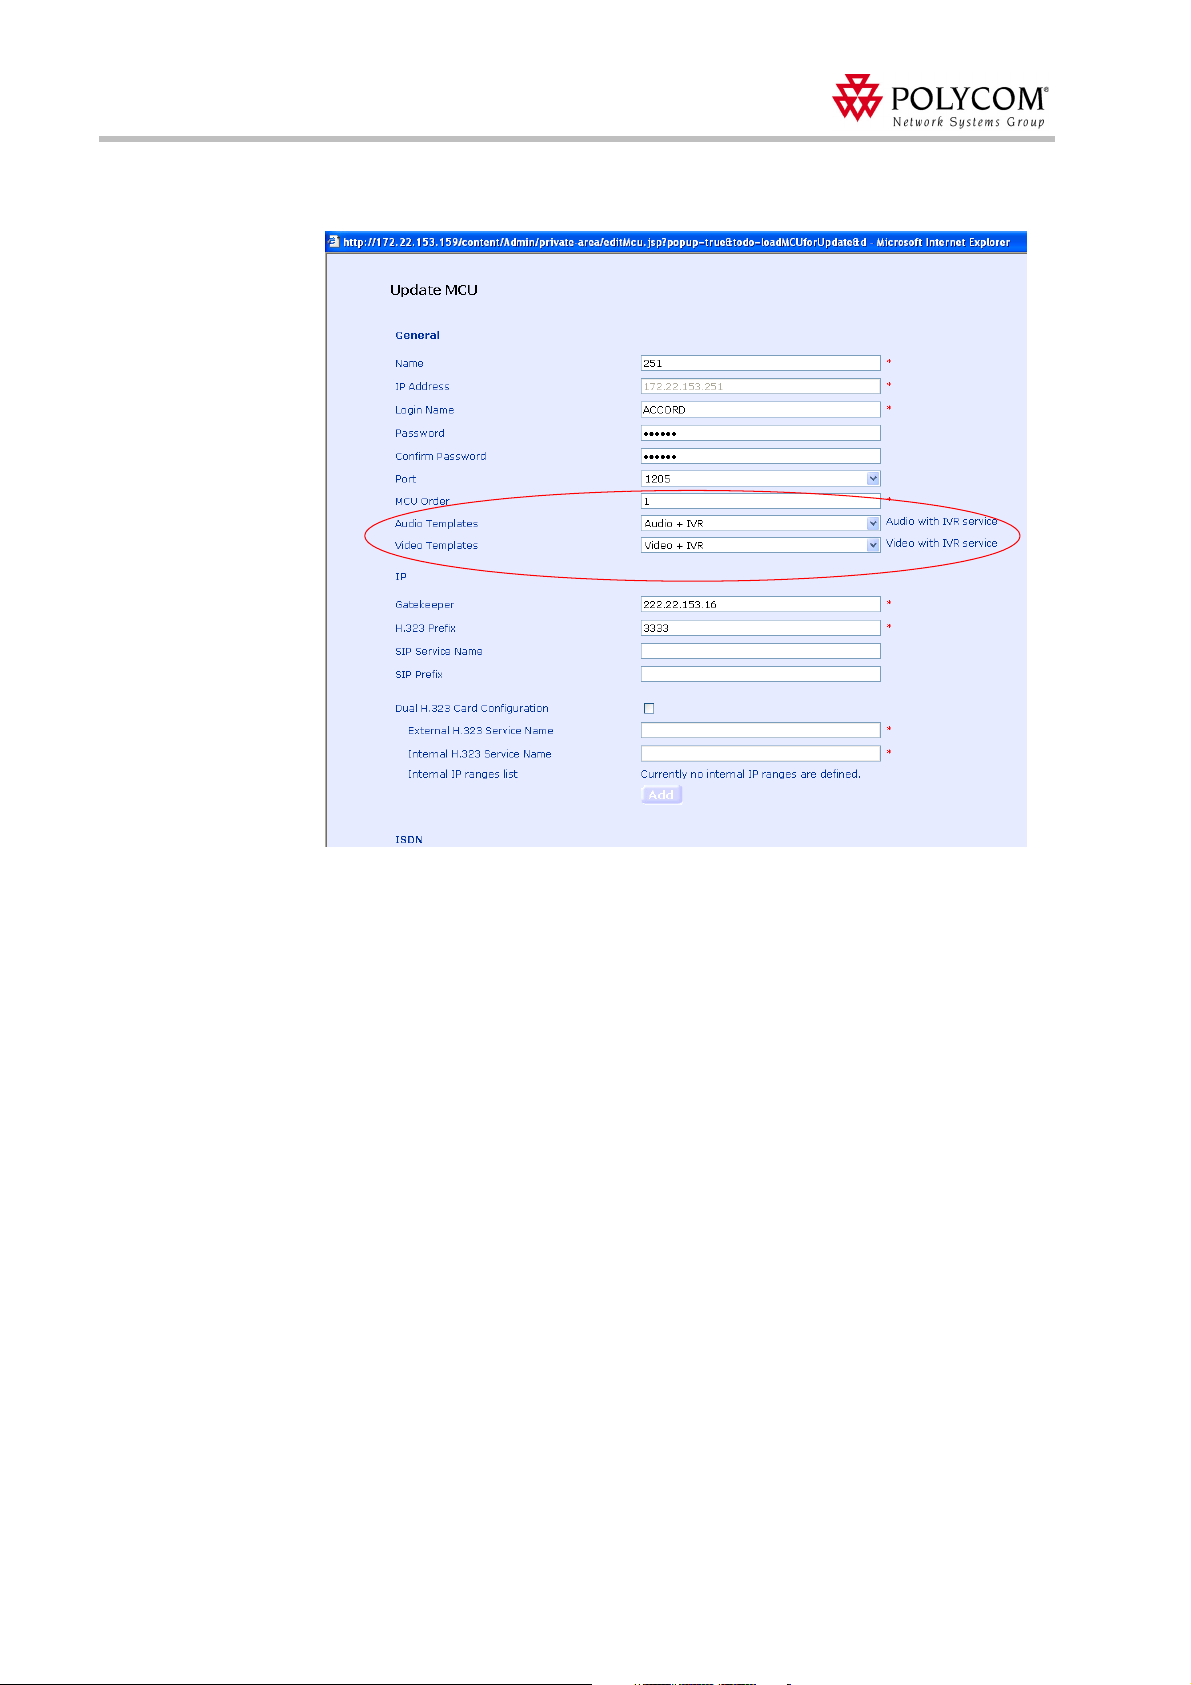
The Update MCU dialog box opens.
25
Page 30
Polycom Web
Office
Release Notes Version 7.0.1
9. Select the Audio and/or Video Template that has been configured to work with IVR Message Services. By default this is Audio + IVR and Video + IVR.
10. Click Update to save the settings.
26
Page 31

WebOffice and MGC Configuration
Configuring the MGC Unit to use an External Database Application for MGC Version 6.0
Configuring the MGC unit to use an external database application for Polycom MGC
version 6.0 consists of two procedures: setting a flag in the system configuration file, and
editing an XML configuration file and sending it to the MCU.
Setting the External Database Access Flag
You must configure the MCU to access an external database application for validation and
authentication. This is done in the file system configuration file (system.cfg).
To set the external database access flag in the system.cfg:
1. In the MGC Manager application, double-click the MCU icon. Alternatively,
right-click on the MCU icon, and the click Connect.
27
Page 32

Polycom Web
Office
Release Notes Version 7.0.1
2. Right click the MCU Utils icon, and then click Edit "system.cfg".
The SysConfig dialog box opens.
3. In the Section pane, double-click the GREET AND GUIDE/IVR option.
The GREET AND GUIDE/IVR flags are displayed in the Item=Value pane.
28
Page 33

WebOffice and MGC Configuration
4. In the Item=Value pane, click the ENABLE_EXTERNAL_DB_
ACCESS item.
5. In the Edit value text box, enter the value YES.
6. Click the Set value button to apply the new value to the system configuration file.
7. Click OK.
A confirmation dialog box opens.
8. Click Ye s to confirm.
Configuring the XML Configuration File
The External DB Tools folder in the MGC Manager software kit contains a file named
apserver.xml, which is used to define information related to the external database
application. The apserver.xml file must be edited and sent to the MCU.
The initial contents of the apserver.xml file are as follows:
<APPServer_Configuration_file>
<Servers_List>
<Server_Data>
<IP>172.22.133.41</IP>
<Port>5001</Port>
<Login>ACCORD</Login>
<Password>ACCORD</Password>
<Directory>McuIntegration</Directory>
<Server_Data>
</Servers_List>
</APPServer_Configuration_file>
29
Page 34

Polycom Web
Office
Release Notes Version 7.0.1
To configure the apserver.xml file and send it to the MCU:
1. Copy the apserver.xml file to your local disk.
2. Open the file in a text editor application.
3. Edit the values of the following elements:
Table 2: apserver.xml File Configuration
Element Description
IP The IP address of the external application server. Enter the IP
Port The port number used by the MCU to access the external
Login The user name defined in the external database application for the
Password The password associated with the user name defined for the MCU
address of the Web
application server. When working with the Web
port 5001 or 1205.
MCU. For the Web
ACCORD.
in the external database application. For the Web
the default password is: ACCORD.
Office
server.
Office
application, the default user name is:
Office
Office
server, use
application,
Directory The URL of the external database application. For the Web
server, this is McuIntergration.
Office
4. Save the new values and close the file.
5. Send the edited apserver.xml file to the MCU using the MGC Manager: In the MGC
Manager application, right-click the MCU icon, click MCU Utils and then click Send
File.
6. Reset the MCU.
30
Page 35

WebOffice and MGC Configuration
Configuring the MGC Unit to use an External Database Application for MGC Versions 6.01 and Higher
Several flags must be set in the system configuration file (system.cfg) to define information
related to the external database application when configuring the MGC unit to use an
external database application for Polycom MGC versions 6.01 and higher.
To set the external database flags in the system configuration file:
1. In the MGC Manager application, right-click on the MCU icon.
A pop-up menu opens.
2. Click the MCU Utils option, and then click Edit "system.cfg".
31
Page 36

Polycom Web
Office
Release Notes Version 7.0.1
The SysConfig dialog box opens.
3. In the Section pane, double-click the External DB option.
The External DB flags are displayed in the Item=Value pane.
4. In the Item=Value pane, click the ENABLE_EXTERNAL_DB_ACCESS item.
The item's value is placed in the Edit value text box.
32
5. In the Edit value text box, enter the value YES.
6. Click the Set value button.
7. Repeat steps 4 to 6 to set the values of the following flags:
Table 3: SysConfig.cfg Flag Configuration
Element Description
EXTERNAL_DB_IP The IP address of the external application server.
EXTERNAL_DB_PORT The port number used by the MCU to access the
external application server. The default is 5001.
EXTERNAL_DB_LOGIN The user name defined in the external database
application for the MCU. For the Web
application, the default user name is: ACCORD.
Office
Page 37

WebOffice and MGC Configuration
Table 3: SysConfig.cfg Flag Configuration
Element Description
EXTERNAL_DB_PASSWORD The password associated with the user name defined
for the MCU in the external database application. For
the Web
ACCORD.
EXTERNAL_DB_DIRECTORY The URL of the external database application. For the
sample script application, the URL is: McuIntegration.
Office
application, the default password is:
8. Click OK.
9. Open the SysConfig dialog box again.
10. In the Section pane, double-click the GREET AND GUIDE\IVR option.
The flags are displayed in the Item=Value pane.
11. In the Item=Value pane, click the QUICK_LOG_IN_VIA_ENTRY_QUEUE item.
33
Page 38

Polycom Web
Office
Release Notes Version 7.0.1
The item's value is placed in the Edit value text box.
12. In the Edit value text box, enter the value NO.
13. Click the Set value button.
14. Click OK.
For more details on the QUICK_LOG_IN_VIA_ENTRY_QUEUE flag, refer to the
Manager Release Notes, Version 6.01
.
MGC
34
Page 39

WebOffice and MGC Configuration
Configuring IVR Message Services to Verify Participant Passwords
IVR Message Services must now be configured to work with the external database. This is
done from the MGC Manager. Following are instructions for configuring IVR Message
Services to verify conference passwords with an external database application.
To define a new IVR Message Service:
1. Connect to the MGC unit (MCU).
2. Expand the MCU tree.
3. Expand the MCU Configuration tree.
4. Right-click the IVR Services icon, and then click New IVR Service.
The IVR-Global dialog box opens.
This dialog box enables you to define the general parameters of the IVR Service.
35
Page 40

Polycom Web
Office
Release Notes Version 7.0.1
5. Define the following parameters:
Table 4: IVR - Global Parameters
Option Description
IVR Service Name
Language for IVR
External Server
Authentication
Number of User
Input Retries
Timeout for User
Input
DTMF Delimiter
6. Click Next.
Enter the name of the IVR Message Service.
Select the language in which the Audio Messages and prompts will
be heard. The languages are defined in the
box. For more details, refer to the
Volume II, Chapter 2
Select Always. The MCU must work with an external database
application to validate a participant’s rights in the conference. The
external database contains a list of participants (users), with their
assigned parameters. The password entered by the participant is
compared against the database. If the system finds a match, the
participant is validated.
Enter the number of times the participant is able to respond to
each menu prompt before the participant is disconnected from the
MCU or waits for the operator’s assistance.
Enter the duration, in seconds, that the system waits for input from
the participant before it is considered as an input error.
The interaction between the caller and the system is done via
touch-tone signals (DTMF codes). Enter the key that will be used
to indicate a DTMF command sent by the participant or the
conference chairperson. Possible keys are the pound key (#) or
star (*).
.
MGC Manager User’s Guide,
IVR Properties
dialog
The Welcome Message dialog box opens.
36
Page 41

WebOffice and MGC Configuration
7. Select the Enable Welcome Message check box to define the system behavior when the
participant enters the conference IVR queue. You can select whether to play a general
Welcome message, a conference-specific message or wait for the operator’s assistance.
Table 5: Welcome Message Parameters
Option Description
General Welcome
Message
Enable Conference
Welcome Message
On Hold for Operator
Assistance
Select None if no general message is to be played or if you
want only the conference specific message to be played.
Select the message to be played when the participant first
connects to the conferencing service and enters the conference
IVR queue. The list includes all the audio files that were
downloaded to the MGC unit’s memory for this Message type.
If you have not downloaded the audio files prior to the definition
of the IVR Service, click the Add Message File button to
download the audio file now.
Select this check box to enable a conference-specific message.
Select the message the participant will hear when connecting to
the conference. The list includes all the audio files that were
downloaded to the MGC unit’s memory for this Message type.
If you have not downloaded the audio files prior to the definition
of the IVR Service, click the Add Message File button to
download the audio file now. For more details, see step 7 of this
procedure.
Clear this check box when working with the Web
and conferences.
Office
server
8. To download an audio file for a specific message, click the Add Message File button
next to the message type.
The Install File dialog box opens.
a. Click the Browse button to select the audio file (*.aca) to download.
The Select Source File dialog box opens.
b. Select the appropriate audio file of type *.aca using the standard Windows
conventions, and then click the Open button.
37
Page 42

Polycom Web
Office
Release Notes Version 7.0.1
The name of the selected file appears in the Install field in the Install File dialog
box.
c. In the Install File dialog box, click Ye s to download the file to the MCU memory.
The Done dialog box opens.
d. Click OK to confirm and return to the IVR Properties dialog box.
The new audio file can now be selected from the list of audio messages.
9. Click Next.
The Conference Chairperson dialog box opens.
10. Select the Enable Chairperson Messages check box to enable a participant to connect
to the conference as a chairperson and play the appropriate messages while the
participant waits in the conference IVR queue. (This is optional.)
11. Select the various audio messages and prompts that will enable the participant to
identify himself/herself as a chairperson:
Table 6: Conference Chairperson parameters
Option Description
Chairperson Identifier
Request
Request Chairperson
Password
Chairperson Password
Failure Message
Chairperson Identifier
Key
Use Chairperson
Password as
Conference Password
Select the audio file requesting the participant to enter the key
that identifies himself/herself as the conference chairperson.
Select the audio file prompting the participant for the
Chairperson password.
Select the audio file requesting the participant to re-enter the
Chairperson password if the participant failed to enter it correctly.
Enter the key that will be used to identify the participant as a
chairperson. Possible keys are: pound key (#) or star (*).
Select this check box to enable the chairperson to connect to the
conference as chairperson by entering only his/her chairperson
password instead of entering two passwords: the conference
entry password and the chairperson password.
Note: The chairperson password must be different from the
conference entry password.
38
Billing Code
Select this check box to enable the chairperson to enter a code
for billing purposes.
Page 43

WebOffice and MGC Configuration
Click the Add Message File button to download the appropriate audio file to the MGC unit’s
memory if the files were not downloaded prior to the definition of the IVR Service, or if you want
to add new audio files to the MGC unit’s memory. For more details, see step 8 on page 37.
12. Click Next.
The Conference Password dialog box opens.
13. Select the Enable Password Message check box. This requests the conference
password before moving the participant from the conference IVR queue to the
conference.
14. Select Request password for dial-in and dial-out participants. The system requests the
participant to enter the conference password, and after the correct conference
password is provided, moves the participant to the conference.
15. Select the various audio messages that will be played:
Table 7: Conference Password parameters
Option Description
Request Password
Retry Password
Request digit
Click the Add Message File button to download the appropriate audio file to the MGC unit’s
memory if the files were not downloaded prior to the definition of the IVR Service or if you want
to add new audio files to the MGC unit’s memory. For more details, see step 8 on page 37.
Select the audio file that prompts the participant for the
conference password/PIN Code. This field is mandatory.
Select the audio file that requests the participant to enter the
conference password/PIN Code again when failing to enter the
correct password/PIN Code.
Select the audio file that prompts the participant to press any key.
Select it for dial out.
16. Click Next.
39
Page 44

Polycom Web
Office
Release Notes Version 7.0.1
The General dialog box opens.
The General dialog box lists additional audio messages and prompts that may be
played before joining the conference or during the conference.
The following messages and prompts can be enabled:
Table 8: General Voice Messages
Message Type Description
Lock On
Lock Off
Billing Number
Secure On
Secure Off
First to Join the
Conference
Conference Locked
Indicates that the conference is now locked to dial-in participants.
This message is played to all the conference participants.
Indicates that the conference is now unlocked to dial-in
participants. This message is played to all the conference
participants.
A message requesting the participant to enter a code for billing
purposes.
Indicates that the conference status has changed to secure
conference. This message is played to the conference when the
chairperson secures the conference and it cannot be entered by
any additional participant or the system administrator/operator. In
this mode, the operator cannot monitor the participants and can
only terminate the conference. The conference may be secured
and unsecured by the chairperson via DTMF commands.
Indicates that the conference status has changed from secure
conference to normal. This message is played to the conference
when the chairperson cancelled the secured mode and the
conference returned to its normal state.
This message is played when the participant is the first person to
join the conference (to clarify the silence).
Indicates that a conference is locked. This message is played to
a participant who wants to join a locked conference, informing the
participant that currently he/ she cannot join the conference.
40
Mute All On
Indicates that all participants are muted. This message is played
to the conference to inform all participants that they are muted
(with the exception of the conference speaker).
Page 45

Table 8: General Voice Messages
Message Type Description
WebOffice and MGC Configuration
Mute All Off
End Time Alert
Self Mute
Self Unmute
Chairperson Help
Menu 1
Indicates that all participants are unmuted. This message is
played to the conference to inform all participants that they are
unmuted (and that the Mute All Except Me mode was cancelled).
Indicates that a conference is about to end. This message is only
played when the conference is about to end and it cannot be
extended.
A confirmation message that is played when the participant
requests to mute his/her line.
A confirmation message that is played when the participant
requests to unmute his/her line.
A help menu which is played upon a request from the
chairperson. It lists the operations that can be performed by the
chairperson and their respective DTMF Codes to participants
requesting it. The playback can be stopped any time.
The voice message that can be recorded for one Help file is
limited to 30 seconds. You can have two audio files played one
after the other as a single menu. The grouping of two Audio files
into one help menu can be done for the Chairperson Help menu
(and also for the Participant Help menu).
If you configure two help menu messages, these two messages
are heard in sequence as one menu.
This is the first file that will be played.
Note: If you intend to modify the default DTMF codes, the default
voice message files for the help menus that are shipped with the
system will have to be replaced with new recordings that list the
new DTMF codes. The help menus are usually recorded by the
conferencing service provider as voice messages and are
configured like any other voice message in the system.
Chairperson Help
Menu 2
Participant Help
Menu 1
Participant Help
Menu 2
Invite Help Menu
Voting Help Menu
The audio file containing additional DTMF codes that can be
used by the chairperson when two help menu messages are
recorded for the chairperson operation. This file will be played
after the file assigned to the Chairperson Help Menu 1.
The audio file listing DTMF codes that can be used by the
ordinary participant.
The voice message that can be recorded for one Help file is
limited to 30 seconds. To overcome this limitation you can have
two audio files played one after the other as a single menu.
This is the first file that will be played.
The audio file listing additional DTMF codes that can be used by
the ordinary participant when two help menu messages are
recorded for the participant operation.
This file will be played after the file assigned to the Participant
Help Menu 1.
The audio file listing DTMF codes available to the participant/
chairperson during the Invite session.
The audio file listing DTMF codes available to the participant/
chairperson who controls the voting session (depending on the
configuration in the DTMF codes dialog box).
41
Page 46

Polycom Web
Office
Release Notes Version 7.0.1
Table 8: General Voice Messages
Message Type Description
Maximum
Participants
Exceeded
A message indicating that the participant cannot join the
destination conference as the maximum number of allowed
participants will be exceeded.
17. To assign the appropriate audio file (if one was downloaded) to the message type, click
appropriate table entry.
The Message Type appears at the bottom of the table and the drop-down list of
message files is enabled.
Click the Add Message File button to download the appropriate audio file to the MGC unit’s
memory if the files were not downloaded prior to the definition of the IVR Service or if you want
to add new audio files to the MGC unit’s memory. For more details, see step 8 on page 37
18. Select the appropriate audio file.
19. Repeat steps 16 and 17 to select the audio files for all the messages to be played during
the conference. Message types to which no audio file is assigned will not be played
during the conference.
20. Click Next.
The Operator Assistance dialog box opens.
42
21. Make sure that the Enable Operator Assistance check box is cleared as the
WebOffice conference is unattended and no operator is available for assistance (unless
configured differently).
22. Click Next.
Page 47

The Roll Call dialog box opens.
23. Make sure the Enable Roll Call check box is cleared.
24. Click Next.
The Video Services dialog box opens.
WebOffice and MGC Configuration
25. Click the Enable Video Services check box to define a video IVR Service, and enable
the Click&View application.
26. Define the following parameters:
Table 9: Video Services
Video Services Description
Click&View
Select the Click&View check box to enable endpoints to run the
application. Click & View requires the Audio+ and Video+ cards for
operation and endpoints have to be DTMF enabled.
43
Page 48

Polycom Web
Office
Release Notes Version 7.0.1
Table 9: Video Services
Video Services Description
Video Welcome
Slide
The Video Welcome Slide appears when an endpoint connects to
a conference.
Select the Video Slide file to be displayed when the participant
connects to the conference.
Select None if no Video slide is to be displayed.
If the video slide file was not downloaded to the MCU prior to the
IVR Service definition, click the Add Slide button. The
dialog box opens. The downloading process the similar to the
downloading of audio files. For more details, see step 8 on
page 37.
Notes:
• The Video Welcome Slide files can be downloaded to the
• Only an H.320 video participant will see the slide when entering
27. Click Next.
The DTMF Codes dialog box opens.
MCU. These slides must be prepared in advance.
a conference.
Install File
44
The participant interacts with the system while in the conference IVR queue or during
the conference using touch-tone signals (DTMF codes) that are entered by pressing the
appropriate key on the telephone/endpoint’s remote control.
This dialog box lists the default DTMF codes to the various functions that can be
performed during the conference by all the conference participants or only by the
conference chairperson. Usually a combination of signals activates a function. For
example, entering *70 activates the Lock Conference feature.
28. To modify the DTMF code assigned to a function, in the Name field, click the function
whose code you wish to modify.
Page 49

WebOffice and MGC Configuration
The appropriate DTMF code appears at the bottom of the list.
29. In the DTMF Code (left) field, enter the new code.
30. In the Permission (right) field, select whether this function may be used by all the
conference participants or only the chairperson.
31. Click Finish to complete the IVR Service definition.
The new IVR Message Service is added to the IVR Services list.
The number of IVR Services defined for a single MGC unit may not exceed 30 Services.
45
Page 50

Polycom Web
Office
Release Notes Version 7.0.1
Version 7.0.1 - New Features List
The following table details the new features available in WebOffice Version 7.0.1.
Table 10: Version 7.0.1 New Features List
Feature Description
General Features
WebOffice Video Plug-in
The Web
variety of third party Web cameras to send and receive video steam,
in addition to previously supported Polycom video endpoints in
Web
endpoint can receive the video stream of a Web
Office
Office
. Additionally Web
Video Plug-in allows Web
Office
users who do not have a video
Office
users to use a broad
Office
conference.
Windows Messenger Integration
Web
Office
is available for integration with Microsoft Windows
Messenger (Windows Messenger Integration mode), extending
Windows Messenger’s capabilities to include Polycom’s multipoint
Office
audio and video conferencing. Web
Windows Messenger and users can invite participants and start a
multipoint conference directly from their instant messaging session
with a click of the mouse.
works seamlessly with
Direct Video Call
Direct Video Call enables Web
point-to-point directly with other Web
Office
start a Web
not have a video endpoint can receive the video stream of a from
other non-Web
conference. Additionally Web
Office
users.
Office
users to communicate
Office
users without having to
Office
users who do
Dial Out
Web
Office
owners can select the dialing mode for their conference
participants - dial-in or dial-out. Dial-out participants can join audio
and/or video multipoint conferences with all endpoint types (both
Polycom and non-Polycom) and will automatically connect to the
Office
conference. Conferences can include both Web
non-Web
Office
users.
and
46
Office
Web
Features
Manager
WebOffice Language Selection
All Web
Chinese Simplified, Chinese Traditional, Japanese and Korean.
Office
components are available in English, German, French,
Polycom WebOffice Licensing
Web
Office
can be registered from the Polycom Web site.
Selecting the Call Type: IP or ISDN
Web
Office
users attached to a group endpoint can select their
preferred call type for the conference endpoint: IP (H.323) or ISDN
(H.320).
Conference Organizer
The Conference Organizer enables Web
dial-in or dial-out to conference participants. Participant’s connection
dialing mode can be changed and you can review the conference
details in a structured manner from one window.
Office
users to manually
Page 51

Version 7.0.1 - WebOffice General Features
Version 7.0.1 - Web
Web
Office
Video Plug-in
The WebOffice Video Plug-in allows WebOffice users to use a broad variety of third party
Web cameras in addition to supported Polycom video endpoints.
When the WebOffice Video Plug-in is installed, third party Web cameras are fully
supported in WebOffice video conferences. In addition, the WebOffice Video Plug-in
enables WebOffice users who do not have a video endpoint to receive the video stream of a
WebOffice video conference or of a direct video call in real-time.
Video-stream in
Office
a Web
conference
Office
General Features
Users who have the Web
Office
non-Web
see “Direct Video Call” on page 70.
Users with supported Polycom video endpoints can also download the Web
to enable them to use a Web camera interchangeably with their Polycom endpoint. However
this is not advisable if you are a current ViaVideo user as the ViaVideo software interface is
completely removed when the Web
able to use the ViaVideo application independently).
The following desktop endpoints are supported with WebOffice Video Plug-In:
• Creative NX Pro
• Creative Pro EX
• Dual Mode Camera 8006
• K2 - USB2
• Logitech Notebook Pro
users via the direct call table in their Web
Office
Video Plug-in installed can also initiate and receive calls with
Office
Manager. For more information,
Office
Office
Video Plug-in software is installed (you will not be
Video Plug-in
47
Page 52

Polycom Web
Office
Release Notes Version 7.0.1
Requirements
Following are the minimum system requirements to install and run the WebOffice Vide o Plug-in software:
• Pentium 3, 1 Ghz
• Windows XP with Service Pack 1
• DirectX 9.0b
Downloading the Web
When a WebOffice user joins a video conference, the system automatically checks to see if
the user has a supported Polycom video endpoint attached. If not, they are given the
opportunity to download the WebOffice Video Plug-in software. The WebOffice Vi deo
Plug-in is installed as a standalone software, and is completely compatible with all
WebOffice environments.
The WebOffice Video Plug-in software is for use with WebOffice only, and does not include
its own user interface. No license is required. The WebOffice Video Plug-in software
supports third party Web cameras and the ability to receive and view video stream if you do
not have a video endpoint.
The WebOffice Video Plug-in software can be downloaded at any time directly from the
WebOffice Web site, or the user is offered the option to download the software when
joining a WebOffice meeting without a supported Polycom video endpoint.
To download the WebOffice Video Plug-in software from the WebOffice Web site:
1. Enter the address of the WebOffice Web site. The address is provided by your system
administrator.
The WebOffice Lobby page opens.
Office
Video Plug-In Software
48
2. Click Get Help on the toolbar.
Page 53

The Office Help page opens.
3. Click the Utilities link.
The Utilities Web page opens.
Version 7.0.1 - WebOffice General Features
4. Click the Download button next to WebOffice Video Plug-In.
49
Page 54

Polycom Web
Office
Release Notes Version 7.0.1
The Download page opens.
5. Click the Download link to start the download.
6. Click Save to save the downloaded file on your computer for installation.
7. When the download is complete, double-click the .exe file.
8. Logout of your WebOffice and re-login.
To download the WebOffice Video Plug-in software when joining a WebOffice conference:
1. Join or start a video conference in WebOffice.
2. The system automatically checks to see if the user has a supported video endpoint attached. If not, they are offered to download the WebOffice Video Plug-in software. In such a case the following message appears:
3. Click Ye s to open the WebOffice Video Plug-in download web page.
50
Page 55

Version 7.0.1 - WebOffice General Features
The Download Software Web page opens.
4. Click the Download link to start the download.
5. Click Save to save the downloaded file on your computer for installation.
6. When the download is complete, double-click the .exe file.
7. Logout of your WebOffice and re-login.
Since the Web
requires you to logout and re-login to your Web
software during the current ongoing conference. Instead, you can wait for the conference to end
and use the new capabilities during the next conference.
Office
Video Plug-in is a big file (7.5 MB), and since using the Video Plug-in
Office
, you might prefer not to download the
Using the WebOffice Video Plug-in
Once the WebOffice Video Plug-in is installed, WebOffice automatically recognizes it and a
Desktop endpoint option is added to your Selected Endpoints list.
"View Only" Mode
If you select Desktop endpoint from the Selected Endpoints list, and WebOffice does not
detect a ViaVideo camera or a supported Web camera, you automatically enter "View Only"
mode and the View Only icon appears in your Selected Endpoints area.
51
Page 56

Polycom Web
Office
Release Notes Version 7.0.1
Other WebOffice owners will see you as a "View Only" buddy in their buddy lists.
You can now start or join a video conference or a direct video call and receive the video
stream of other participants, however other participants will not be able to see you.
Using a Web Camera or a ViaVideo Endpoint
To use a Web camera or a ViaVideo endpoint:
• Connect the camera to your computer and select Desktop endpoint in the Selected
Endpoints list.
The Camera icon appears in the Selected Endpoints area.
You can now send and receive video stream when starting or joining a video conference or
a direct video call.
52
Page 57

If a
View Only
detect your video endpoint. Click
Office
Web
icon appears instead of the
detect your endpoint.
Version 7.0.1 - WebOffice General Features
Camera
icon,it is possible that Web
'Reset desktop camera'
in the
Selected Endpoint
Office
did not
list to have
53
Page 58

Polycom Web
Office
Release Notes Version 7.0.1
Windows Messenger Integration Mode
WebOffice is available for integration with Microsoft Windows Messenger (Windows
Messenger Integration mode), extending Windows Messenger’s capabilities to include
Polycom’s multipoint audio and video conferencing. WebOffice works seamlessly with
Windows Messenger and users can invite participants and start a multipoint conference
directly from their instant messaging session or from their contact’s list, with a click of the
mouse.
The Windows Messenger interface completely replaces the WebOffice Manager user
interface. The WebOffice Buddy list is replaced by the Windows Messenger Contacts list,
and the buddy’s video endpoint type and status are displayed in the Windows Messenger
Contacts pane. Conference preferences, the Conference Organizer and conferences are
started directly from the Windows Messenger interface.
In Windows Messenger Integration mode you can:
• Initiate WebOffice audio, video and data conferences
• Start the WebOffice Conference Organizer
• Modify the WebOffice properties
List of Buddys with
the associated
endpoint and status
As with the standard WebOffice implementation, WebOffice in Windows Integration mode
allows users to associate themselves with a variety of personal or group conferencing
endpoints - including SIP, H.323. H.320/ISDN and PSTN based endpoints. Users can easily
switch between their default associated endpoint (for example a ViaVideo/Web camera)
and a room based system (for example a VSX7000/ViewStation).
WebOffice integrates with Microsoft’s Windows Messenger client (version 5.0), in
conjunction with the Microsoft Office Live Communications Server 2003 (LCS) enterprise
application.
54
For full details on Microsoft Windows Messenger, refer to the Windows Messenger Help.
Page 59

Version 7.0.1 - WebOffice General Features
Initiating Web
When the Web
Messenger Integration mode.
Web
Office
Office
Office
server is in Windows Messenger mode, all users are in Windows
This is configured by the Web
Administrator’s Tool. For more details, see page 65.
Office
Administrator in the
Functionalities in Windows Messenger
When WebOffice is in Windows Messenger Integration mode, users can access WebOffice
functionalities in a variety of ways:
• By right-clicking a contacts name in the Main window:
• From the Actions menu in the Main window:
55
Page 60

Polycom Web
Office
Release Notes Version 7.0.1
• From the I want to... pane in the Conversation window:
56
Page 61

Initiating Audio, Video and Data Conferences
Inviting a user to a new conference from Windows Messenger invokes the WebOffice Meeting with a new conference.
Version 7.0.1 - WebOffice General Features
Before starting to use Web
should associate themselves with an endpoint For more details see page 64.
Office
in Windows Messenger Integration mode Web
To invite a user to a new WebOffice conference:
1. Click Start Polycom Conference from:
— The Main window
— The Conversation window
Office
users
A conference invitation is sent to the conference invitee in Windows Messenger.
2. A confirmation message and an accept/decline message appears in your Conversation
window.
57
Page 62

Polycom Web
Office
Release Notes Version 7.0.1
3. The WebOffice Meeting window is launched and as each participant accepts the invitation, they joins the conference.
Depending on the conference settings, the participants endpoints are either instructed to dial-in
to the conference, or the conference is instructed to dial-out to the endpoint. For more details
on the dialing mode selection, see page 78.
Accepting a Conference Invitation in Windows Messenger
Participants who are invited to a WebOffice conference, receive a conference invitation in their Windows Messenger Conversation window.
To accept a conference invitation in Windows Messenger:
• Click the Accept link in the message or press Alt+T to accept the invitation.
58
A confirmation message appears indicating that you have accepted the conference
invitation and the WebOffice Meeting window opens. If you are already associated
with an endpoint, you are automatically connected to the conference. If you are not
associated with an endpoint, you can connect to the conference as a dial-out
participant.
Page 63

Version 7.0.1 - WebOffice General Features
Joining a Conference as a Dial-out Participant
After the WebOffice Meeting window opens, the invited conference participant who is not
associated with an endpoint (or if the dialing mode was set to dial-out by the conference
owner) receives a request for their dialing details.
To accept a dial-out conference invitation:
1. Click Ye s to accept the conference invitation.
If the call invitation is for a video conference, the Select Device Type window opens.
2. Select how you will connect to the conference; with your video endpoint or your
telephone.
3. Click Continue.
The Endpoint Details dialog box opens.
59
Page 64

Polycom Web
Office
Release Notes Version 7.0.1
4. In the Endpoint Details window, define the following parameters:
Table 11: Endpoint Details parameters
Parameters Description
Preferred Call Type Select your preferred connection type, IP, ISDN or SIP.
(Mandatory)
H.323 Alias
Address/Name
ISDN - Country
Code
ISDN - Area Code Applicable for ISDN or PSTN calls only. Enter the area code of
ISDN - Number Applicable for ISDN or PSTN calls only. Enter the number to be
Applicable for IP or SIP calls only. Enter the IP or SIP address or
alias of the endpoint. (Mandatory)
Applicable for ISDN or PSTN calls only. Enter the country code of
the number to be dialed by the conference. (Optional)
the number to be dialed by the conference. (Optional)
dialed by the conference.(Mandatory)
5. Click OK to connect to the conference.
60
Page 65

Initiating the Conference Organizer
The Conference Organizer can be launched from Windows Messenger. This provides an
alternative way of starting a conference, allowing you to also invite non-Window
Messenger based participants. In addition, the participant’s dialing mode can be changed
and you can review the conference details in a structured manner.
For more details on the Conference Organizer, see “Conference Organizer” on page 87.
To launch the Conference Organizer from Windows Messenger:
1. Select Start Polycom Conference Organizer from:
— The Main window
— The Conversation window
Version 7.0.1 - WebOffice General Features
61
Page 66

Polycom Web
Office
Release Notes Version 7.0.1
The Conference Organizer window opens.
Microsoft Messenger users who are not Web
Organizer buddy list, however they can be added as a manual participant. Refer to “Conference
Organizer” on page 87 for details on adding participants manually.
Office
users do not appear in the Conference
2. Refer to “Conference Organizer” on page 87 for details on setting up a conference via
the Conference Organizer and adding participants manually.
62
Page 67

Changing Conference and User Properties
From Windows Messenger, the user can access the Properties dialog box to change their
system properties and user preferences. This includes:
• Profile - Contains your personal information that is displayed in your WebOffice for
other users and visitors to view, and lets you change your WebOffice password.
• Preferences - Lets you configure preferences according to your specific requirements,
and lets you change the WebOffice language.
• Security - Lets you define the security settings to be activated for both conferences
and documents.
• Conference settings - Lets you set your default conference type, meeting invitation
text and whether point-to-point dialing should be activated for two participants.
• Conference endpoints - Displays the name and status of your conference endpoints,
and allows you to define new endpoint detection settings and to set the dial speed for a
video endpoint. You also can select group endpoints from the existing list defined by
the Administrator, or add new group endpoints manually.
• Dialing settings - Lets you select the default dialing mode for conference participants
- dial-in or dial-out. Dial-in participants are instructed to call the conference, and
dial-out participants will be called by the conference. Dial-out participants can join all
types of multipoint conferences with all endpoint types (both Polycom and
non-Polycom endpoints) and will automatically connect to the conference. The
conference can include both WebOffice and non-WebOffice users.
Version 7.0.1 - WebOffice General Features
For more details on the Properties window, see Chapter 4,
in the Web
Office
User’s Guide.
System Properties and Preferences
To launch the Properties dialog box from Windows Messenger:
1. Select Start Conference Preferences from:
— The Main window
— The Conversation window
63
Page 68

Polycom Web
Office
Release Notes Version 7.0.1
The WebOffice Properties-Profile dialog box opens.
2. Update the required properties and/or set your preferences. For more details, see
Chapter 4, System Properties and Preferences in the WebOffice User’s Guide.
3. Click OK to save the updated properties.
Associating an Endpoint with Windows Messenger
Before starting to use WebOffice in Windows Messenger Integration mode WebOffice users
should associate themselves with an endpoint. Users can associate themselves with a
variety of personal or group conferencing endpoints - including SIP, H.323, H.320/ISDN
and PSTN based endpoints. Users can easily switch between the default associated
endpoint, (for example a desktop Web camera) and a room based system (for example a
VSX7000). The users’ associated endpoint can be selected from a list that is pre-defined by
the Administrator, or the endpoint can be added manually.
WebOffice in Windows Integration mode supports Polycom’s ViaVideo line of personal
video products, ViewStation EX/FX, and entire VSX series (3000/5000/7800/8000) of
video endpoints, including the v500. When configured with the downloadable WebOffice
Video Plug-in, Windows Messenger users can alternatively associate any support Web
camera as their WebOffice video endpoint. The WebOffice Video Plug-in also allows users
without a camera to participate in video conferences in a view-only mode. For more details,
see “WebOffice Video Plug-in” on page 47.
64
Page 69

Version 7.0.1 - WebOffice General Features
Defining the Server for Windows Messenger Mode
All WebOffices on a WebOffice server use either the Windows Messenger Integration modes interface or the WebOffice Manager’s interface. This is configured by the WebOffice Administrator in the Administrator’s tool.
To work in LCS mode, you should have the appropriate license activated on your server.
To se t We b Office to work with Window’s Messenger in the Administrator’s Tool:
1. On the Main Menu pane, click General Server Settings.
The General Server Settings window opens.
2. Select the Server LCS Mode check box to enable WebOffice integration with
Windows Messenger.
3. Click Apply to save the changes.
For more details on the
Windows Messenger Integration mode software, see “Distributing and Installing the Installation
File” on page 68.
Windows Messenger Plug-In
link and downloading the Web
Office
65
Page 70

Polycom Web
Office
Release Notes Version 7.0.1
Creating Accounts for Window Messenger Users
The WebOffice Administrator has the option of using the Bulk Accounts Generator Tool to
create accounts for all users. The Administrator must then provide all users with the
WebOffice installation file access.
Using the Bulk Accounts Generator Tool
The Bulk Registration Tool provided in your WebOffice package CD allows you to easily
create large amounts of accounts for current Windows Messenger users in your
organization.
The Administrator simply exports details of the Windows Messenger users from the
Microsoft LCS or the Active Directory using the Bulk Accounts Generator Tool, where
accounts are automatically created for everyone.
You can export the details of the Microsoft Messenger user account entries directly to the CSV
file. For more details see your Microsoft Messenger LCS or Active Directory Guides.
1. Open the Bulk Accounts Generator Tool, included on the WebOffice package CD.
66
2. Type in the LCS domain name.
3. Click Lookup Users.
Page 71

4. Select the appropriate group, for instance Users.
5. Click the Select button.
6. Select the users you want to import.
Version 7.0.1 - WebOffice General Features
67
Page 72

Polycom Web
Office
Release Notes Version 7.0.1
The imported users are displayed, type in WebOffice IP address or URL to create the offices on the server.
WebOffice server must allow offices to be created from the web in order for this tool to
work. this option is turned off by default, it can be activated from the web admin
interface under Options.
Distributing and Installing the Installation File
The Administrator must provide access to the installation files to all users. The file can be sent to all users, or the users can be directed to the URL where they can download the file themselves.
To access the installation files in the Administrator’s Tool:
1. On the Main Menu pane, click General Server Settings.
The General Server Settings window opens.
2. If it isn’t already selected, select the Server LCS Mode check box to enable
WebOffice integration with Windows Messenger.
68
3. Click the Windows Messenger Plug-In link.
Page 73

Version 7.0.1 - WebOffice General Features
The Download Client Software page opens in your Web browser.
4. Either download the installation file and send it to all WebOffice users in your
organization, or send the Download Client Software URL page to all users in your
organization so they can download the software.
5. After the users receive the installation file, they must logout and completely close
Windows Messenger, then run the installation file.
6. During the installation users are asked for the WebOffice server URL - the
Administrator must provide the user with the appropriate IP or URL.
When the user logs into Windows Messenger after the installation is complete,
WebOffice is fully integrated.
After the installation of Web
Start Polycom Conference Preferences
access
associated video endpoint. For more details, see “Changing Conference and User Properties”
on page 63.
For users to work properly with a ViaVideo or Web camera endpoint, or to have view-only video
stream, the Web
Video Plug-in” on page 47.
Office
Office
in Windows Messenger Integration mode, users should
in Windows Messenger to select their
Video Plug-In should be installed. For more details see “WebOffice
69
Page 74

Polycom Web
Office
Release Notes Version 7.0.1
Direct Video Call
Direct Call enables WebOffice users to communicate point-to-point directly with other
WebOffice users without having to start a WebOffice conference. In addition, WebOffice
users without a video endpoint who have the WebOffice Video Plug-in can receive the
video stream from other non-WebOffice users.
The Direct Video Call functionality is seamlessly incorporated in the WebOffice Manager,
letting users work from one window and perform all of the required tasks. Using a video
endpoint along with the WebOffice Video Plug-in, users can dial directly to other H.323
endpoints and conferences. Users can also receive calls on their video endpoint. Even if the
users do not have an endpoint, using the WebOffice Video Plug-In allows them to receive
the video stream for viewing.
Placing a Call (Point-to-Point)
You can place calls using your video endpoint in the WebOffice Manager window.
To place a call from your video endpoint:
1. In the WebOffice Manager, click the Direct Video Call arrow.
70
The Direct Video Call pane opens.
Page 75

2. Click the Call button.
The Direct Call dialog box opens.
Version 7.0.1 - WebOffice General Features
3. In the Number box, enter an IP address (255.255.255.255), DNS name
(lobby.austin.polycom.com), or H.323 extension of the video endpoint you want to
call. Dialed numbers are stored in the Number box history and can then be selected
from the drop-down list.
4. In the Speed box, select the desired dialing speed. The default dialing speed is 256
Kbps.
5. Click Dial.
71
Page 76

Polycom Web
Office
Release Notes Version 7.0.1
6. When the video call is established, it is shown in the Direct Video Call pane.
If an Audio only call is established, the Audio only icon is shown in the Direct Video
Call pane.
Table 12 details the available camera control icons and their actions for a Direct Video
call.
Direct Video Call pane
Camera controls
Table 12: Direct Video Call icons
Icon Name Action
Decrease Volume Click to reduce the volume.
Increase Volume Click to increase the volume.
Decrease
Brightness
Increase
Brightness
Picture in Picture
(PIP).
Mute Click turn off your microphone. If you are in a call the far
UnMute Click to turn on your microphone if it was turned off.
Click to reduce the brightness of the video image.
(Applicable for video calls only.)
Click to increase the brightness of the video image.
(Applicable for video calls only.)
Click to open a small window showing what the far
endpoint (site) sees. (Applicable for video calls only.)
site will not hear you.
72
Page 77

Ending a Call
To end a video conference:
• In the Direct Video Call pane, click the Hang Up button.
Answering a Call
Incoming Direct Video calls can be answered in two ways:
• Manually
• Automatically
Version 7.0.1 - WebOffice General Features
If the person you have called declines the call, or does not answer the call within a reasonable amount of time, a notification box appears, letting you know that the far endpoint did not answer.
Manually
To answer a call manually:
When a call is received by your video endpoint, the Incoming Call notification dialog box appears, that includes the date, time and IP address of the call.
1. Click Ye s to answer the call.
2. When the video call is established, the video image is shown in the Direct Video Call
pane.
73
Page 78

Polycom Web
Office
Release Notes Version 7.0.1
To end a video conference:
• Click the Hang Up button in the Direct Video Call pane.
Missed Calls
When a call is unanswered, a notification box appears on the far endpoint with the missed call details.
Automatically
You can set the system to answer incoming video calls automatically.
Automatically answering calls is convenient, however an unexpected caller could interrupt a
meeting in progress.
To set the system to answer all calls automatically:
1. In the WebOffice Manager window, click the Properties button.
2. Select the Conference Settings tab.
3. Select the Auto Answer check box.
74
When you receive a video call, it is automatically answered and displayed in the Direct
Video Call pane that opens in the WebOffice Manager.
Page 79

Dial Out
Version 7.0.1 - WebOffice General Features
WebOffice owners can select the dialing mode for their conference participants - dial-in or
dial-out. Dial-in participants are instructed to call the conference, and dial-out participants
will be called by the conference. Dial-out participants can join audio and/or video
multipoint conferences with all endpoint types (both Polycom and non-Polycom endpoints)
and will automatically connect to the conference. The conference can include both
WebOffice and non-WebOffice users.
Invited WebOffice conference participants, who are assigned to fully supported endpoints
are identified as such by the WebOffice server, and can connect automatically whether they
are instructed to call the conference (dial-in), or are called by the conference (dial-out). All
other invited conference participants without assigned endpoints provide their endpoint
details to the WebOffice server and are called by the conference (dial-out). This allows for
automatic connection to the conference for all invitees, regardless of their endpoint type.
The WebOffice owner can set the default dialing mode for their conferences in the
WebOffice Manager - Properties. The default dialing modes can be changed for each
individual conference participant from the Conference Organizer’s window when setting
up the conference. The WebOffice owners’ ability to allow dial-in and dial-out participants
is limited by the permissions set by the WebOffice Administrator in the Administrators
Tool.
Defining the Default Dialing Settings
The meeting owner can select if meeting participants are dial-in or dial-out. The meeting
owners ability to set their dialing settings is limited by the permissions set by the
WebOffice Administrator. For more details, see “Dial-Out Permissions” on page 83.
To set the WebOffice dialing settings:
1. In the WebOffice Manager window, click the Properties button.
The Properties window opens.
2. Click the Dialing Settings tab.
75
Page 80

Polycom Web
Office
Release Notes Version 7.0.1
The Properties - Dialing Settings window opens.
3. Select the dialing settings, as detailed in Table 13.
Table 13: Properties - Dialing Settings options
Option Description
Video
All participants call the
conference (dial-in)
Let the system decide
who calls
(recommended)
Audio
All participants call the
conference (dial-in)
The conference calls
all participants
(dial-out)
Select this option to require all video participants in the Buddy
list to call the conference. You can modify the dialing mode
from the Conference Organizer.
Select this option to let the system determine the best way to
connect the video participant. When this is selected, Polycom
endpoints automatically identified by the system (ViaVideo,
ViewStation, VSX family and Web
instructed to call (dial-in) the conference. If the endpoint is not
recognized, the system will call (dial-out) the endpoint.
Select this option to require all audio participants in the Buddy
list to call the conference. You can modify the dialing mode
from the Conference Organizer.
Select this option to require the conference to call all audio
participants in the Buddy list. You can modify the dialing mode
from the Conference Organizer.
Office
Video Plug-in) are
76
Page 81

Table 13: Properties - Dialing Settings options
Option Description
General
Version 7.0.1 - WebOffice General Features
Prompt when an
ISDN/PSTN dial-out
participant joins the
conference without
receiving an invitation.
Select this check box to receive a message when an ISDN/
PSTN dial-out participant joins an on going conference directly
from the Buddy list without receiving an invitation. This
information is useful to know as ISDN/PSTN participants incur
an additional phone charge when joining the conference as
dial-out participants.
When a ISDN/PSTN dial-out participant joins the conference
without an invitation, the meeting owner receives the following
message:
Select Yes to allow the participant to join the conference or
select No to deny the participant access to the conference. If
the participant is denied access to the conference, they will
receive the following message:
77
Page 82

Polycom Web
Office
Release Notes Version 7.0.1
Modifying the Default Dialing Mode from the Conference Organizer
Conferences with dial-in and dial-out participants are started from the WebOffice Manager
window. If you want to change the default dialing mode of a participant, you must start the
conference from the Conference Organizer.
For more details on the Conference Organizer, see “Conference Organizer” on page 87.
To start a conference and modify the dialing mode from the Conference Organizer window:
1. In the WebOffice Manager, click the Conference arrow and then select Conference Organizer.
The Conference Organizer window opens.
2. Select the required conference type.
3. Select the participants for the conference.
78
Page 83

Version 7.0.1 - WebOffice General Features
The default dialing mode icon appears next to the participant’s name in the Conference Participants list. Table 14 details the dialing mode icons.
Table 14: Dialing Mode Connection icons
Icon Description
Video conference
Automatic-dial
Auto conference
Automatic-dial
Video conference
dial-in
Video conference
dial-out
Audio conference
dial-in
Audio conference
dial-out
Ask the participant
for details for a
Video conferece
Ask the participant
for details for an
Audio conferece
The system decides if the participant is dial-in or
dial-out for a Video conference.
The system decides if the participant is dial-in or
dial-out for an Audio conference.
The participant dials-in (calls) to the Video conference.
The Video conference dials-out (calls)to the participant.
The participant dials-in (calls) to the Audio conference.
The Audio conference dials-out (calls) to the participant.
The conference owner has requested the conference
participant’s endpoint information. The participant will
be connected to the Video conference according to the
details they enter.
The conference owner has requested the conference
participant’s endpoint information. The participant will
be connected to the Audio conference according to the
details they enter.
4. To change the dialing mode in the Conference participants list, right-click the dialing
mode icon next to the participant’s name and then select the desired dialing mode.
79
Page 84

Polycom Web
Office
Release Notes Version 7.0.1
The following options are available for selection:
• Let the system decide who calls - This is the recommended dialing mode. Select this
option to let the system determine the best way to connect the video participant. When
this is selected, Polycom endpoints that are automatically identified by the system
(ViaVideo, ViewStation, VSX family and WebOffice Video Plug-in) are instructed to
call (dial-in) the conference. If the endpoint is not recognized, the system will call
(dial-out) the endpoint.
• The participant calls the conference - The participant dials in to the conference.
Polycom endpoints identified by the system (ViaVideo, ViewStation, VSX family and
WebOffice Video Plug-in) are instructed to automatically call (dial-in) to the
conference. If the endpoint is not recognized, the participant must call the conference
manually using the conference details information provided in the WebOffice Meeting
Manager when the conference begins.
• The conference calls the participant - The conference dials out to the participant.
When this is selected, the participant’s endpoint details must be provided.
5. If you have selected Conference calls the participant (dial-out), select the definition mode of the participant’s dialing details:
— Ask participant for details - A dialog box opens in the participant’s WebOffice
Meeting Manager, asking them to select their endpoint type and to enter their
dialing details. Even if the participant is using a recognized Polycom endpoint,
they will still be asked for their details. Asking the participant to enter their details
is a time-saver, eliminating the need for the WebOffice owner to manually add the
participant’s details.
The participant’s endpoint and dialing details are saved on the participant’s computer for
Office
subsequent requests by Web
The meeting participant will only receive the dialog box requesting their information after you
click the Start button in the Conference Organizer window.
— Enter participant details - a dialog box opens, allowing you to enter the
to enter their details.
participant’s details. This is useful when the WebOffice owner wants to enter
specific endpoint details for the participant. This will override any endpoints
previously assigned to the participant. After the participant’s details are entered,
the participant will need to accept the WebOffice invitation to connect to the
conference. If you want the participant to be able to connect to the conference
automatically even when they are away from the computer, you must add the
80
Page 85

Version 7.0.1 - WebOffice General Features
participant as a Manual participant. For more details see “Conference Organizer”
on page 87.
6. If you have selected to enter the Participant details, define the following parameters:
Table 15: Participant Details fields
Field Meaning
Name This field is automatically filled in with the participant’s name.
Preferred Call Type Select the preferred connection type, IP, ISDN, or SIP.
(Mandatory)
H.323/Sip
Address/Name
ISDN/PSTN Country Code
ISDN/PSTN - Area
Code
ISDN/PSTN Number
ISDN/PSTN - Ext. Applicable for ISDN calls only. Enter the extension, of any, of the
Phone (audio only) Select this check box if the endpoint is audio only (phone).
Applicable for IP and SIP calls only. Enter the IP or SIP address
or alias of the endpoint. (Mandatory)
Applicable for ISDN/PSTN calls only. Enter the country code of
the number to be dialed. (Optional)
Applicable for ISDN calls only. Enter the area code of the number
to be dialed by the conference. (Optional)
Applicable for ISDN calls only. Enter the number to be dialed by
the conference. (Mandatory)
number to be dialed. (Optional)
(Optional)
7. Click OK.
8. Click Start to start the conference.
81
Page 86

Polycom Web
Office
Release Notes Version 7.0.1
Accepting a Dial-out Conference Invitation
If the WebOffice owner selects The conference calls the participant (dial-out) - Ask the
participant for details in the Conference Organizer, or if the dialing mode is set to
dial-out/let the system decide who calls in the WebOffice Manager, the invited conference
participant receives a request for their dialing details after they have entered the conference
and are in the WebOffice Meeting window.
To accept a dial-out conference invitation:
1. Click Ye s to accept the conference invitation.
If the call invitation is for a video conference the Select Device Type window opens.
2. Select how you will connect to the conference; with your video endpoint or your
telephone. If the conference is an audio only conference, skip this step.
3. Click Continue.
The Endpoint Details dialog box opens.
82
Page 87

Version 7.0.1 - WebOffice General Features
4. In the Endpoint Details window, define the following parameters:
Table 16: Endpoint Details fields
Field Meaning
Preferred Call Type Select your preferred connection type, IP, ISDN or SIP.
(Mandatory)
H.323 Alias
Address/Name
ISDN - Country Code Applicable for ISDN calls only. Enter the country code of the
ISDN - Area Code Applicable for ISDN calls only. Enter the area code of the
ISDN - Number Applicable for ISDN calls only. Enter the number to be dialed by
5. Click OK to connect your endpoint to the conference.
Dial-Out Permissions
The WebOffice Administrator defines the permissions for the WebOffice owners to run
multipoint audio and video conferences, and to invite IP, ISDN and PSTN dial-out audio
participants.
Permissions can be set at two levels; for all WebOffices defined on the server, and for each
WebOffice individually.
To set the general permissions for all WebOffice servers:
1. In the WebOffice Administrator’s main menu, select Video/Audio Parameters.
The Audio/Video Common Parameters window opens.
Applicable for IP or SIP calls only. Enter the IP or SIP address
or alias of the endpoint. (Mandatory)
number to be dialed by the conference. (Optional)
number to be dialed by the conference. (Optional)
the conference.(Mandatory)
The Web
in WebCommander mode.
Office
server must be set to MCU Direct Management mode. Dial-Out is not available
83
Page 88

Polycom Web
Office
Release Notes Version 7.0.1
2. Select the parameters, as detailed in Table 17.
Table 17: Dial-Out Permissions for all WebOffices
Parameter Meaning
Allow initiating
Multipoint Audio
conferences
Allow initiating
Multipoint Video
conferences
Allow inviting IP
dial-out participants
Allow inviting ISDN
dial-out video
participants
Allow inviting PSTN
dial-out audio
participants
Select this check box to allow the Web
multipoint audio conferences.
Select this check box to allow the Web
multipoint video conferences.
Select this check box to allow the Web
dial-out participants to their conferences.
Select this check box to allow the Web
ISDN dial-out participants to their conferences.
Note: ISDN dial-out participants included in a Web
conference may incur additional phone charges.
Select this check box to allow the Web
PSTN dial-out participants to their conferences.
Note: PSTN dial-out participants included in a Web
conference may incur additional phone charges.
Office
owner to initiate
Office
owner to initiate
Office
owner to invite IP
Office
owner to invite
Office
owner to invite
Office
Office
3. Click Submit to apply the changes to the WebOffices.
To set the permissions for a new WebOffice:
1. In the Add A WebOffice window, select the parameters, as detailed in Table 17 on
page 84.
84
If a permission is not given in the
appears disabled in the
Add A WebOffice
Audio/Video Common Parameter
2. Click Submit to save the settings.
window, the permission
window.
Page 89

Version 7.0.1 - WebOffice General Features
To set or update the Dial-Out permissions for an existing WebOffice:
1. In the WebOffice Administrator’s Tool, select Search WebOffices on the left-hand
pane.
The Search a WebOffice window opens.
2. Click the more link of the WebOffice where you want to set or update the Dial-Out
permissions.
The Search a WebOffice page opens.
If a permission is not given in the
appears disabled in the
Search A WebOffice
Audio/Video Common Parameter
window.
3. Select the parameters, as detailed in Table 17 on page 84.
window, the permission
4. Click Apply to save the settings.
85
Page 90

Polycom Web
Office
Release Notes Version 7.0.1
Selecting the Call Type: IP or ISDN
In version 7.0.1 WebOffice users attached to a group endpoint can select their preferred call
type for the conference endpoint: IP (H.323) or ISDN (H.320).
The default connection value of the endpoint is defined in the WebOffice server by the
Administrator when defining the endpoint, or by the WebOffice owner when manually
added the endpoint.
If a Web
a message box appears notifying the owner and the connection mode does not change.
If a Web
configured for ISDN, a message box appears notifying the owner that the call might not
succeed, and to contact their Administrator.
Office
owner selects ISDN for an attached endpoint and the endpoint only supports IP,
Office
owner selects ISDN for an attached endpoint and the endpoint is not properly
86
Page 91

Conference Organizer
The Conference Organizer enables you to select the participants dialing mode, dial-in or
dial-out. Participant’s connection dialing mode can be changed and you can review the
conference details in a structured manner from one window.
Launching the Conference Organizer Window
To launch the Conference Organizer:
• In the WebOffice Manager, click the Conference arrow and then select Conference
Organizer.
Version 7.0.1 - WebOffice General Features
The Conference Organizer window opens.
Add/Remove
Conference
Type
Participant
List
Add Participants Manually
Start/Cancel Conference
Conference
Participants
List
87
Page 92

Polycom Web
Office
Release Notes Version 7.0.1
The Conference Organizer window is divided into six general areas:
• Conference type – The conference type is selected: Audio Conference, Video
Conference or a combination of Audio or Video with Data Collaboration.
• Participants list – This list is an exact copy of your buddy list.
• Manual participants – Allows you to manually add participants to the conference.
Participants added manually will connect to the conference as audio/video participants
and will not have direct access to data or the WebOffice conference. You can however,
instruct these participants to go to your WebOffice homepage, from where they can
join the WebOffice conference as a guest, and then be able to view data in the
WebOffice Meeting Manager.
• Conference participants – This list displays the participants (buddies or manual
participants) who have been selected to join the conference, and their conference
connection mode.
• Add/Remove participants – Contains two command buttons that are used to add or
remove conference participants:
— Add – Adds selected participants in Participant list area (left pane) to the
Conference Participants list area (right pane).
— Remove – Removes selected participants from the Conference Participants list
area (right pane). When a manually added participant is removed, you will have to
define that participant again if you decide to add him/her at a later time.
• Start/Cancel conference – Contains command buttons that enable you to start the
conference immediately or to cancel the selections.
Starting a New Conference from the Conference Organizer
To start a conference from the Conference Organizer window:
1. Select the required conference type.
2. Select the participants for the conference:
— In the Participants list, click the participant name(s) and then click Add>>.
The selected participants appear in the Conference Participants list.
3. You can manually add participants who are not on your buddy list.
88
Page 93

Version 7.0.1 - WebOffice General Features
a. In the Add Participant Manually dialog box, enter the participant name and then
click Add >>.
The Participant Details dialog box opens.
89
Page 94

Polycom Web
Office
Release Notes Version 7.0.1
b. Define the following parameters:
Table 18: Participant Details fields
Field Description
Name Type the name of the participant as it will be displayed during the
Call Type Select the preferred network connection type, IP or ISDN.
conference in the Participants list.
H.323/Sip
Address/Name
ISDN/PSTN Country Code
ISDN - Area Code Applicable for ISDN/PSTN calls only. Enter the area code of the
ISDN - Number Applicable for ISDN/SPTN calls only. Enter the number to be
ISDN - Ext. Applicable for ISDN/PSTN calls only. Enter the extension, if any,
Phone (audio only) Select this check box if the conference participant will join the
Applicable for IP and SIP calls only. Enter the IP or SIP address
or alias of the endpoint.
Applicable for ISDN/PSTN calls only. Enter the country code of
the number to be dialed.
number to be dialed. (Optional)
dialed. (Mandatory)
of the number to be dialed. (Optional)
conference by phone.
When the conference is Audio only, this check box is
automatically selected and disabled. (Optional)
c. Click OK to add the participant to the Conference Participants list.
d. Repeat steps a to c to add additional participants manually.
4. Click the Start button.
Defining the Dialing Mode from the Conference Organizer
90
The dialing mode can be selected in the Conference Organizer. The selection is performed
by right-clicking the participant’s name in the Participants list. The dialing modes are:
• Dial-in
• Dial-out
— The owner defines the participant’s connection details
— The guest defines the connection details
The dialing mode options are:
• Let the system decide who calls - This is the default and the recommended dialing
mode. The system determines if the participant calls the conference (dial-in) or the
conference calls the participant (dial-out).
• The participant calls the conference - The participant dials in to the conference.
• The conference calls the participant - The conference dials out to the participant. If
the WebOffice conference organizer does not know the participant’s dial-out details,
he/she can request this information.
Page 95

Version 7.0.1 - WebOffice General Features
The following table details the dialing mode connections and icons:
Table 19: Dialing Mode Connection icons
Icon Dialing Mode Description
Video conference
Automatic-dial
Auto conference
Automatic-dial
Video conference
dial-in
Video conference
dial-out
Audio conference
dial-in
Audio conference
dial-out
Ask the
participant for
details for a
Video conference
Ask the
participant for
details for an
Audio conference
The system decides if the participant is dial-in or dial-out for a
Video conference.
The system decides if the participant is dial-in or dial-out for an
Audio conference.
The participant dials-in (calls) to the Video conference.
The Video conference dials-out (calls) to the participant.
The participant dials-in (calls) to the Audio conference.
The Audio conference dials-out (calls) to the participant.
The conference owner has requested the conference
participant’s endpoint information. The participant will be
connected to the Video conference according to the specified
details.
The conference owner has requested the conference
participant’s endpoint information. The participant will be
connected to the Audio conference according to the specified
details.
The default dialing mode is selected in the WebOffice Manager, in the Properties dialog
box - Dialing Settings tab.
91
Page 96

Polycom Web
Office
Release Notes Version 7.0.1
To change the dialing mode:
1. In the Conference Participants list, right-click the participant’s name and then select the dialing mode.
2. If you have selected Conference calls the participant (dial-out), select the definition mode of the participant’s dialing details.
3. Select the definition mode for the participant number:
a. Ask participant for details - a dialog box opens on the participant’s desktop,
asking them to enter their dialing details.
92
Page 97

Version 7.0.1 - WebOffice General Features
b. Enter participant details - a dialog box opens, allowing you to enter the
participant’s details.
4. Fill in the fields as detailed in Table 15 on page 81.
5. Click OK.
93
Page 98

Polycom Web
Office
Release Notes Version 7.0.1
Version 7.0.1 - Limitations, Corrections and Pending Issues
Version 7.0.1 System Limitations
Table 20: Version 7.0.1 Known Limitations
# Topic Description Workaround/Remarks
3524 IVR service port The IVR Service is on a port other
than 5001.
4197 German language When a Web
created with German 'ue' it
cannot be accessed. The user is
routed to the Web
4327 Audio conference When a Web
an endpoint starts an audio
conference and uses a PSTN
number with an extension, the the
extension number is not dialed
during dial out.
4721 Web
3670 ViewStation In a multipoint conference when
2895 Video endpoints It is impossible to change the IP
Office
language selection
Office
Web
than one active language at a
given time. Users cannot open
several browsers with different
languages.
using a ViewStation endpoint, the
user has no control over the
ViewStation.
address, Access number and
Password to manually added
endpoints.
Office
name was
Office
Lobby.
Office
owner without
does not support more
Use only port 5001.
Office
Web
consist of English
characters only.
The MGC Manager
supports extensions for
dial-out only when working
with an IVR-enabled
conference.
Use one active language
at a time.
You can regain control
only after pressing NEAR
on the remote control.
names must
94
3667 Web
3633 Mutli-Company
2989 Web
Office
Manager Visitor list
mode
Office
Meeting
window
The Web
guests that use Linux or Mac
platforms in the Web
Manager Visitors’ list.
In Multi-Company mode, users
can see the offices of the default
company site even if they belong
to another company.
When the resolution is set to
800*600 the Web
panes are unclear.
Office
owner cannot see
Office
Office
Meeting
Do not have offices under
the default company site
when running a multipoint
conference.
Use a higher resolution.
Page 99

Version 7.0.1 - Limitations, Corrections and Pending Issues
Table 20: Version 7.0.1 Known Limitations
# Topic Description Workaround/Remarks
3056 Administrator
Endpoint
Configuration
3094 XAP Service When restarting the MCU, XAP
2213 Video Conference
Info window
2139 File with .jpeg
extension
2431 Administrator
changes
If the Administrator changes the
endpoint configurations and the
endpoint is listed in a users
Endpoint List in the Web
Manager, the configurations will
not appear updated until the user
removes the endpoint and adds it
again.
might cease to function or be out
of synchronization - making
conferences inaccessible.
The Video Conference Info
window appears damaged if the
A/V conference name Prefix
contains more than 5 characters.
You cannot upload .jpeg files with
the 'jpeg' extension.
After setting 'pending' to other
values and pressing the 'submit'
button, you cannot cancel the last
pending value you made.
Office
The Administrator can
remove the endpoint and
add it again to the
attached offices, or an
email can be sent,
notifying the We owners to
remove the endpoint and
add it again.
Restart the XAP service.
Use a shorter conference
name Prefix.
Rename the file extension
from 'jpeg' to 'jpg', or print
to the Web
from your .jpeg associated
application.
Exit the Administrator
page and re-login to set
the desired value.
Office
publisher
2400 JVM - Java Virtual
Machine Support
5750 MGC
communication
5734 Windows
Messenger - Multi
Lingual
5523 Windows
Messenger Account Generator
5488 Windows
Messenger
Office
5487 Web
Manager
Office
When Web
user does not have JVM installed
on his/her machine, Web
notifies the user via a browser
test. Web
browser that does not have JVM
installed.
When Web
located in the DMZ and MGC in
MZ a disconnection might occur.
Web
Office
language - updated only in the
second sign in.
No appropriate error message
when registration key is missing.
Can't exit from Windows
Messenger if I'm sighed-out.
No uninstall shortcut in the start
menu when moving from
Windows Messenger to regular
Client (Guest side).
detects that the
Office
Office
cannot run on a
Office
server is
menu's are in different
Install the JVM manually.
If you cannot do this,
install SUN JRE. This can
be downloaded free from
http://java.sun.com/j2se/
1.4.1/download.html.
See Note below the table
Sign-out from Windows
Messenger and sign-in
again.
Enter registration key.
Sign-in to Windows
Messenger and then Exit.
Uninstall by Add / Remove
program.
.
95
Page 100

Polycom Web
Office
Release Notes Version 7.0.1
Table 20: Version 7.0.1 Known Limitations
# Topic Description Workaround/Remarks
5118 Web
5048 Web
4917 Windows
Office
Manager - Direct
Call
Office
Meeting Impossible to open files when
Messenger Conference
Organizer
Impossible to control the PVX
volume - PVX version 6.0.
downgrade from version 7 to 6.
Selected contacts are not
selected when choosing
conference organizer.
Fixed in PVX version 6.2.
Uninstall Web
and re-login.
Select the contacts again
when conference
organizer is open.
Office
client
Note:
There is a work around that emulate the way WO7 communicate with MGC7:
Install the XAP server on a machine on the same subnet as the problematic MCUs. The
machine must not have WebOffice installation on it. (You can find the installation in
xap.zip - request Polycom support for that). When prompted choose Polycom MGC Web
server and not IIS.
Stop the XAPHttpSrv service. Copy the attached XAP.dll to c:\program files\XAP KIT\xap
(it's a newer version). Start the service again.
Configure the WebOffice to call this computer.
In c:\polycom\conf find the WebOfficeAdministrator.xml.
In this file find the xml tag property which key is called "server.mcu.xapServer.ip" The xml
should look this way:
<property>
<key>server.mcu.xapServer.ip</key>
<value>127.0.0.1:5005</value>
<access>EDIT</access>
<isMandatory>true</isMandatory>
<needsRestart>true</needsRestart>
<fieldType>text</fieldType>
<lableText>ip</lableText>
</property>
Change the 127.0.0.1 to the ip address of the computer you installed the XAP on. The
property should look the following way now:
<property>
<key>server.mcu.xapServer.ip</key>
<value>172.x.x.x:5005</value> <-- the ip of the computer with the XAP
<access>EDIT</access>
<isMandatory>true</isMandatory>
<needsRestart>true</needsRestart>
96
 Loading...