

Page 1

USER GUIDE
Software 4.1.4 | March 2013 | 1725-49089-001 Rev A
Polycom® VVX® 300 and 310 Busines s Media Phones
i
Page 2
service requests, and more.
Polycom® VVX® 300 and 310 Business Media Phones User Guide
Copyright ©2013, Polycom, Inc. All rights reserved.
6001 America Center Drive
San Jose, CA 95002
USA
No part of this document may be reproduced or transmitted in any form or by any mea ns , electronic or mechanical,
for any purpose, without the express written permission of Polycom, Inc . Under the law, reproducing includes
translating into another langua ge or format.
As between the parties, Polycom, Inc., retains title to and ownership of all proprietary rights with respect to the
software contained within its pr oduc ts. The software is protected by Unit ed States copyright laws and international
treaty provision. Therefore, you mus t treat the software like any other cop yrighted material (e.g., a book or sound
recording).
Every effort has been made to ensure that the information in this manual is acc ur ate. Polycom, Inc., is not
responsible for printing or cleri c al er rors. Information in this document is subject to change without notice.
Trademarks
POLYCOM®, the Polycom logo and the na mes and marks associated with Polycom products are trademarks and/or
service marks of Polycom, Inc. and are registered and/or common law mar k s in the United States and various other
countries. All other trademarks are property of their respective owners. No portion hereof may be reproduced or
transmitted in any form or by any means, for any purpose other than the recipient' s personal use, without the express
written permission of Polycom.
Disclaimer
While Polycom uses reasonable effor ts to include accurate and up-to-date inf or mation in this document, Polycom
makes no warranties or representat ions as to its accuracy. Polycom assu m es no liability or responsibility for any
typographical or other errors or omi s sions in the content of this document.
Limitation of Liability
Polycom and/or its respective suppliers make no representations about the suitability of the information contained in
this document for any purpose. I nformation is provided “as is” without warranty of any kind and is subject to change
without notice. The entire risk ari s i ng out of its use remains with the recipient. In no event shall Polycom and/or its
respective suppliers be liable for any direct, consequential, incid ental, special, punitive or other dama ges whatsoever
(including without limitation, damages for loss of business profits, business interruption, or loss of business
information), even if Polycom has been advised of the possibility of such damages.
Customer Feedback
We are striving to improve our document ation quality and we appreciate your f eedback. Email your opinions and
comments to DocumentationFeedback@polycom.com
Visit the Polycom Support Center for software downloads, product documents, product licenses, troubleshooting tips,
.
ii
Page 3

Contents
About This Guide ................................................................................................................ix
Who Should Read this Guide? .................................................................................................... ix
How to Use this Guide .................................................................................................................. ix
Conventions Used in this Guide ....................................................................................................... x
Terms and Writing Conventions .................................................................................................. x
Information Elements .................................................................................................................... xii
Typographic Conventions ...........................................................................................................xiii
Related Documents ....................................................................................................................... xiii
Chapter 1: Getting Started ................................................................................................. 1
Phone Keys and Hardware ......................................................................................................... 1
Phone Views ................................................................................................................................. 2
Home View .......................................................................................................................................... 3
Lines View ........................................................................................................................................... 4
Calls View ............................................................................................................................................ 5
Understanding Phone Icons and Status Indicators ................................................................ 5
Navigating Your Phone Interface ............................................................................................... 6
Entering Data and Updating Fields ........................................................................................... 7
Using the Dialpad Keys on the Phone Console ............................................................................ 8
Registering the Phone ................................................................................................................. 9
Configuring Your Phone Using the Web Configuration Utility ........................................... 10
Chapter 2: Using Basic Features .................................................................................... 11
How Your Phone Handles Calls ............................................................................................... 11
Answering Calls ......................................................................................................................... 12
Answering Another Call ................................................................................................................... 13
Answering on a Shared Line .......................................................................................................... 13
Answering Calls Automatically ....................................................................................................... 14
Managing Multiple Calls ............................................................................................................ 14
Placing Calls ............................................................................................................................... 15
Calling from the Dialer ..................................................................................................................... 15
Placing Calls from Favorites, Recent Calls, and Directories ..................................................... 17
Redialing Numbers .......................................................................................................................... 17
Ending Calls ................................................................................................................................ 18
sing Headsets .......................................................................................................................... 18
U
Enabling Headset Memory Mode .................................................................................................. 19
iii
Page 4

Polycom® VVX® 300 and 310 Business Media Phones User Guide
Responding to Incoming Calls................................................................................................. 19
Ignoring Incoming Calls ................................................................................................................... 20
Rejecting Incoming Calls ................................................................................................................ 20
Forwarding Incoming Calls to Another Person ............................................................................ 20
During Calls ................................................................................................................................ 20
Holding Calls ..................................................................................................................................... 21
Transferring Calls ............................................................................................................................. 21
Setting Up and Handling Conference Calls ........................................................................... 22
Setting Up Conference Calls .......................................................................................................... 22
Holding and Resuming Conference Calls .................................................................................... 23
Ending Conference Calls ................................................................................................................ 24
Splitting Conference Calls into Two Held Calls ........................................................................... 24
Managing Conference Call Participants ....................................................................................... 24
Changing the Way Calls are Answered .................................................................................. 25
Forwarding All Calls to Another Person ........................................................................................ 25
Rejecting Calls from a Contact....................................................................................................... 27
Diverting Calls from a Contact to Another Person ...................................................................... 27
Using Do Not Disturb ....................................................................................................................... 27
Using Do Not Disturb with Multiple Lines ..................................................................................... 29
Listening to Voicemail ............................................................................................................... 29
Viewing Recent Calls ................................................................................................................. 30
Working with Your Contact Directory ..................................................................................... 32
Working with a Corporate Directory ....................................................................................... 35
Controlling What is Heard ........................................................................................................ 37
Updating the Incoming Call Ringtone ........................................................................................... 37
Updating a Contact’s Ringtone ...................................................................................................... 37
Changing the Speaker Volume ...................................................................................................... 38
Changing the Ringer Volume ......................................................................................................... 38
Muting the Microphone .................................................................................................................... 38
Choosing Where You Hear Sound Effects ................................................................................... 38
Managing Favorites ................................................................................................................... 38
Working with Shared Lines ...................................................................................................... 40
Chapter 3: Using Advanced Features ............................................................................ 43
Using Buddy Lists ..................................................................................................................... 43
Updating Your Status ...................................................................................................................... 44
Setting Up and Managing a Buddy List ........................................................................................ 45
Blocking Contacts from Viewing Your Status .............................................................................. 46
Monitoring Buddies .......................................................................................................................... 47
Integrating with Microsoft Lync Server 2010 ......................................................................... 48
Using the Browser ..................................................................................................................... 49
iv
Page 5

Contents
Navigating the Main Browser ......................................................................................................... 49
Entering Information in the Main Browser .................................................................................... 50
Broadcasting Messages Using Push-to-Talk and Group Paging ....................................... 50
Push-to-Talk Mode ........................................................................................................................... 51
Sending and Receiving PTT Broadcasts .................................................................................. 51
Sending PTT Broadcasts ........................................................................................................ 51
Receiving PTT Broadcasts ..................................................................................................... 52
Receiving PTT Broadcasts When You’re Not in an Active Call ........................................ 53
Receiving PTT Broadcasts During Active Calls ................................................................... 53
Replying to PTT Broadcasts ....................................................................................................... 53
Ending PTT Broadcasts .............................................................................................................. 53
Adjusting the Volume of PTT Broadcasts ................................................................................. 54
Changing Where Broadcasts are Played ................................................................................. 54
Updating the Default Channel .................................................................................................... 54
Updating Channel Subscriptions ............................................................................................... 54
Allowing PTT Broadcasts to Play During Active Calls ............................................................ 54
Group Paging Mode ......................................................................................................................... 55
Sending and Receiving Pages ................................................................................................... 55
Sending Pages ......................................................................................................................... 55
Receiving Pages ....................................................................................................................... 56
Receiving Pages When You’re Not in an Active Call ......................................................... 56
Receiving Pages During Active Calls .................................................................................... 56
Adjusting the Volume of Pages .................................................................................................. 56
Changing Where Pages are Played .......................................................................................... 57
Updating the Default Paging Group .......................................................................................... 57
Updating Paging Group Subscriptions ...................................................................................... 57
Allowing Pages to Play During Active Calls ............................................................................. 57
Using the Calendar .................................................................................................................... 58
Opening and Closing the Calendar ............................................................................................... 59
Navigating Month View .................................................................................................................... 60
Navigating Day View ........................................................................................................................ 60
Navigating Meeting View ................................................................................................................ 61
king with Meeting Reminders .................................................................................................. 61
Wor
Joining Meetings from the Calendar ............................................................................................. 62
Using a Mouse and Keyboard with Your Phone ................................................................... 63
Using Your Computer’s Mouse and Keyboard with Your Phone .............................................. 63
Starting and Stopping Polycom Desktop Connector .............................................................. 63
How to Use Your Computer’s Mouse and Keyboard with Your Phone ............................... 64
Logging into Phones ................................................................................................................. 67
Logging In and Out of a Phone ...................................................................................................... 67
Placing Calls from Phones that are in the Logged-Out State .................................................... 68
Changing Your Password ............................................................................................................... 69
v
Page 6

Polycom® VVX® 300 and 310 Business Media Phones User Guide
Locking the Phone ..................................................................................................................... 69
About Your User Password ............................................................................................................ 70
Locking and Unlocking Your Phone .............................................................................................. 70
Calling and Answering from a Locked Phone .............................................................................. 71
Accessing Features with Your Login Credentials ................................................................ 72
Chapter 4: Customizing the Phone’s Display ............................................................... 75
Changing the Language on Your Phone ................................................................................ 75
Changing the Display Contrast ................................................................................................ 75
Changing the Time and Date Display ..................................................................................... 76
Changing the Backlight ............................................................................................................. 77
Changing the Phone’s Background Picture .......................................................................... 78
Changing the Background Picture ................................................................................................. 78
Using One of Your Own Pictures as the Background Picture ................................................... 78
Displaying Screen Savers ......................................................................................................... 79
Setting Up a Screen Saver ............................................................................................................. 79
Interrupting and Disabling Screen Savers .................................................................................... 80
Chapter 5: Administrative Tasks .................................................................................... 81
Investigating Phone Warnings ................................................................................................. 81
Restarting the Phone ................................................................................................................. 81
Updating Phone Configuration ................................................................................................ 82
Testing Phone Hardware .......................................................................................................... 82
Chapter 6: Getting Help .................................................................................................... 85
Related Documents ..................................................................................................................... 85
The Polycom Community ............................................................................................................ 85
Copyright, Safety, and Regulatory Notices .................................................................. 87
Service Agreements ........................................................................................................................ 87
Governing Law .................................................................................................................................. 87
Limitations of Liability ...................................................................................................................... 87
Polycom Limited Warranty and Limitation Liability...................................................................... 87
Exclusions ......................................................................................................................................... 88
Warranty Exclusive .......................................................................................................................... 88
Safety, Compliance, and Disposal Information ........................................................................... 89
art 15 FCC Rules ....................................................................................................................... 89
P
Class B Digital Device or Peripheral ......................................................................................... 89
Modifications ................................................................................................................................. 89
Installation Instructions ................................................................................................................ 89
vi
Page 7

Contents
Plugs Acts as Disconnect Device .............................................................................................. 89
Industry Canada (IC) ................................................................................................................... 90
CE and VCCI Mark ....................................................................................................................... 90
CE Mark R & TTE Directive (EU only) ...................................................................................... 90
WARNING Electrical Safety ....................................................................................................... 92
Russian Compliance .................................................................................................................... 92
New Zealand Telepermit ............................................................................................................. 92
Special Conditions for this User Guide ................................................................................. 92
Australia ......................................................................................................................................... 93
Operating Ambient Temperatures ............................................................................................. 93
Hearing Aid Compatibility (HAC) ............................................................................................... 93
Waste Electrical and Electronic Equipment (WEEE) .............................................................. 93
Restriction of Hazardous Substances Directive (RoHS) ........................................................ 93
Polycom Take Back ..................................................................................................................... 93
End-User License Agreement for Polycom® Software .................................................
vii
Page 8

Page 9

About This Guide
This guide applies to two phones: the Polycom® VVX® 300 and 310 business media phones.
You can use this guide if you have either phone.
This user guide will help you to navigate and use your VVX 300 or VVX 310 phone. It will give
you an overview of your phone, and walk you through tasks so you can successfully use your
phone to perform basic and advanced phone functions.
As you read this guide, the terms the phone and your phone refer to either the VVX 300 or VVX
310 phone. Unless specifically noted in this guide, both phones operate in the same way and
the information in this guide applies to both phones. Throughout the rest of this guide, VVX 300
is used to represent both the VVX 300 and 310 phones.
Who Should Read this Guide?
This guide contains overview information for people who are just starting to learn about their
VVX 300 or VVX 310 phone, or who have experience, but need a quick refresher. It is intended
for beginning users, as well as intermediate and advanced users who want to learn about their
phone’s features.
How to Use this Guide
This guide is organized into five chapters. The beginning chapters introduce the phone and
explain how to use the phone’s basic features. Later chapters describe advanced features, and
how to customize your phone to suit your needs. The guide also includes safety and legal
information.
• Chapter 1: Getting Started This chapter contains general information about your phone
that you’ll find helpful before you start using it. It describes phone hardware and phone views,
and how to navigate menus and enter data.
• Chapter 2: Using Basic Features All the basic features that your phone offers—such as
how to add contacts and favorites, or transfer or forward calls—are described in this chapter.
• Chapter 3: Using Advanced Features Advanced features that may not be available on the
phone, or that you may not use on a day-to-day basis, are described in this chapter.
Advanced features include recording calls, locking your phone, monitoring buddies, and
accessing a Browser.
ix
Page 10

Polycom® VVX® 300 and 310 Business Media Phones User Guide
• Chapter 4: Customizing Your Phone You can customize your phone in many ways,
including setting up a screen saver, or changing the backlight, background picture, or time
and date format. Read this chapter to personalize your phone.
• Chapter 5: Administrative Tasks This chapter describes tasks that your administrator
may ask you to perform. These tasks include investigating phone issues, restarting the
phone, updating the phone’s configuration, and testing the phone’s hardware.
• Copyright, Safety, and Regulatory Notices This section provides important safety and
compliance information relating to your phone.
• End-User License Agreement The End-User License Agreement outlines the legal
agreement between you and Polycom when you agree to install and use Polycom software.
Conventions Used in this Guide
This user guide contains terms, graphical elements, and a few typographic conventions.
Familiarizing yourself with these terms, elements, and conventions will help you perform phone
tasks.
Terms and Writing Conventions
• Your Phone / the phone These terms refer to either the VVX 300 or VVX 310 phone.
Unless specifically noted in this guide, both phones operate in the same way and the
information in this guide applies to both phones.
• Press This action refers to depressing a key on the keypad, a line key, an arrow key, a
hard key—like Hold or Microphone Mute—or pressing a soft key for a second or two.
• Select Submenu > Submenu > Submenu This convention describes how to access
submenus. Each submenu name is in boldface and separated by a ‘greater than’ symbol. If
the instructions indicate to select Basic > Preferences > Language, select the Basic
submenu, select the Preferences submenu, and select the Language submenu.
• Highlight This action refers to selecting an item on the screen so that its appearance
brightens. Soft keys apply to highlighted items.
• Select Selecting an item on the screen refers to using the arrow keys—up, down, left, and
right—to highlight an item. Press the central Select key so that another screen opens.
• Views Your phone has four main views: Home, Calls, Active Call, and Lines (the default)
view. A view is a specific screen on the phone interface that provides unique information and
enables you to perform specific tasks.
x
Page 11
About This Guide
• Dialpad The dialpad is the area of the keypad you use to enter numbers and characters.
The dialpad consists of all the number keys, as well as the asterisk (*) and pound (#) keys.
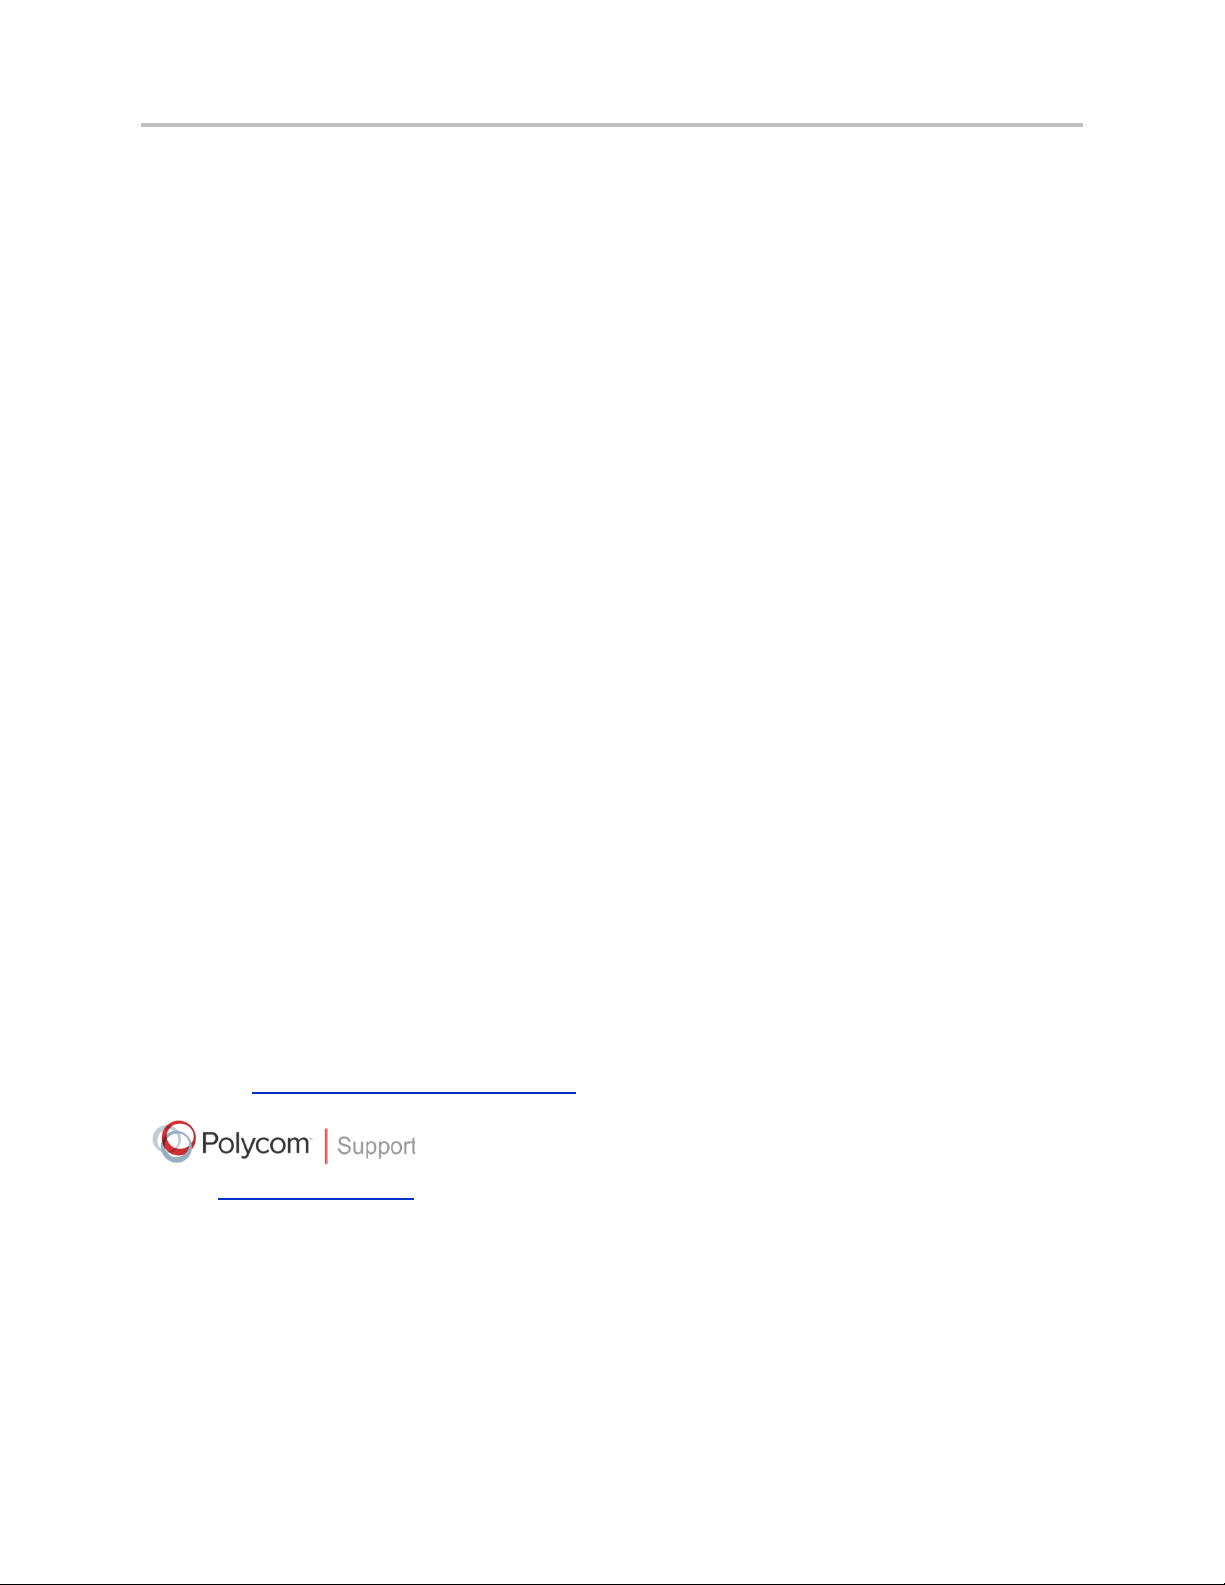
• Key This term refers to any button on the phone console. Phone keys include the dialpad
keys, , , , , , and .
• Option An option is one of a series of items you can select for a phone setting, such as
Enabled and Disabled.
• Held call This term describes any call (including a conference call) that is on hold. Audio for
held calls cannot be heard.
• Active call This term refers to a call (including a conference call) you’re currently in. An
active call has audio associated with it.
• Setting The name of a field for which you can define information or choose an option.
• Field This term describes the area of the screen next to a setting in which you can enter
information or select an option.
• Icon A picture on the screen. There are two types of icons:
○ An icon that you can select to access a function, feature, setting, or application. For
example, when you’re in Home view, you can select the New Call icon ( ) to place
a call.
○ An icon that provides phone information or status only. Selecting this type of icon
doesn’t access another function. For example, your phone may have an icon to indicate
you have a voicemail message simply to notify you of the current status.
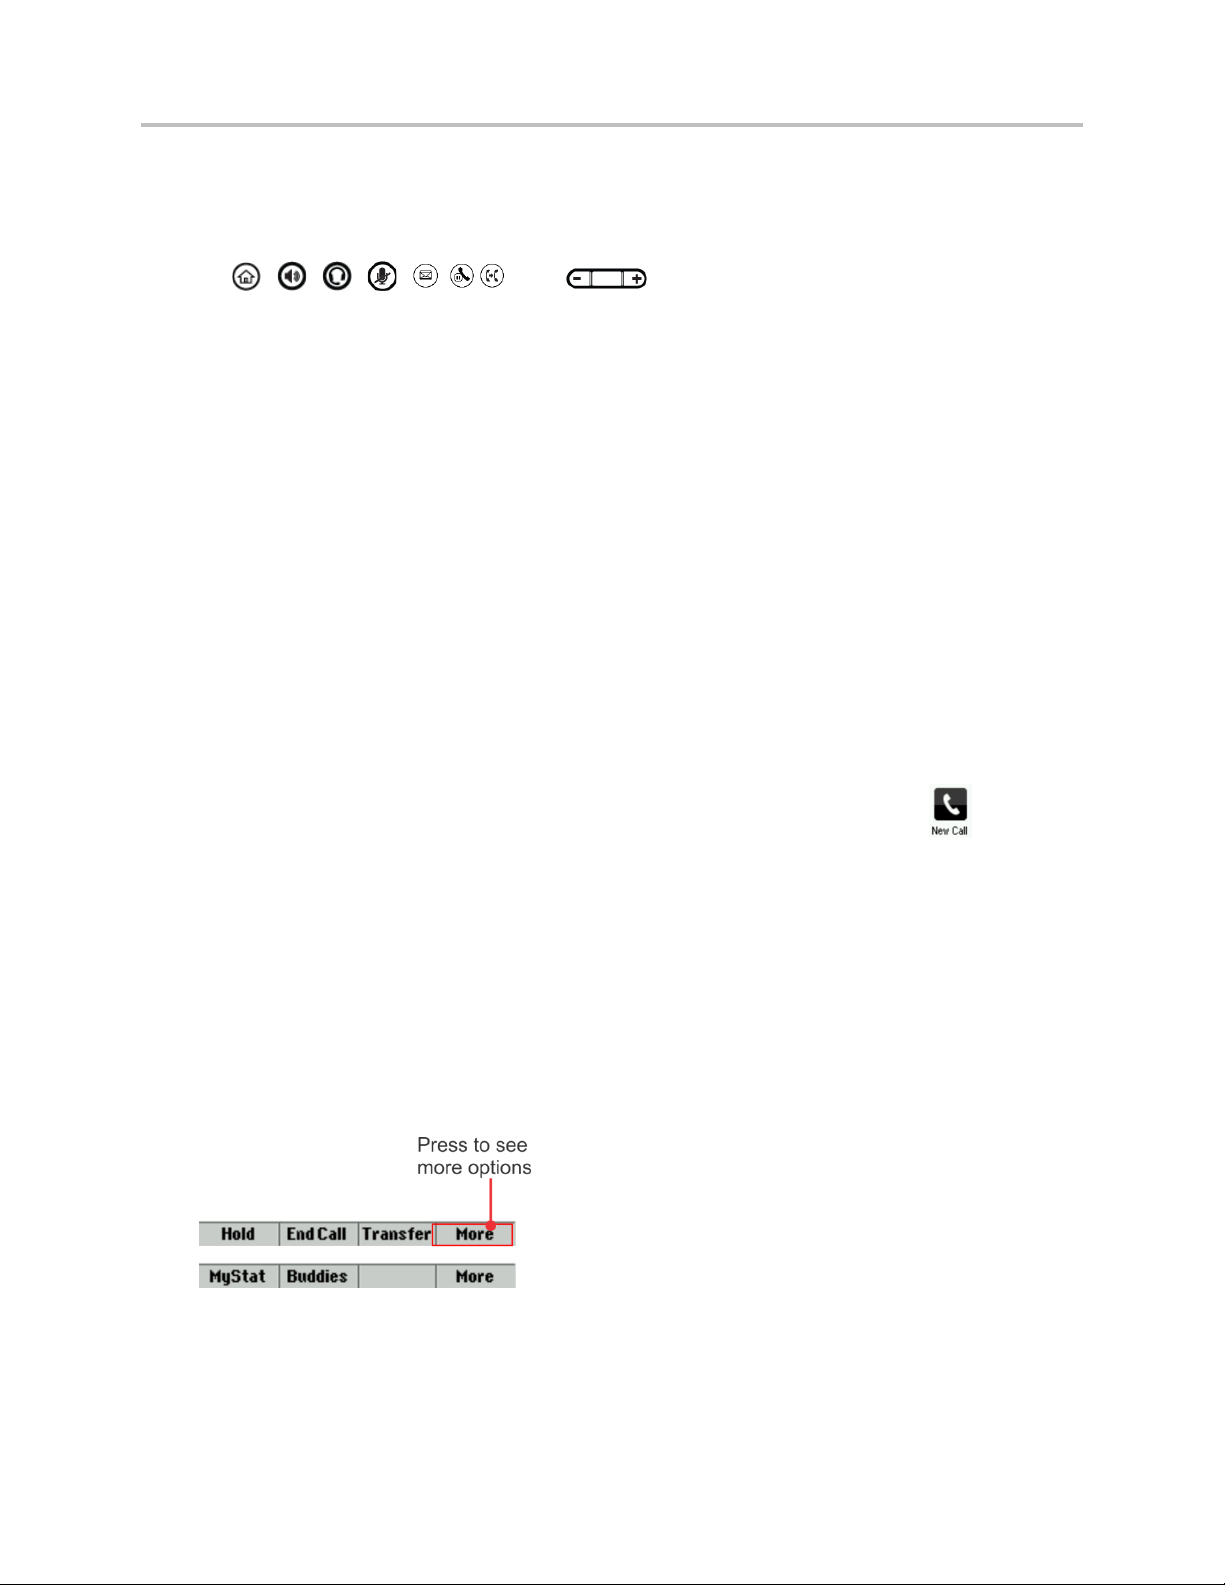
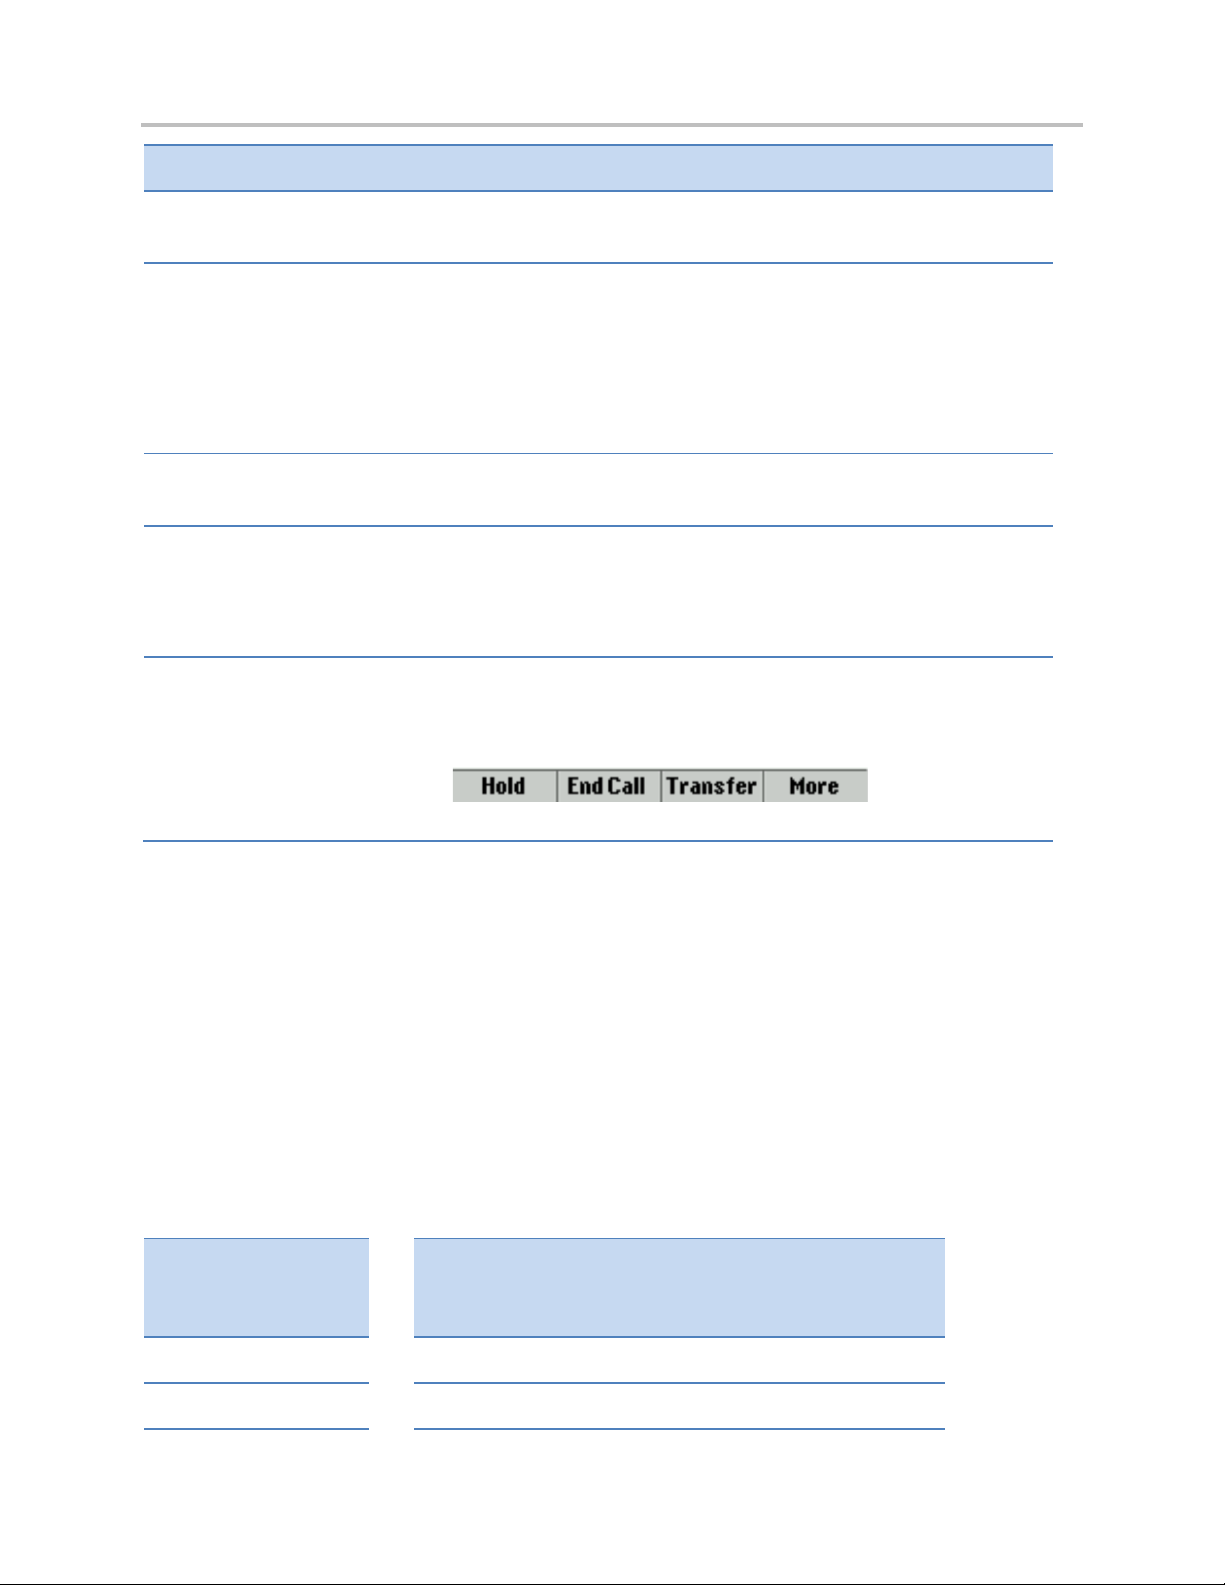
• Soft key This term describes the context-sensitive keys that display along the bottom of the
screen that update depending on the task you’re performing. To see additional options (if
available), press More. The More soft key is always on the far-right of the soft key area, as
shown next. The additional options display as shown next.
xi
Page 12
Polycom® VVX® 300 and 310 Business Media Phones User Guide
Name
Icon
Description
locations.
resources.
• Soft key area The soft key area (shown above) is the area along the bottom of the screen
that displays context-sensitive soft keys.
• Status bar The status bar (shown next) is the top-most part of the screen. It displays the
time and date or other messages instead of the date display.
Information Elements
The following icons are used to alert you to various types of important information in this guide:
Icons Used in this Guide
Note
Administrator Tip
Caution
Warning
Web Info
Timesaver
Power Tip
The Note icon highlights information of int erest or important information
needed to be successful in accomplishin g a procedure or to understand
a concept.
The Administrator Tip icon highlights techniqu es, shortcuts, or
productivity related tips.
The Caution icon highlights information you need to know to avoid a
hazard that could potentially impact device perf ormance, application
functionality, or successful feature configuration.
The Warning icon highlights an action you must perform (or avoid) to
prevent issues that may cause you to lose infor m ation or your
configuration setup, and/or affect phone or net work performance.
The Web Info icon highlights supplementary information available online
such as documents or downloads on support.polycom.com or oth er
The Timesaver icon highlights a faster or alternative method for
accomplishing a method or operation.
The Power Tip icon faster, alternative pr ocedures for advanced
administrators already familiar with the t echniques being discussed.
Troubleshooting
xii
The Troubleshooting icon highlights informat i on that may help you solve
a relevant problem or to refer you to other relevant troubleshooting
Page 13

Name Icon Description
site and other reference sites.
About This Guide
Settings
The Settings icon highlights settings you may need to choose for a
specific behavior, to enable a specific feature, or to access
customization options.
Typographic Conventions
A few typographic conventions, listed next, are used in this guide to distinguish types of in-text
information.
Typographic Conventions
Convention Description
Bold
Italics
Underlined Blue Used for URL links to external Web pages or docume nts. If you click on
Highlights interface items such as menus, soft keys, file names, and
directories. Also used to represent menu select i ons and text entry to the
phone.
Used to emphasize text, to show example value s or inputs, and to show
titles of reference documents available from t he Polycom Support Web
text in this style, you will be linked to an external document or Web page.
Blue Text Used for cross references to other sections within this document. If you
click on text in this style, you will be taken to another part of this
document.
Fixed-width-font Used for code fragments and parameter names.
Related Documents
For additional information about the VVX 300 and 310 phones, see the following documents:
• User Documents:
○ Polycom VVX 300 and 310 Business Media Phone Quick User Guide—This guide is a
quick reference on how to use the phone’s most basic features. It also briefly describes
how to navigate the phone and enter information. It is available from the
310 Business Media Phone Support Web page.
VVX 300 and
xiii
Page 14

Polycom® VVX® 300 and 310 Business Media Phones User Guide
• Setup and maintenance documents:
○ Polycom VVX 300 and 310 Business Media Phone Quick Start Guide—This guide
describes the contents of your phone package, how to assemble the phone, and how to
connect the phone to the network. The quick start guide is included in your phone
package. It is also available from the
VVX 300 and 310 Business Media Phone Support
Web page.
○ Polycom VVX 300, 310, 400, and 410 Business Media Phone Administrators’ Guide—
This guide provides detailed information about setting up and configuring your phone,
including how to configure features. It is available from the
VVX 300 and 310 Business
Media Phone Support Web page.
○ Polycom VVX VVX 300/310/400/410/500/600 Business Media Phone Wallmount
Instructions—This document provides detailed instructions for mounting your phone on
the wall. To install your phone on the wall, you’ll need the optional wallmount package.
The wallmount instructions are included in the optional wallmount package. They are
also available from the VVX 300 and 310 Business Media Phone Support Web page
• Feature Descriptions and Technical Notifications for Polycom phones—These documents
describe workarounds to existing issues and provide expanded descriptions and examples
for phone settings and features. You can find these documents on the Polycom Support
Web site on the Polycom® Profiled UC Software Features and
Polycom® Engineering
Advisories and Technical Notifications support pages.
.
xiv
Page 15

Note: Accessing Features and Options
As you read this guide, keep in mind that certain p hone features are configurable by your
features may not be enabled or may operate differently on your phone. The examples and
figures in this guide may not directly reflect what displays on your phone screen.
Chapter 1: Getting Started
Before you use your Polycom® VVX® 300 phone, you may wish to take a few moments to
become familiar with its features and user interface. In this chapter, you learn about your
phone’s components and the screen layout. You’ll also learn how to configure your phone
remotely using the Polycom Web Configuration Utility.
system administrator or determined by your phone environment. As a result, some
Phone Keys and Hardware
The following figure shows the important phone features, which are described next.
1
Page 16

Polycom® VVX® 300 and 310 Business Media Phones User Guide
Feature
Description
also use the dialpad keys to select menu items t hat have index numbers.
key
data.
green when an analog headset is activated.
Web Info: Attaching Phone Hardware
For information on attaching phone hardwa re, including how to connect your phone to the
network, see the
from the Polycom Business Media Phones Web pa ge.
VVX 300 Phone Features
Speaker Provides ringer and hands-free (speakerphone ) audio output.
Dialpad Enables you to enter numbers, letters, and sp ecial characters. You can
Security slot The connector on the back of your phone that enables you to attach a
laptop cable lock to your phone so you can secur e i t to a desktop. For
more information on locking your phone to t he desktop, see
Security Slots on Polycom Phones (Technical Bulletin 64654).
Message Waiting Indicator Flashes red to indicate new messages.
Home key
Screen The 2.2-inch diagonal screen is backlit.
Navigation keys/Select
Headset key Enables you t o pl ace and receive calls through a headset. The key glows
Press from any screen to display Home view. From Home vi ew,
press to display other phone views.
Scroll through displayed information or option s. Sel ect a field of displayed
Speakerphone key Enables you to place and receive calls using the speakerphone. The key
glows green when activated.
Mute key Mutes local audio during calls and conferences. The key glows red when
activated.
Volume keys Adjust the volume of the handset, headset, speaker, and phone’s ringer.
Microphone Transmits sound to other phones.
Quick Start Guide for your phone, available by navigating to your phone
Phone Views
Your phone has three main views: Home, Calls, and Lines view (the default).
To change views:
• For Home view, press .
2
Page 17
Chapter 1: Getting Started
Troubleshooting: Why Can’t I Access a Certain V i ew?
The views you can access depend on the number of calls your p hone has, and if your
• From Home view, press to display either Lines or Call view.
phone has an active call. If your phone is idle, you can access Home and Lines view. If
your phone has one call only—and it’s active—you can access Home and Lines view. If
your phone has multiple calls, or one held call, you can access Home, Lines, and Calls
view by pressing .
At the top of each view is a status bar, shown next. The status bar shows the date and time. If
your phone has information you should know about, messages will display, together with the
time.
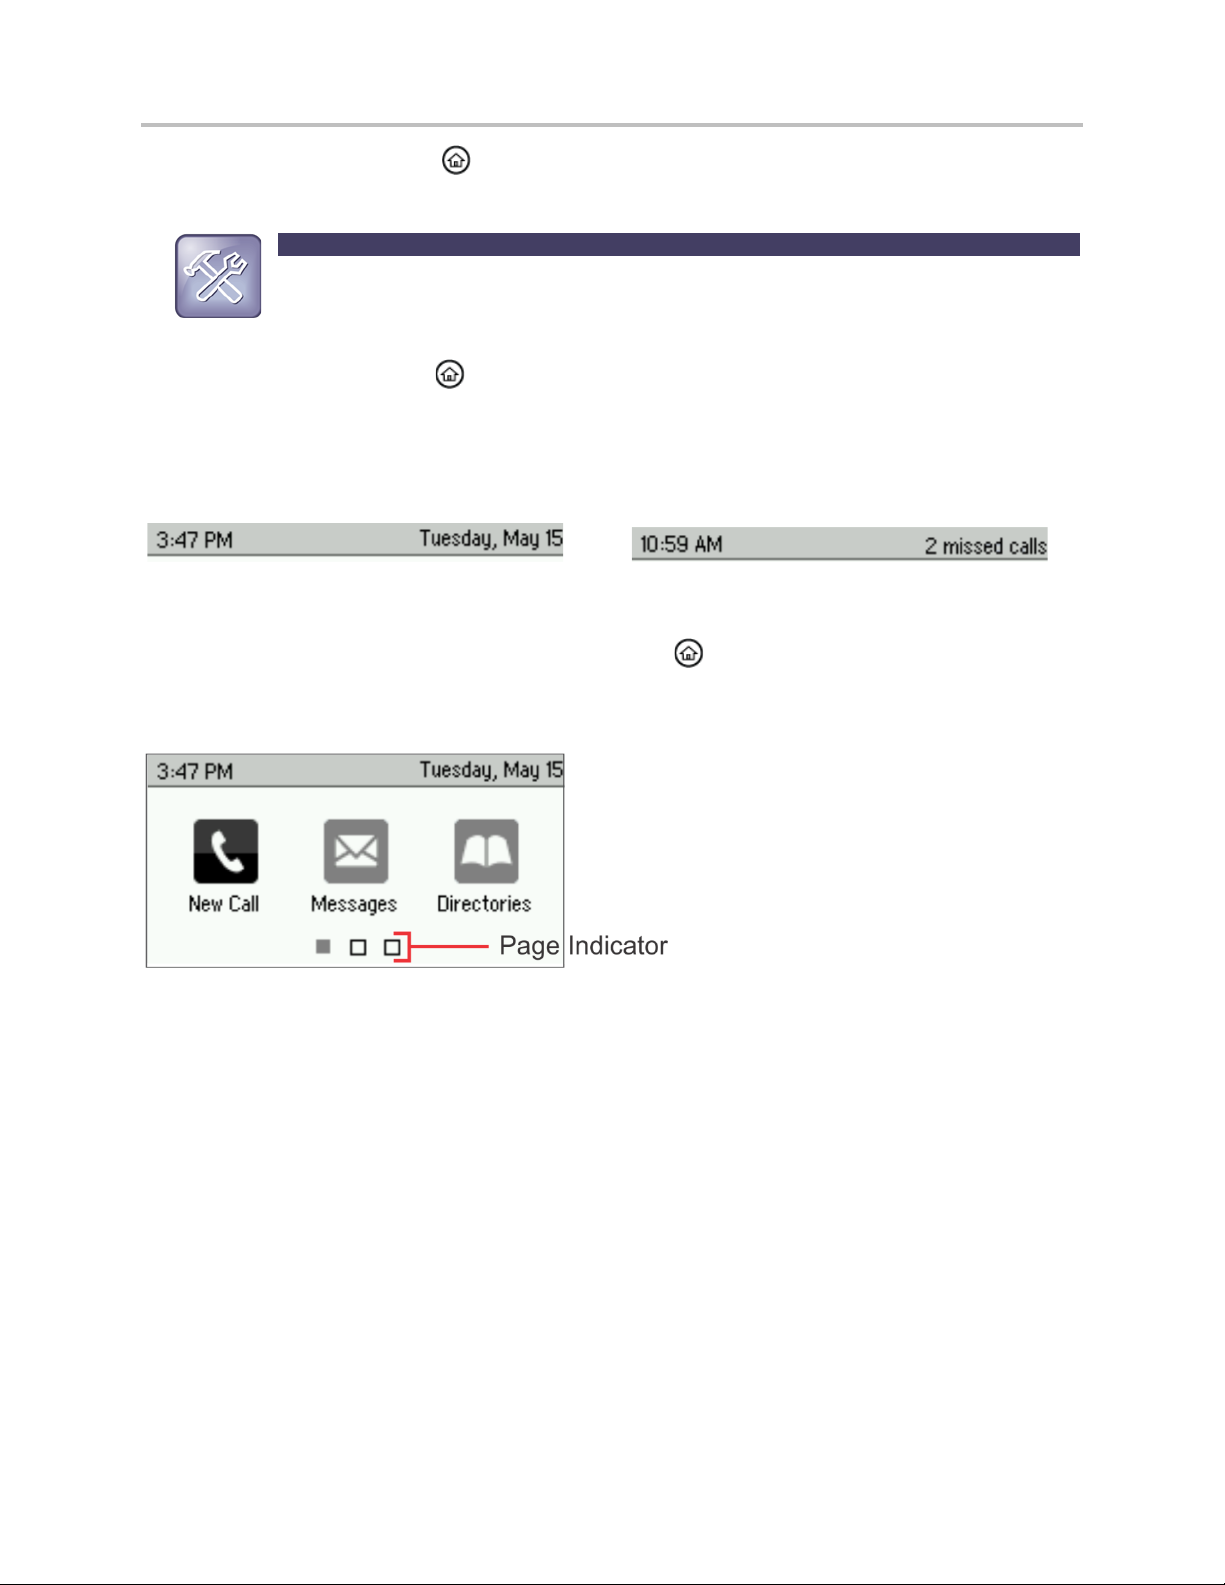
Home View
You can display Home view (shown next) by pressing . Home view displays your phone line,
and messages, settings, and information. At the bottom of Home view is a Page Indicator that
shows how many pages of icons Home view displays.
To change the displayed page, press the down or up arrow key. To change the highlighted
entry, press the right or left arrow key. Press Select to access the desired menu.
Home view displays the following icons:
• New Call—Select New Call to display the Dialer so you can place a call.
• Messages—Select Messages to access your voicemail.
• Directories—Select Directories to access your Contact Directory, Favorites, and Recent
Calls list. You may also be able to access a Corporate Directory and Buddy Status List if
they’re set up on your phone.
• Forward—Select Forward to set up forwarding options for incoming calls.
• DND—Select DND to toggle DND (Do Not Disturb) on or off. When DND is enabled, your
phone won’t ring and incoming calls will go to voice mail.
3
Page 18
Polycom® VVX® 300 and 310 Business Media Phones User Guide
Note: Why Can’t I Access the Idle Browser?
If your phone has calls, you can’t access the Idle Browser. To access the Main Browser,
Browser.
• Settings—Select Settings to access phone features and settings to customize your
phone.
Additional icons may include:
• Applications—Select Applications to access a menu of custom applications. See your
administrator for information about any specific applications listed in this menu.
• Calendar—Select Calendar to show a calendar with your meeting details. Using the
Calendar feature, you can join meetings directly from your phone.
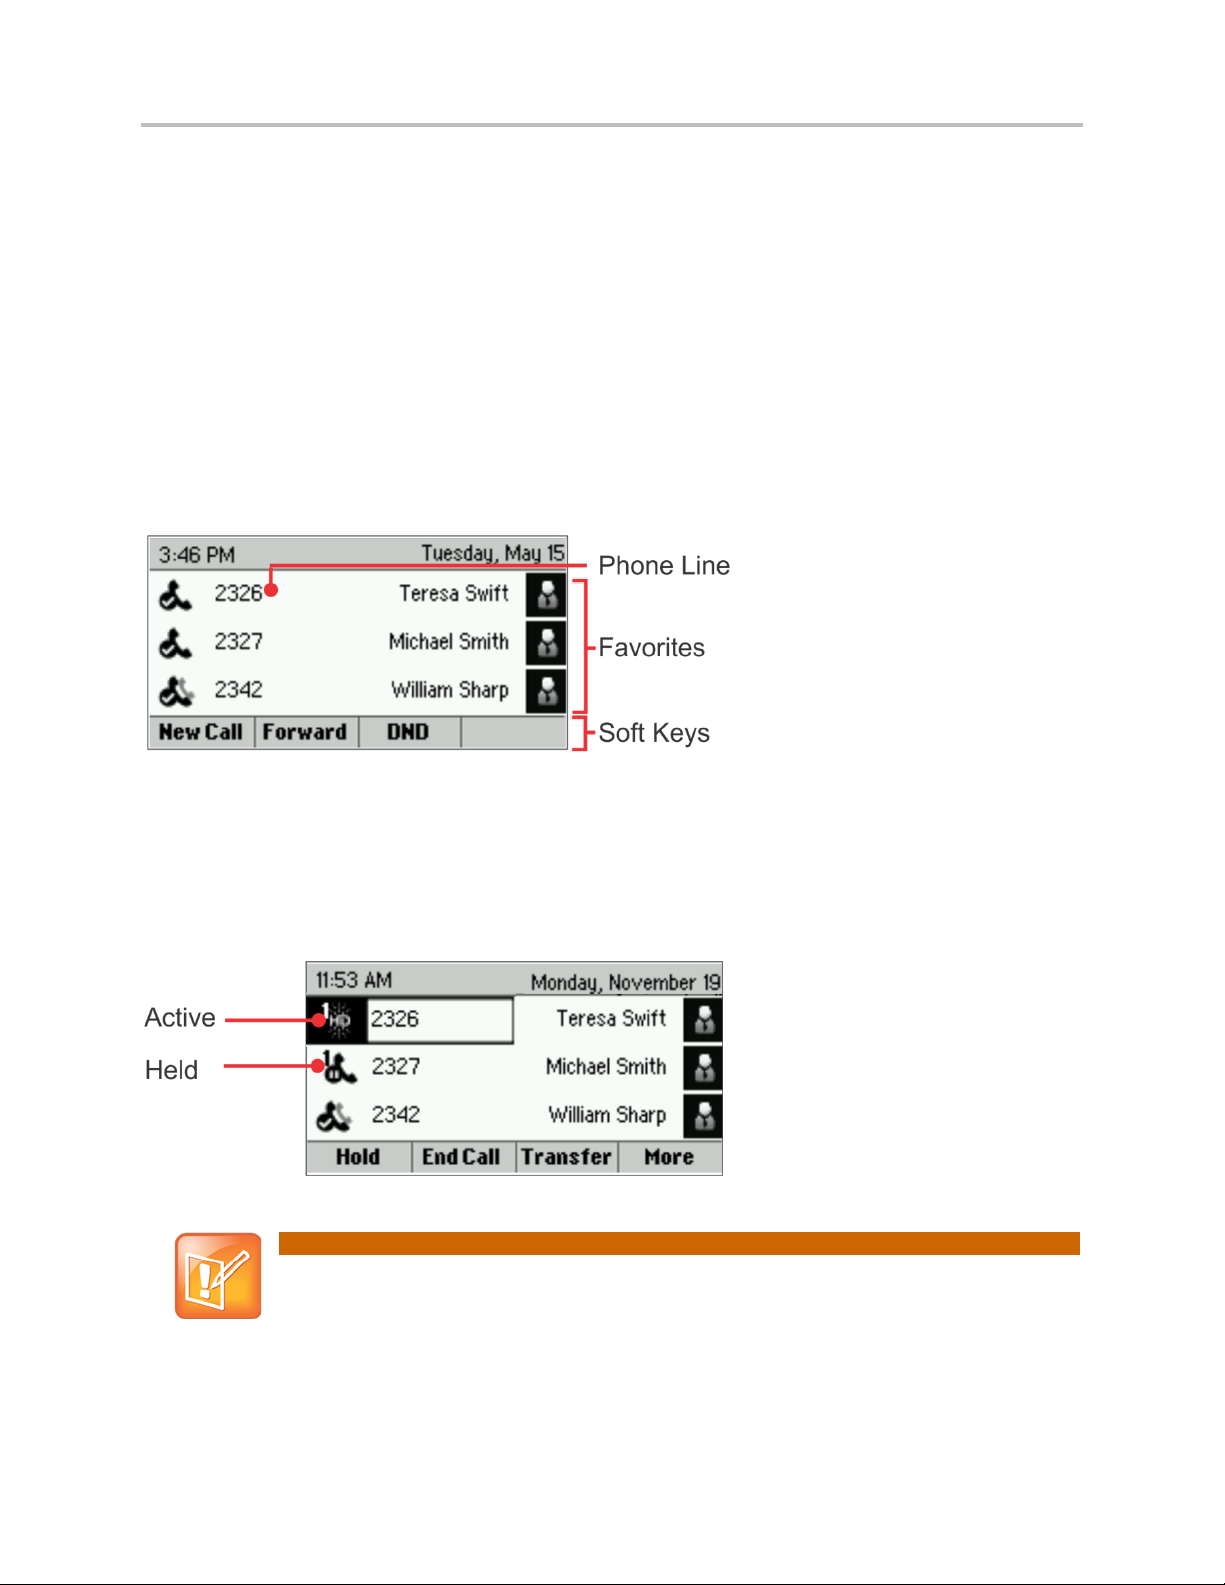
Lines View
Lines view (shown next) is your phone’s default display. Lines view displays your phone line(s),
your favorites, and soft keys in the soft key area.
If your phone is idle, you can press a line key to access the Dialer.
If your phone has calls, the phone line indicates the number of calls you have, and if they’re
active or held. If the phone line has an active call, the call color is medium grey, as shown next.
If the phone line has one or more held calls, the call color is light grey, as shown next. The
number of total calls is shown above the calls. To select a call, use the up and down arrow keys.
select Applications from Home view. For information about the Browser, see Using the
4
Page 19
Chapter 1: Getting Started
Icon
Description
Icon
Description
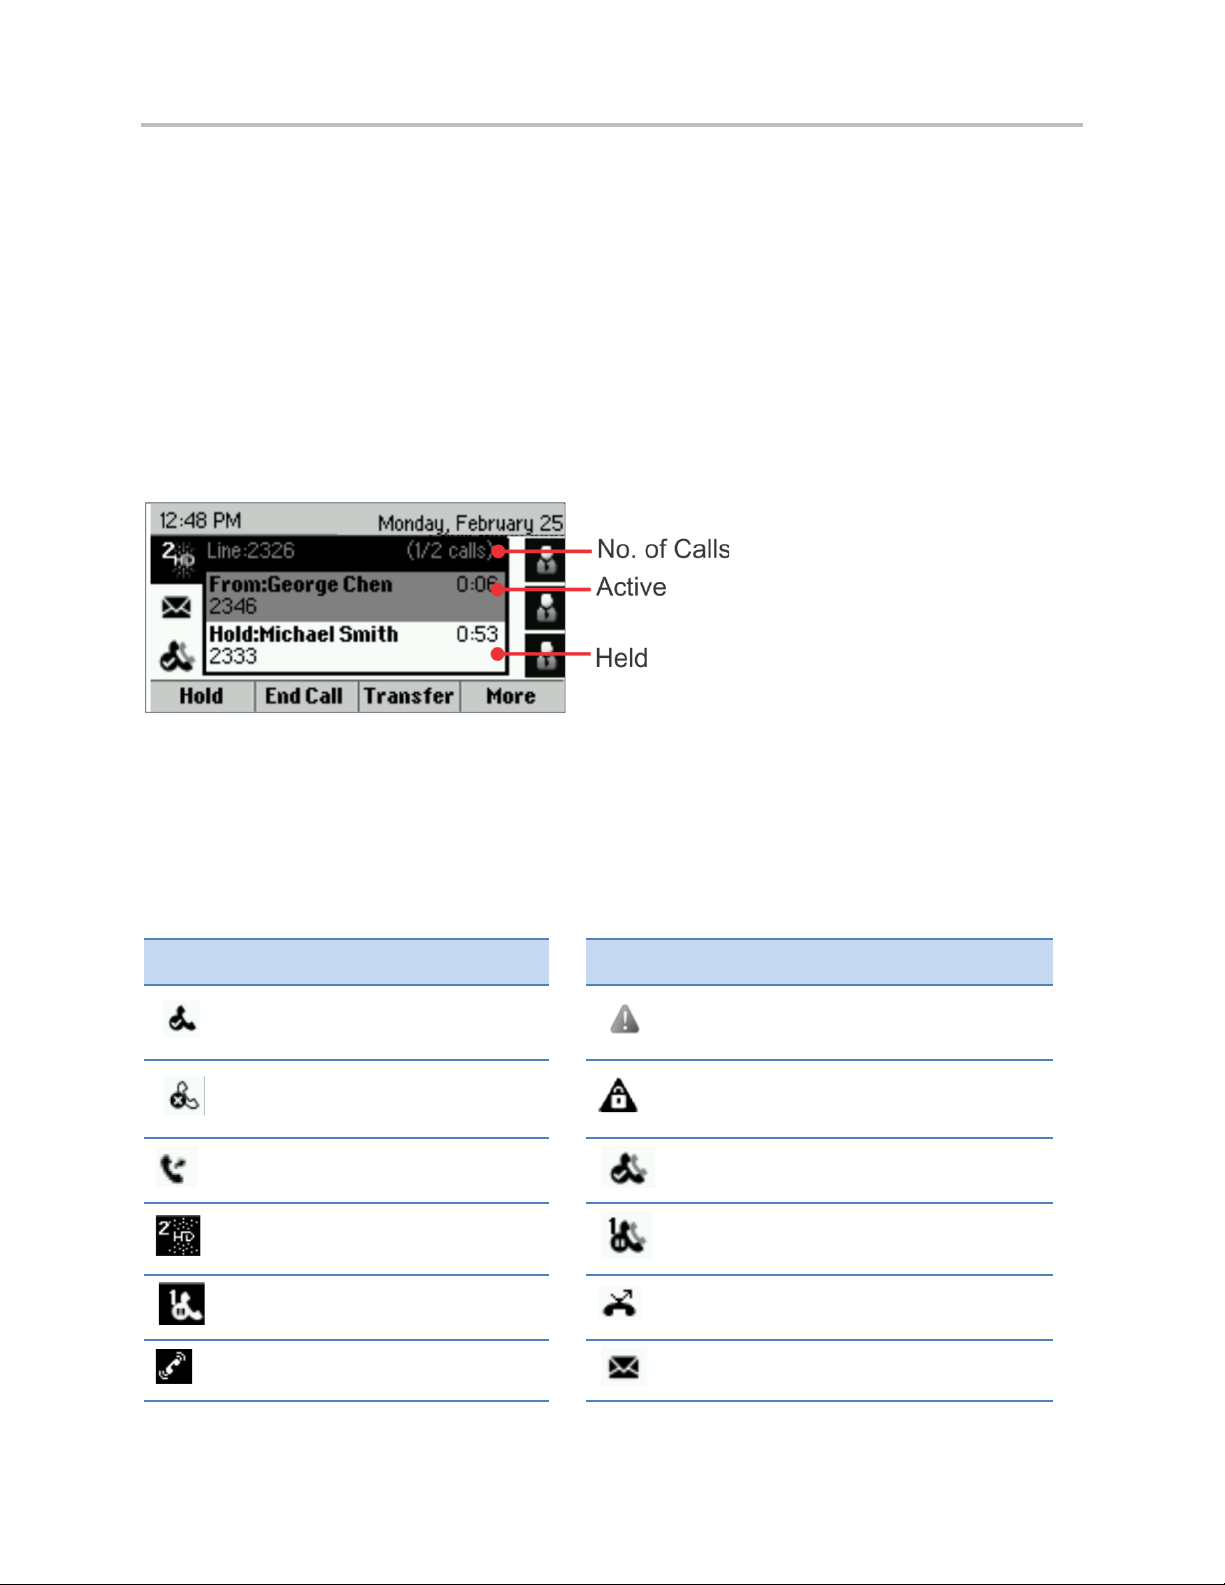
Calls View
You can access Calls view (shown next) if your phone has multiple calls in progress, or you
have one held call. Use the up and down arrow keys to see all your calls. If your phone has
multiple lines, calls display under the associated line.
Call color indicates status:
• Medium grey—Active call
• Dark grey—Incoming call
• Light grey—Held call
Use the up and down arrow keys to highlight a call. The soft keys apply to the highlighted call.
Understanding Phone Icons and Status Indicators
The following icons and indicators indicate phone, call, or buddy/contact status, or to indicate
that a feature is enabled.
Registered line
Unregistered line
Placing a call
Active call using Polycom HD
Voice
Phone warning
Login credentials invalid
Shared line
Shared line with a held call
Held call
Incoming call
Call forwarding is enabled
You have messages
5
Page 20
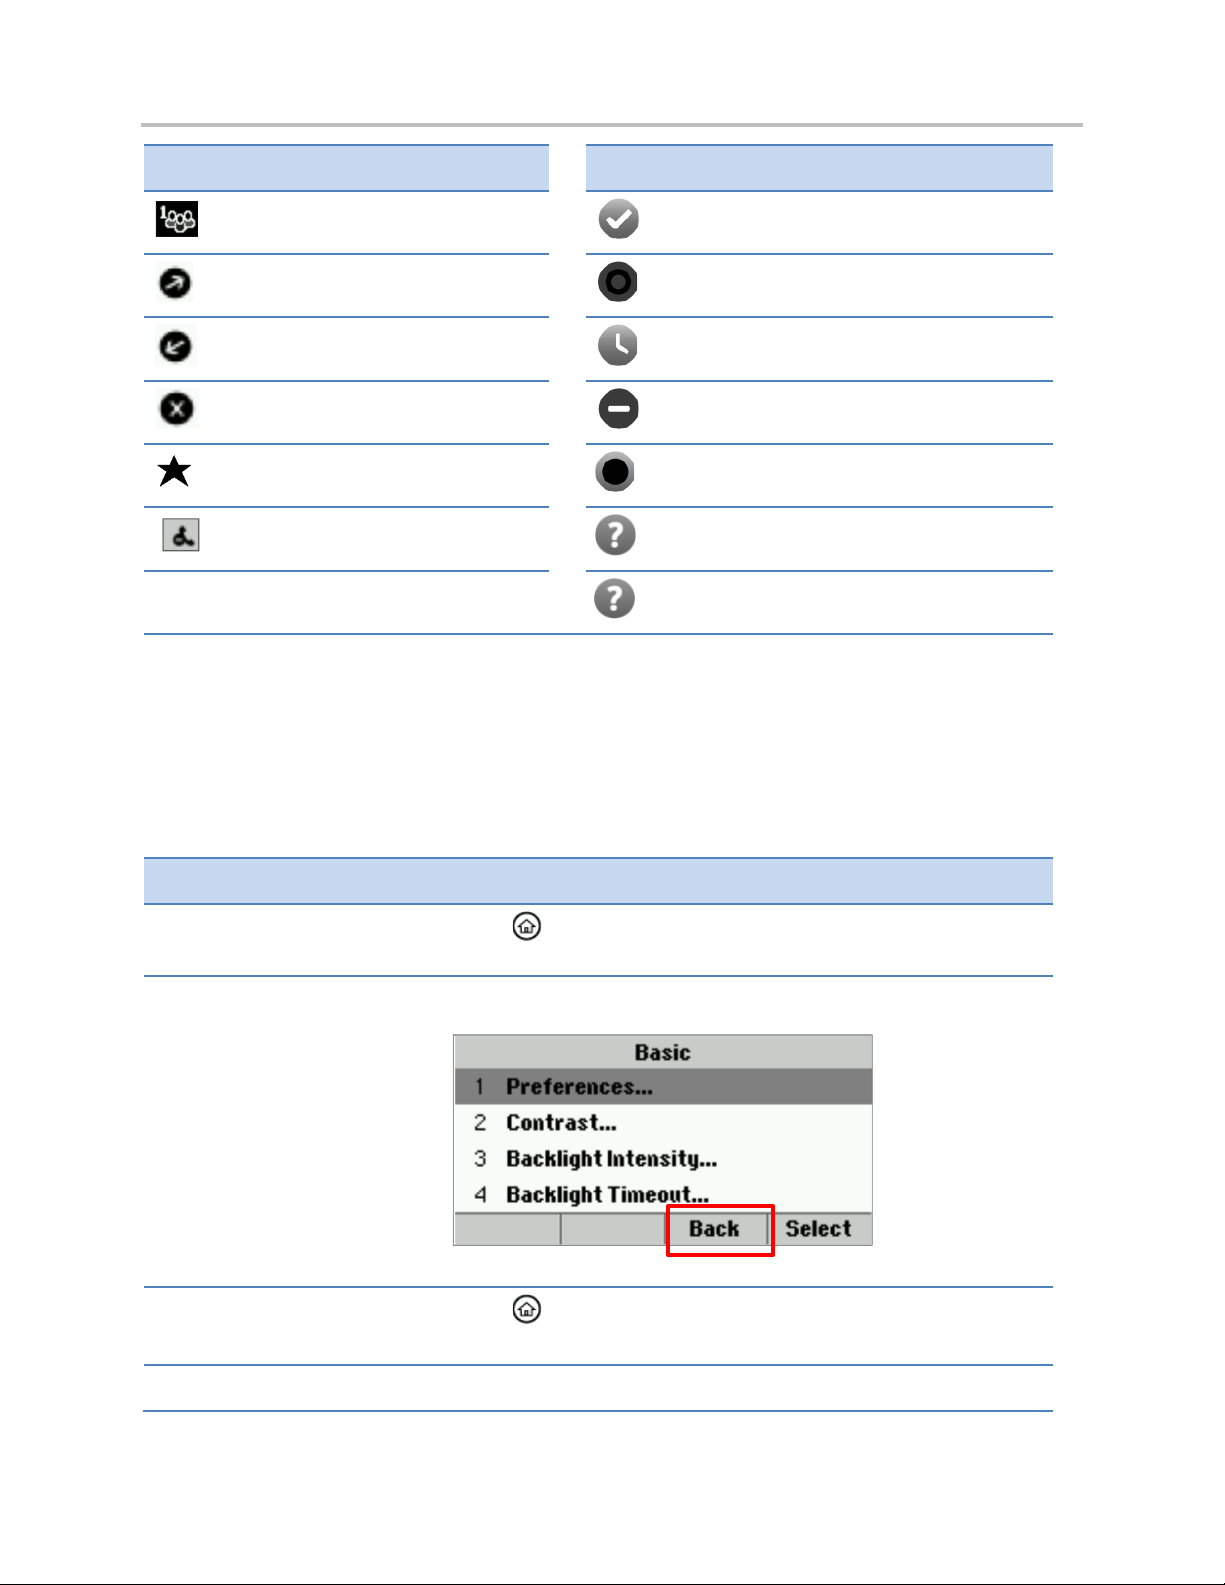
Polycom® VVX® 300 and 310 Business Media Phones User Guide
Icon
Description
Icon
Description
If you want to…
Do this…
screen
Dial
Active conference
Placed call
Received call
Missed call
Favorite
Do Not Disturb enabled
Navigating Your Phone Interface
Presence status (Available)
Presence status (Busy or In a Call)
Presence status (Away)
Presence status (Do Not Disturb)
Presence status (Offline)
Presence status (No information)
Presence status (No information)
The following table shows you how to navigate your phone’s screens, as well as select and
highlight options.
Return to Home view from any
Return to the previous screen Press Back, as shown next. Or press the left arrow key .
Switch phone views
Press .
Press to display a different view (from Home view to Lines
view to Calls view, if there is an active call).
6
Place a call Press
or use the right arrow key from a call list.
Page 21
Chapter 1: Getting Started
If you want to…
Do this…
Hold
Resume
Mode
Highlight calls in Calls view Use the up and down arrow keys to select a call. The soft keys,
like
Select a menu item or option Use the up and down arrow keys to highlight the menu item or
option, and press Select.
If the menu is numbered, press the dialpad key to enter the
corresponding menu. For example, press 4 to enter the Backlight
Timeout menu as shown above.
Use * to page up and # to page down in the menus.
or
, apply to the highlighted call.
Close an option box without
selecting anything
Select a soft key, menu item,
or option
Select a soft key that’s not in
view
Press the left arrow key.
Use the up and down arrow keys to highlight the me nu i tem or
option. Press the appropriate soft key.
If an item in a list has a number next to it, you can press the
corresponding number on the dialpad to select the item.
If a More soft key displays in the far-right of the soft key area (as
shown next), there are additional soft keys available, but you can’t
see them. Press More to view the additional soft keys.
Entering Data and Updating Fields
You can enter information and edit fields using the dialpad keys on the phone console.
Before you use the dialpad keys to enter information in fields, you can select Encoding or
Mode to specify how you want to enter information:
The following tables list the Mode and Encoding options.
• Mode—enables you to enter just numbers, or text in title case, lowercase, or uppercase
characters.
• Encoding—enables you to enter alphanumeric and special characters—including all the
options available when you select Mode—as well as characters in special languages.
Options Available
When You Select
Abc Abc
ABC ABC
Options Available When You Select Encoding
7
Page 22

Polycom® VVX® 300 and 310 Business Media Phones User Guide
Mode
Encoding
Options Available
When You Select
abc abc
123 123
ASCII (for regular text)
Latin (to enter accented characters)
Options Available When You Select Encoding
Katakana (for Japanese characters)
Unicode (to store characters as double bytes)
Cyrillic (for Russian characters)
Using the Dialpad Keys on the Phone Consol e
You can use the dialpad keys on your phone console to update field information. If a field
requires data input, select Encoding or Mode to specify how you want to enter data.
Use the tips in the following table to enter information using the dialpad.
If you want to… Do this…
Enter numbers, or characters in
uppercase, lowercase, or titlecase
mode
Enter only numbers Select Encoding or Mode, and select the numeric (123)
Enter text in a special language Select
Enter a character Press a dialpad key repeatedly to view the character options
Enter a number Press a dialpad key repeatedly (depending what mode
Select Encoding or Mode, and select one of t he al phabetic
(ABC, abc, or Abc) options.
option.
, and select one of the language options.
and stop to select. When the character you want to enter
displays in the field, wait one second, and ent er the next
character.
you’re in) to enter the number that displays on that key.
8
Page 23

Chapter 1: Getting Started
If you want to…
Do this…
numerical (123) mode.
Web Info: How to Register Your Phone
For detailed information on how to register your phone after you install it, see Registering
Standalone Polycom Phones (Quick Tip 44011)
Enter a special character Select Encoding, and select one of the alphabetic (Abc,
ABC, or abc) options. Then, press the 1, *, 0, or # key one
or more times to enter one of the following special
characters:
• 1 key: ! | ‘ ^ \ @ : 1
• * key: . * - & % + ; ( )
• 0 key: / , _ $ ~ = ? 0
• # key: # > < { } [ ] “ ‘
Note: You can’t access special characters when you’re in
Enter a space Select Encoding, and select one of the alphabetic (Abc,
ABC, or abc) options. Then, press the 0 key.
Note: You can’t enter a space when you’re in numerical
(123) mode.
Delete one or more characters Using the left and right arrow keys until the curs or is
positioned to the right of the character(s) you want to del ete.
Then, press .
Registering the Phone
Generally, your phone will be deployed with multiple other phones. In this case, your system
administrator will configure the phone parameters beforehand, so that after you set up your
phone, the phone will be registered and ready to use.
If your phone is not part of a large phone deployment, your phone may not be registered after
you set it up. Before you use your phone, you or your system administrator will have to register
it.
.
9
Page 24

Polycom® VVX® 300 and 310 Business Media Phones User Guide
Web Info: Using the Utility
For detailed information on accessing, nav igating, and using the utility, see the Polycom
Web Configuration Utility User Guide
Configuring Your Phone Using the Web Configuration Utility
This section explains how to update phone settings from your phone, using the phone’s menu
commands. If you wish, you can also update these settings remotely with the Polycom Web
Configuration Utility.
The phone’s Web Configuration Utility enables you to view and configure phone behavior from a
computer using any compatible Web browser. The utility provides a browser-friendly view of
your phone’s current settings. Using the utility, you can perform many of the same updates from
your computer that you can perform using your phone’s menu system.
You can access the utility using any compatible Web browser installed on a computer that
resides on the same network as your phone. Before you begin, you’ll need to know the IP
address of your phone, and the user password to log in to the utility.
.
To access the Web Configuration Utility for your phone:
1 Launch a Web browser from a computer on the same network as your phone.
2 In the Address Bar of your Web Browser, enter the IP address of your phone. For
example, if your phone’s IP address is 123.22.3.4, enter this information in the address
bar.
3 Press the Enter key.
4 From the Web Configuration Utility login screen, select User, and enter the user
password. The default user password is 123.
5 Click Submit.
The Web Configuration Utility Home screen is displayed.
10
Page 25

Chapter 2: Using Basic Features
Now that you’re familiar with your phone’s user interface and how to interact with it, you’re ready
to perform baisc phone tasks that you’ll use on a daily basis. At the end of this chapter, you’ll
become expert at handling multiple calls at one time, manipulating incoming and active calls,
and accessing directories and lists so you can perform tasks quickly and efficiently.
In this chapter, you’ll learn about:
• Calling, answering, holding, and ending calls
• Ignoring, rejecting, forwarding, and transferring calls
• Setting up conference calls
• Enabling Do Not Disturb
• Listening to voicemail
• Handling Directories, Recent Calls, and Favorites
• Customizing ringtones
• Controlling phone volume
• Setting up Do Not Disturb
• Using headsets
• Managing shared lines
How Your Phone Handles Calls
Your phone can handle multiple calls at a time. However, only one active call—the call that has
audio associated with it—can be in progress at any given time. In addition to the active call, your
phone may have multiple other calls that are either held, or in an incoming or ringing state. Your
phone can handle a maximum of 6 calls at one time.
Your administrator can set up your phone to have up to 6 lines. Lines can have unique
extension numbers, or they can have the same extension number as other lines. Your phone
can supported a maximum of 24 calls.
You can place and answer calls in these ways:
• Using the handset
• Using the speakerphone
• Using a headset
11
Page 26
Polycom® VVX® 300 and 310 Business Media Phones User Guide
Troubleshooting: Why Doesn’t the Speakerphone Work?
If your speakerphone doesn’t work, your sy st em adm inistrator may have disabled it. You
you press .
Power Tip: Setting Up the Phone to Automatically Use Your Heads et for All Calls
If you frequently use a headset, you can make t he headset the default call path. To set
this up, see
During a call, you can alternate between handset, headset, or speakerphone modes by picking
up the handset, or pressing or . For example, if you’re using the handset, you can switch
to headset mode by pressing , or switch to speakerphone mode by pressing .
When you’re in speakerphone mode, glows green. When you’re in headset mode, glows
green if an analog headset is connected.
must handle calls using the handset or a headset . If your system administrator disables
the speakerphone on your phone, Handsfree mode disabled appears on the screen after
Enabling Headset Memory Mode
Answering Calls
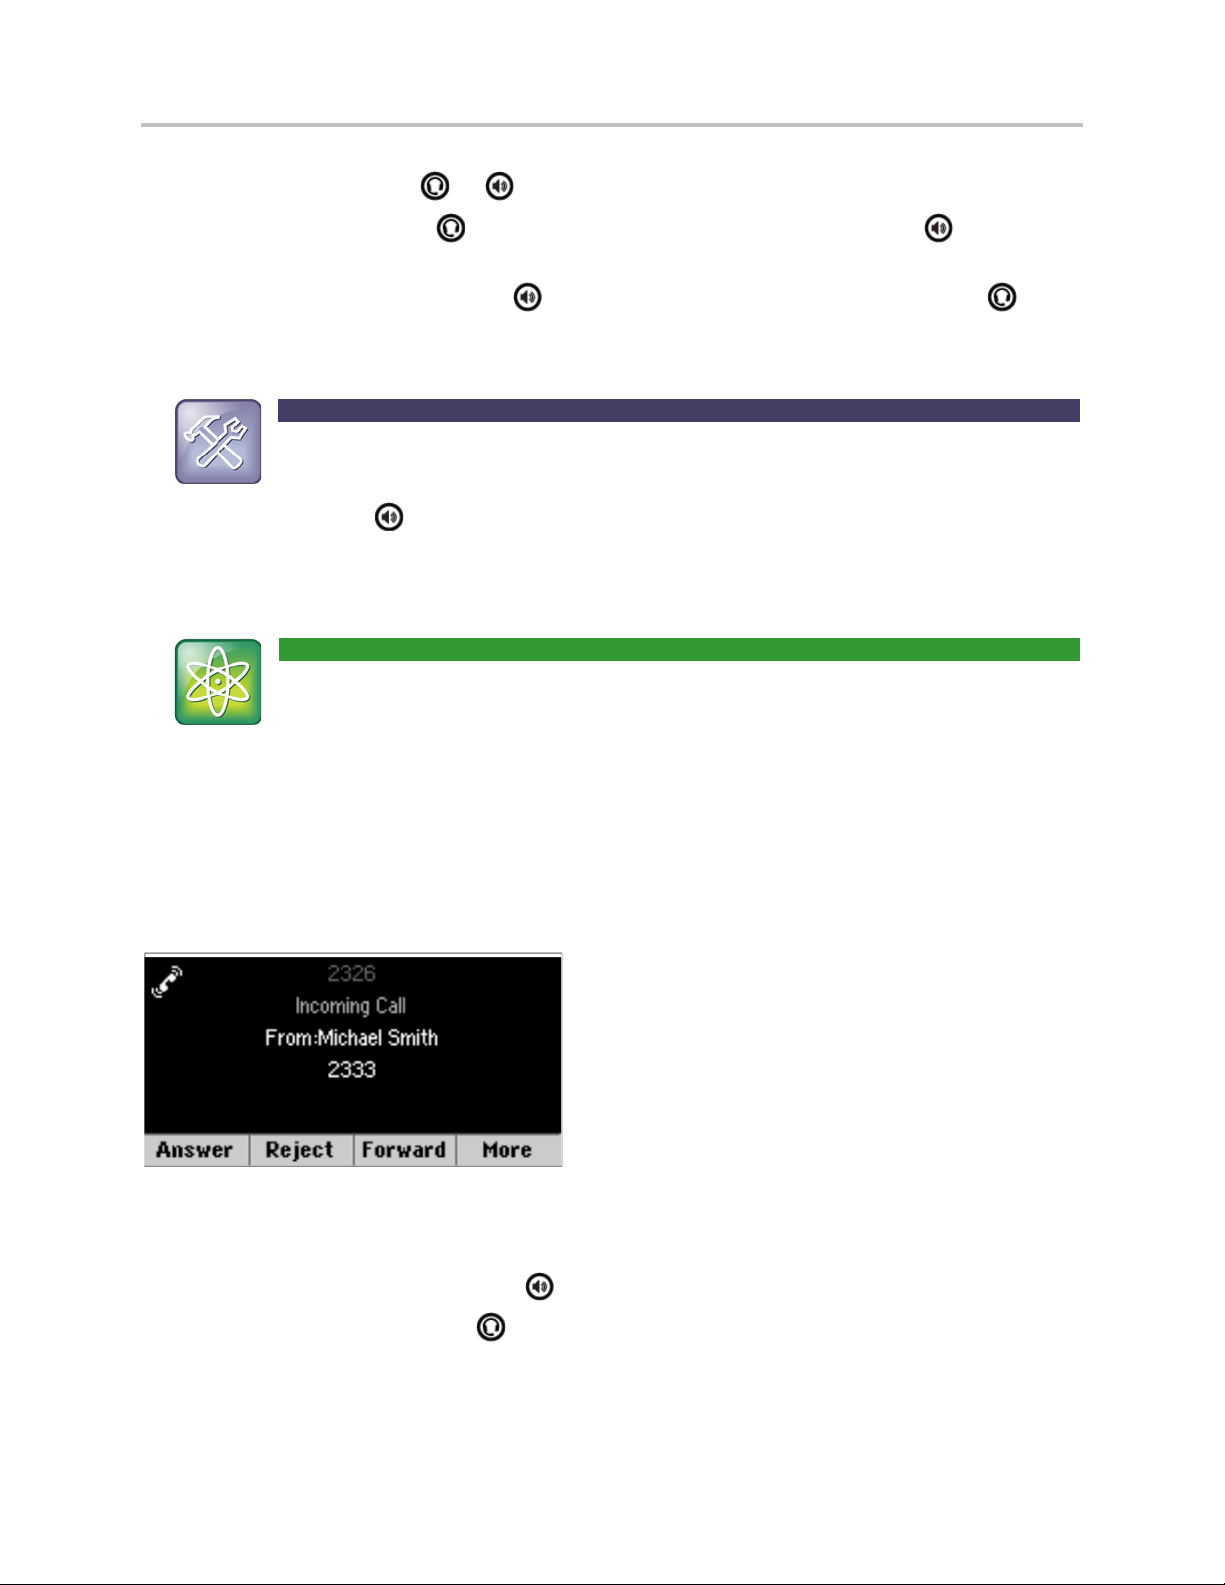
All incoming calls display in an Incoming Call window, as shown next.
To answer the call, do one of the following:
• To use the handset, pick up the handset.
• To use the speakerphone, press or press Answer.
• To use your headset, press .
If you’re already in handset, speakerphone, or headset mode, press Answer, and the phone will
automatically use the mode you’re in.
12
Page 27

Chapter 2: Using Basic Features
Note: Answering Calls When Your Phone is Locked
If your phone is locked, the way you answer calls is different. For more information on
If you don’t answer the call within 10 seconds, the Incoming Call window disappears, and Calls
view displays, as shown next.
To answer the call, pick up the handset, press , or press . Or, from Calls view, press
Answer to use the speakerphone.
answering calls from a locked phone, see Calling and Answering from a Locked Phone.
Answering Another Call
If you have a call and an incoming call arrives on the same or a different line, a call waiting tone
beeps, and the Incoming Call window displays. To answer the call, press Answer. The call you
were in is held.
If you don’t answer the call within 10 seconds, the Incoming Call window disappears, and Calls
view displays.
Answering on a Shared Line
If you share a line with another phone, you can answer calls as described above. Or, someone
who shares the line can choose to answer the call from their phone. If you answer the call and
hold it, anyone who shares your line can answer the held call.
For more information about shared lines, including what you can and can’t do with shared lines,
see Working with Shared Lines.
13
Page 28
Polycom® VVX® 300 and 310 Business Media Phones User Guide
Note: Auto-Answered Calls and Microphone Mute
Your phone mutes the microphone for all auto-ans wered calls, so that the party calling you
enable or disable microphone mute for auto-ans wered calls, see step 2, below.
Answering Calls Automatically
You may find it convenient if your phone to auto-answer calls, so you don’t have to press a key
to answer a call. If you enable this feature, your phone will automatically answer incoming calls
using the speakerphone. Your system administrator sets how many times your phone will ring
before the call is auto-answered.
If Auto Answer is enabled and a call arrives while you’re already in a call, the incoming call will
be automatically answered if you end or hold the current call.
can’t hear you. To unmute the microphone so the ot her party can hear you, press . To
To enable your phone to automatically answer calls:
1 Select Settings from Home view, and select Basic > Preferences > Auto Answer.
2 From the Auto Answer screen, do the following:
○ To enable your phone to automatically answer SIP calls, select Auto Answer SIP
Calls, and select Yes. The default setting is No.
○ To mute the microphone for all auto-answered calls so the incoming caller can’t hear
you, select Microphone Mute, and select Yes. The default setting is Yes.
3 Press Save.
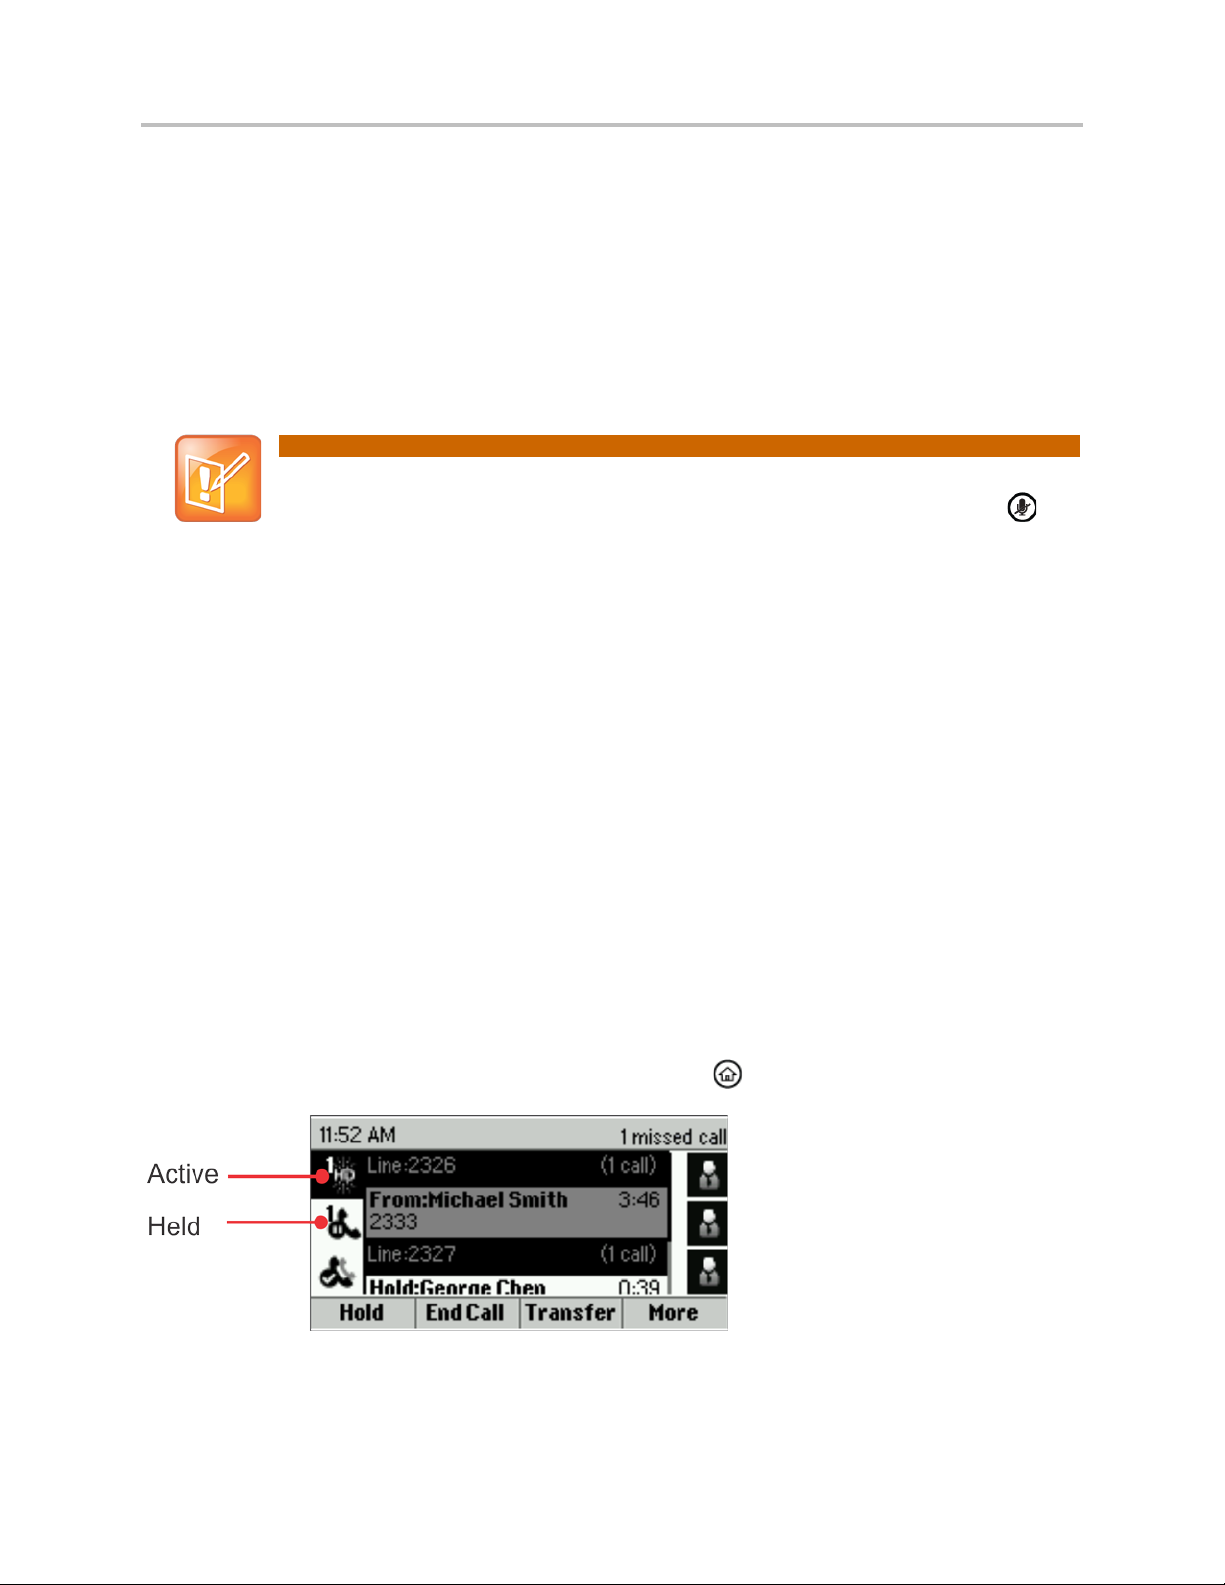
Managing Multiple Calls
You can easily manage multiple calls from Lines and Calls view.
Calls view displays all the calls for each phone line, as shown next. All the calls for a phone line
display under the associated phone line. Scroll up or down to see all your lines and calls. To
switch to Lines view, press More and then Lines or press .
14
Page 29
Chapter 2: Using Basic Features
Note: Calling from a Locked Phone
If your phone is locked, see Calling and Answering from a Locked Phone for information
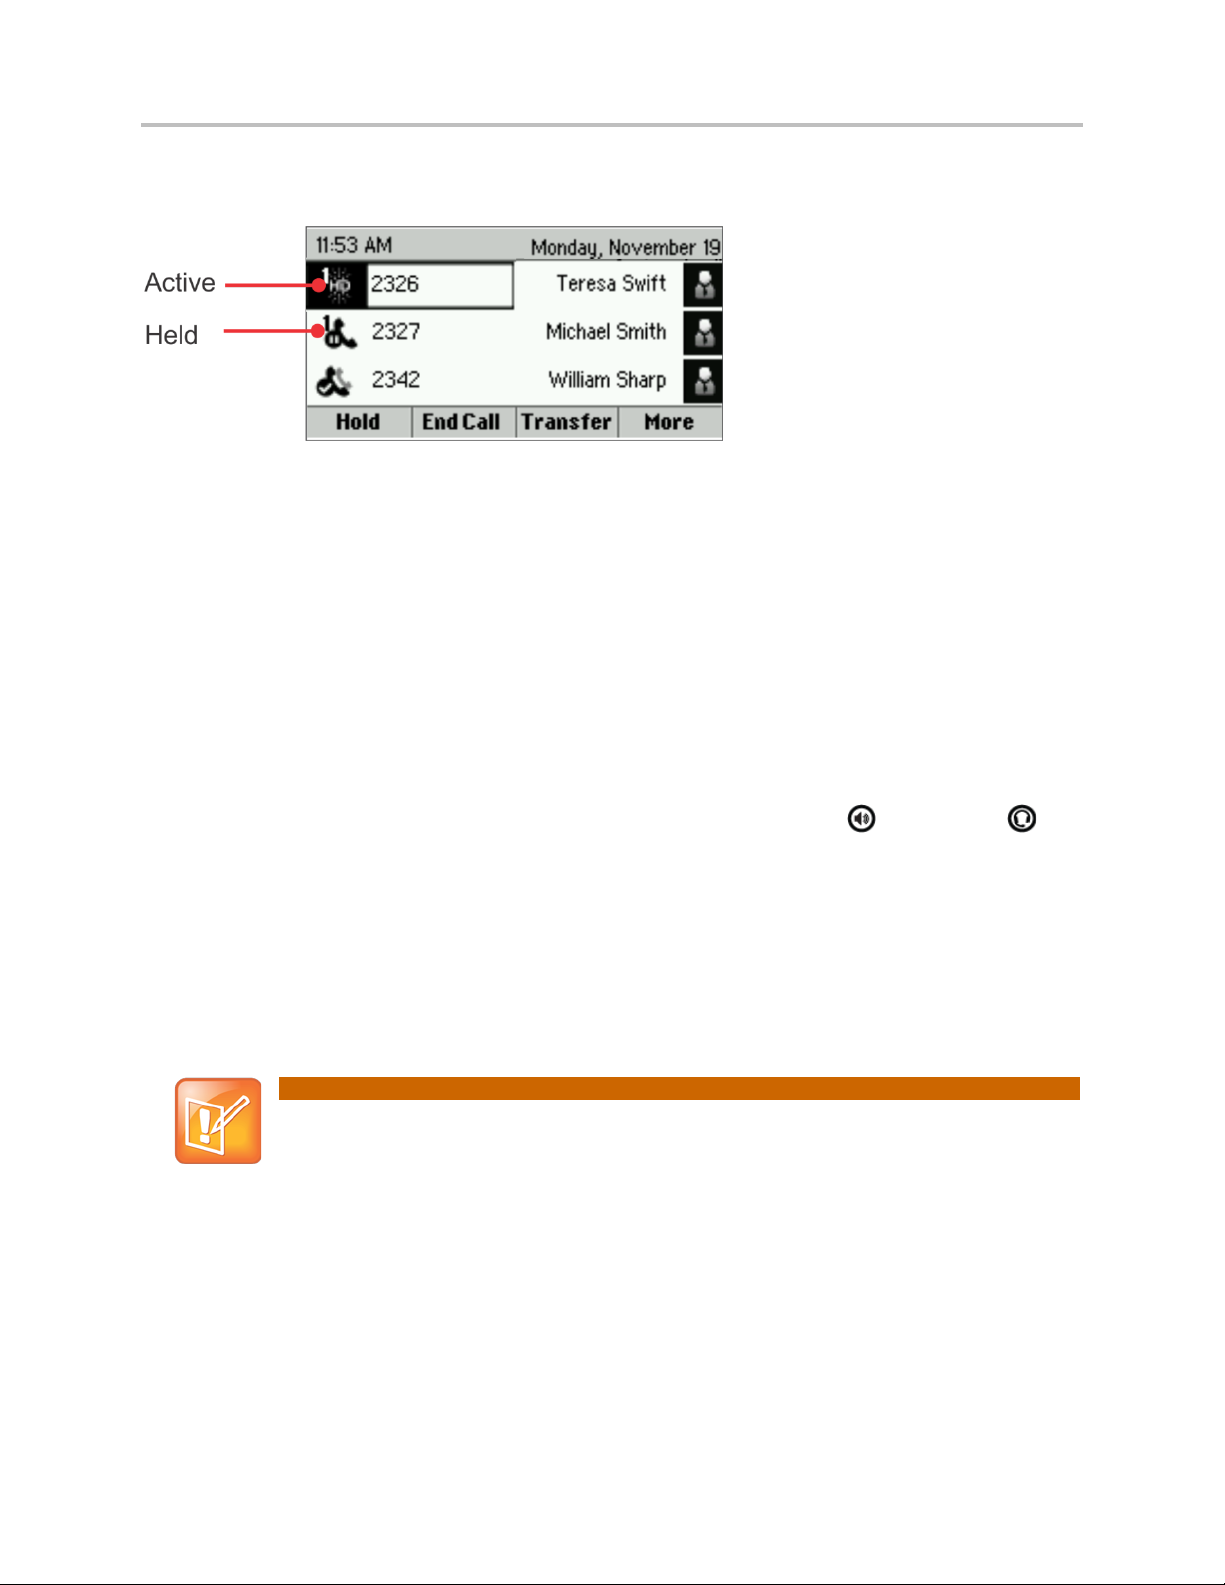
Lines view shows you each line on your phone, and how many calls each line has, as shown
next. In the example below, line 2326 has one active call, and line 2327 has one held call.
If you press a line key that doesn’t have an active call, the most recent call on that line will
become active. The current call will be held.
To manage a call, use the up and down keys to highlight it. Then, press one of the soft keys to
hold, resume, end, or transfer the highlighted call, or set up a conference with the highlighted
call.
Placing Calls
You can place a call using the handset, speakerphone, or headset. You can dial the number
first, and then choose the method—by picking up the handset, pressing , or pressing —or
choose the method first, and then dial the number.
You can place calls in these ways:
• Manually, from the Dialer
• Automatically, by tapping a favorite in Home or Lines view
• Automatically, from your Favorites list, Recent Calls list, or Contact Directory.
on placing calls when your phone is locked.
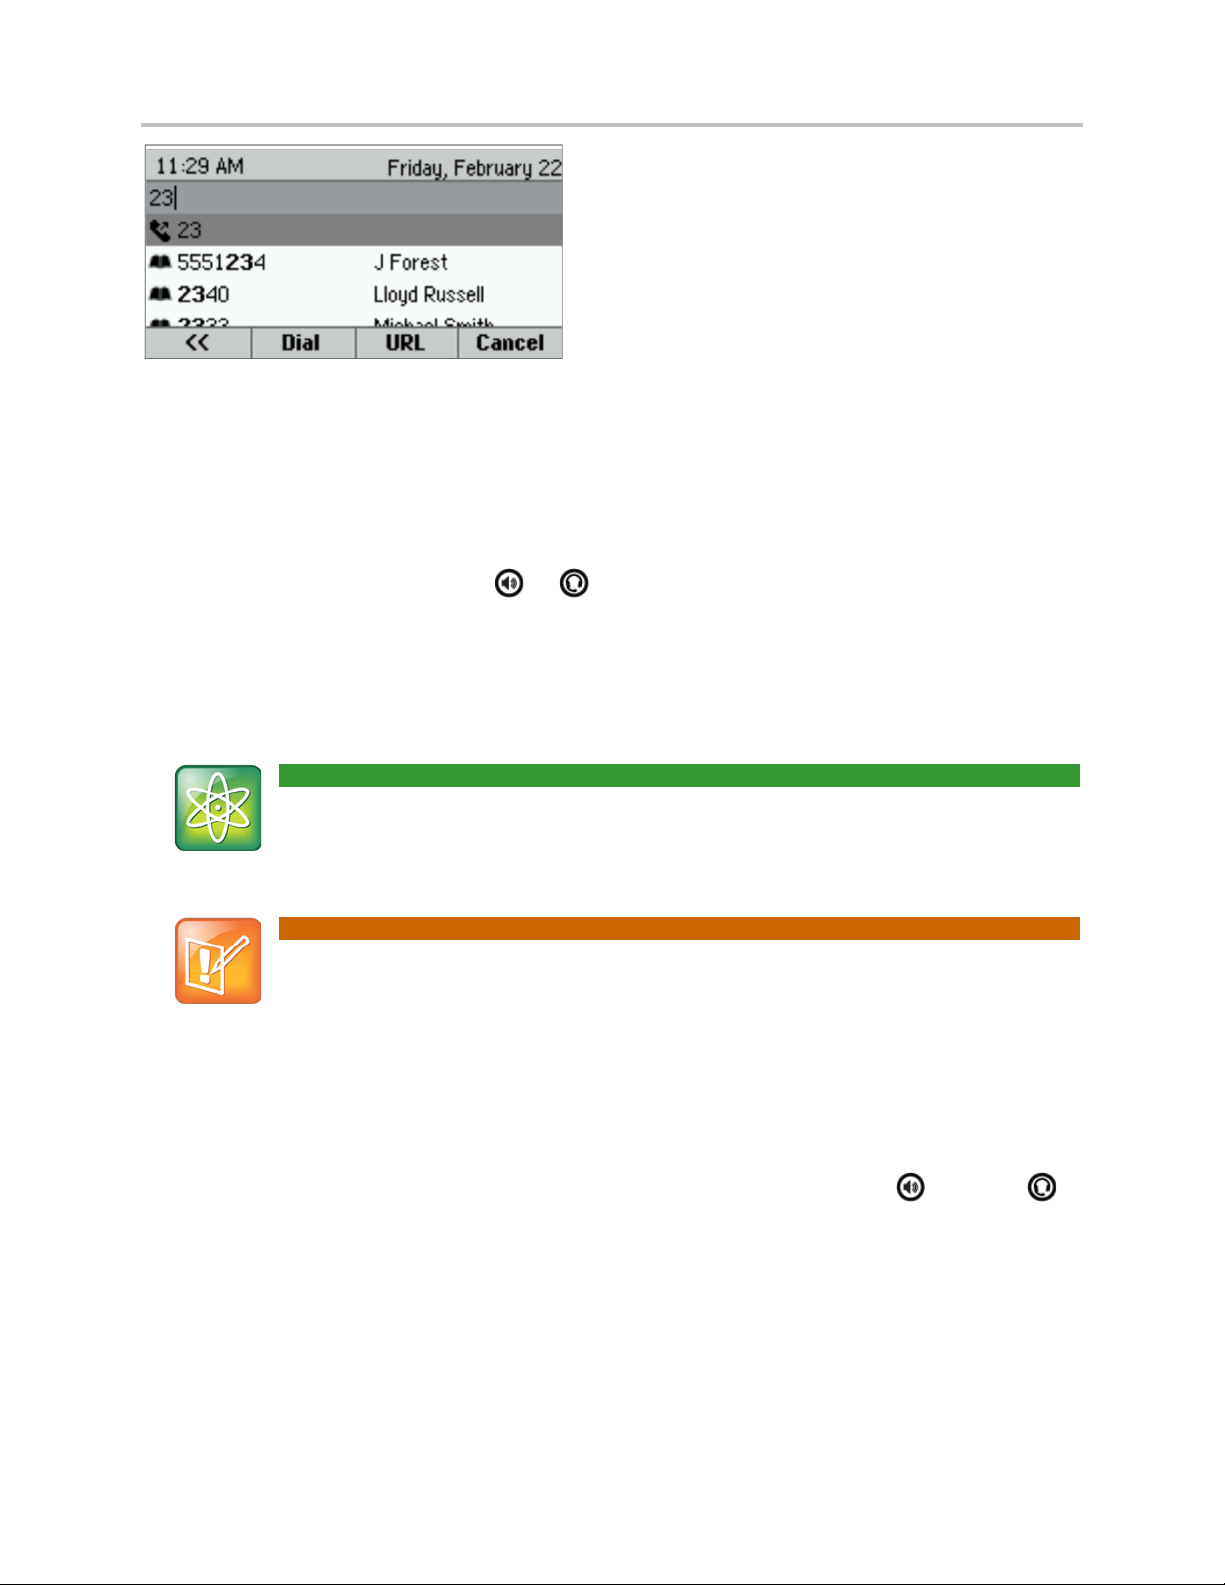
Calling from the Dialer
The Dialer displays a list of previously-placed calls. Select one of the entries to automatically
enter it. Or, start entering a number. As you enter numbers, the Dialer displays a list of similar
numbers, as shown next. Use the up and down arrow keys to select a match and automatically
enter it.
15
Page 30
Polycom® VVX® 300 and 310 Business Media Phones User Guide
Power Tip: Choosing URLs or Numbers Mode from the Dialer
To enter a URL in the Dialer, tap URL. To exit URL mode and enter numbers, tap
Number
Note: No New Call Icon when Maximum Calls Reached
The New Call soft key is not displayed when the maximum number of calls is reached
To display the Dialer, do one of the following:
• From Home view, select New Call.
• From Lines or Calls view, press New Call. (The New Call soft key won’t display if you
have an active call.)
• If your phone is idle, start entering a phone number.
• Pick up the handset, or press or . This method only works if you don’t have an
active call.
• In Lines view, press a line key that doesn’t have any calls.
.
(24).
When you access the Dialer, an active call is held.
To call from the Dialer:
• Enter the number, and then pick up the handset, press a line key, press , or press .
or
• If you’re already in handset, speakerphone, or headset mode, enter the number, and press
Dial.
16
Page 31

Chapter 2: Using Basic Features
Note: Handling Automatically Placed Calls
Your administrator sets up your phone to autom atically place the call after you enter a
number and press Send.
certain number of digits. If your phone does n’ t automatically place the call, press Send. If
a call is placed before you enter all the digits, place the call as follows: enter the phone
Placing Calls from Favorites, Recent Calls, and Directories
In addition to the Dialer, you can place calls from the Recent Calls list, Favorites list, or your
Directory. Or, you can quickly call a favorite from Home or Lines view.
To call from the Recent Calls list:
1 Access your Recent Calls list by doing one of the following:
○ From Home view, select Directories, and select Recent Calls.
or
○ From Lines view, press the right arrow key for the Placed Calls list, the down arrow key
for the Missed Calls list, or the left arrow key for the Received Calls list.
2 From the Recent Calls list, use the up and down arrow key to select the person you want
to call and press Dial.
To call from your Favorites list:
1 From Home view, select Directories, and select Favorites.
You can also press the up arrow key to access the Favorite list.
2 From your Favorites list, use the up and down arrow key to select the favorite you want to
call, and press Dial.
To call from your Directory:
1 From Home view, select Directories, and select Contact Directory.
2 From your Directory, use the up and down arrow key to select the contact you want to call.
3 Place the call by doing one of the following:
○ From the contact’s information screen—press Info, use the up and down arrow key to
select the contact, and press Dial.
○ Use the up and down arrow key to select the contact, and press Dial.
Redialing Numbers
To dial the last number you called, press the right arrow key for the Placed Calls list. The first
number in the list is the last call you placed.
17
Page 32

Polycom® VVX® 300 and 310 Business Media Phones User Guide
Note: How Do I End a Held Call?
A call must be active to end it. To end a held call: From Calls view, select the held call to
To redial a number:
• From the Placed Calls list (shown next), press Dial.
Use the up and down arrow key to select the other previously placed calls.
Ending Calls
To quickly end an active call, replace the handset. Or from Lines or Calls view, press End Call.
If you’re in Calls view, be sure to highlight the call first.
highlight it, press Resume, and then press End Call.
Using Headsets
You can connect an analog headset to your phone. If an analog headset is connected and in
use, glows green.
If you use a headset, you can set up your phone so that all calls use your headset (see Enabling
Headset Memory Mode). If you use a headset that supports electronic hookswitch (EHS), you
can press the hookswitch button to place, answer, and end calls. In addition, you may be able to
mute calls and control volume from your headset.
18
Page 33

Chapter 2: Using Basic Features
Web Info: More Information About Headsets
Polycom® Engineering Advisories and Techni cal Notifications support pages.
• For information on how to connect a headset to your phone, see the Quick Start
Guide for your phone, available by navigating t o your phone from the Polycom
Business Media Phones
• For information on your headset’s features, as well as how to sync your headset
with your phone, see your headset documentation.
• For a list of supported headsets, see the
Bulletin 37477). For detailed information about how to use electronic hookswitch,
see Using an Electronic Hookswitch (Technic al Bulletin 35150). All these
documents are available on the Polycom® Profiled UC Softwa re Featur es and
Web page.
Headset Compatibility List (Technical
Enabling Headset Memory Mode
This feature is useful for permanent or full-time headset users. You can set up your phone so
that all incoming and outgoing calls use your headset. At any time, you can switch to handset or
speakerphone mode.
To use Headset Memory Mode, you must enable, and then activate, Headset Memory Mode.
When Headset Memory Mode is activated, flashes either green (for analog headsets) or
blue (for USB or Bluetooth headsets).
To enable Headset Memory Mode:
1 Select Settings from Home view, and select Basic > Preferences > Headset >
Headset Memory.
2 From the Headset Memory Mode screen, select Enabled.
3 Press .
4 To activate Headset Memory Mode, press twice. The Headset key will flash to indicate
that the phone is in Headset Memory Mode.
Now, whenever you answer a call, the call will connect to your headset automatically.
If you switch to the speakerphone or the handset, you deactivate Headset Memory Mode. Calls
will no longer automatically go to your headset, unless you choose this mode. To have calls go
to your headset again, activate Headset Memory Mode by pressing twice.
Responding to Incoming Calls
While your phone rings, you can do the following:
• Temporarily ignore the call before answering it.
• Reject the call so it goes directly to voicemail.
• Forward the call to another person.
19
Page 34

Polycom® VVX® 300 and 310 Business Media Phones User Guide
Power Tip: Other Ways to Forward Calls
You can also set up your phone to forward all incomin g calls to another person (see
Forwarding All Calls to Another
another person (see Diverting Calls from a Contact to Another Person).
Ignoring Incoming Calls
Ignore or silence a call to stop your phone from ringing. Even though the call is ignored, your
phone will still display the incoming call notification so you can still answer the call.
To ignore or silence a call:
• From the Incoming Call window, press Ignore (for private lines) or Silence (for shared
lines).
The Incoming Call window disappears, your phone stops ringing, and either Home or Calls view
displays.
Rejecting Incoming Calls
Reject a call to stop your phone from ringing and send the call directly to voice mail. Calls you
reject display in your Recent Calls list. Rejecting calls is not available for shared lines.
To reject an incoming call:
• From the Incoming Call window, press Reject. You can also reject an incoming call from
Lines and Calls view.
The call goes directly to voice mail.
Forwarding Incoming Calls to Another Person
While your phone rings, you can forward the call to another person.
To forward an incoming call to another person:
1 While your phone rings, press Forward.
2 From the Call Forwarding screen, enter the forwarding number, and press Forward.
Person), or forward all calls from a certain cont act to
During Calls
When you’re in a call, you can do the following:
• Hold the call.
• Transfer the call to another person.
• Set up a conference call with the person you’re talking with and another person.
20
Page 35

Chapter 2: Using Basic Features
Holding Calls
You can place any active call on hold. A held call displays in Calls and Lines view as follows:
To hold a call:
• From Lines or Calls view, press Hold. If you’re in Calls view, be sure to highlight the call
first.
To resume a held call:
• Do one of the following:
○ From Lines view, press Resume. If there’s more than one held call on the line, the last
call that you held will be resumed. If you have multiple lines and you press Resume,
the last call that you held—on either line—will be resumed.
or
○ From Calls view, use the up and down arrow keys to highlight the call, and press
Resume.
Transferring Calls
When you transfer a call to another person, you have the option to talk to the person before the
transfer completes.
If your phone supports a blind transfer, you can automatically transfer a call without talking to
the other person. The call is automatically transferred after you dial the number you’re
transferring the call to.
To transfer a call:
1 From Lines or Calls view, press Transfer. The active call is held.
2 From the Dialer, place a call to the person you want to transfer the call to.
3 When you hear the ring-back sound, press Transfer to complete the transfer. Or, if you
want to talk with the person before the transfer completes, connect and talk with the
person, and then press Transfer. To cancel the transfer before the call connects, tap
Cancel.
21
Page 36

Polycom® VVX® 300 and 310 Business Media Phones User Guide
Timesaver: Completing a Transfer
If you’re using a handset, complete a transfer by replacing the handset.
To perform a blind transfer:
1 From Lines or Calls view, press Transfer. The active call is held.
2 From the Dialer, press Blind, and place a c all to the person you want to transfer the call
to. If you don’t see Blind, press More, and then Blind.
The call automatically transfers to the person you specified.
Setting Up and Handling Conference Calls
You can set up a conference call with two other people. Depending on your phone system, you
may be able to add more than two people to your call; ask your system administrator for the
maximum number.
Just as with other calls, you can hold and resume conference calls. In addition, you’ll have the
option to split a conference call—end the conference and place the people you were talking with
on hold.
During a conference, you may have access to the conference management feature. This feature
allows you to manage each person in the conference call so that you can mute, hold, and
remove each person. Your system administrator can enabled this feature on your phone. For
more information, see Managing Conference Call Participants.
Setting Up Conference Calls
There are two ways to set up a conference: the conventional way—by calling two people and
using the Confrnc soft key—or joining two existing calls using the Join soft key.
To set up a conference call:
1 Call the first person.
2 From Lines or Calls view, press More and then Confrnc. The active call is held.
3 Using the Dialer, call the second person.
22
Page 37

Chapter 2: Using Basic Features
Power Tip: How to Quickly Set Up a Conference
If your phone has an active call and one held call—on the same or a different line—press
More
call. The conference call takes place on the l i ne from which you handled the la
call.
4 When the second person answers, press More and then Confrnc to join everyone in a
conference. The Active: Conference screen displays, as shown next.
and then Join from either Lines or Calls view to automatically create a conference
st active
Holding and Resuming Conference Calls
When you place a conference call on hold, you place the other two people in the call on hold.
No one in a held conference call can hear each other. To hold just one person, see Managing
Conference Call Participants.
To place a conference call on hold:
• From Lines or Calls view, press Hold. If you’re in Calls view, be sure to highlight the
conference first. The other two people in the conference are held. The following example
shows a held conference in Calls view.
To resume a held conference call:
• From Lines or Calls view, press Resume.
23
Page 38

Polycom® VVX® 300 and 310 Business Media Phones User Guide
Ending Conference Calls
To end a conference, and your connection to the other people, press End Call. By default,
when you press End Call, the other two people remain connected. However, your system
administrator may have set up your phone so that all connections end.
To end a conference call:
• From Lines or Calls view, press End Call.
The conference call ends. By default, the other two people remain connected.
Splitting Conference Calls into Two Held Calls
When you split a conference, you end the conference and place the other two people on hold.
You can split an active or held conference call.
To split a conference call:
• From Lines or Calls view, press Split.
The conference call ends. By default, the other two people are held.
Managing Conference Call Participants
If you’re able to manage the people in a conference call, you can:
• Mute a participant.
• Hold a participant.
• Remove a participant from the conference.
• List information about a participant, such as the participant’s name, number, and call
details—such as whether the call is muted, held, or is video-enabled.
To manage a person in a conference call:
1 Set up an active conference call.
2 From Active Call, Lines, or Calls view, press Manage. If you’re in Calls view, be sure to
highlight the conference first. The following example show the screens that display when
you manage a conference.
3 Use the up and down arrow keys to highlight the person you want to manage.
24
Page 39

Chapter 2: Using Basic Features
Power Tip: Forwarding Calls on a Call-by-Call Basis
You can choose to forward a call as your phone ring s. For m ore information on forwarding
calls on a call
4 Do one of the following:
○ Press Far Mute to mute the person. The muted person can hear everyone, but no one
can hear the muted person.
○ Press Hold to hold the person. The held person can’t hear anyone, and no one can
hear the held person.
○ Press Remove to remove the person from the conference, end the conference call, and
create an active call between you and the person still in the call.
○ Press Info to view information about the person and their call status. When you press
Info, a popup displays listing the person’s information, as shown next. You can
navigate through the popup using the up and down arrow keys.
○ Press Back to exit the conference management function.
Changing the Way Calls are Answered
Change the way calls are answered by doing the following:
• Forwarding all calls to another person.
• Rejecting calls from a contact.
• Diverting calls from a contact to another person.
• Temporarily refusing all calls by enabling Do Not Disturb.
Forwarding All Calls to Another Person
You can set up your phone to forward all calls to another number, even if the Do Not Disturb
feature is enabled. Call forwarding is not available on shared lines.
-by-call basis, see Forwarding Incoming Calls t o Another Person.
25
Page 40

Polycom® VVX® 300 and 310 Business Media Phones User Guide
Note: Call Forwarding and Microsoft® Lync® Server 2010
If your phone is configured to work with Microsoft Ly nc Server 2010, your call forwarding
page.
options will be different than those described below. For more information on forwarding
calls with Microsoft Lync, see Using Polycom Phones with Microsoft Lync Server 2010
Quick User Guide, available from the
VVX 300/310 Business Media Phone Support Web
To forward all calls to another person:
1 From Home view, select Forward. (You can also select Settings from Home view, and
select Features > Forward, or if your phone is idle, press Forward from Lines view.)
2 If your phone is set up with multiple lines, select the line to apply forwarding to.
3 From the Forwarding Type Select screen, select the forwarding type you want:
○ Always—To forward all incoming calls.
○ No Answer—To forward all unanswered incoming calls.
○ Busy—To forward calls that arrive when you’re already in a call.
4 Enter the forwarding number, and select Enable. If you selected the No Answer option,
you can enter the number of rings before your phone forwards the call. A value of 2 is
recommended.
The forwarding number you chose displays in the status bar, as shown next. In this example,
the line is forwarded to 2340.
If a phone line is idle, Lines view displays the forwarding icon, , next to the phone line, as
shown next.
To disable call forwarding:
1 From Home view, select Forward.
2 If your phone is set up with multiple lines, select the line to disable forwarding for.
3 From the Forwarding Type Select screen, select the forwarding type to disable, and select
Disable.
26
Page 41

Chapter 2: Using Basic Features
Note: Rejecting Calls and Shared Lines
You can’t reject calls on shared lines. You can o nl y silence them. For more information,
Rejecting Calls from a Contact
You can send incoming calls from a particular contact to your voicemail system.
see Working with Shared Lines.
To send incoming calls from a contact to your voicemail system:
1 Select Directories from Home view, and select Contact Directory.
2 From your directory, use the up and down arrow keys to select the contact whose calls
you want to reject, and press Info.
3 From the contact’s information screen, press Edit.
4 From the Edit Contact screen, use the up and down arrow keys to select Auto Reject,
select Enabled, and then press Save.
Diverting Calls from a Contact to Another Person
The Divert option enables you to transfer all incoming calls from a particular contact to another
person.
To divert incoming calls from a contact to another person:
1 Select Directories from Home view, and select Contact Directory.
2 From your directory, use the up and down arrow keys to select the contact whose calls
you want to send to another person.
3 From the contact’s information screen, press Edit.
4 From the Edit Contact screen, do the following:
○ Use the up and down arrow keys to select Divert Contact, and enter the number of the
person you want the call to go to.
○ Select Auto Divert, and select Enabled.
○ Press Save.
Using Do Not Disturb
Enabling Do Not Disturb (DND) stops your phone from ringing and sends all incoming calls
directly to voicemail. All calls you receive while DND is enabled are logged to your Recent Calls
list.
27
Page 42

Polycom® VVX® 300 and 310 Business Media Phones User Guide
Note: Do Not Disturb and Shared Lines
Enabling Do Not Disturb on shared lines disables ringing only. You’ll still see a visual
Troubleshooting: Why Doesn’t the DND Icon Display?
If you’ve set your presence status to Do Not Disturb, as well as enabled DND for your
the DND icon won’t display in the status bar.
When you enable Do Not Disturb, the following happens:
• The Do Not Disturb icon displays in the status bar, as shown next.
• If your phone is idle, the Do Not Disturb icon, , displays next to your phone line in
Lines view, as shown next. If you have new messages or forwarding enabled, the
messages or forwarding icon will display instead.
• The DND icon in Home view, , changes to , as shown next.
notification of the call and have the option t o answer the call.
phone, the message My Status: Do Not Disturb will display instead the date display, and
28
Page 43

Chapter 2: Using Basic Features
Power Tip: Automatically Enabling or Disabling Do Not Disturb for All Lines
To automatically enable Do Not Disturb for all l ines, press Set All. To automatical ly
disable the feature for all lines,
Note: Temporarily Removing Message Indicat ors
r
period of time—usually about an hour or two—the me ssage indicators will display again.
To toggle Do Not Disturb on and off:
• From Home view, select DND. Or, if your phone is idle, press DND.
Using Do Not Disturb with Multiple Lines
By default, the Do Not Disturb feature applies to all lines on your phone. However, your phone
may be set up so that you can enable the feature on a per-line basis.
To enable or disable Do Not Disturb for a particular line:
1 From Home view, select DND.
2 From the Line Select screen, use the up and down arrow keys to select the line to enable
or disable Do Not Disturb on.
3 From the Do Not Disturb screen, select Enable or Disable.
press Clear All.
Listening to Voicemail
Your phone may indicate new voicemail messages by the following:
• A message in the status bar, as shown next. The message indicates the number of new
messages you have. The count is a total of all messages on all lines on the phone.
• A flashing Message Waiting Indicator, located at the top-right of your phone.
• An audible alert (if your phone is on-hook).
To temporarily remove the message counter, press , and select Message Center (o
select Messages from Home view, and select Message Center) and press Clear. After a
29
Page 44

Polycom® VVX® 300 and 310 Business Media Phones User Guide
To listen to voicemail messages:
1 Press , and select Message Center. Or, from Home view, select Messages, and
select Message Center.
2 If multiple lines are configured on your phone, the Line Select screen displays. Use the up
and down arrow keys to select the line that has the message.
3 From the Messages screen, press Connect and follow the prompts.
Viewing Recent Calls
Your phone maintains a Recent Calls list—a list of missed, received, and placed. Each list can
hold up to 100 entries.
From the Recent Calls list (shown next), you can:
• Sort, order, and filter calls (press Type). By default, the list displays all call types (missed,
placed, and received), with the most recent call displaying first, as shown next.
• Remove certain calls from the list.
• Select a call record to view call details and manage the call.
• Use the up and down arrow keys to highlight an entry and press Dial to automatically call
the person.
Icons display next to a call to indicate the call type:
• Placed calls display .
• Received calls display .
• Missed calls display .
To view your Recent Calls list:
• From Home view, select Directories from Home view, and select Recent Calls.
30
Page 45

Chapter 2: Using Basic Features
Note: About Filtered Call Lists
You can’t save your filtered call list results. I f you filter your Recent Calls list so that only a
list, all call types (the default filter) will display.
To manage a call record:
1 From your Recent Calls list, use the up and down arrow keys to highlight an entry, and
press the right arrow key.
2 From the call details screen, shown next, you can:
○ Press Dial or the right arrow key to call the person.
○ Press Save to add the person to your Contact Directory. If the person is already in your
Contact Directory, but isn’t a Favorite, Add to Favorites displays instead. Press Add to
Favorites to automatically make the person a Favorite.
○ Press Delete to delete the call from the list.
○ Press Edit to edit the phone number before you dial the person.
To customize the list:
1 From Home view, select Directories from Home view, and select Recent Calls.
2 Press Type to filter calls for specific lines or types of calls.
When you filter calls, you can choose to display only missed, received, or placed calls. Or,
you can choose to display all call types (the default). You can choose to display only calls
from a certain line.
3 Press Sort to sort the calls.
When you sort calls by the time of the call, you can to order calls in ascending (oldest call
first) or descending (most recent call first) order.
When you sort calls by call name, you can order calls in ascending (alphabetical) or
descending (reverse-alphabetical) order.
certain call type—for example, only missed calls—display, the next time you display the
31
Page 46

Polycom® VVX® 300 and 310 Business Media Phones User Guide
Note: Accessing a Corporate Directory
A Corporate Directory may be available on your phone. If you have access to a
to your Contact Directory. For more informati on, see Working with a Corporate Directory .
To remove all calls from the list:
1 From Home view, select Directories from Home view, and select Recent Calls.
2 Press Clear.
All calls are deleted from the call list.
Working with Your Contact Directory
You can store a large number of contacts in your phone’s local Contact Directory (shown next).
Contact your administrator for the exact number.
From your local Contact Directory, you can:
• View contact information.
• Search for contacts.
• Dial contacts.
If you can update your Contact Directory, you can also do the following:
• Add contacts.
• Update contact information.
• Delete contacts.
Corporate Directory, you can dial people in the Corporate Directory, as well as save them
To view your Contact Directory:
• Select Directories from Home view, and select Contact Directory.
From your Contact Directory, scroll to view contacts or enter search criteria to find one.
32
Page 47

Chapter 2: Using Basic Features
To view contact information:
• From your Contact Directory, use the up and down arrow keys to select the contact, and
press Info.
The contact’s information screen, including the contact’s name and phone number,
displays (as shown next). Additional information—such as a job title, label, or email
address—may also display.
To search for a contact:
1 From your Contact Directory, press Search.
2 From the Search screen, enter search criteria and press Search.
A list of search results is displayed. Press Back to display your Contact Directory again.
To dial a contact:
1 From your Contact Directory, use the up and down arrow keys to select the contact you
want to call, and press Info.
2 From the contact’s information screen (shown next), press Dial .
To add a contact:
1 Select Directories from Home view, and select Contact Directory.
2 Press Add.
3 From the Add Contact screen, enter contact information:
33
Page 48

Polycom® VVX® 300 and 310 Business Media Phones User Guide
Note: Directory Fields are Administrator-Set.
Your phone may not display all contact fields. For more inf ormation, see your
administrator. The only required field is the Contact field—the contact’s phone number.
○ For First Name, enter the contact’s first name.
○ Use the down arrow key to select Last Name, and enter the contact’s last name.
○ Use the down arrow key to select Contact, and enter the contact’s phone number.
The phone number must be unique, and can’t already exist in the directory. If you save
an entry with a non-unique phone number, the entry won’t be saved.
○ Use the down arrow key to select Job Title, and enter the contact’s job title, such as
Manager.
○ Use the down arrow key to select Email, and enter the contact’s email address.
○ Use the down arrow key to select Favorite Index, and enter a favorite index number.
The number can be any unused value, up to a maximum value of 9999. A contact that
has a favorite index number will automatically display in your Favorites list. For more
information about favorites, see Managing Favorites.
○ Use the down arrow key to select Label, and enter a label for the contact such as,
Marketing.
If you specify a label, the label will be the first item that displays for the contact on the
Directory screen, and in your Favorites list if the contact is a favorite.
○ Use the down arrow key to select Ring Type, and select the ringtone you want to use
for the contact.
○ Use the down arrow key to select Divert Contact, and enter the phone number of the
third party you want this contact’s calls sent to.
○ Use the down arrow key to select Auto Reject, and enable or disable the setting. The
default setting is Disabled.
If enabled, each time the contact calls, the call will be directed to your mail system.
○ Use the down arrow key to select Auto Divert, and enable or disable the setting. The
default setting is Disabled.
If enabled, each time the contact calls, the call will be directed to the third party you
specified in the Divert Contact field.
○ Use the down arrow key to select Watch Buddy, and enable or disable the setting. The
default setting is Disabled.
If enabled, you can monitor the contact’s status. For more information on monitoring
status, see Using Buddy Lists.
34
Page 49

Chapter 2: Using Basic Features
Timesaver: Saving Recent Callers and Corporate Directory Contacts to Your Directory
You can automatically save a recent caller to your Directory. See Viewing Recent Calls.
Contact Directory in this way, see Working with a Corporate Directory.
○ Use the down arrow key to select Block Buddy, and enable or disable the setting. The
default setting is Disabled.
If enabled, the contact can’t monitor your status. For more information on monitoring
status, see Using Buddy Lists.
4 Press Save.
If a Corporate Directory is available on your phone, you can add contacts from the
Corporate Directory to your Contact Directory . For information on how to update your
To update a contact’s information:
1 From the Contact Directory, use the up and down arrow keys to select the contact you
want to update, and press Info.
2 From the contact’s information screen, press Edit.
3 From the Edit Contact screen, update the contact’s information.
4 Press Save.
To delete a contact:
1 From your Contact Directory, use the up and down arrow keys to select the contact you
want to delete, and press Info.
2 From the contact’s information screen, press Delete. A confirmation message displays,
confirming that you want to delete the contact. Press Yes or No.
Working with a Corporate Directory
You may have access to portions of a Corporate Directory. The Corporate Directory is noneditable; your administrator determines which contacts you can see.
From the Corporate Directory, you can do the following:
• Search for contacts.
• Dial contacts.
• Add contacts to your local Contact Directory.
To view the Corporate Directory:
• Select Directories from Home view, and select Corporate Directory. By default, a blank
search screen displays. To view entries, search for a person.
35
Page 50

Polycom® VVX® 300 and 310 Business Media Phones User Guide
Power Tip: Saving Corporate Directory Search Results
You can save your last search results, so that the next time you view Corporate Directory,
the results of your last search will display. To save Corporate Directory search results,
select
>
you view Corporate Directory, your last search results will display.
Settings from Home view, and select Basic > Preferences > Corporate Directory
View Persistency. From the View Persistency screen, select Enabled. The next time
To search the Corporate Directory:
• From the Corporate Directory, perform a quick search or an advanced search:
○ To perform a quick search, enter the first few characters of the contact’s first or last
name (depending on how the directory is organized), and press Submit.
or
○ To perform an advanced search, press AdvFind. From the Advanced Find screen,
enter your search criteria, and press Submit.
The screen displays a list of contacts, starting with the most successful matches. To view
information for the contact, press View. To erase all your search criteria and enter new criteria
before you submit your search, press multiple times.
To dial a Corporate Directory contact:
1 From the Corporate Directory, search for the contact you want to dial.
2 From the search results, use the up and down arrow keys to select the contact, and press
Dial.
To add a contact to your local Contact Directory:
1 From the Corporate Directory, search for the contact you want to add to your Contact
Directory.
2 From the search results, use the up and down arrow keys to select the contact, and press
View.
3 From the contact’s information screen, press Save.
Only the first name, last name, and phone number are saved. You may want to go to the
Contact Directory to see if the contact was saved correctly and to add additional contact
information.
36
Page 51

Chapter 2: Using Basic Features
Controlling What is Heard
You can change what you hear by doing the following:
• Updating the incoming call ringtone.
• Updating a contact’s ringtone.
• Changing the speaker volume.
• Changing the ringer volume.
• Muting the microphone.
• Changing where you hear sound effects.
Updating the Incoming Call Ringtone
A simple way to personalize your phone is to change your phone’s ringtone. You can even pick
unique ringtones for the different lines on your phone.
To select an incoming call ringtone for your phone or a line:
1 Select Settings from Home view, and select Basic > Ring Type.
2 If multiple lines are configured on your phone, select the line you want to apply a new
ringtone to.
3 From the Ring Type screen, use the up and down arrow keys to select the ringtone you
want. To hear the ringtone before you change it, press Play. The default ringtone is Low
Trill.
Updating a Contact’s Ringtone
You might find it helpful to select unique ring tones for the various contacts in your Contact
Directory. In this way, you can quickly identify callers as your phone rings.
To select a ringtone for a contact:
1 From the Contact Directory, use the up and down arrow keys to select the contact you
want to update, and press Info.
2 From the contact’s information screen, press Edit.
3 From the Edit Contact screen, use the up and down arrow keys to select Ring Type.
4 Select the ringtone you want, and then press Save.
37
Page 52

Polycom® VVX® 300 and 310 Business Media Phones User Guide
Changing the Speaker Volume
To change the volume of what you hear during a call, press one of the Volume keys, ,
to lower or raise the speaker volume.
Changing the Ringer Volume
To change the volume of the incoming call ringtone, press one of the Volume keys, ,
while your phone is idle or ringing.
Muting the Microphone
Mute the microphone so other parties can’t hear you. Microphone Mute applies to all modes
(handset, headset, and speakerphone). You can still hear all other parties when you mute the
microphone.
To mute the microphone:
• During a call (including a conference call), press .
The Mute key glows red. The other parties can’t hear you. To disable Mute, press again.
Choosing Where You Hear Sound Effec ts
You can choose whether you hear sound effects—all phone sounds except call audio—from the
handset, headset, or speaker. For example, you can configure your phone to ring on your
headset, instead of the speaker. By default, you hear all sound effects from the speaker.
To choose where you hear sound effects:
1 Select Settings from Home view, and select Basic > Preferences > Audible Ringer.
2 From the Audible Ringer screen, select where you want to hear sound effects:
○ To hear sound effects only from the phone’s loudspeaker, select Speaker.
○ To hear sound effects only from the handset, select Handset.
○ To hear sound effects only from the headset, select Headset.
○ To hear sound effects only from the device you’re currently using to hear call audio,
select Active.
The default destination is Speaker.
Managing Favorites
Favorites are the contacts in your Contact Directory that you call most often. To make a contact
a favorite, you need to assign a contact a favorite index number. You do this from the Contact
Directory.
38
Page 53

Chapter 2: Using Basic Features
Contacts that have a favorite index number display , as shown next.
All your Favorites display in your Favorites list. A smaller number of Favorites (3 for the VVX
300 and 310 and 9 for the VVX 400 and 410) display in Lines view and from Home view.
The following figure shows a sample Favorites list.
The following figure shows your favorites in Lines view. Favorites display under the phone
line(s).
Favorites display consecutively, according to their index number. The contact with the lowest
number displays first. To reorder your favorites, assign the contact a different index number.
To see your Favorites:
• Press , select Directories from Home view, and select Favorites.
39
Page 54

Polycom® VVX® 300 and 310 Business Media Phones User Guide
Power Tip: Manually Assigning a Favorite Index Number when You Make a Favorite
After you press Add to Favorites, a dialog displays asking if you want to automatically
accept the next available index number, or manually enter your own.
automatically accept an index number, or
number. You can enter a number up to 500.
To make a contact a Favorite:
• From your Contact Directory, select the contact. From the contact’s screen, press More,
and then Add to Favorites.
The contact will now have a star next to their name when you view the contact from the
Contact Directory.
press Edit Index to enter a unique index
Press Yes to
To quickly call a Favorite:
• From your Favorites list or from Lines view, select the favorite you want to call. The call is
automatically placed.
To reorder your Favorites:
1 From your Contact Directory, select the contact.
2 From the contact’s screen, press Edit.
3 From the Edit Contact screen, use the up and down arrow keys to select Favorite Index,
and enter a new favorite index number.
4 Press Save.
To remove a Favorite from the list:
1 From your Contact Directory, select the contact.
2 From the contact’s screen, press Edit.
3 From the Edit Contact screen, use the up and down arrow keys to select Favorite Index,
and remove the favorite index number.
4 Press Save.
Working with Shared Lines
If your phone shares a line with other phones, an incoming call to the shared line will cause all
phones to ring. The call can be answered on any of the phones. You can transfer, hold, or set
up a conference with calls on shared lines.
40
Page 55

Chapter 2: Using Basic Features
Status
Indicator
Note: Unsupported Features on Shared Lines
Call Forwarding is not available on shared lines.
notification of the call and have the option t o answer the call.
If you have an incoming call on a shared line, you can stop your phone from ringing by tapping
Silence. Even though the phone doesn’t ring, the call’s visual notification will still display and
you’ll still have the option to answer the call.
In Lines view, the following icons and status indicators display for shared lines, depending if the
line is idle, has an active call, or has a held call:
Shared Line
Idle
Active call
Held call
Icon and Status
Enabling Do Not Disturb on shared lines disables ringing only. You’ll still see a visual
Status Indicator
(No indicator)
HD voice icon
Hold icon
41
Page 56

Page 57

Note: Feature Availability
Your phone may not support all of the features de scribed in this chapter. Check with your
Chapter 3: Using Advanced Featu res
You’ve mastered the basic features of your phone, but want to know all about the other
interesting and powerful features your phone has to offer. In this chapter, you’ll learn all about
those features that make your phone exciting to use, such as joining Microsoft® Outlook®
meetings with one tap of your finger, using your computer’s keyboard and mouse to handle
calls, viewing Web content, or monitoring other phone users to see when they’re available or
away from their desk.
This chapter shows you how to:
• Manage buddies
• Integrate with Microsoft Lync Server 2010
• View the browser
• Broadcast messages using Push-to-Talk and group paging
• Use the Calendar feature
• Use the Polycom Desktop Connector to link your computer keyboard and mouse to your
phone
• Log into other phones
• Lock your phone
• Access features with your login credentials
system administrator to find out which features are available on your phone.
Using Buddy Lists
A Buddy list is a list of users/devices whose status—or presence—you can monitor. Users
update their presence setting, such as Be right back, Out to lunch, or Busy, and you can view
their status in real time from your Buddy list. You can also view your buddies’ status from Lines
view and Home view.
In this section, you’ll learn how to:
• Update your presence status
• Set up and manage a Buddy list
43
Page 58

Polycom® VVX® 300 and 310 Business Media Phones User Guide
Note: Contacts and Microsoft Lync Server 2010
If your phone is configured to work with Microsoft Lync Server 2010, the way you manage
Note: How Do Not Disturb Status and Use of Do Not Disturb Feature Interact
When you enable Do Not Disturb on your phone, y our presence status automatically
Disturb icon will not display next to phone lines.
• Block people from monitoring your status
• Monitor your buddies from your phone
buddies (known as contacts) is different. See Integrating with Mi crosoft Lync Server 2010.
Updating Your Status
Update your status so that other people can monitor your status from their phones. When you
update your status, your status is automatically sent to the people watching you.
You can update your status to one of the following:
• Online
• Busy
• Be right back
• Away
• On the phone
• Out to lunch
• Do not disturb
Your phone also sends certain status information to the people watching you automatically—
such as if you’re in a call, enabled Do Not Disturb on your phone, or your phone is offline
because you restarted it. For example, if you enable the Do Not Disturb feature on your phone,
your availability automatically updates to Do Not Disturb.
changes to Do Not Disturb. When you disable Do Not Dist urb on your phone, your
presence status automatically changes to Online or O n the Phone.
When you update your presence status to Do Not Di sturb, incoming calls will go to
voicemail, and My Status: Do Not Disturb will dis play in the status bar. Updating your
status to Do Not Disturb does not enable Do Not Disturb on your phone, and the Do Not
44
Page 59

Chapter 3: Using Advanced Features
Power Tip: How to Automatically Change Your Status When Your Phone is Idle
You can enable your phone to automatically set your status to Away if your phone is idle
for a certain length of time. After you touch t he screen or press a key on your phone, your
status changes to
and
screen, enable an office hours and/or off hours t im eout period, and enter the number of
minutes your phone should be idle before your status changes to Away.
When you select a presence setting other than online, the setting displays instead of the date
display on the status bar, as shown next.
You may be able to access status and a list of the people you are watching from the Lines view.
If you see a More soft key, press it to display MyStat and Buddies.
To update your presence setting:
1 From Lines view, press More, and press MyStat. Or, select Settings from Home view,
and select Features > Presence > My Status.
2 From the My Status screen, select the status you want.
Your new status is sent to phones watching you.
select Basic > Preferences > Presence > Idle Timeout. From the Idle Timeout
Online again. To enable this feature, select Settings from Home view,
Setting Up and Managing a Buddy List
If you want to monitor other people, you need to make sure they’re in your Buddy list. You add
people to your Buddy list from your Contact Directory; therefore, make sure the person you want
to monitor exists in your Contact Directory.
45
Page 60

Polycom® VVX® 300 and 310 Business Media Phones User Guide
Power Tip: Dialing Buddies
You can quickly dial a buddy by accessing your Buddy list. Using the up and down arrow
keys to locate the buddy, and press
Power Tip: How to Access Your Blocked and Watcher Lists
To view a list of contacts that can and can’t m onitor your status, do the following:
from Home view, and
and select Features > Presence > Blocked List.
To update your Buddy list:
1 From your Contact Directory, select the contact you want to start or stop monitoring.
2 From the contact’s information screen, press Edit.
From the Edit Contact screen, using the up and down arrow keys to locate Watch Buddy,
and enable or disable the field. The default setting is Disabled. When enabled, the contact
is added to your Buddy list so you can monitor the contact’s status. When disabled, the
contact is removed from your Buddy list, and you won’t be able to monitor the contact’s
status.
3 Press Save.
If you enabled the Watch Buddy setting for a contact, the contact will display in your Buddy list.
To view your Buddy list, press More, and then Buddies from Lines view.
Dial.
Blocking Contacts from Viewing Your Status
You can prevent someone from monitoring you by blocking the contact in your Contact
Directory. If you unblock the contact, the contact can add you to their Buddy list and monitor
you.
• To display contacts that can view your status, select Settings
select Features > Presence > Watche r Li st.
• To display contacts that can’t view your status, select Settings from Home view,
To block or unblock a contact from viewing your status:
1 From your Contact Directory, select the contact you want to block or unblock.
2 From the contact’s information screen, press Edit.
46
Page 61

Chapter 3: Using Advanced Features
Timesaver: How to Quickly Unblock a Contact
You can use your Blocked List to unblock a contact, rather than updating the Contact
The contact can now watch your phone, and will display in your Watcher List.
From the Edit Contact screen, tap Block Buddy, and enable or disable the field. The
default setting is Disabled. When enabled, the contact cannot watch your status, and the
contact will display in your Blocked List. When disabled, the contact can watch your
status, and the contact will display in your Watcher List.
3 Press Save.
Directory. Select Settings from Home view, and select Features > Presence > Blocked
List. From the Blocked List, select the contact you want to unblock, and press Unblock.
Monitoring Buddies
You can monitor your buddies from your Buddy Status list. If a buddy is a favorite, you can also
monitor the buddy from Home and Lines view.
Your buddies display an icon next to their name to indicate their status. The following table
shows the icons and the status they represent.
Buddy Status Icon Buddy Status Icon
Available
Busy
Away
Do Not Disturb
Offline
No information
47
Page 62

Polycom® VVX® 300 and 310 Business Media Phones User Guide
The following table shows you how to monitor your buddies from your Buddy Status list, Home
view, and Lines view.
To monitor
buddies
from…
Buddy list From Lines view, press More, and select Buddies. Or, from Home view, select
Lines view
Do this…
Settings, and select Features > Presence > Buddy Status. Your Buddy list
displays, as shown next.
From Home view, press . The buddies who are favorites display their status, as
shown next.
Integrating with Microsoft Lync Server 2010
Your system administrator can configure your phone to work with Microsoft Lync Server 2010
and communicate with others using Microsoft Lync. From your phone, you can monitor the
status of your Microsoft Lync contacts. For more information on integrating with Microsoft Lync
Server 2010, see your system administrator, or refer to
Lync Server 2010 Quick User Guide, available by navigating to your phone from the Polycom
Business Media Phones Web page.
48
Using Polycom Phones with Microsoft
Page 63

Chapter 3: Using Advanced Features
Using the Browser
You may be able to view an Idle Browser and a Main Browser on your phone if so configured by
your system administrator.
If your phone is idle, you may be able to view an Idle Browser—non-interactive Web content on
the idle screen—as you navigate between Home and Lines view. To see the Idle Browser, you
may need to set up the screen saver. If you are in an active call, the Idle Browser won’t display.
To view an interactive Main Browser, select Applications from the third Home page.
From the Main Browser, you can:
• Select hyperlinks to view more Web pages.
• Select a text box and enter information by using the dialpad keys on the phone console or
the editing icons.
• Move around by using the up, down, right, or left arrow keys. Scrolling indicators on the
screen indicate your position on the Web page.
Navigation and editing icons (shown next) display in a toolbar along the bottom of the Main
Browser.
The toolbar displays unless your system administrator changes the configuration.
The following sections describe how to navigate and enter information in the Main Browser.
Navigating the Main Browser
Navigation icons enable you to view previous Web pages, refresh the current page, return to the
Main Browser’s Home page, or go back to your phone’s Home screen.
Press this… To do this…
Go back to the previous Web page.
49
Page 64

Polycom® VVX® 300 and 310 Business Media Phones User Guide
Press this…
To do this…
Tap this…
To do this…
Refresh the current Web page.
Stop refreshing.
Return to the Main Browser’s home page.
Return to the phone’s Home screen.
Entering Information in the Main Browser
Editing icons enable you to enter information in text boxes. To display the editing icons, select a
text box in the Main Browser.
Select lowercase, uppercase, or numerical mode, or a special character encoding.
Hide the editing icons and display the navigation i cons.
Broadcasting Messages Using Push-to-Talk and Group Paging
The Group Paging feature enables you to make pages—one-way audio announcements—to
users subscribed to a page group. The Push-to-Talk (PTT) feature is a collaborative tool that
enables you to exchange broadcasts to users subscribed to a PTT channel, much like a walkietalkie. Your system administrator can set up both features on your phone.
Your system administrator can define up to 25 paging groups for Group Paging mode or
Channels for PTT mode. Your system administrator may assign a label to each group or
channel that easily identifies the phones in the group or channel, such as All, HR Dept, Shipping
Staff, or Executives. Each group or channel will have one of the following priorities:
50
Page 65

Chapter 3: Using Advanced Features
Timesaver: Automatically Sending a PTT Broadcast
To automatically send a PTT broadcast on the default channel, press and hold Talk, and
Normal By default, broadcasts sent to Groups/Channels 1 to 23 are considered Normal
broadcasts. If two users begin a broadcast on the same group/channel at the same time, the
phone with the lower serial number will continue to transmit while the other phone will enter the
receiving state. By default, all phones are configured to receive broadcasts sent to
Group/Channel 1.
Priority By default, broadcasts sent to Group/Channel 24 are considered Priority broadcasts.
A Priority broadcast will interrupt Normal broadcasts or active calls. All phones receive Priority
broadcasts unless Do Not Disturb is enabled. Phones play Priority broadcasts at the phone’s
current audio level.
Emergency By default, broadcasts sent to Group/Channel 25 are considered Emergency
broadcasts. An Emergency broadcast will interrupt Normal broadcasts, Priority broadcasts, and
active calls and plays out at near maximum volume even if Do Not Disturb is turned on.
Push-to-Talk Mode
Your system administrator can enable your phone to operate in a broadcast mode called Pushto-Talk (PTT). In order to send and receive PTT broadcasts, you have to subscribe to PTT
channels.
PTT broadcasts are collaborative: you can transmit messages and listen to replies.
Sending and Receiving PTT Broadcasts
By default, you’re subscribed to Channels 1, 24, and 25. This means that you can send and
receive PTT broadcasts on Channels 1, 24, and 25.
When you end a PTT broadcast, the channel remains open and enters a waiting period. This
waiting period gives people who received the broadcast a chance to respond. If no one
responds within the waiting period, the channel closes.
Sending PTT Broadcasts
Before you can send a PTT broadcast, you need to choose a channel to broadcast on. Or, you
can hold the Talk soft key to immediately begin broadcasting on Channel 1, the default channel.
You can change your default channel to any channel you want (see Updating the Default
Channel). When you change the default channel, you’re automatically subscribed to it.
To send a PTT broadcast:
1 From Lines view, press Talk and hold.
go to step 4.
51
Page 66

Polycom® VVX® 300 and 310 Business Media Phones User Guide
Note: What Happens if I Release Talk During A Broadcast?
If you release Talk while you’re sending the broadcast, the broadcast temporarily stops
time during the waiting period, you can resume your
the channel closes and the broadcast ends.
2 From the PTT Channels List screen, select the channel to send the broadcast on.
The list displays the default channel, the most recent channel you sent a broadcast on,
and other channels you can broadcast on.
3 To start the broadcast, press and hold Talk. Be sure to press Talk throughout the entire
broadcast.
You’ll hear a ‘transmitting’ beep, and then the phone will display the channel information
such as the channel label.
4 Begin speaking.
and enters a 10 second waiting period. During this period, the channel remains open to
give people a chance to reply. At any
broadcast by pressing and holding Talk. If no one broadcast s during the waiting period,
5 When you finish your broadcast, do one of the following:
○ Release Talk.
or
○ Press End PTT.
After you press End PTT , you can immediately initiate another broadcast on another
channel, even if the previous broadcast is still in its waiting period.
Receiving PTT Broadcasts
To receive a broadcast sent on a particular channel, you need to be subscribed to that channel.
To subscribe to a channel, see Updating Channel Subscriptions.
How you receive a PTT broadcast depends on the broadcast priority, whether you’re in an
active call, or if you’re allowed to receive broadcasts during active calls.
You’ll receive broadcasts on the channels you’re subscribed to as well as Channel 24 (the
Priority channel) and Channel 25 (the Emergency channel). If you’ve enabled Do Not Disturb
on your phone, you’ll only receive Emergency broadcasts. Non-emergency broadcasts won’t
display or play on your phone.
When a broadcast ends, your phone emits an end of transmission beep and enters a 10 second
waiting period. During this period, you can respond to the broadcast (see Replying to PTT
Broadcasts).
52
Page 67

Chapter 3: Using Advanced Features
Receiving PTT Broadcasts When You’re Not in an Active Call
If you receive a broadcast and you’re not in an active call, the broadcast immediately plays,
regardless of the broadcast priority.
Receiving PTT Broadcasts During Active Calls
How you handle a broadcast when you’re in an active call depends on the broadcast priority and
if you’re allowed to receive a broadcast when you’re in an active call.
If the broadcast is a Normal broadcast:
• If your phone is set to receive broadcasts during active calls, the broadcast immediately
plays. You’ll hear both the original call and the broadcast. To listen to only the broadcast,
hold or end the call.
• If your phone isn’t allowed to receive broadcasts during active calls, the broadcast
displays as a Pending broadcast. To listen to the broadcast, hold or end the call, or select
the broadcast, and press Accept.
If the broadcast is a Priority or Emergency broadcast, the broadcast immediately plays. You’ll
hear both the original call and the broadcast. To listen to only the broadcast, hold or end the
call.
Replying to PTT Broadcasts
When a broadcast ends, the broadcast enters a 10 second waiting period. During this period,
the channel remains open to receive or send additional broadcasts.
During a waiting period, you can press and hold Talk and talk to all the people listening on the
channel. When you finish talking, release Talk. The broadcast will enter another waiting period
until someone broadcasts again. If no activity occurs within the waiting period, the channel
closes and no more broadcasts can take place.
Ending PTT Broadcasts
You can end a PTT broadcast by releasing Talk, or by pressing End PTT. After you end a
broadcast, the channel remains open so others can respond.
If you release Talk without pressing End PTT:
• You can resume the broadcast by pressing and holding Talk, if the broadcast is in a wait
period.
• You can’t initiate another broadcast on another channel until the waiting period ends.
If you press End PTT:
• You can’t resume the broadcast by pressing and holding Talk.
• You can immediately initiate another broadcast on another channel.
53
Page 68

Polycom® VVX® 300 and 310 Business Media Phones User Guide
Adjusting the Volume of PTT Broadcasts
You can adjust the volume of PTT broadcasts while they play. During a broadcast, press one of
the Volume keys,
, to raise or lower the volume of the broadcast.
If you adjust the volume of a non-emergency broadcast, your phone retains the adjusted volume
for all subsequent non-emergency broadcasts. However, only system administrators can adjust
the volume level of an Emergency broadcast.
Changing Where Broadcasts are Played
While you send a broadcast, you can pick up the handset, or press or , and continue
speaking. You can also press to mute your audio so that the people receiving your
broadcast won’t hear anything. This behavior is similar to a phone call.
When you listen to a broadcast, you can pick up the handset, or press or , and continue
listening to the broadcast.
Updating the Default Channel
If you press and hold Talk, your broadcast will automatically transmit on the default channel,
Channel 1. If you want, you can change the default channel.
To update the default channel:
1 Select Settings from Home view, and select Basic > Preferences >
Paging/PTT Configuration > PTT Push to Talk.
2 From the PTT Channel Configuration screen, select Default Channel, and select the
number of the channel you want to use.
Updating Channel Subscriptions
You can subscribe to any channel that has been enabled by your administrator and appears in
your channels list. When you subscribe to a channel, you can send and receive PTT broadcasts
on that channel.
To subscribe to additional PTT channels:
1 Select Settings from Home view, and select Basic > Preferences >
Paging/PTT Configuration > PTT Push to Talk.
2 From the PTT Channel Configuration screen, select Channel Subscriptions.
From the Channel Subscriptions screen, select the channel you want to subscribe to, and
press Yes. By default, you’re subscribed to Channels 1, 24, and 25.
Allowing PTT Broadcasts to Play During Active Calls
The Accept While Busy option determines what happens when you’re in a call and receive a
PTT broadcast. If you enable the option, a PTT broadcast will interrupt telephone calls and you’ll
hear the audio of both the telephone call and the broadcast. If you disable the option, the
54
Page 69

Chapter 3: Using Advanced Features
Timesaver: Automatically Sending a Page
To automatically send a page to the default pagi ng group, press and hold Paging, and go
incoming broadcast will be held in a Pending state—it won’t disrupt the telephone call, and you
won’t hear the broadcast. To hear the PTT broadcast, select the PTT broadcast and press
Accept (the telephone call will automatically be held). Or, hold or end the telephone call.
To allow or disallow PTT broadcasts to play during an active call:
1 Select Settings from Home view, and select Basic > Preferences >
Paging/PTT Configuration > PTT Push to Talk.
2 From the PTT Channel Configuration screen, press Accept While Busy, and enable or
disable the setting. The default setting is Disabled. When enabled, your phone will accept
and play broadcasts while you’re in an active call. When disabled, your phone won’t play
broadcasts while you’re in a call, but will hold them as Pending instead.
Group Paging Mode
Your phone may be enabled to operate in a broadcast mode called Group Paging mode. In this
mode, you can broadcast one-way announcements to a specified group of phones, called a
Paging Group. In Group Paging mode, users must subscribe to Paging Groups to send and
receive pages.
Sending and Receiving Pages
To send and receive pages, you need to subscribe to certain paging groups. By default, you’re
subscribed to Paging Groups 1, 24, and 25. This means that you can send and receive pages to
Paging Groups 1, 24, and 25.
Sending Pages
By default, when you send a group page, it’s automatically sent to Paging Group 1. This is your
default paging group.
You can change your default paging group to any group you want (see Updating the Default
Paging Group). If you change your default paging group, you’re automatically subscribed to it.
You can’t send a Page-mode page while you’re in an active call.
To send a page:
1 From Lines view, press Paging and hold.
to step 4.
2 From the Paging Groups List screen, select the paging group to send the page to.
55
Page 70

Polycom® VVX® 300 and 310 Business Media Phones User Guide
3 To begin a page, press Page.
Just before the page starts, you’ll hear an alert tone, and then the page begins.
4 Begin speaking.
5 To end the page, press End Page.
Receiving Pages
To receive a page sent to a particular paging group, you need to be subscribed to that group. To
subscribe to a paging group, see Updating Paging Group Subscriptions.
How you receive a page depends on the priority of the page, whether you’re in an active call, or
if your phone is set to receive a page during an active call.
You’ll receive pages on the paging groups you’re subscribed to as well as Group 24 (Priority
pages) and Group 25 (Emergency pages). If you enabled Do Not Disturb, you’ll only receive
Emergency pages.
Non-emergency pages won’t display or play on your phone.
Receiving Pages When You’re Not in an Active Call
If you receive a page and you’re not in an active call, the page immediately plays, regardless of
the paging priority.
While a page plays, you can:
• Hold the page.
• End the page. This ends the page at your phone only.
• Place a new call.
Receiving Pages During Active Calls
How you handle a page when you’re in an active call depends on the page priority and if you’re
allowed to receive a page when you’re in an active call.
If the page is a Normal page:
• If your phone is allowed to receive pages during active calls, the page immediately plays.
You’ll hear both the original call and the page. To hear only the page, hold or end the call.
• If your phone isn’t allowed to receive pages during active calls, the page displays as a
Pending page. To listen to the page, select the page, and press Accept. Or, hold or end
the call.
If page is a Priority or Emergency page, the page immediately plays. You’ll hear both the
original call and the page. To hear just the page, hold or end the call.
Adjusting the Volume of Pages
You can adjust the volume of pages while they play. During a page, press one of the Volume
keys, , to raise or lower the page volume.
56
Page 71

Chapter 3: Using Advanced Features
If you adjust the volume of a non-emergency page, your phone will use the adjusted volume for
subsequent non-emergency pages. However, only your system administrator can change the
volume of an Emergency page.
Changing Where Pages are Played
While you send a page, you can pick up the handset, or press or and continue
speaking. You can also press to mute your audio so that the people receiving your page
won’t hear anything. This behavior is similar to a phone call.
When you receive a page, the page is always played through the phone’s speakerphone—you
can’t play it through your handset or headset.
Updating the Default Paging Group
If you press and hold Paging, your page will automatically go to the default paging group,
Paging Group 1. If you want, you can change the default paging group.
To update the default Paging Group:
1 Select Settings from Home view, and select Basic > Preferences >
Paging/PTT Configuration > Group Paging.
2 From the Group Paging Configuration screen, select Default Group, and select a new
paging group number. The default paging group is 1.
Updating Paging Group Subscriptions
By default, you’re subscribed to Paging Groups 1, 24, and 25. This means that you can send
pages to and receive pages sent to these groups. You can change which groups you’re
subscribed to. However, you can’t disable your subscriptions to Paging Groups 24 and 25.
To update your Paging Group subscriptions:
1 Select Settings from Home view, and select Basic > Preferences >
Paging/PTT Configuration > Group Paging.
2 From the Group Paging Configuration screen, select Group Subscriptions.
3 From the Group Subscriptions screen, select the group you want to subscribe to, and
press Yes.
Allowing Pages to Play During Active Calls
The Accept While Busy option determines what happens when you’re in a call and receive a
page. If you enable the option, a page will interrupt telephone calls and you’ll hear the audio of
both the telephone call and the page. If you disable the option, the incoming page will be held in
a Pending state—it won’t disrupt the telephone call, and you won’t hear the page. To hear the
page, tap the page and press Accept (the telephone call will automatically be held). Or, hold or
end the telephone call.
57
Page 72

Polycom® VVX® 300 and 310 Business Media Phones User Guide
To allow or disallow pages to play during an active call:
1 Select Settings from Home view, and select Basic > Preferences >
Paging/PTT Configuration > Group Paging.
2 From the Group Paging Configuration screen, scroll to Accept While Busy, and enable or
disable the setting.
The default setting is Disabled. When enabled, your phone will accept and play pages
while you’re in an active call. When disabled, your phone won’t play pages while you’re in
a call, but will hold them as Pending instead.
Using the Calendar
If your phone is configured to connect to the Microsoft Exchange Server, you can view and join
meetings scheduled in your Microsoft® Outlook® application from your phone.
If your phone is configured to connect to the Microsoft Exchange Server, and the
Polycom® Conferencing for Microsoft® Outlook® software feature is installed at your site, you
can schedule meetings using Polycom Conferencing for Outlook.
Your system administrator has assigned you login credentials—a domain, user name, and
password—so you can access the Calendar from your phone. If enabled, the Calendar icon
displays on the third Home page. To use the Calendar feature, the phone must have your
correct Login Credentials.
58
Page 73

Chapter 3: Using Advanced Features
Troubleshooting: What Happens if My Phone Has the Wrong Login Credentials?
If your phone has incorrect Login Credenti al s, or you need to re-submit them, the following
Accessing Features with Your Login Credentials.
Troubleshooting: Why Doesn’t the Calendar Display Anymore?
If you don’t see the Calendar icon in Home view, or you’re not receiving meeting
server.
Note: Accessing the Calendar When the User Logi n Feature is Enabled
If you log in to a phone that has the User Login feature enabled, and then want to access
Login Credentials.
happens:
• The message Login Credentials have failed/Please update them if information is
correct displays on the screen.
• An icon, , displays under the time in the status bar to warn you that your
credentials have failed.
• The message Invalid login credentials display s i nst ead of the date in the status bar.
• The Calendar icon that displays on the Home screen won’t be available.
To learn more about your Login Credentials and how to re-submit or update them, see
reminders, your phone may not be connected to t he M icrosoft Exchange Server. To reconnect to the server and use the Calendar feature again, select Settings from Home
view, and select Features > Calendar. From the Calendar screen, select Connect to the
the Calendar, you’ll need to re-enter your login credentials so that the Calendar will work.
For information about entering your login credentials, see
Opening and Closing the Calendar
To open the calendar, select Calendar from Home view. The Calendar’s Day view displays (as
shown next), showing your meetings for the day. From Day view, you can access additional
Calendar views: Month View and Meeting view. To see Month view, press Month. To see
Meeting view, select a meeting.
Accessing Features with Your
To close the Calendar, press .
59
Page 74

Polycom® VVX® 300 and 310 Business Media Phones User Guide
Troubleshooting: Why Doesn’t the Calendar Display?
If you select Calendar from Home view, but the Calendar doesn’t display, your Login
Accessing Features with Your Login Credentials.
Credentials may be incorrect. To re-submit or update your Login Credentials, see
Navigating Month View
To see Month view, press Month. Month view shows all the days in the month and displays a
dot next to the days that have meetings, as shown next. The current day is always indicated in
black, unless it’s selected—then it’s highlighted in grey.
To navigate in Month view:
• To view the previous month, press Previous.
• To view the next month, press Next.
• To select another day, use the up, down, left, or right arrow key to select the day.
• To close the Calendar and display the Home screen, press or Exit.
Navigating Day View
When you select a day in Month view, Day view displays. Day view shows all the meetings
scheduled for the selected day, including the time, subject, and location of each meeting, as
shown next.
To navigate in Day view:
• To view the meetings for the previous day, press Previous.
• To view the meetings for the next day, press Next.
• To view details for a specific meeting, select the meeting.
• To see the day’s meetings, scroll up and down using the up and down arrow keys.
• To return to Month view, press Month.
60
Page 75

Chapter 3: Using Advanced Features
Navigating Meeting View
You can view meeting details from Meeting view, as shown next. To see Meeting view, select a
meeting in Day view.
From Meeting view, you can:
• View the meeting’s start and end time, location and organizer, required attendees, and
meeting description.
• View the numbers that you can call to join the meeting.
• Select a meeting number to join the meeting.
To navigate in Meeting view:
• To see the meeting details, scroll up or down.
• To return to Day view, press Day.
Working with Meeting Reminders
By default, your phone displays a meeting reminder 15 minutes before a meeting starts, as
shown next. Every minute before the meeting starts, the phone will emit an alert tone and
update the meeting timer. If a meeting starts, and you haven’t joined in, the reminder will let you
know that the meeting is overdue.
From the reminder, you can:
• Press the meeting number (on the far-left of the reminder), to join the meeting.
• Press Detail to view specific information about the meeting.
• Press Snooze to temporarily remove the reminder from the screen, until the next
scheduled reminder.
61
Page 76

Polycom® VVX® 300 and 310 Business Media Phones User Guide
Troubleshooting: Why Don’t My Meeting Remi nders Display?
If you’ve enabled meeting reminders, but your phone isn’t displaying them, make sure that
• Press Dismiss to permanently remove the reminder from the screen and stop all future
reminders for the meeting.
To enable or disable meeting reminders:
1 Select Settings from Home view, and select Basic > Preferences > Calendar Settings.
2 From the Calendar Settings screen, select Reminder, and enable or disable the setting.
The default setting is Enabled. When enabled, your phone will display reminders for all
meetings. When disabled, the phone won’t display reminders for any meeting.
your Login Credentials are correct (see Accessing Features with Your Login Credentials).
Joining Meetings from the Calendar
You can join meetings from the Calendar in two ways:
• From a meeting reminder.
• From Meeting view.
To join a meeting from a meeting reminder:
• From the reminder, press the meeting number that displays at the far-left of the reminder,
as shown next.
If you want to use another number to join the meeting, and the meeting organizer has
specified alternate meeting numbers you can call, press Detail from the reminder. The
Calendar displays Meeting view, which may list alternate numbers you can call. To dial
these numbers, press More Actions, and select one of the numbers.
62
Page 77

Chapter 3: Using Advanced Features
Web Info: Detailed Information About PDC
For more information about using your computer’s mouse and keyboard to navigate and
enter information on your phone, see
Desktop Connector (Feature Profile 52855).
To join a meeting from Meeting view:
1 From Day view, select the meeting you want to join.
2 From Meeting view, press the meeting number, as shown next.
If you want to use another number to join the meeting, and the meeting organizer has
specified alternate numbers you can call, press More Actions. A list of numbers that you
can dial is displayed. To join the meeting, select one of the numbers.
Using a Mouse and Keyboard with Your Phone
You can use your computer’s mouse and keyboard to enter information, select keys, and
navigate screens on your phone.
Using Your Computer’s Mouse and Keyboard with Your Phone
You can use your computer’s mouse and keyboard to enter information and navigate screens
on your phone. For example, you can enter phone numbers, contact directory information, and
select touchscreen objects without using the phone’s keypad. You can easily move the mouse
pointer back and forth between your computer and your phone depending on your task.
Before you can use your mouse and keyboard with your phone, you need to make sure the
Polycom Desktop Connector (PDC) application is installed and running on your computer. While
the PDC application is running, you can move your mouse pointer back and forth between your
computer and phone.
Extend Your PC to Your Phone with the Polycom
Starting and Stopping Polycom Desktop Connector
Before you can start using your mouse and keyboard with your phone, you’ll need to start the
PDC application from your computer.
63
Page 78

Polycom® VVX® 300 and 310 Business Media Phones User Guide
Note: When Your Computer Restarts
The Polycom Desktop Connector application restarts automatically when your computer
You can close the application at any time to prevent your mouse pointer from moving to the
phone. If you stop it, you can restart it again at any time.
To start Polycom Desktop Connector:
1 From the Start Menu, select Programs > Polycom > Polycom Desktop Connector.
After a few seconds, the Polycom Desktop Connector icon, , displays on the
Windows system tray, and the message Allow remote control of device <MAC address of
phone>? displays on the computer. This message displays only the first time the
application is started.
2 Click OK.
When your phone is configured correctly, the Polycom Desktop Connector icon updates to
. When this icon displays, the application is enabled and connected to your phone, and
you’ll be able to use your mouse and keyboard with your phone. If the icon doesn’t
change, contact your system administrator.
restarts.
To quit Polycom Desktop Connector:
1 Right-click the Polycom Desktop Connector icon, , on the Windows system tray, and
select Exit.
2 The message Are you sure you want to stop Polycom Desktop Connector Server?
displays. Click Ok to confirm your action.
The icon is removed from the system tray and the application is terminated. You won’t be able
to use your mouse and keyboard with your phone.
How to Use Your Computer’s Mouse and Keyboard with Your Phone
When PDC is enabled, you can use your mouse and keyboard to navigate menus, make option
selections, and enter text and numeric values as an alternative to using your phone’s keypad
interface. For example, you can use your mouse and/or keyboard to select and copy text from
your computer and paste it into the editable fields on your phone’s screen.
To display the mouse pointer on your phone’s screen, drag the mouse pointer beyond the edge
of your computer screen in the direction of your phone screen. When you see the mouse pointer
on your phone screen, you can start selecting items, and entering data in fields that have a
flashing cursor. To enter information on your computer again, drag the mouse pointer back to
your computer screen.
64
Page 79

Chapter 3: Using Advanced Features
Troubleshooting: Why Can’t I Use My Comput er Keyboard to Enter Information in
Certain Fields?
If you can’t use your computer keyboard t o enter information in a field on your phone,
keyboard will only work if the field has a flashing cursor.
Note: Placing Calls from Your Computer K eyboard
If you’re using PDC, you can’t place a call using New Call from Lines view. To place a
just enter the phone number and press New Call.
keyboard…
F1
Press the left-most soft key
check to see if the field has a flashing cursor. E ntering information using your computer
When you use your mouse and keyboard with your phone, you can do the following:
• Use your keyboard to enter information on your phone screen.
• Use the number keys above the alphabetic characters to enter numeric information such
as phone numbers. If you enable the Num Lock function on your keyboard, you can also
use the numeric keypad on your keyboard.
• Copy information from your computer screen and paste it onto your phone screen, using
your keyboard’s shortcuts to cut, copy, and paste. You can’t copy information from your
phone screen and paste it onto your computer screen.
• Copy and paste information between fields on your phone screen by right-clicking the
field, and choosing a clipboard command such as Cut (Ctrl+X), Copy (Ctrl+C), and/or
Paste (Ctrl+V).
• Use your mouse pointer to highlight information on the phone.
• Delete information on your phone by highlighting the information using your cursor and
pressing the Delete or Backspace keys on your keyboard.
• Use the Home and End keys on your keyboard to position your cursor at the beginning or
the end of fields on your phone.
• Use the Arrow keys to move within text fields.
• Hold Alt + Up Arrow key to increase the volume, and Alt + Down Arrow key to decrease
the volume.
• Use the mouse scroll wheel to navigate through lists and menus.
call, select New Call from Home view, enter the phone number, and press New Call. Or,
You can also use the function keys on your keyboard to save time and be more productive. The
function keys are mapped to features on your phone, as shown in the following table.
Press this on your
To do this on your phone…
65
Page 80

Polycom® VVX® 300 and 310 Business Media Phones User Guide
keyboard…
Directories
Alt+F2
Press Redial
Alt+F3
Press Transfer
Alt+F4
Press Conference
Alt+F5
Press Hold key
Alt+F6
Enable or disable Do Not Disturb
New Call
End Call
Sign Out
Volume Up
Volume Down
Press this on your
To do this on your phone…
F2 Press the second soft key from the left
F3 Press the third soft key from the left
F4 Press the fourth soft key from the left
F6
F7 Open
Press
F8 Open Messages
F9 Press Talk (if PTT enabled)
F10 Press Automatic Call Distribution (ACD) Sign In (if enabled )
F11 Open Applications
F12
Press
Alt+F7
Alt+F8 Press
Alt+F9 Press
Alt+F11
Enable of disable Microphone Mute ( )
Press
Alt+F12 Press Automatic Call Distribution (ACD)
Alt+Up arrow Press
Alt+Down arrow Press
key
key
66
(if enabled)
Page 81

Chapter 3: Using Advanced Features
Troubleshooting: Why Aren’t My Mouse Pointer an d Cursor Responding?
If your computer has multiple programs open or is in any way unresponsive, the mouse
pointer or cursor may not respond as quickly on y our phone. Try closing any unnecessary
programs.
Note: Placing a Call from a Phone in the Logged-Out State
If a phone is in the logged-out state and requires a user login, you may be able to use the
. These numbers are configured by your administrator. For
the Logged-Out State.
Logging into Phones
If your system administrator has set up the User Login feature, you can view your personal
phone settings from any phone in the organization. This means you can access your contact
directory and speed dials, as well as other phone settings, even as you temporarily change work
areas.
If you change any settings while you’re logged in to a phone, the settings are saved—contacts
and call list information—and displayed the next time you log in to a phone. When you log out,
your personal phone settings no longer display.
You can log in to a phone by entering your user ID and password. Default passwords are preset
at the factory to the numerals 123.
phone to place emergency calls to standard emergency numbers, such as 911, and other
pre-configured phone numbers
information on how to place authorized call s, see Placing Calls from Phones that are in
If the User Login feature is set up on your company’s phones, you’ll need to know how to:
• Log in to a phone to access your personal phone settings.
• Log out of a phone after you finish using it.
• Place a call to an authorized number from a phone that is in the logged-out state and
requires a user login.
• Change your user password.
Logging In and Out of a Phone
Depending if the User Login feature is enabled and required, you may or may not have to log in
to the phone to use it. However, if you want to see your personal phone settings from the
phone, you’ll have to log in. If you don’t log in, you’ll see the phone’s default phone profile.
While logged in, you’ll have full access to your personal phone settings and your directory. After
you log out of the phone, you’ll no longer be able to view this information on the phone.
67
Page 82

Polycom® VVX® 300 and 310 Business Media Phones User Guide
Note: Accessing the Calendar When the User Logi n Feature is Enabled
If you log in to a phone that has the User Login feature enabled, and then want to access
enter your login credentials so
Credentials.
After you use a phone, be certain to log out of the phone to prevent access to your personal
settings.
features that require your login credentials, you’ll need to rethat the features will work. For more informat i on, see Accessing Features with Your Login
To log in to a phone:
1 If the User Login screen is in view, go to step 2. If the User Login screen isn’t in view, do
one of the following:
○ From Lines view, press Log in.
or
○ Select Settings from Home view, and select Features > User Login > Log in.
2 From the User Login screen, enter your user ID and password, and press Log in.
Default passwords are preset at the factory to the numerals 123. However, your system
administrator may have changed this for security reasons.
If your login credentials are accepted, the phone updates to display your personal phone profile.
If your credentials are not accepted, the message User login failed is displayed, and the User
Login screen displays again. If you need to confirm your credentials, ask your system
administrator.
To log out of a phone:
1 From Lines view, press Log out. Or, select Settings from Home view, and select
Features > User Login > Log out.
The Logout screen displays with a confirmation message.
3 Press Yes.
Your personal profile is no longer accessible, and the phone displays either the User Login
screen for the next user login, or the default phone profile for anonymous users.
Placing Calls from Phones that are in the Logged-Out State
If a phone doesn’t require a user login, you can use the phone to place calls to any number,
even though the phone may be in the logged-out state.
68
Page 83

Chapter 3: Using Advanced Features
Note: User Password Security Best Practices
By default, user passwords are factory preset to the numerals 123. Polycom recommends
that you change your password when you first log in to a phone. Your user credentials are
managed only by your administrator, meaning you can’t change them yourself.
If a phone requires a user login, you may be able to place calls to authorized numbers when the
phone is in the logged-out state. If your system administrator has set up emergency numbers on
the phone, you can place calls to the standard emergency number, such as 911, and up to five
other authorized numbers. You won’t be able to call any other numbers until you log in to the
phone.
To place a call to an authorized number from a phone in the logged-out state:
1 Press New Call.
2 From the Place an Authorized Call screen, select the number you want to call, and press
Dial.
Changing Your Password
You can change your password from any phone that you’re currently logged in to.
To change your user password:
1 Log in to any phone on your network.
2 Select Settings from Home view, and select Features > User Login > Change User
Login Password.
3 From the Change User Login Password screen, enter your old password, enter a new
password and confirm it, and then press Enter.
Your password is changed. The next time you log in to a phone, you’ll need to enter this
password.
Locking the Phone
Lock your phone to do the following:
• Prevent unauthorized outgoing calls.
• Allow only authorized people to answer calls.
• Prevent people from viewing or modifying phone information, such as your directory, call
lists, or favorites.
When your phone is locked:
• You can only make an outgoing call to a number from a list of authorized numbers.
69
Page 84

Polycom® VVX® 300 and 310 Business Media Phones User Guide
• You must enter a password to answer incoming calls.
• All keys and screen items are disabled, except those that allow you to unlock the phone,
make an authorized call, or view the browser if enabled.
• The messages The phone is locked and Authorized calls only display on the status bar in
Lines view. The messages that displayed before the phone was locked don’t display.
You can unlock the phone by entering your user password. If your phone restarts for any reason
while it’s locked, it will be locked when the phone restarts unless your phone is configured to
start up unlocked.
About Your User Password
You are assigned a user password so you can answer calls from your locked phone and unlock
the phone. By default, your user password is 123. You can change your user password at any
time.
To change your user password:
1 Select Settings from Home view, and select Advanced.
2 From the Password screen, enter your user password, and press Enter.
3 From the Advanced screen, press Change User Password.
4 From the Change User Password screen, enter your password information, and press
Enter.
Locking and Unlocking Your Phone
You can choose how you want your phone to handle incoming calls when it is locked. If you set
up your phone to allow incoming calls when it is locked (the default setting), incoming calls will
ring on your phone, and you can answer calls by entering your user password. If you set up
your phone to ignore incoming calls, Do Not Disturb will be applied to all lines on your phone,
and your phone won’t ring.
To lock your phone:
1 Select Settings from Home view, and select Basic > Lock Phone.
2 From the Lock Phone screen, select how you want incoming calls handled when your
phone is locked.
○ Allow ringing when locked—Select this option if you want your phone to ring when
you have an incoming call. If you choose this option, you can answer a call by entering
your password.
70
Page 85

Chapter 3: Using Advanced Features
Timesaver: A Quick Way to Lock Your Phone
Your phone may be set up so that you can quickly lock it by tapping Lock from Lines view.
use the default setting—Allow ringing when locke d—or the last setting you selected.
○ DND when locked—Select this option if you don’t want your phone to ring. You won’t
have the option to answer incoming calls. All incoming calls will go to your voicemail
system (if enabled) and display as a missed call in your Recent Calls list. Note that
enabling this option on shared lines disables ringing only. You will still see a visual
notification of the call and have the option to answer it.
The default setting is Allow ringing when locked.
3 Press Lock.
Your phone is locked.
If you do this, however, you can’t choose how to handle incoming calls. Your phone will
To unlock your phone:
1 Press Unlock.
2 Enter your user password, and press Enter.
The phone unlocks.
Calling and Answering from a Locked Phone
From a locked phone, anyone can dial the standard emergency number, such as 911, and up to
five other authorized numbers that an administrator can set up. You can’t call any other
numbers from a locked phone. If you set up your phone so you can answer incoming calls when
your phone is locked, you can answer calls by entering your user password.
To call an authorized number from a locked phone:
• Do one of the following:
○ Press New Call. From the Place an Authorized Call screen, select the number you
want to call, and press Dial.
or
○ Place a call to an authorized number by using the handset, headset, or speakerphone.
The call is placed.
71
Page 86

Polycom® VVX® 300 and 310 Business Media Phones User Guide
Note: Which Termination is Used When Pl acing a Call to Authorized Number
the display of the authorized call list. The second press of the same key will cause display
of the idle screen.
Note: Accessing the Calendar when the User Login Feature is Enabled
If you log in to a phone that has the User Login feature enabled, and then want to access
enter your login credentials so
that the features will work.
When a call is placed to a number in the authorized list , it will placed through last used
termination (handset or speakerphone or headset).
The user must first press the speakerphone or headset key or lift the handset to trigger
To answer a call on a locked phone:
1 From the Incoming Call window, press Answer.
2 Enter your user password, and press Enter.
The call connects.
Accessing Features with Your Login Credentials
Your system administrator will assign you login credentials—a domain, user name, and
password—so your phone can access the Calendar feature or work with Microsoft Lync Server
2010. If there is a problem with your login credentials, you won’t be able to access your phone’s
Calendar or use features associated with Microsoft Lync Server 2010. When your phone has
incorrect login credentials, the following happens:
• An icon, , displays on the status bar.
• The message Login Credentials have failed/Please update them if information is incorrect
displays for 10 seconds.
• Your phone will have a Warning message. For information about phone Warnings, see
Investigating Phone Warnings.
To access the features again, re-submit or enter your login credentials.
features that require your login credentials, you’ll need to re-
To re-submit or enter your login credentials:
1 Select Settings from Home view, and select Basic > Login Credentials.
2 From the Login Credentials screen, press Submit.
Your credentials are re-submitted and you have access to the feature(s) again.
72
Page 87

Chapter 3: Using Advanced Features
Troubleshooting: What Happens if I Can’t Acce ss Features?
If you still don’t have access to the feature(s), try entering your credentials, and pressing
administrator.
Submit. If you still don’t have access, or you lock your account, see your system
73
Page 88

Page 89

Chapter 4: Customizing the Phone’s Display
In the previous chapters, you’ve learned how to customize calls—such as how to change call
volume, forward incoming calls in a special way, or divert calls from a contact. But what if you
want to customize the display? This chapter shows you how you can customize your phone’s
screen so that it’s unique to you. Basic customizations include changing the time and date
format and updating the screen brightness. If you want to get fancy, you can set up a
screen saver or change the background picture.
In this chapter, you’ll learn how to do the following:
• Change the language on your phone
• Change the display contrast
• Change the time and date display
• Change the backlight settings
• Change the background picture
• Display a screen saver
• Use the phone as a digital picture frame
• Set up power saving mode
Changing the Language on Your Phone
Your phone supports several languages.
To change the language:
1 Select Settings from Home view, and select Basic > Preferences > Language.
2 From the Language screen, select the language you want. The language on your phone
updates automatically.
Changing the Display Contrast
You can adjust the contrast of the phone’s display.
To adjust the contrast on the phone display:
1 Select Settings from Home view, and select Basic > Contrast.
2 Press Up or Down to increase or decrease the display contrast.
75
Page 90

Polycom® VVX® 300 and 310 Business Media Phones User Guide
Note: Reduced Time and Date Format Options for Certain Languages
The time and date format options are reduced if you change the language displayed on
3 Press Ok to save your changes.
Changing the Time and Date Display
The time and date display in the status bar. If the phone can’t obtain a time and date, the time
and date display will flash. Contact your system administrator if the display flashes, or either the
time or date is incorrect.
You can choose from a variety of time and date display formats, including options to display the
day, month, or year. You can also turn the time and date display off, so it doesn’t display at all.
Select and set options that are right for you.
The following figure shows the default display for the time and date.
To update the time and date display:
1 Select Settings from Home view, and slect Basic > Preferences > Time & Date.
2 From the Time & Date screen, do one of the following:
○ To change the date format, press Clock Date.
or
○ To change the time format, press Clock Time.
or
○ To change the order of the time and date display, press Clock Order.
3 From the Clock Date, Clock Time, or Clock Order screen, select the format you want.
your phone to Simplified Chinese, Traditional Chinese, and Japanese.
To enable or disable the time and date display:
1 Select Settings from Home view, and select Basic > Preferences > Time & Date.
2 From the Time & Date screen, select Enable or Disable to turn on or off the time and date
display.
76
Page 91

Chapter 4: Customizing the Phone’s Display
Changing the Backlight
Your phone’s backlight has two components:
• Backlight Intensity The brightness of the screen during phone activity and inactivity.
Backlight intensity has three settings:
○ Backlight On The brightness of the screen when there is phone activity.
○ Backlight Idle The brightness of the screen when there is no phone activity.
○ Maximum Intensity The brightness scale that applies to both Backlight On and
Backlight Idle intensities.
• Backlight Timeout—The number of seconds the phone is inactive before the backlight
dims to its Backlight Idle intensity. The backlight timeout period begins after your last key
press or the last phone event, such as an incoming call.
You can change the Backlight On intensity and the Backlight Idle intensity separately. You can
choose a high, medium, or low intensity, or turn off the backlight entirely.
When you change the Maximum Intensity, you modify the entire backlight intensity scale. For
example, if you decrease the Maximum Intensity, the low, medium, and high levels for both
Backlight On and Backlight Idle intensities decrease.
The backlight automatically turns on with any phone activity. By setting the Backlight Timeout,
you can determine how long the phone should be idle before the backlight dims to its Backlight
Idle intensity. By default, after the phone is idle for 40 seconds, the backlight dims.
To change the backlight intensity:
1 Select Settings from Home view, and select Basic > Backlight Intensity.
2 From the Backlight Intensity screen, select Backlight On Intensity.
3 From the Backlight On Intensity screen, select the intensity you want, and press Back.
The default is High.
4 From the Backlight Intensity screen, select Backlight Idle Intensity.
5 From the Backlight Idle Intensity screen, select the intensity you want, and press Back.
The default is Low.
6 From the Backlight Intensity screen, select Maximum Intensity.
7 From the Maximum Intensity screen, select Up or Down to increase or decrease the
maximum intensity the screen can display, and press Back.
To change the Backlight Timeout:
1 Select Settings from Home view, and press Basic > Backlight Timeout.
2 From the Backlight Timeout screen, enter the number of seconds the phone will be idle
before the backlight dims. The default is 40 seconds.
77
Page 92

Polycom® VVX® 300 and 310 Business Media Phones User Guide
Web Info: Adding a Web Page as the Background on Your Phone
You may be able to add a Web page as the background on y our phone. For more
information, see
Changing the Phone’s Background Picture
You can change the background picture that displays on your phone. By default, your screen
displays a light grey background that is named Default.
Your system administrator sets up the background images for your phone. If no background
images are set up, only the light grey background, named Default, is available. If you want, you
can use a picture of your own as the background image. For more information, see Using One
of Your Own Pictures as the Background Picture.
Customizing the Display Background (Feature Profile 62470).
Changing the Background Picture
To change the background picture:
1 Select Settings from Home view, and select Basic > Preferences > Background.
The Background screen displays.
Depending how your system is set up, you may have to select Settings from Home view,
and select Basic > Preferences > Background > Select Background. The Select
Background screen will display instead.
The following figure shows a sample background screen. Your screen will have the default
option, as well as other options that your administrator may have added to your phone.
2 Select the background image you want.
Using One of Your Own Pictures as the Background Picture
You can use a picture that is stored on your computer as the background picture on your phone.
When you set one of your pictures as the background picture, the picture will display as Local
File in the Backgrounds list.
78
Page 93

Chapter 4: Customizing the Phone’s Display
Note: Restrictions for Background Imag es
When you use one of your own pictures as the backgr ound i m age, keep in mind the
aspect ratio.
Web Info: Changing the Background Picture Using the Web Configuration Utility
You can use the Web Configuration Utility t o change the background picture on your
phone.
For detailed information on accessing, nav igating, and using the utility, see the
Web Configuration Utility User Guide.
following:
• Progressive or multiscan JPEG images are not supported.
• The phone screen size is 220 x 108pixels. Smaller images will be centered and
surrounded with black space. Larger images will be scaled proportionally to fit the
screen. Horizontal or vertical black bars may be added to preserve the original
If you do not have access, contact your system administrator.
To change the background picture to one of your own pictures:
1 Log into the Web Configuration Utility. See Configuring Your Phone Using the Web
Configuration Utility.
2 From the menu bar, select Preferences > Background.
3 Click + adjacent to Add a new background image.
4 Click Choose File and browse to desired location.
A preview of the file displays.
5 Click Save.
The file is added to the list of possible backgrounds. To select the new file, see Changing
the Background Picture.
Displaying Screen Savers
Polycom
Another way to personalize your phone is to use the idle browser as a screen saver. The screen
saver will automatically start each time your phone is idle a certain amount of time. You can
stop the screen saver at any time by pressing a soft key, line key, or hard key. If your phone is
idle again for a specified period of time, the screen saver will start again.
Setting Up a Screen Saver
You can select one of two screen savers for your phone.
79
Page 94

Polycom® VVX® 300 and 310 Business Media Phones User Guide
To set up a screen saver:
1 Select Settings from Home view, and select Basic > Preferences > Screen Saver.
2 From the Screen Saver screen, do the following:
○ Select Screen Saver, and select Enabled.
○ Select Wait Time, and enter the number of minutes the phone should wait after no
activity before displaying the screen saver.
You can enter a minimum of 1 minute and a maximum of 9999 minutes. The default is
15 minutes.
○ Select Type, and select one of Default or Idle Browser.
○ Press Save.
Interrupting and Disabling Screen Savers
You can stop a screen saver at any time by pressing a soft key, line key, or hard key. After your
phone is idle for the specified period of time, the screen saver will start again.
You can disable a screen saver—prevent it from starting, even if your phone has been idle for
the specified period of time—by disabling the Screen Saver setting.
To disable the Screen Saver setting:
1 Select Settings from Home view, and select Basic > Preferences > Screen Saver.
2 From the Screen Saver screen, select Screen Saver, and select Disabled.
3 Press Save.
80
Page 95

Chapter 5: Administrative Tasks
If your phone is unable to operate properly, you may have to investigate or troubleshoot issues.
To solve issues, your administrator may ask you to restart your phone, update the phone’s
configuration, or test phone hardware. This chapter shows you how to perform all these tasks.
Investigating Phone Warnings
If your phone is unable to perform certain tasks, a warning icon, , will di splay in the status
bar, as shown next. The warning icon lets you know that your phone has one or more important
issues. You can view details about the issues from the Warnings screen.
To view a detailed list of phone issues:
• Select Settings from Home view, and select Status > Diagnostics > Warnings.
The Warnings screen displays (as shown next), listing any phone issues.
After you view the phone warnings, you can press Clear Icon to remove the warning icon from
the status bar. However, the warning will still display in the Warnings list until the phone issue is
fixed.
Each time your phone has a warning that you haven’t viewed, the Warning icon displays.
Restarting the Phone
Your system administrator may ask you to restart your phone if your phone malfunctions or to
assist in troubleshooting.
81
Page 96

Polycom® VVX® 300 and 310 Business Media Phones User Guide
Caution: Restarting Your Phone
update the phone’s configuration, see Updating P hone Configuration.
• Before you restart your phone, contact your sy st em administrator. If your phone is
malfunctioning, you may be able to restore normal operation without restarting the
phone. In addition, your administrator m ay want to troubleshoot your phone before
you restart it.
• If you need to update your phone’s configuratio n, don’t restart your phone. To
To restart the phone:
1 Select Settings from Home view, and select Basic > Restart Phone.
The message Are you sure? displays.
2 If you still want to restart the phone, press Yes.
The restart process begins. The process ends when the default Home screen displays.
Updating Phone Configuration
Your system administrator may ask you to update your phone configuration. You may be able to
do this without restarting your phone.
To update your phone’s configuration:
1 Select Settings from Home view, and select Basic > Update Configuration.
The message Are you sure? displays.
2 To update the configuration, press Yes.
The configuration is updated. Your phone may restart, depending on the phone settings that
have changed.
Testing Phone Hardware
Your system administrator may ask you to access a diagnostics menu on your phone to test
your phone hardware. You can test your phone’s microphones, speaker, handset, third-party
headset (if present), keypad mappings, touchscreen, and LEDs . See your system administrator
for instructions on how to perform these tests.
To test your phone hardware:
1 Select Settings from Home view, and select Status > Diagnostics > Test Hardware.
2 From the Test Hardware screen, select one of the following:
○ Audio Diagnostics
82
Page 97

○ Keypad Diagnostics
○ Display Diagnostics
○ Brightness Diagnostics
○ LED Diagnostics
Chapter 5: Administrative Tasks
83
Page 98

Page 99

Chapter 6: Getting Help
This chapter provides locations where you can access useful Polycom or third-party documents
and web links, including related Polycom, partner, or third-party documents and web sites.
Related Documents
For more information about installing, configuring, and administering Polycom products, refer to
Documents and Downloads at Polycom Support
The Polycom Community
The Polycom Community gives you access to the latest developer and support information.
Participate in discussion forums to share ideas and solve problems with your colleagues. To
register with the Polycom Community, simply create a Polycom online account. When logged in,
you can access Polycom support personnel and participate in developer and support forums to
find the latest information on hardware, software, and development topics.
.
85
Page 100

 Loading...