

Page 1

USER GUIDE
UC Software 5.4.0A | September 2015 | 3725-46211-004A
Polycom® VVX® Business Media
Phones
Applies to Polycom VVX 101, 201, 300, 310, 400, 410,
500, 600, and 1500 phones, Polycom VVX Camera,
and Polycom VVX Expansion Modules
Page 2

Copyright© 2015, Polycom, Inc. All rights reserved. No part of this document may be reproduced, translated into another
language or format, or transmitted in any form or by any means, electronic or mechanical, for any purpose, without the
express written permission of Polycom, Inc.
6001 America Center Drive
San Jose, CA 95002
USA
Trademarks Polycom
trademarks and/or service marks of Polycom, Inc. and are registered and/or common law marks in the United States
and various other countries.
All other trademarks are property of their respective owners. No portion hereof may be reproduced or transmitted in any
form or by any means, for any purpose other than the recipient's personal use, without the express written permission
of Polycom.
®
, the Polycom logo and the names and marks associated with Polycom products are
Disclaimer While Polycom uses reasonable efforts to include accurate and up-to-date information in this document,
Polycom makes no warranties or representations as to its accuracy. Polycom assumes no liability or responsibility for
any typographical or other errors or omissions in the content of this document.
Limitation of Liability Polycom and/or its respective suppliers make no representations about the suitability of the
information contained in this document for any purpose. Information is provided "as is" without warranty of any kind and
is subject to change without notice. The entire risk arising out of its use remains with the recipient. In no event shall
Polycom and/or its respective suppliers be liable for any direct, consequential, incidental, special, punitive or other
damages whatsoever (including without limitation, damages for loss of business profits, business interruption, or loss of
business information), even if Polycom has been advised of the possibility of such damages.
End User License Agreement By installing, copying, or otherwise using this product, you acknowledge that you
have read, understand and agree to be bound by the terms and conditions of the End User License Agreement for this
product. The EULA for this product is available on the Polycom Support page for the product.
Patent Information The accompanying product may be protected by one or more U.S. and foreign patents and/or
pending patent applications held by Polycom, Inc.
Open Source Software Used in this Product This product may contain open source software. You may receive
the open source software from Polycom up to three (3) years after the distribution da te of the applicable product or
software at a charge not greater than the cost to Polycom of shipping or distributing the software to you. To receive
software information, as well as the open source software code used in this product, contact Polycom by email at
OpenSourceVideo@polycom.com.
Customer Feedback We are striving to improve our documentation quality and we appreciate your feedback. Email
your opinions and comments to DocumentationFeedback@polycom.com.
Polycom Support Visit the Polycom Support Center for End User License Agreements, software downloads,
product documents, product licenses, troubleshooting tips, service requests, and more.
2
Page 3

Table of Contents
Before You Begin . . . . . . . . . . . . . . . . . . . . . . . . . . . . . . . . . . . . . . . . . . . . . . . . . . 16
Who Should Read this Guide? . . . . . . . . . . . . . . . . . . . . . . . . . . . . . . . . . . . . . . . . . . . . . . . . 16
Typographic Conventions . . . . . . . . . . . . . . . . . . . . . . . . . . . . . . . . . . . . . . . . . . . . . . . . . . . . 16
Related Documentation . . . . . . . . . . . . . . . . . . . . . . . . . . . . . . . . . . . . . . . . . . . . . . . . . . . . . . 16
Getting Started with Polycom VVX Business Media Phones . . . . . . . . . . . . . . . 18
Overview of Phone Hardware and Keys . . . . . . . . . . . . . . . . . . . . . . . . . . . . . . . . . . . . . . . . . 18
VVX 101 and VVX 201 Phones Hardware . . . . . . . . . . . . . . . . . . . . . . . . . . . . . . . . . . . . 19
VVX 300 and VVX 310 Phones Hardware . . . . . . . . . . . . . . . . . . . . . . . . . . . . . . . . . . . . 21
VVX 400 and VVX 410 Phones Hardware . . . . . . . . . . . . . . . . . . . . . . . . . . . . . . . . . . . . 23
VVX 500 and VVX 600 Phones Hardware . . . . . . . . . . . . . . . . . . . . . . . . . . . . . . . . . . . . 25
VVX 1500 Phone Hardware . . . . . . . . . . . . . . . . . . . . . . . . . . . . . . . . . . . . . . . . . . . . . . . 27
Securing Your Phone with the Security Slot . . . . . . . . . . . . . . . . . . . . . . . . . . . . . . . . . . . 29
Overview of the Phone Interface . . . . . . . . . . . . . . . . . . . . . . . . . . . . . . . . . . . . . . . . . . . . . . . 29
Phone Screens . . . . . . . . . . . . . . . . . . . . . . . . . . . . . . . . . . . . . . . . . . . . . . . . . . . . . . . . . 29
Home Screen . . . . . . . . . . . . . . . . . . . . . . . . . . . . . . . . . . . . . . . . . . . . . . . . . . . . . . . 30
Calls Screen . . . . . . . . . . . . . . . . . . . . . . . . . . . . . . . . . . . . . . . . . . . . . . . . . . . . . . . . 30
Lines Screen . . . . . . . . . . . . . . . . . . . . . . . . . . . . . . . . . . . . . . . . . . . . . . . . . . . . . . . . 31
Active Call Screen . . . . . . . . . . . . . . . . . . . . . . . . . . . . . . . . . . . . . . . . . . . . . . . . . . . 32
Switch among Phone Screens . . . . . . . . . . . . . . . . . . . . . . . . . . . . . . . . . . . . . . . . . . 32
Phone Icons and Status Indicators . . . . . . . . . . . . . . . . . . . . . . . . . . . . . . . . . . . . . . . . . . 33
Entering Information in Data Fields . . . . . . . . . . . . . . . . . . . . . . . . . . . . . . . . . . . . . . . . . . . . . 38
Entering Information Using the Dial Pad . . . . . . . . . . . . . . . . . . . . . . . . . . . . . . . . . . . . . 38
Enter Information Using the Onscreen Keyboard . . . . . . . . . . . . . . . . . . . . . . . . . . . . . . . 39
Inputing Chinese Characters with PinYin . . . . . . . . . . . . . . . . . . . . . . . . . . . . . . . . . . . . . 40
Using the PinYin Input Widget . . . . . . . . . . . . . . . . . . . . . . . . . . . . . . . . . . . . . . . . . . 40
Logging Into and Locking Your Phone . . . . . . . . . . . . . . . . . . . . . . . . . . . . . . . . . 43
Log Into Your Phone . . . . . . . . . . . . . . . . . . . . . . . . . . . . . . . . . . . . . . . . . . . . . . . . . . . . . . . . 43
Log Out of Your Phone . . . . . . . . . . . . . . . . . . . . . . . . . . . . . . . . . . . . . . . . . . . . . . . . . . . 44
Change Your Password . . . . . . . . . . . . . . . . . . . . . . . . . . . . . . . . . . . . . . . . . . . . . . . . . . 44
Log Into a Visitor Desk Phone . . . . . . . . . . . . . . . . . . . . . . . . . . . . . . . . . . . . . . . . . . . . . . . . . 44
Polycom, Inc. 3
Page 4

Polycom VVX Business Media Phones User Guide
Log Out of a Visitor Desk Phone . . . . . . . . . . . . . . . . . . . . . . . . . . . . . . . . . . . . . . . . . . . . 45
Sign Into Skype For Business on Your Phone . . . . . . . . . . . . . . . . . . . . . . . . . . . . . . . . . . . . 45
Set the Time and Date Format on Your Phone . . . . . . . . . . . . . . . . . . . . . . . . . . . . . . . . . 45
Sign Out of Skype for Business . . . . . . . . . . . . . . . . . . . . . . . . . . . . . . . . . . . . . . . . . . . . 46
Sign In Using Your BroadSoft UC-One Credentials . . . . . . . . . . . . . . . . . . . . . . . . . . . . . . . . 46
Locking Your Phone . . . . . . . . . . . . . . . . . . . . . . . . . . . . . . . . . . . . . . . . . . . . . . . . . . . . . . . . 46
Lock Your Phone . . . . . . . . . . . . . . . . . . . . . . . . . . . . . . . . . . . . . . . . . . . . . . . . . . . . . . . . 47
Unlock Your Phone . . . . . . . . . . . . . . . . . . . . . . . . . . . . . . . . . . . . . . . . . . . . . . . . . . . . . . 47
Change Your User Password . . . . . . . . . . . . . . . . . . . . . . . . . . . . . . . . . . . . . . . . . . . . . . 47
Audio Calls . . . . . . . . . . . . . . . . . . . . . . . . . . . . . . . . . . . . . . . . . . . . . . . . . . . . . . . 49
Placing and Answering Audio Calls . . . . . . . . . . . . . . . . . . . . . . . . . . . . . . . . . . . . . . . . . . . . . 49
Placing Audio Calls . . . . . . . . . . . . . . . . . . . . . . . . . . . . . . . . . . . . . . . . . . . . . . . . . . . . . . 50
Place Calls from the Dialer . . . . . . . . . . . . . . . . . . . . . . . . . . . . . . . . . . . . . . . . . . . . . 50
Place an International Call . . . . . . . . . . . . . . . . . . . . . . . . . . . . . . . . . . . . . . . . . . . . . 50
Place Calls from Recent Call Lists . . . . . . . . . . . . . . . . . . . . . . . . . . . . . . . . . . . . . . . 51
Place Calls to Favorites . . . . . . . . . . . . . . . . . . . . . . . . . . . . . . . . . . . . . . . . . . . . . . . 51
Place Calls from Directories . . . . . . . . . . . . . . . . . . . . . . . . . . . . . . . . . . . . . . . . . . . . 52
Place Calls from a Locked or Logged Out Phone . . . . . . . . . . . . . . . . . . . . . . . . . . . 52
Place an Intercom Call . . . . . . . . . . . . . . . . . . . . . . . . . . . . . . . . . . . . . . . . . . . . . . . . 52
Place a Call from a VVX Expansion Module . . . . . . . . . . . . . . . . . . . . . . . . . . . . . . . . 53
Place a Call with a Hidden Number . . . . . . . . . . . . . . . . . . . . . . . . . . . . . . . . . . . . . . 54
Redial a Number . . . . . . . . . . . . . . . . . . . . . . . . . . . . . . . . . . . . . . . . . . . . . . . . . . . . . . . . 54
Use H.323 Protocol to Place Audio Calls . . . . . . . . . . . . . . . . . . . . . . . . . . . . . . . . . . . . . 54
Answer Audio Calls . . . . . . . . . . . . . . . . . . . . . . . . . . . . . . . . . . . . . . . . . . . . . . . . . . . . . . 55
Answer Calls in the Incoming Call Screen . . . . . . . . . . . . . . . . . . . . . . . . . . . . . . . . . 55
Answer Calls from the Calls Screen . . . . . . . . . . . . . . . . . . . . . . . . . . . . . . . . . . . . . . 56
Answer a Call When in a Call . . . . . . . . . . . . . . . . . . . . . . . . . . . . . . . . . . . . . . . . . . . 56
Answering Calls on Shared Lines . . . . . . . . . . . . . . . . . . . . . . . . . . . . . . . . . . . . . . . . 57
Answer Calls Automatically . . . . . . . . . . . . . . . . . . . . . . . . . . . . . . . . . . . . . . . . . . . . 57
Answer Calls on a Locked Phone . . . . . . . . . . . . . . . . . . . . . . . . . . . . . . . . . . . . . . . . 57
Answer Intercom Calls . . . . . . . . . . . . . . . . . . . . . . . . . . . . . . . . . . . . . . . . . . . . . . . . 57
Answer Calls from VVX Expansion Modules . . . . . . . . . . . . . . . . . . . . . . . . . . . . . . . 58
Switch among the Handset, Headset, and Speakerphone . . . . . . . . . . . . . . . . . . . . . . . . 58
Mute and Unmute Audio . . . . . . . . . . . . . . . . . . . . . . . . . . . . . . . . . . . . . . . . . . . . . . . . . . 58
End Audio Calls . . . . . . . . . . . . . . . . . . . . . . . . . . . . . . . . . . . . . . . . . . . . . . . . . . . . . . . . . 59
Holding and Resuming Calls . . . . . . . . . . . . . . . . . . . . . . . . . . . . . . . . . . . . . . . . . . . . . . . . . . 59
Hold Calls . . . . . . . . . . . . . . . . . . . . . . . . . . . . . . . . . . . . . . . . . . . . . . . . . . . . . . . . . . . . . 59
Resume Calls . . . . . . . . . . . . . . . . . . . . . . . . . . . . . . . . . . . . . . . . . . . . . . . . . . . . . . . . . . 59
Resume Calls on VVX Expansion Modules . . . . . . . . . . . . . . . . . . . . . . . . . . . . . . . . 59
Polycom, Inc. 4
Page 5

Polycom VVX Business Media Phones User Guide
Transferring Calls . . . . . . . . . . . . . . . . . . . . . . . . . . . . . . . . . . . . . . . . . . . . . . . . . . . . . . . . . . 60
Choose a Default Transfer Type . . . . . . . . . . . . . . . . . . . . . . . . . . . . . . . . . . . . . . . . . . . . 60
Transfer a Call . . . . . . . . . . . . . . . . . . . . . . . . . . . . . . . . . . . . . . . . . . . . . . . . . . . . . . . . . . 60
Cancel a Transfer . . . . . . . . . . . . . . . . . . . . . . . . . . . . . . . . . . . . . . . . . . . . . . . . . . . . 60
Parking and Retrieving Calls . . . . . . . . . . . . . . . . . . . . . . . . . . . . . . . . . . . . . . . . . . . . . . . . . . 61
Parking and Retrieving Calls on the Skype for Business Server . . . . . . . . . . . . . . . . . . . 61
Park Calls . . . . . . . . . . . . . . . . . . . . . . . . . . . . . . . . . . . . . . . . . . . . . . . . . . . . . . . . . . 61
Retrieving Parked Calls . . . . . . . . . . . . . . . . . . . . . . . . . . . . . . . . . . . . . . . . . . . . . . . 61
Parking and Retrieving Calls on the BroadWorks Server . . . . . . . . . . . . . . . . . . . . . . . . . 62
Park Calls . . . . . . . . . . . . . . . . . . . . . . . . . . . . . . . . . . . . . . . . . . . . . . . . . . . . . . . . . . 62
Retrieve Calls . . . . . . . . . . . . . . . . . . . . . . . . . . . . . . . . . . . . . . . . . . . . . . . . . . . . . . . 63
Managing Multiple Calls . . . . . . . . . . . . . . . . . . . . . . . . . . . . . . . . . . . . . . . . . . . . . . . . . . . . . 64
Managing Calls on VVX 1500 Phones . . . . . . . . . . . . . . . . . . . . . . . . . . . . . . . . . . . . . . . 64
View a List of Calls . . . . . . . . . . . . . . . . . . . . . . . . . . . . . . . . . . . . . . . . . . . . . . . . . . . 64
Manage Calls . . . . . . . . . . . . . . . . . . . . . . . . . . . . . . . . . . . . . . . . . . . . . . . . . . . . . . . 65
Managing Calls on VVX 101, 201, 300/310, 400/410, 500, and 600 Phones . . . . . . . . . . 65
Display Calls from the Lines Screen . . . . . . . . . . . . . . . . . . . . . . . . . . . . . . . . . . . . . . 65
Display Calls from the Calls Screen . . . . . . . . . . . . . . . . . . . . . . . . . . . . . . . . . . . . . . 66
Manage Calls from the Calls Screen . . . . . . . . . . . . . . . . . . . . . . . . . . . . . . . . . . . . . 66
Managing Calls Remotely . . . . . . . . . . . . . . . . . . . . . . . . . . . . . . . . . . . . . . . . . . . . . . . . . . . . 67
Managing Calls with BroadSoft UC-One BroadWorks Anywhere . . . . . . . . . . . . . . . . . . . 67
Enable BroadWorks Anywhere . . . . . . . . . . . . . . . . . . . . . . . . . . . . . . . . . . . . . . . . . . 67
Edit BroadWorks Anywhere Locations . . . . . . . . . . . . . . . . . . . . . . . . . . . . . . . . . . . . 68
Disable BWA Locations . . . . . . . . . . . . . . . . . . . . . . . . . . . . . . . . . . . . . . . . . . . . . . . 68
Remove BWA Locations . . . . . . . . . . . . . . . . . . . . . . . . . . . . . . . . . . . . . . . . . . . . . . . 68
Managing Calls with BroadSoft UC-One Remote Office . . . . . . . . . . . . . . . . . . . . . . . . . . 68
Add a Remote Office Number . . . . . . . . . . . . . . . . . . . . . . . . . . . . . . . . . . . . . . . . . . 69
Disable Remote Office . . . . . . . . . . . . . . . . . . . . . . . . . . . . . . . . . . . . . . . . . . . . . . . . 69
Edit Your Remote Office Number . . . . . . . . . . . . . . . . . . . . . . . . . . . . . . . . . . . . . . . . 69
Ignoring or Rejecting Incoming Calls . . . . . . . . . . . . . . . . . . . . . . . . . . . . . . . . . . . . . . . . . . . . 69
Ignore or Silence Incoming Calls . . . . . . . . . . . . . . . . . . . . . . . . . . . . . . . . . . . . . . . . . . . 70
Reject Incoming Calls . . . . . . . . . . . . . . . . . . . . . . . . . . . . . . . . . . . . . . . . . . . . . . . . . . . . 70
Reject Calls from a Contact . . . . . . . . . . . . . . . . . . . . . . . . . . . . . . . . . . . . . . . . . . . . . . . 70
Rejecting Calls with Do Not Disturb . . . . . . . . . . . . . . . . . . . . . . . . . . . . . . . . . . . . . . . . . 70
Enable Do Not Disturb . . . . . . . . . . . . . . . . . . . . . . . . . . . . . . . . . . . . . . . . . . . . . . . . 71
Reject Calls with Do Not Disturb on Multiple Lines . . . . . . . . . . . . . . . . . . . . . . . . . . . 71
Reject Anonymous Calls . . . . . . . . . . . . . . . . . . . . . . . . . . . . . . . . . . . . . . . . . . . . . . . . . . 72
Redirecting Incoming Calls . . . . . . . . . . . . . . . . . . . . . . . . . . . . . . . . . . . . . . . . . . . . . . . . . . . 72
Forwarding Incoming Calls to a Contact . . . . . . . . . . . . . . . . . . . . . . . . . . . . . . . . . . . . . . 72
Forward an Incoming Call to a Contact . . . . . . . . . . . . . . . . . . . . . . . . . . . . . . . . . . . 72
Polycom, Inc. 5
Page 6

Polycom VVX Business Media Phones User Guide
Forward All Incoming Calls to a Contact . . . . . . . . . . . . . . . . . . . . . . . . . . . . . . . . . . . 73
Disable Call Forwarding . . . . . . . . . . . . . . . . . . . . . . . . . . . . . . . . . . . . . . . . . . . . . . . 73
Forwarding Incoming Skype for Business Calls . . . . . . . . . . . . . . . . . . . . . . . . . . . . . . . . 73
Forward Skype for Business Calls to a Contact . . . . . . . . . . . . . . . . . . . . . . . . . . . . . 74
Forward Calls to Voicemail . . . . . . . . . . . . . . . . . . . . . . . . . . . . . . . . . . . . . . . . . . . . . 74
Simultaneously Ring a Group of Contacts . . . . . . . . . . . . . . . . . . . . . . . . . . . . . . . . . 74
Forward Calls to Delegates . . . . . . . . . . . . . . . . . . . . . . . . . . . . . . . . . . . . . . . . . . . . 75
Simultaneously Ring Delegates . . . . . . . . . . . . . . . . . . . . . . . . . . . . . . . . . . . . . . . . . 75
Divert Calls to a Contact . . . . . . . . . . . . . . . . . . . . . . . . . . . . . . . . . . . . . . . . . . . . . . . . . . 75
Audio Conference Calls . . . . . . . . . . . . . . . . . . . . . . . . . . . . . . . . . . . . . . . . . . . . . 76
Tips for Conference Calls . . . . . . . . . . . . . . . . . . . . . . . . . . . . . . . . . . . . . . . . . . . . . . . . . . . . 76
Audio Conference Calls . . . . . . . . . . . . . . . . . . . . . . . . . . . . . . . . . . . . . . . . . . . . . . . . . . . . . . 76
Initiate Conference Calls . . . . . . . . . . . . . . . . . . . . . . . . . . . . . . . . . . . . . . . . . . . . . . . . . . 77
Join Calls to Create a Conference Call . . . . . . . . . . . . . . . . . . . . . . . . . . . . . . . . . . . . . . . 77
End Conference Calls . . . . . . . . . . . . . . . . . . . . . . . . . . . . . . . . . . . . . . . . . . . . . . . . . . . . 78
Hold Conference Calls . . . . . . . . . . . . . . . . . . . . . . . . . . . . . . . . . . . . . . . . . . . . . . . . . . . 78
Resume Conference Calls . . . . . . . . . . . . . . . . . . . . . . . . . . . . . . . . . . . . . . . . . . . . . . . . 78
Split Conference Calls . . . . . . . . . . . . . . . . . . . . . . . . . . . . . . . . . . . . . . . . . . . . . . . . . . . 78
Manage Conference Call Participants . . . . . . . . . . . . . . . . . . . . . . . . . . . . . . . . . . . . . . . . 78
Skype for Business Conference Calls . . . . . . . . . . . . . . . . . . . . . . . . . . . . . . . . . . . . . . . . . . . 79
Initiating a Skype for Business Conference Call . . . . . . . . . . . . . . . . . . . . . . . . . . . . . . . . 79
Initiate a Skype for Business Conference on Your Phone . . . . . . . . . . . . . . . . . . . . . 80
Initiate a Conference Call in the Skype for Business Client . . . . . . . . . . . . . . . . . . . . 80
Initiating a Group Conference Call . . . . . . . . . . . . . . . . . . . . . . . . . . . . . . . . . . . . . . . . . . 80
Initiate a Group Conference Call on Your Phone . . . . . . . . . . . . . . . . . . . . . . . . . . . . 80
Initiate a Group Conference Call in the Skype for Business Client . . . . . . . . . . . . . . . 81
Initiate a Conference Call during a Skype for Business Call . . . . . . . . . . . . . . . . . . . . . . . 81
Add Contacts to a Skype for Business Conference Call . . . . . . . . . . . . . . . . . . . . . . . . . . 81
Send Contacts Active Conference Information . . . . . . . . . . . . . . . . . . . . . . . . . . . . . . 81
Viewing a Roster of Skype for Business Conference Participants . . . . . . . . . . . . . . . . . . 82
Exit the Roster . . . . . . . . . . . . . . . . . . . . . . . . . . . . . . . . . . . . . . . . . . . . . . . . . . . . . . 82
Return to the Roster . . . . . . . . . . . . . . . . . . . . . . . . . . . . . . . . . . . . . . . . . . . . . . . . . . 82
Managing Skype for Business Conference Participants . . . . . . . . . . . . . . . . . . . . . . . . . . 82
Muting Conference Participants . . . . . . . . . . . . . . . . . . . . . . . . . . . . . . . . . . . . . . . . . 82
Demote or Promote Conference Participants . . . . . . . . . . . . . . . . . . . . . . . . . . . . . . . 83
Enable and Disable Conference Announcements . . . . . . . . . . . . . . . . . . . . . . . . . . . 83
Remove Conference Participants . . . . . . . . . . . . . . . . . . . . . . . . . . . . . . . . . . . . . . . . 84
Lock and Unlock a Conference Call . . . . . . . . . . . . . . . . . . . . . . . . . . . . . . . . . . . . . . 84
Alcatel-Lucent Advanced Conference Calls . . . . . . . . . . . . . . . . . . . . . . . . . . . . . . . . . . . . . . 84
Polycom, Inc. 6
Page 7

Polycom VVX Business Media Phones User Guide
Initiate an Advanced Conference Call . . . . . . . . . . . . . . . . . . . . . . . . . . . . . . . . . . . . . . . . 84
Initiate an Advanced Conference Call During a Call . . . . . . . . . . . . . . . . . . . . . . . . . . 85
Add Contacts to an Advanced Conference Call . . . . . . . . . . . . . . . . . . . . . . . . . . . . . . . . 85
Join Calls to an Advanced Conference Call . . . . . . . . . . . . . . . . . . . . . . . . . . . . . . . . . . . 85
Join Two Calls into an Advanced Conference Call . . . . . . . . . . . . . . . . . . . . . . . . . . . 85
Viewing a Roster of Conference Participants . . . . . . . . . . . . . . . . . . . . . . . . . . . . . . . . . . 86
Exit the Roster . . . . . . . . . . . . . . . . . . . . . . . . . . . . . . . . . . . . . . . . . . . . . . . . . . . . . . 86
Return to the Roster . . . . . . . . . . . . . . . . . . . . . . . . . . . . . . . . . . . . . . . . . . . . . . . . . . 86
Managing Advanced Conference Participants . . . . . . . . . . . . . . . . . . . . . . . . . . . . . . . . . 86
Muting Conference Participants . . . . . . . . . . . . . . . . . . . . . . . . . . . . . . . . . . . . . . . . . 86
Remove Conference Participants . . . . . . . . . . . . . . . . . . . . . . . . . . . . . . . . . . . . . . . . 87
Shared Lines . . . . . . . . . . . . . . . . . . . . . . . . . . . . . . . . . . . . . . . . . . . . . . . . . . . . . . 88
Shared Line Limitations . . . . . . . . . . . . . . . . . . . . . . . . . . . . . . . . . . . . . . . . . . . . . . . . . . . . . . 88
Missed and Received Calls on Shared Lines . . . . . . . . . . . . . . . . . . . . . . . . . . . . . . . . . . . . . 88
Hold Calls Privately on Shared Lines . . . . . . . . . . . . . . . . . . . . . . . . . . . . . . . . . . . . . . . . . . . 89
Barge In on Calls for Busy Lamp Field Lines . . . . . . . . . . . . . . . . . . . . . . . . . . . . . . . . . . . . . 89
GENBAND’s Multiple Appearance Directory Number - Single Call Appearance . . . . . . . . . . 90
Placing a Call . . . . . . . . . . . . . . . . . . . . . . . . . . . . . . . . . . . . . . . . . . . . . . . . . . . . . . . . . . 90
Answering Calls . . . . . . . . . . . . . . . . . . . . . . . . . . . . . . . . . . . . . . . . . . . . . . . . . . . . . . . . 90
Barge In on an Active Call . . . . . . . . . . . . . . . . . . . . . . . . . . . . . . . . . . . . . . . . . . . . . . . . . 90
Leave a Bridge Call . . . . . . . . . . . . . . . . . . . . . . . . . . . . . . . . . . . . . . . . . . . . . . . . . . 91
Resume Held Calls . . . . . . . . . . . . . . . . . . . . . . . . . . . . . . . . . . . . . . . . . . . . . . . . . . . . . . 91
Enabling Privacy . . . . . . . . . . . . . . . . . . . . . . . . . . . . . . . . . . . . . . . . . . . . . . . . . . . . . . . . 91
Enable Privacy . . . . . . . . . . . . . . . . . . . . . . . . . . . . . . . . . . . . . . . . . . . . . . . . . . . . . . 92
Disable Privacy Temporarily . . . . . . . . . . . . . . . . . . . . . . . . . . . . . . . . . . . . . . . . . . . . 92
Enable Privacy on a Bridge Call . . . . . . . . . . . . . . . . . . . . . . . . . . . . . . . . . . . . . . . . . 93
Boss-Admin for Skype for Business . . . . . . . . . . . . . . . . . . . . . . . . . . . . . . . . . . . . . . . . . . . . 93
Assign Delegates . . . . . . . . . . . . . . . . . . . . . . . . . . . . . . . . . . . . . . . . . . . . . . . . . . . . . . . 93
View the Delegates Group . . . . . . . . . . . . . . . . . . . . . . . . . . . . . . . . . . . . . . . . . . . . . 94
View the Boss Group . . . . . . . . . . . . . . . . . . . . . . . . . . . . . . . . . . . . . . . . . . . . . . . . . 95
Set a Ringtone for Boss Calls . . . . . . . . . . . . . . . . . . . . . . . . . . . . . . . . . . . . . . . . . . . . . . 96
Edit the Delegates Group . . . . . . . . . . . . . . . . . . . . . . . . . . . . . . . . . . . . . . . . . . . . . . . . . 96
Managing Calls on the Boss’s Line . . . . . . . . . . . . . . . . . . . . . . . . . . . . . . . . . . . . . . . . . . 96
Respond to Incoming Calls . . . . . . . . . . . . . . . . . . . . . . . . . . . . . . . . . . . . . . . . . . . . . 97
Viewing Call Status on the Boss’s Line . . . . . . . . . . . . . . . . . . . . . . . . . . . . . . . . . . . 97
View Held Calls . . . . . . . . . . . . . . . . . . . . . . . . . . . . . . . . . . . . . . . . . . . . . . . . . . . . . 98
Resume Held Calls . . . . . . . . . . . . . . . . . . . . . . . . . . . . . . . . . . . . . . . . . . . . . . . . . . . 98
Transfer Boss Calls . . . . . . . . . . . . . . . . . . . . . . . . . . . . . . . . . . . . . . . . . . . . . . . . . . 99
Call on Behalf of a Boss . . . . . . . . . . . . . . . . . . . . . . . . . . . . . . . . . . . . . . . . . . . . . . . 99
Polycom, Inc. 7
Page 8

Polycom VVX Business Media Phones User Guide
Join Conference Calls . . . . . . . . . . . . . . . . . . . . . . . . . . . . . . . . . . . . . . . . . . . . . . . . . . . 100
Alcatel-Lucent Shared Call Appearance . . . . . . . . . . . . . . . . . . . . . . . . . . . . . . . . . . . . . . . . 100
Placing a Call . . . . . . . . . . . . . . . . . . . . . . . . . . . . . . . . . . . . . . . . . . . . . . . . . . . . . . . . . 101
Answering Calls . . . . . . . . . . . . . . . . . . . . . . . . . . . . . . . . . . . . . . . . . . . . . . . . . . . . . . . 101
Bridging into Active Calls . . . . . . . . . . . . . . . . . . . . . . . . . . . . . . . . . . . . . . . . . . . . . . . . 101
Leave a Bridge Call . . . . . . . . . . . . . . . . . . . . . . . . . . . . . . . . . . . . . . . . . . . . . . . . . 101
Make Active Calls Public . . . . . . . . . . . . . . . . . . . . . . . . . . . . . . . . . . . . . . . . . . . . . . . . . 101
Holding or Passing Calls . . . . . . . . . . . . . . . . . . . . . . . . . . . . . . . . . . . . . . . . . . . . . . . . . 102
Pass SCAP Calls . . . . . . . . . . . . . . . . . . . . . . . . . . . . . . . . . . . . . . . . . . . . . . . . . . . 102
Create a Personal Ring Group with BroadSoft UC-One Simultaneous Ring . . . . . . . . . . . . 103
Add Numbers to Your Simultaneous Ring List . . . . . . . . . . . . . . . . . . . . . . . . . . . . . . . . 103
Delete Numbers from the Simultaneous Ring List . . . . . . . . . . . . . . . . . . . . . . . . . . . . . 103
Recording Audio Calls . . . . . . . . . . . . . . . . . . . . . . . . . . . . . . . . . . . . . . . . . . . . . 105
Guidelines when Recording Calls . . . . . . . . . . . . . . . . . . . . . . . . . . . . . . . . . . . . . . . . . . . . . 105
Record a Call . . . . . . . . . . . . . . . . . . . . . . . . . . . . . . . . . . . . . . . . . . . . . . . . . . . . . . . . . . . . . 105
Pause a Recording . . . . . . . . . . . . . . . . . . . . . . . . . . . . . . . . . . . . . . . . . . . . . . . . . . . . . . . . 106
Resume a Recoding . . . . . . . . . . . . . . . . . . . . . . . . . . . . . . . . . . . . . . . . . . . . . . . . . . . . 106
Stop Recording . . . . . . . . . . . . . . . . . . . . . . . . . . . . . . . . . . . . . . . . . . . . . . . . . . . . . . . . . . . 106
Record Conference Calls . . . . . . . . . . . . . . . . . . . . . . . . . . . . . . . . . . . . . . . . . . . . . . . . . . . 107
Browse Recorded Calls . . . . . . . . . . . . . . . . . . . . . . . . . . . . . . . . . . . . . . . . . . . . . . . . . . . . . 107
Play Recorded Calls . . . . . . . . . . . . . . . . . . . . . . . . . . . . . . . . . . . . . . . . . . . . . . . . . . . . . . . 107
Pause and Resume Played Recordings . . . . . . . . . . . . . . . . . . . . . . . . . . . . . . . . . . . . . 108
Stop Playing a Recording . . . . . . . . . . . . . . . . . . . . . . . . . . . . . . . . . . . . . . . . . . . . . . . . 108
Rename a Recording . . . . . . . . . . . . . . . . . . . . . . . . . . . . . . . . . . . . . . . . . . . . . . . . . . . . . . . 108
Delete Recordings . . . . . . . . . . . . . . . . . . . . . . . . . . . . . . . . . . . . . . . . . . . . . . . . . . . . . . . . . 108
Video Calls . . . . . . . . . . . . . . . . . . . . . . . . . . . . . . . . . . . . . . . . . . . . . . . . . . . . . . . 110
Tips for Video Calls . . . . . . . . . . . . . . . . . . . . . . . . . . . . . . . . . . . . . . . . . . . . . . . . . . . . . . . . 110
Using a VVX Camera with VVX 500 and 600 Phones . . . . . . . . . . . . . . . . . . . . . . . . . . . . . . 111
Control the Lens Angle . . . . . . . . . . . . . . . . . . . . . . . . . . . . . . . . . . . . . . . . . . . . . . . . . . 111
Use the Privacy Shutter . . . . . . . . . . . . . . . . . . . . . . . . . . . . . . . . . . . . . . . . . . . . . . . . . 111
Status Indicators and Messages for the VVX Camera . . . . . . . . . . . . . . . . . . . . . . . . . . 112
Changing Video Call Settings . . . . . . . . . . . . . . . . . . . . . . . . . . . . . . . . . . . . . . . . . . . . . . . . 113
Set the Call Rate for Video Calls . . . . . . . . . . . . . . . . . . . . . . . . . . . . . . . . . . . . . . . . . . . 113
Stop Video for All Calls . . . . . . . . . . . . . . . . . . . . . . . . . . . . . . . . . . . . . . . . . . . . . . . . . . 113
Change Video Clarity . . . . . . . . . . . . . . . . . . . . . . . . . . . . . . . . . . . . . . . . . . . . . . . . . . . 114
Changing the Video Call and PIP Displays . . . . . . . . . . . . . . . . . . . . . . . . . . . . . . . . . . . 114
Change How PIP Video Displays . . . . . . . . . . . . . . . . . . . . . . . . . . . . . . . . . . . . . . . 116
Change How Far-Side Video Displays . . . . . . . . . . . . . . . . . . . . . . . . . . . . . . . . . . . 116
Polycom, Inc. 8
Page 9

Polycom VVX Business Media Phones User Guide
Display All Video Calls in Full Screen Mode . . . . . . . . . . . . . . . . . . . . . . . . . . . . . . . 117
Place a Video Call on VVX 500, 600, and 1500 Phones . . . . . . . . . . . . . . . . . . . . . . . . . . . . 117
Stop Sending Video . . . . . . . . . . . . . . . . . . . . . . . . . . . . . . . . . . . . . . . . . . . . . . . . . . . . 118
No Video from the Far Side . . . . . . . . . . . . . . . . . . . . . . . . . . . . . . . . . . . . . . . . . . . 118
Display Video Calls in Full Screen . . . . . . . . . . . . . . . . . . . . . . . . . . . . . . . . . . . . . . . . . 119
Exit Full Screen View . . . . . . . . . . . . . . . . . . . . . . . . . . . . . . . . . . . . . . . . . . . . . . . . 119
Swap Video . . . . . . . . . . . . . . . . . . . . . . . . . . . . . . . . . . . . . . . . . . . . . . . . . . . . . . . . . . 119
Handling Video and Audio Calls . . . . . . . . . . . . . . . . . . . . . . . . . . . . . . . . . . . . . . . . . . . 120
Handle Conference Calls with Video . . . . . . . . . . . . . . . . . . . . . . . . . . . . . . . . . . . . . . . . 120
Managing Video Calls without a VVX Camera on VVX 500 and 600 Phones . . . . . . . . . . . . 121
Managing Audio and Video Calls . . . . . . . . . . . . . . . . . . . . . . . . . . . . . . . . . . . . . . . . . . 121
View Video in Full Screen during Calls . . . . . . . . . . . . . . . . . . . . . . . . . . . . . . . . . . . . . . 122
Handling a Mixture of Video and Audio-Only Calls . . . . . . . . . . . . . . . . . . . . . . . . . . . . . 123
Place Audio-Only Calls . . . . . . . . . . . . . . . . . . . . . . . . . . . . . . . . . . . . . . . . . . . . . . . . . . . . . 123
Call Lists and Directories . . . . . . . . . . . . . . . . . . . . . . . . . . . . . . . . . . . . . . . . . . . 124
View Recent Calls . . . . . . . . . . . . . . . . . . . . . . . . . . . . . . . . . . . . . . . . . . . . . . . . . . . . . . . . . 124
View Call Details . . . . . . . . . . . . . . . . . . . . . . . . . . . . . . . . . . . . . . . . . . . . . . . . . . . . . . . 125
Save a Recent Contact . . . . . . . . . . . . . . . . . . . . . . . . . . . . . . . . . . . . . . . . . . . . . . . . . . 125
Delete a Contact . . . . . . . . . . . . . . . . . . . . . . . . . . . . . . . . . . . . . . . . . . . . . . . . . . . . . . . 125
Edit Recent Contact Entries . . . . . . . . . . . . . . . . . . . . . . . . . . . . . . . . . . . . . . . . . . . . . . 125
Sort Recent Call Entries . . . . . . . . . . . . . . . . . . . . . . . . . . . . . . . . . . . . . . . . . . . . . . . . . 125
Sort Entries by Call Type . . . . . . . . . . . . . . . . . . . . . . . . . . . . . . . . . . . . . . . . . . . . . 126
View Recent Skype for Business Calls . . . . . . . . . . . . . . . . . . . . . . . . . . . . . . . . . . . . . 126
View Recent Skype for Business Calls in Outlook . . . . . . . . . . . . . . . . . . . . . . . . . . 126
Managing the Contact Directory . . . . . . . . . . . . . . . . . . . . . . . . . . . . . . . . . . . . . . . . . . . . . . 127
Search for Contacts . . . . . . . . . . . . . . . . . . . . . . . . . . . . . . . . . . . . . . . . . . . . . . . . . . . . 127
Add a Contact to the Contact Directory . . . . . . . . . . . . . . . . . . . . . . . . . . . . . . . . . . . . . . 127
View Contact Information . . . . . . . . . . . . . . . . . . . . . . . . . . . . . . . . . . . . . . . . . . . . . . . . 128
Update a Contact’s Information . . . . . . . . . . . . . . . . . . . . . . . . . . . . . . . . . . . . . . . . . . . . 128
Delete a Contact . . . . . . . . . . . . . . . . . . . . . . . . . . . . . . . . . . . . . . . . . . . . . . . . . . . . . . . 128
Managing the Corporate Directory . . . . . . . . . . . . . . . . . . . . . . . . . . . . . . . . . . . . . . . . . . . . 129
Searching the Corporate Directory . . . . . . . . . . . . . . . . . . . . . . . . . . . . . . . . . . . . . . . . . 129
Perform a Quick Search . . . . . . . . . . . . . . . . . . . . . . . . . . . . . . . . . . . . . . . . . . . . . . 129
Perform an Advanced Search . . . . . . . . . . . . . . . . . . . . . . . . . . . . . . . . . . . . . . . . . 129
Save Search Results . . . . . . . . . . . . . . . . . . . . . . . . . . . . . . . . . . . . . . . . . . . . . . . . 130
Clear Search Results . . . . . . . . . . . . . . . . . . . . . . . . . . . . . . . . . . . . . . . . . . . . . . . . 130
Add Contacts to the Contact Directory . . . . . . . . . . . . . . . . . . . . . . . . . . . . . . . . . . . . . . 130
Search the Skype for Business Directory . . . . . . . . . . . . . . . . . . . . . . . . . . . . . . . . . . . . . . . 130
Saving Contacts from the Skype for Business Directory . . . . . . . . . . . . . . . . . . . . . . . . . 131
Polycom, Inc. 9
Page 10

Polycom VVX Business Media Phones User Guide
Save Contacts to Skype for Business Contacts . . . . . . . . . . . . . . . . . . . . . . . . . . . . 131
Save Contacts to the Contact Directory . . . . . . . . . . . . . . . . . . . . . . . . . . . . . . . . . . 131
Search the Outlook Directory . . . . . . . . . . . . . . . . . . . . . . . . . . . . . . . . . . . . . . . . . . . . . . . . 131
Save Outlook Contacts to the Contact Directory . . . . . . . . . . . . . . . . . . . . . . . . . . . . . . . 132
Searching the BroadSoft Directory . . . . . . . . . . . . . . . . . . . . . . . . . . . . . . . . . . . . . . . . . . . . 132
Perform a Simple Search . . . . . . . . . . . . . . . . . . . . . . . . . . . . . . . . . . . . . . . . . . . . . . . . 132
Perform an Advanced Search . . . . . . . . . . . . . . . . . . . . . . . . . . . . . . . . . . . . . . . . . . . . . 132
Add BroadSoft Contacts to the Contact Directory . . . . . . . . . . . . . . . . . . . . . . . . . . . . . . 133
Managing the GENBAND Address Books . . . . . . . . . . . . . . . . . . . . . . . . . . . . . . . . . . . . . . . 133
Using the Global Address Book . . . . . . . . . . . . . . . . . . . . . . . . . . . . . . . . . . . . . . . . . . . 134
Searching the Global Address Book . . . . . . . . . . . . . . . . . . . . . . . . . . . . . . . . . . . . . 134
Save a Contact . . . . . . . . . . . . . . . . . . . . . . . . . . . . . . . . . . . . . . . . . . . . . . . . . . . . . 134
Save Search Results . . . . . . . . . . . . . . . . . . . . . . . . . . . . . . . . . . . . . . . . . . . . . . . . 135
Using the Personal Address Book . . . . . . . . . . . . . . . . . . . . . . . . . . . . . . . . . . . . . . . . . 135
View Contacts in the Personal Address Book . . . . . . . . . . . . . . . . . . . . . . . . . . . . . 135
Search Your Personal Address Book . . . . . . . . . . . . . . . . . . . . . . . . . . . . . . . . . . . . 136
Add Contacts to the Personal Address Book . . . . . . . . . . . . . . . . . . . . . . . . . . . . . . 136
Delete Contacts . . . . . . . . . . . . . . . . . . . . . . . . . . . . . . . . . . . . . . . . . . . . . . . . . . . . 136
Edit Contacts in the Personal Address Book . . . . . . . . . . . . . . . . . . . . . . . . . . . . . . 136
Favorites and Contact Lists . . . . . . . . . . . . . . . . . . . . . . . . . . . . . . . . . . . . . . . . . 138
Managing Favorites . . . . . . . . . . . . . . . . . . . . . . . . . . . . . . . . . . . . . . . . . . . . . . . . . . . . . . . . 138
Add Favorites . . . . . . . . . . . . . . . . . . . . . . . . . . . . . . . . . . . . . . . . . . . . . . . . . . . . . . . . . 138
View Favorites . . . . . . . . . . . . . . . . . . . . . . . . . . . . . . . . . . . . . . . . . . . . . . . . . . . . . . . . . 139
View Favorites on the Home Screen . . . . . . . . . . . . . . . . . . . . . . . . . . . . . . . . . . . . 139
View Favorites from the Lines Screen . . . . . . . . . . . . . . . . . . . . . . . . . . . . . . . . . . . 139
Reorder Favorites . . . . . . . . . . . . . . . . . . . . . . . . . . . . . . . . . . . . . . . . . . . . . . . . . . . . . . 139
Delete Favorites . . . . . . . . . . . . . . . . . . . . . . . . . . . . . . . . . . . . . . . . . . . . . . . . . . . . 139
Using Buddy Lists . . . . . . . . . . . . . . . . . . . . . . . . . . . . . . . . . . . . . . . . . . . . . . . . . . . . . . . . . 140
Add Contacts to Your Buddy List . . . . . . . . . . . . . . . . . . . . . . . . . . . . . . . . . . . . . . . . . . 140
View Your Buddy List . . . . . . . . . . . . . . . . . . . . . . . . . . . . . . . . . . . . . . . . . . . . . . . . 140
Monitor Contacts on Your Buddy List . . . . . . . . . . . . . . . . . . . . . . . . . . . . . . . . . . . . . . . 141
View Watcher List . . . . . . . . . . . . . . . . . . . . . . . . . . . . . . . . . . . . . . . . . . . . . . . . . . . . . . 141
Block Contacts from Viewing Your Status . . . . . . . . . . . . . . . . . . . . . . . . . . . . . . . . . . . . 141
View Blocked List . . . . . . . . . . . . . . . . . . . . . . . . . . . . . . . . . . . . . . . . . . . . . . . . . . . 142
Managing Skype for Business Contacts . . . . . . . . . . . . . . . . . . . . . . . . . . . . . . . . . . . . . . . . 142
Add Contact to Your Microsoft Skype for Business Contact List . . . . . . . . . . . . . . . . . . 142
View Skype for Business Favorites and Groups . . . . . . . . . . . . . . . . . . . . . . . . . . . . . . . 143
Viewing Skype for Business Contacts’ Presence Information . . . . . . . . . . . . . . . . . . . . . 143
View Contact’s Activity on VVX 201, 300, and 400 Phones . . . . . . . . . . . . . . . . . . . 146
Polycom, Inc. 10
Page 11

Polycom VVX Business Media Phones User Guide
View Contact Information on VVX 500 and 600 Phones . . . . . . . . . . . . . . . . . . . . . 146
View the Skype for Business Contact Card for Contact Information . . . . . . . . . . . . . . . . 146
Change the Privacy Relationship for a Contact . . . . . . . . . . . . . . . . . . . . . . . . . . . . 147
Managing BroadSoft UC-One Favorites and Contacts . . . . . . . . . . . . . . . . . . . . . . . . . . . . . 148
View BroadSoft UC-One Contacts’ Presence Information . . . . . . . . . . . . . . . . . . . . . . . 148
View BroadSoft UC-One Contacts and Favorites . . . . . . . . . . . . . . . . . . . . . . . . . . . . . . 148
View Favorites in the Contact List . . . . . . . . . . . . . . . . . . . . . . . . . . . . . . . . . . . . . . 149
View Contacts and Groups . . . . . . . . . . . . . . . . . . . . . . . . . . . . . . . . . . . . . . . . . . . . . . . 150
Search for BroadSoft UC-One Contacts . . . . . . . . . . . . . . . . . . . . . . . . . . . . . . . . . . . . . 150
Setting Your Presence Status . . . . . . . . . . . . . . . . . . . . . . . . . . . . . . . . . . . . . . . 152
Update Your Skype for Business Presence . . . . . . . . . . . . . . . . . . . . . . . . . . . . . . . . . . . . . 152
Update Your Buddy Status . . . . . . . . . . . . . . . . . . . . . . . . . . . . . . . . . . . . . . . . . . . . . . . . . . 153
Automatically Update Your Buddy Status . . . . . . . . . . . . . . . . . . . . . . . . . . . . . . . . . . . . 153
Accessing, Sending, and Broadcasting Messages . . . . . . . . . . . . . . . . . . . . . . 154
Access Voicemail and Video Messages . . . . . . . . . . . . . . . . . . . . . . . . . . . . . . . . . . . . . . . . 154
Remove Message Alert . . . . . . . . . . . . . . . . . . . . . . . . . . . . . . . . . . . . . . . . . . . . . . . . . . 155
Access Skype for Business Voicemail Messages . . . . . . . . . . . . . . . . . . . . . . . . . . . . . . . . . 155
Managing Skype for Business Voicemail Messages . . . . . . . . . . . . . . . . . . . . . . . . . . . . 156
Call a Contact . . . . . . . . . . . . . . . . . . . . . . . . . . . . . . . . . . . . . . . . . . . . . . . . . . . . . . 156
Delete Voicemail Messages . . . . . . . . . . . . . . . . . . . . . . . . . . . . . . . . . . . . . . . . . . . 156
Mark Message as Read . . . . . . . . . . . . . . . . . . . . . . . . . . . . . . . . . . . . . . . . . . . . . . 156
Send Instant Messages . . . . . . . . . . . . . . . . . . . . . . . . . . . . . . . . . . . . . . . . . . . . . . . . . . . . . 156
Read Instant Messages . . . . . . . . . . . . . . . . . . . . . . . . . . . . . . . . . . . . . . . . . . . . . . . . . 157
Reply to Instant Messages . . . . . . . . . . . . . . . . . . . . . . . . . . . . . . . . . . . . . . . . . . . . . . . 157
Delete Instant Messages . . . . . . . . . . . . . . . . . . . . . . . . . . . . . . . . . . . . . . . . . . . . . . . . . 157
Broadcasting Messages with Group Paging . . . . . . . . . . . . . . . . . . . . . . . . . . . . . . . . . . . . . 157
Sending and Receiving Pages . . . . . . . . . . . . . . . . . . . . . . . . . . . . . . . . . . . . . . . . . . . . 158
Send Pages . . . . . . . . . . . . . . . . . . . . . . . . . . . . . . . . . . . . . . . . . . . . . . . . . . . . . . . 158
Receiving Pages . . . . . . . . . . . . . . . . . . . . . . . . . . . . . . . . . . . . . . . . . . . . . . . . . . . . 158
Changing Group Paging Settings . . . . . . . . . . . . . . . . . . . . . . . . . . . . . . . . . . . . . . . . . . 159
Change the Default Paging Group . . . . . . . . . . . . . . . . . . . . . . . . . . . . . . . . . . . . . . 159
Update Paging Group Subscriptions . . . . . . . . . . . . . . . . . . . . . . . . . . . . . . . . . . . . 160
Enable Pages to Play during Active Calls . . . . . . . . . . . . . . . . . . . . . . . . . . . . . . . . 160
Broadcasting Messages with Push to Talk . . . . . . . . . . . . . . . . . . . . . . . . . . . . . . . . . . . . . . 160
Sending and Receiving PTT Broadcasts . . . . . . . . . . . . . . . . . . . . . . . . . . . . . . . . . . . . 161
Send PTT Broadcasts . . . . . . . . . . . . . . . . . . . . . . . . . . . . . . . . . . . . . . . . . . . . . . . 161
Receiving PTT Broadcasts . . . . . . . . . . . . . . . . . . . . . . . . . . . . . . . . . . . . . . . . . . . . 162
Listen to PTT Broadcasts during Active Calls . . . . . . . . . . . . . . . . . . . . . . . . . . . . . . 162
Polycom, Inc. 11
Page 12

Polycom VVX Business Media Phones User Guide
Reply to PTT Broadcasts . . . . . . . . . . . . . . . . . . . . . . . . . . . . . . . . . . . . . . . . . . . . . . . . 162
End PTT Broadcasts . . . . . . . . . . . . . . . . . . . . . . . . . . . . . . . . . . . . . . . . . . . . . . . . . . . . 163
Changing PTT Settings . . . . . . . . . . . . . . . . . . . . . . . . . . . . . . . . . . . . . . . . . . . . . . . . . . 163
Change the Default Channel . . . . . . . . . . . . . . . . . . . . . . . . . . . . . . . . . . . . . . . . . . 163
Update Channel Subscriptions . . . . . . . . . . . . . . . . . . . . . . . . . . . . . . . . . . . . . . . . . 164
Enable PTT Broadcasts to Play During Active Calls . . . . . . . . . . . . . . . . . . . . . . . . 164
Using Applications on Your Phone . . . . . . . . . . . . . . . . . . . . . . . . . . . . . . . . . . . 165
Using the Calendar . . . . . . . . . . . . . . . . . . . . . . . . . . . . . . . . . . . . . . . . . . . . . . . . . . . . . . . . 165
Open the Calendar . . . . . . . . . . . . . . . . . . . . . . . . . . . . . . . . . . . . . . . . . . . . . . . . . . . . . 165
Navigate Day View . . . . . . . . . . . . . . . . . . . . . . . . . . . . . . . . . . . . . . . . . . . . . . . . . . 165
Navigate Month View . . . . . . . . . . . . . . . . . . . . . . . . . . . . . . . . . . . . . . . . . . . . . . . . 166
Display Meeting View . . . . . . . . . . . . . . . . . . . . . . . . . . . . . . . . . . . . . . . . . . . . . . . . 166
Return to Day View . . . . . . . . . . . . . . . . . . . . . . . . . . . . . . . . . . . . . . . . . . . . . . . . . . 166
Use Meeting Reminders . . . . . . . . . . . . . . . . . . . . . . . . . . . . . . . . . . . . . . . . . . . . . . . . . 167
Choose a Meeting Reminder Type . . . . . . . . . . . . . . . . . . . . . . . . . . . . . . . . . . . . . . 167
Choose an Alert Tone . . . . . . . . . . . . . . . . . . . . . . . . . . . . . . . . . . . . . . . . . . . . . . . . 167
Disable Meeting Reminders . . . . . . . . . . . . . . . . . . . . . . . . . . . . . . . . . . . . . . . . . . . 168
Joining Calendar Meetings . . . . . . . . . . . . . . . . . . . . . . . . . . . . . . . . . . . . . . . . . . . . . . . 168
Join Meetings from the Calendar . . . . . . . . . . . . . . . . . . . . . . . . . . . . . . . . . . . . . . . 168
Join a Meeting from a Meeting Reminder . . . . . . . . . . . . . . . . . . . . . . . . . . . . . . . . . 168
Join a Meeting with an Alternate Number . . . . . . . . . . . . . . . . . . . . . . . . . . . . . . . . . 168
Join Skype for Business Meetings from the Calendar . . . . . . . . . . . . . . . . . . . . . . . 169
Navigating the Browsers . . . . . . . . . . . . . . . . . . . . . . . . . . . . . . . . . . . . . . . . . . . . . . . . . . . . 169
View the Idle Browser . . . . . . . . . . . . . . . . . . . . . . . . . . . . . . . . . . . . . . . . . . . . . . . . . . . 169
Use the Web Browser . . . . . . . . . . . . . . . . . . . . . . . . . . . . . . . . . . . . . . . . . . . . . . . . . . . 169
Browser Navigation Soft Keys . . . . . . . . . . . . . . . . . . . . . . . . . . . . . . . . . . . . . . . . . 170
Enter Information into the Browser . . . . . . . . . . . . . . . . . . . . . . . . . . . . . . . . . . . . . . 170
Using the Launch Pad on VVX 1500 Phones . . . . . . . . . . . . . . . . . . . . . . . . . . . . . . . . . . . . 171
Access the Launch Pad . . . . . . . . . . . . . . . . . . . . . . . . . . . . . . . . . . . . . . . . . . . . . . . . . 171
Open Applications . . . . . . . . . . . . . . . . . . . . . . . . . . . . . . . . . . . . . . . . . . . . . . . . . . . . . . 171
Navigate the Launch Pad . . . . . . . . . . . . . . . . . . . . . . . . . . . . . . . . . . . . . . . . . . . . . . . . 172
Display the Launch Pad’s Main Screen . . . . . . . . . . . . . . . . . . . . . . . . . . . . . . . . . . . . . 172
Enable My Info Portal . . . . . . . . . . . . . . . . . . . . . . . . . . . . . . . . . . . . . . . . . . . . . . . . . . . 172
Customizing Your Phone . . . . . . . . . . . . . . . . . . . . . . . . . . . . . . . . . . . . . . . . . . . 174
Password Required to Customize Your Phone . . . . . . . . . . . . . . . . . . . . . . . . . . . . . . . . . . . 174
Set the Language . . . . . . . . . . . . . . . . . . . . . . . . . . . . . . . . . . . . . . . . . . . . . . . . . . . . . . . . . 174
Set the Time and Date Display . . . . . . . . . . . . . . . . . . . . . . . . . . . . . . . . . . . . . . . . . . . . . . . 175
Disable the Time and Date Display . . . . . . . . . . . . . . . . . . . . . . . . . . . . . . . . . . . . . . . . . 175
Polycom, Inc. 12
Page 13

Polycom VVX Business Media Phones User Guide
Setting the Backlight Intensity and Timeout . . . . . . . . . . . . . . . . . . . . . . . . . . . . . . . . . . . . . 175
Change the Backlight Intensity . . . . . . . . . . . . . . . . . . . . . . . . . . . . . . . . . . . . . . . . . . . . 176
Change the Backlight Timeout . . . . . . . . . . . . . . . . . . . . . . . . . . . . . . . . . . . . . . . . . . . . 176
Select a Background Picture . . . . . . . . . . . . . . . . . . . . . . . . . . . . . . . . . . . . . . . . . . . . . . . . . 176
Adding Personal Photos as Your Background . . . . . . . . . . . . . . . . . . . . . . . . . . . . . . . . 177
Using the Web Configuration Utility . . . . . . . . . . . . . . . . . . . . . . . . . . . . . . . . . . . . . 177
Use a USB Flash Drive . . . . . . . . . . . . . . . . . . . . . . . . . . . . . . . . . . . . . . . . . . . . . . . 178
Reset Your Background . . . . . . . . . . . . . . . . . . . . . . . . . . . . . . . . . . . . . . . . . . . . . . . . . 178
Enable Transparent Line Keys . . . . . . . . . . . . . . . . . . . . . . . . . . . . . . . . . . . . . . . . . . . . . . . 179
Enabling Screen Savers . . . . . . . . . . . . . . . . . . . . . . . . . . . . . . . . . . . . . . . . . . . . . . . . . . . . 179
Enable Screen Savers . . . . . . . . . . . . . . . . . . . . . . . . . . . . . . . . . . . . . . . . . . . . . . . . . . 179
Use Personal Photos as Screen Savers . . . . . . . . . . . . . . . . . . . . . . . . . . . . . . . . . . . . 180
Disable Screen Savers . . . . . . . . . . . . . . . . . . . . . . . . . . . . . . . . . . . . . . . . . . . . . . . . . . 181
Use Your Phone as a Digital Picture Frame . . . . . . . . . . . . . . . . . . . . . . . . . . . . . . . . . . . . . 182
Performing Tasks in the Picture Frame . . . . . . . . . . . . . . . . . . . . . . . . . . . . . . . . . . . . . . 182
Using Power-Saving Mode . . . . . . . . . . . . . . . . . . . . . . . . . . . . . . . . . . . . . . . . . . . . . . . . . . 183
Change Your Office Hours . . . . . . . . . . . . . . . . . . . . . . . . . . . . . . . . . . . . . . . . . . . . . . . 183
Change Timeouts . . . . . . . . . . . . . . . . . . . . . . . . . . . . . . . . . . . . . . . . . . . . . . . . . . . . . . 184
Changing Audio Settings . . . . . . . . . . . . . . . . . . . . . . . . . . . . . . . . . . . . . . . . . . . . . . . . . . . . 184
Change Incoming Call Notifications . . . . . . . . . . . . . . . . . . . . . . . . . . . . . . . . . . . . . . . . 184
Set a Ringtone for Incoming Calls . . . . . . . . . . . . . . . . . . . . . . . . . . . . . . . . . . . . . . . . . . 185
Set a Ringtone for Individual Contacts . . . . . . . . . . . . . . . . . . . . . . . . . . . . . . . . . . . . . . 185
Change the Volume . . . . . . . . . . . . . . . . . . . . . . . . . . . . . . . . . . . . . . . . . . . . . . . . . . . . 185
Accessibility Features on Your Phone . . . . . . . . . . . . . . . . . . . . . . . . . . . . . . . . 186
Features for Hearing-Impaired Users . . . . . . . . . . . . . . . . . . . . . . . . . . . . . . . . . . . . . . . . . . 186
Features for Vision-Impaired and Blind Users . . . . . . . . . . . . . . . . . . . . . . . . . . . . . . . . . . . 187
Features for Mobility-Impaired Users . . . . . . . . . . . . . . . . . . . . . . . . . . . . . . . . . . . . . . . . . . 188
Extending Your Phone’s Capabilities with Accessories . . . . . . . . . . . . . . . . . . 189
Using a Headset with Your Phone . . . . . . . . . . . . . . . . . . . . . . . . . . . . . . . . . . . . . . . . . . . . . 189
Connecting a Headset . . . . . . . . . . . . . . . . . . . . . . . . . . . . . . . . . . . . . . . . . . . . . . . . . . . 190
Use Your Headset for All Calls . . . . . . . . . . . . . . . . . . . . . . . . . . . . . . . . . . . . . . . . . . . . 190
Reactivate Headset Memory Mode . . . . . . . . . . . . . . . . . . . . . . . . . . . . . . . . . . . . . 190
Using Electronic Hookswitch . . . . . . . . . . . . . . . . . . . . . . . . . . . . . . . . . . . . . . . . . . . . . . 191
Setting the Headset Base Unit Options . . . . . . . . . . . . . . . . . . . . . . . . . . . . . . . . . . 191
Enable Electronic Hookswitch . . . . . . . . . . . . . . . . . . . . . . . . . . . . . . . . . . . . . . . . . 191
Using Electronic Hookswitch . . . . . . . . . . . . . . . . . . . . . . . . . . . . . . . . . . . . . . . . . . 192
Disconnect Your Headset . . . . . . . . . . . . . . . . . . . . . . . . . . . . . . . . . . . . . . . . . . . . . . . . 192
Using Bluetooth Headsets with Your VVX 600 Phone . . . . . . . . . . . . . . . . . . . . . . . . . . 192
Polycom, Inc. 13
Page 14

Polycom VVX Business Media Phones User Guide
Enable Bluetooth and Connect a Headset . . . . . . . . . . . . . . . . . . . . . . . . . . . . . . . . 193
Managing Calls with Your Bluetooth Headset . . . . . . . . . . . . . . . . . . . . . . . . . . . . . 193
Disconnect and Remove Your Bluetooth Headset . . . . . . . . . . . . . . . . . . . . . . . . . . 194
Using the Polycom Desktop Connector . . . . . . . . . . . . . . . . . . . . . . . . . . . . . . . . . . . . . . . . . 194
Setting Up and Enabling the Polycom Desktop Connector . . . . . . . . . . . . . . . . . . . . . . . 194
Use the Direct Method . . . . . . . . . . . . . . . . . . . . . . . . . . . . . . . . . . . . . . . . . . . . . . . 194
Using the Indirect Method . . . . . . . . . . . . . . . . . . . . . . . . . . . . . . . . . . . . . . . . . . . . . 195
Disable the Polycom Desktop Connector . . . . . . . . . . . . . . . . . . . . . . . . . . . . . . . . . 197
Using the Polycom Desktop Connector . . . . . . . . . . . . . . . . . . . . . . . . . . . . . . . . . . . . . 197
Access Your Phone Screens . . . . . . . . . . . . . . . . . . . . . . . . . . . . . . . . . . . . . . . . . . 197
Using Keyboard Shortcuts to Perform Tasks on Your Phone . . . . . . . . . . . . . . . . . . 198
Enter Text in a Different Language . . . . . . . . . . . . . . . . . . . . . . . . . . . . . . . . . . . . . . 200
Connecting a Netgear Wi-Fi Adapter to Your Phone . . . . . . . . . . . . . . . . . . . . . . . . . . . . . . . 201
Connect the Wi-Fi Adapter . . . . . . . . . . . . . . . . . . . . . . . . . . . . . . . . . . . . . . . . . . . . . . . 201
Connecting Polycom VVX Expansion Modules to Your Phone . . . . . . . . . . . . . . . . . . . . . . . 202
View VVX Expansion Module Hardware Features . . . . . . . . . . . . . . . . . . . . . . . . . . . . . 203
Connect VVX Expansion Modules . . . . . . . . . . . . . . . . . . . . . . . . . . . . . . . . . . . . . . . . . 206
Connect Additional Expansion Modules . . . . . . . . . . . . . . . . . . . . . . . . . . . . . . . . . . 207
Using VVX Expansion Modules . . . . . . . . . . . . . . . . . . . . . . . . . . . . . . . . . . . . . . . . . . . 207
Assigning Busy Lamp Field Contacts, Microsoft Skype for Business Contacts, and Favor-
ites . . . . . . . . . . . . . . . . . . . . . . . . . . . . . . . . . . . . . . . . . . . . . . . . . . . . . . . . . . . . . . 207
Generate the VVX Expansion Module Directory Card . . . . . . . . . . . . . . . . . . . . . . . 208
Navigate VVX Color Expansion Module Paging . . . . . . . . . . . . . . . . . . . . . . . . . . . . 210
Changing the Backlight Intensity . . . . . . . . . . . . . . . . . . . . . . . . . . . . . . . . . . . . . . . 212
Connecting to Skype for Business on Your Phone using Better Together over Ethernet . . . 212
Installing the Polycom Better Together over Ethernet Connector . . . . . . . . . . . . . . . . . . 212
Find Your Operating System Version . . . . . . . . . . . . . . . . . . . . . . . . . . . . . . . . . . . . 212
Download the Polycom BToE Connector . . . . . . . . . . . . . . . . . . . . . . . . . . . . . . . . . 213
Install the Polycom BToE Connector . . . . . . . . . . . . . . . . . . . . . . . . . . . . . . . . . . . . 213
Enable and Pair Better Together over Ethernet . . . . . . . . . . . . . . . . . . . . . . . . . . . . . . . 215
Set Your Phone as Your Primary Audio Device . . . . . . . . . . . . . . . . . . . . . . . . . . . . 215
Using BToE to Manage Calls on Your Phone and Skype for Business client . . . . . . . . . 216
Answer Calls . . . . . . . . . . . . . . . . . . . . . . . . . . . . . . . . . . . . . . . . . . . . . . . . . . . . . . . 216
Place Calls . . . . . . . . . . . . . . . . . . . . . . . . . . . . . . . . . . . . . . . . . . . . . . . . . . . . . . . . 217
Pause and Resume Calls . . . . . . . . . . . . . . . . . . . . . . . . . . . . . . . . . . . . . . . . . . . . . 217
Move Call Audio between Your Phone and Computer . . . . . . . . . . . . . . . . . . . . . . . 217
Use Your Phone as Your Primary Audio Device for Your Computer . . . . . . . . . . . . . . . 218
Disable BToE on Your Phone . . . . . . . . . . . . . . . . . . . . . . . . . . . . . . . . . . . . . . . . . . . . . 218
Stop BToE on Your Computer . . . . . . . . . . . . . . . . . . . . . . . . . . . . . . . . . . . . . . . . . . . . 218
Uninstall the Polycom BToE Connector . . . . . . . . . . . . . . . . . . . . . . . . . . . . . . . . . . . . . 219
Polycom, Inc. 14
Page 15

Polycom VVX Business Media Phones User Guide
Maintaining Your Phone . . . . . . . . . . . . . . . . . . . . . . . . . . . . . . . . . . . . . . . . . . . . 220
Investigate Phone Warnings . . . . . . . . . . . . . . . . . . . . . . . . . . . . . . . . . . . . . . . . . . . . . . . . . 220
Remove Warnings . . . . . . . . . . . . . . . . . . . . . . . . . . . . . . . . . . . . . . . . . . . . . . . . . . . . . . 220
Restart the Phone . . . . . . . . . . . . . . . . . . . . . . . . . . . . . . . . . . . . . . . . . . . . . . . . . . . . . . . . . 221
Update the Phone Configuration . . . . . . . . . . . . . . . . . . . . . . . . . . . . . . . . . . . . . . . . . . . . . . 221
Test Phone Hardware . . . . . . . . . . . . . . . . . . . . . . . . . . . . . . . . . . . . . . . . . . . . . . . . . . . . . . 221
Clean the Touchscreen . . . . . . . . . . . . . . . . . . . . . . . . . . . . . . . . . . . . . . . . . . . . . . . . . . . . . 222
View Software Details . . . . . . . . . . . . . . . . . . . . . . . . . . . . . . . . . . . . . . . . . . . . . . . . . . . . . . 222
Update the Phone Software . . . . . . . . . . . . . . . . . . . . . . . . . . . . . . . . . . . . . . . . . . . . . . . . . 222
Exit the Software Update Notification . . . . . . . . . . . . . . . . . . . . . . . . . . . . . . . . . . . . . . . 223
Update Software Later . . . . . . . . . . . . . . . . . . . . . . . . . . . . . . . . . . . . . . . . . . . . . . . . . . 223
Postpone Software Updates . . . . . . . . . . . . . . . . . . . . . . . . . . . . . . . . . . . . . . . . . . . . . . 223
Update Your Skype for Business Phone Software . . . . . . . . . . . . . . . . . . . . . . . . . . . . . . . . 224
View Software Update Information . . . . . . . . . . . . . . . . . . . . . . . . . . . . . . . . . . . . . . . . . 224
Update Software Later . . . . . . . . . . . . . . . . . . . . . . . . . . . . . . . . . . . . . . . . . . . . . . . . . . 224
Troubleshooting . . . . . . . . . . . . . . . . . . . . . . . . . . . . . . . . . . . . . . . . . . . . . . . . . . 225
General Phone Issues . . . . . . . . . . . . . . . . . . . . . . . . . . . . . . . . . . . . . . . . . . . . . . . . . . . . . . 225
Speakerphone Issues . . . . . . . . . . . . . . . . . . . . . . . . . . . . . . . . . . . . . . . . . . . . . . . . . . . 225
USB Port Issues . . . . . . . . . . . . . . . . . . . . . . . . . . . . . . . . . . . . . . . . . . . . . . . . . . . . . . . 225
Application Issues . . . . . . . . . . . . . . . . . . . . . . . . . . . . . . . . . . . . . . . . . . . . . . . . . . . . . . . . . 226
Troubleshoot Calendar Issues . . . . . . . . . . . . . . . . . . . . . . . . . . . . . . . . . . . . . . . . . . . . 226
Login Issues . . . . . . . . . . . . . . . . . . . . . . . . . . . . . . . . . . . . . . . . . . . . . . . . . . . . . . . . . . . . . 226
GENBAND Address Book Issues . . . . . . . . . . . . . . . . . . . . . . . . . . . . . . . . . . . . . . . . . . . . . 226
View the Status of the Personal Address Book . . . . . . . . . . . . . . . . . . . . . . . . . . . . . . . . 226
Polycom Desktop Connector Issues . . . . . . . . . . . . . . . . . . . . . . . . . . . . . . . . . . . . . . . . . . . 227
Headset Issues . . . . . . . . . . . . . . . . . . . . . . . . . . . . . . . . . . . . . . . . . . . . . . . . . . . . . . . . . . . 228
Troubleshoot Audio and Echo Issues . . . . . . . . . . . . . . . . . . . . . . . . . . . . . . . . . . . . . . . 228
Bluetooth Headset Issues . . . . . . . . . . . . . . . . . . . . . . . . . . . . . . . . . . . . . . . . . . . . . . . . 228
Recording Issues . . . . . . . . . . . . . . . . . . . . . . . . . . . . . . . . . . . . . . . . . . . . . . . . . . . . . . . . . . 228
Better Together over Ethernet Issues . . . . . . . . . . . . . . . . . . . . . . . . . . . . . . . . . . . . . . . . . . 229
Troubleshoot Polycom BToE Connector Installation Issues . . . . . . . . . . . . . . . . . . . . . . 229
Troubleshoot Polycom BToE Connector Start Issues . . . . . . . . . . . . . . . . . . . . . . . . . . . 229
Troubleshoot Pairing Issues . . . . . . . . . . . . . . . . . . . . . . . . . . . . . . . . . . . . . . . . . . . . . . 230
Polycom, Inc. 15
Page 16

Before You Begin
This Polycom VVX Business Media Phones User Guide uses a number of conventions that help you to
understand information and perform tasks.
See the Polycom VVX Business Media Phones Regulatory Notices guide for all regulatory and safety
guidance.
Who Should Read this Guide?
This user guide contains overview information for the Polycom® VVX® 101, 201, 300, 310, 400, 410, 500,
600, and 1500 phones, the Polycom VVX Camera, and the Polycom VVX Expansion Modules. This guide
is intended for beginning users, as well as intermediate and advanced users who want to learn more about
their phone features.
Typographic Conventions
A few typographic conventions, listed next, are used in Polycom guides to distinguish types of in-text
information.
Typographic Conventions
Convention Description
Bold Highlights interface items such as menus, menu selections, window and dialog box
names, soft keys, filenames, and directory names when they are involved in a
procedure or user action. Also used to highlight text to be entered or typed.
Italics Used to emphasize text, to show example values or inputs (in this form:
<example>), and to show titles of reference documents available from the Polycom
Support Web site and other reference sites.
Blue Text Used for cross references to other sections within this document and for hyperlinks
to external sites and documents.
Courier Used for code fragments and parameter names.
Related Documentation
For additional information about the Polycom VVX Business Media Phones, the VVX Camera, and the VVX
Expansion Modules, view the following support pages:
● Polycom VVX 101
Polycom, Inc. 16
Page 17

Polycom VVX Business Media Phones User Guide
● Polycom VVX 201
● Polycom VVX 300 and 310
● Polycom VVX 400 and 410
● Polycom VVX 500
● Polycom VVX 600
● Polycom VVX 1500
● Polycom VVX Camera
● Polycom VVX Expansion Modules
You can view the following types of documents on each product page:
● User Documents:
Quick Tips A quick reference on how to use the phone’s most basic features.
● Setup and Maintenance Documents:
Quick Start Guide This guide describes the contents of your package, how to assemble the
phone or accessory, and how to connect the phone to the network. The quick start guide is
included in your phone package.
Wallmount Instructions This document provides detailed instructions for mounting your phone
on the wall. To install your phone on the wall, you need the optional wallmount package, which
includes the wallmount instructions.
Administrator’s Guide This guide provides detailed information about setting up your network
and configuring phone features.
Regulatory Notice—This guide provides information for all regulatory and safety guidance.
Y ou can also view Feature Descriptions a nd Tech nical Notifications on the Polycom Voice Support page.
These documents describe workarounds to existing issues and provide expanded descriptions and
examples for phone settings and features. You can find these documents on the Polycom Profiled UC
Software Features and Polycom Engineering Advisories and Technical Notifications support pages.
Polycom, Inc. 17
Page 18

Getting Started with Polycom VVX
Business Media Phones
Before you use your phone, take a few moments to familiarize yourself with its features and user interface.
This section details your phone’s components, the screen layout of your phone, and how to navigate your
phone’s interface.
The terms “the phone” and “your phone” refer to any of the business media phones. Unless specifically
noted in this guide, especially with regard to phone graphics, all VVX phones operate in similar ways.
Note: Accessing features and options
As you read this guide, keep in mind that certain phone features are configurable by your system
administrator or determined by your phone environment. As a result, some features may not be
enabled or may operate differently on your phone. Additionally, the examples and graphics in this
guide may not directly reflect what is displayed or is available on your phone screen.
Overview of Phone Hardware and Keys
Use the following figures and tables to understand your VVX phone’s hardware features. For more
information about attaching phone hardware, including how to connect your phon e to the networ k, see the
Quick Start Guide for your phone available on your phone’s support page on Polycom Voice Support.
Polycom, Inc. 18
Page 19

Polycom VVX Business Media Phones User Guide
VVX 101 and VVX 201 Phones Hardware
The following figure displays the hardware features on the VVX 101 and VVX 201 business media phones.
The table lists each numbered feature shown in this figure.
VVX 101 and 201 hardware features
VVX 101 and 201 Hardware Feature Descriptions
Reference
Number
1 Hookswitch Cradles the handset and end calls.
2 Line keys Enable you to select a phone line, view calls on a
3 Speaker Provides ringer and speakerphone audio output.
4 Dial pad keys Enable you to enter numbers, letters, and special
5 Microphone Transmits audio to other phones.
6 Volume keys Adjust the volume of the handset, headset,
7 Mute key Mutes local audio during calls and conferences.
8 Speakerphone key Enables you to place and receive calls using the
Polycom, Inc. 19
Feature Feature Description
line, or quickly call a favorite contact.
characters. Y ou can also use the dial pad keys to
select menu items that have index numbers.
speaker, and ringer.
speakerphone.
Page 20

Polycom VVX Business Media Phones User Guide
VVX 101 and 201 Hardware Feature Descriptions
Reference
Number
9 Headset key Enables you to place and receive calls through a
10 Security slot (on side) Enables you to attach a universal security cable
Feature Feature Description
headset.
lock to your phone so you can secure it to a
desktop.
11 Navigation keys / Select key Scrolls through information or options displayed
on the phone’s screen. Selects a field of
displayed data.
12 Soft keys Enable you to select context sensitive keys that
display along the bottom of the screen.
13 Home key Displays the Home screen from other screens,
and displays the Lines and Calls screen from the
Home screen.
14 Screen Shows a 2.5-inch diagonal screen with a
backlight that enables you to view menus and
data.
VVX 101 phones do not have a backlight.
15 Message Waiting Indicator Flashes red to indicate when you have new
messages.
Polycom, Inc. 20
Page 21

Polycom VVX Business Media Phones User Guide
VVX 300 and VVX 310 Phones Hardware
The following figure displays the hardware features on the VVX 300 and VVX 310 business media phones.
The table lists each numbered feature shown in this figure.
VVX 300 and VVX 310 hardware features
VVX 300 and 310 Hardware Feature Descriptions
Reference
Number
1 Security slot
2 Reversible tab Secures the handset in the cradle when your phone stand is positioned at a high
3 Speaker Provides ringer and speakerphone audio output.
4 Soft keys Enable you to select context sensitive keys that display along the bottom of the
5 Transfer key Transfers an active call to a contact.
6 Dial pad keys Enable you to enter numbers, letters, and special characters. You can also use
7 Messages key Enables you to access and manage instant and voice messages.
Polycom, Inc. 21
Feature Feature Description
Enables you to attach a universal security cable
(on top)
secure it to a desktop.
angle. To secure the handset, remove the tab, reverse it so the protrusion points
up, and re-insert it. Position the handset so the protrusion on the tab fits into the
slot on the handset.
screen.
the dial pad keys to select menu items that have index numbers.
lock to your phone so you can
Page 22

Polycom VVX Business Media Phones User Guide
VVX 300 and 310 Hardware Feature Descriptions
8 Hold key Holds an active call or resumes a held call.
9 Microphone Transmits audio to other phones.
10 Volume keys Adjust the volume of the handset, headset, speaker, and ringer.
1 1 Mute key Mutes local audio during calls and conferences. The key glows red when
activated.
12 Speakerphone
key
13 Headset key Enables you to place and receive calls through a headset. The key glows green
14 Navigation
key/ Select key
15 Home key Displays the Home screen from other screens, and displays the Lines and Calls
16 Line keys Enable you to select a phone line, view calls on a line, or quickly call a favorite
17 Screen Shows a 2.2-inch diagonal screen with a backlight that enables you to view
18 Message
Waiting
Indicator
Enables you to place and receive calls using the speakerphone. The key glows
green when activated.
when an analog headset is activated, and blue when a USB or Bluetooth headset
is activated.
Scrolls through information or options displayed on the phone’s screen. Selects a
field of displayed data.
screen from the Home screen.
contact.
menus and data.
Flashes red to indicate when you have new messages.
Polycom, Inc. 22
Page 23

Polycom VVX Business Media Phones User Guide
VVX 400 and VVX 410 Phones Hardware
The following figure displays the hardware features on the VVX 400 and VVX 410 business media phones.
The table lists each numbered feature shown in this figure.
VVX 400 and 410 hardware features
VVX 400 and 410 Hardware Feature Descriptions
Reference
Number
1 Security slot (on
2 Reversible tab Secures the handset in the cradle when your phone stand is positioned at a high
3 Speaker Provides ringer and speakerphone audio output.
4 Soft keys Enable you to select context sensitive keys that display along the bottom of the
5 Transfer key Transfers an active call to a contact.
6 Dial pad keys Enable you to ente r numbers, letters, and special characters. You can also use
Polycom, Inc. 23
Feature Feature Description
Enables you to attach a universal security cable
top)
secure it to a desktop.
angle. To secure the handset, remove the tab, reverse it so the protrusion points
up, and re-insert it. Position the handset so the protrusion on the tab fits into the
slot on the handset.
screen.
the dial pad keys to select menu items that have index numbers.
lock to your phone so you can
Page 24

Polycom VVX Business Media Phones User Guide
VVX 400 and 410 Hardware Feature Descriptions
7 Messages key Enables you to access and manage instant and voice messages.
8 Hold key Holds an active call or resumes a held call.
9 Microphone Transmits audio to other phones.
10 Volume keys Adjust the volume of the handset, headset, speaker, and ringer.
11 Mute key Mutes local audio during calls and conferences. The key glows red when
activated.
12 Speakerphone
key
13 Headset key Enables you to place and receive calls through a headset. The key glows green
14 Navigation key/
Select key
15 Home key Displays the Home screen from other screens, and displays the Lines and Calls
16 Line keys Enable you to select a phone line, view calls on a line, or quickly call a favorite
17 Screen Shows a 3.5-inch diagonal screen with a backlight that enables you to view
18 Message
Waiting
Indicator
Enables you to place and receive calls using the speakerphone. The key glows
green when activated.
when an analog headset is activated, and blue when a USB or Bluetooth headset
is activated.
Scrolls through information or options displayed on the phone’s screen. Selects a
field of displayed data.
screens from the Home screen.
contact.
menus and data.
Flashes red to indicate when you have new messages.
Polycom, Inc. 24
Page 25

Polycom VVX Business Media Phones User Guide
VVX 500 and VVX 600 Phones Hardware
The following figure displays the hardware features on the VVX 500 and VVX 600 business media phones.
The table lists each numbered feature shown in this figure.
VVX 500 and VVX 600 hardware features
VVX 500 and 600 Hardware Feature Descriptions
Reference
Number
1 Reversible tab Secures the handset in the cradle when your phone stand is positioned at a high
2 Speaker Provides ringer and speakerphone audio output.
3 Dial pad keys Enable you to enter numbers, letters, and special characters. You can also use the
4 Security slot
5 Microphone Transmits audio to other phones.
6 Volume keys Adjust th e volume of the handset, headset, speaker, and ringer.
Polycom, Inc. 25
Feature Feature Description
angle. To secure the handset, remove the tab, reverse it so the protrusion points
up, and re-insert it. Position the handset so the protrusion on the tab fits into the slot
on the handset.
dial pad keys to select menu items that have index numbers.
Enables you to attach a universal security cable
(on side)
secure it to a desktop.
lock to your phone so you can
Page 26

Polycom VVX Business Media Phones User Guide
VVX 500 and 600 Hardware Feature Descriptions
7 Mute key Mutes local audio during calls and conferences. The key glows red when activated.
8 Speakerphone
key
9 Headset key Enab les you to place and receive calls through a headset. The key glows green
10 Touchscreen Enables you to select items and navigate menus on the touch-sensitive screen. Tap
11 Home key Displays the Home screen from other screens, and displays the Lines and Calls
12 Message
Waiting
Indicator
13 USB port Enables you to attach a USB flash drive, a USB headset, or a VVX Camera.
Enables you to place and receive calls using the speakerphone. The key glows
green when activated.
when an analog headset is activated, and blue when a USB or Bluetooth headset is
activated.
the screen to select and highlight screen items. To scroll, touch the screen, and
swipe your finger up, down, right, or left.
screens from the Home screen.
Flashes red to indicate when you have new messages.
Polycom, Inc. 26
Page 27

Polycom VVX Business Media Phones User Guide
VVX 1500 Phone Hardware
The following figure displays the hardware features on the VVX 1500 business media phone. The table lists
each numbered feature shown in this figure.
VVX 1500 hardware features
Polycom, Inc. 27
Page 28

Polycom VVX Business Media Phones User Guide
VVX 1500 Hardware Feature Descriptions
Reference
Number
1 Camera Provides near-site video. The camera barrel is located directly behind the camera
2 Touchscreen Enables you to select items and navigate menus on the touch-sensitive screen.
3 Menu key Enables you to access your phone and organization’s features as well as other
4 Applications
5 Video key Controls the size, position, and transmission of video images.
6 Dial pad keys Provide the 10 digi ts, alphabetic characters, and special characters available in
7 Security slot
8 Speaker Provides ringer and hands-free (speakerphone) audio output.
9 Transfer key Transfers a call to another party.
10 Headset key Enables you to place and receive calls through an optionally connected headset.
Feature Feature Description
lens. The camera barrel adjusts the camera angle.
T ap the screen to select and highlight screen items on screen. To scroll, touch the
screen, and swipe your finger up and down.
menu options.
Enables you to access the Web Browser and Launch Pad.
key
context-sensitive applications.
Enables you to attach a universal security cable
(on side)
secure it to a desktop.
The key glows green when headset mode is selected.
lock to your phone so you can
11 Hold key Holds an active call or resumes a held call.
12 Speakerphone
key
13 Do Not Disturb
key
14 Headset
connector
15 USB port Enables you to connect a USB flash drive to display pictures on your phone, and
16 Mute key Mutes audio transmission locally during calls and conferences. The key glows
17 Volume keys Adjust the volume of the handset, headset, speaker, and ringer.
18 Conference
key
19 Delete key Deletes data displayed on the screen.
20 Redial key Dials your most recently called contact.
Polycom, Inc. 28
Enables hands-free communication during calls. The key glows green when
speakerphone mode is selected.
Cancels ring
when activated.
Enables you to connect a headset to the phone.
to record and play back calls.
red when activated.
Enables connection with another party for a conference.
ing and directs incoming calls to your mailbox. The key glows red
Page 29

Polycom VVX Business Media Phones User Guide
VVX 1500 Hardware Feature Descriptions
21 Arrow keys Enable you to scroll through lists, highlight items, and scroll through active and
inactive calls. The Left and Right arrow keys enable you to enable and disable
fields, scroll through values for a field, and position the cursor within text to
update the text. The Left arrow key also enables you to return to a previous
menu.
22 Messages key Enables you to access and manage instant, voice, and video messages.
23 Directory key Enables you to access the Contact and Corporate directories, as well as call lists.
24 Message LED
Indicator
25 Privacy
Shutter
Flashes red when you have new messages, when the phone is in power-saving
mode, and when the software is loading on your phone.
Covers and uncovers the camera.
Securing Your Phone with the Security Slot
The security slot is located on the top, left, or right side of the phone and is indicated by a padlo ck symbol.
See the hardware figure for your phone in the Overview of Phone Hardware and Keys section for the
location of the security slot on your phone.
By fastening one end of a universal security cable to a stationary object such as a desk or table, and the
other end to the security slot available on Polycom VVX phones, you can prevent your phone from being
stolen or otherwise removed. Contact the universal security cable manufacturer directly for more information
on securing your phone.
Overview of the Phone Interface
Your VVX phone has phone icons, status indicators, and phone screens to help you navigate your phone
interface and understand important information on the state of your phone. The following topics describe
how to navigate your phone’s interface:
● Phone Screens
● Phone Icons and St atus Indicators
Phone Screens
VVX phones have four screens that display on the phones:
● Home Screen Displays your messages, settings, and information (all VVX phones).
● Calls Screen Displays all active and held calls on your line (VVX 101, 201, 300, 310, 400, 410, 500,
and 600 phones).
● Lines Screen Displays your phone lines, your favorites, and conditional soft keys (VVX 101, 201,
300, 310, 400, 410, 500, and 600 phones).
● Active Call Screen Displays the active call currently in progress (VVX 500, 600, and 1500 phones).
Polycom, Inc. 29
Page 30

Polycom VVX Business Media Phones User Guide
Home Screen
On VVX 101, 201, 300, 310, 400, 410, 500, and 600 phones, the phone line and icons you can select to
access phone features, settings, and information display on the Home screen. On VVX 1500 phones, your
phone line and favorites display on the Home screen. For information on favorites, see the section
Managing Favorites.
On VVX 101, 201, 300, 310, 400, 410, 500, and 600 phones, a Page Indicator shows the page you are
currently viewing. On VVX 500 and 600 phones, you can press and hold the Page Indicator to control how
many icons display on the Home screen. The following figure shows the Page Indicator on the VVX 300 and
310 phones.
Home screen and Page Indicator on VVX 300 and 310 phones
On VVX 500 and 600 phones, you can tap a phone line on the Home screen to display additional phone
lines and favorites on your phone, as shown next. From this screen, you can also t ap a p hone line to o pen
the Dialer or select a favorite to call (see the section Placing Audio Calls).
Additional lines and favorites from the Home screen on VVX 500 phones
Calls Screen
The Calls screen is supported on VVX 101, 201, 300, 310, 400, 410, 500, and 600 phones. You can access
the Calls screen when you have one held call or an active and held call in progress on your phone. The
Calls screen is automatically displayed when you have an active call and one or more held calls on your
phone.
All of your active and held calls display on the Calls screen. Y ou can use the arrow keys or swipe the screen
from the bottom to the top to view all calls on your phone. The total number of calls is displayed on your line,
and if you have multiple lines on your phone, calls display under the associated line.
Polycom, Inc. 30
Page 31
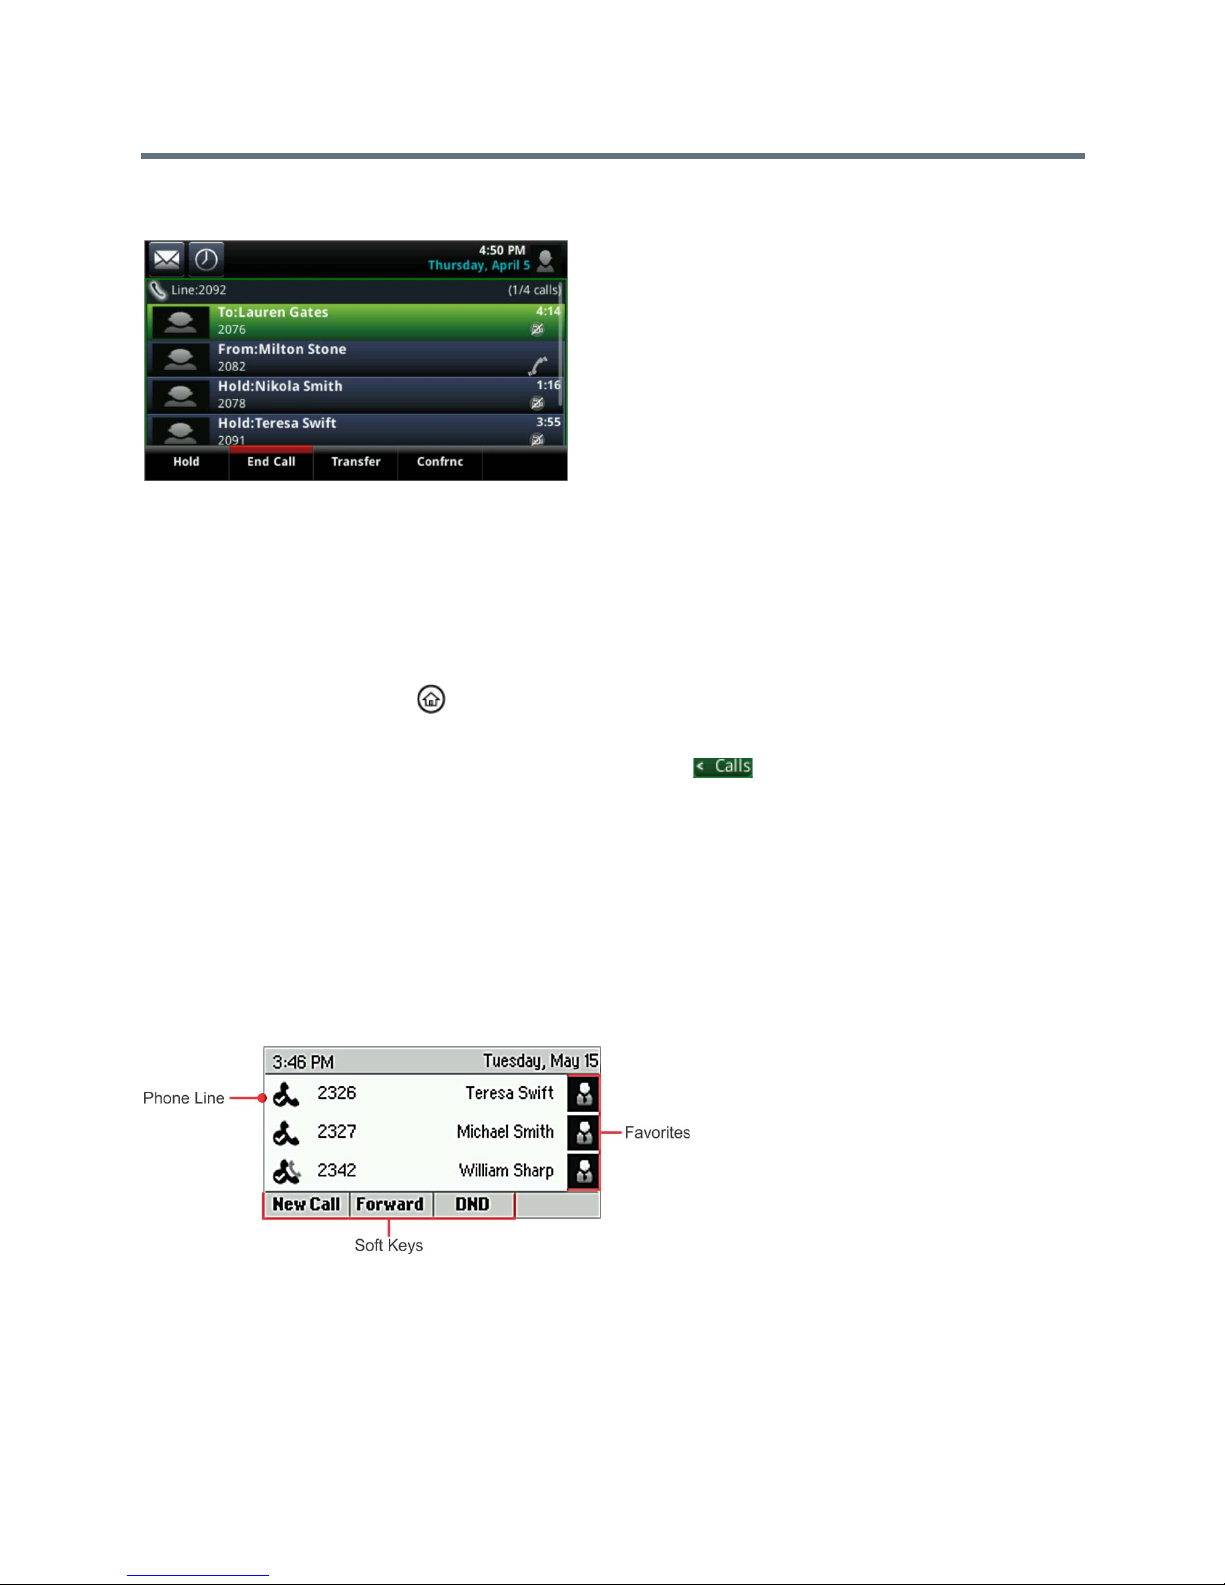
Polycom VVX Business Media Phones User Guide
Calls screen on VVX 600 phones
Display the Calls Screen
When you have more than one call on your phone, you can display the Calls screen from any other screen
on your phone.
To display the Calls screen:
» During a call, do one of the following:
Press the Home key .
On VVX 101 and 201 phones, press the L–>C soft key.
On VVX 500 and 600 phones, tap the Calls soft key in the status bar.
On VVX 500 and 600 phones, swipe the screen right to left.
Lines Screen
The Lines screen is supported on VVX 101, 201, 300, 310, 400, 410, 500, and 600 phones and is the default
screen when your phone is not in use. When you have m ultiple calls on your phone, the number of calls you
have is displayed next to the line number.
You can view your phone lines, favorites, and soft keys on the Lines screen, as shown next.
Phone line, favorites, and soft keys on the Lines screens on VVX 300 and 310 phones
Display the Lines Screen
You can view the Lines screen at any time on your phone from any other screen.
Polycom, Inc. 31
Page 32

Polycom VVX Business Media Phones User Guide
To display the Lines screen:
» Press the Home key .
Active Call Screen
The Active Call screen is supported on VVX 500, 600, and 1500 phones, and the screen is displayed when
you place a call and you have an active call in progr ess. When you have an active call in prog ress, the name
and number of the contact you are talking with and the duration of the call is displayed in the Active Call
screen. In the Active Call screen, you can hold, end, and transfer the call, or set up a conference call.
Active Call screen on VVX 500 phones
Display the Active Call Screen
The Active Call screen displays only when an active call is in progress on your phone.
To display the Active Call screen:
» Do one of the following:
Place a call.
On VVX 500 and 600 phones, press the Home key during an active call.
On VVX 500 and 600 phones, tap the Calls soft key in the status bar.
On VVX 500 and 600 phones, swipe the screen from right to left.
Switch among Phone Screens
You can see any phone screen on your phone from other screens by pressing the Home key , or by
swiping your finger from right to left on the touchscreen. Although you can access any phone screen from
other screens, you can access certain screens only if your phone is idle or has one or more calls in progress.
You can access certain screens in the following scenarios:
● If your phone is not in use, you can access the Home and Lines screen.
● If your phone has an active call, you can access the all screens.
● If your phone has one active call only, you can access the Home, Lines, and Active Call screens.
● If your phone has multiple calls, or one held call, you can access the Home, Lines, and Calls screen.
Polycom, Inc. 32
Page 33

Polycom VVX Business Media Phones User Guide
On VVX 1500 phones, the Home screen is the default screen, and you can only view the Active Call screen
when your phone has an active call in progress. There is no Home key on VVX 1500 phones, and you
cannot switch among screens.
To switch among screens:
» Do one of the following:
From the Home screen, press the Home key to display either the Lines, Calls, or Active Call
screen.
The Calls and Active Call screen display only when an active or held call is in progress on your
phone.
Press the Home key to display the Home screen from the Lines, Calls, or Active Call screen.
On VVX 101 and 201 phones, press the C–>L soft key to display the Lines screen from the Calls
screen.
On VVX 101 and 201 phones, press the L–>C soft key to display the Calls screen from the Lines
screen.
On VVX 500 and 600 phones, swipe the screen to the right or left to switch between the Lines,
Calls, or Active Call screen.
Phone Icons and Status Indicators
The following tables display phone icons and status indicators that display on the VVX business media
phones. For information on video icons, see the section Status Indicators and Messages for the VVX
Camera.
Phone Icons on VVX 101 and 201 Phones
Icon Description Icon Description
Registered line Phone warning
Unregistered line Login credentials invalid
Placing a call Shared line
Active call using Polycom HD
Voice
Held call Call forwarding is enabled
Incoming call New message
Active conference Presence status (Available)
Shared line with a held call
Placed call Presence status (Busy or In a Call)
Polycom, Inc. 33
Page 34

Polycom VVX Business Media Phones User Guide
Phone Icons on VVX 101 and 201 Phones
Icon Description Icon Description
Received call Presence status (Away)
Missed call Presence status (Do Not Disturb)
Favorite Presence status (Offline)
Do Not Disturb enabled Presence status (No information)
Phone Icons on VVX 300 and 310 Phones
Icon Description Icon Description
Registered line Phone warning
Unregistered line Login credentials invalid
Placing a call Shared line
Active call using Polycom HD
Voice
Held call Call forwarding is enabled
Incoming call New message
Active conference Presence status (Available)
Placed call Presence status (Busy or In a Call)
Received call Presence status (Away)
Missed call Presence status (Do Not Disturb)
Shared line with a held call
Polycom, Inc. 34
Page 35

Polycom VVX Business Media Phones User Guide
Phone Icons on VVX 300 and 310 Phones
Favorite Presence status (Offline)
Do Not Disturb enabled Presence status (No information)
Phone Icons on VVX 400 and 410 Phones
Icon Description Icon Description
Registered line Phone warning
Unregistered line Login credentials invalid
Placing a call Shared line
Active call using Polycom HD
Voice
Held call Call forwarding is enabled
Incoming call New message
Active conference Presence status (Available)
Placed call Presence status (Busy or In a Call)
Received call Presence status (Away)
Missed call Presence status (Do Not Disturb)
Favorite Presence status (Offline)
Do Not Disturb enabled Presence status (No information)
Shared line with a held call
Polycom, Inc. 35
Page 36

Polycom VVX Business Media Phones User Guide
Phone Icons and Status Indicators on VVX 500 and 600 Phones
Icon Description Icon Description
Registered line Status indicators in Lines screen. A flashing
red bar indicates held calls. A green bar
indicates an active call.
Unregistered line Do Not Disturb enabled
Placing a call Phone warning
Active call using Polycom HD Voice Login credentials invalid
Held call Shared line
Incoming call in Lines screen Shared line with a held call
Incoming call in Calls screen Call forwarding is enabled
Active conference Select to access recent calls
USB flash drive attached New message.
Recording in progress or paused
(VVX 500 only)
Recording paused
(VVX 600 only)
Recording in progress
(VVX 600 only)
Placed call Presence status (Do Not Disturb)
Received call Presence status (Offline)
Missed call Presence status (No information)
Bluetooth available
(VVX 600 only)
Presence status (Available)
Presence status (Busy)
Presence status (Away)
Bluetooth headset paired and connected
(VVX 600 only)
Polycom, Inc. 36
Page 37

Polycom VVX Business Media Phones User Guide
Phone Icons and Status Indicators on VVX 1500
Icon Description Icon Description
Buddy Status (Online)
Busy Lamp Field (BLF) indicator
(line is idle)
Buddy Status (Busy, Do Not
Disturb)
Buddy Status (Be Right Back,
Away, Out to Lunch)
Buddy Status (Offline)
Busy Lamp Field (BLF) indicator
(line is busy)
Message waiting indicators Call on hold (private line)
Missed calls indicator Call on hold (shared line)
Audio muted Call without Polycom HD Voice (private line)
Speed Dial Key Call (shared line)
USB device attached and idle Conference call
Audio-only Call
Audio Call with Polycom HD Voice
Video Call
Video Call with Polycom HD Voice
USB device attached and playi ng
back
USB device attached and
recording
USB device attached and
recording paused
Presence status (Available) Line (registered, private)
Presence status (Busy) Line (registered, shared)
Presence status (Away) Line (unregistered)
Presence status (Do Not Disturb) Login credentials invalid
Polycom, Inc. 37
Do Not Disturb enabled
Forward (Always)
Headset attached
Page 38

Polycom VVX Business Media Phones User Guide
Phone Icons and Status Indicators on VVX 1500
Presence status (Offline) Video stopped and muted
Presence status (No information) Video stopped
Entering Information in Data Fields
Y ou can enter information and edit fields using the dial p ad keys on the phone console or using the onscreen
keyboard on VVX 500, 600, and 1500 phones.
Before you enter information into fields, you can choose how to enter the information using the following soft
keys:
● Mode Enables you to enter just numbers or text in title case, lowercase, or uppercase characters.
● Encoding Enables you to enter alphanumeric and special characters as well as characters in
special languages.
The following table lists the Mode and Encoding options for the dial pad and the onscreen keyboard.
Mode and Encoding Options
Mode Options Encoding Options
Abc (to capitalize the first letter only, and use
lowercase for the remaining letters)
ABC (to enter uppercase only) ABC
abc (to enter lowercase only) abc
123 (to enter numbers only) 123
Abc
ASCII (for regular text)
Latin (to enter accented characters)
Katakana (for Japanese characters)
Unicode (to store characters as double bytes)
Cyrillic (for Russian characters)
When the onscreen keyboard is displayed on VVX 500, 600, and 1500 phones, the Encoding and Mode soft
keys are not available. For tips on using the onscreen keyboar d, see Enter Information Using the Onscreen
Keyboard.
Entering Information Using the Dial Pad
Y ou ca n use the dial pad keys on your phone console to edit or update field inform ation. The following ta ble
describes how to enter different typ es of data on your phone using the dial pad.
Polycom, Inc. 38
Page 39

Polycom VVX Business Media Phones User Guide
Using the Dial pad Keys to Enter Information
Data Type Action
Enter numbers, or characters in uppercase,
lowercase, or title case mode
Enter only numbers Select Encoding or Mode, and select 123.
Enter text in another language Select Encoding, and select one of the language options.
Enter a character Press a dial pad key repeatedly to view the character options and
Enter a number Select Encoding or Mode, and select 123, or press a dial pad key
Enter a special character Select Encoding, and select Abc, ABC, or abc. Press the
Enter a space Select Encoding, and select one of the alphabetic Abc, ABC, or
Select Encoding or Mode, and select ABC, , or Abc.
stop when the character you want to enter is displayed in the field.
Wait one second, and enter the next character.
repeatedly to enter the number that displays on that key.
1, 0,
asterisk (*), or pound (#) key one or more times to enter one of the
following special characters:
1 key: ! | ‘ ^ \ @ : 1
•
* key: . * - & % + ; ( )
•
• 0 key: / , _ $ ~ = ? 0
# key: # > < { } [ ] “ ‘
•
You cannot access special characters when you are in numerical
(123) mode.
abc. Press the 0 key.
You cannot enter a space when you are in numerical (123) mode.
Delete one or more characters Use the arrow keys to position the cursor to the right of the
character, or drag your finger across the characters until the cursor
is positioned to the right of the character(s) you want to delete.
Press the Delete key, press the Backspace << soft key, or tap the
Delete soft key .
Enter Information Using the Onscreen Keyboard
The onscreen keyboard is available on VVX 500, 600, and 1500 p hones, and the ke yboard ena bles you to
enter field information using your touchscreen. The onscreen keyboard icon is displayed on screen
when data fields are available. When a data entry field requires only numbers, the onscreen keyboard
displays only numbers.
To access and use the onscreen keyboard:
1 Tap the onscreen keyboard icon .
2 Tap the Mode and Encoding icon and select
.
options
3 Press your finger on each character you want to enter.
4 When you finish, tap the Select icon .
Polycom, Inc. 39
Abc, ABC, abc, 123, or one of the special character
Page 40

Polycom VVX Business Media Phones User Guide
The following table describes how to enter information using the onscreen keyboard.
Using the Onscreen Keyboard to Enter Information
Task Action
Select an Encoding option (title case,
uppercase, lowercase, numbers-only, ASCII,
Latin, Katakana, Unicode, Cyrillic)
Enter text Tap Abc and select the characters you want.
Enter uppercase characters Tap ABC and select the characters you want.
Enter lowercase characters Tap abc and select the characters you want.
Enter numbers Tap 123 and select the numbers you want.
Enter special characters Tap ASCII and select the characters you want.
Exit the onscreen keyboard, enter the
information, and update the next field
Delete one or more characters Drag your finger across the characte rs to highlight them in yellow
Replace characters Highlight the characters you want to replace then enter the new
Tap the
options you want.
Tap the Select icon .
and tap the Delete icon .
characters.
Mode and Encoding icon and select the Encoding
Inputing Chinese Characters with PinYin
PinYin is a commonly used text inp ut method for Chinese characters. The Pin Y in text inpu t feature on VVX
phones uses Nuance XT9
phone’s dial pad keys or onscreen keyboard.
®
Smart Input to enable you to ente r Chinese characters into text fields using the
Web Info: About the PinYin text input method
For more information on the PinYin text input method, see the Nuance’s XT9 Smart Input web site.
Using the PinYin Input Widget
Y ou can enter Chinese characters in the contact directory , corporate directory, and browser u sing the PinYin
input widget and the dial pad keys or onscreen keyboard. When you select a data field to edit, the PinYin
input widget is automatically displayed when Simplified or Traditional Chinese is set as the displayed
language on your phone. The following figure shows the PinYin widget on the VVX 1500 phone.
Polycom, Inc. 40
Page 41

Polycom VVX Business Media Phones User Guide
PinYin input widget in the Contact Directory
Enter Chinese Characters with the Dial Pad Keys
You can use the dial pad keys and the PinYin input widget to enter Chinese characters on your phone.
To enter Chinese characters using the PinYin widget and the dial pad keys:
1 Enter the PinYin text that corresponds with the letters on the phone’s dial pad. For example, press
7464.
The possible PinYin matches display in the text field with the first match highlighted.
2 Press the Star key to toggle between selections.
The recommendation area shows the possible character matches. For example, when Qing is
selected, the recommendation area shows 庆情请清青平轻晴萍评 . A navigation indicator is
displayed if more matches are available.
3 Use the left and right arrow keys or swipe the recommendation area on the touch screen to change
the selected character.
4 Press the Select key to select the character from the recommendation area.
5 After the character is selected, it is displayed in the input field at the cursor location.
6 Repeat preceding steps until entry is complete.
The PinYin input widget disappears if you press the Pound key or no keys are pressed for 5 seconds.
Enter Chinese Characters with the Onscreen Keyboard
Y ou can use the onscreen keyboard and th e PinYin input widget to ente r Chinese characters on your phone.
To enter Chinese characters using the PinYin widget and the onscreen keyboard:
1 Tap the onscreen keyboard icon .
2 Tap the Mode and Encoding icon to verify that PinYin is the default input mode.
A list of language options display.
3 Ensure that XT9 PinYin is selected.
Polycom, Inc. 41
Page 42

Polycom VVX Business Media Phones User Guide
4 Enter the PinYin text using the onscreen keyboard.
5 Tap the Select icon on the onscreen keyboard to select the character from th e recommenda tion
area.
6 Repeat preceding steps until entry is complete.
Polycom, Inc. 42
Page 43

Logging Into and Locking Your Phone
Polycom VVX phones enable you to lock your phone, log in to your phone with login credentials, and sign
into Microsoft
● Log Into Your Phone
● Log Into a Visitor Desk Phone
● Sign Into Skype For Business on Your Phone
● Sign In Using Your BroadSoft UC-One Credentials
● Locking Your Phone
If your system administrator has set up user credentials for you r phone, you can vi ew your personal phone
settings from any phone that is part of your organization . You can log in to a phone by entering your user ID
and password, and access your contact directory, speed dials, and phone settings. Contact your system
administrator for your user credent ials.
®
Skype for Business® or BroadSoft UC-One. This section includes the following topics:
Password needed to access settings on your phone
Some of the features described in this section require access to the Basic settings menu on the
phone. If your phone requires a password to access the Basic settings menu, contact your system
administrator for assistance customizing your phone.
Log Into Your Phone
Depending on how your system administrator set up the user login feature, you may need to log into a phone
before you can use it. By default, Polycom phones do not require you to log in before you can use them.
However, if you do not log in, you see the phone’s default profile.
When a phone is logged out, you can use the phone to place emergency calls and calls to other
pre-determined phone numbers. Pre-determined numbers are set up by your system administrator. For
information on how to place authorized calls, see Place Calls from a Locked or Logged Out Phone.
When you log in, you have full access to your personal phone settings and your directory. Any phone
settings you change while logged into another phone are saved and displayed the next time you log into
your phone.
To log in to a phone:
1 Do one of the following:
If you see the User Login screen, proceed to step 2.
If you do not see the User Login screen, select Settings > Features > User Login > Log in. For
VVX 1500 phones, select Menu > Features > User Login > Log in.
Polycom, Inc. 43
Page 44

Polycom VVX Business Media Phones User Guide
2 From the User Login screen, enter your user ID and password, and select Log in.
When your login credentials are accepted, the phone updates to display your pe rsonal phone profile.
When your credentials are not accepted, the message “User login failed” is displayed , and the User
Login screen is displayed again. Check with your system administrator to confirm that your login
credentials are correct.
Log Out of Your Phone
After you use a phone, make sure you log out to prevent access to your personal settings. When you log
out of a phone, your personal profile is no longer accessible, and the phone displays either the User Log in
screen for the next user or the default phone profile.
To log out of a phone:
1 Select the Log out soft key, or select Settings > Features > User Login > Log out.
For VVX 1500 phones, select Menu > Features > User Login > Log out.
The Log out screen is displayed with a confirmation message.
2 Select Yes.
Change Your Password
You can change your password from any phone on your network.
To change your user password:
1 Log in to a phone on your network.
2 Navigate to Settings > Features > User Login > Change User Login Password.
For VVX 1500 phones, select Menu > Features > User Login > Log in Password.
3 From the Change User Login Password screen, enter your old and new p assword information and
select Enter.
Your password is changed. The next time you log in to a phone, you need to enter your new
password.
Log Into a Visitor Desk Phone
When you are registered with the Alcatel-Lucent Converged Telephony Server (CTS), you can log into a
visitor desk phone, which is a shared public phone, to make calls to contacts or access and change your
personal settings. When you log into a visitor desk phone, you have full access to your personal phone
settings and your directory. After you log out, you can no longer view this information.
Your system administrator provides you with login credentials that you can use to log into a visitor desk
phone. By default, Polycom phones do not require you to log in before you can use them. However, if you
do not log in, you see only the phone’s default profile.
This feature is not available for 1500 phones. Check with your system administrator to find out if this feature
is available on your phone.
Polycom, Inc. 44
Page 45

Polycom VVX Business Media Phones User Guide
To log in to a visitor desk phone:
1 Do one of the following:
If you see the Visitor Login screen, proceed to step 2.
If you do not see the Visitor Login screen, press the Visitor Login soft key or navigate to
Settings > Features > Visitor Desk Phone > Visitor Login.
2 From the Visitor Login screen, enter your user ID and password, and select Log in.
When your login credentials are accepted, the phone updates to display your pe rsonal phone profile.
When your credentials are not accepted, the message “User login failed” is displayed, and the Login
screen is displayed again. Check with your system administrator to confirm that your login credentials
are correct.
Log Out of a Visitor Desk Phone
After you use a phone, make sure you log out to prevent access to your personal settings.
To log out of a visitor desk phone:
» Select the Log out soft key , or navigate to Settings > Features > Visitor Des k Phone > Visitor Log
out.
Your personal profile is no longer accessible, and the phone displays the default phone profile.
Sign Into Skype For Business on Your Phone
You can sign into Microsoft Skype for Business on your phone with your login credentials—your domain,
e-mail, user name, and password—or your PIN authentication, if enabled by your administrator. Your
system administrator provides you with your login credentials or PIN authentication.
This feature is not available for VVX 101 and 1500 phones. Check with your system administrator to find
out if this feature is available on your phone.
To sign in to Skype for Business on your phone:
1 Select the SignIn soft key, or select Settings > Features > Microsoft Skype for Business >
SignIn.
2 Enter your login credentials or your phone extension and PIN and select Sign In.
A confirmation message is displayed when your phone successfully signs into Skype for Business.
Troubleshooting: I can't log in using my login credentials
If you input the wrong login credentials or PIN authentication and lock your account, contact your
system administrator.
Set the Time and Date Format on Your Phone
After you sign into your phone with your Skype fo r Business credentials, you have the option to set the time
zone and select a time and date format. If you do not choose to set up your phone when you first sign into
your phone, you can view the section Customizing Your Phone for more information on setting the time and
date formats.
Polycom, Inc. 45
Page 46

Polycom VVX Business Media Phones User Guide
To set the time and date format your phone:
1 After you sign into Skype for Business on your phone, select Next.
2 On the Customize Time Zone screen, select your time zone and press Next.
3 On the Customize Time Format, choose a time format and press Next.
4 On the Customize Date Format screen, choose a date format and press Next.
Sign Out of Skype for Business
If you are signed into Skype for Business on a public phone, make sure you sign out of your account after
you finish using the phone.
To sign out of Skype for Business on your phone:
» Press the SignOut soft key or select Settings > Features > Microsoft Skype for Business >
SignOut.
After you sign out of Skype for Business, you cannot call or view your Skype for Business contacts.
However, you can still use other phone features.
Sign In Using Your BroadSoft UC-One Credentials
Y ou can enter your BroadSoft UC-On e credentials on your phone and register your line with the BroadW orks
server. Your system administrator provides you with your BroadSoft UC-One credentials.
This feature is not available for VVX 1500 phones. Check with your system administrator to find ou t if this
feature is available on your phone.
To sign in to your BroadSoft UC-One credentials:
1 Navigate to Settings > Basic > UC-One Credentials.
2 Enter the Server Address.
3 For User, enter the username for your account.
4 For Password, enter your password for your account.
Locking Your Phone
Your system administrator provides you with a user password that you can use to unlock the phone and
answer calls when your phone is locked.
Consider locking your phone if you want to:
● Prevent unauthorized outgoing calls.
● Allow only authorized people to answer calls.
● Prevent people from viewing or modifying phone information, such as your directory, call lists, or
favorites.
When your phone is locked, you can:
● Make outgoing calls to authorized numbers only.
Polycom, Inc. 46
Page 47

Polycom VVX Business Media Phones User Guide
● Enter a password to answer incoming calls.
● Unlock the phone, make an authorized call, or view the browser, if enabled.
● View messages on the status bar in forming you that the phone is locked and that only authorize d calls
are allowed. Any messages that displayed before the phone was locked do not display.
Lock Your Phone
Y ou can choose how you want your phone to handle inco ming calls when it is locked. When you set up your
phone to receive incoming calls when locked (the default setting), incoming calls ring on your phone, and
you can answer calls by entering your user password. See th e section Answer Calls on a Locked Phone for
more information.
When you set up your phone to ignore incoming calls, Do Not Disturb applies to all lines on your phone, and
your phone does not ring.
To lock your phone:
1 Navigate to Settings > Basic > Lock Phone.
For VVX 1500 phones, select Menu > Settings > Basic > Lock Phone.
2 From the Lock Phone screen, select Allow ringing when locked (the default setting) if you want
your phone to ring when you have an incoming call.
When you choose this option, you can answer a call by entering your password.
3 Select Lock.
Your phone is locked.
Tip: A quick way to lock your phone
Y o u can quickly lock your phone by selecting the Lock soft key. When you do this, you cannot choose
how to handle incoming calls. Your phone uses the default setting or the last setting selected.
Unlock Your Phone
You can unlock your phone using your user password.
To unlock your phone:
1 Select Unlock.
2 Enter your user password and select Enter.
The phone unlocks.
Change Your User Password
You can change your user password at any time.
To change your user password:
1 Navigate to Settings > Advanced.
For VVX 1500 phones, navigate to Menu > Settings > Advanced.
Polycom, Inc. 47
Page 48

Polycom VVX Business Media Phones User Guide
2 Enter your password, and select Enter.
3 From the Advanced screen, select Change User Password.
4 From the Change User Password screen, enter your old and new password information, and
select Enter.
Polycom, Inc. 48
Page 49

Audio Calls
VVX phones enable you to place and answer SIP and H.323 calls, ignore incoming calls from all or
individual contacts, place and manage confer ence calls, manage calls on shared lines, and perform
server-dependent tasks.
This section includes the following topics:
● Placing and Answering Audio Calls
● Holding and Resuming Calls
● Parking and Retrieving Calls
● Managing Multiple Calls
● Managing Calls Remotely
● Ignoring or Rejecting Incoming Calls
● Redirecting Incoming Calls
Password needed to access settings on your phone
Some of the features described in this section require access to the Basic settings menu on the
phone. If your phone requires a password to access the Basic settings menu, contact your system
administrator for assistance customizing your phone.
Placing and Answering Audio Calls
VVX 101 and 201 phones can manage a maximum of 8 active, incoming, and held audio calls at a time.
VVX 300, 400, 500, 600, and 1500 phones can manage a maximum of 24 active, incoming, and held audio
calls at a time. However, you can ha ve only one active call in pr ogress with nume rous other incoming calls
or calls on hold on all phones. Additionally, your system administrator can set up your phone to have up to
six lines with unique extension numbers, or the same extension number as other lines on your network.
This section includes the following topics:
● Placing Audio Calls
● Redial a Number
● Use H.323 Protocol to Place Audio Calls
● Answer Audio Calls
● Switch among the Handset, Headset, and Speakerphone
● Mute and Unmute Audio
● End Audio Calls
Polycom, Inc. 49
Page 50

Polycom VVX Business Media Phones User Guide
Placing Audio Calls
You can place audio calls on your phone, and you have the option to use the handset, the speakerphone,
or a headset.
You can place calls in numerous ways. This section includes the following topics on placing calls:
● Place Calls from the Dialer
● Place an International Call
● Place Calls from Recent Call Lists
● Place Calls to Favorites
● Place Calls from Directories
● Place Calls from a Locked or Logged Out Phone
● Place an Intercom Call
● Place a Call from a VVX Expansion Module
● Place a Call with a Hidden Number
Place Calls from the Dialer
The Dialer enables you to enter a number to place a call and displays a list of previously placed calls. As
you enter numbers, the Dialer displays a list of similar numbers in your directory. Select a match to
automatically enter the number.
To place a call from the Dialer:
1 Do one of the following:
Start typing a phone number.
Press a line key.
Pick up the handset, or press the Speakerphone key or Headset key .
Select New Call.
2 Enter a number or select a recent contact.
On VVX 500, 600, and 1500 phones, tap the onscreen keyboard icon to use the onscreen dial
pad to enter numbers.
3 On VVX 101, 201, 300/310, 400/410, and 1500 phones, select Dial.
On VVX 500 and 600 phones, tap the Dial icon .
Note: Handling automatically placed calls
Your administrator can set up your phone to automatically place the call after you enter a certain
number of digits. If a call is placed before you enter all the digits, add the number to your Contact
Directory and dial the number from the Contact Information screen. See the section Place Calls from
Directories.
Place an International Call
You can place calls to international phone numbers from the Dialer.
Polycom, Inc. 50
Page 51

Polycom VVX Business Media Phones User Guide
To place an international call:
1 In the Dialer, quickly press the star key * twice.
A plus sign + is displayed.
2 Enter the rest of the number and press Dial or tap the Dial icon .
Place Calls from Recent Call Lists
In addition to the Dialer, you can place calls from the Recent Calls list, which has calls that were recently
placed, answered, or missed on your phone.
To place calls from the Recent Calls list:
1 Do one of the following:
On VVX 101, 201, 300/310, and 400/410 phones, navigate to Directories > Recent Calls.
On VVX 500 and 600 phones, tap Directories > Recent.
On VVX 1500 phones, press the Directory key, and select Call Lists.
2 From the Calls List screen, select a contact and select Dial. On VVX 500 and 600 phones, the call
is automatically placed after you select a contact.
Place Calls to Favorites
You can place a call to your favorites from the Favorites list, from the New Call screen, or by selecting a
favorite on your Home or Lines screen. On VVX 1500 phones, you can dial a favorite on the Home screen.
When you add a contact as a favorite, the cont act is ad de d to your Favorites list, a nd you can call co ntact s
directly from the Favorites list.
To place a call from your Favorites list:
1 Select New Call.
2 From the Dialer, select Favorites.
3 Select a favorite, and select Dial. On VVX 500 and 600 phones, the call is automatically placed after
you select a favorite.
Call a Favorite from the Home or Lines Screen
Contacts you add as favorites display on the Home scr een, and you can quickly call favorites from the Home
screen.
To place a call to a favorite from the Home or Lines screen:
» Do one of the following:
On VVX 101, 201, 300/310 and 400/410 phones, press a line key associated with a favorite.
On VVX 500 and 600 phones, press the Home key , tap your phone line, and tap a favorite.
On VVX 1500 phones, tap a favorite.
A call is placed to the favorite automatically.
Polycom, Inc. 51
Page 52

Polycom VVX Business Media Phones User Guide
Place Calls from Directories
You can place a call to a contact directly from your directory or you can select cont a cts in your directory to
call from the New Call screen.
To call a contact from your directory:
1 Do one of the following:
Select Directories.
Navigate to New Call > Directory.
On the VVX 1500, press the Directory key.
2 Choose a directory.
3 From your directory, select a contact.
4 From the Contact Information screen, select the contact’s phone number.
The call is automatically placed on VVX 500 and 600 phones.
5 On VVX 101 201, 300/310, 400/410, and 1500 phones, select Dial.
Place a Call from the Directory Search Screen
You can also call contacts from the Search screen in your directory.
To call contacts from the directory Search screen:
1 Select Directories.
On VVX 1500 phones, press the Directory key.
2 Select Search, enter your contact’s first or last name, and select Search.
3 Select your contact.
4 In the Contact Information screen, select the contact’s number, and select Dial.
Place Calls from a Locked or Logged Out Phone
When your phone is locked or you are not logged into the phone, you can place calls only to emergency
numbers, such as 911, and up to five authorized numbers that your administrator can set up. You cannot
call any other numbers from a locked or logged out phone.
To call an authorized number from a locked or logged out phone:
1 Select New Call.
2 From the Place an Authorized Call screen, select a number, and select Dial, or on VVX 500 and
600 phones, tap the Dial icon .
Place an Intercom Call
The intercom on your phone enables you to place a call to a con tact that is answered automatically on the
contact’s phone as long as the contact is not in an active call. If the contact is in an active call, the contact
can choose to answer the intercom call, or the intercom call is answered automatically after the active call
ends.
Polycom, Inc. 52
Page 53

Polycom VVX Business Media Phones User Guide
Check with your system administrator to find out if this feature is available on your phone.
To place an intercom call:
1 From the Home screen, select the Intercom icon or select the Intercom soft key.
The New Call screen is displayed.
2 Enter a number or select a contact.
3 Select Dial, or on VVX 500 and 600 phones, tap the Dial icon .
The phone plays a tone and the call is answered automatically on the contact’s phone.
4 Speak your message and wait for a response.
5 If you do not need to wait for a response, select End Call.
Tip: Quickly call a contact using the intercom
Your system administrator can set up your phone to automatically call a specific contact when you
press the Intercom soft key. If your phone is set up this way, press the Intercom soft key and wait for
the call to be answered before speaking your message.
Place an Intercom Call during a Call
You can place an intercom call to another contact during an active call.
To use the intercom during a call:
1 Select Hold, and select the Intercom soft key.
The active call is placed on hold and the New Call screen is displayed.
2 Enter a number or select a contact.
3 Select Dial, or on VVX 500 and 600 phones, tap the Dial icon .
4 After the call is answered, speak your message and select End Call.
5 Select Resume.
Place a Call from a VVX Expansion Module
Y ou can pla ce a call using the line keys on your VVX Exp ansion Modules. Line keys on exp ansion modules
activate available lines and place calls to contacts assigned to those lines. See the section Connecting
Polycom VVX Expansion Modules to Your Phone for more information on using expansion modules.
To place a call:
» Do one of the following:
Press a line key corresponding to an available line and dial the number.
Press the line key of the assigned favorite you want to call.
The call is placed and is displayed on your phone’s screen.
Polycom, Inc. 53
Page 54

Polycom VVX Business Media Phones User Guide
Place a Call with a Hidden Number
When your phone is registered with the BroadSoft BroadW orks server, you can choose to hide your phone
number when you place a call. Check with your system administrator to find out if this feature is available
on your phone.
To hide your number:
1 Select UC-One on the Home screen or navigate to Settings > Features > UC-One Call Settings.
On VVX 1500 phones, navigate to Menu > Settings > Features > UC-One Call Settings.
2 If you have more than one line registered, select a line.
3 Select Line ID Delivery Blocking and select Enabled.
Your number does not display when you place calls to contacts.
Redial a Number
Y our phone automatically keeps a record of all the calls placed on your phone. You can recall the last contact
you call using the Redial icon or soft key.
To redial a number:
» Do one of the following:
Select the Redial icon on the Home screen.
Press the Redial soft key.
Use H.323 Protocol to Place Audio Calls
You can use H.323 Protocol to place calls on VVX 500, 600, and 1500 phones. Your system administrator
can set up your phone to handle calls that use the SIP protocol, the H.323 protocol, or both. Your system
administrator can also set up your phone so that a line can handle one or both protocols. Contact your
system administrator to find out if calling with the H.323 protocol is enabled on your phone.
When your phone supports the H.323 protocol, the following limitations apply:
● You cannot forward or transfer H.323 calls.
● You cannot set up forwarding for lines that use the H.323 protocol only.
● You cannot set up shared lines on lines that use the H.323 protocol.
● Y ou cannot place a ca ll by just an H.323 name. Y o u must use URL dialing using the following format:
<H.323 name>@<server name>
Your system administrator can set up your phone so you can choose the protocol you want to use before
placing a call.
To place a call using H.323 protocol:
.
1 Select New Call.
Polycom, Inc. 54
Page 55

Polycom VVX Business Media Phones User Guide
2 In the Dialer, tap Use H.323 or URL to place an H.323 call.
H.323 is displayed in the number field. Your phone uses the H.323 protocol for all subsequent calls
until you select a different protocol.
3 Enter your contact’s H.323 URL name. For example, VVX1500@100.100.100.100.
For dual-protocol phones, the protocol is displayed next to all call IDs, including th e call IDs for conference
call participants and calls on hold.
Select a Protocol for Placing Calls Automatically
Your system administrator can set up your phone so that you can enable it to automatically select the
protocol to use for all calls.
To automatically select a protocol for placing calls:
1 Tap New Call.
2 In the Dialer, tap Use Auto to enable your phone to automatically select the protocol to use.
Your phone uses the selected protocol for all subsequent calls until you select a different protocol.
When you place calls from call lists or directories, your phone automatically chooses the protocol to use
based on the information in the call list or directory. When you add a contact to your Contact Directory, you
can specify the protocol the contact uses to handle calls. This enables your phone to au tomatically use the
correct protocol when you dial the contact. See the section Ma naging the Co nt act Directory for information
on adding contacts.
Answer Audio Calls
When you receive an incoming call on your phone, you can choose to answer the call in various ways. This
section includes the following topics on answering calls:
● Answer Calls in the Incoming Call Screen
● Answer Calls from the Calls Screen
● Answer a Call When in a Call
● Answering Calls on Shared Lines
● Answer Calls Automatically
● Answer Calls on a Locked Phone
● Answer Intercom Calls
● Answer Calls from VVX Expansion Modules
Answer Calls in the Incoming Call Screen
When you receive an incoming call, your phone ring s a nd an Incom i ng Cal l screen is displayed, as shown
next. In the Incoming Call screen, you can choose to answer or reject the incoming call.
Polycom, Inc. 55
Page 56

Polycom VVX Business Media Phones User Guide
Incoming Call window
Note: Setting up a visual incoming call alert
Your system administrator can enable the screen to flash bright orange when you have an incoming
call. The screen continues to flash until the incoming call is displayed in the Home or Calls screen. For
more information about this feature, see your system administrator.
To answer an incoming call:
» Do one of the following:
Pick up the handset.
Press the Speakerphone key or select Answer.
Press the Headset key .
After you answer the incoming call, the call becomes active.
Answer Calls from the Calls Screen
When you don’t answer an incoming call within 10 seconds, the Incoming Call screen disappears, and either
the Calls screen is displayed.
To answer the call from the Calls screen:
» Select the incoming call, and select Answer.
Note: Answering calls when your phone is locked
If your phone is locked, you must enter a user password before answering the call. See the section
Answer Calls on a Locked Phone.
Answer a Call When in a Call
When you are in an active call and an incoming call arrives on the same or a different line, a call waiting
tone beeps, and the Incoming Call screen is displayed.
To answer an incoming call during a call:
» Select Answer.
The active call is placed on hold, and the incoming call becomes active.
If you don’t answer the call within 10 seconds, the Incoming Call screen disappears, and either the Calls
screen is displayed.
Polycom, Inc. 56
Page 57

Polycom VVX Business Media Phones User Guide
Answering Calls on Shared Lines
Incoming calls to a shared line causes all registered ph on es to ring, an d the ca ll can be answe re d on an y
of the phones. When you or another person answers the incoming call, a green indicator light is displayed
on the line key on all phones for the shared line.
You can also choose to ignore the incoming call by selecting Silence. The phone stops ringing, and the
visual notification continues to display giving you the option to answer the call.
Answer Calls Automatically
You can set up your phone to automatically answer call s using th e Auto Answer fe ature. When this feature
is enabled, your phone automatically answers all incoming calls using the speakerphone. Your system
administrator sets how many times your phone rings before the call is automatically answered.
When Auto Answer is enabled and you receive an incoming call while in a call, the incoming call is not
answered until you end or hold the current call.
To enable your phone to automatically answer calls:
1 Navigate to Settings > Basic > Preferences > Auto Answer.
For VVX 1500 phones, navigate to Menu > Settings > Basic > Preferences > Auto Answer.
2 From the Auto Answer screen, select Auto Answer SIP Calls, and select Yes.
3 If your phone supports H.323 protocol, select Auto Answer H.323 Calls, and select Yes.
This option is displayed only if your phone supports the H.323 protocol.
4 Select Microphone Mute, and choose Yes (the default setting) to mute the microphone for
auto-answered calls.
5 For VVX 500, 600, and 1500 phones, select Video Mute, and select Yes to mute the video when
video calls are auto-answered.
The default setting is No. See the section Video Calls for more information on placing video calls.
6 Select Save.
These settings are applied to all incoming calls on your phone.
Answer Calls on a Locked Phone
When you set up your phone so that you can answer incoming calls when your phone is locked (see Locking
Your Phone), you can answer calls by entering your user password.
To answer a call on a locked phone:
1 From the Incoming Call screen, select Answer.
2 Enter your user password and select Enter.
The call connects.
Answer Intercom Calls
When you receive an intercom call on your phone, the call is answered automatically using the
speakerphone. You can switch to the handset or headset after the call is answered (see the section Switch
among the Handset, Headset, and Speakerphone).
Polycom, Inc. 57
Page 58

Polycom VVX Business Media Phones User Guide
If your phone is set up to answer intercom calls with your mi crop ho ne mu te d, you ne e d to unm ut e yo ur
microphone before responding to the call.
To answer and respond to an intercom call with mute enabled:
» After the call is answered, press the Mute key and reply.
Answer Calls from VVX Expansion Modules
Y ou can answer calls using the line keys on your VVX phone or from your VVX Expansion Module. See the
section Connecting Polycom VVX Expansion Modules to Your Phone for more information on using
expansion modules.
To answer calls:
» Press the expansion module line key with a flashing green LED indicator.
Switch among the Handset, Headset, and Speakerphone
You can place and answer calls on your phone using the handset, speakerphone, or headset. You can
alternate among the three modes during calls, if available.
To switch among the handset, headset, and speakerphone:
» During a call, pick up the handset, press the Headset key or press the Speakerphone key .
For example, if you’re using the handset, press th e Headset key to switch to the headset, or press
the Speakerphone key to switch to the speakerphone.
When using the speakerphone, the Speakerphone key glows green. When using the headset, the
Headset key glows green if an analog headset is connected or blue if a USB headset is connected. For
VVX 101 and 201 phones, the headset and speakerphone keys do not glow and the Headset icon
displays in the status bar.
Tip: Setting up the phone to automatically use your headset for all calls
If you frequently use a headset, you can set up your phone to always use your headset for calls. For
more information, see Use Your Headset for All Calls.
Mute and Unmute Audio
You can mute the microphone so other parties cannot hear you. Microphone Mute applies to the handset,
headset, and speakerphone. Y ou can still hear all other parties when you mute your microphone. When your
audio is muted, the Mute icon is displayed, and the Mute key glows red, excluding VVX 101 and 201 phones.
To mute and unmute the microphone:
1 During a call, including a co nf er ence call, press the Mute key .
The other parties cannot hear you.
2 Press the Mute key again to unmute the microphone.
Polycom, Inc. 58
Page 59

Polycom VVX Business Media Phones User Guide
End Audio Calls
You can end an active call on your phone at any time.
To end active calls:
» Do one of the following:
Place the handset on the cradle.
Press End Call.
In the Calls screen, highlight the call and press End Call.
End Held Calls
You cannot end calls that are on hold. You must resume held calls before ending them.
To end a held call:
» From the Calls screen, select the held call and press Resume > End Call.
Holding and Resuming Calls
When you are in a call, you can place a call on hold and resume the call.
Hold Calls
You can place any active call on hold.
To hold a call:
» During an active call, select Hold. If you’re in the Calls screen, highlight the call first.
A hold icon is displayed on the line of the held call, and a red LED light flashes on the line key
for all phones except VVX 101 and 201 phones.
Resume Calls
You can view and resume all held calls in the Active Call, Lines, and Calls screens.
To resume a held call:
» Do one of the following:
Select Resume.
From the Calls screen, select the call to highlight it, and select Resume.
Resume Calls on VVX Expansion Modules
You can resume calls placed on hold by other contacts from your VVX Expansion Module. A flashing red
LED light on a line key on the expansion module indicates a call is on hold on the contact’s line.
Polycom, Inc. 59
Page 60

Polycom VVX Business Media Phones User Guide
To resume a held call:
» Press the line key corresponding to the line with the held ca ll.
Transferring Calls
You can transfer active or held calls to another person using the following transfer types:
● Blind transfer Transfer calls directly to another line without speaking with the other party first.
● Consultative transfer Speak with the other party before completing the transfer.
Choose a Default Transfer Type
Y o u can choose a default transfer type to u se for all calls or choose a transfer type durin g a call. When you
choose a default transfer type, you can press the Transfer soft key, and your phone uses the set transfer
type for all calls. Consultative is set as the transfer type by default.
To set a default transfer type for all calls:
1 Navigate to Settings > Basic > Preferences > Default Transfer Type.
For VVX 1500 phones, navigate to Menu > Settings > Basic > Preferences > Default Tr ansfer
Type.
2 On the Default Transfer Type screen, choose a transfer type.
The selected transfer type is used for all calls.
Transfer a Call
You can transfer a call to another contact and choose the transfer type you want to use for the call.
To transfer a call:
1 During a call, do one of the following
Press Transfer to use the default transfer type.
Press and hold Transfer and select a transfer type.
2 Dial a number or choose a contact from the call list or directory.
If the transfer type is set to Blind, the call is transferred immediately.
3 If the transfer type is set to Consultative, press Transfer after speaking with your contact.
Cancel a Transfer
If a contact does not answer the transfer or you want to remain spea king with the contact on your line, you
can cancel the transfer before it is complete.
To cancel a transfer before the call connects:
» Select Cancel.
The call is not transferred and becomes active.
Polycom, Inc. 60
Page 61

Polycom VVX Business Media Phones User Guide
Parking and Retrieving Calls
Using the Call Park feature, you can park a call on the server or another cont act’s line and retrieve the call
from any phone on your network. The Call Park feature is available on VVX phone s registered with a Skype
for Business or BroadWorks server. See the following sections for more information on using Call Park:
● Parking and Retrieving Calls on the Skype for Business Server
● Parking and Retrieving Calls on the BroadWorks Server
Parking and Retrieving Calls on the Skype for Business Server
Using the Skype for Business Call Park feature, you can park up to eight calls while you continue to make
calls and answer other incoming calls on your phone. Call Park is different from call hold in that the call is
placed in a call orbit on the Microsoft
retrieval number and can be retrieved by any Skype for Bu siness-compatible phone with access to the orbit.
This feature is not available for VVX 101 and 1500 phones. Check with your system administrator to find
out if this feature is available on your phone.
Park Calls
®
Skype for Business® Server. Calls pla ced in the call orbit are given a
You can park up to eight active or held calls on your line. If you try to park additional calls, a message
displays stating that the maximum number of calls have been parked on the server.
To park an active call:
» During a call, press the Park soft key.
The call is placed in the call orbit and given an retrieval number, as shown next.
After you park a call, you can retrieve the call or provide another contact with the call retrieval number to
retrieve the call.
Retrieving Parked Calls
Parked calls are placed in the call orbit and given a retrieval number to retrieve the call. When a p arked call
is retrieved, a notification showing that the call was picked up and by whom is shown on the phone of the
person who parked the call.
If a parked call is not retrieved within a set time limit, the call is returned to the person who parked the call.
For example, if Betty parked a call and no one retrieves the call, the server returns the call to Betty’s line. If
Polycom, Inc. 61
Page 62

Polycom VVX Business Media Phones User Guide
the parked call isn’t answered afte r being returned, the call is sent to th e default line on the server. If the call
is not answered, the call is terminated. The time limit for parked calls and the default line are set by the
system administrator.
Retrieve a Parked Call on the Same Phone
You can retrieve a parked call on the same phone where the call was parked.
To retrieve a parked call on the same phone:
» Do one of the following:
Press the Retrieve soft key.
Select New Call and dial the retrieval number. For example, dial #1347.
Retrieve a Parked Call on Another Phone
Anyone on your network can retrieve a parked call by dialing the retrieval number.
To retrieve the call on another phone:
» Select New Call and dial the retrieval number. For example, dial #1347.
Parking and Retrieving Calls on the BroadWorks Server
When your phone is registered with a BroadW orks server, you can use Call Park to park a call directly to a
contact’s line. Call Park is different from call hold in that the call is parked on another contact’s line, which
enables you to continue using your phone to place other calls. Call Park is also available for shared lines.
Check with your system administrator to find out if this feature is available on your phone.
Park Calls
Y o u can park a call directly on a cont act’s lin e. When you park a call on a contact’ s line, the call is r emoved
from your phone, and the contact is notified that a call is parked on his or her line.
To park a call directly to a contact’s line:
» During a call, press Hold and dial *68 and the contact’s line extension. For example, dial *684144.
When a contact sends a parked call to your extension , the following notifications are displayed or played on
your phone:
● The Call Park icon
● The message “Call is parked” in the status bar
● An audio notification plays, if enabled by your administrator. Audio notifications are not available for
BLF monitored contacts.
The Call Park icon also displays for shared lines, monitored contacts, and for lines and monitored
contacts on VVX Color Expansion Mo dules.
.
Polycom, Inc. 62
Page 63

Polycom VVX Business Media Phones User Guide
Retrieve Calls
The status message and the Call Park icon continue to display on the phone until the parked call is either
retrieved, ignored, or the parked caller ends the call.
If a parked call is not answered after a period of time, which is set by your system administrator, the call is
returned to the parker—the person who p arked the call. If th e p arker a nswers the re turn ed call, the p a rked
call is removed from the parked extension. If the p arker reject s the returned call, th e parked call r emains on
the parked extension until the call is returned to the p arker and answered, or the p arked caller ends the call.
To retrieve a parked call:
1 Press and hold the line key with the parked call.
The Park Info soft key is displayed.
2 Press the Park Info soft key.
The Parked Call screen is displayed, as shown next.
3 Press Retrieve.
Retrieve a Parked Call on Another Phone
You can also retrieve a parked call from any phone within your network.
To retrieve a parked call from any phone:
» Press New Call and dial *88 and the extension the call was parked on. For example, dial *884144.
When a parked call is retrieved by a contact monitoring your line, the Call Park icon and st atus message
is removed from the line.
Ignore Parked Calls
You can choose to ignore a parked call instead of retrieving the call. Ignoring the parked call removes the
parked call icon, but the call remains parked on your line until the call is retrieved, the retrieval time expires,
or the call is ended.
To ignore a parked call:
1 Press and hold the line key with the parked call.
The Park Info soft key is displayed.
Polycom, Inc. 63
Page 64

Polycom VVX Business Media Phones User Guide
2 Press the Park Info soft key.
The Parked Call screen is displayed.
3 Press Ignore.
The phone exits the Parked Call screen, and the Call Park icon and status message is removed
from the line.
Managing Multiple Calls
You can manage multiple calls that are active, incoming, or held on your phone. The following sections
provide information on managing calls on VVX 1500 phones and on the other VVX phones.
Managing Calls on VVX 1500 Phones
When you have active and held calls on VVX 1500 phones, your phone displays the number of calls next
to the line key. If you have an active call and numerous held calls on a line, the Active Call screen is
displayed and a list of held calls is displayed above the soft ke ys, as shown next. If you have only held calls
on your line, the Active Call screen does not display.
Active and held calls on a VVX 1500 phone
A green bar on the line key indicates the line has an active call, and a flashing red bar indicates the line has
one or more held calls.
View a List of Calls
Y our phone displays on ly the list of calls for one line at a time. If you have multiple lines on your phone, you
have to select the line to view calls on that particular line.
To view a list of calls on your line:
» Tap the line.
The line key glows green, and a list of held calls is displayed above the soft keys. The first held call
on the line is automatically resumed.
Polycom, Inc. 64
Page 65

Polycom VVX Business Media Phones User Guide
Manage Calls
Y ou can m anage a call by holding, resuming, o r transferring the call, or you can initiate a confer ence. When
you have more than three held calls on a line, you can press the left and right arrow keys to display the
remaining held calls.
To manage calls:
1 Tap the line with the held calls.
The first held call on the line is automatically resumed.
2 Tap or use the right arrow key to view additional held calls.
3 Tap a held call.
4 Do one of the following:
Tap Hold or press the Hold key to place an active call on hold.
Tap Resume or press the Hold key.
Tap End Call to end a call with a contact. You can end active calls on ly, so resume the held call
first before ending it.
Tap Transfer to send the call to another contact.
Tap Conference to initiate a conference call.
Managing Calls on VVX 101, 201, 300/310, 400/410, 500, and 600
Phones
On VVX 101, 201, 300/310, 400/410, 500, and 600 phones, you can see the number of calls for each line
from the Lines screen, as shown next. On all VVX phones, a green light on the line key indicates a line with
an active call, and a red light indicates a line with one or more held calls.
Multiple Calls on phone lines on the Lines screen
Display Calls from the Lines Screen
You can display the calls for each line from the Lines screen.
To display all the calls for a particular line from the Lines screen:
» Do one of the following:
Polycom, Inc. 65
Page 66

Polycom VVX Business Media Phones User Guide
On VVX 101, 201, 300/310 and 400/410 phones, press and hold the line key.
On VVX 500 and 600 phones, press and hold the phone line.
On VVX 500 and 600 phones, swipe the screen from right to left.
When you select a phone line that does not have an active call, the first held call on that line is automatically
resumed, even if you already have an active call on a different line.
Display Calls from the Calls Screen
You can also view multiple calls on your line from the Calls screen.
To display your calls in the Calls screen:
» Do one of the following:
On VVX 101 and 201 phones, press the L–>C soft key.
From the Lines or Home screen, press the Home key .
On VVX 500 and 600 phones, tap the Calls icon in the status bar.
The Calls screen is displayed with the list of active and held calls for each line on the phone.
Active and held calls for each line on the Calls screen on VVX 101 and 410
Manage Calls from the Calls Screen
From the Calls screen, you can manage a call by holding, resuming, or transferring the call, or you can
initiate a conference.
To manage a call from the Calls screen:
1 Select a call.
The call is highlighted.
2 Do one of the following:
Select Hold to place an active call on hold.
Select Resume to make a held call active.
Select End Call to end a call with a cont act. You can end active calls only, so resume the held call
first before ending it.
Polycom, Inc. 66
Page 67

Polycom VVX Business Media Phones User Guide
Select Transfer to send the call to another contact.
Select Conference to initiate a conference call.
Managing Calls Remotely
When your phone is registered with a BroadWorks server, and you are signed in to the phone with your
BroadSoft UC-One credentials, you ca n mana ge calls to your lin e remotely fr om any of you r pho nes using
the BroadWorks Anywhere or Remote Office features. With these features, you can handle any incoming
calls to your office phone on other phones o r mobile dev ice s, an d move cal ls seamlessly from your mobile
device to your desk phone without ending the call.
Check with your system administrator to find out if these features are available on your phone.
Managing Calls with BroadSoft UC-One BroadWorks Anywhere
BroadWorks Anywhere (BWA) is a BroadSoft UC-One feature that enables you to use one phone number
to receive calls on your desk phone, mobile phone, or home of fice pho ne and place calls from any of the se
phones using one number. BWA also enables you to move calls between your desk phone and mobile
phone as well as perform any additional functions, such as intercom calls, you would on your desk phone.
Contact your system administrator or your service provider for more information on using BroadWorks
Anywhere.
Enable BroadWorks Anywhere
You can enable BroadWorks Anywhere on your VVX phone, add locations that act as duplicates of your
desk phone, and manage all your calls from those locations. VVX pho nes support up to 10 pho ne numbers
added as BWA locations for each registered line. You can save a location name, primary number, and
alternate number for each location you add.
When you add a location, you can also choose to enable the following settings:
● Diversion Inhibitor—Determines if diversion inhibitor must be enabled when extending a call to the
remote BWA location.
● Answer Confirmation Required —Requires confirmation when a ca ll is answered by a remote
location.
● Call Control—Determines if call control is handled by the BWA location or by the BroadWorks serve r .
To enable BroadWorks Anywhere and add locations:
1 Select UC-One on the Home screen or navigate to Settings > Features > UC-One Call Settings.
On VVX 1500 phones, navigate to Menu > Settings > Features > UC-One Call Settings.
2 Select a line.
3 Select BroadWorks Anywhere and press Add.
4 Enter information for the Status, Name, Primary Number, and Alt. Number/SIP URI fields, if
applicable.
5 Choose the settings you want to enable.
6 Press Save.
Polycom, Inc. 67
Page 68

Polycom VVX Business Media Phones User Guide
Edit BroadWorks Anywhere Locations
After you enable BWA and add locations on your VVX phone, you can edit the added BWA locations.
To edit BWA locations:
1 Select UC-One on the Home screen or navigate to Settings > Features > UC-One Call Settings.
On VVX 1500 phones, navigate to Menu > Settings > Features > UC-One Call Settings.
2 Select a line.
3 Select BroadWorks Anywhere and select a location.
4 Edit the selection.
5 Press Save when you finish editing.
Disable BWA Locations
When you return to the office or want to stop remotely mana ging your calls, you can di sable BW A locations.
To disable a BWA location:
1 Select UC-One on the Home screen or navigate to Settings > Features > UC-One Call Settings.
On VVX 1500 phones, navigate to Menu > Settings > Features > UC-One Call Settings.
2 Select a line.
3 Select BroadWorks Anywhere and select a location.
4 Select Status > Disabled.
5 Press Save.
Remove BWA Locations
You can choose to remove locations that you do not want to manage remote calls from anymore.
To remove a BWA location:
1 Select UC-One on the Home screen or navigate to Settings > Features > UC-One Call Settings.
On VVX 1500 phones, navigate to Menu > Settings > Features > UC-One Call Settings.
2 Select a line.
3 Select BroadWorks Anywhere and select a location.
4 Press Delete.
Managing Calls with BroadSoft UC-One Remote Office
With the Remote Office feature, you can forward all incoming calls to your VVX phone to a remote office
number, such as your mobile or home office number, when you are away from the office. You can answer
all incoming calls to your desk phone on your mobile phone or h ome office phone, and any calls you place
to contacts from your remote office number shows your desk phone number on the caller ID.
Contact your system administrator or your service provider for more information on using Remote Office.
Polycom, Inc. 68
Page 69

Polycom VVX Business Media Phones User Guide
Add a Remote Office Number
You can add one number only as your remote office number.
To enable Remote Office and add a remote office number:
1 Select UC-One on the Home screen or navigate to Settings > Features > UC-One Call Settings.
On VVX 1500 phones, navigate to Menu > Settings > Features > UC-One Call Settings.
2 Select a line.
3 Select Remote Office.
4 Enter your remote office number and press Enabled.
5 Press Save.
All calls made to your desk phone are forwarded to the remote office number.
Disable Remote Office
When you return to the office or want to stop forwarding your calls, make sure you disable Remote Office.
To disable Remote Office:
1 Select UC-One on the Home screen or navigate to Settings > Features > UC-One Call Settings.
On VVX 1500 phones, navigate to Menu > Settings > Features > UC-One Call Settings.
2 Select a line.
3 Select Remote Office > Disabled.
4 Press Save.
Edit Your Remote Office Number
You can also edit your remote office number to add a different number for forwarding your calls.
To edit your remote office number:
1 Select UC-One on the Home screen or navigate to Settings > Features > UC-One Call Settings.
On VVX 1500 phones, navigate to Menu > Settings > Features > UC-One Call Settings.
2 Select a line.
3 Select Remote Office.
4 Enter the new number, and press Save.
Ignoring or Rejecting Incoming Calls
When you receive an incoming call, you can choose to ignore or reject the call instead of answering. This
section shows you how to reject or ignore incoming calls in the following ways:
● Ignore or Silence Incoming Calls
● Reject Incoming Calls
● Reject Calls from a Contact
Polycom, Inc. 69
Page 70

Polycom VVX Business Media Phones User Guide
● Rejecting Calls with Do Not Disturb
● Reject Anonymous Calls
Note: Rejecting calls on shared lines
You cannot reject calls on shared lines. You can only silence the ringer.
Ignore or Silence Incoming Calls
You can ignore or silence a call to stop your phone from ringing. Even if you ignore the call and silence the
ringer, an incoming call notification continues to display on your phone.
To ignore or silence a call:
» From the Incoming Call screen, select Ignore for private lines, or Silence for shared lines.
The Incoming Call screen disappears, your phone stops ringing, and either the Home or Calls
screen is displayed.
Reject Incoming Calls
Y ou ca n reject a call and send the call directly to voicemail. Rejected calls display in the Missed Calls list in
your Recent Calls list. Rejecting calls is not available for shared lines.
To reject an incoming call:
» From the Incoming Call screen, select Reject.
The call goes directly to voicemail.
Reject Calls from a Contact
You can send incoming calls from a particular contact directly to your voicemail.
To reject calls from a contact:
1 Navigate to Directories > Contact Directory.
On VVX 1500 phones, press the Directory key and select Contact Directory.
2 From your Contact Directory, select a contact.
3 From the Contact Information screen, select Edit, or on VVX 500 and 600 phones, tap the Edit
icon .
4 From the Edit Contact screen, select Auto Reject > Enabled and select Save.
Calls from the contact are sent directly to voicemail when the contact calls.
Rejecting Calls with Do Not Disturb
When you enable Do Not Disturb (DND), the following occurs:
● The DND icon is displayed in the status bar on all VVX phones. On VVX 600 phones, you can
tap the DND icon in the status bar to enable or disable the feature.
Polycom, Inc. 70
Page 71

Polycom VVX Business Media Phones User Guide
● When your phone is idle, the DND icon is displayed next to your phone line on the Lines screen. If
you have new messages or call forwarding is enabled, the messages or forwarding icon is displayed
instead.
● The message “Do Not Disturb” is displayed in the status bar on all phones.
● On VVX 400/410, 500, and 600 phones, the DND icon on the Home screen chan ges from to .
On VVX 300 and 310 phones, the icon changes from to . For VVX 101 and 201 phones, the
line icon changes to .
Troubleshooting: Why doesn't the DND icon display?
When you have set your presence status to Do Not Disturb, as well as enabled DND for your phone,
the message My Status: Do Not Disturb scrolls under the time display, and the DND icon does not
display in the status bar. See the section Update Your Presence Status for more information.
Enable Do Not Disturb
Y ou can enable DND to prevent yo ur phone from ringing and to send all incoming calls directly to voicemail.
All calls you receive while DND is enabled are logged in your Recent Calls list.
Enabling DND on shared lines disables ringing only. A visual notification of the call still displays, and you
have the option to answer or ignore the call.
To enable or disable Do Not Disturb:
» Select DND. On VVX 1500 phones, press the DND key.
Tip: Quickly disable DND on VVX 600 phones
To disable DND on VVX 600 phones, tap the DND icon , in the status bar.
Reject Calls with Do Not Disturb on Multiple Lines
By default, the Do Not Disturb feature applies to all lines on your phone. your system administrator can set
up your phone so that you can enable the feature on a per-line basis.
To automatically enable Do Not Disturb for all lines:
1 Select DND. On VVX 1500 phones, press the DND key.
2 Select Set All to enable DND for all lines.
Enable DND for One Line
If enabled, you can choose to enable DND for a particular line and not all lines.
To enable Do Not Disturb for a particular line:
1 Select DND. On VVX 1500 phones, press the DND key.
2 From the Line Select screen, select a line.
3 From the Do Not Disturb screen, select Enable.
Polycom, Inc. 71
Page 72

Polycom VVX Business Media Phones User Guide
Reject Anonymous Calls
When your phone is registered with a BroadWorks server, and you are signed into the phone with your
BroadSoft UC-One credentials, you can use the Anonymous Call Reject (ACR) feature to automatically
reject anonymous calls to your line from callers who have restricted their ca ller identification.
Check with your system administrator to find out if this feature is available on your phone.
To enable Anonymous Call Rejection:
1 Select UC-One on the Home screen or navigate to Settings > Features > UC-One Call Settings.
On VVX 1500 phones, navigate to Menu > Features > UC-One Call Settings.
2 If your phone has multiple lines, select a phone line.
3 Select Anonymous Call Reject.
4 On the Anonymous Call Reject screen, select Enabled.
When an anonymous call is placed to your phone number, the call is automatically rejected, and the caller
hears a message stating that you do not accept calls from uniden tified numbers. Your phone does not ring,
and you are not notified of an attempted call.
Redirecting Incoming Calls
You can redirect incoming calls in the following ways:
● Forwarding Incoming Calls to a Contact
● Forwarding Incoming Skype for Business Calls
● Divert Calls to a Contact
Forwarding Incoming Calls to a Contact
Y ou can choose to fo rward an incoming call to a contact o r forward all incoming calls to one of your contacts.
Note: Call Forwarding and Microsoft Skype for Business Server
If you are signed into Skype for Business on your phone, your call forwarding options are different
than those described below. For more information on forwarding Skype for Business calls, see the
section Forwarding Incoming Skype for Business Calls.
Forward an Incoming Call to a Contact
You can forward an incoming call directly to a contact without answering the call. You cannot forward calls
in this way on shared lines.
To forward an incoming call to a contact:
1 In the Incoming Call screen, select Forward.
2 From the Call Forwarding screen, enter the forwarding number, and select Forward.
Polycom, Inc. 72
Page 73

Polycom VVX Business Media Phones User Guide
Forward All Incoming Calls to a Contact
You can set up your phone to forward all incoming calls to a contact using one of the following forwarding
types:
● Always Forwards all incoming calls.
● No Answer Forwards all unanswered incoming calls.
● Busy Forwards incoming calls when you’re in a call.
For shared lines, you can only choose Always as your fo rwarding type; the o ther forwarding options are not
available for shared lines.
To forward all incoming calls to a contact:
1 Select Forward or navigate to Settings > Features > Forward.
For VVX 1500 phones, navigate to Menu > Features > Forward.
2 If your phone has multiple lines, select a line.
3 From the Forwarding Type Select screen, select a forwarding type.
4 Enter a contact’s number, URL, or IP address, if enabled, and select Enable.
5 If you selected the No Answer option, enter the number of rings before your phone forwards the
call. The default is set to nine.
The forwarding number you chose scrolls in the status bar, and when you select Always as your
forwarding option, the forwarding icon is displayed next to the phone line.
Disable Call Forwarding
You can disable call forwarding when you no longer want to forward your calls.
To disable call forwarding:
1 Select Forward.
2 If your phone has multiple lines, select a line.
3 From the Forwarding Type Select screen, select your forwarding type, and select Disable.
Forwarding Incoming Skype for Business Calls
When your phone is registered with Skype for Business Server, you have more options for forwarding calls.
This feature is not available for VVX 101 and 1500 phones. Check with your system administrator to find
out if this feature is available on your phone.
You can forward all Skype for Business calls to your line in the following ways:
● Forward Skype for Business Calls to a Contact
● Forward Calls to Voicemail
● Simultaneously Ring a Group of Contacts
● Forward Calls to Delegates
● Simultaneously Ring Delegates
Polycom, Inc. 73
Page 74

Polycom VVX Business Media Phones User Guide
Note: Forward to Voicemail option not available when voicemail is disabled
The Forward to Voicemail option is available only when voicemail is enabled. If voicemail is disabled
on your phone, you cannot select the Forward to Voicemail option.
Forward Skype for Business Calls to a Contact
You can set up your phone to forward all your Skype for Business calls to one of your Skype for Business
contacts.
To forward all Skype for Business calls to a contact:
1 Select Forward > Forward to a Contact.
2 Enter a contact’s number.
A scrolling message showing that you have forwarded all incoming calls to your contact is displayed
on your phone.
Forward Calls to Voicemail
When you are signed into Skype for Business on your phone, you have the option to forward Skype for
Business calls to your voicemail.
To forward all Skype for Business calls to voicemail:
» Select Forward > Forward to Voicemail.
All incoming calls are sent directly to your voicemail.
Simultaneously Ring a Group of Contacts
You can choose to simultaneously ring a group of Skype for Business contact s when you receive incomi ng
calls.
To simultaneously ring a group of contacts for incoming calls:
1 In the Skype for Business client, click Settings icon and selectTools > Call Forwarding
Settings.
2 Select Simultaneously Ring > My Team-Call Group.
3 In the Call Forwarding – My Team-Call Group dialog box, click Add.
4 In the Choose a Team-Call Group Member dialog box, select the contacts you want to add and
click Ok.
The contacts you add as group members are displaye d in the Call Forwarding – Team-Call Group
dialog box.
5 Click the Ring your team-call group after this many seconds drop-down menu to determine
when your contacts’ phones ring.
Simultaneous ringing is enabled fo r all assigned team-call members. If your line receives an inco ming
call, everyone in the team-call group phones ring.
Polycom, Inc. 74
Page 75

Polycom VVX Business Media Phones User Guide
Forward Calls to Delegates
If you have delegates assigned to your line, you can forward all incoming calls directly to your delegates.
See the section Boss-Admin for Skype for Business for more information on delegates.
To forward all Skype for Business calls to your delegates:
» Select Forward > Forward to Delegates.
Simultaneously Ring Delegates
If you have delegates assigned to your line, you can enable your delegates’ phones to simultaneously ring
when you receive incoming calls. See the section Boss-Admin for Skype for Business for more information
on delegates.
To simultaneously ring your delegates’ phones for incoming calls:
» Select Forward > Simultaneously Ring My Delegates.
Divert Calls to a Contact
You can divert all incoming calls from a particular contact to another contact.
To divert incoming calls from a contact:
1 Select Directories > Contact Directory.
On VVX 1500 phones, press the Directory key and select Contact Directory.
2 From the Contact Directory, select a contact.
On VVX 1500 phones, select a contact and tap Edit.
3 From the Contact Information screen, select Edit, or on VVX 500 and 600 phones, tap the Edit
icon .
4 From the Edit Contact screen, select Divert Contact, and enter a contact’s number.
5 Select Auto Divert > Enabled.
6 Select Save.
Polycom, Inc. 75
Page 76

Audio Conference Calls
Y ou can initiate audio conference calls with various contacts on your VVX business media phone. When you
initiate a conference call, you can hear audio for two or more contacts, manage conference participant s, and
join calls into a conference or split a conference into individual calls.
See the following topics for more information on initiating and managing conference calls:
● Tips for Conference Calls
● Audio Conference Calls
● Skype for Business Conference Calls
● Alcatel-Lucent Advanced Conference Calls
For information on video conference calls on VVX 500, 600, and 1500 phones, see the section Handle
Conference Calls with Video.
Tips for Conference Calls
When you are in a conference call, follow these tips:
● Use the handset or a headset if you’re in an open environment.
● Mute your microphone when you are not speaking, especially in noisy environments.
● Avoid tapping or rustling papers near the microphone.
● Speak in your normal voice without shouting.
Audio Conference Calls
You can initiate an audio conference call with two contacts and hold, resume, or split a conference call on
your VVX phone. VVX 101 and 201 phones can manage a maximum of 4 active or held conference calls at
a time. All other VVX phones can manage a maximum of 12 active or held conference calls at a time.
However, you can have only one active conference call in progress with numerous other conference calls
on hold.
If your system administrator enables the Conference Man agement feature on your phone, yo u can manage
each participant in the call. With the Conference Management feature, you can mute, hold, and remove
individual participants in a confer ence call. For more information, see the section Manage Con ference Ca ll
Participants.
Polycom, Inc. 76
Page 77

Polycom VVX Business Media Phones User Guide
Note: Initiating and managing Skype for Business or Alcatel-Lucent conference calls
If you are signed into Skype for Business on your phone, you have different options for initiating and
managing Skype for Business conference calls. See the section Skype for Business Conference Calls
for more information.
If your phone is registered with the Alcatel-Lucent CTS, you can initiate advanced conference calls
and have different options for initiating and managing conference calls. See the section Alcatel-Lucent
Advanced Conference Calls for more information.
Initiate Conference Calls
You can initiate a conference by calling two people and selecting the Conference soft key or hard key.
To initiate a conference call:
1 Call a contact.
2 After the contact answers, select the Conference soft key, or on VVX 1500 phones, press the
Conference key.
The call is held.
3 Enter another contact’s number or select a contact from the directory or the call lists.
4 When the contact answers, select the Conference soft key, or on VVX 1500 phones, press the
Conference key.
All call participants are added to a conference call.
Note: Single key press conference
When your phone is set up for single key press conferences, you do not need to tap the Conference
soft key or press the Conference key a second time to join parties to a conference call.
Join Calls to Create a Conference Call
Y ou can join one active call and one held call into a conference call. If you have more th an one call on hold,
you can select a held call to join into a conference call with the active call.
To join two calls into a conference call:
» Do one of the following:
When you have an active call and a held call, select the Join soft key.
The two calls are joined together in a conference call.
When you have an active call and more than on e held call, select a held call, a nd select the Join
soft key.
The active call and the selected held call are joined into a conference while the other held calls
on the line remain held.
Polycom, Inc. 77
Page 78

Polycom VVX Business Media Phones User Guide
End Conference Calls
By default, when you end a conference call, your connection to the call ends, and the other participants in
the conference remain in the call. However, your system administrator can set up your phone so that all
connections terminate when you end a conference call.
To end a conference call:
» During a conference call, select End Call.
Hold Conference Calls
When you place a conference call on hold, you place all conference participants on hold. To place one
conference participant on hold, see the section Manage Conference Call Participants.
To place a conference call on hold:
» Select Hold.
If you’re in the Calls screen, highlight the conference first.
Resume Conference Calls
Resuming a held conference call enables all participants to hear the audio of everyone on the call.
To resume a held conference call:
» Select Resume.
Split Conference Calls
When you split a conference, you end the conference call and place the other two people on hold. You can
split an active or held conference call. After you split a confer ence call, you can resume one of the held calls.
To split a conference call:
» During a conference call, select the Split soft key.
The conference call ends, and the two participants are held in two separate calls.
Manage Conference Call Participants
If your system administrator enables the Conference Man agement feature on your phone, yo u can manage
conference call participants in the following ways:
● Mute a participant.
● Hold a participant.
● Remove a participant from the conference.
● List information about a participant, such as the particip ant’s name, number , and call details, including
whether the call is muted, held, or is video-enabled .
Polycom, Inc. 78
Page 79

Polycom VVX Business Media Phones User Guide
This feature is not available for VVX 101 and 201 phones. Check with your system administrator to find out
if this feature is available on your phone.
To manage a participant in a conference call:
1 Initiate a conference call.
2 Select Manage. If you’re in the Calls screen, highlight the conference first.
3 Select the participant you want to manage.
4 Do one of the following:
Select Fa r Mute to mute the participant. The mute d participant can hear everyone, b ut no one can
hear the muted participant.
Select Hold to hold the participant. The held p articipant cannot hear anyone , and no one can hear
the held participant.
Select Remove to remove the participant from the conference, end the conference call, and
create an active call between you and the participant still in the call.
Select Information to view information about the participant’s call status. When you select
Information, a screen is displayed listing the person’s information, as shown next.
5 Select Back to exit the conference management function.
Skype for Business Conference Calls
When you are signed into Polycom with Skype for Business on your VVX phone, you can initiate audio
conference calls with your Skype for Business contact s from your phone. You can also manage conference
participants, enable announcements, and lock a conference.
You can manage a maximum of 8 Skype for Business conference calls on VVX 201 phones and 24 Skype
for Business conference calls at a time on VVX 300/310, 400/410, 500, and 600 phones. However , you can
have only one active audio conference call in progress on your phone.
This feature is not available for VVX 101 and 1500 phones. Check with your system administrator to find
out if this feature is available on your phone.
Note: Join Skype for Business conferences from the calendar
You can join Skype for Business conference calls from the calendar on your phone , if enabled. See
the section Join Skype for Business Meetings from the Calendar for more information.
Initiating a Skype for Business Conference Call
You can initiate a Skype for Business conference call on your phone or in the Skype for Business client.
Polycom, Inc. 79
Page 80

Polycom VVX Business Media Phones User Guide
When all the participants are added to the conference call, the Ro ster screen is displa yed. See the section
Viewing a Roster of Skype for Business Conference Participants for more information.
Initiate a Skype for Business Conference on Your Phone
Y ou can initiate a Skype for Business conferen ce call, add and invite contacts to a conferen ce call, and have
up to 24 conference calls on your phone.
To initiate a Skype for Business conference call on your phone:
1 Press Meet Now > Invite.
2 Select a contact and press Dial.
Y ou can choose to add cont acts from Contact s, the Recent Calls list, your Directory , Favorites, or the
Lines screen.
The contact is added to the conference call. You can only select one contact at a time to add to the
conference call.
3 Press Invite to add additional contacts to the conference call.
Initiate a Conference Call in the Skype for Business Client
When you initiate a conference call in the Skype for Business client, the call is also established on your
phone.
To initiate a conference call in the Skype for Business client:
1 Click the Settings icon and click Meet Now.
The call window is displayed.
2 Click the Participants icon and click Invite More People.
3 Select a contact and click OK. To add multiple cont act s at the sa me time, hold the Ctrl key and click
each contact you want to add.
The contacts are added to the conference an d the call is displayed on your phone.
Initiating a Group Conference Call
Y o u can also initiate a Skype for Bu siness conference call with all the co ntact s in a grou p on your phone or
in the Skype for Business client.
Initiate a Group Conference Call on Your Phone
You can initiate a group conference call with Skype for Business contacts on your phone.
To initiate a Skype for Business conference call with a group on your phone:
1 Press Contacts and select Groups.
2 On the Groups screen, select a group.
3 Press Dial All.
Polycom, Inc. 80
Page 81

Polycom VVX Business Media Phones User Guide
4 Press Yes to confirm that you want to dial all contacts in the group.
Each contact in the group is called one at a time.
Initiate a Group Conference Call in the Skype for Business Client
When you initiate a group conference call in Skype for Business, the call displays in the Skype for Business
client and on your phone.
To initiate a conference call with a group in the Skype for Business client:
1 Right-click a group and click Start a Conference Call.
2 Click Skype for Business Call.
The call window is displayed with all of the invited contacts.
Initiate a Conference Call during a Skype for Business Call
During a Skype for Business call on your phone, you ca n add contacts to the call to i nitiate a conference call.
To initiate a conference call during an active Skype for Business call:
1 Press Conference and select a contact.
2 Press Invite to add additional contacts to the conference call.
Note: Initiating conference calls with video
You cannot initiate a Skype for Business conference call with video on VVX phones. If you are in an
active video call when you initiate a conference call, the video call ends, and an audio-only
conference call is established.
Add Contacts to a Skype for Business Conference Call
During a conference call, all participants can invite additional contacts to the call.
To invite contacts to an active conference call:
1 During a confer ence call, pr es s Invite.
2 Select a contact to join the meeting.
An alert tone is played when the contact has joined the conference.
Send Contacts Active Conference Information
If you are a conference participant, you can send the conference dial-in number and PIN to contacts you
want to join the call. You can view the conference contact information on your phone during an active
conference call.
To send the conference dial-in number and PIN:
1 During an active co nf er ence call, pr es s Conf.Opts.
The dial-in number and PIN for the conference is displayed.
Polycom, Inc. 81
Page 82

Polycom VVX Business Media Phones User Guide
2 Copy the information and send it to the contacts you want to join the conference.
When a contact dials into a conference using the confere nce dial-in number and PIN, the contact is added
to the conference call immediately unless the conference call is locked. When the conference call is locked,
the contact must wait for the conference presenter to admit the contact to the call. See the section Lock and
Unlock a Conference Call for more information.
Viewing a Roster of Skype for Business Conference Participants
When you initiate or join a conference call, the conference participants automatically display in a Roster.
The Roster displays eight participants per page on the VVX phones. The Roster only displays participants
in the conference call; it does not display any calls on hold.
Exit the Roster
When you exit the Roster, you cannot view the list of conference participants.
To exit the Roster screen:
» Press Close.
Return to the Roster
You can return to the Roster at anytime during an active conference.
To return to the Roster screen:
» Press Roster.
Managing Skype for Business Conference Participants
When you initiate a conference call, you and all conference participants are listed as presenters.
Conference participants with the Presenter icon next to their names are presenters.
As a presenter, you can manage call participants in the following ways:
● Mute all participants or individual participants
● Remove participants from the conference call
● Demote a presenter to an attendee or promote an attendee to presenter
● Enable or disable conference announcements
● Lock or unlock a conference
These options do not display for attendees.
Muting Conference Participants
Only presenters can mute and unmute conference participan ts.
If a presenter mutes your audio, a notification is displayed on your phone, and a M ute icon is displayed
next to each person who is muted. When a presenter mutes your audio in the Skype for Business client, it
takes one second for the mute icon to display on your phone.
You must wait for the presenter to unmute your audio before you can speak in the conference again.
Polycom, Inc. 82
Page 83

Polycom VVX Business Media Phones User Guide
Mute and Unmute All Conference Participants
Presenters can mute and unmute all conference participants at one time.
To mute and unmute all conference participants:
1 Press Mute All.
A notification is displayed on the participants’ phon es informing them that the presenter has muted
the audience.
2 Press Unmute to enable participants to speak in the conference.
A notification is displayed on the particip ants’ phones informing th em that the presenter has unmuted
the audience.
Mute and Unmute Individual Participants
Presenters can choose to mute and unmute individual participants during conferences.
To mute and unmute an individual conference participant:
1 Select a participant and press Far Mute.
A notification is displayed on the participant’s phone informing him or her that the presenter has
muted the participant.
2 Select the muted participant and press Unmute.
A notification is displayed on the participant’s phone informing him or her that the presenter has
unmuted the participant.
Demote or Promote Conference Participants
Presenters can promote conference participants from an attendee to a presenter, or demote conference
participants from a presenter to an attendee.
To promote or demote conference participants:
» In the Roster screen, select a conference participant and do one of the following:
Press Host to promote a participant to presenter.
Press Attendee to demote a presenter to attendee.
The participant is now a presenter who can manage conference participants or an attendee.
Enable and Disable Conference Announcements
When enabled, announcements play whenever a presenter mutes or unmutes the audience, locks or
unlocks the conference, and removes a conference particip ant, or when a new person joins the conference.
Presenters can choose to enable or disable announcements during a Skype for Business conference call.
To enable or disable conference announcements:
» During a conference call, press Ena.Anc to enable announcements or Dis.Anc to disable
announcements.
Polycom, Inc. 83
Page 84

Polycom VVX Business Media Phones User Guide
Remove Conference Participants
A presenter can remove any participant, excluding the conference host, from the conference call.
To remove conference participants:
» In the Roster screen, select a participant and select Remove.
A notification is displayed on the participant's phone informing him or her that the presenter has
removed them from the conference.
Lock and Unlock a Conference Call
Presenters can lock a conference call to prevent other people from joining the conference call without a
presenter’s approval. When a conference is unlocked, anyone on the network can join a conference call
automatically with the conference dial-in number and PIN.
To lock and unlock a conference:
1 During an active co nf er en ce , press Lock.
The conference is locked, and anyone that tries to join the call must be admitted by the main
presenter.
2 Press Unlock to enable people to join the conference.
The conference is unlocked, and anyone can join the conference call.
Alcatel-Lucent Advanced Conference Calls
When you are registered with the Alcatel-Lucent CTS on your VVX phone, you can initiate impromptu audio
conference calls with two or more contacts from your phone. You can also create a participant list and
manage conference participant s. You can manage a maximum of 24 advanced conference calls at a time
on your phone, if enabled on the server. However , you can have only one active conference call in prog ress
on your phone.
This feature is not supported on VVX 101, 201, and 1500 phones. Check with your system administrator to
find out if this feature is available on your phone.
Initiate an Advanced Conference Call
You can initiate an advanced audio conference call, add and invite contacts to the audio conference call,
and have up to 24 audio conference calls on you r phone. You can also initiate an audio conference call from
an active call.
To initiate a conference call:
1 Press Meet Now.
2 Press Invite and choose the contacts you want to add to the conference from a directory, Recent
Calls, or Favorites.
3 Press Invite.
The Roster screen displays with a list of participants in the conference.
Polycom, Inc. 84
Page 85

Polycom VVX Business Media Phones User Guide
Initiate an Advanced Conference Call During a Call
During an active call on your phone, you can add contacts to the call to initiate a conference call.
To initiate a conference call from an active call:
1 During an active call, select the Conference soft key.
The call is held.
2 Enter another contact's number or select a contact from the directory or the call lists.
3 When the contact answers, select the Conference soft key.
All call participants are added to a conference call.
Add Contacts to an Advanced Conference Call
During a conference call, the chairperson— the person who initiated the conference call—can invite
additional contacts to the call.
To invite contacts to an active conference call:
1 During a confer ence call, pr es s Invite.
2 Select a contact to join the meeting.
Join Calls to an Advanced Conference Call
The conference host can join incoming calls to a conf erence. Conference p articipants can not add incoming
calls to a conference.
To join an incoming call to a conference call:
1 During a conferen ce call, an swe r the inco m ing call.
2 Press the Join soft key.
The call is joined to the conference call.
Join Two Calls into an Advanced Conference Call
You can join an active call and a held call into an advanced conference call.
To join two calls into a conference call:
» Do one of the following:
When you have an active call and a held call, select the Join soft key.
The two calls are joined together in a conference call.
When you have an active call and more than on e held call, select a held call, a nd select the Join
soft key.
The active call and the selected held call are joined into a conference while the other held calls
on the line remain held.
Polycom, Inc. 85
Page 86

Polycom VVX Business Media Phones User Guide
Viewing a Roster of Conference Participants
When you initiate or join a conference call, all conference participants automatically display in a Roster . The
roster only displays participants in the conference call; it does not display any calls on ho ld.
Exit the Roster
When you exit the Roster, you cannot view the list of conference participants.
To exit the Roster screen:
» Press Exit.
Return to the Roster
You can return to the Roster at anytime during an active conference.
To return to the Roster screen:
» Press Roster.
Managing Advanced Conference Participants
When you initiate or join a conference call, the conference participants are automatically displayed in a
Roster. From the Roster, the chairperson, the person who initiated the conference call, can mute and
remove individual participants from the conference.
Muting Conference Participants
Chairpersons can mute all conference participants at one time, or mute an individual participant. Only
chairpersons can mute and unmute conference participants.
If a chairperson mutes a participant’s audio, a mute icon is displayed in the Roster next to each person who
is muted.
Mute and Unmute All Conference Participants
Chairpersons can mute and unmute all conference participants at one time.
To mute and unmute all conference participants:
1 Press Mute All.
2 Press Unmute to enable participants to speak in the conference.
Mute and Unmute Individual Participants
Chairpersons can choose to mute and unmute individual participants during conferences.
To mute and unmute an individual conference participant:
1 Select a participant and press Far Mute.
2 Select the muted participant and press Unmute.
Polycom, Inc. 86
Page 87

Polycom VVX Business Media Phones User Guide
Remove Conference Participants
A chairperson can remove any participant from the conference call.
To remove conference participants:
» In the Roster, select a participant and select Remove.
Polycom, Inc. 87
Page 88

Shared Lines
All VVX phones support multiple and shared lines, except VVX 101. Y our administrator can customize your
phone so that you have multiple shared lines enabled.
This section provides information on the following topics:
● Missed and Received Calls on Shared Lines
● Hold Calls Privately on Shared Lines
● Barge In on Calls for Busy Lamp Field Lines
● GENBAND’s Multiple Appearance Directory Number - Single Call Appearance
● Boss-Admin for Skype for Business
● Alcatel-Lucent Shared Call Appearance
● Create a Personal Ring Group with BroadSoft UC-One Simulta neous Ring
Shared Line Limitations
The following features are not available or have limitations on phones with shared lines:
● Forwarding an incoming call is not available.
● Enabling Do Not Disturb on shared lines disables ringing only, and a visual notification of the call is
displayed with the option to answer the call.
● Registering lines as shared lines is not available for lines that use the H.323 protocol.
Missed and Received Calls on Shared Lines
When you have an incoming call on a shared line, which none of the phones answer, the call is displayed
in the Missed Calls list on all the phones. If you have an incoming call on a shared line and you or any of
the other phones answer the call, the call is not logged as missed on any phone.
Your administrator can configure the phones so th at if yo u have a n incom ing ca ll on a shar ed line and one
phone answers, the other phones log the call as a re ceived call. That way , if another phone on a shared line
answers an incoming call, you can still view the call information from your phone’s call lists even if you did
not answer the call.
See the section View Recent Calls for in formation on viewing missed or received calls.
Polycom, Inc. 88
Page 89

Polycom VVX Business Media Phones User Guide
Hold Calls Privately on Shared Lines
When you place a call on hold on a shared line, all of the phones registered with that line are notified of the
call’s held status. You can hold a call privately on a shared line using the Private Hold feature, which places
the call on hold and displays the line as busy on the other phones on the shared line. Contact your system
administrator to find out if this feature is available on your phone.
When the Private Hold feature is enabled, the Pvt Hold soft key is displayed, and you can hold a call
privately, transfer a call, or initiate a conference call without notifying others on the shared line of the call’s
held state.
To hold a call privately on a shared line:
» During a call, press More > Pvt Hold.
The call is held on your phone, and the line shows as busy on the other shared line users’ phones.
When you hold a call privately, other users on the shared line cannot resume or pick up the call. However,
users on the shared line can barge in on privately held calls. In order to allow other users to resume the call,
you have to publicly hold the call by pressing the Hold key or soft key.
When Private Hold is enabled, you can also transfer a call or initiate a conference call without the other
shared line users being notified of the call’s status. When you press the Transfer or Conference soft key on
the shared line, the call is held privately . If you press Hold before you transfe r a call or initiate a confer ence,
the other users on the shared line are notified of the call’s held status.
See the sections Transferring Calls and Audio Conference Calls for more information.
Barge In on Calls for Busy Lamp Field Lines
When your phone is registered with the Alcatel-Lucent CTS, you and other con tact s ca n barge in on active
calls for Busy Lamp Field (BLF) lines you all are monitoring. Only one contact ca n barge in on a call at a
time, and contacts cannot barge in on parked calls. Contacts can also barge in on remote held calls using
the Normal barge in mode.
This feature is not supported on VVX 101, 201, and 1500 phones. Check with your system administrator to
find out if this feature is available on your phone.
You can barge in on a call using one of the following modes:
● Normal (audio and video calls): Initiates a conference call with you an d the contacts currently in the
call.
● Whisper (audio-only): Enables you to barge in on audio calls only to talk to a contact in the call
without the far-end hearing your audio. This mode is not available for video calls.
● Listen (audio-only): Enables you to barge into audio calls only and listen to the other parties'
conversation without anyone hearing your audio. This mode is not available for video calls.
To barge-in on a call:
1 During an active call, select Barge In.
2 On the Barge In screen, select a mode.
If enabled, a tone plays when you barge into a call using any of the modes.
Polycom, Inc. 89
Page 90

Polycom VVX Business Media Phones User Guide
GENBAND’ s Multiple Appearance Directory Number Single Call Appearance
When your phone is registered with the GENBAND server , you ca n use the Multiple Appearance Directory
Number – Single Call Appearance (MADN-SCA) feature to share a single line with other contacts as a
member of a Multiple Appearance Directory Number (MADN) group. System administrators assign
members to MADN groups, which can have a maximum of 32 members. Check with your system
administrator to find out if this feature is available on your phone.
Any MADN group member can place, answer, hold, resume, or barge in on a call on a shared line.
Additionally, all group members can view the status of a call on the shared line on their phones.
This section includes information and instructions on using the following MADN-SCA functions:
● Placing a Call
● Answering Calls
● Barge In on an Active Call
● Resume Held Calls
● Enabling Privacy
Placing a Call
Any MADN member can place a call on the shared line. When a member places a call on the shared line,
the other members are notified with a steady red LED light on the line key of the members’ phones.
Only one call at a time can be active on the shared line. If a call is placed to the shared line with an active
call in place, the incoming call is sent to voicemail.
Answering Calls
Any incoming call to the shared line rings on all group members’ phones simult aneously , the call is displayed
on all members’ screens, and a green LED light flashes on the line’s line key.
Any MADN member can respond to an incoming call to the shared line. When a MADN member answers
an incoming call, the LED indicator on the line key for all phones changes to a steady red light to indicate
the call was answered. Members can also view the status of a call on the shared line by pressing and
holding the corresponding line key for one second . Th e call’s status and the Barge In soft key display for
five seconds.
If bridging is disabled and privacy is enabled for the shared line, you cannot barge in on active calls
answered by other MADN members.
Barge In on an Active Call
After a call is answered, any group member can barge in on the active call on a public shared line, which
becomes a bridge call—a call between two or more MADN members and another party. Ask your system
administrator about the maximum number of particip ants allowed on a bridge call.
To barge in on an active call:
1 Press and hold the corresponding line key for the shared line for one second.
Polycom, Inc. 90
Page 91

Polycom VVX Business Media Phones User Guide
2 Select the Barge In soft key, as shown next, and lift the handset.
A bridge tone plays notifying the other call participants that you are barging in on the call.
Leave a Bridge Call
Any member in a bridge call can leave the call, and the call remains active.
To leave a bridge call:
» Select the End Call soft key, or place the handset in the cradle.
Your connection to the bridge call is ended, and the other call participants remain on the call.
You can rejoin a bridge call after leaving by pressing the Barge In soft key again.
Resume Held Calls
Any MADN member can resume a held call on the shared line. When an active call is placed on hold on the
shared line, all group members are notified of the call’s new status by a flashing red LED light on the line
key on all members’ phones, if enabled by your system administrator.
To resume a call on the shared line:
» Do one of the following:
Select the corresponding line key and lift the handset.
Press and hold the corresponding line key and select Resume.
When a held call is resumed by another MADN member, the other group members are notified of the call’ s
new status with a steady red LED light on the line key on the members’ phone.
Enabling Privacy
Any MADN member can temporarily enable privacy fo r an active or bridge call on a public shar ed line using
privacy codes or privacy soft keys configured by your system administrator. Additionally, MADN members
can use privacy codes and soft keys to temporarily disable privacy on an active call on a private shared line.
The following are three types of privacy co des that you can use to enable and disable privacy on a shared
line:
Polycom, Inc. 91
Page 92

Polycom VVX Business Media Phones User Guide
● Privacy Access (PRV) code Enables privacy for an active call on a public line.
● Privacy Release Activation (PRLA) code Disables privacy for an active call on a private shared line.
● Privacy Release Cancel (PRLC) code Re-enables privacy for an active call on a private shared line.
When a shared line is configured as private or when privacy is enabled on an active call, bridging is disabled
and other MADN members cannot barge in on an active call on the shared line.
Enable Privacy
After you enable privacy for an active call on a public shared line, you cannot disable privacy for the call.
You can allow other MADN members to join the active call by transferring the call or initiating a conference
call.
To enable privacy for an active call on a public line:
» During an active call, do one of the following:
Select Transfer and dial the PRV code given to you by your administrator
For example, dial *91.
Select the Privacy soft key, if enabled, as shown next.
A confirmation tone plays, and the call is resumed automatically.
Disable Privacy Temporarily
Y ou can temporarily disable privacy for an active call on a private shared line to allow other MADN member s
to join the call.
To temporarily disable privacy on a private shared line:
1 During an active call, press the PRLA soft key or select Hold and dial the PRLA code given to you
by your administrator. For example, dial *921.
A confirmation tone plays, and the call is resumed automatically. Privacy is disabled for the call and
any member can barge in on the call.
2 After other MADN members have joined the call, press the PRLA soft key or select Hold and dial
the PRLC code given to you by your administrator. For example, dial *922.
A confirmation tone plays, and the call is resumed automatically.
Polycom, Inc. 92
Page 93

Polycom VVX Business Media Phones User Guide
Enable Privacy on a Bridge Call
You can enable privacy on a bridge call to prevent additional MADN members from barging into the call.
To enable privacy on a bridge call on a public line:
» During a bridge call, select Transfer and dial the PR V code or select th e Privacy sof t key, if enabled.
A confirmation tone plays when privacy is enabled , and the call is resumed automatically. The bridge
call is now private and additional MADN members are not allowed to join the call.
Boss-Admin for Skype for Business
When your phone is registered with the Polycom with Skype for Business server, you can use the
Boss-Admin feature to manage shared lines. The Boss-Admin feature enables you to manage phones on
your network and see when there is an answered call, when a call is on hold, or when a call has ended on
a boss or delegate line. A boss can assign delegates and delegates can manage calls on behalf of the
boss’s line.
This feature is not available for VVX 101 and 1500 phones. Check with your system administrator to find
out if this feature is available on your phone.
This section includes information and instructions on using the following Boss-Admin functions:
● Assign Delegates
● Set a Ringtone for Boss Calls
● Edit the Delegates Group
● Managing Calls on the Boss’s Line
● Join Conference Calls
Assign Delegates
You can assign up to 25 delegates to your line using your Skype for Business client; however, you cannot
assign yourself as a delegate to a boss’s line. You can have delegates and be a delegate for another boss’s
line, and you can assign your bosses as delegates for you r line.
Delegates can be assigned to up to 18 bosses’ lines dep ending on the number of line keys available on their
VVX phone and if a VVX Expansion Module with a color display is connected to the phone (see the section
Connecting Polycom VVX Expansion Modules to Your Phone).
If all available line keys have been assigned to boss contacts and an expansion module is not attached to
the phone, additional contacts are not shown on the phone’s screen. For example, Bob can be a delegate
for Alice, Anna, Ken, and Jim because he has four line keys available on his phone. If Bob has an expansion
module connected to his phone, he can be assigned to an additional 14 bosses’ lines, which ar e shown for
the line keys on the expansion module.
To assign delegates:
1 In your Skype for Business client, click the Settings icon and selectTools > Call Forwarding
Settings.
2 Select Simultaneously Ring > My Delegates, as shown next.
Polycom, Inc. 93
Page 94

Polycom VVX Business Media Phones User Guide
3 In the Call Forwarding – Delegates dialog box, click Add to add contacts as delegates for your
calls.
4 In the Choose a Delegate dialog box, select the contact you want to add as a delegate and click
Ok.
The contacts you add as delegates display in the Call Forwarding – Delegates dialog box, shown
next.
5 Click OK when you have finished assigning contacts as delegates.
Simultaneous ringing is enabled for all assigned delegates. If the boss’s line receives an incoming
call, both the boss and delegate’s phones ring.
You can choose to change when your delegates’ phones ring in the Call Forwarding – Delega tes dialog
box.
When you assign delegates to your line, your phone displays a notification that you have added a contact
as a delegate, and a scrolling message “Simultaneous Ringing is activated” is displayed in the status bar.
When you are added as a delegate, a notification is displayed on your phone and in the Skype for Business
client, and the boss icon is displayed on the boss’s line. The boss icon changes color to reflect the boss’s
presence status (see Viewing Skype for Business Contacts’ Presence Information).
View the Delegates Group
Your delegates are automatically added to the Delegates group on your phone and in the Skype for
Business client, as shown in the next figure.
Polycom, Inc. 94
Page 95

Polycom VVX Business Media Phones User Guide
Delegates group in the Skype for Business client
To view the Delegates group on your phone:
» Navigate to Contacts > Groups > Delegates.
All assigned delegates are displayed in order by last nam e, as show n ne xt .
View the Boss Group
Y ou can view the cont acts for which you are assigned as a delegate in the group People I Manage Calls For
on your phone and in the Skype for Business client.
To view the People I Manage Calls For group on your phone:
» Navigate to Contacts > Groups > People I Manage Calls For.
All assigned bosses are displayed in order by last name, as shown next.
Polycom, Inc. 95
Page 96

Polycom VVX Business Media Phones User Guide
Set a Ringtone for Boss Calls
As a delegate, you can set a distinct ringtone for incoming calls on each of your assigned bosses’ lines.
To set a ringtone for boss calls:
1 Navigate to Settings > Basic > Ring Type > Boss Ring Type.
2 Select a boss and select a ring tone.
Edit the Delegates Group
You cannot edit the Delegates group on your phone. If you want to add or remove delegates, you need to
edit the Delegates group in your Skype for Business client.
To edit the Delegates group:
1 In your Skype for Business client, click the Settings icon and select Tools > Call Forwarding
Settings.
2 Select Edit my delegate members, as shown next.
3 Do one of the following:
Select Add to add delegates.
Select a delegate and click Remove to delete the delegate from the group.
Delegates removed from the Delegates group can no longer monitor ca ll activity on a boss’ s line.
Managing Calls on the Boss’s Line
A boss can monitor calls on the delegate’s line, and delegates can place, answer, hold, or transfer calls on
behalf of the boss’s line.
Polycom, Inc. 96
Page 97

Polycom VVX Business Media Phones User Guide
Respond to Incoming Calls
When a call is placed to the boss’s line, the call is displayed on the boss and delegate’s phones, as shown
next.
Incoming call notification on boss and deleg ate’s phones
As a delegate, you can answer an incoming call on a boss’s line, reject the call, or forward the call directly
to the boss’s voicemail.
To respond to an incoming call on the boss’s line:
» Do one of the following:
Select Answer.
Select Dismiss or Ignore.
Select Boss VM.
If an incoming call for a boss is answered by a delegate or the boss answers the incoming call, a notification
is displayed on the boss and delegate’s phones. In the next figure, a call from Steve Bakers to the boss’s
line is answered by Nikki Nguyen and a notification displays on the delegates phone.
Answered call notification on the boss's phone
Viewing Call Status on the Boss’s Line
A boss and delegate can both view the status of any call on the other’s phone. Bosses can see when a
delegate answers or holds a call, which delegate answered the call, and the call information of the caller.
Delegates can see when a boss is in an active call or has placed a call on hold. Bosses and delegates can
also resume calls held on the other’s line.
Polycom, Inc. 97
Page 98

Polycom VVX Business Media Phones User Guide
When there is an active call on the boss’s line, for VVX 500 and 600 phones, a solid red bar is displayed on
the boss’s line key on the boss and delegates’ phones. For 201, VVX 300/310, and 400/410 phones, a
steady red LED light on the boss’s line key indicates there is an active call on the boss’s line.
The next figure displays a call on the boss’s line on a VVX 500 phone.
Call on the boss's line on a VVX 500 phone
View Held Calls
Bosses and delegates can both view held calls on the boss’s line. A fl ashing red bar or LED light indicate s
that a call is on hold on a boss’s line.
To view held calls on a boss’s line on the delegate’s phone:
» Press and hold the boss’s line key.
All held calls display, as shown next on the VVX 400.
Resume Held Calls
Any assigned delegate can resume held calls on the boss’s line.
To resume a call held on a boss’s line:
1 Press and hold the boss’s line key.
2 Select the call and select Pickup.
Polycom, Inc. 98
Page 99

Polycom VVX Business Media Phones User Guide
Transfer Boss Calls
After a delegate answers a delegation call, the delegate can transfer the call to the boss’s phon e using Safe
Transfer , which enables the delegate to transfer the call to the boss’s phone and prevent the call from going
to voicemail if the boss does not answer the call.
To transfer a delegation call to the boss’s phone:
» During a delegation call, press More > Safe Xfer.
The Calls screen is displayed.
If the boss is not available to answer the transferred call , a notification stating that the call was not answered
is displayed on the delegate’s phone, and the delegate can resume the call.
Transfer to Boss Voicemail
If a boss is unavailable to take calls, delegates can transfer the calls directly to a boss’s voicemail.
To transfer a call to a boss’s voicemail:
» During a delegation call, press Boss VM.
Call on Behalf of a Boss
As a delegate, you can make calls on behalf of your assigned boss’s lines.
To place a call on behalf of an assigned boss:
1 Press and hold the boss’s line key.
2 Select On behalf, as shown next.
Polycom, Inc. 99
Page 100

Polycom VVX Business Media Phones User Guide
3 Select a contact and select Dial, or on VVX 500 and 600 phones, tap the Dial icon .
The delegate and third-party phones display a notification indicating that a delegate is calling on
behalf of a boss, as shown next.
When a call is made on behalf of the boss’s line, a solid red bar is displayed on the line key on the boss’s
phone.
Join Conference Calls
Y o u can join an incomi ng conference call on behalf of a boss’s line and add the boss to the conference call.
To add a boss’s line to a conference call:
1 Press the Conference soft key.
2 Dial the boss’s number or select the contact.
3 After the call is answered, press the Conference soft key.
4 After you have connected the boss’s line to the conference call, press End Call to leave the
conference call.
Alcatel-Lucent Shared Call Appearance
When your phone is registered with the Alcatel-Lucent CTS, you can use the Shared Call Appearance
(SCAP) feature to share a single line with other contacts as a member of a group. System administrators
assign members to SCAP groups.
This feature is not supported on VVX 101 and 1500 phones. Check with your system administrator to find
out if this feature is available on your phone.
Any SCAP group member can place, answer , ho ld, or resume call s on the line. SCAP g roup memb ers can
also bridge in on a call on the shared line. Additionally, all group members can view the status of a call on
the shared line on their phones. Each line supports up to 21 call appearances.
This section includes information and instructions on using the following functions:
● Placing a Call
● Answering Calls
● Bridging into Active Calls
● Make Active Calls Public
● Holding or Passing Calls
Polycom, Inc. 100
 Loading...