

Page 1

User Guide
4.3.0 | May 2015 | 3725-64325-007A
Polycom® RealPresence® Group
Series and Polycom Touch Control
Page 2

Copyright© 2015, Polycom, Inc. All rights reserved. No part of this document may be reproduced, translated into another
language or format, or transmitted in any form or by any means, electronic or mechanical, for any purpose, without the
express written permission of Polycom, Inc.
6001 America Center Drive
San Jose, CA 95002
USA
Trademarks Polycom
trademarks and/or service marks of Polycom, Inc. and are registered and/or common law marks in the United States
and various other countries.
All other trademarks are property of their respective owners. No portion hereof may be reproduced or transmitted in any
form or by any means, for any purpose other than the recipient's personal use, without the express written permission
of Polycom.
®
, the Polycom logo and the names and marks associated with Polycom products are
Disclaimer While Polycom uses reasonable efforts to include accurate and up-to-date information in this document,
Polycom makes no warranties or representations as to its accuracy. Polycom assumes no liability or responsibility for
any typographical or other errors or omissions in the content of this document.
Limitation of Liability Polycom and/or its respective suppliers make no representations about the suitability of the
information contained in this document for any purpose. Information is provided "as is" without warranty of any kind and
is subject to change without notice. The entire risk arising out of its use remains with the recipient. In no event shall
Polycom and/or its respective suppliers be liable for any direct, consequential, incidental, special, punitive or other
damages whatsoever (including without limitation, damages for loss of business profits, business interruption, or loss of
business information), even if Polycom has been advised of the possibility of such damages.
End User License Agreement By installing, copying, or otherwise using this product, you acknowledge that you
have read, understand and agree to be bound by the terms and conditions of the End User License Agreement for this
product. The EULA for this product is available on the Polycom Support page for the product.
Patent Information The accompanying product may be protected by one or more U.S. and foreign patents and/or
pending patent applications held by Polycom, Inc.
Open Source Software Used in this Product This product may contain open source software. You may receive
the open source software from Polycom up to three (3) years after the distribution da te of the applicable product or
software at a charge not greater than the cost to Polycom of shipping or distributing the software to you. To receive
software information, as well as the open source software code used in this product, contact Polycom by email at
OpenSourceVideo@polycom.com.
Customer Feedback We are striving to improve our documentation quality and we appreciate your feedback. Email
your opinions and comments to DocumentationFeedback@polycom.com.
Polycom Support Visit the Polycom Support Center for End User License Agreements, software downloads,
product documents, product licenses, troubleshooting tips, service requests, and more.
2
Page 3

Contents
Content s
Conventions Used in This Guide . . . . . . . . . . . . . . . . . . . . . . . . . . . . . . . . . . . . . . . 7
Information Elements . . . . . . . . . . . . . . . . . . . . . . . . . . . . . . . . . . . . . . . . . . . . . . . . . . . . . . . . . 7
Typographic Conventions . . . . . . . . . . . . . . . . . . . . . . . . . . . . . . . . . . . . . . . . . . . . . . . . . . . . . 7
Before You Begin . . . . . . . . . . . . . . . . . . . . . . . . . . . . . . . . . . . . . . . . . . . . . . . . . . . 9
Audience, Purpose and Required Skills . . . . . . . . . . . . . . . . . . . . . . . . . . . . . . . . . . . . . . . . . . 9
Get Help . . . . . . . . . . . . . . . . . . . . . . . . . . . . . . . . . . . . . . . . . . . . . . . . . . . . . . . . . . . . . . . . . . 9
Polycom and Partner Resources . . . . . . . . . . . . . . . . . . . . . . . . . . . . . . . . . . . . . . . . . . . . 9
The Polycom Community . . . . . . . . . . . . . . . . . . . . . . . . . . . . . . . . . . . . . . . . . . . . . . . . . 10
Polycom® RealPresence® Group Series and Polycom Touch Control . . . . . . . 11
Remote Control . . . . . . . . . . . . . . . . . . . . . . . . . . . . . . . . . . . . . . . . . . . . . . . . . . . . . . . . . . . . 11
Remote Control Buttons and Descriptions . . . . . . . . . . . . . . . . . . . . . . . . . . . . . . . . . . . . 12
Recharge the Remote Control Battery . . . . . . . . . . . . . . . . . . . . . . . . . . . . . . . . . . . . . . . 12
RealPresence Group System Power . . . . . . . . . . . . . . . . . . . . . . . . . . . . . . . . . . . . . . . . . . . . 13
Power On Self Test (POST) . . . . . . . . . . . . . . . . . . . . . . . . . . . . . . . . . . . . . . . . . . . . . . . 14
View POST Warnings . . . . . . . . . . . . . . . . . . . . . . . . . . . . . . . . . . . . . . . . . . . . . . . . . 14
Power On the RealPresence Group System . . . . . . . . . . . . . . . . . . . . . . . . . . . . . . . . . . . 14
Wake the RealPresence Group System . . . . . . . . . . . . . . . . . . . . . . . . . . . . . . . . . . . . . . 14
Power Off the RealPresence Group System . . . . . . . . . . . . . . . . . . . . . . . . . . . . . . . . . . . 14
RealPresence Group Series User Interface . . . . . . . . . . . . . . . . . . . . . . . . . . . . . . . . . . . 15
Polycom Touch Control . . . . . . . . . . . . . . . . . . . . . . . . . . . . . . . . . . . . . . . . . . . . . . . . . . . . . . 15
Power On the Touch Control . . . . . . . . . . . . . . . . . . . . . . . . . . . . . . . . . . . . . . . . . . . . . . . 16
Wake the Touch Control . . . . . . . . . . . . . . . . . . . . . . . . . . . . . . . . . . . . . . . . . . . . . . . . . . 16
Power Off the Touch Control . . . . . . . . . . . . . . . . . . . . . . . . . . . . . . . . . . . . . . . . . . . . . . . 17
Pair a Touch Control with a RealPresence Group System . . . . . . . . . . . . . . . . . . . . . . . . 17
Disconnect a Touch Control from a RealPresence Group System . . . . . . . . . . . . . . . . . . 17
Ways to Place, Answer, and End Calls . . . . . . . . . . . . . . . . . . . . . . . . . . . . . . . . . . . . . . . . . . 18
Call by Entering a Name or Number . . . . . . . . . . . . . . . . . . . . . . . . . . . . . . . . . . . . . . . . . 18
Call from the Contacts Screen . . . . . . . . . . . . . . . . . . . . . . . . . . . . . . . . . . . . . . . . . . . . . 18
Call from the Recent Calls List . . . . . . . . . . . . . . . . . . . . . . . . . . . . . . . . . . . . . . . . . . . . . 18
Answer a Call . . . . . . . . . . . . . . . . . . . . . . . . . . . . . . . . . . . . . . . . . . . . . . . . . . . . . . . . . . 19
End a Call . . . . . . . . . . . . . . . . . . . . . . . . . . . . . . . . . . . . . . . . . . . . . . . . . . . . . . . . . . . . . 19
Point-to-Point Call Hold and Resume . . . . . . . . . . . . . . . . . . . . . . . . . . . . . . . . . . . . . . . . . . . 19
Place a Point-to-Point Call on Hold . . . . . . . . . . . . . . . . . . . . . . . . . . . . . . . . . . . . . . . . . . 19
Polycom, Inc. 3
Page 4

Contents
Place a Point-to-Point Call on Hold and Answer a Call . . . . . . . . . . . . . . . . . . . . . . . . . . . 19
Place a Point-to-Point Call on Hold and Make a Call . . . . . . . . . . . . . . . . . . . . . . . . . . . . 20
Switch Between Calls in a Point-to-Point Call . . . . . . . . . . . . . . . . . . . . . . . . . . . . . . . . . . 20
Resume a Point-to-Point Call . . . . . . . . . . . . . . . . . . . . . . . . . . . . . . . . . . . . . . . . . . . . . . 20
Encrypted Calls . . . . . . . . . . . . . . . . . . . . . . . . . . . . . . . . . . . . . . . . . . . . . . . . . . . . . . . . . . . . 20
Encryption Check Code for H.323 Point-to-Point Calls . . . . . . . . . . . . . . . . . . . . . . . . . . . 21
Verify Encryption Check Codes . . . . . . . . . . . . . . . . . . . . . . . . . . . . . . . . . . . . . . . . . 21
View Touch Control System Details . . . . . . . . . . . . . . . . . . . . . . . . . . . . . . . . . . . . . . . . . . . . 21
Video and User Interface Adjustments . . . . . . . . . . . . . . . . . . . . . . . . . . . . . . . . . . . . . . . . . . 22
Adjust Touch Control Brightness . . . . . . . . . . . . . . . . . . . . . . . . . . . . . . . . . . . . . . . . . . . . 22
Select Cameras with the Touch Control . . . . . . . . . . . . . . . . . . . . . . . . . . . . . . . . . . . . . . 22
Adjust Cameras . . . . . . . . . . . . . . . . . . . . . . . . . . . . . . . . . . . . . . . . . . . . . . . . . . . . . . . . . 22
Enable EagleEye Director Tracking in a Call . . . . . . . . . . . . . . . . . . . . . . . . . . . . . . . 23
Disable EagleEye Director Tracking in a Call . . . . . . . . . . . . . . . . . . . . . . . . . . . . . . . 23
Camera Presets . . . . . . . . . . . . . . . . . . . . . . . . . . . . . . . . . . . . . . . . . . . . . . . . . . . . . . . . 23
View Stored Presets with the Touch Control . . . . . . . . . . . . . . . . . . . . . . . . . . . . . . . 24
Store a Preset with the Touch Control . . . . . . . . . . . . . . . . . . . . . . . . . . . . . . . . . . . . 24
Move the Camera to a Stored Preset with the Touch Control . . . . . . . . . . . . . . . . . . 24
Audio Adjustments . . . . . . . . . . . . . . . . . . . . . . . . . . . . . . . . . . . . . . . . . . . . . . . . . . . . . . . . . . 25
Adjust the Volume . . . . . . . . . . . . . . . . . . . . . . . . . . . . . . . . . . . . . . . . . . . . . . . . . . . . . . . 25
Mute the Microphone . . . . . . . . . . . . . . . . . . . . . . . . . . . . . . . . . . . . . . . . . . . . . . . . . . . . 25
Adjust the Touch Control Ring Tone and Alert Volume . . . . . . . . . . . . . . . . . . . . . . . . . . 25
Stereo Audio in Video Calls . . . . . . . . . . . . . . . . . . . . . . . . . . . . . . . . . . . . . . . . . . . . . . . 26
Audio Mute Notification for Near-End Site . . . . . . . . . . . . . . . . . . . . . . . . . . . . . . . . . . . . 26
Content . . . . . . . . . . . . . . . . . . . . . . . . . . . . . . . . . . . . . . . . . . . . . . . . . . . . . . . . . . . . . . . . . . 26
People+Content IP . . . . . . . . . . . . . . . . . . . . . . . . . . . . . . . . . . . . . . . . . . . . . . . . . . . . . . 27
Install People+Content IP . . . . . . . . . . . . . . . . . . . . . . . . . . . . . . . . . . . . . . . . . . . . . . 27
Show Content with People+Content IP . . . . . . . . . . . . . . . . . . . . . . . . . . . . . . . . . . . 27
Show Content from a Computer Connected to a Polycom Touch Control . . . . . . . . . 27
Stop Showing Content with People+Content IP . . . . . . . . . . . . . . . . . . . . . . . . . . . . . 28
Show Content from a Computer Connected to RealPresence Group System . . . . . . . . . 28
Show Content from a USB Drive with the Touch Control . . . . . . . . . . . . . . . . . . . . . . . . . 30
Annotate Content on a USB Drive . . . . . . . . . . . . . . . . . . . . . . . . . . . . . . . . . . . . . . . . . . 31
Directory and Contact Entries . . . . . . . . . . . . . . . . . . . . . . . . . . . . . . . . . . . . . . . . . . . . . . . . . 32
Multiple Sites in Video Calls . . . . . . . . . . . . . . . . . . . . . . . . . . . . . . . . . . . . . . . . . . . . . . . . . . 32
Place a Multipoint Call by Adding Sites . . . . . . . . . . . . . . . . . . . . . . . . . . . . . . . . . . . . . . . 33
Add a Call to a Multipoint Conference . . . . . . . . . . . . . . . . . . . . . . . . . . . . . . . . . . . . . . . . 33
Hold and Answer a Call in a Conference . . . . . . . . . . . . . . . . . . . . . . . . . . . . . . . . . . . . . 33
Ignore an Individual Incoming Call in a Conference . . . . . . . . . . . . . . . . . . . . . . . . . . . . . 33
Place a Call While a Multipoint Call is on Hold . . . . . . . . . . . . . . . . . . . . . . . . . . . . . . . . . 33
Polycom, Inc. 4
Page 5

Contents
Switch Between Calls . . . . . . . . . . . . . . . . . . . . . . . . . . . . . . . . . . . . . . . . . . . . . . . . . . . . 34
Resume a Held Call . . . . . . . . . . . . . . . . . . . . . . . . . . . . . . . . . . . . . . . . . . . . . . . . . . . . . 34
Hang Up an Individual Call in a Multipoint Call . . . . . . . . . . . . . . . . . . . . . . . . . . . . . . . . . 34
Hang Up All Calls . . . . . . . . . . . . . . . . . . . . . . . . . . . . . . . . . . . . . . . . . . . . . . . . . . . . . . . 34
Passwords for Multipoint Calls . . . . . . . . . . . . . . . . . . . . . . . . . . . . . . . . . . . . . . . . . . . . . 34
Set Up a Meeting Password . . . . . . . . . . . . . . . . . . . . . . . . . . . . . . . . . . . . . . . . . . . . 35
Multipoint Viewing Modes . . . . . . . . . . . . . . . . . . . . . . . . . . . . . . . . . . . . . . . . . . . . . . . . . . . . 35
Multipoint Viewing Layouts . . . . . . . . . . . . . . . . . . . . . . . . . . . . . . . . . . . . . . . . . . . . . . . . 35
Multiple Layouts in Lync Calls . . . . . . . . . . . . . . . . . . . . . . . . . . . . . . . . . . . . . . . . . . 35
Call Answering Selections . . . . . . . . . . . . . . . . . . . . . . . . . . . . . . . . . . . . . . . . . . . . . . . . . . . . 35
Temporarily Refuse Calls Using the Touch Control . . . . . . . . . . . . . . . . . . . . . . . . . . . . . 36
Enable Answering Video Calls Automatically Using the Touch Control . . . . . . . . . . . . . . 36
Mute Automatically Answered Video Calls Using the Touch Control . . . . . . . . . . . . . . . . 36
Video Stopping and Starting . . . . . . . . . . . . . . . . . . . . . . . . . . . . . . . . . . . . . . . . . . . . . . . . . . 37
Stop Video . . . . . . . . . . . . . . . . . . . . . . . . . . . . . . . . . . . . . . . . . . . . . . . . . . . . . . . . . . . . . 37
Start Video . . . . . . . . . . . . . . . . . . . . . . . . . . . . . . . . . . . . . . . . . . . . . . . . . . . . . . . . . . . . 37
Microsoft Outlook Calendaring . . . . . . . . . . . . . . . . . . . . . . . . . . . . . . . . . . . . . . . . . . . . . . . . 37
Scheduled Meetings . . . . . . . . . . . . . . . . . . . . . . . . . . . . . . . . . . . . . . . . . . . . . . . . . . . . . 38
View Scheduled Meetings with the Touch Control . . . . . . . . . . . . . . . . . . . . . . . . . . . 38
Calendar Meetings . . . . . . . . . . . . . . . . . . . . . . . . . . . . . . . . . . . . . . . . . . . . . . . . . . . . . . 38
Join a Scheduled Meeting from the Calendar Screen . . . . . . . . . . . . . . . . . . . . . . . . 38
Microsoft Office Communications Server and Lync Contacts . . . . . . . . . . . . . . . . . . . . . . . . . 39
Contact Presence States on the Touch Control . . . . . . . . . . . . . . . . . . . . . . . . . . . . . . . . 39
Multipoint Calls Using Centralized Conferencing Control Protocol (CCCP) . . . . . . . . . . . 40
Manually Create a Conference with CCCP . . . . . . . . . . . . . . . . . . . . . . . . . . . . . . . . 40
Add Participants to a CCCP Conference . . . . . . . . . . . . . . . . . . . . . . . . . . . . . . . . . . 40
Calls Muted with Lync . . . . . . . . . . . . . . . . . . . . . . . . . . . . . . . . . . . . . . . . . . . . . . . . . 40
Allow the Far-End System to Control Your Camera . . . . . . . . . . . . . . . . . . . . . . . . . . . . . 41
Adjust for Room Lighting . . . . . . . . . . . . . . . . . . . . . . . . . . . . . . . . . . . . . . . . . . . . . . . . . . 41
Allow Video Display on the Web . . . . . . . . . . . . . . . . . . . . . . . . . . . . . . . . . . . . . . . . . . . . 41
Polycom
Incoming Call Alert for Hearing-Impaired Users . . . . . . . . . . . . . . . . . . . . . . . . . . . . . . . . . . . 44
Virtual Remote Control . . . . . . . . . . . . . . . . . . . . . . . . . . . . . . . . . . . . . . . . . . . . . . . . . . . . . . 45
Tips for Troubleshooting . . . . . . . . . . . . . . . . . . . . . . . . . . . . . . . . . . . . . . . . . . . . . . . . . . . . . 45
®
RealPresence®Capture Server Recording . . . . . . . . . . . . . . . . . . . . . . . . . . . . . . . 42
RealPresence Capture Server Connection Methods . . . . . . . . . . . . . . . . . . . . . . . . . . . . 42
RealPresence Capture Server TVUI Interface . . . . . . . . . . . . . . . . . . . . . . . . . . . . . . . . . 43
Use the Touch Control to Record on a RealPresence Capture Server . . . . . . . . . . . . . . . 44
Test Calls . . . . . . . . . . . . . . . . . . . . . . . . . . . . . . . . . . . . . . . . . . . . . . . . . . . . . . . . . . . . . 45
View Call Statistics for an Active Point-to-Point Call with the Touch Control . . . . . . . . . . 46
View Call Statistics for an Active Multipoint Call with the Touch Control . . . . . . . . . . . . . 46
Polycom, Inc. 5
Page 6

Contents
Polycom Technical Support . . . . . . . . . . . . . . . . . . . . . . . . . . . . . . . . . . . . . . . . . . . . . . . . . . . 46
Polycom Solution Support . . . . . . . . . . . . . . . . . . . . . . . . . . . . . . . . . . . . . . . . . . . . . . . . . . . . 46
Regulatory Notices . . . . . . . . . . . . . . . . . . . . . . . . . . . . . . . . . . . . . . . . . . . . . . . . . . . . . . . . . 47
Polycom, Inc. 6
Page 7

Conventions Used in This Guide
This guide contains terms, graphical elements, and a few typographic conventions. Familiarizing yourself
with these terms, elements, and conventions will help you successfully perform tasks.
Information Elements
This guide may include any of the following icons to alert you to important information.
Icons Used in this Guide
Name Icon Description
Note
Caution
User Tip
The Note icon highlights information of interest or important information
needed to be successful in accomplishing a procedure or to understand
a concept.
The Caution icon highlights information you need to know to avoid a
hazard that could potentially impact device performance, application
functionality, or successful feature configuration.
The User Tip icon highlights techniques, shortcuts, or productivity
related tips.
Typographic Conventions
A few typographic conventions, listed next, may be used in this guide to distinguish types of in-text
information.
A
Typographic Conventions
Convention Description
Bold Highlights interface items such as menus, menu selections, window and dialog names,
soft keys, file names, and directory names when they are involved in a procedure or us er
action. Also used to highlight text to be entered or typed.
Italics Used to emphasize text, to show example values or inputs (in this form: <example>), and
to show titles of reference documents available from the Polycom Support Web site and
other reference sites.
Polycom, Inc. 7
Page 8

Conventions Used in This Guide
Typographic Conventions
Convention Description
Blue Text Used for cross references to other sections within this document and for hyperlinks to
external sites and documents.
Courier Used for code fragments and parameter names.
Polycom, Inc. 8
Page 9

Before You Begin
This guide is for users who need to operate Polycom® RealPresence® Group systems. Please read the
Polycom RealPresence Group Series documentation before you operate the system. The following related
documents for RealPresence Group Series systems are available from Polycom Support:
● Software and Options for the Polycom RealPresence Group Series and Accessories Installation
Guide, which describes how to install Polycom RealPresence Group systems and accessories
● Polycom RealPresence Group Series Administrator Guide, which describes how to co nf igu re ,
customize, manage, and troubleshoot RealPresence Group Series systems and the Polycom Touch
Control
● Setup sheets for your hardware
● Release notes
● Polycom RealPresence Group Series Integrator Reference Guide, which provides cable information
and API command descriptions
● Regulatory Notices for the Polycom RealPresence Group Series, which describes safety and legal
considerations for using RealPresence Group Series systems
Polycom recommends that you record the serial number and option key of your Polycom RealPresence
Group Series system here for future reference. The serial number for the system is printed on the unit.
System Serial Number: ____________________________________________
Option Key: ____________________________________________________
Audience, Purpose and Required Skills
The primary audience for this guide are users who want to perform basic to intermediate tasks using the
RealPresence Group Series system with or without the Polycom Touch Control. These tasks include using
the remote control, making video conference calls to one or several endpoints, adjusting cameras and
audio, showing content, recording calls, and much more.
Get Help
For more information about installing, configuring, and administering Polycom products, refer to
Documents and Downloads at Polycom Support.
Polycom and Partner Resources
To find all Polycom partner solutions, see Strategic Global Partner Solutions.
Polycom, Inc. 9
Page 10

Before You Begin
The Polycom Community
The Polycom Community gives you access to the latest developer and support informatio n. Part icipate in
discussion forums to share ideas and solve problems with your colleagues. To register with the Polycom
Community, simply create a Polycom online account. When logged in, you can access Polycom support
personnel and participate in developer and support forums to find the lates t info rm a tio n on har dw ar e,
software, and partner solutions topics.
Polycom, Inc. 10
Page 11

Polycom® RealPresence® Group Series
and Polycom Touch Control
This guide includes information about the Polycom RealPresence Group Series systems. It includes
information that helps you when you're just st arting to learn ab out video conferencing or if you ne ed a quick
refresher. It also includes step-by-step instructions for everyday video conferencing tasks.
The guide also provides details about the Polycom Touch Control Operating System software, the Polycom
Touch Control Panel software, and the Polycom Touch Control hardware as it interoperates with
RealPresence Group Series hardware.
All RealPresence Group systems, except the 700 systems, support 1080p6 0 performance for people or for
content at one time. The RealPresence Group 700 systems support 1080p60 performance for people and
content at the same time.
You can use the remote control to operate the system, or you can purchase and use the optional Polycom
Touch Control. When you use the Touch Control, the infrared remote control is disabled.
For detailed information on the available systems and bundles, as well as the most recent feature
descriptions, refer to the Polycom RealPresence Group Series Release Notes available at
support.polycom.com.
Note: Options are enabled by your administrator
RealPresence
options used in your organization. Therefore, this guide might cover options that you cannot access
on your system. To find out more about these options, speak to your administrator.
Group systems and Polycom Touch Control can be configured to show only those
Remote Control
Use the remote control to place calls, adjust the volume, zoom the camera, navigate screens, and select
options. The RealPresence Group systems and the EagleEye cameras have infrared receivers. You can
control your RealPresence Group system by pointing the remote control toward the RealPresence Group
system or the EagleEye camera (if connected). You might need a special cable to connect an SDI camera
to the system to receive infrared signals from the remote control. For more information about the cable,
contact Polycom support.
Note: Infrared remote control is disabled when the system is paired
When the RealPresence Group system is paired with the optional Polycom Touch Control, the
infrared remote control is disabled. This insures that only one device is controlling the system.
Polycom, Inc. 11
Page 12

Remote Control Button Descriptions
Number Description
1 LED IR emitter
2 Decrease speaker volume.
3 Increase speaker volume.
4 Zoom camera out.
5 Zoom camera in.
6
Press center Select button to select
highlighted menu item.
7
Navigate through menu items using the Up,
Down, Left, and Right buttons; pan/tilt the
camera.
8
Delete letters or numbers or go back to a
previous screen.
9 Display the Menu screen.
10 Return to the Home screen.
11 Place, answer call.
12 End, reject call.
13 Enter letters or numbers.
14
In camera control mode, move the camera to
a stored preset or press and hold a number
to store a preset.
15
• Generates an asterisk if the cursor is in a
text field.
• Generates a period if the cursor is in a
numeric field.
16
Generates touch (DTMF) tones. Press #,
followed by DTMF keys to send
17 Mute or unmute a microphone.
Parts of the Remote Control
Remote Control Buttons and Descriptions
Descriptions of the remote control parts are shown in the following table and corresponding graphic.
Recharge the Remote Control Battery
Your system setup sheet shows how to charge the battery in the remote control the first time. When the
remote control battery power is at 10% or less, a notification displays on the home screen. Although other
Polycom, Inc. 12
Page 13

notifications might override the low battery notification, the low battery notification returns after the other
notifications are dismissed. The low battery notification does not display while the system is in a call.
Use a USB 2.0 port to charge the remote batter y. The RealPresence Group 300, 310, and 500 systems have
two USB 2.0 ports on the back of each system, while the RealPresence Group 700 system has one USB
2.0 port on the front of the system and two USB 3.0 ports on the back of the system.
To recharge the remote control battery:
1 Pull the battery out of the end of the remote control.
2 Insert the USB plug of th e ba ttery into a USB 2.0 port such as the one on your system.
3 Wait until the status light on the battery turns green before removing it from the port.
Recharging the battery might take from 20 minutes to multiple hours.
4 Insert the char ge d ba tt er y into the rem o te control.
Recharge the Battery: RealPresence Group 300, 310, 500 and 700 Systems
RealPresence Group System Power
Powering your system on and off is a simple proc edu re, but it is important to perform the tasks in a certain
order . Make sure that the system is powered of f before yo u connect devices to it. After you have co nnected
all of the related equipment that you intend to use, connect the power and power on the RealPresence
Group system.
It is important to note that RealPresence Group Series systems do not have what you might think of as a
power button—they have a power proximity sensor. Instead of pressing an actual button that moves, you
touch the sensor (or near the sensor) that indi ca tes po we r on the front of the system.
Polycom, Inc. 13
Page 14

Power On Self Test (POST)
After being powered on, RealPresence Group 300, 310, 500, and 700 systems automatically perform
system health checks before the systems are initia lized . Th is pr oc ess is known as a power on self test, or
POST. The status of the POST sequence is displayed with the LED indicator light on the front of the device,
or for the RealPresence Group 700 system, in the text field display on the front of the system.
All test results are logged in the system me mory . For more info rmation about what the colors of the indicator
lights mean, refer to the Polycom RealPresence Group Series Administrator Guide.
When the POST sequence completes with no severe errors, the RealPresence Group system starts
normally. To see the warnings, refer to View POST Warnings.
View POST Warnings
If any warnings occur during the POST, use the remote control to view them after the system starts.
» Go to > System Information > Status > Active Alerts.
For more details, use the remote control to select More Information. If a severe error occurs during
startup, the system does not power on. Contact Polycom technical support.
Power On the RealPresence Group System
After charging your remote control or attaching acce ssories, you need to power on the RealPresence Group
Series system.
To power on the RealPresence Group system:
● On RealPresence Group 300, 310, 500, and 700 systems, touch and hold the power sensor on
the front of the system. Because the power sensor is touch sensitive, you can place your finger on or
close to the sensor.
The Polycom splash screen displays within several seconds.
Wake the RealPresence Group System
After a certain amount of time, the RealPresence Group system goes into sleep mode.
» Press any button on the remote control, or just pick up the remote to wake up the system.
Power Off the RealPresence Group System
If you need to change out certain connected peripherals, you might need to power off the RealPresence
Group system.
To power off RealPresence Group 300, 310, 500, and 700 systems:
1 Touch the power sensor on the front of the system. The indicator light changes color and blinks,
which means that the system is shutting down.
2 Release the power sensor when the indicator light changes color.
Polycom, Inc. 14
Page 15

RealPresence Group Series User Interface
Cycle through the icons at the bottom of the Home screen to access system features. To accomplish tasks,
you can press buttons directly on your remote control or use your remote contr ol to navigate menus on the
left side of the local user interface.
Available icons on the home screen vary based on how your administrator configured the system.
Your system IP address, extension, and SIP address might be displayed on the home screen if your
administrator has configured them to be visible .
Icon Description
Menu - Displays the Menu screen, which allows you to place a call, change cameras, show content
in a call, and show the Self View (PIP).
Place a Call - Displays the keypad, recent calls, or contacts so that you can enter numbers, letters,
or names to make a call.
Content - Allows you to send content from a supported device. This icon appears only when a
content source is detected.
Settings - Displays the Settings screen, which allows you to open one of the following screens:
System Information - Displays the System Information screen, which allows you to obtain system
details, view system usage, run diagnostic tests, and view call statistics.
User settings
settings and to configure call and meeting preferences. This screen is only available if your
administrator has allowed you access to the user settings.
Administration - Displays the Administration screen, which allows you to configure location
settings, specify LAN properties, and manage some user security settings. This screen is only
available if your administrator has allowed you access to the administration settings. Once an admin
password is configured, this icon changes to a padlock.
- Displays the User Settings screen, which allows you to change basic camera
Polycom Touch Control
The Polycom T ouch Co ntrol has a touch screen that allows you to control your RealPresence Group system.
You can use the Touch Control to place calls, adjust the volume, control the camera, show content, and
select options. When you pair and use the Touch Control, the remote control no longer affects the system.
Polycom, Inc. 15
Page 16

Polycom Touch Control User Interface
Number Description
1 Use the Touch Control to operate a RealPresence Group system.
2 Touch the screen to select an item. Drag your finger across the screen to scroll.
3 Scroll left and right on the Home screen for quick access to common calling and configuration
tasks.
4 Touch Back to go to the previous screen. Touch
5 Use the Call screen for quick access to common tasks while you are in a call.
to go to the Home screen.
Power On the Touch Control
If you want to use a Touch Control with you RealPresence Group system, you must first power it on.
» To power on the Polycom Touch Control, connect the LAN cable to the underside of the device. The
Home button is lit when the device is powered on.
Wake the Touch Control
The Polycom Touch Control goes to sleep after 2 minutes of inactivity.
» To wake the Touch Control, touch the screen.
Polycom, Inc. 16
Page 17

Power Off the Touch Control
If you need to move your system to another area, power off the Touch Control before you disconnect the
LAN cable.
To power off the Polycom Touch Control:
1 From the Home scre en , to uc h .
2 Scroll to Power.
3 Select Touch Control Power.
4 In the menu that appears, select Power Off the Touch Control. If you choose to power off the
Polycom Touch Control, you must disconnect and reconnect the LAN cable to power it on again.
Pair a Touch Control with a RealPresence Group System
Before you make a call using the Polycom Touch Control, you must pair the To uch Control with a
RealPresence Group system. After the devices are successfully paired, the remote control no longer has
control of the system.
To pair with a RealPresence Group system:
1 Do one of the following:
After you power on the Polycom Touch Control, a Connect to Device screen is displayed. Enter
the IP address for the RealPresence Group system. Touch Connect.
From your Home screen, touch and then touch the RealPresence Group Series system tab.
Under Device Connection st atus, touch . T ouch Vie w Pairing Settings. Enter the admin ID
and password for your Polycom Touch Control. Enter the RealPresence Group system IP
address.
2 Enter the ID and password of the RealPresence Group system.
3 Touch Next. The pairing connection begins, and a message displays when the connection is
successful.
Disconnect a Touch Control from a RealPresence Group System
The connection pairing with the Polycom Touch Control persists until you either disconnect or power of f the
RealPresence Group system.
To disconnect from a RealPresence Group system:
1 On the Home screen, touch then touch the RealPresence Group Series System tab.
2 Under Device Connection Status, touch .
3 Touch View Pairing Settings.
4 Enter your Admin ID and Admin Password.
5 Touch Forget This Device. The IP Address field is now blank.
Polycom, Inc. 17
Page 18

Ways to Place, Answer, and End Calls
To place, answer, and end calls, refer to the following sections:
Call by Entering a Name or Number
Call from the Contacts Screen
Call from the Recent Calls List
Answer a Call
End a Call
Call by Entering a Name or Number
You can place a call several different ways. One easy way to place a call is to enter a specific name or
number.
To place a call by entering a name or number:
1 From the Home scre en , to uc h .
2 In the dialing field, en te r th e dialing info rm a tio n as fo llow s:
Letters: To enter letters, touch . Touch and hold keys to access accented characters.
Backspace: To backspace, touch .
Depending on the capabilities of your system and the system you are calling, the dialing information
could look like one of these examples:
10.11.12.13 (IPv4 address—include the dots)
2555 (E.164 extension for H.323 or SIP)
stereo.polycom.com (host name )
user@domain.com (SIP)
3 Touch to place the call.
Call from the Contacts Screen
If your system administrator has added directory and contact s, you can view your favorites and search for
contacts registered to the same Global Directory Server.
To place a call from the Contacts Favorites screen:
1 From the Home scre en , to uc h > Favorites.
2 Touch an entry to place the call.
To see more details about an entry in Favorites, touch next to the entry.
Call from the Recent Calls List
You can quickly choose a number to call from a list of the sites you have called recently. The Recent Calls
screen provides details of all incoming and outgoing calls, including the time of the calls.
Polycom, Inc. 18
Page 19

To place a call from the Recent Calls list:
1 From the Home scre en , to uc h and then touch Recent Calls.
2 Touch an entry to place the call.
You can filter the list by touching All, Placed, or Received.
To see more details about a call listed on the Recent Calls screen, touch next to the entry.
Answer a Call
If the Polycom RealPresence Group system does not answer incoming calls automatically, you are
prompted to answer manually.
» Touch Answer or Ignore when a call comes in.
End a Call
When your call is complete, hang up the call.
To hang up a call:
» From the Call screen, touch Hang Up.
Point-to-Point Call Hold and Resume
The RealPresence Group system supports call hold and resume in Microsoft Lync 2013 and H.323 calls.
Putting a call on hold pauses audio and video bidirectionally betwe en RealPresence Group systems, remote
Lync clients, or Lync AV MCUs.
For information on multipoint call hold and resume, refer to Multiple Sites in Video Calls.
Place a Point-to-Point Call on Hold
In a point-to-point call, you can place a call on hold, and then answer an incoming call, make an outgoing
call, or switch between two calls. After you complete a call, you can resume the call you had on hold.
To place a point-to-point call on hold:
» On the Touch Control, touch Hold.
When a call is on hold, On Hold appears on the RealPresence Group system screen for 5 seconds.
After 5 seconds, the Hold icon appears and remains on the screen until all calls disconnect or are
resumed.
Place a Point-to-Point Call on Hold and Answer a Call
At times, you might need to place a call on hold and answer an incoming call.
To place a call on hold to answer a call:
» Touch Hold + Answer.
Polycom, Inc. 19
Page 20

Note: Hang Up 1 + Answer support
The Polycom Touch Control doe s not support Hang Up 1 + Answer.
Place a Point-to-Point Call on Hold and Make a Call
To make an individual outgoing call while you are on a call, you must place the active call on hold.
To make an outgoing call while a call is on hold:
» Touch Place a Call. Place the call using your preferred method.
Switch Between Calls in a Point-to-Point Call
In certain situations, you need to be able to switch between two calls.
To switch between calls:
» Touch Switch To.
Resume a Point-to-Point Call
When you no longer want to keep a call on hold, you can resume the call.
To resume a held call:
» Touch Resume Call.
Note: Far-end site hold message
If the far-end site puts you on hold, a message displays for 5 seconds that you have been placed on
hold.
Encrypted Calls
If encryption is enabled on the system, a locked padlock appears on the monitor screen when a call is
encrypted. If a call is not encrypted, an open padlock appears on the monitor screen.
● If you are in a point-to-point call or a multipoint call hosted by another system, the padlock icon
displays the state of your individual connection.
● If you are hosting a multipoint call, the padlock icon displays the combined state of all connections:
encrypted if all connections in the call are encrypted, unencrypted if one or more connections in the
call are not encrypted.
In one call, some connections might be encrypted while other s are not. However , the padlock icon might not
accurately indicate whether the call is encrypted if the call is cascaded or includes an audio-only endpoint.
If encryption is required on your system, the far end must support encryption or the call will not be
completed.
Polycom, Inc. 20
Page 21

Note: Communicate state of padlock icon s
To avoid security risks, Polycom recommends that all participants communicate the state of their
padlock icons verbally at the beginning of a call.
Encryption Check Code for H.323 Point-to-Point Calls
T o provide extra security for encr ypted H.323 calls, the RealPresence Group system provides an encryption
check code. Participants in a call can use this check code to verify that their call is not being intercepted by
a third party. This mechanism is most useful for point-to-point calling; in externally-hosted multipoint calls,
check code numbers do not match any other numbers in the call.
The check code is a 16-digit hexadecimal number that is calculated so that the number is the same at both
sites in the call. The numbers are identical if, and only if, the calculation uses dat a exclusively from the two
sites in the call, with no data being intercepted and modified by a third party.
Verify Encryption Check Codes
Polycom recommends verifying check codes at each site to protect against third-party eavesdropping on
H.323 point-to-point calls.
To verify the check codes match:
1 Place an encrypted H.323 point-to-point call between two sites.
2 On the Call screen, touch View Call Statistics.
3 At Call Encryption, locate the 16-digit check code as in the following example:
ABC-123/ab-1234 / 1a2b34c99009d66e
4 Verbally verify that the check code is the same at both sites.
5 Do one of the following:
If the codes match, the call is secure. Proceed with the call.
If the codes do not match and the call is not a multipoint call on an external MCU, the call might
be compromised. Hang up the call and contact your system administrator.
View Touch Control System Details
Y ou might need to view cert ain system details to do video confer encing tasks, such as pairing, or to pe rform
troubleshooting tests to provide information for your administrator or technical support.
To view your system details with the Touch Control:
1 On the Home screen, touch System and then . The following Touch Control information
displays:
Model
Hardware Version
Serial Number
Panel Software
Polycom, Inc. 21
Page 22

Operating System Version
Kernel Version
MAC Address
IP Address
2 To view the paired RealPresence Group system details, touch the RealPresence Group Series
System tab.
Video and User Interface Adjustments
Adjust Touch Control Brightness
You can adjust the brightness of the Polycom Touch Control screen.
To adjust the Polycom Touch Control display brightness:
1 From the Home scre en , to uc h .
2 Select the Touch Control tab if it is visible.
3 Use the slider under Display to adjust the brightness of the display.
Select Cameras with the Touch Control
You can use the Polycom T ouch Control to select and ad just th e main camera or other near -end or fa r-end
video sources. Y ou might be able to adjust other auxiliary cameras or far-end cameras that support pan, tilt,
and zoom movement.
When you are in camera control mode, you can press and hold a number to save a preset. For more
information about presets, see Camera Presets.
To use the Touch Control to select a near-end or far-end camera, or other video source:
1 From the Call screen or from the Home screen, touch .
2 Touch Select Camera, and then touch the camera or other video source you want to use.
3 In a call, touch Near or Far to select either near-end or far-end control. The icon for the video source
moves up slightly on the screen, and the video source is shown to the call participants.
Adjust Cameras
After you select a camera, you can make some adjustments to enhance the view.
Note: Turn camera tracking off before adjustments
Before you can adjust the EagleEye Director camera, you must turn camera tracking off.
To adjust a Polycom EagleEye III, Polycom EagleEye IV, Polycom EagleEye Acoustic, or
Polycom EagleEye Director using the Polycom Touch Control:
1 Touch Control Camera.
Polycom, Inc. 22
Page 23

2 Touch the arrow buttons on the Polycom Touch Control to move the camera up, down, left, or right.
3 Touch and to zoom out and zoom in.
Enable EagleEye Director Tracking in a Call
If EagleEye Director tracking is enabled, the camera follows th e pe rs on or pe op le who are sp ea kin g. This
tracking action, also called automatic camera positioning, can be manually started or stopped.
You must start camera tracking using the menu before the Mute and Unmute buttons will again affect
tracking. After the call is complete, EagleEye Director returns to its default setting.
EagleEye Director
To enable EagleEye Director tracking in a call:
» On the Polycom Touch Control Home or Call screen, touch Cameras and select Start Camera
Tracking.
Disable EagleEye Director Tracking in a Call
While in a call, you might want to disable EagleEye Director tracking. When you stop camera tracking
through the menu, the Mute and Unmute buttons do not affect tracking.
To disable EagleEye Director tracking in a call:
» On the Polycom Touch Control Home or Call screen, touch Cameras and select Stop Camera
Tracking.
Camera Presets
Camera presets are stored camera positions that you can create ahead of time or during a call. Presets
allow you to do the following:
● Quickly point a camera at pre-defined locations in a room.
● Select a video source such as a document camera or an auxiliary camera.
If your system camera supports pan, tilt, and zoom movement, you can create up to 10 preset camera
positions for the near-end camera. Each preset stores the following information:
● Camera number
● Camera zoom level
● Direction the camera points
These presets remain in effect until you change them.
Polycom, Inc. 23
Page 24

If far-end camera control is allowed, you can create 10 presets for the far-e nd camera. These presets are
saved only for the duration of the call. You might also be able to use presets that were created at the far end
to control the far-end camera.
Keep the following camera control information in mind when using Self Layout:
● When in a call, selecting near camera control pans and zooms the local camera withou t changing the
layout.
● When out of a call, selecting camera control changes the Self View to full screen.
● Incoming calls override the full-screen Self View layout.
View Stored Presets with the Touch Control
You need to be familiar with the stored camera presets to get the most out of your system.
To view presets:
1 From the Home scre en or Call screen, touch Cameras.
2 If you are in a call, touch Near or Far to select either near-end or far-end control.
3 Touch View Presets.
Icons for presets 0-9 are shown on the screen. Solid preset icons indicate stored camera positions.
Transparent icons indicate unassigned presets.
4 Touch a number to go to a saved preset.
Store a Preset with the Touch Control
You cannot delete a preset. Instead, overwrite an existing preset with a new camera position.
To store a preset:
1 From the Home scre en or Call screen, touch Cameras.
2 If you are in a call, touch Near or Far to choose a near-end or far-end camera.
3 Touch Select Camera to choose a camera or oth er video source.
4 Touch Control Camera to move the camera to the desired position.
5 Touch V i ew Presets, then touch and hold a number to store the preset position. Any existing preset
stored at the number you select is replaced.
Move the Camera to a Stored Preset with the Touch Control
After you have your presets stored, move the camera to one of the stored presets.
To move the camera to a preset using the Touch Control:
1 From the Home scre en or Call screen, touch Cameras.
2 If you are in a call, touch Near or Far to select either near-end or far-end control.
3 Touch View Presets. Icons for presets 0-9 are shown on the screen. Solid preset icons indicate
stored camera positions. Transparent icons indicate unassigned presets.
4 Touch a number to go to a saved preset.
Polycom, Inc. 24
Page 25

Audio Adjustments
You can control the following audio settings on your RealPresence Group system:
Adjust the Volume
Mute the Microphone
Adjust the Touch Control Ring Tone and Alert Volume
Adjust the Volume
You can raise or lower the volume of the meeting. Changing the volume affects only the sound you hear at
your site.
To adjust the volume:
1 From the Home scre en , to uc h .
2 T o increase or decrease volu me on the near end, touch an d slide your finger over the Volume slider.
When you are in a call, volume control is available on the Call screen and in the top right corner of
other screens.
Mute the Microphone
You can mute the microphone if you do not want the far end to hear conversations at your site. Keep the
following in mine regarding muting:
● Muting the microphone does not mute a udio coming from any device conne cted to the content audio
inputs.
● The red mute indicator on the front of the Polycom EagleEye View camera is lit when the system is
muted or when a Polycom microphone is connected and muted.
● The microphone might mute when the system automatically answers an incoming call and if the
system is configured to mute auto answered calls.
To mute the microphone:
» From the Home screen, touch . On the audio screen you can touch Mute to control your
microphones. When you are in a call, mute controls are available on the Call screen.
If a Polycom tabletop microphone array is connected to your system, you can mute the call by
touching on the microphone.
Adjust the Touch Control Ring Tone and Alert Volume
You can adjust the volume levels of the Polycom Touch Control ring tone and user alert tones.
To adjust the Polycom Touch Control volume:
1 From the Home scre en , to uc h .
2 Touch the Touch Control tab.
3 Use the Volume slider to adjust the Polycom Touch Control volume.
Polycom, Inc. 25
Page 26

Stereo Audio in Video Calls
If your video conferencing room is configured to use stereo sound, the left an d right micropho ne input s are
configured during system setup. It is important that you do not move the microphones as this might detract
from the stereo audio experience.
Note: Stereo audio
Stereo audio is available only in video calls of 256 kbps or higher.
Audio Mute Notification for Near-End Site
When the near-end site microphone is muted and the RealPresence Group Series audio system detects
sound in the near-end site conference room, the RealPresence Group Series displays a You are muted
notification to warn you that your audio is muted. This message appears for 8 seconds on the near-end site
main display and is displayed once per audio mute session. Audio mute notification is automatic and no
intervention is required.
Content
To show people and content at the same time, the RealPresence Group systems must be configured for
content. You can show the following to the far-end systems:
● Any information stored on a computer connected directly to a Polycom RealPresence Grou p system
or a Polycom Touch Control
● Some types of information stored on a USB drive
● A paper document or object placed on a document camera
● A DVD or DVR player connected directly to a Polycom RealPresence Group system
● Content from the Polycom People+Content™ IP application (ins talled on a computer and connected
to the Polycom RealPresence Group system)
Note: Copyright-protected media
If you attempt to display copyright-protected content on the local interface, such as from a DVD or
DVR, the following message is shown on the RealPresence Group system: “This content is protected
and cannot be displayed or shared.” This message appears in a call and out of a call.
Y o u can show one conten t source and one people vide o source at a time, and yo u can switch to a dif ferent
type of content or people video source if you need to. Participants at other sites can also show content or
people video sources. Content shown is from one site at a time ; another site sharing co ntent overrides a ny
content being shared.
When you are showing content, a message appears on your main monitor. Whether you also see the
content on your monitor or projector depends on how your system was configured.
Note: Showing content on RealPresence Group 300 systems
To show content on a RealPresence Group 300 system, you must use the People+Content IP
application.
Polycom, Inc. 26
Page 27

People+Content IP
The People+Content IP application allows you to send content from a computer that is not connected
directly to the RealPresence Group system or the Polyco m Touch Control.
Keep the following points in mind about People+Content IP:
● People+Content IP provides video-only content. No audio is shared.
● People+Content IP supports any computer desktop resolution with color set to 16-bit or higher.
● Your computer resolution can be set to anything, but People+Content IP scales the image to
1024x768 or 1280x720.
User Tip: Showing content recommendations
For a computer connected directly to the RealPresence Group system, Polycom recommends using
the Send Computer button or Content button instead of People+Content IP.
Install People+Content IP
You must install the People+Content IP application on a computer before you can use it to show content.
To install People+Content IP on a computer:
1 On a computer with a Microsoft® Windows XP, Windows Vista, Windows 7, Windows 8, or Apple
Mac OS 10.8 operating system, go to http://www.polycom.com. In the Search box, type PPCIP
application download.
2 Download and install the People+Content IP software.
Show Content with People+Content IP
After you install People+Content IP, you are ready to share content.
To start showing content:
1 On your computer, start the Polycom People+Content IP application.
2 Enter the IP address or host name of the RealPresence Group system and the meeting passwor d, if
one is set.
To view the IP address of the RealPresence Group system using the Touch Control, touch and
then touch the RealPresence Group Series System tab from the Home screen. Then under the
RealPresence Group Series System heading, scroll down to IP Address.
3 On the computer, click Connect.
4 In People+Content IP, open the content you want to show, and click .
Show Content from a Computer Connected to a Polycom Touch Control
User Tip: Multiple windows and People+Content IP
If you are using multiple windows on your computer, move the People+Content IP icon to the window
you want to share.
People+Content IP allows you to send content from a computer that is connected directly to the Touch
Control.
Polycom, Inc. 27
Page 28

To start showing content from a computer connected directly to the Touch Control:
1 Using the USB content cable, connect the computer directly to the underside of the Touch Control.
If autorun is enabled on the computer, you are prompted to run People+Conten t IP. If autorun is
disabled on your computer , People+Content IP shows up as an external drive, and you must na vigate
to My Computer to launch it manually.
2 Launch People+Content IP.
3 In People+Content IP, open the content you want to show and click .
4 T o stop showing content, click .
Stop Showing Content with People+Content IP
When you are done showing content, you must shut down People+Content IP.
To stop showing content:
1 If the People+Content IP toolbar is minimized, maximize it by clicking the icon in the task bar.
2 Click in People+Content IP.
3 Click Disconnect.
Show Content from a Computer Connected to RealPresence Group
System
Before you show content, check that the computer video output is configured to use one of these supported
resolutions and refresh rates. For best video quality, use refresh rates of 60 Hz or less.
Resolution Refresh rates (Hz)
800 x 600 56, 60, 72, 75, 85
1024 x 768 60, 70, 75, 85
1280 x 720 50, 60
1280 x 768 60
1280 x 1024 60, 75
1600 x 1200 60
1680 x 1050 60
1920 x 1080 60
1920 x 1200 60
Note: Resolution and refresh rates
The way you set the resolution and refresh rate differs, depending on the type of operating system
you have. Check your computer’s manual or help topics for the appropriate steps.
Polycom, Inc. 28
Page 29

Before you prepare to show content, make sure the computer is powered on and connected to the
RealPresence Group system. You can connect a computer to the HDMI or VGA video input.
Note: 3.5 mm audio input and VGA content
The 3.5mm audio input is independent and not combined with VGA content on RealPresence Group
systems. This is because the 3.5 mm audio input is a program audio input, which is always active and
mixed into the RealPresence Group Series system. During a call, the 3.5 mm audio input is heard by
both the near-end and far-end site participants.
Connections for RealPresence Group 310 and 500 systems
Polycom, Inc. 29
Page 30
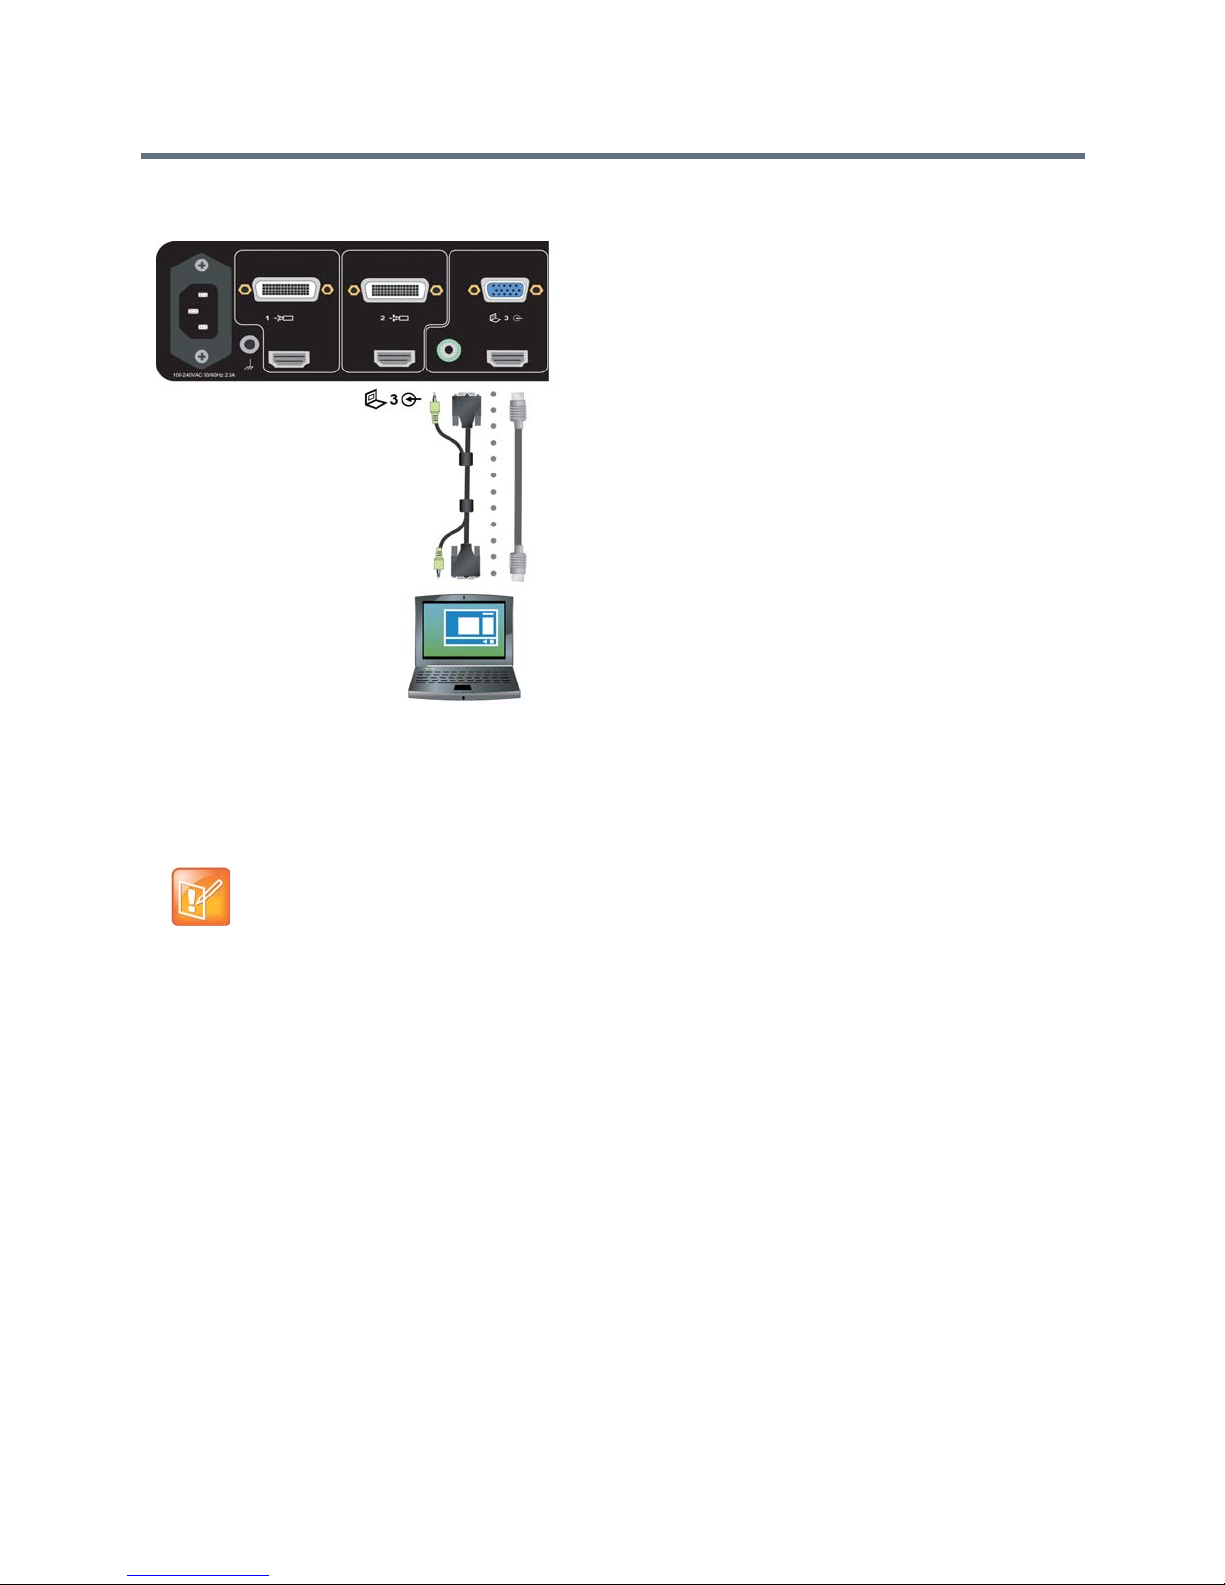
Connections for a RealPresence Group 700 system
To start showing content:
1 From the Home scre en or Call screen, touch Show Content.
2 Touch the video source to start showing content. Touch it again to stop showing content.
Note: Audio and analog content
• Audio from the content input is muted unless the content input is selected as a video source.
• If both digital and analog inputs are connected, only the digital content is sent.
• To send analog content, disconnect both digital and analog inputs, wait 15 seconds, then connect
only the analog input.
To stop showing content:
» From the Content screen of the Touch Control, touch the computer source to stop showing it.
Show Content from a USB Drive with the Touch Control
A Polycom Touch Control can show content stored on a USB drive.
To show content from a USB drive using a Polycom Touch Control:
1 Connect the USB device to the USB port on the right side of the Polycom Touch Control.
Polycom, Inc. 30
Page 31
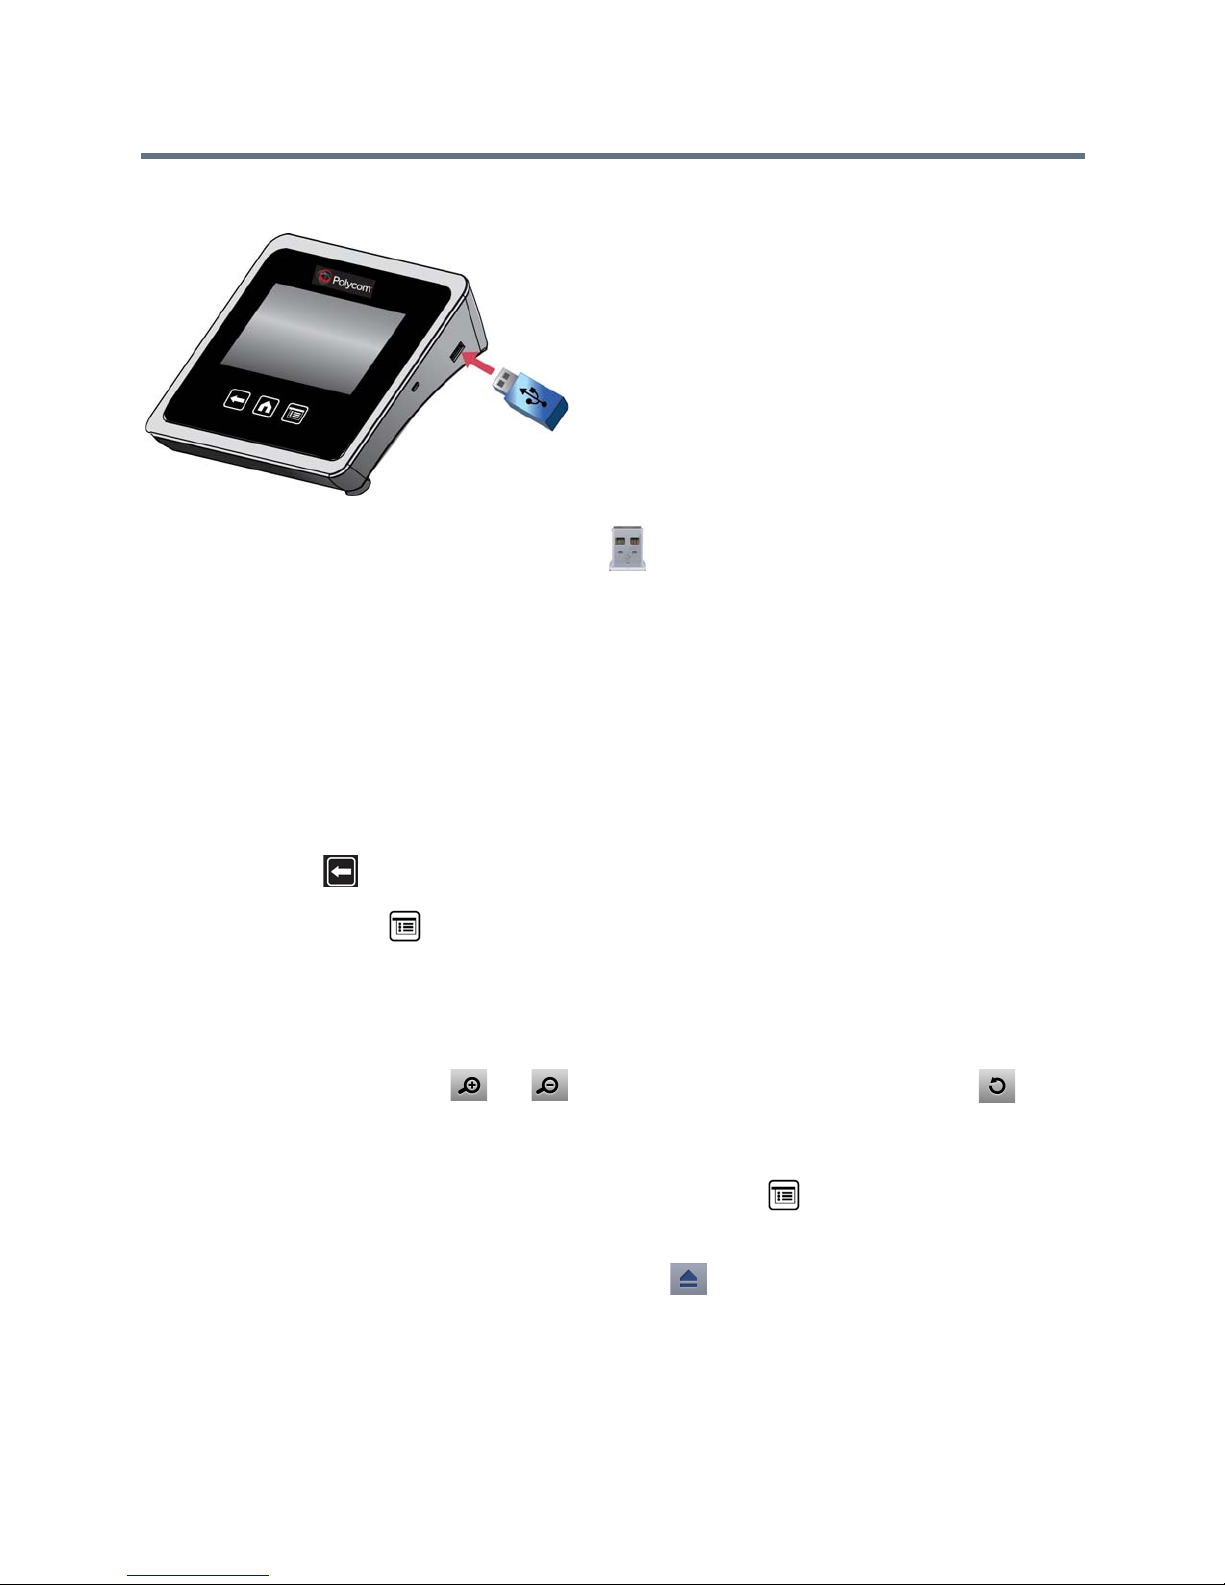
Connecting a USB Device to the Polycom Touch Control
2 From the Home scre en or Call screen, touch Show Content.
3 To view files stored on a USB drive, touch the USB drive button.
If another participant has People+Content IP connected to the RealPresence Group system to show
content, that content must be stopped before the Polycom Touch Control can show content from a
USB drive.
4 Navigate to the file that you want to show.
The Polycom Touch Control can open slideshows (.pptx), documents (.pdf), and images (.bmp, .gif,
.jpg, .png).
To browse by Name, File Type, or Date Modified, do the following:
Touch the tabs at the bottom of the screen.
Touch a tab again to reverse the sort order.
Touch a folder to open it.
Touch to go back one level.
T o filter by All Files, Recently Viewed Files, or type of file such as Slide Presentations, Docu ments,
or Images, touch .
To search for a file, touch the search field at the top of the screen. Touch a folder to open it.
5 To view a file, touch it.
6 To show the file to other call participants, touch Show Content.
While viewing a file, you can do the following on the Touch Control screen:
To zoom in or out, touch and . To reset the content to its original size, touch .
You can also zoom in and out by sliding two fingers together or apart on the screen. Touch and
drag the image to move it around the screen and view different areas.
T o go back and forth within the page s while showing a file, touch the arrows on the bottom left and
right of the Touch Control screen. To view thumbnails, touch , and then touch any thumbnail
to jump to that page.
7 To stop showing the content of a file, touch Stop Content.
8 To eject the USB drive before disconnecting it, touch .
Annotate Content on a USB Drive
You can annotate content on a USB drive while showing it to the far-end sites.
Polycom, Inc. 31
Page 32

To annotate the content:
1 While you are showing content from a USB drive, touch to access the annotation toolbar.
Touch to draw red lines on the content.
Touch to add yellow highlighting to areas of the content.
Touch to white out areas of the content.
2 After you select a tool, touch and drag your finger across the screen to use it. If you are in a call and
showing the content, the far-end sites see your annotations.
» To clear the annotations, touch . The annotations are automatically cleared when you go to
another page or touch Stop Content.
Note: Annotation mode and navigation
While you are in annotation mode, you cannot navigate between pages. To view another page, you
must exit annotation mode.
Directory and Contact Entries
The directory on your RealPresence Group system stores dialing information that helps you make calls
quickly and easily. When a site listed in the directory calls your system, the system displays the name on
the screen when the call comes in. If a site that calls you is not listed in the directory , you might be prompted
to save the contact information in the directory when the call ends.
If your system is registered with a Global Directory Server , you can search for i nformation about other active
sites that are registered with the same Global Directory Server. These entries are stored on the Global
Directory Server, and you cannot edit them.
Note: To pic reference
For information about using a Microsoft Office Communications Server or Microsoft® Lync™ Server
directory , refer to Microsoft Office Communications Server and Lync Contacts.
Sites that you have added are stored on your RealPr es ence Gro up system as Contacts. Everyone at your
site who uses the system can use the contact entries to place calls. Users at other sites cann ot access the
contacts on your system.
Polycom RealPresence Group systems support up to 2,000 contacts. They can also support the following:
● An unlimited number of contacts when the RealPresence Gro up system is registered with Micr osoft
Office Communications Server 2007 R2 or Microsoft Lync Server 2010 or 2013.
● Up to 200 additional contacts with presence when re gistered with a Polycom Converged
Management Application™ (CMA
For more information about this and other Microsoft and Polycom interoperability considerations, refer to
the Polycom Unified Communications for Microsoft Environments Deployment Guide.
®
) system
Multiple Sites in Video Calls
Multipoint conferences involve at least three different endpoints. During a multipoint call, multiple sites can
see and hear each other . You can also share content in a multipoint call, just as you can in a point-to-point
call.
Polycom, Inc. 32
Page 33

All systems can participate in multipoint calls. T o host multipoint calls, your RealPresence Group 500, or 700
system must have a multipoint video option key installed. You can host multipoint calls using a video
conferencing system with multipoint capabilities, or you can use a bridge, such as the RealPresence
Collaboration Server 800s.
Note: Multipoint limitation
You cannot host multipoint video calls on RealPresence Group 300 and 310 systems.
How you place a multipoint call depends on whether you’re using a RealPresence Group system or bridge
with multipoint capabilities. The number of sites allowed in the call is determined by the capabilities of the
system or bridge hosting the call.
Place a Multipoint Call by Adding Sites
To place a multipoint call by adding sites to a call:
1 Call the first site.
2 After the call connects, touch Add Call Participant from the Call screen.
3 Place a call to the next site. For more information, refer to Call by Entering a Name or Number .
4 Repeat the above steps until all sites are connected.
Add a Call to a Multipoint Conference
In multipoint calls, you often need to add another call to the conference.
» Touch Add to Call to add the call to the conference.
Hold and Answer a Call in a Conference
While in a multipoint call, you might need to hold the main call and answer an incoming call.
» Touch Hold + Answer to hold the current call and answer the incoming call.
Note: Cannot hold specific calls in a multipoint conference
Y ou ca nnot put an individual p articip ant in the meeting on hold and resume in a multipoint
conference.
Ignore an Individual Incoming Call in a Conference
You can choose to ignore an incoming call while you are in a conference.
» Touch Ignore to choose not to answer an incoming call.
Place a Call While a Multipoint Call is on Hold
You might find yourself needing to hold the conference call in order to make a new call.
Polycom, Inc. 33
Page 34

To make an outgoing call while a call is on hold:
» Touch Place a Call. Place the call using your preferred method.
Switch Between Calls
You can switch between held and active calls.
To switch between calls:
» When one call is on hold and one call is active, a Manage button displays on the Call screen. Touch
Manage to display the Manage screen, then touch Switch To to change to the other call.
Resume a Held Call
When there is no active call, but there is a call on hold, you can resume the held call.
To resume a call on hold:
» If you have a single call on hold with no active call on the Call screen, touch Resume Call.
Hang Up an Individual Call in a Multipoint Call
To hang up an individual call in a multipoint call:
» On the Active Call screen, select the call that you want to hang up and touch Hang Up.
Hang Up All Calls
To hang up all calls in a multipoint conference call:
» At the top of the Active Call screen above the list of individual calls, touch Hang Up.
Passwords for Multipoint Calls
Y ou might be required to enter a me eting password to join a multipoint call. And you can require that far-end
systems enter a meeting password to prevent unauthorize d participants from joining multipoin t calls hosted
by your RealPresence Group system.
Keep the following points in mind regarding meeting passwords:
● If you need to generate touch tones (DTMF tones), touch Keypad from the Call screen. Then use the
keypad number buttons.
● Do not set a meeting password if multipoint calls include audio-only endpoints. Aud io-only endpoint s
are unable to participate in password-protected calls.
● Microsoft Office Communicator clients are unable to join password-protected multipoint calls.
● SIP endpoints are unable to dial in to password-protected multipoint calls.
● If a meeting password has been set for a call, People+Content IP clients must enter the password
before joining the meeting.
Polycom, Inc. 34
Page 35

Set Up a Meeting Password
To configure a meeting password:
1 From the Home scre en , to uc h .
2 Touch the RealPresence Group Series System tab.
Multipoint Viewing Modes
The multipoint viewing mode configured on the host system is the on e used in the call. The default mode is
Discussion, however, your administrator might have configured one of the other m od es for yo ur syste m .
Multipoint Viewing Layouts
What you see during a multipoint call can vary depending on how the RealPresence Group system is
configured, the number of sites participating, the number of monitors you are using, and whether content is
shared. The multipoint viewing layout configured on the host system is the one used in the call.
When you use two monitors of equal size, you can have eight-way multipoint calling, depending upon your
system configuration. When you share content, one monitor is used for content and one for people. The
configuration varies depending on whether your administrator has enabled Self View and how many peo ple
are participating. When you do not share content, the configuration for both monitors is spread over both
monitors.
To find out more about multip oin t layouts, please talk to the administrator of your RealPresence Group
system.
Note: Layout option limitation
®
If you are not in an RealPresence
is Browse.
Collaboration Server (RMX®) system call, your only layout option
Multiple Layouts in Lync Calls
In a Microsoft Lync 2 013-hosted multipo int or po int-to-point call, you can now view multiple far-end sites in
layouts. In previous RealPresence Group system releases, you could only see the dominant speaker in
Voice Switching Mode. You can see five far-end sites on Lync-hosted multipoint calls.
Call Answering Selections
To change the way calls are answered, you might want to change the default settings of your system as
described in the following sections:
Temporarily Refuse Calls Using the Touch Control
Enable Answering Video Calls Automatically Using the Touch Control
Mute Automatically Answered Video Calls Using the Touch Control
Polycom, Inc. 35
Page 36

Temporarily Refuse Calls Using the Touch Control
If your system administrator has allowed you access, you can automatically refuse incoming calls when you
do not want to be disturbed. Callers get a message that the call was rejected, and you receive no notification
about incoming calls. You can, however, make outgoing calls.
To temporarily refuse incoming calls using the Touch Control:
1 From the Home scre en , to uc h .
2 Touch the RealPresence Group Series System tab.
3 Do one of the following:
To refuse incoming point-to-point video calls, set Auto Answer Point-to-Point to Do Not
Disturb.
To refuse incoming multipoint video calls, set Auto An swer Multipoint V ideo to Do Not Disturb.
Enable Answering Video Calls Automatically Using the Touch Control
If your system administrator has allowed access to user settings, you can specify whether to answer video
calls automatically or to have the system announce incoming video calls and wait for you to answer
manually.
Caution: Security risk and auto-answering calls
Automatically answering calls is convenient, but it can create security issues. An unexpected caller
could interrupt a meeting in progress or look at equipment and notes left in an empty room.
To use the Touch Control to enable automatically answering video calls:
1 From the Home scre en , to uc h .
2 Touch the RealPresence Group Series System tab.
3 If you want to automatically answer incoming point-to-point video calls, set Auto Answer
Point-to-Point to Yes.
4 If you want to automatically answer incoming multipoint video calls, set Auto Answer Multipoint
Video to Yes.
Mute Automatically Answered Video Calls Using the Touch Control
If your system administrator has allowed access to user settings, you can choose wh ether to mute the audio
when automatically answered video calls connect. This prevents callers from overhearing conver sations or
meetings.
User Tip: Automatic muting
If you enable automatic muting during a call, the audio for the current meeting is not affected.
To mute automatically answered video calls using the Touch Control:
1 From the Home scre en , to uc h .
2 Touch the RealPresence Group Series System tab.
Polycom, Inc. 36
Page 37

3 Under Meetings, touch Mute Auto Answer Calls to enable the option.
4 After the call connects, touch Mute when you’re ready to unmute the microphones.
Video Stopping and Starting
You can now stop your near-end site video while in a call, or stop your near-end site video before a call
begins. You can start your video again at any time.
When your video is stopped, the far end does not see local video transmission from you. Stopping your
video allows you to stop sending your near-end camera-encoded video while sti ll remaining connected to
the conference.
User Tip: Stopping video in Lync versus non-Lync environments
In Lync environments when your video is stopped, video transmissions ceases and no Self View
displays. When your video is stopped in non-Lync environments, a video pause image is sent to the
far end.
Regardless of environment, stopping your video does not affect the sending or receiving of content.
Stop Video
Sometimes, you want to stop sharing your video whether in or out of a call.
To stop video in or out of a call:
1 Using the local interface, go to > My Video.
2 T o stop video, select Stop Video.
When you stop the video, a video pause icon appears on the display.
Start Video
When you are ready to share video, start the video stream.
To start video in or out of a call:
1 Using the local interface, go to > My Video.
2 T o start video, select Start Video. When you start the video, the video pause icon disappears from
the display.
Microsoft Outlook Calendaring
If your system is configured to connect to the Microsoft Exchange Server , you view scheduled meetings on
the RealPresence Group Series Home screen. If you have completed configuration steps, you can also call
from calendar meetings. Refer to the following sections:
Scheduled Meetings
Calendar Meetings
Polycom, Inc. 37
Page 38

Scheduled Meetings
If your RealPresence Group system is configured to connect to the Microsoft Exchange Server, you can
view scheduled meetings on the Home screen.
To view more information about a meeting on the calendar, highlight the meeting. Depending on how your
system is configured, private meeting details might not b e visible. You might also see reminders displayed
on the system a short time before each meeting.
User Tip: Scheduled meetings
• Meetings are displayed as days of the week, starting with the current day.
• The calendar meeting list displays the next 15 meetings scheduled for the current day and the next
6 days, ending at midnight.
View Scheduled Meetings with the Touch Control
To view scheduled meetings from the calendar using the Touch Control:
» On the Home screen, touch Calendar or the date and time display at the top of the screen.
Scheduled meetings are listed for the current day and for the next 6 days.
Calendar Meetings
RealPresence Group systems can connect to Microsoft Exchang e Server 2010 or 2013 and retrieve
calendar information, including meeting details. If the meeting was created using the Polycom Conferencing
Add-in for Microsoft Outlook, the RealPresence Group system can:
● Identify video-enabled meetings with a icon displayed on the system calendar.
● Let users join the meeting without knowing the co nn ec tio n de tails.
If your RealPresence Group system is configured to connect to the Microsoft Exchange Server, and the
Polycom Conferencing for Microsoft Outlook add-in is installed at your site, you can join a scheduled
meeting from the Calendar screen. If the home screen does not display ca lendar information, the system is
not registered with the Microsoft Exchange Server. If no meetings are scheduled, a “No Meetings Today”
message is displayed.
Join a Scheduled Meeting from the Calendar Screen
To join a scheduled meeting from the Calendar screen:
1 From the Home scre en , to uc h Calendar or the date and time display at the top of the screen.
2 Touch Join to call into the meeting. Only meetings scheduled with the Polycom Conferencing
Add-In for Microsoft Outlook display a Join button.
Touch in the day view to see the meeting details and to join the meeting.
If the Calendar screen is blank, these criteria have not been met, or no meetings are scheduled in
Microsoft Outlook.
Polycom, Inc. 38
Page 39

Note: Additional information
For information about obtaining the Polycom Conferencing Add-In for Microsoft Outlook, refer to
Polycom Solution Support.
Microsoft Office Communications Server and Lync
Contacts
Depending on how your system is configured, you might be able to search a directory , view a list of Microsof t
Office Communications Server (OCS) or Microsoft Lync contacts, see if the contacts are online, and call
them without knowing or remembering their addresse s. RealPresence series support s Microsoft OCS 2007
R2 and Microsoft Ly nc Server 2010 and 2013.
Office Communicator and Microsoft Lync contacts appear on the RealPresence Group system and on the
Contacts screen.
User Tip: Office Communicator and distribution list groups
Polycom RealPresence Group systems do not support Office Communicator or Microsoft Lync
distribution list groups, which are created on the Microsoft Exchange Server and are typically used for
sending email to a group of people.
Contact Presence States on the Touch Control
If your RealPresence Group system is registered to a Microsoft Office Communications Server (OCS) or
Microsoft
contacts.
Icon Presence Description
®
Lync™ Server 2010/2013 directory server , you can see the following presence ico ns next to your
Do Not Disturb One of the contact’s devices is set to Do Not
Disturb.
In a Call At least one of the contact’s devices is in a call,
and none of the devices is set to Do Not
Disturb.
Available At least one of the contact’s devices is available
for a call, and the contact’s other devices are
available, away, or offline.
Busy At least one of the contact’s devices is busy.
Idle All of the contact’s devices are either idle or
offline.
Offline All of the contact’s devices are offline.
Presence Unknown The presence state for all of the contact’s
Polycom, Inc. 39
devices is unknown.
Page 40

Multipoint Calls Using Centralized Conferencing Control Protocol
(CCCP)
If a Polycom RealPresence Group system is deployed in a Microsoft L ync Server 2010 or 2013 environ ment
and Centralized Conferencing Control Protocol (CCCP) is enabled, you can place and participate in
multipoint calls that are hosted by Microsoft audio and video servers.
If you are used to being in conferences hosted by a Lync server, you might notice that the Polycom
RealPresence system interface closely resembles the interface you see in Microsoft environments.
For more information about CCCP multipoint calling, refer to the Polycom Unified Communications for
Microsoft Environments Deployment Guide or contact your system administrator.
Manually Create a Conference with CCCP
To manually create a multipoint call with CCCP using the Touch Control:
1 From the Call screen on the Polycom Touch Control, touch Conference.
2 Create a list of participants you want in the call. You can add participants using any combination of
the following methods.
Touch Keypad, then enter SIP addresses. Each time you enter a SIP address, touch Add to add
it to the list of participants.
Touch Directory, then touch the names you want to include in the list of particip ants. If you to uch
a group, the group opens and you can touch the individual names to add them.
Touch Favorites, then touch the names you want to include in the list of participants.
3 To initiate the conference call, touch Join when your list of participants is complete.
After you touch Join, you can touch Add Participant to add other participants as described in step
2 without putting other participants on hold, although yo u might experience a brief audio or video
pause.
Add Participants to a CCCP Conference
To add participants to a CCCP conference using the Touch Control:
1 From the Call screen, touch Add Participant.
2 Select Keypad and enter a number to call, or choose a site from one of the following locations:
Recent Calls list
Favorites screen
Directory
Calls Muted with Lync
A Microsoft Lync client acting as the call organizer can mute all of the participants in the call. You cannot
unmute until the organizer unmutes the particip ants unless you are designated as a presenter . If the meeting
organizer has muted your Polycom RealPresence Grou p system selectively, you can unmute your system
even if the organizer does not. It is important to underst and that no one else can un mute your microphone.
They can only request that you unmute.
Polycom, Inc. 40
Page 41

When your mute status changes due to a Microsoft Lync client organizer muting or unmuting all of the
participants, notification is displayed on the Polycom RealPresence Group system monitor.
Allow the Far-End System to Control Your Camera
If your system administrator has allowed access to user settings, you can allow the far-end system to control
your camera. Far-end participants can also set and use presets for your camera, if their systems support
presets.
User Tip. Setting display is immediate
Changing this setting takes effect immediately, even if a call is in progress.
To allow others in the call to control your camera:
1 From the Home scre en , to uc h .
2 Touch the RealPresence Group Series System tab.
3 Under Cameras, touch Far Control of Near Camera to enable the option.
Adjust for Room Lighting
If your system administrator has allowed access to user settings, you can use the backlight control to adjust
the brightness of the video that the main camera sends to the RealPresence Group system. Use backlight
compensation in situations where the subject appears darker than the background. Enabling this setting
helps to darken a bright background, which can imp act the tracking performance of the Polycom EagleEye
Director.
User Tip: Backlight control display
Because backlight controls adjust the main bu i lt -i n camera, these controls do not make content
displayed from a computer appear brighter.
To turn backlight compensation on:
1 From the Home scre en , to uc h .
2 Touch the RealPresence Group Series System tab.
3 Under Cameras, touch Backlight Compensation to enable the setting.
4
Allow Video Display on the Web
If your system administrator has allowed access to user settings, you can choose whether to allow viewing
of the room where the system is located or video of calls in which the system participates.
Caution: Default setting does not allow video displ ay
The default setting is to not allow video display on the web. Be sure to verify whether your system
administrator wants the setting to be changed.
Polycom, Inc. 41
Page 42
To allow the display of video on the web:
1 From the Home scre en , to uc h .
2 Touch the RealPresence Group Series System tab.
3 Under Meetings, touch Allow Video Display on Web.
Polycom®RealPresence®Capture Server Recording
Polycom® RealPresence® Capture Server is a network-based video streaming and recording solution that
integrates with RealPresence Group systems to allow you to record a call using the following methods:
● Dial a RealPresence Capture Server directly: Use the default recording settings defined by a
RealPresence Capture Server administrator. Before recoding a call using this method, you must
obtain the IP address, H.323 extension, or SIP URL of the RealPresence Capture Server.
● Dial a RealPresence Capture Server Video Recording Room (VRR): A VRR is a virtual Capture
Server with a specific recording profile that is defined by a RealPresence Capture Server
administrator. Before recording a call using this method, you must obtain the VRR number and the
IP address, H.323 ID, or SIP address of the RealPresence Capture Server.
● Dial a RealPresence Group system from a RealPresence Capture Server portal: If you have
access to a RealPresence Capture Server portal, you can log in to the portal to dial in to a Group
system from which you want to record a call. This method is ideal for an administrator of a remote
RealPresence Group system. For information about using this method, refer to the Polycom
RealPresence Capture Server, Appliance Edition User Guide or Polycom RealPresence Capture
Server, Virtual Edition at support.polycom.com.
User Tip: Additional RealPresence Capture Server features
If you have access to a RealPresence Capture Server portal, you can use additional
features, such as copying the URL for a recording to share with others. For more
information, refer to the Polycom RealPresence Capture Server, Appliance Edition User
Guide or Polycom RealPresence Capture Server, Virtual Edition at support.polycom.com.
RealPresence Capture Server Connection Methods
The following connection methods are supported for dialing a RealPresence Capture Server.
Capture Server
Type
Capture Server
system
If the RealPresence Group system is not registered to
the gatekeeper or to a SIP server, dial the
RealPresence Capture Server IP address.
If the RealPresence Group system is registered to the
gatekeeper, dial the RealPresence Capture Server
E.164 extension for H.323.
If the RealPresence Group system is registered to a
SIP server, dial the RealPresence Capture Server SIP
address.
Connection Method Example
10.11.12.13
1234
CS123
Polycom, Inc. 42
Page 43

Capture Server
Type Connection Method Example
VRR
For H.323 calls:
[RealPresence Capture Server IP]##[VRR number]
or
[RealPresence Capture Server E.164 prefix][VRR
number]
For SIP calls:
[VRR number]@[RealPresence Capture Server IP]
or
[SIP peer prefix][VRR number]
If the RealPresence Capture
Server IP is 11.12.13.14 and the
VRR number is 4096,dial
11.12.13.14##4096.
If the RealPresence Capture
Server E.164 prefix is 8888 and the
VRR number is 4096, dial
88884096.
If the RealPresence Capture
Server IP is 11.12.13.14 and the
VRR number is 4096, dial
4096@11.12.13.14.
If the SIP peer prefix of the
RealPresence Capture Server is
8888 and the VRR number is 4096,
dial 88884096.
RealPresence Capture Server TVUI Interface
When you establish a connection to a RealPresence Capture Ser ver, the TV Interface (TVUI) with buttons
and far-end controls appear, as shown in the next graphic. Unless the administrator for the RealPresence
Capture Server has disabled the Start Recording Immediately option, the recording starts immediately
after the TVUI opens.
Y ou can use either of the following methods to dial a RealPres ence Capture Server and activate the controls
on the TVUI:
● RealPresence Group system local interface with the remote control
Polycom, Inc. 43
Page 44

● RealPresence Group system with the Touch Control
Use the Touch Control to Record on a RealPresence Capture Server
Y ou can use the Polycom T ouch Con trol system to start, pause, resume, stop, and playback a Rea lPresence
Capture Server recording.
The FECC keys shown in the table below are supported for activating the controls on the TVUI using a
Polycom Touch Control system.
Operation FECC Key
Pause recording
Start a recording
Resume a paused recording
Stop a recording
Playback a recording
To activate recording button controls on the TVUI using a Touch Control:
1 From the Home scre en , to uc h .
2 In the dialing field, enter the number of the RealPresence Capture Server you want to use to record
the call as follows:
Letters: To enter letters, touch Keyboard. Touch and hold keys to access accented characters.
Backspace: To backspace, touch Delete.
3 Touch to place the call.
4 The TVUI opens. If the recording does not start immediately, press the appropriate FEC key to start
the recording.
5 When you are done recording, press the appropriate FEC key to stop the recording.
6 To playback the recording, by press the appropriate FEC key.
Incoming Call Alert for Hearing-Impaired Users
If your administrator has configured this feature, an attention-getting me ssage displays for hearing-impaired
users when an incoming call is received by the RealPresence Group system. When a call is received, the
RealPresence Group system displays a message asking if you would like to answer the call.
If the feature is enabled, the enlarged message text flashes between white and yellow. Flashing text is off
by default. The incoming call alert persists after powering the system off and on.
Polycom, Inc. 44
Page 45
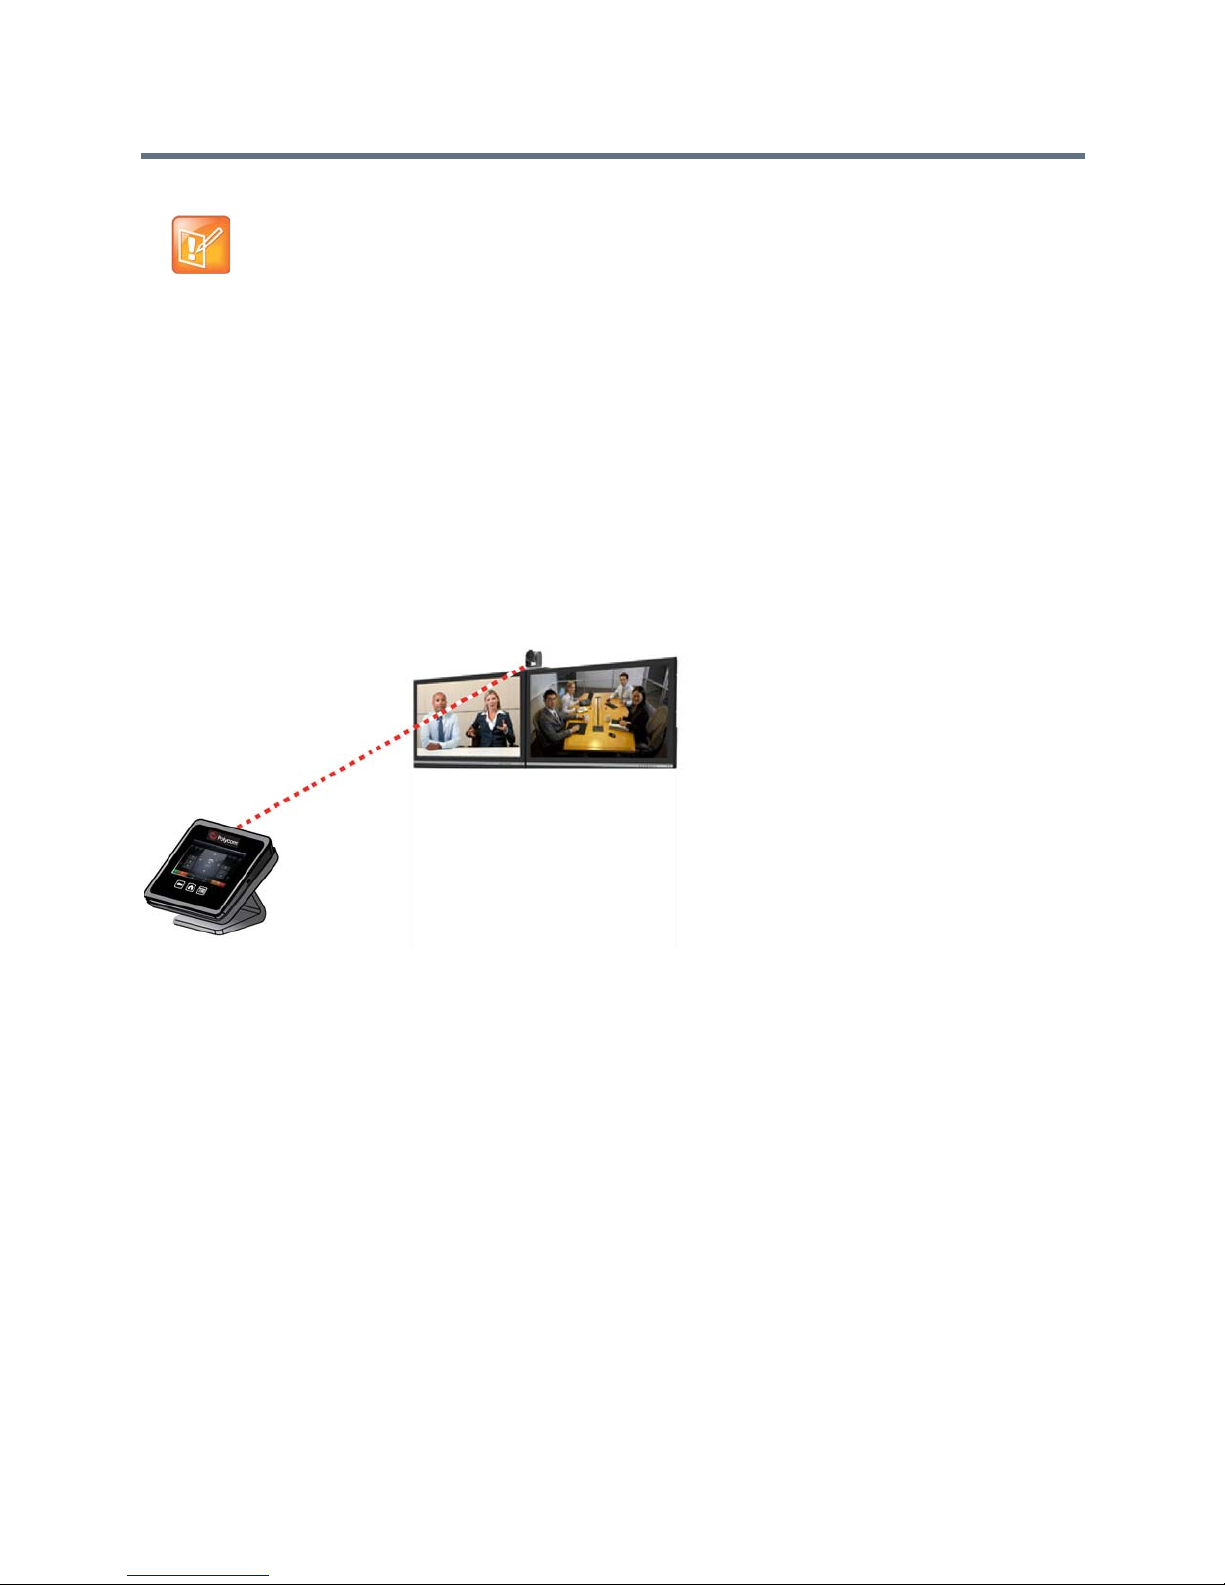
Note: Auto Answer Point-to Point
If your RealPresence Group system is paired with a Polycom Touch Control and your administrator
has enabled Auto Answer Point-to-Point, you do not see the flashing message on the
RealPresence Group system or on the Touch Control screen. You must interact with the call on the
Touch Control screen.
Virtual Remote Control
During normal operation, the Polycom Touch Control uses an IP connection to communicate with the
RealPresence Group system. If this connection is lost for more than 2 minutes, you might see error
messages on the RealPresence Group system monitor and the Polycom Touch Control screen.
After you are disconnected, you can use a virtual remote control on the Polycom Touch Control to access
the RealPresence Group system until the connection is restored. The virtual r emote control sends IR signals
across the room, so make sure the back of the Polycom Touch Control is facing the RealPresence Group
system camera.
Virtual Remote Control
When the IP connection is restored, the virtual remote control is no longer available.
Tips for Troubleshooting
If you are having problems making a call or need to view system information, diagnostics, or configure some
administration settings, refer to the following topics:
Test Calls
View Call Statistics for an Active Point-to-Point Call with the Touch Control
Test Calls
To troubleshoot any issues making video calls, call a Polycom video site to test your setup. A list of
worldwide test numbers is available at www.polycom.com/videotest.
When placing test calls, try these best practices:
● Make sure the number you dialed is correct, then try the call again. For e xample , you migh t nee d to
dial 9 for an outside line or include a long distance access or country code.
Polycom, Inc. 45
Page 46
● To find out if the problem exists in your system, ask the person you were trying to reach to call you
instead.
● Find out if the system you are calling is powered on and is functioning properly.
● If you can make calls but not receive them, make sure that your system is configured with the correct
number
View Call Statistics for an Active Point-to-Point Call with the Touch
Control
To view information about a point-to-point call in progress:
1 Touch Participants.Participant information displays.
2 Touch View Call Statistics.
Streams associated with the participant are displayed beneath the participant information. To view
more information about a specific stream, navigate to the desired stream and touch . From an
individual stream view you can touch Next Stream to view the next stream in the list.
View Call St atistics for an Active Multipoint Call with the Touch Control
To view information about a multipoint call in progress:
1 Touch Participants.A list of participants in the call displays.
2 Touch View Call Statistics and do one of the following:
To view a participant’s details, navigate to the desired participant, and touch .
The participants’ ac tive streams are d isplayed benea th th e p articipant information. To view more
information about a specific stream, navigate to the desired stream and touch . From an
individual stream view you can select Next Stream to view the next stream in the stream list.
To quickly access a list of all active audio, video, and content streams within the call, navigate to
Active Streams. This option is available in SVC calls only. Select the desired stream and touch
.
Polycom Technical Support
If you are not able to make test calls successfully and you have verified that the equipment is installed and
set up correctly, contact your Polycom distributor or Polycom Technical Support.
To contact Polycom Technical Support, go to support.polycom.com.
Polycom Solution Support
Polycom Implementation and Maintenance service s provide support for Polycom solution compone nts only .
Additional services for supported third-party Unified Communications (UC) environments integrated with
Polycom solutions are available from Polycom Global Services and its certified Partners. These additional
services will help customers successfully design, deploy, optimize and manage Polycom visual
communications within their UC environments.
Polycom, Inc. 46
Page 47

Professional Services for Microsoft Integration is mandatory for Polycom Conferencing for Microsoft
Outlook, Microsoft Office Communications Server , and Microsoft Lync Server 20 10 or 2013 integrations. For
additional information and details please refer to
http://www.polycom.com/services/professional_services/index.html or contact your local Polycom
representative.
Regulatory Notices
Regulatory notices describe safety and legal considerations for using the following Polycom RealPr esence
Group systems:
● Polycom RealPresence Group 300 System (Model: Group 300; Type: P001)
● Polycom RealPresence Group 310 System (Model: Group 310; Type: P001)
● Polycom RealPresence Group 500 System (Model: Group 500; Type: P001)
● Polycom RealPresence Group 700 System (Model: Group 700; Type: P002)
For more regulatory information, refer to the Regulatory Notices for the Polycom RealPresence Group
Series at
support.polycom.com.
Caution: EagleEye Acoustic camera interoperability
If you have an EagleEye Acoustic camera, be sure to use it only with UL-approved Information
Technology Equipment (ITE) or similarly approved equipment.
Polycom, Inc. 47
 Loading...