

Page 1

Polycom ReadiManager Web Scheduling Guide
PN: DOC2130A
Page 2

Polycom ReadiManager Web Scheduling Guide
Copyright
© 2005 Polycom, Inc. All rights reserved.
Polycom Headquarters: 4750 Willow Road, Pleasanton, CA 94588
(T) For North America only:
1.800.POLYCOM (765.9266)
(T) For North America, Latin America and Caribbean
+1.925.924.6000, (F) +1.925.924.6100
Polycom EM EA: 270 Bath Road, Slough, Berkshire SL1 4DX
(T) +44 (0)1753 723000, (F) +44 (0)1753 723010
Polycom Asia Pacific: Polycom Hong Kong Ltd., Rm 1101 MassMutual Tower, 38
Gloucester Road, Wanchai, Hong Kong
(T) +852.2861.3113, (F)+852.2866.8028
No part of this document may be reproduced or transmitted in any form or by any means,
electronic or mechanical, for any purpose, without the express written permission of
Polycom, Inc. Under the law, reproducing includes translating into another language or
format.
As between parties, Polycom, Inc. retains title to and ownership of all proprietary rights with
respect to the software contained within its products. The software is protected by United
States copyright laws and international treaty provision. Therefore, you must treat the
software like any other copyrighted material (e.g. a book or sound recording).
Other Restrictions
You shall not and shall not allow any third party to 1) decompile, disassemble, or otherwise
reverse engineer or attempt to reconstruct or discover any source code or underlying ideas
or algorithms of the software by any means whatsoever or 2) remove any product.
Trademark Information
Polycom®, the Polycom logo design, ViaVideo®, ViewStation®, and SoundStation® are
registered trademarks; ReadiManager™ SE200, Global Management System™,
PathNavigator™, ReadiConvene™, iPower™, People+Content™, MGC™,
WebCommander™, PVX™, QSX™, VSX™, and VTX™7000 are trademarks of Polycom, Inc.
in the United States and various other countries. Microsoft® and Outlook® are registered
trademarks of Microsoft Corporation in the United States and/or other countries. All other
trademarks are the property of their respective owners.
Patent Information
The accompanying product is protected by one or more U.S. and foreign patents and patents
pending held by Polycom, Inc.
Warranty
See Polycom End User License Agreement
Note: Polycom believes that this document is accurate as of the date of its issuance. Polycom
disclaims any obligation to update the information contained herein. You use the
information in this document at your own risk, and Polycom will not be liable for errors or
omissions in this document. Polycom does not warrant that the information contained in this
document will meet your particular requirements or the requirements of any particular
installation.
Page 3

Contents
About this Guide
1 Getting Started with Scheduling
Logging On . . . . . . . . . . . . . . . . . . . . . . . . . . . . . . . . . . . . . . . . . . . . . . . . . . . . . . . . . . . . . . . 1–1
Downloading the Polycom Plugin . . . . . . . . . . . . . . . . . . . . . . . . . . . . . . . . . . . . . . . . . . . 1–3
Getting Help When You Need It . . . . . . . . . . . . . . . . . . . . . . . . . . . . . . . . . . . . . . . . . . . . . 1–4
2 Scheduling Videoconferences
Creating a Videoconference . . . . . . . . . . . . . . . . . . . . . . . . . . . . . . . . . . . . . . . . . . . . . . . . . 2–2
Differences in Conference Type . . . . . . . . . . . . . . . . . . . . . . . . . . . . . . . . . . . . . . . . . . 2–6
Other Scheduling Features . . . . . . . . . . . . . . . . . . . . . . . . . . . . . . . . . . . . . . . . . . . . . . . . . . 2–6
Editing Dial Options for a Video Endpoint . . . . . . . . . . . . . . . . . . . . . . . . . . . . . . . . 2–7
Creating Recurring Conferences . . . . . . . . . . . . . . . . . . . . . . . . . . . . . . . . . . . . . . . . . 2–9
Adding a Guest to a Videoconference . . . . . . . . . . . . . . . . . . . . . . . . . . . . . . . . . . . 2–10
Making Changes to a Scheduled Conference . . . . . . . . . . . . . . . . . . . . . . . . . . . . . . . . . 2–11
3 Using Advanced Settings When Scheduling
Selecting a Template in Advanced Settings . . . . . . . . . . . . . . . . . . . . . . . . . . . . . . . . . . . 3–2
Specifying Dial Options for the Conference . . . . . . . . . . . . . . . . . . . . . . . . . . . . . . . . . . . 3–3
Forcing MCU Usage . . . . . . . . . . . . . . . . . . . . . . . . . . . . . . . . . . . . . . . . . . . . . . . . . . . . . . . 3–3
Setting the Video Mode for Multipoint Calls . . . . . . . . . . . . . . . . . . . . . . . . . . . . . . . . . . 3–4
Setting the Connection Speed for a Conference . . . . . . . . . . . . . . . . . . . . . . . . . . . . . . . . 3–5
Using People + Content . . . . . . . . . . . . . . . . . . . . . . . . . . . . . . . . . . . . . . . . . . . . . . . . . . . . 3–5
Using T.120 . . . . . . . . . . . . . . . . . . . . . . . . . . . . . . . . . . . . . . . . . . . . . . . . . . . . . . . . . . . . . . . 3–6
Chair Person Control . . . . . . . . . . . . . . . . . . . . . . . . . . . . . . . . . . . . . . . . . . . . . . . . . . . . . . 3–7
iii
Page 4

Polycom ReadiManager Web Scheduling Guide
iv
Page 5

About this Guide
This document, the Polycom ReadiManager Web Scheduling Guide, includes
information about using the web scheduling capabilities in Polycom
ReadiManager
Web scheduling is part of the larger ReadiManager application that is used to
configure and manage video communications within an enterprise.
An HTML version of the information in this guide is available to you as online
help while you work with ReadiManager. To access the online help, click the
question mark icon in the upper-right corner of the ReadiManager page.
The following additional documentation about ReadiManager is available:
• Polycom ReadiManager Outlook Scheduling Guide
• Polycom ReadiManager Operator’s Guide
• Polycom ReadiManager Administrator’s Guide
™ to schedule videoconferences.
®
v
Page 6

Polycom ReadiManager Web Scheduling Guide
vi
Page 7

Getting Started with Scheduling
This chapter tells you how to get started with ReadiManager, including how
to access it through a browser, how to use help, and how to download the
required Microsoft .Net controls.
If you are already logged in and ready to schedule, turn to Chapter 2,
“Scheduling Videoconferences.”
Logging On
Polycom ReadiManager is installed on a server and is accessed through
Microsoft Internet Explorer.
1
What you need:
• The IP address of the ReadiManager server.
• Your user name and password.
If you have a ReadiManager-only surname and password, your
ReadiManager administrator can provide you with them. Otherwise, use
your regular company network login.
To access ReadiManager from a PC
>>
Launch Internet Explorer and type your ReadiManager server IP address
in the address line of your browser.
Example: http://ReadiManager Appliance IP Address
1–1
Page 8
Polycom ReadiManager Web Scheduling Guide
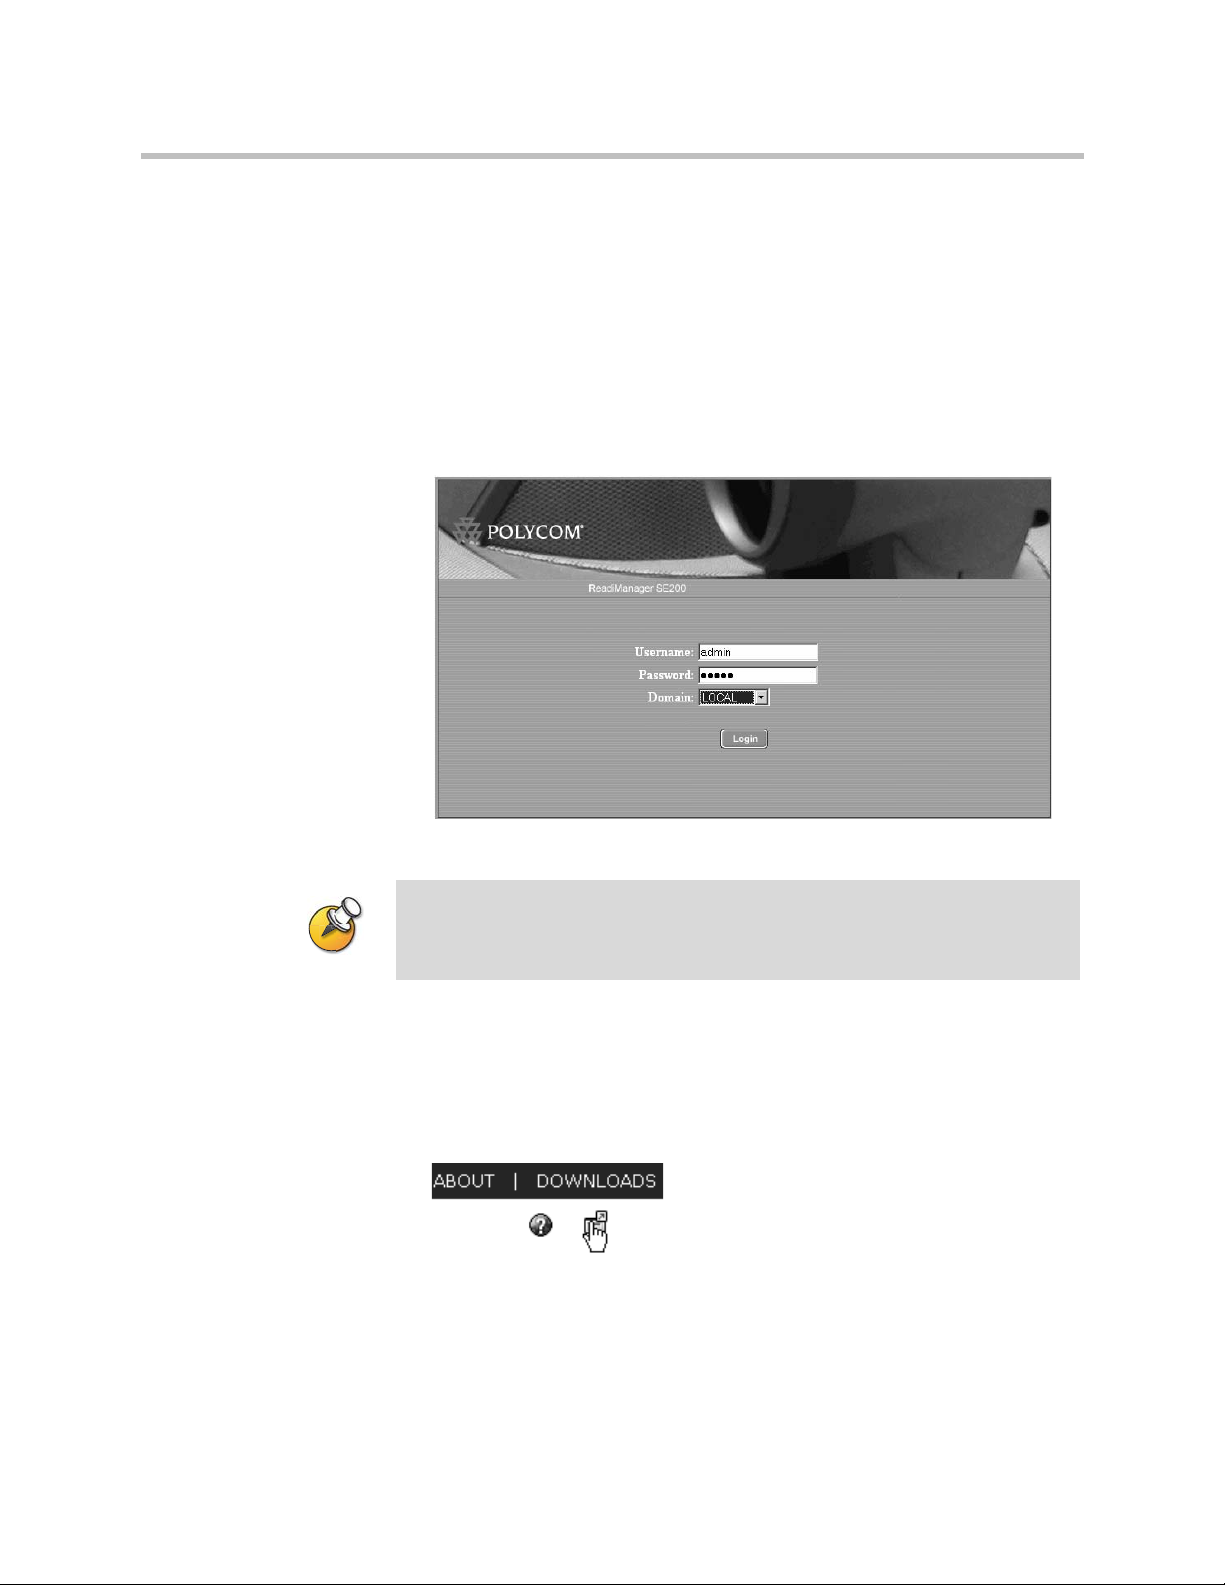
To log in to ReadiManager
>>
Log into ReadiManager by entering your user name, password, and
domain, and then clicking the Login button.
Please note: The password is case-sensitive.
For most users, the appropriate domain will be the same as the domain
you use to log into your main company network. For some users, the
domain is “Local.” If you are uncertain what domain to use, contact your
ReadiManager administrator.
Figure 1-1 Login Screen
The My Conferences page appears.
If you are assigned a ReadiM anager role other than Scheduler, you will se e a
different screen. If so, click the My Conferences link at the top of the page to get to
S cheduling.
To log out of ReadiManager
>>
When you are finished working in ReadiManager click the Log Out link at
the top right corner of the screen.
Figure 1-2 Log Out Link
1–2
Page 9

Downloading the Polycom Plugin
The ReadiManager Scheduling interface uses special Microsoft.NET controls
and ActiveX controls that run in your Internet Explorer browser window. The
first time that you access ReadiManager Scheduling on a given computer, you
will be prompted to download and install a Polycom plugin, and may also be
prompted to download and install the .NET framework, if it is not already on
your computer system.
If you need assistance setting up yo ur com puter system and brow ser to work
correctly with R eadiM anager, please contact your R eadiM anager adm inistrator.
When you return to the ReadiManager Operator View, you may see a “Wait...”
prompt for a few seconds as the control loads, but you will not have to install
it again on this computer.
To install the ReadiManager plugin
1 Click the link to download the plugin.
Getting Started with Scheduling
2 If an Internet Explorer Security Warning appears, click Run to confirm
that it is ok to download and run the plugin.
3 In the Download message box, click Open.
4 When the installer window appears, click Next to start the installation
process.
5 Respond to the screens in the Installer Wizard, to install the plugin.
6 If another Internet Explorer Security Warning appears, click OK to
confirm that it is ok to run the control.
The control will load and display in the page.
1–3
Page 10
Polycom ReadiManager Web Scheduling Guide
Getting Help When You Need It
Online help is available throughout ReadiManager. On any page, you can click
the Help button in the upper right corner to get information about the current
page.
Figure 1-3 The Help button launches the online help
The online help automatically displays a topic associated with the page you
were on in ReadiManager.
From any help page, you can access the full help system. To display the Table
of Contents, Index, and Search panel, click the TOC button at the top of the
Help window, as shown below.
Figure 1-4 A ccessing the Table of Contents
1–4
Accessing PDFs of the Documentation
PDFs of the documentation are available for download from the online help
system.
From any page in the Help, click the PDF link.
Figure 1-5 PDF Link
Page 11

Scheduling Videoconferences
The My Conferences page is your starting point for working with your
videoconferences using a web browser.
From this page you can create new videoconferences and make changes to
existing videoconferences.
If you are assigned a ReadiManager role of Scheduler, this page appears
automatically when you log in. It lists all the conferences you have scheduled.
If you are assigned a ReadiManager role that includes access to other views,
you may start at a different page. Click the My Conferences link at the top of
the page to access this page.
2
Figure 2-1 My Conferences Page
2–1
Page 12

Polycom ReadiManager Web Scheduling Guide
Creating a Videoconference
Creating a videoconference is fast and easy. You step through a three-page
wizard to select the date and time and then select the participants.
Start at the My Conferences page
1 Log into ReadiManager.
2 On the My Conferences page, click Create New (Start with Time)
Schedule Conference: Step 1 of 3
After you click Create New on the My Conferences page, the first page of the
Schedule Conference wizard appears.
Figure 2-2 S chedule Conference P age 1
2–2
1 Enter a name for the conference.
2 Select the date and start time for the conference.
3 In the Duration field, select how long the conference will last (the default
is 30 minutes).
4 If you want this to be an audio-only conference, change the Conference
Type to “Audio.”
5 Click Next.
Page 13
Scheduling Videoconferences
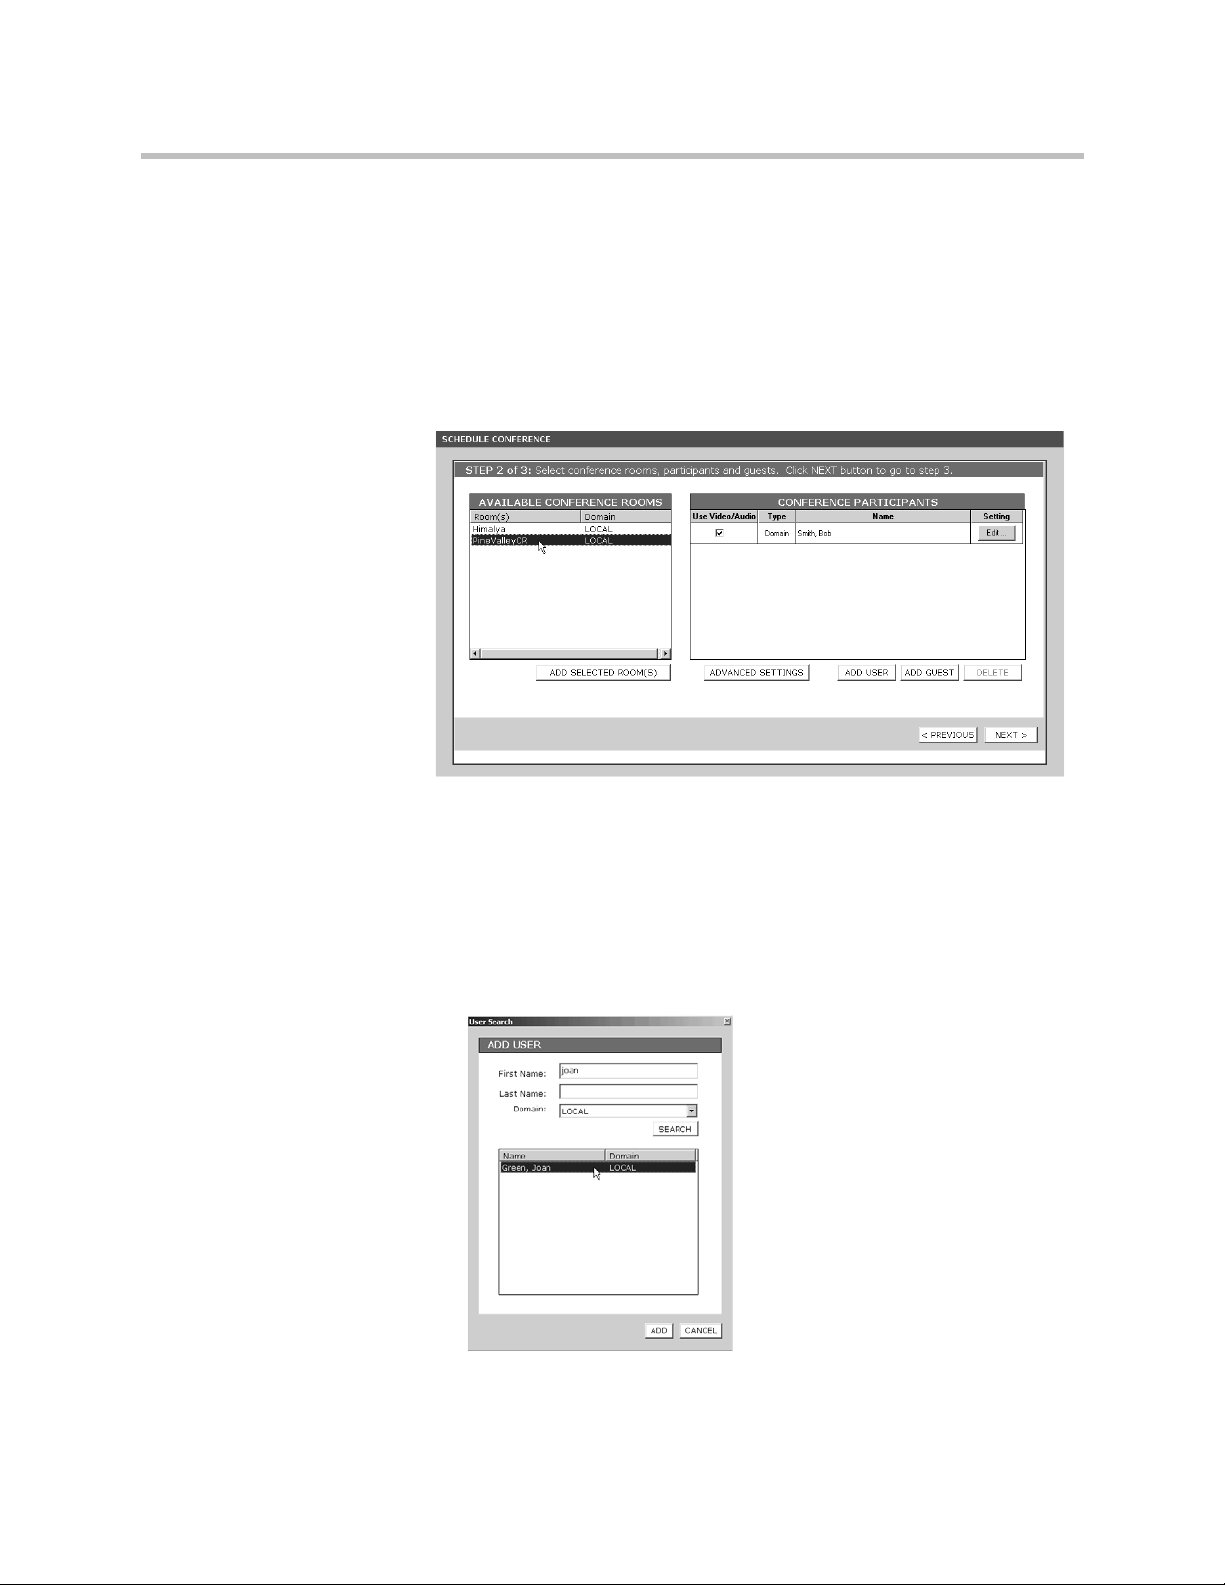
Schedule Conference: Step 2 of 3
On this page you select rooms and people to be included in the conference.
1 Select one or more rooms to be used in the conference.
In the list on the left, highlight the rooms you want to use and click Add
Selected Rooms to move them to the Conference Participants list.
All the rooms that are listed have video devices associated with them.
Figure 2-3 S chedule Conference P age 2
2 Add individual users you want to invite.
For each person, do the following:
— Click Add Users.
— In the User Search box, enter some or all of the first user’s name and
click search. If you type the first few characters of either first or last
name, ReadiManager will find all users that match.
ReadiManager lists the matching people.
— Select the person in the list box and click Add.
2–3
Page 14

Polycom ReadiManager Web Scheduling Guide
To add a guest (a person not in your company’s ReadiManager video
network), see “Adding a Guest to a Videoconference” on page 2-10.
3 Review the video endpoints to be used in this conference.
Users who have video endpoints associated with them have the box in the
“Use Video/Audio” column checked. If the person will attend, but
doesn’t need their own device, uncheck the box.
Figure 2-4 Selecting Video E ndpoints to Use in the C onference
You can also view settings for the equipment and make adjustments to it.
For details see “Editing Dial Options for a Video Endpoint” on page 2-7.
4 Click Next to go to the next screen.
2–4
Page 15

Scheduling Videoconferences
Schedule Conference: Step 3 of 3
1 Review the conference information to make sure it is correct.
If you need to make a change, click Previous to go back to a previous page
and make a change.
2Add any relevant notes.
3 Enter the email address of anyone you want to notify of the conference.
Figure 2-5 S chedule Conference P age 3
4 Click Finish.
A series of messages appears, as ReadiManager reserves resources,
schedules participants and sends emails related to the conference.
That’s it! Your videoconference is scheduled and you return to the My
Conferences View page.
How time is reserved for a videoconference. In addition to the meeting duration,
additional time is scheduled before and after the m eeting, depending on the
requirem ents for the particu lar room .
When R eadiM anager defines your video network resources, each r
Setup Minutes and Breakdow n Minutes that are needed before and after a
conference. T hese are autom atically added to the con ference duration time w hen
the conference is scheduled., so that adjacent conferences do not con flict with one
another. However, t
handled behind the scenes.
hey do not appear in the scheduled conference times; they are
oom is assigned
2–5
Page 16

Polycom ReadiManager Web Scheduling Guide
Differences in Conference Type
When you select an Audio versus a Video conference, ReadiManager reserves
different resources.
Video. Creating a video conference allows you to use a combination of video
and audio connections in the conference, and to reserve the required
bandwidth and equipment associated with resources, as well as the rooms.
The conference can use a combination of both Dial-In and Dial-Out. If you
have Advanced Scheduling capability, you can also specify that a conference
should be Dial In only, if you want all connections to be made through one
bridge.
A udio Only. When you create an audio-only conference, the bridge is reserved
as an audio-only media, with no video media. Choosing this conference type
automatically makes the conference be “Dial In Only” and requires that an
MCU be used. This means that an MCU's resources will be reserved and used
to create a dial-in conference. After you create the conference, the conference
confirmation email you receive will include the dial-in number and pin code
required to access it.
With this type of conference, no bandwidth is reserved except the MCU. The
rooms associated with the audio devices are reserved, so any other devices in
those rooms will not be available to other people. This also does not reserve
precious video resources on the MCU that would otherwise be reserved for a
mixed audio/video call.
Only regular POTS audio phones can be used— not ISDN endpoints. Attem pting to
mimic an audio call using a 64K dial speed through an audio/video endpoint may
result in the call being dropped, or in very poor audio quality, due to the network
overhead when con ve rti
Other Scheduling Features
The ReadiManager web scheduling wizard includes a number of features that
help make videoconferencing more efficient and customized for your needs.
These are described in the remainder of this chapter. They include:
• Editing Dial Options for a Video Endpoint
• Creating Recurring Conferences
• Adding a Guest to a Videoconference
ng a digital signal to/from an analog signal.
2–6
Page 17

Editing Dial Options for a Video Endpoint
You can check the dial options to be used for video endpoints in rooms or at
people’s desks and change them if required to make a video conference call
work smoothly. These changes are only in effect for this conference.
If the room or user has more than one video endpoint associated with them,
you can also use this process to select the endpoint to be used.
To edit dial options
1 On the second page of the Schedule Conference wizard, locate the room
or person associated with the equipment in the Conference Participants
list.
Figure 2-6 A ccessing Dial Options for Video Endpoints
Scheduling Videoconferences
2 Click the Edit button in the Setting column.
The Edit Dial Options window appears.
Figure 2-7 Edit Dial Options Dialog Box
2–7
Page 18

Polycom ReadiManager Web Scheduling Guide
3 Make sure the Device field shows the name of the device that should be
used in the conference.
4 Make the appropriate changes to the dial options. (For details see, the
table below.)
5 Click OK.
Table2-1 Edit Dial Options
Dial Type Specifies how this video endpoint will be a ccessed: through IP
Device If there is more than one device asso ciated with the room or
Field D escription
or ISDN.
person, you can select the co rrect one from the dropdow n list.
Dial Options If yo u se lect
dial-in num ber and pass code will be created and sent to you in
the reserva tion confirmation em ail. You ca n then provide it to
people w ho will attend.
The available dial opt
in the A dvanced Settings. If Dial-In is selected in the Advanced
Settings, then Dial-In is the only option available, and Dial-Out
is grayed out. On the other hand, if the Dial-I
selected in the A dvanced Settings, then both Dial in and Dial
Out are enabled.
If you do not have acce ss to Advanced Settings, then this option
are already preset.
Bit RateThis specifies what connection speed the device will use
scheduled conference.
Dial-In for one or more video endpoints in a ca ll, a
ions are based on the dial option selected
n+D ial Out option is
for the
2–8
Page 19

Creating Recurring Conferences
If you exceed the maximum of 100, you will receive a message to that effect,
asking you to reduce the number of recurrences.
Once a recurring conference is created, any changes to be m ade must be applied
to each meeting sepa rately.
To create a recurring conference
1 On the first page of the Schedule Conference wizard, click Recurrence.
The Appointment Recurrence window appears.
Figure 2-8 A ppointment Recurrence Window
Scheduling Videoconferences
2 Complete the Appointment Recurrence dialog box, to specify how often
the conference should recur, and click OK.
ReadiM anager does not support creation of annual recurring conferences, but
does support Daily, Weekly, and Monthly meetings.
3 Finish creating the conference, as you normally would.
When you click Create Schedule, ReadiManager checks availability and
bandwidth as it normally does, and reserves the resources for all recurring
meeting times, if there are no conflicts.
2–9
Page 20

Polycom ReadiManager Web Scheduling Guide
Adding a Guest to a Videoconference
Guests are people who are outside the ReadiManager network. Their
equipment capability is unknown to ReadiManager and must be manually
entered in order to connect to them.
To add a guest to a videoconference
1 On the second page of the Schedule Conference wizard, click Add Guest.
The Add Guest dialog box appears.
Figure 2-9 Add Guest Dialog Box
2–10
2 Enter the guest’s connection information.
For details, see the table below.
If the guest will not use video to participate in this conference, uncheck the
“Use Video” box.
3 When finished, click OK.
Table2-2 Add Guest Options
Field D escription
N am e The nam e of the guest.
Em ail The em ail address of the guest.
Page 21

Scheduling Videoconferences
Table2-2 Add Guest Options
Field D escription
Use Video C heck this box to specify that the guest will use video.
Dial Type Specifies how the guest video endpoint will be
acce sse d — through IP (H.323) or ISDN (H.320).
Dial Options S elect whether the guest will be dialed out to for the con ference,
or will dial in. If you select Dial-In, a dial-in num ber and pass
cod e will be created and sent to yo u in the reserva tion
con firmation em ail. You can then send it to the guest.
If you select Dial-Out, an M CU wil
attendees at the scheduled conference time.
Country The coun try in which the guest is located. Used for ISDN
dialing.
Area/City C ode The area or city co de of the guest. Used for ISDN dialing.
N um ber The num ber to be dialed to connect t
Use m odified
dial num ber
Num ber Enter the modified dial num ber.
Check this option if yo u w ant to enter a num ber that does not fit
the C ountry C ode + Area/City C ode + N um ber format.
Making Changes to a Scheduled Conference
After a videoconference has been scheduled, you can make changes to it at any
time before it starts.
l dial the conference
o the guest.
To make changes to a scheduled conference
1 On the My Conferences page, select the conference you want to change.
2 Click the Edit button.
3 Step through the pages in the scheduling wizard, making the appropriate
changes to the conference.
4 When you are done, click Finish.
ReadiManager rechecks the resources for the conference, reserves
resources, schedules participants and sends emails related to the
conference.
2–11
Page 22

Polycom ReadiManager Web Scheduling Guide
2–12
Page 23

Using Advanced Settings When Scheduling
Depending on your permissions in ReadiManager, you may see a button
labeled Adv Settings on the Select Participants page. Clicking it opens a dialog
box in which you can select conference templates and override default settings
for a number of scheduling details.
This chapter describes how to use the Advanced Settings, including:
• Selecting a Template in Advanced Settings
3
• Specifying Dial Options for the Conference
• Forcing MCU Usage
• Setting the Video Mode for Multipoint Calls
• Setting the Connection Speed for a Conference
• Using People + Content
• Using T.120
• Chair Person Control
The ability to view and change Advanced Settings depends on the permission
settings asso ciated with your user nam e. If you do not see an A dvanced Settings
button on the Conference Resources tab, you do not have access to this feature.
For more information, contact yo u r
R eadiM anager adm inistrator.
3–1
Page 24

Polycom ReadiManager Web Scheduling Guide
Figure 3-1 A dvanced Settings Dialog Box
Selecting a Template in Advanced Settings
Templates are collections of advanced conference settings. When you are
scheduling a conference and open the Advanced Settings dialog box for the
first time, a default template is always selected, and the values in the
Advanced Settings dialog reflect the settings associated with that template.
You may have only one template available in Advanced Settings, or your
ReadiManager administrator may have created multiple templates to adjust
the Advanced Settings in different ways.
If you select a different template from the list, it will adjust the values
throughout the Advanced Settings dialog. If desired, you can then make
additional adjustments to fine-tune the settings for this conference.
3–2
Page 25

Using Advanced Settings When Scheduling
Specifying Dial Options for the Conference
You can determine whether a conference will require all endpoints to dial in
to the conference, or whether a combination of dial-in and dial-out will be
allowed.
When you want an MGC (also known as an MCU or a bridge) to create a
dial-in conference for which a particular phone number and pin code are
created for all conference participants, use the Dial-In Only setting. With a
dial-in conference, any audio or video system can dial in, and all participants
will be connected to the same conference inside the bridge. This allows
participants to dial into the bridge at their convenience from anywhere they
choose.
When you want an MCU to be able to dial-out to a video system, as well as to
have participants dial in, use the Dial In+Dial Out setting.
When you specify Dial In+Dial Out, you can specify the individual resources
that you want to dial in. For example, you might specify that a particular
end-point should use dial-in, in which case a bridge will create a dial-in
number for it.
When selecting the Dial-in only option from the Advanced Settings dialog box, all
selected resources are forced to be dial-in only. If yo u change that se lection to
Dial-in/Dial-out, the individual selected resources rem ain set to dial-in. If yo u want
them to be dial-out, you will need to m anually change the settings. See “Editing Dial
Options for a Video E ndpoint” on page 2-7.
When you want an MCU to dial out to all participants in the conference, use
the Dial-Out only setting.
Forcing MCU Usage
If you want a conference to always use an MCU, regardless of the number of
participants, select the option “Always Use MCU” in the Advanced Settings
dialog box. When this is selected, video endpoints cannot connect to each
directly, even if there are only two in the call.
“Always Use MCU” is set automatically if you select Audio Only as the
Conference Type.
When this setting is not selected, the endpoints can connect directly to each
other with either point-to-point configurations or using one endpoint's built-in
multipoint capability.
3–3
Page 26

Polycom ReadiManager Web Scheduling Guide
Setting the Video Mode for Multipoint Calls
The Video Mode setting determines the initial screen layout on an endpoint's
monitor during a multipoint conference when the conference uses a
stand-alone bridge (MCU).
The available layouts are of 2 main types:
• Sw itching means that the display changes each time the speaker changes,
and everyone sees the current speaker.
• C ontinuous P resence layouts show a number of panels on the display
screen at once, each showing a different participant. You can select a
particular continuous presence layout, with a set number of windows
open. Each panel requires a different port. If you select more windows
than there are participants, the extra windows simply display with a
background color.
The continuous presence layouts allow you to see all of the meeting
participants at once.
When selecting a video m ode, it is a good idea to con sider the MCU resources that
it will require. Normally, Switching m ode, which displays only the person speaking,
consum es few er MCU resource s than Continuous Presence m ode, which displays
multiple video str
used, the more video resources required on the M CU.
eam s. T he greater the num ber of sm all video window s that are
Figure 3-2 Video M ode Selection Window
3–4
Page 27

Using Advanced Settings When Scheduling
Setting the Connection Speed for a Conference
The speed requested using the Bit Rate setting in the Advanced Settings dialog
box requests a speed at which the endpoints will communicate for both
point-to-point and multipoint conferences. Whether the requested speed will
be used depends on a number of factors, including the maximum bit rate in the
site topology. If those settings do not set a lower limit, the requested speed will
be used.
If you want to use a higher bit rate than the default rate, contact your ReadiM anager
Adm inistrator to see if a different policy group with a higher bit rate can be m ade
available and asso ciated with the video endpoints you are scheduling.
If a higher speed is selected than can be supported by an endpoint, the speed
for that endpoint will be reduced, but the conference will use the default
connection speed for the endpoints that can match it. If the calls are placed
through an endpoint with an embedded MCU, the behavior depends on the
capabilities of that codec.
In the case of ISDN dialing, if the dial speed is higher than the bandwidth
defined in the H.320 service of the endpoint, you will receive a warning about
exceeding ISDN resources. If that occurs, simply lower the dial speed to less
than or equal to the ISDN capability of the endpoint.
Higher speed is important when you want high quality video in a meeting.
Because higher speed uses more bandwidth, scheduling a meeting with higher
speed may limit the number of conferences that can be reserved at one time.
Using People + Content
The People+Content setting in the Advanced Settings dialog box controls the
ability for one of the endpoints to send two types of data (a data stream and a
video stream) over the same bandwidth, so that both people and content can
be displayed. The two video streams are handled differently by the receiving
endpoint, and may be shown on separate screens, or through Video Switching
mode.
The MGC requires that conferences with People + Content use a Speed of at least
192 K. If you set the Speed to 128, the conference will fail.
Select the type of People + Content capability you want the conference to use.
If you do not want to display both people and content in this conference, leave
this setting as “None.”
3–5
Page 28

Polycom ReadiManager Web Scheduling Guide
A conference can have only one People + Content setting. What you select here
determines the setting to be used for all participants in the conference.
Endpoints in the conference that do not support the selected method will
connect with either video (if they connect via IP) or audio only (if they connect
via ISDN).
The available settings include:
• N one. Select “None” when dual-streams of data are not required.
• People+C o ntent. This Polycom proprietary technology works with most
Polycom endpoints.
• People and Content VO. This Polycom proprietary technology works
mainly with PictureTel endpoints. Select this option when working with
older endpoints.
• Visual Concert PC. This is PC-based software available with Polycom
ViewStation MP/512/SP/323.
• Visual Concert FX. This is a hardware solution available with Polycom
ViewStation FX/EX and VS4000.
• H320 Duo Video. The dual stream mode is available with Tandberg
endpoints in which one part of the conference is set as the videoconference
and the other as the presentation conference. This selection supports both
IP and ISDN.
Using T.120
ReadiManager allows you to define T.120 conferences, and to select the speed
for the T.120 connection. Select “None” to disable the T.120 mode.
T.120 is a standard that contains a series of protocols and specifications
describing application sharing in multi-point data communication. The
following options may be available, depending on the participant equipment
and software:
• Application sharing, allowing two or more conference participants to
work on the same document/application even if only one participant has
the application. In application sharing, one participant launches the
application and it runs simultaneously on all the other computers.
• File transfer to all conference participants.
• Chat or “Whiteboard” in which participants communicate with each other
via writing.
In all of these modes, the participants can view and hear each other.
From the T.120 drop-down box, select the speed for the T.120 connection. The
higher rates (larger numbers) enable faster data transfer rates, but reduce the
bandwidth available for the video portion of the call. In low bandwidth calls
3–6
Page 29

of 128 kbps, use the smallest bandwidth numbers for the T.120 setting. Check
with the IT department to determine the best combinations for your
conferences.
Selecting this option in the A dvanced Settings dialog box uses T.120 resource s on
the bridge. It is best not to select it unless yo u are sure yo u w ant to use it.
T.120 cannot be added to a conference that has already started.
Chair Person Control
You can enter a four-digit Chair Control PIN in the Advanced Settings dialog
box, to be used by the bridge during the conference.
Using Advanced Settings When Scheduling
Be sure to make note of this PIN in your ow n records. You will need to com m un icate
the PIN to the conference chair separately. It is not sent out in a conference em ail.
3–7
Page 30

Polycom ReadiManager Web Scheduling Guide
3–8
Page 31

Index
A
Advanced Settings
Chair Person Control 3-7
B
bandwidth
see connection speed 3-5
C
Chair Person Control 3-7
conference
adding a guest 2-10
changing a scheduled 2-11
creating 2-2
creating recurring 2-9
scheduling, see also scheduling 2-1
setting connection speed 3-5
connection speed, setting 3-5
creating a conference 2-2
D
data stream (with video) 3-5
dial options
editing for a video endpoint 2-7
specifying for a conference 3-3
F
forcing MCU usage 3-3
G
guest
adding 2-10
H
help
accessing 1-4
L
logging on to ReadiManager 1-1
logging out of ReadiManager 1-2
M
MCU
forcing usage 3-3
multipoint calls
setting video mode 3-4
P
PDF
accessing documentation in the form of 1-4
People + Content 3-5
plugin
downloading 1-3
installing 1-3
R
ReadiManager
logging on to 1-1
logging out 1-2
plugin 1-3
recurring conferences
creating 2-9
S
scheduled conference
making changes 2-11
scheduling
advanced settings 3-1
getting started 1-1
other features 2-6
T
T.120 3-6
templates 3-2
V
video mode 3-4
videoconference, see conference
Index - 1
Page 32

Index - 2
 Loading...