

Page 1

Polycom ReadiManager LX 100
Scheduling Administrator’s Guide
September 2004
Page 2

Polycom ReadiManager LX100 Scheduling Administrator’s Guide
Copyright
© 2003-2004 Polycom, Inc. All rights reserved.
This product includes software developed by CDS Networks, Inc. Copyright 1998, 1999
CDS Networks, Inc., Medford Oregon. All rights reserved.
No part of this document may be reproduced or transmitted in any form or by any
means, electronic or mechanical, for any purpose, without the express written
permission of Polycom, Inc. Under the law, reproducing includes translating into
another language or format. As between parties, Polycom, Inc. retains title to and
ownership of all proprietary rights with respect to the software contained within its
products. The software is protected by United States copyright laws and international
treaty provision. Therefore, you must treat the software like any other copyrighted
material (e.g. a book or sound recording).
Trademark Information
Polycom®, the Polycom logo design, ViaVideo®, and ViewStation® are registered
trademarks; ReadiManager™ LX100, Polycom PathNavigator™, iPower™,
People+Content™, MGC™, and VSX™7000 are trademarks of Polycom, Inc. in the
United States and various other countries. Microsoft® and Outlook® are registered
trademarks of Microsoft Corporation in the United States and/or other countries. Lotus
Notes® is a trademark of International Business Machines Corporation. All other
trademarks are the trademarks of their respective owners.
Disclaimer
Part number: 1725-18011-001 A
THIS PRODUCT INCLUDES CDS NETWORKS, INC. SOFTWARE. THIS SOFTWARE
IS PROVIDED BY CDS NETWORKS, INC. ``AS IS'' AND ANY EXPRESS OR IMPLIED
WARRANTIES, INCLUDING, BUT NOT LIMITED TO, THE IMPLIED WARRANTIES
OF MERCHANTABILITY AND FITNESS FOR A PARTICULAR PURPOSE ARE
DISCLAIMED. IN NO EVENT SHALL CDS NETWORKS, INC. BE LIABLE FOR ANY
DIRECT, INDIRECT, INCIDENTAL, SPECIAL, EXEMPLARY, OR CONSEQUENTIAL
DAMAGES (INCLUDING, BUT NOT LIMITED TO, PROCUREMENT OF SUBSTITUTE
GOODS OR SERVICES; LOSS OF USE, DATA, OR PROFITS; OR BUSINESS
INTERRUPTION) HOWEVER CAUSED AND ON ANY THEORY OF LIABILITY,
WHETHER IN CONTRACT, STRICT LIABILITY, OR TORT (INCLUDING
NEGLIGENCE OR OTHERWISE) ARISING IN ANY WAY OUT OF THE USE OF THIS
SOFTWARE, EVEN IF ADVISED OF THE POSSIBILITY OF SUCH DAMAGE.
ANY REDISTRIBUTION MUST COMPLY WITH THE CONDITIONS LOCATED AT
HTTP://JTDS.SOURCEFORGE.NET/LICENSE.HTML.
ii
Page 3

Table of Contents
About This Guide
Conventions .............................................................................................................................. vi
Chapter 1 Welcome to Polycom ReadiManager LX100
Scheduling and Scheduling Administration ................................................................................ 2
Device Management ..................................................................................................................2
System Configuration .................................................................................................................3
Chapter 2 Getting Started
System Requirements and Setup ...............................................................................................5
Setting Up Your Browser ....................................................................................................6
Allowing ActiveX controls .................................................................................................... 6
Setting the Polycom ReadiManager LX100 Server as a Trusted Server ............................ 8
Accessing and Logging On to Polycom ReadiManager LX100 ..................................................9
Moving Around in the Scheduling Administration Module ........................................................ 10
Tips When Working in the Polycom ReadiManager LX100 Web View ............................. 10
Overview of Setup Tasks .........................................................................................................11
Chapter 3 Setting Up the Domain, Templates, and Users
Setting Up the Domain .............................................................................................................14
Fields in the Domain Form ................................................................................................ 14
Enabling ICAL ..................................................................................................................15
Setting Up Conference Templates ...........................................................................................16
Fields in the Conference Setting Template Form .............................................................17
Setting Up Users and Working with User Data ........................................................................20
About User Groups ........................................................................................................... 21
Creating a New User Group .............................................................................................25
Fields in the User Group Form .........................................................................................25
Copying a Group to Create a New Group ......................................................................... 27
Adding Users to Groups ...................................................................................................28
Fields in the User Information Form .................................................................................30
Viewing User Permissions ................................................................................................ 33
Changing a User’s Password ...........................................................................................34
Sending Broadcast Email to Listed Users ........................................................................35
Deleting a User ................................................................................................................. 35
Setting Up LDAP ............................................................................................................... 36
Chapter 4 Entering Network Topology Data
The Network Topology Structure .............................................................................................41
Setting Up and Working with Areas, Zones, and Pipes ............................................................ 44
Viewing Areas, Zones, and Pipes .....................................................................................44
Defining an Area ...............................................................................................................45
Defining a Zone ................................................................................................................46
Defining a Pipe .................................................................................................................47
© Polycom, Inc. i
Page 4

Polycom ReadiManager LX100 Scheduling Administrator’s Guide
Changing Information About Areas, Zones, and Pipes ..................................................... 49
Deleting an Area, Zone, or Pipe .......................................................................................49
Chapter 5 Setting Up and Working with Resources
Defining a Resource ................................................................................................................. 52
Fields in the Resources Form ...........................................................................................53
Adding ISDN-Only Resources without IP Connections ....................................................56
Viewing Information about Resources ......................................................................................57
Changing Resource Information ...............................................................................................58
Copying a Resource ................................................................................................................. 58
Deleting a Resource ................................................................................................................. 59
Assigning or Removing Resource Facilitators .......................................................................... 59
Associating or Removing a Facilitator from a Resource ...................................................60
Associating or Removing a Facilitator from All Resources in a Zone ............................... 61
Associating Equipment with a Resource .................................................................................. 63
Viewing Equipment Associated with a Resource .............................................................. 63
Adding Equipment to a Resource ..................................................................................... 64
Fields in the Equipment Information Form ........................................................................65
Moving Equipment from One Resource to Another .......................................................... 68
Deleting Equipment from a Resource ...............................................................................68
Setting Up an MCU In Polycom ReadiManager LX100 ............................................................ 69
Setting up an MGC 100 in Polycom ReadiManager LX100 .............................................. 69
Parameter Fields for a Polycom MGC 100 ....................................................................... 70
Setting up a Radvision MCU-30 in Polycom ReadiManager LX100 .................................71
Parameter Fields for a Radvision MCU-30 ....................................................................... 72
Important Settings for Use with People + Content ............................................................ 73
3rd Party MCU Support ....................................................................................................73
Setting up a Video Codec in Polycom ReadiManager LX100 .................................................. 73
Parameter Fields for a Video Codec ................................................................................. 75
Setting Up Services .................................................................................................................. 76
Setting Up a Direct Connect Service ................................................................................76
Setting Up Gateway Services ........................................................................................... 78
Setting Up H.323 Services (IP) .........................................................................................79
Setting Up H.320 Services (ISDN) .................................................................................... 81
Where Services are Set in MGC Manager .......................................................................84
Where Settings You Need Are Defined in Radvision MCU-30 Software .......................... 89
Setting Up Dial-In on the MGC .........................................................................................92
Managing Problems with Resources ........................................................................................ 94
Making Use of Remote Alerts .......................................................................................... 94
Chapter 6 Reporting
Creating Schedule Reports ......................................................................................................98
Creating Standard Reports .......................................................................................................99
Clearing the Report Screen .................................................................................................... 104
Summarizing Data in Reports and Displaying a Chart ........................................................... 104
Exporting Report Data ............................................................................................................ 107
Saving a Report ......................................................................................................................107
Accessing a Saved Report ..................................................................................................... 108
Creating Custom Reports .......................................................................................................109
ii
Page 5

Some Common Joins .....................................................................................................111
Scheduling Recurring Reports ...............................................................................................112
Chapter 7 Using the
Scheduling Wizard
Scheduling a Video Conference: Basic Steps ........................................................................ 116
Scheduling Features in the Wizard ........................................................................................121
Finding a Room that Fits Your Needs (Filtering) ............................................................124
Using My Favorites to Select a Room ............................................................................126
Sending Email Notifications About the Conference ........................................................ 127
Configuring Contact Lists ................................................................................................ 128
Creating Recurring Conferences .................................................................................... 129
Setting the Host Site for a Multipoint Call .......................................................................131
Changing Dial-In Settings for Individual Resources .......................................................131
Changing How the Connection is Made .........................................................................132
Setting the Connection Type for Individual Resources ...................................................132
Adding a Guest to a Videoconference ............................................................................ 133
Using Advanced Settings .......................................................................................................135
Selecting a Template ...................................................................................................... 136
Specifying the Type of Conference ................................................................................. 136
Specifying Dial Options ................................................................................................... 137
Forcing MCU Usage .......................................................................................................137
Setting the Video Mode for Multipoint Calls ....................................................................138
Using Auto-Start or Manual Start for a Conference ........................................................ 139
Setting the Default Connection Speed for a Call ............................................................ 139
Using People + Content .................................................................................................. 139
Using T.120 ....................................................................................................................140
Chair Control PIN ............................................................................................................ 141
Managing Scheduled Conferences ........................................................................................ 142
Chapter 8 Scheduling and Managing Conferences
The Scheduling Window .........................................................................................................146
Creating the Conference Request .......................................................................................... 147
Finding a Resource that Fits Your Needs (Filtering) ..............................................................151
Using My Favorites to Select a Resource ..............................................................................154
Requesting Specific Dates and Times ...................................................................................155
How Much Time is Reserved ..........................................................................................157
Sending Email Notifications About the Conference ................................................................157
Configuring Contact Lists .......................................................................................................158
Creating Recurring Conferences ............................................................................................ 160
Viewing Details about a Resource .........................................................................................161
Using the Legend ...................................................................................................................162
Using the Advanced Settings ................................................................................................. 162
Selecting a Template ...................................................................................................... 163
Specifying the Type of Conference ................................................................................. 163
Specifying Dial Options ................................................................................................... 164
Forcing MCU Usage .......................................................................................................165
Setting the Video Mode for Multipoint Calls ....................................................................165
Using Auto-Start or Manual Start for a Conference ........................................................ 166
© Polycom, Inc. iii
Page 6

Polycom ReadiManager LX100 Scheduling Administrator’s Guide
Setting the Default Connection Speed for a Call ............................................................166
Using People + Content .................................................................................................. 167
Using T.120 ....................................................................................................................168
Chair Control PIN ............................................................................................................ 169
Setting the Host Site for a Multipoint Call ...............................................................................169
Changing Dial-In Settings for Individual Resources ............................................................... 170
Changing How the Connection is Made ................................................................................. 170
Setting the Connection Type for Individual Resources ..........................................................171
Adding a Guest to a Videoconference ....................................................................................172
Creating Conference Notes ....................................................................................................172
Managing Scheduled Conferences ........................................................................................ 174
Locating the Conference You Want to Manage ..............................................................174
Approving a Requested Conference ............................................................................... 176
Deleting a Conference .................................................................................................... 176
Entering Additional Conference Details .......................................................................... 177
Managing an Active Conference ..................................................................................... 178
Closing a Completed Conference ...................................................................................181
Chapter 9 Advanced Setup and Maintenance
Accessing Support .................................................................................................................184
Creating Categories ...............................................................................................................184
Customizing Equipment Data ................................................................................................. 185
Importing Data Into Polycom ReadiManager LX100 .............................................................. 187
Importing User Data ........................................................................................................ 187
Importing Resources ....................................................................................................... 188
Importing Equipment ....................................................................................................... 190
The Administrator Console ..................................................................................................... 192
SNMP Trap Configuration ......................................................................................................193
Changing the Mail Server IP Address ....................................................................................194
Specifying an Email Header ................................................................................................... 195
Configuring Conference Time Warnings ................................................................................195
Enabling Auto Start Conference ............................................................................................. 196
Enabling Equipment Alert Management Notification .............................................................. 196
Troubleshooting with Debug Tools ......................................................................................... 197
About the Task Manager Debug Levels .........................................................................197
Debug Tool Command Definitions ..................................................................................198
Using Least Cost Routing .......................................................................................................199
Example of Savings Using Least Cost Routing ..............................................................199
How Least Cost Routing Works ......................................................................................200
Example of Least Cost Routing ......................................................................................202
Determining What to Enter in LCR Tables ...................................................................... 204
Setting Up Least Cost Routing .......................................................................................206
Creating Least Cost Routing Tables ...............................................................................207
Fields in the Least Cost Routing Table Form .................................................................209
Index 211
iv
Page 7

About This Guide
This manual, Polycom ReadiManager LX100 Scheduling Administrator’s Guide,
provides instructions for installing, setting up, and administering the Scheduling
Administration module of Polycom ReadiManager LX100.
This guide is intended for installers and administrators who are setting up the
Scheduling Administration module of Polycom ReadiManager LX100 for the first time
and as a reference for administrators making changes to network information and
managing resources over time. In addition, it includes information about how to
schedule and manage conferences that will be of use to end-users, and information
about viewing and handling problems with equipment that will be of use to technicians.
Information about other Polycom ReadiManager LX100 modules is available from the
web interface of the product. Launch the appropriate module and click the Help link at
the top of the page.
The table below lists some common tasks and associated topics in this guide.
For information
about
Refer to these sections
Setting up Polycom
ReadiManager LX100
for the first time
Setting up
advanced features,
such as server
administration and
least cost routing.
Administrative tasks
to maintain user and
network data
© Polycom, Inc. v
Overview of Setup Tasks on page 11
Setting Up the Domain, Templates, and Users on page 13
Advanced Setup and Maintenance on page 183
Setting Up the Domain on page 14
Setting Up Users and Working with User Data on page 20
Setting Up LDAP on page 36
Entering Network Topology Data on page 41
Setting Up and Working with Areas, Zones, and Pipes on
page 44
Setting Up and Working with Resources on page 51
Assigning or Removing Resource Facilitators on page 59
Associating Equipment with a Resource on page 63
Page 8

Polycom ReadiManager LX100 Scheduling Administrator’s Guide
For information
about
Refer to these sections
Conventions
The following conventions are used in this guide:
Boldface is used for buttons that you click on the screen.
References to other sections in this book are indicated with blue italics. When you
Scheduling and
managing
conferences
Managing problems
with resources
are viewing the HTML or PDF-versions of this document, these provide hyperlinks
to the associated section.
Using the Scheduling Wizard on page 115
Scheduling and Managing Conferences on page 145
Managing Problems with Resources on page 94
Making Use of Remote Alerts on page 94
vi Conventions
Page 9

1
Welcome to Polycom
ReadiManager LX100
Polycom ReadiManager LX100 is a pre-installed server with software that provides
scheduling and management for video, audio, and data conferencing. A client/server
software tool, Polycom ReadiManager LX100 encompasses scheduling and
centralized management for your enterprise-wide video communications network and
devices. It also serves as a directory server for video codecs.
Polycom ReadiManager LX100 includes four modules:
Scheduling Administration
Device Administration
System Configuration
Scheduling Wizard
In addition, this simple-to-use yet powerful video scheduling and management
application fully integrates with Microsoft® Outlook® and Lotus Notes®.
This guide provides detailed information about the Scheduling Administration module
and the Scheduling Wizard. For details about Device Management features and
functionality, see the ReadiManager LX100 Device Management Guide. For details
about System Configuration, see ReadiManager LX100 System Configuration Guide.
© Polycom, Inc. 1
Page 10

Polycom ReadiManager LX100 Scheduling Administrator’s Guide
Scheduling and Scheduling Administration
Polycom ReadiManager LX100 makes life easier for people who want to schedule their
own meetings with or without video, for the conference administrator who wants to
manage videoconferences from setup to breakdown, and for the network administrator
who monitors the reliability of video networks.
Polycom ReadiManager LX100 includes a highly configurable scheduling application
that uniquely enables users to schedule video calls right from an Outlook or Lotus
Notes interface or a web interface. The users choose the resources that need to be
scheduled from the same appointment window when scheduling a meeting that doesn’t
require video.
One of the unique features that Polycom ReadiManager LX100 has is its patent
pending bandwidth reservation system that schedules bandwidth for the conference.
The support for MCUs includes the ability to monitor MCU port availability. When more
than one MCU is deployed on the network, scheduling decisions for multipoint calls will
be based on zone location and port availability.
Conferences scheduled through Polycom ReadiManager LX100 become a
manageable entity. Conferences can be managed from Microsoft Outlook, Lotus Notes,
and from two web interfaces. Endpoints can be added to, removed from, or swapped
for any given conference. Conferences can be remotely restarted or extended from the
Manage Conference interface.
With the Scheduling and Scheduling Administration modules of Polycom
ReadiManager LX100, you can:
Schedule conferences through the web, Microsoft Outlook, or Lotus Notes,
reserving required video and audio equipment and resources
Manage conferences
Run reports for Call Records, Video Utilization, and Troubleshooting and create
other custom reports
The Scheduling Administration module also provides the ability to define and maintain
information about your video network topology, resources and equipment, users and
user permissions, and other system management.
Device Management
The Device Management module in Polycom ReadiManager LX100 enables the
administration and centralized management of your enterprise-wide video
communications network. Using Device Management features, administrators can
proactively monitor devices for call status, errors, and warnings. Through the Remote
Alert Notification Feature, administrators can be paged on their cell phones with
2 Scheduling and Scheduling Administration
Page 11

updates on device status. The Device Management module provides device
maintenance features such as Software Update and Provisioning.
End Users will enjoy a centralized address book with intelligent dialing built in.
Administrators will appreciate the minimal time required for upkeep - a nearly zero
administration directory.
Administrators can also run various Call Detail Record reports, view Network Status
reports, and Device Tracing logs.
For detailed information about the device management features, see the online help in
the Device Management module.
System Configuration
The System Configuration module is used primarily when you first set up Polycom
ReadiManager LX100, and later, if you need to make changes to the configuration.
In addition, this module gives you access to License Management, if you purchase
additional seats, and to Advanced Setup, through Microsoft Windows Remote Desktop.
Chapter 1 - Welcome to Polycom ReadiManager LX100
For additional information, see the online help in the System Configuration module.
Using the Scheduling Wizard on page 115
© Polycom, Inc. 3
Page 12

Polycom ReadiManager LX100 Scheduling Administrator’s Guide
4 System Configuration
Page 13

2
Getting Started
This chapter provides an overview of what you need to get started with Polycom
ReadiManager LX100
System Requirements and Setup
Accessing and Logging On to Polycom ReadiManager LX100
Moving Around in the Scheduling Administration Module
Tips When Working in the Polycom ReadiManager LX100 Web View
For administrators, it also includes an overview of what you need to know to set up
Polycom ReadiManager LX100. (See Overview of Setup Tasks on page 11.)
.
System Requirements and Setup
When you use Polycom ReadiManager LX100 for the first time, you need to make sure
you are working with supported versions of Microsoft Windows and Internet Explorer,
and that you have browser security settings appropriately configured. This section
includes these topics:
Client System Requirements
Setting Up Your Browser
Allowing ActiveX controls
Setting the Polycom ReadiManager LX100 Server as a Trusted Server
© Polycom, Inc. 5
Page 14

Polycom ReadiManager LX100 Scheduling Administrator’s Guide
Client System Requirements
The web interface of the Polycom ReadiManager LX100 is supported on computers with
the following:
Microsoft Windows 2000 or XP
Microsoft Internet Explorer 5.5 or greater with Active X control permission enabled
Intel Pentium II-class processor or higher
64 MB RAM. Recommended 128MB RAM for better performance
30 MB free space
For the Microsoft Outlook component, MS Outlook 2000 (SR1), Outlook 2003, or
Outlook XP must be installed. (See Microsoft hardware requirements for Outlook.)
For the Lotus Notes component, Lotus Notes version 6.0.1 or higher must be
installed. (See IBM Lotus Notes hardware requirements.)
Setting Up Your Browser
There are two security settings in Internet Explorer that need to be set up properly on
each client PC from which
Allowing ActiveX controls
Setting the Polycom ReadiManager LX100 server as a trusted server
The settings described below refer to the Internet zone. The same settings should
also be applied to the Local Intranet zone as well, especially if
ReadiManager LX100
Allowing ActiveX controls
Many Active X controls are used in Polycom ReadiManager LX100. The first time that a
feature that requires an ActiveX control is used, the ActiveX control will be automatically
downloaded to the client PC. To make sure the necessary ActiveX controls are
downloaded properly, you may need to change some security settings in Internet
Explorer.
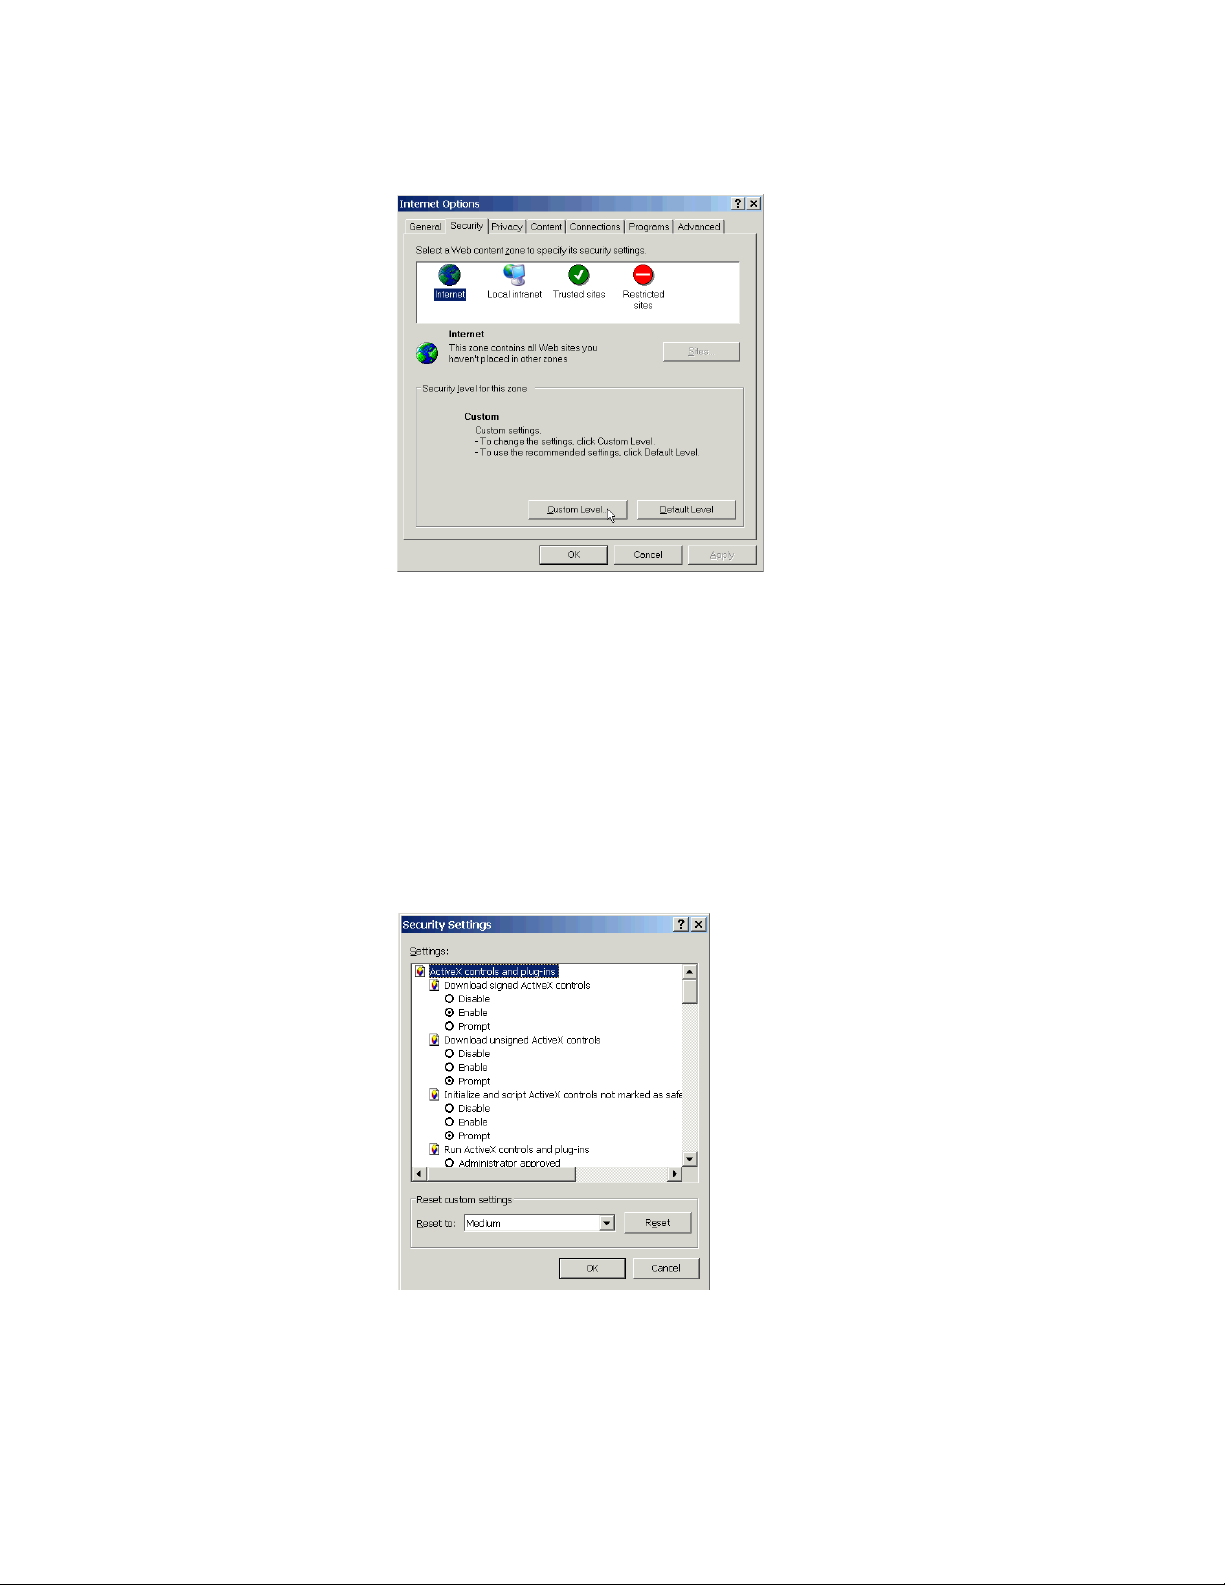
To set ActiveX control settings
1. Launch Internet Explorer on the client PC, and from the Tools menu, choose
Internet Options.
2. In the Internet Options dialog box, click the Security tab.
Polycom ReadiManager LX100 will be accessed:
Polycom
is setup with a WINS Name.
6 System Requirements and Setup
Page 15
Chapter 2 - Getting Started
3. Select Internet.
4. Click the Custom Level button to open the Security Settings dialog box.
5. In the Security Settings dialog box, select “Enable” for the following settings:
• Download signed ActiveX controls
• Run ActiveX controls and plug-ins
• Script ActiveX controls marked safe for scripting
6. Select “Prompt” for the following settings:
• Download unsigned ActiveX controls
• Initialize and script ActiveX controls not marked as safe
7. Click OK to save the changes to the Security Settings for internet.
8. Select Local Intranet and click the Custom Level button to open the Security
Settings dialog box.
© Polycom, Inc. 7
Page 16
Polycom ReadiManager LX100 Scheduling Administrator’s Guide
9. Repeat steps 5 through 7 so that the settings for Local Intranet match those for
Internet.
10. Click OK again to exit the Internet Options dialog box.
Note: There are many controls that will be downloaded to the client when accessing certain
sections of Polycom ReadiManager LX100. To avoid this, check the checkbox on the
security certificate that asks “Always trust content from Polycom (or other organizations)”.
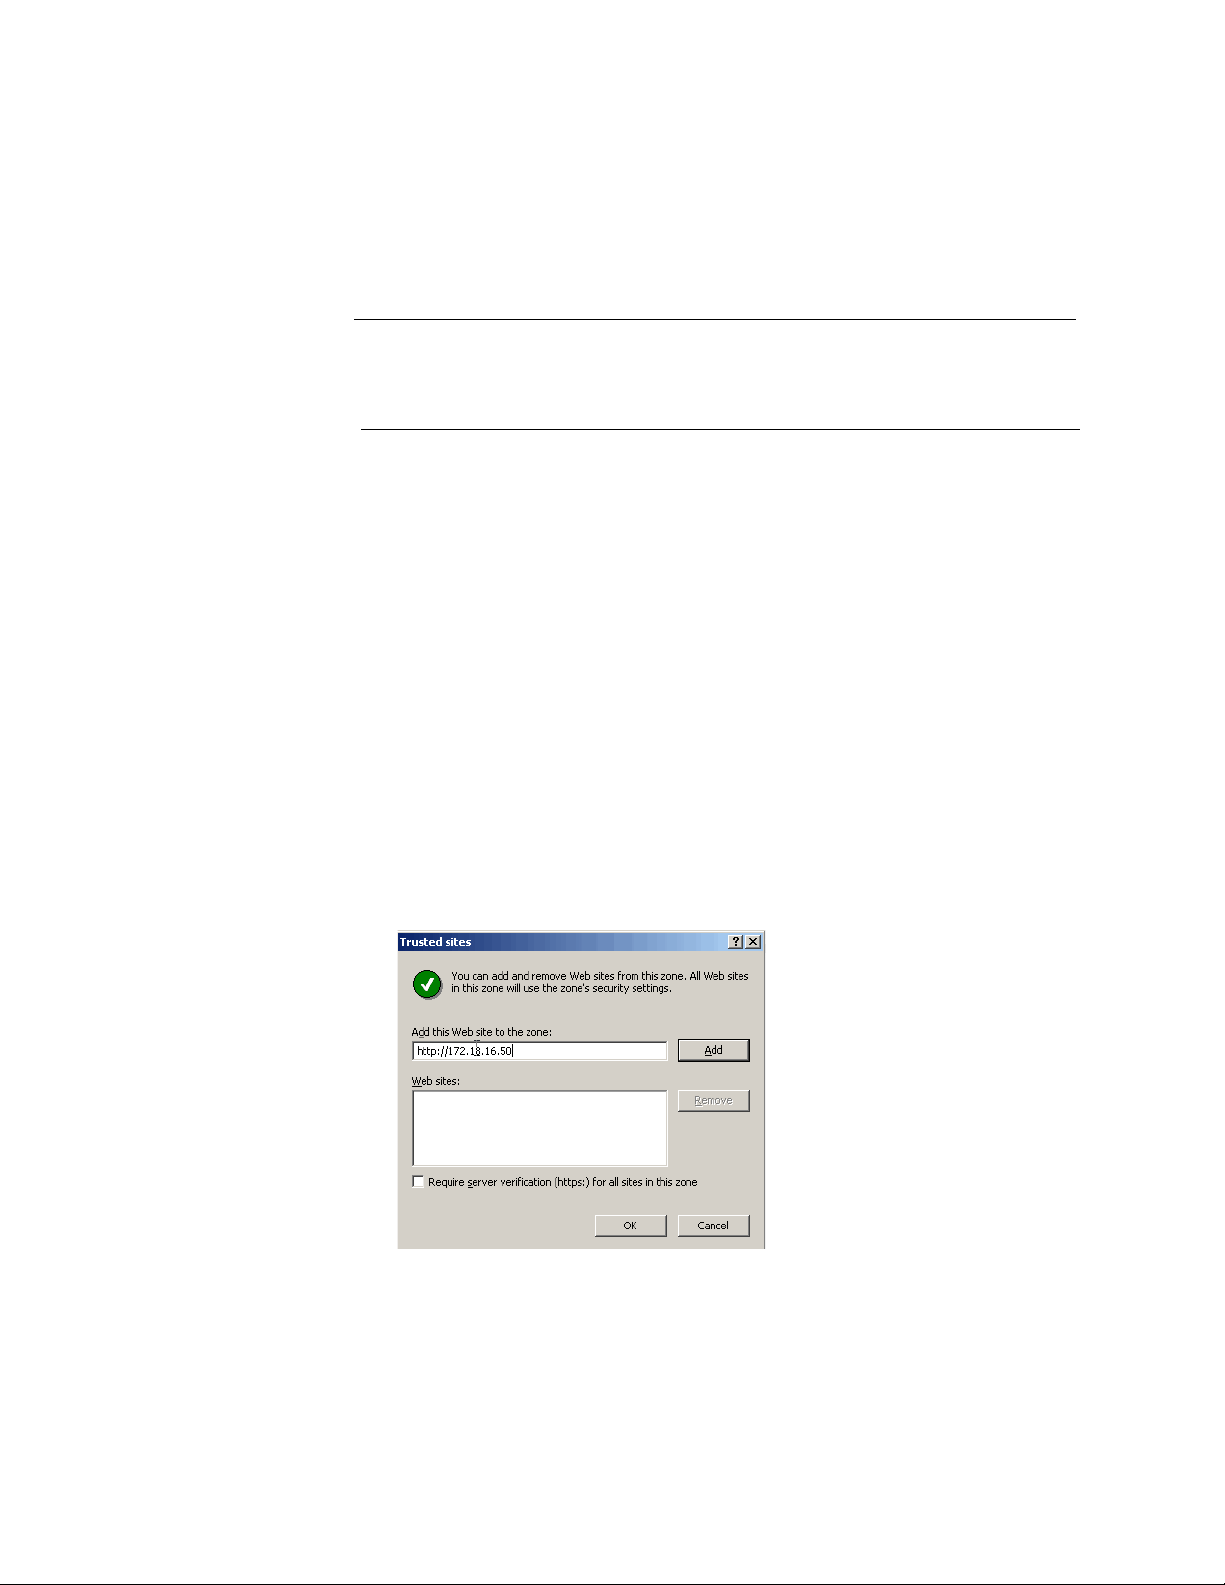
Setting the Polycom ReadiManager LX100 Server as a Trusted Server
In some networks, current security settings in your Internet Explorer browser will not
allow ActiveX controls to pass from the
client PC. Since many scheduling functions in Polycom ReadiManager LX100 are
executed by ActiveX controls, by setting Polycom ReadiManager LX100 as a trusted
server, you can download and run these controls safely in your computer.
To set the Polycom ReadiManager LX100 server as a trusted server
Polycom ReadiManager LX100 server to the
1. Launch Internet Explorer from the client PC, and from the Tools menu choose
Internet Options.
2. In the Internet Options dialog box, click the Security tab.
3. Click the Trusted Sites icon and then click the Sites... button.
4.
Under the field “Add this Web site to the zone,” enter the URL of the Polycom
ReadiManager LX100
5. Uncheck the checkbox "Require server verification (https:) for all sites in this
zone".
6. Click OK in all of the dialog boxes to close out of the Internet Options.
server and click Add.
8 System Requirements and Setup
Page 17

Chapter 2 - Getting Started
Accessing and Logging On to Polycom ReadiManager LX100
Polycom ReadiManager LX100 is installed on a server and is accessed through Internet
Explorer. Network Aware Scheduler can also be accessed through Microsoft Outlook
and through Lotus Notes.
To access the Polycom ReadiManager LX100 web interface from a PC
>> Launch Internet Explorer and type your Server IP address in the address line of
your browser.
Example: http://YOUR SERVER IP ADDRESS
To log on to Polycom ReadiManager LX100
>> Log into Polycom ReadiManager LX100 by entering your user name and password,
and then clicking the Login button. (Please note: the password is case-sensitive.)
Your Polycom ReadiManager LX100 administrator can tell you your user name
and password.
If you are prompted for a password and do not see a login page, your network
probably uses LDAP. In this case, enter your system password. A user record will
automatically be created for you, using your system user name and password.
If you are prompted for a Directory Domain, enter you system LDAP domain.
The factory default logon for administrators is:
• User Name: admin
• Password: admin
You can use this login to get started setting up
Note: To safeguard your video network, be sure to change this default logon and
password to a confidential and unique administrative user logon and password. For
details, see Changing a User’s Password on page 34.
>> At the Homepage, select the area of Polycom ReadiManager LX100 in which you
want to work. For example, to work in Scheduling Administration (described in this
manual), click Scheduling Administration.
Polycom ReadiManager LX100.
To log out of Polycom ReadiManager LX100
>> Click the Log Out link at the top of the screen.
You are logged out of
reappears.
Polycom ReadiManager LX100 and the logon page
© Polycom, Inc. 9
Page 18
Polycom ReadiManager LX100 Scheduling Administrator’s Guide
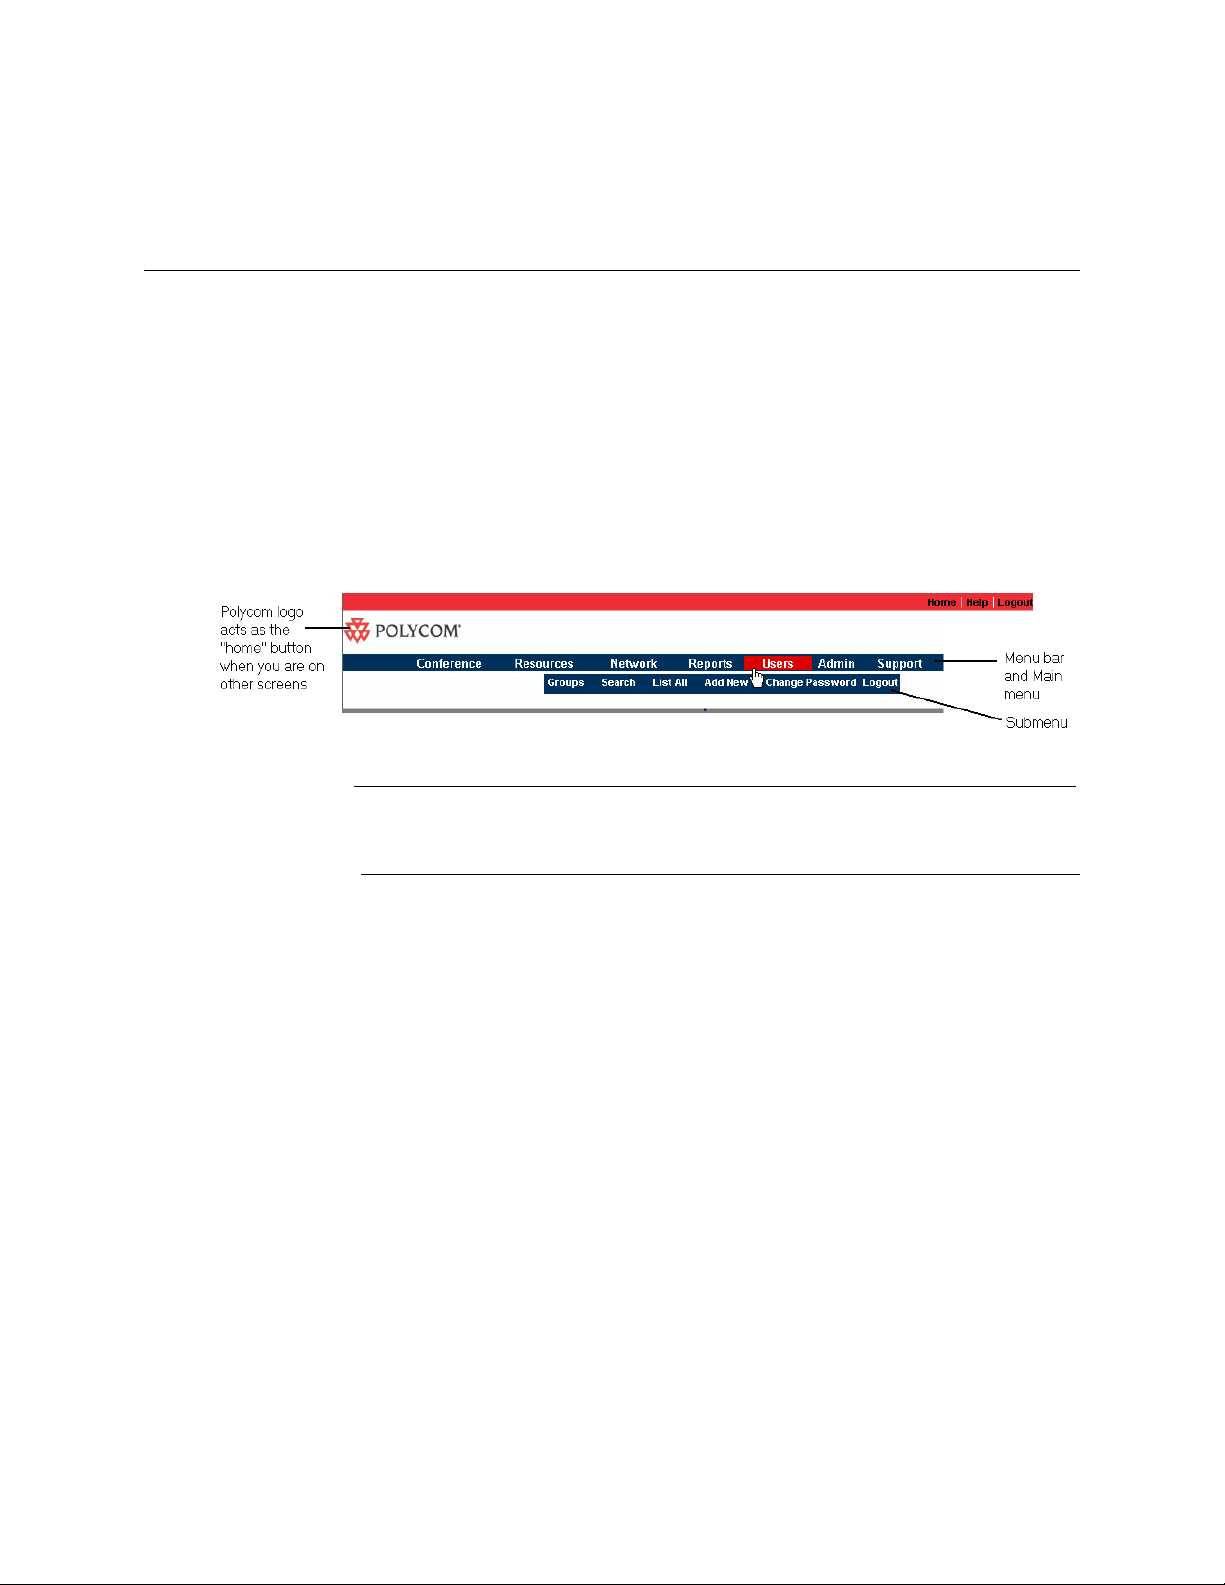
Moving Around in the Scheduling Administration Module
The main menu appears on the screen most of the time as you work with the
Scheduling Module of
parts of the application, and to start tasks.
>> To see the available submenu items, click any of the menu names on the menu
bar.
>> To start a task, click the appropriate submenu name.
In the screen shown below, when the Users menu was clicked, the items on the Users
submenu appeared—Groups, Search, List All, Add New, Change Password, and
Logout. When Add New is clicked, a User Information form will appear.
Polycom ReadiManager LX100. You use it to move to different
Note: Depending on your user permissions, the menus and commands available to you
may differ from those shown in the screenshots in this manual.
Tips When Working in the Polycom ReadiManager LX100 Web View
To maximize the performance of Polycom ReadiManager LX100 on your network, if a
user remains at one screen for some time without taking any action, their session with
Polycom ReadiManager LX100 automatically times out. In this case, it may appear that
Polycom ReadiManager LX100 is not working. To continue work, close the browser and
log on again, and continue work.
If any unusual error messages appear, the Internet Explorer connection to the server
has been compromised. Simply close ALL open Internet Explorer windows, restart
Internet Explorer and login as normal.
Allow the web pages to fully load before clicking on any controls, back buttons or home.
This will reduce the chances of unexpected browser behavior.
10 Moving Around in the Scheduling Administration Module
Page 19

Overview of Setup Tasks
There are two main parts to setting up the Scheduling Administration module of
Polycom ReadiManager LX100:
Enter information in the browser-based application interface. The steps below
provide a detailed summary of what you need to do.
If you use Microsoft Outlook or Lotus Notes, install the Outlook or Notes component
on individual personal computers.
For details, see Polycom ReadiManager LX100 Outlook Scheduling or Polycom
ReadiManager LX100 Lotus Notes Guide. These guides can be downloaded from
the Support > Downloads area of the Scheduling Administration module .
To set up the Scheduling Administration module, perform the following tasks
You’ll find step-by-step instructions for each of these tasks later in this document. The
sequence listed below is recommended for data entry, because the templates, users,
and network information you enter become available as selection items in other
records. For example, when you create resources, you will need to select user and
network information. The order below should provide the easiest flow of information
entry.
Chapter 2 - Getting Started
1. Create Conference Setting templates (optional). (See Setting Up Conference
Templates on page 16.)
2. Enter User Groups and User information. (See Setting Up Users and Working with
User Data on page 20.)
3. If your network uses LDAP, configure LDAP within Polycom ReadiManager
LX100, so that users can be automatically added. (See Setting Up LDAP on
page 36.)
4. Enter the following information about your network topology:
• Areas (See Defining an Area on page 45.)
• Zones—requires Area, Gatekeeper and User information (See Defining a
Zone on page 46.)
• Pipes that connect zones—requires zone information (See Defining a Pipe on
page 47)
5. Enter Resource information (rooms, MCUs, gateways, and Hubs)—requires User
and Zone information (See Setting Up and Working with Resources on page 51.)
• Equipment (for rooms) (See Associating Equipment with a Resource on
page 63.)
• Facilitators (for rooms)—requires User information (Assigning or Removing
Resource Facilitators on page 59.)
• If you have multiple MCUs, enable MCU Cascading (optional). (See on
page 93.)
© Polycom, Inc. 11
Page 20

Polycom ReadiManager LX100 Scheduling Administrator’s Guide
6. If your company uses Microsoft Outlook or Lotus Notes, install the Outlook or
Notes component of
Polycom ReadiManager LX100 on computers of users who
you want to be able to schedule video meetings. For details, see Polycom
ReadiManager LX100 Outlook Scheduling and Polycom ReadiManager LX100
Lotus Notes Guide, which are separate manuals.
7. If you have gateways, consider setting up Least Cost Routing to help reduce the
cost of calls. (See Using Least Cost Routing on page 199.)
12 Overview of Setup Tasks
Page 21

3
Setting Up the Domain,
Templates, and Users
The domain, conference templates and users are the first things that need to be set up
in
Polycom ReadiManager LX100. This chapter includes topics you will need to know
about both. It includes:
Setting Up the Domain
• Fields in the Domain Form
• Enabling ICAL
Setting Up Conference Templates
• Fields in the Conference Setting Template Form
Setting Up Users and Working with User Data
• About User Groups
• Creating a New User Group
• Fields in the User Group Form
• Copying a Group to Create a New Group
• Adding Users to Groups
• Adding a User to Polycom ReadiManager LX100
• Fields in the User Information Form
• Viewing Information about Users
• Viewing User Permissions
• Changing User Information
• Changing a User’s Password
• Sending Broadcast Email to Listed Users
• Deleting a User
• Setting Up LDAP
© Polycom, Inc. 13
Page 22
Polycom ReadiManager LX100 Scheduling Administrator’s Guide
Setting Up the Domain
Polycom ReadiManager LX100 contains a domain record in which you define several
settings that impact how users schedule and work with conferences.
To define settings for the domain
1. From the menu bar, choose Admin > Domains.
2. In the Domain list, click the link labeled Domain.
3. When the Domain form displays, make desired changes.
For details about the fields in the form, see Fields in the Domain Form on page 14.
4. Click Update.
Fields in the Domain Form
Fields with asterisks are required fields.
Field Name Description
Domain Details
Name* Name of the domain. The name is set to “root” and cannot be
changed.
Description* Description of the domain.
Recurring Conference
Limit*
Enable ICAL for
Domain
Sets the maximum number of times a conference can recur.
This will apply to all conferences scheduled by users in this
domain through the Scheduling Wizard, Microsoft Outlook,
Lotus Notes, or through the Polycom ReadiManager LX100
web interface.
Allows ICAL events to be sent via email when creating and
modifying conferences from the web interface. If ICAL is NOT
enabled for your email service, you should not check this
setting because when ICAL events are sent to users who do not
have ICAL support, the messages look confusing.
For more information about ICAL, see
page 15.
Enabling ICAL on
14 Setting Up the Domain
Page 23
Chapter 3 - Setting Up the Domain, Templates, and Users
Field Name Description
Billing ID An identifier for the domain. This ID will be associated with all
conferences created by users associated with this domain.
When a user creates a conference, a reference number that
combines the domain Billing ID and any user Billing ID is stored
in the database and can be used in reports. The Domain Billing
ID can be up to 24 characters.
Enabling ICAL
Default Template for
Conference
Scheduling
Specifies the template to be used as the default template for
users assigned to this domain. The template sets defaults for a
number of conference settings. When new users are imported,
the template to which they are assigned is determined by the
default template associated with their domain.
For more information, see
on page 16.
Setting Up Conference Templates
When ICAL is enabled on a server, conference requests that are sent to individuals
appear in the email client with Accept and Decline buttons, allowing the message
recipients to reply to the message in a way that updates their calendar and informs the
conference creator whether they will attend. Figure 3-1 shows how these buttons
appear in a message in Outlook XP. Users of Lotus Notes have similar capabilities.
Figure 3-1. Response buttons in an ICAL-supported message
If you want users to be able to create and manage conferences from the web and send
meeting requests of this type, you should enable ICAL for the domain in the Domain
form. (To access the Domain form, choose Admin > Domain, and then click the Domain
link.)
Microsoft Outlook and Lotus Notes already use ICAL format, so enabling ICAL in the
Domain record is not required to enable conference and meeting requests to be sent
correctly from Outlook or Notes. It applies only to conferences created and managed
from the
© Polycom, Inc. 15
Polycom ReadiManager LX100 web interface.
Page 24

Polycom ReadiManager LX100 Scheduling Administrator’s Guide
Note: If conference messages appear in recipients’ email messages without the Accept and
Decline buttons and with text that looks confusing, your server may not set have ICAL
support enabled. Check with your IT administrator.
ICAL requires a POP3 type environment. If you are using Enterprise Workgroup Outlook
instead of POP3, your users will not be able to receive messages in ICAL format when they
originated through the Polycom ReadiManager LX100 Web interface. In this case, you
should disable ICAL for the domains.
Setting Up Conference Templates
You can use Conference Setting Templates to define a number of settings which will
become the defaults for a conference. Many of these settings determine the settings to
be used when an MGC controls the conference, such as speed, video mode, audio and
video algorithms, entry and edit tones, dial options, whether to force use of an MCU,
and whether to auto-start a conference. (A complete list of settings that can be defined
in a Conference Setting template is provided under Fields in the Conference Setting
Template Form on page 17.)
When you first install
You can customize this template and you can create additional templates with different
settings.
Many of the individual settings defined by the template can be overridden for a
particular conference by entering a change in the Advanced Settings dialog box in the
Conference window. (Users must have permissions to change Advanced Settings in
order to be able to see and change these settings.) If additional Conference Setting
templates are available for that domain, those templates will be available in a
drop-down list at the top of the Advanced Settings dialog box, making it easy for a user
to change a number of settings at once by selecting another template.
In the domain record, you can specify the default Conference Setting template.
You can also assign a Conference Setting template to an individual user. By default,
users are assigned to the default template set for the domain; you can select another,
if you prefer. Users who have permission to view and change advanced settings when
creating and working with conferences can also change their default template by
selecting another in the Advanced Settings dialog box. (For details, see Using the
Advanced Settings on page 162.) If the user does not have privileges to open the
Advanced Settings dialog, either the default template for the domain or the default
template for the user will determine the settings used in the conference.
When a conference is started, MGC-specific settings from the Conference Setting
template are sent to the MGC. If the MCU is not a Polycom MGC, some of these
settings do not apply and are ignored by Polycom ReadiManager LX100.
Polycom ReadiManager LX100, one default template is provided.
16 Setting Up Conference Templates
Page 25
Chapter 3 - Setting Up the Domain, Templates, and Users
Fields in the Conference Setting Template Form
The values entered in the Conference Setting template form become the defaults for
conferences created by users associated with this template. Access to change most of
these settings can be permitted by associating users with a user group that has access
to the Advanced Settings when scheduling. For users who cannot see or change the
Advanced Settings, these defaults become the settings for conferences they create.
Field Name Description
MCU Settings
Template Name* Name of the template. This name will appear in drop-down lists in
the Domain form, User Information form, and Advanced Settings
dialog box.
Te mp l at e
Description*
Domain Domain to which the template belongs. This is always defined as
Audio Alg Sets the compression algorithm that the MCU will use to process
Video Alg Sets the compression algorithm that the MCU will use to process
Entry Tone Sets whether an entry tone will be sounded when a participant
Exit Tone Sets whether an exit tone will be sounded when a participant
Description of the template. Both the Template Name and
Template Description appear in the list of Conference Setting
templates.
“Root.”
audio. Select the algorithm you want to use.
This setting cannot be changed in the Advanced Settings dialog
box in the Conference window.
video. Select the algorithm you want to use. (specifies
compression).
This setting cannot be changed in the Advanced Settings dialog
box in the Conference window.
leaves a conference. Check the box to have entry tones used;
uncheck it to prevent them from being used.
This setting cannot be changed in the Advanced Settings dialog
box in the Conference window.
leaves a conference. Check the box to have exit tones used;
uncheck it to prevent them from being used.
This setting cannot be changed in the Advanced Settings dialog
box in the Conference window.
End Time Alert Sets whether an alert tone will be generated near the end of the
conference, and the number of minutes before the end that it
should be generated.
This setting cannot be changed in the Advanced Settings dialog
box in the Conference window.
© Polycom, Inc. 17
Page 26
Polycom ReadiManager LX100 Scheduling Administrator’s Guide
Field Name Description
Talk Hold Time (sec) Indicates the minimum period, in seconds, that a participant has
to speak to become the main speaker. During this period, no other
participant is allowed to become the main speaker. This
parameter is designed to prevent participants from becoming the
main speakers when coughing or laughing or fast and frequent
changes of the main speakers.
This setting cannot be changed in the Advanced Settings dialog
box in the Conference window.
Audio mix depth Sets the number of participants with the loudest voices who can
speak at once during a conference. If additional participants
speak, their comments will not be heard.
Dial Options Determines whether a conference will require all endpoints to dial
in to the conference, or whether a combination of dial-in and
dial-out will be allowed.
Dial In Only. Creates a dial-in conference for which a particular
phone number and pin code are created for all conference
participants. With a dial-in conference, any audio or video system
can dial in, and all participants will be connected to the same
conference inside the bridge. This allows participants to dial into
the bridge at their convenience from anywhere they choose.
Dial Out/Dial In. Creates a conference that allows the MCU to
dial-out to a video system, as well as to have participants dial in.
When Dial Out/Dial In is selected, the person setting up the
conference can specify the individual resources that should dial
in. For example, it might be desired to have a particular end-point
use dial-in, in which case a bridge will create a dial-in number for
it. For more information about how this can be done when
scheduling a conference, see
Individual Resources
Changing Dial-In Settings for
on page 99.
Force MCU Check this box to force all end-points in a conference to use an
MCU. Establishing this as a default provides consistency in the
features available across video conferences, but may limit the
number of calls that can be made at one time. This setting can be
changed in the Advanced Details dialog box when creating or
editing individual conferences.
Auto Start
Conferences
Chair Control
Option
Specifies whether the conference should be auto-started. This
setting can be changed in the Advanced Details dialog box when
creating or editing individual conferences.
Enables someone scheduling the conference to specify a 4-digit
number that can be used by the conference chair to control the
conference. (The actual chair control number must be
communicated independently to the conference chair. It is NOT
included in a conference-related email.)
Note: In order to use Chair Control, IVR must be enabled in the
Equipment record for the MCU.
18 Setting Up Conference Templates
Page 27
Chapter 3 - Setting Up the Domain, Templates, and Users
Field Name Description
Speed Specifies the maximum speed at which a conference can be
conducted. Choices include None, Audio, 128, 256, 320, 384,
512, and 768. Selecting None causes “Room only” to be selected
as the Conference Type in the Advanced Settings dialog box
when scheduling conferences. Selecting Audio causes “Bridged
Audio” to be selected as the Conference Type in the Advanced
Settings dialog box.
People + Content Determines whether People + Content is enabled, and if so, what
type of People + Content format will be the default. Enabling this
setting is useful when you have equipment that supports the
display of both people and content. For more information, see
Using People + Content on page 167Note: The MGC requires
that conferences with People + Content use a Speed of at least
192 K. If you set the Speed to 128, the conference will fail.
T120 Determines whether T.120 is enabled, and if so, the default
transfer rate. Enabling this setting is useful when you have
equipment that supports T.120 display of data. Because this
setting uses resources on the bridge, it is recommended that you
leave this setting as “None” except when you know that you want
to use it. For more information, see
Using T.120 on page 168.
Lecture Mode The Lecture Mode settings are typically used in distance learning
environments. The Lecturer is selected through the MGC
Manager.
Lecture Mode Possible values are Lecture Mode, Presentation Mode, and
None.
Lecture Mode. All participants view the lecturer in full screen,
while the lecturer views all conference participants in either a
Continuous Presence layout, or for conferences defined as Video
Switching, by scrolling through the other participants in full screen
at the interval defined in the Lecture Interval field.
Presentation Mode. Available for Continuous Presence
conferences. When the person currently speaking talks for a
predefined time (defined by Lecture Interval), the conference
layout automatically changes to full screen, displaying the current
speaker as the conference lecturer on the monitors of all
conference participant. The person speaking sees the previous
conference layout. When another participant starts talking, the
display returns to the predefined video layout. If that person
speaks for the predefined amount of time, they become the
conference lecturer, and other participants see them in full
screen.
None. Rotates by audio activation, depending on who is talking.
© Polycom, Inc. 19
Page 28

Polycom ReadiManager LX100 Scheduling Administrator’s Guide
Field Name Description
Timer Enables or disables the automatic switching between
participants. The frequency of switching is determined by the
value in the Lecture Interval field.
In a Continuous Presence conference this setting is irrelevant, as
all the participants are displayed on the lecturer screen.
The Timer is active when the number of participants exceeds the
number of windows in the selected video layout. In such a case,
when the switching is performed, the system refreshes the
display while replacing the last active speaker with a speaker who
was invisible during the last display interval. When one of the
participants is talking, the automatic switching is suspended,
showing the current speaker. Switching resumes when the
lecturer resumes talking.
Lecture Interval The number of seconds a participant is displayed in the lecturer
window before switching to the next participant.
Video Mode
Video Mode Determines the initial screen layout on an endpoint’s monitor
during a multipoint conference if it requires a stand-alone bridge.
Selecting Switching causes the display to change each time the
speaker changes, so that everyone sees the current speaker.
Other settings let you select the number of panels to be shown,
so that you can see all of the meeting participants at once.
For more details about available video modes, see
Video Mode for Multipoint Calls
Setting the
on page 165.
Setting Up Users and Working with User Data
All people who will access Polycom ReadiManager LX100 must be entered as users,
even those who only use the Outlook component of Network Aware Scheduler.
This section includes the following topics about working with users:
About User Groups
Creating a New User Group
Fields in the User Group Form
Copying a Group to Create a New Group
Adding Users to Groups
Adding a User to Polycom ReadiManager LX100
Fields in the User Information Form
Viewing Information about Users
Viewing User Permissions
20 Setting Up Users and Working with User Data
Page 29

Changing User Information
Changing a User’s Password
Sending Broadcast Email to Listed Users
Deleting a User
Setting Up LDAP
About User Groups
Users are granted access rights to different features in the software, depending on the
groups with which they are associated. Users can be associated with multiple user
groups.
Note: When the groups a user is associated with do not grant them access to a feature, they
do not see that feature in Polycom ReadiManager LX100.
Chapter 3 - Setting Up the Domain, Templates, and Users
Polycom ReadiManager LX100
definitions of these groups cannot be changed or deleted. However, you can create
additional user groups to meet your needs, and set specific user privileges for
those.The tables below provide a general description of the user group types included
Polycom ReadiManager LX100 and specific permissions associated with each.
in
Note: In addition to the permissions available with their user profile, all users except those
only assigned to the Wizard Only group have the ability to view resources, access user
manuals, change their password, and view schedule reports.
Table 3-1. Default User Groups
User Group Description
Conference
Administrator
Conference Schedule
Request Notify
Global Administrator The Global Administrator has the highest administrative
comes with a number of default user groups. The
The Conference Administrator has the ability to create and
modify all conferences, and to approve requested
conferences. This administrator also has the ability to view
and modify resources.
Users assigned this group receive notification of all
scheduling emails.
privileges for the Polycom ReadiManager LX100. This user
has administrative rights to all menu items. This user also has
the ability to modify all information written to the database
from Polycom ReadiManager LX100.
© Polycom, Inc. 21
Page 30
Polycom ReadiManager LX100 Scheduling Administrator’s Guide
Table 3-1. Default User Groups
User Group Description
Network Administrator The Network Administrator has the ability to create and edit
network diagrams for their domain in the Polycom Video
Network Management module. This administrator also has
the ability to view and modify resources, and scheduled
conferences, and to approve requested conferences
Request Only Request Only is a variation of the Scheduler profile.
Conferences requested by a user with the Request Only user
profile must be approved by a Conference Administrator or
Network Administrator, or by a user with Approve and
Manage Conference privilege.
Resource Facilitator The Resource Facilitator has the ability to view and modify
resources for which they are facilitators, and conferences
they have scheduled.
Scheduler The Scheduler has only the ability to view and modify their
own scheduled conferences.
System Technician The System Technician has the ability to view resources and
reports. The technician also has the ability to view and modify
scheduled conferences.
Wizard Only Users in this group are allowed to use only the wizard
scheduling interface.
Note that if a user is given this user group and other user
groups, the other user groups are ignored; they will have
access only to the wizard.
Table 3-2. Capabilities Granted with Each Default User Group
Note that Global and Domain both indicate access to that capability.
Capability
Admin
Features
License
Management
View/Modify
Equipment
Type/Category
Global
Administrator
Conference
Admin
Network
Admin
System
Technician
Resource
Facilitator
Global None None None None None None None None
Global None None None None None None None None
Scheduler
Request Only
Conference
Schedule
Request Notify
Wizard Only
22 Setting Up Users and Working with User Data
Page 31

Chapter 3 - Setting Up the Domain, Templates, and Users
Table 3-2. Capabilities Granted with Each Default User Group
Note that Global and Domain both indicate access to that capability.
Capability
Equipment
Type/Category
Delete
Generate All
Reports
Global
Administrator
Conference
Admin
Network
Admin
System
Technician
Resource
Facilitator
Global None None None None None None None None
Global None None None None None None None None
Scheduler
Request Only
Conference
Schedule
Request Notify
Resource Features
View Resources Global Domain Domain Domain Domain Domain Domain None Domain
Modify
Resources
Delete
Resources
View Equipment
Information
Modify
Equipment
Information
Global Domain Domain None None None None None None
Global None None None None None None None None
Global Domain Domain Domain Domain Domain None None Domain
Global None Domain None None None None None None
Scheduling Features
Approve and
Manage All
Conferences
Global Domain Domain Domain None None None None None
Wizard Only
Request
Conferences
Only
Schedule
Conference
View Conference Global Domain Domain Domain Domain Domain Domain None Domain
Receive
Scheduling
Emails
Order Catering Global None None None None None None None None
Access Trouble
Tickets from
Schedule page
© Polycom, Inc. 23
Global None None None None None Domain None None
Global Domain Domain Domain Domain Domain None None Domain
None Domain None None None None None Domain None
Global Global Global Global Global None None None None
Page 32

Polycom ReadiManager LX100 Scheduling Administrator’s Guide
Table 3-2. Capabilities Granted with Each Default User Group
Note that Global and Domain both indicate access to that capability.
Capability
Access
Advanced
Settings from
Schedule page
Schedule
Interface
Global
Administrator
Conference
Admin
Network
Admin
System
Technician
Resource
Facilitator
Global Global Global Global Global None None None None
Normal Normal Normal Normal Normal Normal Normal Normal Wizard
Scheduler
Request Only
Conference
Schedule
Request Notify
Only
Caterer Maintenance
Modify Caterers Global Domain Domain None None None None None None
Delete Caterer DomainNone None None None None None None None
Network Features
Design/Modify
Network
Topology
Delete Network
Topology Entries
Manage Network Global None Domain Domain None None None None None
Global None Domain None None None None None None
Global None None None None None None None None
Trouble Ticketing
View Tickets Global Domain Domain Domain Domain Domain None None None
Wizard Only
Enter Tickets Global Domain Domain Domain Domain Domain None None None
Assign Tickets Global None None None None None None None None
Update Tickets Global None Domain Domain Domain None None None None
Block Ticket
Emails
None None None None None None None None None
User Maintenance
View Users Global Domain Domain Domain Domain Domain Domain None None
Modify/Delete
Users
View/Modify/
Delete Groups
View/Modify/
Delete Domains
24 Setting Up Users and Working with User Data
Global None Domain None None None None None None
Global None None None None None None None None
Global None None None None None None None None
Page 33

Notes
Only a Global Administrator can grant another user the Global Administrator
permission. Other users with permissions for Modify/Delete Users will not see this
option.
Facilitators can only edit the details of resources and associated equipment when
they are assigned to that resource.
When a resource is made private or hidden, only users assigned as facilitators for
that resource can schedule it.
Resource Facilitators and Schedulers can only manage conferences that they
have created.
By default, only Global Administrators can Import user, equipment, and resource
data. If you need to create a new group that includes import capabilities, you must
grant them access to Modify Resources, Modify Equipment Information, and
Modify/Delete Users.
Creating a New User Group
Chapter 3 - Setting Up the Domain, Templates, and Users
The Polycom ReadiManager LX100 Global Administrator can create additional user
groups, if they are needed. When you create a new user group, you indicate what
permissions users assigned to that group will have, and whether they are on a Global
or Domain basis.
To create a new group
1. From the menu bar, choose Users > Groups
2. In the Groups list, click Add New.
3. In the User Group form, enter a group name and description, and then set the
capabilities to be associated with this group. (For details about the form, see
Fields in the User Group Form on page 25.)
4. When you are finished, click Update to submit this form and create the group.
You will see the group listed in the Groups list. You can now assign users to this
new group.
Fields in the User Group Form
Fields with asterisks are required fields.
Most of the fields in the User Group form specify whether an access capability is Not
available, available for the Domain, or available globally (across all domains).
© Polycom, Inc. 25
Page 34

Polycom ReadiManager LX100 Scheduling Administrator’s Guide
Field Name Description
Group Details
Name* Name of the group.
Description* Description of the group.
Admin
License Management Allows users to access and enter license and serial number
information.
View/Modify
Equipment
Allows users to view and modify Equipment and Category
screens from the Admin menu.
Type/Category
Equipment
Type/Category Delete
Determines whether users can delete Equipment Type and
Category records.
Generate All Reports Determines whether users can generate all types of reports.
When this setting is No, users will have access only to
Schedule Reports.
Resource
View Resources Determines whether users can view resources.
Modify Resources Determines whether users can change resource records.
Delete Resources Determines whether users can delete resource records.
View Equipment
Information
Modify Equipment
Information
Determines whether users can view equipment information
associated with resources.
Determines whether users can change equipment information
associated with resources.
Scheduling
Approve and Manage
All Conferences
Request Conferences
Only
Determines whether users can create, manage, and approve
all conferences.
Determines whether users can schedule conferences that
need to be approved before it is scheduled.
Schedule Conference Determines whether users can schedule conferences that do
not require approval.
View Conference Determines whether users can view conferences, but not
schedule or change them.
Receive Scheduling
Emails
Access Advanced
Settings from Schedule
page
Determines whether users can receive emails about scheduled
conferences.
Determines whether the Advanced Settings button appears in
the Schedule page. When this is set to No, users can only
schedule conferences with the Advanced Settings defaults
specified for the domain.
26 Setting Up Users and Working with User Data
Page 35

Field Name Description
Network
Chapter 3 - Setting Up the Domain, Templates, and Users
Design/Modify Network
To po l og y
Delete Network
Topology Entries
User Maintenance
View User Determines whether users can view user records.
Modify/Delete Users Determines whether users can create, modify, and delete user
View/Modify/Delete
Groups
View/Modify/Delete
Domains
Determines whether users can create and modify network
topology information. When this setting is No, the user does not
see the Network menu.
Determines whether users can delete network topology
records.
records.
Determines whether users can view, create, modify, and delete
user groups.
Determines whether users can view, create, modify, and delete
domains.
Copying a Group to Create a New Group
If you want to create a group that is similar to an existing group, you can start by copying
that group, and then making adjustments to the permissions.
To copy a group and create a new group
1. From the menu bar, choose Users > Groups.
2. In the Groups list, click locate the group you want to make a copy of and click the
Group link in the View column.
3. Scroll to the bottom of the group form and click Copy.
A copy of the group is created, with “Copy of” appended to the end of the name in
the list of groups.
4. In the list of user groups, click the newly created copy to open it.
5. In the User Group form, change the group name and description, and then make
any adjustments to the capabilities to be associated with this group. (For details
about the form, see Fields in the User Group Form on page 25.)
6. When you are finished, click Update to submit this form and save the group with
the new name and permissions.
You will see the new group name listed in the Groups list. You can now assign
users to this new group.
© Polycom, Inc. 27
Page 36

Polycom ReadiManager LX100 Scheduling Administrator’s Guide
Adding Users to Groups
You can add users to groups when you set up each user record. You can also add one
or more users to a group from the list of groups. This is a faster method when you have
existing user records.
To add multiple users to a group
1. From the menu bar, choose Users > Groups.
2. In the Groups list, find the group to which you want to add users and click Users in
the View column for that record.
The Group/User Information form appears. The list on the right shows users who
are currently assigned to this group, and the list on the left shows other available
users.
3. In the list of Available Users, select the user you want to add to this group and
click Add.
4. Repeat step 3 to add additional users this group.
When you are finished adding users, click Update to save the changes you made.
The permissions for the users you added to the group are immediately updated.
28 Setting Up Users and Working with User Data
Page 37

Chapter 3 - Setting Up the Domain, Templates, and Users
Adding a User to Polycom ReadiManager LX100
When adding a user, enter the user’s name, define the user’s login and password, then
select user groups that determine what features the user can access, and finally enter
other user contact information, such as the email to which communications are sent.
Notes: Only Network Administrators and Global Administrators can add new users. Network
Administrators can only add users to their domain, however Global Administrators can add
users to any domain.
You can also import information about users from a file (for details, see
on page 187), and if your network has an LDAP server, you can set up Polycom
ReadiManager LX100 so that LDAP users can automatically be added (for details, see
Importing User Data
Setting Up LDAP on page 36).
To add a user
1. From the menu bar, choose Users > Add New.
2. In the User Information form, enter user logon, contact, and profile information.
The following information is required:
• First Name and Last Name. These will be used to identify the user throughout
Polycom ReadiManager LX100.
• User Name. This will be the user’s logon.
• Password. This is the password the user will use to access
ReadiManager LX100
. The password is case-sensitive.
Polycom
• Domain. Automatically set to “root.”
• Email. This is the email address to which information about conferences will
be sent, when the user schedules a conference. If the user is a facilitator for a
resource, remote alerts may also be sent to this address.
3. In the User Groups section, select each user group to which you want to assign
this user and click Add to move the group from the Available Groups list to the
Current Groups list.
You select and add one group at a time.
If you make a mistake or change your mind, select the group in the Current
Groups list and click Remove.
The user groups selected here determine what the user can and cannot do in
Polycom ReadiManager LX100. (For details, see About User Groups on page 21.)
4. Enter any additional information for this user and click Update to submit the
information.
For details about individual fields, Fields in the User Information Form.
© Polycom, Inc. 29
Page 38

Polycom ReadiManager LX100 Scheduling Administrator’s Guide
Fields in the User Information Form
Fields with asterisks are required fields.
Field Name Description
User Description
First Name* User’s first name. Can be used when searching for users.
Last Name* User’s last name. Can be used when searching for users.
Work Phone User’s work phone number. Appears in the list of users.
Home Phone This number can be included in a report on users.
Fax Number If the user is a contact for a resource, this number is included
in the Contact Information pop-up available from a link in the
Resource Information form. This number can also be included
in a printable user report.
Cell/Pager If the user is a contact for a resource, this number is included
in the Contact Information pop-up available from a link in the
Resource Information form. This number can also be included
in a printable user report.
Picture Upload
[Browse]
User Location
Address (street, 3
fields)
City City in which user resides. Can be used when searching for
State State in which user resides. Can be used when searching for
Zip Code Zip code of user’s address.
Country Country in which user resides.
User Specification
User Name* This will be the user’s logon name.
Password* Password for user to access Polycom ReadiManager LX100.
Email* Email address to which conference-related messages are
PagerEmail Email address to which remote alerts are sent, when the user
You can display a picture with the user record. Click Browse
to navigate to the image file and then upload it to the database.
User’s street address.
users.
users.
sent. If the user is a facilitator for a resource, remote alerts will
also be sent to this address. This address also appears in user
lists.
is assigned as a facilitator for a resource.
Domain Automatically set to “root.”
30 Setting Up Users and Working with User Data
Page 39

Field Name Description
Chapter 3 - Setting Up the Domain, Templates, and Users
Conference Setting
template
The default Conference Setting template to be used for this
user.
When “None” is set in the user form, the default template
defined for the domain with which this user is associated will
be used.
The list of available Conference Setting templates includes all
those associated with the domain to which the user is
assigned, and those assigned to the Top Level Domain. (If you
have Global Administrator access rights, you will see all
available templates in the list.)
The Conference Setting template defines a number of specific
details for conferences. Users who have permissions to
access the Advanced Settings dialog box when scheduling a
conference can see and changes those settings. For more
information about Conference Setting templates, see
Up Conference Templates
on page 16.
Setting
Note: If the user changes the template in the Advanced
Settings dialog box when scheduling a conference, their
selection is automatically saved as their default template in
their user record.
Billing ID An identifier for the user. This ID will be associated with all
conferences created by this user, in conjunction with the Billing
ID assigned to the domain. The User Billing ID can be up to 24
characters.
Billing IDs assigned to users should be unique within the
domain.
User Groups
Available Groups A list of available groups that could be assigned to the user.
Current Groups* The user groups assigned to this user. The groups assigned
here determine what the user can and cannot do in Polycom
ReadiManager LX100. For details, see Table 3-1 on page 21.
General Comments Any additional information of note about this user.
© Polycom, Inc. 31
Page 40

Polycom ReadiManager LX100 Scheduling Administrator’s Guide
Viewing Information about Users
You can see a list of all users, or you can search for a subset of users, such as those
that live in a particular city or state.
User lists include contact information. When you want to see additional information, you
can open individual user records.
To view a list of all users
>> From the menu bar, choose Users > List All.
The Users list appears.
To search for users
1. From the menu bar, choose Users > Search.
2. In the User Query form, enter the search criteria and click Search.
You can search by First Name, Last Name, City, and State.
A list of users that match the criteria you entered appears.
Tip: Type the first few characters of the text you want to match.
ReadiManager LX100
32 Setting Up Users and Working with User Data
will find all entries that start with those characters.
Polycom
Page 41

Viewing User Permissions
Chapter 3 - Setting Up the Domain, Templates, and Users
Users are granted access to Polycom ReadiManager LX100 features by being assigned
to User Groups. When a user is assigned to more than one group, the permissions from
each group are cumulative. You can see all of the permissions provided to a particular
user by opening the User Privilege page.
Note: The User Privileges form is read-only. You cannot change the settings on this page.
If you want to change the permissions granted to a user, do so in their user record, by
changing the groups to which they are assigned.
To view a user's permissions
1. From the menu bar, choose Users > List All.
The list of users appears.
2. Locate the record for the user your want, and in the View column, click the Priv
link for that user.
The User Privileges form for the user opens.
© Polycom, Inc. 33
Page 42

Polycom ReadiManager LX100 Scheduling Administrator’s Guide
Changing User Information
As a user, you can always change information about yourself. Only Network
Administrators and Global Administrators can change information about other users.
User records can be opened from a list of users. You can either use the List All
command, or search for users that match name and location information.
To change user information
1. From the menu bar, choose Users > List All, or choose Users > Search to find the
user for whom you want to change information.
2. Locate the user record you want in the User list, and in the View column, click the
User link for that record.
3. In the User Information form, make the necessary changes and click Update to
submit them.
For details about User fields, see Fields in the User Information Form on page 30.
Note: If you don’t see the Update button at the bottom of the form, you do not have
access rights to change this user information.
Changing a User’s Password
As a user, you can always change your own password. In addition, Network
Administrators and Global Administrators can change the password for other users.
To change your own user password
1. From the menu bar, choose Users > Change Password.
2. In the Change Password form, enter the following:
• Old Password. This is your current password.
• New Password. Enter the new password.
• Confirm New Password. Enter the new password again.
3. Click Update.
34 Setting Up Users and Working with User Data
Page 43

Chapter 3 - Setting Up the Domain, Templates, and Users
To change a different user’s password
If you are a Network Administrator or Global Administrator, you can also change the
password for other users.
1. From the menu bar, choose Users > List All, or choose Users > Search to find the
user for whom you want to change information.
2. In the User list, click the User link in the View column for the user record you want
to change.
3. In the User Information form, scroll down to the Password field and replace the
text shown.
4. Click Update.
Sending Broadcast Email to Listed Users
You can send a broadcast email to all users in a list. This is useful if you need to inform
them about network-wide issues, such as the need to take down
ReadiManager LX100
To send a broadcast email
1. Display the list of users to whom you want to send the email.
for maintenance.
Polycom
Deleting a User
Choose either Users > List All, or use Users > Search to find a particular subset of
users.
2. Click the Broadcast Email to All Users link at the bottom of the User list.
3. In the Broadcast Email To form, enter a subject and the message text, and then
click Send Email.
Deleting a user prevents them from being able to access Polycom ReadiManager LX100.
If the user had been a facilitator or contact for a resource, that entry is also deleted.
After being deleted, the individual will no longer receive emails related to the resource,
scheduled conferences, or trouble tickets.
To delete a user
1. From the menu bar, choose Users > List All, or choose Users > Search to find the
user for whom you want to change information.
2. In the User list, find the user you want to delete and click Delete in the Action
column for that record.
3. When the confirmation message appears, click OK to delete the user or Cancel to
keep the user.
Note: The user admin, admin cannot be deleted, but the password can be changed.
© Polycom, Inc. 35
Page 44

Polycom ReadiManager LX100 Scheduling Administrator’s Guide
Setting Up LDAP
If your network uses LDAP and Active Directory or a similar program, you can set up
Polycom ReadiManager LX100 to allow LDAP users to log into the Polycom
ReadiManager LX100
ReadiManager LX100
Users are Added to Polycom ReadiManager LX100 on page 38
web interface and automatically be added to the list of Polycom
users. For details about the user’s experience, see How LDAP
You set up and enable LDAP in
screen. You will need to know the IP of the LDAP server and the Windows LDAP domain.
Polycom ReadiManager LX100 from the Admin Console
To enter LDAP settings in Polycom ReadiManager LX100
1. From the menu bar, choose Admin > Console.
2. On the Administrator Console page, click Edit in the row for LDAP.
3. In the LDAP Configuration form, complete all fields.
• LDAP Enabled. Check this box to enable use of LDAP. If you ever want to
disable LDAP, you can uncheck this box without changing the values in the
other fields.
• LDAP Server Address. Enter the IP address of the LDAP server.
• LDAP Default DN. Enter the default Distinguished Name (DN) to be used for
all LDAP queries.
You can enter this in one of the following two formats:
DN Format: DC=domain name, DC=TLD
(where “DC” stands for Domain Component and “TLD” stands for Top Level
Domain)
Example: DC=westcoast, DC=com
Hostname: Distinguished Name.TLD
(Example: westcoast.com)
If you use the hostname format,
Polycom ReadiManager LX100 will convert it to
the DN Format behind the scenes.
• LDAP New User Group: Select the
Polycom ReadiManager LX100 User Group
to which LDAP users will be assigned. This will set the initial permissions for
LDAP users. You can edit the user’s record later to add or change user groups.
36 Setting Up Users and Working with User Data
Page 45

4. Click Update.
Chapter 3 - Setting Up the Domain, Templates, and Users
© Polycom, Inc. 37
Page 46

Polycom ReadiManager LX100 Scheduling Administrator’s Guide
How LDAP Users are Added to Polycom ReadiManager LX100
When LDAP has been set up and enabled in Polycom ReadiManager LX100, those
users will be able to log on to
Polycom ReadiManager LX100.
When LDAP users go to the
Polycom ReadiManager LX100 website for the first time, if
they are already logged into the LDAP domain, they are prompted to enter another
password. In addition, if an email address is not defined for the user on the LDAP
server, users are prompted for an email address. After they enter this information, a
user record is automatically created for them in
Polycom ReadiManager LX100, using
their system user name and the password they enter.
If a user is not logged into the LDAP domain, the system will prompt for user account
information. If the user is authenticated as an LDAP user (and is validated),
the user is
added to Polycom ReadiManager LX100. If the user is not authenticated as an LDAP
user but is already included in the
Polycom ReadiManager LX100 database, the user is
logged in.
Note: When users are prompted to enter a password, they may want to enter their LDAP
password. That way one password works for both the system and for Polycom
ReadiManager LX100. If a user enters a different password, or makes an error when
entering the password, they will have a different password for logging into Polycom
ReadiManager LX100.
The user is assigned to the LDAP domain and granted the permissions associated with
the user group specified in the LDAP Configuration form.
Note: Once an LDAP user has been entered as a Polycom ReadiManager LX100 user, their
logon information exists in both the LDAP database and the Polycom ReadiManager LX100
database. Changing user information in one database does not affect the information in the
other database, nor does deleting the user record in one database delete it from the other
database.
After the first time, when LDAP users go to the Polycom ReadiManager LX100 website,
they will briefly see a message “Checking security settings” before the main
ReadiManager LX100
page appears.
Polycom
LDAP and Users of Microsoft Outlook and Lotus Notes
Automatic creation of user records in Polycom ReadiManager LX100 can only occur
when the user visits the Polycom ReadiManager LX100 website. Users of Microsoft
Outlook and Lotus Notes should go to the
their password, and access the Welcome page. After they have done this once, they
will be able to use the
38 Setting Up Users and Working with User Data
Polycom ReadiManager LX100 component in Outlook or Notes.
Polycom ReadiManager LX100 website, enter
Page 47

Chapter 3 - Setting Up the Domain, Templates, and Users
User login information for the Polycom ReadiManager LX100 Outlook or Notes
component should be the same as for the web. It should include:
User Name
Password
Domain set to root
IP of the Polycom ReadiManager LX100 server.
© Polycom, Inc. 39
Page 48

Polycom ReadiManager LX100 Scheduling Administrator’s Guide
40 Setting Up Users and Working with User Data
Page 49

4
Entering Network Topology
Data
Defining your network topology provides the information necessary for Polycom
ReadiManager LX100 to manage and schedule videoconferences. This information is
used for two purposes:
It creates the routing information that is used by Network Aware Scheduler.
It sets up the folder views that users see during scheduling, and that appear in the
Polycom Video Network Management module.
What You Need
For reference, you will need information about your network topology—either a
document that contains the required information, or the person who is most familiar with
your network.
The Network Topology Structure
Hierarchically, your video network in Polycom ReadiManager LX100 is organized like
this:
Pipes are an additional, important part of the network, but are not part of the hierarchy.
They connect zones to one another.
© Polycom, Inc. 41
Page 50

Polycom ReadiManager LX100 Scheduling Administrator’s Guide
You see this hierarchy whenever you schedule a conference, as shown in Figure 4-1.
Figure 4-1. Network Topology As it Appears in Polycom ReadiManager LX100 Screen
You define your network by entering information about all the neighborhoods, areas,
zones, pipes, resources, and equipment.
Areas tend to be geographical. You can think of them like a campus—typically a
group of buildings. Areas provide a way to organize zones. (See Defining an Area
on page 45.)
Zones roughly correspond to a building or a floor in a building. A Zone in Polycom
ReadiManager LX100 may correspond to an H.323 Zone, however it does not have
to. Zones are used to organize resources. (See Defining a Zone on page 46.)
Pipes indicate a limited bandwidth transport between zones, usually associated
with WAN links. (See Defining a Pipe on page 47.)
Resources are rooms, and hubs. Resources can contain equipment. (See Chapter
5, Setting Up and Working with Resources on page 51.)
Equipment is associated with (or placed in) a particular resource. For example, a
room may contain codecs, projectors, screens, VCRs, and so forth. A hub can
contain an MCU, Gateway or other networking equipment such as a router.
Figure 4-2 shows an area with four zones, each comprised of a series of endpoints in
room resources. Pipes show network connections between zones. Zone D also has a
Hub resource containing an MCU.
42 The Network Topology Structure
Page 51

Chapter 4 - Entering Network Topology Data
Figure 4-2. Network Topology for a single area
© Polycom, Inc. 43
Page 52

Polycom ReadiManager LX100 Scheduling Administrator’s Guide
Setting Up and Working with Areas, Zones, and Pipes
This section describes how to enter and work with information about areas, zones, and
pipes in your network. It includes these topics:
Viewing Areas, Zones, and Pipes
Defining an Area
Fields in the Area Form
Defining a Zone
Fields in the Zone Form
Defining a Pipe
Fields in the Pipe Form
Changing Information about Areas, Zones, and Pipes
Deleting an Area, Zone, or Pipe
Viewing Areas, Zones, and Pipes
Information about most of your network topology is entered through a series of
commands on the Network menu, shown in Figure 4-3. Resources are treated
separately, and accessed via the Resources menu. They are discussed later in this
document, under Setting Up and Working with Resources on page 41.
Figure 4-3. Network Menu
To view a list of areas, zones, or pipes
>> From the menu bar, choose Network > Area, Network > Zones, or Network >
Pipes. A list of the items you requested appears.
Once one of these lists is in view, it’s easy to see related network information, because
the lists include links to related items. Each area record on the Area list contains a link
to the zones in that area. Likewise, each zone record in the Zone list contains a link to
the pipes associated with it. Figure 4-4 provides an illustration.
44 Setting Up and Working with Areas, Zones, and Pipes
Page 53

Chapter 4 - Entering Network Topology Data
Figure 4-4. Area, Zone, and Pipe Lists
When Polycom ReadiManager LX100 is first installed, these lists include a few default
records. Most of these initial records exist only as examples, and can be deleted. The
one exception is the Off Net Zone. This zone is defined so that you can set up endpoints
that are not on the network. For more information, see Adding ISDN-Only Resources
without IP Connections on page 56.
Defining an Area
Areas are the highest organizational level in your network, unless using a distributed
server network. They typically represent a geographical area.
Multiple areas are not required, however they are recommended for large networks.
Their main purpose is to help organize zones.
When you first install Polycom ReadiManager LX100, a default area called
“YourPrimaryArea” is provided. It’s a good idea to rename this area to one that is more
meaningful for your network.
© Polycom, Inc. 45
Page 54

Polycom ReadiManager LX100 Scheduling Administrator’s Guide
To define an area
1. From the menu bar, choose Network > Area.
2. In the Area Information list, click Add New.
3. In the Area form, enter a name and description for the form, and click Update to
submit the information.
For details about individual fields, see Fields in the Area Form.
Fields in the Area Form
Field Name Description
Name Name of the area. This name will appear to users when they
create schedules and select resources.
Description Description of the area.
Domain Domain with which the area is associated.
Defining a Zone
As defined in the H.323 Recommendation from the ITU-T, a zone is “the collection of
all terminals, Gateways, and Multipoint Control Units (MCUs) managed by a single
Gatekeeper. A zone includes at least one terminal and may or may not include
Gateways or MCUs. A zone has one and only one Gatekeeper. A zone may be
independent of network topology and may be comprised of multiple network segments
which are connected using routers or other devices.”
1
In Polycom ReadiManager LX100, a zone may correspond to the H.323 definition, but
this is not a requirement.
A zone is a grouping of resources and endpoints that have a shared set of video
bandwidth among them. Sometimes this may be a LAN, or it may be a subnet.
A zone often roughly corresponds to a building or a floor in a building.
When you first install Polycom ReadiManager LX100, a default zone called
“YourPrimaryZone” is provided. It’s a good idea to rename this zone to one that is more
meaningful for your network.
To define a zone
1. From the menu bar, choose Network > Zones.
1
ITU-T Recommendation H.323. Series H: Audiovisual and Multimedia Systems. Draft v4 (11/2000),
International Telecommunication Union.
46 Setting Up and Working with Areas, Zones, and Pipes
Page 55

2. In the Zone Information list, click Add New.
3. In the Zone form, complete the following required fields:
•Name
• Description
•Area
4. Enter any additional information for this zone and click Update to submit the
information.
For details about individual fields, Fields in the Zone Form.
Fields in the Zone Form
Field Name Description
Zone Information
Name Name of the zone. Be sure to use a name that has meaning to
Chapter 4 - Entering Network Topology Data
users, as zones appear when users create schedules and
select resources.
Defining a Pipe
Description Description of the zone. This description appears in the zone
list.
Area The area in which this zone is defined. Existing areas can be
selected from the drop-down list. If you want to use an area
that has not yet been created in
, exit this form and create the area.
LX100
Polycom ReadiManager
Pipes are predefined paths between zones that indicate the limited bandwidth available
between zones. Internally, the pipe bandwidth limit is set to 64 Mbps. If your network
contains multiple zones, you must create pipes.
Polycom ReadiManager LX100 uses router emulation to predict which paths the
network routers will use when the actual calls are made. This enables the Network
Aware Scheduler to accurately determine whether enough bandwidth will be available
for the call. In order to make the right decisions, the Network Aware Scheduler must
understand the network topology. To ensure the scheduler makes the correct decisions,
network pipe and zone information are required entries.
For example, say you have three zones, A, B, and C. If you want to place a call from A
to C, but the pipe between A and C is too loaded, Network Aware Scheduler knows the
network routers will use the path from A to B to C.
© Polycom, Inc. 47
Page 56

Polycom ReadiManager LX100 Scheduling Administrator’s Guide
Note: Pipes can only be created or edited from the main screen of the Polycom
ReadiManager LX100
Video Network Management screen.
, as described below. They cannot be created or edited through the
Before creating a pipe, the two zones that are connected by the pipe must already be
defined.
To define a pipe
1. From the menu bar, choose Network > Pipes.
2. In the Pipes Information list, click Add New.
3. In the Pipes form, complete the following required fields:
• Description
• Delay (microseconds)
• Zone One
• Zone Two
4. Enter any additional information for this pipe and click Update to submit the
information. For details about individual fields, see Fields in the Pipes Form.
Fields in the Pipes Form
Field Name Description
Pipe Information
Description A description of the pipe. Consider using the names of the two
zones that the pipe connects as the description. This
description appears in the list of pipes.
48 Setting Up and Working with Areas, Zones, and Pipes
Page 57

Chapter 4 - Entering Network Topology Data
Delay (microseconds) Delay only applies if you are using EIGRP/IGRP or OSPF
Router emulation. It does not apply to GRP router emulation.
(Router Emulation is specified during installation.)
Most users will use RIP, so delay will not apply.
The default delay is 10,000 microseconds (10 milliseconds).
To find out the delay in your network, average the PINGS
between endpoints in the two zones connected by this pipe.
The result will give you a reasonable expectation of the delay.
Zone Connections
Zone One One of the zones that the pipe connects. The drop-down list
contains all existing zones.
Zone Two The second of the zones that the pipe connects. The
drop-down list contains all existing zones.
Comments Any comments you want to record about this pipe.
Changing Information About Areas, Zones, and Pipes
Changes to the network topology can only be made by Network Administrators and
Global Administrators.
To change information about an area, zone, or pipe
1. Display the list of areas, pipes, or zones.
2. In the list, click the link the View column to open the record you want to change.
3. Make the necessary changes in the form and click the Update button.
Note that the top links allow adding a zone facilitator or pipes. To learn more about
adding a zone facilitator refer to Associating or Removing a Facilitator from All
Resources in a Zone on page 61. For more information on Pipes see Defining a Pipe
on page 47.
Deleting an Area, Zone, or Pipe
Warning: Be extremely cautious about deleting an area, zone, or pipe. Deleting a zone
or pipe affects the logic used by Network Aware Scheduling in making bandwidth
decisions. Resources that were assigned to deleted zones will be denied scheduling
due to “insufficient bandwidth” unless they are reassigned to new zones. The same
thing will happen to resources in zones that have pipes deleted, unless other pipes are
available. Deleting an area will also result in users no longer being able to view
Warning
© Polycom, Inc. 49
Page 58

Polycom ReadiManager LX100 Scheduling Administrator’s Guide
resources and zones that were in that area, when scheduling conferences. Those
resources will not be able to be scheduled unless they are assigned to a new zone.
To delete an area, zone, or pipe
1. Display the list of areas, pipes, or zones.
2. In the list, locate the record you want to delete.
3. In the Action column, click the Delete link.
4. When the confirmation message appears, click OK to delete the record or Cancel
to keep it.
Note: If you don’t see the Delete link, you do not have permission to delete areas, zones,
and pipes.
50 Setting Up and Working with Areas, Zones, and Pipes
Page 59

5
Setting Up and Working with
Resources
Resources are created as one of two types: rooms or hubs. Each resource is identified
as one of these types.
After resources are created, equipment can be associated with them, and facilitators
can be assigned to each resource. For room resources, equipment may include a wide
range of devices, including video endpoints, computers, document camera, VCRs, and
so forth. For hub resources, equipment is either a hub, MCU, or gateway.
This section includes the following topics about resources and equipment:
Defining a Resource
Viewing Information about Resources
Changing Resource Information
Copying a Resource
Deleting a Resource
Assigning or Removing Resource Facilitators
Associating Equipment with a Resource
Setting Up an MCU In Polycom ReadiManager LX100
Setting up a Video Codec in Polycom ReadiManager LX100
Setting Up Services
Managing Problems with Resources
© Polycom, Inc. 51
Page 60

Polycom ReadiManager LX100 Scheduling Administrator’s Guide
Defining a Resource
Defining the resources in your network prepares them to be used for network
management and for use when scheduling conferences.
You can also import information about resources, from a file. For details, see Importing
Resources on page 188.
Tip: In most cases, you will only want room resources to show in the network diagram for
users who are scheduling conferences. To prevent hubs from displaying during scheduling,
select the “Hidden” option in the Schedule Access field. When this option is selected, only
the facilitator for that resource will see it on views of the network.
To define a resource
1. From the menu bar, choose Resources > Add New.
2. In the Resource Information form, complete at least the following fields:
• Resource Name
• Resource Nickname
•Zone
• Resource Type
• Time Zone
3. Enter any additional information for this resource and click Update to submit the
information.
For details about individual fields, see Fields in the Resources Form.
After you click Update, you see a message that the resource has been added.
From this screen you can add equipment, assign a facilitator, and add caterers.
Most of the time your next step will be to add equipment, and then to assign a
facilitator.
4. Assign equipment to this resource. For details, see Associating Equipment with a
Resource on page 63.
5. Assign a facilitator for this resource. For details, see Assigning or Removing
Resource Facilitators on page 59.
52 Defining a Resource
Page 61

Fields in the Resources Form
Field Name Description
Resource Description
Resource Name Name of the resource.
Resource Nickname Nickname for the resource. The nickname is the name that
Resource Phone The audio number associated with this resource, for example,
Zone The zone in which the resource resides. When you are
Chapter 5 - Setting Up and Working with Resources
Note: It is a good idea to give each resource a unique name.
Polycom ReadiManager LX100 does not prevent you from
entering duplicate names; so pay attention as you create
resources.
users will see on graphical views of the network, when
scheduling a conference or creating a network diagram.
the phone in a conference room.
defining a new resource, this field defaults to the first zone in
the list. Be sure to change it to the appropriate zone.
Note that if you select a different zone from the drop-down, the
screen refreshes, and all fields below Zone are cleared.
(
Note: This list contains an Offnet zone. It is recommended
that you not use this selection to indicate when a resource is
offnet. Instead, use the checkbox in the “Resource
Characteristics” section of this form.)
Picture Upload
[Browse]
Floor Plan Upload
[Browse]
You can display a picture with the resource record. Click
Browse to navigate to the image file and then upload it to the
database.
Users can see this image in graphical views of the network,
when scheduling conferences or designing diagrams. To view
it, right-click on the resource in the tree view and choose View
Image.
Note: If the image is very large in file size after clicking
Update, the browser may take some time to complete the
upload of the image to the server.
For a room, you may want to include an image showing the
floor plan. Click
upload it to the database.
Users can see this image in graphical views of the network,
when scheduling conferences or designing diagrams. To view
it, right-click on the resource in the tree view and choose View
Floor plan.
Browse to navigate to the image file and then
Note: If the image is very large in file size after clicking
Update, the browser may take some time to complete the
upload of the image to the server.
© Polycom, Inc. 53
Page 62

Polycom ReadiManager LX100 Scheduling Administrator’s Guide
Field Name Description
Resource Type
Resource Type The type of resource this is. Choices are: Hub and Room.
Note: Create resources with the type “Hub” for MCUs and
gateways.
Resource Location Use the address fields to indicate where the resource is
Address (3 fields)
City
State/Province
Zip/Postal Code
County
Country
located. You will be able to search on the City, when locating
resources.
Resource
Characteristics
This resource resides
off the network
Time Zone The time zone for the resource location.
Style For rooms, select the style of room. Choices are: Unknown,
Maximum Occupancy For a room, the maximum number of people who can be in the
Maximum Speed
(Kbps)
The information entered in the Resource Characteristics fields
allow users to schedule a resource that fits their need by
filtering to identify resources with desired characteristics.
Check this field if the resources is off the network. When you
add an off-net resource to a conference, it will be added as a
guest.
This is useful when a system that is not part of this network,
(e.g., a partner's video system), is repeatedly added to other
conferences and you want to avoid repeatedly entering the
system information as a guest in every call. By entering this
resource in the database and flagging it as off the network, it
can be selected just like any other resource on the network.
Scheduling occurs based on the time zone. When checking for
conflicts,
appropriate time zone for each resource requested.
Classroom, Conf Room—Large, Conf Room—Small, Desk
Top, Lecture Hall, Office, Lab.
room.
Maximum speed for the video call to the video equipment in
this room, measured in Kbps.
LX100
availability.
Polycom ReadiManager LX100 uses the
Polycom ReadiManager
uses this variable when checking bandwidth
Internet Access Check this box if there is internet access in the room.
54 Defining a Resource
Page 63

Chapter 5 - Setting Up and Working with Resources
Field Name Description
Schedule Access Select whether this resource is Public, Private, or Hidden.
Tip: If this resource is not a room (for example, if it is an MCU
or a Gateway), consider selecting “Hidden,” so that it will only
appear on schedule diagrams to users who are assigned as
facilitators for this resource.
Public: Anyone can schedule the resource.
Private: The resource appears on the schedule diagram, but
only the facilitator or a contact associated with the resource
can schedule it. Other users may manage the conference
(connect, disconnect, and end conference), however, if such a
user removes someone from a conference, the user cannot
add that person back in.
Hidden: The resource only appears on the schedule and
network diagrams to users associated with it as facilitators.
Conference Buffer
Time
Setup Minutes The amount of time required for setup of the resource before
the time of the conference. During scheduling, this will be
added to the requested time for the conference, but will not be
shown in the users' calendars. The requested start time will be
used in the calendar.
When reserving resources,
Polycom ReadiManager LX100
will use the longest time required for a resource being
scheduled to determine how early to launch the conference.
Breakdown Minutes The amount of time required for breakdown of the resource
after the time of the conference. During scheduling, this will be
added to the requested time for the conference, but will not be
shown in the users' calendars. The requested end time will be
used in the calendar.
When reserving resources,
Polycom ReadiManager LX100
will use the longest time required for a resource being
scheduled to determine how long to have the conference last.
Resource Contact &
Install Information
© Polycom, Inc. 55
Page 64

Polycom ReadiManager LX100 Scheduling Administrator’s Guide
Field Name Description
Contact Person The person who should be contacted with questions or issues
related to this resource.
The drop-down list includes all Polycom ReadiManager
LX100
users.
To see details about the person listed, click the View Contact
Info link, next to the Contact Person field.
Note: Every resource must have a contact person. The
drop-down list defaults to the first person in the list,
alphabetically. Be sure to change it to the appropriate user.
The resource contact is not the same as a resource facilitator.
To identify a person who is notified of conferences that make
use of this resource, see
Facilitators
Comments Any comments you want to record about the resource.
on page 59.
Assigning or Removing Resource
Adding ISDN-Only Resources without IP Connections
If you have a remote office or regular guest to conferences who is off your network
(ISDN only, with no IP connection, or managed by a different enterprise), but who you
want to conference in without having to use the manual guest entry for every call, set
them up as a resource. In the Resource Characteristics section of the Resource form,
check the box “This resource resides off the network.” When added to a conference,
these offnet resources automatically appear as guests.
Important: If you select the option “This resource resides off the network” in the
Resource Characteristics section of this form, be sure to define the H.320 (ISDN)
service and enter the ISDN number when you define the equipment for this resource.
Otherwise this resource will not be able to be connected to as a dial-out participant to
an ongoing conference. When scheduling, users will see “(ISDN Only)” displayed next
to the name of the resource in the Resources list.
56 Defining a Resource
Page 65

Chapter 5 - Setting Up and Working with Resources
Viewing Information about Resources
You can see a list of all resources, or you can search for a subset of resources, such
as those in a particular city.
Resource lists include name and contact information. When you want to see additional
information, you can open individual resource records.
To view a list of all resources
>> From the menu bar, choose Resources > List All.
The Resources list appears.
To search for resources
1. From the menu bar, choose Resources > Search.
2. In the Resource Search form, enter the search criteria and click Search.
You can search by Resource Name, Resource Nickname, and City.
A list of users that match the criteria you entered appears.
Tip: Type the first few characters of the text you want to match. Polycom
ReadiManager LX100 will find all entries that start with those characters.
© Polycom, Inc. 57
Page 66

Polycom ReadiManager LX100 Scheduling Administrator’s Guide
To see details about a resource
>> Locate the resource in the resource list, and in the View column, click the
Resource link.
The Resource Information form opens.
Changing Resource Information
Only Network Administrators and Global Administrators can make changes to all
resources and associated equipment. Users who are assigned as a facilitator for a
resource can edit that resource and the equipment associated with it.
To change resource information
1. From the menu bar, choose Resources > List All, or choose Resources > Search
to find the resource for which you want to change information.
2. In the Resources list, click the Resource link in the View column for the resource
record you want to change.
3. In the Resource Information form, make the necessary changes and click Update
to submit them.
For details about Resource fields, see Fields in the Resources Form on page 53.
Note: If you don’t see the Update button at the bottom of the form, you do not have
access rights that allow you to change the resource.
Copying a Resource
When you want to add a resource that is similar to one that already exists, you can start
by making a copy.
To copy a resource
1. From the menu bar, choose Resources > List All, or choose Resources > Search
to find the resource you want to copy.
2. Scroll to the bottom of the form and click Copy.
3. When a message asks you to confirm, click OK.
58 Changing Resource Information
Page 67

The Resources list appears, and the new copy appears in the list, with “copy”
appended to the resource name.
4. Click the Resource link for the new item to open it.
5. In the Resource Information form, change the Resource Name.
6. Make any additional changes to this item and click Update to submit them.
Deleting a Resource
Only Network Administrators and Global Administrators can delete a resource.
If a resource is scheduled, it cannot be deleted. If you attempt to delete a scheduled
resource, Polycom ReadiManager LX100 will display an error message to this effect. If
you need to delete a resource that is currently scheduled, create a Schedule Report to
see what conferences it is scheduled in; then you can remove it from the conferences.
Equipment attached to a resource is made inactive when you delete the resource.
However, if the equipment has been added to diagrams in the Video Network
Management module, it will have to be manually deleted from the diagrams.
Chapter 5 - Setting Up and Working with Resources
To delete a resource
1. From the menu bar, choose Resources > List All or choose Resources > Search to
find the resource which you want to delete.
2. In the Resources list, locate the record for the resource you want to delete and
click Delete in the Action column for that record.
3. When the confirmation message appears, click OK to delete the resource or click
Cancel to keep it.
Assigning or Removing Resource Facilitators
Resource facilitators are the people who maintain the equipment associated with the
resource, and respond to problems when trouble tickets are created. Multiple
facilitators can be assigned to the same resources.
You can assign facilitators to individual resources, and you can also assign a facilitator
to all resources in a given zone. Facilitators must be associated with the same domain
as the area in which the resource is located.
© Polycom, Inc. 59
Page 68

Polycom ReadiManager LX100 Scheduling Administrator’s Guide
Note: Facilitator and Resource Contact serve two different purposes, but can be the same
person. See additional information, see the discussion of the Resource contact field under
Fields in the Resources Form on page 53.
Associating or Removing a Facilitator from a Resource
You add and remove facilitators from individual resources from the Resource
Information form.
To assign a facilitator to a resource
1. From the menu bar, click Resources > List All, or choose Resources > Search to
list the resource you want.
2. In the Resources list, locate the resource to which you want to add a facilitator,
and in the View column, click the Resource link.
3. At the top of the Resource form, click the Assign a Facilitator link.
4. In the drop-down list on the top of the Resource/Facilitator Assignment form,
select the person you want to be the facilitator for this resource.
60 Assigning or Removing Resource Facilitators
Page 69

Chapter 5 - Setting Up and Working with Resources
5. Click Add.
The facilitator is added, and the form remains open.
6. Add another facilitator, if you like.
7. When you’re finished adding facilitators, click the Return to Resource link.
8. In the Resources form, click Update.
To remove a facilitator from a resource
1. Display the Resource form for the resource from which you will remove a facilitator.
2. At the top of the Resource Information form, click the Assign a Facilitator link.
3. In the drop-down list on the bottom of the Resource/Facilitator Assignment form,
select the facilitator you want to remove.
4. Click Delete.
5. Make any other changes you want to the facilitators for this resource.
6. When finished, click the Return to Resource link.
7. In the Resources form, click Update.
Associating or Removing a Facilitator from All Resources in a Zone
You can add the same facilitator to all the resources in a zone at one time, and you can
remove a facilitator from all the resources in a zone.
To add a facilitator to all resources in this zone
1. From the menu bar, choose Network > Zones.
2. In the list of zones, locate the zone to which you will add a facilitator, and in the
View column, click Zones.
© Polycom, Inc. 61
Page 70

Polycom ReadiManager LX100 Scheduling Administrator’s Guide
3. Click the Assign Zone Facilitator link at the top of the form.
4. In the drop-down on the left, select the person you want to be the facilitator for all
resources in this zone.
5. Click Add.
To delete a facilitator from all resource in this zone
1. From the menu bar, choose Network > Zones.
2. In the list of zones, locate the zone from which you will remove a facilitator, and in
the View column, click Zones.
3. Click the Assign Zone Facilitator link at the top of the form.
4. In the drop-down on the right, select the person you want to remove from the list
of facilitators for all resources in this zone.
The drop-down list contains all those who are currently assigned as facilitators to
one or more resources in this zone.
5. Click Delete.
Note: If you remove all facilitators from a resource, no one will be notified in the event
of a conference or equipment failure
62 Assigning or Removing Resource Facilitators
Page 71

Chapter 5 - Setting Up and Working with Resources
Associating Equipment with a Resource
This section includes the following topics about equipment and resources:
Viewing Equipment Associated with a Resource
Adding Equipment to a Resource
Fields in the Equipment Information Form
Moving Equipment from One Resource to Another
Deleting Equipment from a Resource
You may also want to refer to Setting Up an MCU In Polycom ReadiManager LX100 on
page 69 and Setting up a Video Codec in Polycom ReadiManager LX100 on page 73.
Viewing Equipment Associated with a Resource
To view equipment associated with a resource
1. From the menu bar, click Resources > List All.
2. In the list of resources, locate the resource you are interested in.
3. In the View column for that record, click the Equip link.
The Equipment for Room list appears.
© Polycom, Inc. 63
Page 72

Polycom ReadiManager LX100 Scheduling Administrator’s Guide
Note: You can also get to the equipment list by displaying the detail form for the
resource, and clicking the Equipment link at the top of the form.
4. To see details about a particular piece of equipment, locate it in the equipment list
and in the View column, click the Equipment link.
5. The Equipment Information form opens.
Adding Equipment to a Resource
MCUs, gateways, routers and other networking equipment need to be added to
resources that have the resource type “Hub.”
Other kinds of equipment—video endpoints, VCRs, document cameras, and so
forth—are added to resources that are rooms.
Note: It can be useful to designate non-video or audio-only equipment for use with
conferences that don’t have video equipment. That way, users can use
Scheduler
video equipment free for those who need to schedule a videoconference. To provide this,
you may want to create a special equipment type. For details, see
to schedule conferences that don’t need video equipment. This keeps rooms with
Data on page 149.
64 Associating Equipment with a Resource
Network Aware
Customizing Equipment
Page 73

Chapter 5 - Setting Up and Working with Resources
The steps below describe the basic process of adding equipment to a resource. For
specific information about adding MCUs (bridges) and video endpoints, see Setting Up
an MCU In Polycom ReadiManager LX100 on page 69and Setting up a Video Codec
in Polycom ReadiManager LX100 on page 73.
To add equipment to a resource
1. Display the Equipment List for the resource, as described above under Viewing
Equipment Associated with a Resource on page 52.
2. At the top of the Equipment for Room list, click Add New.
3. In the Equipment Information form, complete at least the following fields:
• Equipment Category. From the drop-down list, select the appropriate
category.
• Equipment Description. From the drop-down list, select the specific model of
equipment.
4. Complete any additional information about this piece of equipment and click
Update.
If you are defining a video codec or an MCU, gateway, router, or other type of
networking equipment, be sure to complete all necessary fields in the Parameter
section of the form.
For details about the fields, see Fields in the Equipment Information Form.
Fields in the Equipment Information Form
Note: The Parameter fields you see in the Equipment form will vary, depending on the
specific type of equipment you select. Some equipment types have no parameters, and so
a Parameter section is not displayed.
Field or Button
Name
Equipment
Information
Equipment Category Select the category that indicates the type of equipment.
Equipment Description Select the specific model of equipment. The choices in this
Description
drop-down list depend on the selection in the Equipment
Category list.
© Polycom, Inc. 65
Page 74

Polycom ReadiManager LX100 Scheduling Administrator’s Guide
Field or Button
Name
IP Address The IP address may be a fixed IP address, or a LAN host
Description
name, if you are set up in a DNS domain and the equipment
registers with the DNS server.
Note: If the equipment has a dynamic IP address (DHCP), you
will only be able to use it if it is registered with the DNS.
If using a LAN host name, the endpoint must be registered with
a gatekeeper and the alias must be entered in the alias field.
Login Name If the equipment requires a login, enter it here. If it requires a
login name and you do not include the information, the
equipment cannot be controlled by
LX100
auto-launch conference
Password If the equipment requires a password, enter it here.
Equipment Status The status of the equipment: Functional, Semi-Functional,
Non-Functional, MIA. This field is informational only. You can
use it to indicate the status of the equipment.
Polycom ReadiManager
and it cannot successfully initiate calls in an
Equipment Parameter
Information
If parameter fields appear, they are necessary to establish
communication over the video network.
Parameter fields vary from one type of equipment to another.
Be sure to complete the parameter fields when they appear, so
that your video network can communicate with the equipment
appropriately.
For examples of parameter fields, see:
Parameter Fields for a Polycom MGC 100 on page 70
Parameter Fields for a Video Codec on page 75
General Comments Enter any specific comments about this piece of equipment.
Alert Management
Enable Alert Check this field to send a pager email and email to the
resource contact and facilitator(s).
Note: Be cautious about enabling alerts. They are useful when
it is critical that the equipment remain on and working at all
times, such as an MCU or a router. However, you should not
enable alerts on equipment that is turned off frequently, as the
result will be that an alert is sent each time it is turned off.
This feature only works when Alert Notification is enabled in
the Server Management page of the Administrator Console.
(For details, see
Notification
Enabling Equipment Alert Management
on page 196.)
Last Alert Time The last time that an alert message was sent to indicate the
equipment was not functioning.
66 Associating Equipment with a Resource
Page 75

Chapter 5 - Setting Up and Working with Resources
Field or Button
Name
Status Time The time when the equipment was last checked by a Polycom
Status Change Time The time at which the status changed from functioning to
Alarm Level The level of the last alarm: Critical, Major, Minor, or None.
Average Latency Not currently used.
Description
ReadiManager LX100
non-functioning, or vice versa.
An alarm of “critical” indicates that
LX100
cannot communicate with the device. If alerts are
enabled and a critical alarm is received, a pager email is sent
to the facilitator and contact associated with the resource to
which this equipment is assigned.
An alarm of “major” indicates that
LX100
can establish an IP connection to the device, but it is
unable to determine the call status.
An alarm of “minor” is currently not used.
An alarm of “none” indicates there are no problems
communicating with the equipment.
service.
Polycom ReadiManager
Polycom ReadiManager
Successful Number of times that alert management successfully
communicated with the equipment. The frequency with which
the equipment is checked depends on how many endpoints
are being checked.
Attempts Number of times that alert management attempted to
communicate with the equipment.
Jitter Measurement of the Jitter between the Polycom
ReadiManager LX100
This measurement is automatically accumulated during the
polling of the device. It is updated after each polling cycle.
This is not related to the diagnostic jitter test available in the
Network Management screen, which is measured from the PC
that requests the diagnostic test.
Last Latency Last measurement that was read.
Max Latency Highest latency measurement that has been read.
Std Dev Latency Standard Deviation Latency Jitter measurement.
Average Success Rate Average success rate of alarm management communicating
with the equipment.
Clear Alarm button Use this button to only reset the Alarm Level to None. Then
click
Update to save the change.
Reset Stats button Use this button to reset both the management statistics and
clear the alarm to a no-alarm condition. Then click
save the change.
Server and the equipment.
Update to
© Polycom, Inc. 67
Page 76

Polycom ReadiManager LX100 Scheduling Administrator’s Guide
Field or Button
Name
Call History The call history fields show information about the last
Call Status 0=not in call 1=currently in call
Last Call Type Type of call. 0=IP 1=ISDN
Last Call Start Time Time the last call started.
Last Call End Time Time the last call ended.
Last Call Remote Alias, number, or IP address of the endpoint or MCU the last
Last Call Speed Data rate in Kbps of the last call.
Description
conference the equipment was involved in.
call was with.
Moving Equipment from One Resource to Another
If Polycom Video Network Management is installed, you can move equipment from one
resource to another. For details, see Moving Equipment Between Resources on
page 220.
Deleting Equipment from a Resource
Deleting equipment from a resource removes the equipment from the database.
To delete equipment from a resource
1. Display the Equipment Information form for the item you want to delete, as
described above under Viewing Equipment Associated with a Resource on
page 63.
2. Scroll to the bottom of the form.
3. Click Delete.
4. When prompted to confirm, click Yes.
The Equipment List for the resource appears. The equipment you just deleted is
no longer listed.
68 Associating Equipment with a Resource
Page 77

Chapter 5 - Setting Up and Working with Resources
Setting Up an MCU In Polycom ReadiManager LX100
Set up for using an MCU with Polycom ReadiManager LX100 includes two main steps:
Creating a Resource record that defines the resource as a hub.
Creating an Equipment record associated with that hub for the MCU. In the
Equipment form, you provide details about the IP and login information for the
MCU, define the services used to communicate with the MCU, enter any IVR
settings, and other setting that define capabilities and limits of the MCU.
The MCU should already be configured. You will enter information in Polycom
ReadiManager LX100 based on the existing MCU configuration.
Although different MCUs have somewhat different capabilities and features, the overall
process of setting up each MCU in Polycom ReadiManager LX100 is similar. To help
you see how to set them up, examples of setting up two different MCUs are provided:
Setting up an MGC 100 in Polycom ReadiManager LX100
Setting up a Radvision MCU-30 in Polycom ReadiManager LX100
Setting up an MGC 100 in Polycom ReadiManager LX100
The steps below provide a general overview of how to set up an MGC 100 in Polycom
ReadiManager LX100. The parameter fields that appear for this model are described
under Parameter Fields for a Polycom MGC 100 on page 70.
1. Create a resource record for a hub. For details, see Defining a Resource on
page 52.
2. After you create the Resource, when prompted, click the Add Equipment link.
The Equipment Information form appears.
3. In the Equipment Category field, select Gateways, Bridges, MCU:
4. In the Equipment Description field, select the type of MCU (for this example,
Polycom MGC 100).
The screen refreshes and Equipment Parameter fields that need to be defined for
this MCU appear.
5. Enter the IP Address, Login Name, and Password for the MCU.
For the MGC, this is the IP address of the controller. (If you need to locate this IP
in MGC Manager, right-click on the MGC icon and select IP Configuration. The IP
Configuration dialog box will open, displaying the IP, Subnet Mask, and Default
Gateway.)
You will enter the IP addresses of individual H.323 cards by defining H.323
Services.
© Polycom, Inc. 69
Page 78

Polycom ReadiManager LX100 Scheduling Administrator’s Guide
6. In the Equipment Parameter Information section of the form, define the Services
used by this MCU.
This may include Direct Services, Gateway Services, H.320 (ISDN) Services, and
H.323 (IP) Services. For more information, see Setting Up Services on page 76.
To see where in MGC Manager to find the information you need to define these
services, see Where Services are Set in MGC Manager on page 84.
7. Complete the IVR-related fields, if appropriate: IVR Capable, IVR IP Alias, and
IVR Number.
8. Complete the Conference Limits fields: Maximum CP Conferences, Maximum
Total Conferences, Maximum Total Participants and Maximum Transcoding Ports.
9. Turn on Alert Management, if desired. (For details, see the discussion of the Alert
Management field in Fields in the Equipment Information Form on page 65.)
10. Click Update to save details about the MCU.
Parameter Fields for a Polycom MGC 100
The table below describes parameter settings for an MGC 100. For general
step-by-step set-up instructions, see Setting up an MGC 100 in Polycom
ReadiManager LX100 on page 69.
Parameter Field Description
Equipment
Parameter
Information
Direct Services Click this link to define Direct Connect Services parameters.
Gateway Services Click this link to define specific gateway service channels
H.320 Services
(ISDN)
H.323 Services (IP) Click this link to define specific IP service information for each
Parameter fields vary from one type of equipment to another.
The fields and descriptions here are an example, shown for a
Polycom MGC 100.
Note: You must define Direct Connect for the MGC before you
can define it for a video codec that connect to this MGC.
The MGC must also be configured for Direct Connect.
For details, see
page 76.
defined in the MGC.
An H.320 service must also be defined, which is referenced in
the gateway service form.
For details, see Setting Up Gateway Services on page 78.
Click this link to define specific ISDN dial-out capability and dial
rules. You can also select a Least Cost Routing table. For
details, see
H.323 card in the MGC. For details, see Setting Up H.323
Services (IP)
Setting Up a Direct Connect Service on
Setting Up H.320 Services (ISDN) on page 81.
on page 79.
70 Setting Up an MCU In Polycom ReadiManager LX100
Page 79

Chapter 5 - Setting Up and Working with Resources
Parameter Field Description
IVR Capable? (Y/N) Indicates whether the MGC is IVR capable.
Note: When this is set to “Y,” People + Content cannot be used
in a conference scheduled through this MCU.
IVR IP Alias The IP number which conference participants will dial to get to
the IVR prompt when accessing a meeting.
IVR Number The ISDN-allocated phone number of the IVR.
Conference Limits The Conference Limits parameters define resource limitations
for this MCU implementation.
Maximum CP
Conferences
Maximum Total
Conferences
Maximum Total
Participants
Maximum
Transcoding Ports
Maximum number of licensed continuous presence
conferences. This must be a numerical character.
Maximum total conferences at once.
Maximum total of MCU participants at once.
Maximum number of transcoding ports—that is, ports on which
both ISDN and IP participants can be connected.
Setting up a Radvision MCU-30 in Polycom ReadiManager LX100
The steps below provide a general overview of how to set up a Radvision MCU-30 in
Polycom ReadiManager LX100. The parameter fields that appear for this model are
described under Parameter Fields for a Radvision MCU-30 on page 72.
1. Create a resource record for a hub. For details, see Defining a Resource on
page 52.
2. After you create the Resource, when prompted, click the Add Equipment link.
3. In the Equipment Information form, select Gateways, Bridges, MCU in the
Equipment Category field:
4. In the Equipment Description field, select the type of MCU (for this example,
Radvision Via MCU-60, since it is closet in model functionality to the MCU-30).
The screen refreshes and Equipment Parameter fields that need to be defined for
this MCU appear.
5. Enter the IP Address, Login Name, and Password for the MCU.
To see an example of where in the Radvision MCU-30 software you will find this
IP, see Where Settings You Need Are Defined in Radvision MCU-30 Software on
page 89.
6. Define the H.323 (IP) Services used by this MCU.
For details about setting up H.323 services, see Setting Up H.323 Services (IP) on
page 79. To see where H.323 settings are configured for the Radvision MCU-30,
© Polycom, Inc. 71
Page 80

Polycom ReadiManager LX100 Scheduling Administrator’s Guide
see Where Settings You Need Are Defined in Radvision MCU-30 Software on
page 89.
Note that for this MCU model, only a link to H.323 (IP) Services shows in the
Equipment Parameters section, because this model only supports IP. (Other MCU
models may list links to H.320 (ISDN) services, Gateway services, and Direct
services.)
7. Complete the IVR-related fields, if appropriate: IVR Capable, IVR IP Alias, and
IVR Number.
8. Complete the web-related fields, if appropriate: Web Page, Web Port, and XML
Port.
9. Complete the Conference Limits fields: Maximum CP Conferences, Maximum
Total Conferences, Maximum Total Participants and Maximum Transcoding Ports.
10. Turn on Alert Management, if desired. (For details, see the discussion of the Alert
Management field in Fields in the Equipment Information Form on page 65.)
11. Click Update to save details about the MCU.
Parameter Fields for a Radvision MCU-30
The table below describes parameter settings for an Radvision MCU-30. For general
step-by-step instructions for how to set up this MCU, see Setting up a Radvision
MCU-30 in Polycom ReadiManager LX100 on page 71.‘
Parameter Field Description
Equipment
Parameter
Information
H.323 Services (IP) Click this link to define specific IP service information. For
IVR Capable? (Y/N) Indicates whether the MCU is IVR capable.
IVR IP Alias The IP number which conference participants will dial to get to
IVR Number The ISDN-allocated phone number of the IVR.
Web Page Web page for the MCU.
Web Port Web port for the MCU.
XML Port XML port for the MCU.
Conference Limits The Conference Limits parameters define resource limitations
Maximum CP
Conferences
Maximum Total
Conferences
Parameter fields vary from one type of equipment to another.
The fields and descriptions here are an example, shown for a
Radvision MCU-30.
details, see
the IVR prompt when accessing a meeting.
for this MCU implementation.
Maximum number of licensed continuous presence
conferences. This must be a numerical character.
Maximum total conferences at once.
Setting Up H.323 Services (IP) on page 79.
72 Setting Up an MCU In Polycom ReadiManager LX100
Page 81

Parameter Field Description
Chapter 5 - Setting Up and Working with Resources
Maximum Total
Participants
Maximum
Transcoding Ports
Maximum total of MCU participants at once.
Maximum number of transcoding ports—that is, ports on which
both ISDN and IP participants can be connected.
Important Settings for Use with People + Content
If you want to use People + Content in conferences, you must have a a Polycom bridge
(MCU) that has “IVR Capable” set to N in the Equipment Parameter section of the
Equipment record for that bridge.
If “IVR Capable” is set to Y, selecting a People + Content format for the conference will
have no effect.
3rd Party MCU Support
Polycom ReadiManager LX100 supports conference configurations where the
MCUs/bridges used for audio/video calls are controlled by outside firms. The setup of
this feature is specific to your configuration and requires in-depth changes to your
Polycom ReadiManager LX100 database. Please contact your Polycom Support Team
for further configuration information.
Setting up a Video Codec in Polycom ReadiManager LX100
Set up for using a video codec with Polycom ReadiManager LX100 includes two main
steps:
Creating a Resource record that defines the resource as a room
Creating an Equipment record associated with that room for the video codec. In the
Equipment form, you provide details about the IP and login information for the
endpoint, define the services used to communicate with the endpoint, and enter
some other details that define the endpoint’s capabilities.
Although different video codecs have somewhat different capabilities and features, the
overall process of setting one up is similar. The steps below use setup for a Polycom
ViewStation MP as an example.
If the codec can use more than one service (direct connect, IP, or ISDN), define each,
and then set the method that will be used most frequently in the Default Service field.
© Polycom, Inc. 73
Page 82

Polycom ReadiManager LX100 Scheduling Administrator’s Guide
If you do not define a service for the video codec, it cannot work within Polycom
ReadiManager LX100
If a room contains more than one codec, create a room resource for each codec. Polycom
ReadiManager LX100 does not support multiple codecs per room.
.
To set up a video codec in Polycom ReadiManager LX100
1. Create a resource record for a room. For details, see Defining a Resource on
page 52.
2. After you create the Resource, when prompted, click the Add Equipment link.
3. In the Equipment Information form, select Video Codec in the Equipment
Category field:
4. In the Equipment Description field, select the type of Video Codec (for this
example, Polycom ViewStation).
The screen refreshes and Equipment Parameter fields that need to be defined for
this video codec appear. (For details about parameter fields for Polycom
ViewStation, see Parameter Fields for a Video Codec on page 75.)
5. Enter the IP Address, Login Name, and Password for the Video Codec.
6. Define the Services used by this video codec. This may include Direct Services,
H.320 (ISDN) Services, and H.323 (IP) Services.
For details about setting up these services, see Parameter Fields for a Video
Codec on page 75.
If you set up more than one service, select which should be the Default Service.
The person scheduling the conference for this endpoint can select one of the
other services, if desired. For details, see Changing How the Connection is Made
on page 170.
7. Complete other parameter setting fields, as appropriate. As an example of
parameter fields for a Polycom ViewStation, see Parameter Fields for a Video
Codec on page 75.
8. Turn on Alert Management, if desired. (For details, see the discussion of the Alert
Management field in Fields in the Equipment Information Form on page 65.)
9. Click Update to save details about the ViewStation.
74 Setting up a Video Codec in Polycom ReadiManager LX100
Page 83

Parameter Fields for a Video Codec
The table below shows the parameter fields for a Polycom Viewstation MP. For a more
general description of how to set up a video codec, see Setting up a Video Codec in
Polycom ReadiManager LX100 on page 73.
Parameter Field Description
Chapter 5 - Setting Up and Working with Resources
Equipment
Parameter
Information
Control Port Device-specific setting. Blank for ViewStation MP.
Default Service The default service used to connect with this endpoint. If
Direct Service Lets you define a Direct Connect service for this endpoint.
Parameter fields vary from one type of equipment to another.
The fields and descriptions here are an example, shown for a
Polycom ViewStation MP.
multiple services are available—for example, if a Video Codec
can be accessed through either IP or ISDN, or if there is a
choice of a Direct Connect, then the user can change the
connection method when they schedule the resource. For
details about how the user does this, see
Connection is Made
on page 170.
Changing How the
Note: If you are defining Direct Connect for a video codec, you
must already have the Direct Connect service defined in the
MCU equipment record, and the MCU must be configured for
Direct Connect.
For details, see
page 76.
H.320 Service (ISDN) Lets you define the H.320 Service used by this endpoint. Use
this link to enter the ISDN number and specify dialing rules to
be used. For details, see
on page 81.
Setting Up a Direct Connect Service on
Setting Up H.320 Services (ISDN)
H.323 Service (IP) Lets you define the H.323 Service used by this endpoint and
specify the Alias For details, see
(IP)
on page 79.
HTML Default Page Default page of the built-in web server for this codec. Not
required for a ViewStation.
HTML Interface Port HTTP port for this codec. Not required for a ViewStation.
SNMP Community SNMP Community Name. A community name is used to weakly
authenticate queries to agents of managed network devices.
Telnet Port Port at which this endpoint can be reached via Telnet. Not
required for a ViewStation.
Multipoint
Capabilities
© Polycom, Inc. 75
If the endpoint is capable of making embedded multipoint calls
without a separate bridge, specify the maximum number of calls
that can be supported using IP, ISDN, or both. If these fields are
all blank,
embedded multipoint capability, even if it exists.
If it is desirable to have all multipoint calls ONLY occur from
stand-alone bridges, then do not enter values into these fields.
Network Aware Scheduler will not attempt to use any
Setting Up H.323 Services
Page 84

Polycom ReadiManager LX100 Scheduling Administrator’s Guide
Parameter Field Description
Total IP Parties The maximum number of IP calls that can be made from this
endpoint.
Total ISDN Parties The maximum number of ISDN calls that can be made from this
endpoint.
Total Transcoded
Parties
Setting Up Services
Services are used to define how to communicate with MCUs, gateways, and video
codecs in your network. The particular services you define will depend on the
capabilities of your equipment.
Services are defined in the equipment record for each MCU, gateway, and endpoint.
The same settings must be configured for the equipment itself, as well as within
Polycom ReadiManager LX100.
Available services include:
Direct Services. (For details, see Setting Up a Direct Connect Service on page 76.)
Gateway Services. (Applicable to MCUs only. When a gateway is used, an H.320
Service must be defined for the MCU, as it will be referenced by the Gateway
service. For details, see Setting Up Gateway Services on page 78.)
The maximum number of transcoded calls (that is, a
combination of IP and ISDN calls) that can be made from this
endpoint.
H.323 (IP) Services. (For details, see Setting Up H.323 Services (IP) on page 79.)
H.320 (ISDN) Services. (For details, see Setting Up H.320 Services (ISDN) on
page 81.)
If you define multiple services for a video endpoint, you then select which should be
used as the default service. The person scheduling the conference can elect to use a
different service, if appropriate. For details about how the user adjusts this setting, see
Changing How the Connection is Made on page 170.
Setting Up a Direct Connect Service
Define a Direct Connect service when a video endpoint will be directly connected to an
MCU. This is typically associated with V.35 type connections to the MCU.
When Direct Service is used, all multipoint calls originating from the endpoint will be
directed through the MCU to which the endpoint is connected. The direct connection
can be achieved via RS-366 dialing if so desired.
76 Setting Up Services
Page 85

Chapter 5 - Setting Up and Working with Resources
In Polycom ReadiManager LX100, Direct Connect service must be defined in both the
MCU equipment record and the video codec equipment record.
Direct Connect must be configured in the MCU itself, as well as defined for the MCU
equipment record in Polycom ReadiManager LX100.
To set up direct connect service for an MCU or a video codec
1. Open the Equipment form for the MCU or video codec. (For details, see Viewing
Equipment Associated with a Resource on page 63.)
2. Scroll down to the Equipment Parameter Information section of the Equipment
form.
3. Click the Direct Service link.
4. If no Direct Service has been defined yet, click the Add New button. (If a Direct
Service already exists, click the Parameter Set link to open the Direct Service
page.)
5. For an MCU, enter a Service Name and select a Type. (For details, see Fields in
the Direct Service Form for an MCU on page 77.)
For a video endpoint, complete all required fields in the form. (For details, see
Fields in the Direct Service Form for a Codec on page 77.)
6. When you are finished defining the service, click Update.
7. Click Return to return to the Equipment form.
For video codecs, Direct will now appear in the Default Service list.
8. Click Update to save the changes to the Equipment form.
Fields in the Direct Service Form for an MCU
Field Name Description
Service Name* Name for the Direct Service. This name will appear in the list of
available MCU Services when you create a Direct service for an
endpoint.
Type The type of Direct Service: MPI, RS366, or T1
Fields in the Direct Service Form for a Codec
Field Name Description
Service Name* Name of the service.
Direct Connect
MCU*
© Polycom, Inc. 77
The MCU to which this codec will connect directly.
Page 86

Polycom ReadiManager LX100 Scheduling Administrator’s Guide
Field Name Description
MCU Service* The name of the MCU service, as defined in the Direct Service
form for the MCU.
Party Name* The MCU Party Name, from the MCU configuration. This field is
case sensitive. The name must exactly match the party name on
the MCU.
Dial Number for
RS366 IMux
Setting Up Gateway Services
If your enterprise use combination of ISDN and IP dialing, gateway services will
need to be defined, usually after the H.320 (ISDN) Services have been defined,
because
made successfully, set up all gateway services that your gateway supports.
If you use Least Cost Routing, Polycom ReadiManager LX100 uses the H.320 Service
and the Gateway service when looking up Least Cost Routing tables. For more
information, see Using Least Cost Routing on page 199.
To set up a gateway service for an MCU
1. Open the Equipment form for the MCU. (For details, see Viewing Equipment
2. Scroll down to the Equipment Parameter Information section of the Equipment
3. Click the Gateway Service link.
4. To create a new gateway service, click the Add New button. If a Gateway Service
5. Complete all required fields in the form. (For details, see Fields in the Gateway
the gateway service references it. To ensure that gateway dialing can be
Associated with a Resource on page 63.)
form.
already exists, click the Parameter Set link to open the existing Gateway Service
page.
Service Form on page 79.)
The ISDN number to be dialed, to make the direct connection.
This number is defined at the MCU.
6. When you are finished defining the service, click Update.
7. Click Return to return to the Equipment form.
8. Click Update to save the changes to the Equipment form.
9. Repeat steps 4 through 8 until all gateway services have been defined.
78 Setting Up Services
Page 87

Fields in the Gateway Service Form
Field Name Description
Service Name* Descriptive name of the gateway service. You may want to
include the speed as part of the name.
Prefix* E164 prefix for selecting this service, as specified in the MCU
properties. This is a unique ID for each of the gateway services
you define. Each speed will have a unique ID.
For an MGC, the prefix is labeled the “Session Profile ID (E164)”
for the Gateway Session Profile in the MGC Manager software.
Channels* Number of 64K channels allocated for the prefix.
Chapter 5 - Setting Up and Working with Resources
H.320 Service
Name
Setting Up H.323 Services (IP)
H.323 Services define how MCUs and Video Codecs can be reached through an IP
address. The H.323 fields required vary, depending on whether you are defining the
service for an MCU or for a video codec, and depending on the specific equipment you
are defining.
To set up H.323 (IP) service for an MCU or a video codec
1. Open the Equipment form for the MCU or video codec. (For details, see Viewing
Equipment Associated with a Resource on page 63.)
2. Scroll down to the Equipment Parameter Information section of the Equipment
form.
3. Click the H.323 (IP) link.
4. For each H.323 service you want to define, click the Add New button. If you want
to see details of an existing H.323 Service, click the Parameter Set link to open
the H.323 Service page.
Name of the H.320 service associated with the dial-in number. An
H.320 Service must also be defined for this MCU, using the name
that you specify here. Make sure that the name entered here
matches the H.320 Service name.
5. Complete all required fields in the form.
The particular fields required vary, depending on whether you are defining an
MCU or a video codec. In addition, some equipment may have different required
fields. Examples of H.323 fields for two different MCUs and a Video codec are
described below, under:
Fields in the H.323 Services (IP) Form for an MGC-100.
Fields in the H.323 Services (IP) Form for a Radvision MCU-30
Fields in the H.323 Services (IP) Form for a Codec
© Polycom, Inc. 79
Page 88

Polycom ReadiManager LX100 Scheduling Administrator’s Guide
6. When you are finished defining the service, click Update.
7. Click Return to return to the Equipment form.
For video codecs, Direct will now appear in the Default Service list.
8. Click Update to save the changes to the Equipment form.
9. Repeat steps 4 through 8 until all H.323 services are defined.
Fields in the H.323 Services (IP) Form for an MGC-100
For an example of where to find these settings in the MGC Manager software, see
Where Services are Set in MGC Manager on page 84.
Field Name Description
Service Name* The name of the H.323 service as defined in the MCU
configuration.
IP Address* IP address connected to the service, as defined in the MCU
configuration.
Alias* Alias corresponding to the service, as defined in the MCU
configuration. This number may include 0-9, #, and *. The alias for
the MGC can be found in the Span tab of the H323 Service (see
Figure 5-3).
Ports* Number of IP connections available to the service.
Prefix* Prefix for selecting this service. The Prefix for the MGC can be
found in the H.323 Service properties dialog (see Figure 5-2).
Use Gatekeeper?* Indicates whether the MCU is registered with a gatekeeper (Yes
or No), and that the MCU alias will be used for calls.
Fields in the H.323 Services (IP) Form for a Radvision MCU-30
For an example of where to locate these settings in the Radvision MCU software, see
Where Settings You Need Are Defined in Radvision MCU-30 Software on page 89.
Field Name Description
Service Name* The name of the H.323 service as defined in the MCU
configuration. (Shown as “Description” in the Radvision software.)
Channels* Number of 64K channels.
Prefix* Prefix for selecting this service. Figure Figure 5-8 shows where
the prefix can be found in the MCU-30 software.
Mode** Indicates whether CP—Continuous Presence (All see one)—or
SW—switching (See you, see me)—will be used. (Shown as
“Voice Activate Method” in the Radvision software.)
80 Setting Up Services
Page 89

Fields in the H.323 Services (IP) Form for a Codec
Field Name Description
Service Name* The name of the H.323 service.
Alias Alias (also known as E164) corresponding to the service. This is
number that will be dialed if the endpoints are registered with the
same gatekeeper. This number is defined in the Gatekeeper
service. (If the endpoints are not registered with the same
gatekeeper, they will use their regular IP address to connect.)
If endpoints are not registered with a gatekeeper, you still need to
define an H.323 service, however you should leave this field
blank.
Setting Up H.320 Services (ISDN)
H.320 Services define how MCUs and Codecs can be reached through ISDN. The
information required to define the ISDN service (H.320) in Polycom ReadiManager
LX100 varies for MCUs and Codecs.
Chapter 5 - Setting Up and Working with Resources
Dial rules for dialing out from endpoints that use ISDN are also set in the H.320 (ISDN)
form.
If you will use Least Cost Routing tables, you associate the LCR table with an MCU
through the H.320 (ISDN) service for that MCU.
To set up H.320 (ISDN) service for an MCU or a video codec
1. Open the Equipment form for the MCU or video codec. (For details, see Viewing
Equipment Associated with a Resource on page 63.)
2. Scroll down to the Equipment Parameter Information section of the Equipment
form.
3. Click the H.320 (ISDN) link.
4. To define a new H.320 service, click the Add New button. If an H.320 Service
already exists, click the Parameter Set link to open the H.320 Service page.
5. Complete all required fields in the form.
Two examples of these fields are described below:
Fields in the H.320 Services (ISDN) form for an MCU
Fields in the H.320 Services (ISDN) form for a Video Codec
6. When you are finished defining the service, click Update.
7. Click Return to return to the Equipment form.
For video codecs, Direct will now appear in the Default Service list.
8. Click Update to save the changes to the Equipment form.
© Polycom, Inc. 81
Page 90

Polycom ReadiManager LX100 Scheduling Administrator’s Guide
Fields in the H.320 Services (ISDN) form for an MCU
For an example of where to find these settings in MGC Manager, see Where Services
are Set in MGC Manager on page 84.
Field Name Description
Details
Service Name* Name of the H.320 ISDN service.
Channels* Number of 64K channels dedicated to the MCU
Number Range* Dial-in number range of service. These are the ISDN numbers
available on an MCU for all endpoints to use. Also known as DID.
Least Cost Routing Selects the Least Cost Routing table to be used for calls made
through this gateway. For details about Least Cost Routing, see
Using Least Cost Routing on page 199.
Dial Rules The entries in the fields under Dial Rules define how the MCU will
dial out to make other calls.
Local Prefix* The prefix required for local dial-out.
Non-local Prefix* The prefix required for long distance dial-out.
International Prefix* The prefix required for international dial-out.
Local Area Codes* A list of local area codes, separated by commas.
Number of Local
Digits*
Country Code* The country in which the MCU is located. Polycom
The number of digits to be dialed for local calls.
ReadiManager LX100
numeric code. The country code is the national prefix to be used
when an a call is made to this MCU from another country.
will convert the country to the appropriate
Fields in the H.320 Services (ISDN) form for a Video Codec
Define an H.320 service if the endpoint is ISDN-capable. This means that the endpoint
can be scheduled to launch ISDN calls to ISDN-only endpoints and to guests. In
addition, it can be scheduled to receive ISDN calls from ISDN-only endpoints.
In addition, if there is a failure in an attempted IP call, an alert will be sent notifying the
facilitator that ISDN is available, so that a backup ISDN call can be made manually.
(ISDN calls are not made automatically.)
82 Setting Up Services
Page 91

Chapter 5 - Setting Up and Working with Resources
If more ISDN channels are required than the endpoint has, you will receive an error
indicating that there are insufficient ISDN channels available.
Field Name Description
Details
Service Name* Name of the H.320 ISDN service.
Channels* The maximum number of ISDN channels available to the
endpoint. A channel is 64 kbps
ISDN Number* Dial-in number used by Polycom ReadiManager LX100 to make
ISDN calls that do not involve Direct Connect.
Country Code Select the country in which this endpoint resides. This is the
country code that needs to be used to contact this endpoint.
Area/City Code The Area Code or City Code portion of the ISDN number.
Number The main portion of this ISDN number.
Dial Rules The entries in the fields under Dial Rules define how the MCU will
dial out to make other calls.
Local Prefix* The prefix required for local dial-out.
Non-local Prefix* The prefix required for long distance dial-out.
International Prefix* The International prefix required for dial-out.
Local Area Codes* The local area code. If there are multiple local area codes,
separate them by commas.
Number of Local
Digits*
The number of digits to be dialed for local calls (excludes the
prefix).
Country Code* The country in which the endpoint is located. Polycom
ReadiManager LX100
will convert the country to the appropriate
numeric code. The country code is the national prefix to be used
when an a call is made to this endpoint from another country.
© Polycom, Inc. 83
Page 92

Polycom ReadiManager LX100 Scheduling Administrator’s Guide
Where Services are Set in MGC Manager
You can look up the specific values required to define services for an MGC in Polycom
ReadiManager LX100, in the MGC Manager software. The screenshots below show
where these are defined in MGC Manager.
Direct Connect Settings in MGC Manager
If you need to locate information about Direct Connect service on an MGC in MGC
Manager. Direct, expand the specific MGC you are working with, and then expand MCU
Configuration and Network Services. Right-click on the MPI icon and choose
Properties.
Gateway Settings in MGC Manager
The figure below shows where you can look up details about the Gateway service in
MGC Manager. As shown in the figure below, expand the specific MGC you are working
with, and then expand MCU Configuration. Locate the Gateway Configuration icon and
expand it, as well. You can then see the H.320 and H.323 services that are defined for
the gateway.
Figure 5-1. MGC Manager Screen Showing Where the Gateway is Defined
84 Setting Up Services
Page 93

Chapter 5 - Setting Up and Working with Resources
H.323 (IP) Settings in MGC Manager
The next three figures show where you can look up details about H.323 services in
MGC Manager. As shown in the figure below, expand the specific MGC you are working
with, and then expand MCU Configuration, Network Services, and H.323.
To see the details for each H.323 card, right-click on it and choose Properties. The tabs
in the Properties dialog box include the information you need to define in the H.323
services in the MCU equipment record in Polycom ReadiManager LX100.
Figure 5-2. MGC Manager screen showing where the H.323 (IP) service is defined
© Polycom, Inc. 85
Page 94

Polycom ReadiManager LX100 Scheduling Administrator’s Guide
Figure 5-3. Span tab of the Network Service Properties dialog box in MGC Manager
The Gatekeeper tab becomes available when you check the External Gatekeeper box
on the Settings tab.
Figure 5-4. Network Services Properties dialog box in MGC Manager
H.320 (ISDN) settings in MGC Manager
The next two figures show where you can look up details about H.320 (ISDN) services
in MGC Manager. As shown in the figure below, expand the specific MGC you are
working with, and then expand MCU Configuration, Network Services, and ISDN.
To see the details for each ISDN connection, right-click on it and choose Properties.
The tabs in the Properties dialog box include the information you need to define in the
86 Setting Up Services
Page 95

Chapter 5 - Setting Up and Working with Resources
H.320 (ISDN) services in the MCU equipment record in Polycom ReadiManager
LX100.
Figure 5-5. MGC Manager screen showing where the H.320 (ISDN) service is defined
© Polycom, Inc. 87
Page 96

Polycom ReadiManager LX100 Scheduling Administrator’s Guide
Figure 5-6. Spans and Phones tab of the Network Service Properties dialog box in MGC
Manager
88 Setting Up Services
Page 97

Chapter 5 - Setting Up and Working with Resources
Where Settings You Need Are Defined in Radvision MCU-30 Software
The screens below provide examples of where to locate the information you need to set
up Radvision MCUs in Polycom ReadiManager LX100. These sample screens are
taken from the Radvision MCU-30 software. If you have a different Radvision MCU, the
screens may be different.
IP Address Defined for Radvision MCU-30
As shown in the figure below, the Addressing tab of the MCU-30 Board screen contains
the IP address you need to enter in the MCU equipment record in Polycom
ReadiManager LX100.
Figure 5-7. Radvision MCU-30 Board screen with IP address
List of Prefixes for Radvision MCU-30
As shown in the figure below, the Services tab of the MCU-30: MCU screen lists the
services defined for this MCU. For each service you want to make available, create an
H.323 service record in Polycom ReadiManager LX100. This Services list summarizes
much of the information you will need, such as Prefix and Description (Service Name).
To see additional detail, drill-down into individual services by double-clicking on an item
in the list. Figure 5-8 shows the result of double-clicking on a service.
© Polycom, Inc. 89
Page 98

Polycom ReadiManager LX100 Scheduling Administrator’s Guide
Figure 5-8. Radvision MCU-30 MCU Services screen with list of services
Details about a Service in Radvision MCU-30
This screen appears when you double-click on a service in the list of services. From this
screen you can drill-down further, to display details about conference views. To do so,
double-click on an item in the Conference Views list; the resulting screen is shown in
Figure 5-10 and Figure 5-11.
Figure 5-9. Radvision MCU-30 screen showing details about a service
90 Setting Up Services
Page 99

Chapter 5 - Setting Up and Working with Resources
Additional Details About a Service in Radvision MCU-30
On the screens shown below, you can determine the Mode setting required in the H.323
Service form in Polycom ReadiManager LX100. The field “Voice Activate Method” sets
whether Continuous Presence (All see one) or Switching (See you see me) is used.
Figure 5-10. Radvision MCU-30 screen showing additional details about a service
Changing the Voice Activate Method in Radvision MCU-30
Figure 5-11. Radvision MCU-30 screen selecting the voice activate mode
© Polycom, Inc. 91
Page 100

Polycom ReadiManager LX100 Scheduling Administrator’s Guide
Setting Up Dial-In on the MGC
An entry queue must be created at the MGC for ISDN dial-in participants.
1. Launch the MGC Manager.
2. From the MGC Manager, right-click on Meeting Room and select New Entry
Queue.
3. In the Entry Queue Properties dialog box, create an entry queue by filling in a row
in the list at the bottom.
The Service Name is the ISDN service name, and the Dial-in Number is the
number that ISDN dial-in participants will use in order to connect to the
conference.
4. In Polycom ReadiManager LX100, go to the Equipment form for the MGC.
92 Setting Up Services
 Loading...