

Page 1

[Type the document title]
Polycom Document Title 1
Version 7.8 | November 2012 | DOC2702A
Polycom® RealPresence® Collaboration Server
(RMX) 1500/2000/4000 Administrator’s Guide
Page 2

Trademark Information
POLYCOM® and the names and marks associated with Polycom's products are trademarks and/or service
marks of Polycom, Inc., and are registered and/or common law marks in the United States and various other
countries.
All other trademarks are the property of their respective owners.
Patent Information
The accompanying product may be protected by one or more U.S. and foreign patents and/or pending patent
applications held by Polycom, Inc.
This software has not achieved UC APL certification.
This document provides the latest information for security-conscious users running Version 7.8 software.
The information in this document is not intended to imply that DoD or DISA certifies Polycom RMX systems.
For regulatory notices see individual Polycom® RealPresence® Collaboration Server
(RMX®) 1500/2000/4000 Hardware Guides.
© 2012 Polycom, Inc. All rights reserved.
Polycom, Inc.
6001 America Center Drive
San Jose CA 95002
USA
No part of this document may be reproduced or transmitted in any form or by any means, electronic or
mechanical, for any purpose, without the express written permission of Polycom, Inc. Under the law,
reproducing includes translating into another language or format.
As between the parties, Polycom, Inc., retains title to and ownership of all proprietary rights with respect to
the software contained within its products. The software is protected by United States copyright laws and
international treaty provision. Therefore, you must treat the software like any other copyrighted material (e.g.,
a book or sound recording).
Every effort has been made to ensure that the information in this manual is accurate. Polycom, Inc., is not
responsible for printing or clerical errors. Information in this document is subject to change without notice.
Page 3

Table of Contents
Overview . . . . . . . . . . . . . . . . . . . . . . . . . . . . . . . . . . . . . . . . . . . . . . . . . . . . . . . 1-1
About the RMX Administrator’s Guide ..............................................................................1-1
Who Should Read This Guide? ....................................................................................1-2
Prerequisites ............................................................................................................1-2
How This Guide is Organized ......................................................................................1-2
About the Polycom RMX System ......................................................................................... 1-3
IP and ISDN Network Guidelines ...............................................................................1-4
IP Networks .............................................................................................................1-4
ISDN Networks .......................................................................................................1-4
Card Configuration Modes ...........................................................................................1-4
Viewing the Card Configuration Mode ..............................................................1-4
Feature Support with MPMx Cards Only ........................................................... 1-5
Workstation Requirements ...................................................................................................1-8
Conference Profiles . . . . . . . . . . . . . . . . . . . . . . . . . . . . . . . . . . . . . . . . . . . . . . 2-1
Conferencing Modes ..............................................................................................................2-1
AVC Conferencing - Video Session Types .........................................................................2-2
Continuous Presence (CP) Conferencing ....................................................................2-2
Video Protocol Support in CP Conferences ........................................................2-4
Video Switching (VSW) Conferencing ........................................................................2-4
Guidelines ................................................................................................................2-5
Line Rates for CP and VSW ..........................................................................................2-6
AVC Conferencing Parameters ....................................................................................2-7
Basic Conferencing Parameters ............................................................................2-7
Supplemental Conferencing Features .................................................................2-8
TIP Support .............................................................................................................2-9
Operator Conferences (CP only Conferences) ...................................................2-9
Default Profile Settings in CP Conferencing Mode .................................................2-10
SVC-based Conferencing ..................................................................................................... 2-12
Guidelines ......................................................................................................................2-13
MCU Supported Resolutions for SVC Conferencing ......................................2-15
Viewing Profiles ................................................................................................................... 2-16
Profile Toolbar ..............................................................................................................2-17
Modifying an Existing Profile .............................................................................................2-17
Deleting a Conference Profile ............................................................................................. 2-18
Defining New Profiles ......................................................................................................... 2-18
Defining AVC Conferencing Profiles ........................................................................2-19
Defining a Video Switching Conference Profile ......................................................2-50
H.264 High Profile Support in Video Switching Conferences ....................... 2-53
Minimum Threshold Line Rate System Flags ..................................................2-54
Defining SVC Conferencing Profiles .........................................................................2-55
CP Conferencing Additional Information ........................................................................2-61
Overlay Layouts ...........................................................................................................2-61
Guidelines ..............................................................................................................2-61
Table of Contents
Polycom, Inc i
Page 4

Polycom RealPresence® Collaboration Server (RMX) 1500, 2000, 4000 Administrator’s Guide
Site Names Definition ..................................................................................................2-64
Guidelines ..............................................................................................................2-64
Site Names Display Position ...............................................................................2-65
Message Overlay for Text Messaging ........................................................................2-67
Guidelines ..............................................................................................................2-67
Chinese Font Types ......................................................................................................2-69
Exporting and Importing Conference Profiles .................................................................2-70
Guidelines ......................................................................................................................2-70
Exporting Conference Profiles ....................................................................................2-70
Exporting All Conference Profiles from an MCU ............................................2-70
Exporting Selected Conference Profiles .............................................................2-71
Importing Conference Profiles ....................................................................................2-72
Video Protocols and Resolution Configuration for CP Conferencing . . . . . .3-1
Video Resolutions in AVC-based CP Conferencing ..........................................................3-1
Video Display with CIF, SD and HD Video Connections ................................3-2
H.264 High Profile Support in CP Conferences .........................................................3-2
Guidelines ................................................................................................................3-2
CP Conferencing with H.263 4CIF ...............................................................................3-3
H.263 4CIF Guidelines ...........................................................................................3-4
The CP Resolution Decision Matrix .....................................................................................3-4
H.264 Base Profile Decision Matrix ..............................................................................3-5
H.264 High Profile Decision Matrices (MPMx) ..........................................................3-9
H.264 Base Profile and High Profile Comparison ....................................................3-10
Default Minimum Threshold Line Rates and Resource Usage Summary ...........3-12
Resolution Configuration for CP Conferences .................................................................3-13
Accessing the Resolution Configuration Dialog Box ...............................................3-13
Modifying the Resolution Configuration in MPM or MPM+ Card
Configuration Mode .....................................................................................................3-14
Maximum CP Resolution Pane ...........................................................................3-14
Resolution Configuration Pane ...........................................................................3-15
Sharpness / Motion Resolution Slider Panes ...................................................3-16
Modifying the Resolution Configuration in MPMx Card Configuration
Mode ...............................................................................................................................3-17
Resolution Configuration - Basic ........................................................................3-17
Resolution Configuration Pane ...........................................................................3-18
Resolution Configuration - Detailed ..................................................................3-18
Base Profile / High Profile Resolution Slider Panes ........................................3-19
Flag Settings ...................................................................................................................3-19
Setting the Maximum CP Resolution for Conferencing .................................3-19
Minimum Frame Rate Threshold for SD Resolution .......................................3-20
H.264 High Profile System Flags (Version 7.0.1 only) .....................................3-20
Additional Video Resolutions in MPM+/MPMx Card Configuration Mode .............3-21
w448p Resolution ..........................................................................................................3-21
Guidelines ..............................................................................................................3-21
Content ...................................................................................................................3-23
Packet Loss Compensation ..................................................................................3-23
Enabling Support of the w448p Resolution ......................................................3-23
ii Polycom, Inc
Page 5

Table of Contents
RMX System Flag Settings ..................................................................................3-23
RMX Profile Setting ..............................................................................................3-24
Additional Intermediate Video Resolutions .............................................................3-24
Microsoft RTV Video Protocol Support in CP Conferences ...........................................3-24
Guidelines ..............................................................................................................3-24
Participant Settings ......................................................................................................3-26
Monitoring RTV ............................................................................................................3-27
Controlling Resource Allocations for Lync Clients Using RTV Video
Protocol ..........................................................................................................................3-27
Threshold HD Flag Settings using the RTV Video Protocol ..........................3-29
Additional Conferencing Information . . . . . . . . . . . . . . . . . . . . . . . . . . . . . . . 4-1
H.239 / People+Content ........................................................................................................ 4-2
H.239 ................................................................................................................................. 4-2
People+Content ..............................................................................................................4-2
Guidelines ................................................................................................................4-2
SIP BFCP Content Capabilities .....................................................................................4-3
Defining Content Sharing Parameters for a Conference .......................................... 4-5
Content Settings ..............................................................................................................4-7
AVC Only Content Setting ....................................................................................4-7
SVC Only Content Setting .....................................................................................4-8
Content Protocols ...........................................................................................................4-8
H.263 & H.264 Auto Selection (AVC Default Setting) ......................................4-8
H.263 (AVC Only Conferences) ............................................................................4-9
H.264 HD (AVC Only Conferences) ....................................................................4-9
H.264 Cascade and SVC Optimized ..................................................................4-11
Selecting a Customized Content Rate in AVC Conferences ..................................4-14
Modifying the Threshold Line Rate for HD Resolution Content .......................... 4-16
Sending Content to Legacy Endpoints (AVC Only) ................................................4-17
Guidelines for Sending Content to Legacy Endpoints ....................................4-17
Enabling the Send Content to Legacy Endpoints Option ...............................4-19
Exclusive Content Mode ..............................................................................................4-21
Guidelines .............................................................................................................4-21
Stopping a Content Session .........................................................................................4-23
Content Broadcast Control ..........................................................................................4-23
Giving and Cancelling Token Ownership ........................................................ 4-24
Managing Noisy Content Connections .....................................................................4-25
Content Display Flags ..........................................................................................4-25
Forcing Other Content Capabilities ........................................................................... 4-26
Video Preview .......................................................................................................................4-26
Video Preview Guidelines ........................................................................................... 4-26
Workstation Requirements .........................................................................................4-27
Testing your Workstation ....................................................................................4-27
Previewing the Participant Video ..............................................................................4-29
Gathering Phase .................................................................................................................... 4-30
Gathering Phase Guidelines .......................................................................................4-31
Gathering Phase Duration ................................................................................... 4-32
Enabling the Gathering Phase Display ..............................................................4-32
Auto Scan and Customized Polling in Video Layout .....................................................4-33
Polycom, Inc iii
Page 6

Polycom RealPresence® Collaboration Server (RMX) 1500, 2000, 4000 Administrator’s Guide
Guidelines ......................................................................................................................4-33
Enabling Auto Scan and Customized Polling ..........................................................4-33
Auto Scan ...............................................................................................................4-33
Customized Polling ..............................................................................................4-34
Audio Algorithm Support ...................................................................................................4-35
Guidelines ......................................................................................................................4-36
SIP Encryption .......................................................................................................4-36
Mono .......................................................................................................................4-36
Stereo ......................................................................................................................4-37
Audio algorithms supported for ISDN ......................................................................4-38
Monitoring Participant Audio Properties .................................................................4-39
Media Encryption (AVC Only) ...........................................................................................4-40
Media Encryption Guidelines .....................................................................................4-40
Mixing Encrypted and Non-encrypted Endpoints in one Conference .........4-41
Direct Connection to the Conference .................................................................4-42
Connection to the Entry Queue ..........................................................................4-43
Moving from the Entry Queue to Conferences or Between Conferences .....4-44
Recording Link Encryption .................................................................................4-45
Encryption Flag Settings ..............................................................................................4-46
Enabling Encryption in the Profile .............................................................................4-47
Enabling Encryption at the Participant Level ...........................................................4-47
Monitoring the Encryption Status ..............................................................................4-49
Packet Loss Compensation (LPR and DBA) .....................................................................4-50
Packet Loss .....................................................................................................................4-50
Causes of Packet Loss ...........................................................................................4-50
Effects of Packet Loss on Conferences ...............................................................4-50
Lost Packet Recovery ....................................................................................................4-50
Lost Packet Recovery Guidelines .......................................................................4-50
Enabling Lost Packet Recovery ...........................................................................4-51
Monitoring Lost Packet Recovery ..............................................................................4-51
Network Quality Indication (AVC Only) ..........................................................................4-52
Guidelines ......................................................................................................................4-53
Network Quality ...........................................................................................................4-53
Indication Threshold Values ...............................................................................4-53
Customizing Network Quality Indicator Display ...................................................4-54
Telepresence Mode (AVC Only) .........................................................................................4-55
RMX Telepresence Mode Guidelines .........................................................................4-56
System Level ..........................................................................................................4-56
Conference Level ...................................................................................................4-56
Room (Participant/Endpoint) Level ..................................................................4-56
Automatic Detection of Immersive Telepresence (ITP) Sites .........................4-56
Horizontal Striping ...............................................................................................4-57
Cropping ................................................................................................................4-57
Video Fade in Telepresence conferences ...........................................................4-57
Gathering Phase with ITP Room Systems .........................................................4-58
Aspect ratio for standard endpoints ..................................................................4-58
Skins and Frames ..................................................................................................4-58
iv Polycom, Inc
Page 7

Table of Contents
RPX and TPX Video Layouts ...................................................................................... 4-58
Enabling Telepresence Mode ......................................................................................4-60
Conference Level .................................................................................................. 4-60
Multiple Cascade Links ............................................................................................... 4-62
Guidelines ..............................................................................................................4-62
Enabling and Using Multiple Cascade Links ........................................................... 4-63
Creating a Link Participant .........................................................................................4-66
Link Participant in the Dial Out RMX ...............................................................4-66
Participant Link in the Dial In RMX ..................................................................4-68
Disconnection Causes ..........................................................................................4-68
Monitoring Telepresence Mode .................................................................................4-70
Monitoring Ongoing Conferences .....................................................................4-70
Monitoring Participant Properties .....................................................................4-71
Monitoring Multiple Cascade Links ..........................................................................4-71
Disconnection Causes ..........................................................................................4-71
Lecture Mode (AVC Only) ..................................................................................................4-73
Enabling Lecture Mode ...............................................................................................4-73
Selecting the Conference Lecturer ......................................................................4-73
Enabling the Automatic Switching ....................................................................4-75
Lecture Mode Monitoring ...........................................................................................4-75
Restricting Content Broadcast to Lecturer ................................................................4-77
Muting Participants Except the Lecturer .................................................................. 4-78
Guidelines ..............................................................................................................4-78
Enabling the Mute Participants Except Lecturer Option ................................4-79
Permanent Conference ........................................................................................................4-80
Guidelines ......................................................................................................................4-80
Enabling a Permanent Conference .............................................................................4-80
Closed Captions (AVC Only) .............................................................................................4-81
Closed Captions Guidelines ........................................................................................4-81
Enabling Closed Captions ...........................................................................................4-81
Cascading Conferences . . . . . . . . . . . . . . . . . . . . . . . . . . . . . . . . . . . . . . . . . . 5-1
Video Layout in Cascading conferences .....................................................................5-1
Guidelines ................................................................................................................5-2
Flags controlling Cascade Layouts ......................................................................5-2
DTMF Forwarding .................................................................................................5-3
Play Tone Upon Cascading Link Connection ....................................................5-3
Basic Cascading ......................................................................................................................5-4
Basic Cascading using IP Cascaded Link .................................................................... 5-4
Dialing Directly to a Conference ..........................................................................5-5
Dialing to an Entry Queue ....................................................................................5-5
Automatic Identification of the Cascading Link ................................................5-5
Basic Cascading using ISDN Cascaded Link .............................................................5-5
Network Topologies Enabling H.239 Content Over ISDN Cascaded
Links .........................................................................................................................5-5
Guidelines ................................................................................................................5-6
Gateway to Gateway Calls via ISDN Cascading Link ......................................5-7
Gateway to MCU Calls via ISDN Cascading Link ............................................5-8
MCU to MCU Calls via ISDN Cascading Link ..................................................5-8
Polycom, Inc v
Page 8

Polycom RealPresence® Collaboration Server (RMX) 1500, 2000, 4000 Administrator’s Guide
RMX Configuration Enabling ISDN Cascading Links ......................................5-9
Suppression of DTMF Forwarding ....................................................................5-13
Star Cascading Topology .....................................................................................................5-14
Master-Slave Cascading ...............................................................................................5-14
Cascading via Entry Queue .........................................................................................5-20
Enabling Cascading ..............................................................................................5-21
Creating the Cascade-enabled Entry Queue .....................................................5-21
Creating the Dial-out Cascaded Link .................................................................5-22
Enabling Cascaded Conferences without Password .......................................5-24
Monitoring Star Cascaded Conferences ....................................................................5-25
Creating the Dial-out Link from a Conference Running on the MGC to the
Conference Running on the RMX ...............................................................................5-25
Cascading Conferences - H.239-enabled MIH Topology ................................................5-26
MIH Cascading Levels .........................................................................................5-27
Cascading Topologies ..........................................................................................5-27
MIH Cascading Guidelines in CP Licensing ....................................................5-28
Video Layout in Cascading CP Conferences ....................................................5-30
MGC to RMX Cascading ......................................................................................5-32
Meeting Rooms . . . . . . . . . . . . . . . . . . . . . . . . . . . . . . . . . . . . . . . . . . . . . . . . . .6-1
Meeting Rooms List ................................................................................................................6-2
Meeting Room Toolbar & Right-click Menu ...............................................................6-4
Creating a New Meeting Room ............................................................................................6-4
Entry Queues, Ad Hoc Conferences and SIP Factories . . . . . . . . . . . . . . . . .7-1
Entry Queues ...........................................................................................................................7-1
Defining a New Entry Queue ........................................................................................7-3
Listing Entry Queues ......................................................................................................7-6
Modifying the EQ Properties ........................................................................................7-6
Transit Entry Queue .......................................................................................................7-6
Setting a Transit Entry Queue ...............................................................................7-6
IVR Provider Entry Queue (Shared Number Dialing) ..............................................7-7
Call Flow ..................................................................................................................7-7
Guidelines ................................................................................................................7-7
RMX Configuration ................................................................................................7-8
SIP Factories .............................................................................................................................7-9
Creating SIP Factories ....................................................................................................7-9
SIP Registration & Presence for Entry Queues and SIP Factories .................................7-11
Guidelines ..............................................................................................................7-11
Monitoring Registration Status ...................................................................................7-11
Ad Hoc Conferencing ...........................................................................................................7-12
Gateway to Polycom® Distributed Media Application™ (DMA™) 7000 ...........7-12
Address Book . . . . . . . . . . . . . . . . . . . . . . . . . . . . . . . . . . . . . . . . . . . . . . . . . . .8-1
Viewing the Address Book ....................................................................................................8-2
Displaying and Hiding the Group Members in the Navigation Pane ....................8-3
Participants List Pane Information ...............................................................................8-3
Displaying and Hiding the Address Book ..................................................................8-4
Adding Participants from the Address Book to Conferences ..........................................8-5
Adding Individual Participants from the Address Book to Conferences ..............8-5
vi Polycom, Inc
Page 9

Table of Contents
Adding a Group from the Address Book to Conferences ........................................8-5
Participant Groups .................................................................................................................8-6
Managing Groups in the Address Book ......................................................................8-6
Managing the Address Book ................................................................................................8-7
Guidelines ........................................................................................................................8-7
Adding a Participant to the Address Book ................................................................. 8-7
Adding a new participant to the Address Book Directly ......................................... 8-8
Adding a Participant from an Ongoing Conference to the Address Book ..........8-13
Modifying Participants in the Address Book ...........................................................8-14
Deleting Participants from the Address Book .......................................................... 8-15
Copying or Moving a Participant ..............................................................................8-16
Searching the Address Book .......................................................................................8-17
Filtering the Address Book .........................................................................................8-18
Filtering Address Book Data Using a Predefined Pattern ..............................8-18
Filtering Address Book Data Using a Custom Pattern ...................................8-19
Clearing the Filter ................................................................................................. 8-20
Obtaining the Display Name from the Address Book .................................................... 8-21
Guidelines ......................................................................................................................8-21
Enabling and Disabling the Obtain Display Name from Address Book
Feature ............................................................................................................................ 8-21
Importing and Exporting Address Books .........................................................................8-22
Exporting an Address Book ........................................................................................8-22
Importing an Address Book ........................................................................................8-22
Upgrading and Downgrading Considerations ................................................................8-23
Integrating the Polycom CMA™ Address Book with the RMX ....................................8-23
Reservations . . . . . . . . . . . . . . . . . . . . . . . . . . . . . . . . . . . . . . . . . . . . . . . . . . . 9-1
Guidelines ........................................................................................................................9-1
System ......................................................................................................................9-1
Resources .................................................................................................................9-1
Reservations ............................................................................................................9-2
Using the Reservation Calendar ........................................................................................... 9-3
Toolbar Buttons .......................................................................................................9-3
Reservations Views ........................................................................................................9-4
Week View ...............................................................................................................9-4
Day View .................................................................................................................9-4
Today View .............................................................................................................9-5
List View ..................................................................................................................9-5
Changing the Calendar View .......................................................................................9-6
Scheduling Conferences Using the Reservation Calendar ...............................................9-8
Creating a New Reservation .........................................................................................9-8
Managing Reservations .......................................................................................................9-14
Guidelines ......................................................................................................................9-14
Viewing and Modifying Reservations ....................................................................... 9-14
Using the Week and Day views of the Reservations Calendar .....................9-14
Adjusting the Start Times of all Reservations ..........................................................9-16
Deleting Reservations .................................................................................................. 9-17
Searching for Reservations using Quick Search ......................................................9-18
Polycom, Inc vii
Page 10

Polycom RealPresence® Collaboration Server (RMX) 1500, 2000, 4000 Administrator’s Guide
Operator Assistance & Participant Move . . . . . . . . . . . . . . . . . . . . . . . . . . .10-1
Operator Conferences ..........................................................................................................10-1
Defining the Components Enabling Operator Assistance ......................................10-3
Defining a Conference IVR Service with Operator Assistance Options .......10-3
Defining an Entry Queue IVR Service with Operator Assistance Options ..10-5
Defining a Conference Profile for an Operator Conference ...........................10-6
Defining an Ongoing Operator Conference ....................................................10-11
Saving an Operator Conference to a Template ...............................................10-14
Starting an Operator Conference from a Template ........................................10-15
Monitoring Operator Conferences and Participants Requiring Assistance .......10-16
Requesting Help ..................................................................................................10-16
Participant Alerts List .........................................................................................10-17
Audible Alarms ...................................................................................................................10-18
Using Audible Alarms .......................................................................................10-18
Moving Participants Between Conferences ....................................................................10-18
Moving Participants ...................................................................................................10-19
Conference Templates . . . . . . . . . . . . . . . . . . . . . . . . . . . . . . . . . . . . . . . . . . .11-1
Guidelines ..............................................................................................................11-1
Using Conference Templates ..............................................................................................11-2
Toolbar Buttons .....................................................................................................11-3
Creating a New Conference Template ...............................................................................11-3
Creating a new Conference Template from Scratch ................................................11-3
Saving an Ongoing or AVC-based Operator Conference as a Template ..............11-8
Starting an Ongoing Conference From a Template .........................................................11-9
Starting an Operator Conference from a Template (AVC Conferencing) ..11-10
Scheduling a Reservation From a Conference Template (AVC Conferencing) .........11-11
Deleting a Conference Template ......................................................................................11-13
Exporting and Importing Conference Templates ..........................................................11-13
Exporting Conference Templates .............................................................................11-14
Exporting All Conference Templates from an MCU .....................................11-14
Exporting Selected Conference Templates ......................................................11-15
Importing Conference Templates .............................................................................11-17
Polycom Conferencing for Microsoft Outlook® . . . . . . . . . . . . . . . . . . . . . . .12-1
Setting up the Calendaring Solution ..................................................................................12-2
Calendaring Guidelines ...............................................................................................12-6
Creating and Connecting to a Conference ........................................................................12-8
Creating a Conference ..................................................................................................12-8
Connecting to a Conference ........................................................................................12-9
RMX Standalone Deployment ..........................................................................12-10
RMX and Polycom DMA System Deployment ..............................................12-10
Polycom Solution Support .........................................................................................12-10
Conference and Participant Monitoring . . . . . . . . . . . . . . . . . . . . . . . . . . . . .13-1
General Monitoring ..............................................................................................................13-1
Monitoring AVC-based Video Switching Conferences ...........................................13-2
Conference Level Monitoring .............................................................................................13-2
Viewing the Properties of an Ongoing AVC-based Conference ............................13-3
viii Polycom, Inc
Page 11

Table of Contents
Viewing the Properties of an Ongoing SVC-based Conference ..........................13-14
Monitoring Operator Conferences and Participants Requiring Assistance ......13-18
Requesting Help .................................................................................................13-18
Request to Speak .................................................................................................13-19
Participant Alerts List ........................................................................................13-20
Participant Level Monitoring ............................................................................................13-21
Displaying Participants Properties ..........................................................................13-21
IP Participant Properties ............................................................................................13-22
Monitoring SIP BFCP Content ..........................................................................13-32
Monitoring ISDN/PSTN Participants .....................................................................13-33
Monitoring Telepresence Participant Properties ...................................................13-38
Recording Conferences . . . . . . . . . . . . . . . . . . . . . . . . . . . . . . . . . . . . . . . . . 14-1
Creating Multiple Virtual Recording Rooms on the RSS ...............................................14-2
Configuring the RMX to Enable Recording ......................................................................14-2
Defining the Recording Link ......................................................................................14-2
Enabling the Recording Features in a Conference IVR Service .............................14-4
Enabling the Recording in the Conference Profile ..................................................14-5
Recording Link Encryption ......................................................................................... 14-7
Recording Link Encryption Flag Setting ...........................................................14-7
Recording Link Settings .......................................................................................14-8
Managing the Recording Process .......................................................................................14-8
Recording Link Layout ................................................................................................14-9
Using the RealPresence Collaboration Server Web Client to Manage the
Recording Process ......................................................................................................14-10
Using DTMF Codes to Manage the Recording Process ........................................14-11
Conference Recording with Codian IP VCR ..................................................................14-11
Users, Connections and Notes . . . . . . . . . . . . . . . . . . . . . . . . . . . . . . . . . . . 15-1
Users .......................................................................................................................................15-1
User Types .....................................................................................................................15-1
Administrator ........................................................................................................15-1
Administrator Read-only ....................................................................................15-1
Operator .................................................................................................................15-1
Chairperson ...........................................................................................................15-2
Auditor ...................................................................................................................15-2
Machine Account ..................................................................................................15-2
Guidelines ......................................................................................................................15-2
Monitoring .............................................................................................................15-3
Active Directory ....................................................................................................15-3
Listing Users .................................................................................................................. 15-3
Adding a New User .....................................................................................................15-4
Deleting a User .............................................................................................................. 15-5
Changing a User’s Password ...................................................................................... 15-5
Disabling a User ............................................................................................................ 15-6
Enabling a User .............................................................................................................15-6
Renaming a User ..........................................................................................................15-7
Connections ........................................................................................................................... 15-8
Viewing the Connections List ..................................................................................... 15-8
Polycom, Inc ix
Page 12

Polycom RealPresence® Collaboration Server (RMX) 1500, 2000, 4000 Administrator’s Guide
User and Connection Management in Ultra Secure Mode .............................................15-8
Managing the System Users ........................................................................................15-9
User Types .............................................................................................................15-9
Disabling/Enabling Users ...................................................................................15-9
Renaming Users ....................................................................................................15-9
Disabling Inactive Users ......................................................................................15-9
Managing the User Login Process ............................................................................15-10
Implementing Strong Passwords .....................................................................15-10
Implementing Password Re-Use / History Rules .........................................15-11
Defining Password Aging .................................................................................15-11
Maximum Repeating Characters ......................................................................15-11
Defining Password Change Frequency ...........................................................15-12
Forcing Password Change .................................................................................15-12
Temporary User Lockout ...................................................................................15-12
User Lockout ........................................................................................................15-12
User Login Record ..............................................................................................15-13
Controlling User Sessions ..........................................................................................15-13
Management Sessions per System ....................................................................15-13
Sessions per User ................................................................................................15-14
Connection Timeout ...........................................................................................15-14
Session Timeout ..................................................................................................15-14
Erase Session History After Logout .................................................................15-14
Notes .....................................................................................................................................15-14
Using Notes .................................................................................................................15-14
Network Services . . . . . . . . . . . . . . . . . . . . . . . . . . . . . . . . . . . . . . . . . . . . . . .16-1
IP Network Services .............................................................................................................16-1
Management Network (Primary) ...............................................................................16-2
Default IP Service (Conferencing Service) ................................................................16-2
Modifying the Management Network .......................................................................16-3
Modifying the Default IP Network Service ............................................................16-11
Ethernet Settings .........................................................................................................16-24
IP Network Monitoring .............................................................................................16-27
Using IPv6 Networking Addresses for RMX Internal and External Entities .....16-32
RMX Internal Addresses ....................................................................................16-32
External Entities ..................................................................................................16-32
IPv6 Guidelines ...........................................................................................................16-32
LAN Redundancy ...............................................................................................................16-32
Configuration Requirements .....................................................................................16-33
Media Redundancy .....................................................................................................16-33
Signaling and Management Redundancy ...............................................................16-35
Hardware Monitor Indications .................................................................................16-36
Network Traffic Control ....................................................................................................16-36
SIP Proxy Failover With Polycom® Distributed Media Application™
(DMA™) 7000 ......................................................................................................................16-37
RealPresence Collaboration Server (RMX) Network Port Usage ................................16-38
ISDN/PSTN Network Services ........................................................................................16-40
Adding/Modifying ISDN/PSTN Network Services .............................................16-41
x Polycom, Inc
Page 13

Table of Contents
Obtaining ISDN/PSTN required information ...............................................16-41
Modifying an ISDN/PSTN Network Service .........................................................16-47
Network Security ................................................................................................................16-48
RealPresence Collaboration Server (RMX) 1500/RealPresence Collaboration
Server (RMX) 4000 ......................................................................................................16-49
RealPresence Collaboration Server (RMX) 2000 ....................................................16-49
Multiple Network Services ...............................................................................................16-49
Guidelines ....................................................................................................................16-50
Resource Allocation and Capacity ...................................................................16-52
First Time Installation and Configuration ..............................................................16-52
Upgrading to Multiple Services ...............................................................................16-53
Gather Network Equipment and Address Information - IP Network Services
Required Information ................................................................................................16-54
RealPresence Collaboration Server (RMX) Hardware Installation .....................16-55
RealPresence Collaboration Server (RMX) 4000 Multiple Services
Configuration ...................................................................................................... 16-55
RealPresence Collaboration Server (RMX) 2000 Multiple Services
Configuration ...................................................................................................... 16-57
RealPresence Collaboration Server (RMX) 1500 Multiple Services
Configuration ...................................................................................................... 16-58
RMX Configuration .................................................................................................... 16-58
System Flags and License Settings ...................................................................16-59
IP Network Service Definition ..........................................................................16-59
Setting a Network Service as Default .............................................................. 16-65
Ethernet Settings ................................................................................................. 16-66
Signaling Host IP Address and MCU Prefix in GK Indications ..................16-66
Video/Voice Port Configuration and Resolution Configuration ................16-66
Conference Profile ..............................................................................................16-67
Gateway Profiles .................................................................................................16-68
Hardware Monitor .....................................................................................................16-68
Signaling Monitor .......................................................................................................16-69
Conferencing ...............................................................................................................16-69
Defining Dial Out Participants .........................................................................16-69
Reserving Video Resources for a Conference .................................................16-70
Monitoring Conferences ....................................................................................16-70
Resource Report ..........................................................................................................16-71
Port Gauge Indications ......................................................................................16-71
NAT (Network Address Translation) Traversal ............................................................16-72
Deployment Architectures ................................................................................................16-72
Remote Connection Using the Internet ...................................................................16-72
Business to Business Connections ............................................................................16-73
FW (Firewall) NAT Keep Alive ................................................................................16-74
System Configuration in SBC environments ..................................................16-74
IVR Services . . . . . . . . . . . . . . . . . . . . . . . . . . . . . . . . . . . . . . . . . . . . . . . . . . . 17-1
IVR Services List ...................................................................................................................17-1
IVR Services Toolbar ....................................................................................................17-2
Adding Languages ...............................................................................................................17-3
Uploading a Message File to the RMX ......................................................................17-4
Polycom, Inc xi
Page 14

Polycom RealPresence® Collaboration Server (RMX) 1500, 2000, 4000 Administrator’s Guide
Defining a New Conference IVR Service ..........................................................................17-6
Defining a New Conference IVR Service ..................................................................17-6
Entry Queue IVR Service ...................................................................................................17-21
Defining a New Entry Queue IVR Service ..............................................................17-21
Setting a Conference IVR Service or Entry Queue IVR Service as the Default
Service ...........................................................................................................................17-26
Modifying the Conference or Entry Queue IVR Service Properties ....................17-27
Replacing the Music File ....................................................................................................17-27
Adding a Music File ...........................................................................................17-27
Creating Audio Prompts and Video Slides .....................................................................17-28
Recording an Audio Message ...................................................................................17-28
Creating a Welcome Video Slide ..............................................................................17-32
Inviting Participants using DTMF ....................................................................................17-33
Invite Call Flow ...........................................................................................................17-33
Entering Additional DTMF Codes ...................................................................17-33
Error Handling ....................................................................................................17-33
Guidelines ....................................................................................................................17-34
Enabling the Invite Participants using DTMF Option ...........................................17-34
Disabling the Invite Participant Option ..................................................................17-37
Default IVR Prompts and Messages ................................................................................17-37
Volume Control of IVR Messages, Music and Roll Call ...............................................17-40
The Call Detail Record (CDR) Utility . . . . . . . . . . . . . . . . . . . . . . . . . . . . . . . .18-1
The CDR File ..........................................................................................................................18-1
CDR File Formats ..........................................................................................................18-1
Multi-Part CDR Files ....................................................................................................18-3
Guidelines ..............................................................................................................18-3
CDR File Contents ........................................................................................................18-3
Viewing, Retrieving and Archiving Conference Information ........................................18-4
Viewing the Conference Records ...............................................................................18-4
Multi-part CDR File display ................................................................................18-5
Refreshing the CDR List ..............................................................................................18-6
Retrieving and Archiving Conference CDR Records ..............................................18-6
Gateway Calls . . . . . . . . . . . . . . . . . . . . . . . . . . . . . . . . . . . . . . . . . . . . . . . . . .19-1
Gateway Functionality .........................................................................................................19-1
Call Flows ...............................................................................................................................19-2
IP Participants ...............................................................................................................19-2
Direct Dialing ........................................................................................................19-2
Gateway IVR ..........................................................................................................19-5
Direct IP Dialing ............................................................................................................19-6
Dial-out Calls .........................................................................................................19-6
Dial-in Calls ...........................................................................................................19-7
Enabling or Disabling Direct IP Dialing ............................................................19-8
ISDN Participants .........................................................................................................19-8
Gateway IVR ..........................................................................................................19-8
Direct Dial-in to Endpoints or DMA VMR using Automatically
Generated Destination Numbers ........................................................................19-9
Interoperability with CMA ................................................................................19-10
xii Polycom, Inc
Page 15

Table of Contents
Gateway Redial or Redialing Gateway Calls .........................................................19-11
Guidelines ............................................................................................................19-11
Redial on Wrong Number .........................................................................................19-11
Wrong Destination Number .............................................................................19-11
Wrong Destination Number Time-out ............................................................19-12
Disconnect on Busy ....................................................................................................19-12
Disconnect on No Answer ........................................................................................19-12
Disconnect on Wrong Number .................................................................................19-13
New IVR Messages .....................................................................................................19-13
Configuring the Gateway Components on the RMX ....................................................19-13
Defining the IVR Service for Gateway Calls ..........................................................19-14
Defining the Conference Profile for Gateway Calls ..............................................19-17
Defining the Gateway Profile ...................................................................................19-18
System Configuration ................................................................................................ 19-21
Displaying the Connection Information .........................................................19-21
Enabling PSTN dial-in using GK prefix ..........................................................19-21
Monitoring Ongoing Gateway Sessions .........................................................................19-22
Connection Indications ..............................................................................................19-22
Gateway Session Parameters ....................................................................................19-23
Connected Participant Parameters ........................................................................... 19-23
Direct Dialing from ISDN/PSTN Endpoint to IP Endpoint via a Meeting Room ....19-23
Dialing to Polycom® DMA™ 7000 ..................................................................................19-25
Calling a DMA Direct with Automatically Generated Destination Dial
Strings ...........................................................................................................................19-26
Calling the DMA via Gateway IVR .........................................................................19-26
Manual Dial String Entry ..........................................................................................19-27
Automatic Dial String Generation ........................................................................... 19-27
PSTN Dial-in Using GK Prefix ..........................................................................19-28
Deploying a Polycom RMX™ Serial Gateway S4GW ................................................... 19-29
RMX Manager Application . . . . . . . . . . . . . . . . . . . . . . . . . . . . . . . . . . . . . . . 20-1
Accessing the RMX Manager Directly ..............................................................................20-1
Installing the RMX Manager ...............................................................................................20-2
Starting the RMX Manager Application ...........................................................................20-4
Connecting to the MCU ...............................................................................................20-5
RMX Manager Main Screen ........................................................................................ 20-7
MCUs Pane ............................................................................................................20-7
Conferences Pane .................................................................................................. 20-9
RMX Management ................................................................................................20-9
List Pane ...............................................................................................................20-10
Status Bar .............................................................................................................20-10
Address Book ......................................................................................................20-11
Conference Templates ........................................................................................20-11
Adding MCUs to the MCUs List ......................................................................................20-12
Starting a Conference .........................................................................................................20-13
Starting a Conference from the Conferences Pane ................................................20-14
Starting a Reservation ................................................................................................20-15
Starting an Ongoing Conference or Reservation From a Template ....................20-16
Polycom, Inc xiii
Page 16

Polycom RealPresence® Collaboration Server (RMX) 1500, 2000, 4000 Administrator’s Guide
Monitoring Conferences ....................................................................................................20-16
Grouping the Participants by MCU .........................................................................20-17
Start Monitoring/Stop Monitoring ..........................................................................20-18
Modifying the MCU Properties ........................................................................................20-19
Disconnecting an MCU ......................................................................................................20-19
Removing an MCU from the MCUs Pane .......................................................................20-20
Changing the RMX Manager Language ..........................................................................20-20
Import/Export RMX Manager Configuration ................................................................20-21
Installing RMX Manager for Secure Communication Mode ........................................20-23
Using an Internal Certificate Authority ...................................................................20-27
RealPresence Collaboration Server (RMX) Administration and Utilities . . .21-1
System and Participant Alerts .............................................................................................21-1
System Alerts .................................................................................................................21-2
Participant Alerts ..........................................................................................................21-3
RMX Time ..............................................................................................................................21-4
Guidelines ..............................................................................................................21-4
Altering the clock ..........................................................................................................21-4
Resource Management .........................................................................................................21-6
Resource Capacity ........................................................................................................21-6
Resource Capacity Modes ....................................................................................21-7
Resource Usage .....................................................................................................21-8
Video/Voice Port Configuration ..............................................................................21-10
Flexible Resource Capacity Mode ....................................................................21-10
Fixed Resource Capacity ....................................................................................21-10
Configuring the Video/Voice Resources in MPM Mode ............................21-11
Configuring the Video/Voice Resources in MPM+ and MPMx Mode ......21-11
Flexible Resource Capacity ................................................................................21-12
Fixed Resource Capacity (for AVC-based Conferencing) .............................21-12
Forcing Video Resource Allocation to CIF Resolution ..................................21-15
Resource Report ..........................................................................................................21-16
Displaying the Resource Report .......................................................................21-16
Resource Report Display in Flexible Resource Capacity Mode™ ...............21-17
Resource Report in Fixed Resource Capacity Mode™ (AVC-based
Conferencing) ......................................................................................................21-18
ISDN/PSTN .........................................................................................................21-19
RMX Resource Management by CMA and DMA ..................................................21-20
Guidelines ............................................................................................................21-20
Port Usage Threshold .................................................................................................21-21
Setting the Port Usage Threshold .....................................................................21-21
SIP Dial-in Busy Notification ............................................................................21-22
Port Usage Gauges ......................................................................................................21-23
Port Gauges in Flexible/Fixed Capacity Modes ............................................21-23
System Information ............................................................................................................21-24
SNMP (Simple Network Management Protocol) ...........................................................21-27
MIBs (Management Information Base) ....................................................................21-27
Traps .............................................................................................................................21-27
Guidelines ............................................................................................................21-27
xiv Polycom, Inc
Page 17

Table of Contents
Private MIBs ........................................................................................................21-27
Support for MIB-II Sections ..............................................................................21-27
The Alarm-MIB ...................................................................................................21-28
H.341-MIB (H.341 – H.323) ...............................................................................21-28
Standard MIBs .....................................................................................................21-28
Unified MIB .........................................................................................................21-29
Traps ............................................................................................................................. 21-31
Status Trap ...........................................................................................................21-32
Defining the SNMP Parameters in the RMX ..........................................................21-32
Hot Backup ..........................................................................................................................21-38
Guidelines ....................................................................................................................21-39
Enabling Hot Backup .................................................................................................21-40
Using Hot Backup Triggers .......................................................................................21-40
Guidelines ............................................................................................................21-41
Configuring the Hot Backup Triggers .....................................................................21-41
Modifications to the Master MCU Requiring System Reset ................................21-42
Audible Alarms .................................................................................................................. 21-43
Using Audible Alarms ...............................................................................................21-43
Audible Alarm Permissions ..............................................................................21-43
Stop Repeating Message ....................................................................................21-43
Configuring the Audible Alarms .............................................................................21-44
User Customization ............................................................................................21-44
Replacing the Audible Alarm File .................................................................... 21-45
Multilingual Setting ...........................................................................................................21-46
Customizing the Multilingual Setting ..................................................................... 21-46
Banner Display and Customization ................................................................................. 21-46
Guidelines ............................................................................................................21-47
Non-Modifiable Banner Text .................................................................................... 21-47
Sample 1 Banner .................................................................................................21-47
Sample 2 Banner .................................................................................................21-48
Sample 3 Banner .................................................................................................21-48
Sample 4 Banner .................................................................................................21-48
Customizing Banners .................................................................................................21-49
Banner Display ............................................................................................................21-50
Login Screen Banner ..........................................................................................21-50
Main Screen Banner ............................................................................................21-51
Software Management .......................................................................................................21-51
Backup and Restore Guidelines ...............................................................................21-51
Using Software Management ...........................................................................21-52
Ping RMX .............................................................................................................................21-53
Guidelines ....................................................................................................................21-53
Using Ping ...................................................................................................................21-53
Notification Settings ........................................................................................................... 21-54
Logger Diagnostic Files .....................................................................................................21-55
Information Collector .........................................................................................................21-57
Standard Security Mode ............................................................................................21-57
Ultra Secure Mode ......................................................................................................21-58
Polycom, Inc xv
Page 18

Polycom RealPresence® Collaboration Server (RMX) 1500, 2000, 4000 Administrator’s Guide
Network Intrusion Detection System (NIDS) .................................................21-58
Using the Information Collector ...............................................................................21-58
Step 1: Creating the Information Collector Compressed File ...............................21-59
Step 2: Saving the Compressed File .........................................................................21-60
Step 3: Viewing the Compressed File ......................................................................21-60
Auditor .................................................................................................................................21-60
Auditor Files ................................................................................................................21-61
Auditor Event History File Storage ..................................................................21-61
Retrieving Auditor Files .....................................................................................21-61
Auditor File Viewer ....................................................................................................21-62
Audit Events ................................................................................................................21-65
Alerts and Faults .................................................................................................21-65
Transactions .........................................................................................................21-66
ActiveX Bypass ....................................................................................................................21-68
Installing ActiveX .......................................................................................................21-68
Resetting the RMX ..............................................................................................................21-69
Restore Factory Defaults ....................................................................................................21-70
Standard Restore .................................................................................................21-70
Comprehensive Restore .....................................................................................21-70
Restoring Factory Defaults ........................................................................................21-70
System Configuration Flags . . . . . . . . . . . . . . . . . . . . . . . . . . . . . . . . . . . . . .22-1
Modifying System Flags ......................................................................................................22-1
Manually Adding and Deleting System Flags ........................................................22-18
Manually Adding Flags to the CS_MODULE_PARAMETERS Tab ...........22-39
Deleting a Flag .....................................................................................................22-40
Auto Layout Configuration .......................................................................................22-41
Customizing the Default Auto Layout ............................................................22-41
LEGACY_EP_CONTENT_DEFAULT_LAYOUT Flag Values ............................22-43
CS_ENABLE_EPC Flag ..............................................................................................22-45
Automatic Password Generation Flags ...................................................................22-45
Guidelines ............................................................................................................22-45
Enabling the Automatic Generation of Passwords ........................................22-46
Flags Specific to Maximum Security Environments - Ultra Secure Mode .........22-48
Ultra Secure Mode Flag ......................................................................................22-48
Guidelines ............................................................................................................22-48
ULTRA_SECURE_MODE System Flag Descriptions ....................................22-51
RMX Hardware Monitoring . . . . . . . . . . . . . . . . . . . . . . . . . . . . . . . . . . . . . . . .23-1
Viewing the Status of the Hardware Components ..........................................................23-1
HW Monitor Pane Tool bar .................................................................................23-2
Viewing the Properties of RealPresence Collaboration Server (RMX) 1500
Hardware Components .......................................................................................................23-3
Viewing the Properties of RealPresence Collaboration Server (RMX) 2000
Hardware Components .......................................................................................................23-9
Viewing the Properties of RealPresence Collaboration Server (RMX) 4000
Hardware Components .....................................................................................................23-15
Diagnostic Mode (RMX 1500/2000/4000) ......................................................................23-21
Performing Basic Mode Diagnostics ........................................................................23-22
xvi Polycom, Inc
Page 19

Table of Contents
Performing Advanced Mode Diagnostics .............................................................. 23-27
Diagnostics Monitoring .............................................................................................23-31
MCU Monitor ......................................................................................................23-31
Cards Monitor .....................................................................................................23-32
Error Buffer .......................................................................................................... 23-33
Temperature Thresholds ...........................................................................................23-34
RMX RTM-IP 1500/RTM-IP/RTM IP 4000 Card Properties .......................23-35
CNTL Card Properties .......................................................................................23-35
MPM+ Card Properties ......................................................................................23-37
MPMx Card Properties ......................................................................................23-38
Appendix A - Disconnection Causes . . . . . . . . . . . . . . . . . . . . . . . . . . . . . . . . A-1
IP Disconnection Causes ......................................................................................................A-1
ISDN Disconnection Causes ................................................................................................A-7
Appendix B - Alarms and Faults . . . . . . . . . . . . . . . . . . . . . . . . . . . . . . . . . . . B-1
Alarms ..............................................................................................................................B-1
Appendix C - CDR Fields - Unformatted File . . . . . . . . . . . . . . . . . . . . . . . . . C-1
The Conference Summary Record ...................................................................................... C-2
Event Records ........................................................................................................................ C-3
Standard Event Record Fields ..................................................................................... C-3
Event Types ....................................................................................................................C-4
Event Specific Fields ................................................................................................... C-10
Disconnection Cause Values .............................................................................................. C-39
MGC Manager Events that are not Supported by the MCU .........................................C-42
Appendix D - Ad Hoc Conferencing and External Database
Authentication . . . . . . . . . . . . . . . . . . . . . . . . . . . . . . . . . . . . . . . . . . . . . . . . . . D-1
Ad Hoc Conferencing without Authentication ................................................................D-1
Ad Hoc Conferencing with Authentication ......................................................................D-2
Entry Queue Level - Conference Initiation Validation with an External
Database Application ....................................................................................................D-3
Conference Access with External Database Authentication ...........................................D-4
Conference Access Validation - All Participants (Always) .....................................D-5
Conference Access Validation - Chairperson Only (Upon Request) .....................D-6
System Settings for Ad Hoc Conferencing and External Database Authentication ....D-7
Ad Hoc Settings .............................................................................................................D-7
Authentication Settings ................................................................................................D-8
MCU Configuration to Communicate with an External Database
Application .............................................................................................................D-9
Enabling External Database Validation for Starting New Ongoing
Conferences ..........................................................................................................D-10
Enabling External Database Validation for Conferences Access ..................D-10
Appendix E - Participant Properties Advanced Channel Information . . . . . E-1
Appendix F - Secure Communication Mode . . . . . . . . . . . . . . . . . . . . . . . . . . F-1
Certificate Configuration and Management ......................................................................F-1
Certificate Template Requirements .............................................................................F-1
Certificate Requirements for Polycom Devices ..........................................................F-2
Configure Certificate Management .............................................................................F-2
Switching to Secure Mode .....................................................................................................F-2
Polycom, Inc xvii
Page 20

Polycom RealPresence® Collaboration Server (RMX) 1500, 2000, 4000 Administrator’s Guide
Purchasing a Certificate ................................................................................................ F-2
Installing the Certificate ................................................................................................ F-4
Creating/Modifying System Flags .............................................................................. F-5
Enabling Secure Communication Mode ..................................................................... F-5
Alternate Management Network ......................................................................... F-6
Ultra Secure Mode ................................................................................................................. F-7
ULTRA_SECURE_MODE System Flag ...................................................................... F-7
Securing an External Database ............................................................................................ F-7
(PKI) Public Key Infrastructure ........................................................................................... F-8
Unique Certificates for all Networked Entities ......................................................... F-8
Offline Certificate Validation ....................................................................................... F-9
Peer Certificates ...................................................................................................... F-9
Self Validation of Certificates ............................................................................... F-9
Certificate Revocation List .................................................................................. F-10
Installing and Using Certificates on the MCU ......................................................... F-10
Default Management Network .................................................................................. F-10
Peer Certificate Validation .................................................................................. F-10
Default IP Network Service ........................................................................................ F-11
Managing Certificates in the Certification Repository ........................................... F-12
Adding Trusted Certificates and CRLs to the Certification Repository ...... F-13
Trusted Certificates ...................................................................................................... F-13
Adding Trusted Certificates ............................................................................... F-13
Personal Certificates (Management and Signaling Certificates) ........................... F-16
CRL (Certificate Revocation List) .............................................................................. F-16
Adding a CRL ....................................................................................................... F-17
Removing a CRL .................................................................................................. F-18
MS Active Directory Integration ....................................................................................... F-18
Directory and Database Options ............................................................................... F-19
Ultra Secure Mode ............................................................................................... F-19
Standard Security Mode ..................................................................................... F-19
Guidelines .....................................................................................................................F-19
Enabling Active Directory Integration ..................................................................... F-20
Restoring the RealPresence® Collaboration Server (RMX®) 1500/2000/4000
Using the USB Port .............................................................................................................. F-22
Appendix G - Configuring Direct Connections to RealPresence
Collaboration Server (RMX) . . . . . . . . . . . . . . . . . . . . . . . . . . . . . . . . . . . . . . . G-1
Management Network (Primary) ........................................................................................G-1
Alternate Management Network ........................................................................................G-1
Configuring the Workstation .......................................................................................G-2
Connecting to the Management Network ..................................................................G-4
Connecting to the Alternate Management Network ................................................G-6
Connecting to the MCU via Modem ...........................................................................G-7
Procedure 1: Install the RMX Manager ...............................................................G-7
Procedure 2: Configure the Modem ....................................................................G-7
Procedure 3: Create a Dial-up Connection .........................................................G-8
Procedure 4: Connect to the MCU .....................................................................G-12
Appendix H - Setting the MCU for Integration Into Microsoft
xviii Polycom, Inc
Page 21

Table of Contents
Environment . . . . . . . . . . . . . . . . . . . . . . . . . . . . . . . . . . . . . . . . . . . . . . . . . . . . H-1
Overview ................................................................................................................................H-1
Conferencing Entities Presence ...................................................................................H-2
Multiple Networks ........................................................................................................H-2
Guidelines .......................................................................................................................H-3
Interactive Connectivity Establishment (ICE) ...........................................................H-4
ICE Guidelines .......................................................................................................H-4
Connecting to the MCU in ICE Environment ...................................................H-4
Dialing Methods ....................................................................................................H-5
Integrating the MCU into the Microsoft Office Communications Server
Environment ...........................................................................................................................H-6
Setting the Matched URI Dialing Method .................................................................H-6
Configuring the Office Communications Server for MCU Systems ..............H-7
Setting the Trusted Host for MCU in the Office Communications Server ...H-7
Setting the Static Route for MCU in the OCS ....................................................H-9
Optional. Setting the Static Route & Trusted Host for MCU in the Load
Balancer Server ....................................................................................................H-10
Configuring the MCU System ...........................................................................H-11
Dialing to an Entry Queue, Meeting Room or Conference Using the
Matched URI Method .........................................................................................H-12
Setting the Numerical Dialing Method ....................................................................H-12
Setting the Numerical Dialing for MCU Meeting Rooms .............................H-12
Optional. Removing the MCU from the Host Authorization List ...............H-13
Configuring the MCU as a Routable Gateway ................................................H-14
Establishing a Voice Route to the MCU “Voice” Gateway ...........................H-15
Configuring Office Communicator Users for Enterprise Voice ...................H-18
Starting a Conferencing Call from the MOC ...................................................H-21
Setting Simultaneous Numerical Dialing and Matched URI Routing .................H-21
PFX Method - Creating the Security (TLS) Certificate in the OCS and
Exporting the Certificate to the MCU Workstation ................................................H-22
Retrieving the Certificate from the OCS to be sent to the MCU
Workstation ..........................................................................................................H-27
Optional. Creating the Certificate Password File (certPassword.txt) ..........H-29
Supporting Remote and Federated Users in Office Communications Server
ICE Environment .........................................................................................................H-30
Creating an Active Directory Account for the MCU ......................................H-30
Enabling the MCU User Account for Office Communication Server ..........H-32
Configure the MCU for ICE dialing ..................................................................H-33
MCU Integration into the Microsoft Lync Server 2010 and Lync Server 2013
Environments .......................................................................................................................H-34
Configuring the Polycom-Microsoft Solution .........................................................H-34
Call Admission Control (CAC) .................................................................................H-34
Guidelines .............................................................................................................H-34
FEC Support .................................................................................................................H-35
Media Over TCP ..........................................................................................................H-35
Network Error Recovery ............................................................................................H-35
SIP Dialog Recovery ....................................................................................................H-35
Configuring the RMX 1500/2000/4000 for Microsoft Integration ...............................H-36
Polycom, Inc xix
Page 22

Polycom RealPresence® Collaboration Server (RMX) 1500, 2000, 4000 Administrator’s Guide
Modify the MCU Management Network Service to Include the DNS Server ... H-36
Defining a SIP Network Service in the MCU and Installing the Security
Certificate ..................................................................................................................... H-37
The Security Certificate ...................................................................................... H-37
Configuring the MCU IP Network Service ..................................................... H-38
Polycom MCU System Flag Configuration ............................................................. H-46
Enabling the Microsoft Environment ............................................................... H-46
Setting the audio protocol for the Microsoft Client running on a single
core PC .................................................................................................................. H-47
Controlling Resource Allocations for Lync Clients Using the RTV Video
Protocol ................................................................................................................. H-48
HD Frame Rate Flag Settings using the RTV Video Protocol ...................... H-50
Adding Presence to Conferencing Entities in the Buddy List ...................................... H-51
Guidelines .................................................................................................................... H-51
Enabling the Registration of the Conferencing Entities ........................................ H-52
Creating an Active Directory Account for the Conferencing Entity ........... H-52
Enabling the Conferencing Entity User Account for Office
Communication Server or Lync Server ........................................................... H-54
Defining the Microsoft SIP Server in the IP Network Service ...................... H-55
Enabling Registration in the Conference Profile ............................................ H-55
Verifying the MCU Conferencing Entity Routing Name and Profile ......... H-57
Monitoring the Registration Status of a Conferencing Entity in the
RealPresence Collaboration Server (RMX) Web Client or RMX Manager
Application .................................................................................................................. H-57
Conferencing Entity List .................................................................................... H-57
Conferencing Entity Properties ......................................................................... H-59
MCU Configuration for CAC Implementation ...................................................... H-60
Enabling CAC Implementation ........................................................................ H-60
Conferencing Behavior ....................................................................................... H-60
Connecting an MCU Meeting Room to a Microsoft AV-MCU Conference ....... H-62
Configuring the MCU for Federated (ICE) Dialing ....................................................... H-63
Monitoring the Connection to the STUN and Relay Servers in the ICE
Environment ................................................................................................................ H-65
Monitoring the Participant Connection in ICE Environment .............................. H-65
Active Alarms and Troubleshooting ................................................................................ H-67
Active Alarms .............................................................................................................. H-67
ICE Active Alarms ...................................................................................................... H-69
Troubleshooting .......................................................................................................... H-70
Known Issues ............................................................................................................... H-71
Polycom Solution Support ......................................................................................... H-71
Appendix I - Polycom Open Collaboration Network (POCN) . . . . . . . . . . . . . I-1
Collaboration With Cisco’s Telepresence Interoperability Protocol (TIP) ..................... I-1
Deployment Architectures .................................................................................................... I-2
Single Company Model - Polycom and Cisco Infrastructure ................................... I-2
Call Flows ......................................................................................................................... I-5
Multipoint call with DMA ..................................................................................... I-5
Multipoint call without DMA ............................................................................... I-6
Company to Company Models Using a Service Provider ........................................ I-7
xx Polycom, Inc
Page 23

Table of Contents
Model 1 .............................................................................................................................I-8
Call Flow ...........................................................................................................................I-9
Multipoint call via Service Provider - Model 1 ...................................................I-9
Model 2 ...........................................................................................................................I-10
Call Flow .........................................................................................................................I-12
Multipoint call via Service Provider - Model 2 .................................................I-12
Administration .......................................................................................................................I-13
Gatekeepers ....................................................................................................................I-13
Standalone Polycom CMA System as a Gatekeeper ........................................I-13
Standalone Cisco IOS Gatekeeper .......................................................................I-13
Neighbored Cisco IOS and Polycom CMA Gatekeepers .................................I-13
DMA ................................................................................................................................I-13
CUCM .............................................................................................................................I-13
Configuring the Cisco and Polycom Equipment ..............................................................I-14
Cisco Equipment ............................................................................................................I-15
Polycom Equipment ......................................................................................................I-15
Procedure 1: Set the MIN_TIP_COMPATIBILITY_LINE_RATE System
Flag ..........................................................................................................................I-17
Procedure 2: Configuring MCU to statically route outbound SIP calls to
DMA or CUCM ......................................................................................................I-17
Procedure 3: Configuring the MCU’s H.323 Network Service to register
with CMA gatekeeper ...........................................................................................I-18
Procedure 4: Configuring a TIP Enabled Profile on the MCU ........................I-19
Procedure 5: Configuring an Ad Hoc Entry Queue on the MCU if DMA
is not used ...............................................................................................................I-23
Procedure 6: Configuring a Meeting Room on the MCU ................................I-24
Procedure 7: Configuring Participant Properties for dial out calls ................I-24
Collaboration with Microsoft and Cisco ............................................................................I-25
Deployment Architecture .....................................................................................................I-26
Call Flow .........................................................................................................................I-28
Multipoint Calls using DMA ...............................................................................I-28
Administration .......................................................................................................................I-28
DMA ................................................................................................................................I-29
Microsoft Lync Server ...................................................................................................I-29
CUCM .............................................................................................................................I-29
Configuring the Microsoft, Cisco and Polycom Components ........................................I-29
Encryption ..............................................................................................................I-35
Endpoints ................................................................................................................I-36
Content ....................................................................................................................I-37
Operations During Ongoing Conferences .........................................................................I-38
Monitoring ......................................................................................................................I-38
CTS Participants ....................................................................................................I-38
Lync Participants (RTV) .......................................................................................I-39
Known Limitations ........................................................................................................I-41
Appendix J - Restoring Defaults . . . . . . . . . . . . . . . . . . . . . . . . . . . . . . . . . . . J-1
USB Restore Defaults ..............................................................................................................J-1
Polycom, Inc xxi
Page 24

Polycom RealPresence® Collaboration Server (RMX) 1500, 2000, 4000 Administrator’s Guide
USB Ports on RealPresence Collaboration Server (RMX) 1500/RealPresence
Collaboration Server (RMX) 2000/RealPresence Collaboration Server
(RMX) 4000 ....................................................................................................................... J-1
Restore to Factory Security Defaults .................................................................................... J-2
Comprehensive Restore to Factory Defaults ...................................................................... J-3
Comprehensive Restore to Factory Defaults Procedure ........................................... J-3
Procedure A: Backup Configuration Files ........................................................... J-4
Procedure B: Restore to Factory Defaults ............................................................ J-4
Procedure C: Restore the System Configuration From the Backup ................ J-4
Appendix K - SIP RFC Support . . . . . . . . . . . . . . . . . . . . . . . . . . . . . . . . . . . . K-1
Appendix L - Homologation for Brazil . . . . . . . . . . . . . . . . . . . . . . . . . . . . . . L-1
H.323 & SIP Protocol Flag Options ..................................................................................... L-1
H.323 & SIP Flag Settings ............................................................................................. L-1
Flag name: SIP_TIMERS_SET_INDEX ............................................................... L-1
Flag name: H323_TIMERS_SET_INDEX ............................................................ L-2
Flag name: DISABLE_DUMMY_REGISTRATION .......................................... L-2
xxii Polycom, Inc
Page 25

Overview
About the RMX Administrator’s Guide
1
The product names, Polycom® RealPresence® Collaboration Server 1500, 2000, 4000
and RMX
The Polycom® Polycom® RealPresence® Collaboration Server 1500, 2000, 4000 provides
instructions for configuring, deploying, and administering Polycom Multipoint Control
Units (MCUs) for video conferencing. This guide will help you understand the Polycom
video conferencing components, and provides descriptions of all available conferencing
features. This guide will help you perform the following tasks:
• Customize the RMX conferencing entities such as conference Profiles, IVR Services,
• Define RMX Users.
• Further customize the RMX Network Settings for ISDN networks, IP networks for Ultra
• Advanced conference Management
• Define Video Protocols and Resolution Configuration for CP Conferencing
• Configure Templates, the Address Book and Schedule Reservations
• Record Conferences
• Configure the RMX to support special call flows and conferencing requirements, such
• Configure the RMX to support Polycom third party and partner environments such as
• Configure the RMX for special applications and needs by setting various system flags.
• Manage and troubleshoot the RMX’s performance.
®
1500, 2000, 4000 are used interchangeably throughout this document.
Meeting Rooms, Entry Queues, etc., to your organization’s needs.
Secure Mode, and IPv6 environments.
as Cascading Conferences and Gateway Calls.
Microsoft, IBM, Cisco, Avaya, Broadsoft and Siemens.
The RealPresence Collaboration Server (RMX) 1500/2000/4000 Getting Started Guide provides
description of basic conferencing operations. It will help you perform the following tasks:
• Unpack the RMX system and install it on a a rack.
• Connect the required cables to the RMX.
• Perform basic configuration procedures.
• Start a new conference and connect participants/endpoints to it.
• Monitor ongoing conferences
• Perform basic operations and monitoring tasks
Polycom, Inc. 1-1
Page 26

Polycom RealPresence Collaboration Server (RMX) 1500/2000/4000
The RealPresence Collaboration Server (RMX) 1500/2000/4000 Deployment Guide for Maximum
Security Environments provides a deployment methodology for system administrators
implementing Maximum Security Environments.
Who Should Read This Guide?
System administrators and network engineers should read this guide to learn how to
properly set up Polycom RMX systems. This guide describes administration-level tasks.
For detailed description of first time installation and configuration, description of the RMX
Web Client, and basic operation of your RMX system, see the RealPresence Collaboration
Server (RMX) 1500/2000/4000 Getting Started Guide.
Prerequisites
This guide assumes the user has the following knowledge:
• Familiarity with Windows® XP or Vista® operating systems and interface.
• Familiarity with Microsoft® Internet Explorer® Version 7 or higher.
• Basic knowledge of video conferencing concepts and terminology.
How This Guide is Organized
The following typographic conventions are used in this guide to distinguish types of in-text
information.
Table 1-1 Typographic Conventions
Convention Description
Bold Highlights interface items such as menus, soft keys, flag names, and
directories. Also used to represent menu selections and text entry to the
phone.
Italics Used to emphasize text, to show example values or inputs, file names and to
show titles of reference documents available from the Polycom Support Web
site and other reference sites.
Underlined Blue
Blue Text Used for cross referenced page numbers in the same or other chapters or
<variable name> Indicates a variable for which you must enter information specific to your
Used for URL links to external Web pages or documents. If you click on text in
this style, you will be linked to an external document or Web page.
documents. If you click on blue text, you will be taken to the referenced
section.
Also used for cross references. If you click the italic cross reference text, you
will be taken to the referenced section.
installation, endpoint, or network. For example, when you see <IP address>,
enter the IP address of the described device.
> Indicates that you need to select an item from a menu. For example,
Administration > System Information indicates that you need to select
System Information from the Administration menu.
1-2 Polycom, Inc.
Page 27
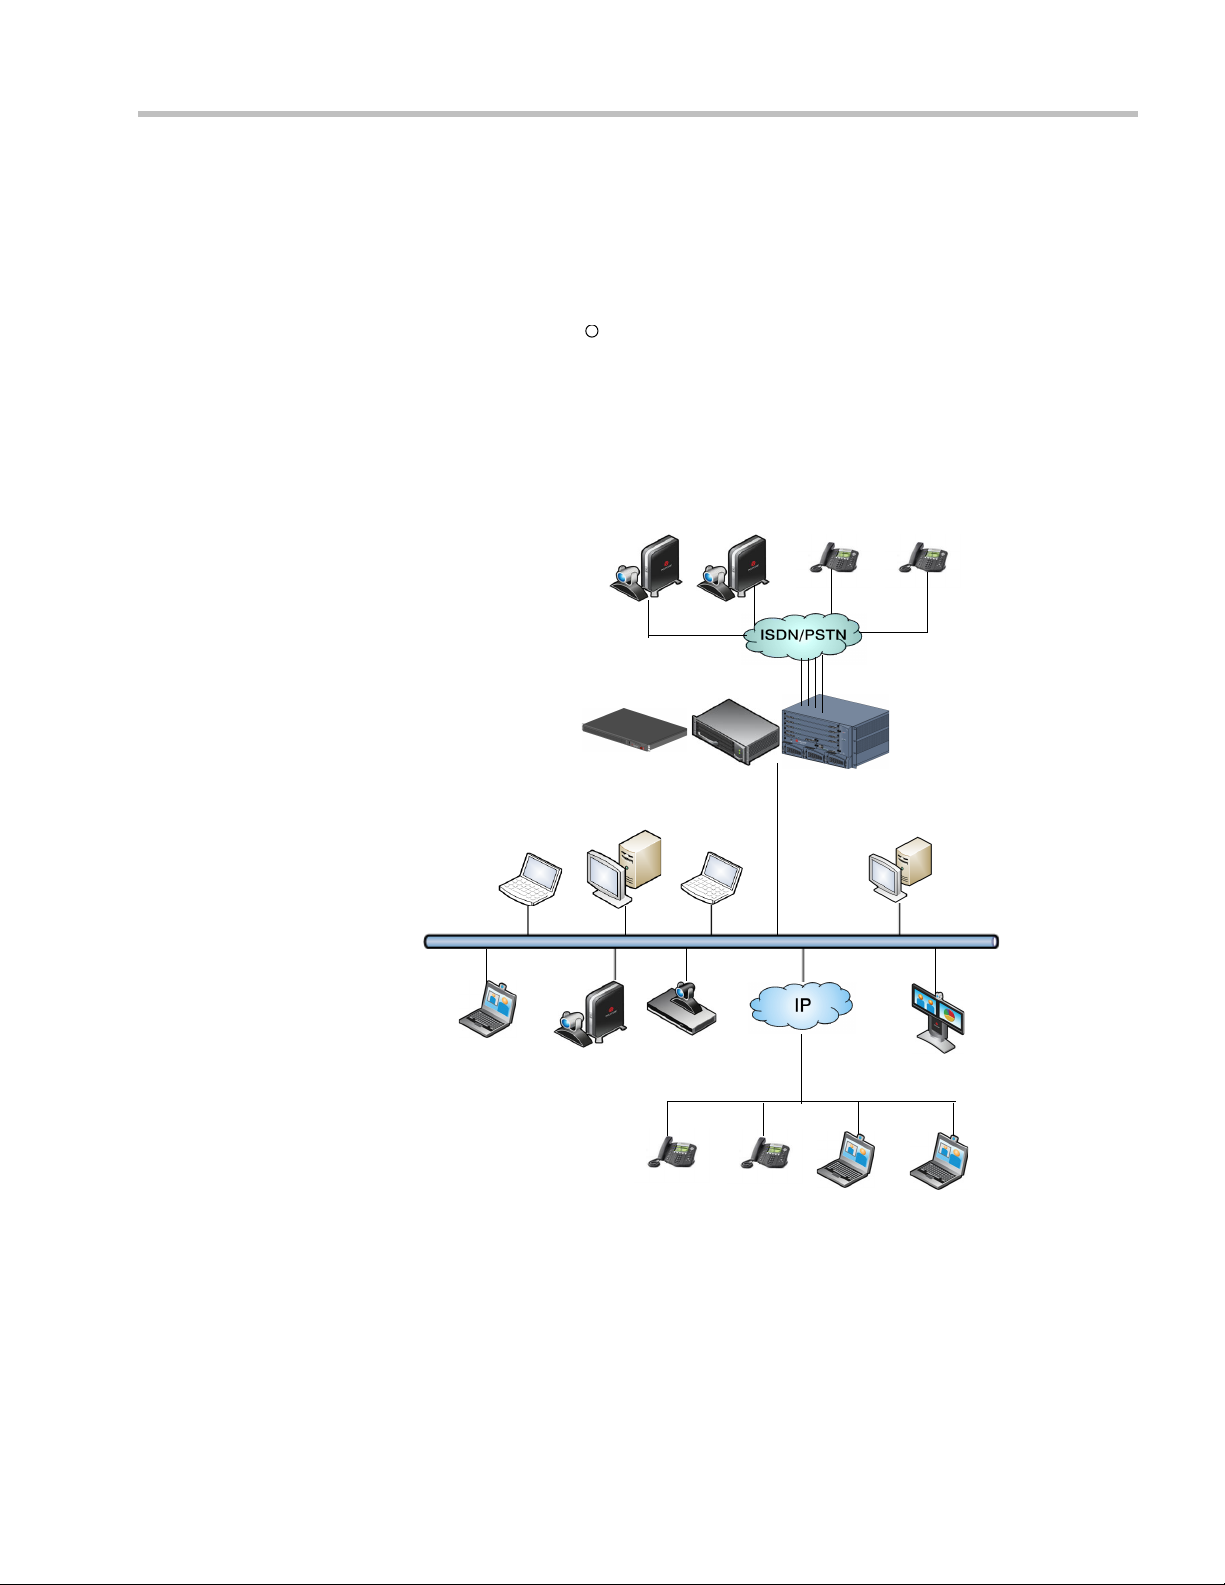
About the Polycom RMX System
R
PSTN Phones
RealPresence Collaboration
Server (RMX) Web Client
PCIP Phone
Endpoints
E1/T1 PRI Lines
RealPresence Collaboration
Server (RMX) 1500/2000/4000
ISDN Endpoints
LAN
The Polycom RMX 1500/2000/4000 Multipoint Control Unit (MCU) is a high performance,
scalable, IP-network (H.323 and SIP) and ISDN/PSTN solution that provides the user with
feature-rich and easy-to-use multipoint voice and video conferencing.
The RMX 1500/2000/4000 unit can be controlled via the LAN, the RMX Web Client
application, Internet Explorer installed on the user’s workstation, or the RMX Manager
application. The RMX Manager can control several RMX units (RealPresence Collaboration
Server (RMX) 1500, RealPresence Collaboration Server (RMX) 2000 and RealPresence
Collaboration Server (RMX) 4000). For more information about the RMX Manager, see
"RMX Manager Application” on page 20-1.
Chapter 1-Overview
Figure 1-1 Multipoint Video Conferencing using a RMX 1500/2000/4000
Polycom, Inc.
1-3
Page 28

Polycom RealPresence Collaboration Server (RMX) 1500/2000/4000
IP and ISDN Network Guidelines
IP Networks
In the RealPresence Collaboration Server (RMX) 1500 and RealPresence Collaboration
Server (RMX) 2000, system management and IP conferencing are performed via a single
LAN port. The networks can be separated in Maximum Security Environments.
In the RealPresence Collaboration Server (RMX) 4000, system management and IP
conferencing are performed via two different LAN ports. The networks can be separated in
Maximum Security Environments.
ISDN Networks
RealPresence Collaboration Server (RMX) 1500 supports one ISDN card with up to 4 E1/T1
PRI lines.
RealPresence Collaboration Server (RMX) 2000 and RealPresence Collaboration Server
(RMX) 4000 support a maximum of two RTM ISDN cards, each providing connection for up
to either 7 E1 or 9 T1 PRI lines.
On the RMX 1500/2000/4000, E1 and T1 connections cannot be used simultaneously.
For more detailed information about RMX abilities, see the RealPresence Collaboration
Server (RMX) Hardware Guides, Hardware Description, Chapter 1.
Card Configuration Modes
The media card installed in the system determines the Card Configuration Mode. The Card
Configuration Mode represents different generations of the media card. Each new generation
provides additional functionality, higher video resolutions and higher resource capacity.
Only one Media Card type can be installed in any RMX, which sets the Card Configuration
Mode for that RMX:
• MPM Card Configuration Mode – Supported with MPM cards in all RealPresence
Collaboration Server (RMX) 2000 versions prior to Version 7.1.
From Version 7.1, MPM media cards are not supported.
• MPM+ Card Configuration Mode – Supported from Version 4.0, with MPM+ cards
installed in the RealPresence Collaboration Server (RMX) 2000 and RealPresence
Collaboration Server (RMX) 4000.
• MPMx Card Configuration Mode – Supported from Version 7.0, with MPMx cards
installed in the RealPresence Collaboration Server (RMX) 1500, RealPresence
Collaboration Server (RMX) 2000 and RealPresence Collaboration Server (RMX) 4000.
Viewing the Card Configuration Mode
The Card Configuration Mode is determined according to the installed media card.
The Licensing Mode and the Card Configuration Mode for your MCU can be viewed in the
System Information dialog box (go to Administration > System Information).
1-4 Polycom, Inc.
Page 29
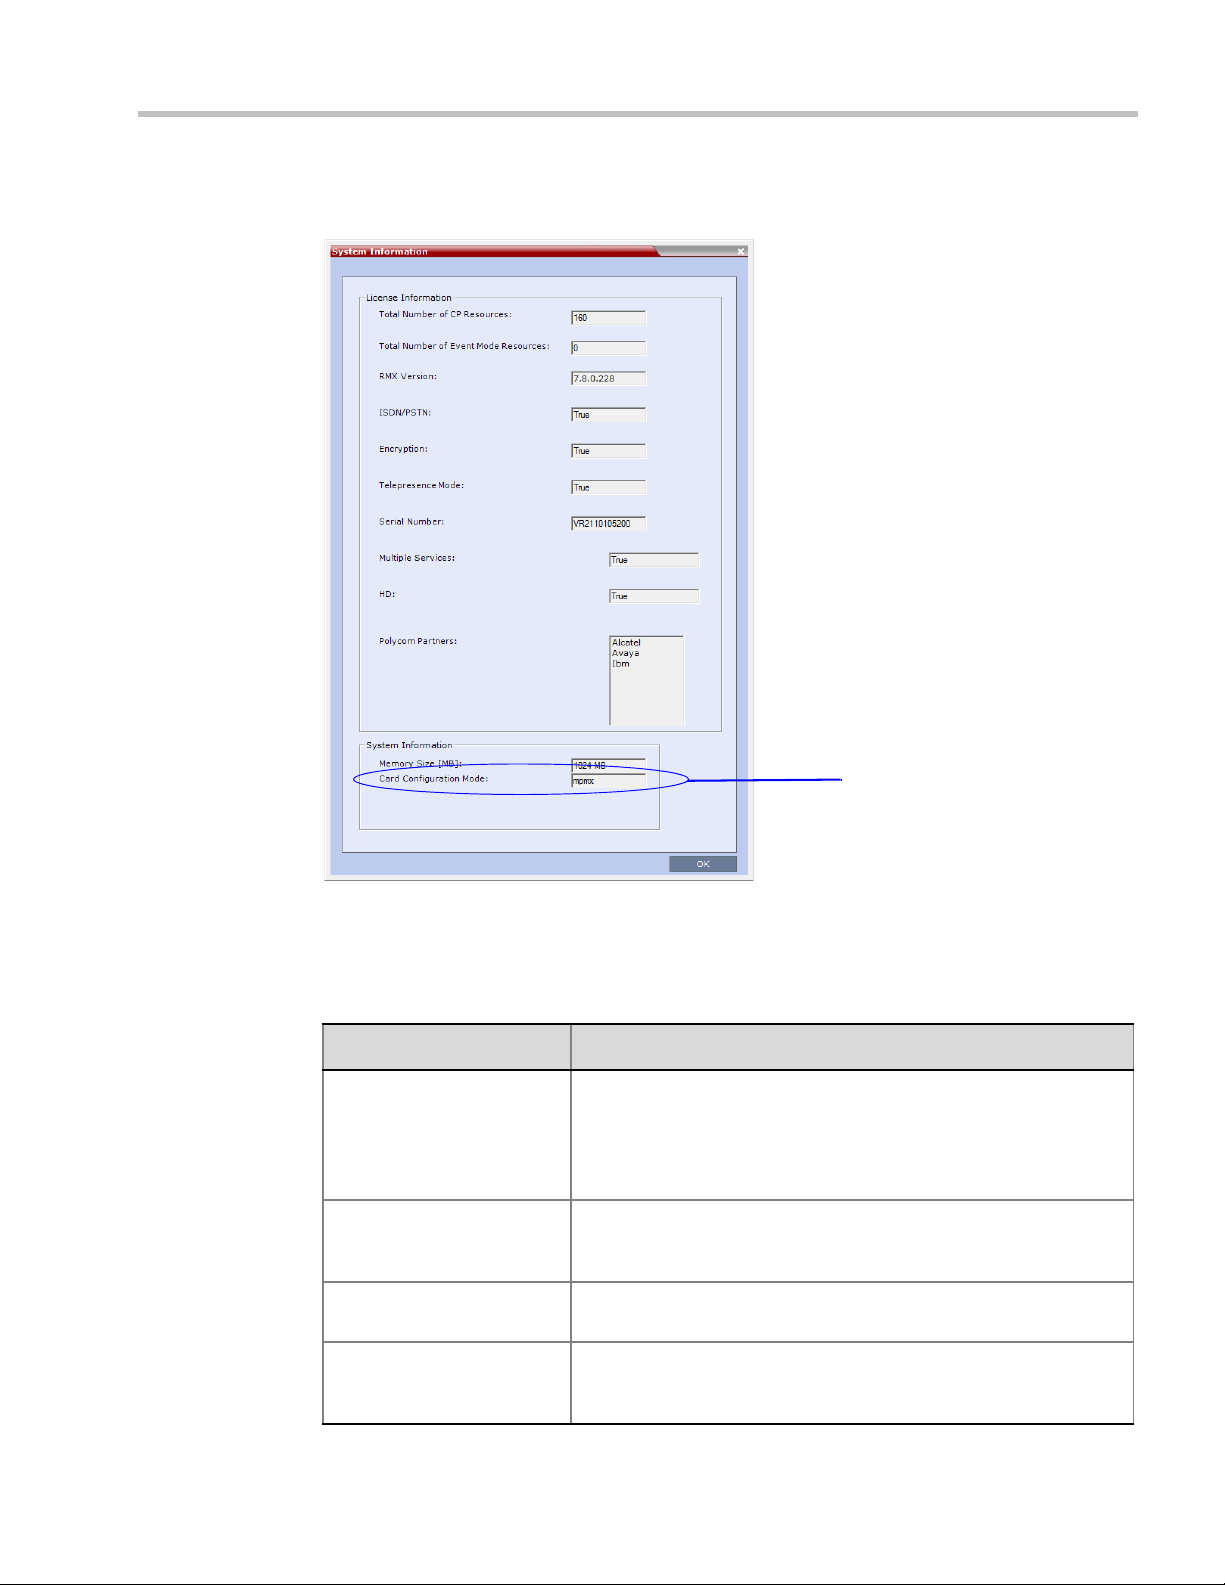
Chapter 1-Overview
Card Configuration Mode
In the example shown here, the RealPresence Collaboration Server Licensing Mode is CP
Licensing, and the Card Configuration Mode is MPMx.
Polycom, Inc.
Feature Support with MPMx Cards Only
Table 1-2 lists the RMX (RMX) features that are only supported with MPMx cards. .
Table 1-2 Features Supported with MPMx Card Configuration Mode Only
Feature Name Description
Scalable Video Coding
(SVC)
H.264 High Profile Support The H.264 High Profile improves video quality and can reduce
Support of Symmetric HD
Resolutions
w448 Resolution support Improves interoperability with Tandberg MXP 990/3000 endpoints
Scalable Video Coding (SVC) Conferencing, based on the SVC
video protocol and SAC audio protocol.
SVC Conferencing offers high resolution video conferencing with
low end-to-end latency, improved Error Resiliency and higher
system capacities.
bandwidth requirements for video conferencing transmissions by up
to 50%. Supported in IP and ISDN calls.
Support of symmetric HD video resolutions HD 1080p30 and HD
720p60.
providing these endpoints the resolution of W448p (768x448 pixels)
at 25fps.
1-5
Page 30

Polycom RealPresence Collaboration Server (RMX) 1500/2000/4000
Table 1-2 Features Supported with MPMx Card Configuration Mode Only
Feature Name Description
Content at HD1080p
Content is supported at HD1080p resolution at 30 fps and 60 fps.
Resolution
HD H.264 Content and
H.264 Content for
Enables conference participants to receive higher quality Content in
both standard conferences and cascaded conferences.
Cascading links
Site Names Additional controls over the display of site names in the conference
Profile.
Interactive Video Forcing Participants in ongoing conferences can be interactively forced to a
Video Window in the conference layout by using Drag and Drop.
Video Preview H.264 High Profile is supported with Video Preview.
Recording indication A Recording Indication can be displayed to all conference
participants informing them that the conference is being recorded.
Network Quality Indication A Network Quality Indicator is displayed for each participant in the
CP layout indicating the quality of the participants’ video channels.
Auto scan and Customized
Polling
A single cell in the conference layout is used to cycle the display of
participants that are not in the conference layout. The order of the
cyclic display can be predefined.
SirenLPR Prevents audio degradation and maintains high audio (CD) quality if
packet loss occurs.
Speaker Change Threshold The option to configure the amount of time a participant must speak
continuously until becoming the speaker.
Integration with Cisco
Telepresence Systems
(CTS)
POCN - Collaboration with
Microsoft and Cisco in the
same environment
Additional Chinese Font
Types
The MCU natively inter-operate with Cisco TelePresence Systems
and Polycom TelePresence and vide conferencing endpoints,
ensuring optimum quality multi-screen, multipoint calls.
The POCN solution, enables Polycom, Microsoft and Cisco users,
each within their own environment, to participate in the same
conference running on an RMX.
Additional Chinese fonts may be selected for several features when
using the RMX in Chinese.
Support of Microsoft Protocols, algorithms and workflows
RTV Video Protocol Microsoft RTV Video protocol is supported.
RTV B-Frame Support The MCU supports Microsoft RTV B-Frame encoder of real-time
video enhancing the viewing experience for Microsoft Lync clients. It
delivers a better quality video picture by splitting a video frame into
pixel segments or slices and predicting the pixel segments in the
next video frame.
Conferencing Entities
Presence in Microsoft Office
Communications Server
Client or Lync Server Client
Registration & Presence enables the OCS or LYNC client users to
see the availability status (Available, Busy or Offline) of Meeting
Rooms, Entry Queues and SIP Factories and connect to them
directly from the buddy list.
1-6 Polycom, Inc.
Page 31

Table 1-2 Features Supported with MPMx Card Configuration Mode Only
Feature Name Description
Chapter 1-Overview
Cascading between RMX
Meeting room / Microsoft
Microsoft Lync users can connect an RMX Meeting Room to a
conference running on the Microsoft A/V MCU.
A/V MCU
FEC Support Support of Microsoft RTV FEC (Forward Error Correction) that
controls and correct packet loss when receiving and sending video
streams using the Microsoft Lync Server 2010.
ICE Over TCP Enables the automatic usage of the ICE connection through the
TCP port instead of UDP when the UDP port in the firewall is
blocked.
Media Over TCP Media is automatically transmitted using TCP when UDP, the default
transport protocol, is not available.
Error Recovery The RMX can automatically recover from short duration network
errors (5 seconds), enabling calls in Microsoft Lync to continue
video or audio conferences without disconnecting.
Polycom, Inc.
1-7
Page 32

Polycom RealPresence Collaboration Server (RMX) 1500/2000/4000
Workstation Requirements
The RMX Web Client and RMX Manager applications can be installed in an environment that
meets the following requirements:
• Minimum Hardware – Intel® Pentium® III, 1 GHz or higher,
1024 MB RAM, 500 MB free disk space.
• Workstation Operating System – Microsoft® Windows® XP, Vista®, Windows® 7.
• Network Card – 10/100 Mbps.
• Web Browser - Microsoft® Internet Explorer® Version 7 or higher.
• RMX Web client and RMX Manager are optimized for display at a resolution of
1280 x 800 pixels and a magnification of 100%.
.Net Framework 2.0 SP1 or above is required and installed automatically.
Internet Explorer must be enabled to allow running Signed ActiveX.
If ActiveX installation is blocked please see the Polycom® RealPresence® Collaboration Server
1500, 2000, 4000 , "ActiveX Bypass” on page 21-69.
RMX Web Client does not support larger Windows text or font sizes. It is recommended to set the
text size to 100% (default) or Normal in the Display settings in Windows Control Panel on all
workstations. Otherwise, some dialog boxes might not appear properly aligned. To change the text
size, select Control Panel>Display. For Windows XP, click the Appearance tab, select Normal for
the Font size and click OK. For Windows 7, click the Smaller - 100% option and click OK.
When installing the RMX Web Client, Windows Explorer >Internet Options> Security Settings must
be set to Medium or less.
It is not recommended to run RMX Web Client and Polycom CMAD applications simultaneously on
the same workstation.
For Windows 7™ Security Settings, see the RealPresence Collaboration Server (RMX) 1500/
2000/4000 Getting Started Guide, "Windows 7™ Security Settings” on page 1-13.
For Internet Explorer 8 configuration, see the RealPresence Collaboration Server (RMX) 1500/
2000/4000 Getting Started Guide, "Internet Explorer 8 Configuration” on page 1-14.
1-8 Polycom, Inc.
Page 33

Conference Profiles
Profiles stored on the MCU enable you to define all types of conferences. Profiles include
conference parameters such as Conferencing Mode, Conference Session Type, Conference
Line Rate, People and Content resolution and settings, Video Layout, Encryption, Lost
Packet Recovery etc.
The maximum number of Conference Profiles that can be defined is:
• RealPresence Collaboration Server (RMX) 1500 - 40
• RealPresence Collaboration Server (RMX) 2000 - 40
• RealPresence Collaboration Server (RMX) 4000 - 80
Conference Profiles are assigned to Conferences, Meeting Rooms, Reservations and Entry
Queues. The same Profile can be assigned to different conferencing entities. When modifying
the Profile parameters, the changes will be applied to all the conferencing entities to which
the profile is assigned.
Conference Profile options differ according to the selected Conferencing Mode and Conference
Type. Profiles can be defined for AVC (Advanced Video Codec) conferencing Mode or SVC
(Scalable Video Codec) conferencing Mode. AVC Conferencing Mode, offers two Video
session types: Continuous Presence (CP) conferences and Video Switching (VSW)
Conferences. and a special functional conference - Operator Conferences.
Conference Profiles can be saved to Conference Templates along with all participant parameters,
including their Personal Layout and Video Forcing settings, enabling administrators and
operators to create, save, schedule and activate identical conferences. For more information
see Chapter 11, “Conference Templates” .
2
Conferencing Modes
The MCU system offers two Conferencing Modes:
• Transcoding - AVC Conferencing
• Media Relay - SVC Conferencing
Transcoding - AVC Conferencing
In this mode, video is received from all the endpoints using different line rates, different
protocols (SIP, H.323, PSTN and ISDN) and video parameters:
• Video protocols: H.261, H.263, H.264 Base and High profile and RTV
• Video Resolutions: from QCIF, CIF and up to 1080p
• Frame rates up to 60 fps
The MCU process the received video, transcodes it and send the resulting video streams to
the endpoints. The video processing that is required differs according to the video session
set for the conference, with all the processing performed by the MCU. For more details, see
"AVC Conferencing - Video Session Types” on page 2-2.
Polycom, Inc. 2-1
Page 34

Polycom RealPresence Collaboration Server (RMX) 1500/2000/4000 Administrator’s Guide
Media Relay - SVC Conferencing
SVC Conferencing is based on the SVC video protocol and SAC audio protocol.
SVC Conferencing offers high resolution video conferencing with low end-to-end latency
and improved Error Resiliency without video transcoding by the MCU, hence using less
video resources.
The Polycom multipoint media server, acts as an integrated media relay engine that
provides media streams for displaying conferences at low latency video experience in video
conferences. For more details, see "SVC-based Conferencing” on page 2-12.
AVC Conferencing - Video Session Types
All endpoints have AVC capabilities and can connect to AVC conferences running on the
MCU. AVC-based Endpoints can connect can connect using different signaling protocols
and different video protocols.
Based on the video processing required during the conference, the RMX offers two Video
Session Types for AVC-based conferencing:
• Continuous Presence
• Video Switching
The video session type determines the video display options (full screen or split screen with
all participants viewed simultaneously) and the method in which the video is processed by
the MCU (with or without using the MCU’s video resources).
Continuous Presence (CP) Conferencing
The dynamic Continuous Presence (CP) capability of the RMX system enables viewing
flexibility by offering multiple viewing options and window layouts for video conferencing.
Endpoints can connect to the conference using any signaling protocol (H.323, SIP, ISDN/
PSTN and RTV), line rate (up to a maximum line rate defined for the conference), Video
Protocol (H.261, H.263, H.264 Base and High Profile) and at any resolution and frame rate
(provided they meet the minimum requirements set for the conference).
In Continuous Presence conferences, the MCU receives the video stream from each
endpoint at the video rate, video resolution and frame rate that it is capable of sending, and
it superimposes all the received streams into one video stream that includes the input from
the other endpoints arranges in the selected video layout.
Participants do not see themselves in the video layout. By Default, the speaker is shown in
the top left layout cell in symmetric layouts, in the larger cell in asymmetric layouts, or in
full screen. The speaker sees the previous speakers (their number depends on the number of
cells on the speaker’s layout.
The Continuous Presence video session offers layouts to accommodate different numbers of
participants and conference settings including support of the VUI annex to the H.264
protocol for endpoints that transmit wide video instead of 4CIF resolution. Each participant
can select his/her layout for viewing during the conference, as can be seen in Figure 2-1.
2-2 Polycom, Inc.
Page 35

Chapter 2-Conference Profiles
For conferences with more participants than display squares, the RMX dynamic video mix
capability allows the viewed sites to be modified throughout the conference. The displayed
layout can be changed during an ongoing conference, allowing a participant to view
different screen layouts of the other conference participants. These layout options allow
conferences to have greater flexibility when displaying a large number of participants and
maximizes the screen’s effectiveness.
Figure 2-1 AVC Continuous Presence (CP) video streams and built layouts
Video quality in Continuous Presence conferences is affected by the conference line rate
(that determines the maximum line rate to be used by the connecting endpoints), and the
video capabilities of the endpoints such as the video protocol, video resolution and frame
rate. Content sharing is available in all CP conferences.
This requires extensive processing of the video sent to each participant in the conference.
The higher the video rate and resolution, the more processing power is required.
By default every conference, Entry Queue and Meeting Room has the ability to declare the
maximum CP resolution as defined for the system. This includes conferences launched by
the RMX Web Client and conferences started via the API.
CP conferencing is defined in the Conference profile by settings the following main features:
• Setting the Conferencing Mode to AVC only
• Conference Line Rate
• Video Quality – Motion or Sharpness
•Video Layout
Polycom, Inc. 2-3
Page 36

Polycom RealPresence Collaboration Server (RMX) 1500/2000/4000 Administrator’s Guide
Video Protocol Support in CP Conferences
The video protocol selected by the system determines the video compression standard used
by the endpoints. In Continuous Presence conferences, the system selects the best video
protocol for each of the endpoint according to he endpoint’s capabilities.
The following Video protocols are supported in CP conferences:
• H.261 - the legacy video compression algorithm mandatory to all endpoints. It is used
by endpoints that do not support other protocols.
• H.263 - a video compression algorithm that provides a better video quality than H.261.
This standard is not supported by all endpoints.
• H.264 Base Profile - a video compression standard that offers improved video quality,
especially at line rates lower than 384 Kbps.
H.264 High Profile allows higher quality video to be transmitted at lower line rates.
• RTV - a video protocol that provides high quality video conferencing capability to
Microsoft OCS (Office Communicator Server) endpoints at resolutions up to HD720p30.
(SIP only).
Video Switching (VSW) Conferencing
In Video Switching mode all participants see the same video picture (full screen). The current
speaker is displayed in full screen on all the participants' endpoints, while the speaker sees
the previous speaker. Switching between participants is voice-activated; whenever a
participant starts to speak, he or she becomes the conference speaker and is viewed on all
screens. All conference participants must use the same line rate and video parameters such
as video protocol, frame rate, annexes and interlaced video mode as no video processing is
performed. Endpoints that are unable to meet these requirements connect as Secondary
(audio only).
Figure 2-2 AVC Video Switching (VSW) video streams and Full Screen Layout
2-4 Polycom, Inc.
Page 37

Chapter 2-Conference Profiles
Guidelines
• Only H.264 Base and High Profile video protocols are supported in Video Switching
Conferences.
• Video Switching conferences can be set to one of the following resolutions, depending
on the capabilities of the endpoints connecting to the conference:
— H.264 1080p60 (Symmetrically, at bit rates of up to 6Mbps).
— HD1080p60
— H.264 1080p30
— H.264 720p30
— H.264 720p60
— H.264 SD 30
— H.264 CIF (from version 7.6)
— H.263 CIF (from version 7.6)
— H.261 CIF (from version 7.6)
• Video Switching conferencing mode is unavailable to ISDN participants.
• Video Switching uses fewer system resources than CP: only one CIF video resource per
participant for any resolution (including HD). Table 2-1 lists the resources available to
VSW conferences by line rate and card type.
Table 2-1 VSW Resource Capacity Line Rate
Maximum Possible Resources Per Card*
Resource Type
MPM MPM+ MPMx
VSW 2Mbps 40 80 80*
VSW 4Mbps 40 40 40*
VSW 6Mbps -2020*
Capacity numbers are for maximum capacity card assemblies. These numbers may be lower
*
when LPR and/or encryption are enabled.
Table 2-2 lists the recommended number of connections at HD1080p resolution for fully
configured and licenced RealPresence Collaboration Server (RMX) systems with MPMx
cards. For detailed resource capacity information see the relevant RMX Hardware
Guide.
Table 2-2 Maximum Number of HD1080p Connections by Line Rate
Line Rate/Participants RMX 1500 RMX 2000 RMX 4000
Up to 2Mbps 80 160 320
4Mbps 40 80 160
6Mbps (MPM+/MPMx)
20 40 80
• The maximum supported video conference size is 160 participants with the MPM+ card
and 180 participants with the MPMx card.
• The display aspect ratio is 4x3 or 16x9.
Polycom, Inc. 2-5
Page 38

Polycom RealPresence Collaboration Server (RMX) 1500/2000/4000 Administrator’s Guide
• Site (endpoint) names, skins, message overlay etc. are not supported in Video
Switching.
• Video forcing is enabled at the conference and participant levels.
• To connect to a Video Switching conference via Entry Queue, the Profile assigned to the
Entry Queue must be set to Video Switching. It is recommended to use the same profile
for both the destination conference and Entry Queue.
•The HD_THRESHOLD_BITRATE flag must be set in the System Configuration. The value
of this flag is the system minimum threshold bit rate for HD resolutions. The line rate
selected in the conference Profile must be the same as or higher than that specified by
the HD_THRESHOLD_BITRATE flag.
The HD_THRESHOLD_BIT RATE flag is responsible for negotiation only, It does not guarantee that
the endpoint will open an HD channel or transmit on an opened HD channel.
The HD_THRESHOLD_BITRATE flag line rate value ranges from 384kbps to 4Mbs,
default is 768kbps. For more information, see "Modifying System Flags” on page 22-1.
Line Rates for CP and VSW
Table 2-3 lists the video session modes available at all supported line rates in MPM, MPM+
and MPMx card configuration modes.
Table 2-3 Video Session Mode by Line Rate and Card type
Line Rate (kbps) MPM MPM+ MPMx
64
96
128
192
256
320
384
512
768
832
1024
115 2
1280
1472
1536
1728
1920
2048
CP / Video
Switching
CP / Video
Switching
CP / Video
Switching
2-6 Polycom, Inc.
Page 39

Table 2-3 Video Session Mode by Line Rate and Card type (Continued)
Line Rate (kbps) MPM MPM+ MPMx
2560
3072
Video Switching
3584
4096
6144 Not Supported Video Switching
AVC Conferencing Parameters
Basic Conferencing Parameters
When defining a new video Profile, you select the parameters that determine the video
display on the participant’s endpoint and the quality of the video. When defining a new
conference Profile, the system uses default values for Continuous Presence (CP) standard
conferencing. Continuous Presence conferencing enables several participants to be viewed
simultaneously and each connected endpoint uses its highest video, audio and data
capabilities up to the maximum line rate set for the conference.
The main parameters that define the quality of a video conference are:
• Line (Bit) Rate - The transfer rate of video and audio streams. The higher the line (bit)
rate, the better the video quality.
• Audio Algorithm - The audio compression algorithm determines the quality of the
conference audio.
• Video protocol, video format, frame rate, annexes, and interlaced video mode - These
parameters define the quality of the video images. The RMX will send video at the best
possible resolution supported by endpoints regardless of the resolution received from
the endpoints.
— When Sharpness is selected as the Video Quality setting in the Conference Profile, the
RMX will send 4CIF (H.263) at 15fps instead of CIF (H.264) at 30fps.
— H.264 High Profile protocol provides better compression of video images in line
rates lower than 384 Kbps and it will be automatically selected for the endpoint if it
supports H.264 High Profile. If the endpoint does not support H.264 High Profile,
the RMX will try H.264 Base Profile which provides good compression of video
images in line rates lower than 384 Kbps (better than H.263 and not as good as
H.264 High Profile).
— When working with RMXs at low bit rates (128, 256, or 384Kbps), HDX endpoints
will transmit SD15 resolution instead of 2CIF resolution.
When using a full screen (1x1) conference layout, the RMX transmits the same
resolution it receives from the endpoint.
• Lost Packet Recovery (LPR) - LPR creates additional packets that contain recovery
information used to reconstruct packets that are lost during transmission.
Chapter 2-Conference Profiles
Polycom, Inc. 2-7
Page 40

Polycom RealPresence Collaboration Server (RMX) 1500/2000/4000 Administrator’s Guide
• Video Clarity - Video Clarity feature applies video enhancing algorithms to incoming
video streams of resolutions up to and including SD.
• Supported resolutions:
— H.261 CIF/QCIF – Is supported in Continuous Presence (CP) conferences at
resolutions of 288 x 352 pixels (CIF) and 144 x 176 pixels (QCIF). Both resolutions
are supported at frame rates of up to 30 frames per second.
— H.263 4CIF - A high video resolution available to H.263 endpoints that do not
support H.264. It is only supported for conferences in which the video quality is set
to sharpness and for lines rates of 384kbps to 1920kbps.
— Standard Definition (SD) - A high quality video protocol which uses the H.264
and H.264 High Profile video algorithms. It enables compliant endpoints to
connect to Continuous Presence conferences at resolutions of 720X576 pixels for
PAL systems and 720X480 pixels for NTSC systems. For more information, see
"Video Resolutions in AVC-based CP Conferencing” on page 3-1.
— High Definition (HD) – HD is an ultra-high quality video resolution that uses he
H.264 and H.264 High Profile video algorithms. Depending on the RMX’s Card
Configuration mode compliant endpoints are able to connect to conferences at the
following resolutions:
• 720p (1280 x 720 pixels) in MPM, MPM+ and MPMx Card Configuration
Modes
• 1080p (1920 x 1080 pixels) in MPM+ and MPMx Card Configuration Modes
For more information, see "Video Resolutions in AVC-based CP Conferencing” on
page 3-1.
From Version 7.1, MPM media cards are not supported.
Supplemental Conferencing Features
In addition to Standard Conferencing the following features can be enabled:
• H.239 – Allows compliant endpoints to transmit and receive two simultaneous streams
of conference data to enable Content sharing. H.239 is also supported in cascading
conferences. Both H.263 and H.264 Content sharing protocols are supported. If all
endpoints connected to the conference have H.264 capability, Content is shared using
H.264, otherwise Content is shared using H.263.
For more information, see "H.239” on page 4-2.
• Lecture Mode – The lecturer is seen by all participants in full screen while the lecturer
views all conference participants in the selected video layout.
For more information, see "Lecture Mode (AVC Only)” on page 4-73.
• Presentation Mode (CP Conferences only) – When the current speaker’s speech
exceeds a predefined time (30 seconds), the conference layout automatically changes to
full screen, displaying the current speaker as the conference lecturer on all the
participants’ endpoints. During this time the speaker’s endpoint displays the previous
conference layout. When another participant starts talking, the Presentation Mode is
cancelled and the conference returns to its predefined video layout. Presentation mode
is available with Auto Layout and Same Layout.
— If the speaker in a video conference is an Audio Only participant, the Presentation
Mode is disabled for that participant.
2-8 Polycom, Inc.
Page 41

Chapter 2-Conference Profiles
— Video forcing works in the same way as in Lecture Mode when Presentation Mode
is activated, that is, forcing is only enabled at the conference level, and it only
applies to the video layout viewed by the lecturer.
• Telepresence Mode (CP Conferences only) - enables the connection of numerous high
definition telepresence rooms and of different models (such as TPX and RPX) into one
conference maintaining the telepresence experience. This mode is enabled by a special
license.
• Encryption – Used to enhance media security at conference and participant levels. For
more information, see "Audio Algorithm Support” on page 4-35.
• Conference Recording - The RMX enables audio and video recording of conferences
using Polycom RSS 2000 recording system.
• Packet Loss Concealment (PLC) - for Siren audio algorithms improves received audio
when packet loss occurs in the network. PLC is enabled by the SET_AUDIO_PLC
System Flag in system.cfg
— PLC for Audio is supported with MPM+ and MPMx cards only.
— The speaker’s endpoint must use a Siren algorithm for audio compression.
— The following audio algorithms are supported:
• Siren 7 (mono)
• Siren 14 (mono/stereo)
• Siren 22 (mono/stereo)
• Auto Brightness - detects and automatically adjusts the brightness of video windows
that are dimmer than other video windows in the conference layout.
— Auto Brightness is supported with MPM+ and MPMx cards only.
— Auto Brightness only increases brightness and does not darken video windows.
• Audio Clarity - improves received audio from participants connected via low audio
bandwidth connections, by stretching the fidelity of the narrowband telephone
connection to improve call clarity.
— Audio Clarity is supported with MPM+ and MPMx cards only.
— Audio Clarity is applied to the following low bandwidth (4kHz) audio algorithms:
• G.729a
• G.711
TIP Support
TIP is a proprietary protocol created by Cisco for deployment in Cisco TelePresence systems
(CTS). Polycom’s solution is to allow the RMX to natively inter-operate with Cisco
TelePresence Systems, ensuring optimum quality multi-screen, multipoint calls. For more
information, see "Collaboration With Cisco’s Telepresence Interoperability Protocol (TIP)” on
page I-1.
Operator Conferences (CP only Conferences)
Offers additional conference management capabilities to the RMX users, enabling them to
attend to participants with special requirements and acquire participant details for billing
and statistics. This service is designed usually for large conferences that require the personal
touch. Operator assistance is available in MPM, MPM+ and MPMx Card Configuration
Modes. For more information, see Chapter 10, “Operator Assistance & Participant Move” on
page 10-1
Polycom, Inc. 2-9
Page 42

Polycom RealPresence Collaboration Server (RMX) 1500/2000/4000 Administrator’s Guide
Default Profile Settings in CP Conferencing Mode
The RMX is shipped with a default Conference Profile for CP conferences which allows users
to immediately start standard ongoing CP conferences. These are also the default settings
when creating a new Profile.
Table 2-4 Default Conference Profile Settings (CP Licensing Mode)
Setting Val ue
Profile Name Factory Video Profile
Line Rate 384Kbps
Video Switching Disabled
Operator Conference Disabled
Encryption Disabled
The default settings are as follows
:
Packet Loss Compensation (LPR
and DBA)
Auto Terminate
Enabled for CP Conferences
• After last participant quits - Enabled
• When last participant remains - Disabled
Auto Redialing Disabled
Exclusive Content Mode Disabled
TIP Compatibility Disabled
Enable FECC Enabled
Enabled Gathering Phase Enabled
Display Language English
Video Quality Sharpness
Maximum Resolution Auto
Video Clarity Enabled
Auto Brightness Enabled
Content Settings Graphics
Content Protocol H.263 & H.264 Auto Selection
Presentation Mode Disabled
Send Content to legacy endpoints Disabled
Same Layout Disabled
Lecturer View Switching Disabled
Telepresence Mode Auto
Telepresence Layout Mode Continuous Presence
2-10 Polycom, Inc.
Page 43

Chapter 2-Conference Profiles
Table 2-4 Default Conference Profile Settings (CP Licensing Mode) (Continued)
Setting Value
Auto Scan Interval Disabled (10)
Auto Layout Enabled
Echo Suppression Enabled
Keyboard Noise Suppression Disabled
Audio Clarity Enabled
Mute participants except the lecturer Disabled
Skin Polycom
IVR Name Conference IVR Service
Recording Disabled
Site Names display Disabled
Message Overlay Disabled
Network Services - SIP Registration Disabled
Network Services - Accept Calls Enabled
This Profile is automatically assigned to the following conferencing entities:
Name ID
Meeting Rooms
Maple_Room 1001
Oak_Room 1002
Juniper_Room 1003
Fig_Room 1004
Entry Queue
Default EQ 1000
Polycom, Inc. 2-11
Page 44

Polycom RealPresence Collaboration Server (RMX) 1500/2000/4000 Administrator’s Guide
SVC-based Conferencing
The SVC-Based conferencing mode provides video without transcoding by the MCU, hence
requiring less video resources while providing better error resiliency and lower latency.
Using the SVC video protocol, SVC conferences provide video bit streams at different
resolutions, frame rates and line rates to SVC-enabled endpoints with various display
capabilities and layout configurations.
In the SVC-based conference, each SVC-enabled endpoint transmits multiple bit streams,
called simulcasting, to the Polycom® RealPresence® Collaboration Server. Simulcasting
enables each endpoint to transmit at different resolutions and frame rates such as 720p at
30fps, 15fps, and 7.5fps, 360p at 15fps and 7.5fps, and 180p at 7.5fps.
The Polycom SVC-enabled endpoints (such as Polycom® RealPresence® Desktop and
Polycom® RealPresence® Mobile) compose the layout according to their layout settings and
video capabilities. This enables the MCU to send or relay the selected video streams to each
endpoint without processing the video streams and sending the composite video layout to
the endpoints.
-
Figure 2-3 SVC video streams and Layouts
The video streams displayed in the conference layout on each endpoint is obtained from the
different streams received from each of the endpoints displayed in the layout. Depending on
the size of the video cell in the configured layout, the endpoint requests the video stream in
the required resolution from the RealPresence Collaboration Server. The higher the display
quality and size, the higher the requested resolution will be sent to the endpoint. The
endpoint creates the displayed layout from the different video streams it receives.
2-12 Polycom, Inc.
Page 45

Chapter 2-Conference Profiles
For instance, an SVC endpoint might want to receive three video streams at different frame
rates and resolutions, and create a conference layout with the received video streams. Each
SVC-enabled endpoint sends encoded SVC bit streams to the MCU to relay to the other
SVC-enabled endpoints in the conference.
The endpoints encode the video in multiple resolutions and decodes the multiple video
input streams.
For example:
RealPresence mobile client (2) will transmit two resolutions; one that is suited for
RealPresence Desktop client (3) and a second that is suited for two other endpoints:
RealPresence Desktop client (4) and (1).
RealPresence Desktop client (1) transmits two resolutions; one that is suited for
RealPresence Mobile client (2) and a second that is suited for RealPresence Desktop
client (4).
The MCU determines which of the incoming resolutions to send to each endpoint. It does
not perform any SVC encoding and decoding, or any transcoding of the video streams. The
RealPresence Collaboration Server functions as the multipoint media relay to the endpoints.
For voice activated selection of the video streams, the RealPresence Collaboration Server
determines which of the incoming bit streams to send to each endpoint.
Advantages of SVC Conferencing
SVC increases the scalability of video networks and enables mass desktop video
deployments. Some of the advantages of SVC conferencing are:
• Offers high-resolution video conferencing with low end-to-end latency, improved error
resiliency and higher system capacities.
• Allows the SVC-enabled video endpoints to manage display layouts, supporting
multiple line rates, resolutions and frame rates.
• The RealPresence Collaboration Server functions as a media relay server providing low
cost production benefits. The RealPresence Collaboration Server reduces bandwidth
usage by only selecting the necessary video stream to be sent to the endpoints.
Guidelines
• SVC conferences are supported only with the following:
— RMX systems with MPMx card
— CP Licensing
— SIP over UDP signaling
— SIP over TLS Signaling
— Polycom SVC-enabled endpoints (Polycom® RealPresence® Desktop, Polycom®
RealPresence® Mobile)
— Ad Hoc conferencing via Meeting Rooms and ongoing conferences
• SVC Only conferences can run on the same MCU as AVC Only conferences.
• All the endpoints participating in a single SVC Only conference must be connected to
the same media card and cannot be handled by different media cards as the SVC media
streams cannot be shared between them.
• End-to-end latency on a local network (same site), is around 200mSec to ensure AV
sync (also known as Lip-sync).
• Dial-out is not available in SVC Only conference.
Polycom, Inc. 2-13
Page 46

Polycom RealPresence Collaboration Server (RMX) 1500/2000/4000 Administrator’s Guide
• Dial-in is available as follows:
— AVC endpoints (participants) can only connect to an AVC conference. When
dialing into SVC Only conferences they will be disconnected and the calls fail.
— SVC endpoints support both AVC and SVC video protocols.
When dialing into SVC Only conferences, they connect as SVC endpoints.
When dialing into AVC Only conferences, they connect as AVC endpoints. They
cannot connect to an AVC conference using the SVC capabilities.
• SVC endpoints cannot connect to SVC Only conferences via Entry Queues.
• SVC endpoints cannot be moved between conferences.
• Content is supported in H.264 (AVC).
— Only the H.264 Cascade and SVC Optimized option is supported.
— LPR and DBA are not supported for SVC content sharing.
• Auto Layout is the default and only setting to display the video on the endpoint screen.
• Site names display is controlled from the SVC endpoints.
• When DMA is part of the solution, the DMA is used as the SIP proxy and the SVC
endpoint subscribes to DMA for call control. If a DMA is not part of the solution, the
SVC endpoint dial directly to the RMX using IP addresses is the SIP dialing strings.
• When Hot backup is enabled, all the conferences are created on the Slave MCU.
• When Hot Backup is activated and the Slave MCU becomes the Master MCU:
— All AVC endpoints will be reconnected to the AVC (CP and VSW) conferences.
SVC endpoints connected to AVC conferences using their AVC capabilities will be
reconnected to their AVC conferences.
— SVC endpoints cannot be reconnected to their SVC Only conferences as dial-out is
not supported for SVC endpoints. These endpoints will have to manually
reconnect to their SVC conferences.
• Cascading between SVC Only conferences or between AVC and SVC Only conferences
is not supported.
• Gateway sessions are not supported for SVC calls.
• Reservations cannot be scheduled for SVC Only conferences.
• The following functionality and features are not supported during SVC Only
conferences:
— FECC
— Skins. The video cells are displayed on the endpoint’s default background.
— IVR functionality
— Conference Gathering phase
— Password protected conferences as DTMF input for passwords cannot be
processed
— All DTMF enabled features during the conference
— Manual selection of video layout
— Chairperson functionality
— Media Encryption
— Recording of SVC Only conferences
— Text messaging using Message Overlay
2-14 Polycom, Inc.
Page 47

Chapter 2-Conference Profiles
MCU Supported Resolutions for SVC Conferencing
The MCU automatically selects the resolution and frame rate according to the conference
line rate. Table 2-5 details the maximum resolution and frame rates supported by the MCU
for each conference line rate. The actual video rate, resolution and frame rates displayed on
each endpoints is determined by the endpoint’s capabilities.:
Table 2-5 SVC Conferencing - Maximum Supported Resolutions per Simulcast Stream
Conference Line Rate
(kbps)
1472 - 2048 High Profile 720p 30fps 48
1024 - 1472 High Profile 720p 15fps 48
768 - 1024 High Profile 360p 30fps 48
512 - 768 High Profile 360p 15fps 48
256 - 512 Base Profile 180p 30fps 48
192 - 256 Base Profile 180p 15fps 48
128 - 192 Base Profile 180p 7.5fps 48
Profile
Maximum
Resolution
Max. Frame
Rate (fps)
Audio Rate
(kbps)
Polycom, Inc. 2-15
Page 48

Polycom RealPresence Collaboration Server (RMX) 1500/2000/4000 Administrator’s Guide
Profile Toolbar
Profile List
Viewing Profiles
Conference Profiles are listed in the Conference Profiles list pane.
To list Conference Profiles:
1 In the RMX Management pane, expand the Rarely Used list.
2 Click the Conference Profiles button.
The Conference Profiles are displayed in the List pane.
The number of the currently defined Conference Profiles appears in the title of the list
pane.
The following Conference Profile properties are displayed in the List pane:
Table 2-6 Conference Profiles Pane Columns
Field Description
Name The name of the Conference Profile.
Layout Displays either “Auto Layout” or an icon of the layout selected for the
profile.
For information about video layouts, see Table 2-14 "Video Layout
Options” on page 2-34.
Line Rate The maximum bit rate in kbps at which endpoints can connect to the
conference.
2-16 Polycom, Inc.
Page 49

Profile Toolbar
Chapter 2-Conference Profiles
Table 2-6 Conference Profiles Pane Columns (Continued)
Field Description
Routing Name Displays the Routing Name defined by the user or automatically
generated by the system.
Encryption Displays if media encryption is enabled for the Profile. For more
information see "Media Encryption (AVC Only)” on page 4-40.
The Profile toolbar provides quick access to the Profile functions:
Table 2-7 Profile Tool bar buttons
Button Button Name Description
New Profile To create a new Profile.
Delete Profile To delete a Profile, click the Profile name and then click this
button.
Import Profile To import Conference Profiles from another MCU in your
Export Profile To export Conference Profiles to a single XML file that can be
Modifying an Existing Profile
You can modify any of the Profile’s parameters but you cannot rename the Profile.
To modify the Profile Properties:
1 In the Conference Profiles list, double -click the Profile icon or right-click the Profile icon,
and then click Profile Properties.
The Profile Properties - General dialog box opens.
environment.
used to import the Conference Profiles on multiple MCUs.
Polycom, Inc. 2-17
Page 50

Polycom RealPresence Collaboration Server (RMX) 1500/2000/4000 Administrator’s Guide
MPMx MPM+
Deleting a Conference Profile
To delete a Conference Profile:
1 In the Conference Profiles list, select the Conference Profile you want to delete.
2 Click the Delete Profile
or
Right-click the Conference Profile to be deleted and select
Delete Profile from the drop-down menu.
A confirmation dialog box is displayed.
3 Click OK in the confirmation dialog box.
4 The Conference Profile is deleted.
A Conference Profile cannot be deleted if it is being used by Meeting Rooms, Entry Queues, SIP
Factories and Reservations.
A Profile that is assigned to only one ongoing conference and no other conferencing entity can be
deleted.
Defining New Profiles
Conference Profile options differ according to the selected Conferencing Mode and Conference
Type. Profiles can be defined for AVC (Advanced Video Codec) conferencing Mode or SVC
(Scalable Video Codec) conferencing Mode. AVC Conferencing Mode, offers two Video
session types: Continuous Presence (CP) conferences and Video Switching (VSW)
Conferences. and a special functional conference - Operator Conferences.
Profiles are the basis for the definition of all ongoing conferences, Reservations, Meeting
Rooms, Entry Queues, and Conference Templates and they contain only conference properties.
The tabs displayed in the New Profile dialog box are dependent on the Card Configuration
Mode of the RMX—whether the RMX is configured with MPMx or MPM+ cards.
In MPMx Mode, an additional tab - Site Names is displayed:
() button.
In MPM+ Card Configuration Mode, the Site Names are configured and behave as in
version 7.6 and earlier.
2-18 Polycom, Inc.
Page 51
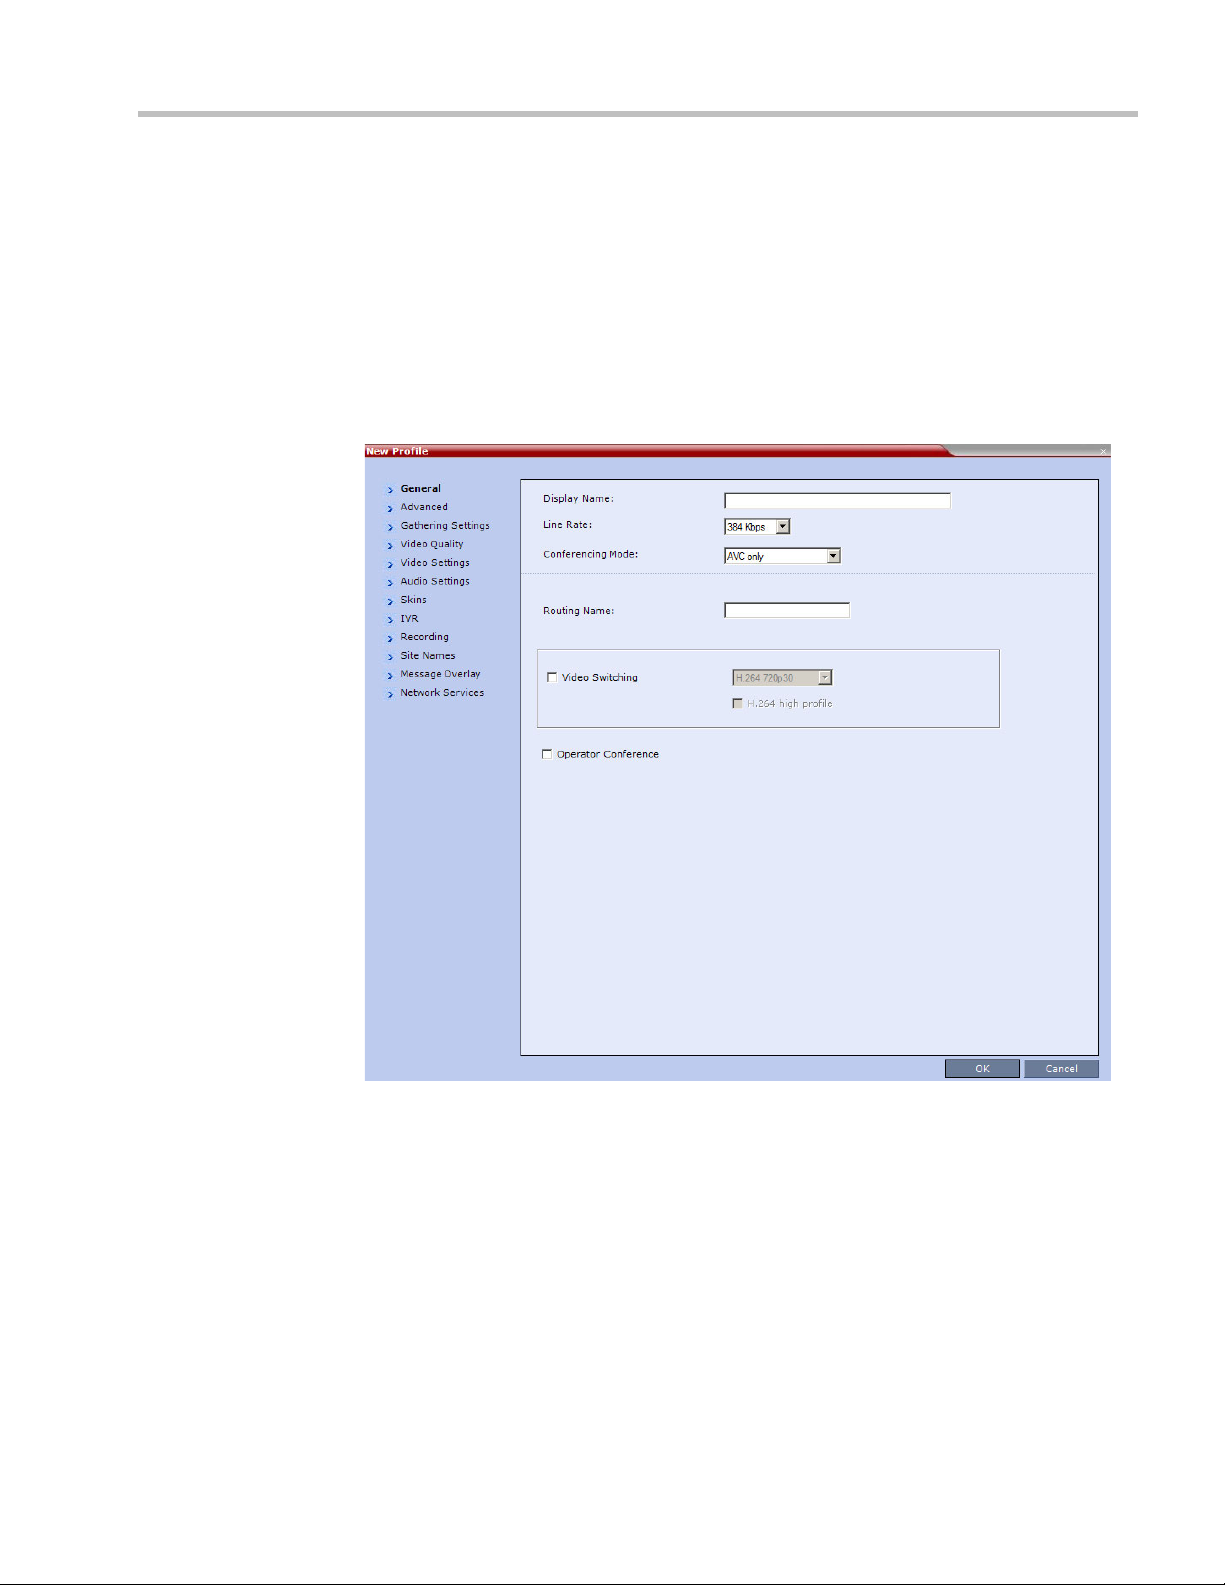
The following Profile Definition procedure assumes that the RMX is in MPMx Mode.
Differences in the procedure that are affected by the Card Configuration Mode will be
highlighted and explained as and when applicable.
Defining AVC Conferencing Profiles
To define a new Profile:
1 In the RMX Management pane, click Conference Profiles.
2 In the Conference Profiles pane, click the New Profile button.
The New Profile – General dialog box opens.
Chapter 2-Conference Profiles
Polycom, Inc. 2-19
Page 52

Polycom RealPresence Collaboration Server (RMX) 1500/2000/4000 Administrator’s Guide
3 Define the Profile name and, if required, the Profile - General parameters:
Table 2-8 New AVC Profile - General Parameters
Field/Option Description
Display Name Enter a unique Profile name, as follows:
•
English text uses ASCII encoding and can contain the most
characters (length varies according to the field).
• European and Latin text length is approximately half the length of
the maximum.
• Asian text length is approximately one third of the length of the
maximum.
It is recommended to use a name that indicates the Profile type, such
as Operator conference or Video Switching conference.
Note: This is the only parameter that must be defined when creating
a new profile.
Note: This field is displayed in all tabs.
Line Rate Select the conference bit rate. The line rate
video, audio and Content rate
The default setting is 384 Kbps.
Notes:
.
represents the combined
• This field is displayed in all tabs.
• Maximum line rate at which ISDN endpoints can connect to a
conference is 768 kbps.
Conferencing Mode Foe AVC conferencing, make sure that AVC O n ly (default) is
selected to define a CP or VSW conference Profile.
Note: This field is displayed in all tabs.
Routing Name Enter the Profile name using ASCII characters set.
The Routing Name can be defined by the user or automatically
generated by the system if no Routing Name is entered as follows:
• If an all ASCII text is entered in Display Name, it is used also as
the Routing Name.
• If any combination of Unicode and ASCII text (or full Unicode text)
is entered in Display Name, the ID (such as Conference ID) is
used as the Routing Name.
2-20 Polycom, Inc.
Page 53

Chapter 2-Conference Profiles
Table 2-8 New AVC Profile - General Parameters (Continued)
Field/Option Description
Video Switching If the Operator Conference option is selected, this option is disabled,
and the selection is cleared.
Select the video protocol and resolution for the conference.
When selected, the conference is in a special conferencing mode
which implies that all participants must connect at the same line rate
and use the same video resolution. Participants with endpoints that
do not support the selected line rate and resolution will connect as
secondary (audio only).
For more information, see "Video Switching (VSW) Conferencing” on
page 2-4.
Notes:
• Video Switching conferencing mode is unavailable to ISDN
participants.
• To connect to a Video Switching conference via Entry Queue, the
Profile assigned to the Entry Queue must be set to Video
Switching. It is recommended to use the same profile for both the
destination conference and Entry Queue.
• Telepresence Mode is unavailable in Video Switching
conferences.
H.264 High Profile Select this check box to enable the use of H.264 High Profile in Video
Switching conferences. For more information, see "H.264 High Profile
Support in Video Switching Conferences” on page 2-53.
Operator Conference
(CP Only)
Select this option to define the profile of an Operator conference.
An Operator conference can only be a Continuous Presence
conference, therefore when selected, the Video Switching option is
disabled and cleared.
When defining an Operator Conference, the Send Content to Legacy
Endpoints option in the Video Settings tab is cleared and disabled.
For more information, see Chapter 10, “Operator Assistance &
Participant Move” on page 10-1.
4 Click the Advanced tab.
Polycom, Inc. 2-21
Page 54

Polycom RealPresence Collaboration Server (RMX) 1500/2000/4000 Administrator’s Guide
The New Profile – Advanced dialog box opens.
5 Define the following parameters:
Table 2-9 New AVC Profile - Advanced Parameters
Field/Option Description
Encryption Select the Encryption option for the conference:
• Encrypt All - Encryption is enabled for the conference and all
conference participants must be encrypted.
• No Encryption - Encryption is disabled for the conference.
• Encrypt when Possible - enables the negotiation between the
MCU and the endpoints and let the MCU connect the participants
according to their capabilities, where encryption is the preferred
setting. For connection guidelines see "Mixing Encrypted and
Non-encrypted Endpoints in one Conference” on page 4-41.
For more information, see "Media Encryption (AVC Only)” on
page 4-40.
2-22 Polycom, Inc.
Page 55

Chapter 2-Conference Profiles
Table 2-9 New AVC Profile - Advanced Parameters (Continued)
Field/Option Description
LPR When selected (default for CP conferences), Lost Packet Recovery
creates additional packets that contain recovery information used to
reconstruct packets that are lost during transmission.
LPR check box is automatically cleared if High Definition Video
Switching is selected, but can be selected if required. For more
information, see "Packet Loss Compensation (LPR and DBA)” on
page 4-50.
Auto Terminate When selected (default), the conference automatically ends when the
termination conditions are met:
Before First Joins — No participant has connected to a conference
during the n minutes after it started. Default idle time is 10 minutes.
At the End - After Last Quits — All the participants have
disconnected from the conference and the conference is idle (empty)
for the predefined time period. Default idle time is 1 minute.
At the End - When Last Participant Remains — Only one
participant is still connected to the conference for the predefined time
period (excluding the recording link which is not considered a
participant when this option is selected). This option should be
selected when defining a Profile that will be used for Gateway Calls
and you want to ensure that the call is automatically terminated when
only one participant is connected. Default idle time is 1 minute.
Note: The selection of this option is automatically cleared and
disabled when the Operator Conference option is selected. The
Operator conference cannot automatically end unless it is terminated
by the RMX User.
Auto Redialing The Auto Redialing option instructs the RMX to automatically redial IP
and SIP participants that have been abnormally disconnected from
the conference.
• Auto Redialing is disabled by default.
• Auto Redialing can be enabled or disabled during an ongoing
conference using the Conference Properties – Advanced dialog
box.
• The RMX will not redial an endpoint that has been disconnected
from the conference by the participant.
• The RMX will not redial an endpoint that has been disconnected
or deleted from the conference by an operator or administrator.
Exclusive Content
Mode
Select the Exclusive Content Mode check box to limit the Content
broadcasting to one participant, preventing other participants from
interrupting the Content broadcasting while it is active. For more
details, see "Exclusive Content Mode” on page 4-21.
Polycom, Inc. 2-23
Page 56

Polycom RealPresence Collaboration Server (RMX) 1500/2000/4000 Administrator’s Guide
Table 2-9 New AVC Profile - Advanced Parameters (Continued)
Field/Option Description
TIP Compatibility Select the TIP Compatibility mode when implementing an RMX and
Cisco Telepresence Systems (CTS) Integration solution.
• None
• Video Only
• Video & Content
The TIP Compatibility mode affects in the user video and content
experience. For more information, see "Collaboration With Cisco’s
Telepresence Interoperability Protocol (TIP)” on page I-1.
Enable FECC This option is enabled by default, allowing participants in the
conference to control the zoom and PAN of other endpoints in the
conference via the FECC channel. Clear this check box to disable
this option for all conference participants.
FW NAT Keep Alive The RMX can be configured to send a FW NAT Keep Alive message
at specific Intervals for the RTP, UDP and BFCP channels.
For more information see "FW (Firewall) NAT Keep Alive” on
page 16-74.
Interval If needed modify the NAT Keep Alive Interval field within the range of
5 - 86400 seconds.For more information see "FW (Firewall) NAT
Keep Alive” on page 16-74.
2-24 Polycom, Inc.
Page 57

6 For CP Conferences only: Click the Gathering Settings tab.
Chapter 2-Conference Profiles
7 Optional. Define the following fields if the conference is not launched by the Polycom
Conferencing Add-in for Microsoft Outlook:
• If the conference is launched by the Polycom Conferencing Add-in for Microsoft Outlook the field
information is received from the meeting invitation and existing field value are overridden. For
more information see "Polycom Conferencing for Microsoft Outlook®” on page 12-1.
• From Version 7.2, the Gathering option is disabled in gateway calls.
Table 2-10 New AVC Profile - Gathering Settings Parameters
Field Description
Display Name This field is defined when the Profile is created. For more information
see the "Defining New Profiles” on page 2-18.
Enable Gathering Select this check box to enable the Gathering Phase feature.
Default: Selected.
Polycom, Inc. 2-25
Page 58

Polycom RealPresence Collaboration Server (RMX) 1500/2000/4000 Administrator’s Guide
Info 1
Info 2
Info 3
Table 2-10 New AVC Profile - Gathering Settings Parameters
Field Description
Displayed Language Select the Gathering Phase slide language:
Gathering Phase slide field headings are displayed in the language
selected.
The Gathering Phase slide can be in a different language to the RMX
Web Client.
Default: English
Note: When working with the Polycom Conferencing Add-in for
Microsoft Outlook, the language selected should match the language
selected for the conference in the Polycom Conferencing Add-in for
Microsoft Outlook to ensure that the Gathering Phase slide displays
correctly.
Access Number 1 Enter the ISDN or PSTN number(s) to call to connect to the
conference.
Access Number 2
Note: The numbers entered must be verified as the actual Access
Numbers.
Info 1 Optionally, enter any additional information to be displayed during
the Gathering Phase.
These fields are not limited in the RMX Web Client but only 96
characters can be displayed in the Gathering Slide on a 16:9 monitor.
If the Gathering slide is displayed on a 4:3 endpoint: the slide is
cropped on both sides:
Info 2
• The left most characters of the information fields are not
displayed.
• The live video is cropped on the right side of the display.
Info 3
For more information see "Video Preview” on page 4-26.
2-26 Polycom, Inc.
Page 59

8 Click the Video Quality tab.
The New Profile – Video Quality dialog box opens.
Chapter 2-Conference Profiles
9 Define the following parameters:
Table 2-11 New AVC Profile - Video Quality Parameters
Field/Option Description
People Video Definition
Video Quality Depending on the amount of movement contained in the conference
video, select either:
• Motion – for a higher frame rate without increased resolution.
When selected, Video Clarity is disabled.
• Sharpness – for higher video resolution and requires more
system resources.
Note: When Sharpness is selected as the Video Quality setting in the
conference Profile, the RMX will send 4CIF (H.263) at 15fps instead
of CIF (H.264) at 30fps. For more information, see
in AVC-based CP Conferencing”
on page 3-1.
"Video Resolutions
Polycom, Inc. 2-27
Page 60

Polycom RealPresence Collaboration Server (RMX) 1500/2000/4000 Administrator’s Guide
Table 2-11 New AVC Profile - Video Quality Parameters (Continued)
Field/Option Description
Maximum Resolution This setting overrides the Maximum Resolution setting of the
Resolution Configuration dialog box.
The administrator can select one of the following Maximum
Resolution options:
• Auto (default) - The Maximum Resolution remains as selected in
the Resolution Configuration dialog box.
• CIF
• SD
• HD720
• HD1080
Maximum Resolution settings can be monitored in the Profile
Properties - Video Quality and Participant Properties - Advanced
dialog boxes.
Notes:
The Resolution field in the New Participant - Advanced dialog box
allows Maximum Resolution to be further limited per participant
endpoint.
The Maximum Resolution settings for conferences and participants
cannot be changed during an ongoing conference.
Video Clarity™ When enabled (default), Video Clarity applies video enhancing
algorithms to incoming video streams of resolutions up to and
including SD. Clearer images with sharper edges and higher contrast
are sent back to all endpoints at the highest possible resolution
supported by each endpoint.
All layouts, including 1x1, are supported.
Note: Video Clarity is enabled only when Video Quality is set to
Sharpness (default setting) and is disabled when Video Quality is set
to Motion.
Video Clarity can only be enabled for Continuous Presence
conferences in MPM+ and MPMx Card Configuration Mode.
Auto Brightness Auto Brightness detects and automatically adjusts the brightness of
video windows that are dimmer than other video windows in the
conference layout.
• Auto Brightness is supported with MPM+ and MPMx cards only.
• Auto Brightness only increases brightness and does not darken
video windows.
• Auto Brightness is selected by default.
• Auto Brightness cannot be selected and deselected during an
ongoing conference.
Default: On
Note: When Auto Brightness is enabled, color changes may be
observed in computer-based VGA Content sent by HDX endpoints
through the People video channel.
2-28 Polycom, Inc.
Page 61

Chapter 2-Conference Profiles
Table 2-11 New AVC Profile - Video Quality Parameters (Continued)
Field/Option Description
Content Video Definition
Content Settings Select the transmission mode for the Content channel:
• Graphics — basic mode, intended for normal graphics
• Hi-res Graphics (AVC Only) — a higher bit rate intended for high
resolution graphic display
• Live Video (AVC Only) — Content channel displays live video
• Customized Content Rate (AVC Only) - manual definition of the
Conference Content Rate, mainly for cascading conferences.
Selection of a higher bit rate for the Content results in a lower bit rate
for the people channel.
For a detailed description of each of these options, see "Content
Settings” on page 4-7.
Content Protocol
• H.263 (AVC only)
• Content is shared using the H.263 protocol.
• Use this option when most of the endpoints support H.263 and
some endpoints support H.264.
• H.263 & H.264 Auto Selection (Default)
• Content is shared using H.263 if a mix of H.263-supporting
and H.264-supporting endpoints are connected.
• Content is shared using H.264 if all connected endpoints have
H.264 capability.
• H.264 Cascade and SVC Optimized
• All Content is shared using the H.264 content protocol and is
optimized for use in Cascaded Conferences.
• H.264 HD (AVC only)
• Ensures high quality Content when most endpoints support
H.264 and HD Resolutions.
For more information, see "Content Protocols” on page 4-8 and
"Defining Content Sharing Parameters for a Conference” on
page 4-13.
Polycom, Inc. 2-29
Page 62

Polycom RealPresence Collaboration Server (RMX) 1500/2000/4000 Administrator’s Guide
Site Names
field is only
displayed in
MPM+ Mode
10 Click the Video Settings tab.
The New Profile - Video Settings dialog box opens.
11 Define the video display mode and layout using the following parameters:
Table 2-12 New AVC Profile - Video Settings Parameters
Field/Option Description
Presentation Mode
(CP only)
Lecture View
Switching
Select this option to activate the Presentation Mode. In this mode,
when the current speaker speaks for a predefined time (30 seconds),
the conference changes to Lecture Mode. When another participant
starts talking, the Presentation Mode is cancelled and the conference
returns to the previous video layout.
Select this option to enable automatic switching of participants on the
Lecturer’s screen when Lecture Mode is enabled for the conference.
The automatic switching is enabled when the number of participants
exceeds the number of video windows displayed on the Lecturer’s
screen.
Note: Lecture Mode is enabled in the Conference Properties –
Participants tab. For more information, see "Lecture Mode (AVC
Only)” on page 4-73.
2-30 Polycom, Inc.
Page 63

Table 2-12 New AVC Profile - Video Settings Parameters (Continued)
Field/Option Description
Chapter 2-Conference Profiles
Send Content to
Legacy Endpoints
(CP only)
When enabled (default), Content can be sent to H.323/SIP/ISDN
endpoints that do not support H.239 Content (legacy endpoints) over
the video (people) channel. For more information see Chapter 4,
“Sending Content to Legacy Endpoints (AVC Only)” on page 4-17.
Notes:
• This option is enabled in MPM+ and MPMx Card Configuration
Modes only.
• When enabled, additional video resources are allocated to the
conference:
• In MPM+ mode, an additional SD video resource is allocated.
• In MPMx mode, an additional HD video resource is allocated.
• This option is valid when sending Content as a separate stream is
enabled by the System Flag ENABLE_H239 set to YES.
• Select this option when Avaya IP Softphone will be connecting to
the conference.
• If High Definition Video Switching option is selected in the
Conference Profile - General tab, the Send Content to Legacy
Endpoints selection is cleared and the option is disabled.
• If the Same Layout option is selected, the Send Content to Legacy
Endpoints selection is cleared and is disabled.
• Once an endpoint is categorized as Legacy, it will not be able to
restore its content to the Content channel and will receive content
only in the video channel.
• This option is automatically enabled when H.264 Cascade
Optimized is selected as the Content Protocol. For more
information see "Content Protocols” on page 4-8.
Site Names
(MPM+ Only)
(CP only)
Auto Scan Interval(s)
(CP only)
Clear this check box to hide the display of site names on the endpoint
screens during the conference. When selected (default), Site Names
are displayed during the conference, whenever the conference
speaker changes.
Prior to Version 7.6, Site Names display was enabled or disabled by
the HIDE_SITE_NAMES System Flag.
Site Names display is controlled by the following System Flags, as in
previous versions:
• SITE_NAME_TRANSPARENCY - Used to turn Site Name
Transparency of 50% on or off.
• SITE_NAMES_ALWAYS_ON - Enables the permanent display of
Site Names.
• SITE_NAMES_LOCATION - Changes the default location of the
Site Name in the video layout.
Select the time interval, 10 - 300 seconds, that Auto Scan uses to
cycle the display of participants that are not in the conference layout in
the selected cell.
Auto Scan is often used in conjunction with Customized Polling which
allows the cyclic display to be set to a predefined order for a
predefined time period.
Polycom, Inc. 2-31
Page 64

Polycom RealPresence Collaboration Server (RMX) 1500/2000/4000 Administrator’s Guide
Table 2-12 New AVC Profile - Video Settings Parameters (Continued)
Field/Option Description
Same Layout
(CP only)
Auto Layout
(CP only)
Telepresence Mode
(CP only)
Select this option to force the selected layout on all participants in a
conference. Displays the same video stream to all participants and
personal selection of the video layout is disabled. In addition, if
participants are forced to a video layout window, they can see
themselves.
When selected (default), the system automatically selects the
conference layout based on the number of participants currently
connected to the conference. When a new video participant connects
or disconnects, the conference layout automatically changes to reflect
the new number of video participants.
For more information, see Table 2-13 "Auto Layout – Default Layouts”
on page 2-33.
Clear this selection to manually select a layout for the conference.
The default Auto Layout settings can be customized by modifying
default Auto Layout system flags in the System Configuration file. For
more information see, "Auto Layout Configuration” on page 22-41.
Note: In some cases, the default layout automatically selected for the
conference contains more cells than the number of connected
participants, resulting in an empty cell. For example, if the number of
connected participants is 4, the default layout is 2x2, but as only 3
participants are displayed in the layout (the participants do not see
themselves), one cell is empty.
Select the Telepresence Mode from the drop-down menu:
• Off - Normal conference video is sent by the RMX.
• Auto (Default) - If any ITP (Immersive Telepresence) endpoints
are detected, ITP features are applied to the conference video for
all participants.
When Auto is selected, the ITP features are dynamic. If all ITP
endpoints disconnect from the conference, normal conference
video is resumed for all participants. ITP features are resumed for
all participants should an ITP endpoint re-connects to the
conference.
• On - ITP features are applied to the conference video for all
participants regardless of whether there are ITP endpoints
connected or not.
Notes:
• This field is enabled only if the RMX system is licensed for
Telepresence Mode.
• Telepresence Mode is unavailable in Video Switching conferences.
2-32 Polycom, Inc.
Page 65

Table 2-12 New AVC Profile - Video Settings Parameters (Continued)
Field/Option Description
Chapter 2-Conference Profiles
Telepresence Layout
Mode
The Telepresence Layout Mode drop-down menu enables VNOC
operators and Polycom Multi Layout Applications to retrieve
Telepresence Layout Mode information from the RMX.
(CP only)
The following modes can be selected:
• Manual
• Continuous presence - Room Continuous Presence (Default)
• Room Switch - Voice Activated Room Switching
Note: This field is enabled only if the RMXsystem is licensed for
Telepresence Mode.
Table 2-13 Auto Layout – Default Layouts
Number of Video Participants Auto Layout Default Settings
0–2
3
4–5
6–7
8-10
11
12+
In layout 2+8, the two central windows display the last two speakers in the conference:
the current speaker and the “previous” speaker. To minimize the changes in the layout,
when a new speaker is identified the “previous” speaker is replaced by the new speaker
while the current speaker remains in his/her window.
The RMX supports the VUI addition to the H.264 protocol for endpoints that transmit wide video
(16:9) in standard 4SIF resolution.
Polycom, Inc. 2-33
Page 66

Polycom RealPresence Collaboration Server (RMX) 1500/2000/4000 Administrator’s Guide
12 To select the Video Layout for the conference, click the required number of windows
from the layouts bar and then select the windows array. The selected layout is
displayed in the Video Layout pane.
Table 2-14 Video Layout Options
Number of Video Windows Available Video Layouts
1
2
3
4
5+
9
10+
Overlay
When there is a change of speaker in a Continuous Presence conference, the transition is set by
default to fade in the current speaker while fading out the previous speaker.
To make this transition visually pleasant, fading in the current speaker while fading out the previous
speaker is done over a period of 500 milliseconds.
The Fade In / Fade Out feature can be disabled by adding a new flag to the System Configuration.
The Value of the new flag must be: FADE_IN_FADE_OUT=NO.
Fade In / Fade Out is not supported with MPMx cards.
For more information about System Flags, see the RealPresence Collaboration Server (RMX) 1500/
2000/4000 Administrator’s Guide, "Modifying System Flags” on page 22-1.
For more information see "Overlay
Layouts” on page 2-61.
2-34 Polycom, Inc.
Page 67

13 Click the Audio Settings tab.
The New Profile - Audio Settings dialog box opens.
Chapter 2-Conference Profiles
14 Define the video display mode and layout using the following parameters:
Table 2-15 New AVC Profile - Audio Settings Parameters
Field/Option Description
Echo Suppression When enabled (default), an algorithm is used to search for and detect
echo outside the normal range of human speech (such as echo) and
automatically mute them when detected.
Clear this option to disable the Echo Suppression algorithm.
Notes:
• This option is activated only in MPM+ and MPMx Card
Configuration Modes.
The CMA uses the Profiles that are stored in the RMX. When the
Echo Suppression is enabled, it will be enabled in the conference that
is started from the CMA with that Profile. However, the CMA does not
display an indication that this option is enabled for the conference.
Polycom, Inc. 2-35
Page 68

Polycom RealPresence Collaboration Server (RMX) 1500/2000/4000 Administrator’s Guide
Table 2-15 New AVC Profile - Audio Settings Parameters (Continued)
Field/Option Description
Keyboard Noise
Suppression
Select this option to let the system use an algorithm to search for and
detect keyboard noises and automatically mute them when detected.
Notes:
• This option is activated only in MPM+ and MPMx Card
Configuration Modes.
• The CMA uses the Profiles that are stored in the RMX. When the
Keyboard Noise Suppression is enabled, it will be enabled in the
conference that is started from the CMA with that Profile.
However, the CMA does not display an indication that this option
is enabled for the conference.
Audio Clarity When selected, improves received audio from participants connected
via low audio bandwidth connections, by stretching the fidelity of the
narrowband telephone connection to improve call clarity.
• The enhancement is applied to the following low bandwidth (8kHz)
audio algorithms:
• G.729a
• G. 71 1
• Audio Clarity is supported with MPM+ and MPMx cards only.
• Audio Clarity is selected by default.
• Audio Clarity cannot be selected and deselected during an
ongoing conference.
Speaker Change
Threshold
Select the amount of time a participant must speak continuously
before becoming the speaker. The possible values are:
• Auto (Default, 3 seconds)
• 1.5 seconds
• 3 seconds
• 5 seconds
Note: This option can only be changed in MPMx Card Configuration
Mode. in MPM+ Card Configuration Mode this value is always Auto.
2-36 Polycom, Inc.
Page 69

Table 2-15 New AVC Profile - Audio Settings Parameters (Continued)
Field/Option Description
Chapter 2-Conference Profiles
Mute participant
except lecturer
When the Mute Participants Except Lecturer option is enabled, the
audio of all participants in the conference except for the lecturer can
be automatically muted upon connection to the conference. This
prevents other conference participants from accidentally interrupting
the lecture, or from a noisy participant affecting the audio quality of the
entire conference. Muted participants cannot unmute themselves
unless they are unmuted from the RMX Web Client/RMX Manager.
You can enable or disable this option during the ongoing conference.
Notes:
• When enabled, the mute indicator on the participant endpoints are
not visible because the mute participants was initiated by the
MCU. Therefore, it is recommended to inform the participants that
their audio is muted by using the Closed Caption or Message
Overlay functions.
In the RMX Web Client/Manager, the mute by MCU indicator is
listed for each muted participant in the Audio column in the
Participants pane.
• The Mute Participants Except Lecturer option can be disabled
during an ongoing conference, thereby unmuting all the
participants in the conference.
• If the endpoint of the designated lecturer is muted when the
lecturer connects to the conference, the lecturer remains muted
until the endpoint has been unmuted.
• When you replace a lecturer, the MCU automatically mutes the
previous lecturer and unmutes the new lecturer.
• When you disconnect a lecturer from the conference or the
lecturer leaves the conference, all participants remain muted but
are able to view participants in regular video layout until the you
disable the Mute Participants Except Lecturer option.
• A participant can override the Mute Participants Except Lecturer
option by activating the Mute All Except Me option using the
appropriate DTMF code, provided the participant has authorization
for this operation in the IVR Services. The lecturer audio is muted
and the participant audio is unmuted. You can reactivate the Mute
Participants Except Lecturer option after a participant has
previously activated the Mute All Except Me option. The
participant is muted and the lecturer, if designated, is unmuted.
• In cascaded conferences, all participants (including the link
participants) are muted. Only the lecturer is not muted.
Polycom, Inc. 2-37
Page 70

Polycom RealPresence Collaboration Server (RMX) 1500/2000/4000 Administrator’s Guide
In Classic View (for the first two skin
options) the frames fill the screen with
their borders touching
15 For CP Conferences only: Click the Skins tab to modify the background and frames.
The New Profile - Skins dialog box opens.
16 Select one of the Skin options.
When Telepresence Mode is enabled, the Skin options are disabled as the system uses a black
background and the frames and speaker indication are disabled.
17 Click IVR tab.
2-38 Polycom, Inc.
Page 71

The New Profile - IVR dialog box opens.
Chapter 2-Conference Profiles
18 If required, set the following parameters:
Table 2-16 New AVC Profile - IVR Parameters
Field/Option Description
Conference IVR
Service
Conference Requires
Chairperson
The default conference IVR Service is selected. You can select
another conference IVR Service if required.
Select this option to allow the conference to start only when the
chairperson connects to the conference and to automatically
terminate the conference when the chairperson exits. Participants
who connect to the conference before the chairperson are placed on
Hold and hear background music (and see the Welcome video slide).
Once the conference is activated, the participants are automatically
connected to the conference.
When the check box is cleared, the conference starts when the first
participant connects to it and ends at the predefined time or according
to the Auto Terminate rules when enabled.
Note: This feature is implemented only if the System Flag
TERMINATE_CONF_AFTER_CHAIR_DROPPED is set to YES.
19 Optional. Click the Recording tab to enable conference recording with Polycom RSS
2000/4000.
Polycom, Inc. 2-39
Page 72
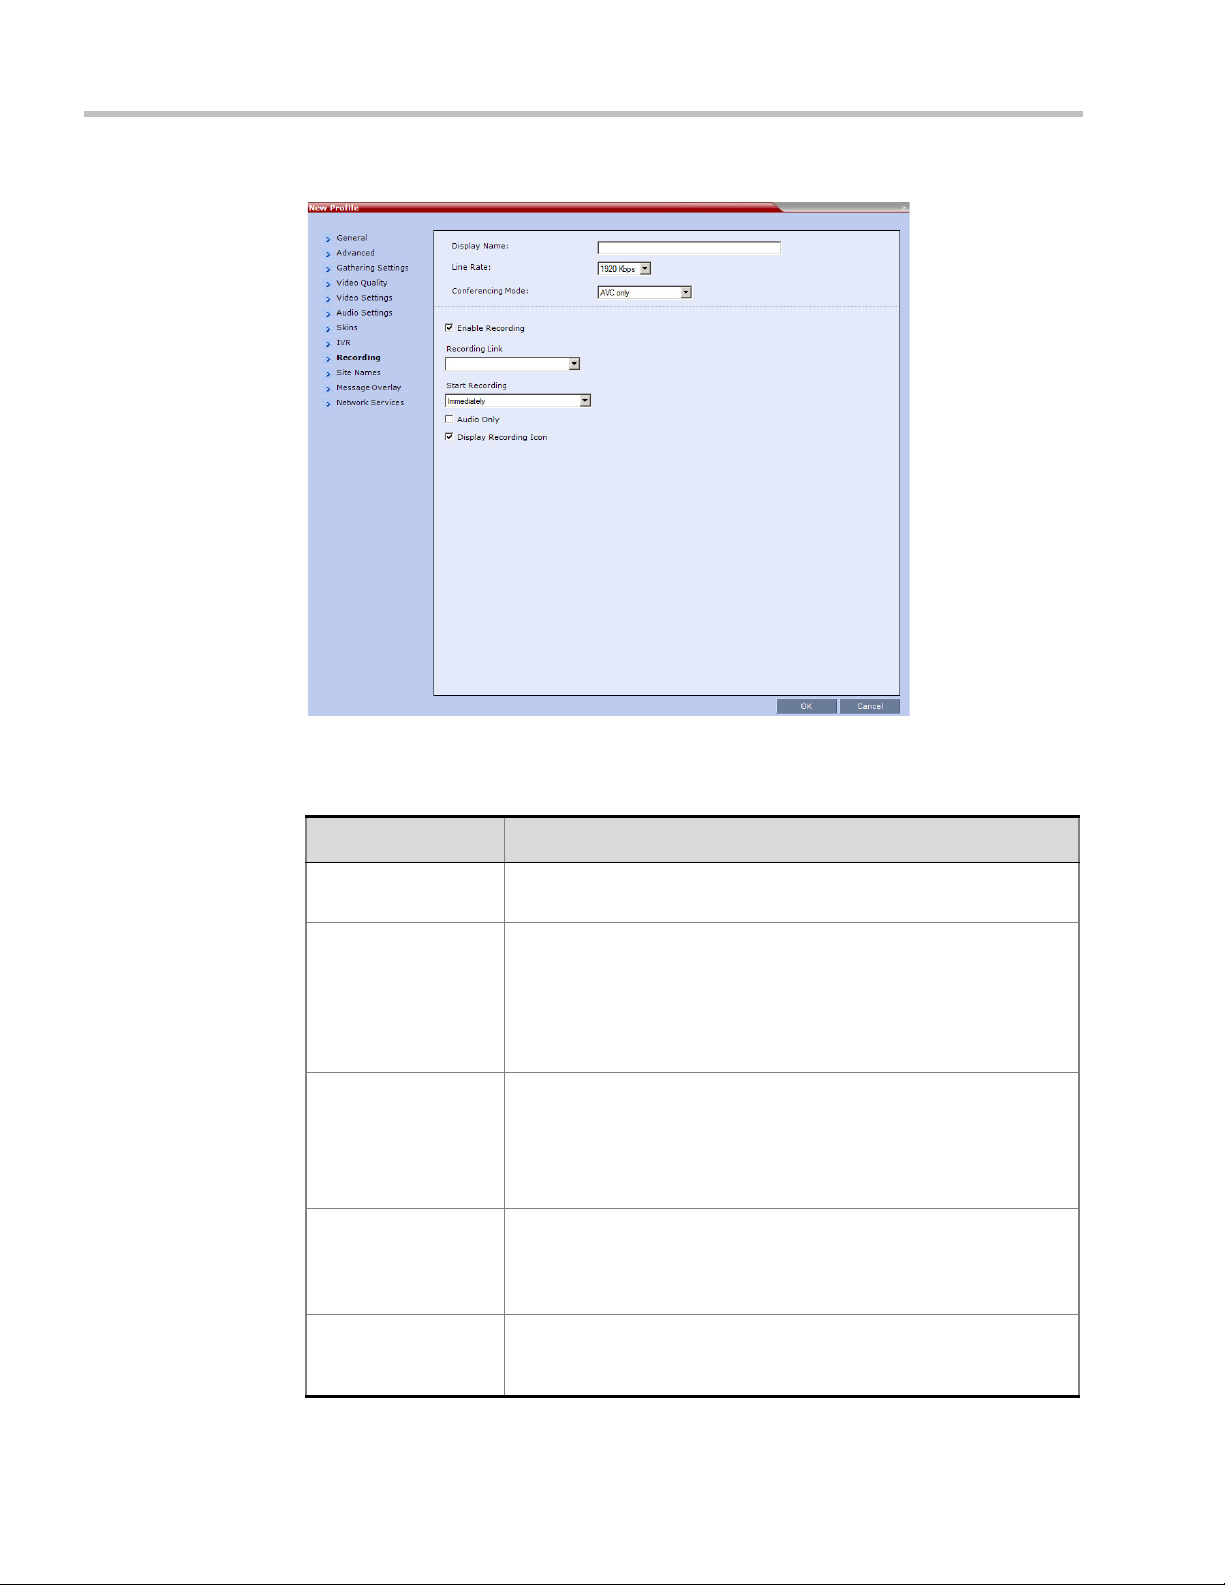
Polycom RealPresence Collaboration Server (RMX) 1500/2000/4000 Administrator’s Guide
The New Profile - Recording tab opens.
20 Define the following parameters:
Table 2-17 New AVC Profile - Recording Parameters
Parameter Description
Enable Recording Select this check box to enable the Recording settings. If no
Recording Links are found an error message is displayed.
Recording Link Select the Recording Link to be used for conference recording.
Recording Links defined on the RMX can be given a descriptive name
and can be associated with a Virtual Recording Room (VRR) saved
on the Polycom® RSS™ 4000 Version 6.0 Recording and Streaming
Server (RSS). For more information see "Recording Conferences” on
page 14-1.
Start Recording Select one of the following:
• Immediately – conference recording is automatically started upon
connection of the first participant.
• Upon Request – the operator or chairperson must initiate the
recording (manual).
Audio Only Select this option to record only the audio channel of the conference.
Note: This option can be used only if there are Voice ports configured
in the Video/Voice Port Configuration. For more information, see
"Video/Voice Port Configuration” on page 21-10.
Display Recording
Icon
2-40 Polycom, Inc.
This option is automatically selected to display a Recording Indication
to all conference participants informing them that the conference is
being recorded.
Page 73

Chapter 2-Conference Profiles
The Recording participant does not support H.264 High Profile. If recording a conference set to
H.264 High Profile, the Recording participant connects as Audio Only and records the conference
Audio.
21 For MPMx Card Configuration Mode and CP Conferences only: Click the Site Names
tab to display the Site Names dialog box.
Using the Site Name dialog box, you can control the display of the site names by
defining the font, size, color, background color and transparency and position within
the Video Window. For a detailed description of the site names options see "Site Names
Definition” on page 2-64.
Polycom, Inc. 2-41
Page 74
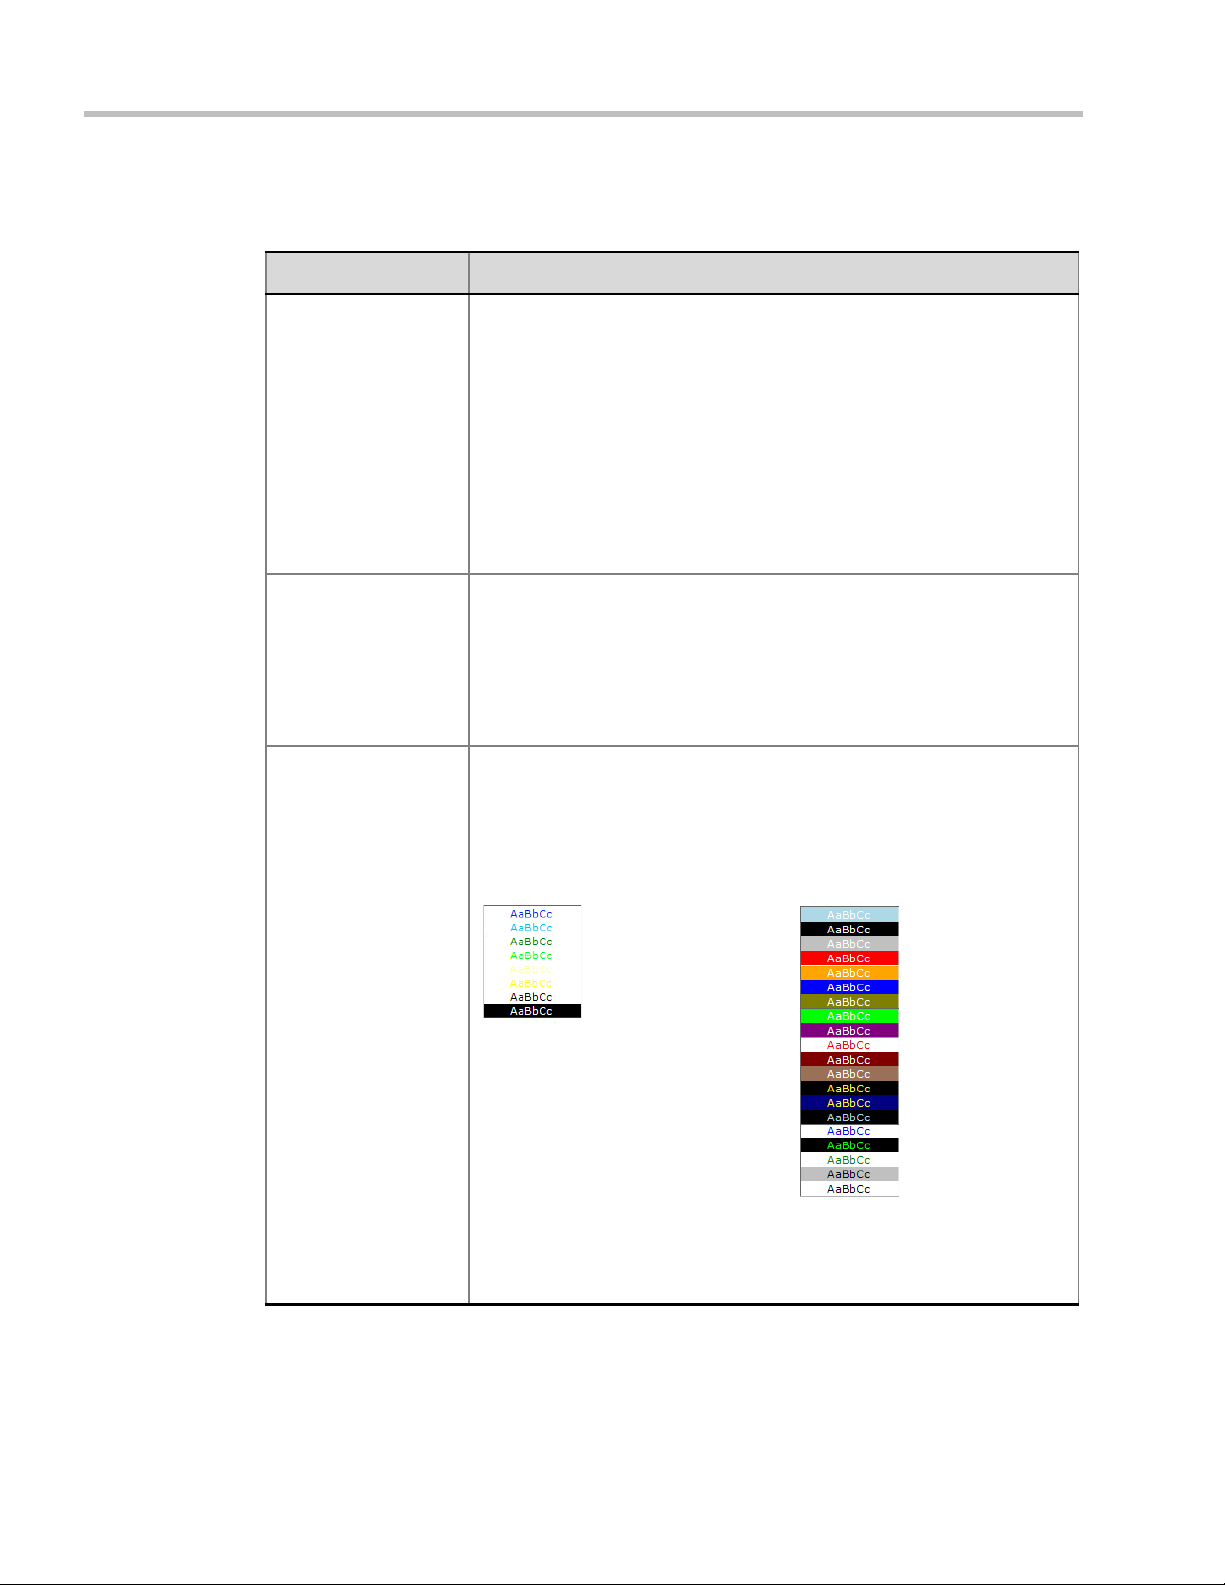
Polycom RealPresence Collaboration Server (RMX) 1500/2000/4000 Administrator’s Guide
Plain Skin
Picture Skin
Default:
White Text
No Background
(For contrast, no
background is shown as
black when the text is
white.)
Default:
White Text
Red Background
22 Define the following parameters:
Table 2-18 New AVC Profile - Site Names Parameters
Field Description
Display Mode Select the display mode for the site names:
• Auto - Display the Site Names for 10 seconds whenever the Video
Layout changes.
• On - Display the Site Names for the duration of the conference.
• Off (default) - Do not display the Site Names.
Note:
The Display Mode field is grayed and disabled if Video Switching mode is
selected in the Profile - General tab.
If Display Mode is Off, all other fields in this tab are grayed and disabled.
Selecting Off enables Video Switching for selection in the Profile -
General tab (if the conference is not already ongoing).
Font Size Click the arrows to adjust the font size (in points) for the Site Names
display.
Range: 9 - 32 points
Default: 12
Note: Choose a Font Size that is suitable for viewing at the conference’s
video resolution. For example, if the resolution is CIF, a larger Font Size
should be selected for easier viewing.
Background Color Select the color of the Site Names display text.
The color and background for Site Names display text is dependent on
whether a Plain Skin or a Picture Skin was selected for the conference in
the Profile - Skins tab.
The choices are:
Note: Choose a Background Color combination that is suitable for viewing
at the conference’s video resolution. At low resolutions, it is recommended
to select brighter colors as dark colors may not provide for optimal
viewing.
2-42 Polycom, Inc.
Page 75

Chapter 2-Conference Profiles
Table 2-18 New AVC Profile - Site Names Parameters (Continued)
Field Description
Display Position Select the pre-set position for the display of the Site Names.
Selection Site Names Position
LeftTop (Default)
Top
RightTop
LeftMiddle
RightMiddle
Polycom, Inc. 2-43
Page 76

Polycom RealPresence Collaboration Server (RMX) 1500/2000/4000 Administrator’s Guide
Table 2-18 New AVC Profile - Site Names Parameters (Continued)
Field Description
Display Position
(cont.)
LeftBottom
Bottom
RightBottom
Custom The current Site Names
Horizontal Position Move the slider to the left to move the
horizontal position of the Site Names to
the left within the Video Windows.
Move the slider to the right to adjust the
horizontal position of the Site Names to
the right within the Video Windows.
Vertical Position Move the slider to the left to move the
vertical position of the Site Names
upward within the Video Windows.
Move the slider to the right to move the
vertical position of the Site Names
downward within the Video Windows.
display position becomes the
initial position for Site Names
position adjustments using
the Horizontal and Vertical
Position sliders.
Note: Use of these sliders
will set the Display Position
selection to Custom.
2-44 Polycom, Inc.
Page 77
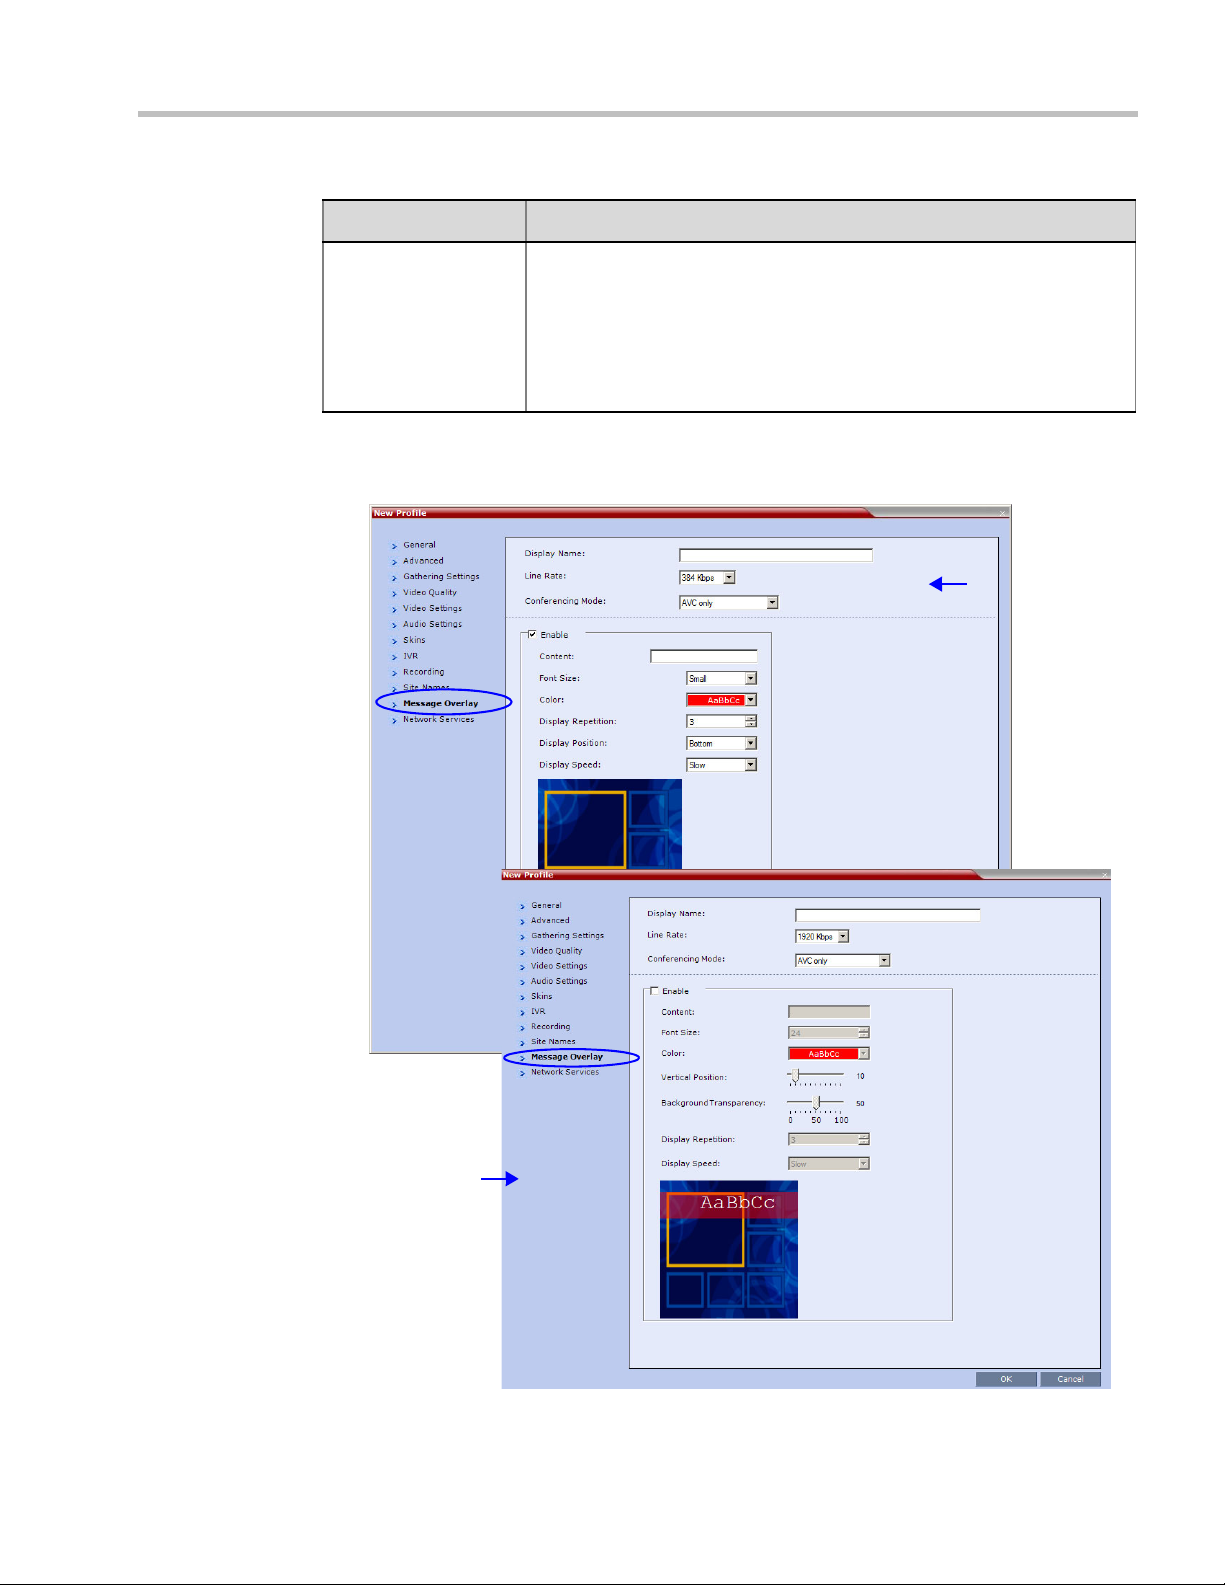
Table 2-18 New AVC Profile - Site Names Parameters (Continued)
Message
Overlay in
MPM+ Card
Configuration
Mode
Message
Overlay in
MPMx Card
Configuration
Mode
Field Description
Chapter 2-Conference Profiles
Background
Transparency
Move the slider to the left to decrease the transparency of the background
of the Site Names text. 0 = No transparency (solid background color).
Move the slider to the right to increase the transparency of the
background of the Site Names text. 100 = Full transparency (no
background color)
Default: 50
Note: This slider is only displayed if a Picture Skin is selected.
23 For CP Conferences only: Click the Message Overlay tab to display the Message
Overlay dialog box.
Polycom, Inc. 2-45
Page 78

Polycom RealPresence Collaboration Server (RMX) 1500/2000/4000 Administrator’s Guide
Message Overlay enables you to send text messages to all participants during ongoing
Continuous Presence conferences.
The text message is seen as part of the in the participant’s video layout on the endpoint
screen or desktop display.
For more details, see "Message Overlay for Text Messaging” on page 2-67.
Define the following fields:
Table 2-19 New AVC Profile - Message Overlay Parameters
Field Description
Enable Select this check box to enable Message Overlay. Clear this check
box to disable Message Overlay.
Default: Cleared.
Note:
• The Message Overlay field is shaded and disabled when Video
Switching mode is selected in the New Profile - General tab. All
other fields in this tab are also disabled.
• Clearing the Enable check box enables Video Switching for
selection in the New Profile - General tab.
• If Message Overlay is selected, the Video Switching check box in
the New Profile - General tab is disabled and cannot be selected.
Content Enter the message text. The message text can be up to 50 (MPMx)
or 32 (MPM+) Chinese characters.
Font Size In MPMx Card Configuration Mode:
Click the arrows to adjust the font size (points) for the Message
Overlay display.
Range: 9 - 32
Default: 24
In MPM+ Card Configuration Mode:
Select the size of the text font from the list: Small, Medium or Large.
Default: Small
Note: In some languages, for example Russian, when a large font
size is selected, both rolling and static messages may be truncated if
the message length exceeds the resolution width.
2-46 Polycom, Inc.
Page 79
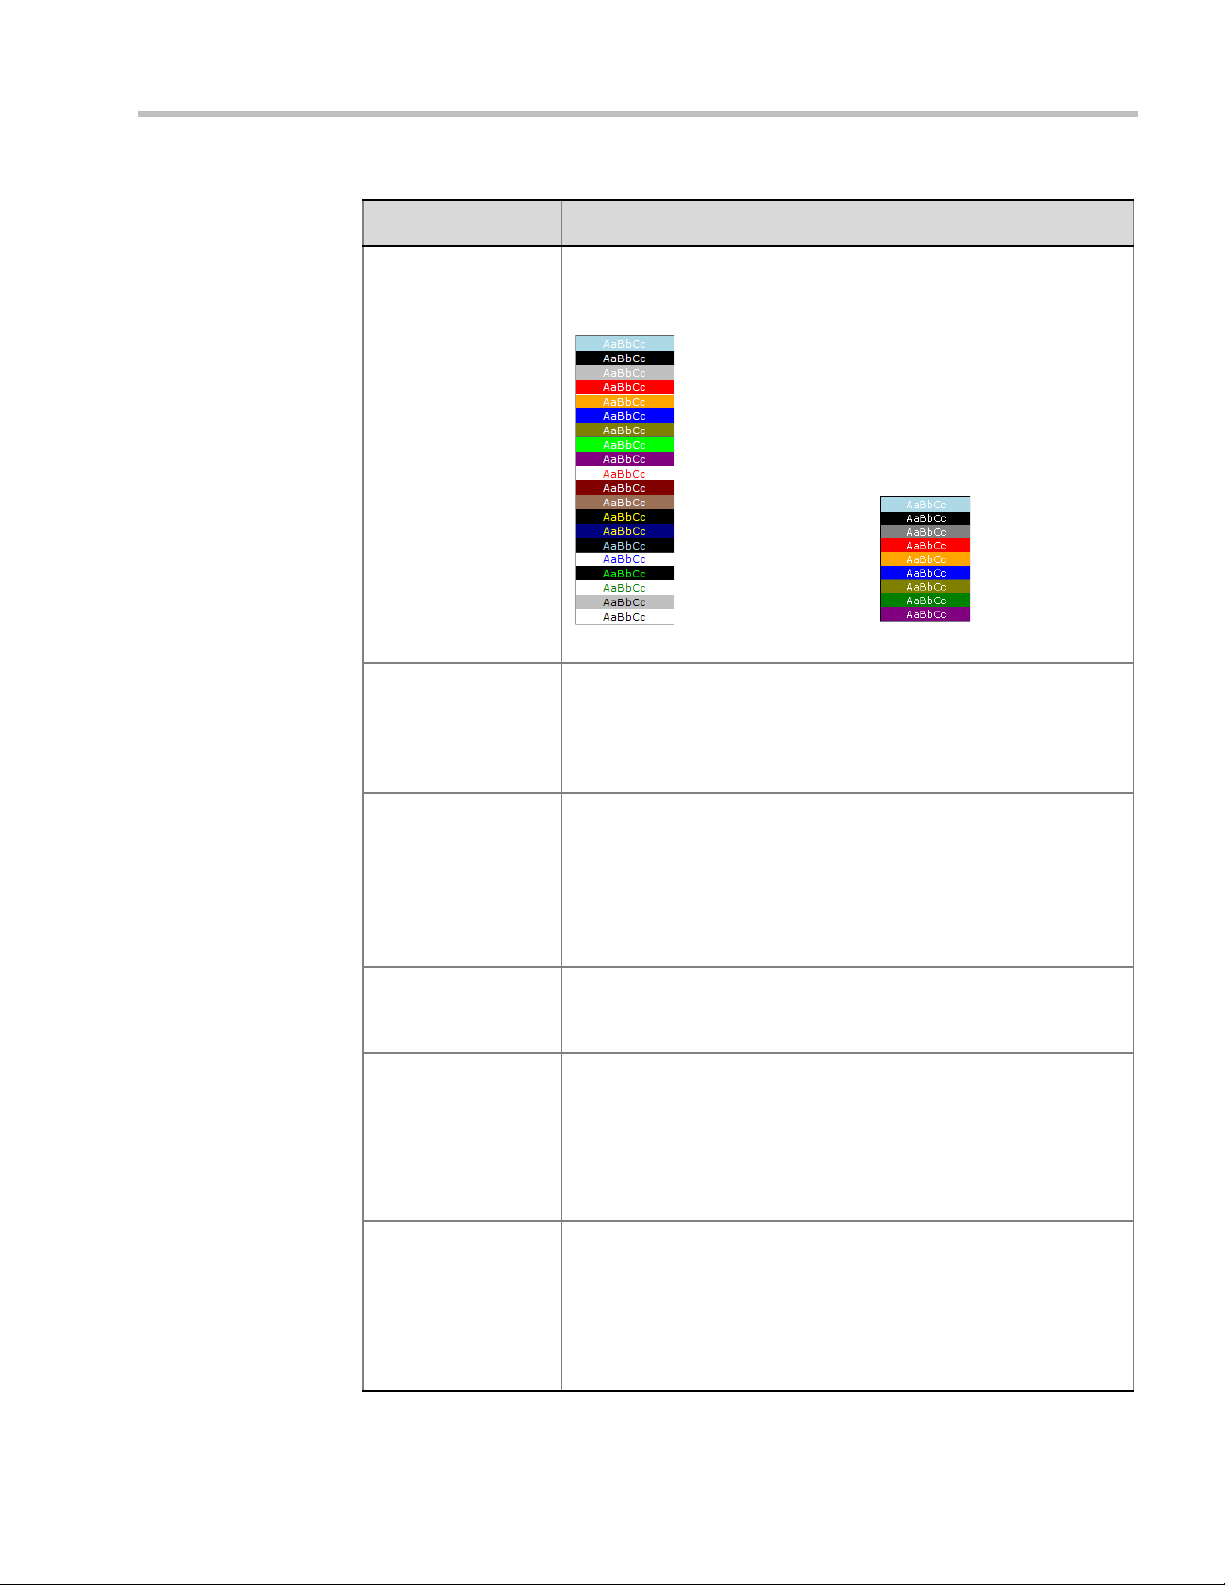
Chapter 2-Conference Profiles
MPMx Mode
Color Options
MPM+ Mode
Color Options
Table 2-19 New AVC Profile - Message Overlay Parameters (Continued)
Field Description
Color From the drop-down menu select the color and background of the
Message Overlay display text.
The choices are:
Default: White Text on Red Background.
Vertical Position
(MPMx Card
Configuration Mode
Only)
Background
Transparency
(MPMx Card
Configuration Mode
Only)
Display Repetition Click the arrows to increase or decrease the number of times that the
Display Position
(MPM+ Card
Configuration Mode
Only)
Move the slider to the right to move the vertical position of the
Message Overlay downward within the Video Layout.
Move the slider to the left to move the vertical position of the
Message Overlay upward within the Video Layout.
Default: Top Left (10)
Move the slider to the left to decrease the transparency of the
background of the Message Overlay text. 0 = No transparency (solid
background color).
Move the slider to the right to increase the transparency of the
background of the Message Overlay text. 100 = Full transparency (no
background color).
Default: 50
text message display is to be repeated.
Default: 3
Select the position for the display of the Message Overlay on the
endpoint screen:
• To p
• Middle
• Bottom
Default: Bottom
Display Speed Select whether the text message display is static or moving across
the screen, the speed in which the text message moves:
• Static
• Slow
• Fast
Default: Slow
Polycom, Inc. 2-47
Page 80

Polycom RealPresence Collaboration Server (RMX) 1500/2000/4000 Administrator’s Guide
Small Text, White on red, Top, Middle
Small Text, White on yellow, Bottom
As the fields are modified the Preview changes to show the effect of the changes.
For example:
24 Click the Network Services tab.
The New Profile - Network Services tab opens.
2-48 Polycom, Inc.
Registration of conferencing entities such as ongoing conferences, Meeting Rooms,
Entry Queues, SIP Factories and Gateway Sessions with SIP servers is done per
conferencing entity. This allows better control on the number of entities that register
with each SIP server. Selective registration is enabled by assigning a conference Profile
in which registration is configured to the required conferencing entities. Assigning a
conference Profile in which registration is not configure to conferencing entities will
prevent them from registering. By default, Registration is disabled in the Conference
Profile, and must be enabled in Profiles assigned to conferencing entities that require
registration.
Page 81

Chapter 2-Conference Profiles
25 Define the following parameters:
Table 2-20 New AVC Profile - Network Services Parameters
Parameter Description
IP Network Services:
Service Name This column lists all the defined Network Services, one or several
depending on the system configuration.
SIP Registration To register the conferencing entity to which this profile is assigned
with the SIP Server of the selected Network Service, click the check
box of that Network Service in this column.
When SIP registration is not enabled in the conference profile, the
RMX's registering to SIP Servers will each register with an URL
derived from its own signaling address. This unique URL replaces the
non-unique URL, dummy_tester, used in previous versions.
Accept Calls To prevent dial in participants from connecting to a conferencing
entity when connecting via a Network Service, clear the check box of
the Network Service from which calls cannot connect to the
conference.
26 Click OK to complete the Profile definition.
A new Profile is created and added to the Conference Profiles list.
Polycom, Inc. 2-49
Page 82

Polycom RealPresence Collaboration Server (RMX) 1500/2000/4000 Administrator’s Guide
Defining a Video Switching Conference Profile
A Video Switching-enabled Profile must be created prior to running Video Switching
conferences.
Video Switching conferences and Meeting Rooms are created by selecting a Video
Switching-enabled Profile and must be set to the same line rate as the target conference.
To connect to an Video Switching conference via an Entry Queue, the Entry Queue must be
Video Switching enabled. It is recommended to use the same Profile for both the target
conference and Entry Queue.
To Create a Video Switching-enabled Profile:
1 In the RMX Management pane, click Conference Profiles.
2 In the Conference Profiles pane, click the New Profile button.
The New Profile – General dialog box opens.
2-50 Polycom, Inc.
Page 83

Chapter 2-Conference Profiles
3 Define the Profile name and, if required, the Profile - General parameters:
Table 2-21 New AVC Profile (VSW) - General Parameters
Field/Option Description
Display Name Enter a unique Profile name, as follows:
•
English text uses ASCII encoding and can contain the most
characters (length varies according to the field).
• European and Latin text length is approximately half the length of
the maximum.
• Asian text length is approximately one third of the length of the
maximum.
It is recommended to use a name that indicates the Profile type, such
as Operator conference or Video Switching conference.
Note: This field is displayed in all tabs.
Line Rate Select the conference bit rate. The line rate
video, audio and Content rate
When defining a VSW profile, select a line rate that all connecting
participants can use. Participants that their endpoint or network that
do not support this line rate cannot connect to the conference or will
connect as Audio Only (if resources were designated as Voice ports).
If a high definition resolution will be selected for the conference video,
make sure that the selected line rate is higher than the line rate
minimum threshold defined in the flag HD_THRESHOLD_BITRATE
for HD video Switching conferences.
The default setting is 384 Kbps.
Notes:
.
represents the combined
• This field is displayed in all tabs.
• Maximum line rate at which ISDN endpoints can connect to a
conference is 768 kbps.
Conferencing Mode Make sure that AVC Only is selected (default) to define a VSW
conference Profile.
Note: This field is displayed in all tabs.
Routing Name Enter the Profile name using ASCII characters set.
The Routing Name can be defined by the user or automatically
generated by the system if no Routing Name is entered as follows:
• If an all ASCII text is entered in Display Name, it is used also as
the Routing Name.
• If any combination of Unicode and ASCII text (or full Unicode text)
is entered in Display Name, the ID (such as Conference ID) is
used as the Routing Name.
Polycom, Inc. 2-51
Page 84

Polycom RealPresence Collaboration Server (RMX) 1500/2000/4000 Administrator’s Guide
Table 2-21 New AVC Profile (VSW) - General Parameters (Continued)
Field/Option Description
Video Switching If the Operator Conference option is selected, this option is disabled,
and the selection is cleared.
• Select this check box to create a Video Switching profile.
• Then select the video protocol and resolution for the conference.
Resolution supported by MPM media cards:
• H.264 720p30
Resolutions supported by MPM+ and MPMx cards only:
• H.264 1080p60
• H.264 1080p30
• H.264 720p60
• H.264 720p30
• H.264 SD 30
• H.264 CIF
• H.263 CIF
• H.261 CIF
When selected, the conference is in a special conferencing mode
which implies that all participants must connect at the same line rate
and use the same video resolution. Participants with endpoints that
do not support the selected line rate and resolution will connect as
secondary (audio only).
For more information, see "Video Switching (VSW) Conferencing” on
page 2-4.
Notes:
• Video Switching conferencing mode is unavailable to ISDN
participants.
• To connect to a Video Switching conference via Entry Queue, the
Profile assigned to the Entry Queue must be set to Video
Switching. It is recommended to use the same profile for both the
destination conference and Entry Queue.
• Telepresence Mode is unavailable in Video Switching
conferences.
H.264 High Profile Select this check box to enable the use of H.264 High Profile in Video
Switching conferences.
The High Profile check box is only displayed if MPMx cards are
installed in the RMX. By default the High Profile check box is not
selected.
If H.264 is not the selected video protocol the check box is inactive
(grayed out). For more information, see "H.264 High Profile Support
in Video Switching Conferences” on page 2-53.
2-52 Polycom, Inc.
Page 85
Table 2-21 New AVC Profile (VSW) - General Parameters (Continued)
Field/Option Description
Chapter 2-Conference Profiles
Operator Conference
(CP Only)
Selecting a new conference line rate lower than the initial line rate selected for the conference (for
example, changing from 4096 kbps to 1532 kbps) may result in system reverting to the default
resolution for that line rate (for example, 720p instead of 1080p). You may need to select the
required resolution again, provided the selected line rate is higher than the minimum threshold line
rate defined for that resolution in the system configuration. For more details, see “Minimum
Threshold Line Rate System Flags” below.
Select this option to define the profile of an Operator conference.
An Operator conference can only be a Continuous Presence
conference, therefore when selected, the Video Switching option is
disabled and cleared.
When defining an Operator Conference, the Send Content to Legacy
Endpoints option in the Video Settings tab is cleared and disabled.
For more information, see Chapter 10, “Operator Assistance &
Participant Move” on page 10-1.
When Video Switching is selected for the conference, the following options are not
available:
— Operator Conference
— Gathering Phase
— Video Settings:
• Presentation Mode
• Send Content To Legacy Endpoints
• Auto Layout/Same Layout (only full screen, 1x1 layout display is available)
•Auto Scan
— Skins
— Site Names
— Message Overlay
4 Define the various Profile parameters. For more information, see "Defining AVC
Conferencing Profiles” on page 2-19.
5 Click OK.
H.264 High Profile Support in Video Switching Conferences
Beginning with Version 7.6, the H.264 High Profile video protocol is supported in Video
Switching (VSW) conferences.
Guidelines
• H.264 High Profile is supported in VSW conferences:
— With MPMx cards.
— In H.323 and SIP networking environments only (VSW conferences are not
supported in ISDN networking environments.)
• For H.264 High Profile-enabled VSW conferences:
— All endpoints connecting to the conference must support High Profile.
— High Profile-enabled endpoints must connect to the VSW conference at the exact line
rate and exact resolution defined for the conference.
Polycom, Inc. 2-53
Page 86

Polycom RealPresence Collaboration Server (RMX) 1500/2000/4000 Administrator’s Guide
— Endpoints that do not support High Profile, connecting to the VSW conference at
the exact line rate and exact resolution defined for the conference are connected to
the conference as Secondary (audio only).
• For H.264 Base Profile VSW conferences:
— High Profile supporting and non-High Profile supporting endpoints connect to the
VSW conference using the H.264 Base Profile video protocol.
— Endpoints that do not support the exact conference line rate are disconnected.
— Endpoints that do not support the exact video settings such as protocol and
resolution defined for the conference will be connected as Secondary (audio only).
Minimum Threshold Line Rate System Flags
The following table lists the System Flags that control the minimum threshold line rate for the
various resolutions available for High Profile-enabled VSW conferences.
Table 2-22 System Flags - Minimum Threshold Line Rates
Flag Name
VSW_CIF_HP_THRESHOLD_BITRATE 64
VSW_SD_HP_THRESHOLD_BITRATE 128
VSW_HD720p30_HP_THRESHOLD_BITRATE 512
VSW_HD720p50-60_HP_THRESHOLD_BITRATE 832
VSW_HD1080p_HP_THRESHOLD_BITRATE 1024
VSW_HD1080p60_HP_THRESHOLD_BITRATE 1024
VSW_HD_1080p60_BL_THRESHOLD_BITRATE 1728
Minimum Threshold Line
Rate (Kbps)
• Line rate and resolution combinations are checked for validity. If the selected line rate is
below the minimum threshold line rate required for the selected resolution, the line rate is
automatically adjusted to the minimum threshold line rate value for the selected resolution.
• The value of the SUPPORT_HIGH_PROFILE System Flag (used for CP conferences)
has no effect on VSW conferences.
• Before they can be modified, all of the System Flags mentioned above must be added to
the system.cfg file using the RMX Menu – Setup option. For more information see
"Modifying System Flags” on page 22-1.
2-54 Polycom, Inc.
Page 87

Defining SVC Conferencing Profiles
To define SVC Only Profile:
1 In the RMX Management pane, click Conference Profiles.
2 In the Conference Profiles pane, click the New Profile button.
The New Profile – General dialog box opens.
Chapter 2-Conference Profiles
By default, the Profile is set to AVC Only Conferencing Mode.
3 In the Conferencing Mode list, select SVC Only to define an SVC Profile.
Polycom, Inc. 2-55
Page 88

Polycom RealPresence Collaboration Server (RMX) 1500/2000/4000 Administrator’s Guide
The profile tabs and options change accordingly and only supported options are
available for selection. Unsupported options are disabled (grayed out).
4 Define the Profile name and, if required, the Profile - General parameters:
Table 2-23 New SVC Profile - General Parameters
Field/Option Description
Display Name Enter a unique Profile name, as follows:
•
English text uses ASCII encoding and can contain the most
characters (length varies according to the field).
• European and Latin text length is approximately half the length of
the maximum.
• Asian text length is approximately one third of the length of the
maximum.
It is recommended to use a name that indicates the Profile type, such
as Operator conference or Video Switching conference.
Note: This is the only parameter that must be defined when creating
a new profile.
Note: This field is displayed in all tabs.
Line Rate Select the conference bit rate. The line rate
video, audio and Content rate
The default setting for SVC Only conference is 1920kbps.
Notes:
.
represents the combined
• This field is displayed in all tabs.
2-56 Polycom, Inc.
Page 89
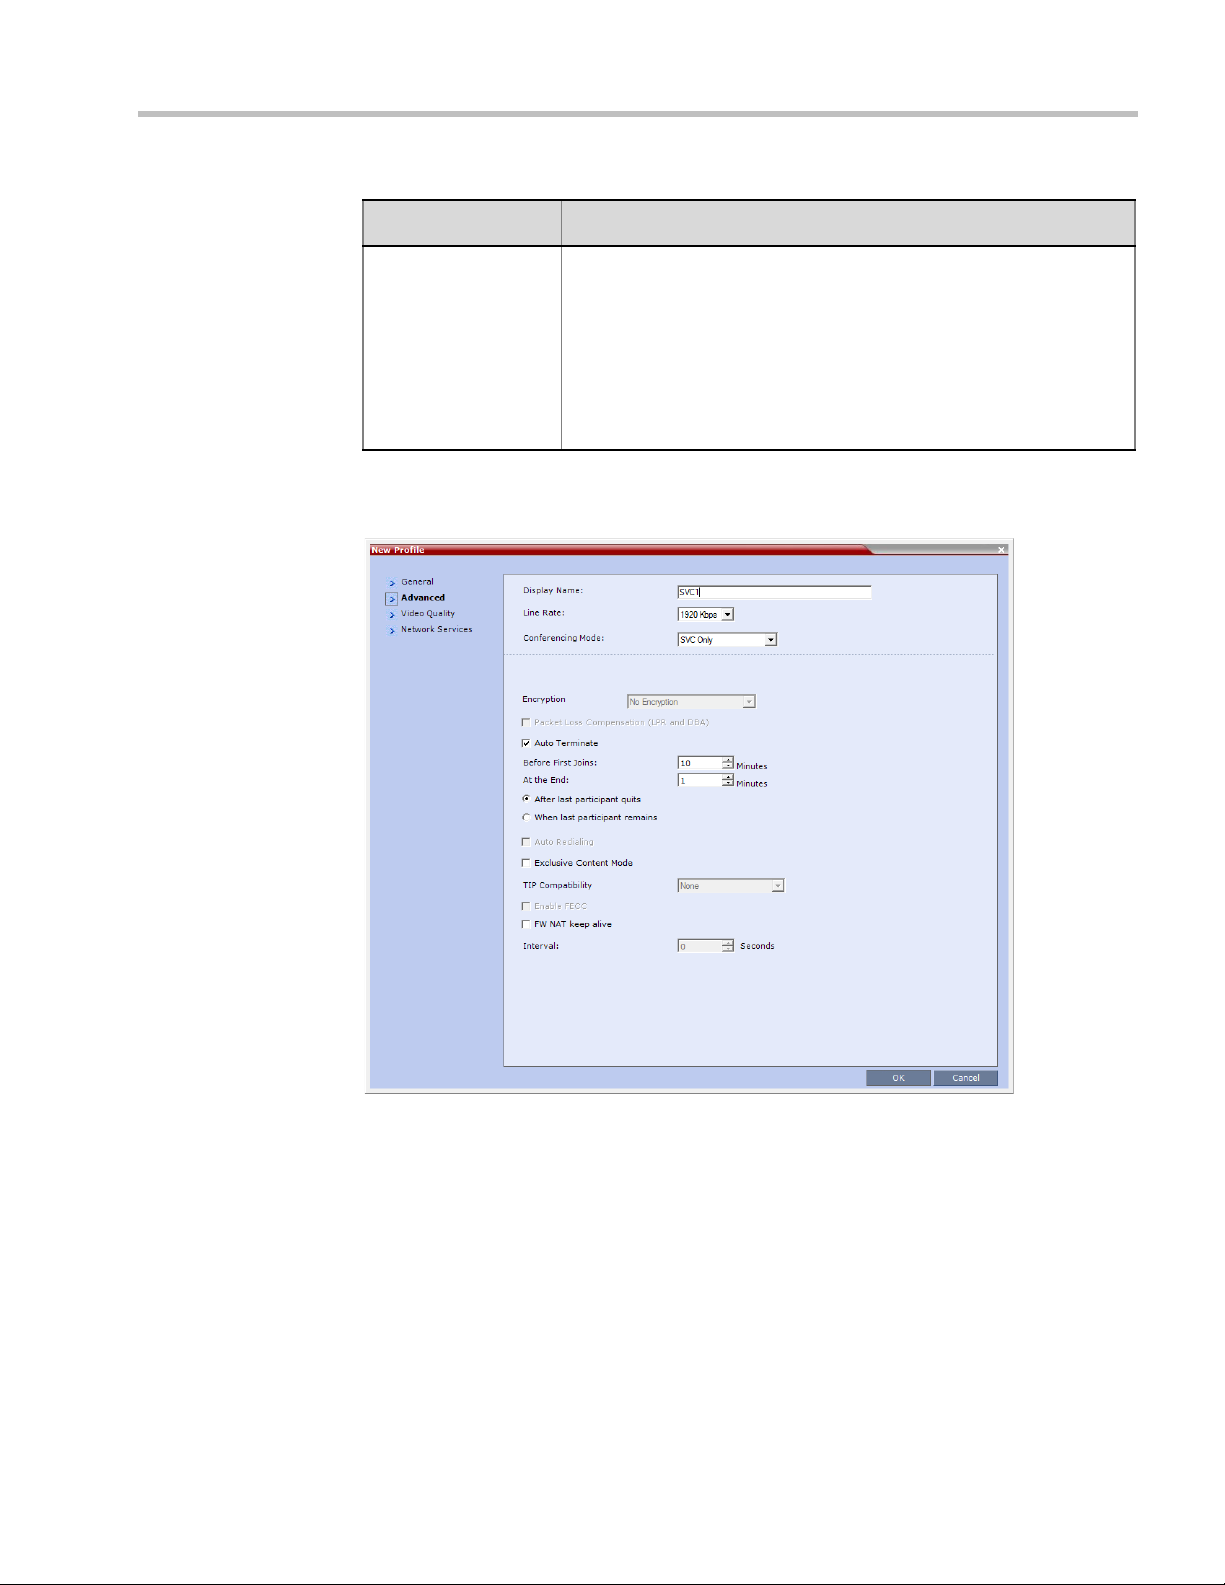
Table 2-23 New SVC Profile - General Parameters (Continued)
Field/Option Description
Routing Name Enter the Profile name using ASCII characters set.
The Routing Name can be defined by the user or automatically
generated by the system if no Routing Name is entered as follows:
• If an all ASCII text is entered in Display Name, it is used also as
the Routing Name.
• If any combination of Unicode and ASCII text (or full Unicode text)
is entered in Display Name, the ID (such as Conference ID) is
used as the Routing Name.
5 Click the Advanced tab.
The New Profile – Advanced dialog box opens.
Chapter 2-Conference Profiles
Polycom, Inc. 2-57
Page 90

Polycom RealPresence Collaboration Server (RMX) 1500/2000/4000 Administrator’s Guide
6 Define the following supported parameters:
Table 2-24 New SVC Profile - Advanced Parameters
Field/Option Description
Auto Terminate When selected (default), the conference automatically ends when the
termination conditions are met:
Before First Joins — No participant has connected to a conference
during the n minutes after it started. Default idle time is 10 minutes.
At the End - After Last participant Quits — All the participants
have disconnected from the conference and the conference is idle
(empty) for the predefined time period. Default idle time is 1 minute.
At the End - When Last Participant Remains — Only one
participant is still connected to the conference for the predefined time
period (excluding the recording link which is not considered a
participant when this option is selected).
It is not recommended to select this option for SVC Conferences.
Default idle time is 1 minute.
Exclusive Content
Mode
When selected, Content broadcasting is limited to one participant
preventing other participants from interrupting the Content
broadcasting while it is active. For more details, see
FW NAT Keep Alive When selected, an FW NAT Keep Alive message is sent at an interval
defined in the field below the check box.
Interval The time in seconds between FW NAT Keep Alive messages.
2-58 Polycom, Inc.
Page 91

7 Click the Video Quality tab.
The New Profile – Video Quality dialog box opens.
Chapter 2-Conference Profiles
8 Define the following parameters:
Table 2-25 New SVC Profile - Video Quality Parameters
Field/Option Description
Content Video Definition
Content Settings Only Graphics is available in SVC Conferencing Mode for
transmission of Content. It offers the
basic mode, intended for normal graphics
For more information, see "H.239” on page 4-2.
Content Protocol H.264 Cascade and SVC Optimized is the only available Content
Protocol for content sharing during SVC-based conferences.
In this mode, all Content is shared using the H.264 content protocol
and all endpoints must use the set video resolution and frame rate
(720p 5fps). Endpoints that do not support these settings cannot
share content.
9 Click the Network Services tab.
Polycom, Inc. 2-59
Page 92

Polycom RealPresence Collaboration Server (RMX) 1500/2000/4000 Administrator’s Guide
The New Profile - Network Services tab opens.
Registration of conferencing entities such as ongoing conferences, Meeting Rooms, and
SIP Factories with SIP servers is done per conferencing entity. This allows better control
of the number of entities that register with each SIP server. Selective registration is
enabled by assigning a conference Profile in which registration is configured for the
required conferencing entities. Assigning a conference Profile in which registration is
not configure for conferencing entities will prevent them from registering. By default,
Registration is disabled in the Conference Profile, and must be enabled in Profiles
assigned to conferencing entities that require registration.
10 Define the following parameters:
Table 2-26 New SVC Profile - Network Services Parameters
Parameter Description
IP Network Services:
Service Name This column lists all the defined Network Services, one or several
depending on the system configuration.
SIP Registration To register the conferencing entity to which this profile is assigned
with the SIP Server of the selected Network Service, click the check
box of that Network Service in this column.
When SIP registration is not enabled in the conference profile, the
RMX's registering to SIP Servers will each register with an URL
derived from its own signaling address. This unique URL replaces the
non-unique URL, dummy_tester, used in previous versions.
2-60 Polycom, Inc.
Page 93
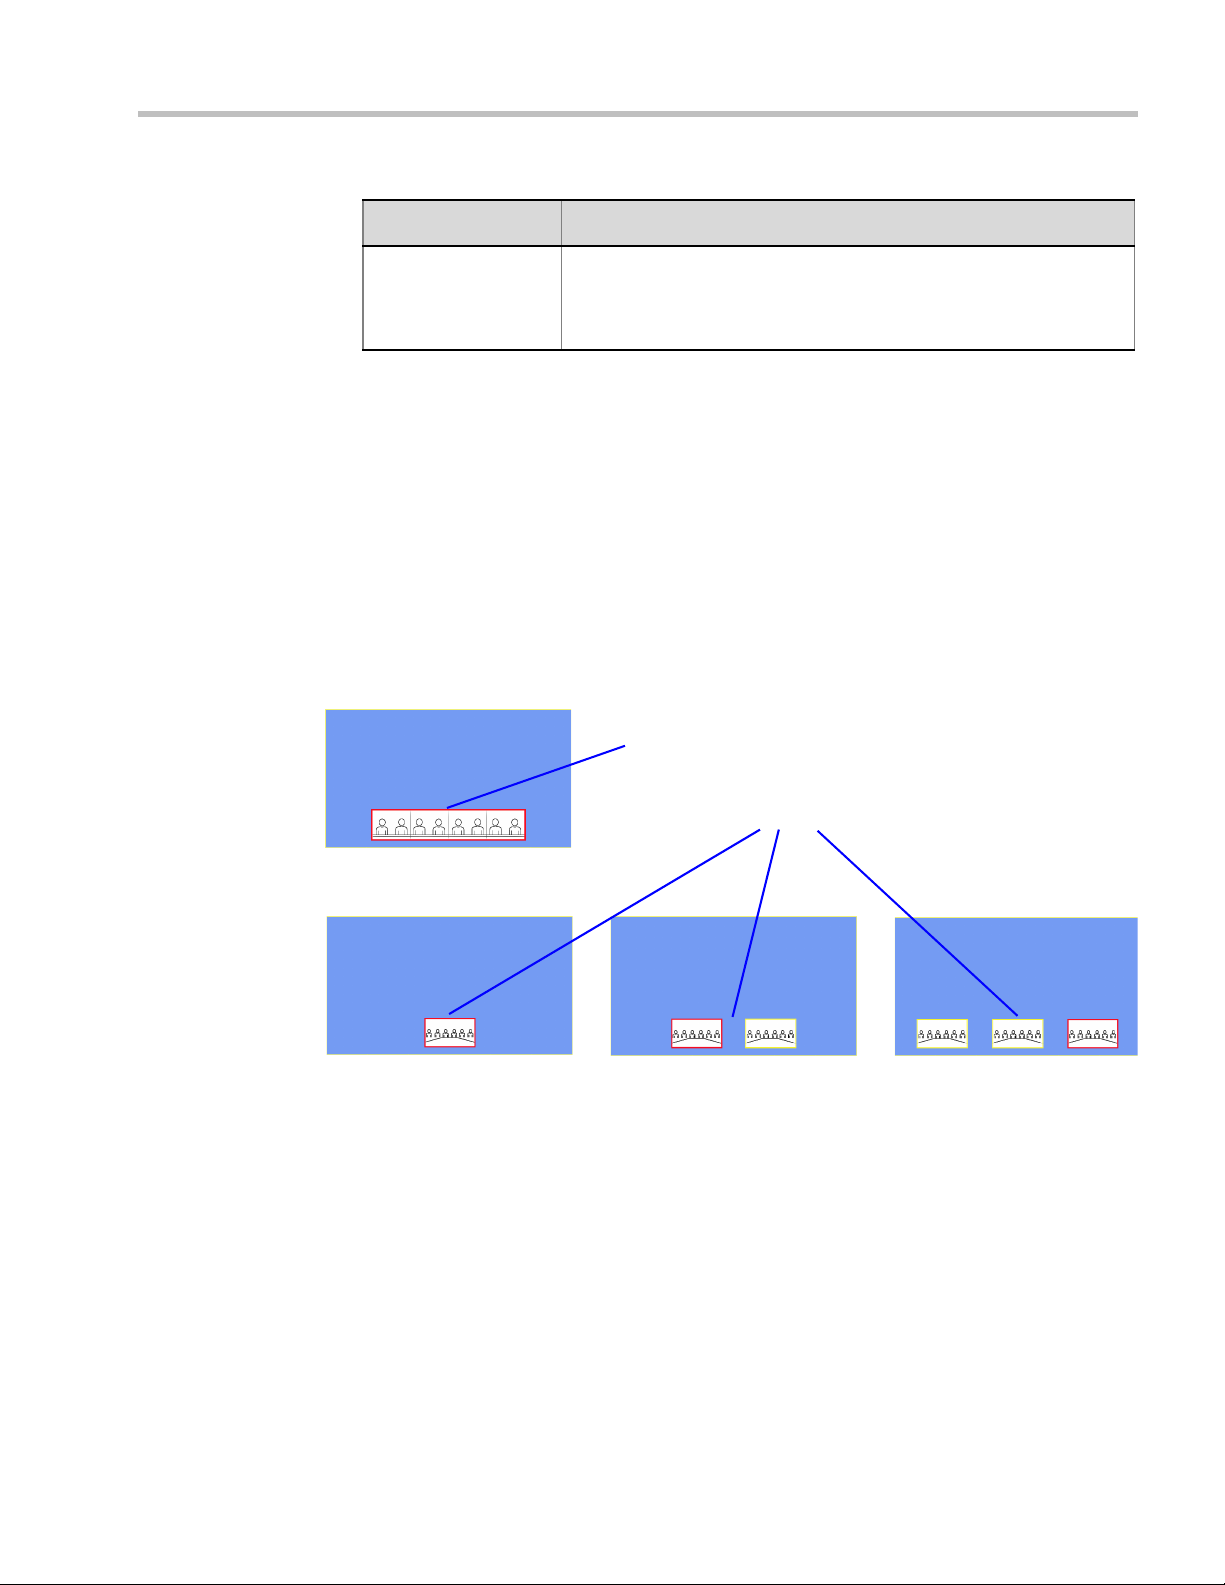
Table 2-26 New SVC Profile - Network Services Parameters (Continued)
Overlay Cell: Telepresence (ITP) Room
OTX/RPX (2-4 screens)
Overlay Cell(s): 1, 2 or 3Standalone Endpoints
Parameter Description
Accept Calls To prevent dial in participants from connecting to a conferencing
entity when connecting via a Network Service, clear the check box of
the Network Service from which calls cannot connect to the
conference.
11 Click OK to complete the Profile definition.
A new Profile is created and added to the Conference Profiles list.
CP Conferencing Additional Information
Overlay Layouts
Overlay Layouts allow additional participant endpoints to be displayed in 1x1 conference
Video Layouts. The following Overlay Layouts are available:
Chapter 2-Conference Profiles
Guidelines
•The Overlay Layouts are supported:
— With MPMx cards only.
— In RMX CP mode only.
— With ITP, non-ITP and CTS endpoints. Support of ITP and CTS requires MLA as a
•The Overlay Layouts are 20% of the height of the endpoint display and are supported on
• Overlay Layouts are recommended for use with high resolution endpoints.
Polycom, Inc. 2-61
system component. (For more information see the Polycom® Multipoint Layout
Application (MLA) User’s Guide for Use with Polycom Telepresence Solutions).
— With both new and old Skins in RMX CP mode. Skins do not apply to ITP
conferences.
endpoints of both 16:9 and 4:3 aspect ratios.
Page 94

Polycom RealPresence Collaboration Server (RMX) 1500/2000/4000 Administrator’s Guide
• Overlay Layouts are not selected as defaults by the system. Default layouts are selected
as in previous versions and are described in detail in "Auto Layout – Default Layouts” on
page 2-33.
•The Overlay Layouts are not available for selection when using PCM or Click&View for
Personal Layout selection. PCM menus are not affected by the use of Overlay Layouts and
are displayed as the top level overlay.
• Message Overlay is not affected by the use of Overlay Layouts and is displayed as the top
level overlay.
• Vertical Position for Site Name display: Site Names are displayed for all cells. Because the
smaller cells are located at the bottom of the large cell, when enabling Site Names it is
advisable not to locate the Site Name at the bottom of the cells.
Telepresence (ITP) Room Layout Overlay
•The Telepresence (ITP) Room Layout Overlay is displayed with a border of the selected
Skin’s border color for the entire room while no border is displayed between the
individual room cameras. For more information see “Skins” on page 2-38.
• When an ITP Room is selected for as an overlay cell, only Telepresence Room names are
listed for selection in the drop-down menu - not the individual endpoints in the ITP
Room.
If Auto is selected in the drop-down menu, the overlay cell will display the active
speaker unless the active speaker is the large cell. If the endpoint itself is the current
speaker, the previous speaker is displayed.
For more information see "Selecting the Overlay Layouts” on page 2-63. All other System
behavior for Video Forcing and Personal Layout Control using the Overlay Layouts during
an ongoing conference is the same as for previous versions and is described in the
RealPresence Collaboration Server 1500/2000/4000 Getting Started Guide:
— "Video Forcing (AVC-based Conferences)”
— "Personal Layout Control with the RMX Web Client” on page 3-68.
on page 3-
58
Standalone Endpoint Layout Overlay
•Each Standalone Endpoint Layout Overlay is displayed with a border of the selected Skin’s
border color. For more information see “Skins” on page 2-38.
2-62 Polycom, Inc.
Page 95

Chapter 2-Conference Profiles
New Tab: Overlay
1 Standalone
Endpoint
2 Standalone
Endpoints
3 Standalone
Endpoints
1 ITP Room
ITP Room Names
Displayed in
Drop-down Menu
Selecting the Overlay Layouts
The Overlay Layouts are selected using the New Profile - Video Settings dialog box.
An additional tab, Overlay, has been added and includes the additional layout options.
Polycom, Inc. 2-63
Page 96

Polycom RealPresence Collaboration Server (RMX) 1500/2000/4000 Administrator’s Guide
Site Names without Background
(Plain Skin)
Site Names with Background
(Picture Skin)
Site Names Definition
Using the Site Name dialog box, you can control the display of the site names by defining the
font, size, color, background color and transparency and position within the Video Window.
2-64 Polycom, Inc.
Guidelines
•Only MPMx cards are supported.
• Site Names display is Off by default in a new profile.
• Site Names can be enabled to function in one of two modes:
— Auto – Site names are displayed for 10 seconds whenever the conference layout
changes.
— On – Site names are displayed for the duration of the conference.
• During the display of the site names, the video frame rate is slightly reduced
• Site Names display is not available for Video Switching (VSW) conferences.
• Site Names display characteristics (position, size, color) can by modified during an
ongoing conference using the Conference Properties - Site Names dialog box. Changes are
immediately visible to all participants.
• Site Names display text and background color is dependent on the Skin selected for the
conference:
— Plain Skins - Site Names text is displayed without a background.
Page 97
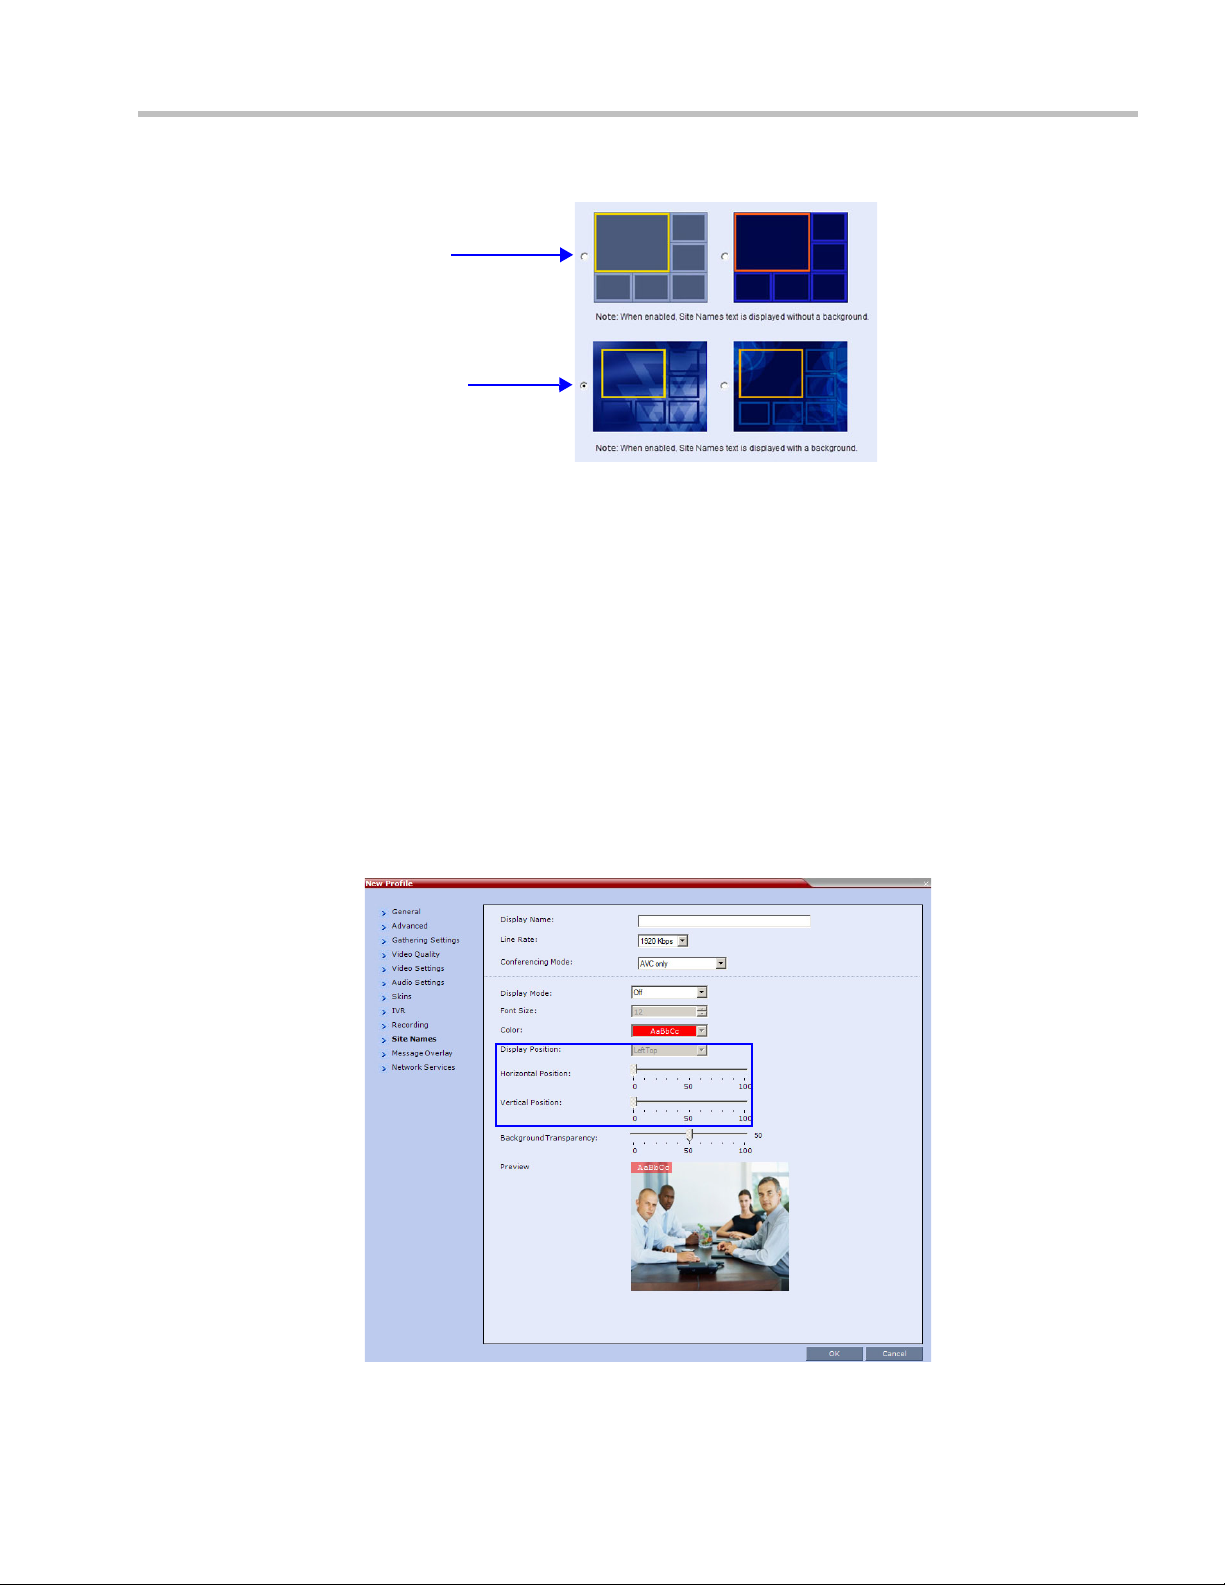
Chapter 2-Conference Profiles
Plain Skins
Picture Skins
— Picture Skins - Site Names text is displayed with a background.
•In MPMx Card Configuration Mode, the Site Names tab options replace the functionality
of the System Flags that were used in versions 7.6 and earlier (as for MPM+).
•In MPM+ Card Configuration Mode, Site Names display is controlled by the following
System Flags, as in previous versions:
— SITE_NAME_TRANSPARENCY
— SITE_NAMES_ALWAYS_ON
— SITE_NAMES_LOCATION
For more information see "Modifying System Flags” on page 22-1.
Site Names Display Position
The Site Names display position is controlled using three fields in the Site Names tab:
• Display Position drop-down menu
• Horizontal Position slider
• Vertical Position slider
Using these three fields, the position at which the Site Names are displayed in the Video
Windows can be set by:
Polycom, Inc. 2-65
Page 98

Polycom RealPresence Collaboration Server (RMX) 1500/2000/4000 Administrator’s Guide
Preset
Position
LeftTop
• Selecting a preset position from the drop-down menu in the Display Position field.
•Moving the Horizontal and Vertical Position sliders.
• Selecting Custom and moving the Horizontal and Vertical Position sliders.
Selecting a preset position from the drop-down menu in the Display Position field
>> In the Display Position drop-down menu select a preset position for Site Names display.
Preset positions include:
LeftTop Top RightTop
LeftMiddle RightMiddle
LeftBottom Bottom RightBottom
Custom
When Custom is selected, the current position becomes the initial position for Site Names
position adjustments using the Horizontal and Vertical Position sliders.
The Horizontal and Vertical Position sliders are automatically adjusted to match the
Display Position drop-down menu preset selection.
Moving the Horizontal and Vertical Position sliders
>> Drag the Horizontal and Vertical Position sliders to adjust the position of the Site Names
display.
The Site Names display moves from its current position according to the slider
movement.
Dragging the sliders causes the Display Position drop-down menu field to be set
Custom.
Selecting Custom and moving the Horizontal and Vertical Position sliders
1 In the Display Position drop-down menu select Custom.
The current Site Names position becomes the initial position for Site Names position.
Dragging the Horizontal and Vertical Position sliders moves the Site Names from this
position.
2 Drag the Horizontal and Vertical Position sliders to adjust the position of the Site Names
display.
For a detailed description of the Site Names dialog box options, see Table 2-18 on page 2-42.
2-66 Polycom, Inc.
Page 99

Message Overlay for Text Messaging
Overlay
Message Overlay
Message Overlay allows the operator or administrator to send text messages to a single,
several or all participants during an ongoing conference.
The text message is seen as part of the in the participant’s video layout on the endpoint
screen or desktop display.
Guidelines
• Message Overlay messaging is supported in:
— MPM+ and MPMx Card Configuration Modes, with a few differences in
implementation between the two modes
— Continuous Presence (CP)conferences
— in Same Layout mode
— in encrypted conferences
It is not available for Video Switching (VSW) conferences.
• Messages Overlay can be enabled or disabled during the ongoing conference.
•Text messages Content can be changed on the fly during the ongoing conference.
• Message Overlay text messages are supported in Unicode or ASCII characters.
• The number of characters for each language can vary due to the type of font used, for
example, the available number of characters for Chinese is 32, while for English and
Russian it is 48.
— In some languages, for example Russian, when large font size is selected, both
rolling and static messages may be truncated if the message length exceeds the
resolution width.
• Changes to the Message Overlay display characteristics (position, size, color and speed)
are immediately visible to all participants.
• Changes to the Message Overlay Content are immediately visible to all participants.
When there is a current Message Overlay:
— The current message is stopped immediately.
— The Display Repetition count is reset to 1.
— The new message Content is displayed <Display Repetition> times or until it is
stopped and replaced by another Content change.
•If a Repeating Message is modified before it has completed all its repetitions, it is changed
immediately without completing all of its repetitions. The modified Repeating Message is
displayed starting with repetition one.
• Message Overlay messaging is not supported in Lecture mode.
• If during the ongoing conference the Show Number of Participants DTMF option
(default DTMF *88) is used, when the displayed number of participants is removed, the
message overlay text is also removed.
Chapter 2-Conference Profiles
Polycom, Inc. 2-67
Page 100

Polycom RealPresence Collaboration Server (RMX) 1500/2000/4000 Administrator’s Guide
• Participants that have their video suspended do not receive Message Overlays messages.
• Message Overlay text messages cannot be sent via the Content channel.
• Message Overlay messages are not displayed when the PCM menu is active.
• Message Overlay text settings are not saved in the Conference Template when saving an
ongoing conference as a Conference Template.
• Sending text messages using Message Overlay can be enabled or disabled during the
ongoing conference. For more details, see the RealPresence Collaboration Server (RMX)
1500/2000/4000 Getting Started Guide, "Sending Text Messages to All Participants Using
Message Overlay (AVC-based Conferences)” on page 3-64.
• Text messages can be sent to individual or several participants during the ongoing
conferences. For more details, see the RealPresence Collaboration Server (RMX) 1500/2000/
4000 Getting Started Guide, "Sending Messages to Selected Participants Using Message
Overlay” on page 3-71.
For a detailed description of the Message Overlay parameters, see Table 2-19, “New AVC
Profile - Message Overlay Parameters,” on page 2-46.
2-68 Polycom, Inc.
 Loading...