

Page 1
Polycom® DMA™ 7000 System Getting Started Guide
v. 2.3 | February 2011 | 3725-76311-020D
Page 2

Trademark Information
Polycom®, the Polycom “Triangles” logo, and the names and marks associated with Polycom’s products are
trademarks and/or service marks of Polycom, Inc., and are registered and/or common-law marks in the United
States and various other countries.
All other trademarks are the property of their respective owners.
Java is a registered trademark of Oracle and/or its affiliates.
Patent Information
The accompanying product is protected by one or more U.S. and foreign patents and/or pending patent
applications held by Polycom, Inc.
End User License Agreement
Use of this software constitutes acceptance of the terms and conditions of the Polycom DMA 7000 system end-user
license agreement (EULA).
The EULA is included in the release notes document for your version, which is available on the Polycom Support
page for the Polycom DMA 7000 system.
© 2011 Polycom, Inc. All rights reserved.
Polycom, Inc.
4750 Willow Road
Pleasanton, CA 94588-2708
USA
No part of this document may be reproduced or transmitted in any form or by any means, electronic or
mechanical, for any purpose, without the express written permission of Polycom, Inc. Under the law, reproducing
includes translating into another language or format.
As between the parties, Polycom, Inc., retains title to and ownership of all proprietary rights with respect to the
software contained within its products. The software is protected by United States copyright laws and international
treaty provision. Therefore, you must treat the software like any other copyrighted material (e.g., a book or sound
recording).
Every effort has been made to ensure that the information in this manual is accurate. Polycom, Inc., is not
responsible for printing or clerical errors. Information in this document is subject to change without notice.
ii
Page 3

Contents
Polycom® DMA™ System Server Setup . . . . . . . . . . . . . . . . . 1
Regulatory Notices . . . . . . . . . . . . . . . . . . . . . . . . . . . . . . 15
End User License Agreement . . . . . . . . . . . . . . . . . . . . . . . . . . . . . . . . . . . . . . . 1
Collect Necessary Materials . . . . . . . . . . . . . . . . . . . . . . . . . . . . . . . . . . . . . . . . 2
Complete the First-Time Setup Worksheet . . . . . . . . . . . . . . . . . . . . . . . . . . . 2
Unpack and Install the Hardware Components . . . . . . . . . . . . . . . . . . . . . . . 6
Configure the Polycom DMA System Server(s) . . . . . . . . . . . . . . . . . . . . . . . 7
Alternate Procedure: Configure the Polycom DMA System Server(s)
Without Using the USB Stick . . . . . . . . . . . . . . . . . . . . . . . . . . . . . . . . . . . . . . 11
Polycom, Inc. iii
Page 4

DMA Getting Started Guide
iv Polycom, Inc.
Page 5
Polycom® DMA™ System Server Setup
The sections below describe the steps required to perform the initial setup of a
Polycom
platform server or two-node server cluster.
If you’re installing a new server to expand a single-node system into a two-node
cluster, see “Adding a Second Server” in the Polycom DMA Operations Guide or
online help.
At the end of this procedure, you will have successfully logged into the
Polycom DMA system and be ready to finish configuring the system,
including setting up users and MCUs, integrating with an enterprise directory,
configuring signaling, and completing other configuration tasks.
®
Distributed Media Application™ (DMA™) multipoint conference
End User License Agreement
Use of this software constitutes acceptance of the terms and conditions of the
Polycom DMA 7000 system end-user license agreement (EULA).
The EULA is included in the release notes document for your version, which
is available on the Polycom Support page for the Polycom DMA 7000 system.
Polycom, Inc. 1
Page 6
DMA Getting Started Guide
Collect Necessary Materials
Before you install a Polycom DMA system, collect these materials:
• Polycom DMA system server shipment
• Completed First-Time Setup Worksheet
• PC running Microsoft® Windows® (XP Pro or Vista) with:
— USB port
— Java™ 1.6 or newer
— Microsoft Internet Explorer® 7 or newer, or Mozilla Firefox® 3 or
newer
— Adobe® Flash® Player 9.0.124 or newer
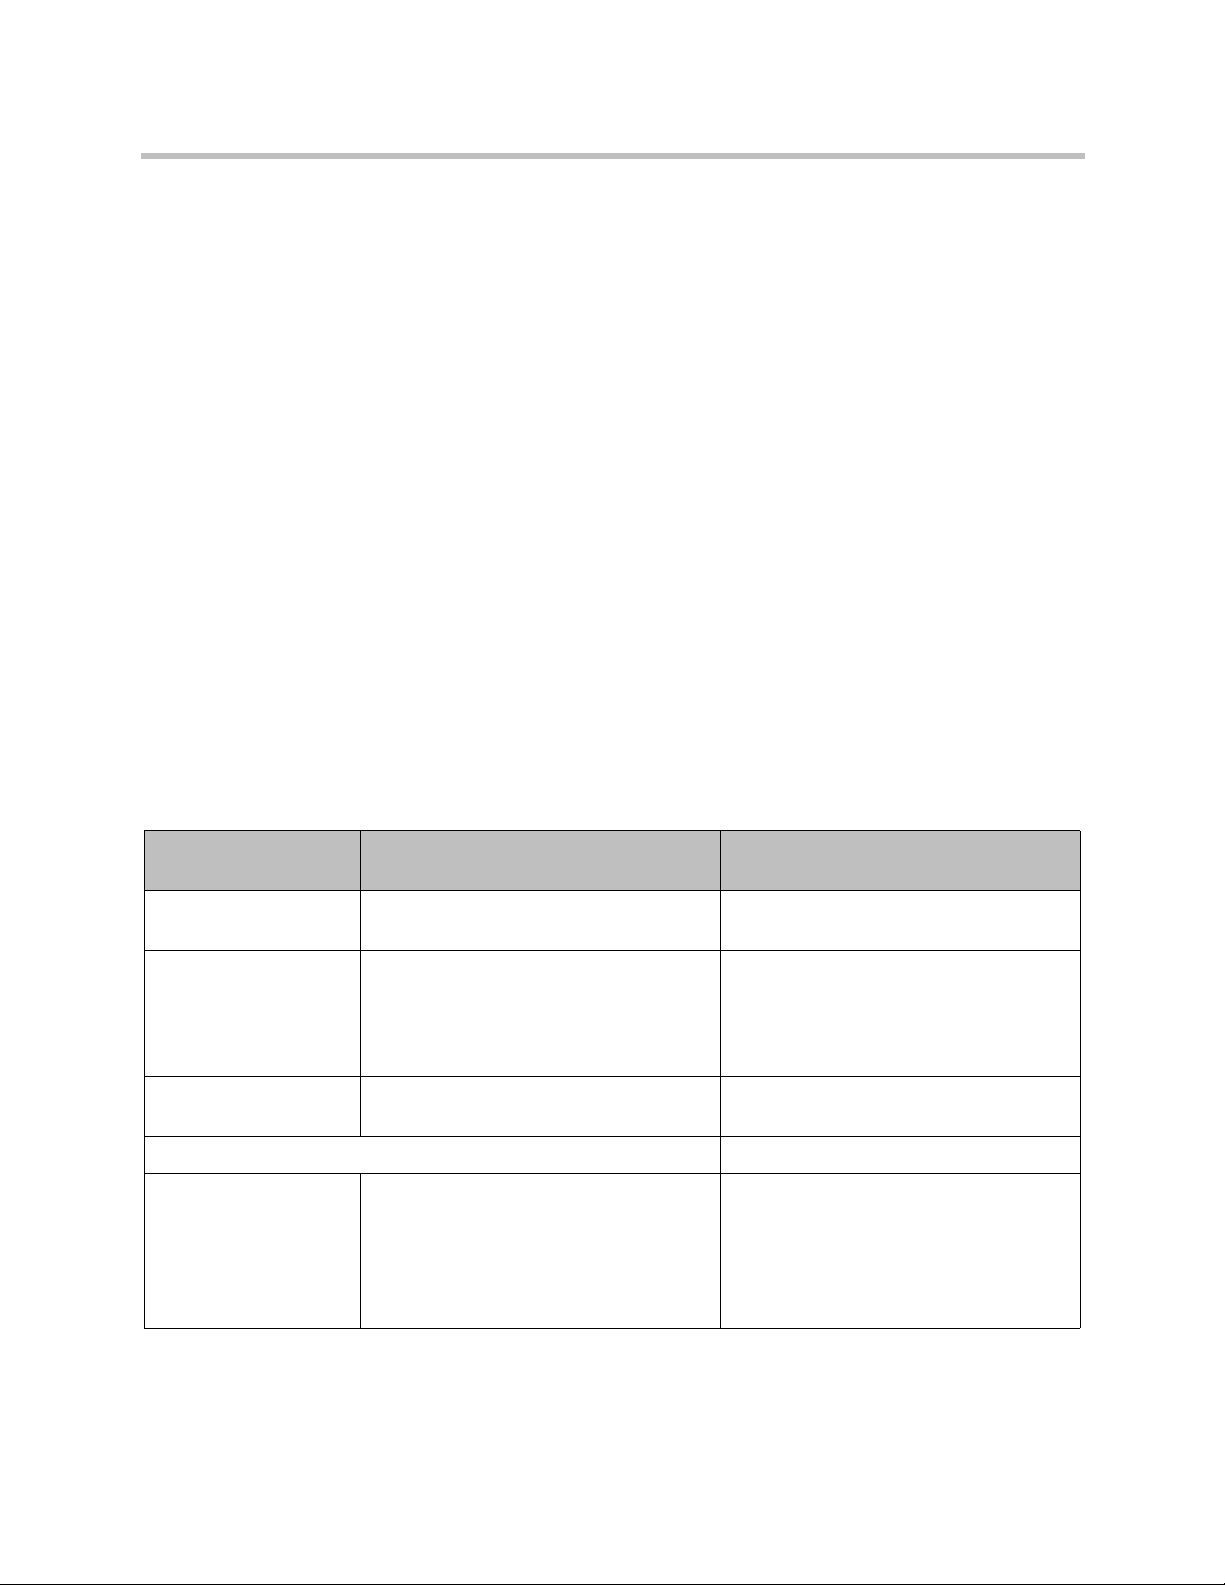
Complete the First-Time Setup Worksheet
Before you begin system setup, fill out the My System Values column of this
worksheet.
First-Time Setup Worksheet
System Configuration
Information My System Values Description
One node or two? For a single-node system, skip the Node 2
section below.
Separate management
and signaling
interfaces, or
combined?
IPv4, IPv6, or both? Complete the appropriate address fields
Node 1
Management host
name
If the same network will be used for both
management (administrative access) and
signaling, skip the signaling IP addresses
and the Shared Signaling Network
Settings section below.
below for your choice.
Local host name of the first (or only)
Polycom DMA system server’s
management (or combined) interface.
Must be a valid host name: the letters a - z
(case-insensitive), digits 0 - 9, and internal
hyphens are allowed.
2 Polycom, Inc.
Page 7
Polycom® DMA™ System Server Setup
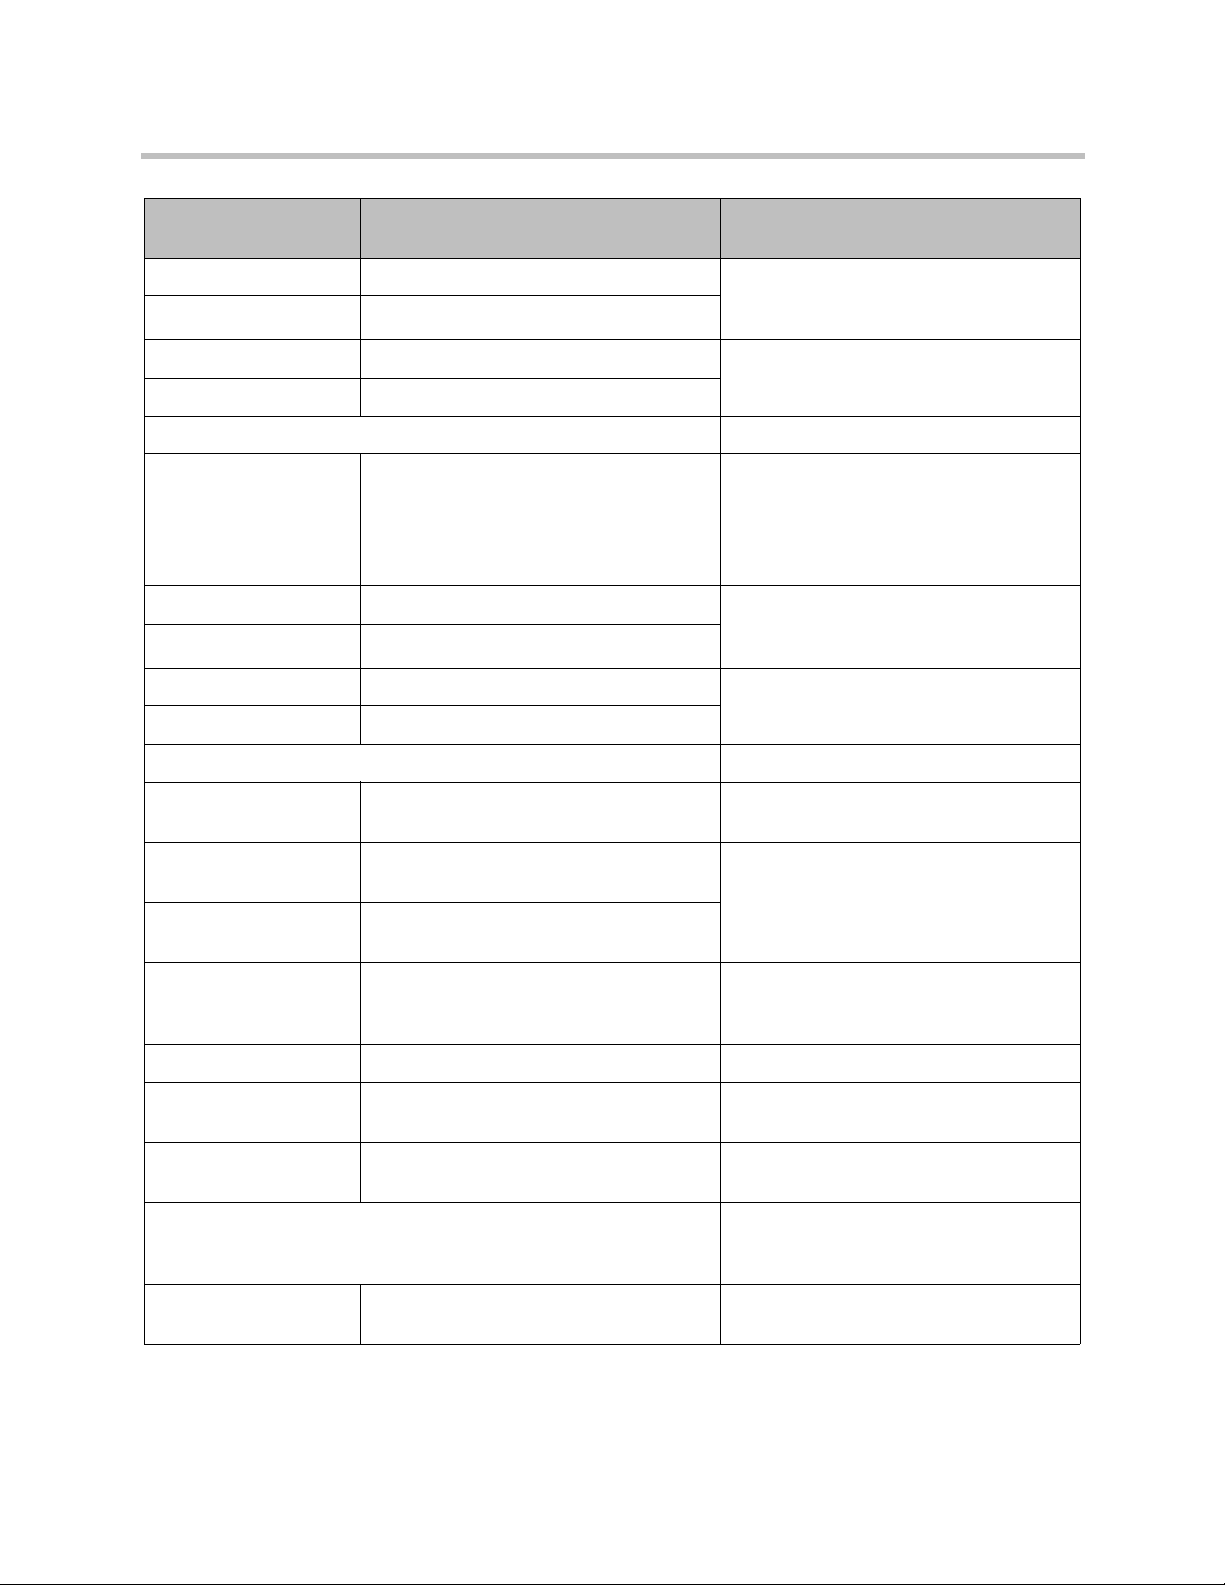
System Configuration
Information My System Values Description
Management IPv4 Static, physical IP address(es) for the first
Management IPv6
Signaling IPv4 Static, physical IP address(es) for the first
Signaling IPv6
Node 2
(or only) server’s management (or
combined) interface.
(or only) server’s signaling interface.
Management host
name
Management IPv4 Static, physical IP address(es) for the
Management IPv6
Signaling IPv4 Static, physical IP address(es) for the
Signaling IPv6
Shared Management Network Settings Required even for single-node installation.
Virtual management
host name
Virtual management
IPv4
Virtual management
IPv6
Subnet mask Network mask that defines the
Local host name of the second server’s
management (or combined) interface.
Must be a valid host name: the letters a - z
(case-insensitive), digits 0 - 9, and internal
hyphens are allowed.
second server’s management (or
combined) interface.
second server’s signaling interface.
Local host name of the virtual
management host.
IP address(es) of the virtual management
host.
subnetwork of the system’s management
interface.
IPv6 prefix length IPv6 CIDR value.
IPv4 gateway IP address of the gateway server used to
route network traffic outside the subnet.
Auto-negotiation Yes or no. If no, indicate speed and full or
half duplex.
Shared Sigaling Network Settings Needed only if signaling network is
separate. In that case, required even for
single-node installation.
Virtual signaling host
name
Polycom, Inc. 3
Local host name of the virtual signaling
host.
Page 8

DMA Getting Started Guide
System Configuration
Information My System Values Description
Virtual signaling IPv4 IP address(es) of the virtual signaling
Virtual signaling IPv6
Subnet mask Network mask that defines the
IPv6 prefix length IPv6 CIDR value.
IPv4 gateway IP address of the gateway server used to
Auto-negotiation Yes or no. If no, indicate speed and full or
General System Network Settings
DNS search domains Space- or comma-separated list of fully
host.
subnetwork of the system’s signaling
interface.
route network traffic outside the subnet.
half duplex.
qualified domain names to query on the
DNS servers to resolve host names
(optional). The system domain is added
automatically; you don’t need to enter it.
DNS 1 IP address of the primary Domain Name
System server.
Optional, but strongly recommended. At
least one DNS server is required in order
to import global groups from an enterprise
directory and for CMA integration.
DNS 2 IP address of a second DNS server
(optional).
DNS 3 IP address of a third DNS server
(optional).
Domain Fully qualified domain name for the
system (optional).
Signaling DSCP The DSCP value is used to classify
packets for quality of service (QoS)
purposes. If you’re not sure what value to
use, leave the default of 0.
Default IPv6 gateway The interface to use for accessing the
IPv6 gateway, generally eth0. Optionally,
the gateway’s address and the interface,
specified as:
<IPv6_address>%eth0
4 Polycom, Inc.
Page 9
Polycom® DMA™ System Server Setup
System Configuration
Information My System Values Description
Default IPv4 gateway In split network configuration, select which
of the two networks’ gateway servers is
the default.
Your choice depends on your network
configuration and routing. Typically, unless
all the endpoints, MCUs, and other
devices that communicate with the system
are on the same subnet, you’d select the
signaling network.
System Time
Time zone Time zone in which the system resides.
NTP server #1 IP address of the primary NTP time server
(optional, but strongly recommended).
NTP server #2 IP address of a second NTP time server
(optional).
NTP server #3 IP address of a third NTP time server
(optional).
Routing Configuration If you know you need to set up a special
network routing rule or rules, specify the
information below for each rule.
In a split network configuration, routing
rules are necessary for proper routing of
network traffic.
Destination The destination network mask for this
route.
Length The destination CIDR subnet.
Interface In split network configuration, specify the
interface for this route.
Via IP address of router for this route.
Optional, and only needed for non-default
routers.
Polycom, Inc. 5
Page 10

DMA Getting Started Guide
Unpack and Install the Hardware Components
The Polycom DMA system uses either one or two Polycom-branded Dell
servers.
To unpack and install the hardware
1 If you purchased Polycom RMX conference platforms (MCUs) with your
Polycom DMA system servers, unpack and install them as described in
the Getting Started Guide for the model you purchased.
2 Examine the Polycom DMA system shipping containers for damage.
Polycom is not responsible for damage sustained during shipment of this
product.
3 Open and review the container packing slips.
4 Open the containers and examine the contents. A single-node Polycom
DMA system shipment includes:
— 1 Polycom DMA system server
— 2 power cords
— 1 rack-mount kit (four-post)
— 1 bezel key
— 1 server documentation set
— 1 copy of this Polycom DMA System Getting Started Guide
— 1 Polycom DMA system installation disk (included for recovery
purposes; the software on the disk is already installed on the server)
— 1 USB memory stick containing the Polycom DMA USB Configuration
Utility
— 2 crossover Ethernet cables, short and long (not used for single-server
system)
— Your license documents
If you ordered the optional 2-post rack mounting kit, it’s in a separate box.
A two-node system shipment contains a second set of the above items.
5 Examine the contents for damage.
If you find damage, file a claim with the delivery carrier. Polycom is not
responsible for damage sustained during shipment.
6 Remove all of the components from their containers.
7 Install the Polycom DMA server(s) according to the server
documentation. To rack-mount a server, refer to the Rack Installation
Guide and use the brackets provided.
8 Connect the Polycom DMA server(s) to the network:
6 Polycom, Inc.
Page 11

Polycom® DMA™ System Server Setup
a Connect the GB 1 Ethernet port of each server to the enterprise
network to be used for management (or combined) traffic.
This is the eth0 network interface, which must be used for this
purpose.
b For a split network configuration, connect the GB 3 Ethernet port of
each server to the network to be used for signaling traffic.
This is the eth2 network interface, which must be used for this
purpose.
c For a two-node system, connect one of the provided crossover cables
between the GB 2 ports of the two servers.
This is the eth1 network interface, which must be used for this
purpose.
Don’t turn on the server(s) at this time.
9 Remove the bezel(s) from the server(s).
Configure the Polycom DMA System Server(s)
You configure the Polycom DMA system server(s) using the Polycom DMA
USB Configuration Utility on the USB memory stick.
To configure the system server(s) without using the USB memory stick, see
“Alternate Procedure: Configure the Polycom DMA System Server(s) Without Using
the USB Stick” on page 11.
To configure the Polycom DMA system server(s)
1 Connect the USB memory stick containing the Polycom DMA USB
Configuration Utility to a Windows PC.
2 When prompted, elect to run the Configuration Utility.
If autorun doesn’t work or is turned off, navigate to the USB memory stick using My
Computer, Windows Explorer, or another file manager. Then start the Configuration
Utility by double-clicking
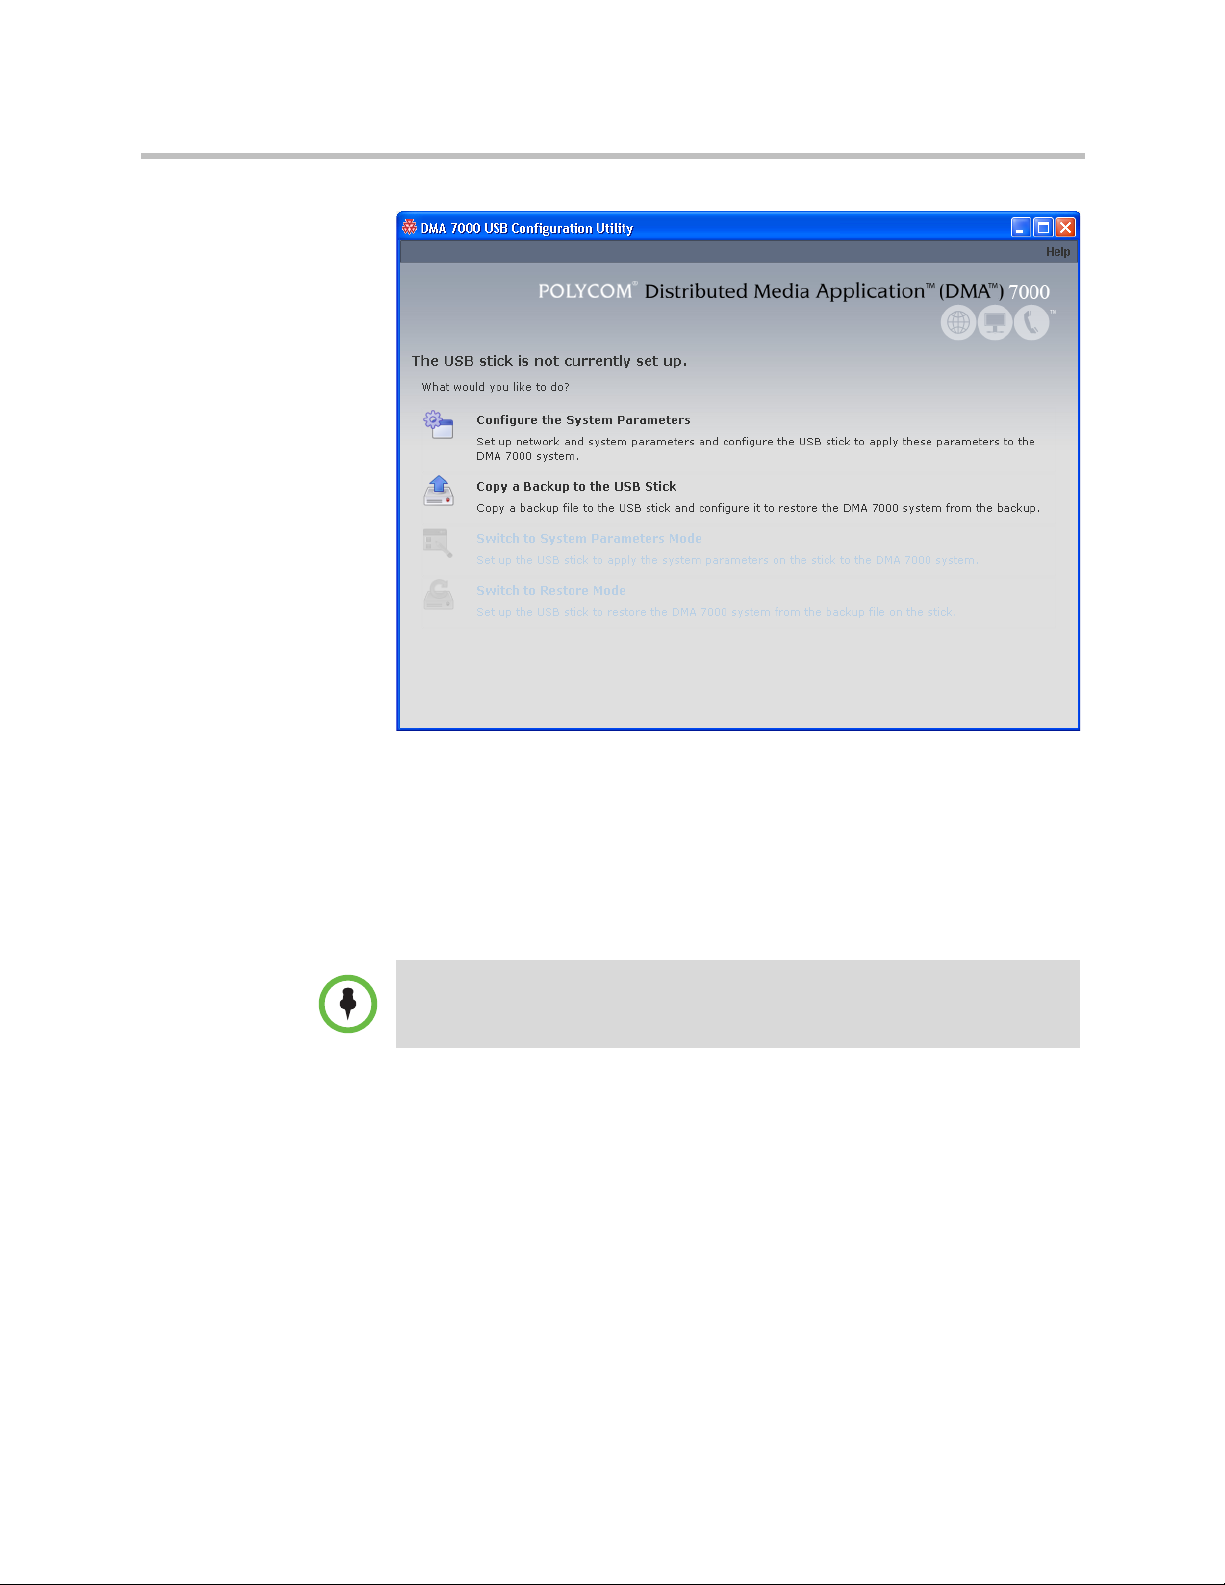
3 In the DMA USB Configuration Utility window, click Configure the
System Parameters.
dma7000-usb-gui.exe
.
Polycom, Inc. 7
Page 12
DMA Getting Started Guide
4 On the Network page, select the correct System node configuration and
System split network setting.
5 Enter the network values from the First-Time Setup Worksheet.
6 If you need to set up a special network routing rule or rules, click
Routing Configuration, create the rule(s), and click OK.
In a split network configuration, routing rules are necessary for proper routing of
network traffic. If you aren’t sure what rule or rules you need, consult the
appropriate IT staff or network administrator for your organization.
7 Click Next.
8 On the System Time page:
a Select the correct System time zone for your location.
We strongly recommend selecting the best location-specific setting,
not one of the generic GMT offset settings.
b Leave Auto Adjust For Daylight Savings checked (deselecting this
may cause problems, especially with NTP servers).
8 Polycom, Inc.
Page 13
Polycom® DMA™ System Server Setup
c Under NTP servers, enter the IP addresses (or domain names) for the
time servers from the First-Time Setup Worksheet.
We strongly recommend specifying at least one and preferably three
time servers. Use NTP stratum 3 quality time servers, if possible.
9 Click Done.
The utility confirms that the configuration file was created and returns
you to the initial menu.
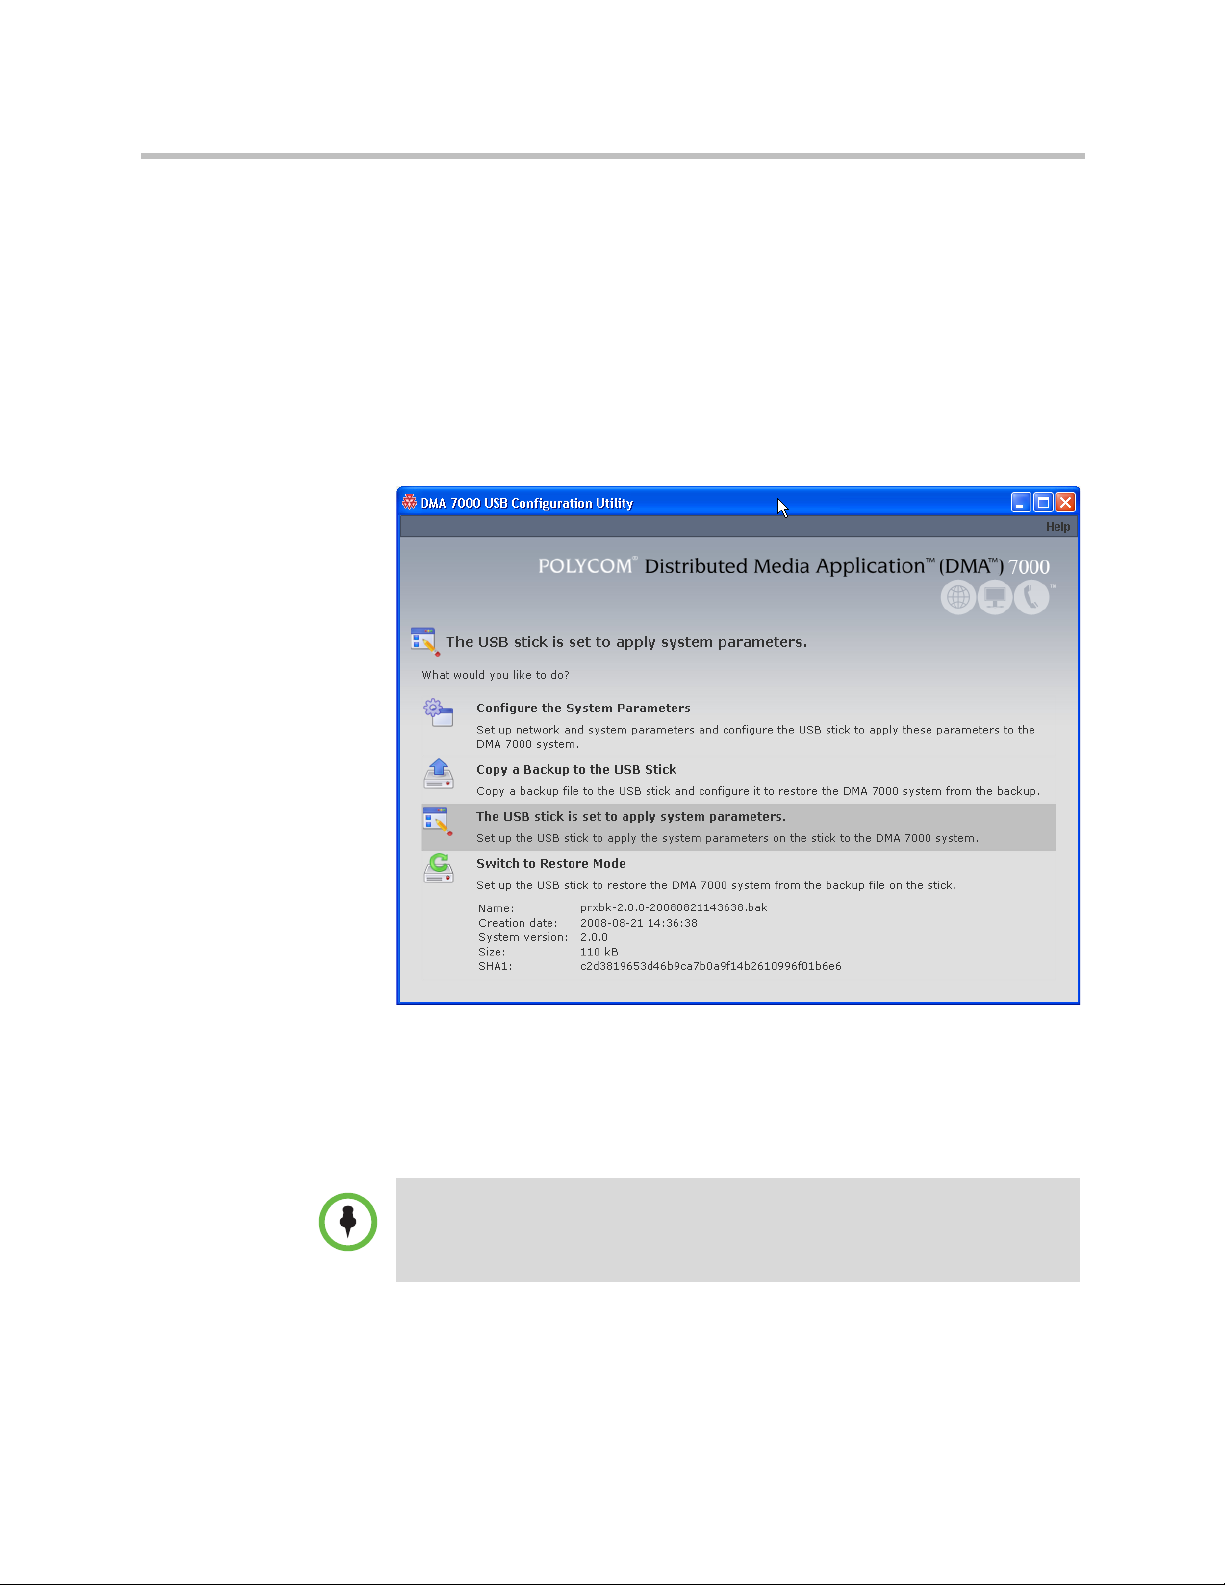
10 Verify that the initial menu now states that The USB stick is set to apply
system parameters.
11 Close the program.
12 In your system tray, click Safely Remove Hardware and select Safely
Remove USB Mass Storage Device. When a message tells you it’s safe to
do so, disconnect the USB memory stick from the PC.
The Polycom DMA system software is already installed on the server(s), so the
system installation disk isn’t needed to set up a new system. Using it overwrites the
same software already on the server and needlessly lengthens the setup process.
Put the disk away in a safe place in case it’s ever needed to restore the system.
13 Make sure that both servers are off.
Polycom, Inc. 9
Page 14

DMA Getting Started Guide
14 If you need to replace the system software on the server(s) with a
different version, turn on the first (or only) server (the one you want
configured as Node 1) and insert the system installation disk for that
version. Otherwise, continue with the next step.
15 On the first (or only) server (the one you want configured as Node 1),
insert the USB stick into a USB port and boot (or reboot) the server. Leave
the second server off.
If you’re replacing the system software, the server boots from the DVD,
and the installation commences. About 15-20 minutes later, the DVD ejects
and the server reboots.
If you’re not replacing the system software (or if you are, after the reboot),
the server reads its network and system parameters from the USB stick
and applies them.
16 Wait for the front panel LCD to display DMA Ready. Then disconnect
the USB stick and if applicable, remove the disk. If you’re installing a
single-node system, skip to step 18.
17 If you’re installing a two-node cluster, turn on the second server
(Node 2). If you’re replacing the system software, insert the Polycom
DMA system installation disk into the DVD drive, turn off the server, and
turn it back on.
If you’re replacing the system software, the server boots from the DVD,
and the installation commences. About 15-20 minutes later, the DVD ejects
and the server reboots.
If you’re not replacing the system software (or if you are, after the reboot),
the server detects and gets its configuration settings from Node 1, and
joins the cluster. When done, both servers’ LCDs display DMA Clustered.
18 On a PC with network access to the Polycom DMA system, point your
browser to the system’s virtual host name or IP address and log in with
user ID
and password
admin
.
admin
The Polycom DMA system’s management interface appears, displaying
the Dashboard. From its menus, you can complete your system setup:
— Install your license(s).
— Check security configuration settings and change if necessary.
— Add MCUs to the system, add conference templates for the MCUs,
and set conference defaults.
— Configure the system to use a gatekeeper (if H.323 is enabled) and set
up SIP protocols and ports (if SIP is enabled).
— Install security certificates.
— Manage system access, either by adding local users or by integrating
the Polycom DMA system with your enterprise directory, remove the
default admin login, and secure the system.
— Make other desired configuration changes.
10 Polycom, Inc.
Page 15

Polycom® DMA™ System Server Setup
Refer to the online help or the Polycom DMA Operations Guide for the
relevant descriptions and procedures.
Alternate Procedure: Configure the Polycom DMA System Server(s) Without Using the USB Stick
If for some reason you don’t have or can’t use the Polycom DMA USB
Configuration Utility on the USB memory stick, the following procedure
enables you to complete the initial setup using only a laptop PC and an
Ethernet cable.
This is possible because Polycom DMA system servers are shipped with
default network settings that you can use to connect to the system. The settings
are:
IP address:
Subnet mask:
Default gateway:
To configure the Polycom DMA system server(s) using a laptop PC
1 Follow the unpack and install procedure (page 6) through step 7. Do not
connect the server(s) to the enterprise network.
2 Configure the network settings on your laptop to put it on the same
network segment as the Polycom DMA system server(s) (see the server’s
default settings above). For instance, you can use the following settings:
IP address:
Subnet mask:
Default gateway:
3 Connect an Ethernet cable between your laptop and the GB 1 interface of
the first (or only) server (the one you want configured as Node 1).
You can use the cable that will later connect the server to the switch
(enterprise network). Be sure you connect to the server’s GB 1 interface,
not the GB 2 or GB 3 interface.
4 On the laptop, point your browser to
security certificate warning appears, ignore it) and log in with user ID
admin
192.168.1.101
255.255.255.0
192.168.1.1
192.168.1.20
255.255.255.0
192.168.1.1
and password
admin
http://192.168.1.101
.
(if a
The Polycom DMA system’s management interface appears, displaying
the Dashboard.
5 Go to Configuration > System > Network, enter the network values (and
routing configuration, if necessary) from the First-Time Setup Worksheet,
Polycom, Inc. 11
Page 16

DMA Getting Started Guide
6 If you need to set up a special network routing rule or rules, click
Routing Configuration, create the rule(s), and click OK.
In a split network configuration, routing rules are necessary for proper routing of
network traffic. If you aren’t sure what rule or rules you need, consult the
appropriate IT staff or network administrator for your organization.
7 Click Update. When asked to confirm restarting the system, click Yes.
The system begins to reboot.
8 While the server is rebooting, disconnect the Ethernet cable from the
laptop and connect the server’s GB 1 port to the enterprise network to be
used for management (or combined) traffic. For a split network
configuration, connect the GB 3 port to the network to be used for
signaling traffic.
The reboot process takes several minutes. When it’s finished, the front
panel LCD displays DMA Ready.
9 From a PC with network access to the Polycom DMA system, point your
browser to the system’s virtual host name or IP address and log in with
user ID
and password
admin
.
admin
10 Go to Configuration > System > System Time and do the following:
a Select the correct System time zone for your location.
We strongly recommend selecting the best location-specific setting,
not one of the generic GMT offset settings.
b Leave Auto Adjust For Daylight Savings checked (deselecting this
may cause problems, especially with NTP servers).
c Under NTP servers, enter the IP addresses (or domain names) for the
time servers from the First-Time Setup Worksheet.
We strongly recommend specifying at least one and preferably three
time servers. Use NTP stratum 3 quality time servers, if possible.
d Click Update. When asked to confirm restarting the system, click Yes.
The system begins to reboot. The process takes several minutes. When it’s
finished, the front panel LCD displays DMA Ready.
11 If you’re installing a two-node cluster, verify that Node 2 is off and do the
following:
a Connect the GB 1 Ethernet port of the second server (Node 2) to the
enterprise network to be used for management (or combined) traffic.
For a split network configuration, connect the GB 3 port to the
network to be used for signaling traffic.
b Connect one of the provided crossover cables between the GB 2 ports
of the two servers.
12 Polycom, Inc.
Page 17

Polycom® DMA™ System Server Setup
c Verify that the first server (Node 1) is running and its front panel LCD
displays DMA Ready. Then turn on the second server (Node 2).
After the second server boots, it detects and gets its configuration
settings from Node 1 and joins the cluster. When done, both servers’
LCDs display DMA Clustered.
12 Log back into the system and complete your system setup:
— Install your license(s).
— Check security configuration settings and change if necessary.
— Add MCUs to the system, add conference templates for the MCUs,
and set conference defaults.
— Configure the system’s signaling settings to support H.323, SIP, or
both.
— Install security certificates.
— Manage system access, either by adding local users or by integrating
the Polycom DMA system with your enterprise directory, remove the
default admin login, and secure the system.
— Make other desired configuration changes.
Polycom, Inc. 13
Page 18

DMA Getting Started Guide
14 Polycom, Inc.
Page 19

Regulatory Notices
Regulatory Notices
USA Regulatory Notices
Part 15 FCC Rules
This device is compliant with Part 15 of the FCC Rules. Operation is subject to the following two conditions:
1 This device may not cause harmful interference, and
2 This device must accept any interferences received, including interference that may cause undesired operation.
Class A Digital Device or Peripheral
NOTE: This equipment has been tested and found to comply with the limits for a Class A digital device, pursuant to
part 15 of the FCC Rules. These limits are designed to provide reasonable protection against harmful interference
when the equipment is operated in a commercial environment. This equipment generates, uses, and can radiate
radio frequency energy and, if not installed and used in accordance with the instruction manual, may cause harmful
interference to radio communications. Operation of this equipment in a residential area is likely to cause harmful
interference in which case the user will be required to correct the interference at his own expense.
In accordance with part 15 of the FCC rules, the user is cautioned that any changes or modifications not expressly
approved by Polycom Inc. could void the user's authority to operate the equipment.
We recommend that you install an AC surge arrestor in the AC outlet to which this device is connected. This action
will help to avoid damage to the equipment caused by local lightning strikes and other electrical surges.
EEA Regulatory Notices
This Polycom DMA system has been marked with the CE mark. This mark indicates compliance with EEC
Directives 2006/95/EC and 2004/108/EC. A full copy of the Declaration of Conformity can be obtained from
Polycom Ltd, 270 Bath Road, Slough, Berkshire, SL1 4DX, UK.
Canadian Regulatory Notices
Class A Digital Device
This Class [A] digital apparatus complies with Canadian ICES-003.
Cet appareil numérique de la classe [A] est conforme à la norme NMB-003 du Canada.
Polycom, Inc. 15
Page 20

Polycom DMA
ὤG 㦹G ⷸG ㇠G 㟝G 㣄G 㙼G⇨G ⱬG
hἽG ὤὤG
O㛹ⱨ㟝G ⵝ㋕䋩㐔ὤὤPG
㢨 G ὤὤ⏈ G 㛹ⱨ㟝 O h Ἵ P㡰⦐ G 㤸㣄䑀㤵䚝☥⦑㡸
䚐G ὤὤ㢨㝘⏼G 䑄⬘㣄G ❄⏈ G ㇠㟝㣄⏈G 㢨G 㥄㡸
㨰㢌䚌㐐ὤG ⵈ⢰⮤SG ᴴ㥉㞬㢌G 㫴㜡㜄㉐G ㇠㟝䚌⏈
ᶷ㡸G ⯝ 㤵㡰⦐G 䚝⏼␘UG G
Regulatory Notices
South Korean Regulatory Notices
Chinese Regulatory Notices
Czech Republic Regulatory Notices
South Korean Regulatory Notices
16 Polycom, Inc.
Page 21

Regulatory Notices
Regulatory Notices
Japanese Regulatory Notices
Taiwanese Regulatory Notices
Worldwide Regulatory Notices
Warning
This is a Class A product. In a domestic environment, this product may cause radio interference in which case the
user may be required to take adequate measures.
Plugs Acts as Disconnect Device
The socket outlet to which this apparatus is connected must be installed near the equipment and must always be
readily accessible.
La prise électrique à laquelle l’appareil est branché doit être installée près de l’équipement et doit toujours être
facilement accessible.
Installation Instructions
Installation must be performed in accordance with all relevant national wiring rules.
L’Installation doit être exécutée conformément à tous les règlements nationaux applicable au filage électrique.
Polycom, Inc. 17
Page 22

Polycom DMA
18 Polycom, Inc.
Page 23

Polycom® DMA™ 7000 시스템 시작 안내서
v. 2.0 | 2010 년 2 월 | 3725-76311-008B
Page 24

상표 정보
Polycom®, Polycom "Triangles" 로고 및 Polycom 제품과 관련된 이름과 마크는 Polycom, Inc.의 상표 및 서비
스 마크이며 미국과 기타 여러 국가에서 등록된 마크 및 관습법 마크입니다.
다른 모든 상표는 해당 소유자의 자산입니다.
특허 정보
동봉한 제품은 Polycom, Inc.에서 소유한 하나 이상의 미국 및 외국 특허 및 특허 출원의 보호 대상입니다.
© 2008-9 Polycom, Inc. All rights reserved.
Polycom, Inc.
4750 Willow Road
Pleasanton, CA 94588-2708
USA
이 설명서의 어떠한 부분도 Polycom, Inc.의 명시적인 서면 승인 없이는 어떠한 형식이나 수단(전자적 또는
기계적) 또는 목적으로도 복제되거나 전송될 수 없습니다. 해당 법률에 의거하여 복제에는 다른 언어나 형
식으로의 번역도 포함됩니다.
제품에 포함된 소프트웨어와 관련된 모든 소유권과 권리는 Polycom, Inc.에 있습니다. 이 소프트웨어는 미국
저작권법과 국제 협약의 보호를 받습니다. 따라서 본 소
운드 녹음)과 같이 취급해야 합니다.
Polycom, Inc.는 이 설명서에 정확한 정보를 제공하기 위해 최선을 다했으며, Polycom, Inc.는 인쇄 오류나 오
기에 대해서는 책임지지 않습니다. 이 설명서의 내용은 예고 없이 변경될 수 있습니다.
ii
프트웨어는 다른 저작권 보호 대상(예: 서적 또는 사
Page 25

목차
Polycom® DMA™ 시스템 서버 설정 . . . . . . . . . . . . . . . . . . . 1
필요한 자료 수집 . . . . . . . . . . . . . . . . . . . . . . . . . . . . . . . . . . . . . . . . . . . . . . . . . 1
최초 시간 설정 워크시트 작성 . . . . . . . . . . . . . . . . . . . . . . . . . . . . . . . . . . . . . . 2
하드웨어 구성요소 포장 풀기 및 설치 . . . . . . . . . . . . . . . . . . . . . . . . . . . . . . . . 3
Polycom DMA 시스템 서버 구성 . . . . . . . . . . . . . . . . . . . . . . . . . . . . . . . . . . . . 4
대안 : USB 스틱을 사용하지 않고 Polycom DMA 시스템 서버 구성 . . . . . . 8
Polycom® DMA™ 시스템 서버 기술 사양 . . . . . . . . . . . . . . 11
Polycom, Inc. iii
Page 26

DMA 시작 안내서
iv Polycom, Inc.
Page 27

Polycom® DMA™ 시스템 서버 설정
아래의 섹션에서는 Polycom® Distributed Media Application™ (DMA™) 다지
점 회의 플랫폼 서버 또는 2 노드 서버 클러스터를 처음 설정할 때 필요한 단계
에 대해 설명합니다.
새 서버를 설치하여 단일 노드 시스템을 2 노드 클러스터로 확장하는 경우 Polycom
DMA
작동 안내
의 "두 번째 서버 추가" 또는 온라인 도움말을 참조하십시오.
이 절차가 끝나면 Polycom DMA 시스템에 로그인하여 사용자 및 MCU 설정하
기, 엔터프라이즈 디렉토리와 통합하기, 게이트키퍼를 사용하도록 시스템 구성
하기 등의 시스템 구성을 완료할 수 있습니다.
필요한 자료 수집
Polycom DMA 시스템을 설치하기 전에 다음과 같은 자료를 수집해야 합니다.
• Polycom DMA 시스템 서버 제품
• 작성이 완료된 최초 시간 설정 워크시트(2페이지 참조)
• Microsoft Windows (XP Pro 또는 Vista)가 실행되며 다음이 포함된 PC
— USB 포트
— Java 1.6 이상
— Internet Explorer 6 이상 또는 Firefox 2 이상
— Adobe Flash Player 9.0.28 이상
Polycom, Inc. 1
Page 28

DMA 시작 안내서
최초 시간 설정 워크시트 작성
시스템 설정을 시작하기 전에 이 워크시트의 내 시스템 값 난을 작성하십시오.
최초 시간 설정 워크시트
시스템 구성 정보 내 시스템 값 설명
노드 1 시스템 이름 첫 번째(또는 유일한) Polycom DMA 시스템 서버의 로컬 호
스트 이름입니다. 유효한 호스트 이름을 기입해야 합니다.
문자 a - z(대소문자 구분 안 함), 숫자 0 - 9 및 내부 하이픈을
사용할 수 있습니다.
노드 1 IP 주소 첫 번째(또는 유일한) Polycom DMA 시스템 서버의 정적,
물리적 IP 주소(네 자리로 구분)입니다.
노드 2 시스템 이름 두 번째 Polycom DMA 시스템 서버의 로컬 호스트 이름입
니다. 단일 노드 설치에는 사용되지 않습니다.
노드 2 IP 주소 두 번째 Polycom DMA
노드 설치에는 사용되지 않습니다.
가상 시스템 이름 가상 호스트의 로컬 호스트 이름입니다. 단일 노드 설치에
도 필요합니다.
가상 IP 주소 가상 호스트의 IP 주소입니다. 단일 노드 설치에도 필요합
니다.
시스템 도메인 시스템(옵션)의 완전한 도메인 이름입니다.
서브넷 마스크 시스템 서브네트워크를 정의하는 네트워크 마스크입니다.
기본 게이트웨이 네트워크 트래픽 경로를 서브넷 외부로 지정할 때 사용되는
게이트웨이 서버의 IP 주소입니다.
1차 DNS 서버
2차 DNS 서버 2차 DNS 서버(옵션)의 IP 주소입니다.
3차 DNS 서버
DNS 검색 도메인 호스트 이름(옵션)을 확인하기 위해 DNS 서버에서 질의하
표준 시간대 시스템이 상주하는 시간대입니다.
1차 도메인 이름 시스템 서버의 IP 주소입니다(옵션이지만
적극 권장합니다. 엔터프라이즈 디렉토리의 전역 그룹을 가
져오기 위해서는 하나 이상의 DNS 서버가 필요합니다).
3차 DNS 서버(옵션)의 IP 주소입니다.
는 완전한 도메인 이름의 스페이스 또는 쉼표로 분리된 목
록입니다. 시스템 도메인이 자동으로 추가되므로 여기에 입
력할 필요가 없습니다.
시스템 서버의 IP 주소입니다. 단일
NTP 서버 #1 1차 NTP 시간 서버의 IP 주소입니다(옵션이지만 적극 권장
합니다).
NTP 서버 #2
NTP 서버 #3 3차 NTP 시간 서버(옵션)의 IP 주소입니다.
2 Polycom, Inc.
2차 NTP 시간 서버(옵션)의 IP 주소입니다.
Page 29

Polycom® DMA™ 시스템 서버 설정
하드웨어 구성요소 포장 풀기 및 설치
Polycom DMA 시스템에서는 하나 또는 두 개의 Polycom 브랜드 Dell 서버가 사
용됩니다.
하드웨어 포장 풀기 및 설치하기
1 Polycom DMA 시스템 서버가 장착되어 있는 Polycom RMX 2000 회의 플
랫폼(MCU)을 구입한 경우에는 포장을 풀고 Polycom RMX 2000
의 설명에 따라 설치하십시오.
서
2 Polycom DMA 시스템 포장 상자의 손상 여부를 자세히 살펴봅니다.
Polycom은 제품 배송 중에 발생한 손상에 대해 책임지지 않습니다.
3 포장을 열고 포장 전표를 확인합니다.
4 포장을 열고 내용물을 자세히 살펴봅니다. 단일 노드 Polycom DMA 시스
템과 함께 배송되는 품목은 다음과 같습니다.
— Polycom DMA 시스템 서버 1개
시작 안내
— 전원 코드 2개
— 랙 장착 키트(기둥 4개) 1개
— 베젤 키 1개
— 서버 설명
— 본 Polycom DMA
— Polycom DMA 시스템 설치 디스크 1개(복구용, 디스크에 담긴 소프트
웨어는 서버에 이미 설치되어 있음.)
— Polycom DMA USB 구성 유틸리티가 들어 있는 USB 메모리 스틱 1개
— 크로스오버 이더넷 케이블 긴 것, 짧은 것 각각 1개씩(단일 서버 시스템
용 아님)
— 라이센스 문서
기둥 2개 짜리 랙 장착 키트(옵션)를 주문한 경우 별도의 상자에 담겨 배송
됩니
다.
2 노드 시스템의 경우 위 품목이 들어있는 세트가 하나 더 포함되어 배송됩
니다.
5 내용물의 손상 여부를 자세히 살펴봅니다.
손상된 부분이 있을 경우 배송업체에 손해 배상을 청구하십시오. Polycom은
제품 배송 중에 발생한 손상에 대해 책임지지 않습니다.
서 1부
시스템 시작 안내서
1부
6 포장 안에서 모든 구성요소를 꺼냅니다.
7 서버 설명서에 따라 Polycom DMA 서버를 설치합니다. 서버를 랙에 장착
할 때는
Polycom, Inc. 3
랙 설치 안내서
를 참조하고, 제공된 브래킷을 사용하십시오.
Page 30

DMA 시작 안내서
8 Polycom DMA 서버를 네트워크에 연결합니다.
a 각 서버의 GB 1 이더넷 포트를 기업 네트워크에 연결합니다.
b 2 노드 시스템의 경우 제공된 크로스오버 케이블 하나를 두 서버의 GB 2
포트에 연결합니다.
이때 서버 전원을 켜지 마십시오.
9 서버에서 베젤을 분리합니다.
Polycom DMA 시스템 서버 구성
USB 메모리 스틱에 있는 Polycom DMA USB 구성 유틸리티를 사용하여
Polycom DMA 시스템 서버를 구성합니다.
USB 메모리 스틱을 사용하지 않고 시스템 서버를 구성하는 방법은 "대안: USB 스틱
을 사용하지 않고 Polycom DMA 시스템 서버 구성" (8페이지)를 참조하십시오.
Polycom DMA 시스템 서버 구성하기
1 Polycom DMA USB 구성 유틸리티가 들어 있는 USB 메모리 스틱을
Windows PC에 연결합니다.
2 메시지가 표시되면 구성 유틸리티를 실행합니다.
자동 실행이 안되거나 전원이 꺼진 경우에는 내 컴퓨터, Windows Explorer 또는 다
른 파일 관리자를 사용하여 USB 메모리 스틱으로 이동하십시오. 그런 다음
dma7000-usb-config.exe
를 더블 클릭하여 구성 유틸리티를 시작하십시오.
4 Polycom, Inc.
Page 31

Polycom® DMA™ 시스템 서버 설정
3 DMA USB 구성 유틸리티 창에서 시스템 매개 변수 구성을 클릭합니다.
4 2 노드 클러스터를 설치할 경우에는 네트워크 페이지에서 2 노드 구성 사용
을 클릭합니다.
5 최초 시간 설정 워크시트의 네트워크 값을 입력하고 다음을 클릭합니다.
6 시스템 시간 페이지에서
a 해당 지역의 정확한 시스템 시간대를 선택합니다.
b 일광 절약 시간으로 자동 조정을 설정해 둡니다(설정
하지 않을 경우 특
히 NTP 서버에 문제가 발생할 수 있습니다).
c NTP 서버에서 시간 서버 항목에 최초 시간 설정 워크시트의 IP 주소
(또는 도메인 이름)를 입력합니다.
시간 서버를 가급적 3개, 적어도 1개 이상 지정할 것을 적극 추천합니다.
가급적 NTP 계층 3 고품질 시간 서버를 사용하십시오.
d 다음을 클릭합니다.
7 보안 구성 페이지에서 사용할 보안 처리 되지 않는 액세
스 방법을 하나 이
상 선택하거나 최대 보안을 선택합니다.
Polycom, Inc. 5
Page 32

DMA 시작 안내서
8 완료를 클릭합니다.
유틸리티에서 구성 파일이 생성되었음을 확인한 후 초기 메뉴로 돌아갑니다.
9 초기 메뉴에 시스템 매개 변수가 적용되도록 USB 스틱이 설정되었습니다
라는 문구가 표시되는지 확인합니다.
10 프로그램을 닫습니다.
11 시스템 트레이에서 하드웨어 안전하게 제거를 클릭하고 USB 대용량 저장
장치 안전하게 제거를 선택합니다. 안전하게 제거할 수 있다는 메시지가 표
시되면 USB 메모리 스틱을 PC에서 분리합니다.
Polycom DMA 시스템 소프트웨어가 서버에 이미 설치되어 있으므로 시스템 설치 디
스크로 새 시스템을 설치할 필요가 없습니다. 설치 디스크를 사용할 경우 서버에 이
미 있는 동일한 소프트웨어를 덮어쓰므로 설치 프로세스가 불필요하게 길어집니다.
설치 디스크는 시스템 복원이 필요한 경우를 대비하여 안전한 곳에 보관하십시오.
12 두 서버의 전원
이 모두 꺼졌는지 확인합니다.
13 서버의 시스템 소프트웨어를 다른 버전으로 교체해야 할 경우에는 첫 번째
(또는 유일한) 서버(노드 1로 구성할 서버)를 켜고 해당 버전의 시스템 설치
디스크를 넣습니다. 동일 버전일 경우에는 다음 단계로 넘어가십시오.
6 Polycom, Inc.
Page 33

Polycom® DMA™ 시스템 서버 설정
14 첫 번째(또는 유일한) 서버(노드 1로 구성할 서버)에서 USB 스틱을 USB 포
트에 꽂고 서버를 부팅(또는 재부팅)합니다. 두 번째 서버는 꺼 둡니다.
시스템 소프트웨어를 교체할 경우 서버가 DVD로 부팅되고 설치가 시작됩
니다. 약 15-20분 후에 DVD가 나오고 서버가 재부팅됩니다.
시스템 소프트웨어를 교체하지 않을 경우에는(또는 재부팅 후에 교체할 경
우) 서버
용합니다.
15 전면 패널 LCD에 DMA Ready가 표시되면 USB 스틱을 분리하고 디스크
를 사용한 경우 디스크를 꺼냅니다. 단일 노드 시스템을 설치할 경우에는
17단계로 넘어갑니다.
16 2 노드 클러스터를 설치할 경우에는 두 번째 서버(노드 2)를 켭니다. 시스템
소프트웨어를 교체할 경우에는 Polycom DMA 시스템 설치 디스크를
DVD 드라이브에 넣고 서버
시스템 소프트웨어를 교체할 경우 서버가 DVD로 부팅되고 설치가 시작됩
니다. 약 15-20분 후에 DVD가 나오고 서버가 재부팅됩니다.
시스템 소프트웨어를 교체하지 않을 경우에는(또는 재부팅 후에 교체할 경
우) 서버가 노드 1의 구성 설정을 가져와 클러스터와 결합시킵니다. 완료되
면 두 서버의 LCD에 DMA Clustered라고 표시됩니다.
가 USB 스틱에서 네트워크 및 시스템 매개 변수를 읽고 그것을 적
를 껐다가 다시 켭니다.
17 Polycom DMA 시스템과 네트워크로 연결
된 PC에서는 브라우저를 시스템
의 가상 호스트 이름 또는 IP 주소로 지정하고 로그인합니다(사용자 ID:
admin
, 암호:
admin
).
Polycom DMA 시스템의 관리 인터페이스가 나타나며 대시보드라고 표시
됩니다. 메뉴에서 다음과 같이 시스템 설정을 완료할 수 있습니다.
— 라이센스를 설치합니다.
— 시스템에 MCU를 추가하고, MCU 회의 템플릿을 추가하고, 회의 기본
값을 설정합니다.
— 게이트키퍼를 사용하도록 시스템을 구성합니다.
— 보안 인증서를 설치합니다.
— 로컬 사용자를 추가하거나 Polycom DMA 시스템을 엔터프라이즈 디
렉토리에 통합하여 시스템 액세스를 관리하고 시스템의 보안을 확보합
니다.
관련
된 설명과 절차는 온라인 도움말 또는 Polycom DMA
작동 안내
하십시오.
를 참조
Polycom, Inc. 7
Page 34

DMA 시작 안내서
대안: USB 스틱을 사용하지 않고 Polycom DMA 시스템 서버 구성
어떤 이유로 인해 USB 메모리 스틱에 Polycom DMA USB 구성 유틸리티가 없
거나 사용할 수 없는 경우, 다음 절차를 통해 랩탑 PC와 이더넷 케이블만 사용하
여 최초 설정을 완료할 수 있습니다.
이는 시스템에 연결할 수 있는 기본 네트워크 설정이 완료된 상태로 Polycom
DMA 시스템이 출고되기 때문입니다. 그 설정은 다음과 같습니다.
IP 주소:
서브넷 마스크:
기본 게이트웨이:
랩탑 PC를 사용하여 Polycom DMA 시스템 서버 구성하기
1 포장 풀기 및 설치 절차(3페이지)의 7단계까지 실시합니다. 서버를 기업 네
트워크에 연결하지
2 랩탑에 네트워크 설정을 구성할 때 Polycom DMA 시스템 서버와 같은 네
트워크 세그먼트에 구성합니다(위의 서버 기본 설정을 참조하십시오). 예
를 들어 다음과 같은 설정을 사용할 수 있습니다.
IP 주소:
서브넷 마스크:
기본 게이트웨이:
3 랩탑과 첫 번째(또는 유일한) 서버(노드 1로 구성하려는 서버)의 GB 1 인터
페이스를 이더넷 케이블로 연결합니다.
나중에 서버와 스위치(기업 네트워크)를 연결할 케이블을 사용할 수 있습니
다. 서버의 GB 2 인터페이스가 아니라 GB 1 인터페이스와 연결해야 합니다.
4 랩탑에서 브라우저를
admin
192.168.1.101
255.255.255.0
192.168.1.20
255.255.255.0
, 암호
admin
192.168.1.1
마십시오
192.168.1.1
http://192.168.1.101
으로 로그인합니다.
.
로 지정하고 사용자 ID
Polycom DMA 시스템의 관리 인터페이스가 나타나며 대시보드라고 표시
됩니다.
5 구성 > 시스템 > 네트워크로 이동해 최초 시간 설정 워크시트에 나와있는
네트워크 값을 입력하고 업데이트를 클릭합니다. 시스템 재시작을 확인하
는 메시지가 표시되면 예를 클릭합니다.
시스템이 재부팅됩니다.
6 서버가 재부팅되는 동안 이더넷 케이블을 랩탑에서 분리하여 서버의 GB1
인터페이스를 기업 네트워크에 연결합니다.
재부팅 프로세스는 약 3분 소
가 표시됩니다.
8 Polycom, Inc.
요됩니다. 완료되면 전면 LCD에 DMA Ready
Page 35

Polycom® DMA™ 시스템 서버 설정
7 Polycom DMA 시스템과 네트워크로 연결된 PC에서는 브라우저를 시스템
의 가상 호스트 이름 또는 IP 주소로 지정하고 로그인합니다(사용자 ID:
admin
, 암호:
admin
).
8 구성 > 시스템 > 시스템 시간으로 이동해 다음 작업을 실시합니다.
a 해당 지역의 정확한 시스템 시간대를 선택합니다.
b 일광 절약 시간으로 자동 조정을 설정해 둡니다(설정하지 않을 경우 특
히 NTP 서버에 문제가 발생할 수 있습니다).
c NTP 서버에서 시간 서버 항목에 최초 시간 설정 워크시트의 IP 주소
(또는 도메인 이름)를 입력합니다.
시간 서버를 가급적 3개, 적어도 1개 이상 지정할 것을 적극 추천합니다.
가급
적 NTP 계층 3 고품질 시간 서버를 사용하십시오.
d 업데이트를 클릭합니다. 시스템 재시작을 확인하는 메시지가 표시되면
예를 클릭합니다.
시스템이 재부팅됩니다. 이 프로세스는 약 3분 소요됩니다. 완료되면 전면
LCD에 DMA Ready가 표시됩니다.
9 시스템에 다시 로그인하여 구성 > 시스템 > 보안 구성으로 이동합니다.
10 하나 이상의 안
전하지 않은 액세스 방법을 선택하거나 최대 보안을 선택합
니다. 업데이트를 클릭합니다.
설정에 따라 시스템이 다시 시작될 수 있습니다. 그럴 경우 확인을 묻는 메
시지가 표시됩니다. 예를 클릭합니다.
시스템 재부팅이 필요할 경우 재부팅이 시작됩니다. 이 프로세스는 약 3분
소요됩니다. 완료되면 전면 LCD에 DMA Ready가 표시됩니다.
11 2 노드 클러스터를 설치할 경우 다음과 같이 합니다.
a 두 번째 서버(노드 2)의 GB
1 이더넷 포트를 기업 네트워크에 연결합
니다.
b 제공된 크로스오버 케이블 하나를 두 서버의 GB 2 포트에 연결합니다.
c 첫 번째 서버(노트 1)가 실행되고 있는지, 전면 LCD에 DMA Ready가
표시되는지 확인합니다. 그런 다음 두 번째 서버(노드 2)를 켭니다.
두 번째 서버는 부팅 후 노드 1의 구성 설정
을 탐색하고 가져와 클러스
터와 결합시킵니다. 완료되면 두 서버의 LCD에 DMA Clustered라고
표시됩니다.
12 필요할 경우 시스템에 다시 로그인하여 시스템 설정을 완료합니다. 관련
된 설명과 절차는 온라인 도움말 또는 Polycom DMA
작동 안내
를 참조하
십시오.
Polycom, Inc. 9
Page 36

DMA 시작 안내서
10 Polycom, Inc.
Page 37

Polycom
사양
항목 설명
프로세서
프로세서 유형 쿼드 또는 듀얼 코어 Intel® Xeon® 프로세서 1~2개
확장 버스
버스 유형
라이서 카드를 통한 확장 슬롯:
라이서 1(중앙 라이서)
®
DMA™ 시스템 서버 기술
아래 표에는 Polycom® Distributed Media Application™ (DMA™) 시스템에서
사용되는 Dell PowerEdge
™
R610 시스템용 기술 사양이 나옵니다 .
PCI Express Generation 2
(슬롯 1) 전체 높이, 반높이 x8 링크 한 개
라이서 2(좌측 라이서)
메모리
아키텍처 800, 1066, 1333MHz DDR3 등록 또는 언버퍼드 오류 수정
메모리 모듈 소켓 240핀 12개
메모리 모듈 용량 1GB 또는 2GB UDIMM, 2GB, 4GB 또는 8GB RDIMM, 단일,
최소 RAM 단일 CPU로 1GB
최대 RAM 96GB(8GB RDIMM) 또는 24GB(2GB UDIMM)
Polycom, Inc. 11
(슬롯 2) 전체 높이, 반높이 x8 링크 한 개
참고: 두 슬롯 모두 최대 25W를 지원하지만 한 번에 한 개의
25W 카드만 시스템에 설치할 수 있습니다. 두 개의 카드를 설
치할 경우에는 25
른 카드는 15W 이하이어야 합니다.
코드(ECC) DIMM. 고급 ECC 또는 메모리 최적화 작업을 지
원합니다.
듀얼 또는 쿼드 등급
W 카드 한 개를 설치할 수 있으며, 이때 다
Page 38

DMA 시작 안내서
항목 설명
드라이브
하드 드라이브 2.5인치, 내장형, 핫스왑 가능 SAS 또는 SATA 하드 드라이브
(백플레인 지지대 포함) 최대 6개
디스켓 드라이브 외장 USB 1.44-MB 드라이브(옵션)
광학 드라이브 내장 슬림형 SATA DVD-ROM 또는 DVD+RW 드라이브(옵션)
한 개
외장 USB DVD(옵션)
참고: DVD 장치는 데이터 전용입니다
플래시 드라이브 내장 USB(옵션)
내장 SD(Secure Digital) 메모리 카드(옵션)
외장 SD 메모리 카드(옵션)
커넥터
뒤로
NIC
직렬
USB
비디오
외장 VFlash 카드(옵션)
RJ-45 10/100/1000Mbps 이더넷 4개
9핀, DTE,
4핀 2개, USB 2.0 규격
15핀 VGA
플래시 메모리 카드 슬롯(옵션) 한 개, iDRAC6 Enterprise 포
함
16550 호환
전면
비디오
USB
내부
USB
내장 SD 모듈
비디오
비디오 유형 통합형 Matrox G200
비디오 메모리 8MB 공유
15핀 VGA
4핀 2개, USB 2.0 규격
4핀 1개, USB 2.0 규격
플래시 메모리 카드 슬롯(옵션) 1개, 내장 SD 모듈 포함
12 Polycom, Inc.
Page 39

Polycom® DMA™ 시스템 서버 기술 사양
항목 설명
전원
AC 전원 공급(장치당)
와트수
전압
열 방출
최대 돌입 전류
배터리
시스템 배터리
RAID 배터리(옵션)
물리적 특성
717W(고출력)
502W(에너지 절감)
90-264 VAC, 자동 범위 조정, 47-63Hz
최대 2446.5BTU/시(고출력)
최대 1712.9BTU/시(에너지 절감)
일반적인 라인 조건 이하 전체 시스템 주변 작동 범위 이상에
서, 돌입 전류는 10ms 이하 전원 공급 장치당 55A가 될 수 있
습니다.
CR 2032 3.0-V 리튬 이온 코인 셀
3.7-V 리튬 이온 배터리 팩
높이 4.26cm(1.68인치)
너비 4
깊이 76.2cm(30인치)
무게(최대 구성)
무게(빈 상태)
환경적 특성
온도
작동
보관
상대 습도
작동
보관
8.24cm(18.99인치), 랙 래치 포함
42.4cm(16.69인치), 랙 래치 제외
17.69kg(39lb)
13.25kg(29.2lb)
10° ~ 35°C (50° ~ 95°F), 최대 온도 변화: 시간당 10°C
참고: 2950피트 이상의 고도에서는 최대 작동 온도가
1°F/550ft로 저하됩니다.
-40° ~ 65°C (-40° ~ 149°F), 최대 온도 변화: 시간당 20°C
20
% ~ 80%(비응축), 최대 습도 변화: 시간당 10%
5% ~ 95%(비응축), 최대 습도 변화: 시간당 10%
Polycom, Inc. 13
Page 40

DMA 시작 안내서
항목 설명
최대 진동
작동
보관
최대 충격
작동
보관
고도
작동
보관
5-350Hz에서 작동 방향으로 5분 동안 0.26Gms
10-250Hz에서 모든 방향으로 10분 동안 1.54Gms
모든 작동 방향으로 펄스 시간 2.6ms ± 10%에서 반정현 충
격 31G ± 5%
전체 6개 면에서 펄스 시간 2ms ± 10%에서 반정현 충격
71G ± 5%
전체 6개 면에서 235인치/초이상의 속도 변화로 사각파 충격
27G
-16 ~ 3,048 m(-50 ~ 304,800.00 cm)
참고: 2950피트 이상의 고도에서는 최대 작동 온도가
1°F
-16 ~ 10,600m(-50 ~ 35,000ft)
/550ft로 저하됩니다.
14 Polycom, Inc.
Page 41

תכרעמ רובע הדובעה תליחת ךירדמ
Polycom
®
לש DMA™ 7000
v. 2.0 | 2010 ראורבפ | 3725-76311-009B
Page 42

Polycom DMA System רובע הלחתה ךירדמ
םיירחסמ םינמיס אשונב עדימ
לש תוריש ינמיס וא/ו םיירחסמ םינמיס םה Polycom ירצומל םיכיושמה םינמיסהו תומשהו ,Polycom לש "םישלושמה" למס ,®Polycom
.תורחא תונוש תונידמבו תירבה תוצראב םילבוקמ וא/ו םימושר םינמיס םהו ,Polycom, Inc.
טנטפ אשונב עדימ
ידיב תאצמנ תולעבהו תורז תונידמבו ב"הראב טנטפל תוניתממ תושקב וא/ו םיטנטפ רתוי וא דחא ידי-לע ןגומ הוולנה רצומה
.Polycom, Inc .
.תורומש תויוכזה לכ © 2008 Polycom, Inc.
Polycom Inc.
4750 Willow Road
Pleasanton, CA 94588-2708
USA
רושיא תלבק אלל ,יהשלכ הרטמל ,ינכמ וא ינורטקלא ,יעצמא לכבו הרוצ לכב הז ךמסממ והשלכ קלח לש רודיש וא לופכש לע רוסיא לח
.הנוש בוציעל וא תרחא הפשל םוגרת ללוכ לופכש ,קוחה תרגסמב .Polycom, Inc. תאמ בתכב שרופמ
.רצומה םע הלולכה הנכותל רשאב תויניינקה תויוכזה לכב תולעבהו תולעבה תוכז תא המצעל תרמוש Polycom, Inc. ,םידדצ ןיב לבוקמכ
תויוכזב ןגומה רחא רמוח לכ לאכ הנכותל סחייתהל ךילע ,ןכל .םיימואלניב רחס יקוחו תירבה תוצרא לש םירצוי תויוכז יקוחב תנגומ הנכותה
.)תילוק הטלקה וא רפס תמגוד( םירצוי
.םירפוס תויועט וא סופד תואיגשל תיארחא הניא Polycom, Inc. .הז ךירדמב עדימה תונקייד תא חיטבהל ידכ ץמאמ לכ עקשוה
.העדוה אלל םייונישל ףופכ הז ךמסמב עדימה
ii
Page 43

Polycom DMA System רובע הלחתה ךירדמ
1 .......... Polycom® לש DMA™ תכרעמ תרש לש םיינכט םיטרפמ
1 ........................................................................................... םישורדה םילכה תנכה
2 ................................................................................... הנושארה הרדגהה ףד יולימ
3 ........................................................................... הרמוחה יביכר לש הנקתהו הקירפ
4 ............................................ Polycom לש DMA תכרעמ )י(תרש לש הרוצתה תעיבק
שומיש אלל Polycom לש DMA תכרעמ )י(תרש לש הרוצתה תעיבק :יפולח ךילה
8 ...................................................................................................... USB-ה לקמב
11 ......... Polycom® לש DMA™ תכרעמ תרש לש םיינכט םיטרפמ
ןכות
iii © Polycom ,Inc.
Page 44

Polycom DMA System רובע הלחתה ךירדמ
iv© Polycom ,Inc.
Page 45

תכרעמ תרש לש םיינכט םיטרפמ
Polycom® לש DMA
תרש לש תינושארה הרדגהה עוציבל םישורדה םיבלשה תא םיראתמ הלא םיפיעס
תכרעמב םיתמצ ינש לעב םיתרש לוכשא וא םירתא תובורמ תודיעו לוהינל המרופטלפ
. Polycom® לש ) DMA™ ( Distributed Media Application™
קרפב ןייע ,יתמוצ-וד לוכשאל תיתמוצ-דח תכרעמ ביחרהל ידכ שדח תרש ןיקתמ התא םא
) Polycom לש DMA לועפת ךירדמ( Polycom DMA Operations Guide-ב "ינש תרש תפסוה"
.תנווקמה הרזעב וא
Polycom לש DMA תכרעמל החלצהב רבוחמ ךמצע תא אצמת ,הז ךילהת לש ומויסב
, MCU תודיחיו םישמתשמ תרדגה ללוכ ,תכרעמה לש הרוצתה תעיבק תא םילשהל ןכומו
. gatekeeper-ב שומישל תכרעמה תרוצת תרדגהו ינוגרא ךירדמב בוליש
םישורדה םילכה תנכה
™
:םיאבה םילכה תא ןכה , Polycom לש DMA תכרעמ ןיקתתש ינפל
Polycom לש DMA תכרעמ תרש תליבח •
)2 ’מע האר( אלמ הנושאר הרדגה ףד •
:םע ,) Vista וא XP Pro( Microsoft Windows הלעפהה תכרעמ לעב בשחמ •
USB תאיצי —
הלעמו Java 1.6 —
הלעמו Firefox 2 וא ,הלעמו Internet Explorer 6 —
הלעמו Adobe Flash Player 9.0.28 —
1 © Polycom ,Inc.
Page 46

הנושארה הרדגהה ףד יולימ
.הז ףדב ילש תכרעמה יכרע הדומעה תא אלמ ,תכרעמה תא רידגהל ליחתתש ינפל
הנושאר הרדגה ףד
םש תויהל בייח הז ךרע .Polycom לש DMA תכרעמב
a - z תויתואב שמתשהל רתומ :ףקת חראמ
.םיימינפ םיפקמבו ,9 - 0 תורפסב ,)תוישיר-יולת אל(
תכרעמב )דיחיה וא( ןושארה תרשה לש )תודוקנב
.Polycom לש DMA
.הדיחי תמוצ לש הנקתהל יטנוולר אל .Polycom לש
.הדיחי תמוצ לש הנקתהל יטנוולר אל .Polycom
Polycom DMA System רובע הלחתה ךירדמ
תכרעמה תרוצת לע עדימ ילש תכרעמה יכרע רואית
1 תמוצ לש תכרעמ םש )דיחיה וא( ןושארה תרשה לש ימוקמה חראמה םש
1 תמוצ לש IP תבותכ תדרפומ םירפסמ תייעיבר( תיזיפ תחיינ IP תבותכ
2 תמוצ לש תכרעמ םש DMA תכרעמב ינשה תרשה לש ימוקמה חראמה םש
2 תמוצ לש IP תבותכ לש DMA תכרעמב ינשה תרשה לש IP תבותכ
.הדיחי תמוצ לש הנקתהל
.הדיחי תמוצ לש הנקתהל
.הנשמה תשרל ץוחמ תשרה
לכל דחא DNS תרש שורד ;םוחב ץלמומ ךא ,ילנויצפוא(
.)ינוגרא ךירדממ תוילבולג תוצובק אבייל ידכ תוחפה
תוהזל ידכ DNS-ה יתרש לומ הקידבל םיניקתו םיאלמ
ןפואב ףסונ תכרעמה םוחת .)ילנויצפוא( םיחראמ תומש
.ןאכ וניזהל ךירצ ךניא ;יטמוטוא
תילאוטריווה תכרעמה םש ףא שרדנ .ילאוטריווה חראמה לש ימוקמה חראמה םש
תילאוטריו IP תבותכ ףא שרדנ .ילאוטריווה חראמה לש IP-ה תבותכ
תכרעמה םוחת .)ילנויצפוא( תכרעמה לש ןיקתו אלמ םוחת םש
הנשמ תשר תכיסמ .תכרעמה לש הנשמה תשר תא הרידגמה תשר תכסמ
לדחמ תרירב רעש תעונת תא בתנל דעונה רעשה תרש לש IP-ה תבותכ
ישאר DNS תרש םימוחתה תומש תכרעמ תרשל תכיישה IP-ה תבותכ
ינשמ DNS תרש .)ילנויצפוא( ינש DNS תרש לש IP-ה תבותכ
ישילש DNS תרש .)ילנויצפוא( ישילש DNS תרש לש IP-ה תבותכ
DNS-ב שופיחל םימוחת םימוחת תומש לש םיקיספ וא םיחוורב תדרפומ המישר
2© Polycom ,Inc.
Page 47

Polycom DMA System רובע הלחתה ךירדמ
.)םוחב ץלמומ ךא
הרמוחה יביכר לש הנקתהו הקירפ
לש ירחסמ ןומיס םע םיינש וא דחא Dell תרשב תשמתשמ Polycom לש DMA תכרעמ
. Polycom
הרמוחה תא ןיקתהלו קורפל ידכ
) MCU תודיחי( Polycom לש RMX 2000 גוסמ הדיעו לוהינל תומרופטלפ תשכר םא 1
Polycom-ב ראותמכ םתוא ןקתהו קורפ , Polycom לש DMA תכרעמ יתרש םע דחי
RMX 2000 םע הדובעה תלחתה ךירדמ( RMX 2000 Getting Started Guide
.) Polycom לש
תכרעמה תרוצת לע עדימ ילש תכרעמה יכרע רואית
ןמז רוזא .תכרעמה תנכוש וב ןמזה רוזא
1 ’סמ NTP תרש,ילנויצפוא( ישאר NTP ןמז תרש לש IP-ה תבותכ
2 ’סמ NTP תרש .)ילנויצפוא( ינש NTP ןמז תרש לש IP-ה תבותכ
3 ’סמ NTP תרש .)ילנויצפוא( ישילש NTP ןמז תרש לש IP-ה תבותכ
.וקוזינ םא קודבו Polycom לש DMA תכרעמ לש חולשמה תוזירא תא ןחב 2
.רצומה חולשמ ךלהמב ועריאש םיקזנל תיארחא הניא Polycom
.חולשמה יקתפ תא קודבו חתפ 3
לש תיתמוצ-דח DMA תכרעמ לש חולשמ .הלוכתה תא קודבו תוזיראה תא חתפ 4
:תללוכ Polycom
Polycom לש DMA תכרעמ לש דחא תרש —
למשח ילבכ ינש —
)םידומע העברא( דמעמב הנקתהל תחא הכרע —
דחא הדלש חתפמ —
תרשל תחא דועית תכרע —
לש DMA תכרעמ םע הדובעה תלחתה ךירדמ ,הז ךירדמ לש דחא קתוע —
Polycom
הנכותה ;רוזחש תורטמל ףרוצמ( Polycom לש DMA תכרעמל דחא הנקתה קסיד —
)תרשב תנקתומ רבכ קסידה יבג לע היוצמה
3 © Polycom ,Inc.
Page 48

Polycom DMA USB Configuration תא ליכמה , USB רוביחב דחא ןורכיז לקמ —
) USB רוביחב Polycom לש DMA תרוצת תעיבקל תורישה ילכ( Utility
םע תכרעמל יטנוולר אל( ךורא דחאו רצק דחא ,םיבלצומ Ethernet ילבכ ינש —
)דחא תרש
ךלש ןוישרה יכמסמ —
אצמנ אוה ,םידומע ינש םע דמעמל תילנויצפואה הנקתהה תכרע תא תנמזה םא
.תדרפנ הספוקב
.ליעל םירכזנה םיטירפה תא תללוכה היינש הכרע ליכמ תיתמוצ-וד תכרעמ לש חולשמ
.הקוזינ םא קודבו הלוכתה תא ןחב 5
ומרגנש םיקזנל תיארחא הניא Polycom .חלשמה דגנ העיבת שגה ,קזנ תיליג םא
.חולשמה ךלהמב
.םהיתוזיראמ םיביכרה לכ תא אצוה 6
ןיקתהל ידכ .תרשל הוולנה דועיתל םאתהב , Polycom לש DMA )י(תרש תא ןקתה 7
שמתשהו )דמעמב הנקתה ךירדמ( Rack Installation Guide-ב ןייע ,דמעמב תרש
.תופרוצמה הבכרהה תויווזב
:תשרל Polycom לש DMA )י(תרש תא רבח 8
.תינוגראה תשרל תרש לכ לש GB 1 Ethernet-ה תאיצי תא רבח א
Polycom DMA System רובע הלחתה ךירדמ
לש GB 2 תואיציל םיבלצומה םילבכהמ דחא רבח ,תיתמוצ-וד תכרעמב ב
.םיתרשה ינש
.הז בלשב )םי(תרשה תא ליעפת לא
.)םי(תרשהמ )תו(הדלשה תא רסה 9
DMA תכרעמ )י(תרש לש הרוצתה תעיבק
Polycom לש
תורישה ילכ תועצמאב תישענ Polycom לש DMA תכרעמ )י(תרש לש הרוצתה תעיבק
לש DMA תרוצת תעיבקל תורישה ילכ( Polycom DMA USB Configuration Utility
. USB גוסמ ןורכיזה לקמב ) USB רוביחב Polycom
האר ,USB גוסמ ןורכיז סיטרכב שומיש אלל תכרעמה )י(תרש תרוצת תא עובקל ידכ
לקמב שומיש אלל Polycom לש DMA תכרעמ )י(תרש לש הרוצתה תעיבק :יפולח ךילה“
8 דומעב ” USB-ה
Polycom לש DMA תכרעמ )י(תרש לש הרוצתה תעיבקל
Polycom DMA USB תא ליכמה , USB רוביח םע ןורכיזה לקמ תא רבח 1
רוביחב Polycom לש DMA תרוצת תעיבקל תורישה ילכ( Configuration Utility
. Windows הלעפהה תכרעמ לעב בשחמל ,) USB
4© Polycom ,Inc.
Page 49

Polycom DMA System רובע הלחתה ךירדמ
תעיבקל תורישה ילכ( Configuration Utility-ה תא ליעפהל רחב ,ךכל שרדית רשאכ 2
.)הרוצתה
תועצמאב USB גוסמ ןורכיזה לקמל טוונ ,היובכ איהש וא תדבוע הניא תיטמוטואה הלעפהה םא
.רחא םיצבק להנמ וא ,) Windows רייס( Windows Explorer ,)ילש בשחמה( My Computer
הלופכ הציחלב )הרוצתה תעיבקל תורישה ילכ( Configuration Utility-ה תא לעפה ,ןכמ רחאל
. dma7000-usb-config.exe לע
DMA תרוצת תעיבקל תורישה ילכ( DMA USB Configuration Utility ןולחב 3
תרוצת תא רדגה( Configure the System Parameters לע ץחל ,) USB רוביחב
.)תכרעמה לש םירטמרפה
Enable 2-node לע ץחל ,יתמוצ-וד לוכשא ןיקתמ התא םא ,)תשר( Network ףדב 4
.)תיתמוצ-וד הרוצת רשפא( configuration
.)אבה( Next לע ץחלו הנושארה הרדגהה ףדמ תשרה יכרע תא ןזה 5
:)תכרעמה ןמז( System Time ףדב 6
.ךמוקימל םיאתמה )תכרעמה לש ןמזה רוזא( System time zone תא רחב א
)ץיק ןועש רובע יטמוטוא ןונווכ( Auto Adjust For Daylight Savings תא רתוה ב
.) NTP יתרש םע דחוימב ,תויעבל םורגל היושע וז תורשפאב הריחבה תרסה(
יתרש לש )םוחתה תומש וא( IP-ה תבותכ תא ןזה ,) NTP יתרש( NTP servers תחת ג
.הנושארה הרדגהה ףד ךותמ ןמזה
יתרשב שמתשה .השולשל הפדעה םע ,דחא ןמז תרש תוחפל ןייצל םוחב םיצילממ ונא
.רשפאה תדימב ,תיתבכש-תלת תוכיאב NTP ןמז
.)אבה( Next לע ץחל ד
5 © Polycom ,Inc.
Page 50

Polycom DMA System רובע הלחתה ךירדמ
השיגל רתוי וא תחא הטיש רחב ,)החטבאה תרוצת( Security Configuration ףדב 7
.)תיברמ החטבא( Maximum security רחב ,ןיפולחל .תחטבואמ אל
.)םויס( Done לע ץחל 8
.ישארה טירפתל ךתוא ריזחמו רצונ הרוצתה ץבוקש אדוומ תורישה ילכ
The USB stick is set to apply העדוהה תא תעכ גיצמ ישארה טירפתהש אדו 9
.)תכרעמה לש םירטמרפה תלחהל רדגומ USB-ה לקמ( system parameters
.הנכותה תא רוגס 10
)חוטב ןפואב הרמוח תאצוה( Safely Remove Hardware לע ץחל ,תכרעמה שגמב 11
USB ןקתהה תרסה( Safely Remove USB Mass Storage Device רחבו
קתנ ,תאז תושעל חוטבש העדוה העיפומ רשאכ .)החטבב Mass Storage Device
.בשחמהמ USB גוסמ ןורכיזה לקמ תא
תנקתה קסידב ךרוצ ןיאש ךכ ,)םי(תרשב תנקתומ רבכ Polycom לש DMA תכרעמ תנכות
ךיראיו תרשב רבכ תמייקה הנכותה תא בתכשי וב שומיש .השדח תכרעמ רידגהל ידכ תכרעמה
ול קקדזת םעפ יאש הרקמל ,חוטב םוקמב קסידה תא חנה .תרתוימ הרוצב הנקתהה ךילהת תא
.תכרעמה רוזחש םשל
.םייובכ םיתרשה ינשש אדו 12
תא לעפה ,הנוש הסרגב )םי(תרשבש תכרעמה תנכות תא ףילחהל ךירצ התא םא 13
קסיד תא סנכהו )1 תמוצכ ורידגהל ךנוצרבש תרשה( )דיחיה וא( ןושארה תרשה
.אבה בלשל ךשמה ,תרחא .המיאתמה הסרגה לש תכרעמה תנקתה
6© Polycom ,Inc.
Page 51

Polycom DMA System רובע הלחתה ךירדמ
לקמ תא סנכה ,)1 תמוצכ ורידגהל ךנוצרבש תרשה( )דיחיה וא( ןושארה תרשב 14
ינשה תרשה תא רתוה .תרשה תא )שדחמ לחתא וא( לחתאו USB תאיציל USB-ה
.יובכ
.הליחתמ הנקתההו , DVD-מ לחתאמ תרשה ,תכרעמה תנכות תא ףילחמ התא תא
.שדחמ לחתואי תרשהו אצי DVD-ה ,תוקד 20 - 15 - כ רחאל
,)לוחתאה רחאל התוא ףילחמ ךנה םא וא( תכרעמה תנכות תא ףילחמ ךניא םא
.םתוא ליחמו USB-ה לקממ ולש תכרעמהו תשרה לש םירטמרפה תא ארוק תרשה
חולבש LCD-ה ךסמ ידי לע )ןכומ DMA( DMA Ready העדוהה תגצהל ןתמה 15
התא םא .רשפאה תדימב ,קסידה תא אצוהו USB-ה לקמ תא קתנ ,ןכמ רחאל .ימדקה
.17 בלשל גלד ,תיתמוצ-דח תכרעמ ןיקתמ
התא םא .)2 ’סמ תמוצ( ינשה תרשה תא לעפה ,יתמוצ-וד לוכשא ןיקתמ התא םא 16
Polycom לש DMA תכרעמ תנקתה קסיד תא סנכה ,תכרעמה תנכות תא ףילחמ
.שדחמ ותוא לעפהו תרשה תא הבכ , DVD-ה ןנוכל
.הליחתמ הנקתההו , DVD-מ לחתאמ תרשה ,תכרעמה תנכות תא ףילחמ התא תא
.שדחמ לחתואי תרשהו אצי DVD-ה ,תוקד 20 - 15 - כ רחאל
,)לוחתאה רחאל התוא ףילחמ ךנה םא וא( תכרעמה תנכות תא ףילחמ ךניא םא
תא רבחמו ,1 ’סמ תמוצמ םתוא לבקמו ולש הרוצתה תורדגה תא ההזמ תרשה
העדוהה תא םיגיצמ םיתרשה ינש לש LCD-ה יכסמ ,וז הלועפ םויס רחאל .לוכשאה
.)ןכומ DMA-ה לוכשא( DMA Clustered
חראמה םשל ךלש ןפדפדה תא ןווכ ,תכרעמל תשר תשיג ול שיש בשחמ ךותמ 17
admin שמתשמה ההזמ םע סנכיהו IP-ה תבותכל וא תכרעמה לש ילאוטריווה
.admin המסיסהו
Dashboard תא גיצמו עיפומ Polycom לש DMA תכרעמ לש לוהינה קשממ
:תכרעמה תרדגה תא םילשהל לכות ,ולש םיטירפתה ךותמ .)םינווחמה חול(
.ךלש )תונ(ןוישרה תא ןקתה —
תא רדגהו , MCU-ה תודיחיל הדיעו תוינבת ףסוה ,תכרעמל MCU תודיחי ףסוה —
.הדיעווה לש לדחמה תורירב
. Gatekeeper-ב שומישל תכרעמה תרוצת תא רדגה —
.החטבא ירושיא ןקתה —
בוליש ידי לע ןהו םיימוקמ םישמתשמ תפסוה ידי לע ןה ,תכרעמל השיגה תא להנ —
.תכרעמה תא חטבאו ,ינוגראה ךירדמב Polycom לש DMA תכרעמ
DMA לועפת ךירדמ( Polycom DMA Operations Guide-ב וא תנווקמה הרזעב ןייע
.םייטנוולרה םיכילהתהו םירואיתה תלבקל ) Polycom לש
7 © Polycom ,Inc.
Page 52

Polycom DMA System רובע הלחתה ךירדמ
לש DMA תכרעמ )י(תרש לש הרוצתה תעיבק :יפולח ךילה
USB-ה לקמב שומיש אלל Polycom
Polycom תורישה ילכ תא ליכמ וניא ךתושרבש USB גוסמ ןורכיזה לקמ יהשלכ הביסמ םא
Polycom לש DMA תרוצת תעיבקל תורישה ילכ( DMA USB Configuration Utility
אבה ךילהה ,USB-ה לקמ ךותמ תורישה ילכב שמתשהל חילצמ ךניאש וא ) USB רוביחב
.דבלב Ethernet לבכו דיינ בשחמ תועצמאב תינושארה הרדגהה תא םילשהל ךל רשפאמ
תרירב תורדגה םע םיקפוסמ Polycom לש DMA תכרעמ יתרשש םושמ ירשפא רבדה
:ןה תורדגהה .תכרעמל רבחתהל ידכ שמתשהל ךתורשפאב ןהבש תשרה לש לדחמ
192.168.1.101 : IP תבותכ
255.255.255.0 :הנשמ תשר תכיסמ
192.168.1.1 :לדחמ תרירב רעש
דיינ בשחמ תועצמאב Polycom לש DMA תכרעמ )י(תרש לש הרוצתה תעיבקל
)םי(תרשה תא רבחת לא .7 בלש דע ) 3דומע( הנקתההו הקירפה ךילהל םאתהב לעפ 1
.תינוגראה תשרל
לש תשר עטקמ ותואב התוא םקמל ידכ ךלש דיינה בשחמב תשרה תורדגה תא עבק 2
.)ליעל תרשה לש לדחמה תרירב תורדגה האר( Polycom לש DMA תכרעמ )י(תרש
:תואבה תורדגהב שמתשהל ךתורשפאב ,המגודל
192.168.1.20 : IP תבותכ
255.255.255.0 :הנשמ תשר תכיסמ
192.168.1.1 לדחמ תרירב רעש
ןושארה תרשה לש GB 1 קשממ ןיבל ךלש דיינה בשחמה ןיב Ethernet לבכ רבח 3
. )1 תמוצכ רידגהל ךנוצרבש תרשה( )דיחיה וא(
תשר( גתמל תרשה תא רתוי רחואמ בלשב רבחיש לבכב שמתשהל ךתורשפאב
.GB 2 קשממל אל ,תרשה לש GB 1 קשממ לא רבחתהל דפקה .)תינוגרא
http://192.168.1.101 תבותכל ךלש ןפדפדה תא הנפה ,דיינה בשחמב 4
.admin המסיסה םעו admin שמתשמה ההזמ םע רבחתהו
חול( Dashboard תא גיצמו עיפומ Polycom לש DMA תכרעמ לש לוהינה קשממ
.)םינווחמה
ןמז > תכרעמ > הרוצת( Configuration > System > Network לא רובע 5
.Update ץחלו ,First-Time Setup Worksheet ךותמ תשרה יכרע תא ןזה ,)תכרעמ
.)ןכ( Yes לע ץחל ,תכרעמה לש שדחמ הלעפה רשאל שקבתתשכ
.שדחמ לוחתא תעצבמ תכרעמה
8© Polycom ,Inc.
Page 53

Polycom DMA System רובע הלחתה ךירדמ
רבחו דיינה בשחמהמ Ethernet-ה לבכ תא קתנ ,שדחמ לוחתא עצבמ תרשהש ןמזב 6
.תינוגראה תשרה לא תרשה לש GB1 קשממ תא
חולה לש LCD-ה ךסמ ,ךילהתה םויסב .תוקד שולשכ ךשמנ שדחמ לוחתאה ךילהת
.)ןכומ DMA( DMA Ready העדוהה תא גיצמ ימדקה
ךלש ןפדפדה תא ןווכ ,Polycom לש DMA תכרעמל תשר תשיג ול שיש בשחמ ךותמ 7
שמתשמה ההזמ םע סנכיהו IP-ה תבותכל וא תכרעמה לש ילאוטריווה חראמה םשל
.admin המסיסהו admin
ןמז > תכרעמ > הרוצת( Configuration > System > System Time לא רובע 8
:תואבה תולועפה תא עצבו )תכרעמ
.ךמוקימל םיאתמה )תכרעמה לש ןמזה רוזא( System time zone תא רחב א
ןועש רובע יטמוטוא ןונווכ( Auto Adjust For Daylight Savings תא רתוה ב
.) NTP יתרש םע דחוימב ,תויעבל םורגל היושע וז תורשפאב הריחבה תרסה( )ץיק
לש )םוחתה תומש וא( IP-ה תבותכ תא ןזה ,) NTP יתרש( NTP servers תחת ג
.הנושארה הרדגהה ףד ךותמ ןמזה יתרש
שמתשה .השולש ןייצל ףידע ןתינ םאו ,תוחפל דחא ןמז תרש ןייצל םיצילממ ונא
.רשפאה תדימב ,תיתבכש-תלת תוכיאב NTP ןמז יתרשב
לע ץחל ,תכרעמה לש שדחמ הלעפה רשאל שקבתתשכ .)ןוכדע( Update לע ץחל ד
.)ןכ( Yes
ךסמ ,ךילהתה םויסב .תוקד שולשכ ךשמנ ךילהתה .שדחמ לוחתא תעצבמ תכרעמה
.)ןכומ DMA( DMA Ready העדוהה תא גיצמ ימדקה חולה לש LCD-ה
Configuration > System > Security לא רובעו תכרעמל הרזחב רבחתה 9
.)החטבאה תרוצת > תכרעמ > הרוצת( Configuration
Maximum רחב וא רשפאל ידכ תחטבואמ אלה השיגה תוטישמ רתוי וא תחא רחב 10
.)ןוכדע( Update לע ץחל .)תיברמ החטבא( security
שרדנ םא .תכרעמה לש שדחמ לוחתאב ךרוצ היהיש ןכתיי ,תעבקש תורדגהל םאתהב
.)ןכ( Yes לע ץחל .רשאל שקבתמ התא ,לוחתא
.תוקד שולשכ ךשמנ ךילהתה .עצבתמ לוחתאה ,תכרעמה לש שדחמ לוחתא שורד םא
DMA Ready העדוהה תא גיצמ ימדקה חולה לש LCD-ה ךסמ ,ךילהתה םויסב
.)ןכומ DMA(
:תואבה תולועפה תא עצב ,יתמוצ-וד לוכשא ןיקתמ התא םא 11
.תינוגראה תשרה לא )2 תמוצ( ינשה תרשה לש GB 1 Ethernet תאיצי תא רבח א
.םיתרשה ינש לש GB 2 תואיציל םיבלצומה םילבכהמ דחא רבח ב
תא גיצמ ימדקה חולה לש LCD-ה ךסמשו לעופ )1 תמוצ( ןושארה תרשהש אדו ג
.)2 תמוצ( ינשה תרשה תא לעפה ,ןכמ רחאל .)ןכומ DMA( DMA Ready העדוהה
ולש הרוצתה תורדגה תא לבקמו ההזמ אוה ,לוחתא עצבמ ינשה תרשהש רחאל
ינש לש LCD-ה יכסמ ,וז הלועפ םויס רחאל .לוכשאה תא רבחמו ,1 תמוצ ךותמ
.)ןכומ DMA-ה לוכשא( DMA Clustered העדוהה תא םיגיצמ םיתרשה
הרזעב ןייע .תכרעמה תרדגה תא םלשהו ,ךרוצה תדימב ,תכרעמל הרזחב רבחתה 12
לש DMA לועפת ךירדמ( Polycom DMA Operations Guide-ב וא תנווקמה
.םייטנוולרה םיכילהתהו םירואיתה תלבקל ) Polycom
9 © Polycom ,Inc.
Page 54

Polycom DMA System רובע הלחתה ךירדמ
10© Polycom ,Inc.
Page 55

תכרעמ תרש לש םיינכט םיטרפמ
Polycom® לש DMA
אצמנש Dell PowerEdge™R610 תרשה רובע םיינכט םיטרפמ הליכמ ןלהלש הלבטה
. Polycom® לש ) DMA™ ( Distributed Media Application™ תכרעמ ידי לע שומישב
הלופכ
: Riser סיטרכ ךרד הבחרה יצירח
ךרוא יצחב ,אלמ הבוגב דחא x8 רושיק )1 ץירח(
ךרוא יצחב ,אלמ הבוגב דחא x8 רושיק )2 ץירח(
קר ןיקתהל ןתינ לבא ,טאוו 25 דעב םיכמות םיצירחה ינש :הרעה
ינש םינקתומ רשאכ .םעפ לכב תכרעמב טאוו 25 לש דחא סיטרכ
רחאה סיטרכה לעו טאוו 25 לש דחא סיטרכ ןיקתהל ןתינ ,םיסיטרכ
.הטמו טאוו 15 לש תויהל
)יזכרמ Riser( Riser 1
)ילאמש Riser( Riser 2
טירפ רואית
דבעמ
דבעמ גוס וא תעבורמ הביל ילעב Intel® Xeon® ידבעמ ינש וא דחא דבעמ
הבחרה תזכר
תזכר גוס PCI Express Generation 2
™
ןורכיז
הרוטקטיכרא וא םימושר DDR3 Error Correcting Code )ECC( DIMM יביכר
רובע הכימת . 1,333 MHz וא 1,066 , 800 לש Unbuffered גוסמ
.ןורכיז-בטוממ לועפת וא Advanced ECC
ןורכיז ילודומל םיעקש םיניפ 240 לש םיעקש רשע םינש
ןורכיזה ילודומ לש תולוביק , 4 GB , 2 GB לש RDIMM יביכר ; 2 GB וא 1 GB לש UDIMM יביכר
תעבורמ וא הלופכ ,הדיחי הביל לש גוריד םע , 8 GB וא
ילמינימ RAM ןורכיז דיחי CPU םע 1 GB
ילמיסקמ RAM ןורכיז UDIMM יביכר םע( 24 GB וא ) 8 GB לש RDIMM יביכר םע( 96 GB
) 2 GB לש
11 © Polycom ,Inc.
Page 56

םא חולב הכימת םע המח הפלחהל םינתינה
USB רוביחב ילנויצפוא ינוציח DVD
דבלב םינותנל םה DVD ינקתה :הרעה
ילנויצפוא ימינפ ) SD( Secure Digital ןורכיז סיטרכ
ילנויצפוא ינוציח SD ןורכיז סיטרכ
RJ-45 10/100/1000 Mbps Ethernet ירבחמ העברא
םיניפ 9 לש ,16550 םאות ,DTE
םיניפ 4 לש USB 2.0 ימאות םירבחמ ינש
םיניפ 15 לש VGA
iDRAC6 Enterprise םע Flash ןורכיז סיטרכל ילנויצפוא דחא ץירח
Polycom DMA System רובע הלחתה ךירדמ
טירפ רואית
םיננוכ
םיחישק םיננוכ ’ץניא 2.5 לדוגב םיימינפ םיחישק SATA וא SAS יננוכ השיש דע
םינוטילקת ןנוכ 1.44-MB לש ילנויצפוא ינוציח USB ןנוכ
יטפוא ןנוכ ילנויצפוא קד ימינפ SATA DVD-ROM or DVD+RW ןנוכ
Flash ןנוכ ילנויצפוא ימינפ USB
םירבחמ
ןקתהה בג
NIC
ירוט
USB
ואדיו
ילנויצפוא ינוציח VFlash סיטרכ
םיניפ 15 לש VGA
םיניפ 4 לש USB 2.0 ימאות םירבחמ ינש
םיניפ 4 לש USB 2.0 םאות דחא רבחמ
ימינפה SD-ה לודומ םע Flash ןורכיז סיטרכל ילנויצפוא דחא ץירח
תיזח
ואדיו
USB
ימינפ
USB
ימינפ )SD( Secure Digital לודומ
ואדיו
ואדיו גוס בלושמ Matrox G200
ואדיו ןורכיז ףתושמ 8 MB
12© Polycom ,Inc.
Page 57

Polycom DMA System רובע הלחתה ךירדמ
)הובג טלפ( טאוו 717
)היגרנאב ןוכסיח( טאוו 502
ץרה 47-63 ,יטמוטוא חווט ,AC טלוו 90–264
)הובג טלפ( רתויה לכל 2,446.5 BTU/hr
)היגרנאב ןוכסיח( רתויה לכל 1,712.9 BTU/hr
םרזה ,תכרעמה לש ףיקמה הלעפהה חווט לכבו םיינייפוא וק יאנת תחת
הינשה תויפלא 10 ךות חוכ קפס לכל רפמא 55 דע עיגהל יושע סנכנה
.תוחפ וא
CR 2032 3.0-V ןוי-םויתיל גוסמ עבטמ תללוס
3.7-V לש ןוי-םויתיל תוללוס תכרע
דמעמל םיספת אלל )’ץניא 16.69( מ”ס 42.4
טירפ רואית
למשח תכירצ
)הדיחי לכל( AC חוכ קפס
םיטאווב ילמשח קפסה
םיטלווב ילמשח חתמ
םוח זובזב
יברמ סנכנ םרז
תוללוס
תכרעמה תללוס
)תילנויצפוא( RAID תללוס
תויזיפ תודימ
הבוג )’ץניא 1.68( מ”ס 4.26
בחור דמעמל םיספת םע )’ץניא 18.99( מ”ס 48.24
)דנואפ 39( ג”ק 17.69
)דנואפ 29.2( ג”ק 13.25
יברמ יתגרדה יוניש םע )טייהנרפ 95° דע 50°( סויזלצ 35° דע 10°
העשב סויזלצ 10° לש הרוטרפמטב
הלועפ ןמזב תיברמה הרוטרפמטה ,לגר 2,950 לעמ םיהבגב :הרעה
לגר 550/טייהנרפ 1° לש רועישל תדרוי
יברמ יתגרדה יוניש םע )טייהנרפ 149° דע -40°( סויזלצ 65° דע -40°
העשב סויזלצ 20° לש הרוטרפמטב
לש תוחלב יברמ יתגרדה יוניש םע )יוביע אלל( 80% דע 20%
העשב 10%
לש תוחלב יברמ יתגרדה יוניש םע )יוביע אלל( 95% דע 5%
העשב 10%
קמוע )’ץניא 30( מ”ס 76.2
)תיברמ הרוצת( לקשמ
)קיר( לקשמ
םייתביבס םיאנת
הרוטרפמט
הלועפב
ןוסחאב
תיסחי תוחל
הלועפב
ןוסחאב
13 © Polycom ,Inc.
Page 58

הלעפה תביבסב תוקד 5 -ל ץרה 350 דע 5 -מ 0.26 Gms
תוביבסה לכב תוקד 10 -ל ץרה 250 דע 10 -מ 1.54 Gms
וא רתוי 5% דועו 31 G לש הלעפהה תוביבס לכב סוניס יצח לש םלה
תוחפ וא רתוי 10% דועו 2.6 ms לש המיעפ ךשמ םע תוחפ
וא רתוי 5% דועו 71 G לש םידדצה תשש לכב סוניס יצח לש םלה
תוחפ וא רתוי 10% דועו 2 ms לש המיעפ ךשמ םע תוחפ
בצקב תוריהמ יוניש םע 27 G לש םידדצה תשש לכב עבורמ לג םלה
הלעמו 235 in/sec לש
)לגר 10,000 דע –50( רטמ 3,048 דע –16
הלועפ ןמזב תיברמה הרוטרפמטה ,לגר 2,950 לעמ םיהבגב :הרעה
.לגר 550/טייהנרפ 1° לש רועישל תדרוי
)לגר 35,000 דע –50( רטמ 10,600 דע –16
Polycom DMA System רובע הלחתה ךירדמ
טירפ רואית
תיברמ הדונת
הלועפב
ןוסחאב
יברמ םלה
הלועפב
ןוסחאב
הבוג יאנת
הלועפב
ןוסחאב
14© Polycom ,Inc.
 Loading...