

Page 1
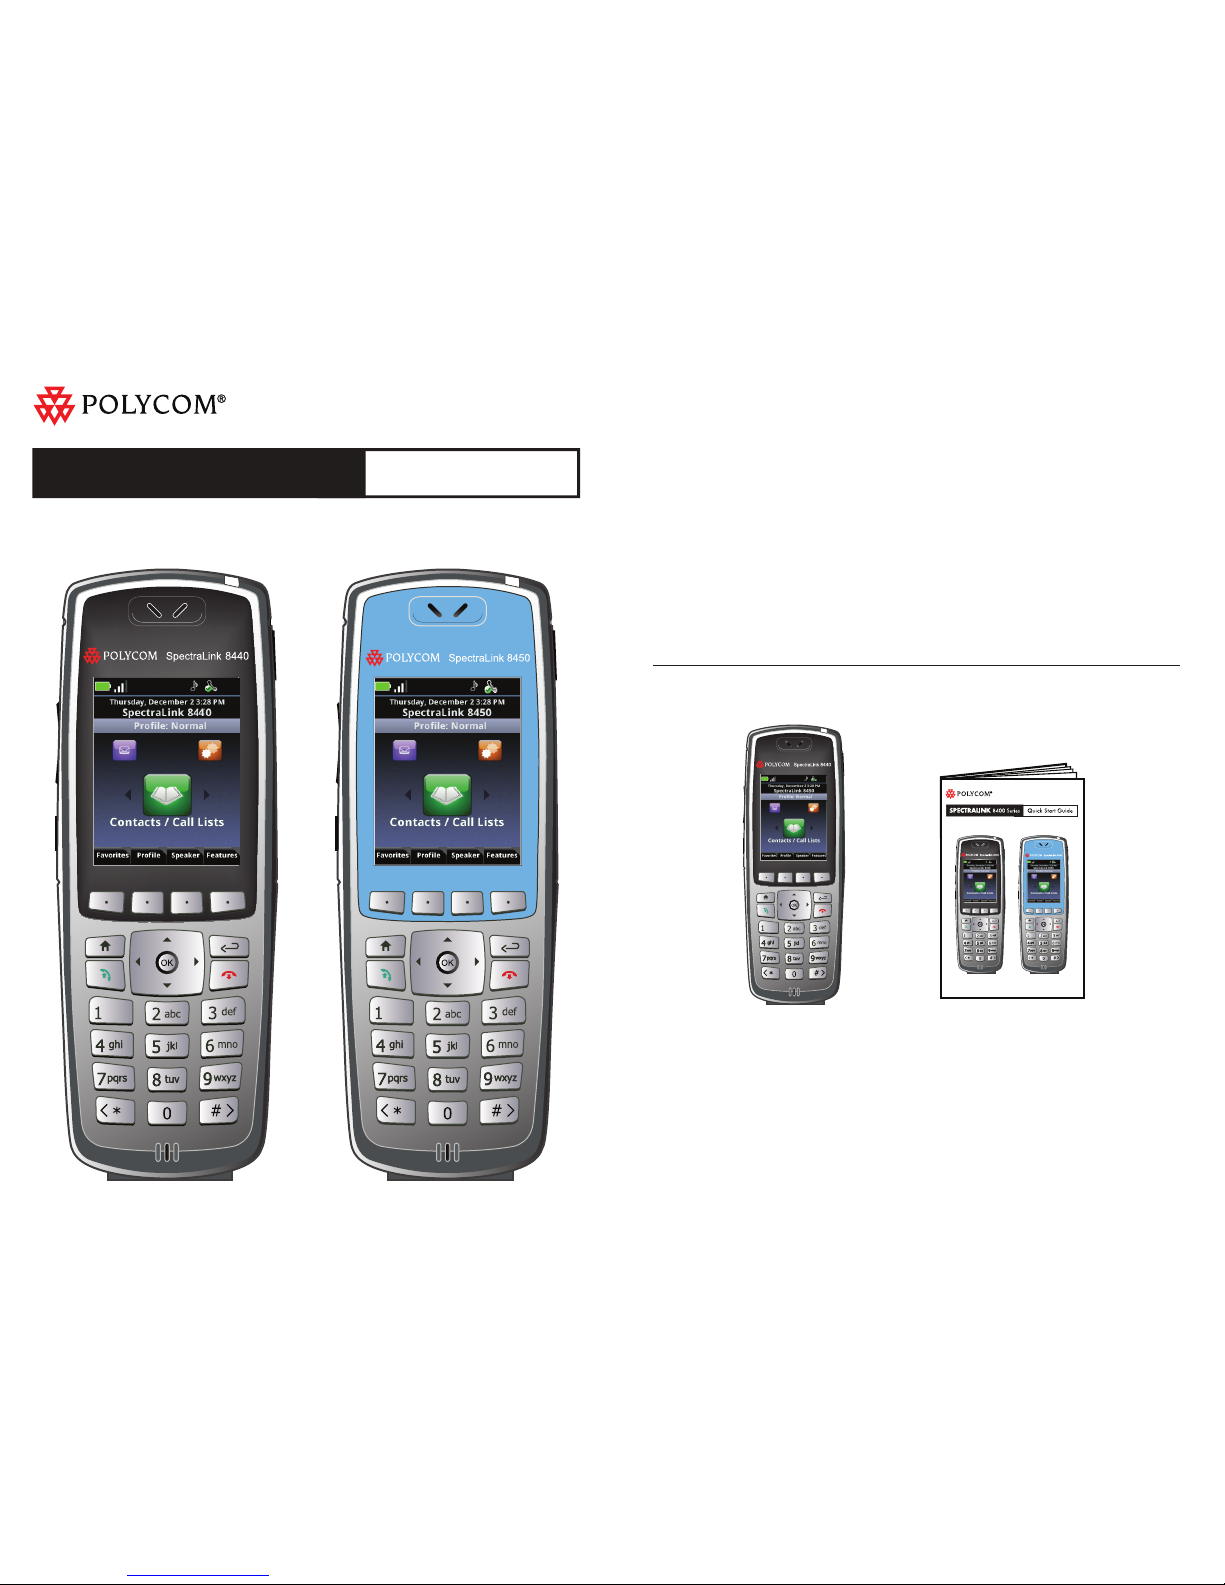
Package Contents
1
This booklet is a basic guide to getting started with your
SpectraLink® 8400 Series Wireless Telephone.
For more detailed information, consult the User Guide for
the SpectraLink 8400 Wireless Handsets available at:
http://support.polycom.com/support/spectralink8400
Table of Contents
Package Contents ..................................................................... 1
The Home Screen ................................................................ 4
The Session Manager ................................................................. 6
Status and Call Icons ................................................................. 7
Basic Handset Features ............................................................. 8
Using the Barcode Reader ...................................................... 16
Using the Dual Charger ........................................................... 16
Battery Pack Removal and Replacement .............................. 18
Accessories ............................................................................. 20
Warranty, Copyright, Safety Notices ...................................... 21
Quick Start Guide
SPECTRALINK®
8400 Series
Page 2
2 3
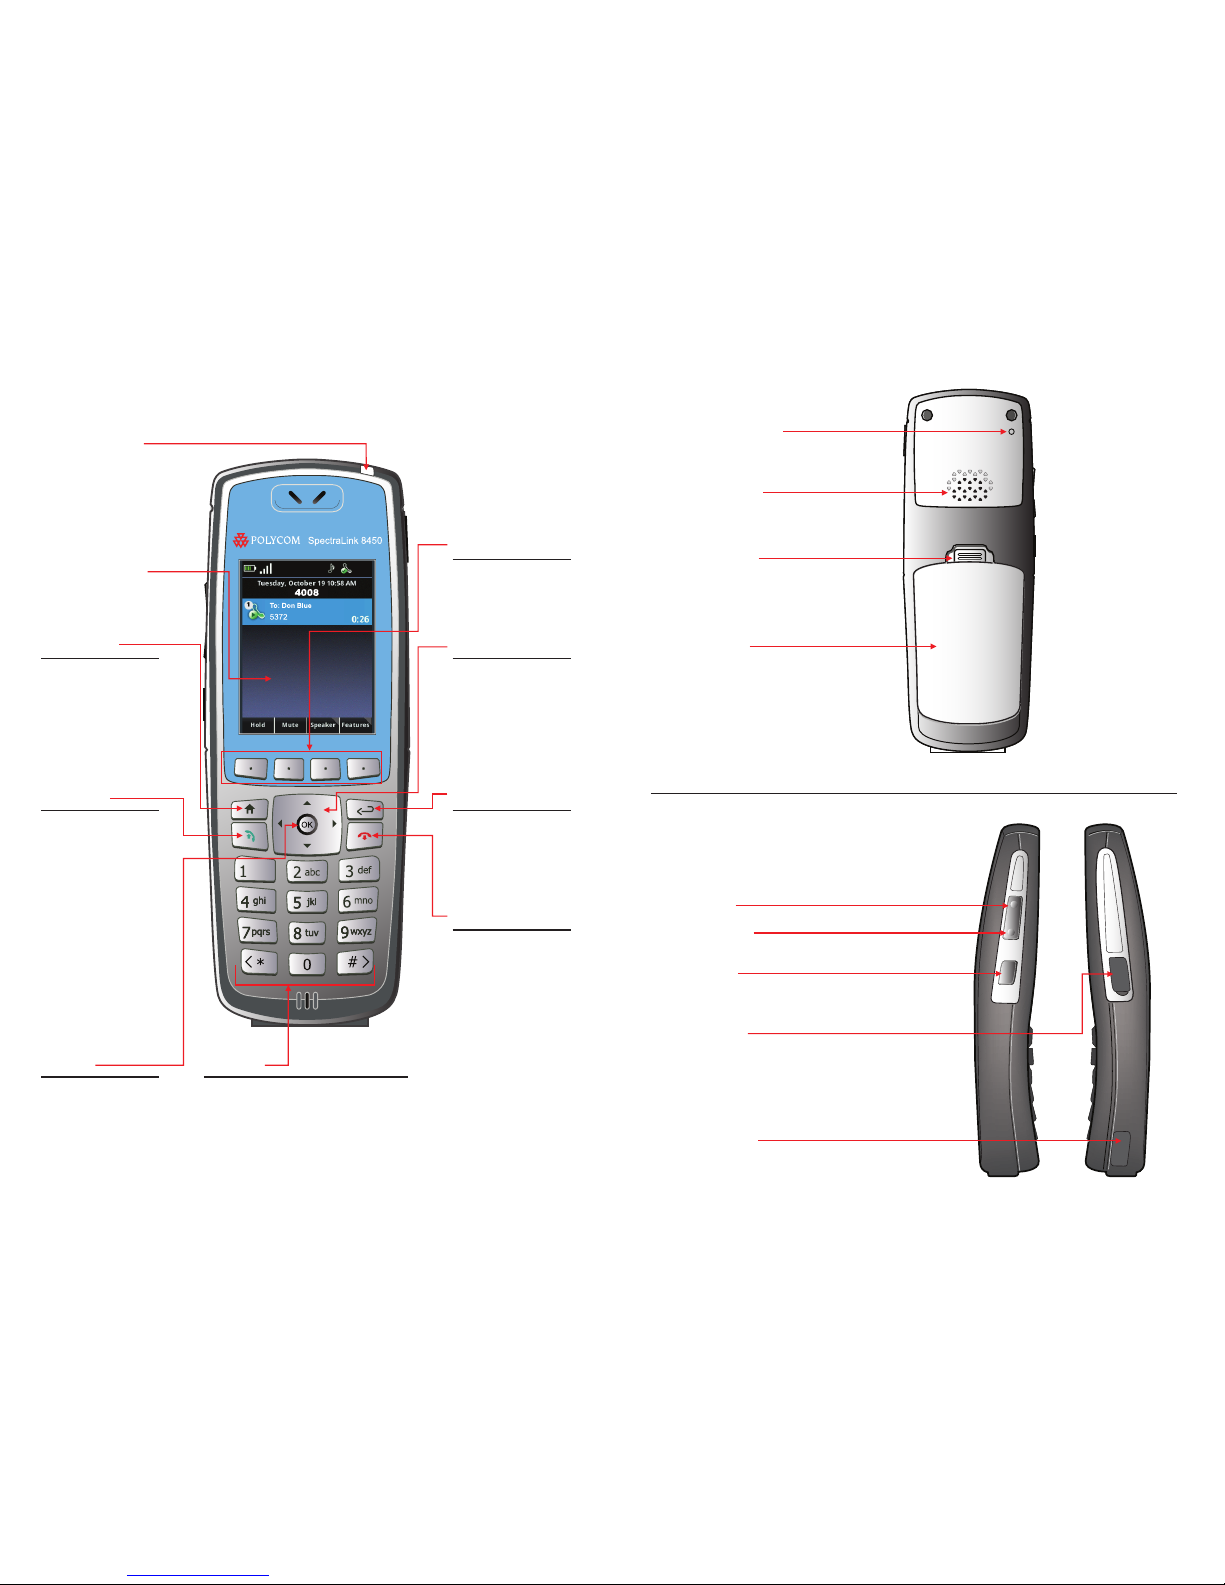
LED indicator
Start key
• Opens the
Dialer from the
Home screen
• Initiates a call
from the Dialer
• Answers an
incoming call
Keypad
While in Multi Key Answer
Mode you can use any of these
keys to answer an incoming
call instead of pressing the
Start key or Answer soft key
Home key
Returns you to
the Home
screen
Back key
Returns to the
previous menu
level or to the
Home screen
End key
• Ends the call or
returns to the
Home screen
• Rejects an
incoming call
• Terminates a
conference call
• Powers the
handset on or
off when held
down for about
two seconds
Navigation keys
and
Scroll through
menus and fields
◄
and ►
Move cursor
OK key
• Selects menu
items
• Enables or
disables menu
items
Full-color LCD
display
Battery Pack
Battery Pack
removal latch
Speakerphone
Noise-cancelling
Microphone
Volume up
Volume down
USB interface
(Lift the cover for
access)
Headset jack
(Lift the cover for
access)
Talk button
(PTT)
Soft keys
Access
context-sensitive
features
Front View
Rear View
Side View - 8440
Page 3
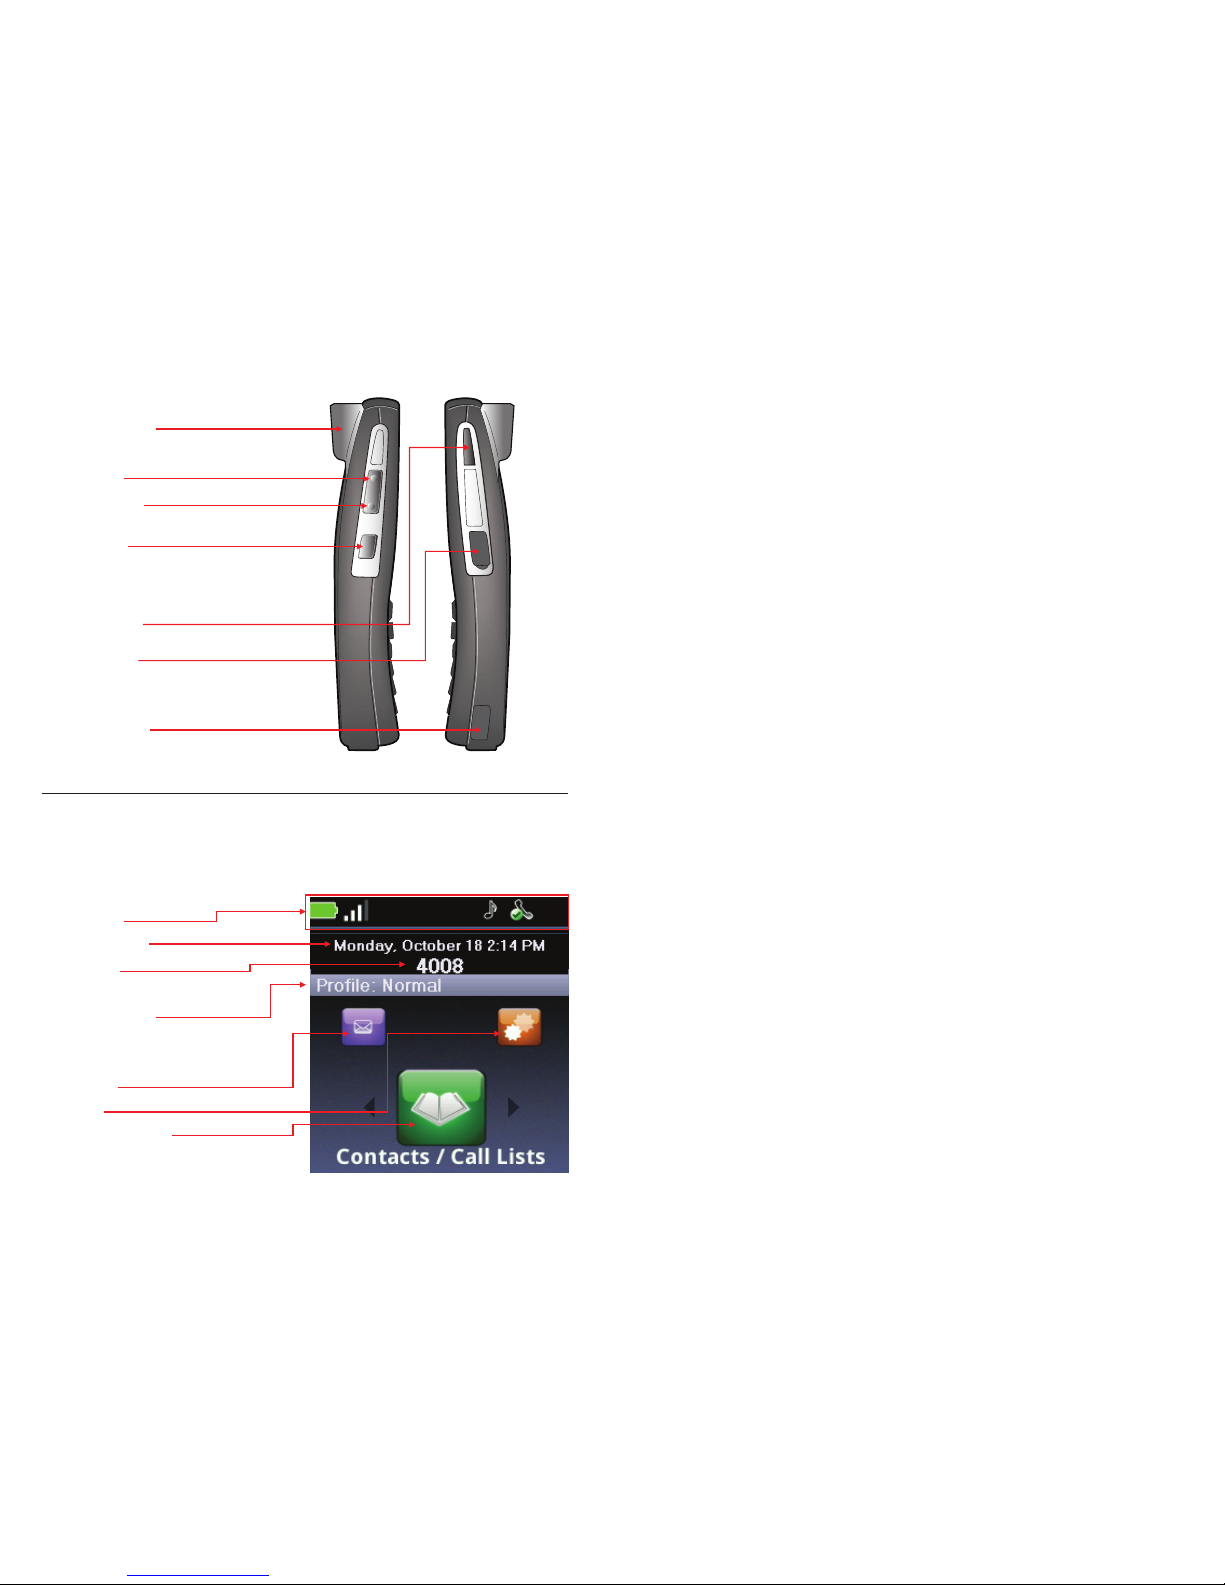
Status bar
Date and time
Extension
Current profile
Home icons:
Messages
Settings
Contacts/Call Lists
Applications
(not shown)
4 5
Barcode reader
Volume up
Volume down
Talk button
(PTT)
Barcode reader
scan button
Headset jack
(Lift the cover for
access)
USB interface
(Lift the cover for
access)
Side View - 8450
The Home Screen
The Home screen provides you with information about the status
of the handset and the Home icons.
Shortcut Menus
The soft keys at the bottom of the display allow you to select
functions. The gray triangles in the upper right corner of the soft
keys indicate that there is a shortcut menu with additional options.
Use the shortcut menus to quickly find the options you want. Use
the ▲ and ▼ navigation keys to highlight an option, and choose
the option by pressing OK. Alternatively, you can press the
number of the option on the keypad to instantly activate it. Grayed
options are not available.
Home Icons
The Home icons allow you to access your handset’s features
from the Home screen. Use the ◄ and ► keys to rotate the
Home icons. Press the OK key to select the center icon.
Messages
The Messages icon gives you access to Voicemail and Instant
Messages. For more information, see
Voicemail on page 12,
and
Instant Messaging on page 13.
Settings
The Settings icon opens a menu for configuring many handset
features. See your User Guide for a complete list of these
options.
Contacts/Call Lists
The Contacts/Call Lists icon gives you access to your Contact
Directory and your Corporate Directory, if available. For more
information, see
Contact Directory on page 12.
Applications
Depending on the configuration of your handset, a menu of
custom applications may be accessible by selecting the
Applications icon from the Home screen. See your system
administrator for information about any applications listed on this
menu.
Page 4
6 7
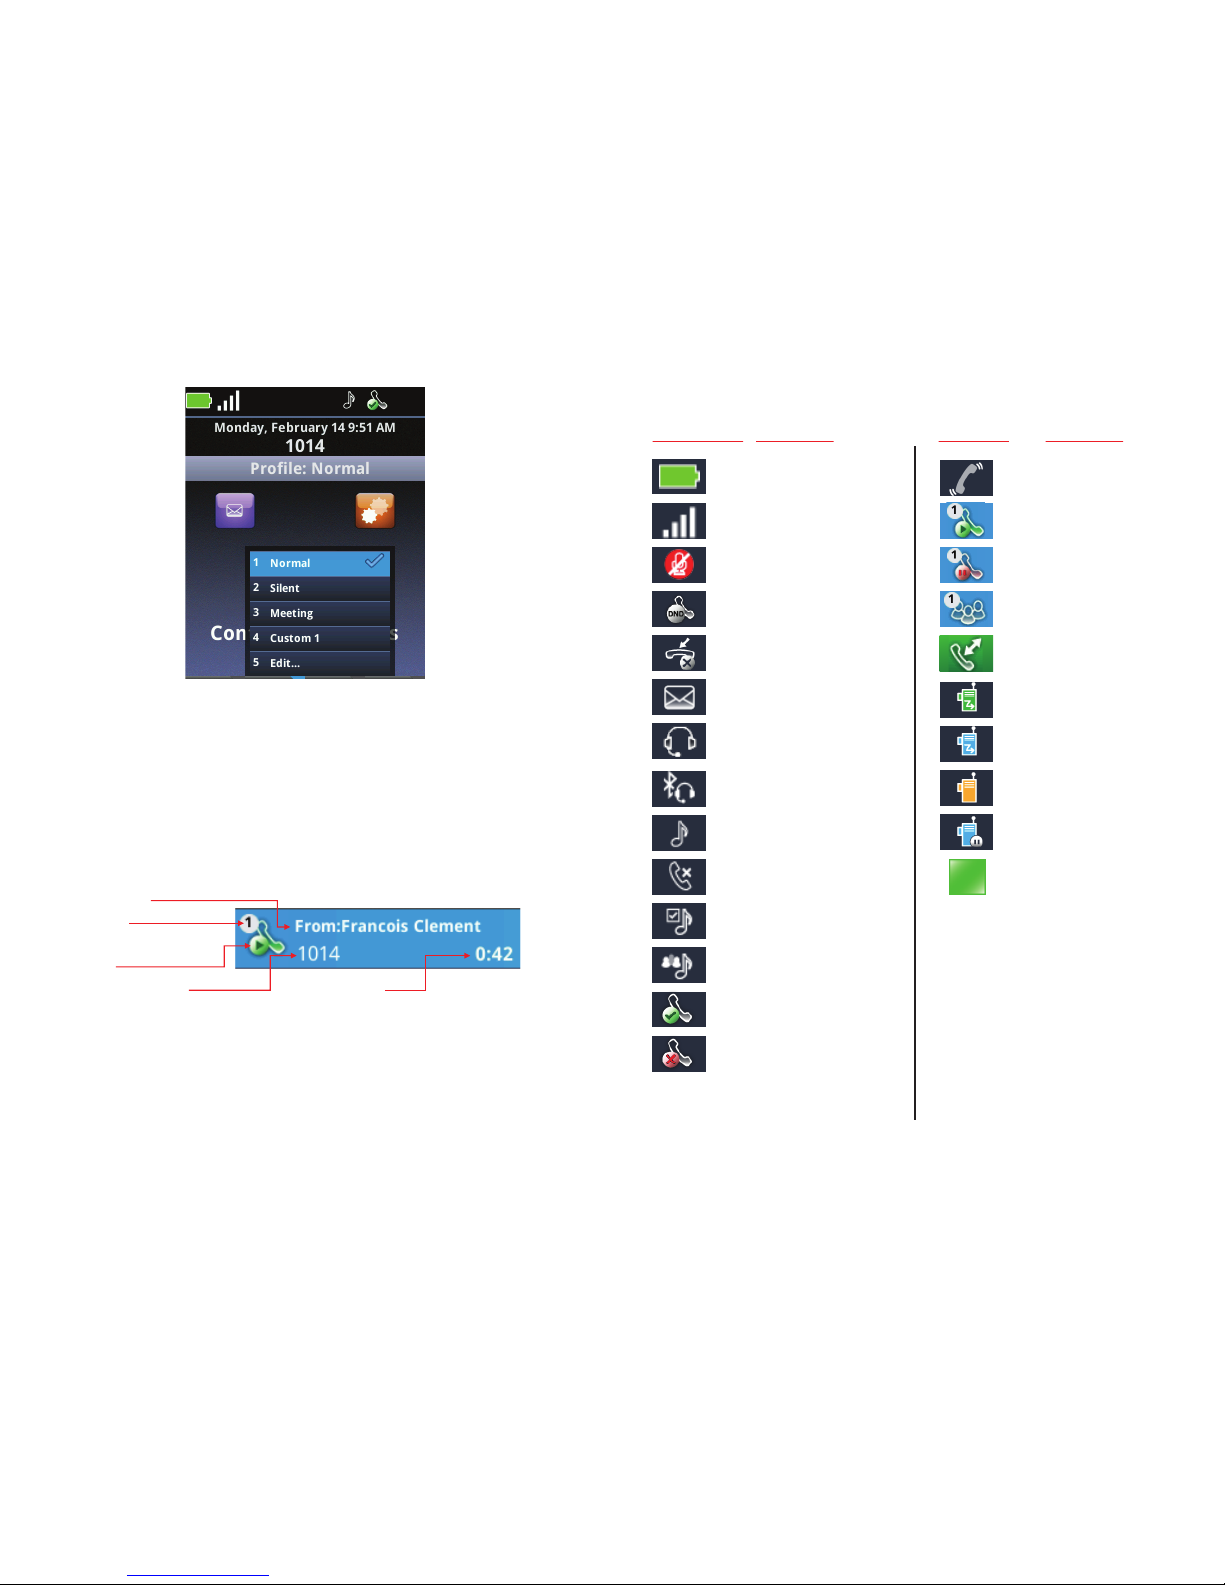
Line number
Name, if known
Call icon indicates
call status
Call duration
Extension or channel
Status and Call Icons
Indication
Incoming call
ringing
Call active
Call on hold
Conference call
Conference leg
PTT/Page receive
PTT/Page transmit
PTT/Page idle
PTT/Page hold
IM Presence
indicator
Status Icon
Call Icon
Indication
Battery full
Signal strength
Mute
Do not disturb
Missed call(s)
Voicemail
Bluetooth Available
Bluetooth connected
Profile: Normal
Profile: Silent
Profile: Meeting
Profile: Custom
SIP reg success
SIP reg failure
For a complete list of all Status Icons, see the
User Guide for
the SpectraLink 8400 Wireless Handsets
The Session Manager
Use your handset to manage up to eight communication sessions
- calls, broadcasts, chats, and alerts - at any one time and in any
combination. Each communication session is shown as a
color-coded cell in the Session Manager screen. Cells display
with a call icon indicating call status, a line number indicator, the
name and extension/channel of the party, and the call duration,
as shown next:
Cell color indicates cell status.
• Dark blue Indicates on hold status
• Green Indicates active while another cell is highlighted
• Light blue Indicates call is highlighted
When a cell is highlighted, soft keys display that you can press to
affect that call while other cells remain unaffected. Use the ▲
and ▼ navigation keys to scroll to and highlight a cell.
Page 5

8 9
Enter a number in
the number field
The Contact
Directory list will be
filtered according to
the number entered
are sorted alphabetically. Scroll to highlight or use the
Search
soft
key. Press the Start key to dial the number.
Use Speed Dial
Press the Speed Dial soft key from the Home screen to display
the shortcut menu of Favorites—those contacts with speed dial
numbers 1-10. Dial any contact by pressing the corresponding
speed dial index number(s) on the keypad. Index numbers are
assigned when a contact is entered. See
Contact Directory on
page 12.
Answering a Call
Press the Start key. If Multi Key Answer is enabled, press any
keypad key (except soft keys and side buttons).
Incoming Call Management
When you are in an active call, the call window replaces the
Session Manager when you receive another call. You can:
• Reject the call by pressing End. If voicemail is available, the call
will be routed to voicemail.
• Silence the ring by pressing the Ignore soft key. The call will
appear in the Session Manager until it stops ringing. If
unanswered, it will be routed to voicemail, if available.
• Answer the call by pressing Ignore to open the Session
Manager. Press Hold to place your active call on hold and press
Start to answer the incoming call.
• To end the current call and answer the incoming call, press
Ignore to open the Session Manager and press End to end the
current call. Then press Start to answer the incoming call.
• Forward the call to another number by pressing the Forward soft
key. See
Forward an Incoming Call on page 11.
Microphone Mute
The Mute soft key appears during active calls. Press this key to
mute the microphone.
You can still hear all other parties while Mute is enabled, but other
parties cannot hear you.
Basic Handset Features
Basic handset features offer you the ability to place, answer, end,
hold, resume, and otherwise manage your incoming and outgoing
calls. Other basic features include muting, transferring,
forwarding, and conference calls.
Placing a Call
You can begin a call using one of the following methods:
Enter a Number
Entering numbers using the handset keypad is the default dialing
mode. Pressing any number on the keypad opens the Dialer,
which will automatically display similar numbers from your
Contact Directory for you to select. As you enter additional
numbers, the list is filtered. You can choose a contact from the list
or continue to enter the number. Press the Start key to make the
call.
Enter a Name
To place a call to an existing directory contact by entering the
name, press the Start key to open the Dialer. Select the Entry
Mode soft key and select the Name option. As you enter the
letters of the name, the list of contacts shown is filtered. Highlight
the name and press the Start key.
Call a Contact
Navigate to Contacts/Call Lists > Contact Directory. Contacts
Page 6

10 11
The UnMute soft key appears while Mute is enabled. To disable
Mute, press the UnMute the soft key.
Call Hold and Resume
The Hold/Resume soft key appears during active calls. Press
this key to place the highlighted call on hold. Press it again to
resume the call.
Keypad Lock
Your keypad can be locked so you do not make inadvertent calls.
From the Home screen, press the Feature soft key and select
Keypad Lock. To unlock the keypad, repeat this sequence.
Volume Adjustment
Press the volume buttons on the left side of the handset to adjust
the call volume of the active call. Press these buttons during
ringing to adjust the ringer volume.
Hands-free Options
You can plug a headset into the headset jack on the right side of
the handset. The headset icon will display. Bluetooth headsets
can be used. Navigate to Settings > Bluetooth for pairing
options.
Transfer and Conference Calls
Use the Features shortcut menu during an active call to perform
Blind and Attended Transfers and Conference calls.
Blind transfer
1. Connect to the first party.
2. Select the Blind Transfer option to open the Dialer (the active
call is placed on hold).
3. Place a call to the target party.
4. The transfer is complete when the target party answers.
Attended Transfer or Conference call
1. Connect to the first party.
2. Select the Transfer or Conference option to open the Dialer
(the active call is placed on hold).
3. Place a call to the target party and explain you are going to
transfer/conference the call.
4. Scroll to the first call and optionally explain the
transfer/conference is about to occur.
5. Press the Transfer or Conference soft key.
If you selected Transfer, you are disconnected. If you selected
Conference, you remain connected.
Conference Behavior
• When the Active Conference cell is highlighted, you can use
the Mute and Hold soft keys and the End key to affect your
participation in the conference.
• When a participant cell is highlighted, you can use FarMute to
mute the participant, the End key will disconnect the
participant, Hold will place that participant on hold.
• Pressing the Feature soft key, Split option will split the
conference into two separate held calls.
Do Not Disturb (DND)
DND sends all calls to Voicemail, if available. Navigate to
Settings > Features > Do Not Disturb. Enable or disable as
needed.
Forward an Incoming Call
While the handset rings, select the Forward soft key. The
Forward-to-Dial screen appears. The screen displays the last
number you forwarded calls to (either statically or dynamically).
To forward the call to a different number, enter the target number
as you would through the Dialer.
Forward All Calls
1. Navigate to Settings > Features > Forward.
2. Select Forwarding Type: Always, No Answer, or Busy.
Page 7

12 13
Use the following as a guide when adding or editing a contact in
the Contact Directory:
Instant Messaging (if available)
Once you have set up a contact with an instant message (IM)
name, the IM icon will display to the left of the name in the
Contact Directory to indicate chat availability.
When you receive a chat, you can press the Start key to reply or
press the End soft key to send the chat to the Message Center.
3. Enter the number of the desired call destination. For No
Answer, enter the number of rings before forwarding.
4. Press the Enable soft key.
To disable call forwarding:
Perform steps 1 and 2 above, but press the Disable soft key.
Voicemail
When Voicemail is configured, the Voicemail icon in the
Status Bar indicates
one or more new Voicemail messages.
To listen to voice messages:
1. Select the Messages icon from the Home screen. Urgent, New
and Old options are available.
2. Press the Connect soft key, and then follow the voice prompts.
Use the Clear soft key to clear Voicemail messages.
Call Lists
Navigate to Contacts/Call Lists and press OK. Press the Type
soft key to specify which type of call you wish to view: Missed,
Received or Placed Calls. Press the Back key to return to the
Call list which now displays the selected type. Press the Info soft
key to view the call details. You may then dial, edit, save or delete
the call.
Contact Directory
Contacts can be dialed, added, edited, searched and deleted.
Note that contacts can be added from the Corporate Directory if
available in your facility.
1. Navigate to Contacts/Call Lists > Contact Directory. A
Corporate Directory option may be available.
2. Use the Edit, Add, Search, and Delete soft keys to customize
your contacts. Note that you can only Add and Search the
Corporate Directory.
3. Press the Encoding soft key to access special characters,
other languages and capitalization options.
Description/Function
Both names are searchable; the list is
sorted alphabetically by last name.
The phone number entered for the contact.
Automatically assigned but can be
changed/overridden. Index numbers 1-10
will appear on the shortcut menu.
Identify the contact with a short
description, such as Sales.
Choose a ring identifier from the dropdown
list to specify a unique ring tone for this
contact.
Enter a number to divert calls from this
contact to if Auto Divert is enabled.
Enable this option to block all calls from
this contact.
Enable this option to divert all calls from
this contact to the Divert Contact number
(see Divert Contact)
The Instant Messaging identifier for this
contact.
Field/Option
First Name/
Last Name
Contact
Speed Dial Index
Label
Ring Type
Divert Contact
Auto Reject
Auto Divert
IM Name
Page 8

14 15
IM Status Icons
Additional PTT information is available in the
User Guide for
the SpectraLink 8400 Wireless Handsets
.
Set Profile
Your SpectraLink 8400 handset has four configurable Profiles
which can be customized for event notifications such as
incoming calls or PTT sessions:
Normal Audible alerts
Silent All handset sounds are silenced
Meeting Vibrates to notify of incoming calls
Custom Can be tailored to specific needs
The chosen active profile can be changed from the Home screen
by pressing the Profile soft key and selecting one of the options
from the Profile shortcut menu.
Set Other Preferences
To access other Preferences, choose Settings> Preferences
and select one of the following options:
1. Language
2. Time and Date
3. Headset Memory
4. Background
5. Screen Capture
6. Auto Answer
7. On-Hook dialing
8. Easy Answer
9. Paging/PTT Configuration
10. Paging/PTT config
Push to Talk (if configured)
T
o set Push to Talk (PTT) options, navigate to Settings >
Preferences > Paging/PTT Config.
Make a PTT
broadcast
Answer a PTT
broadcast
End a wait period
Select a different PTT
channel
Hear a PTT broadcast
while on a phone call
End a PTT broadcast
Change the PTT
volume
Press and hold the Talk button. Wait for the
display to show Transmitting… and then
speak into the microphone.
Press and hold the Talk button during the
10-second wait period.
Press the End key.
Press and release the Talk button. Use the
and keys to highlight the desired
channel.
Place the telephone call on hold. Now you
can hear the PTT broadcast.
Press the End key to exit the PTT
broadcast.
Press the up/down volume buttons on the
side of the handset while transmitting or
receiving a PTT broadcast.
Answer a
telephone call
during a PTT
broadcast
Start a telephone
call during a PTT
broadcast
Turn off PTT
Press the Start key. PTT transmissions will
be overridden by the telephone call.
Press the Start key and dial the number.
PTT transmissions will be overridden during
the telephone call.
Disable PTT in the Settings menu accessed
through the Settings icon on the Home
screen.
Field/Option
Description/Function
Field/Option (cont’d)
Description/Function (cont’d)
Available
Busy
Away
DND
Offline
No info
Page 9

16 17
Battery Pack fully charged,
handset in charger
The Home Screen
The Home screen provides you with information about the status
of the handset and the Home icons.
Using the Dual Charger
The Dual Charger is an optional accessories. (See Accessories
on page 20.)
You can use the Dual Charger to charge the Battery Pack in an
operational handset while also charging a spare Battery Pack in
the rear charging slot (as shown next).
Shortcut Menus
The soft keys at the bottom of the display allow you to select
functions. The gray triangles in the upper right corner of the soft
keys indicate that there is a shortcut menu with additional options.
Use the shortcut menus to quickly find the options you want. Use
the ▲ and ▼ navigation keys to highlight an option, and choose
the option by pressing OK. Alternatively, you can press the
number of the option on the keypad to instantly activate it. Grayed
options are not available.
Two LED’s on the front of the Dual Charger indicate charging status:
The charging icon on the handset indicates the charging status of
the Battery Pack in the handset.
LED
Blinking
Solid green
Off
Battery Pack charge
Charging
Fully Charged
Not seated or empty
Handset charge
n/a
Properly seated
Not seated or empty
Using the Barcode Reader (8450 only)
The barcode scanner is located at the top rear of the 8450
handset. It is used in conjunction with an on-board application or
a PC-based application. See your system administrator, or
consult your User Guide for complete information.
Battery Packs should be fully charged before first use.
Barcode reader
scan button
Barcode reader
Spare Battery
Pack charging
slot
Handset charge
LED
Battery Pack
charge LED
Handset
charging slot
Battery Pack charging,
handset in charger
Page 10

18 19
Battery Pack
Removal latch
Tab
Bottom slot
Battery Pack Removal and Replacement
To remove the Battery Pack, press up on the latch on the back of
the handset. The Battery Pack releases outward.
To replace, slide the tab of the Battery Pack into the bottom slot of
the handset cavity. Gently press the top of the Battery Pack until it
snaps into place. The Battery Pack should snap into position with
minimal pressure.
Do not remove the Battery Pack to power off the handset. Log off or
power off the handset and then remove the Battery Pack if you need
to replace it.
Page 11

20
Accessories
Warranty, Copyright, Safety Notices
Speakerphone Dock
Quad Charger
USB Charger
Extended Battery Pack
Dual Charger
These accessories are designed to enhance your SpectraLink
8400 Series Wireless Telephone. For more information, contact
your reseller, or visit
http://www.polycom.com/forms/contact_polycom.html
Battery Pack
assigned when a contact is entered. See
Contact Directory on
page 12.
Answering a Call
Press the Start key. If Multi Key Answer is enabled, press any
keypad key (except soft keys and side buttons).
Incoming Call Management
When you are in an active call, the call window replaces the
Session Manager when you receive another call. You can:
• Reject the call by pressing End. If voicemail is available, the call
will be routed to voicemail.
• Silence the ring by pressing the Ignore soft key. The call will
appear in the Session Manager until it stops ringing. If
unanswered, it will be routed to voicemail, if available.
• Answer the call by pressing Ignore to open the Session
Manager. Press Hold to place your active call on hold and press
Start to answer the incoming call.
• To end the current call and answer the incoming call, press
Ignore to open the Session Manager and press End to end the
current call. Then press Start to answer the incoming call.
• Forward the call to another number by pressing the Forward soft
key. See
Forward an Incoming Call on page 11.
Microphone Mute
The Mute soft key appears during active calls. Press this key to
mute the microphone.
You can still hear all other parties while Mute is enabled, but other
parties cannot hear you.
You can begin a call using one of the following methods:
Enter a Number
Entering numbers using the handset keypad is the default dialing
mode. Pressing any number on the keypad opens the Dialer,
which will automatically display similar numbers from your
Contact Directory for you to select. As you enter additional
numbers, the list is filtered. You can choose a contact from the list
or continue to enter the number. Press the Start key to make the
call.
Enter a Name
To place a call to an existing directory contact by entering the
name, press the Start key to open the Dialer. Select the Entry
Mode soft key and select the Name option. As you enter the
letters of the name, the list of contacts shown is filtered. Highlight
the name and press the Start key.
Call a Contact
Navigate to Contacts/Call Lists > Contact Directory. Contacts
Please contact your Polycom Authorized Reseller for assistance.
http://www.polycom.com
Polycom, Inc. 4750 Willow Road, Pleasanton, CA 94588-2708 USA
1725-36721-001 Rev. B
The software included in this Product (including, without limitation, firmware
and all updated thereto, including any software that may be downloaded
electronically via the internet or otherwise (the “Software”) is licensed, not sold.
Customer shall not reverse compile, disassemble, or otherwise reverse
engineer, embed with any other software product, or modify in any manner
with respect thereto, the software in whole or in part.
LIMITED WARRANTY. Polycom warrants to the end user (“Customer”) that this
product will be free from defects in workmanship and materials, under normal
use and service, for one year from the date of purchase from Polycom or its
authorized reseller.
Polycom’s sole obligation under this express warranty shall be, at Polycom’s
option and expense, to repair the defective product or part, deliver to Customer
an equivalent product or part to replace the defective item, or if neither of the
two foregoing options are reasonably available, Polycom may, in its sole
discretion, refund to Customer the purchase price paid for the defective product.
All products that are replaced will become the property of Polycom.
Replacement products or parts may be new or reconditioned. Polycom warrants
any replaced or repaired product or part for ninety (90) days from shipment, or
the remainder of the initial warranty period, whichever is longer.
Products returned to Polycom must be sent prepaid and packaged appropriately
for safe shipment, and it is recommended that they be insured or sent by a
method that provides for tracking of the package. Responsibility for loss or
damage does not transfer to Polycom until the returned item is received by
Polycom. The repaired or replaced item will be shipped to Customer, at
Polycom’s expense, not later than thirty (30) days after Polycom receives the
defective product, and Polycom will retain risk of loss or damage until the item
is delivered to Customer.
EXCLUSIONS. Polycom will not be liable under this limited warranty if its testing
and examination disclose that the alleged defect or malfunction in the product
does not exist or results from:
• Failure to follow Polycom’s installation, operation, or maintenance
instructions.
• Unauthorized product repair, modification or alteration.
• Unauthorized use of common carrier communication services accessed
through the product.
• Abuse, misuse, negligent acts or omissions of Customer and persons under
Customer’s control; or
• Acts of third parties, acts of God, accident, fire, lightning, power surges or
outages, or other hazards.
WARRANTY EXCLUSIVE. IF A POLYCOM PRODUCT DOES NOT OPERATE AS
WARRANTED ABOVE, CUSTOMER’S SOLE REMEDY FOR BREACH OF THAT
WARRANTY SHALL BE REPAIR, REPLACEMENT, OR REFUND OF THE PURCHASE
PRICE PAID, AT POLYCOM’S OPTION. TO THE FULL EXTENT ALLOWED BY LAW,
THE FOREGOING WARRANTIES AND REMEDIES ARE EXCLUSIVE AND ARE IN LIEU
OF ALL OTHER WARRANTIES, TERMS, OR CONDITIONS, EXPRESS OR IMPLIED,
EITHER IN FACT OR BY OPERATION OF LAW, STATUTORY OR OTHERWISE,
INCLUDING WARRANTIES, TERMS, OR CONDITIONS OF MERCHANTABILITY,
FITNESS FOR A PARTICULAR PURPOSE, SATISFACTORY QUALITY,
CORRESPONDENCE WITH DESCRIPTION, AND NON-INFRINGEMENT, ALL OF
WHICH ARE EXPRESSLY DISCLAIMED. POLYCOM NEITHER ASSUMES NOR
AUTHORIZES ANY OTHER PERSON TO ASSUME FOR IT ANY OTHER LIABILITY IN
CONNECTION WITH THE SALE, INSTALLATION, MAINTENANCE OR USE OF ITS
PRODUCTS.
SERVICE AGREEMENTS. Please contact your Polycom Authorized Reseller for
information about service agreements applicable to your product.
SOFTWARE SUPPORT. Polycom will provide support for software running on the
Product if all of the following conditions are satisfied:
• The product is under warranty or is covered by a Polycom service contract;
• The product is operating on a Polycom-approved partner platform; and
• The product software is the current major version or the next preceding major
version (software revisions are labeled as “x.y.z,” with the first two digits
designating major versions).
Requests for software support should be made through the Polycom Reseller
from whom the product was purchased.
LIMITATION OF LIABILITY. TO THE FULL EXTENT ALLOWED BY LAW, POLYCOM
EXCLUDES FOR ITSELF AND ITS SUPPLIERS ANY LIABILITY, WHETHER BASED IN
CONTRACT OR TORT (INCLUDING NEGLIGENCE), FOR INCIDENTAL,
CONSEQUENTIAL, INDIRECT, SPECIAL, OR PUNITIVE DAMAGES OF ANY KIND, OR
FOR LOSS OF REVENUE OR PROFITS, LOSS OF BUSINESS, LOSS OF INFORMATION
OR DATA, OR OTHER FINANCIAL LOSS ARISING OUT OF OR IN CONNECTION
WITH THE SALE, INSTALLATION, MAINTENANCE, USE, PERFORMANCE, FAILURE,
OR INTERRUPTION OF ITS PRODUCTS, EVEN IF POLYCOM OR ITS AUTHORIZED
RESELLER HAS BEEN ADVISED OF THE POSSIBILITY OF SUCH DAMAGES, AND
LIMITS ITS LIABILITY TO REPAIR, REPLACEMENT, OR REFUND OF THE PURCHASE
PRICE PAID, AT POLYCOM’S OPTION. THIS DISCLAIMER OF LIABILITY FOR
DAMAGES WILL NOT BE AFFECTED IF ANY REMEDY PROVIDED HEREIN SHALL
FAIL OF ITS ESSENTIAL PURPOSE.
DISCLAIMER. Some countries, states, or provinces do not allow the exclusion or
limitation of implied warranties or the limitation of incidental or consequential
damages for certain products supplied to consumers, or the limitation of liability
for personal injury, so the above limitations and exclusions may be limited in
their application to the customer. When the implied warranties are not allowed
to be excluded in their entirety, they will be limited to the duration of the
applicable written warranty. This warranty gives the customer specific legal
rights which may vary depending on local law.
GOVERNING LAW. This Limited Warranty and Limitation of Liability shall be
governed by the laws of the State of California, U.S.A., and by the laws of the
United States, excluding their conflicts of laws principles. The United Nations
Convention on Contracts for the International Sale of Goods is hereby excluded
in its entirety from application to this Limited Warranty and Limitation of
Liability. COPYRIGHT. All rights reserved under International and pan-American
Copyright Conventions. No part of the contents of this manual may be copied,
reproduced, or transmitted in any form or by any means, or translated into
another language or format, in whole or part, without written consent of
Polycom, Inc.
Polycom® and the logo design are registered trademarks of Polycom, Inc. in
the United States, and various countries.
Do not remove (or allow any third party to remove) any product identification,
copyright or other notices.
The software contained within this product is protected by United States
copyright laws and international treaty provisions. Polycom, Inc., retains title
and ownership of all property rights with respect to the software within this
product.
LIMITATION OF W ARRANTY: Pro ducts purc hased hereun der may
include an Application Prog ramming Inter face, includin g, with out
limitation, t he XHTM L based API and the OAI API or any ot her API that
may included in futur e softwar e releases , which is resident on the Product
and which e nables external, t
hird party control o f the application-sp ecific
element s of the Product and provides t hird-party applicati ons
developers with tools for integration wit h t he Product (the “AP I
Software ”). P olycom does not and c annot warrant that: (i) certain
performa nce or results may be obtained using the API So ftware; (ii) the API
Software is appro priate for Purchaser’s purposes or p articular application;
or (iii) t
he A PI Softwar e is error or bug free of th at it will provide
uninterrupte d usage. A CCORDINGLY, THE API SOFTWA RE A ND ITS
DOCUMEN TATION IS L ICENSED "A S IS" W ITHOUT ANY W ARRANTY AS
TO THEIR Q UALITY, P ERFORMANCE, ME RCHANTABILITY O R FITNESS FOR
ANY PA RTICULAR PURPOSE. THE ENTIRE RISK AS TO THE RESUL TS
AND P ERFORMANCE OF THE API SOFTWA RE IS ASSUMED B Y PURCHASE R.
SAFETY AND REGULATORY INFORMATION. For complete safety information,
consult the Safety Guide for SpectraLink 8000 Series Wireless Telephones.
Contact Information:
 Loading...