

Page 1
SpectraLink 8020/8030
Wireless Telephone
and Accessories
Link 5120
SPECTRALINK 8020/8030 WIRELESS TELEPHONE
USER GUIDE
Page 2
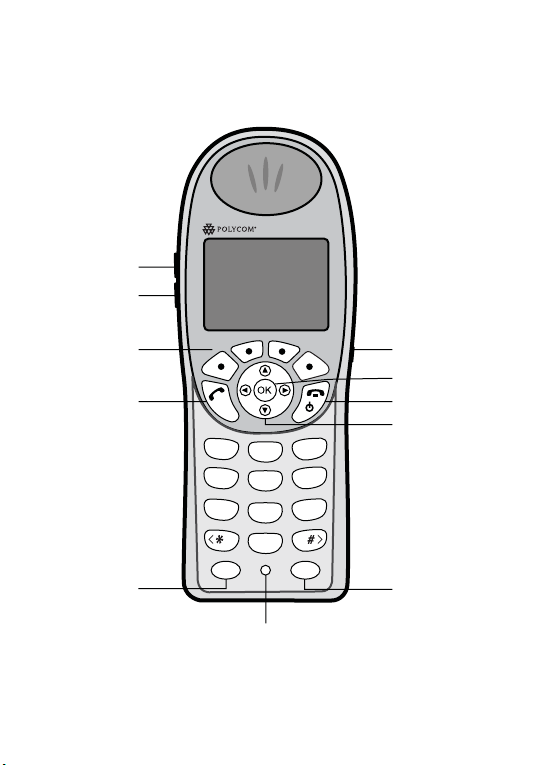
SpectraLink 8020 Wireless Telephone
SpectraLink 8020
Volume
up
Volume
down
Softkeys
Function key
2
START
(FCN)
1
GHI
4
PQRS
7
FCN
ABC
2
JKL
5
TUV
8
0
Microphone
Headset
jack
NavOK
END
Nav keys
DEF
3
MNO
6
WXYZ
9
LINE
LINE
Page 3
SpectraLink 8030 Wireless Telephone
SpectraLink 8030
Volume
up
Volume
down
Softkeys
TALK
START
Function key
(FCN)
1
GHI
4
PQRS
7
FCN
ABC
2
JKL
5
TUV
8
0
Microphone
Headset
jack
NavOK
END
Nav keys
DEF
3
MNO
6
WXYZ
9
LINE
LINE
3
Page 4

Notice
Polycom, Inc. has prepared this document fo r use by Polycom personnel and customers. The
drawings and specifications contained herein are the property of Polycom and shall be neither
reproduced in whole or in part without the prior written approval of Polycom, nor be implied to
grant any license to make, use, or sell equipment man ufactured in accordance herewith.
Polycom reserves the right to make changes in specifications and other information contained in
this document without prior notice, and the reader should in all cases consult Polycom to determine whether any such changes have be en made.
No representation or other affirmation of fact contained in this document including but not limited to statements regarding capacity, response-time performance, suitability for use, or performance of products described herein sh all be deemed to be a warranty by Polycom for any
purpose, or give rise to any liability of Polycom whatsoever.
Trademark Information
Polycom® and the logo designs
SpectraLink®
LinkPlus
Link
NetLink
SVP
Are trademarks and registered trademarks of Po lycom, Inc. in the United States of America and
various countries. All other trademarks used herein are the property of their respective owners.
Patent Information
The accompanying product is protected by one or more US and foreign patents and/or pending
patent applications held by Polycom, Inc.
Model Numbers
Handset models: 802X, 803X
Charger models: PCS1850, PCD1850, PCQ1850
Battery Pack models: PBP0850, PBP1 300, PBP1850
4
Page 5

INTRODUCTION
Your SpectraLink 8020/8030 Wireless Telephone uses radio wave technology to send and receive voice transmissions. It is designed to operate like a cell phone. However, the handset uses the private telephone
system installed in your facility and will not operate outside the area
covered by this system.
About This Guide
This guide is meant to provide general information about your handset.
Contact your system administrator for additional information on how
your handset functions within your telephone system. This guide
includes information about:
• The Handset
• Getting Started
• Advanced Features
• Handset Accessories
• Handset Administration
5
Page 6

TABLE OF CONTENTS
THE HANDSET .......................................................................... 8
Modes of Operation ..............................................................................8
Menu Navigation ................................................................................. 8
Shortcut Keys .................................................................................. 9
Handset Displays ..................................................................................9
Status Bar Indicators ........................................................................ 10
Softkey Labels ...................................................................................12
GETTING STARTED ................................................................15
Basic Handset Operation Summary ...................................................15
ADVANCED FEATURES .......................................................... 21
Facility-Specific Features ....................................................................21
The Config Menu ................................................................................21
Toggle Options ...............................................................................22
Profiles ..........................................................................................22
Changing Ring Settings ..................................................................23
Default Profile Settings ..................................................................23
Config Menu Options .......................................................................... 24
Data Entry and Editing ........................................................................26
Speakerphone ..................................................................................... 27
Predial ................................................................................................ 27
Redial .................................................................................................27
Phonebook .........................................................................................28
Phonebook List Options .................................................................28
Phonebook Edit Entry Options ........................................................ 29
Speed-Dial .........................................................................................29
Push-to-talk (PTT) ..............................................................................31
6
Page 7

ACCESSORIES .........................................................................33
Battery Packs .................................................................................... 33
Notes on Battery Packs ..................................................................34
Charger Models ..................................................................................34
Charging Status ............................................................................. 35
Single Charger ....................................................................................36
Dual Charger ...................................................................................... 37
Quad Charger .....................................................................................38
Carrying Options ................................................................................39
Headsets ............................................................................................ 39
HANDSET ADMINISTRATION ................................................40
FAQs ..................................................................................................40
Specifications ................................................................................... 43
INDEX .......................................................................................45
CARE OF YOUR HANDSET ......................................................47
7
Page 8

THE HANDSET
K
Modes of Operation
The Handset
Your handset has five modes of operation:
Mode Description
Standby
Config menu
Message alert
Push-to-talk (PTT)
Menu Navigation
The handset is not in a call or messaging.
Active
A call is coming in, a call is being dialed or
the handset is in a call or messaging.
User preferences are being accessed in the
Config Menu. In this mode the handset is on,
but will not receive calls.
Custom text messaging applications may be
programmed for your facility. This mode is
activated through the
The SpectraLink 8030 Wireless Telephone
uses channels for incoming and outgoing
radio communication. While PTT is active,
the handset is in PTT mode.
Nav
FCN menu.
NavO
Nav
Nav
Nav
8
Page 9
The navigation keys (Nav keys) just below the softkeys are used to navigate through menu options. These are referred to in this guide as
NavT, NavW, NavX, and NavOK to select.
Shortcut Keys
NavS,
When a menu is displayed, a shortcut key may be displayed on the right
edge of the menu line. Press the corresponding number on the keypad to
activate the corresponding menu option.
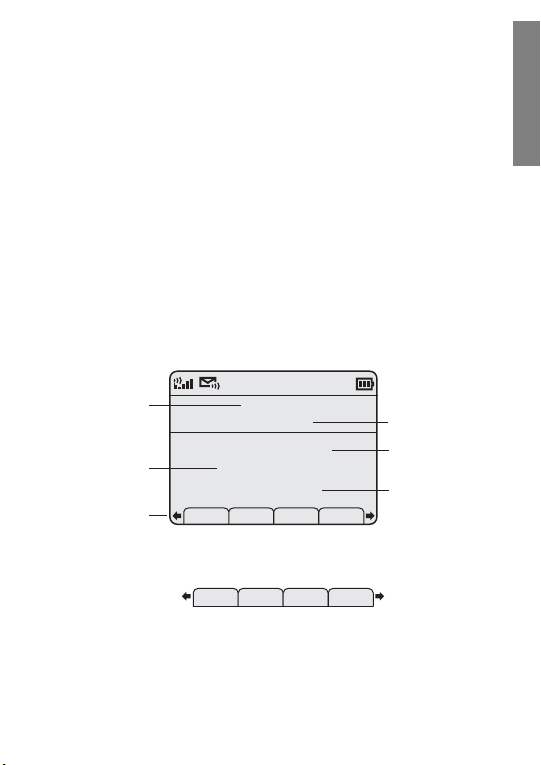
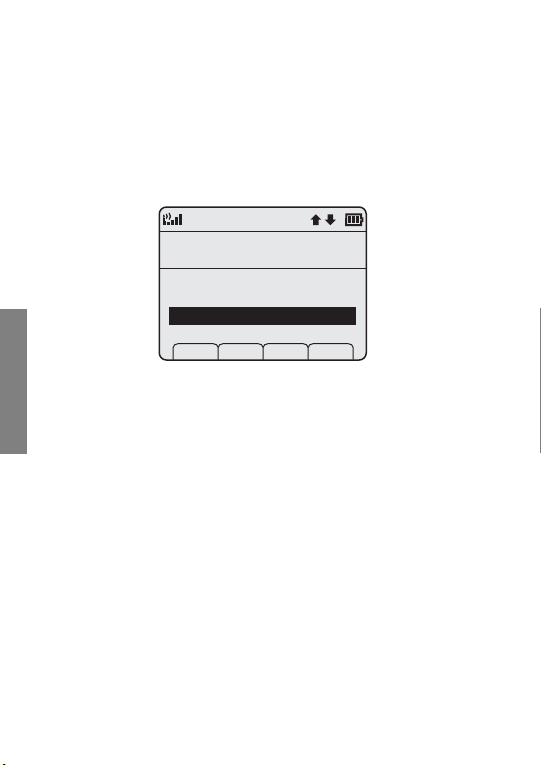
Handset Displays
The top row of the display provides status indicators for various handset
conditions. It is referred to as the status bar.
The middle lines display information about the handset identity, user profile, calls in progress, menu options, and data from telephone system.
The bottom row displays softkey labels.
Standby Mode Display
The Handset
Extension
User
profile
Softkey
Press
labels
NavW or X to display the second set of available softkeys:
Ext. 555
John Doe
07-05 12:19p
Profile: Loud
1: General
Spkr Phbk Prof Lock
Spdl Redl Cfg
User name
Date/time
Default PTT
channel
(model 8030
only)
When the handset is in a call or in active mode, information from the
telephone system in your facility displays. Information may include
extension or telephone number of called or calling party, active line
9
Page 10
information, and softkeys that have been programmed by your system
administrator. Press
FCN to scroll to additional softkey sets.
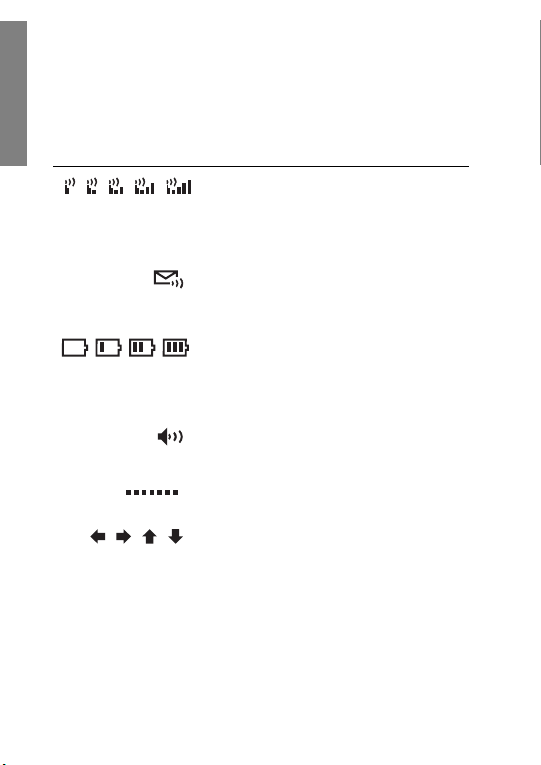
Status Bar Indicators
The Handset
Indicator Function
1
The signal-strength icon indicates the
strength of the signal and can assist the
user in determining if the handset is moving
out of range.
The voicemail icon is activated when a new
voicemail message is received when this
feature is available in your facility.
The battery icon indicates the amount of
charge remaining in the Battery Pack. When
only one level remains, the Battery Pack
needs to be charged.
The speakerphone icon displays when the
speakerphone is active.
The line indicators are associated with
telephone line status and access.
Up and down arrows are displayed when the
menu has additional options above or
below.
Left or right arrows are displayed during
editing when the cursor may be moved left
or right.
10
Page 11

Indicator Function
Telephone ring icon. A regular telephone call
is coming in.
Messaging ring icon. A call is coming in
from a Messaging application.
The PTT ring icon. A PTT call is coming in.
The priority PTT ring icon. A call is coming in
on the priority PTT channel. This call will
override any other.
Muted
The muted indicator displays after the Mute
softkey has been pressed. It indicates that
the microphone is not transmitting sound.
Press the
microphone.
Locked
Locked indicates that the keypad is locked to
prevent accidental activation. Use the
softkey plus the
[No Service
message]
If warning tones are enabled, an alarm will
sound and a descriptive message displays
when the handset cannot receive or place
calls. You may be outside of the covered
area. Walk back into the covered area. The
in-service tone indicates service is reestablished.
The Handset
Mute softkey again to unmute the
Unlk
# key to unlock it.
11
Page 12

Indicator Function
The download icon indicates that the
The Handset
handset is downloading code. This icon only
appears while the handset is running the
over-the-air downloader. It appears to the
right of the signal strength icon in the same
location as the voicemail icon.
Location Service (RTLS) is enabled.
Softkey Labels
The bottom row of the handset displays labels associated with the four
softkeys just below it. When a softkey is active, a label appears to
describe its function. Pressing the softkey will activate the feature.
When additional softkeys are available,
and right of the softkey labels. Press
softkey labels.
These are some of the softkeys you will see.
Label Description Action
Back
Go back Returns to the previous menu
CAPS
Change case Toggles to allow a change in case
caps
Cfg
Configure Opens the Config Menu.
Clr
Clear Deletes the entry.
Nav arrows appear to the left
NavX or W to view the additional
display.
when entering alphabetical text.
12
Page 13

Label Description Action
Cncl
Cancel Returns to the previous menu display
without saving any data that might
have been entered.
Del
Delete Deletes the character to the left of
the cursor.
Done
Finished Exits a list when more than one
selection is possible.
Edit
Edit Opens an editing window so you can
change information about an entry in
the phonebook.
Exit
Exit Exits out of the menus.
Lock
Lock Keys Locks the keypad to prevent
accidental activation. See
softkey below.
Hold
Hold Places a call on hold.
Mute
Mute Toggles to mute or unmute the
microphone.
No
Negative reply Press tso reply “No” to a displayed
question.
Phbk
Phonebook Opens the phonebook.
Play
Play Plays the selected ring tone.
Prof
Profile Opens the Profile menu.
The Handset
Unlk
13
Page 14

Label Description Action
Redl
Redial Displays a list of the last 10 numbers
The Handset
Save
Save Saves the current entry to the
dialed.
phonebook.
Set
Set From the speed-dial assignment
display, opens the phonebook listing
for assigning a phonebook entry to a
speed-dial key.
Spdl
Speed-dial Opens the list of speed-dial
numbers.
Spkr
Speakerphone Toggles speakerphone function.
Unlk
Unlock keys Press Unlk, then the # key to unlock
a locked keypad.
USB
Active USB port Displays when the handset is being
configured via the USB port of the
Dual Charger.
View
View Displays information about an entry
in the phonebook .
Yes
Positive reply Press to reply “Yes” to a displayed
question.
14
Page 15

GETTING STARTED
Your SpectraLink 8020/8030 Wireless Telephone is designed for full
mobility within the workplace and operates much like a cell phone. It
also interfaces with the telephone system at your workplace and incorporates advanced telephony features. This section covers the basic
functions available in every facility. For specific telephony system functions, see the Facility-Specific Features section or contact your system
administrator.
Place the handset into the charger for a minimum of two
hours. The handset's Battery Pack must be fully charged
before its first use. See the section Charger Models for full
information.
Basic Handset Operation Summary
If you want to Then
Remove the
Battery Pack
Replace the
Battery pack
Turn handset on
Press down on the latch on the Battery Pack
at the back of the handset and pull the
Battery Pack towards you. The Battery Pack
releases outward.
Slide the lip of the Battery Pack into the
bottom of the cavity. Push the top of the
Battery Pack until it snaps into place. You
should not have to force it into the handset.
Press and hold the END key until two chirps
sound.
Getting Started
15
Page 16

Unlock the keypad
Getting Started
Make an emergency
If you want to Then
Turn handset off
Lock the keypad
Make an internal
Make an external
call
call
call
Select a line
Press and hold the END key. One chirp will
sound. If you are in a call, hang up first, then
turn off the handset.
Press the Unlk softkey, then #, to unlock the
keypad.
Press the Lock softkey.
Press the START key, wait for a dial tone,
then dial the extension.
Press the START key, wait for a dial tone,
then dial the number just as you would from
your desk phone.
Open the speed-dial list to determine if you
have an emergency speed-dial number that
has been programmed by your system
administrator. If so, it will appear as the first
item on the speed-dial list with a >
in front of it and the programmed keypress
as the next character. The
^ represents the
volume up and down buttons on the side of
the handset. Press the programmed key for 3
seconds to activate the call. See Open the
speed-dial list below.
If multiple lines are available, your
telephone system may require you to select
a line before dialing a number. Press
LINE
and the number key corresponding to the
desired line. You will hear a dial tone.
16
Page 17

If you want to Then
Dial a number
Predial a number
Redial a number
Make a
speed-dial call
Open/edit the
speed-dial list
Make a
phonebook call
Answer a call
Once you hear a dial tone, press the number
keys to dial the number.
From standby mode, press the keypad to
enter up to 28 numbers. Then dial the call by
START, NavOK or the Spkr softkey.
pressing
Press the Redl softkey from standby mode. A
list of recently-dialed numbers displays.
Select the number and press
Spkr softkey.
or the
START, NavOK
Press and hold the speed-dial key assigned
to the number.
Press the Spdl softkey from standby mode.
Press the Phbk softkey from standby mode.
Highlight the name and press the
START
softkey.
The handset will ring or vibrate to alert you
of an incoming call. Additionally, a line
indicator on the display may flash and the
display may show information about the
call, such as the caller’s name and
extension.
To answer a call, press the
START key and
hold the earpiece to your ear. You may also
activate the speakerphone function or use a
headset.
Getting Started
17
Page 18

Getting Started
Place a call on hold
If you want to Then
Answer a call on a
second line
Answer with
headset
Silence while
ringing
Change the
ring volume
Activate or
deactivate the
speakerphone
Adjust the
speaker volume
Adjust the
headset volume
Resume a held call
If you are on a call and hear subdued
ringing, a call is coming in on a second line.
The line number on the display may be
flashing. To answer this call, put your first
call on hold and press the
LINE key, then the
line number of the second call.
Press any key (other than END) to answer a
call when a headset is plugged in.
Press the END key to silence the ring.
Press the up/down volume buttons on the
side of the handset during ringing. The
default ring volumes are set in the User
Profile menus.
Press the Spkr softkey and speak towards
the handset. Note that this feature may be
unavailable in your facility.
Press the up/down volume buttons on the
side of the handset during the call.
Press the up/down volume buttons on the
side of the handset during the call.
Press the Hold softkey.
Press the LINE key followed by the line
number key.
18
Page 19

If you want to Then
Mute the
microphone
End the call
Change the profile
Edit the phonebook
Display additional
features
Turn on the backlight
Press the Mute softkey.
Press the END key. Be sure to do this at the
end of each call to return to the standby
mode.
Press the Prof softkey and use the Nav keys
to select a new profile while in standby
mode. The selected profile is marked with
an asterisk (*).
Press the Phbk softkey from standby mode.
During a call press the FCN key to display
the softkeys programmed to additional
features available in your facility. These
might include transfer, conference,
voicemail, etc.
The backlight comes on when any key is
pressed or when there is an incoming call
and stays on for 10 seconds. It turns off
after 10 seconds if another key is not
pressed within that period.
Getting Started
19
Page 20

Getting Started
If you want to Then
Use message alerts
If programmed in your facility, message
alerts may be activated by pressing the
designated softkey assigned by the system
administrator. Press the
FCN key to scroll
through the softkey sets.
In certain messaging applications, the
back-arrow/asterisk (< *) key is used for left
and up navigation and the forward-arrow/
pound (# >) key is used for right and down
navigation. Contact your system
administrator for detailed information about
message alert mode.
20
Page 21

ADVANCED FEATURES
Facility-Specific Features
Press the FCN key while off-hook or in a call to display the the softkeys
programmed for advanced telephony features such as transfer, conference, and voicemail. The features may be activated by pressing the corresponding shortcut key. Contact your system administrator for more
information about custom features available in your facility.
The Config Menu
When the handset is in standby mode, press the Cfg softkey to enter the
Config Menu. The handset cannot make or receive calls while in the Config Menu. This menu allows you to set user preferences. Refer to the
diagrams on pages 24-25.
Advanced Features
Menu line
Info line
Config Menu
General Settings
Lock Keys
User Profiles
Phone Settings
Push-to-talk
Prof Pl Exit
Scroll through menu options by using
NavS and NavT. When an aster-
3
Shortcut
key
isk (*) appears to the left of an option, it indicates that the option is currently selected. Press the
the
Back softkey to return to the previous menu.
Exit softkey to return to standby mode. Use
21
Page 22

Toggle Options
Some menu options that have only two possibilities operate on a toggle
basis. The current setting is shown on the second row of the display,
called the info line. Highlight the option and press
between the settings. For example, when
option,
Ring in Speaker will show on the info line as the active setting.
If you select
Ring in Headset, Ring in Headset will show on the info line
as the active setting and the menu option will toggle to
Profiles
NavOK to toggle
Ring in Headset is the menu
Ring in Speaker.
Your handset ring behavior is established by five User Profiles: Silent,
Vibrate, Loud, Soft, and Custom. The currently-active user profile is
shown on the standby display. The ring behavior can easily be changed
by pressing the
Prof softkey and selecting a new profile from the list
when the handset is in standby mode. The currently-active profile is
marked with an asterisk (*).
Advanced Features
User Profiles
Choose a Profile
Silent
Vibrate
Loud
*
Soft
Prof P Back
3
22
Page 23

Changing Ring Settings
To change the ring tone or any other ring setting for any profile, go to
User Profiles and select the profile. Select Ring Settings and then select
Telephone for standard phone calls or one of the Message Alerts for text
messages. Then select the ring option you want to adjust. See page 24
for the diagram that shows this sequence graphically.
Default Profile Settings
Setting/Profile Silent Vibrate Soft Loud Custom
Ring Cadence Off Off Telephone Telephone Telephone
Ring Tone Tone 1 Tone 1 Tone 1 Tone 1 Tone 1
Ring Volume11375
Vibrate Cadence Off Telephone Off Off Telephone
Ring Delay 00005
Noise Mode Normal Normal Normal Normal Normal
Headset/Speaker Speaker Speaker Speaker Speaker Sp eaker
Key Tones Off Off On On On
Warning Tones Off Off On On On
Push-to-talk* Off Off On On On
*Push-to-talk is only available on the SpectraLink 8030 m odel.
Contact your system administrator if you want to reset all user profiles
back to these default settings.
Advanced Features
23
Page 24

Config Menu Options
Lock Keys
User Profiles
Silent
Vibrate
Loud
Soft
Custom
Advanced Features
continued on next page
Set as Active
Ring Settings
Noise Mode
Ring in Headset
Ring in Speaker
Warning Tones
Key Tones
Push-to-talk
Telephone
Message Alert 1
Message Alert 2
Ring Cadence
Ring Tone
Ring Volume
Vibrate Cadence
Ring Delay
24
Page 25

continued from previous page
Phone Settings
Push-to-talk
System Info
Extension Info
Keypad Autolock
Display Contrast
Use Hearing Aid
Use No Hearing Aid
Startup Song
Play/Inhibit
Predial
Enable/Disable
Default Channel
Subscribed Channels
PTT Audio Volume
PTT Tone Volume
Phone IP Address
SVP IP Address
Firmware Version
Extension Number
Extension Name
Advanced Features
25
Page 26

Data Entry and Editing
Enter numbers by pressing the buttons on the keypad. The blinking
underscore identifies the current cursor position. When entering alphanumeric strings, the
to toggle between upper and lower-case letters. Enter letters by repeatedly pressing the corresponding key until the desired letter displays on
the screen. Use the
To edit during entry, delete the character to the left of the cursor by
pressing the
pressing the
entry, use
the
Del softkey to delete the character to the left. Insert new data by
pressing the buttons on the keypad.
Alphanumeric entries:
Advanced Features
CAPS/caps softkey will appear and may be pressed
CAPS softkey to change the case as needed.
Del softkey. To replace an entry, delete all characters by
Clr softkey and then enter the new data. To edit an existing
NavW and NavX to move the cursor position, and then press
Key
caps CAPS
1
11
2
2 a b c 2 A B C
3
3 d e f 3 D E F
4
4 g h i 4 G H I
5
5 j k l 5 J K L
6
6 m n o 6 M N O
7
7 p q r s 7 P Q R S
8
8 t u v 8 T U V
9
9 w x y z 9 W X Y Z
0
00
*
* . - _! $ % & ’ ( ) + , : ; / \ = @ ~
#
# <space>
26
Page 27

Speakerphone
Your system administrator can enable or disable the speakerphone
mode. If the speakerphone is enabled, it is activated by pressing the
Spkr softkey. Press the Spkr softkey again to end speakerphone mode.
The audio then transfers to the handset earpiece. When speakerphone
mode is disabled,
Spkr will not appear as a softkey label.
Predial
Predial is automatically activated when you begin pressing numbers on
the keypad while in standby mode. Up to 28 numbers may be pressed.
The call is then placed by pressing the
softkey. Press
Save to add the dialed number to the phonebook before
START key, NavOK, or the Spkr
placing the call.
Predial may be disabled in the
Config Menu.
Redial
The Redl softkey is available in the standby mode. When it is pressed, a
list of the last 10 pre-dialed calls will be displayed. Use the
highlight the number and press
START to dial the number.
You may save any of these numbers to the phonebook by pressing the
Save softkey. You may also view any entry already saved in the phone-
book by pressing the
View softkey.
Nav keys to
Advanced Features
27
Page 28

Phonebook
The phonebook in your SpectraLink 8020/8030 Wireless Telephone can
store up to 20 user-defined numbers. Open the phonebook list by pressing the
Phbk softkey from the standby mode or by pressing the Save
softkey during predial. You may add, delete, or edit a phonebook entry,
open the speed-dial list or start a call from the phonebook.
The phonebook list is sorted alphabetically. If the system speed-dial key
has been programmed, it will be listed as the first entry with a greaterthan symbol (>) as the first character. Only the system administrator
may change this entry. The
number of entries has been entered.
Phonebook List Options
If you want to Then
Dial number
Search for an entry
Advanced Features
View an entry
Enter a new name
and number
Delete an entry
Edit an entry
<new> option appears until the maximum
Press START or the Spkr softkey.
Press the key corresponding to the first
letter of the name. Use
NavW and NavX to
edit the search characters.
Press NavOK.
Select the <new> option (if available) and
Edit softkey to open the enter
press the
number display.
Press the Del softkey to delete an entry.
Press the Edit softkey to open the enter
number display and edit the existing
number. Use the
select an entry. Press the
Nav keys to highlight and
Dial softkey to dial
the number.
28
Page 29

Phonebook Edit Entry Options
If you want to Then
Dial number
Assign a speed-dial
number to this entry
Edit an entry
Press START or the Spkr softkey.
Press the Spdl softkey. Use the Nav keys to
highlight an empty slot and then press
NavOK.
Press the Edit softkey to open the enter
number display and edit the existing
number.
Return to
phonebook list
Press the Back softkey or NavOK.
Speed-Dial
The SpectraLink 8020/8030 Wireless Telephone can assign up to 10
speed-dial keys to numbers entered into the phonebook.
Open the speed-dial list by pressing the
mode. If programmed, the first item on this list is the system-wide
speed-dial number set by the system administrator. It is specially
marked with a greater-than symbol (>) on the left side of the row. It is
usually reserved for emergency situations. This feature is disabled if
pre-dial is disabled in the
Config menu.
To make a speed-dial call, press and hold the corresponding key for one
second. The system (emergency) speed-dial key must be pressed for
three seconds. The handset will display the name and number for one
second before the call is dialed. You may press
to terminate the call.
Spdl softkey from standby
END during this second
Advanced Features
29
Page 30
You may also use the Nav keys to highlight a number or listing and then
press
START or the Spkr softkey to dial the number. The Exit softkey
returns you to the standby mode.
A phonebook entry may be assigned to a speed-dial key from the speed-
dial list. Select the speed-dial key that you wish to assign and then
press the
Set softkey to open the phonebook list. Use the search routine
or the
Nav keys to select the desired entry.
Speed Dial Key 3
Choose a Number
>[System Name]
[Name]
[Name]
[Name]
NavOK to assign the selected name to that speed-dial key. The
Press
Back softkey returns you to the speed-dial list. Speed-dial entries may
be edited through the phonebook, as described above.
Advanced Features
Back
30
Page 31

Push-to-talk (PTT)
The PTT feature allows SpectraLink 8030 Series Wireless Telephones to
operate in a group broadcast mode that allows the handsets to behave
like walkie-talkies, where a single handset can transmit to multiple listeners.
DEF
1
3
ABC
2
GHI
MNO
4
6
JKL
5
PQRS
WXYZ
7
9
TUV
8
#
*
0
FCN
LINE
DEF
1
3
ABC
2
GHI
MNO
4
6
JKL
5
PQRS
WXYZ
7
9
TUV
8
#
*
0
FCN
LINE
DEF
1
3
ABC
2
GHI
MNO
4
6
JKL
5
PQRS
WXYZ
7
9
TUV
8
#
*
0
FCN
LINE
DEF
1
3
ABC
2
GHI
MNO
4
6
JKL
5
PQRS
WXYZ
7
9
TUV
8
#
*
0
FCN
LINE
DEF
1
3
ABC
2
GHI
MNO
4
6
JKL
5
PQRS
WXYZ
7
9
TUV
8
#
*
0
FCN
LINE
Transmitter Receivers
PTT is enabled by the system administrator and set up by the user in the
Config Menu. See the Config Menu options for setting up PTT. If the sys-
tem administrator has disabled PTT, the PTT options will not appear in
the
Config Menu.
If you want to Then
Make a PTT call
To call on the default channel, from standby
mode press and hold the
for the display to show
TALK button. Wait
Transmitting and
then hold the handset approximately two
inches from your mouth and speak.
Respond to a PTT
End a wait period
Select a different
PTT channel
Press and hold the TALK button during the
call
10-second wait period.
Press END.
Press and release the TALK button.Use the
Nav keys or volume side buttons to highlight
the desired channel. Press
TALK to transmit.
Advanced Features
31
Page 32

End one PTT call and
Answer a telephone
Advanced Features
Start a telephone
If you want to Then
start another one
Receive a PTT
call while on a
telephone call
Transmit on the
priority channel
End a PTT call
Change the
PTT volume
call during a PTT
transmission
call during a PTT
transmission
Turn off PTT
Subscribe to
additional PTT
channels
Press the END key to exit the PTT call. Press
and release the
TALK button and select a
different channel from the list. Press and
TALK button to begin transmitting
hold the
on the different channel.
Press the END key to end the telephone call.
Now you can hear the PTT call.
Press and release the TALK button. Select
the priority channel from the list. Press and
TALK, then speak.
hold
Press the END key to exit the PTT call.
Press the up/down volume buttons on the
side of the handset while transmitting or
receiving a PTT call.
Press the START key. PTT transmissions will
be pre-empted by the telephone call.
Press the START key and dial the number.
PTT transmissions will be pre-empted during
the telephone call.
Change to a different profile (Silent and
Vibrate disable PTT by default).
Press the Cfg softkey to open the Config
Menu and select Push-to-talk.
Subscribed Channels and then select
Select
the channels you want to add. Subscribed
channels are marked with an asterisk (*).
32
Page 33

ACCESSORIES
Accessories for the SpectraLink 8020/8030 Wireless Telephone include
three different charger models, three different Battery Pack models,
headsets and several carrying options.
Battery Packs
The Battery Packs must be recharged periodically. Each type of Battery
Pack requires a different amount of time to achieve a fully charged state
from a fully depleted state. Three Battery Pack options are available.
Type Talk Time Standby Time Charging Time
Standard
Extended
Ultra-Extended
The Battery Pack icon on the status row indicates the charge amount
remaining. Additionally the handset will sound warning tones and display the
Battery Low message when there are fewer than two minutes
of talk time remaining.
A melody will play when the handset is powered on for the first time
after being fully charged, unless this feature has been disabled. Each
Battery Pack type has a different melody.
See your system administrator if you have questions about the type of
Battery Pack you have been issued.
4 hours 80 hours 2 hours
6 hours 120 hours 3 hours
8 hours 160 hours 4 hours
The type of Battery Pack is printed on the label. Remove
the Battery Pack and view the label to determine the type
of Battery Pack you have been issued.
Accessories
33
Page 34

The Battery Pack can be changed while the call is still in progress. Do
not press
END. Quickly remove the discharged Battery Pack and replace
with a charged Battery Pack, press
then press
Notes on Battery Packs
START to resume the call.
END to turn the handset back on and
• Battery Pack life will vary depending on handset model and features and system infrastructure.
• Maximum Battery Pack performance is achieved after a few
charge/discharge cycles.
• If multiple Battery Packs are supplied with your handset, Polycom
recommends that each be fully charged upon receipt to prolong
battery life. Battery Packs will slowly lose charge if unused. To
maintain battery potential, charge unused Battery Packs occasionally or alternate Battery Pack use.
• After a length of time Battery Packs will lose the ability to maintain
a charge and to perform at maximum capacity and will need to be
replaced. This is normal for all batteries.
• If your Battery Pack requires replacement, contact your system
administrator.
Charger Models
Three charger models are available for the SpectraLink 8020/8030
Wireless Telephone. The Single Charger will charge a single handset
with an installed Battery Pack. The Dual Charger will charge the handset and a spare Battery Pack. The Quad Charger can charge up to four
Accessories
Battery Packs at a time. Any SpectraLink 8020/8030 Battery Pack can be
charged in any charger.
The Single and Dual Chargers allow the handset to remain operative in
speakerphone mode or with a headset while charging. Handsets may be
charged while in standby mode, while in an active call or while turned off.
34
Page 35

Place the Single or Dual Charger on a flat, horizontal surface. Plug the
power supply into the charger and into an appropriate wall outlet. The
Quad Charger may be mounted on a horizontal or vertical surface.
Charging Status
The handset display and the LED on the Dual and Quad Chargers indicate whether or not charging is occurring or completed or if a Battery
Pack failure has been detected.*
Handset/LED Charging Status
Charging
LED Solid On
The Battery Pack in the handset is charging.
Note that in the Dual Charger, the handset’s
Battery Pack takes charging precedence,
and when it is finished charging, the single
Battery Pack in the rear slot will charge.
Charge Complete
The Battery Pack in the handset has finished
charging.
LED Off
Battery Pack fully charged, empty slot, or
unit is not powered.
Battery Failure
LED Flash
Error. Battery Pack not able to be charged.
Reinsert Battery Pack or replace Battery
Pack.
* Note: the Single Charger does not have an LED indicator.
Accessories
35
Page 36

Single Charger
1
ABC
2
DEF
3
GHI
4
J
5
K
L
MNO
6
P
7
Q
R
S
TUV
8
WXY
9
Z
<
*
0
# >
F
C
N
L
IN
E
The Single Charger is designed to allow the handset to remain operational through speakerphone or headset use while the handset's Battery
Pack is being charged. The handset may also be charged while it is in
standby mode or turned off.
Place the handset in the Single Charger facing forward. While the handset is charging in standby mode, it will display its extension number and
Charging…. An animated charge icon will indicate that charging is in
progress. The handset is fully operational and will ring if called. When
the handset is charging while turned off, only
and no calls will be received. The dots will be racing during the charging
cycle.
When the handset is fully charged,
Accessories
No charging information will display during an active call.
Charge Complete will display.
Charging… will display
36
Page 37

Dual Charger
1
A
2
B
C
D
3
E
F
G
4
H
I
J
5
K
L
M
6
NO
PQ
7
RS
TUV
8
W
9
X
Y
Z
<
*
0
#
>
F
C
N
L
IN
E
LED indicator
The Dual Charger is designed to charge the Battery Pack in the handset
while it remains operational and also charge an additional Battery Pack
in the rear charging bay. The handset has charging priority when both
slots are occupied.
Place the handset in the front slot, facing forward. The Battery Pack
alone snaps into the charging bay as shown in the illustration.
The LED indicates the status of the Battery Pack in the rear bay. The
handset displays its charging status as described for the Single Charger.
When the handset is fully charged or is removed, the Battery Pack in the
rear bay will begin charging.
Note that the time it takes for the Battery Pack to charge will be lengthened if its charging cycle is interrupted by the placement of a handset in
the front slot.
Accessories
37
Page 38

Quad Charger
The Quad Charger is designed to simultaneously charge four Battery
Packs. It may be mounted on a horizontal or vertical surface.
The Battery Pack snaps into the charging slot. The LED above the occupied bay indicates the charging status of the Battery Pack in the bay.
A flashing LED may indicate a Battery Pack failure. Verify
the condition of the Battery Pack by the following procedure before replacing it. First check the Battery Pack in a
different bay or substitute another charger and repeat t he
operation that caused the failure. If the same Battery
Pack lights a steady LED when inserted in a different bay
or charger, the first charger may be faulty. Contact your
system administrator for service information.
Accessories
38
Page 39

Carrying Options
The following options are available for handset protection and easy
handset carrying and removal.
Belt clip: Spring-loaded plastic belt clip that attaches to the back of
the handset.
Swivel belt clip: Swivel-style belt clip that attaches to the back of the
handset with full 360 degree swivel or eight-position ratchet options.
Swivel carrying case: Black leather case with keypad cover and
swivel-style quick release belt clip.
Holster: Black holster with belt clip.
Cord lanyard: Nylon cord lanyard with quick disconnect.
Coiled lanyard: Plastic coiled lanyard with clothing clip.
Headsets
Polycom offers optional headsets (for North America only) for use in
noisy environments or if you need to have your hands free while talking
on the handset.
To use the headset, simply plug it into the jack on the right side of the
handset.
While using a headset, the handset will ring according to the user profile setting established in the
ring will ring according to the setting of the profile.
The headsets offered by Polycom have been laboratory tested and work
properly with the SpectraLink 8020/8030 Wireless Telephone.
Polycom does not recommend using other headsets.
Headset/Speaker Ring option. The external
Accessories
39
Page 40

HANDSET ADMINISTRATION
FAQs
How does the handset power off and power on?
The
END key is the power on/power off key. Press and hold it to turn the
handset on. Turn the handset off from the standby mode by pressing and
holding the
the
END again to turn the handset off.
How do I place a call and terminate a call?
To place a call, press the
the call by pressing the
(
Spkr softkey) instead of the START key.
Can I change the ring?
The ring is fully adjustable and may be set differently for different profiles. For a complete explanation of how to change the ring, see the Pro-
file Settings section of this guide.
How do I change the voice volume and the ringing volume?
Whether using a headset, the speakerphone, or the internal speaker,
the speaker volume for the current call may be raised or lowered by
pressing the up and down volume buttons on the side of the handset.
The volume buttons may be pressed while the handset is ringing to
raise or lower the ring volume, which also changes the ring volume setting in the current profile.
END key. If you are in an active call, end the call by pressing
END key. This returns the handset to the standby mode, then press
START key and then dial the number. End
END key. You can also use the speakerphone
Administration
40
Page 41

What is the range of the SpectraLink 8020/8030 Wireless
Telephone?
As barriers affect radio transmission, there is no single answer for this
question. Normally, you can expect the same range as with any other
wireless device. However, if your facility has metal walls or other materials that inhibit radio waves, the range will be reduced.
How do I charge the Battery Pack?
The Battery Pack in the handset may be charged in a Single or Dual
Charger without being removed from the handset by simply placing the
handset into the charger. A spare Battery Pack may be charged in the
rear bay of the Dual Charger or in a Quad Charger.
How long does the Battery Pack hold a charge?
There are three different Battery Pack models and each has a different
charge capacity. The type of Battery Pack is printed on the label.
Remove the Battery Pack and view the label to determine the type of
Battery Pack you have been issued.
Type Talk Time Standby Time Charging Time
Standard
Extended
Ultra-Extended
4 hours 80 hours 2 hours
6 hours 120 hours 3 hours
8 hours 160 hours 4 hours
Administration
41
Page 42

What features (transfer, mute, etc.) are available and how are
they activated?
Active call features such as Mute and Hold are available by pressing the
softkey programmed to the feature. Additional features, such as Transfer and Conference, are locally programmed and usually activated by
pressing the
FCN key and then the softkey that corresponds to the pro-
grammed feature. Contact your phone system administrator for detailed
information on how to access these features in your facility.
Can I use the SpectraLink 8020/8030 Wireless Telephone at
home?
Access points installed in your facility transmit the radio waves emitted
by your SpectraLink 8020/8030 Wireless Telephone to the telephone
system in your facility which links the handsets to each other and to the
rest of the world. The handset operates only within range of these
access points and therefore will not work in your home.
How should I clean the handset?
Wiping the handset surface with a water-dampened cloth or paper
towel will remove most films or residues. If the soiling is too stubborn
for plain water, a mild detergent solution may be used. A spray cleaner
may be used with care. Do not spray at an angle. Do not allow liquid
cleaners to seep into keypad. Be sure to wipe away any detergent residue with a clean water-dampened cloth. Do not immerse in any fluid.
Administration
42
Page 43

Specifications
Radio mode
(set by system
administrtator)
Transmission type Direct-sequence spread spectrum (DSSS)
Transmit data rate Up to 54 Mb/s
Radio QoS SpectraLink Voice Priority (SVP)
Wireless security Wired Equivalent Privacy (WEP), 40-bit and 128-
FCC certification Part 15.247
Management DHCP, TFTP
Voice encoding G.711, G.729a/ab
VoIP Protocols SpectraLink Radio Protocol (SRP)
Transmit power Up to 100 mW (set by system administrator).
SpectraLink 8020
Wireless Telephone
dimensions
SpectraLink 8030
Wireless Telephone
dimensions
SpectraLink 8020
Wireless Telephone
SpectraLink 8030
Wireless Telephone
802.11b, 802.11g 2.4–2.4835 GHz
802.11a 5.150–5.250 GHz
bit; Cisco FSR; WPA-PSK, WPA2-PSK
Display Up to five lines of text plus two icon status rows
and one row for softkey labels.
5.4" x 2.0" x 0.9"
(13.7 x 5.1 x 2.3 cm)
5.7" x 2.0" x 0.9"
(14.5 x 5.1 x 2.3 cm)
3.9 oz. ( 110.6 g) with
Standard Battery Pack
weight
4.2 oz. (119.1 g) with
Standard Battery Pack
weight
5.250–5.350 GHz
5.470–5.725 GHz
5.725–5.825 GHz
Administration
43
Page 44

Notes:
Administration
44
Page 45

INDEX
A
Accessories
Battery Packs 33
Carrying options 39
Chargers 34
Headset 39
Active mode 8
Administration
Care of handset 47
FAQs 40
Handset Operation Summary 15–20
Specifications 43
Answer call
First line 17
Second line 18
Via headset 18
B
Backlight 19
Battery Packs
Charging 35–38, 41–42
Charging status 35
Dual Charger 37
Options 33
Quad Charger 38
Remove/replace 15
Single Charger 36
C
Care of handset 47
Carrying options 39
Chargers
Charging status 35
Cleaning the handset 47
Dual Charger 37
Quad Charger 38
Single Charger 36
Use of 34–38
Cleaning handsets and chargers 42
Config menu
Default profile settings 23
Defined 21
Entering 21
Mode 8
Options diagram 24, 25
Profiles 22
D
Data entry 26
Data entry table 26
Dial call
Outgoing calls 16–17, 40
Via phonebook 28
Displays, handset 9
E
Edit
Arrows during 10
Data entry 26
Phonebook 28
Speed-dial number 29
Emergency call 16
External call 16
F
Features
Config menu 21
Config menu options 24
Data entry and editing 29
Display additional 19
Facility-specific 21
Phonebook 28
Predial 27
Push-to-talk (PTT) 31
Redial 27
Speakerphone 27
Speed-dial 29
H
Handset Operation Summary 15–20
Hang up 16, 19
Headset
Answer 18
Cleaning connector 47
Profile setting 23
Use of 39
Volume 18
45
Page 46

Volume with 40
While charging 34, 36
Hold
Place a call on 18
Softkey label 13
I
Internal call 16
K
Keypad
Cleaning 42, 47
Cover 39
Illustration 2, 3
Lock 9, 11, 16
Unlock 14, 16
M
Menu navigation 8
Modes of operation 8
Mute
On status bar 11
Softkey label 13
Use of 19, 42
N
Navigation 8
P
Phonebook
Call 17
Edit 19
Edit entry options 29
Features 28
List options 28
Open 13
Save to 27
Predial
Use of 17, 27
Push-to-talk (PTT)
Defined 31
Mode 8
Operation summary 31
R
Range 41
Redial
Softkey label 14
Use of 17, 27
S
Shortcut key 9, 21
Softkey
Active 12
Labels 12, 14
Speakerphone
Answer with 17
Icon 10
Softkey label 14
Use of 18, 27, 40
Volume with 40
While charging 34, 36
Specifications 43
Speed-dial
Open speed-dial list 17, 28
Softkey label 14
Use of 17, 29
Standby mode 8
Status indicators 10–12
System administrator 5
U
User profile
Changing 19
Headsets and 39
Setting 22–23
V
Volume
Changing 40
Headset 18
Ring 18, 23
46
Page 47

CARE OF YOUR HANDSET
• Avoid dropping the handset or knocking it against hard surfaces. Carrying the
handset in a holster or carrying case will help protect it.
• There are no serviceable parts in the handset or chargers. You should not
open the handset case or disassemble the chargers. Doing so will void your
warranty.
• Turn off the handset and unplug chargers before you clean them. Take care
not to exert undue pressure on charger electrical contacts while wiping.
• Wiping the handset surface with a water-dampened cloth or paper towel
will remove most films or residues. If the soiling is too stubborn for plain
water, a mild detergent solution may be used. A spray cleaner may be used
with care. Do not spray at an angle. Do not allow liquid cleaners to seep into
keypad. Be sure to wipe away any detergent residue with a clean waterdampened cloth. Do not immerse.
• Should the headset connector become dirty, you may experience a scratchy
or intermittent signal. To clean the connector, dip the non-padded end of a
wooden or paper cotton swab stick in isopropyl alcohol. Gently insert in the
connector and twist, repeating several times. If available, blow compressed
air into the connector to clear debris.
• Keep the headset jack covered when it is not in use.
• Using a carrying case may help protect the surfaces and help prevent liquids
(e.g., rain) from entering the interior of the handset.
• If your handset interior gets wet, do not try to accelerate drying with the use
of an oven or a dryer as this will damage the handset and void the warranty.
Instead, do the following:
1. Immediately power off the handset.
2. Remove the Battery Pack from handset.
3. Shake excess liquid from the handset.
4. Place the handset and Battery Pack in an upright position in an area that
is at room temperature and has good airflow.
5. Let the handset and Battery Pack dry for 72 hours before reconnecting
the Battery Pack and/or powering on the handset.
If the handset does not work after following the steps listed above, contact
your phone system administrator for servicing information.
47
Page 48

Contact Information
Please contact your Polycom Authorized Reseller for assistance.
Polycom, Inc.
4750 Willow Road,
Pleasanton, CA 94588
http://www.polycom.com
Copyright Notice
Copyright © 2007, 2008 Polycom, Inc.
All rights reserved under the International and pan-American
Copyright Conventions.
No part of this manual, or the software described herein, may
be reproduced or transmitted in any form or by any means, or
translated into another language or format, in whole or in part,
without the express written permission of Polycom, Inc.
Do not remove (or allow any third party to remove) any product
identification, copyright or other notices.
Every effort has been made to ensure that the information in
this document is accurate. Polycom, Inc. is not responsible
for printing or clerical errors. Information in this document is
subject to change without notice and does not represent a
commitment on the part of Polycom, Inc.
1725-36023-001
Revision C
 Loading...