

Polycom 4-Line Phone, 6-Line Phone, IP650, IP550 Owner's Manual

Owner’s Manual
1
ACC 1137- PUG
Polycom 4 and 6-Line Phones
Owner’s Manual V.1

Owner’s Manual
2
Table of Contents
1! Introduction ........................................................................ 5!
Using this Document ............................................................ 5!
Basic Requirements ............................................................. 6!
2! Getting to know your Hosted PBX system ....................... 7!
Before you Begin Your Installation ....................................... 7!
Assigning Extension Numbers and Phone
Numbers to Phones ........................................................ 10!
! Installing your Hosted PBX Phone System .................... 11!
3 ........................................................................................................ 11!
Installing Desk Phones ....................................................... 11!
Attaching the Base ............................................................. 14!
Activating the Service ......................................................... 16!
4! Using Your Hosted PBX phone system ......................... 18!
System Description ............................................................. 18!
Getting Started .................................................................... 18!
Polycom 4 and 6-Line Desk Phones ................................. 18!
Introduction to your Polycom Desk Phone ................. 18!
Before You Use Your Phone .............................................. 18!
Using the Navigation Keys ................................................. 21!
Information Screen ............................................................. 22!
5! Customizing Your Phone ................................................ 23!
Configuring Basic Settings ................................................. 23!
Changing the Appearance of Time and Date ............. 23!
Changing the Display Contrast ................................... 24!
Changing the Backlight Intensity ................................. 25!
Enabling the Headset Memory Mode ......................... 27!
Selecting the Correct Headset for Electronic
Hookswitch ............................................................... 28!
Selecting the Ring Type .............................................. 28!
Changing the Language .............................................. 29!
Changing the Graphic Display Background ............... 30!
Changing the Soft Key Label Color ............................ 31!
Adjusting the Volume .................................................. 32!

Owner’s Manual
3
6! Managing Incoming Calls ............................................... 32!
Rejecting Calls .................................................................... 33!
Diverting Calls ..................................................................... 34!
7! Desk Phone– Basic Call Features ................................. 35!
Answering a call .................................................................. 35!
To answer a call using Hands-Free
Speakerphone mode: .............................................. 35!
Inbound Caller ID ......................................................... 36!
Placing a call ....................................................................... 36!
Placing a second call ................................................... 38!
Ending Calls ........................................................................ 39!
Forwarding Calls ................................................................. 39!
Call Management Features ................................................ 42!
Call Hold ....................................................................... 43!
Conferencing Calls ...................................................... 43!
Transferring Calls ........................................................ 45!
At this point, the call is connected to the
number to which you are transferring them. ........... 47!
Call Park ....................................................................... 48!
Paging (Intercom) ........................................................ 49!
Redial ........................................................................... 49!
Mute ............................................................................. 50!
8! Using Voicemail .............................................................. 50!
Setting up the voicemail box for the first time ............. 51!
Retrieving messages from your Desk Phone ............. 51!
Retrieving messages when you are away from
the office ................................................................... 51!
Returning a Call ........................................................... 52!
Change your Voicemail PIN ........................................ 52!
Record a Personal Greeting via the Phone ................ 52!
Forward Voicemail Messages via the Phone ............. 52!
Logging into your Voicemail Box via the Web ............ 52!
Retrieving messages via the Web .............................. 54!
Forward Voicemail Messages via the Web ................ 54!
To Create a Voicemail Group ..................................... 57!

Owner’s Manual
4
Change the Number of Rings Before
Voicemail Picks Up .................................................. 58!
9! Call Lists and Directories ................................................ 58!
Managing Call Lists ............................................................ 58!
Managing Contacts ............................................................ 59!
Adding Contacts ................................................................. 60!
Editing Contacts .................................................................. 62!
Deleting Contacts ............................................................... 63!
Placing Calls to Contacts ................................................... 64!
Searching for Contacts ....................................................... 64!
Conformance ...................................................................... 65!
Important Safety instructions .............................................. 65!
FCC Information ................................................................. 66!

Owner’s Manual
5
1 Introduction
Congratulations on purchasing the AccessLine DPS FLEX phone
system and service. You will now be able to share your phone
connection between fixed & wireless handsets and across multiple
locations using the latest in ‘Voice over IP’ services.
This User Guide will show you how to setup and use your new DPS
FLEX phone system and service.
Using this Document
Notational conventions
Acronyms are defined the first time they appear in the text.
The term LAN refers to a group of Ethernet-connected computers at
one site.
Typographical conventions
Italic text is used for items you select from menus and drop-down
lists and the names of displayed web pages.
Bold text is used for text strings that you type when prompted by the
program, and to emphasize important points.
Special messages
This document uses the following icons to draw your attention to
specific instructions or explanations.
Note
Provides clarifying or non-essential information on the current
topic.
Definition
Explains terms or acronyms that may be unfamiliar to many
readers. These terms are also included in the Glossary.
WARNING
Provides messages of high importance, including messages
relating to personal safety or system integrity.

Owner’s Manual
6
Basic Requirements
The PBX phone system is designed to use your existing broadband
data connection as well as the existing data wiring in your office.
Where you don’t have data wiring, you may use the optional
Wireless Transmitter and Wireless Adapters to connect Desk
Phones wirelessly.
In order to use all the features of the DPS FLEX phone system and
service, you must have the following:
• Broadband Internet access
• At least one free port on your router or modem/router
• Your router must be set to DHCP

Owner’s Manual
7
2 Getting to know your Hosted PBX
Before you Begin Your Installation
The DPS FLEX phone system is designed to use your existing
broadband data connection as well as the existing data wiring in
your office. Where you don’t have data wiring, you may use the
optional Wireless Transmitter and Wireless Adapters to connect
Desk Phones wirelessly. In order to begin using your new phone
system and service, you need to perform the following steps:
1. Make sure you have received all of your phones and
optional equipment
2. Go to www.accessline.com/login. Enter your login
name and password to the Admin Portal
3. Activate your phone lines
4. Install your phones and optional equipment
You have several options regarding how to setup your new phone
system. How you choose to install your phone system will depend
on your existing data network and the phones and optional
equipment you have purchased. The diagrams below describes
options for setting up the phone system.

Owner’s Manual
8
Standard Setup Options:
This diagram depicts your setup options. By purchasing the
optional Wireless Transmitter and Wireless Adapters you may also
connect Desk Phones wirelessly.
Cordless Phones:
This diagram depicts the setup options for Cordless Phones.
Cordless phones can be used in conjunction with Shared Line
Phones and the optional Base Unit or they can be installed as Stand
Alone Phones.

Owner’s Manual
9
Fax Adapter:
This diagram depicts the setup options for the Fax Adapter. The Fax
Adapter allows you to use your existing fax machine with the
AccessLine DPS service.
Setup Options that are not supported
The following setup options ARE NOT supported:
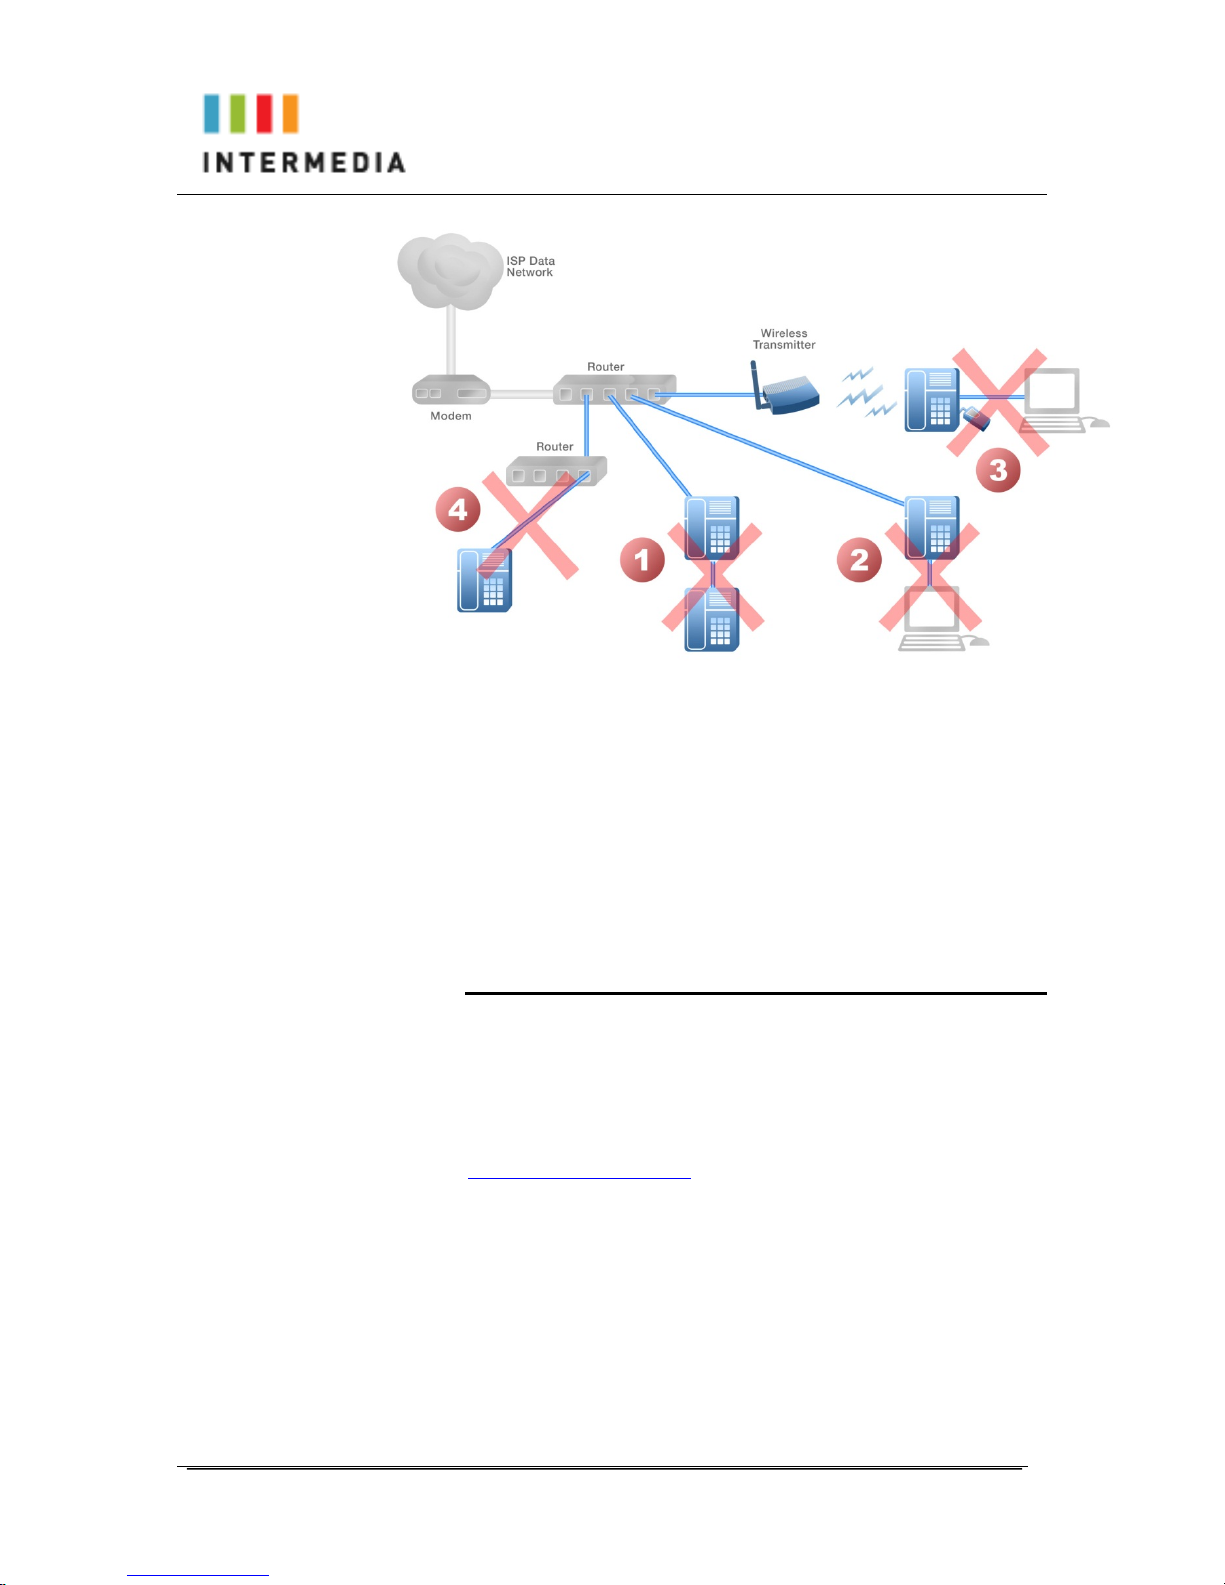
Owner’s Manual
10
1. Connecting one phone to another
2. Connecting a phone to the base unit then connecting a PC
3. Connecting a phone to the base unit wirelessly and then
connecting a PC
4. Connecting a PC to the base unit
5. Connecting a phone to a router that is connected to another
router
Assigning Extension Numbers and Phone Numbers to Phones
Each phone is assigned an extension and a phone number.
Packing list includes a list of your phones and their associated
phone numbers and extension. You should have also received and
email from AccessLine with the phone numbers and extensions
associated with each enhanced services such as an Auto Attendant
or WebFax. You may also log into your Admin Portal at
www.accessline.com/login to view a list of your phone numbers and
extensions.
Owner’s Manual
11
3 Installing your Hosted PBX Phone System
Installing Desk Phones
Desk Phones can be installed in the following ways
• You may connect Desk Phones Wirelessly to the Optional
Wireless Transmitter and the Optional Wireless Adapters
• You may connect Desk Phones to your existing router
• You may connect Desk Phones to any data wall jack on your
existing network
• You may connect a Desk Phone to a wall jack or router then
connect a PC to the Desk Phone.
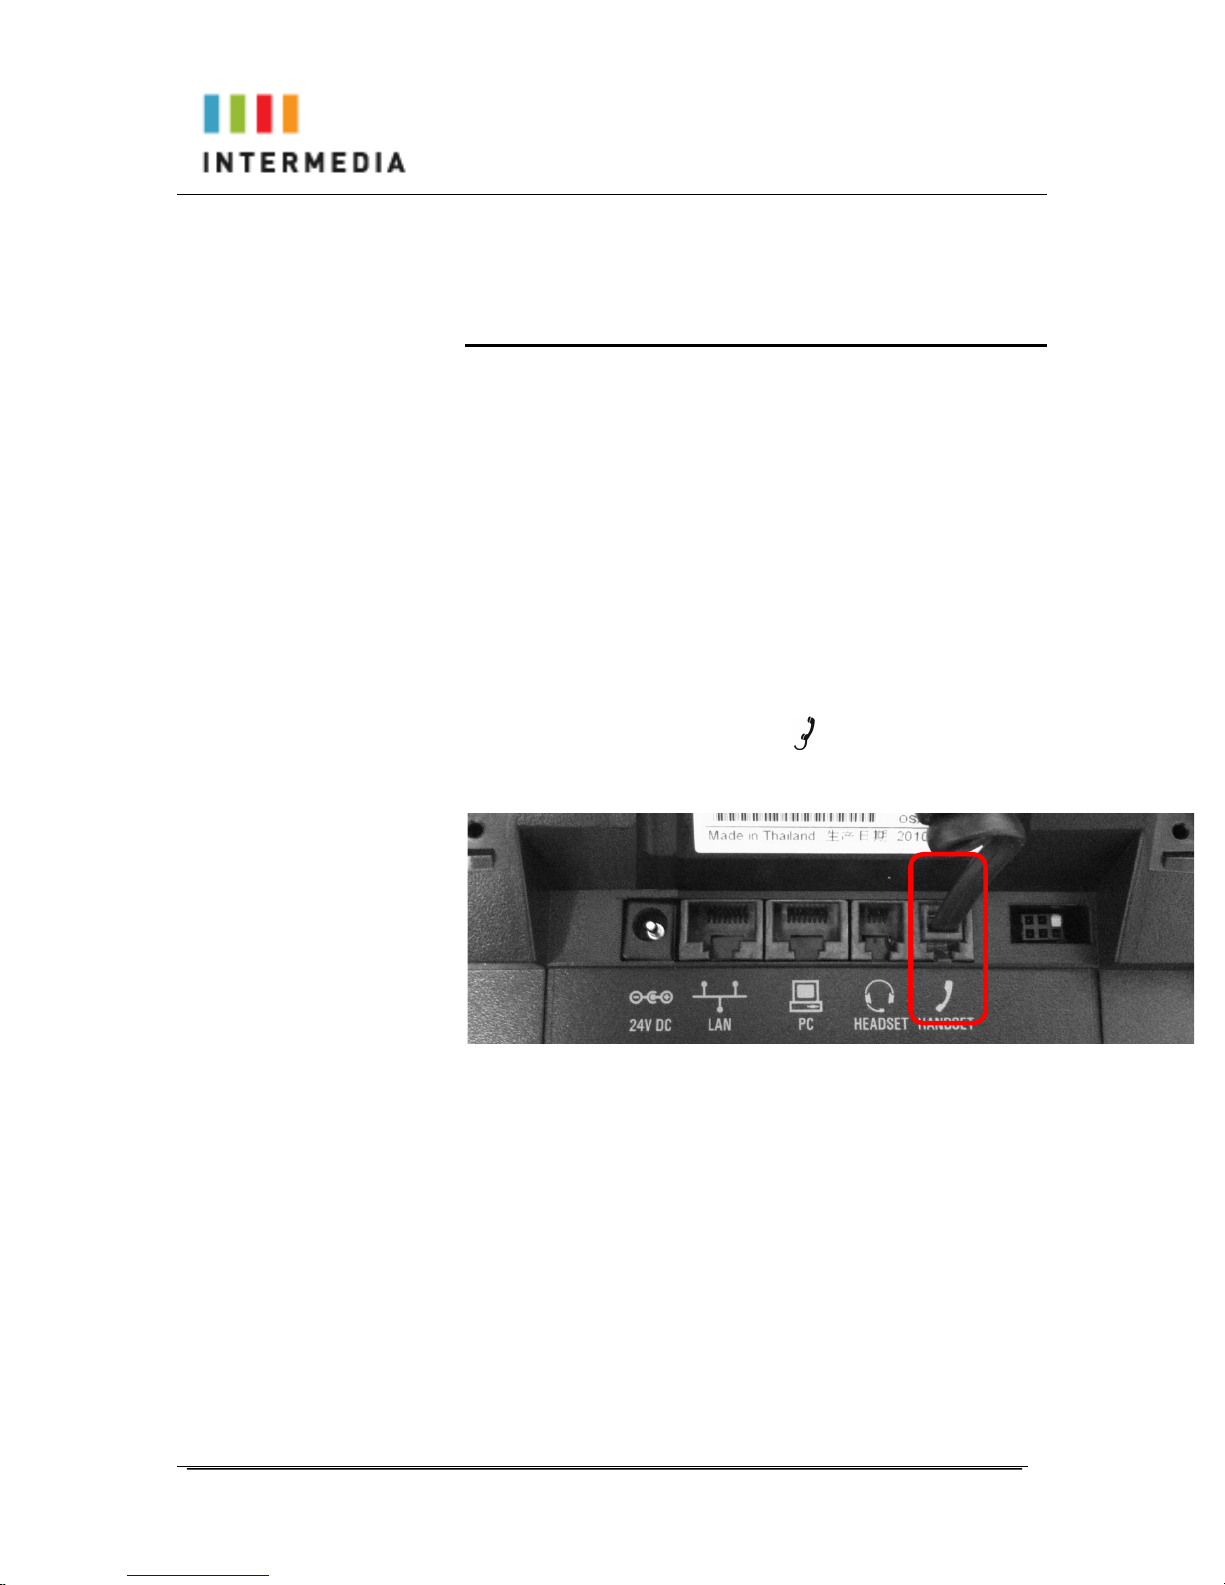
1. Assemble the Desk Phones
Use the included coiled handset cord and connect one end into the
base of the handset and the other end into the handset port on the
side of the phone labeled HANDSET (there is a handset port and
a headset port)
2. Connect the Desk Phone
For your convenience, you have four options to connect your Desk
Phones. You may use any or all of them
Owner’s Manual
12
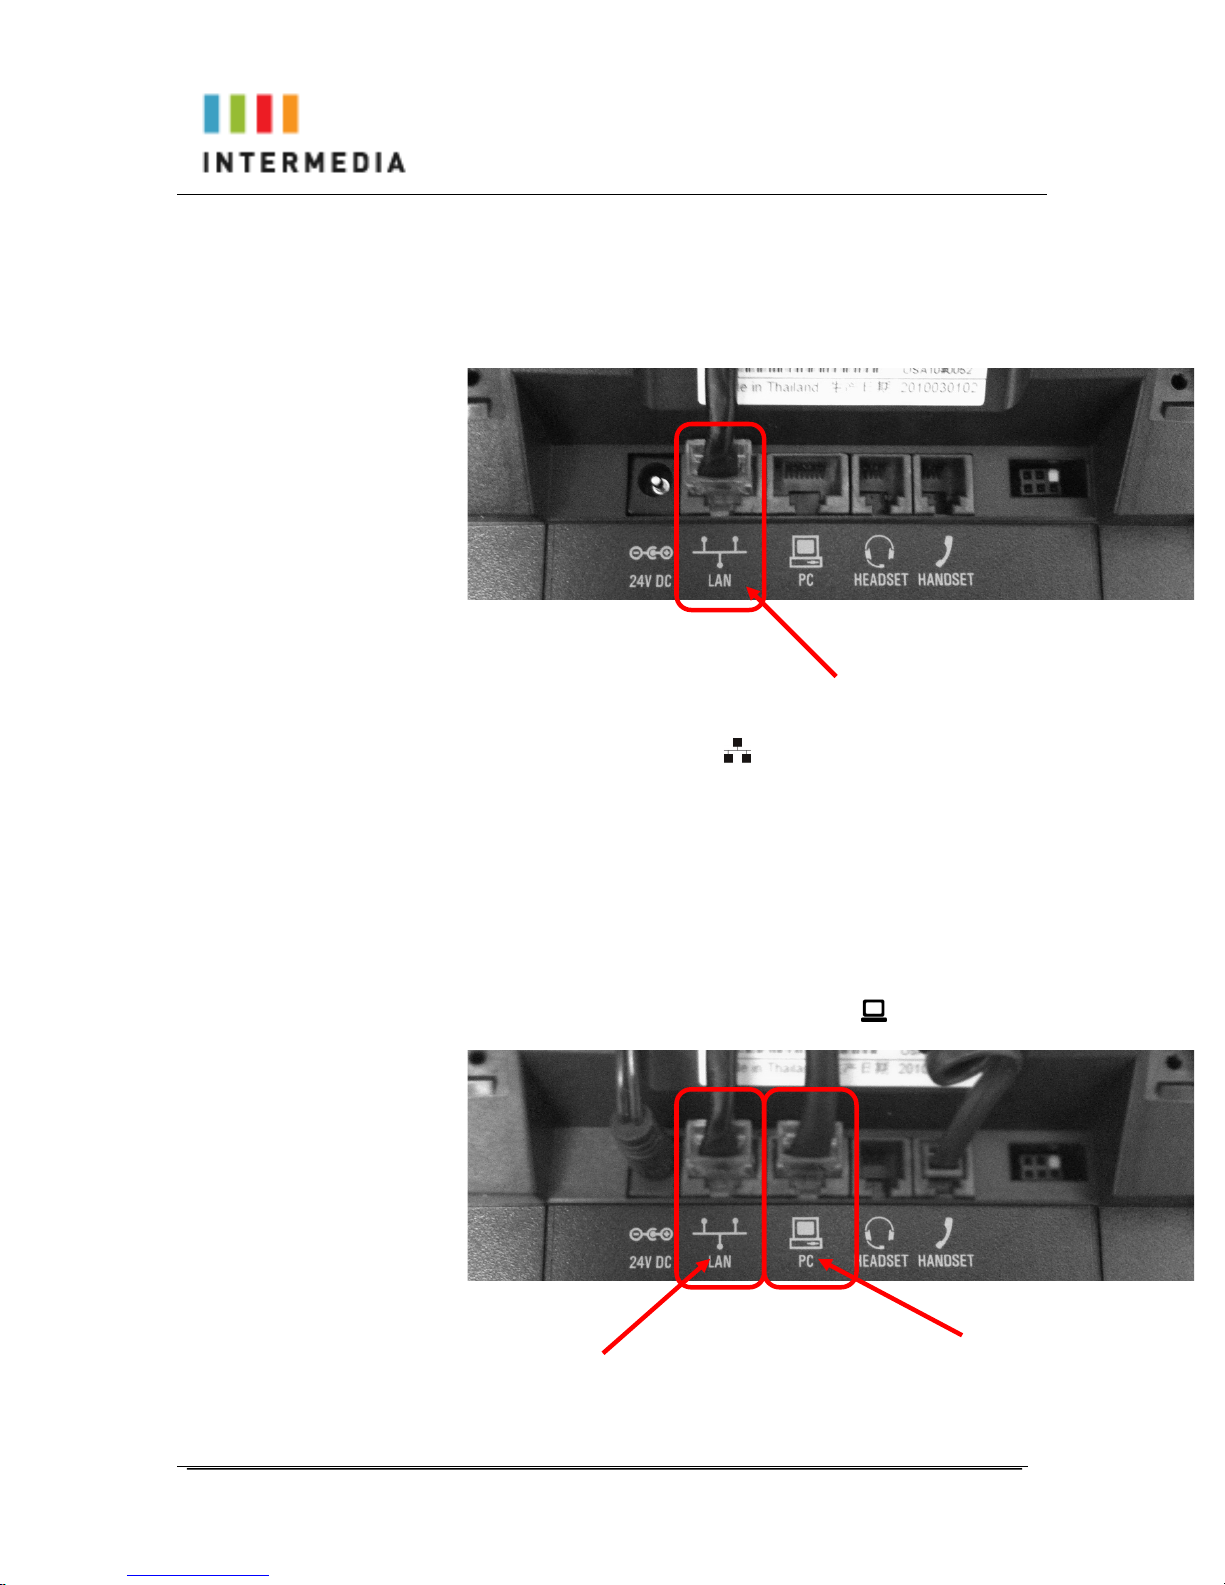
Option 1: Connect Desk Phones using your existing data
network
Use the included phone cord and connect one end into the port on
the back of the phone labeled and connect the other end into
any data port on your network (router, switch or wall jack).
Option 2: Connect Desk phones using your existing data
network then connect the phones to your computer
If you already have a computer using a wall data jack or
router/switch port, unplug the computer from the network, then
connect the phone using the steps in Option 1. Plug your computer
into the port on the back of the phone labeled
To your router or wall jack
To your router or
data wall jack
To your PC
Owner’s Manual
13
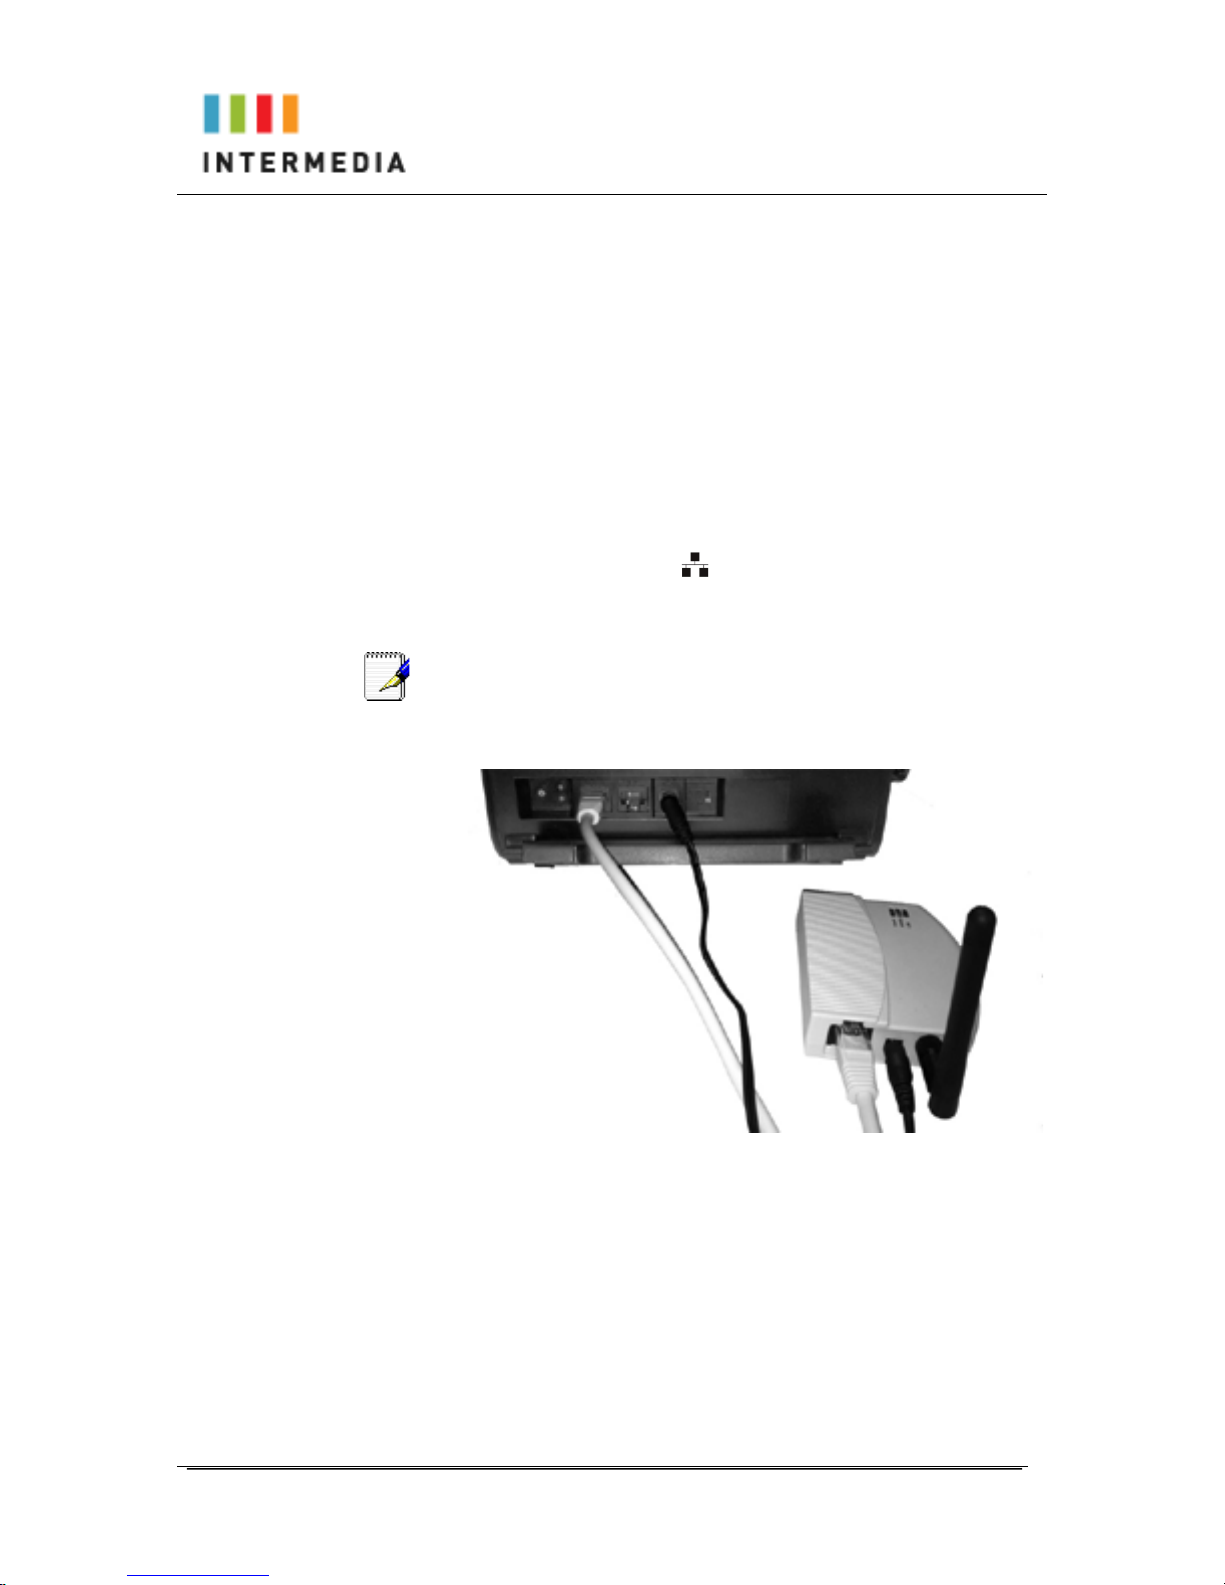
Option 3: Connect phones wirelessly within 40’ using the
Wireless Adapter
The wireless adapter allows a desk phone to be used without a cord
connecting it to the Wireless Transmitter. The range of the Wireless
Adapter is 40 feet from the base unit.
The wireless adaptor has its own power supply. Plug the phone’s
power cord into the short “power in” cord on the wireless adapter
and then into the wall outlet. Then,
1. Plug the included LAN cable into the Wireless Adapter
2. Plug the other end of the LAN cable into the back of the
phone using the port.
3. Plug the Wireless Adapter long power cord into an outlet
Note
To avoid interference or static on the phone, place the Wireless
Adapter away from the phone as shown.
3. Connect Power to the Desk Phone
Use the included power cord and plug one end into the back of the
phone and the other end into the wall outlet. The phone will indicate
that it is configuring itself. Once the phone has finished its
configuration, it is ready to make and receive phone calls.

Owner’s Manual
14
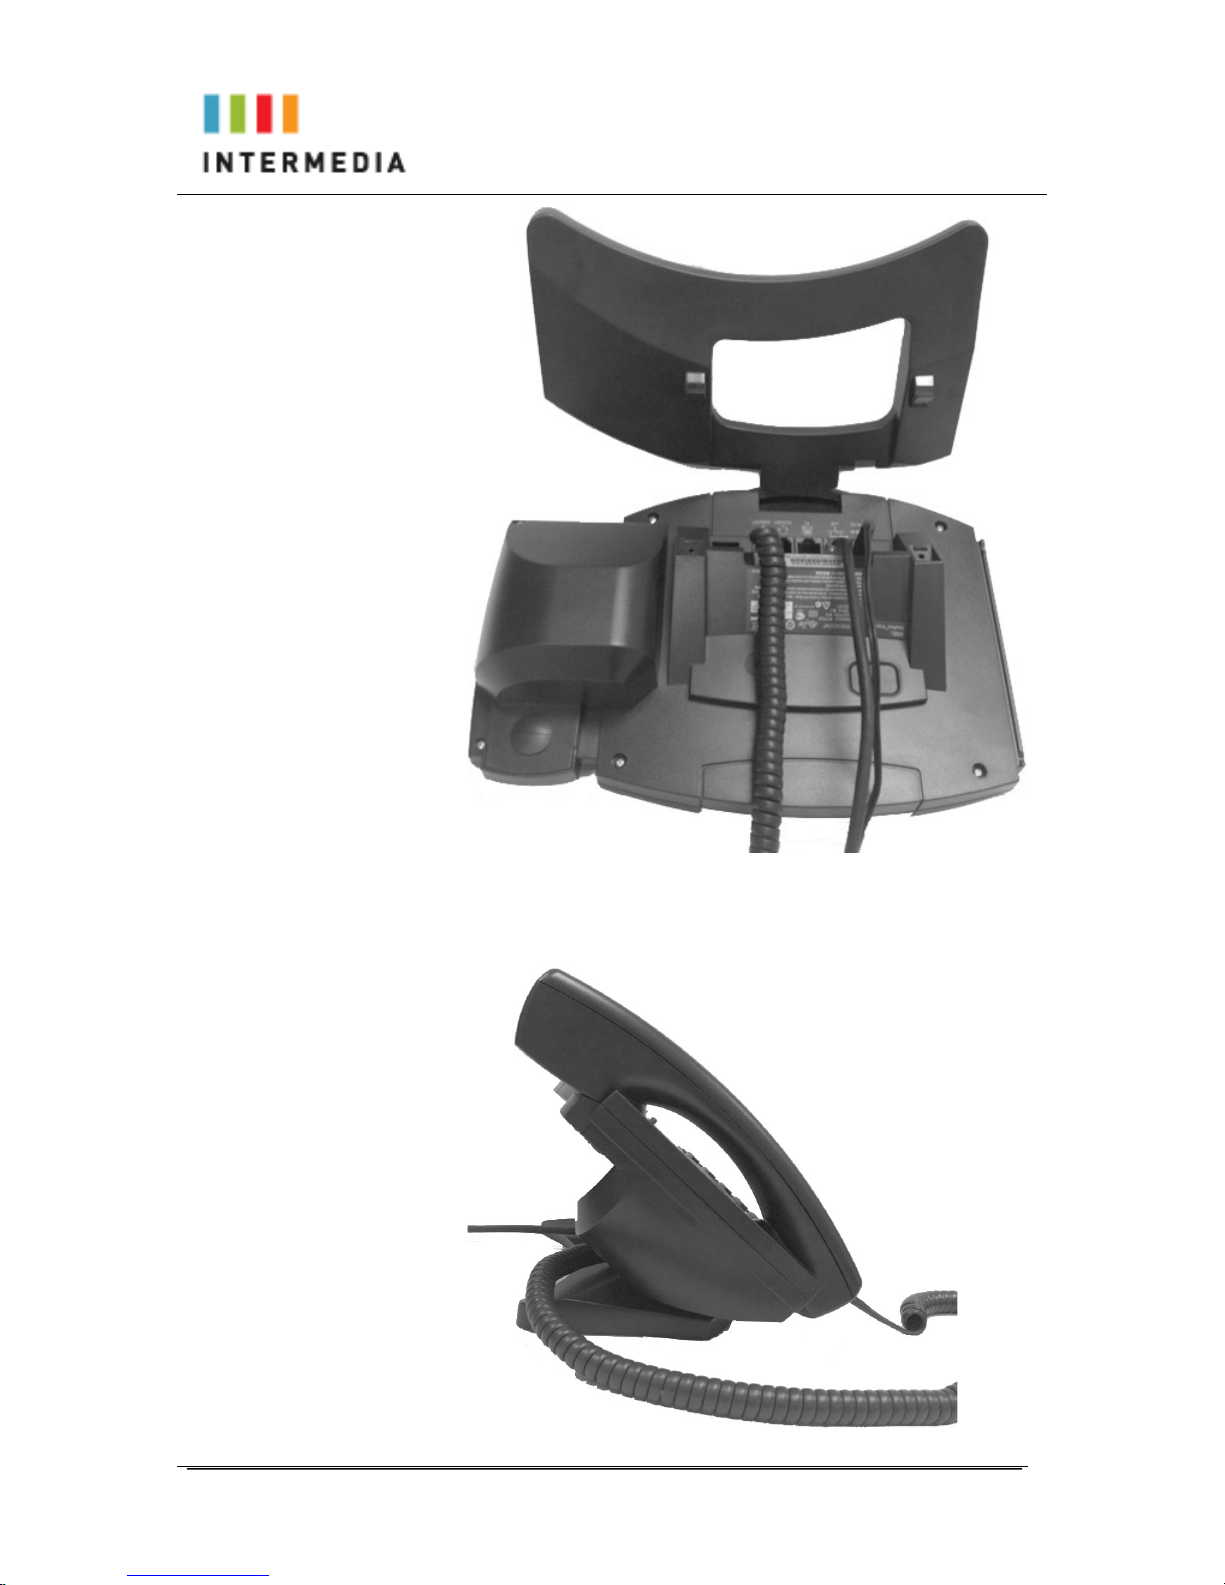
Attaching the Base
To attach the Base to the phone:
1. Place all cords in the recessed area above the modular jacks.
2. Align the two protrusions on the bracket with their
corresponding holes in the phone.
Owner’s Manual
15
3. Snap them together to lock the base to the phone.
Owner’s Manual
16
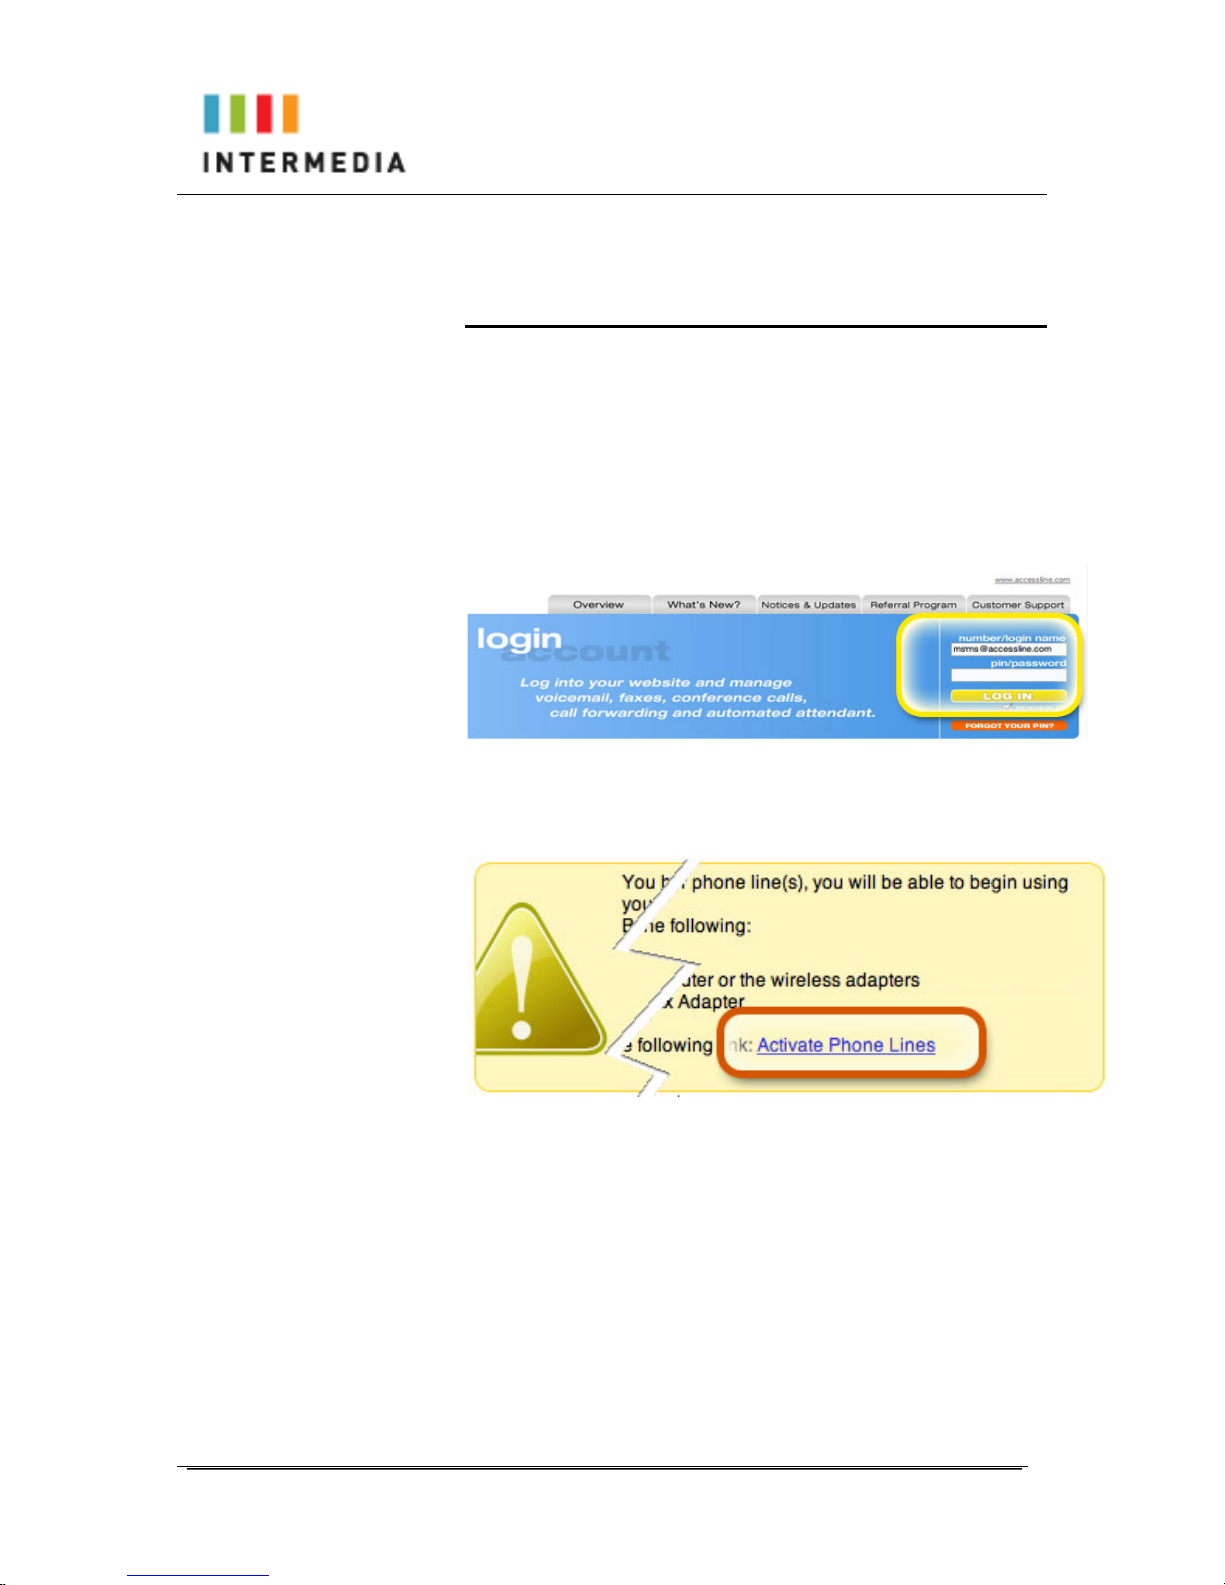
Activating the Service
Before you can make or receive calls, you need to activate your
phone line(s). This also activates the billing for your phone
line(s). To activate your phone line(s):
1. Go to www.accessline.com/login and enter your Administrator
Portal login name and password
2. On the 1st screen, click “Activate Phone Lines” button
NOTE- You will activate all of your lines at once, so if there is no
“Activate Lines” button, then you have already activated the
lines.

Owner’s Manual
17

Owner’s Manual
18
4 Using Your DPS FLEX phone system
System Description
The DPS FLEX phone system supports up to 100 phones
• You can have as few as one phone at an address
• Cordless phones can be used in conjunction with Desk Phones or
can be installed stand alone
• Through your Admin Portal, you can view information and make
changes to phone system
Getting Started
This section of your Owner’s Manual is your guide to using the DPS FLEX
phone system and its features. It also explains how to program system
settings for your Desk Phones and Cordless Phones.
Polycom 4 and 6-Line Desk Phones
Introduction to your Polycom Desk Phone
The Polycom 4 and 6-Line Desk Phones provide a powerful, yet flexible IP
communications solution, delivering excellent voice quality. The high-resolution
graphic display supplies content for call information, directory access, and
system status. The phones support advanced functionality, including multiple
call appearances, HTTPS security and a suite of business phone features.
Some system settings are programmed through your Admin Portal website
while others are programmed through the phone.
Before You Use Your Phone
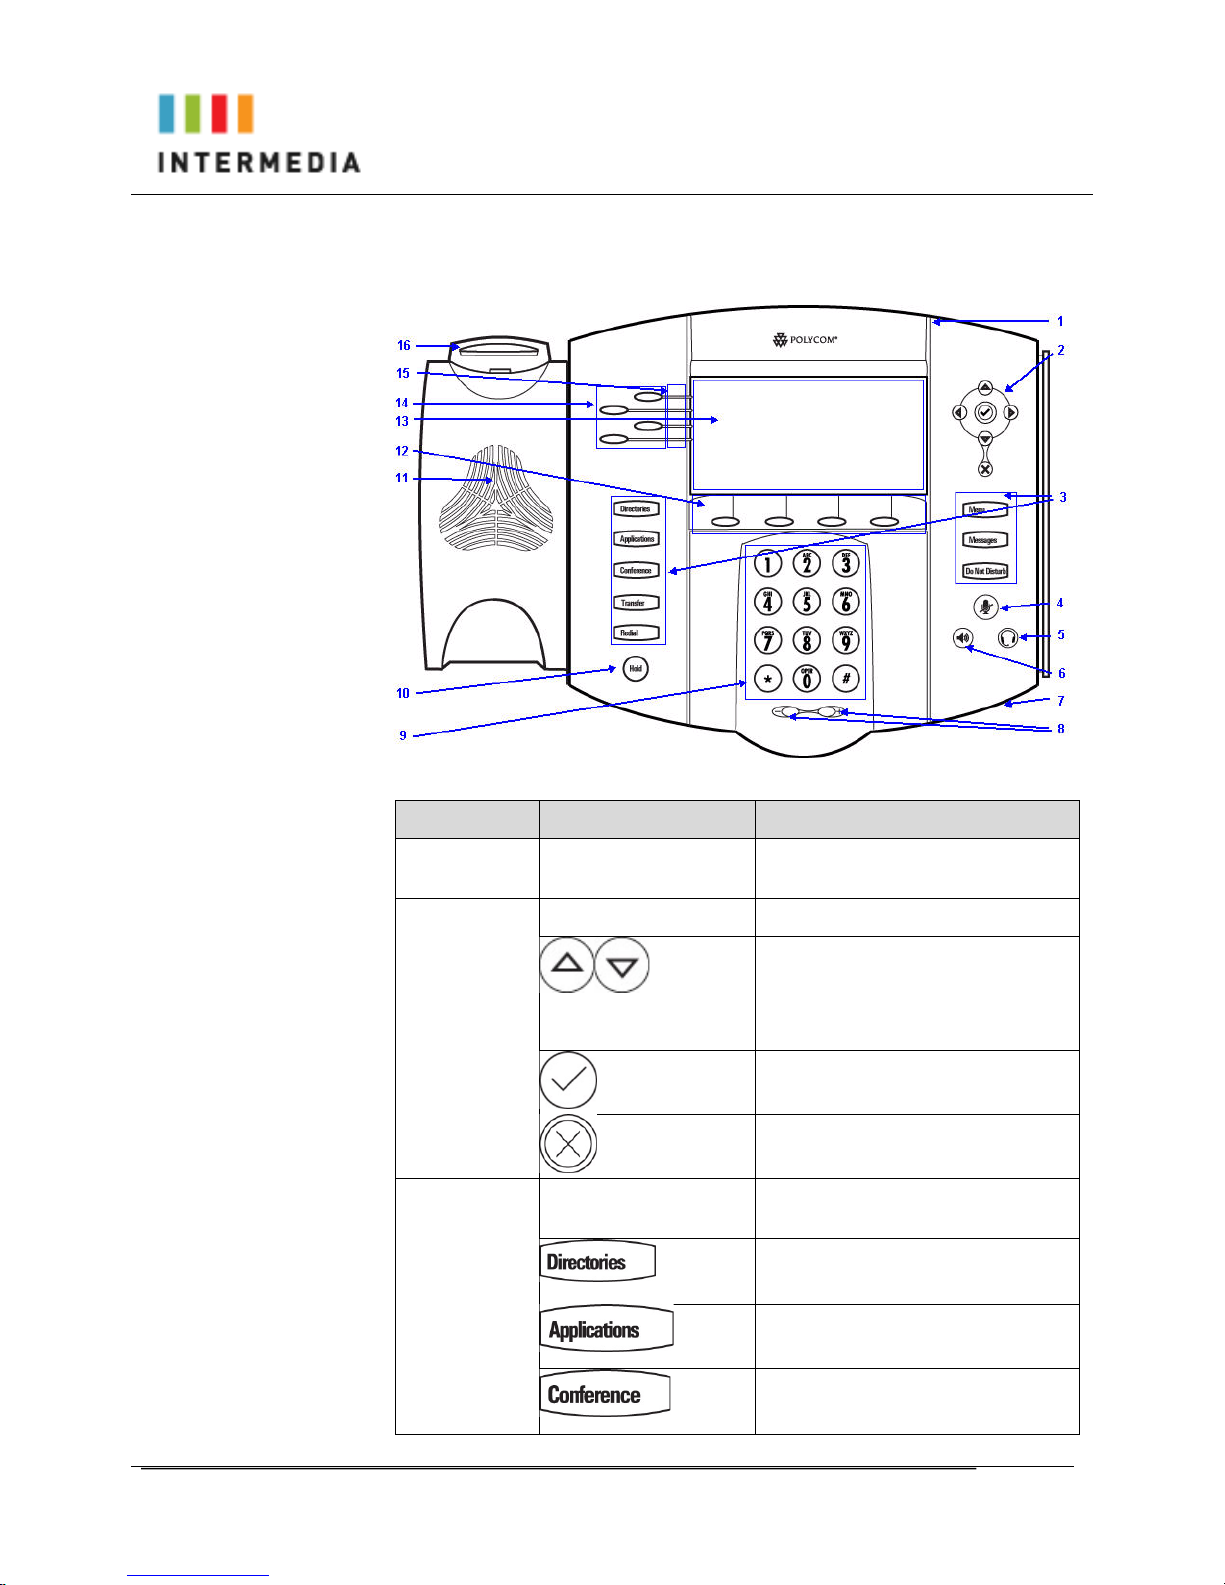
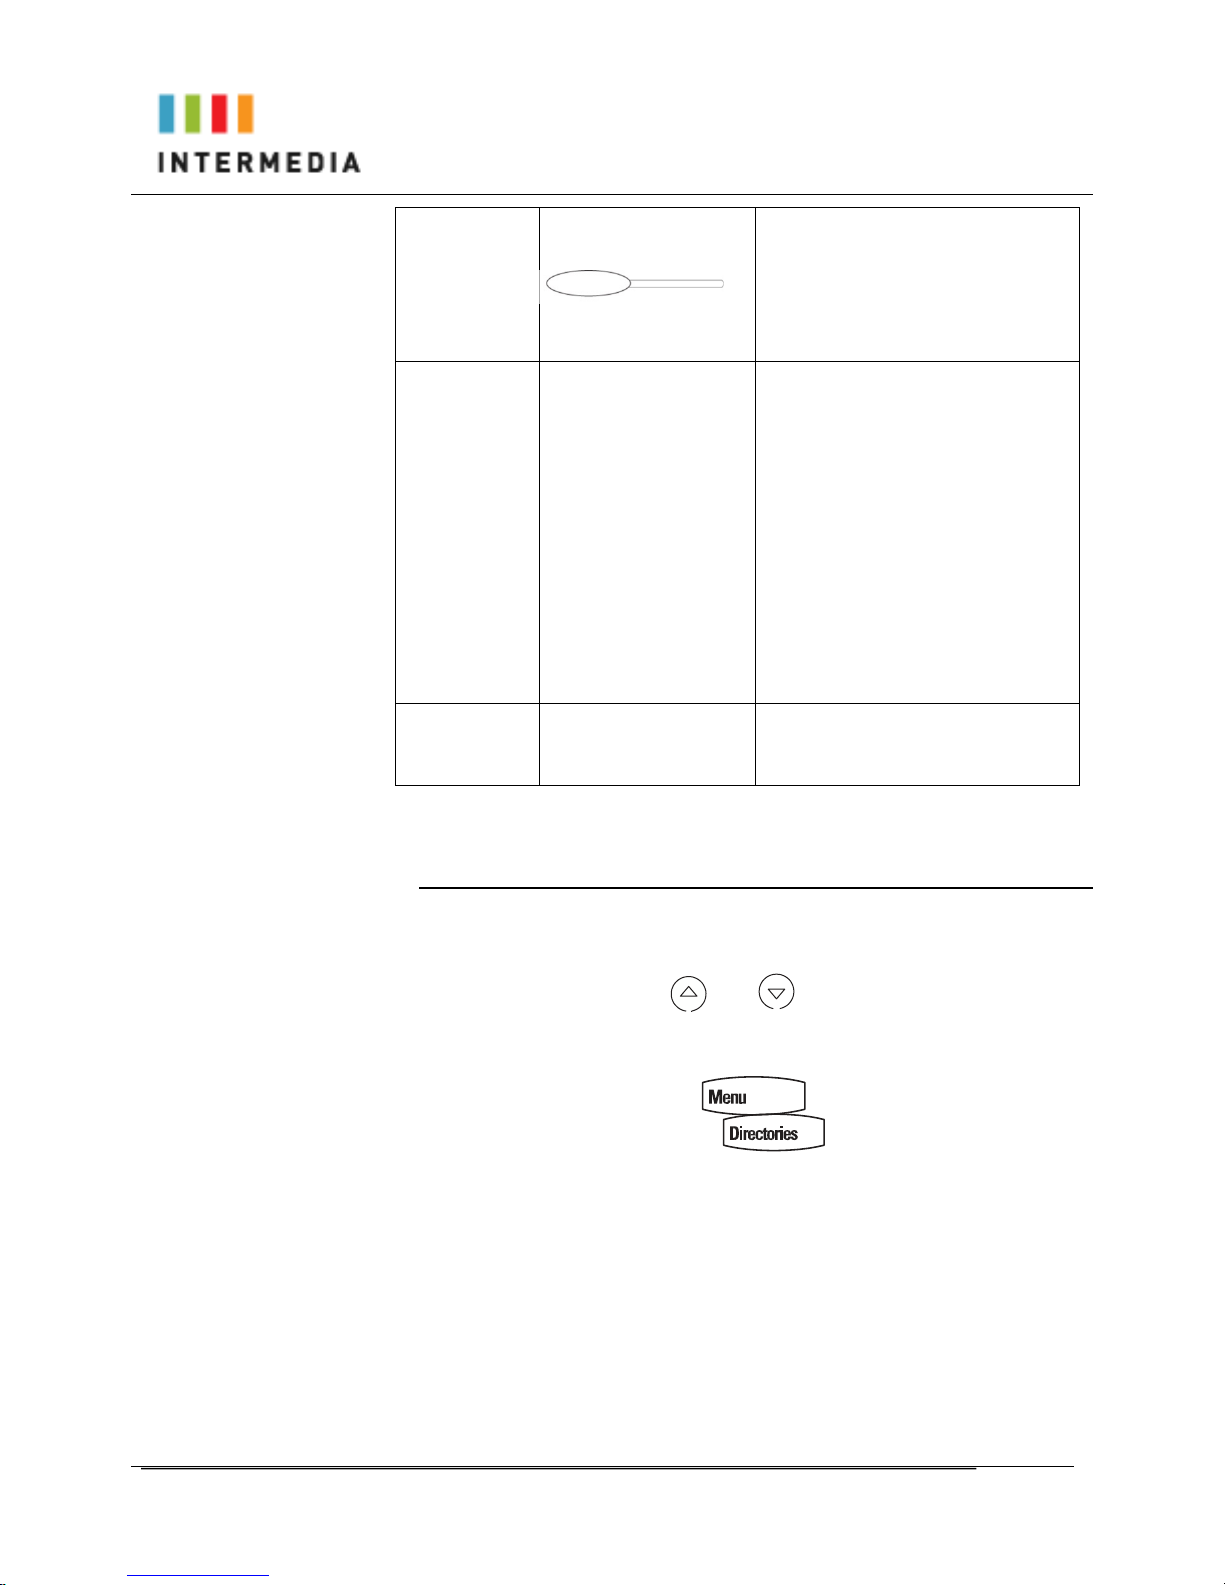
The image below and table describe the various feature buttons of your phone.
Depending which phone you have purchased, you will have either 4 or 6 call
appearance keys on the left of the display screen.
Owner’s Manual
19
!
Item!
Description!
1!
Message!Waiting!
Indicator!
Alert!for!voice!messages!
2!
Arrow!Keys!
!
!
Scroll!through!displayed!information.!
!
Select!a!field!of!displayed!data.!
!
Delete!displayed!data.!
3!
Feature!Keys!
Access!important!features!
using!these!keys.!
!
Access!to!local!directories!and!call!
lists.!
!
Provides!customer!service!contact!
information!
!
Allows!connection!with!multiple!
other!parties!for!a!conference.!
Owner’s Manual
20
!
Transfer!of!current!call!to!third!party.!
!
Dials!most!recently!dialed!party.!
!
Access!various!features!of!your!
phone!
!
Access!to!voicemail!messages!
!
Cancels!ringing!and!directs!incoming!
calls!to!your!voice!mail!.!
4!
Microphone!Mute!
Mutes!audio!transmission!
locally!during!calls!and!
conferences.!
5!
Headset!
Allows!you!to!place!and!receive!calls!
through!an!optionally!connected!
headset.!
6!
Speakerphone!
!
!
Allows!for!handsJfree!
communication!during!calls.!
7!
HandsJfree!Microphone!
Picks!up!audio!during!handsJfree!
calls.!Place!your!phone!on!a!hard,!
flat!surface!for!best!results.!
8!
Volume!Keys!
!
!
Adjusts!the!volume!of!the!handset,!
headset,!speaker,!and!ringer.!
9!
Dial!Pad!
Provides!the!10!digits,!the!
alphabetic!characters,!and!special!
characters!available!in!context!
sensitive!applications.!
10!
Hold!
!
Holds!an!active!call!or!resumes!a!
held!call.!
11!
Speaker!
For!ringer!and!handsJfree!audio!
output.!
12!
Soft!Keys!
These!keys!are!automatically!
labelled!to!identify!their!cont ex tJ
sensitive!functions.!
13!
Graphic!Display!
Shows!information!about!calls,!
messages,!soft!keys,!time,!date,!and!
other!relevant!data.!
Owner’s Manual
21
14!
Call!Key!
Use!these!keys!to!activate!the!4!or!6!
call!appearance!lines!on!your!
phone.!!The!buttons!on!the!screen!
display!your!extension!numbed.!
15!
Line!Indicators!
Individual!multiJcolor!LEDs!display!
the!dynamic!call!state!mapping!is:!
•Solid!green—An!active!call!is!in!
progress.!
•Fast!flashing!green—There!is!an!
incoming!(ringing)!call.!
•Flashing!green—The!call!is!held!by!
the!other!party.!
•Flashing!red—The!call!is!on!hold.!
•Solid!red—The!line!is!busy!
remotely!(shared!lines)!
16!
Hookswitch!
!
Using the Navigation Keys
To help you navigate menus and enter data, use these tips:
To scroll through lists, use and
Press the * key to page up. Press the # key to page down. Use these
shortcuts when lists appear on more than one page.
To exit from any menu, press .
To exit from any directory, press .
Use the dial pad keys to navigate through and make selections in numbered
menu lists.
To enter text using the dial pad, press the number keys one or more times.
For example, for ‘A’ press 2 and for ‘C’ press 222. When in text entry mode,
the title will show whether keys will generate digits (1), upper-case (A), or
lower-case (a) characters— use the 1/A/a soft key to change—and whether
keys will generate ASCII, Latin, Cyrillic, Katakana, or Unicode characters—
use the Encoding soft key to change.
 Loading...