

Page 1

FOCUS ON YOUR
BUSINESS, NOT
YOUR BUSINESS
COMMUNICATIONS.
Welcome to Comcast
Business VoiceEdge
™
Page 2

Table of Contents 2
Table of Contents
Welcome to Comcast Business VoiceEdge™ ...........................................5
Quick Start: VoiceEdge Common Basic Features .....................................6–8
Introduction to Your Phone .......................................................6–7
Placing a Call ..................................................................7
Voicemail Set Up ................................................................7
Listening to Voicemail ............................................................8
Call Transfer ...................................................................8
3-Way Calling ..................................................................8
Quick Start: VoiceEdge Common Advanced Features ................................9–12
Downloading the Telephony Toolbar ..................................................9
Activating Your Telephony Toolbar ...................................................9
Dialing from the Telephony Toolbar ..................................................10
Speed Dial ................................................................10 –11
Be Anywhere ..............................................................11–12
VoiceEdge Mobile App ...........................................................12
Messages — On the Phone ....................................................13–15
Setting Up Voicemail ............................................................13
First Time Voicemail Activation .....................................................13
Setting Your Personalized Name ....................................................13
Accessing Voicemail ............................................................13
Managing Voicemail ............................................................14
Using Your Voicemail Box to Forward Calls ............................................15
To Make a Call from the Voice Portal ................................................15
Leaving Messages for Other Users in Your Group .......................................15
Messages — Online ..........................................................16–18
Greetings ....................................................................17
Distribution Lists ...............................................................18
Features — On the Phone .....................................................19–22
Call Transfer ..................................................................19
Call Transfer with Consultation .....................................................19
Call Transfer Direct to Voicemail ....................................................19
Call Hold .....................................................................19
Call Return ...................................................................20
Call Waiting ..................................................................20
Caller ID and Caller ID with Call Waiting ..............................................20
Do Not Disturb ................................................................21
Extension Dialing ...............................................................21
Extensions — Standard Seat ......................................................21
Selective Call Acceptance .....................................................21–22
Selective Call Rejection ..........................................................22
Directed Call Pickup with Barge-In ..................................................22
Features — Online and/or Using the Telephony Toolbar .............................23–36
Downloading the Telephony Toolbar .................................................23
Using the Telephony Toolbar ......................................................24
Services Menu ................................................................25
Be Anywhere ..............................................................25–27
Remote Office .................................................................28
Click to Dial from Microsoft Outlook .................................................28
Alternate Numbers .............................................................29
Page 3

Table of Contents 3Table of Contents 3
Call Forwarding Always ..........................................................29
Call Forwarding Busy ............................................................30
Call Forwarding No Answer ....................................................30–31
Call Forwarding Selective. . . . . . . . . . . . . . . . . . . . . . . . . . . . . . . . . . . . . . . . . . . . . . . . . . . . . . . . . 31
Sequential Ring ................................................................31
Call Notify ....................................................................32
Hoteling ..................................................................33–34
Priority Alert ..................................................................35
Privacy ......................................................................36
Bria Softphone ..............................................................37–43
System Requirements and Devices ..................................................37
Login .......................................................................38
Bria Softphone Basics ...........................................................38
Placing a Call .................................................................39
Answering a Call ...............................................................39
Controlling Calls ............................................................40 – 41
Three-Way Calling ...........................................................42–43
Voicemail ....................................................................43
Reception Console ...........................................................44–45
Launching Reception Console for the First Time ........................................44
Accessing Reception Console via Desktop Icon .........................................44
Reception Console Overview ......................................................45
Managing Calls with Reception Console ..............................................45
System Requirements ...........................................................45
Tech Admin .................................................................46–51
Music On Hold ................................................................46
Call Park .....................................................................46
Call Park and Retrieve ...........................................................46
Call Pickup ...................................................................47
Busy Lamp Field ...............................................................47
Shared Call Appearance .........................................................47
Multiple Call Arrangement ........................................................47
Automatic Callback .............................................................48
Basic Call Logs ................................................................48
Push to Talk ..................................................................48
Business VoiceEdge Auto Attendant ..............................................48–49
Hunt Group — Automatically Handled ............................................49–51
Business Voice Continuity .....................................................52–53
Call Forwarding Not Reachable ....................................................52
Additional Business Voice Continuity Features ..........................................53
Privacy .......................................................................54
Caller ID Blocking per Call ........................................................54
Caller ID Blocking per Line ........................................................54
Anonymous Call Rejection ........................................................54
Billing Features .............................................................55–57
Online Bill Access ..............................................................55
Call Detail Records ..........................................................56–57
Block Calls to 900/976 Numbers ...................................................57
Block Collect Calls and Bill to Third Party Calls .........................................57
International Calling Plans ........................................................57
Page 4

Table of Contents 4
More Services ...............................................................58–59
Business Level Support ..........................................................58
Directory Listings ..............................................................58
Directory Assistance ............................................................58
Directory Assistance Call Completion ................................................58
Diversion Inhibitor ..............................................................58
Enhanced Directory Assistance ....................................................58
IP Phone Information ............................................................59
911 Emergency Calls ............................................................59
Toll Free Service ...............................................................59
Useful Tips .................................................................60–61
Last Number Redial .............................................................60
Lists ........................................................................60
Domestic Dialing ...............................................................60
International Dialing .............................................................60
Operator Services ..............................................................60
Feature Access Codes ........................................................60–61
Index ......................................................................62–63
Page 5

Welcome 5
Welcome to Comcast Business VoiceEdge
™
Now that you have Comcast Business VoiceEdge™, you can focus on your business and not your business
communications. You’ll enjoy all the usual features you would expect of a phone service, plus advanced
features that help ensure your business voice continuity and can enhance your business productivity. You
could enjoy features like:
• Call Forward Not Reachable to assure your business keeps receiving calls, even when weather or power
outages keep the lights off
• Voicemail
• Voicemail to Email Integration so messages follow you wherever you’re located
• High-Definition Voice Calling with Advanced IP phones
And all of this is provided and managed by Comcast, bringing you the latest technology to help your business.
Plus, you get unlimited nationwide direct-dial calling for your office.
Enhancing features have never been so accessible. With Business VoiceEdge, you can access features
in three convenient ways — the Telephony Toolbar* available on your desktop integrated with Microsoft
Outlook
®
and/or Internet Explorer® and Mozilla Firefox®, the Comcast Business VoiceEdge Online Web portal
for additional point-click activation and for some features via feature access codes on your IP phone or via
your mobile smartphone.
To download the Telephony Toolbar or the Bria Softphone*, visit business.comcast.com/getstarted and
follow the links. Alternately for feature activation and customization, visit Business VoiceEdge Online at
htt p://hdvdms we b.onvoip.net.
To learn more about your convenient calling features and options, flip through the following pages or visit our
online interactive training at business.comcast.com/getstarted.
Still have questions? Want to add features and services? Your Business Customer Support
representatives will be happy to help. Just call 800-472-4176.
* Telephony Toolbar and Bria Softphone only available with the Unified Communications user package.
Page 6
Quick Start 6
Quick Start: VoiceEdge Common Basic Features
Get familiar with your new Business VoiceEdge service and phones by reading this quick start section.
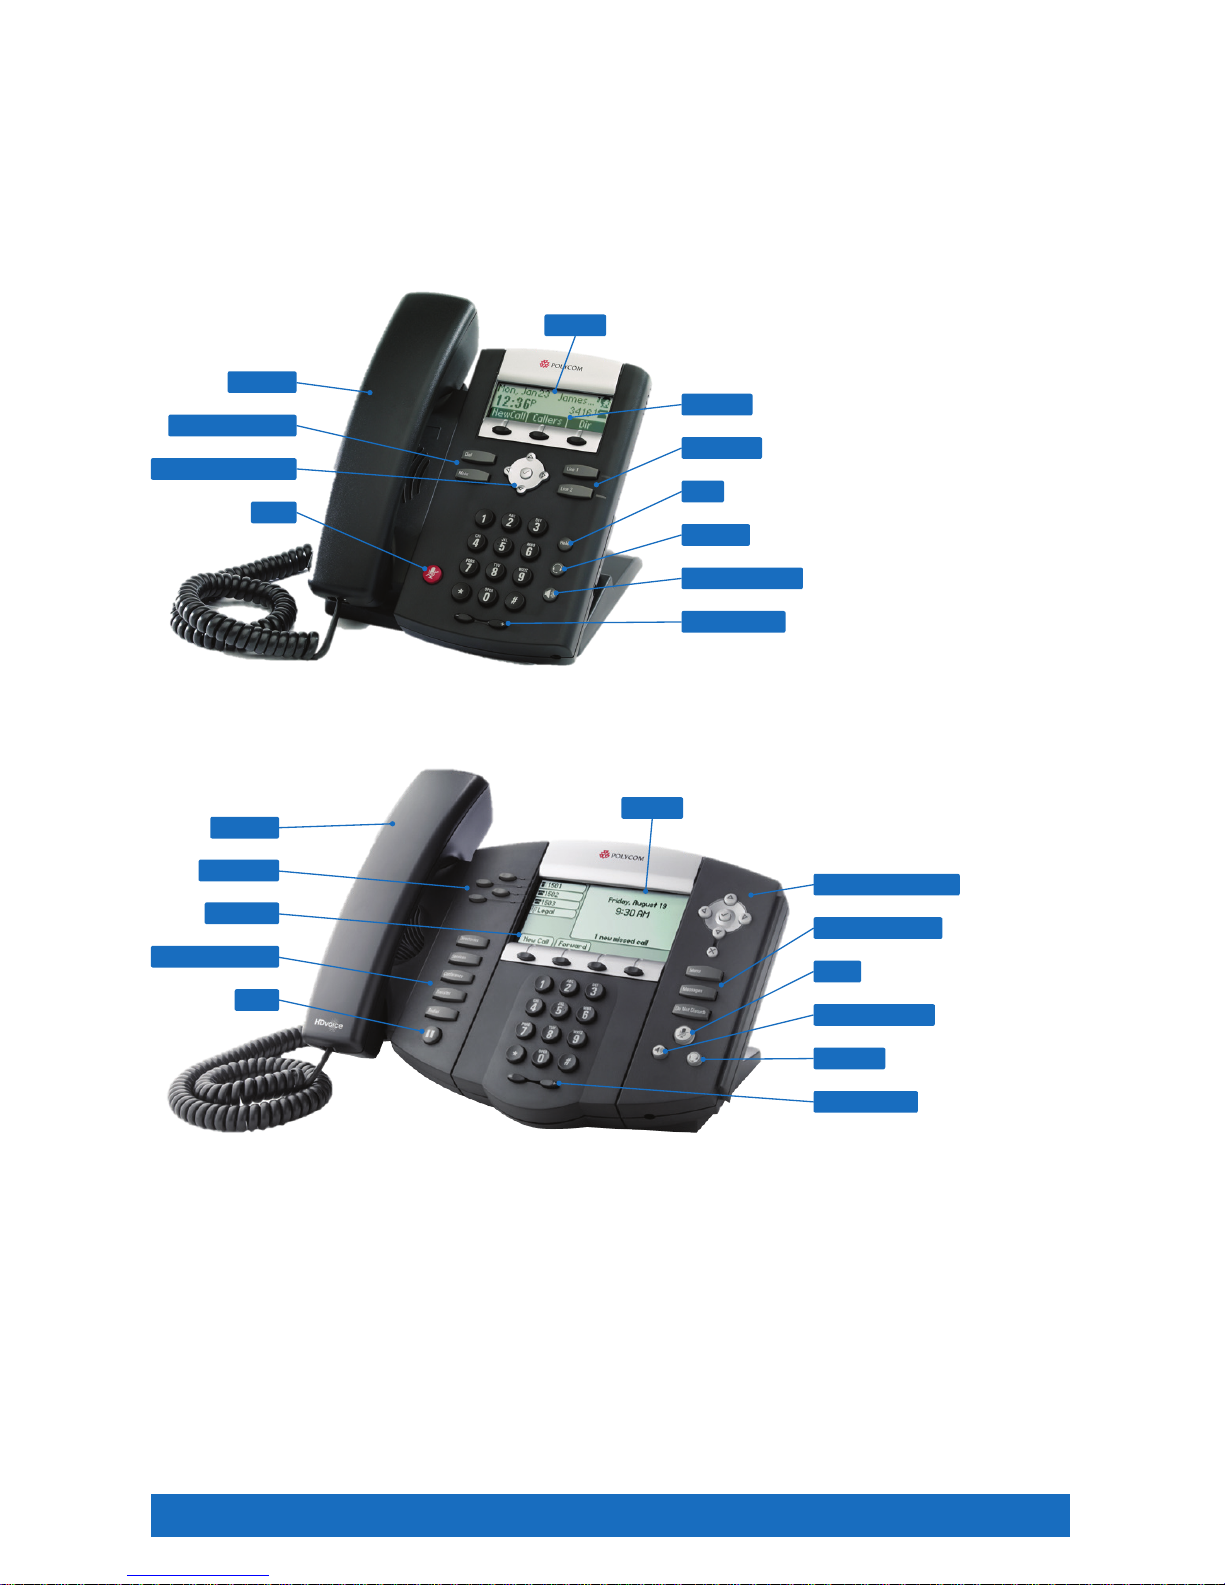
Introduction to Your Phone
The Business VoiceEdge service comes with Polycom® IP Phones. Please refer to the diagrams below to get
quickly introduced to the buttons and functions of your new phone.
Polycom 335 Series Phone
Display
Softkeys
Line Keys
Volu me Keys
Headset
Navigation Arrows
Hold
Mute
Speaker Phone
Feature Buttons
Handset
Polycom 560 Series Phone
Display
Navigation Arrows
Headset
Volu me Keys
Mute
Softkeys
Hold
Feature Buttons
Speaker Phone
Feature Buttons
Line Keys
Handset
Note: The Polycom 670 series phone has the same layout as the 560 series, and includes 6 lines.
Your new Polycom IP phone will operate similar to other phones for the basic functions. In addition, the
Polycom IP phones use a screen to display interactive features that become available as needed. Users can
use the navigation arrows as well as the soft keys to help navigate through each feature. The navigation
arrows will be your main tool for navigating the different setup menus while the soft keys will be used for more
call related options.
Page 7

Quick Start 7
Navigation Arrows
If you are not in any Menu lists your Navigation Arrows act as a quick access tool for your recent call logs. By
pressing each of the Navigation Arrows you can access Placed calls, Missed calls, Received calls and Speed
Dial. All calls are ordered in order by time stamp with the most recent appearing at the top of the list.
Arrow Key Call Log
▷ Right arrow Placed calls
▽ Down arrow Missed calls
◁ Left arrow Received calls
△ Up arrow Speed dial
Soft Keys
Your Polycom phone is equipped with a number of soft keys. The soft keys are the buttons directly below the
screen, and the display changes depending on the current call state. For example, if you are on a call, the soft
keys may display transfer or conference as options. As the phone goes through different states, the Soft keys
provide different options. To use a soft key, press the button below the screen that corresponds to the option
you would like to select.
Placing a Call
There are many ways to place a call — you can pick up the handset and dial, you can select the soft key for
“new call”, you can hit the speaker button and dial, and more. To see a short video on time-saving tricks to
place calls, please visit business.comcast.com/getstarted.
Placing calls using the number pad
To place a call using your phone number pad simply pick up the handset and dial your desired telephone
number or extension using the number pad. If you would like to use a headset or speaker phone, activate the
headset or speaker phone by pressing the appropriate button and then dial the number or extension.
Dialing from Call Logs
To place a call from a number that is stored in your call logs, enter a call log of your choice by pressing the
corresponding Navigation Arrow key. Using the Navigation Arrow keys scroll up or down to highlight the
number you wish to dial. And then, press the Dial soft key.
Voicemail Set Up
Comcast Business VoiceEdge voicemail enables you to manage your time without missing your calls. Callers
can leave a message while you’re on the phone, off-site, or just need phone-free time to focus on a project.
If you are away from the office, you can opt to be notified via email that you have messages waiting. Voicemail
is included with a Unified Communication seat, and can be added as an a la carte item to a Standard seat,
Hunt Group or Auto Attendant.
Activate your voicemail account
To setup your voicemail for the first time you have to be physically present at your desk phone. For voicemail
activation:
1. Press the “Messages” button on your phone or dial your extension or 10-digit telephone number.
2. A tutorial will guide you through the setup of your new voicemail service.
Note: You will be prompted to enter the default password, which is the numbers 17932486. Once you’re in the system, listen carefully
to the recorded instructions. You will be prompted to create a password, record your name and record a customized business
greeting.
Page 8

Quick Start 8
Listening to Voicemail
When a voicemail has been recorded, your phone will alert you by flashing the red messages light.
To listen to your voicemail:
1. Push the “Messages” button on your phone.
2. When prompted enter your passcode and press the key.
3. Follow the prompts to listen to your messages.
To access your voicemail while you are away from your desk phone:
1. Dial your office telephone number.
2. When your personal greeting starts, press the
key.
3. Enter your passcode when prompted.
If you are a Unified Communications user, voicemail to email will be activated so that you will receive a copy
of your voicemail delivered to your email in a .wav format file. You can then listen to this voicemail on your
smartphone or wherever you check email.
Call Transfer
Business VoiceEdge allows users to quickly and easily transfer callers to the appropriate party. Users have the
option to blind transfer or transfer with a consultation. Blind transfers send the caller to a coworker without
knowledge of the call, while a consultative transfer allows the coworker to talk with the destination party prior
to transferring the call.
To blind transfer a call to another team member or to an off-site facility:
1. Press the “Transfer” button on your phone.
2. Dial the phone number or extension of the destination party.
3. Press the “Transfer” button again.
To transfer with consultation:
1. Press the “Transfer” button on your phone.
2. Dial the phone number of the destination party.
3. When the second party answers, you will be speaking privately.
4. When you are ready to connect all parties press the “Transfer” button once again.
5. Hang up. The transfer will be complete.
3-Way Calling
Often it’s more efficient to get your colleagues or clients on the phone at the same time. 3-Way Calling makes
it easy for multiple parties to collaborate on a call.
To connect a three-party conference:
1. Connect to the first party.
2. Press the “Conference” button on your phone.
3. Dial the second party.
4. When the second party answers press the “Conference” button again.
Page 9
Quick Start 9
Quick Start: VoiceEdge Common Advanced Features
Business VoiceEdge has many advanced features that can help enhance your productivity and this section will
guide you through using the most common features.
Most of these features are set up and accessed through the Telephony Toolbar or the portal. You will find
reference to activating features in either place.
Downloading the Telephony Toolbar
The Telephony Toolbar is a tool that gives you quick access to many of your Business VoiceEdge functions
and features. The Toolbar is available through an online download and installs to your browser and Microsoft
Outlook
®
, Internet Explorer® or Mozilla Firefox®. Downloading the Telephony Toolbar is quick and easy with
our Telephony Toolbar Installation Wizard. Follow the instructions below to access and download your toolbar.
Note: The Telephony Toolbar is a PC-only application. Please refer to page 23 for minimum PC requirements.
1. Go to business.comcast.com/getstarted.
2. Find the Telephony Toolbar Download area and click on the words “Click here”.
3. The Telephony Toolbar Installation Wizard will pop up in a new screen.
4. Follow the instructions in the Wizard.
5. Once the installation process starts, you may need to exit out of any open browsers and Microsoft Outlook.
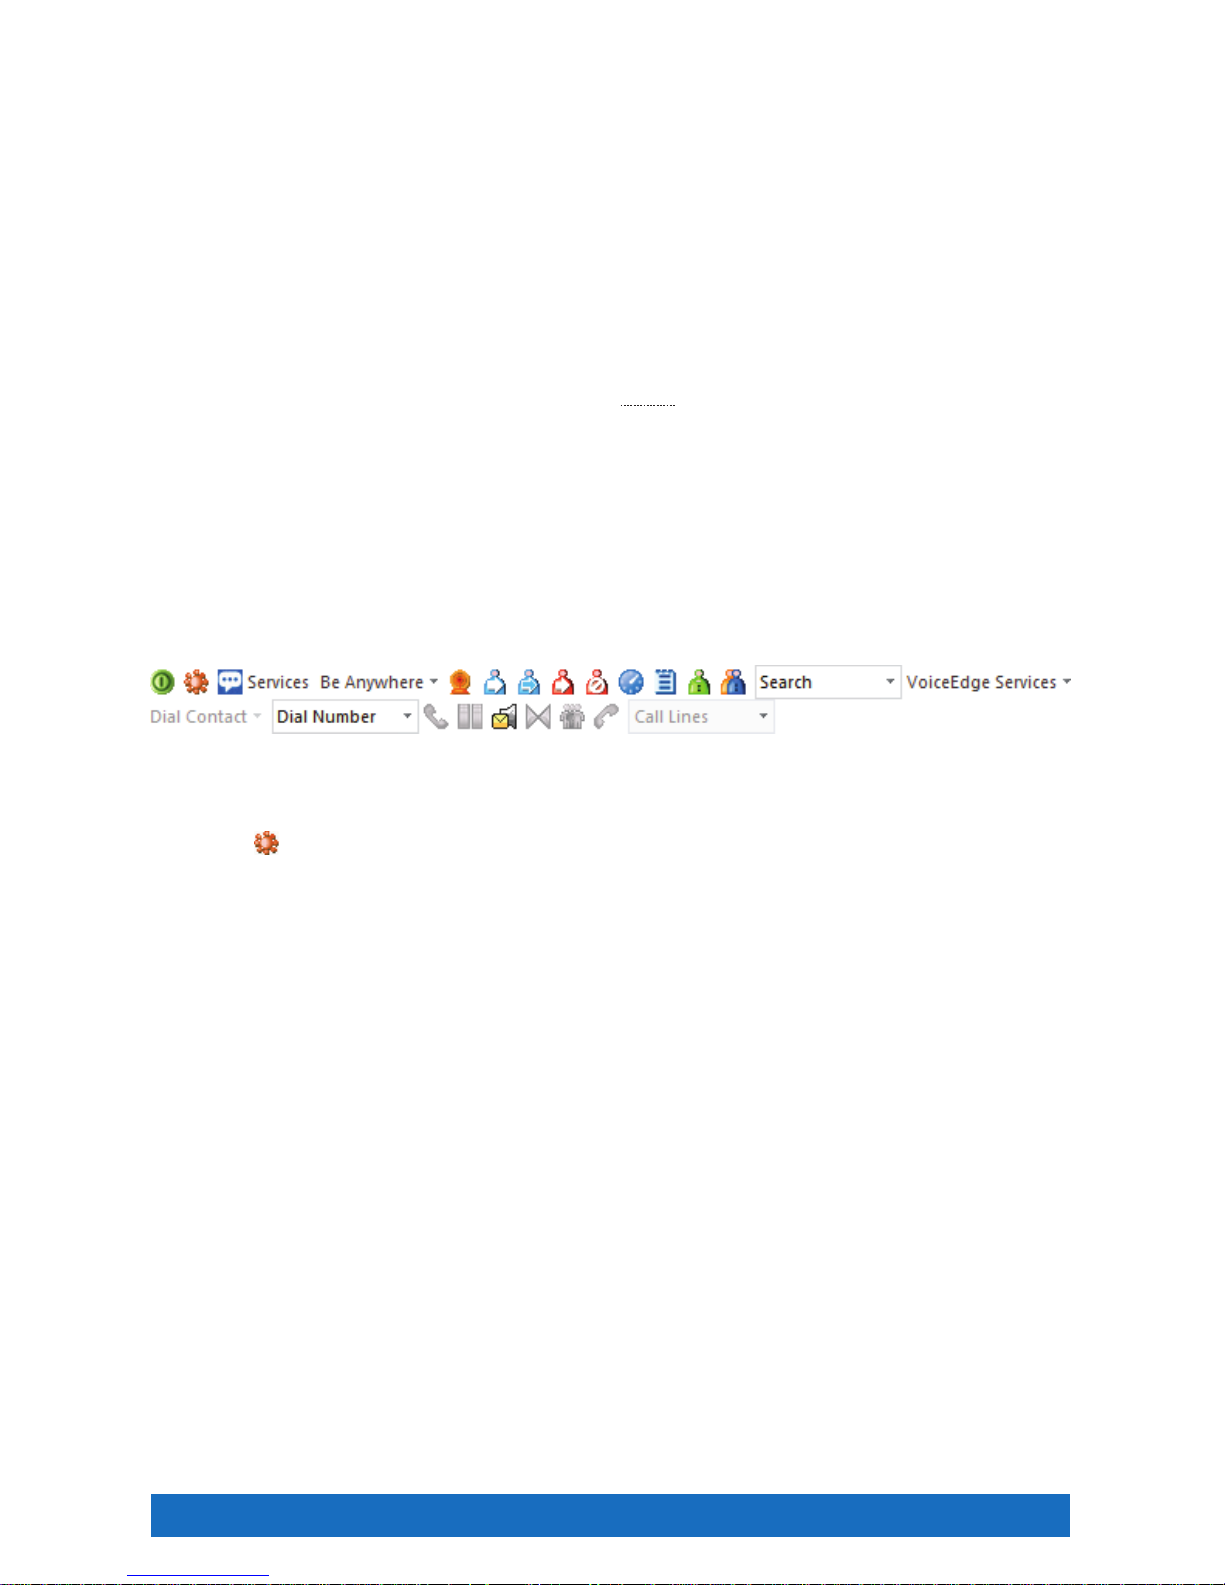
After you have installed the Telephony Toolbar you will notice a new toolbar in your browser, as pictured below.
Activating Your Telephony Toolbar
Once the Telephony Toolbar has been installed, you will need to activate it for the first time:
1. Click the
button. This is the Options menu.
2. On the left hand side of the screen click on “General”.
3. Make sure that the Check Box is checked for the Auto Login.
4. On the left hand side of the screen click on “Account”.
5. Enter your username which is your 10 digit number (no dashes, no spaces).
6. Enter the Password that is given to you in the Welcome Letter.
Note: The Welcome email is sent to the point of contact on the account. Please check with your internal point of contact or call our 24x7
care team at 800-472-4176.
7. Select boxes for “Save User Name” and “Save Password”.
8. On the left hand side of the screen select “Connection”.
9. Enter the Host Address: hdvdmstoolbar.onvoip.net.
10. Enter Host Port number: 2208.
11. Click “OK ”.
The buttons on the Telephony Toolbar will no longer be gray and will light up. To view a short video outlining
these steps, please visit business.comcast.com/getstarted.
Page 10
Quick Start 10
Dialing from the Telephony Toolbar
Unified Communication seats have the ability to make calls from the Telephony Toolbar and other methods
including Click to Dial from Microsoft Outlook and calling telephone numbers that appear on your screen.
To dial from your tool bar:
1. Enter the destination number into the Dial Number area of the Telephony Toolbar.
2. Press Enter on your Keyboard.
To dial a Microsoft Outlook contact:
1. In your Microsoft Outlook click on “Contacts”.
2. Find the contact you wish to call.
3. Alternate click on the contact information.
4. Select “Call”.
To call phone numbers on a web page:
1. Highlight the number you wish to call.
2. Right click.
3. Select “Call”.
For even more ways to call please see the self-help video about time saving tricks for placing calls at
business.comcast.com/getstarted.
Speed Dial
Business VoiceEdge includes functionality for Speed Dial 8 or Speed Dial 100. Speed Dial 8 is used for
programming up to 8 telephone numbers into your phone for quick dialing using single digits. Speed Dial 100
does the same as Speed Dial 8, only it stores up to 100 numbers and you dial them using two digits. You can
do either or both as long as you follow the appropriate set up for each.
Speed Dial 8
To set up Speed Dial 8 from your phone:
1. Lift the receiver and listen for the dial tone.
2. Press
and listen for the stutter dial tone.
3. Enter a speed dial digit between 2 and 9.
4. Dial the phone number you would like the digit to represent. (Remember to include the area code and any
other numbers necessary to place the call).
5. Listen for the voice prompt confirmation.
6. To add the next number, repeat steps 2 through 5.
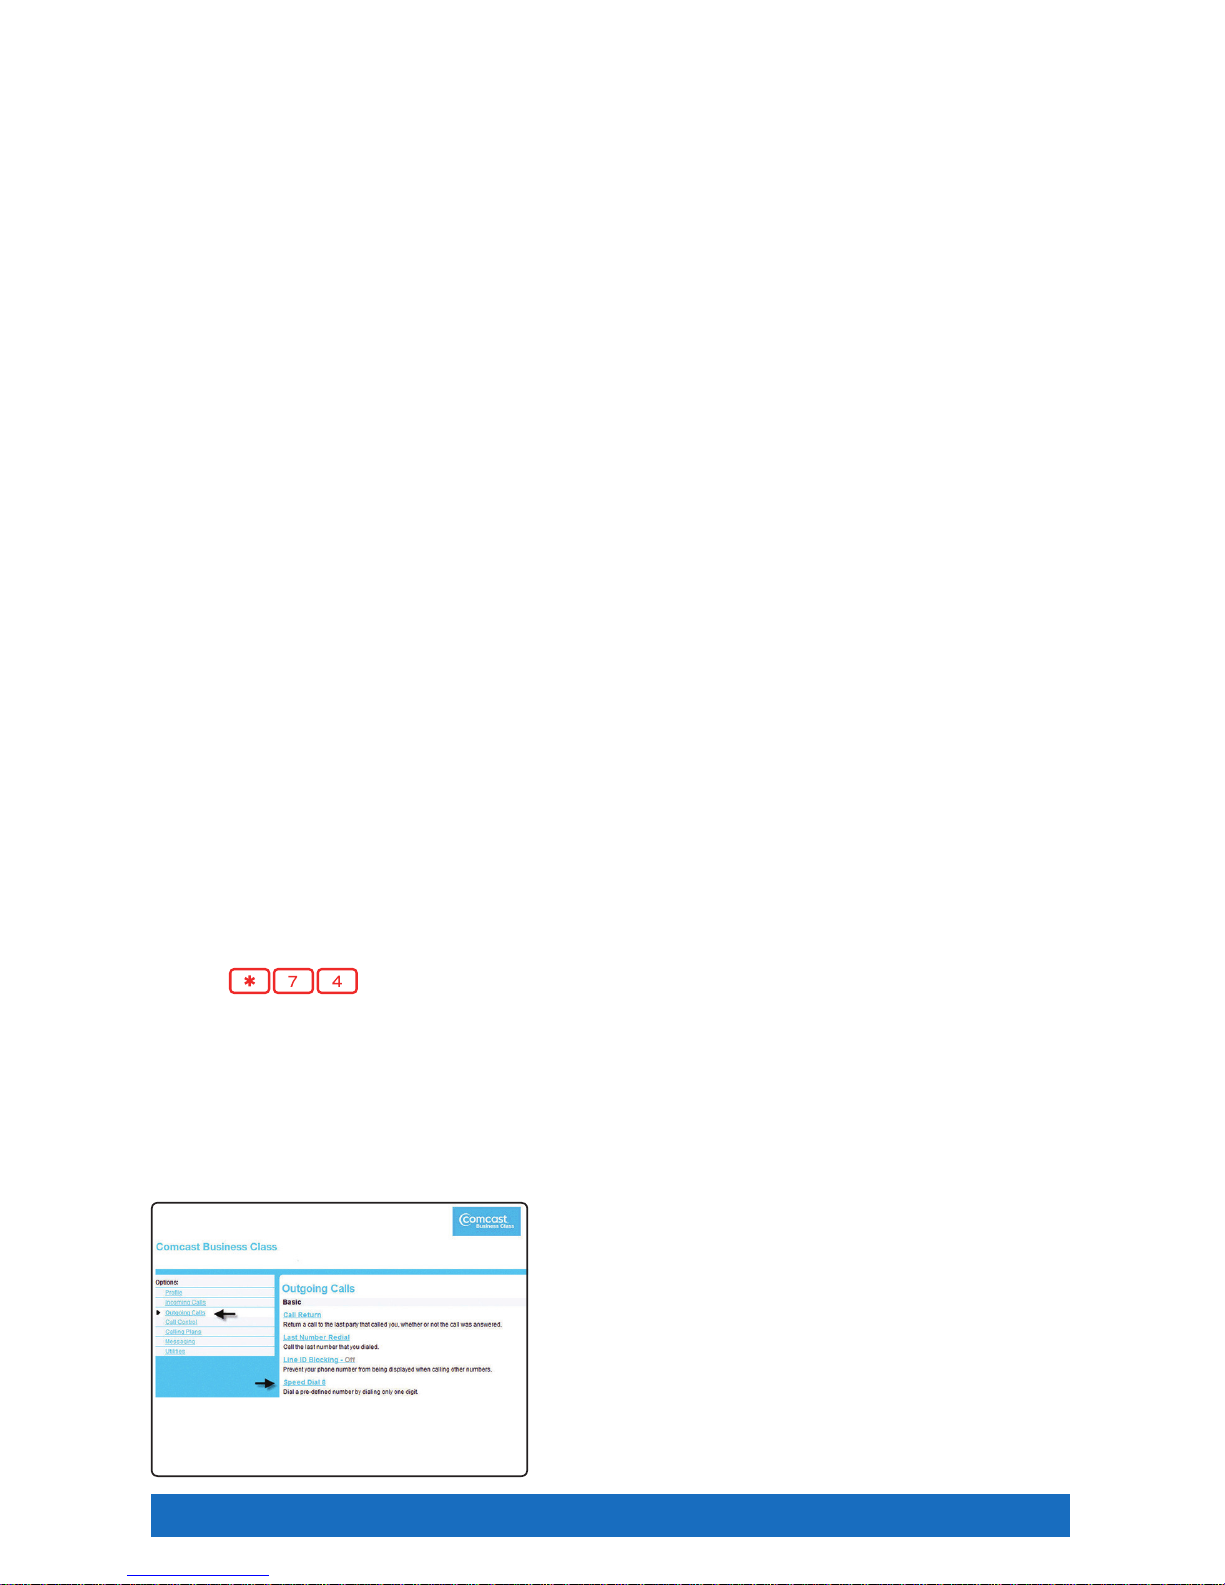
To set up Speed Dial 8 from your computer:
1. Log on to the Main Navigation Page.
2. From the Main Navigation Page, click “Outgoing Calls”.
3. Click “Speed Dial 8”.
4. Enter the appropriate phone numbers in the boxes
corresponding with digits 2 through 9 and the person’s
name in the Name box.
5. Click “Apply”.
Page 11

Quick Start 11
To use Speed Dial 8:
1. Lift the receiver and listen for the dial tone.
2. Press the digit (2 through 9) that represents the number you wish to call, then press
.
Note: Speed Dial can also be used on the Telephony Toolbar.
Speed Dial 100
To set up Speed Dial 100 from your phone:
1. Lift the receiver and listen for the dial tone.
2. Press
and listen for the stutter dial tone.
3. Enter any two digits through 99.
4. Dial the phone number you would like the digits to represent. (Remember to include the area code and any
other numbers necessary to place the call).
5. Listen for the voice prompt confirmation.
6. To add the next number, repeat steps 2 through 5.
To set up Speed Dial 100 from your computer:
1. From the Outgoing Calls Page, click “Speed Dial 100”.
2. Click “Add”. Your Speed Dial 100 Management Page appears.
3. Select a two-digit Speed Dial code.
4. Type a name or description for the Speed Dial number in the Description text box.
5. Type the phone number and the person’s name you are assigning to your Speed Dial code.
6. Click “OK”.
To use Speed Dial 100:
1. Lift the receiver and listen for the dial tone.
2. Press
and then dial the two digits that represent the number you wish to call.
Note: Speed Dial can also be used on the Telephony Toolbar.
Be Anywhere
The Be Anywhere service allows you (as a Unified Communications seat user) to make and receive calls from
any device at any location with only one phone number. Be Anywhere lets you make and receive calls from
colleagues, prospects and customers on any phone using your office number.
Receiving Business Calls on Your Mobile
You can receive business calls on your mobile phone by adding your mobile number to the Be Anywhere
Locations List. In addition, you can also receive calls on another phone number (it does not have to be your
mobile number).
To add your mobile number to the Be Anywhere Locations List:
1. Click the “Services” button on the Telephony Toolbar.
2. Select “Be Anywhere”.
3. Click “Add”. Enter your mobile phone number and a description.
4. Ensure Enable is checked.
5. Select “Apply”.
Page 12
Quick Start 12
Make Business Calls from Your Mobile
You can make calls from your mobile phone using your Business VoiceEdge business number as the calling
line ID.
From your mobile, dial your Be Anywhere portal number and wait for the dial tone. Once you hear the tone,
dial the destination number or business extension. The called party sees your Business VoiceEdge business
number (not your mobile number) as the calling line ID.
Note: Your Be Anywhere portal number is displayed in the VoiceEdge online portal or in the Telephony Toolbar under the Be Anywhere
section.
Move Call from One Phone to Another Phone
This functionality enhances your personal productivity. For example, you may move a business call you placed
through the Be Anywhere portal on your mobile while you are on lunch, and upon returning to the office, you
may choose to move the call to your desk phone.
Move Active Call from Your Mobile to Your Desk Phone or Soft Phone:
While engaged in a call you placed through the Be Anywhere portal via your mobile, dial
from your desk phone or soft client. The call is seamlessly moved to the new phone and the mobile call leg is
dropped.
You may also move a call that was placed to your business line that you answered on your mobile phone from
Be Anywhere, using the same process as above.
Note: You cannot move calls placed directly to your mobile number, since Be Anywhere and the VoiceEdge platform have no knowledge of
the call.
Move Active Call from Your Desk Phone or Soft Client to Your Mobile:
From your mobile, dial your Be Anywhere portal number and wait for the dial tone. Once you hear the tone,
dial
manually.
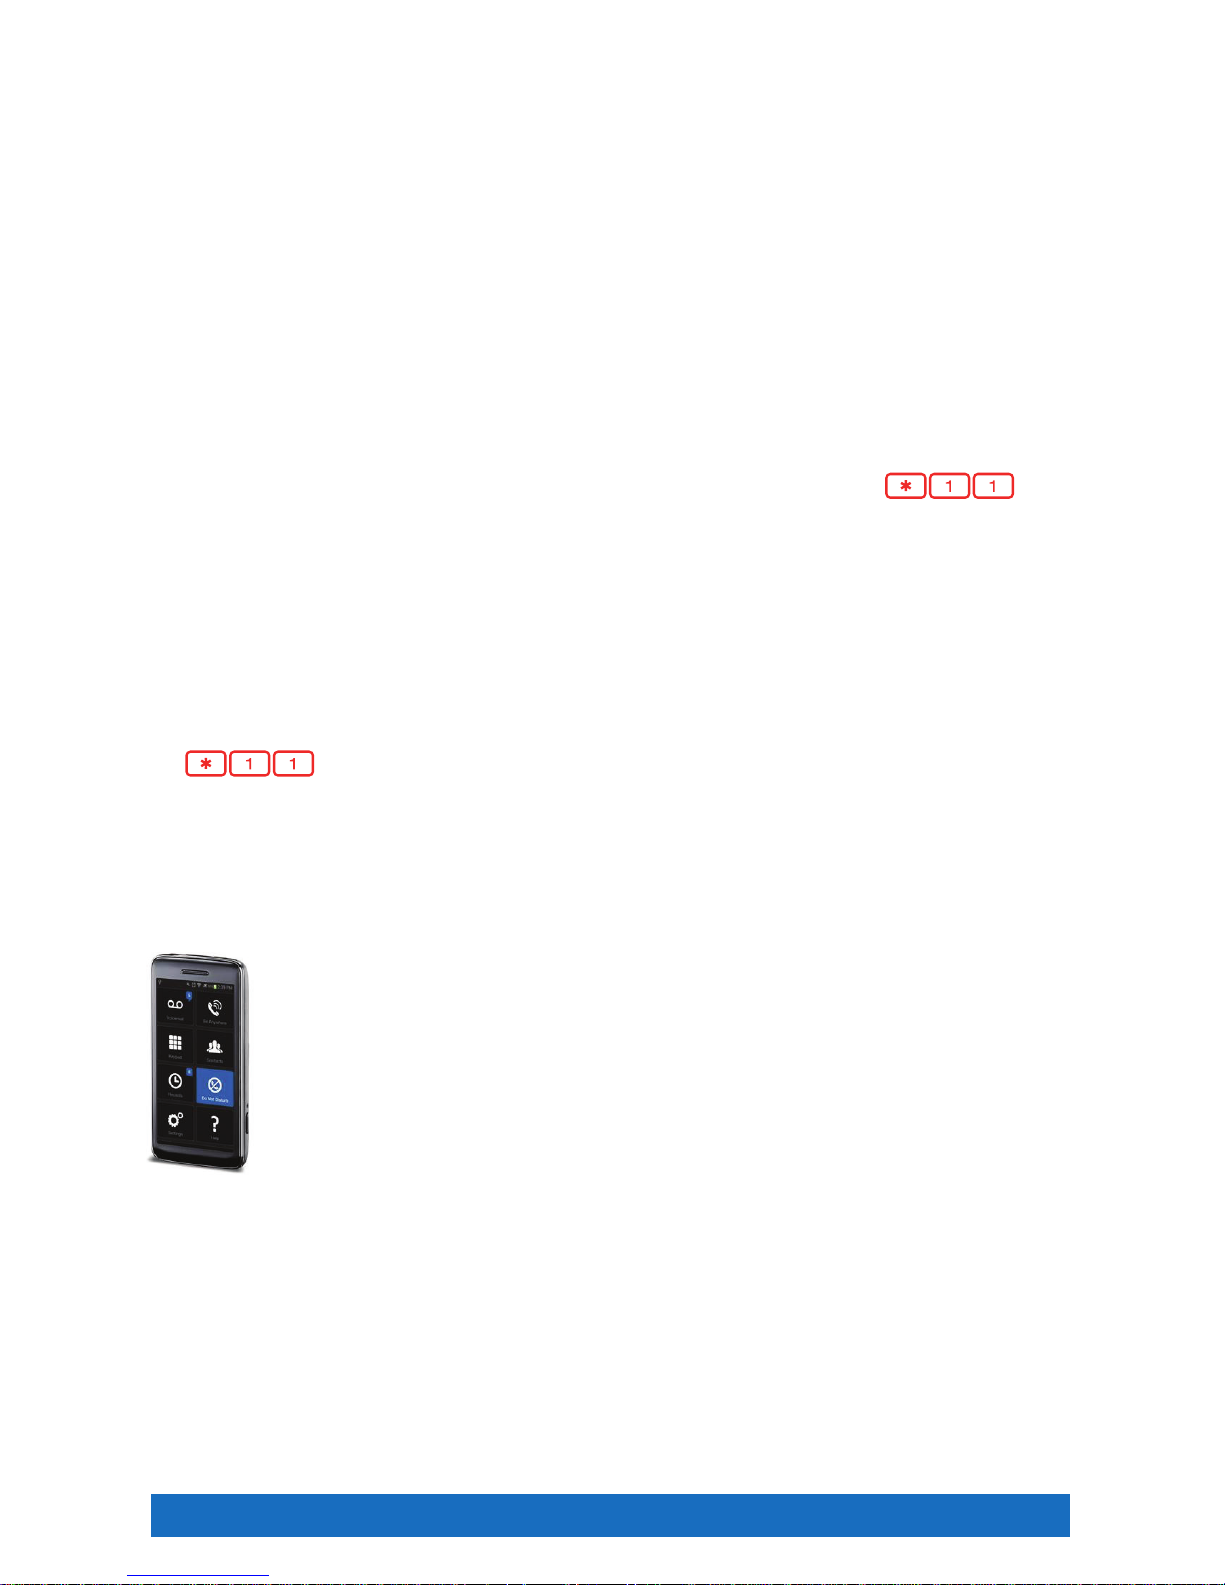
VoiceEdge Mobile App
The VoiceEdge Mobile App lets you make calls from your smartphone using your VoiceEdge business number,
just as if you were in your office. You can check your business voicemail, set your smartphone and other
phones as your ring to devices, change and record your voicemail greetings, see your call logs, and have easy
access to your VoiceEdge phone directory, all from your smartphone.
Following are some of the other features that the VoiceEdge Mobile App provides:
• Use the keypad for extension dialing
• Record and select your VoiceEdge No Answer greetings
• Get notifications when you have an incoming call and new voicemail
• Turn Do Not Disturb on and off for privacy
• Get notified if service is set in a way that may result in missed calls
For information on how to download and use the VoiceEdge Mobile App, see our VoiceEdge Mobile App
Quick Reference Guide that is posted with other VoiceEdge training resources at business.comcast.com/
getstarted.
Page 13

End User 13
Messages — On the Phone
Comcast Business VoiceEdge voicemail enables you to manage your time without missing your calls. Callers
can leave a message while you’re on the phone, off-site, or just need phone-free time to focus on a project. If
you are away from the office, you can opt to be notified via email that you have messages waiting.
Setting Up Voicemail
To set up your new Comcast Business VoiceEdge voicemail service, follow these easy-to-use instructions.
The first time you call into your Comcast Business VoiceEdge voicemail, you will be asked to create a new
password and record your name to personalize the greeting that callers will hear when they reach your
voicemail.
Note: Each line may have its own voicemail and would need to be set up individually.
First Time Voicemail Activation
From your office:
1. Press the “Messages” button on your phone or dial your extension or 10-digit telephone number.
2. A tutorial will guide you through the setup of your new voicemail service.
Note: You will be prompted to enter the default password, which is the numbers 17932486. Once you’re in the system, listen carefully
to the recorded instructions. You will be prompted to create a password, record your name and record a customized business
greeting.
Setting Your Personalized Name
Press to record new Personalized Name.
Press
to listen to current Personalized Name.
Press
to delete Personalized Name.
Press
to return to the Main Menu.
Press
to repeat the Main Menu.
Accessing Voicemail
There are three ways to access your voicemail:
From your office:
1. Press the “Messages” button on your phone or dial your 4-6 digit extension or 10-digit telephone number.
From your desktop:
1. Click the “Dial Voicemail” icon on the Telephony Toolbar.
Away from your office:
1. Dial your office telephone number.
2. When your personal greeting starts, press
.
3. Enter your password when prompted.
Page 14

End User 14
Managing Voicemail
When you access Comcast Business VoiceEdge voicemail by phone, you will be in the Main Menu. This menu
will prompt you with a set of options to use in managing your messages. Once you’ve made a selection from
the Main Menu, you will hear prompts to guide you through further options. The following is a list of options
available to you from the Main Menu.
Main Menu options:
Press
to access voice messaging.
Press
to change password.
Press
to exit.
Press
to repeat the Main Menu.
Once you’ve made a selection from the Main Menu, you will hear prompts to guide you through further options.
Message options:
Press to review your new messages. While playing the message you can:
• Press
to skip backwards 3 seconds.
• Press
to pause playback of a message.
• Press
to skip forward 3 seconds.
• Press
to skip to the beginning of a message.
• Press
to skip to the end of a message.
• Press
to delete the message.
• Press
to save the message.
After you’ve listened to your new messages, you have the following options:
• Press
to replay the message. While playing the message you can:
• Press
to return to the previous message.
• Press
to skip to the next message.
• Press
to call the sender of your message.
• Press
to hear more options.
• Press
to return to the Main Menu.
• Press
to repeat the Main Menu.
Greeting options:
Press
for message management options, like updating your various greeting messages. You then have
the following options:
• Press
for the line busy Greeting Menu.
• Press
for the no answer Greeting Menu.
• Press
for the Compose Message Menu.
Page 15

End User 15
Using Your Voicemail Box to Forward Calls
If you are a Unified Communications seat user, you may use your voicemail box to activate and deactivate Call
Forwarding options when you are out of the office or when your office phone is already in Call Forwarding mode.
To activate Call Forwarding:
1. Access your voicemail box.
2. You will be prompted to enter your mailbox number, which is your 10-digit office telephone number.
3. Enter your password when prompted.
4. From the Main Menu, dial
for Call Forwarding.
5. Follow the prompts to activate or deactivate Call Forwarding Always to the current destination number.
Note: The destination numbers can only be domestic telephone numbers; international numbers are not allowed.
To Make a Call from the Voice Portal
1. Enter the destination digits. While engaged in a call, press to terminate and make another call.
2. Press
to return to the Main Menu.
Leaving Messages for Other Users in Your Group
During greeting:
1. Press
to interrupt the greeting and start recording a new voice message.
2. Press
to transfer out of the greeting to your voicemail box password prompt.
3. Press
to transfer out of the greeting to a pre-configured number.
While recording message:
1. Press
to cancel the recording and transfer to voicemail box password prompt.
2. Press
to cancel the recording and transfer to a pre-configured number.
3. Press
to stop recording and review your message.
Page 16

End User 16
Messages — Online
With VoiceEdge, some feature management is only available through the portal, and this section will go
through those features.
1. From your browser, log on to
htt p://hdvdms we b.onvoip.net.
2. You are on the Main Navigation Page.
3. Find the service you wish to access on the left-hand
side of the Navigation Page.
Note: Your username and password were emailed to you upon
installation. Should you need this information reset, please
contact Comcast Customer Care.
To set the number of rings before a call goes to
voicemail:
1. On the left-hand side of your Main Navigation Page,
click “Messaging”.
2. From the Messaging Page, select “Greetings”.
3. Under “Number of rings before greeting”, select the
option for how many times you would like the phone to
ring before the greeting starts.
4. Click “Apply”.
To activate/deactivate voice messaging (voicemail):
1. From your Main Navigation Page, click “Messaging”.
2. From the Messaging Page, select “Voice Management”.
3. Select your preference as “On” or “Off”.
4. Click “Apply”.
To set up a message waiting indicator:
1. From your Main Navigation Page, click “Messaging”.
2. From the Messaging Page, select “Voice Management”.
3. Check the box for “Use phone message waiting indicator”.
4. Click “Apply”.
Voicemail to email — forward voicemails as WAV files to your email:
1. From the Messaging Page, select “Voice Management”.
2. Check the box for “Email a carbon copy of the message to”.
3. In the text box, enter the email address.
4. Click “Apply”.
Page 17

End User 17
To be notified via email that new voicemail is waiting:
1. From the Messaging Page, select “Voice Management”.
2. Check the box for “Notify me by email of the new message at this address”.
3. In the text box, enter the email address.
4. Click “Apply”.
To allow the caller to transfer from voicemail to an operator:
1. From the Messaging Page, select “Voice Management”.
2. Check the box for “Transfer on 0 to phone number”.
3. In the text box, enter the phone number.
4. Click “Apply”.
5. Remember to change your voicemail greeting to tell callers that they can press
to reach whomever
you have designated as the operator (this could also be used to reach you on your cell phone).
Greetings
The platform also allows you to upload personal WAV files as greetings to use when people reach your voice
messaging box. You may provide up to three alternate no answer recordings, although you can access only
one of these greetings at a time.
To upload a no answer greeting:
1. From the Messaging Page, select “Greetings”.
2. If you want callers to hear a standard greeting, select “System Greeting”.
3. To have callers hear your personalized greeting, select “Unavailable Greeting”.
4. Type the name of the WAV file with your message or use the “Browse” button to locate the file.
5. Click “Apply”, then click “OK” to save and return to the previous page.
To upload a busy greeting:
1. From the Messaging Page, select “Greetings”.
2. If you want callers to hear a standard greeting, select “System Greeting”.
3. To have callers hear your personalized greeting, select “Personal Greeting”.
4. Type the name of the WAV file with your message or use the “Browse” button to locate the file.
5. Click “Apply”.
Note: To create a WAV file using your PC requires specific settings in Windows Sound Editor. The file must be saved using uLaw 8-bit
mono settings. To record your greetings please refer to the instructions on page 7 and 13. The maximum greeting length is five
minutes.
Page 18

End User 18
Distribution Lists
Immediately broadcast a message to any combination of customers and colleagues with a Distribution List.
You can create up to 14 different lists that will enable you to send bulk voicemail.
To create a Distribution List:
1. From the Messaging Page, select “Distribution Lists”.
2. Select one of the 14 tabs to set up your Distribution List.
3. In the Description text box, input a name or description of the list you will create.
4. Click “Apply”. You have now set up a tab for your Distribution List and the numbers for that list.
To add phone numbers to a Distribution List:
1. From the Messaging Page, select “Distribution Lists”.
2. Select the appropriate tab for the list to receive additional phone numbers.
3. Type the number in the Phone Number box.
4. Click “Add”. The new number is added to your list.
5. Click “Apply”.
To delete a phone number from a Distribution List:
1. From the Messaging Page, select “Distribution Lists”.
2. Select the tab of the list you wish to change.
3. Check the Delete box next to the phone number(s) you wish to remove.
4. Click “Delete”. All checked numbers are deleted.
Page 19

End User 19
Features — On the Phone
The features listed below are configurable through your advanced IP phone.
Call Transfer
Quickly respond to customers by transferring incoming calls to the appropriate party or to an off-site facility.
To use Call Transfer:
1. Press the “Transfer” button on your phone.
2. Dial the phone number or extension of your destination party. Use the “Transfer” button to designate the
end of your number.
Call Transfer with Consultation
Announce your caller to a colleague or briefly explain a caller issue to be resolved.
To use Call Transfer with Consultation:
1. Press the “Transfer” button. Your caller is now on hold.
2. Dial the phone number or extension of your destination party.
3. When the second party answers, you can speak privately before you connect to your original caller. When
you are ready to connect all parties, press the “Transfer” button.
4. Hang up and your transfer is complete.
Call Transfer Direct to Voicemail
Quickly transfer the caller to a specific voicemail box.
To use Call Transfer Direct to Voicemail:
1. Use the switch hook or flash button on your phone to get a second dial tone.
2. Dial and the phone number or extension of your destination party.
3. Hang up and the incoming caller will be transferred directly to the destination voicemail box.
Call Hold
Call Hold enables you to quickly telephone a second number or check information while a customer is on
the line.
To use Call Hold:
1. Press the “Hold” button on your phone.
2. Your customer is now on hold. You can dial a second number.
3. To deactivate Call Hold and return to your original call, press the “Resume” button on your phone.
Page 20
End User 20
Call Return
Call Return enables you to call the last party that called. To call back the last party that called, the user dials a
recall feature access code. The system stores the number of the last party that called and attempts to connect
the user to that party. This service also allows the user to delete the last incoming number using a feature
access code.
To use Call Return:
1. Dial
from your phone. The last call received will attempt to be placed, if the number was
available. For example, Anonymous or Restricted callers would not have an available number to call back.
2. Dial
from your phone if you would like to delete the last called number.
Call Waiting
Take a second call without disconnecting the first. When you’re on the phone, a Call Waiting tone
alerts you that you have an incoming call. Call Waiting enables you to put the first caller on hold and answer
the second call. If you’re on an important call and do not wish to answer the incoming call, you can simply
continue talking.
You can also temporarily cancel Call Waiting so that you will not be disturbed during a critical call. If you
temporarily cancel Call Waiting, incoming calls will be forwarded directly to your voicemail. Call Waiting is
automatically restored for the next call.
To activate/deactivate Call Waiting online:
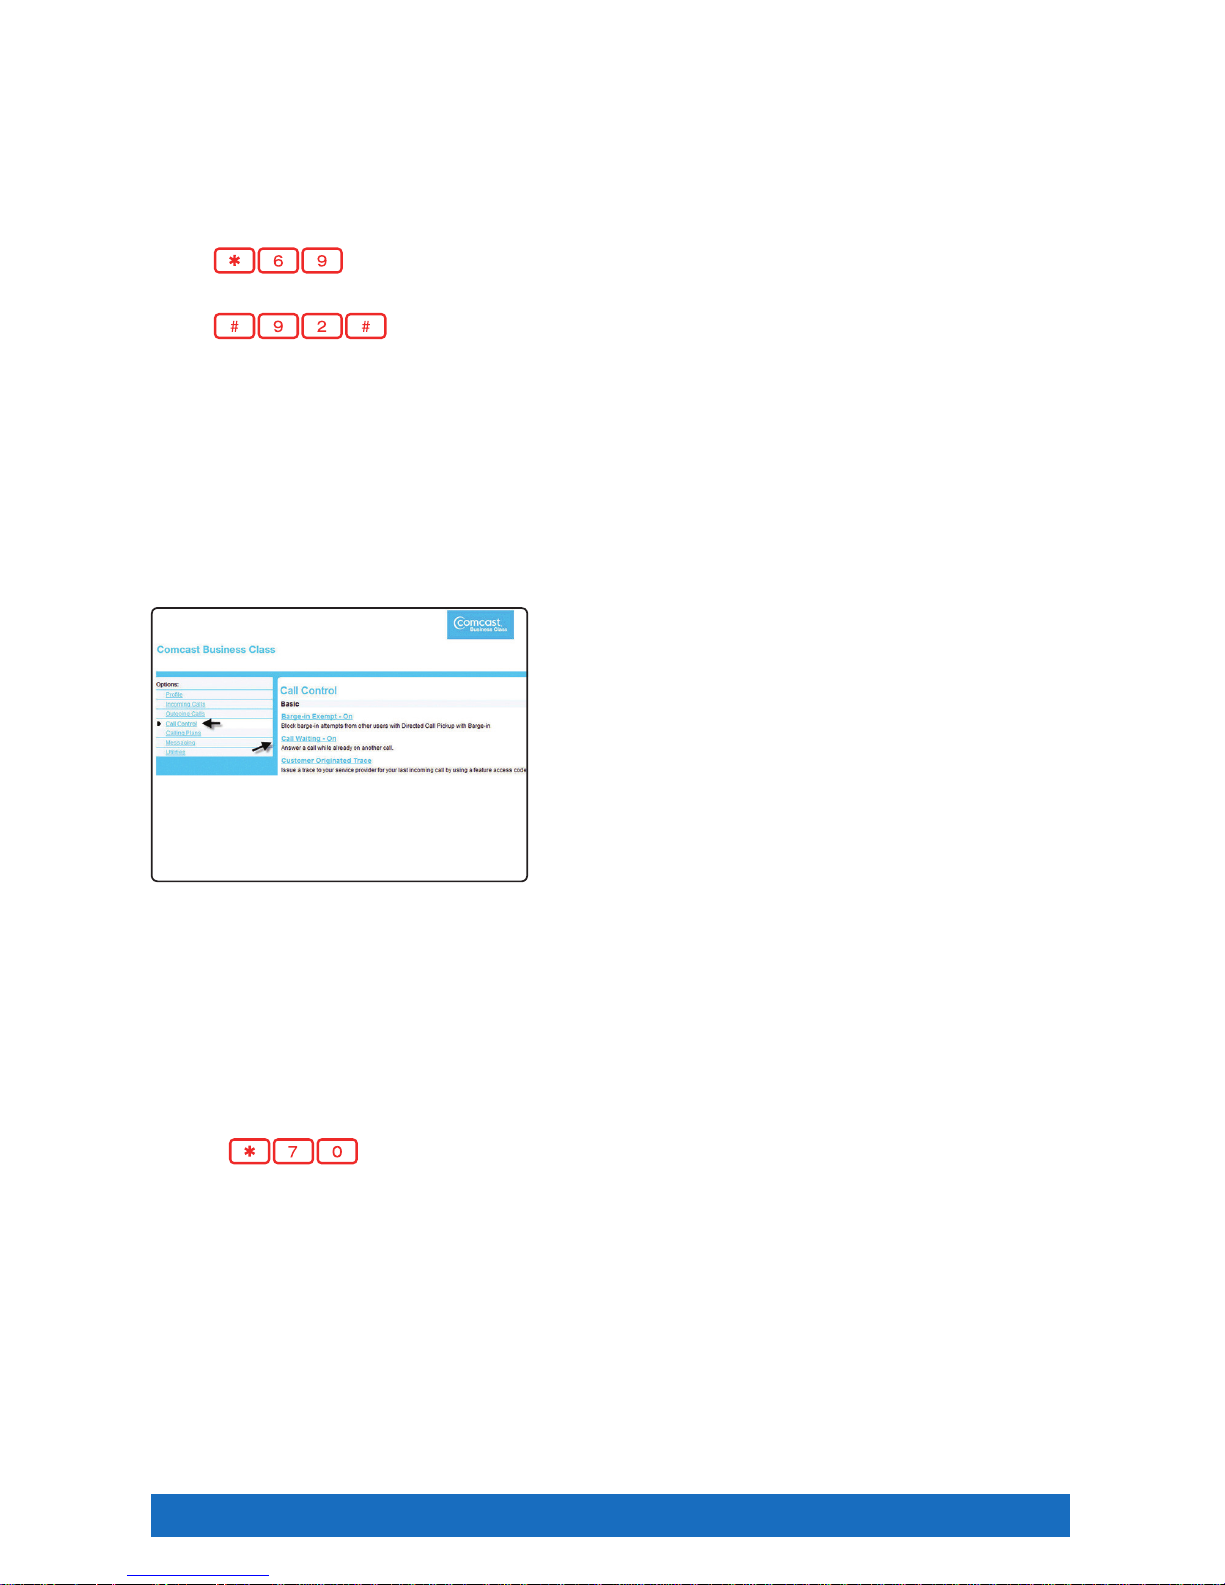
1. From the Main Navigation Page, click “Call Control”.
2. Click “Call Waiting”.
3. Select “On” or “Off” to enable or disable Call Waiting
for all calls, then click “Apply”.
To use Call Waiting:
1. When you hear the Call Waiting tone, press the “Hold” button or the flash hook.
2. Your first call will be placed on hold. Press the “Answer” button to answer the second call.
3. You can alternate the two calls as often as you’d like by using the “Resume” and “End Call” buttons.
To temporarily cancel Call Waiting from your phone:
1. Lift the receiver and listen for the dial tone.
2. Press
, then dial the party you wish to call.
3. Call Waiting is canceled for the current call only.
Note: Call Waiting is also available with Standard seats. Call Waiting is not available with Hunt Group.
Caller ID and Caller ID with Call Waiting
When you hear the Call Waiting tone, Caller ID with Call Waiting enables you to see the number, and where
available, the name of your incoming caller. If you decide you want to answer the second call, place the first
caller on hold by using the “Hold” button, then press the “Answer” button. If you choose not to answer the call,
the caller will be forwarded directly to your voicemail.
Page 21

End User 21
Do Not Disturb
When the Do Not Disturb service is activated, all calls are processed as if your line is busy and cannot receive
calls. Your incoming calls will go directly to your mailbox.
Note: If your line is on Do Not Disturb, Hunt Group will automatically skip over your line to the next available one.
To activate/deactivate Do Not Disturb from your phone:
Dial
to activate and to deactivate. The system will play a confirmation
announcement before you hang up. If you have a Polycom 560 or 670 phone, you may also use the Do Not
Disturb button to quickly activate/deactivate this feature.
To activate/deactivate Do Not Disturb online:
1. From the Main Navigation Page, click “Incoming Calls”.
2. From the Incoming Calls Page, click “Do Not Disturb”.
3. Click to toggle “On” or “Off”. Click the checkbox if you want to hear a splash ring on your phone to remind
you that the feature is active, then click “Apply”. Or, you can toggle Do Not Disturb on or off by using the
button on the Telephony Toolbar.
Note: Your phone will not ring until you deactivate Do Not Disturb.
Extension Dialing
Extension dialing speeds intra-office communications and several of the Business VoiceEdge features you
will use are enabled by extension dialing. An extension is designated as the last four to six digits of any phone
number in your account group. Your organization will have selected whether extensions are 4, 5 or 6 digits.
To place an intra-office extension call, dial the last four digits of the phone number you wish to reach. Some
customers may have selected five or six digit dialing options, if this is the case, dial the appropriate quantity of
digits for intra-office calling.
Extensions — Standard Seat
A Standard seat is a voice line without a 10-digit telephone number. Instead, it has an extension number
that can be called from within the customer group, and is reached from the outside world through an Auto
Attendant or Hunt Group (see Auto Attendant, page 48 or Hunt Group, page 49 ).
A Standard seat includes the following services: Calling Line Identification, Call Transfer, Call Waiting and
E911 Support. A 10-digit number and a voicemail box can be added to a Standard seat as an a la carte item.
Selective Call Acceptance
You are working against a deadline and do not want to be distracted with incoming calls, but you are waiting
for specific people to call you. Selective Call Acceptance enables you to designate certain phone numbers and
other criteria which will allow the calls you want to come through. All other calls are blocked and the caller is
informed that you are not taking calls at this time.
To set up Selective Call Acceptance:
1. From the left-hand side of the Main Navigation Page, select “Incoming Calls”.
2. Click “Selective Call Acceptance”, then click “Add”.
3. Enter a title to describe the specific criteria.
4. Enter the timeframe.
5. Enter up to 12 specific phone numbers.
6. When you are certain all the information is correct, click “OK”.
Page 22

End User 22
To use Selective Call Acceptance:
1. From the Incoming Calls Page, click “Selective Call Acceptance”.
2. Select the appropriate title checkbox under “Active” and click “Apply” to activate.
3. To deactivate, click the “Active” checkbox to turn off and click “Apply”.
Selective Call Rejection
Program your phone to act as a gatekeeper. Select times of the day to reject ALL calls or specific numbers to
enable you to work uninterrupted and prevent disturbing calls during important meetings.
To set up Selective Call Rejection:
1. From the left-hand side of Main Navigation Page, select “Incoming Calls”.
2. Click “Selective Call Rejection”, then click “Add”.
3. Enter a title to describe the specific criteria.
4. Enter the timeframe.
5. Select calls from any number, or enter specific phone numbers. When you are certain all the information is
correct, click “OK”.
To activate/deactivate Selective Call Rejection:
1. From the Incoming Calls Page, click “Selective Call Rejection”.
2. Select the appropriate title checkbox under “Active” and click “Apply” to activate.
3. To deactivate, click the “Active” checkbox to turn off and click “Apply”.
Directed Call Pickup with Barge-In
The Directed Call Pickup service allows you to pick up a ringing call at a specific extension of your call pickup
group.
The Barge-In feature allows a user to join a call with a warning tone or silently. Once joined to an in-progress
call, the behavior is that of a 3-way call.
When the Warning Tone is “On”, the caller hears a tone before you barge in to an ongoing call.
Another attribute of Directed Call Pick-up and Barge-In is Automatic Target Selection. When the Automatic
Target Selection is “On”, you need only dial the feature access code (no extension is required). The system
automatically selects the ongoing call and attempts to barge in. If the system cannot automatically select a
call (for example, when there are two ongoing calls), you will hear a stutter dial tone and you must enter the
extension. A user with Barge-In Exempt enabled cannot have their calls joined.
Note: To barge in, dial followed by the two-digit code that is assigned for this service. This code can be viewed on the Feature
Access Code page. The default is
.
Page 23

End User 23
Features — Online and/or Using the Telephony Toolbar
Downloading the Telephony Toolbar
The Business VoiceEdge Unified Communications package includes a Toolbar that is fully integrated with
Microsoft Outlook
®
and Internet Explorer®.
The Telephony Toolbar resides in Microsoft Outlook
®
, Mozilla Firefox® and Internet Explorer® and allows for
click-to-dial functionality from existing Outlook contacts or from phone numbers on a Web page, as well as
advanced feature control and setup.
• Visit business.comcast.com/getstarted, click “Business VoiceEdge”, then click “Telephony Toolbar
Download”.
• Follow the Telephony Toolbar Application Wizard prompts. When finished, proceed to Configuring the
Toolbar.
Configuring the Telephony Toolbar:
• Click the “Options”
button from the Toolbar.
• Click the “Account” icon.
• Enter your username and password found in your
Toolbar Credentials email, check the “Save Username
and Password” boxes and click “OK”.
• Click the “Connection” icon and enter
hdvdmstoolb ar.onvoip.net in the Hosted Address
field.
System Requirements to Run the Toolbar
Software Requirements
Windows 2000 with SP4 (or higher), Windows XP, Windows Vista, Windows 7 or Citrix
Presentation Server 3 or 4
Windows Installer 2.0
Internet Explorer (IE) — 6.0, 7.0, or 8.0 (required to use the toolbar in IE)
Mozilla Firefox 2.0, 3.0, 3.1, 3.5, 3.6, 4.0 (required to use the toolbar in Firefox)
Outlook 2000 SP3, 2002/ XP SP2, 2003, 2007, 2010 (required to use the toolbar in
Outlook)
32 and 64-bit Outlook & IE
Microsoft Active Directory has been tested and supported for LDAP integration
Squid Proxy Server has been tested and supported for silent upgrades
Citrix Presentation
Server Platform
The application can be published on a Citrix server via the Management Console for
MetaFrame.
Citrix ICA Client
Workstation Platform
No additional software requirements.
Note: When the toolbar is run on a 64-bit version of Windows 7 and uses a Firefox browser the User Account Control (UAC) must be set
to “Never Notify.”
Page 24

End User 24
Using the Telephony Toolbar
1 2 3 5 6 7 8 9 10 11 12 13 14 15
1. Connect: This button is red if you are not logged in; click to automatically log in.
2. Options: Pre-configured general connection settings; where you enter login during initial setup.
3. Services: Configure incoming call control features and/or voice messaging.
4. Portal Login: Log on to the Business VoiceEdge portal from Internet Explorer or Firefox.
5. Be Anywhere: Set up one number that rings all your phones; use the Be Anywhere voice portal to make
and place calls using your office line while you are mobile.
6. Remote Office: Enable a remote location to act as your work phone.
7. Call Forwarding Always: Turn on/off the ability to send calls directly to a specified phone number.
8. Call Forwarding No Answer: Turn on/off the ability to forward all incoming calls to a specified phone
number if your phone isn’t answered.
9. Call Forwarding Busy: Turn on/off the ability to forward all incoming calls if you are on a call.
10. Do Not Disturb: Turn on/off the ability to send calls directly to voicemail (busy greeting).
11. Speed Dial: Dial from the speed dial directory.
12. Call History: View missed, dialed and received calls.
13. Personal Directory: Access your personal directory.
14. Group Directory: Access the company-wide group directory.
15. Search: Enables you to search for a previously searched user/contact directly or to specify an ad hoc
user/contact query.
Call Controls
1 2 3 4 5 6 7 8 9
1. Dial Contact: Click to dial an Outlook contact’s business, home or mobile phone number.
2. Dial Other: Displays the last 10 dialed numbers for quick selection.
3. Answer: Answer a call.
4. Hold: Place a call on hold.
5. Voicemail: Dial voicemail.
6. Transfer: Transfer a call to another extension.
7. 3-Way: Initiate a 3-way conference call.
8. End: Terminate a call.
9. Call Line: When a call is placed or received, the call line selector will automatically select a call and
provide the name of the party (if available).
Page 25

End User 25
Services Menu
Anonymous Call Rejection: Enables a user to reject calls from
anonymous parties who have explicitly restricted their Caller
ID. Callers without available caller ID are informed that the user is not
accepting calls at that time. The user’s phone does not ring and the
user sees or hears no indication of the attempted call.
To set up the feature, click on the item and turn it “On” or “Off”.
Call Forwarding Always: Enables a user to redirect all incoming
calls to another phone number. If activated, a user must specify the
forwarding number.
Call Forwarding No Answer: Enables a user to redirect calls to
another destination when an incoming call is not answered within a
specified number of rings.
To set up the feature, click on the item and turn it “On” or “Off”. Enter
the forwarding telephone number and the number of rings before the
call should be forwarded.
Call Forwarding Busy: Enables a user to redirect calls to another destination when an incoming call
encounters a busy condition. If activated, a user must specify the forwarding number.
To set up the feature, click on the item and turn it “On” or “Off”, then supply the forwarding number.
Do Not Disturb: Allows users to set their station as unavailable so that incoming calls are given a busy
treatment.
To set up the feature, click on the item and turn it “On” or Off”.
External Calling Line ID Delivery: Provides calling line ID information of an external caller. To set up the
feature, click on the item and turn it “On” or “Off”.
Internal Calling Line ID Delivery: Provides calling line ID information of an internal caller. To set up the
feature, click on the item and turn it “On” or “Off”.
Be Anywhere
The Be Anywhere service allows you (as a Unified Communications seat user) to make and receive calls from
any device at any location with only one phone number. Be Anywhere always offers colleagues, prospects and
customers your office number, and then the platform will ring through to your mobile or home office phone
without having to give these numbers out directly. Other benefits of Be Anywhere include:
• The ability to call colleagues from your mobile using their 4-digit extension.
• Move a call seamlessly from your desk to your mobile.
• Move a call from your mobile to your desk phone (for calls placed via your cell phone through the Be
Anywhere portal).
Page 26

End User 26
1. Alert all Locations for Click-to-Dial calls: The check box specifies whether Be Anywhere locations
listed should be alerted for the Click-to-Dial service. This means (when enabled) that when you place a call
all of your Be Anywhere devices will ring, however you will not be able to use the auto-answer capability on
your desk phone.
2. View Available Portal List: The link displays the page below, which lists the Be Anywhere portal
available to you. Add this contact to your cell phone Contact list or as a Speed Dial for use when you would
like to place a call from your cell phone, but have it appear as if it is coming from your office phone.
3. Be Anywhere Locations List: Allows you to add, delete or modify your Be Anywhere location phone
numbers. The phone numbers added here will ring when you receive a call to your business number.
4. Advanced Options per Location: Contains a list of advanced options that can be enabled or disabled
separately for each Be Anywhere location.
• Enable Diversion Inhibitor — This feature is not applicable. No need to enable.
• Require Answer Confirmation — Enabling this feature requires that the user press a button on their cell
phone to accept a call. By doing this, in the event there is no answer the caller returns to your business
voicemail box, and is not dropped into your cell phone voicemail.
• Use BroadWorks-based Call Control Services — This feature is not applicable. No need to enable.
• Outbound Alternate Number/SIP URI — This feature is not applicable. No need to enable.
Note: If you have Be Anywhere enabled, be sure to DISABLE Remote Office and /or Call Forwarding Always for the duration, as it will have
a service interaction and not work as expected.
Make Business Calls from Your Mobile
You can make calls from your mobile phone using your Business VoiceEdge business number as the calling
line ID.
From your mobile, dial your Be Anywhere portal number and wait for the dial tone. Once you hear the tone,
dial the destination number or business extension. The called party sees your Business VoiceEdge business
number (not your mobile number) as the calling line ID. Calls placed this way can also utilize the Call Pull
feature and may be moved to your desk phone using
, and the instructions below.
Page 27

End User 27
Control Your Ability to Be Reached
The Be Anywhere solution allows you to make or receive business calls from your desk phone, mobile, or soft
client, allowing you to be productive from any location, at any time.
However, there are times when you may not want to be reached. Perhaps you are several time zones away on
the other side of the world and you do not want your daily flurry of business calls alerting your mobile.
Be Anywhere allows you to activate and deactivate your ability to be reached from your phone so that on those
long business trips, you can “deactivate” your mobile at night. This way calls to your business number do not
reach you. Calls go to your other phones as always, and callers receive a standard voicemail if you do not
answer. In the morning, you simply reactivate your mobile and you start receiving calls sent to your business
number.
Deactivate a Be Anywhere Phone:
From the phone to be deactivated, dial
.
Activate a Be Anywhere Phone:
From the phone to be activated, dial
.
Move Call from One Phone to Another Phone
This functionality enhances your personal productivity. For example, you may move a business call you placed
through the Be Anywhere portal on your mobile while you are on lunch, and upon returning to the office, you
may choose to move the call to your desk phone.
Move Active Call from Your Mobile to Your Desk Phone or Soft Phone:
While engaged in a call you placed through the Be Anywhere portal via your mobile, dial
from your desk phone or soft client. The call is seamlessly moved to the new phone and the mobile call leg is
dropped.
You may also move a call that was placed to your business line that was answered on your cell from Be
Anywhere, using the same process as above.
Note: If someone dials your mobile number directly ( instead of your VoiceEdge desk number that rings on your mobile device ), you will not
be able to move the call, since Be Anywhere and the Business VoiceEdge platform have no knowledge of the call.
Move Active Call from Your Desk Phone or Soft Client to Your Mobile:
From your mobile, dial your Be Anywhere portal number and wait for the dial tone. Once you hear the tone,
dial
manually.
Page 28

End User 28
Remote Office
The Remote Office feature enables users to access and use their Business VoiceEdge service from any end
point, on-net or off-net (e.g., home office, mobile phone). This service is especially useful for mobile workers,
as it enables them to use all of their advanced features while working remotely (e.g., extension dialing,
transfers, conference calls, Outlook Integration, directories, etc.).
5
1
Step 1: Click the “Services” button from the Toolbar.
Step 2: Select “Remote Office”.
Step 3: Turn the feature “On”.
Step 4: Enter the telephone number to which calls should
be forwarded. Click “OK” when finished.
Step 5: Once configured via the Services Menu, Remote
Office can be turned “On” or “Off” via the
Remote Office button on the Toolbar.
Note: If you have Remote Office enabled, be sure to DISABLE Be Anywhere for the duration, as it will have a service interaction and not
work as expected.
Outbound Dialing with Remote Office
Outbound dialing requires access to the Telephony Toolbar. Enter the number in the Dial Contact field and
hit the enter key on your keyboard. Alternately, you may click on “Telephony Toolbar” from an open contact
record, then select the phone number of the contact you wish to dial by clicking the icon of the phone number
you wish to dial (business, home or mobile).
The Remote Office service will first dial your Remote Office line (mobile or home number), and when you
answer your Remote Office line, it will start ringing the number you entered into the Toolbar. The remote
calling party will see your office line caller ID.
Receiving Inbound Calls with Remote Office
All calls to your office line will ring to your Remote Office line (mobile or home number) assigned in the Toolbar.
Note: It is important to turn off Remote Office if you leave the location of the Remote Office line. Incoming calls to your business line will
continue to ring at the Remote Office number until you turn off the feature.
Click to Dial from Microsoft Outlook
From within the Contacts Menu of Outlook, users
have the ability to click on the contact and have the
contact’s telephone number dialed automatically. You
may also dial from an open contact record by clicking
on the Telephony Toolbar tab of the contact record, then
clicking on the Business, Home or Mobile icons in the
upper left-hand corner of the contact record to dial the
respective phone numbers.
2
3
4
Page 29

End User 29
Alternate Numbers
Alternate Numbers allows you to have up to ten alternate phone numbers or extensions assigned, in addition
to your main phone number. A user can be reached (receive an inbound call) through any of the phone
numbers. The first number is the main or primary phone number, while the additional ten numbers are the
user’s alternate or secondary phone numbers. Each alternate phone number can be a direct inward dialing
number (DID) or an extension. Outbound calls use the main number only.
For each alternate number, the user can associate one of four ring patterns. All calls to the main number result
in the normal ring pattern. Calls to the alternate numbers result in a distinctive ring pattern that corresponds to
the number that was used.
If a user is busy (and Call Waiting is enabled) an incoming call to the main number results in the usual call
waiting tone, while an incoming call to any of the alternate numbers results in a distinctive call waiting tone.
Business VoiceEdge Customer Care can provision or update an Alternate Number. Once provisioned, you can
see any Alternate Numbers provisioned to your main line on the Online Portal.
Call Forwarding Always
Call Forwarding Always enables you to forward ALL of your incoming calls.
To activate Call Forwarding Always from your phone:
1. Lift the receiver and listen for the dial tone.
2. Press and wait for the voice prompts.
3. Dial the number to which your calls will be forwarded. You will hear a voice prompt confirmation.
4. If you want to change the “forward to” number, repeat steps 1 through 3.
To deactivate Call Forwarding Always from your phone:
1. Lift the receiver and listen for the dial tone.
2. Press
. Call Forwarding Always is now turned off.
Note: While Call Forwarding Always is active, you will hear a splash ring on your phone to remind you that the feature is active. You will
not be able to answer any calls on your line while Call Forwarding Always is active. To resume receiving calls on your business
line, cancel Call Forwarding Always. If you have Be Anywhere enabled, be sure to DISABLE Remote Office and/or Call Forwarding
Always for the duration, as it will have a service interaction and not work as expected.
To activate/deactivate Call Forwarding Always online:
1. From the Main Navigation Page, click “Incoming Calls”.
2. Click “Call Forwarding Always”.
3. Input the “forward to” number and select a splash ring reminder option.
4. Select “On” to activate Call Forwarding of ALL calls, or “Off” to deactivate Call Forwarding.
5. Click “Apply”.
Page 30

End User 30
Call Forwarding Busy
When you’re waiting for a critical call, but still need to use your telephone, Call Forwarding Busy enables you
to send all incoming calls to an alternate number when you’re using your line. Simply activate Call Forwarding
Busy before making your call, or activate Call Forwarding Busy online while speaking if your call becomes
unexpectedly lengthy.
To activate Call Forwarding Busy from your phone:
1. Pick up the phone and press
.
2. Dial the number to which you want to direct your call.
To deactivate Call Forwarding Busy from your phone:
1. Pick up the phone and press .
2. Hang up. Your incoming calls may now be received normally.
To activate Call Forwarding Busy online:
1. From the Main Navigation Page, select “Incoming Calls”.
2. On the Incoming Calls Page, click “Call Forwarding Busy”.
3. Input the number to which incoming calls should go, click “On”, then click “Apply”.
To deactivate Call Forwarding Busy online:
1. From the Main Navigation Page, select “Incoming Calls”.
2. On the Incoming Calls Page, click “Call Forwarding Busy”.
3. Click “Off”, then click “Apply”. Your incoming calls will now be received normally.
Call Forwarding No Answer
Redirect incoming calls to another telephone number when you are unable to answer. When you
know you won’t be back in time for a critical call, you can program and activate Call Forwarding No Answer to
ring your current location, your cell phone or a colleague.
To activate Call Forwarding No Answer from your phone:
1. Pick up the phone and press
.
2. Dial the number to which you want to direct your call. (Be sure to include any access numbers and area
codes you normally use to call this number).
To deactivate Call Forwarding No Answer from your phone:
1. Pick up the phone and press
.
2. Hang up to deactivate. Incoming calls may now be received normally.
To activate Call Forwarding No Answer online:
1. Log on to http://hdvdmsweb.onvoip.net.
2. From the Main Navigation Page, select “Incoming Calls”.
3. On the Incoming Calls Page, click “Call Forwarding No Answer”.
4. Input the number to which incoming calls should go.
5. Select the number of rings, click “On”, then click “Apply”.
Page 31

End User 31
To deactivate Call Forwarding No Answer online:
1. From the Main Navigation Page, select “Incoming Calls”.
2. From the Incoming Calls Page, click “Call Forwarding No Answer”.
3. Click “Off”, then click “Apply”. Your call activity will return to normal.
Call Forwarding Selective
Forward only those calls you don’t want to miss. Call Forwarding Selective allows you to create a list
of people whose calls will be forwarded to a number you designate. When you activate this feature, only calls
from the individuals on your list will be forwarded.
To use Call Forwarding Selective:
1. From the Main Navigation Page, click “Incoming Calls”.
2. From the Incoming Calls Page, click “Call Forwarding
Selective”.
3. Designate the number to which you want to forward calls.
4. Click “Apply”.
5. After designating the forwarding number, click “Add”,
enter the list of numbers you want to selectively
forward and click “OK”.
6. Once your list is saved you can activate, edit and/or delete your list.
Sequential Ring
Sequential Ring enables you to define a “find me” list of phone numbers or URLs, which are alerted
sequentially when you receive an incoming call. If an incoming call to your line is not answered within a given
number of rings, your calling party will hear an announcement stating the system is attempting to locate you.
If your last Sequential Ring number remains unanswered, your caller is sent to your voicemail.
To set up Sequential Ring:
1. From the Main Navigation Page, click “Incoming Calls”.
2. From the Incoming Calls Page, click “Sequential Ring”.
3. From the Sequential Ring Page, select the “Use Base Location First” option.
• If the check box is selected, your base location phone rings first in the ring sequence.
• If the check box is cleared, the first phone in the ring sequence rings first.
4. Select the number of rings before incoming calls are redirected to your “find me” phone numbers.
5. Enter your “find me” phone numbers in the order most likely to reach you first.
6. Enter the number of rings before your incoming call is redirected to the next line.
7. Click “Apply”.
To activate/deactivate Sequential Ring:
1. From the Main Navigation Page, click “Incoming Calls”.
2. From the Incoming Calls Page, click “Sequential Ring”.
3. On the Sequential Ring Page, click “On” or “Off” to activate/deactivate.
Page 32

End User 32
Call Notify
There are certain incoming calls you want to know about as soon as possible. Call Notify sends an email when
specific calls you designate come in. You specify the pre-defined criteria such as phone number, time of the
day or day of the week. Call Notify will send an email only when all of the pre-defined criteria are met.
To set up Call Notify:
1. Log on to Business VoiceEdge Online at http://hdvdmsweb.onvo i p.net.
2. From the left-hand side of your Main Navigation Page, select “Incoming Calls”.
3. Click “Call Notify”.
4. Click “Add”.
5. Enter a title to describe the specific criteria.
6. Enter the timeframe.
7. Enter up to 12 specific phone numbers.
8. When you are certain all the information is correct, click “OK”.
9. Enter the email address and click “Apply”.
To activate/deactivate Call Notify:
1. From the Incoming Calls Page, click “Call Notify”.
2. Select the appropriate title checkbox under “Active” and click “Apply” to activate.
3. To deactivate, click the “Active” checkbox to turn off and click “Apply”.
Page 33

End User 33
Hoteling
Hoteling allows users to associate their service profiles with devices other than their own. For example, your
enterprise can set up a visitor’s office with a phone. The user account associated with this phone would have
the Hoteling Host service assigned. A salesperson, with the Hoteling Guest service assigned, can associate
their service profile with the phone in the visitor’s office for when that employee is using that phone.
Hoteling consists of two separate services, Hoteling Host and Hoteling Guest. The first service, Hoteling
Host, is used to designate a particular user as a host and is a feature of the Unified Communications seat,
allowing other users, with the Hoteling Guest service assigned, to associate their service profile with the Host
user’s device. The second service, Hoteling Guest, is used to allow a Hoteling Guest user to associate their
service profile with a Hoteling Host user’s device.
Note: A user who is both a Hoteling Host and a Hoteling Guest cannot associate their Hoteling Guest service to themselves as a Host.
Therefore, even if you are provisioned with both, Hoteling Guest and Hoteling Host services; when you as a Hoteling Guest, list all
available Hoteling Hosts, your name does not appear in the list of available Hosts.
Hoteling Host
To enable your phone as host so that guests may use it, you will need to do so in the Business VoiceEdge
portal, per the instructions that follow below.
The User — Hoteling Host page displays information on the associated guest, as follows:
Item Description
Association Limit The amount of time a Hoteling Guest is allowed to use your device.
If an association limit is enforced, the Enforce Association Limit is displayed beside the
checkmark, for example, 24 hours. The Enforce Association Limit can be modified only
by administrators. If the association limit is not enforced, the Hoteling Guest is allowed to
associate with the Hoteling Host indefinitely.
Last Name Last name of the Hoteling Guest using your device.
First Name First name of the Hoteling Guest using your device.
Phone Number The phone number of the Hoteling Guest using your device.
Extension The extension number of the Hoteling Guest using your device.
Association Date The date the Hoteling Guest began using your device.
To activate your phone device as a guest:
1. Click “On”.
2. If your Host Association Limit is enforced, select the Limit Association to check box and enter a timeout
limit in the Hours text box, after which the hotel-guest association ends. The Limit Association to time
must be equal to or less than the Host Association Limit of the Hoteling Host (see Note below). If the
Host Association Limit is not enforced, you can set an association with a host that will never expire by
un-checking the Limit Association to check box, although the hours text box must still be populated. If the
host does not enforce the association limit but the guest chooses to set the limit, the maximum association
limit hours defined by the guest is not restricted by the host’s association limit hour.
3. To select a host, move a name from the Available Hosts column to the Associated Hosts column.
• On the Available Hosts column, select the host.
• To set the selected host for Hoteling, click “Add”.
Note: A read-only Host Association Limit field appears above the Limit Association to check box after each host is associated. This provides
the timeout limit of the currently selected host. If the current association is removed, the timeout limit information is cleared.
4. Save your changes. Click “Apply” or “OK”. Apply saves your changes. OK saves your changes and displays
the previous page.
Page 34

End User 34
To deactivate your phone device as a guest:
1. Click “Off”.
2. Save your changes. Click “Apply” or “OK”. Apply saves your changes. OK saves your changes and displays
the previous page.
Call Control — Hoteling Host
1. On the User — Call Control menu page, click Hoteling Host. The User — Hoteling Host page appears,
showing information on the Hoteling Host services.
2. To designate your phone as a Hoteling Host, check “On”. To deactivate it, check “Off”.
3. To save your changes, click “Apply” or “OK”. Apply saves your changes. OK saves your changes and
displays the previous page.
To exit without saving, select another page or click “Cancel” to display the previous page.
Hoteling Guest
Users with Hoteling Guest assigned associate themselves with a Host via the Business VoiceEdge Online
portal or the Voice portal. From the web portal, users select an idle Host and associate their service profiles
with this Host. From the voice portal, users dial in from the host phones they wish to associate their service
profiles with. After entering their identities and passwords, they invoke the Hoteling menu and can associate
their service profiles with the host phone.
The User — Hoteling Guest voice portal controls to enable and disable a guest, are as
follows:
Voice Portal Main Menu (If Hoteling Guest is Assigned)
Default Key Option
1 Access Voice Messaging
2 Change CommPilot Express Profile
3 Record Personalized Name
4 Change Call Forwarding Options
6 Make Call
7 Access Hoteling
8 Change Passcode
9 Exit Voice Portal
# Repeat Menu
Hoteling Menu
Default Key Option
1 Check Host Status
2 Associate With Host
3 Dissassociate From Host
4 Return to Main Menu
# Repeat Menu
Page 35

End User 35
Priority Alert
Priority Alert enables you to make your phone utilize a different ring tone based on pre-defined criteria. Use
this service if you want to know when anyone from a specific company calls or any member of a group is
working on a critical project. Priority Alert can be a list of up to 12 phone numbers or digit patterns as well
as a specified time schedule. All criteria for an entry must be true for the phone to ring with a different tone
(phone number plus day of the week and time of the day).
To set up Priority Alert:
1. Log on to http://hdvdmsweb.onvoip.net.
2. From the left-hand side of your Main Navigation Page, select “Incoming Calls”.
3. Click “Priority Alert”.
4. Click “Add”.
5. Enter a title to describe the specific criteria.
6. Enter the timeframe.
7. Enter up to 12 specific phone numbers.
8. When you are certain all the information is correct, click “OK”.
To activate/deactivate Priority Alert:
1. From the Incoming Calls Page, click “Priority Alert”.
2. Select the appropriate title checkbox under “Active” and click “Apply” to activate.
3. To deactivate, click the “Active” checkbox to turn off and click “Apply”.
Page 36

End User 36
Privacy
Use this menu item on the User — Profile page of the Business VoiceEdge Online portal to configure your
privacy settings for Attendant Extension Dialing Privacy, Auto Attendant Name Dialing Privacy, and Phone
Status Privacy. You can also choose which enterprise or group members can view your phone status
regardless of your Phone Status Privacy setting.
By default all user names and numbers appear in Group and Enterprise directory listings. These listings are
accessible via the User — Utilities menu page and the Call Manager Group/Enterprise tab. The Profile —
Privacy menu page allows you to eliminate your name from these directory listings.
Note: Enabling Privacy hides your name and number from other users in your own group/enterprise and from group administrators.
However, it does not hide it in the LDAP or Outlook listings, nor does it remove it from user’s personal directories.
Steps Details
Enable or disable Directory Privacy. To turn on your privacy status, select Enable Directory Privacy. This
prevents the users in your group or enterprise from seeing your phone
status. With privacy enabled, when another user does a directory listing,
your name and information do not appear. With privacy disabled, your
name appears as usual.
Enable or disable Auto Attendant Extension
Dialing Privacy.
To exclude yourself from Auto Attendant extension dialing, select Auto
Attendant Extension Dialing Privacy.
Enable or disable Auto Attendant Name
Dialing Privacy.
To exclude yourself from Auto Attendant name dialing, select Auto
Attendant Name Dialing Privacy.
Enable or disable Phone Status Privacy. To exclude yourself from Phone Status monitoring, select Phone Status
Privacy.
Select the users authorized to monitor your
phone status.
You can select a group of users allowed to monitor your phone status
regardless of the Phone Status Privacy setting.
This page includes an advanced search mechanism to filter the display
of entries. To perform a basic search, click “Search”. The list appears.
• To move one or more users from the Available Users box to the
Monitoring Users box, select the user or users, and click “Add>”.
• To move all numbers from the Available Users box to the
Monitoring Users box, click “Add All>>”.
Move the users you want to allow to monitor your phone status from the
Available Users table to the Monitoring Users table.
Save your changes. Click “Apply” or “OK”. Apply saves your changes. OK saves your
changes and displays the previous page.
Click “Cancel” to exit without saving.
Page 37

End User 37
Bria Softphone
The Bria Softphone from CounterPath is a powerful desktop application that, when integrated with your
Comcast Business VoiceEdge service, is a feature-rich communications tool available with the Unified
Communications seat. The Bria Softphone allows a user’s computer to act as their work telephone, whether
you’re in the office or traveling. The Bria Softphone is ideal as a primary phone for a remote office user or a
secondary device for someone frequently on the go.
System Requirements and Devices
Processor
Minimum: Pentium 4
®
2.4 GHz or equivalent
Optimal: Intel Core 2 Duo or equivalent. Video card with DirectX 9.0c support
Recommended to support HD video: Intel Core 2 Duo or equivalent with minimum
3.0 GHz, or a triple- or quad-core processor; Video Card with DirectX 9.0c support
Memory
Minimum: 1 GB RAM
Optimal: 2 GB RAM
Hard Disk Space
50MB
Operating System
Microsoft Windows XP Service Pack 2
Microsoft Windows Vista, 32-bits and 64-bits arch
Microsoft Windows 7
Connection
IP network connection (broadband, L AN, wireless); Constant Internet connection
Sound Card
Full-duplex, 16-bit or use USB headset
Multimedia Device Requirements
Bria requires both speakers and a microphone to make calls. Any of the following configurations are
acceptable:
• External speakers and microphone
• Built-in speakers and microphone
• Dual-jack multimedia headset
• Bluetooth
®
multimedia headset
• USB multimedia headset
• USB phone
Calls made with Bria will work without a video camera, but a video camera is necessary to allow other parties
to see your image. Bria will work with most USB video cameras.
Page 38

End User 38
Login
Installation and First Time Login
1. Download the software from business.comcast.com/
getstarted.
2. Install the downloaded software by double-clicking on
the icon.
3. Click next and finish the install by following the wizard
instructions.
4. Launch the Bria Softphone.
5. Once installed, in the username field enter your
username which is your portal login with the following
appended to the username: @ws-7.onvoip.net. For
example, if your portal login is 6304323311 than your
Softphone login will be 6304323311@ws-7.onvoip.
net. Your password will be the same as your portal
password.
6. In the Password field enter the password.
7. To have your computer remember your username and password select “Remember login information”.
8. To have your computer automatically login and launch the application, check “Log In Automatically”.
Bria Softphone Basics
Bria Softphone Menu
Detach Panel
Call History
Additional Panel Selections
Call Panel
Dial Pad
Page 39

End User 39
Placing a Call
You can use the Bria Softphone to place calls; there are many ways to place calls using the Bria Softphone.
Method Where Instructions
Dial a Number Call Panel Dial Pad 1. If the Dial pad isn’t visible, press “Show or Hide Dial
pad” button to view dial pad .
2. Use the Dial pad to enter in the extension or the ten
digit number and press the call button.
Key in a Number Call Panel 1. Type in a number using your keyboard and press
“Enter ”.
2. To make a video call select the call options in the call
button.
Drag and Drop a
Contact
Address Book Contacts,
History and Favorites
Drag an entry from the address book tab into the call
panel and the call shall be placed immediately.
Double Click a Contact Addres Book Contacts 1. Double-click on the name to immediately place a call in
these tabs.
2. Alternately, right click and select video or audio call
from the menu.
Click a Number Call History, Group Directory Click the underlined number to immediately place a call.
Placing a Concurrent Call
If you want to place a concurrent call while you have an active call, just dial another number and the first call
will be put on hold and the new call will dial out.
Ending a Call
Press the red “End Call” button on the call panel.
Answering a Call
The Bria Softphone must be running to answer incoming calls. When the Softphone rings a box alerts you of
an incoming call, with this box you can accept to answer or decline the call. Declining the call will treat the call
like an unanswered call (for example it will send the call to voicemail if you have a voice mailbox).
Auto Answer
If you select Auto Answer from the More Call Options Menu then the Bria Softphone will automatically answer
and connect you to any incoming calls. An icon will appear on your Softphone under the More Call Options
menu that looks like this:
The auto answer feature is automatically turned off when you shut down or log off, you’ll need to manually turn
it back on each time you log back in.
More Call Options Menu
Page 40

End User 40
Controlling Calls
Raise or Lower Volume
Click on the volume icon on the active call and either drag the volume up or down or use the arrows on your
keyboard.
Mute the Call
Click on the microphone icon to mute your voice on the call.
Turn On/Off The Speakerphone
If your computer is equipped with a speaker phone, click the speaker icon to turn on or off.
Hold call
To hold a call click the “Hold” button, the call information will then be minimized within the Softphone, to
unhold the call click “Resume.”
Add a Contact
Click the yellow plus sign next to the active calling party’s name to add them to your contact list. A dialog box
will appear to allow you to add additional information.
Page 41

End User 41
Transfer a Call
Click on the call transfer button to transfer a call.
Clicking on this icon will put the caller on hold and change the window to allow you to enter in the party to
transfer.
There is a box to enter in a phone number or drag a contact into the box.
Note: Click to dial in your group directory will not work as a transfer address, you’ll need to enter in the number in the transfer box.
Consultative Transfer
Click the “Call First” button when the call is connected and you will be able to tell the person who you are
transferring to who the party is you are transferring. When you are ready to transfer the call then hit the
“Transfer Now” button and the two parties will be speaking.
Note: Your calling line ID will be delivered to the party you are transferring to. Press “Cancel” to stop the transfer and then you can
reconnect with the original party.
Blind Transfer
A blind transfer will allow you to transfer the call to the other party without speaking to that party first. The
calling line ID information will show up as the transferred party when you use this capability.
Click the “Transfer” button as described above and populate the number you are transferring to.
Click the arrow next to the green box that is populated as call first and select Transfer Now, which will
automatically send the call and end your call with the transferred party.
Page 42

End User 42
Three-Way Calling
To add another caller onto an existing call for a three-way call, in the bottom right corner click the arrow and
select “Invite to Conference Call”.
A dial box will show up where you can either drag a contact to the box or type in the number.
When your three-party call is established your Bria Softphone will show Conference Call: 3 Participants and
list those whom are on the call in the active call window.
Merging Two Active Calls
If you have two active calls (with one on hold) use the call options in the lower right hand corner and select
merge calls, and it will allow you to merge the two active parties into a three-way call.
Page 43

End User 43
Splitting a Three-Way Call
Click the arrow next to any participant and it will allow you to split the call or end the call with both parties.
Upon splitting, one party will be active and the other will be on hold.
Voicemail
If your service includes voicemail, then when you have voicemail messages, an envelope icon will appear
near the top of your Softphone and will indicate the number of voice messages you have. Click the icon to
automatically connect to voicemail to listen to your messages.
Note: To enter in your passcode for the voicemail system you must click in the call status window prior to entering in your passcode.
Page 44

End User 44
Reception Console
The Receptionist Console is a software based platform that allows your receptionist or office manager
to manage calls with ease. This is an additional service that is provided in conjunction with Business
VoiceEdge. This section includes information to get started with the Reception Console tool. For more detailed
information, please also download the Reception Console user guide at business.comcast.com/getstarted.
Launching Reception Console for the First Time
The Reception Console is launched directly from the portal; therefore, there is no need to distribute the
application for installation on end-users’ PC. When initially launched, a desktop icon as pictured below, is
created for convenient access to the application.
1. Log in to the portal account associated with the Reception Console software. Typically, this is the account
of the main line or reception end user, and you will use the same user credentials provided in the Welcome
Letter for that user.
2. From the launch drop-down list at the top right of the portal logo pane, select the Receptionist Enterprise
link.
Reception Console will start and you are automatically logged in.
Accessing Reception Console via Desktop Icon
After the initial launch, you will have a Reception Console icon on your desktop. You can access the Reception
Console by double-clicking the shortcut on your desktop or by selecting it from the Start menu.
1. Click the Reception Console shortcut. Reception Console starts and you are presented with the following
login interface:
2. Enter your user name and password.
Note: You can also select the Remember Me (or Forget Me) and the Remember my Password options so that your user name and
password are remembered on your computer, and therefore you will be auto-logged in.
3. Click “Sign In”.
Page 45

End User 45
Reception Console Overview
1
4
7
6
5
2 3
The Reception Console interface contains the following work areas:
1. Switchboard panel
2. Company Notes and Profile area
3. Queue panel
4. Contact Directory panel
5. Alphabetical Index filter
6. Options panel
7. Control panel
Managing Calls with Reception Console
You manage calls using a combination of the panels in a top to bottom workflow style. You should be able to
distribute calls using this workflow for most of the common activities.
For more information about the user interface please see the full Receptionist Console User Guide at
business.comcast.com/getstarted.
System Requirements
Processor
Minimum: Pentium 3® 1.2 GHz or higher or compatible CPU
Memory
Minimum: 512 MB of RAM
Hard Disk Space
60MB
Additional
Recommendations
Video graphics card with minimum of 8 MB of RAM
Super VGA monitor (15 inches or larger)
800 x 600 screen resolution minimum
Software Requirements
Windows 2000 with SP4 (or higher), Windows XP, or Windows Vista
Sun Microsystems 32-bit Java Runtime Edition, Version 6 Update 23, or later
Outlook 2000 SP3, 2002/ XP SP2, 2003, 2007 (required for Outlook contact directory)
Microsoft Excel (Optional)
Flash Player 9 Runtime (ActiveX Control)
Page 46

Tech Admin 46
Tech Admin
Business VoiceEdge gives Tech Administrators the ability to manage and designate group level features such
as Auto Attendants, setting up Hunt Groups, Business Continuity features and the features described below.
The following is a list of features the Tech Admin may wish to change.
Note: To make any changes to these features, ensure you have the details of what you need and then call Customer Care, 24x7 at
800-472-4176.
Music On Hold
Comcast Business VoiceEdge enables a generic music stream for people to hear when on Hold in a Call Park
scenario. If you would like a custom Music On Hold .wav file, please contact Customer Care at 800-472-4176.
The audio file must have the following attributes:
• May not be longer than 10 minutes.
• The WAV file must be saved using uLaw 8-bit mono settings. This can be done using Windows sound
editor, or other audio editing software.
Call Park
Call Park is the ability to place a call on hold and retrieve it in another location. A call can be parked to a single
destination or to a group.
To have Call Park configured you need to collect the following information prior to calling Customer Care:
1. What would you like to name your Call Park Group?
2. Which seat or group of seats (users) would you like to have as a part of this Call Park Group?
3. What would you like the recall timer set to? The value needs to be in seconds. When the Call Park Recall
Timer expires, the call is recalled to the person that parked it. The Recall Timer option has a range from 30
through 600 seconds. The default is “45 seconds”.
Call Park and Retrieve
Place a call on hold with the intent of retrieving it from another extension or location. The call can be parked
on your own extension or any other within an enterprise group. As a user on the platform, you may place a call
on park using *68 flash/star code. Use *88 to retrieve the parked call from a different location.
For example:
1. User A is talking to User B.
2. User A flashes to originate another call and dials the Call Park FAC (*68).
3. User A parks User B against User X’s phone by dialing User X’s phone number.
4. User C retrieves User B by dialing the Call Park Retrieve FAC (*88) and User X’s phone number.
5. User C is now talking to User B.
Page 47

Tech Admin 47
Call Pickup
Call Pickup allows users to answer any ringing line within their call-pickup group. A call pickup group is
defined by your site administrator and is a subset of the users in your group and configured by Comcast
VoiceEdge Customer Care.
To pick up a ringing call coming to another user of the group, users go off-hook and dial the Call Pickup
feature access code, which connects them to the ringing party. If more than one line in the call pickup group
is ringing, the call that has been ringing the longest is picked up. Users already engaged in a two-way call can
flash the switch hook to put the other party on hold and dial the Call Pickup feature access code to answer an
incoming call to the call pickup group. Users then flash the switch hook to toggle between the two parties. The
Call Park and Directed Call Pickup feature enhances the Call Pickup service so that its scope encompasses an
enterprise as opposed to being restricted to a group.
Note: A single group can have multiple Call Pickup groups defined simultaneously, but a given user can only belong to a single Call Pickup
group.
Busy Lamp Field
Busy Lamp Field (BLF) enables IP attendant console phones or Reception Console to subscribe to a list of
resources (users) to monitor, and receive presence notifications on the state of the monitored resources. The
BLF service is a user service that supports the provisioning of an ordered list of monitored users.
The order of monitored users corresponds to the line appearance order of the monitored user on the SIP
attendant console phone.
The list of available users to be monitored is determined by the users within the enterprise or group of the user
who is assigned the BLF service. The maximum number of monitored users that can be provisioned is fifty.
Shared Call Appearance
The Shared Call Appearance service allows you to provision up to 35 locations (identity/device profiles) for
a user. These locations share the same line appearance, so they all behave as extensions of a single line, or
user.
One of these provisioned locations is the user’s primary location, while the other locations are called alternate
locations. Users can be assigned any identity/device profile for their primary and alternate locations.
Note: There is a one-time set-up charge for this feature.
To have a Shared Call Appearance configured, call into the Business VoiceEdge Support Center with the
following information:
1. Which Unified Communications seat user requires the Shared Call Appearance?
a. What is their telephone number?
b. How many available lines does their phone have? For example, the Polycom 335 is a 2-line phone, the
Polycom 560 is a 4-line phone, and the Polycom 670 is a 6-line phone.
c. What number do you want in Position 1 (line 1) of the phone?
Note: It is recommended that this be the device’s primary User.
d. What telephone number do you want in position 2? Position 3, etc.?
Multiple Call Arrangement
The Multiple Call Arrangement (MCA) is an overlay to the Shared Call Appearance (SCA) feature. SCA with
MCA service provides the ability for multiple calls to be handled concurrently on different SCA locations for a
user. No single SCA location is considered the active location, so all locations are allowed to originate calls and
receive new incoming calls when they have an available call appearance, regardless of the activity at the other
locations.
Page 48

Tech Admin 48
Automatic Callback
When enabled in the Web portal, you are prompted to activate Automatic Callback when you get a busy signal
while calling another intra-group user. This feature will monitor and notify you with a distinctive ring when the
user becomes available.
Basic Call Logs
The Basic Call Logs service allows for you to see the 20 last missed, placed or dialed calls. The maximum
number is 20 entries per call type. These Basic Call logs are viewable by Unified Communications seat users
in the toolbar.
Push to Talk
Push to Talk allows people to call each other and have the phone answer automatically. You can control which
users call you this way through the Web portal. If you would like this feature activated or modified, please call
800-472-4176.
Business VoiceEdge Auto Attendant
Auto Attendant ensures that incoming calls receive prompt, consistent and professional treatment.
Customers route themselves via menu prompts directly to the specific information or department they seek.
Auto Attendants can provide information frequently asked for like hours of operation, make sales and daily
“specials” announcements or give detailed directions to your location.
Auto Attendant gives your company the “Big Business” sound of multiple departments with a receptionist or
frees your receptionist for other duties.
Note: There is a monthly charge for this feature.
Auto Attendant Options can be routed to internal company telephone numbers, cellular telephone numbers
and other external numbers, voicemail boxes and Hunt Groups.
Incoming call
Customer Service Hunt Group
‘Press 1 for Corporate Events’
Ext. 317
‘Press 2 for Event Billing’
303-555-1234
Etc.
Etc.
Ext. 525
Event Planning Auto Attendant
Option 1
Agent 1
Agent 2
Agent 3
Option 1
Option 3
Option 3
Option 2
Option 2
Option 4
Option 4
Option 5
Page 49

Tech Admin 49
To have an Auto Attendant configured you need to assemble the following information and then call into the
Business VoiceEdge Support Center to have it configured. Please have the following information available
when calling in:
1. What is the telephone number or extension of the Auto Attendant you wish to create?
2. How many Options do you require?
Note: Auto Attendants have the ability to provide nine (9 ) different locations for calls to go. If you require more than nine options, you may
need to purchase additional Auto Attendants to create a stacked or tiered Auto Attendant.
3. How would you like Options 1 through 9 configured DURING business hours?
a. What phone number or extension should each option go to?
b. For each option should the transfer occur with or without a prompt? Should it go to the operator/
receptionist?
Below is the list of prompt options, the message the caller hears, and a description of the action the platform
takes.
Description Key Prompt Played To Caller Description Of What Happens
Transfer to Operator “Please wait while your call is
transferred to the operator”
Ends with the message “Your call cannot be
transferred, please try again later”
Transfer with Prompt “Please wait while your call is
transferred”
Ends with the message “Your call cannot be
transferred, please try again later”
Transfer without Prompt None Ends with the message “Your call cannot be
transferred, please try again later”
Name Dialing None Access to name dialing. First or Last Name
Extension Dialing None Access to extension dialing
Exit “Thank you for calling” Call is released
Repeat Menu None Menu greeting is replayed
4. How would you like Options 1 through 9 configured AFTER business hours?
a. What phone number or extension should each option go to?
b. For each option should the transfer occur with or without a prompt? Should it go to the operator/
receptionist?
5. What are the business hours for your business? Monday through Friday, 8 AM to 5 PM? Something else?
a. What time zone is your business in?
6. What should happen at the end of the Auto Attendant, Option “0”? Should this go to an operator?
A voicemail box? Elsewhere?
Hunt Group — Automatically Handled
A busy signal is an opportunity lost. But with Hunt Group, when an incoming call reaches a busy signal, the
call is automatically routed to the next open line. Hunt Group allows incoming calls to ring a group of users in a
specific pattern.
When you place your Business VoiceEdge order for multiple lines, Hunt Group will be set up to ensure swift
and timely answers to all your customer calls.
Note: A Hunt Group is an INCLUDED feature of each Business VoiceEdge seat you purchase. If you require more Hunt Groups you may
purchase additional Hunt Groups for a monthly charge.
Page 50

Tech Admin 50
Types of Hunting
Regular
Rings each user in the order they
appear on the User List
Simultaneous
Rings all users at once
Circular
Notes the last user to answer a
call then rings the next user on
the User List
Uniform
Rings the user that has been idle
the longest
The name of the Hunt Group is passed to users along with the Caller ID number so they know what type of call
is incoming (e.g., “Sales Group” or “Customer Care Group”).
Note: One Hunt Group is included with each seat purchased. Additional Hunt Groups are available for a monthly charge.
To have a Hunt Group configured you need to collect the following information and then call into the Business
VoiceEdge Support Center to have it configured. Please have the following information available when calling in:
1. What would you like to name your Hunt Group?
2. What telephone number should be associated with this Hunt Group?
3. What Time zone should this Hunt Group be set to?
4. Which Hunt Group type would you like? Regular, Simultaneous, Circular, or Uniform.
5. How many rings before the Hunt Group should go to the next User? The default is 4 rings.
6. What telephone number should the Hunt Group Call Forward Busy or Call Forward No Answer be to?
7. Which seats (users) would you like to have included in this Hunt Group?
8. Any other notes or questions.
Incoming call
User 1 User 2 User 3 User 4
Incoming call
User 1 User 2 User 3 User 4
User 1 User 2 User 3 User 4
Incoming call
User 1 User 2 User 3 User 4
Incoming call
Page 51

Tech Admin 51
Directory Number Hunting
This service allows users in the group to be called directly. When assigned to a Directory Number Hunting
group, except for the Be Anywhere policy, the call is handled by the existing Hunt Group policies and the called
user, if unavailable, is skipped. For the Be Anywhere policy, an unavailable agent is not skipped.
Note: A member of a Hunt Group can be assigned to only one Directory Hunting Group in the system.
Page 52

Business Voice Continuity 52
Business Voice Continuity
Business VoiceEdge has many user-level features that ensure Business Continuity. Technical Administrators
may want to ensure that users understand these features and how they may impact a broader Business
Continuity plan.
Call Forwarding Not Reachable
There are several features that ensure your business voice continuity. The most important of these features
is Call Forwarding Not Reachable. With Call Forwarding Not Reachable, your incoming phone calls are
automatically routed to a pre-determined destination in the event of power outages, broadband outages,
device outages or natural disasters causing outages. No human intervention is needed. The service is set up
during the provisioning of your VoiceEdge service. However, users can change the settings at any time.
Note: The forwarding phone number must be permitted by your outgoing calling plan.
You can activate or change the phone number for this feature at Business VoiceEdge Online, or by using
Feature Access Codes on your device.
Business VoiceEdge Online activation of Call
Forwarding Not Reachable:
1. Click “Incoming Calls” on the upper, left-hand side of
your screen.
2. Click “Call Forwarding Not Reachable” to access the
customization screen for this feature.
3. The default setting for Call Forwarding Not Reachable
is “Off”. Click the “On” button to activate the feature.
4. Next, enter the telephone number that you want calls
routed to in the case of your business line not being
reachable. This could be a cell phone, a home phone or
an alternate business location.
5. After entering the telephone number for Call Forwarding Not Reachable, click “OK” to save and exit this
screen.
6. Call Forwarding Not Reachable has now been updated. All incoming calls will be routed to the number you
entered if your phone device should become unreachable.
Feature Access Code activation of Call Forwarding Not Reachable:
1. Lift the receiver and listen for the dial tone.
2. Press
.
3. A menu of options will guide you in managing this feature. The prompts will enable you to activate and
deactivate the feature as well as add and delete the numbers on your list.
To deactivate Call Forwarding Not Reachable:
1. Lift the receiver and listen for the dial tone.
2. Press
.
3. When prompted, press to turn the feature off.
Note: When entering the “forward to” number, remember to dial 1 and/or the area code before the number if it’s necessary to place the
call. When creating your list, enter the area code plus the 7-digit number for both local and long-distance numbers.
Page 53

Business Voice Continuity 53
Additional Business Voice Continuity Features
In addition to Call Forwarding Not Reachable mentioned previously, there are several other features that help
ensure your business voice continuity. Options may include:
For Users with Voicemail:
• Voicemail to Email Integration: Receive voice messages in your email inbox on your computer or
handheld device as a WAV file. For more information on this feature, please refer to page 16.
• Message Notification: Receive a short email message informing you that a message has been left, with
the date and time the message was sent. For more information on this feature, please refer to page 17.
For Unified Communications Seat Users:
• Call Forwarding Selective: Automatically forward calls based on incoming call number, time of day or
day of the week. For more information on this feature, please refer to page 31.
• Call Notify: Send an email with the caller’s name and number to a specified email address when
predefined criteria such as phone number, time of day or day of the week are met. For more information on
this feature, please refer to page 32.
• Be Anywhere: If your main line, hunt groups or first responders are not answered by a set number of
rings, ring alternate numbers simultaneously to ensure calls are not missed. For more information on this
feature, please refer to page 25.
• Sequential Ring: If your main line, hunt groups or first responders are not answered by a set number
of rings, ring alternate numbers sequentially to ensure calls are not missed. For more information on this
feature, please refer to page 31.
For feature questions, contact Comcast Business Customer Care at 800-472-4176.
Page 54

XXXX 54Privacy 54
Privacy
Caller ID Blocking per Call
You control when your business name and number appear on Caller ID. Caller ID Blocking enables
you to block your business name and number from appearing on select calls you place. You may also want to
employ Caller ID Blocking per Line so that EVERY call from a specific line is anonymous. Caller ID Blocking per
Line is available via http://hdvdmsweb.onvoip.net.
To use Caller ID Blocking per Call:
To ensure your business name and number are marked “Private” or “Anonymous” on select calls:
1. Lift the receiver and listen for the dial tone.
2. Press .
3. When you hear a second dial tone, dial the number you wish to call.
4. Your business name and number will be blocked for the current call only.
Note: Caller ID Blocking per Call may not be available on some calls, including calls to 911.
Caller ID Blocking per Line
Caller ID Blocking per Line ensures that your business name and number are marked “Private” or
“Anonymous” on ALL outgoing calls on a specific line. Some clients and businesses may reject incoming
calls that are marked “Private” or “Anonymous”, and, in these instances, you can temporarily cancel Caller
ID Blocking per Line to enable you to call those numbers. Your Caller ID Blocking per Line function is
automatically restored for the next call.
To use Caller ID Blocking per Line:
1. From the left-hand side of the Main Navigation Page,
select “Outgoing Calls”.
2. Click “Line ID Blocking”.
3. Select “On” or “Off”.
4. Click “Apply”.
To cancel Caller ID Blocking per Line from your phone:
1. Lift the receiver and listen for the dial tone.
2. Press
.
3. When you hear a second dial tone, dial the number you want to call.
4. Your business name and number will appear on your party’s Caller ID display for this call only.
Anonymous Call Rejection
Anonymous Rejection announces to callers who block the display of their name and number that you are not
accepting anonymous calls and instructs them to unblock their information and dial you again.
To activate/deactivate Anonymous Rejection:
1. From the left-hand side of the Navigation Page, select “Incoming Calls”.
2. Select Anonymous Rejection to toggle “On” or “Off”, then click “Apply”.
Page 55

Billing Features 55
Billing Features
Online Bill Access
If you are the billing administrator for your company, you may have access to the VoiceEdge monthly
statement. It will include a summary of charges you’ve incurred for the month. You can view the bill online, or
you may choose to receive a paper invoice. Please note, to view detailed call records, you will need to access
your bill online. Registration is fast, easy and free. First-time users will be prompted to create a user profile
and password. Returning users can log in by entering their username and password.
1. Go to https://www.myebill.com/index.asp?st artnam. You can also access this link from
business.comcast.com/getstarted.
2. Enter your username and password, which you received in your welcome letter email (if you are the
designated tech admin).
3. Follow the prompts to view billing statements, make payments, order services and more.
For more information about Business VoiceEdge billing and reporting please reference the eBill User Guide
and Quick Reference Guide on business.comcast.com/welcome.
Adding a payment account
You can add a payment account to your Ebill to make paying your monthly bill easier. Once you have added
a payment account you can sign up for automatic payments or just pay the Ebill monthly without having to
reenter your payment information.
To add a payment account:
1. Click on “Payments”.
2. Select “Add an Account”.
3. Fill in the required information.
4. Select “Submit”.
Opting in for automatic payments.
Business VoiceEdge gives you the ability to opt-in for automatic payments. Automatic payments will charge
your selected payment option once a month for the total amount of your bill. To sign up for automatic
payments:
1. Select “Payments”.
2. Click on “Automatic payments”.
3. Select the account you would like to charge monthly.
Note: If you would like to charge a payment option not listed you will have to follow the instructions above for adding a payment account
using that payment option.
4. Select “Update”.
Page 56

XXXX 56Billing Features 56
Call Detail Records
Business VoiceEdge gives you the ability to see your detailed call records in different views through the use of
reports. From your Ebill portal simply choose the Reports tab to view the following Billing Reports.
Reports
To view standard billing reports, select the “Reports” tab. You can click on each report provided to see the
results.
The Statement History report shows balances and payments from past statements.
The Area Code Summary report shows the number of calls, duration and charge amount to every call area
code.
The Originating Number report shows the calls, duration and charges for each of your telephone numbers.
The International Call report shows all international calls.
Page 57

Billing Features 57
The Long Call report shows all calls over 20 minutes in length.
The Frequently Called Numbers report shows all numbers called frequently.
The Frequently Called Cities report shows cities called frequently.
Block Calls to 900/976 Numbers
All Comcast business phone lines come with 900/976 Call Blocking activated so that calls to these numbers
are automatically blocked. Call Blocking to these numbers cannot be removed. There is no charge for this
service.
Block Collect Calls and Bill to Third Party Calls
Collect calls and bill to third party calls are blocked. For more information, contact your Business Customer
Support Center.
International Calling Plans
Business VoiceEdge offers three settings for international calling. This may be set by phone line or extension.
It is important that you select the appropriate international calling option, as potential means to limit the
expense, if fraudulent calls are made from your phone.
1. No international calls may be placed from the device.
2. Standard — limited international calling access to major international destinations.
3. Expanded — this offers the largest list of international destinations that may be placed from a device.
Page 58

XXXX 58More Services 58
More Services
Business Level Support
Your dedicated Business Technical Support Team is available to assist you 24 hours a day, 7 days a week. To
contact Tech Support, call 800-472-4176.
Directory Listings
A simple directory listing in both the White Pages and Yellow Pages is included with your Comcast Business
VoiceEdge service. Blue Pages/Government listings are available for such entities. A Directory Listing for an
address that is not local to the telephone number (foreign listing), is also available.
Directory Assistance
Dial for access to local, long-distance and international numbers.
Directory Assistance Call Completion
Dial for access to both local and long-distance numbers, then press the indicated key and
your call will be connected.
Diversion Inhibitor
The Diversion Inhibitor service prevents calls, redirected by a user, to be redirected again by the called party.
This service is especially useful to help prevent calls from being answered by another user’s voicemail when
using Sequential Ring.
A feature access code (FAC) can be activated as a dial prefix on a per-call basis or as a static prefix for the
destination number for the caller’s redirection services. The FAC is *80. There is no provisioning configuration
for the service and can only be used on a per-call basis via the FAC dial prefix.
The following services can be inhibited with the Diversion Inhibitor FAC:
• Call Forwarding No Answer, Busy, Always
• Selective Call Forwarding
• Voicemail
• Sequential Ringing
The following redirection services are not affected by the FAC and cannot be inhibited:
• Remote Office
• Hunt Group
• Auto Attendant
• Call Pickup (all variations)
Enhanced Directory Assistance
Now when you dial , you can get even more valuable information like fully interactive, turn-byturn driving directions from a live operator.
Note: Directory Assistance calls are charged on a per use basis. For prices, call Comcast Customer Support.
Page 59

More Services 59
IP Phone Information
Your Business VoiceEdge IP phone has many capabilities. To view the different models, capabilities, data
sheets, videos, quick reference guides and end-user training, please visit business.comcast.com/
getstarted. If you want to upgrade your device, please call 800-472-4176.
Headsets: Comcast does not offer headsets for cordless capability, but your VoiceEdge IP device is
compatible with many headset options. Please reference materials offered by Polycom to learn more about
compatible headsets at www.polycom.com.
911 Emergency Calls
In most major cities, emergency police, fire and medical services can be reached by dialing 911. Enhanced
911 (E911) automatically provides the emergency service with your telephone number and location when
you dial 911 from your business phone. Remember, dial
immediately in case of any emergency.
Note: Comcast Business VoiceEdge service may have E911 limitations specified below:
• In order for your 911 calls to be properly directed to emergency services, Comcast must have your correct service address. If
you move Comcast Business VoiceEdge service to a different address without Comcast approval, 911 calls may be directed to
the wrong emergency authority, may transmit the wrong address and /or Comcast Business VoiceEdge service (including 911)
may fail altogether.
• Comcast needs a correct service address to deliver your proper location information to a 911 operator. If you move Comcast
provided equipment to a different address, call Comcast at 800-472-4176.
• Comcast Business VoiceEdge uses the electrical power and Internet access in your office. You may not be able to make
911 calls if there is a power outage, Comcast experiences network or other technical problems, or your Internet service is
suspended. When a 911 call is placed, you may need to instruct the operator of your location.
• Prior to changing your address or moving your service, or if you have any 911-related questions, please call your Business
Customer Support Center. Comcast will need several business days to update your new service address in the E911 system.
E911 service is also available with Extension Only Lines.
Toll Free Service
Can help you generate more calls and more business opportunity. Toll Free Service can help you
expand your business by enabling your customers to place orders via a toll free number. Many customers
include their toll free numbers on their website, as it makes them easier to do business with. A Comcast
Business Toll Free line for your company is as fast and easy as a toll free call to your Business Customer
Support Team at 800-472-4176.
Page 60

XXXX 60Useful Tips 60
Useful Tips
Last Number Redial
Polycom SoundPoint 335: User may press the “Dial” button and last number dialed is displayed and may
be dialed.
Polycom SoundPoint 560 & 670: User may press the “Redial” button to dial the last number dialed.
Lists
Some of the calling features require you to create a list (e.g.: priority list, block list, etc.). These lists are
distinct from one another and remain stored so that each time you activate a particular feature, the feature will
refer to the list created for it.
Domestic Dialing
Dial as you normally would. You can also reference your local telephone book for more information on dialing
instructions and calling areas. Dialing a “1” before dialing the area code and number is not required.
International Dialing
To place the call yourself, dial , plus the country code, then the phone number.
Operator Services
To contact the operator, press for local calls and for long-distance calls. An operator can help
you place certain types of calls such as:
• Collect calls — The operator will connect you and request payment from the called party.
• Person-to-person calls — The operator will connect you to a specific person.
• Bill to third party calls — The operator will connect you and request payment from a third party.
Note: Services may not be available in all areas. Additional charges will depend on the service requested. For prices, call your Business
Customer Support Center.
Feature Access Codes
To view an available list of Feature Access Codes, navigate to the following location in the Business VoiceEdge
portal.
1. Log on to http://hdvdmsweb.onvoip.net.
2. From the left-hand side of your Main Navigation Page, select “Utilities”.
3. Click “Feature Access Codes”.
Feature Activation Deactivation
Anonymous Call Rejection
*77 *87
Automatic Callback n/a
#8
Automatic Callback Menu Access
#9
n/a
BroadWorks Anywhere E.164 Dialing
*14
n/a
Call Bridge
*15
n/a
Call Forwarding Always
*72 *73
Call Forwarding Always Interrogation
*21*
n/a
Call Forwarding Always To Voicemail
*21 #21
Call Forwarding Busy
*90 *91
Call Forwarding Busy Interrogation
*67*
n/a
Call Forwarding Busy To Voicemail
*40 #40
Page 61

Useful Tips 61
Feature Activation Deactivation
Call Forwarding No Answer
*92 *93
Call Forwarding No Answer Interrogation
*61*
n/a
Call Forwarding No Answer To Voicemail
*41 #41
Call Forwarding Not Reachable
*94 *95
Call Forwarding Selective
#76 #77
Calling Line ID Delivery Blocking per Call
*67
n/a
Calling Line ID Delivery Blocking Persistent
*31 #31
Calling Line ID Delivery per Call
*65
n/a
Call Park
*68
n/a
Call Park Retrieve
*88
n/a
Call Pickup
*98
n/a
Call Retrieve
*11
n/a
Call Return
*69
n/a
Call Return Number Deletion
#92#
n/a
Call Waiting Persistent
*43 #43
Cancel Call Waiting
*70
n/a
Clear Voice Message Waiting Indicator
*99
n/a
Customer Originated Trace
*57
n/a
Directed Call Pickup
*97
n/a
Directed Call Pickup with Barge-In
*33
n/a
Direct Voicemail Transfer
*55
n/a
Diversion Inhibitor
*80
n/a
Do Not Disturb
*78 *79
Flash Call Hold
*22
n/a
Group Call Park
#58
n/a
Last Number Redial
*66
n/a
Location Control
*12 *13
Music On Hold Per-Call
n/a *60
No Answer Timer
*610
n/a
Push to Talk
*50
n/a
Speed Dial 8
*74
n/a
Speed Dial 100
*75
n/a
Sustained Authorization Code (calls unlocking)
*47 *37
Voice Portal Access
*62 n/a
Page 62

XXXX 62Index 62
Index
3-Way Calling 8
Alternate Numbers 29
Anonymous Call Rejection 54
Auto Attendant 48–49
Automatic Callback 48
Basic Call Logs 48
Be Anywhere 11–12, 25–27
Block Calls 57
Bria Softphone 37–43
Business Level Support 58
Busy Lamp Field 47
Call Detail Records 56–57
Call Forwarding Always 29
Call Forwarding Busy 30
Call Forwarding No Answer 30–31
Call Forwarding Not Reachable 52
Call Forwarding Selective 31
Call Hold 19
Call Notify 32
Call Park 46
Call Pickup 47
Call Return 20
Call Park and Retrieve 46
Call Transfer 8, 19
Call Transfer with Consultation 19
Call Transfer Direct to Voicemail 19
Call Waiting 20
Caller ID with Call Waiting 20
Caller ID Blocking per Call 54
Caller ID Blocking per Line 54
Click to Dial from Microsoft Outlook 28
Directed Call Pickup with Barge-In 22
Directory Assistance 58
Directory Listings 58
Distribution Lists 18
Page 63

Index 63
Diversion Inhibitor 58
Do Not Disturb 21
Domestic Dialing 60
Emergency Calls 59
Enhanced Directory Assistance 58
Extension Dialing 21
Extensions-Standard Seat 21
Feature Access Codes 60–61
Greetings 17
Hoteling 33–34
Hunt Group 49 –51
International Calling 57, 60
IP Phone Information 59
Last Number Redial 60
Multiple Call Arrangement 47
Music On Hold 46
Online Bill Access 55
Operator Services 60
Placing a Call 7
Polycom
®
IP Phones 6
Priority Alert 35
Privacy 36
Push to Talk 48
Reception Console 44–45
Remote Office 28
Selective Call Acceptance 21–22
Selective Call Rejection 22
Sequential Ring 31
Services Menu 25
Shared Call Appearance 47
Speed Dial 8 10–11
Speed Dial 100 11
Telephony Toolbar 9 –10, 23–24
Toll Free Service 59
VoiceEdge Mobile App 12
Voicemail 7–8, 13–17
Page 64

BC BVE Rev. 10.13© 2013 Comcast. All rights reserved.
 Loading...