

Page 1
PRESSONE
the future of global communications
hosted iPBX solutions
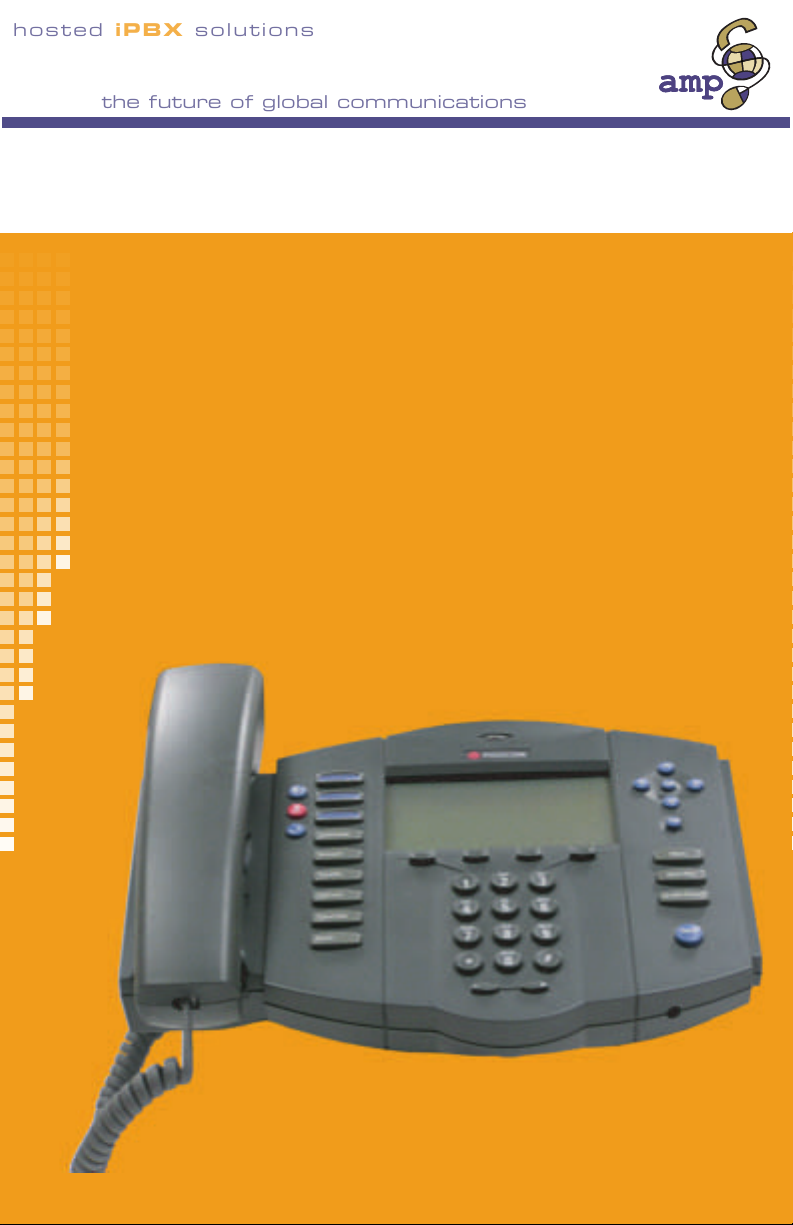
Polycom Soundpoint IP Phone
USER GUIDE
powered by
pcsp500rev1.0.012004
Page 2

Table of Contents
1 Your Polycom Telephone .......................................... 1
Introduction ..................................................................................... 1
Accessing Phone Features.......................................................... 1
In This Manual ............................................................................. 1
Telephone Description.................................................................... 1
Polycom Telephone Features Table ............................................... 3
Moving Your Telephone.................................................................. 4
2 Basic Phone Features ................................................ 7
Adjusting the Volume...................................................................... 7
Answering a Call............................................................................. 7
…using the Phone ....................................................................... 7
Answering a Second Call (Call Waiting) ......................................... 8
Hanging Up..................................................................................... 8
Dial Tone and Ringer Patterns ....................................................... 9
Making an External Call.................................................................. 9
…using the Handset .................................................................... 9
…using the Speakerphone ........................................................ 10
…using the Phone Keypad........................................................ 10
Making an Internal Call ................................................................. 10
Using a Headset ........................................................................... 10
Using the Speakerphone .............................................................. 11
To Answer a Call using the Speakerphone ............................... 11
To End a Call on the Speakerphone ......................................... 11
Adjusting the Speakerphone Volume ........................................ 11
Speakerphone Troubleshooting ................................................ 12
3 PressOne Telephone Features ............................... 13
Feature Activation Digit................................................................. 13
Abbreviated Dial ........................................................................... 13
Creating an Abbreviated Dial Code ........................................... 14
Using an Abbreviated Dial Code ............................................... 14
Modifying an Abbreviated Dial Code ......................................... 14
Polycom Telephone User Guide i
621-00000092
Page 3

Deleting an Abbreviated Dial Code ........................................... 15
Verifying an Abbreviated Dial Number ...................................... 15
Anonymous Call Rejection............................................................ 16
Enabling Anonymous Call Rejection ......................................... 16
Disabling Anonymous Call Rejection......................................... 16
Authorization Code Calling ........................................................... 16
Billing Codes................................................................................. 17
…using the Phone ..................................................................... 17
…using Star Codes ................................................................... 17
Blind Transfer ............................................................................... 18
Call Back Queuing ........................................................................ 18
Call Block (Selective Call Rejection)............................................. 19
Enabling/Disabling Call Block.................................................... 20
Blocking Number of Last Call Received .................................... 20
Adding Numbers to Call Block List ............................................ 20
Listing Blocked Numbers........................................................... 21
Deleting Numbers from Call Block............................................. 21
Call Forward (All Calls) ................................................................. 23
Enabling Call Forward (All)........................................................ 23
…using the Phone.................................................................. 23
…using Star Codes ................................................................ 24
Disabling Call Forward (All) ....................................................... 24
…using the Phone.................................................................. 24
…using Star Codes ................................................................ 24
Call Forward (Busy) ...................................................................... 24
Enabling Call Forward (Busy).................................................... 25
Disabling Call Forward (Busy) ................................................... 25
Call Forward (No Answer) ............................................................ 25
Enabling Call Forward (No Answer) .......................................... 25
Disabling Call Forward (No Answer) ......................................... 26
Call Pickup.................................................................................... 26
Directed Call Pickup .................................................................. 26
…using the Phone.................................................................. 26
…using Star Codes ................................................................ 26
Group Call Pickup...................................................................... 27
…using the Phone.................................................................. 27
…using Star Codes ................................................................ 27
ii Polycom Telephone User Guide
621-00000092
Page 4

Call Return.................................................................................... 27
Call Trace ..................................................................................... 28
Call Waiting................................................................................... 28
Answering the Second Call ....................................................... 29
Switching Between Held Calls................................................... 29
Call Waiting with Caller ID ............................................................ 29
Call Waiting with ID Manager ....................................................... 29
Caller ID Block .............................................................................. 30
Conference ................................................................................... 30
Conference Call Tips ................................................................. 31
Dial Tone and Ringer Patterns ..................................................... 31
Direct Extension Assignment........................................................ 32
Programming a Guest Phone .................................................... 32
Re-establishing the Guest Phone.............................................. 33
Re-establishing Your Old Phone ............................................... 33
Do Not Disturb .............................................................................. 34
Tips for using Do Not Disturb .................................................... 34
Enabling/Disabling Do Not Disturb ............................................ 34
…using the Phone.................................................................. 34
…using Star Codes ................................................................ 34
Group Speed Dial ......................................................................... 35
Hold .............................................................................................. 35
Hold-on Queuing........................................................................... 35
Hunt Groups ................................................................................. 36
Intercom........................................................................................ 36
Meet-Me Conference .................................................................... 37
Joining a Meet-Me Conference ................................................. 37
To join a Meet-Me Conference............................................... 38
Dialing In Too Early ................................................................ 39
Entering an Incorrect ID ......................................................... 39
Extending the Conference Duration ....................................... 39
Roll Call .................................................................................. 40
Adding More Ports to an Active Meet-Me Conference ........... 40
Dropping a Conference Call ................................................... 40
Scheduling a Meet-Me Conference ........................................... 41
Canceling a Meet-Me Conference............................................. 42
Modifying a Meet-Me Conference ............................................. 42
Polycom Telephone User Guide iii
621-00000092
Page 5

Getting a List of Meet-Me Conferences..................................... 44
MultiLine Call Park........................................................................ 44
Parking a Call ............................................................................ 44
Retrieving a Parked Call............................................................ 44
Music on Hold ............................................................................... 45
Mute.............................................................................................. 45
Night ............................................................................................. 45
On-hook Dialing ............................................................................ 47
One-Touch Transfer ..................................................................... 48
Permanent Caller ID Block Release ............................................. 49
Phone Configurator....................................................................... 49
Assigning Your Phone Number to Your Phone ......................... 50
IP Address/Phone Number Announcement............................... 50
Changing the Extension Number............................................... 51
Priority Call ................................................................................... 51
Enabling/Disabling Priority Call ................................................. 52
Adding Members to the Priority Call List ................................... 52
Listing Priority Call Members..................................................... 53
Deleting Priority Call Members .................................................. 53
Queue/ACD (Automatic Call Distribution)..................................... 55
Finding Your Queues................................................................. 55
Logging Into/Out of Queues ...................................................... 55
Answering Calls from Queues ................................................... 55
Viewing Calls-in-queue Information........................................... 56
Redial............................................................................................ 56
…using the Phone ..................................................................... 56
…using Star Codes ................................................................... 56
Release......................................................................................... 56
Remote Access to Call Forwarding .............................................. 57
Setting or Changing Remote Forwarding .................................. 57
Canceling Remote Forwarding .................................................. 58
Remote Phone.............................................................................. 58
Dial-in Setup of Remote Phone ................................................. 59
Deactivating Dial-up Remote Phone ......................................... 59
Web Portal Setup of Remote Phone ......................................... 60
Deactivating Remote Phone via Web Portal ............................. 60
Selective Call Forward.................................................................. 60
iv Polycom Telephone User Guide
621-00000092
Page 6

Enabling/Disabling Selective Call Forward............................. 61
Entering the Forwarding Destination Number ........................ 62
Identifying the Forwarding Destination Number ..................... 62
Adding Forwarded Phone Numbers ....................................... 62
Listing Forwarded Phone Numbers........................................ 63
Deleting Forwarded Phone Numbers ..................................... 63
Speaker ........................................................................................ 65
Speed Dial .................................................................................... 65
Programming a Speed Dial Button ............................................ 65
Using a Speed Dial Button ........................................................ 65
Identifying the Number Assigned to a Speed Dial Button ...... 66
Modifying a Speed Dial Number................................................ 66
Deleting a Speed Dial Number .................................................. 66
Star Codes.................................................................................... 67
Transfer ........................................................................................ 68
4 Voice Mail Features .................................................. 71
Menus and Commands................................................................. 72
Accessing Your Voice Mail ........................................................... 76
…from your phone..................................................................... 76
…from any other internal phone ................................................ 76
…from any outside touchtone phone......................................... 77
…from the email program on your PC....................................... 78
Using Controls While Playing Messages ...................................... 79
Rewind/Fast Forward ................................................................ 79
Skip to the Beginning of a Message .......................................... 79
Skip to the End of a Message.................................................... 79
Pause Play of a Message.......................................................... 79
Composing Messages before Sending......................................... 80
Compose and Send a Message ................................................ 80
Marking a Message as Urgent...................................................... 81
Changing Your Password ............................................................. 81
Skipping the Mail Menu to Hear Messages .................................. 81
Returning to the Auto Attendant or Operator ................................ 82
Zeroing Out to a Custom Operator ............................................... 82
Replaying a Message ................................................................... 83
Saving a Message ........................................................................ 83
Polycom Telephone User Guide v
621-00000092
Page 7

Skipping to the Next Message ...................................................... 84
Deleting a Message ...................................................................... 84
Forwarding a Message to Another Mailbox .................................. 84
Replying to a Message ................................................................. 85
Dialing Back a Caller .................................................................... 85
Sending a Message Directly to an Extension ............................... 86
Recording Personalized Mailbox Greetings.................................. 86
Listening to Your Greetings .......................................................... 87
Receiving Pager Notification......................................................... 87
What You Receive on Your Pager/Cell Phone .......................... 88
Managing Distribution Groups ...................................................... 88
Available Options....................................................................... 89
Creating a New Group............................................................... 89
Editing or Modifying a Group ..................................................... 90
List all members: .................................................................... 91
Add a member:....................................................................... 91
Delete a member:................................................................... 91
Play the name of the group: ................................................... 92
Change the name of the group............................................... 92
Deleting a Group ....................................................................... 93
Listening to a List of Distribution Groups: .................................. 93
Exiting the Voice Mail System ...................................................... 94
5 Set Up Outlook for TAPI........................................... 95
Using TAPI to Call from Outlook ................................................... 95
Installing the TAPI Support Software ............................................ 98
Configuring Windows for TAPI.................................................... 103
Configuring Outlook to Use TAPI................................................ 114
vi Polycom Telephone User Guide
621-00000092
Page 8

Chapter 1
Your Polycom Telephone
Introduction
This guide describes how to use all of the features that are provided
by your PressOne telephone system on your Polycom Soundpoint
400 and 500 telephones.
Accessing Phone Features
Some features require you to dial an activating digit followed by a
numeric code. The default value for this activating digit is 5 and it is
used throughout this guide. However, your system administrator
may choose to use another digit for this function. In that case,
substitute your activating digit for the default. All feature operation
will be exactly the same.
In This Manual
• Chapter 1 discusses the telephone hardware
• Chapter 2 contains an alphabetical summary of each
telephone feature
• Chapter 3 contains an alphabetical summary of each
VIOSS telephone feature
• Chapter 4 discusses voice mail features.
• Chapter 5 discusses setting up Outlook for TAPI.
Telephone Description
The Polycom phone is a full-featured telephone that provides voice
communication over an IP network. The phone functions much like
a traditional analog phone, allowing you to place and receive
telephone calls. The phone also supports features such as call
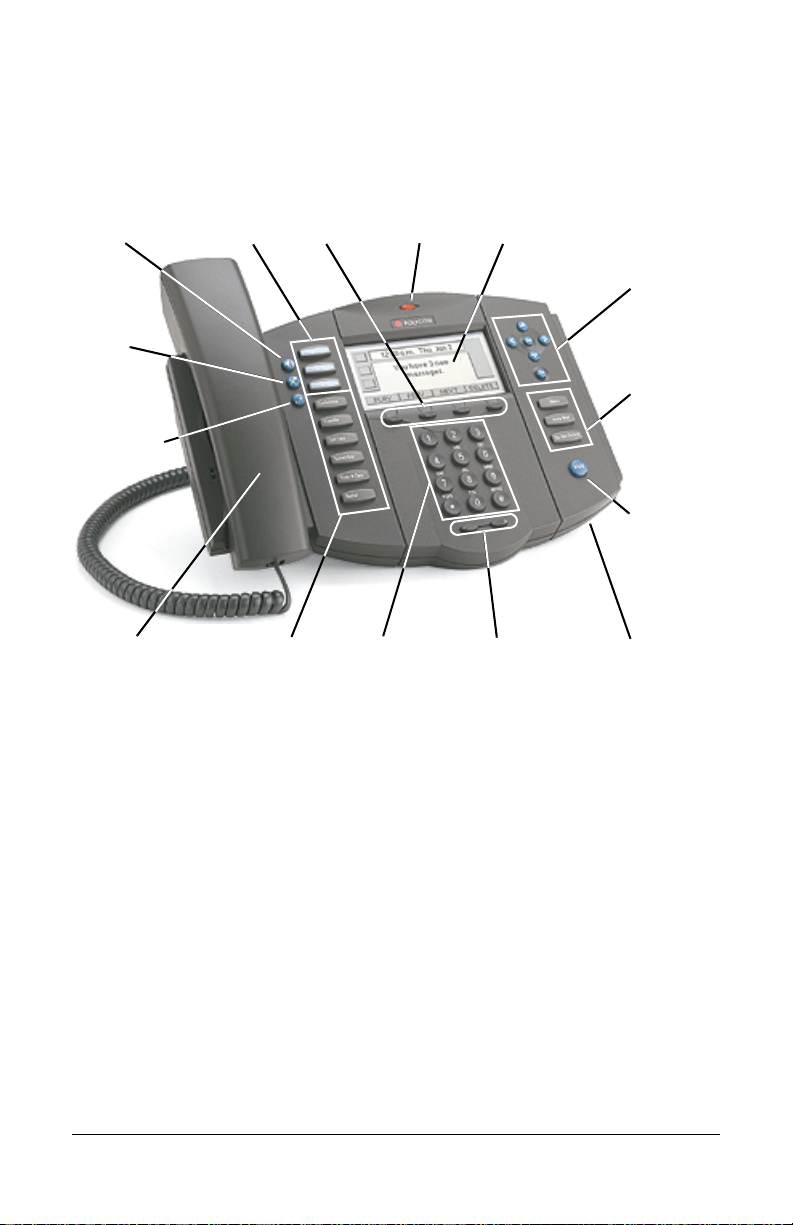
Polycom Telephone User Guide Your Polycom Telephone 1 621-00000092
Page 9
forwarding, redialing, speed dialing, transferring calls, conference
calls, and accessing voice mail. The Polycom telephone has
several key components, which are shown in the following figure.
LCD
Display
Speaker
Line
Buttons
Soft
eys
K
Alert
ED
L
Mute
Headset
Handset
NOTE:
Feature
Buttons
Figure 1:
Pad
Polycom Soundpoint Model 400/500
Volume
The only difference between the model 400 and 500
MicrophoneDial
phones is that the IP 500 has a red microphone button and a
full-duplex speakerphone (whereas the 400 has a half-duplex
speakerphone).
Display
Control
Keys
Feature
Buttons
Hold
The SoundPoint IP telephone provides 13 programmable line/
feature buttons, four context-sensitive soft keys and a pre-defined
hold button. Three of the 13 programmable buttons can be
configured as line or ACD queue appearances while the four soft
keys change function depending on the feature and mode being
used.
2 Your Polycom Telephone Polycom Telephone User Guide
621-00000092
Page 10

The large 3-line x 19-character LCD display provides features such
as date and time, calling party name, calling party number, and digit
dialed as well as feature and line status. The SoundPoint IP
telephone also provides a speakerphone for hands-free operation,
headset support, buttons for selecting the speaker and headset,
and a mute button, which controls microphone in any mode
(speaker, handset or headset).
Dual Ethernet ports allow direct connection to a 10BaseT Ethernet
network via an RJ-45 interface and connection to a co-located PC
for access through a single LAN connection. A dedicated headset
port eliminates the need for a separate amplifier when using a
headset. Also the handset can remain in its cradle making headset
use simpler.
NOTE:
The Polycom Soundpoint IP telephones do not support
multiple distinctive ring tones.
Polycom Telephone Features Table
Features Descriptions
LCD Screen The 160 x 80 pixel screen displays the time,
date, your phone number, caller ID, line/call
status and the soft key tabs.
Soft keys Soft key functions change depending on the
status of the phone (for example, whether you
are on a call or the phone is not in use). The
key's current function is shown on the LCD
screen.
Feature Keys Thirteen configurable keys that can be
customized using the PressOne Administrator
application. The three top keys on the left may
be associated with corresponding indicators
on the LCD screen.
Alert LED Flashes when messages are waiting.
Polycom Telephone User Guide Your Polycom Telephone 3
621-00000092
Page 11

Features Descriptions
Dial Pad These 12 keys provide the 10 digits, the 26
alphabetic characters, #, and *. In
alphanumeric entry mode, press the same key
repeatedly to cycle through the number and
letters associated with that key.
Volume buttons Increase or decrease the volume for the
currently active voice receiver – handset,
headset, or speakerphone. The volume
buttons also control the ringer volume (if onhook), and the contrast of the LCD via the
settings button.
Speaker button This button toggles the speakerphone function
on and off.
Mute button This button toggles the microphone function
on and off. Works with the speakerphone,
handset, or headset microphone.
Headset button This button toggles the headset function on
and off.
Display Control keys Controls scrolling and different soft key options
displayed on the LCD.
Handset Lift the handset and press the dial pad
numbers to place a call, review voice mail
messages, answer a call, etc.
Moving Your Telephone
Before moving your telephone, you should check with your system
administrator to make sure that there is power for the telephone at
the new location. You need a power adapter for your phone at the
new location as well.
To move your phone, follow these steps:
1. Unplug the telephone from the LAN connection jack and the
power adapter from the wall.
4 Your Polycom Telephone Polycom Telephone User Guide
621-00000092
Page 12

2. Take the telephone to the new location.
3. Plug the telephone into the LAN connection jack and the power
adapter into a wall outlet.
4. Watch to ensure that the phone registers and boots up
properly. If it does not, contact your system administrator.
Polycom Telephone User Guide Your Polycom Telephone 5
621-00000092
Page 13

6 Your Polycom Telephone Polycom Telephone User Guide
621-00000092
Page 14

Chapter 2
Basic Phone Features
Adjusting the Volume
There are two keys labeled with a plus (+) and minus (–) below the
Dial Pad that will adjust the volume of the phone speakers. By
default, these keys control the handset volume. If you wish to adjust
the volume of the speakerphone, microphone or headset, follow
these steps:
1. Either pick up the handset, or press the appropriate button for
the device whose volume you want to adjust:
- Speakerphone
- Microphone
- Headset
2. Press and hold the plus (+) button to increase the volume or the
minus (–) button to decrease the volume. You should hear the
tone adjust up or down and a slider scale is displayed on the
phone to indicate the volume level.
NOTE:
The handset volume change is not stored.
Answering a Call
When you hear your phone ring, you can answer in any of the
following ways:
…using the Phone
• Lift the handset.
• Press the line button that has a blinking bell symbol next
to it to turn on the speakerphone.
Polycom Telephone User Guide Basic Phone Features 7 621-00000092
Page 15

• Press the button to talk to the caller using the
speakerphone.
NOTE:
to using the speakerphone by pressing the button and
then hanging up the handset.
If you answered using the handset, you can switch
• If you have a headset connected to the phone, press the
button to use the headset.
Answering a Second Call (Call Waiting)
To answer a second call, press the Hold button to put the first call
on hold. Then press the indicated line button to answer the second
call.
When you have two calls on the line, you can switch back and forth
by putting the current call on hold, and pressing the line button for
the line you want to talk to. You can also put either or both call on
hold, then pick up the other call by pressing the corresponding Line
button.
Hanging Up
To hang-up or release a call, use one of these options:
• Replace the handset in its cradle.
• Press the line button and replace the handset (if in use).
• Pick up and replace the handset in its cradle if using the
speakerphone.
• Press the button (if using the speakerphone).
• Press the line button.
• Press the Release soft key.
• Press the button (if using a headset).
8 Basic Phone Features Polycom Telephone User Guide
621-00000092
Page 16

Dial Tone and Ringer Patterns
The VOISS telephone system generates different ringer and dial
tones, depending on call conditions.
There are four types of ringers – all are answered the same way:
• One Ring -- Internal (Extension-to-Extension) Calls and
when the VOISS system has called your extension to
remind you or to notify you about something.
• Multiple Rings -- External Calls
• Distinctive Rings - A different ring tone is provided for up
to two additional DID numbers assigned to your telephone
by the system administrator. These numbers do not
appear as lines on your telephone, but ring your prime line
with the appropriate ring when they are dialed.
• Priority Ring - The Personal Attendant Manager (call
screening feature) allows users to designate specific
callers as important enough to ring through to their
telephone even if they have Do Not Distrub activated. A
different ring tone is provided for calls assigned the priority
call option.
Making an External Call
Several options exist for you to make an external call from your
telephone. You may use any of the following options: the handset
(traditional), the speakerphone, or the keypad (direct dialing).
…using the Handset
1. Lift the handset.
2. Press 9 (or the digit that is required to access an outside line).
An outside line is automatically selected.
Polycom Telephone User Guide Basic Phone Features 9
621-00000092
Page 17

3. Dial the desired number, including “1” and the area code, if
required (as supported by your configured class of service).
NOTE:
using the speakerphone by pressing the button and then
hanging up the handset.
If you placed a call using the handset, you can switch to
…using the Speakerphone
1. Press the button.
2. Press 9 (or the digit that is required to access an outside line).
An outside line is automatically selected.
3. Dial the desired number, including “1” and the area code, if
required.
…using the Phone Keypad
1. Press 9 (or the digit that is required to access an outside line).
An outside line is automatically selected and the speakerphone
is turned on.
2. Dial the desired number, including “1” and the area code, if
required.
Making an Internal Call
The VOISS system provides several ways to make an internal call.
To make an internal call, you can either lift the handset, or press the
speaker button or a line button, then dial the desired extension
(e.g., 1105). See also the Intercom feature, described on page 36.
Using a Headset
Using the phone with a headset requires leaving the handset
offhook. All of the same features are available using a headset that
are available using the handset.
10 Basic Phone Features Polycom Telephone User Guide
621-00000092
Page 18

Using the Speakerphone
Your telephone is equipped with a speakerphone that lets you
converse “hands free” without having to use the handset. The
speakerphone also allows others in the room to listen and
participate in a telephone conversation.
To Switch from the Handset to Speakerphone
If you answered or initiated a call using the handset, you can switch
to using the speakerphone by pressing the button. This
deactivates the handset. You can leave the handset offhook, or
hang it up. If you lift the handset again, the speakerphone is
disabled automatically.
While the speakerphone is active, the LCD screen on the phone
shows a speaker icon.
To Answer a Call using the Speakerphone
• Press the button.
• Press the blinking line button.
To End a Call on the Speakerphone
• Press the button on your phone.
Adjusting the Speakerphone Volume
When the speakerphone is on, press the plus (+) and minus (-)
buttons beneath the dial pad to adjust the speakerphone volume.
The speakerphone microphone is optimized for speaking within 3
feet from in front of the microphone.
Polycom Telephone User Guide Basic Phone Features 11
621-00000092
Page 19

Speakerphone Troubleshooting
Problem Solution
You can’t hear callers on the
speaker.
Callers can’t hear you when
you use the speakerphone.
The caller’s voice echoes. Decrease the speaker volume.
Increase the speaker volume.
Make sure nothing is blocking the mic.,
which is located on the left side of the
telephone under the handset cradle.
Move closer to the microphone and face
the microphone when speaking.
12 Basic Phone Features Polycom Telephone User Guide
621-00000092
Page 20

Chapter 3
PressOne Telephone Features
This chapter contains an alphabetical summary of all features that
may be provided on your telephone. You will only be able to use
those features that have been configured on to your telephone by
the system administrator.
NOTE:
phone service provider. It is possible that some system
features are not configured on your phone. If you do not have
a feature listed in this chapter and would like to have it on your
phone, contact your system administrator for help.
Each user’s phone features are configured by the
Feature Activation Digit
Some features require you to dial an activating digit followed by a
numeric code (example: 588). The default value for this activating
digit is 5 and it is used throughout this help system. However, your
system administrator may choose to use another digit for this
function. In that case, substitute your activating digit for the default.
Operation of all features will be exactly the same.
NOTE:
procedures are the default values for your phone system at the
time of installation. They may be changed by your system
administrator. Any list of feature codes given to you by your
system administrator should be used in place of the codes
listed here.
The feature codes (“star codes”) listed in these
Abbreviated Dial
This feature lets a you create, modify, delete, verify and use a
personal list of up to 100 Abbreviated Dial codes. Abbreviated Dial
codes must be entered as two digits when programming and dialing
(Example: enter 00-09 instead of 0-9).
Polycom Telephone User Guide VocalData Telephone Features 13
621-00000092
Page 21

Creating an Abbreviated Dial Code
1. Press 75#.
NOTE:
steps.
2. Press 1 to program (set) the Abbreviated Dial code.
3. Press the digits (00-99) you wish to use as the Abbreviated Dial
code or enter * to exit.
4. Dial the phone number you want to assign to this Abbreviated
Dial code, followed by #.
The phone number you entered for this Abbreviated Dial
number is repeated back.
NOTE:
dial the call. This includes the area code for long distance calls
and may include the area code for local calls in some areas.
5. Press # to save or * to exit without saving.
6. Program or verify another Abbreviated Dial code or hang up to
exit.
A voice prompt will lead you through the remaining
Be sure to enter all the numbers normally required to
Using an Abbreviated Dial Code
1. Press *3 then the desired Abbreviated Dial code (00-99).
2. Wait for the called party to answer.
Modifying an Abbreviated Dial Code
1. Press 75#.
NOTE:
steps.
2. Press 1 to program (set) the Abbreviated Dial code (00-99).
3. Press the digits of the Abbreviated Dial code to modify followed
by # or press * to exit.
14 VocalData Telephone Features Polycom Telephone User Guide
A voice prompt will lead you through the remaining
621-00000092
Page 22

4. Dial the phone number you want to assign to this Abbreviated
Dial code followed by the # sign, or press * to cancel.
The phone number you entered for this Abbreviated Dial
number is repeated back.
NOTE:
dial the call. This includes the area code for long distance calls
and may include the area code for local calls in some areas.
5. Press # to save the changes or * to exit without saving.
6. Program or verify another Abbreviated Dial code or hang up to
exit.
Be sure to enter all the numbers normally required to
Deleting an Abbreviated Dial Code
Deleting an Abbreviated Dial code means simply removing the
telephone number associated with the Abbreviated Dial code.
1. Press 75#.
NOTE:
steps.
2. Press 1 to program (set) the Abbreviated Dial code (00-99).
3. Press the digits of the Abbreviated Dial code to delete followed
by the # sign.
A confirmation message tells you: “No number was entered.”
A voice prompt will lead you through the remaining
4. Program or verify another Abbreviated Dial code or hang up to
exit.
Verifying an Abbreviated Dial Number
1. Press 75#.
2. Press 2 to verify (check) an Abbreviated Dial code (00-99).
Polycom Telephone User Guide VocalData Telephone Features 15
621-00000092
Page 23

3. Press the Abbreviated Dial code you wish to verify.
The phone number you entered for this Abbreviated Dial
number is repeated back.
4. Program or verify another Abbreviated Dial code or hang up to
exit.
Anonymous Call Rejection
When enabled, this feature rejects calls from callers who block the
display of their caller ID information.
Enabling Anonymous Call Rejection
1. Press *77 on the telephone keypad.
2. Hang up.
On the next incoming call, the calling party gets a message that
the party they are calling does not accept anonymous calls.
Disabling Anonymous Call Rejection
1. Press *87 on the telephone keypad.
2. Hang up.
Authorization Code Calling
This feature is available system-wide to allow/deny long distance
dialing and does not appear as a button on your telephone.
If you are required to enter an authorization code for a call, follow
these steps:
1. Access an outside line.
2. Press #.
16 VocalData Telephone Features Polycom Telephone User Guide
621-00000092
Page 24

3. Enter the authorization code (obtained from your system
administrator). When the correct code is entered, you hear dial
tone.
4. Enter the desired number you want to call.
Billing Codes
This feature, if enabled by your service provider, lets you assign a
project or client code to any call. The code is recorded in the Call
Data Record (CDR) file. Contact your system administrator to
retrieve the billing records from the CDR file. You can enter the
billing code from the telephone keypad or using star codes.
…using the Phone
After you dial the number (or during a call), follow these steps:
1. Press the Billing key (as configured by the system
administrator).
2. Enter the associated billing code for the call. The other party
will hear the billing code tones.
NOTE:
response (IVR) applications, since the IVR will respond to
tones it recognizes. An example would be a voice mail menu if
you are leaving a message.
3. Re-press the Billing key.
This can affect the performance of interactive voice
…using Star Codes
After you have dialed the number (or during a call), follow these
steps:
1. Press *02.
Polycom Telephone User Guide VocalData Telephone Features 17
621-00000092
Page 25

2. Enter the associated billing code for the call. The other party
will hear the billing code tones.
NOTE:
response (IVR) applications, since the IVR will respond to
tones it recognizes. An example would be a voice mail menu if
you are leaving a message.
3. Press the # key.
NOTE:
but only the last code entered is recorded for billing purposes.
This can affect the performance of interactive voice
You can perform this function as many times as desired,
Blind Transfer
Use this feature to transfer a call to another number without having
to announce it. See also “One-Touch Transfer” on page 48 and
“Transfer” on page 68.
1. Tell the calling party you will transfer the call
2. Press the Hold key.
3. Dial the number to which you want to transfer the call.
4. Hang up.
Call Back Queuing
This feature instructs the PressOne system to call you when a
previously unavailable outgoing line becomes available. (See also
“Hold-on Queuing” on page 35.)
When you try to make an external call and all outgoing lines are
unavailable, you will hear a recorded announcement. When you
hear the announcement, follow these steps:
1. During a call where you hear that all lines are unavailable,
press the Call Back soft key.
2. Hang up. When the line becomes available, the system calls
your station with a system ring (two short rings).
18 VocalData Telephone Features Polycom Telephone User Guide
621-00000092
Page 26

3. Answer the call to have the system automatically dial the
external number for you.
NOTE:
button, the speaker button or by picking up the handset. You
hear a message that all trunks are busy and you are queued for
the next available trunk. Press the Call Back soft key and hang
up to remain queued. If you hang up without pressing Call
Back, you are removed from the queue. While you are queued,
the line is unavailable for use.
You can access the line at any time by pressing the line
Call Block (Selective Call Rejection)
Call Block (also known as Selective Call Rejection) allows you to
program your phone not to accept calls from a list of telephone
numbers. All calls from phones on the list receive a message which
says you are not accepting calls.
To use this feature (*60), you create a list of telephone numbers
(internal or external) that receive the message when a call with that
caller ID appears at your telephone.
Call Block is managed through a menu of commands activated by
pressing digits on the keypad. The menu commands are:
• 1 - Enable/disable feature
• 2 - Add last caller to blocked list
• 3 - Add numbers to blocked list
• 4 - List numbers to blocked list
• 5 - Delete numbers from blocked list
If you have a display on your telephone, the options for each menu
level appear on your display. For example, if you press 5 to delete
a number, the display will show:
“1=Num, 2=List, 3=Del All, *=Main Menu”.
Polycom Telephone User Guide VocalData Telephone Features 19
621-00000092
Page 27

Enabling/Disabling Call Block
The PressOne system allows you to turn the Call Block feature on
and off (i.e., decide when calls from your list will be forwarded and
when they will ring at your telephone as usual). Disabling (turning
off) the feature does not delete the list of callers who are blocked
and receive the message.
1. Press *60 or *80 on the telephone keypad.
• A voice prompt tells you whether Call Block is enabled or
disabled and then gives the menu choices.
2. Press 1 to enable Call Block if it is disabled or to disable the
feature if it is enabled.
Blocking Number of Last Call Received
1. Press *60 or *80 on the telephone keypad.
A voice prompt tells you whether Call Block is enabled or
disabled and then gives the menu choices.
2. Press 2 to add the number of the last call you received to the
blocked list.
You are returned to the Selective Call Forward menu.
3. Select a menu item or hang up.
NOTE:
already on your list, but simply adds the most recent caller to
your blocked list.
Adding a number this way does not affect any numbers
Adding Numbers to Call Block List
1. Press *60 or *80.
2. Press 3 to add telephone numbers to the list of numbers that
will be blocked.
3. Enter the number with no spaces, dashes or special characters
followed by the # key.
20 VocalData Telephone Features Polycom Telephone User Guide
621-00000092
Page 28

4. Press # to save the entry or * to exit without saving.
5. Select a menu item or hang up.
Listing Blocked Numbers
1. Press *60 or *80 on the telephone keypad.
2. Press 4 to hear the list of numbers which will be blocked.
The voice prompt announces the list and the first number.
3. Press # to hear the next number or press * to return to the Call
Block menu.
NOTE:
will scroll through the list of member numbers, starting over
with the first number after the last number is spoken.
4. Repeat the previous two steps until you have heard as many of
the numbers as you want.
5. Press * to return to the Call Block menu when you are finished
listening to member numbers.
As long as you press # for the next number, the system
Deleting Numbers from Call Block
1. Press *60 or *80 on the telephone keypad.
• A voice prompt tells you whether Call Block is enabled or
disabled and then gives the menu choices.
2. Press 5 to delete telephone numbers from the list of numbers
which will be blocked.
3. The voice prompt provides options for deleting members
including:
• Press 1 if you know the number to delete;
(see Step 4)
• Press 2 for a list of numbers;
(see Step 8)
• Press 3 to delete all numbers;
(see Step 14)
Polycom Telephone User Guide VocalData Telephone Features 21
621-00000092
Page 29

• Press * to return to the Call Block menu.
4. Press 1 to remove a specific number.
5. Enter the number to delete with no spaces, dashes or special
characters followed by the # key.
The voice prompt repeats the number you just entered.
6. Press # to save the entry (delete it from your list) or press * to
cancel the entry.
7. Select a menu item or hang up.
8. Press 2 to hear the list of numbers and have the option to
delete them as you go through the list.
The voice prompt announces the list and the first number.
9. Press # until you find the number you wish to delete.
10. Press 1 to delete the number, # to hear the next number or * to
return to the Call Block menu.
The number is deleted immediately and the next number in the
list is announced.
11. You can press 1 to delete it, # to hear the next number or * to
return to the Call Block menu.
12. Repeat the previous three steps until you have found and
deleted as many of the numbers as you want.
13. Press * to return to the Call Block menu or hang up
14. Press 3 to immediately delete all member numbers.
The voice prompt announces that all phone numbers have
been removed from the list and you are returned to the Call
Block menu.
15. Select a menu item or hang up.
22 VocalData Telephone Features Polycom Telephone User Guide
621-00000092
Page 30

Call Forward (All Calls)
Call Forward (All Calls) allows you to forward all calls for your phone
to the number you enter. Calls will not ring at your phone and will be
sent to the number to entered as the forward destination. If your
telephone has a display, it will show that your telephone is
forwarded. You can forward calls to an IP or non-IP phone.
Calls forwarded to an external number (7- or 10-digits) that are
unanswered will roll over to voice mail (if available) at that number.
Calls forwarded to an internal number (4-digit extension) that are
unanswered will roll over to voice mail (if available) for the called
party (not the forwarding destination).
External forwarding must be supported by your system for external
numbers to be accepted. Be sure to include the access code for an
outside line and the area code, if necessary, with the external
number. Up to 20 digits may be entered.
NOTE:
validity by the PressOne system.
The specified destination number is not tested for
Enabling Call Forward (All)
…using the Phone
1. Press the Forward button. The speaker phone turns on (
Speaker lamp lights) and the display “Enter Forwarding
Number:”.
2. Enter the number to which you want to forward all your calls.
Be sure to enter the number exactly as you would if you were
to call that number. Include the area code, if necessary. The
display shows the number as it is entered.
3. To forward your calls, do one of the following to hang up the
phone:
• Press the Forward button
• Press the Speaker button
• Press the line button
Polycom Telephone User Guide VocalData Telephone Features 23
621-00000092
Page 31

• Pickup and replace the handset.
Call forward (all) is enabled and the display shows “Fwd
number”.
…using Star Codes
1. Press 72# on the telephone keypad. The speaker phone turns
on ( Speaker lamp lights) and the display shows “Enter
Forwarding Number:”.
2. Enter the number to which you want to forward all your calls.
Be sure to enter the number exactly as you would if you were
to call that number. Include the area code, if necessary. The
display shows the number as it is entered.
3. Press #.
Call forward (all) is enabled, the phone hangs up and the
display shows “Fwd [number]”.
Disabling Call Forward (All)
…using the Phone
• Press the Forward button twice. Call forwarding (all) is
disabled and the phone hangs up.
…using Star Codes
• Press 73# or 72## on the telephone keypad.
Call Forward (Busy)
Call Forward (Busy) allows you to forward calls arriving at your
phone while it is busy to be forwarded to the number you enter. Calls
will not ring at your phone and will be sent to the number entered as
the forward destination.
24 VocalData Telephone Features Polycom Telephone User Guide
621-00000092
Page 32

Enabling Call Forward (Busy)
1. Press 76# on the telephone keypad. The speaker phone turns
on ( Speaker lamp lights) and the display shows “Dial:”.
2. Enter the number to which you want to forward all your calls
when busy. Be sure to enter the number exactly as you would
if you were to call that number. Include the area code, if
necessary. The display shows the number as it is entered.
3. Press # on the telephone keypad. Call forward (busy) is
enabled and the phone hangs up.
NOTE:
unanswered will roll over to voice mail (if available) at the
forwarded to destination. Calls that stay on-net and are
unanswered will roll over to your voice mail (if available).
Calls forwarded to an off-net number that are
Disabling Call Forward (Busy)
• Press 77# or 76## on the telephone keypad Call forward
(busy) is disabled and the phone hangs up.
Call Forward (No Answer)
Call Forward (No Answer) allows you to forward calls that are
unanswered at your phone to the number you enter. Calls will not
ring at your phone and will be sent to the number entered as the
forward destination.
Enabling Call Forward (No Answer)
1. Press 78# on the telephone keypad. The speaker phone turns
on ( Speaker lamp lights) and the display shows “Dial:”.
2. Enter the number to which you want to forward all your calls
when busy. Be sure to enter the number exactly as you would
if you were to call that number. Include the area code, if
necessary. The display shows the number as it is entered.
3. Press # on the telephone keypad. Call forward (no answer) is
enabled and the phone hangs up.
Polycom Telephone User Guide VocalData Telephone Features 25
621-00000092
Page 33

NOTE:
unanswered will roll over to voice mail (if available) at the
forwarded to destination. Calls that stay on-net and are
unanswered will roll over to your voice mail (if available).
Calls forwarded to an off-net number that are
Disabling Call Forward (No Answer)
• Press 79# or 78## on the telephone keypad. Call forward
(no answer) is disabled and the phone hangs up.
Call Pickup
This feature lets you use one phone to answer another phone that
is ringing. There are two types of Call Pickup: Directed Call Pickup
and Group Call Pickup. Both phones must be members of the same
Call Pickup Group. Your system administrator should tell you if you
are in a pickup group and who the members are.
Directed Call Pickup
Directed Call Pickup lets you answer another phone from your
phone when you hear the other phone ringing. Both phones must be
members of the same Directed Call Pickup Group. Your system
administrator should tell you if you are in a pickup group and who
the members are.
…using the Phone
1. Pickup up the handset.
2. Press the button to which directed call pickup has been
assigned.
(Check with your system administrator for the location on your
phone.)
3. Dial your extension number to answer the phone and begin
speaking with the caller.
…using Star Codes
1. Press *12 on the telephone keypad.
26 VocalData Telephone Features Polycom Telephone User Guide
621-00000092
Page 34

2. Dial the ringing extension number to begin speaking with the
caller.
Group Call Pickup
Group Call Pickup lets you answer another phone that is in your Call
Pickup Group. Both phones must be members of the same Call
Pickup Group. Your system administrator should tell you if you are
in a pickup group and who the members are.
…using the Phone
1. Pickup up the handset.
2. Press the button to which group pickup has been assigned.
(Check with your system administrator for the location on your
phone.)
…using Star Codes
1. Press *06 on the telephone keypad.
2. Begin speaking with the caller.
Call Return
Using this feature dials the telephone number of the last incoming
call. However, if the caller is shown as “Unknown”, then Call Return
will not work.
1. Press *69 on the telephone keypad.
2. Wait for the called party to answer.
Polycom Telephone User Guide VocalData Telephone Features 27
621-00000092
Page 35

Call Trace
Call Trace allows you to record the telephone number of an
offending call, but must be performed immediately after the
offending call is ended.
NOTE:
you are receiving the offending call.
1. Hang up.
2. Wait 10 seconds.
3. Press *57 on the telephone keypad.
The last number that called you is traced. After you initiate Call
Trace, a recording informs you if the trace succeeded and provides
you with an 800 number you can use to take legal action.
Your phone number and the caller ID of the offending caller is
recorded in the phone system’s Call Data Record (CDR). Check
with your service provider to retrieve the phone number of the
traced call from the CDR. Note the time and date that you traced the
call, as this will help the system administrator find the call in the
CDR file.
The feature won't work if Call Waiting is triggered while
Call Waiting
If your phone is configured with Call Waiting, you can answer an
incoming call without disconnecting from the current call.
If a call comes in while you are on the phone, you will hear a single
beep repeated approximately every ten seconds.
NOTE:
it will skip to the next phone in the hunt group before you will be
able to pick up the second incoming call.
28 VocalData Telephone Features Polycom Telephone User Guide
If your phone is configured to be part of a Hunt Group,
621-00000092
Page 36

Answering the Second Call
To answer a second call without ending the current call, press line
button for the incoming call (the display shows a slow flashing bell
symbol for the ringing line). Your current caller is placed on hold (the
line indicator for this call displays a slow-blinking “H”) and you are
connected to the second caller.
NOTE:
indicate a line with an incoming call.
The phone display shows a slow-blinking “H” to indicate a line
with a call on hold.
The phone display shows a slow-blinking bell icon to
Switching Between Held Calls
While speaking with the new party, follow these steps:
To switch between calls after the first time, press the line button with
the call currently on hold. The the current call is placed on hold and
you are reconnected to the waiting call.
NOTE:
button to indicate the line currently being used.
The phone display shows a slow-blinking “H” to indicate a line
with a call on hold.
The phone display shows a graphic of a depressed
Call Waiting with Caller ID
If you have both the call waiting and caller ID capabilities, you can
see the caller ID of a call waiting call on your telephone's display.
Call Waiting with ID Manager
While already on a phone call, this feature allows the user to view
the Caller ID of a second incoming phone call and decide how the
second call should be handled. The user has four options:
• Answer the new call and put the current on hold.
Polycom Telephone User Guide VocalData Telephone Features 29
621-00000092
Page 37

• Press 1 to send the call to voice mail.
• Press 2 to send a "Please Hold" announcement to the
incoming caller.
• Press 3 to send a "Call Me Back" announcement to the
incoming caller. After the announcement is played, the call
is disconnected.
This feature must be turned on by your system administrator for you
to have access to its functions.
NOTE:
phone, and a call comes in for the other line, you can only use
the 2 - “Please Hold” feature to put the call on hold.
Pressing 1 or 3 for an incoming call for the other lineappearance will disconnect the caller from your phone, but the
call will continue to ring on the other phone.The “send to voice
mail” and “Call Me Back” features are not available because
the call may still be picked up on the phone that the line was
primarily assigned to.
If you have a line-appearance of another phone on your
Caller ID Block
This feature blocks the display of your phone number to the called
party for this call only. Be aware that if the person you are calling
does not accept anonymous calls, your call will be rejected since no
Caller ID information is provided.
1. Press *67 on the telephone keypad.
2. Dial the phone number that you want to block.
Conference
If supported by your system, you can conference several internal
and/or external parties together. Check with your system
administrator for the availability of this feature on your system.
To create a conference call, follow these steps:
30 VocalData Telephone Features Polycom Telephone User Guide
621-00000092
Page 38

1. Make a call or be engaged in a call.
2. Press the Conference button.
The call is placed on hold and you hear dial tone.
3. Dial the number of the person that you want to include in the
conference.
4. When the person answers, inform the party about the
conference and then press the Conference button to add that
party into the conference call.
5. Repeat steps 1-4 to add additional parties to the conference.
Conference Call Tips
• The parties connected to the conference call remain
connected to each other while you add additional parties.
They may carry on a conversation with each other while
you finish adding parties to the conference.
• Even if the call initiator disconnects, any of the other
parties (who have the conference feature) can use it to
add new parties.
• To place a conference call on hold, press the HOLD
button. The other parties can talk among themselves but
they can’t hear you.
• When you put the call on hold, a beeping tone
automatically sounds every few seconds. To avoid
disrupting the other callers, consider muting the call
instead. To mute the call, press the MUTE soft key.
• To transfer a conference call to another telephone, press
the Transfer soft key. Dial the number to which you want
to transfer the call and then press Transfer key again.
Dial Tone and Ringer Patterns
The PressOne telephone system generates different ringer and dial
tones, depending on call conditions.
There are two types of dial tone:
Polycom Telephone User Guide VocalData Telephone Features 31
621-00000092
Page 39

• Internal Dial Tone – A continuous, higher-pitched tone
• External (Outside) Dial Tone – A continuous, lower-
pitched tone
There are four types of ringers – all are answered the same way:
• One Ring – Internal (Extension-to-Extension) Calls and
when the VocalData system has called your extension to
remind you or to notify you about something.
• Two Rings – External Calls
• Distinctive Rings – A different ring tone is provided for up
to two additional Direct Inward Dial (DID) numbers
assigned to your telephone by the system administrator.
These numbers do not appear as lines on your telephone,
but ring your prime line with the appropriate ring when they
are dialed.
• Priority Ring – The call screening feature allows users to
designate specific callers as important enough to ring
through to their telephone even if Do Not Disturb is
activated. A different ring tone is provided for calls
assigned the Priority Call option. See “Priority Call” on
page 51.
Direct Extension Assignment
This feature lets you program another telephone in the same
corporate system to be your telephone. For example, you are
visiting a branch office for an extended business trip and you want
to program a “guest” telephone to ring as your telephone while you
are there. This feature requires your old phone and the “new/guest”
phone to be the same type of phone.
Programming a Guest Phone
To program a guest phone to act as your phone, follow these steps:
32 VocalData Telephone Features Polycom Telephone User Guide
621-00000092
Page 40

1. From the guest /new phone, dial 588 (or the code provided by
your system administrator). You are prompted to enter the
telephone number which you want that phone to be
(Presumably, your “original/old” phone number).
2. Enter your complete 10-digit telephone number, followed by
the # key. You are prompted to enter a password. The
password default is the last four digits of the phone number
entered in this step.
3. Enter your password, followed by the # key. The phone is now
programmed to be your phone and your old phone is removed
from service.
NOTE: When you reassign your telephone number to the new
phone, the button template from your “old” phone is assigned
to the “new” phone.
Re-establishing the Guest Phone
To reset the guest phone to its original number, follow the steps to
program a phone, using the original phone number and password
of the guest phone.
Re-establishing Your Old Phone
Once you have programmed another phone with your old phone’s
extension, you must reconfigure your old phone before using it.
Your old phone displays the message “Pickup handset to
configure”. Pickup the handset and perform the following steps:
1. Enter your old 10-digit phone number, followed by the # key.
You are prompted to enter a password.
2. Enter the password, followed by the # key. (Your password is
typically the last four digits of your phone number.) The phone
is now programmed back to its original extension.
Polycom Telephone User Guide VocalData Telephone Features 33
621-00000092
Page 41

Do Not Disturb
Do Not Disturb instantly routes all your incoming calls to another
destination (your voice mailbox, the main operator, your secretary,
a co-worker, etc.), but still lets you make calls and use other
telephone features. With Do Not Disturb enabled, the phone will not
ring when a call comes in.
The LCD display on the phone shows “*Dnd” when the phone is in
Do Not Disturb mode.
Tips for using Do Not Disturb
You can record a special voice mail greeting for callers to hear if
your calls go to voice mail when you activate the Do Not Disturb
feature. See Chapter 4, “Voice Mail Features” for more information.
The Do Not Disturb destination where incoming calls are sent can
be changed by your system administrator.
Enabling/Disabling Do Not Disturb
…using the Phone
To enable Do Not Disturb, press the Do Not Disturb button.
To disable Do Not Disturb,re-press the Do Not Disturb button.
…using Star Codes
The same star code is used to enable and disable Do Not Disturb
since you are switching between the on and off mode for this
feature.
1. To enable or disable Do Not Disturb, press *04 on the
telephone keypad.
2. Hang up the handset.
34 VocalData Telephone Features Polycom Telephone User Guide
621-00000092
Page 42

Group Speed Dial
This feature provides additional speed dialing capabilities beyond
those provided by speed dial buttons and the Abbreviated Dial
feature. With Group Speed Dialing, you have access to a common
speed dial list of up to 1,000 entries managed by your system
administrator.
Group Speed Dial numbers are extension numbers that have been
programmed to dial another number, usually an external number.
Your system administrator will provide you with a list of Group
Speed Dial numbers and their destinations.
Hold
This feature lets you place a call on hold. While a call is holding, the
holding party occupies the associated line. (To place a call on hold
and free the line, see the Park feature description.)
1. During a conversation, press the HOLD button. On the phone’s
LCD display, an “H” is displayed next to the held line.
Depending on your system configuration, the party may hear
music, a recorded announcement, or silence while holding.
2. To resume the conversation, press the associated line button.
NOTE:
occurring each minute after that, one ring sounds from the
phone speaker. The message LEDs do not flash. This occurs
whether you are using the handset or the speakerphone. This
is to remind you that you have a call on hold.
NOTE:
“Switching Between Held Calls” on page 29.
Starting one minute after the party is on hold, and
For more details on handling two calls at once, see
Hold-on Queuing
This feature allows you to wait for a busy outgoing line to become
available. (See “Call Back Queuing” on page 18.)
Polycom Telephone User Guide VocalData Telephone Features 35
621-00000092
Page 43

When you try to make an external call and all outgoing lines are
unavailable, you will hear a recorded announcement.
• Hold for a line to become available.
• When a line becomes available, the system automatically
dials the external number for you.
Hunt Groups
The Hunt Group feature allows the PressOne system to distribute
calls made to a specific "pilot" number or to any member of a
defined group based on the specified hunting order. Your system
administrator or manager should tell you if you are a member of a
hunt group and who the other members are.
Intercom
Use this feature to make and receive extension-to-extension
intercom calls.
1. Press the Intercom (Intcom) soft key.
2. After hearing the dial tone, dial the desired 4-digit extension
number.
The system identifies the call to the called party as an intercom
call by playing a beep or playing three fast beeps and turning
on the called party’s speaker so that you can begin speaking
with each other immediately.
NOTE:
or if they are already off-hook, you get a busy tone when
attempting to call them using the intercom feature.
36 VocalData Telephone Features Polycom Telephone User Guide
If the called party has the Do Not Disturb feature active,
621-00000092
Page 44

Meet-Me Conference
If supported by your system, Meet-Me Conferencing provides the
ability to schedule conference calls where the moderator (who has
control of the conference) and other members (internal or external)
call into the conference and are connected at the appropriate time
to carry on the conference call.
Moderators can do any of the following:
• Schedule a conference
• Cancel a conference
• Modify a conference
• List all conferences
Check with your system administrator to find out if you are
authorized to schedule Meet-Me Conferences. The default internal
access number is 523, but check with your system administrator if
the default does not work for your system. If a DID number was
created for outside access, you can dial in from an external
telephone to schedule Meet-Me Conferences. Your system
administrator can provide you with the external access number.
Anyone can join Meet-Me Conferences from both internal and
external telephones by dialing the correct numbers and entering the
required ID. The default internal access number is 522, but your
system may be different. Check with your system administrator for
the internal access number you should use. If you need to join a
Meet-Me Conference from outside the system, check with either the
conference moderator (the person who set up the conference) or
your system administrator to get the external access number for the
Meet-Me Conference.
Joining a Meet-Me Conference
Joining a conference call is done by dialing the correct number and
entering the Moderator or Guest ID. The system provides helpful
prompts when dialing in too early or entering an incorrect ID. Only
Moderators may extend a meet-me conference call.
Polycom Telephone User Guide VocalData Telephone Features 37
621-00000092
Page 45

To join a Meet-Me Conference
1. If dialing internally, dial the Meet-Me Join number (default is
522). Otherwise, dial the ten-digit conference access number.
2. Enter the ID of the conference you wish to join.
• If you are the moderator of the conference, enter the
Moderator ID.
• If you are a guest, enter the Guest ID (provided by the
moderator of the conference).
3. Press the # key.
• You will be prompted by the system:
“Please record your name after the tone, press the # key
when you are done.”
4. Record your name and press the # key within 5 seconds.
NOTE:
will be connected to the conference without being identified.
Within the 5 seconds, you may press the * key to cancel the
current recording and start the recording over.
If you do not complete this step within 5 seconds, you
• Under normal operations, when you successfully enter the
Guest or Moderator ID and are not too early, the system
will play the following greetings to you:
• If you are the first to join the conference:
“Your conference call is active. You are the first caller
to join this conference. Please wait for the next
participant.”
• If participants have already joined the conference:
“You are now being connected to the conference”.
• If you are within 5 minutes before the start of the
conference call:
“Your conference will start in a few minutes, please
wait or call back later.”
38 VocalData Telephone Features Polycom Telephone User Guide
621-00000092
Page 46

• When you join the conference, if you are the third (or later)
conferee to join, the system will play your recorded name
and the join tone to the moderator and the other
conference participants.
NOTE:
As participants leave the conference call, a “ding” sound
will alert the moderator and all remaining participants that
someone has left the conference call.
Dialing In Too Early
If you dial the Meet-Me Conferencing number more than five
minutes prior to the scheduled conference call time, you will hear
the following message and the system will then disconnect:
“Your conference is not scheduled to start until (time) on (day,
date). Please call back at that time.”
Entering an Incorrect ID
If you enter the wrong Guest or Moderator ID, the system informs
you the conference you wish to join could not be found and prompts
you to press 1 to re-enter the conference ID or press the * key to end
the call.
If you pressed 1, do the following:
1. Enter the ID of the conference you wish to join.
2. Press the # key.
Extending the Conference Duration
Five minutes prior to the end of the call, the system plays a
message to the moderator that the conference will end in five
minutes. Instructions are provided to the moderator on how to
extend the conference call, if desired. The conference call may be
extended in increments of 5 minutes by pressing *6 for as long as
needed or until the next scheduled conference call.
Polycom Telephone User Guide VocalData Telephone Features 39
621-00000092
Page 47

Roll Call
During a conference call, the moderator may initiate a roll call of the
participants that have signed in by pressing *2. All conference call
participants will hear:
“There are (n) people in the conference. The following people
have joined the conference. (System plays the name of each
participant as recorded.) Roll call complete.”
Adding More Ports to an Active Meet-Me Conference
During an active conference call, the moderator may add more ports
if needed. To add more ports, do the following:
1. Press *3. The moderator will hear:
“Please enter the number of ports you wish to add followed by
the # key.”
2. Enter the number of ports to be added, then press the # key.
The system will check the availability of the ports and report
results to the moderator. For example, the moderator wants to
add six ports:
• If all six ports are available, the moderator will hear:
“Six additional ports have been reserved for this conference.”
• If only 5 of 6 ports are available, the moderator will hear:
“Five of six additional ports have been reserved for this
conference.”
• If no ports are available, the moderator will hear:
“We are sorry, additional ports are not available at this time.”
Dropping a Conference Call
Should it be necessary, a conference call may be dropped (deleted)
while in progress. Reasons for dropping a conference call may
include participants becoming loud, not allowing others to talk, and
40 VocalData Telephone Features Polycom Telephone User Guide
621-00000092
Page 48

lack of courtesy, among others. To drop a conference call, press *7.
All callers will be disconnected from the conference call and the call
terminated.
Scheduling a Meet-Me Conference
1. If dialing internally, dial the Meet-Me Join number (default is
522). Otherwise, dial the ten-digit conference access number.
2. Press 1 to schedule a conference call.
3. Enter the date of the conference call in mm/dd/yy format.
4. Enter the 4-digit start time of the conference call in 24-hour
format (HHMM). All start times must be in quarter hour
increments (e.g., 0800, 0815, 0830, 0845)
5. Enter the length of the conference call in 5-minute increments,
but with a minimum of 15 minutes (e.g., 15, 20, 25, etc.)
followed by the # key.
6. Enter the number of participants (conference ports to reserve)
followed by the # key.
The system repeats your conference call settings to you as
“You have requested to reserve a conference call for (day of
week, date), at (time) with a duration of (X) minutes and (X)
ports.”
7. Press the # key if the information is correct, otherwise press 1
to re-enter the conference call parameters.
NOTE:
If you pressed # to accept the settings, the system
speaks your conference call meeting IDs including the
Moderator ID, Guest ID, and the dial-in number.
Write down this information. It should also be displayed across
your display telephone.
8. Do one of the following:
• Press 1 to hear the information again, or
• Press * to return to the Meet-Me Conference setup menu,
or
Polycom Telephone User Guide VocalData Telephone Features 41
621-00000092
Page 49

• Hang up.
Canceling a Meet-Me Conference
You may cancel a conference reservation at any time; however,
conference reservations are frozen 30 minutes before the start time
and cannot be cancelled after that time.
1. If dialing internally, dial the Meet-Me Join number (default is
522). Otherwise, dial the ten-digit conference access number.
2. Press 2 to cancel a conference call.
3. Enter the Moderator ID of the conference you wish to cancel
followed by the # key.
The system confirms your decision to cancel the conference
call including speaking the scheduled day and date, time,
duration and ports.
4. Press the # key to confirm the cancellation or press the * key to
return to the Meet-Me Conference setup menu.
• If you pressed #, the system announces that your
conference reservation has been cancelled.
• If you pressed *, the Meet-Me Conference setup menu is
played.
Modifying a Meet-Me Conference
You may modify a conference reservation at any time; however,
conference reservations are frozen 10 minutes before the start time
and cannot be modified after that time.
1. If dialing internally, dial the Meet-Me Join number (default is
522). Otherwise, dial the ten-digit conference access number.
2. Press 3 to modify a conference call.
42 VocalData Telephone Features Polycom Telephone User Guide
621-00000092
Page 50

3. Enter the Moderator ID that was received when the conference
was scheduled followed by the # key.
The system announces the selected conference call settings to
you as “You have selected to modify a conference call
scheduled for (day), (date), at (time) with a duration of (X)
minutes and (X) ports.”
4. Press the # key to confirm you want to modify this reservation
or press * if this is the wrong reservation and return to the
conference menu.
NOTE:
If this is not the meet-me conference you want to
modify, press the * key to return to the Meet-Me Conference
setup menu.
5. Enter the 4-digit start time of the conference call in 24-hour
format (HHMM). All start times must be in quarter hour
increments (e.g., 0800, 0815, 0830, 0845)
6. Enter the length of the conference call in 15-minute increments
(e.g., 15, 30, 45, etc.) followed by the # key.
7. Enter the number of participants (conference ports to reserve)
followed by the # key.
The system repeats your conference call settings to you as
“You have requested to reserve a conference call for (day of
week, date), at (time) with a duration of (X) minutes and (X)
ports.”
8. Press the # key if the information is correct, otherwise press 1
to re-enter the conference call parameters.
NOTE:
If you pressed # to accept the settings, the system
speaks your conference call meeting IDs including the
Moderator ID, Guest ID, and the dial-in number.
Write down this information. It should also be displayed by your
display telephone.
9. Press 1 to hear the information, press * to return to the MeetMe Conference setup menu or hang up.
Polycom Telephone User Guide VocalData Telephone Features 43
621-00000092
Page 51

Getting a List of Meet-Me Conferences
1. If dialing internally, dial the Meet-Me Join number (default is
522). Otherwise, dial the ten-digit conference access number.
2. Press 4 to list all conference call reservations.
The system announces the number of conference reservations
you currently have and then announces each conference
providing the day of week and date, time, duration, ports,
moderator ID and guest ID. After the last conference listing, the
system informs you that there are no more conferences.
3. The conference menu is played and you may make a selection
or hang up.
MultiLine Call Park
This feature lets you park more than one call from your phone or
pick up a specific parked call from a group of parked calls. When
parked, a call is assigned an ID number by the system. This ID
number makes multi-line call parking possible. Parking a call is
similar to placing a call on hold, except that when a call is parked,
you can pick up the parked call from anywhere in the system. Once
the call is parked, the line is free again.
Parking a Call
1. Tell the caller that you are going to place them on hold.
2. Press the MCPark soft key. The display shows “Park number
is xxxx” and a voice prompt repeats the same information.
NOTE:
know it to retrieve this parked call.
3. Hang up.
Write down the Park Number because you will need to
Retrieving a Parked Call
NOTE:
44 VocalData Telephone Features Polycom Telephone User Guide
You can retrieve the call using any phone in the system.
621-00000092
Page 52

1. Take the phone off-hook by doing one of the following:
• Press the Speaker button
• Press the linebutton
• Pickup the handset.
2. Dial the call ID number of the parked call you wish to retrieve.
3. Speak with the parked caller.
Music on Hold
Your telephone provides crystal clear voice conversations.
However, if you listen to music on hold, you may notice that some
types of music sound slightly distorted. This is normal.
The PressOne system has been optimized to transmit and receive
speech; music contains a variety of sounds that are considerably
higher and lower in pitch than the human voice, so some of these
musical sounds are not included in the audio signal.
Mute
Your system administrator may configure a Mute soft key on your
phone. Press the Mute button to turn off the speakerphone/handset
microphone during a conversation. This way, you can converse
with someone else in your office and the party on the phone will not
be able to hear the conversation. Press the Mute button again to
turn the handset microphone back on.
Night
The Night feature lets you determine where calls will be routed
based on the time of day and day of the week. Typically, this feature
is assigned to the receptionist’s or attendant’s telephone (usually
the company’s main number) and is used when the attendant
leaves the office and wants the automated attendant to answer
calls. You can switch to the “night” or “after hours” mode during the
day or to the “day” mode after hours.
Polycom Telephone User Guide VocalData Telephone Features 45
621-00000092
Page 53

• “Day” mode (or Mode 1) is defined by default as Monday -
Friday, 8:00 am to 5:00 pm.
• “Night” mode (Mode 2) is defined by default as Monday -
Friday, 5:01 pm - 7:59 am and all day Saturday and
Sunday.
These modes are defined by the service provider and can be
configured for different time periods. When the system is in Day
mode and has not been manuall switched, there is no label on the
phone display. If the system is in Night mode or the Night button has
been used to change the mode (either from Day to Night or Night to
Day), the word Night appears on the phone display.
Pressing the Night button to change modes will briefly display a
message of the selected mode. The easy way to tell which mode is
active is:
• If “Night” shows during the Day mode period, Night has
been activated.
• If “Night” shows during the Night mode period, Day has
been activated.
The Night feature has three states – normal, temporary or
permanent, which are changed when the Night button is pressed.
The states are shown on the phone display as follows:
• Normal = no stars (this means the display is blank in Day
mode and shows Night in Night mode
• Temporary = one star in front of the word Night (this
applies whether the mode was changed from Day to Night
or Night to Day)
• Permanent = two stars in front of the word Night (this
applies whether the mode was changed from Day to Night
or Night to Day)
These modes are defined by the service provider and can be
configured for different time periods.
46 VocalData Telephone Features Polycom Telephone User Guide
621-00000092
Page 54

The following table shows how to activate the various states of Night
mode.
State Activation Definition Example
Normal Default state,
no activation
required
Temporary
(*Night)
Permanent
(**Night)
Return to
Normal
Press the
Night
soft key
once.
Press the
Night
soft key
twice.
Press the
Night
soft key
twice.
Routes calls
appropriately based
on the time-of-day
and day-of-week.
Changes the mode,
but will automatically
revert back to the
Normal state at the
next change in the
time-of-day/day-ofweek schedule.
Changes the mode,
but requires manual
intervention to return
to the Normal state.
Night mode is
disabled, whether it is
Temporary or
Permanent.
Monday-Friday 8-5,
calls go to attendant’s
phone. All other times,
calls are answered by
auto-attendant.
Attendant leaves early
Monday and activates
Night mode. The
system automatically
returns to normal at 8
a.m. Tuesday
morning.
Attendant will be out
for several days and
no one will answer the
main number.
Attendant uses
Permanent Night
mode, which remains
in effect until the Night
soft key is pressed
again.
On-hook Dialing
You can dial a number while the handset is on-hook by doing one of
the following:
• Dial the phone number on the keypad
• Press the desired line button and dial the number.
Polycom Telephone User Guide VocalData Telephone Features 47
621-00000092
Page 55

• Press the button and dial the number.
• Press a speed dial button.
• Press the Redial soft key.
• Press the Intercom (Intcom) soft key.
TIP:
You can pick the handset up at any time to conduct a
private conversation.
One-Touch Transfer
One-Touch Transfer allows you to transfer a call using predefined
one-touch transfer buttons. You can make instant, “unsupervised”
transfers with this feature, which is typically assigned to the
receptionist’s telephone. The PressOne system administrator
assigns either extension numbers or voice mail destinations to the
buttons used for one-touch transfers. See also “Blind Transfer” on
page 18 and “Transfer” on page 68.
For example, you might have a button for John Smith (labeled J
Smith) that transfers a call to his telephone, or you might have a
button labeled J Smith VM that transfers callers directly to his voice
mail.
NOTE:
Speed Dial button. You cannot perform a one-touch transfer
using a button that has been configured to speed dial.
If you have a button for John Smith’s line on your phone and see
that the lamp associated with it is lit (telling you he is on the phone)
or you know that he is out of the office, you can ask the calling party
if they want to be transferred to his voice mail so they can leave a
message.
To transfer a call using a one-touch transfer button, use one of the
following methods:
1. After you answer the call, inform the caller that you are
transferring the call.
48 VocalData Telephone Features Polycom Telephone User Guide
A One-Touch Transfer button is not the same as the
621-00000092
Page 56

2. Press the one-touch transfer button (J Smith VM) to transfer
the call.
3. Hang up.
Permanent Caller ID Block Release
If you chose to always have your caller ID information blocked on all
calls, this feature allows your caller ID information to be sent for this
call only.
Your caller ID may be required for some calls to be completed. If
your call will not be accepted without caller ID information you may
get a message that the number you called will not accept
anonymous (no caller ID) calls. You may use this feature to send
caller ID information for that call only.
To allow your caller ID to be displayed on the phone you are calling:
1. Press *82.
2. Dial the desired phone number.
The called number should either ring or be busy. You should
not get the anonymous call rejection message.
Phone Configurator
The PressOne system allows the system administrator to configure
your phone in the database before it is physically installed. You can
then pick up the handset and enter your phone number and
password (provided by your system administrator), and it will be
assigned to your phone.
It also allows you to find out the telephone number and IP address
assigned to any telephone. Using the Configurator, you can also reassign your phone number to another telephone of a similar type
(usually for a temporary period at another location) and then reassign the number to back your regular telephone set.
Polycom Telephone User Guide VocalData Telephone Features 49
621-00000092
Page 57

Assigning Your Phone Number to Your Phone
When your phone is first installed, you may need to assign your
phone number to your phone. Your administrator should provide
both your phone number and a password to allow you to do this.
NOTE:
phone, you may be required to change your password. If not, it
is recommended that you change it for security.
To assign your phone number:
1. Take the phone off-hook.
2. Enter your complete telephone number and press #.
3. Enter your password and press #.
4. Hang up the phone.
5. Wait for the phone to reboot.
6. When your telephone indicates that it is back online, you can
use the phone.
NOTE:
functionality, wait a minute or so and pick up the handset and
listen for dial tone. Once you hear dial tone, you can make and
receive calls.
NOTE:
have the Phone Configurator active on multiple lines, finish the
assignment process on one of the lines. Any additional active
calls to the Phone Configurator are on hold. When the phone
becomes active, disconnect the held call.
Once you have assigned your phone number to your
If you don’t have a display or other indicator of phone
If you accidentally press more than one line button and
IP Address/Phone Number Announcement
The IP address and phone number announcement feature of the
Phone Configurator function allows dialing an extension to hear the
IP address or phone number of the phone. This is especially useful
50 VocalData Telephone Features Polycom Telephone User Guide
621-00000092
Page 58

in conference rooms with analog speaker phones or at other
locations with an analog phone where the phone number is
unknown.
• To hear the phone number, dial 587.
• To hear the IP address assigned to a phone, dial 589.
NOTE:
the system and your access codes may be different. Check
with the system administrator for the correct access codes if
the default codes do not work.
These access codes are the default access codes for
Changing the Extension Number
The extension number assigned to a phone may be changed using
Phone Configurator. To change the extension number, dial 588 and
follow the instructions.
NOTE:
your access code may be different. Check with the system
administrator for the correct access code if the default code
does not work.
The 588 access code is the default for the system and
Priority Call
The Priority Call feature allows you to define numbers that will ring
at your telephone with a special ring that tells you this is an
important call. To use this feature, you manage a list of telephone
numbers (internal or external) that cause the priority ring to sound
when a call with that caller ID appears at your telephone.
Priority Call is managed through a menu of commands activated by
pressing digits on the keypad. The commands are:
• 1 - Enable/disable feature
• 2 - Add members
• 3 - List members
• 4 - Delete members
Polycom Telephone User Guide VocalData Telephone Features 51
621-00000092
Page 59

If you have a display on your telephone, the options for each menu
level appear on your display. For example, if you press 4 to delete
a number, the display will show:
“1=Del Num, 2=List, 3=Del All, *=Menu”.
Enabling/Disabling Priority Call
The PressOne system allows you to turn the Priority Call feature on
and off (i.e., set the feature not to use the priority ring). Disabling
(turning off) the feature does not delete your list of callers assigned
to receive the priority ring.
1. Press *61.
2. Press the Dial soft key or pickup the handset.
A voice prompt tells you whether Priority Call is enabled or
disabled and then gives the menu choices.
3. Press 1 to enable Priority Call if it is disabled or to disable the
feature if it is enabled.
4. Hang up.
Adding Members to the Priority Call List
1. Press *61.
A voice prompt tells you whether Priority Call is enabled or
disabled and then gives the menu choices.
2. Press 2 to add telephone numbers to the list of members who
will trigger the priority ring.
3. Enter the number with no spaces, dashes or special characters
followed by the # key.
4. Press # to save the entry (add it to your list) or press * to cancel
the entry,
5. Select a menu item or hang up.
52 VocalData Telephone Features Polycom Telephone User Guide
621-00000092
Page 60

Listing Priority Call Members
1. Press *61.
A voice prompt tells you whether Priority Call is enabled or
disabled and then gives the menu choices.
2. Press 3 to hear the list of telephone numbers which will trigger
the priority ring.
3. Press # to hear the next number or press * to return to the
Priority Call menu.
NOTE:
will scroll through the list of member numbers, starting over
with the first number after the last number is spoken.
4. Repeat the previous two steps until you have heard as many of
the numbers as you want.
5. Press * to return to the Priority Call menu when you are finished
listening to member numbers.
As long as you press # for the next number, the system
Deleting Priority Call Members
1. Press *61.
A voice prompt tells you whether Priority Call is enabled or
disabled and then gives the menu choices.
2. Press 4 to delete telephone numbers from the list of members
who will trigger the priority ring.
• The voice prompt provides options for deleting members
including:
• Press 1 if you know the number to delete;
(see Step 3)
• Press 2 for a list of numbers;
(see Step 8)
• Press 3 to delete all numbers;
(see Step 13)
• Press * to return to the Priority Call menu.
3. Press 1 to remove a specific number.
Polycom Telephone User Guide VocalData Telephone Features 53
621-00000092
Page 61

• You are prompted to enter the number to delete followed
by the # key.
4. Enter the number with no spaces, dashes or special
characters.
5. Press the # key.
• The voice prompt speaks the number you just entered and
you are prompted to press # to save the entry (delete it
from your list) or press * to cancel the entry,
6. Press # or *.
• You are returned to the Priority Call menu.
7. Select a menu item or hang up.
8. Press 2 to hear the list of numbers and have the option to
delete them as you go through the list.
• The voice prompt announces the list, speaks the first
number and prompts you to press 1 to delete it, # to hear
the next number or * to return to the Priority Call menu.
9. Press # until you find the number you wish to delete.
10. Press 1 to delete the number.
• The number is deleted immediately and the next number
in the list is announced.
• You are prompted to press 1 to delete it, # to hear the next
number or * to return to the Priority Call menu.
11. Repeat the previous two steps until you have found and
deleted as many of the numbers as you want.
12. Press * to return to the Priority Call menu or hang up.
13. Press 3 to immediately delete all member numbers.
• The voice prompt announces that all phone numbers have
been removed from the list and you are returned to the
Priority Call menu.
14. Select a menu item or hang up.
54 VocalData Telephone Features Polycom Telephone User Guide
621-00000092
Page 62

Queue/ACD (Automatic Call Distribution)
The Automatic Call Distribution (ACD) queuing feature allows the
PressOne system to distribute incoming calls arriving at the pilot
number to a defined group of phones. You will have one or more
feature buttons on your telephone assigned as queue lines,
depending on how many ACD groups you belong to.
Finding Your Queues
The queue name is visible on the phone when you are logged out
of the queue. It is not visible when you are logged into the queue.
When you are logged out of the queue, the name is displayed next
to the line button to which the queue is assigned and the name will
be preceded by a star (
Logging Into/Out of Queues
You may log into multiple queues simultaneously by pressing the
queue button for each queue for which you wish to be active.
Press the button associated with the queue you want to be logged
into.The name of the queue will no longer be displayed next to the
line button on the LCD.
).
Answering Calls from Queues
When a call from the queue is distributed to your phone, the phone
MUST
will ring. You
ACD queue. Otherwise, you will activate your prime line and hear
dial tone.
NOTE:
queue will ring at your telephone.
1. Press the line button assigned to the queue line that is ringing.
2. Speak to the calling party.
Polycom Telephone User Guide VocalData Telephone Features 55
621-00000092
You must be logged into a queue before calls from the
press the queue button to answer calls from the
Page 63

Viewing Calls-in-queue Information
If the Display Queue Status feature has been activated for your
phone, you will be able to see the number of unanswered calls
currently in queue for the displayed queue. The information display
format is
<queue name>=<number of unanswered calls in queue>
For example, “Pubs=2” would mean there are two calls waiting in
the queue named Pubs.
If you have been provided with queue status display from multiple
queues, your phone will show the calls-in-queue status for the
queue which most recently received a call.
Redial
This feature lets you redial the last number (internal or external) that
you dialed.
…using the Phone
1. Press the Redial soft key (There is no need to select a line or
dial the outside line access code.)
2. Speak to the called party.
…using Star Codes
1. Dial *07.
2. Speak to the called party.
Release
This feature is mainly used when a headset is connected to the
telephone and allows you to disconnect from a call without having
to hang up the handset.
56 VocalData Telephone Features Polycom Telephone User Guide
621-00000092
Page 64

Hanging up a call this way means you will not get the reminder tone
in the handset that the phone is off-hook. It also allows incoming
calls to ring through to the telephone.
NOTE:
caller. Only the 911 Operator can disconnect the call.
If a call is made to 911, it cannot be disconnected by the
Remote Access to Call Forwarding
This feature allows you to call a DID number from any telephone
and set, change or cancel the destination phone number that is the
forwarding target for all incoming calls to your telephone. Contact
your system administrator for the DID number to call to make use of
this feature.
Setting or Changing Remote Forwarding
1. Dial the DID number for Remote Access to Call Forwarding.
(If calling from an internal business phone, dial 9 first.)
NOTE:
2. Enter the complete phone number of your VocalData phone,
followed by the # key.
3. Enter the phone’s password, followed by the # key
A voice prompt leads you through the remaining steps.
If you have your phone forwarded to another phone, your
current forwarding number is announced.
4. Enter the new forwarding number followed by the # key. Enter
the number as if you were dialing it, including the area code if
necessary.
You hear an announcement that the forwarding number has
been changed and the call is idled.
Polycom Telephone User Guide VocalData Telephone Features 57
621-00000092
Page 65

Canceling Remote Forwarding
1. Dial the DID number for Remote Access to Call Forwarding.
(If calling from an internal business phone, dial 9 first.)
NOTE:
2. Enter the complete phone number you want to access,
followed by the # key.
3. Enter the phone’s password, followed by the # key
If you have your phone forwarded to another phone, your
current forwarding number is announced.
4. Do one of the following:
A voice prompt leads you through the remaining steps.
• Press # to cancel remote forwarding
You hear an announcement that the forwarding number
has been changed and the call is idled.
or
• Hang up without pressing any keys to quit the canceling
operation.
Remote Phone
The Remote Phone feature provides the capability to set up a
remote phone to act as if it were the PressOne phone. Instead of
placing and receiving calls from the PressOne desktop phone, calls
are made and answered from the Remote Phone. A Remote button
is required on your phone for this feature to be available, but the
phone does not have to be working for the Remote Phone feature
to be operational.
For example, you could configure your cell phone to be your remote
phone, and it would act as if it was your PressOne phone. All calls
coming into your PressOne (office) phone would ring your cell
58 VocalData Telephone Features Polycom Telephone User Guide
621-00000092
Page 66

phone instead. Callers will hear an announcement asking them to
wait while the called party is located and giving them the option to
leave a voice mail.
NOTE:
remote mode (it will be playing on-hold music), an
announcement tells you that 911 is not allowed from Remote
Phone and advises you to hang up the phone and try again.
Until you hang up the phone and disconnect from the Remote
Phone feature, you will receive the announcement.
If you dial 911 from the remote phone while it is in
Dial-in Setup of Remote Phone
To set up a remote phone by dialing in, you must call using the
remote phone where your PressOne phone calls will be forwarded.
1. From the remote phone (example, your cell phone or a hotel
phone), dial the Remote Phone access DID number. Your
system administrator should have provided this number to you.
EXAMPLE:
2203 from the destination phone.
2. Enter the phone number of your PressOne IP phone followed
by the pound sign (#).
3. Enter the password for your PressOne phone followed by #.
The user dials the Remote Phone DID 469-555-
4. DO NOT hang up the destination phone. Leave it off-hook.
5. If a call comes in, press star (*) to answer the call.
6. Disconnect from a call by pressing “###”, which will leave the
Remote Phone active (you will hear hold music playing).
NOTE:
is still in an active call.
Be aware that if you are using a cell phone, the phone
Deactivating Dial-up Remote Phone
If you hang up the remote phone, it will deactivate the Remote
Phone connection.
Polycom Telephone User Guide VocalData Telephone Features 59
621-00000092
Page 67

You can also press the Remote button on the PressOne IP phone
to deactivate the remote phone connection.
Web Portal Setup of Remote Phone
The remote phone feature can be activated via the Web Portal by
selecting Options > Remote. You must check the box labeled
“Enable Remote User”, then enter the phone number of the remote
phone (for example, a cell phone or hotel phone number).
From the Web Portal, you can specify whether the call receiver’s
Caller ID will display your remote phone number or PressOne
desktop phone number. You can also set the number of seconds the
phone will ring unanswered before the call is redirected to voice mail
or other destination.
The Web Portal will only show the Remote Phone enabled status if
the remote phone was activated from the Web Portal. If the remote
phone was enabled by dialing into the PressOne system from the
remote phone, the active status will not be shown on the Web Portal
display.
Deactivating Remote Phone via Web Portal
If you enable Remote Phone from the Web Portal, you can hang up
the remote phone and the remote feature will still be active. The
feature can only be disabled by unchecking the Enable Remote
User field in the Web Portal or by pressing the Remote key on your
PressOne phone.
Selective Call Forward
Selective Call Forward allows you to program your phone to send
calls from a list of telephone numbers to another telephone number.
All calls from phones on the list go to the same destination, which
can be changed at any time.
60 VocalData Telephone Features Polycom Telephone User Guide
621-00000092
Page 68

To use this feature, you designate the forward destination and
manage a list of telephone numbers (internal or external) that are
forwarded to that number when a call with that caller ID appears at
your telephone.
Selective Call Forward is managed through a menu of commands
activated by pressing digits on the phone keypad. The commands
are:
• 1 - Enable/disable feature
• 2 - Enter the forward (destination) number
• 3 - ID (forward destination number)
• 4 - Add members (to list to be forwarded)
• 5 - List members (of list to be forwarded)
• 6 - Delete members (from list to be forwarded)
If you have a display on your telephone, the options for each menu
level appear on your display. For example, if you press 6 to delete
a number, the display will show:
“1=Num, 2=List, 3=Del All, *=Main Menu”.
Enabling/Disabling Selective Call Forward
The PressOne system allows you to turn the Selective Call Forward
feature on and off (i.e., decide when calls from your list will be
forwarded and when they will ring at your telephone as usual).
Disabling (turning off) the feature does not delete the list of callers
assigned for forwarding.
1. Press *63 or *83.
A voice prompt tells you whether Selective Call Forward is
enabled or disabled and then gives the menu choices.
2. Press 1 to enable Selective Call Forward if it is disabled or to
disable the feature if it is enabled.
3. Hang up.
Polycom Telephone User Guide VocalData Telephone Features 61
621-00000092
Page 69

Entering the Forwarding Destination Number
1. Press *63 or *83.
A voice prompt tells you whether Selective Call Forward is
enabled or disabled and then gives the menu choices.
2. Press 2 to enter the forwarding number (destination for
forwarded calls).
3. Enter the forwarding number followed by the # key
4. Press # to save the entry (add it to your list), or press * to cancel
the entry,
5. Select another menu item or hang up.
Identifying the Forwarding Destination Number
1. Press *63 or *83.
A voice prompt tells you whether Selective Call Forward is
enabled or disabled and then gives the menu choices.
2. Press 3 to hear the forwarding number (destination for
forwarded calls).
The voice prompt tells you the forwarding number and you are
returned to the Selective Call Forward menu.
Adding Forwarded Phone Numbers
1. Press *63 or *83.
A voice prompt tells you whether Selective Call Forward is
enabled or disabled and then gives the menu choices.
2. Press 4 to add telephone numbers to the list of members who
will be forwarded.
3. Enter the number with no spaces, dashes or special
characters, followed by the # key.
4. Press # to save the entry (add it to your list) or press * to cancel
the entry,
62 VocalData Telephone Features Polycom Telephone User Guide
621-00000092
Page 70

5. Select another menu item or hang up.
Listing Forwarded Phone Numbers
1. Press *63 or *83.
A voice prompt tells you whether Selective Call Forward is
enabled or disabled and then gives the menu choices.
2. Press 5 to list telephone numbers of members who will be
forwarded.
3. Press # to hear the next number or press * to return to the
Selective Call Forward menu.
NOTE:
will scroll through the list of member numbers, starting over
with the first number after the last number is spoken.
4. Repeat the previous two steps until you have heard as many of
the numbers as you want.
5. Press * to return to the Selective Call Forward menu when you
are finished listening to member numbers.
6. Select another menu item or hang up.
As long as you press # for the next number, the system
Deleting Forwarded Phone Numbers
1. Press *63 or *83.
2. Press 6 to delete telephone numbers from the list of numbers
which will be forwarded.
3. The voice prompt provides options for deleting members
including:
• Press 1 if you know the number to delete;
(see Step 4)
• Press 2 for a list of numbers;
(see Step 8)
• Press 3 to delete all numbers;
(see Step 14)
• Press * to return to the Selective Call Forward menu.
Polycom Telephone User Guide VocalData Telephone Features 63
621-00000092
Page 71

4. Press 1 to remove a specific number.
5. Enter the number with no spaces, dashes or special
characters, followed by the # key.
6. Press # to save the entry (delete it from your list), or press * to
cancel the entry,
7. Select another menu item or hang up.
8. Press 2 to hear the list of number and have the option to delete
them as you go through the list.
The voice prompt announces the list, speaks the first number
and prompts you to press 1 to delete it, # to hear the next
number or * to return to the Selective Call Forward menu.
9. Press # until you find the number you wish to delete.
10. Press 1 to delete the number.
The number is deleted immediately and the next number in the
list is announced.
11. Press 1 to delete it, # to hear the next number or * to return to
the Selective Call Forward menu.
12. Repeat the previous three steps until you have found and
deleted as many of the numbers as you want.
13. Press * to return to the Selective Call Forward menu or hang
up.
14. Press 3 to immediately delete all member numbers.
The voice prompt announces that all phone numbers have
been removed from the list and you are returned to the
Selective Call Forward menu.
15. Select another menu item or hang up.
64 VocalData Telephone Features Polycom Telephone User Guide
621-00000092
Page 72

Speaker
Press the (Speaker) button to turn on your speakerphone, to
select your default prime line, or to hang up the phone during a
speakerphone conversation.
Speed Dial
This feature allows you have a favorite phone number associated
with a button and then dial the number by pressing the button.
Programming a Speed Dial Button
Follow these steps:
1. Press 544 (or the code provided by your system administrator)
or 74# on the keypad.
2.
NOTE:
Press keypad digit 1.
3. Press the speed dial button on the telephone you wish to
program.
A voice prompt leads you through the remaining steps.
4. Enter the internal or external telephone number on the keypad
followed by the pound # key.
NOTE:
to enter the area code if required.
5. Do one of the following:
If the speed dial number is an external number, be sure
• Press # to save the speed dial number and hang up, or
• Press * to cancel and return to the main menu
6. Make another selection from the main menu or hang up.
Using a Speed Dial Button
Press the speed dial button on the telephone.
Polycom Telephone User Guide VocalData Telephone Features 65
621-00000092
Page 73

Identifying the Number Assigned to a Speed Dial Button
Choose one of the following bulleted methods:
• Press the speed dial number.
This identifies the number by dialing it.
• Follow these steps on the phone:
a. Press 544 (or the code provided by your system
administrator) on the keypad.
b. Press keypad digit 2.
c. Press the speed dial button on the telephone you want
to know the number for. (The system speaks the
number assigned to the button and returns you to the
main menu.)
d. Make another selection from the main menu or hang
up.
NOTE: The tag can be titled anything and doesn’t necessarily
reflect the most recent speed dial number. To double check the
accuracy of the tag, you may want to follow one of these other
procedures.
Modifying a Speed Dial Number
From the phone, repeat the procedure for programming a speed dial
number.
Deleting a Speed Dial Number
From the phone, you can remove the phone number from a Speed
Dial button by repeating the procedure for programming the button.
When prompted to enter the number to dial, press the # key for the
number, then press the # key again.
66 VocalData Telephone Features Polycom Telephone User Guide
621-00000092
Page 74

Star Codes
The codes used by analog DTMF users to activate features
(commonly referred to as "star codes") are also supported for IP
phones. By pressing the pound or star button on the telephone and
entering the proper code, you can make use of these codes for
feature use.
The feature must be active at your phone for it to be accessed from
the star codes (that is, you can't use features that aren't turned on)
and some caution should be used when activating features from
star codes, since they may not be reflected in display messages or
lamp activity on the telephone.
NOTE:
This table lists the feature codes that are the default
values for your phone system at the time of installation. They
may be changed by your system administrator to meet the
needs of your company. Any list of feature codes given to you
by your system administrator should be used in place of the
codes listed here.
Table 1: Feature Matrix
Feature Name Enable Disable
Abbreviated Dial - Program 75# 75#
Abbreviated Dial - Enable *3+code N/A
Anonymous Call Rejection *77 *87
Call Forward (All) 72#+number+# 73# or 72##
Call Forward (Busy) (On/Off) 76#+number+# 77# or 76##
Call Forward (No Answer)
(On/Off)
78#+number+# 79# or 78##
Call Return *69 N/A
Call Trace *57 N/A
Polycom Telephone User Guide VocalData Telephone Features 67
621-00000092
Page 75

Table 1: Feature Matrix
Feature Name Enable Disable
Caller ID Block *67 (suspend for
current call)
Directed Call Pickup (Bus only) *12+your
extension
Do Not Disturb *04 *04
Group Pickup (Bus only) *06
Permanent Per Call Block N/A *82+number
Priority Call *61+menu *61+menu
Redial *07 N/A
Selective Call Forward *63+menu *83+menu
Selective Call Rejection
(Call Block)
Speed Dial 74#+program 74#+program
Voice Mail *09 *09
*60+menu *80+menu
N/A
Transfer
Use this feature to transfer a call to another number. See also“Blind
Transfer” on page 18 and “One-Touch Transfer” on page 48.
1. Tell the calling party you will transfer the call, then press the
Transfer button.
The call is placed on hold and you hear a dial tone.
2. Dial the number to which you want to transfer the call.
3. If the called party answers, you can inform them of the transfer
and do one of the following:
• Hang up and let the call transfer.
• Press the line button which has the held call to cancel the
transfer and return to the holding party.
68 VocalData Telephone Features Polycom Telephone User Guide
621-00000092
Page 76

4. If the called party does not answer, you can do one of the
following:
• Press the line button which has the held call to cancel the
transfer and return to the holding party, or
• Hang up and let the call transfer to the called party’s voice
mail.
Polycom Telephone User Guide VocalData Telephone Features 69
621-00000092
Page 77

70 VocalData Telephone Features Polycom Telephone User Guide
621-00000092
Page 78

Chapter 4
Voice Mail Features
The PressOne voice mail system stores messages in your personal
voice mailbox from callers who are unable to speak with you, and
provides an indication that voice mail has arrived. The red on the
Polycom telephone lights when new or unsaved voice messages
are stored in your mailbox.
You can access the voice mail system on your phone by pressing
*09 or by pressing the Voice Mail button, if your phone is equipped
with one.
System settings determine the number (and length) of voice mail
messages that are stored in your voice mailbox. If supported by
your system, callers can press “0” while they are “in” your mailbox
to transfer to your main number or operator.
The PressOne voice mail system also provides both personal and
group distribution lists which let you send a voice mail to a defined
group of people as easily as sending a voice mail to a single user.
Combining the ability to compose a voice mail message before
sending it with a distribution list, you can easily create and send a
voice mail message to multiple users or lists.
Polycom Telephone User Guide Voice Mail Features 71 621-00000092
Page 79

Menus and Commands
The following tables show the main voice mail menu along with the
message control commands and the distribution group menu.
Table 2: Voice Mail Main Menu
Access Code Function
1 Play inbox messages
2 Play saved messages
3 Change password
4 Playback personal greetings
5 Record personal greetings
6 Access personal distribution groups
7 Compose a message
8 Manage custom operator number (Not
supported for stand-alone mailboxes.)
NOTE:
menu option is displayed as “ZO=8”.
On the phone LCD display, this
* (star) Exit the voice mail system
Table 3: Voicemail Message Controls
Feature Before Mail
Message
Replay from start NA NA 77
Skip 8 8 #
Forward 6 6 6
Reply 2 2 2
Dial Back Originator 3 3 3
Delete 4 4 4
72 Voice Mail Features Polycom Telephone User Guide
After Mail
Message
During Mail
Message
621-00000092
Page 80

Table 3: Voicemail Message Controls
Feature Before Mail
Message
After Mail
Message
During Mail
Message
Save 5 5 5
Fast Forward NA NA 9
Rewind NA NA 7
Pause/Unpause Play NA NA 8
Skip to the End NA NA 99
Skip to Previous Menu Options * * *
NOTE:
If you are listening to the introductory message and you
press *, you will exit from voice mail.
Polycom Telephone User Guide Voice Mail Features 73
621-00000092
Page 81

Table 4: Voice Mail Distribution List
Access Code Function
1 Hear a list of all distribution groups
2 Edit a distribution group
1 - list of members
2 - add a member
3 - delete a member
4 - hear the group name
5 - change the name
* - return to the previous menu
3 Create a distribution group
4 Delete a distribution group
* (star) Return to main voice mail menu
Your service provider may have selected an Octel-style voice mail
menu for you. If so, the following commands will allow you to access
your voice mail system.
Table 5: Alternate Voice Mail Menu Keys
Access Code Function
Top Menu
1 Play inbox messages
2 Compose a message
3 Play saved messages
4 Playback personal greetings
5 Record personal greetings
6 Access personal distribution groups
7 Change password
74 Voice Mail Features Polycom Telephone User Guide
621-00000092
Page 82

Table 5: Alternate Voice Mail Menu Keys
Access Code Function
8 Hear or change custom operator number
(Not supported for stand-alone mailboxes)
NOTE:
On the phone LCD display, this
menu option is displayed as “ZO=8”.
* (star) Exit the voice mail system
Play Control Keys
* (star) • When pressed while sender, date, and
time information (message header) is
playing, returns to Alternate Voice Mail
Top Menu
• When pressed while message is
playing, returns to message header.
# • When pressed while message header is
playing, goes to next message header.
• When pressed while message is
playing, goes to Message Handling
Message Control Menu.
1 Skip backward
2 Pause/Resume
3 Skip forward
11 Skip to the beginning
33 Skip to the end
Message Handling Message Control Menu
* (star) Return to Alternate Voice Mail Top Menu
#Next message
1 Skip ahead
4 Play again
6Forward
Polycom Telephone User Guide Voice Mail Features 75
621-00000092
Page 83

Table 5: Alternate Voice Mail Menu Keys
Access Code Function
7 Delete
8 Reply
9Save
88 Call originator
Accessing Your Voice Mail
You can access your voice mailbox from several different sources:
• Your phone
• Any other internal phone
• Any touchtone phone outside your office.
• The email program on your PC (password required)
…from your phone
1. Press the Voice Mail button or dial *09 to access your voice
mail system.
2. Enter your password (if required).
3. If you have new voice mail, the messages are identified and
played. Otherwise, you will be prompted with choices to play
your inbox messages, play your saved messages, change your
password, playback your greetings, record new greetings, or
exit the voice mail system.
4. Press the corresponding digit on your phone to select the
desired voice mail function.
…from any other internal phone
1. Dial 555 (or the code provided by your system administrator).
You hear a welcome greeting and are prompted to enter your
extension number.
76 Voice Mail Features Polycom Telephone User Guide
621-00000092
Page 84

2. Enter your extension number. You are prompted to enter your
password.
3. Enter your numeric password, followed by the # key.
NOTE:
If you have new, or previously heard but not saved or
deleted, voice mail, the message is identified and played.
Otherwise, you are prompted with choices to play your saved
messages, change your password, playback your greetings,
record new greetings, or exit the voice mail system.
4. Press the corresponding digit on your phone to select the
desired voice mail function.
…from any outside touchtone phone
1. Dial your main telephone number for the Auto Attendant
feature and press 555 (or the code provided by your system
administrator).
NOTE:
the telephone number you have been given for voice mail
system access by your system administrator.
NOTE:
your extension number.
2. Enter your extension number.
If your system is set up for direct voice mail access, dial
You hear a welcome greeting and are prompted to enter
3. You will be prompted to enter your password.
4. Enter your numeric password, followed by the # key.
NOTE:
If you have new, or previously heard but not saved or
deleted, voice mail, the message is identified and played.
Otherwise, you are prompted with choices to play your saved
messages, change your password, playback your greetings,
Polycom Telephone User Guide Voice Mail Features 77
621-00000092
Page 85

record new greetings, or exit the voice mail system.To select
the desired option, press the corresponding digit on your
phone.
NOTE:
Pressing the * key from the main voice mail menu will
send you to the main auto-attendant menu. You may then dial
extension numbers to reach internal parties or access any
other feature available from the auto attendant.
…from the email program on your PC
1. Open your email reader.
2. Open the email message containing the voice mail.
3. Open the attachment in the email message.
The Email Player appears.
4. Click the green arrow (play button) to hear your voice mail
message.
5. Click the red X to close the voice mail message.
NOTE:
While the message plays, the box to the right of the
green arrow turns red. Click on the red box to stop the
message.
NOTE:
The yellow folder icon to the left of the green arrow lets
you open a saved voice mail message. Click on the icon for the
saved messages.
NOTE:
The voice mail message plays concurrently with music
CDs or other music coming from your speakers. Stop other
features before playing the voice mail message to increase the
78 Voice Mail Features Polycom Telephone User Guide
621-00000092
Page 86

clarity of the message. Also remember to check the volume
level on your speakers before playing any voice mail
messages.
Using Controls While Playing Messages
The system provides you with the following message control
options:
Rewind/Fast Forward
While listening to a message follow these steps:
• Press 7 to skip back in 5 second increments.
• Press 9 to skip forward in 5 second increments.
• Repeat the process to further rewind or fast forward.
Skip to the Beginning of a Message
If you want to return to the beginning of the message:
• Press 77.
Skip to the End of a Message
If you want to forward to the end of a message:
• Press 99.
Pause Play of a Message
To pause play of a message or to resume play of a paused
message:
• Press 8.
Polycom Telephone User Guide Voice Mail Features 79
621-00000092
Page 87

Composing Messages before Sending
The compose feature of the voice mail system allows you to record
a message and review or change it before sending it to any number
of users or distribution groups. You first enter the extensions and
distribution group numbers of the recipients and then record and
send your message.
Compose and Send a Message
1. Press the Voice Mail button.
2. Press 7 to select compose a message.
3. Enter the extensions and group numbers of those persons you
want to receive the message followed by the # key.
4. When you are finished, press # again to complete your mailing
list.
5. Record your message after the tone and press # when finished.
6. You are prompted to perform one of the following:
• Press 1 to send
• Press 2 to change
• Press 3 to review (your message is played back to you)
• Press 9 to send as urgent
7. Press a number to act on your message.
• If you pressed 1, your message is sent and voice mail
disconnects.
• If you pressed 2, your are returned to the prompt to record
your message. Record again and follow the prompts.
• If you pressed 3, your message is played back to you and
you are then prompted to perform an action from the
previous list.
• If you pressed 9, your message is marked as urgent and
sent. The voice mail system hangs up when the message
is sent.
80 Voice Mail Features Polycom Telephone User Guide
621-00000092
Page 88

Marking a Message as Urgent
To mark a message as urgent, which places it in the recipient(s)
mailbox before any regular messages, follow these steps:
1. Record a message.
2. Press #.
3. Press 9 to mark as urgent and send.
NOTE:
the option to page the recipient with a notice that they have an
urgent voice message.
Marking a Message as urgent automatically allows you
Changing Your Password
The system default for your voice mail password is your extension
number. To keep others from listening to your voice mail messages,
you should change your password to something only you know.
To change your password, follow these steps:
1. Press your voice mail button or dial *09.
2. Press 3 to change your password.
3. Enter your new password by pressing numbers on the keypad
followed by #.
4. Enter your new password again. A prompt will tell you if you
have successfully changed your password.
NOTE:
want to skip them and change your password, press * to get the
main menu, then follow the above steps. Otherwise listen to
your messages and then follow the above steps.
If you have messages in your voice mail box, but you
Skipping the Mail Menu to Hear Messages
To immediately begin listening to voice mail, press # during the
voice mail menu announcement.
Polycom Telephone User Guide Voice Mail Features 81
621-00000092
Page 89

Returning to the Auto Attendant or Operator
When calling from outside of the PressOne system, you can escape
from voice mail to the auto attendant or operator using the star (*)
key. Press * to move from the selected option to the previous menu.
When you reach the main voice mail menu, press * to transfer to the
main number or operator, depending on your system configuration.
Zeroing Out to a Custom Operator
When callers reach your voice mail, you can give them the option to
leave a message or dial zero (0) and reach your custom operator
(which may be the auto attendant or another phone number). By
default, the VocalData system will route callers to the auto attendant
when they press zero. You can change the destination from the
voice mail main menu.
TIP:
When you record your greetings, be sure to tell callers
than they can press zero (0) to be transferred to the auto
attendant or to your designated alternate phone number.
NOTE:
To hear or change where pressing zero (0) goes, follow these steps:
1. Press the Voice Mail button or dial *09 to access your voice
mail system.
2. Press 8 to hear or change your custom operator selection.
NOTE:
displayed as “ZO=8”.
3. You should hear an announcement that your custom operator
is a phone number you previously programmed or the default
selection.
NOTE:
message to that effect.
82 Voice Mail Features Polycom Telephone User Guide
This feature is not supported for stand-alone mailboxes.
On the phone LCD display, this menu option is
If a custom operator is not available, you will hear a
621-00000092
Page 90

4. Do one of the following:
• Press 1 to change your custom operator number, see step
5.
• Press 2 to restore the default custom operator, see step 6.
• Press * to return to the voice mail main menu, see step 7.
5. If you pressed 1, enter your custom operator number, press #
and listen to the confirmation announcement.
6. If you pressed 2, listen to the announcement that your default
custom operator has been restored.
7. If you pressed 3, listen to the voice mail main menu.
NOTE:
extensions must match your 4-, 5- or 6-digit plan, or a valid
outside number, including all necessary access and area code
numbers), cannot be the same extension as your mail box, and
you must be able to dial the number entered from your phone.
You will receive an error message if you enter an invalid
number or are not allowed to enter a long distance number as
your custom operator.
TIP:
and attempt to enter a long distance number as the custom
operator without the access codes, the PressOne system will
accept the digits, but when the caller presses zero (0), the call
will be disconnected.
Entered numbers must match a valid dial plan (i.e.,
If you cannot make long distance calls from your phone
Replaying a Message
To replay a voice mail message, press 7.
Saving a Message
To save a voice mail message, press 5.
NOTE:
moved to the saved messages, and is unavailable until you exit
and re-enter voice mail.
Polycom Telephone User Guide Voice Mail Features 83
621-00000092
When you save a voice mail message, the message is
Page 91

Skipping to the Next Message
To skip to the next voice mail message, press 8.
Deleting a Message
To delete a voice mail message, press 4.
NOTE:
deleted, but the caller ID and message received information
(date, time, etc.) remains in the inbox listing until you exit voice
mail.
When you delete a voice mail message, the message is
Forwarding a Message to Another Mailbox
To forward a voice mail message to another mailbox, follow these
steps:
1. Press 6.
NOTE:
person(s) to whom you want to forward the message.
2. Enter the extension digits and then either:
3. You get a prompt to leave an introduction to the forwarded
message:
You hear a prompt to enter the extension number of the
• press # to enter another extension or,
• press ## if this is the only (or last) person to receive the
forwarded message.
a. Record your introductory message.
NOTE:
introductory message, press # immediately after the prompt.
4. Choose one of the following options to finish forwarding:
To forward the voice mail immediately without an
b. Press # to accept the message.
• Press 1 to forward the message.
84 Voice Mail Features Polycom Telephone User Guide
621-00000092
Page 92

• Press 2 to change the introductory message.
• Press 3 to review the introductory message.
• Press 9 to mark urgent and forward.
• Press * to cancel the forward.
NOTE:
you must reenter the extension(s) and any desired
introduction.
Press * at anytime to cancel the forward. If you press *,
Replying to a Message
To reply to a message you receive:
1. Press 2 to reply to the message.
You hear a prompt to record your reply.
2. Record your reply message.
3. Press # to accept your message.
Your voice mail system gives you the following options:
• Press 1 to send reply.
• Press 2 to change reply.
• Press 3 to review reply.
• Press 9 to mark urgent and reply.
• Press * to cancel the reply and re-record.
You hear the message options again.
Dialing Back a Caller
To dial a caller who left a message (if Caller ID information is
available):
Press 3.
Polycom Telephone User Guide Voice Mail Features 85
621-00000092
Page 93

Sending a Message Directly to an Extension
You can send a voice mail message directly to an extension without
dialing their extension and having to wait for the call to roll to the
voice mail system.
To go directly to someone’s voice mail box:
1. Dial 577 (or the code provided by your system administrator)
on the keypad.
You hear a voice prompt to enter the extension number of the
person you want to send a message to.
2. Dial the extension number.
You hear a greeting and voice prompt to enter a message.
3. Record your message and hang up.
NOTE:
greeting to skip to the end of it.
You can press * on your phone at any time during the
Recording Personalized Mailbox Greetings
You can record a different voice mail greeting for each of the
conditions that transfers a caller to your voice mailbox:
• when your phone rings and you don’t answer it (the “No
Answer” greeting)
• when you have activated the Do Not Disturb feature (if this
feature is provided on your telephone)
• when you are talking on the phone (the “Busy” greeting)
TIP:
When you create your greeting be sure to tell the caller
they can dial zero (0) to reach either the automated attendant
or the person you have programmed to answer “zero out” calls.
To record a personalized greeting, press 5 from the main voice mail
menu. Choose the greeting you want to record by pressing the
corresponding digit key.
86 Voice Mail Features Polycom Telephone User Guide
621-00000092
Page 94

• Press 1 to record the No Answer greeting.
• Press 2 to record the Do Not Disturb greeting.
• Press 3 to record the Busy greeting.
• Press * to return to the main menu.
Listening to Your Greetings
You may want to check your personalized greetings to make sure
they are still appropriate. Press 4 from the main voice mail menu
and then use the same digit selections used for recording greetings
to listen to your greetings. To change a greeting, return to the main
voice mail menu and press 5 to record greetings.
Receiving Pager Notification
PressOne has provided the ability for you to be alerted on your
mobile phone or pager that you have received a voice message.
You must set this service up with your system administrator.
Mobile devices support different types of alerts:
• Basic numeric pages accept only keypad phone digits (1-
0, * and #).
• Cell phones support voice streaming.
• Some cell phone models can receive text-only e-mails.
• E-mail pagers can accept text-only e-mail messages.
You may choose to be alerted:
• Each time you receive any voice message.
• Only when you receive a message marked as urgent.
Polycom Telephone User Guide Voice Mail Features 87
621-00000092
Page 95

What You Receive on Your Pager/Cell Phone
Numeric - You receive the numbers you entered in the Pager Info
box; when you set up the pager option with the system
administrator. The number could be a code that means something
to you.
Voice - when you answer the page, voice mail plays a welcome
announcement followed by a request for the account password.
Enter the password and listen to the normal voice mail menu
options. If the voice message is marked as "Urgent", the first voice
message you receive is the urgent message.
When someone leaves a voice mail message on your phone, the
system immediately dials your pager or cellular phone. The system
tries to reach you every five minutes, up to three times if you don’t
answer. If you take the call, but you don’t enter digits at the prompt,
the system acts like you never answered the call and continues
trying to reach you as stated above. If you have caller id, your
“office” phone number/name is displayed as the caller.
E-Mail -The message you receive, reads as follows:
Subject: Voice Mail from calling party
Body: the text entered by the system administrator (i.e. Please call
me! I need to talk to you.)
NOTE:
get as the body: calling party called you on “date” at “time”.
If the system administrator left the body text empty, you
Managing Distribution Groups
Voice messaging distribution groups can be created as either
personal or corporate groups. Up to 20 personal groups can be
created by individuals for their own use while up to 70 corporate
groups can be created.
88 Voice Mail Features Polycom Telephone User Guide
621-00000092
Page 96

Corporate (customer) distribution lists are created by an
administrator or a user with access to a customer’s main number
voice mail box and are available for use by all of a customer’s users.
By default, corporate group number 10 in each customer partition is
named “Everyone”, includes all mailboxes within a company and is
available to all users. The “Everyone” group is updated whenever a
mailbox assigned to the customer partition is added or deleted.
Available Options
The following options are available when you press 6 to access the
distribution groups menu item:
• List all distribution groups
• Edit a group
• Create a group
• Delete a group
• Return to the main menu
Creating a New Group
1. Press the button on your phone you use to access the voice
mail system.
2. Press or click 6 for distribution groups.
3. Press or click 3 to create a group.
4. Enter the number of the group to be created and record the
name of the group.
• The group number must be from the allowed range and
cannot already exist as a group.
• If the voicemail account is corporate, then allowed range
is 10-79.
• If the voicemail account is personal, then the allowed
range is 80-99.
5. Press # to confirm or * to cancel.
Polycom Telephone User Guide Voice Mail Features 89
621-00000092
Page 97

6. Enter the extension number of one of the members of the
group.
7. Press # key.
8. Repeat steps the previous two steps until all members are
added.
9. Press the # key again.
TIP:
A group can be created without any members in it.
Members can be added later by using the edit menu to add
members. To create a group with no members, follow the
previous steps with one exception. When prompted to enter
members, just press or click the # key.
NOTE:
lists, you must be in the mailbox for your company's main
number.
To create group (corporate or company) distribution
Editing or Modifying a Group
1. Press the button on your phone you use to access the voice
mail system.
2. Press or click 6 for distribution groups.
3. Press or click 2 to edit a group.
4. Enter the number of the group to be edited.
5. Press a number to select an option from the edit menu:
• List all members - press 1
• Add a member - press 2
• Delete a member - press 3
• Play the group name - press 4
• Change the name - press 5
90 Voice Mail Features Polycom Telephone User Guide
621-00000092
Page 98

• Go back to the previous menu - press *.
NOTE:
number xx does not exist, Please try again.”
NOTE:
you must be in the mailbox for your company's main number.
If the group does not exist, the user will hear “The group
To edit group (corporate or company) distribution lists,
List all members:
If you pressed 1 for a list of all members the following happens:
1. The total number of members in the group is announced.
2. The extension of each member is announced.
3. Press # to skip to the next entry in the list before the number
being announced is finished.
Add a member:
If you pressed 2 to add a member, do the following:
1. After the prompt, enter the extension number of the member
you wish to add.
2. Press or click the # sign.
• The extension number you entered is played back to you
for confirmation.
3. Press the # key to add the user or * key to cancel.
• If you press # and the member does not exist, you will hear
“The member has been successfully added to this group.”
• If you press # and the member already exists, you will hear
“The member already exists in this group, please try
again.”
• If you press *, you will be asked to reenter the extension
number to add.
Delete a member:
If you pressed 3 to delete a member, do the following:
Polycom Telephone User Guide Voice Mail Features 91
621-00000092
Page 99

1. After the prompt, enter the extension number of the member
you wish to delete.
2. Press or click the # sign.
• The extension number you entered is played back to you
for confirmation.
3. Press the # key to delete the user or * key to cancel.
• If you press # and the member exists, you will hear “The
member has been successfully deleted from this group.”
• If you press # and the member does not exist, you will hear
“The member does not exist in this group, please try
again.”
• If you press *, you will be asked to reenter the extension
number to delete.
Play the name of the group:
If you pressed 4 to play the name of the group, the voice mail
system plays the name of the group already recorded for this group.
If there is no recording for this group, you will hear “Unknown.”
Change the name of the group
If you pressed 5 to change the name of the group, do the following:
1. The voicemail system plays the prompt:
“Please record the name for this group after the tone, when
your recording is complete press the # key.”
2. Record the new name for the group.
3. Press or click the # sign.
NOTE:
lists, you must be in the mailbox for your company's main
number.
92 Voice Mail Features Polycom Telephone User Guide
To delete group (corporate or company) distribution
621-00000092
Page 100

Deleting a Group
1. Press the button on your phone you use to access the voice
mail system.
2. Press or click 6 for distribution groups.
3. Press or click 4 to delete a group.
4. Enter the number of the group to be deleted.
5. Press # to confirm this is the correct group or * to reject the
group.
If you entered the wrong group number and pressed *, you will
be prompted for the number of the group to delete. Enter a
different group number or press * again to return to the
distribution group menu.
6. Press # to finish the delete or press * to cancel the delete
process and return to the distribution group menu.
NOTE:
lists, you must be in the mailbox for your company's main
number.
To delete group (corporate or company) distribution
Listening to a List of Distribution Groups:
1. Press the button on your phone you use to access the voice
mail system.
2. Press or click 6 for distribution groups.
3. Press or click 1 to list all your groups.
4. Listen to the playback of your groups as follows
• the number of groups
• the group number
• the group name
• If there is no recording for the group name, you will
hear “Unknown”.
• The corporate group 10 will always be named as
“Everyone”.
Polycom Telephone User Guide Voice Mail Features 93
621-00000092
 Loading...