

Page 1

ReadiVoice®
Administration &
Maintenance Guide
Page 2

ReadiVoice Administration & Maintenance Guide
Trademark Information
Polycom®, the Polycom logo design, ReadiVoice®, InnoVox®, and the Voyant logo are registered
trademarks of Polycom, Inc. Voyant Technologies
TM
is a trademark of Polycom, Inc. All other trademarks
are the property of their respective owners.
Patent Information
The accompanying product is protected by one or more U.S. and foreign patents and/or pending patent
applications held by Polycom, Inc.
Catalog No. 3725-70003-009
F
v. 2.56.x
© 2005 Polycom, Inc. All rights reserved.
Polycom Inc.
1765 West 121st Avenue
Westminster, CO 80234-2301 U.S.A.
No part of this document may be reproduced or transmitted in any form or by any means, electronic or
mechanical, for any purpose, without the express written permission of Polycom, Inc. Under the law,
reproducing includes translating into another language or format.
As between the parties, Polycom, Inc. retains title to, and ownership of, all proprietary rights with respect
to the software contained within its products. The software is protected by United States copyright laws
and international treaty provision. Therefore, you must treat the software like any other copyrighted
material (e.g. a book or sound recording).
Every effort has been made to ensure that the information in this manual is accurate. Polycom, Inc. is not
responsible for printing or clerical errors. Information in this document is subject to change without notice.
ii Proprietary & Confidential
Page 3

Contents
About This Manual . . . . . . . . . . . . . . . . . . . . . . . . . . . . . . xv
1 Introducing the ReadiVoice® System
Purpose . . . . . . . . . . . . . . . . . . . . . . . . . . . . . . . . . . . . . . . . . . . . . . . . . . . . . . . . xv
Document Conventions . . . . . . . . . . . . . . . . . . . . . . . . . . . . . . . . . . . . . . . . . xvi
Support . . . . . . . . . . . . . . . . . . . . . . . . . . . . . . . . . . . . . . . . . . . . . . . . . . . . . . xvii
What is the ReadiVoice System? . . . . . . . . . . . . . . . . . . . . . . . . . . . . . . . . . . . . 1
How ReadiVoice Conferencing Works . . . . . . . . . . . . . . . . . . . . . . . . . . . . . . . 1
Starting and Joining a Conference . . . . . . . . . . . . . . . . . . . . . . . . . . . . . . 2
Controlling a Conference . . . . . . . . . . . . . . . . . . . . . . . . . . . . . . . . . . . . . . 2
Managing Your ReadiVoice System . . . . . . . . . . . . . . . . . . . . . . . . . . . . . . . . 3
Operator Interface . . . . . . . . . . . . . . . . . . . . . . . . . . . . . . . . . . . . . . . . . . . . 3
Provisioning Interface . . . . . . . . . . . . . . . . . . . . . . . . . . . . . . . . . . . . . . . . . 4
Administration Interface . . . . . . . . . . . . . . . . . . . . . . . . . . . . . . . . . . . . . . . 4
Components of the ReadiVoice System . . . . . . . . . . . . . . . . . . . . . . . . . . . . . . 5
ReadiVoice-PSTN Systems . . . . . . . . . . . . . . . . . . . . . . . . . . . . . . . . . . . . . . . . . 5
ReadiVoice-IP Systems . . . . . . . . . . . . . . . . . . . . . . . . . . . . . . . . . . . . . . . . . . . . 9
ReadiVoice-IP Call Processing . . . . . . . . . . . . . . . . . . . . . . . . . . . . . . . . . 10
“Dialing” in ReadiVoice-IP Systems . . . . . . . . . . . . . . . . . . . . . . . . . . . . 11
ReadiVoice Call Flow . . . . . . . . . . . . . . . . . . . . . . . . . . . . . . . . . . . . . . . . . . . . 12
How Quick-Start and Conference Continuation Affect Call Flow . . . 12
How One-Click Conference Affects Call Flow . . . . . . . . . . . . . . . . . . . . 12
How A Two-Password Configuration Affects Call Flow . . . . . . . . . . . 14
How IP Tributaries Affect ReadiVoice-IP Call Flow . . . . . . . . . . . . . . . 14
2 Administering the ReadiVoice System
Opening ReadiVoice System Administration . . . . . . . . . . . . . . . . . . . . . . . . 16
Maintaining Bridge Information . . . . . . . . . . . . . . . . . . . . . . . . . . . . . . . . . . . 18
Adding a New Bridge . . . . . . . . . . . . . . . . . . . . . . . . . . . . . . . . . . . . . . . . 18
Modifying an Existing Bridge . . . . . . . . . . . . . . . . . . . . . . . . . . . . . . . . . . 20
Deleting a Bridge . . . . . . . . . . . . . . . . . . . . . . . . . . . . . . . . . . . . . . . . . . . . 21
Proprietary & Confidential iii
Page 4

ReadiVoice Administration & Maintenance Guide
Working with Translation Numbers . . . . . . . . . . . . . . . . . . . . . . . . . . . . 22
Working with Bridge Groups and Routing Lists . . . . . . . . . . . . . . . . . . . . . 25
Managing Bridge Groups . . . . . . . . . . . . . . . . . . . . . . . . . . . . . . . . . . . . . 25
Managing Routing Lists . . . . . . . . . . . . . . . . . . . . . . . . . . . . . . . . . . . . . . 27
Working with Number Groups . . . . . . . . . . . . . . . . . . . . . . . . . . . . . . . . . . . . 30
Adding a Number Group . . . . . . . . . . . . . . . . . . . . . . . . . . . . . . . . . . . . . 31
Modifying a Number Group . . . . . . . . . . . . . . . . . . . . . . . . . . . . . . . . . . . 32
Deleting a Number Group . . . . . . . . . . . . . . . . . . . . . . . . . . . . . . . . . . . . 32
Working with Access Classes . . . . . . . . . . . . . . . . . . . . . . . . . . . . . . . . . . . . . 33
Adding an Access Class . . . . . . . . . . . . . . . . . . . . . . . . . . . . . . . . . . . . . . . 33
Renaming an Access Class . . . . . . . . . . . . . . . . . . . . . . . . . . . . . . . . . . . . 34
Deleting an Access Class . . . . . . . . . . . . . . . . . . . . . . . . . . . . . . . . . . . . . . 34
Working with Access Phone Numbers . . . . . . . . . . . . . . . . . . . . . . . . . . . . . . 35
Adding Access Phone Numbers . . . . . . . . . . . . . . . . . . . . . . . . . . . . . . . 36
Moving Fixed Access Numbers to Another Bridge . . . . . . . . . . . . . . . . 37
Reassigning an Access Phone Number’s Subscribers . . . . . . . . . . . . . . 38
Changing an Access Phone Number’s Access Class . . . . . . . . . . . . . . . 40
Changing Hidden Numbers . . . . . . . . . . . . . . . . . . . . . . . . . . . . . . . . . . . 41
Deleting an Access Phone Number . . . . . . . . . . . . . . . . . . . . . . . . . . . . . 42
Working with Multiple Providers . . . . . . . . . . . . . . . . . . . . . . . . . . . . . . . . . . 43
Adding a Provider . . . . . . . . . . . . . . . . . . . . . . . . . . . . . . . . . . . . . . . . . . . 43
Editing a Provider Account . . . . . . . . . . . . . . . . . . . . . . . . . . . . . . . . . . . . 45
Deleting a Provider . . . . . . . . . . . . . . . . . . . . . . . . . . . . . . . . . . . . . . . . . . 46
Working with Subscriber Groups . . . . . . . . . . . . . . . . . . . . . . . . . . . . . . . . . . 46
Adding a New Subscriber Group . . . . . . . . . . . . . . . . . . . . . . . . . . . . . . 47
Editing a Subscriber Group . . . . . . . . . . . . . . . . . . . . . . . . . . . . . . . . . . . . 48
How Continuation Settings Interact . . . . . . . . . . . . . . . . . . . . . . . . . . . . 58
Deleting a Subscriber Group . . . . . . . . . . . . . . . . . . . . . . . . . . . . . . . . . . . 59
Setting Up the Provisioning Interface . . . . . . . . . . . . . . . . . . . . . . . . . . . . . . . 60
Managing System Access . . . . . . . . . . . . . . . . . . . . . . . . . . . . . . . . . . . . . . . . . 63
Adding an Internal User . . . . . . . . . . . . . . . . . . . . . . . . . . . . . . . . . . . . . . 63
Changing an Internal User’s Password . . . . . . . . . . . . . . . . . . . . . . . . . . 65
Adding Translation Numbers to a Bridge . . . . . . . . . . . . . . . . . . . . 23
Changing the Translation Numbers Assigned to a Bridge . . . . . 24
Adding a Bridge Group . . . . . . . . . . . . . . . . . . . . . . . . . . . . . . . . . . . 25
Modifying a Bridge Group . . . . . . . . . . . . . . . . . . . . . . . . . . . . . . . . . 26
Deleting a Bridge Group . . . . . . . . . . . . . . . . . . . . . . . . . . . . . . . . . . 26
Adding a Routing List . . . . . . . . . . . . . . . . . . . . . . . . . . . . . . . . . . . . 27
Modifying a Routing List . . . . . . . . . . . . . . . . . . . . . . . . . . . . . . . . . . 28
Renaming a Routing List . . . . . . . . . . . . . . . . . . . . . . . . . . . . . . . . . . 29
Deleting a Routing List . . . . . . . . . . . . . . . . . . . . . . . . . . . . . . . . . . . . 29
iv Proprietary & Confidential
Page 5

Deleting an Internal User . . . . . . . . . . . . . . . . . . . . . . . . . . . . . . . . . . . . . 66
Defining Invalid Subscriber Passwords . . . . . . . . . . . . . . . . . . . . . . . . . . . . . 66
Adding Entries to the List of Invalid Subscriber Passwords . . . . . . . . 66
Deleting Entries from the List of Invalid Subscriber Passwords . . . . . 67
3 Monitoring the ReadiVoice System
Accessing the Monitoring Tools . . . . . . . . . . . . . . . . . . . . . . . . . . . . . . . . . . . 69
Checking System Status . . . . . . . . . . . . . . . . . . . . . . . . . . . . . . . . . . . . . . . . . . 71
Viewing Conferencing Information . . . . . . . . . . . . . . . . . . . . . . . . . . . . . . . . 72
Current Conferences Information . . . . . . . . . . . . . . . . . . . . . . . . . . . . . . 72
CDR Data by Subscriber . . . . . . . . . . . . . . . . . . . . . . . . . . . . . . . . . . . . . . 73
CDR Data by Conference . . . . . . . . . . . . . . . . . . . . . . . . . . . . . . . . . . . . . . 74
Detailed CDR Data for One Conference . . . . . . . . . . . . . . . . . . . . . . . . . 76
Viewing Operator Information . . . . . . . . . . . . . . . . . . . . . . . . . . . . . . . . . . . . 77
Viewing Operator Request Records . . . . . . . . . . . . . . . . . . . . . . . . . . . . 77
Viewing Operator Request Statistics . . . . . . . . . . . . . . . . . . . . . . . . . . . . 79
Using the SNMP Monitor . . . . . . . . . . . . . . . . . . . . . . . . . . . . . . . . . . . . . . . . . 81
Using the Channel State Monitor . . . . . . . . . . . . . . . . . . . . . . . . . . . . . . . . . . 86
Contents
4 Maintaining the ReadiVoice System
Quick Maintenance Checklist . . . . . . . . . . . . . . . . . . . . . . . . . . . . . . . . . . . . . 92
Understanding Informix Backup . . . . . . . . . . . . . . . . . . . . . . . . . . . . . . . . . . 93
Archives . . . . . . . . . . . . . . . . . . . . . . . . . . . . . . . . . . . . . . . . . . . . . . . . . . . . 93
Logical Logs . . . . . . . . . . . . . . . . . . . . . . . . . . . . . . . . . . . . . . . . . . . . . . . . . 94
Backing Up Logical Logs . . . . . . . . . . . . . . . . . . . . . . . . . . . . . . . . . . . . . . . . . 96
Daily Maintenance Tasks . . . . . . . . . . . . . . . . . . . . . . . . . . . . . . . . . . . . . . . . . 97
Stopping Logical Log Backup and Replacing Tapes . . . . . . . . . . . . . . 97
Checking the ReadiVoice Processes . . . . . . . . . . . . . . . . . . . . . . . . . . . . 97
Checking Informix Dynamic Server . . . . . . . . . . . . . . . . . . . . . . . . . . . . 99
Restarting Backup and Verifying Tape Drive Status . . . . . . . . . . . . . 102
Weekly Maintenance Tasks . . . . . . . . . . . . . . . . . . . . . . . . . . . . . . . . . . . . . . 103
Checking Solaris Disk Space . . . . . . . . . . . . . . . . . . . . . . . . . . . . . . . . . 103
Checking for Defunct Processes . . . . . . . . . . . . . . . . . . . . . . . . . . . . . . 104
Database Maintenance Tasks . . . . . . . . . . . . . . . . . . . . . . . . . . . . . . . . . . . . . 105
Purging Outdated Call Detail Records (CDRs) . . . . . . . . . . . . . . . . . . 105
CDR Purge Script Command Syntax and Examples . . . . . . . . . . 105
Running a One-Time Purge of CDRs . . . . . . . . . . . . . . . . . . . . . . . 107
Scheduling Automatic Purges of CDR Records . . . . . . . . . . . . . . 108
Restoring Purged CDR Records . . . . . . . . . . . . . . . . . . . . . . . . . . . 108
Purging Subscriber Records Flagged for Deletion . . . . . . . . . . . . . . . 109
Proprietary & Confidential v
Page 6

ReadiVoice Administration & Maintenance Guide
Purging the CacsEventUpdate Table . . . . . . . . . . . . . . . . . . . . . . . . . . . 110
Purging the AccOptChanges Table . . . . . . . . . . . . . . . . . . . . . . . . . . . . 110
Infrequent Maintenance Tasks . . . . . . . . . . . . . . . . . . . . . . . . . . . . . . . . . . . . 111
Stopping and Restarting ReadiVoice Processes . . . . . . . . . . . . . . . . . 111
Rebooting the Sun Server . . . . . . . . . . . . . . . . . . . . . . . . . . . . . . . . . . . . 112
Rebooting a Bridge . . . . . . . . . . . . . . . . . . . . . . . . . . . . . . . . . . . . . . . . . 113
Changing the ReadiVoice Password . . . . . . . . . . . . . . . . . . . . . . . . . . . 114
Manually Backing Up and Restoring . . . . . . . . . . . . . . . . . . . . . . . . . . 115
5 Configuring the ReadiVoice System
Changing System Configuration Settings . . . . . . . . . . . . . . . . . . . . . . . . . . 118
Changing the Talker Update Frequency . . . . . . . . . . . . . . . . . . . . . . . . . . . 123
Configuring Shortened Dial-Out Call Flow . . . . . . . . . . . . . . . . . . . . . . . . . 124
Disabling Waiting Room Notifications . . . . . . . . . . . . . . . . . . . . . . . . . . . . . 125
Configuring Dial-Out Billing . . . . . . . . . . . . . . . . . . . . . . . . . . . . . . . . . . . . 126
Enabling Account Options Updating . . . . . . . . . . . . . . . . . . . . . . . . . . . . . . 128
Using the Music Hold Extender Message . . . . . . . . . . . . . . . . . . . . . . . . . . 130
Configuring Remote Alarm Notifications . . . . . . . . . . . . . . . . . . . . . . . . . . 131
Pager Notification Setup . . . . . . . . . . . . . . . . . . . . . . . . . . . . . . . . . . . . . 131
Email Notification Setup . . . . . . . . . . . . . . . . . . . . . . . . . . . . . . . . . . . . . 132
Testing Remote Alarm Notification . . . . . . . . . . . . . . . . . . . . . . . . . . . . 133
Changing the Alarm Settings . . . . . . . . . . . . . . . . . . . . . . . . . . . . . . . . . 134
Continuously Monitoring for Alarms . . . . . . . . . . . . . . . . . . . . . . . . . 135
Interpreting the Alarm Codes . . . . . . . . . . . . . . . . . . . . . . . . . . . . . . . . 136
Enabling Conference Recording . . . . . . . . . . . . . . . . . . . . . . . . . . . . . . . . . . 137
Enabling Conference Recording Connections . . . . . . . . . . . . . . . . . . . 137
How Conference Recording Works . . . . . . . . . . . . . . . . . . . . . . . . . . . . 140
Enabling SNMP Logging . . . . . . . . . . . . . . . . . . . . . . . . . . . . . . . . . . . . . . . . 141
Changing the Web Server Port . . . . . . . . . . . . . . . . . . . . . . . . . . . . . . . . . . . 142
Enabling Operators to Unlock Conferences . . . . . . . . . . . . . . . . . . . . . . . . . 143
Backing Up Manually . . . . . . . . . . . . . . . . . . . . . . . . . . . . . . . . . . . 115
Restoring from a Manual Backup Tape . . . . . . . . . . . . . . . . . . . . 116
Voice Prompts for Conference Recording . . . . . . . . . . . . . . . . . . . 138
Recording Configuration Variables in the .odprocrc File . . . . . . 138
6 Diagnostics and Troubleshooting
Viewing Critical Logs . . . . . . . . . . . . . . . . . . . . . . . . . . . . . . . . . . . . . . . . . . . 145
Database Troubleshooting . . . . . . . . . . . . . . . . . . . . . . . . . . . . . . . . . . . . . . . 147
Checking for Informix Server Engine Errors . . . . . . . . . . . . . . . . . . . . 147
Checking for Slow SQL Queries . . . . . . . . . . . . . . . . . . . . . . . . . . . . . . . 147
vi Proprietary & Confidential
Page 7

Logging Database Activity with the Database Monitoring Script . . 148
Running the
Contents of
Telephony Troubleshooting . . . . . . . . . . . . . . . . . . . . . . . . . . . . . . . . . . . . . . 149
Dial-Out Channel Testing . . . . . . . . . . . . . . . . . . . . . . . . . . . . . . . . . . . . 149
Dial-In Channel Testing . . . . . . . . . . . . . . . . . . . . . . . . . . . . . . . . . . . . . . 152
dbMon.pl
dbMon.pl
Script . . . . . . . . . . . . . . . . . . . . . . . . . . . . . 148
Log File . . . . . . . . . . . . . . . . . . . . . . . . . . . . 148
7 Customizing & Branding Your ReadiVoice System
Customizing Touchtone Commands . . . . . . . . . . . . . . . . . . . . . . . . . . . . . . 155
Rules and Guidelines for Customizing Commands . . . . . . . . . . . . . . 156
Procedure for Customizing Commands . . . . . . . . . . . . . . . . . . . . . . . . 156
Detailed Information for Specific Touchtone Features . . . . . . . . . . . . 158
Lock/Unlock . . . . . . . . . . . . . . . . . . . . . . . . . . . . . . . . . . . . . . . . . . . 158
Mute/Unmute . . . . . . . . . . . . . . . . . . . . . . . . . . . . . . . . . . . . . . . . . . 159
Mute All / Unmute All . . . . . . . . . . . . . . . . . . . . . . . . . . . . . . . . . . . 160
Listen Only / Unlisten Only . . . . . . . . . . . . . . . . . . . . . . . . . . . . . . 160
Private and Conference Roll Call . . . . . . . . . . . . . . . . . . . . . . . . . . 161
Customizing Confirmation Sounds . . . . . . . . . . . . . . . . . . . . . . . . . . . . . . . 162
Customizing the Moderator Interface . . . . . . . . . . . . . . . . . . . . . . . . . . . . . 163
Branding the Moderator with Your Company Logo . . . . . . . . . . . . . 163
Customizing the Moderator for a Specific Subscriber Group . . . . . . 164
Working with Prompt Sets . . . . . . . . . . . . . . . . . . . . . . . . . . . . . . . . . . . . . . . 166
Adding a Prompt Set . . . . . . . . . . . . . . . . . . . . . . . . . . . . . . . . . . . . . . . . 167
Renaming a Prompt Set . . . . . . . . . . . . . . . . . . . . . . . . . . . . . . . . . . . . . . 168
Deleting a Prompt Set . . . . . . . . . . . . . . . . . . . . . . . . . . . . . . . . . . . . . . . 168
Customizing Greetings and Related Messages . . . . . . . . . . . . . . . . . . . . . . 169
Creating Your Own Indexed WAVE Files . . . . . . . . . . . . . . . . . . . . . . . . . 171
Building Indexed WAVE Files . . . . . . . . . . . . . . . . . . . . . . . . . . . . . . . . 171
Key File Guidelines . . . . . . . . . . . . . . . . . . . . . . . . . . . . . . . . . . . . . . 171
Setting Up a Predefined Key File . . . . . . . . . . . . . . . . . . . . . . . . . . 172
Creating a Generic Key File . . . . . . . . . . . . . . . . . . . . . . . . . . . . . . . 173
Running the Build Process . . . . . . . . . . . . . . . . . . . . . . . . . . . . . . . . 174
Details About the WAVE File Format . . . . . . . . . . . . . . . . . . . . . . . . . . 175
Indexed WAVE File Specifications . . . . . . . . . . . . . . . . . . . . . . . . . . . . 176
Language Chunk . . . . . . . . . . . . . . . . . . . . . . . . . . . . . . . . . . . . . . . . 176
Index Chunk . . . . . . . . . . . . . . . . . . . . . . . . . . . . . . . . . . . . . . . . . . . . 177
Contents
A Voice Prompts and Call Flows
Overview . . . . . . . . . . . . . . . . . . . . . . . . . . . . . . . . . . . . . . . . . . . . . . . . . . . . . . 179
About Initial Greetings . . . . . . . . . . . . . . . . . . . . . . . . . . . . . . . . . . . . . . . . . 181
Voice Prompt File Reference . . . . . . . . . . . . . . . . . . . . . . . . . . . . . . . . . . . . . 182
Proprietary & Confidential vii
Page 8

ReadiVoice Administration & Maintenance Guide
Call Flow Diagrams . . . . . . . . . . . . . . . . . . . . . . . . . . . . . . . . . . . . . . . . . . . . . 205
B CDR Data Reference
CDR Processing Database . . . . . . . . . . . . . . . . . . . . . . . . . . . . . . . . . . . . . . . 251
Informix CDR Tables . . . . . . . . . . . . . . . . . . . . . . . . . . . . . . . . . . . . . . . . . . . 252
C SNMP Events and Alarms
SNMP Reference . . . . . . . . . . . . . . . . . . . . . . . . . . . . . . . . . . . . . . . . . . . . . . . 261
Contents of the SNMP MIB . . . . . . . . . . . . . . . . . . . . . . . . . . . . . . . . . . 263
Using the SNMP Log Files . . . . . . . . . . . . . . . . . . . . . . . . . . . . . . . . . . . . . . . 266
Contents of SNMP Log File . . . . . . . . . . . . . . . . . . . . . . . . . . . . . . . . . . . 266
Contents of Histogram Log File . . . . . . . . . . . . . . . . . . . . . . . . . . . . . . . 270
D ReadiVoice-IP with IP Tributaries
What are IP Tributaries? . . . . . . . . . . . . . . . . . . . . . . . . . . . . . . . . . . . . . . . . . 271
Implementing IP Tributaries . . . . . . . . . . . . . . . . . . . . . . . . . . . . . . . . . . . . . 274
Index . . . . . . . . . . . . . . . . . . . . . . . . . . . . . . . . . . . . . . . 275
Figures
Figure 1-1 ReadiVoice-PSTN system diagram . . . . . . . . . . . . . . . . . . . . . . . . . . . . . . 6
Figure 1-2 ReadiVoice-PSTN INCR signaling flow . . . . . . . . . . . . . . . . . . . . . . . . . . 8
Figure 1-3 ReadiVoice-IP system diagram . . . . . . . . . . . . . . . . . . . . . . . . . . . . . . . . . . 9
Figure 1-4 ReadiVoice call flow . . . . . . . . . . . . . . . . . . . . . . . . . . . . . . . . . . . . . . . . . 13
Figure 2-1 System Administration home page . . . . . . . . . . . . . . . . . . . . . . . . . . . . 17
Figure 2-2 Login dialog box . . . . . . . . . . . . . . . . . . . . . . . . . . . . . . . . . . . . . . . . . . . . . 17
Figure 2-3 Bridges page . . . . . . . . . . . . . . . . . . . . . . . . . . . . . . . . . . . . . . . . . . . . . . . . 20
Figure 2-4 Translation Numbers page . . . . . . . . . . . . . . . . . . . . . . . . . . . . . . . . . . . 23
Figure 2-5 Bridge Groups page (routed system only) . . . . . . . . . . . . . . . . . . . . . . . 26
viii Proprietary & Confidential
Page 9

Figures
Figure 2-6 Routing Lists page (routed system only) . . . . . . . . . . . . . . . . . . . . . . . . 27
Figure 2-7 Edit Routing List page (routed system only) . . . . . . . . . . . . . . . . . . . . 28
Figure 2-8 Number Groups page (routed system) . . . . . . . . . . . . . . . . . . . . . . . . . . 31
Figure 2-9 Access Classes page . . . . . . . . . . . . . . . . . . . . . . . . . . . . . . . . . . . . . . . . . . 33
Figure 2-10 Access Phone Numbers page . . . . . . . . . . . . . . . . . . . . . . . . . . . . . . . . . . 36
Figure 2-11 Access Phone Numbers page after search . . . . . . . . . . . . . . . . . . . . . . . 38
Figure 2-12 Modify Existing Access Phone Number page . . . . . . . . . . . . . . . . . . . 39
Figure 2-13 Checking an Access Phone Number’s subscribers . . . . . . . . . . . . . . . . 40
Figure 2-14 Application Providers page . . . . . . . . . . . . . . . . . . . . . . . . . . . . . . . . . . . 43
Figure 2-15 Add Provider page . . . . . . . . . . . . . . . . . . . . . . . . . . . . . . . . . . . . . . . . . . . 45
Figure 2-16 Subscriber Group page . . . . . . . . . . . . . . . . . . . . . . . . . . . . . . . . . . . . . . . 47
Figure 2-17 Edit Group page (top portion) . . . . . . . . . . . . . . . . . . . . . . . . . . . . . . . . . 48
Figure 2-18 Company and Billing sections of Edit Group page . . . . . . . . . . . . . . . 50
Figure 2-19 Call Flow and Voice Prompt section of Edit Group page . . . . . . . . . . 51
Figure 2-20 Conference Options section of Edit Group page . . . . . . . . . . . . . . . . . 53
Figure 2-21 Quick Provisioning Setup page (top) . . . . . . . . . . . . . . . . . . . . . . . . . . 61
Figure 2-22 Quick Provisioning Setup page (bottom) . . . . . . . . . . . . . . . . . . . . . . . 62
Figure 2-23 Passwords page . . . . . . . . . . . . . . . . . . . . . . . . . . . . . . . . . . . . . . . . . . . . . 64
Figure 2-24 Operator Registered Subscriber Groups page . . . . . . . . . . . . . . . . . . . 65
Figure 2-25 Invalid Subscriber Password Table page . . . . . . . . . . . . . . . . . . . . . . . 67
Figure 3-1 ReadiVoice internal user home page . . . . . . . . . . . . . . . . . . . . . . . . . . . . 70
Figure 3-2 System Status page . . . . . . . . . . . . . . . . . . . . . . . . . . . . . . . . . . . . . . . . . . 71
Figure 3-3 Conference Status page . . . . . . . . . . . . . . . . . . . . . . . . . . . . . . . . . . . . . . 72
Figure 3-4 Viewing CDR data by subscriber . . . . . . . . . . . . . . . . . . . . . . . . . . . . . . . 73
Figure 3-5 Retrieving CDR data by conference . . . . . . . . . . . . . . . . . . . . . . . . . . . . . 75
Figure 3-6 Viewing detailed CDR data for a conference . . . . . . . . . . . . . . . . . . . . 76
Figure 3-7 The Operator Statistics Requests page . . . . . . . . . . . . . . . . . . . . . . . . . 78
Figure 3-8 Searching for operator requests by subscriber . . . . . . . . . . . . . . . . . . . . 78
Figure 3-9 Results of operator request search . . . . . . . . . . . . . . . . . . . . . . . . . . . . . . 79
Figure 3-10 Generating statistics for all operators . . . . . . . . . . . . . . . . . . . . . . . . . . . 80
Figure 3-11 Results of generating statistics for all operators . . . . . . . . . . . . . . . . . . 81
Figure 3-12 Perfmeter tab of SNMP Monitor window . . . . . . . . . . . . . . . . . . . . . . . 82
Figure 3-13 SNMP Monitor Properties dialog box . . . . . . . . . . . . . . . . . . . . . . . . . . 83
Figure 3-14 Statistics tab of SNMP Monitor window . . . . . . . . . . . . . . . . . . . . . . . 84
Figure 3-15 Histograms window of SNMP Monitor . . . . . . . . . . . . . . . . . . . . . . . . . 85
Figure 3-16 Channel State Monitor page, listing bridges in the system . . . . . . . . 86
Figure 3-17 Channel State Monitor’s summary information for a bridge . . . . . . . 87
Figure 3-18 Applet window with details for the selected card . . . . . . . . . . . . . . . . . 88
Figure 3-19 Applet window with details for the selected span . . . . . . . . . . . . . . . . 89
Proprietary & Confidential ix
Page 10

ReadiVoice Administration & Maintenance Guide
Figure 3-20 Applet window with details for the selected channel (port) . . . . . . . . 89
Figure 4-1 Checking the ReadiVoice processes . . . . . . . . . . . . . . . . . . . . . . . . . . . . . 98
Figure 4-2 Checking the Informix database space . . . . . . . . . . . . . . . . . . . . . . . . . . 99
Figure 4-3 Checking Informix users . . . . . . . . . . . . . . . . . . . . . . . . . . . . . . . . . . . . . 100
Figure 4-4 Checking logical logging . . . . . . . . . . . . . . . . . . . . . . . . . . . . . . . . . . . . . 101
Figure 4-5 Checking the status of the logical log tape drive . . . . . . . . . . . . . . . . 102
Figure 4-6 Checking the status of the archive tape drive . . . . . . . . . . . . . . . . . . . 102
Figure 4-7 Checking disk space . . . . . . . . . . . . . . . . . . . . . . . . . . . . . . . . . . . . . . . . . 103
Figure 4-8 Checking for defunct processes . . . . . . . . . . . . . . . . . . . . . . . . . . . . . . . 104
Figure 5-1 System Configuration page . . . . . . . . . . . . . . . . . . . . . . . . . . . . . . . . . . 118
Figure 5-2 The default alarm modem settings in the /etc/remote file . . . . . . . . 131
Figure 5-3 The alarm settings in the .odprocrc file . . . . . . . . . . . . . . . . . . . . . . . . . 134
Figure 5-4 ReadiVoice Monitoring Tool running . . . . . . . . . . . . . . . . . . . . . . . . . 135
Figure 5-5 Example of conference recording settings in the
Figure 5-6 The SNMP logging settings in
.odprocrc
.odprocrc . . . . . . . . . 141
file . . . 140
Figure 6-1 Critical Logs page . . . . . . . . . . . . . . . . . . . . . . . . . . . . . . . . . . . . . . . . . . 145
Figure 6-2 Bridge critical log page . . . . . . . . . . . . . . . . . . . . . . . . . . . . . . . . . . . . . . 146
Figure 7-1
[DTMF_CMDS]
section of default
ive.ini
file . . . . . . . . . . . . . . . . . . . . 157
Figure 7-2 Prompt Sets page . . . . . . . . . . . . . . . . . . . . . . . . . . . . . . . . . . . . . . . . . . . 168
Figure A-1 Checking the format of
.wav
files . . . . . . . . . . . . . . . . . . . . . . . . . . . . . 180
Figure A-2 Understanding the call flow diagrams . . . . . . . . . . . . . . . . . . . . . . . . . 206
Figure A-3 Traditional shared call flow (initial entry) . . . . . . . . . . . . . . . . . . . . . . 207
Figure A-4 Traditional private call flow (initial entry) . . . . . . . . . . . . . . . . . . . . . . 208
Figure A-5 Two-password shared call flow (initial entry) . . . . . . . . . . . . . . . . . . . 209
Figure A-6 Two-password private call flow (initial entry) . . . . . . . . . . . . . . . . . . 210
Figure A-7 Routed (INCR) call flow (initial entry) . . . . . . . . . . . . . . . . . . . . . . . . . 211
Figure A-8 IP Call process . . . . . . . . . . . . . . . . . . . . . . . . . . . . . . . . . . . . . . . . . . . . . . 212
Figure A-9 Recording dial-out process . . . . . . . . . . . . . . . . . . . . . . . . . . . . . . . . . . . 213
Figure A-10 Subscriber dial-out process (long) . . . . . . . . . . . . . . . . . . . . . . . . . . . . . 214
Figure A-11 Subscriber dial-out process (short) . . . . . . . . . . . . . . . . . . . . . . . . . . . . 215
Figure A-12 Called party dial-out process . . . . . . . . . . . . . . . . . . . . . . . . . . . . . . . . . 216
Figure A-13 Dial-out newcomer process . . . . . . . . . . . . . . . . . . . . . . . . . . . . . . . . . . . 217
Figure A-14 Subscriber call flow (after initial entry) . . . . . . . . . . . . . . . . . . . . . . . . . 218
Figure A-15 Participant call flow (after initial entry) . . . . . . . . . . . . . . . . . . . . . . . . 219
Figure A-16 Subscriber validation process . . . . . . . . . . . . . . . . . . . . . . . . . . . . . . . . . 220
Figure A-17 Conference security code process (subscriber) . . . . . . . . . . . . . . . . . . 221
x Proprietary & Confidential
Page 11

Figures
Figure A-18 Conference security code process (participant) . . . . . . . . . . . . . . . . . . 222
Figure A-19 Music hold process . . . . . . . . . . . . . . . . . . . . . . . . . . . . . . . . . . . . . . . . . . 223
Figure A-20 Name record process . . . . . . . . . . . . . . . . . . . . . . . . . . . . . . . . . . . . . . . . 224
Figure A-21 Locked/full conference process (participant) . . . . . . . . . . . . . . . . . . . 225
Figure A-22 Operator wait process . . . . . . . . . . . . . . . . . . . . . . . . . . . . . . . . . . . . . . . 226
Figure A-23 Account options process . . . . . . . . . . . . . . . . . . . . . . . . . . . . . . . . . . . . . 227
Figure A-24 Account options menu . . . . . . . . . . . . . . . . . . . . . . . . . . . . . . . . . . . . . . . 228
Figure A-25 Account options help . . . . . . . . . . . . . . . . . . . . . . . . . . . . . . . . . . . . . . . . 229
Figure A-26 Announcement setting process . . . . . . . . . . . . . . . . . . . . . . . . . . . . . . . 230
Figure A-27 Autocontinuation setting process . . . . . . . . . . . . . . . . . . . . . . . . . . . . . 231
Figure A-28 Listen only entry setting process . . . . . . . . . . . . . . . . . . . . . . . . . . . . . . 232
Figure A-29 Password setting process . . . . . . . . . . . . . . . . . . . . . . . . . . . . . . . . . . . . . 233
Figure A-30 Quick start setting process . . . . . . . . . . . . . . . . . . . . . . . . . . . . . . . . . . . 234
Figure A-31 Roll call setting process . . . . . . . . . . . . . . . . . . . . . . . . . . . . . . . . . . . . . . 235
Figure A-32 Waiting room setting process . . . . . . . . . . . . . . . . . . . . . . . . . . . . . . . . . 236
Figure A-33 Entry announce process . . . . . . . . . . . . . . . . . . . . . . . . . . . . . . . . . . . . . . 237
Figure A-34 Exit announce process . . . . . . . . . . . . . . . . . . . . . . . . . . . . . . . . . . . . . . . 238
Figure A-35 Waiting room process (subscriber) . . . . . . . . . . . . . . . . . . . . . . . . . . . . 239
Figure A-36 Toggle waiting room reminders process . . . . . . . . . . . . . . . . . . . . . . . 240
Figure A-37 Roll call process . . . . . . . . . . . . . . . . . . . . . . . . . . . . . . . . . . . . . . . . . . . . . 241
Figure A-38 Operator request process . . . . . . . . . . . . . . . . . . . . . . . . . . . . . . . . . . . . . 242
Figure A-39 Rejoin conference process . . . . . . . . . . . . . . . . . . . . . . . . . . . . . . . . . . . . 243
Figure A-40 End conference process (subscriber) . . . . . . . . . . . . . . . . . . . . . . . . . . . 244
Figure A-41 In-conference commands by subscriber . . . . . . . . . . . . . . . . . . . . . . . . 245
Figure A-42 In-conference commands by subscriber (continued) . . . . . . . . . . . . . 246
Figure A-43 In-conference commands by subscriber (continued) . . . . . . . . . . . . . 247
Figure A-44 In-conference commands by participant . . . . . . . . . . . . . . . . . . . . . . . . 248
Figure A-45 Conference termination process . . . . . . . . . . . . . . . . . . . . . . . . . . . . . . . 249
Figure A-46 Other in-conference events . . . . . . . . . . . . . . . . . . . . . . . . . . . . . . . . . . . 250
Figure C-1 SNMP overview . . . . . . . . . . . . . . . . . . . . . . . . . . . . . . . . . . . . . . . . . . . . 262
Figure C-2 Sample SNMP log file . . . . . . . . . . . . . . . . . . . . . . . . . . . . . . . . . . . . . . . 267
Figure C-3 Sample histogram log file . . . . . . . . . . . . . . . . . . . . . . . . . . . . . . . . . . . . 270
Proprietary & Confidential xi
Page 12

ReadiVoice Administration & Maintenance Guide
Tables
Table 2-1 Maximum number of translation numbers needed per bridge . . . . . . 22
Table 2-2 Provider Information fields . . . . . . . . . . . . . . . . . . . . . . . . . . . . . . . . . . . . 43
Table 2-3 Group Information fields . . . . . . . . . . . . . . . . . . . . . . . . . . . . . . . . . . . . . 49
Table 2-4 Company Information fields . . . . . . . . . . . . . . . . . . . . . . . . . . . . . . . . . . . 50
Table 2-5 Billing Information fields . . . . . . . . . . . . . . . . . . . . . . . . . . . . . . . . . . . . . 51
Table 2-6 Call Flow and Voice Prompt fields and settings . . . . . . . . . . . . . . . . . . 52
Table 2-7 Conference Options . . . . . . . . . . . . . . . . . . . . . . . . . . . . . . . . . . . . . . . . . . 54
Table 2-8 Continuation settings at a glance . . . . . . . . . . . . . . . . . . . . . . . . . . . . . . . 58
Table 4-1 Summary of daily and weekly maintenance tasks . . . . . . . . . . . . . . . . 92
Table 4-2
Table 4-3
Table 5-1 Supported call flows on non-routed shared systems . . . . . . . . . . . . . 121
Table 5-2 Supported call flows on non-routed private systems . . . . . . . . . . . . . 121
Table 5-3 Supported call flows on routed systems . . . . . . . . . . . . . . . . . . . . . . . . 122
Table 5-4 Alarm section parameters of
Table 5-5 Alarm code format . . . . . . . . . . . . . . . . . . . . . . . . . . . . . . . . . . . . . . . . . . 136
Table 5-6 Error code descriptions . . . . . . . . . . . . . . . . . . . . . . . . . . . . . . . . . . . . . . 136
Table 5-7 Variables you can use in recorderSetupString . . . . . . . . . . . . . . . . . . . 138
Table 5-8 SNMP logging parameters of the
Table A-1 All voice prompts, alphabetized . . . . . . . . . . . . . . . . . . . . . . . . . . . . . . 182
Table A-2 Guide to call flow diagrams . . . . . . . . . . . . . . . . . . . . . . . . . . . . . . . . . . 205
Table B-1 Conference Information (cdr_post_conf) . . . . . . . . . . . . . . . . . . . . . . . 252
Table B-2 Participant Information (cdr_post_part) . . . . . . . . . . . . . . . . . . . . . . . . 255
Table B-3 Feature Information (cdr_post_state) . . . . . . . . . . . . . . . . . . . . . . . . . . 258
Table B-4 Conference End Verification (cdr_end_conf) . . . . . . . . . . . . . . . . . . . . 259
Table B-5 ACM Data (cdr_acm_data) . . . . . . . . . . . . . . . . . . . . . . . . . . . . . . . . . . . 259
purgeCDR
purgeCDR
command options . . . . . . . . . . . . . . . . . . . . . . . . . . . . . . . . . . 106
examples . . . . . . . . . . . . . . . . . . . . . . . . . . . . . . . . . . . . . . . . . 107
.odprocrc
file . . . . . . . . . . . . . . . . . . . . 134
.odprocrc
file . . . . . . . . . . . . . . . . 141
Table C-1 The SNMP MIB’s system information table . . . . . . . . . . . . . . . . . . . . . 263
xii Proprietary & Confidential
Page 13

Tables
Table C-2 The SNMP MIB’s system histogram table . . . . . . . . . . . . . . . . . . . . . . 264
Table C-3 The SNMP MIB’s bridge information table . . . . . . . . . . . . . . . . . . . . . 264
Table C-4 The SNMP MIB’s bridge histogram table . . . . . . . . . . . . . . . . . . . . . . . 265
Table C-5 SNMP log file fields . . . . . . . . . . . . . . . . . . . . . . . . . . . . . . . . . . . . . . . . . 267
Table C-6 Histogram log file fields . . . . . . . . . . . . . . . . . . . . . . . . . . . . . . . . . . . . . 270
Proprietary & Confidential xiii
Page 14

ReadiVoice Administration & Maintenance Guide
xiv Proprietary & Confidential
Page 15

About This Manual
This introduction provides a brief overview of the ReadiVoice Administration &
Maintenance Guide, describes the conventions used in this manual, and
explains how to get additional information or support.
Purpose
This manual is for administrators of a ReadiVoice system. It covers:
• Administering the ReadiVoice application. Describes using the Web-based
System Administration interface to add, modify, and view the system and
user data.
• Monitoring the ReadiVoice system. Describes using the monitoring tools
in the System Administration interface to monitor the status of the system,
usage levels, conference data, and operator data.
• Maintaining the ReadiVoice system. Includes routine maintenance tasks,
backup and database maintenance procedures, and other maintenance
tasks you may need to perform from time to time.
• Configuring the ReadiVoice system. Includes procedures for changing
how the system works and what capabilities, features and options are
enabled. Many of these tasks involve editing configuration files and
working at the UNIX command prompt.
• Customizing and branding the ReadiVoice system. Describes customizing
the system for your company and customizing how specific sets of users
experience the system.
• Diagnosing and troubleshooting the ReadiVoice system. Describes tools
and procedures for identifying problems with the system.
In addition, the appendices of this manual provide reference information
about the system, including voice prompts and call flows, CDR (call detail
record) data, and SNMP data.
Proprietary & Confidential xv
Page 16

ReadiVoice Administration & Maintenance Guide
Document Conventions
This document uses the following typographical conventions.
Typef ace Usage
bold Names of fields, screens, windows, dialog boxes,
italics New terms, book titles, or emphasis; for example:
and other user interface elements; for example:
1 Type the number into the Phone Number
field and click Dial.
2 Click Cancel to close the dialog box.
According to the VERITAS Cluster Server User
Guide, crash tolerant applications are sometimes
referred to as cluster friendly applications.
code
code, bold
code, bold & italics
Computer output, command references within text,
and filenames; for example:
Performs the initial configuration and reads the
.vcsrc
file
Command line entries, for example:
>>
Type
cp ../default_group.ini
group.ini
Command line variables, for example:
>>
Type
groupnn.ini
.
cp ../default_group.ini
replacing
nn
with the
subscriber group number.
SMALL CAPS Specific keys on the keyboard, for example:
>>
Move the cursor by pressing TAB or
SHIFT+TAB.
xvi Proprietary & Confidential
Page 17

Support
About This Manual
Recognizing that technology alone cannot solve today’s complex challenges,
Polycom Global Services provides the industry’s best technical support staff
and programs to let you concentrate on the task at hand. ReadiVoice users can
select from a variety of support solutions to obtain the level of support that
best meets their needs.
Before contacting your Polycom Global Services representative for technical
assistance, gather as much information as possible about your situation. Any
information you can provide helps us assess the problem and develop an
appropriate solution.
Polycom Global Services Telephone and Email
If you have comments or questions about ReadiVoice or if you need technical
assistance, contact:
• Polycom Global Services in U.S.A
• Denver metro or outside U.S.A.
• Email: techsupport@polycom.com
Polycom Global Services on the Web
For more information about Polycom Global Services, go to
http://www.polycom.com and select the Support Solutions link under the
Global Services category.
Polycom Technical Publications Department
If you have comments or questions about this or any other ReadiVoice
documentation, contact:
Polycom Technical Publications Department
1765 West 121st Avenue
Westminster, CO 80234-2301 U.S.A.
Email: TechPubs@polycom.com
800-827-7782
303-223-5223
Proprietary & Confidential xvii
Page 18

ReadiVoice Administration & Maintenance Guide
xviii Proprietary & Confidential
Page 19

1
Introducing the ReadiVoice® System
This chapter offers a general overview of the ReadiVoice conferencing system
and its features, functionality, and components.
What is the ReadiVoice System?
The ReadiVoice is the industry-leading, on-demand conferencing system. It
provides an easy-to-use, reliable, scalable, and full-featured conferencing
solution.
A ReadiVoice conference may contain up to 300 participants, including the
conference leader(s).
How ReadiVoice Conferencing Works
The ReadiVoice system is subscriber-based. A subscriber is someone, such as a
chairperson or conference leader, for whom you’ve set up conferencing access.
Each subscriber has access to a specified number of conferencing ports and can
use them at any time.
Through the provisioning process, you add subscribers to the ReadiVoice
system’s database. Each subscriber is given an access phone number for dialing
into the system and a subscriber password that identifies the subscriber. An
access number can be shared by many subscribers or private (assigned to only
one subscriber). If the access number is shared, the subscriber is also given
either:
• An access code that everyone uses to access the subscriber’s conferences.
• A participant password that participants use to access the subscriber’s
conferences (the subscriber uses the subscriber password).
Each conferencing subscriber is a member of a subscriber group. Subscriber
groups are logical groupings of related subscribers who share the same default
settings and options (for instance, a specific prompt set). You can create groups
for specific purposes or you can use one subscriber group for all subscribers.
Proprietary & Confidential 1
Page 20

ReadiVoice Administration & Maintenance Guide
Starting and Joining a Conference
Once provisioned, a subscriber can hold a conference at any time. No advance
reservation is necessary or possible. Subscribers can start conferences from
any touchtone telephone by dialing the access phone number and providing
their access code (if any) and subscriber password when prompted.
Participants join a conference by dialing the access phone number and
providing their access code or participant password. If the account permits,
the subscriber can also specify a conference security code that participants
must know to join the conference.
Controlling a Conference
A subscriber can have only one conference active at a time. During a
conference, subscribers can control the conference and dial out to additional
participants using:
Telephone touchtone (DTMF) commands — The ReadiVoice system
supports a complete set of touchtone commands. Subscribers can use these to
control the conference, enable or disable features, and dial out. Participants
can use these to control their own lines and use features to which they’ve been
given access.
The touchtone command set is completely configurable at the system level. In
addition, you can enable or disable specific features at the subscriber group or
individual subscriber level.
The Web-based Moderator interface — The Moderator lets your conferencing
subscribers or their designated moderators set up, start, monitor, and control
their conferences over the Internet. To log into the Moderator, users enter the
subscriber’s access phone number, access code (if any), and password.
The Moderator provides the conference control features that are enabled in the
subscriber profile for the conference. Most commands available to the
subscriber as touchtone commands are also available in the Moderator.
By default, conferences start when the subscriber arrives and end when the
subscriber leaves. This can be modified as follows:
• If the Quick Start option is enabled, participants don’t have to wait on hold
for the subscriber. The conference starts when the first participant arrives.
• If Continuation is enabled, the conference doesn’t end when the subscriber
leaves. It continues until the last participant leaves.
• The system can be configured to end a conference (or call an operator)
containing only one to three lines (configurable) after a specified delay.
You can use this feature to handle problems such as someone forgetting to
hang up a speaker phone in a conference room.
For more detailed information about how subscribers and participants interact
with the system to set up, start, control, and join conferences, see the ReadiVoice
Subscriber Guide.
2 Proprietary & Confidential
Page 21

Managing Your ReadiVoice System
Day-to-day management and operation of your ReadiVoice system is
accomplished using operator/maintenance stations, which are typically standard
PCs connected to your company’s LAN (local area network) or WAN (wide
area network). From these PCs, your company’s staff can access the
Web-based ReadiVoice applications for:
Operators — Respond to operator requests from subscribers (and, if
authorized, participants) to resolve problems, answer questions, or provide
other assistance.
Provisioners — Add, modify, and delete subscriber accounts.
System Administrators — Configure and maintain the ReadiVoice system,
create new subscriber groups, and set up other internal users and their
passwords. They can also perform the provisioning functions.
To use a Web-based ReadiVoice application, users launch a supported
browser (Microsoft Internet Explorer version 5.5 or later), point it to the correct
Internet address (URL) for the application, and log in when prompted.
Introducing the ReadiVoice® System
Note:
Operator Interface
Note:
The Operator application and some parts of the Administration interface also
require a Java virtual machine (plug-in), which the user is prompted to
download if it isn’t already installed. Voyant has certified these Java applets
with the Sun Microsystems Java Runtime Engine (JRE) 1.3.1 and 1.4.2, on
Microsoft Windows 2000 and Microsoft Windows XP.
These applets should work on other platforms and operating systems and with
newer versions of the JRE, but that depends on proper implementation by the
operating system and Java virtual machine. Polycom hasn’t tested other possible
combinations and can’t be responsible for implementation or compatibility issues
beyond our control.
The ReadiVoice Operator interface lets operators monitor the conferences on
the system, answer operator requests from their subscribers and participants,
and perform various tasks to assist users.
The ReadiVoice system doesn’t require operators. Providing operator services is
entirely optional.
Operators may have access to all conferences or they may be limited to the
conferences of a specific subscriber group or groups, depending on their login
name and the system configuration.
When someone requests an operator, the system sends an audible and visual
alert to the available operators. An operator can answer the oldest request in
the queue or select a specific request from a list.
Proprietary & Confidential 3
Page 22

ReadiVoice Administration & Maintenance Guide
When operators answer a request or select a conference to monitor, the system
registers them for the conference and displays all the available information
about the conference and its participants.
If an operator’s duties include provisioning as well as answering operator
requests, the operator can switch to the Provisioning interface by clicking the
Provisioning button on the Operator page.
For more information about the Operator interface and operator tasks, see the
ReadiVoice Operator Guide.
Provisioning Interface
The ReadiVoice Provisioning interface lets provisioners create and modify
ReadiVoice subscriber accounts. A subscriber account authorizes someone to
use your ReadiVoice system.
Note:
We recommend automating your initial subscriber provisioning. Contact Polycom
for help with this. The ReadiVoice system’s Provisioning interface is available for
manual provisioning and for viewing or modifying subscriber account information.
To set up an account for a customer, a provisioner enters subscriber and billing
information and defines the subscriber’s conference access and features.
All subscribers belong to a subscriber group. You can use one subscriber group
for everyone, or you can have multiple subscriber groups, each used for a
specific company, access method, or other affinity group. A subscriber group
can have its own default voice prompt set, account settings, and number group
(controlling access numbers and routing).
Like operators, provisioners may have access to all subscriber groups or they
may be limited to a specific subscriber group, depending on their login name
and the system configuration.
The Provisioning interface lets provisioners create new subscriber accounts or
search for an existing account and then edit or disable it.
For more information about the Provisioning interface and provisioning tasks,
see the ReadiVoice Provisioning Guide.
Administration Interface
The ReadiVoice Administration interface lets administrators monitor the
system, create new subscriber groups, customize the interfaces, create and
maintain user logins, set default parameters, and configure bridges.
This manual describes the Administration interface and administrative tasks.
4 Proprietary & Confidential
Page 23

Components of the ReadiVoice System
A ReadiVoice system includes:
• A Conference Allocation and Control System (CACS) server.
• Up to twelve InnoVox media servers (conferencing bridges), providing up
to 5,760 ports in a single system, or one InnoVox media server, providing
4032 ports in a single 13U bridge cabinet.
• An optional boot server from which the bridges boot.
The specific configuration of a ReadiVoice system depends on its capacity
(number of ports), type of media server(s), and options.
The CACS and boot server may be the same server. All system components
mount into a standard 19-inch rack.
Two types of ReadiVoice systems are available. There are both hardware and
software differences between the two types, although the core ReadiVoice
software is the same (merely configured differently). The two types are for
different network environments:
Introducing the ReadiVoice® System
ReadiVoice-PSTN uses the Public Switched Telephone Network (PSTN). The
bridge or bridges make circuit-switched connections over standard digital
telephony spans.
ReadiVoice-IP uses Voice Over IP (VOIP). The bridge makes packet-switched
Internet Protocol (IP) connections over Ethernet.
ReadiVoice-PSTN Systems
The PSTN version of ReadiVoice has two call routing configurations:
Fixed Access — Each access telephone number terminates on a specific bridge
in the system. This configuration is called a non-routed system.
Intelligent Network Call Routing (INCR) — Access telephone numbers
aren’t assigned to specific bridges. Instead, the ReadiVoice system uses a
carrier common channel signaling network (such as SS7 or Tollfree Gateway)
to dynamically route calls among available bridges. This configuration is
called a routed system. A routed system makes more efficient use of the bridges
because you can distribute the conferencing load and specify bridge
availability and priority.
Figure 1-1 provides a high-level view of the major components in a routed
ReadiVoice-PSTN system attached to a carrier common channel signaling
network. A fixed access system is identical, but without the Service Control
Point (SCP) connecting it to the carrier common channel signaling network.
The SCP may or may not be required for a routed system, depending on your
carrier.
Proprietary & Confidential 5
Page 24
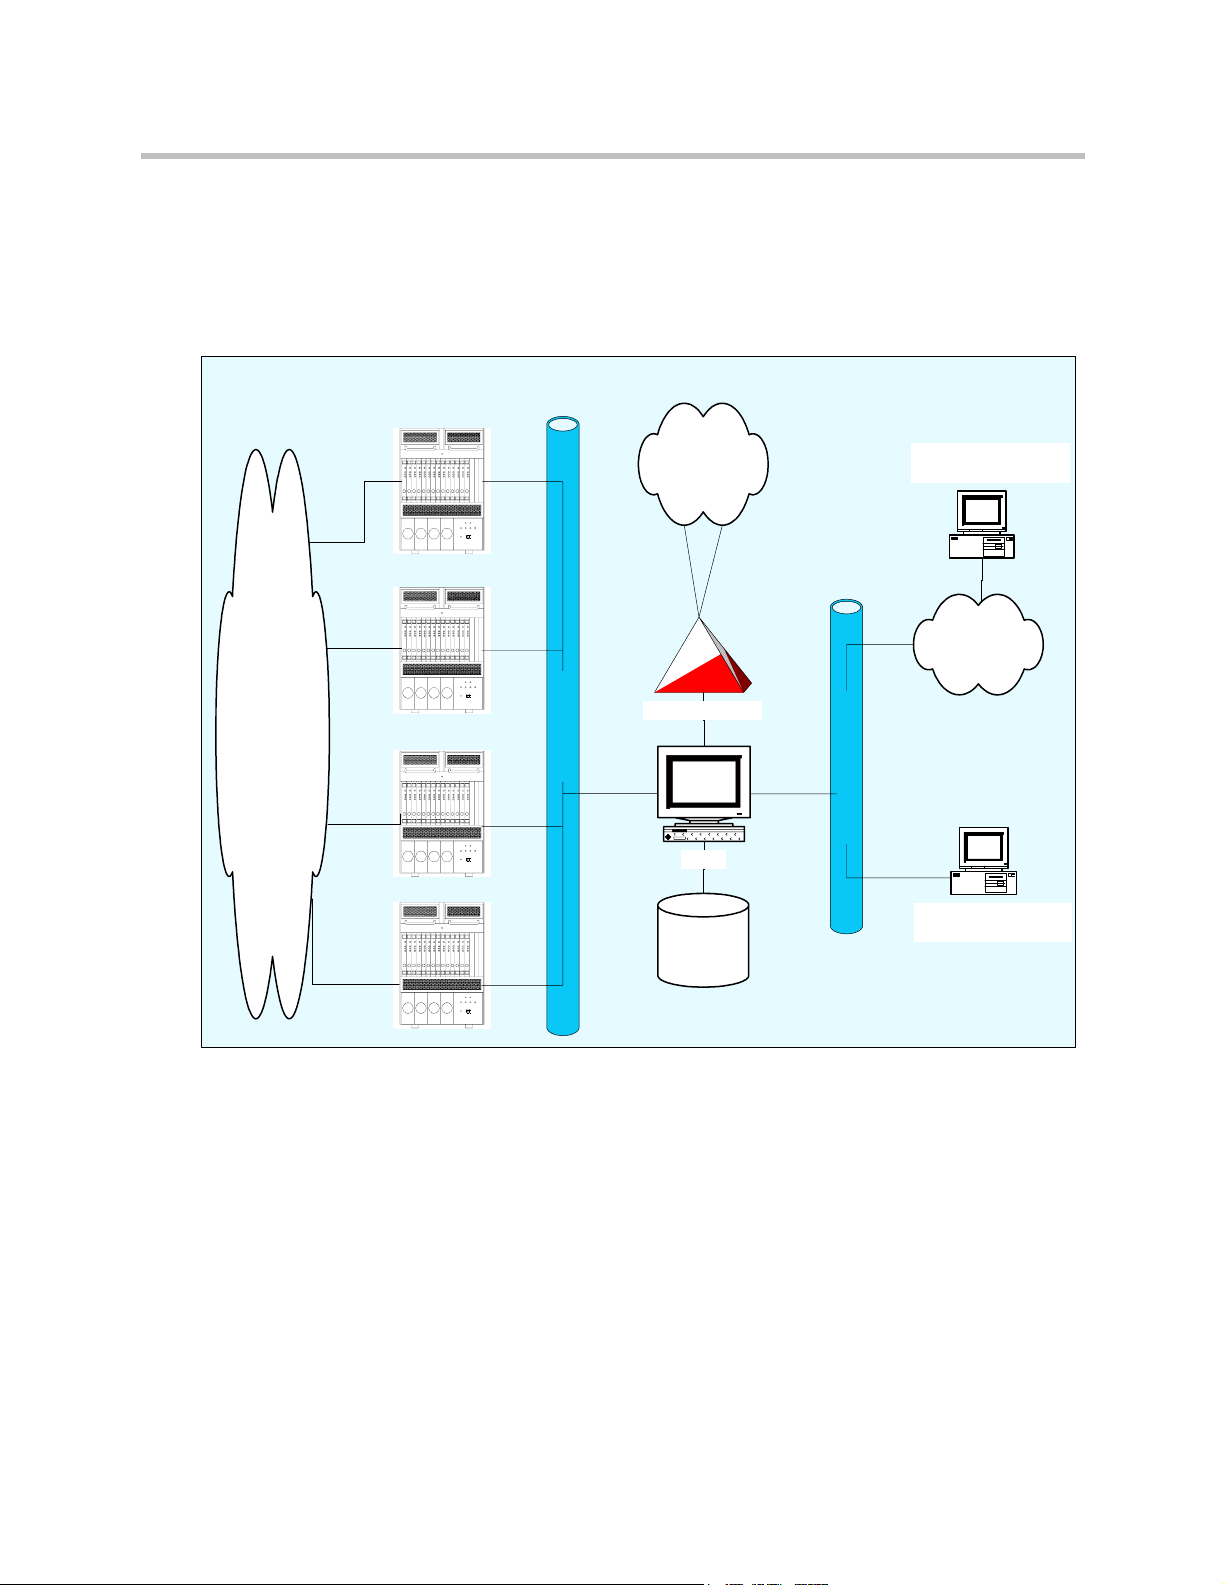
ReadiVoice Administration & Maintenance Guide
The SCP (if required), subscriber database, and Web server can physically
reside on the CACS server. In large systems, however, these components may
be distributed among multiple servers in order to distribute the processing
load.
Figure 1-1 ReadiVoice-PSTN system diagram
InnoVox
Bridges
Carrier
common
channel
signaling
network
Subscriber access via
Web-based Moderator
Internet
PSTN
(See note)
SCP (if required)
SCP (if required)
Dedicated LAN
Corporate LAN/WAN
CACS
Operator/Maintenance
Database
Note: The InnoVox bridges are connected to
the PSTN via a switch certified by the local
country regulatory authority.
Station
When a caller dials a ReadiVoice-PSTN subscriber’s access phone number on
a typical routed ReadiVoice system:
1 The originating central office switch recognizes the number as requiring
carrier common channel signaling network handling.
2 The carrier switch sends a query through the carrier common channel
signaling network to the ReadiVoice CACS, which allocates bridge
resources to that subscriber according to his or her subscriber account
settings.
3 The CACS returns a routing solution through the carrier common
channel signaling network to the originating carrier switch. It also
notifies the bridge of the upcoming call and the associated account profile
and features.
6 Proprietary & Confidential
Page 25

Introducing the ReadiVoice® System
4 The carrier switch uses the routing solution to route the call to the
InnoVox bridge selected by the CACS call router.
Figure 1-2 summarizes this INCR signaling flow.
5 When the call reaches the bridge, the ReadiVoice system places it into an
interactive call flow script to guide the caller into the conference. In a
fixed access system, the script collects the access code (if needed). In all
systems, the script handles subscriber identification and collection of the
optional conference security code. Non-subscribers are put on hold until
the subscriber arrives, enters the subscriber password, and starts the
conference.
6 If the account permits, the call flow script gives the subscriber an
opportunity to review and change account options prior to starting the
conference.
7 Once the subscriber starts the conference, participants are prompted to
enter the conference security code (if applicable) and then placed into the
conference.
Figure 1-4 on page 13 summarizes the ReadiVoice basic call flow after the call
reaches the bridge or on a non-routed system.
If the Quick Start feature is enabled, participants don’t have to wait for the
subscriber. They’re placed directly into conference instead of on hold. If the
Roll Call feature is enabled, callers are prompted to record their name before
entering the conference.
Callers who enter the subscriber or participant password or the conference
security code incorrectly three times are played the appropriate message and
then either sent to an operator (if available) or disconnected, depending on
how your system is configured.
Proprietary & Confidential 7
Page 26
ReadiVoice Administration & Maintenance Guide
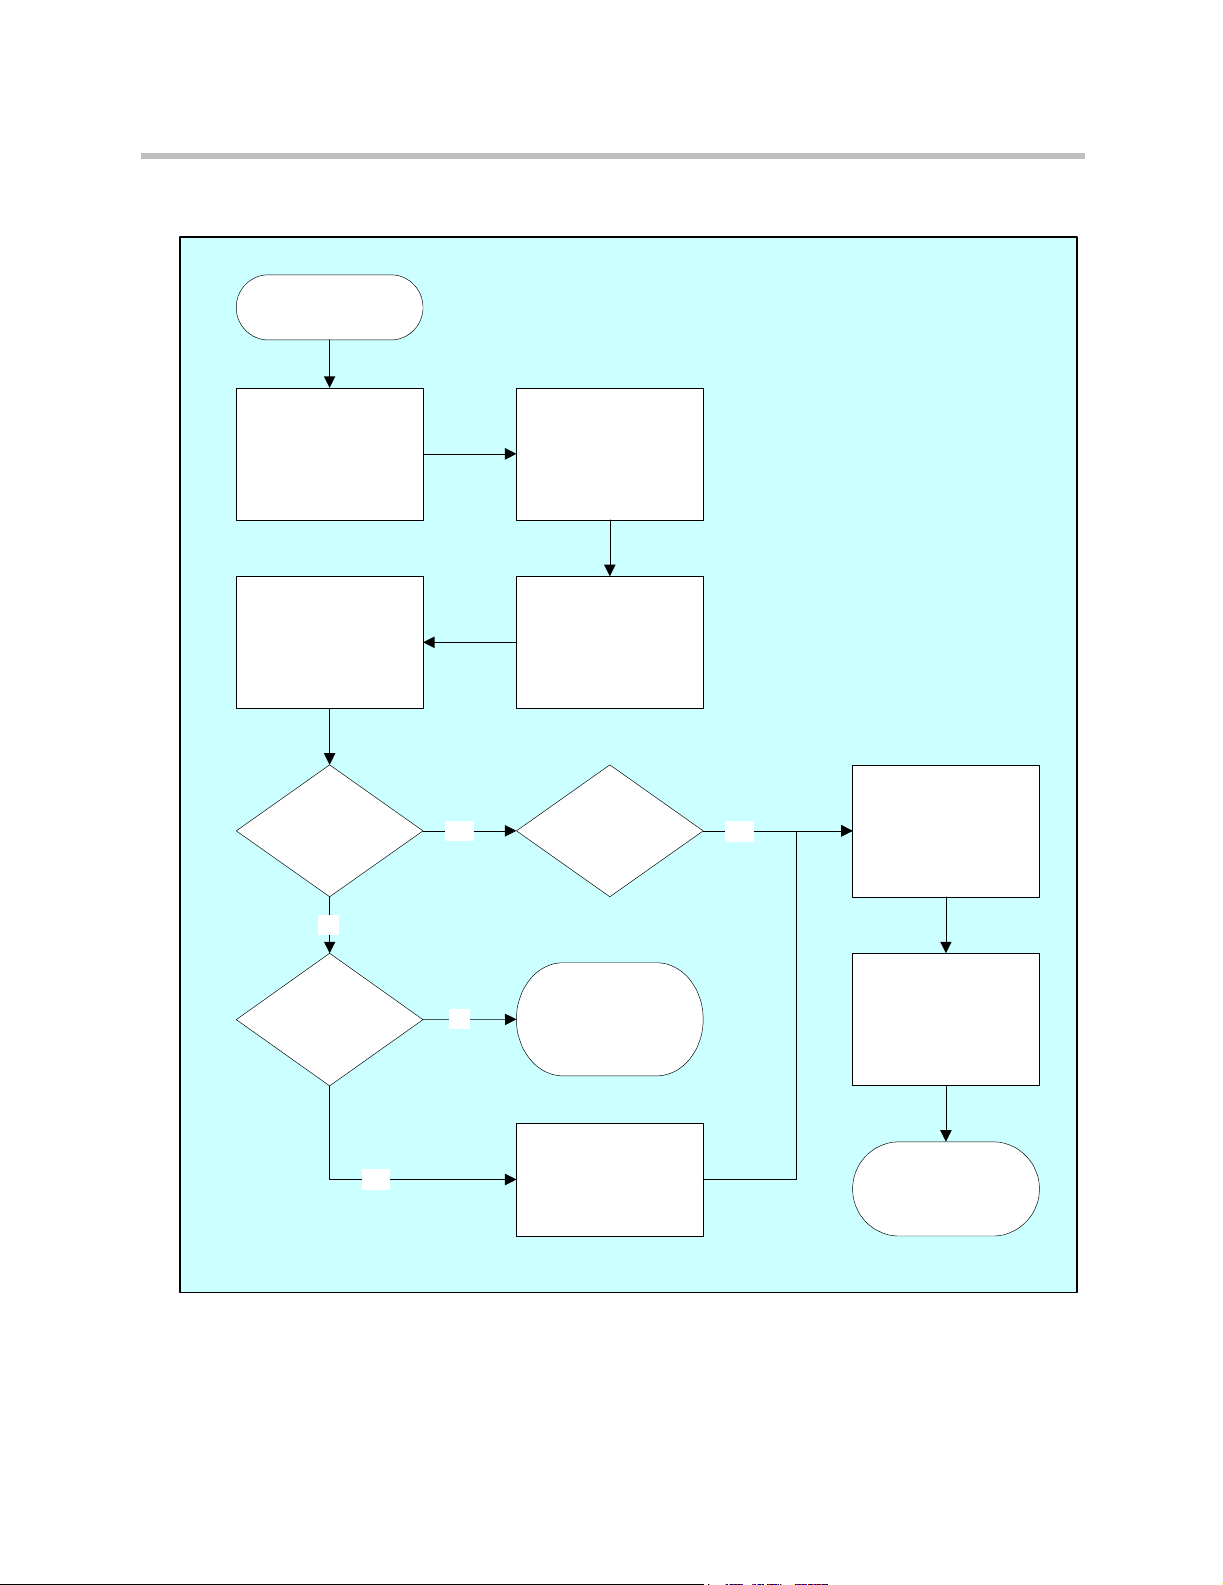
Figure 1-2 ReadiVoice-PSTN INCR signaling flow
Start
User dials
ReadiVoice
access phone number
Originating switch
initiates carrier common
channel signaling
network query to CACS
Originating switch
recognizes that the
number requires carrier
common channel
signaling network
handling
If applicable, collects
access code.
Is the conference
underway?
No
Are there enough
ports?
Yes
Yes
No
Are there enough
ports?
ReadiVoice is not
available. Try again.
(Or special network
handling.)
Select bridge,
allocate resources
Yes
Return associated
PSTN translation
number
Originating switch
completes call using
translation number
supplied by carrier
common channel
signaling network
Call placed in
ReadiVoice call flow
script
8 Proprietary & Confidential
Page 27
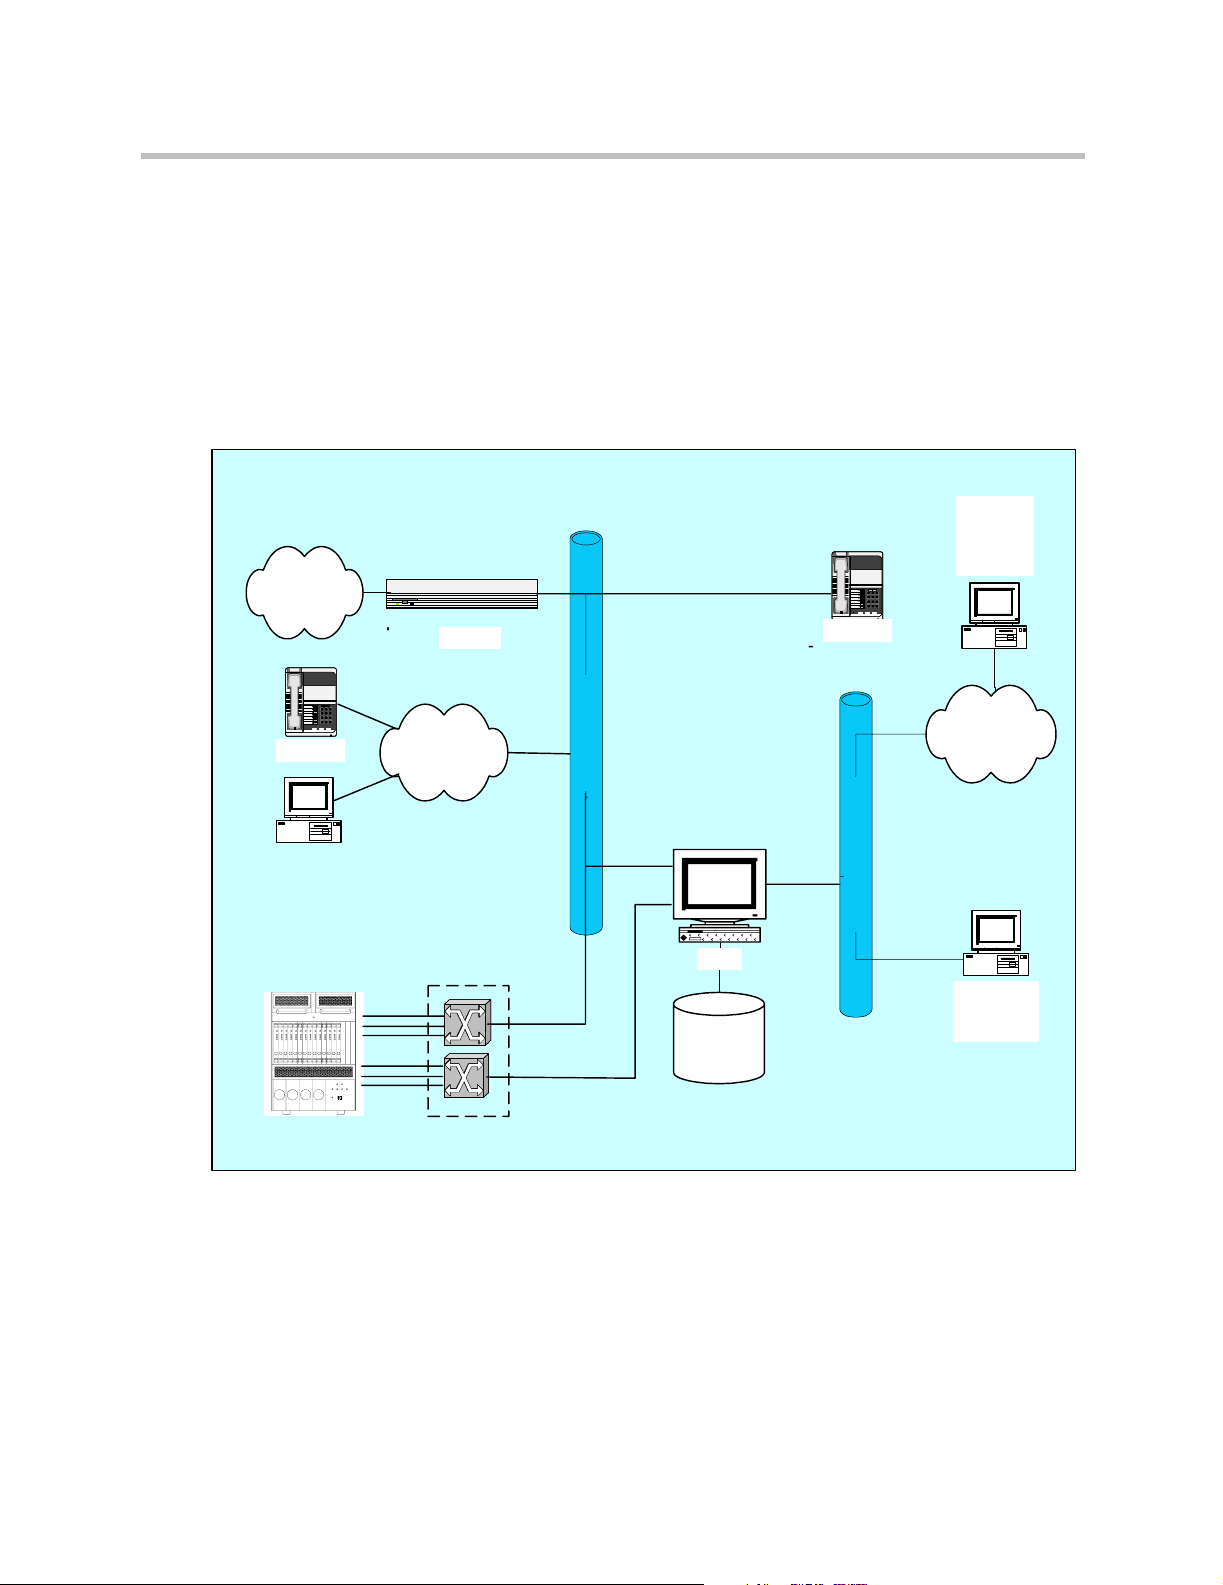
ReadiVoice-IP Systems
All ReadiVoice-IP systems are routed. That is, the CACS uses SIP (Session
Initiation Protocol) signaling over IP to route calls dynamically among
available bridges.
Figure 1-3 provides a high level view of the components in a ReadiVoice-IP
system.
Figure 1-3 ReadiVoice-IP system diagram
PSTN
Gateway
Introducing the ReadiVoice® System
Subscriber
access via
Web-based
Moderator
123
456
789
8#
*
SIP Phone
123
456
789
8#
*
SIP Phone
Windows XP
SIP Phone
InnoVox
Bridge(s)
I P
Ethernet
Switch
Gigabit
Conference
100Base-T
Control
Internet
IP Over Ethernet
Corporate LAN/WAN
CACS
Operator/
Maintenance
Database
Station
Proprietary & Confidential 9
Page 28

ReadiVoice Administration & Maintenance Guide
ReadiVoice-IP Call Processing
When a caller dials a ReadiVoice-IP subscriber’s access phone number on a
typical ReadiVoice system:
1 The SIP Invite message from the caller‘s SIP user agent (perhaps a SIP
telephone) reaches the call-control portion of the CACS. If the SIP invite
contains no access code:
a The CACS directs the call to a bridge with a free port and runs a bridge
script that prompts the caller for the access code.
b The bridge returns that access code to the CACS.
2 The CACS uses the access code to identify the subscriber account. Its call
router allocates bridge resources according to the service description of
the subscriber just identified.
3 The CACS connects the call to the bridge just chosen.
4 When the call reaches the bridge, an interactive call flow script guides the
caller into the conference. The script handles subscriber identification and
collection of the optional conference security code. Non-subscribers are
put on hold until the subscriber arrives, enters the subscriber password,
and starts the conference.
5 If the account permits, the call flow script gives the subscriber an
opportunity to review and change account options prior to starting the
conference.
6 Once the subscriber starts the conference, participants are prompted to
enter the conference security code (if applicable) and then placed into the
conference.
Figure 1-4 on page 13 summarizes the ReadiVoice basic call flow after the call
reaches the bridge.
If the Quick Start feature is enabled, participants don’t have to wait for the
subscriber. They’re placed directly into conference instead of on hold. If the
Roll Call feature is enabled, callers are prompted to record their name before
entering the conference.
10 Proprietary & Confidential
Page 29

“Dialing” in ReadiVoice-IP Systems
For the sake of simplicity, we refer to “dialed phone numbers” throughout this
document. Actually, in IP telephony, end points are identified by a Universal
Resource Identifier (URI).
This URI resembles an email address: phonecontact@domain. Domain is
pretty much what one would expect: something.com or something.org, for
example. Phonecontact can be anything that identifies a device known to the
domain, such as a name, a 10-digit phone number, or perhaps an extension
number.
The ReadiVoice-IP system uses the Session Initiation Protocol (SIP) to
communicate with other IP telephony equipment. It sends out formal SIP
URIs, but users can “dial” any of the following:
Formal SIP URI
The URI described above preceded by the name of the protocol and a
colon. For instance:
SIP:3032235000@voyanttech.com
SIP:brent@voyanttech.com
SIP:5000@voyanttech.com
Introducing the ReadiVoice® System
Simplified URI
The URI with the protocol name omitted (similar to omitting the “http:” in
a Web address). For instance:
3032235000@voyanttech.com
brent@voyanttech.com
5000@voyanttech.com
URI Without Domain
If your system is configured with a default domain and port, it routes
addresses that don’t specify a domain to the default domain and port. For
instance:
3032235000
brent
5000
Since most of the world is still using the PSTN and ordinary phone numbers,
your ReadiVoice-IP system undoubtedly sits behind one or more gateways to
the circuit-switched network. When your system is given an ordinary phone
number with no domain specified (such as the example 3032235000 above), it
routes the call to the gateway (or to a router that sends it to the appropriate
gateway).
Proprietary & Confidential 11
Page 30

ReadiVoice Administration & Maintenance Guide
ReadiVoice Call Flow
The basic call flow is the same for ReadiVoice-PSTN and ReadiVoice-IP (see
Figure 1-4). Various system-level and subscriber-level configurations and
settings affect the basic call flow, however. The sections that follow describe
some of these call flow differences.
How Quick-Start and Conference Continuation Affect Call Flow
By default, conferences start when the subscriber arrives and end when the
subscriber leaves. Two options can change this:
Quick Start
The conference starts as soon as the first participant arrives. Participants
can speak to one another prior to the arrival of the subscriber or hold a
conference without the subscriber. Quick Start is useful for certain types of
users, such as disaster management groups and others who need to meet
without relying on any one individual to start the meeting.
Subscribers should be aware that Quick Start conferences are less secure
than conferences requiring a subscriber password.
Conference Continuation
The conference can continue after the subscriber disconnects. In this case,
the conference ends when the last participant disconnects.
If the subscriber’s account permits, the subscriber can turn Conference
Continuation on or off for each conference. If the subscriber’s account has
Auto Continuation enabled, all the subscriber’s conferences start with
Conference Continuation turned on.
How One-Click Conference Affects Call Flow
In a One-Click Conference, participants click on a link or icon to enter the
conference. The ReadiVoice system identifies the conference from the link’s
URL and returns a Web page asking for the participant’s phone number. When
the system gets this number, it calls and puts the connection in conference (or
on music hold, if the subscriber isn’t present and Quick Start is off). The
subscriber can use the same link, since the Web page provides a checkbox to
indicate subscriber and a field for entering the subscriber password.
The Provisioning application generates the One-Click Conference link for a
new subscriber account. If the provisioners have email capability, they can
paste the link into an email message and send it to the subscriber for
distribution to participants.
12 Proprietary & Confidential
Page 31

Figure 1-4 ReadiVoice call flow
Introducing the ReadiVoice® System
(1) In an Intelligent Network Call Routing (INCR) system, the carrier's network takes care of this.
(2) If the Access Phone Number is shared, an Access Code is required to identify the specific subscriber.
(3) Depending on your system configuration, additional Access Code prompts may be possible.
(4) If account has Roll Call feature enabled.
(5) After three incorrect attempts, caller is routed to an operator (if available) or played a message and disconnected.
(6) For Quick Start conferences, participants bypass hold and are placed directly into conference.
(7) The caller remains on hold until the subscriber arrives and starts the conference.
(8) Subscription setting determines whether Conference Security Passcode is mandatory, optional, or unavailable. If optional,
the subscriber chooses whether to use a Conference Security Code for each conference.
(9) ACM (Application Control Mode), if enabled, removes callers from the call flow for an interactive session with an external application.
(10) Subscription setting determines whether subscriber has access to Account Options Menu.
(11) There is no request to press * if a Participant Password is enabled and specified.
(12) Skip if Prompt For Subscriber is set to Off; subscriber is not asked to press *, and, instead, a generic password request is played.
Proprietary & Confidential 13
Page 32

ReadiVoice Administration & Maintenance Guide
How A Two-Password Configuration Affects Call Flow
In the traditional ReadiVoice call flows, the system:
• Prompts all callers for an access code (unless the subscriber has a private
access number) to identify the conference.
• Prompts callers to identify themselves as subscribers by pressing *.
• Prompts the subscribers for their subscriber password.
In two-password call flows, no separate access code is used; both subscribers
and participants are given passwords. The system:
• Prompts all callers for their password.
• Uses it both to identify the conference and to distinguish between
subscribers and ordinary participants.
With two passwords, subscriber identification occurs without any additional
prompting by the system. This provides a shorter call flow.
How IP Tributaries Affect ReadiVoice-IP Call Flow
ReadiVoice-IP systems can be configured to enable the IP Tributaries feature.
To use this feature, callers must be authenticated by some means outside of the
ReadiVoice system, and the SIP
system must include the identifying information.
Each piece of information contained in the SIP
of information that the caller would otherwise be prompted to enter. For
instance:
• If the SIP
then the system can identify the conference from the invite and only needs
to prompt for subscriber identification.
• If the
password (traditional call flow) or either a participant password or a
subscriber password (two-password call flow), then the system can
identify both the conference and the caller’s role and doesn’t need to
prompt the caller for any information.
For security, the authentication mechanism can encrypt the passwords.
For more information on this feature, see Appendix D.
INVITE
INVITE
message includes an access code (traditional call flow),
message includes both the access code and subscriber
INVITE
message that they send to access the
INVITE
message takes the place
14 Proprietary & Confidential
Page 33

2
Administering the ReadiVoice System
This chapter describes how to use the ReadiVoice system’s Web-based System
Administration interface to add, modify, and view the system and user data.
It covers:
• Opening ReadiVoice System Administration
• Maintaining Bridge Information
• Working with Bridge Groups and Routing Lists
• Working with Number Groups
• Working with Access Classes
• Working with Access Phone Numbers
• Working with Multiple Providers
• Working with Subscriber Groups
• Setting Up the Provisioning Interface
• Managing System Access
• Defining Invalid Subscriber Passwords
Some of the functions available in the System Administration interface are
described elsewhere:
• The changes you can make on the System Configuration page are
described in Chapter 5, “Configuring the ReadiVoice System.”
• The various monitoring functions available in the System Administration
interface are described in Chapter 3, “Monitoring the ReadiVoice System.”
• Installing multiple prompt sets and setting them up in the System
Administration interface are described in Chapter 7, “Customizing &
Branding Your ReadiVoice System.”
• Using the Critical Logs page to help diagnose problems is described in
Chapter 6, “Diagnostics and Troubleshooting.”
Proprietary & Confidential 15
Page 34

ReadiVoice Administration & Maintenance Guide
Opening ReadiVoice System Administration
You can access the ReadiVoice System Administration interface from any
computer that can connect to the ReadiVoice system’s Web server and has a
compatible Web browser (Microsoft Internet Explorer, version 5.5 or later, is
compatible with all ReadiVoice interfaces).
Access is restricted to authorized users. You must know the correct user name
and password.
To access the System Administration pages:
1 Do one of the following:
— Point your browser to the internal user home page (for example,
http://www.rvoice.com/index2.html). Then click the System
Administration link in the navigation bar on the right.
— Point your browser directly to the System Administration page (for
example,
https://www.rvoice.com/provisioning/Adminframe.html).
The System Administration home page appears (Figure 2-1). A
navigation bar on the right provides links to pages for performing various
administrative functions.
2 In the navigation bar, under the System Administration heading, click
the link for the function you want.
All the System Administration links are restricted to authorized users. If
you aren’t already logged in as an authorized user, a login dialog box
appears (Figure 2-2).
16 Proprietary & Confidential
Page 35

Figure 2-1 System Administration home page
Administering the ReadiVoice System
Figure 2-2 Login dialog box
3 Enter a user name and password authorized for Administration access.
Then click OK.
Proprietary & Confidential 17
Page 36

ReadiVoice Administration & Maintenance Guide
Maintaining Bridge Information
When Polycom installs your ReadiVoice system, we configure the application
with the correct bridge information. If any of this information changes, you
must update the system’s bridge table.
Caution!
Adding a New Bridge
Installing a bridge (media server) involves:
• Physically installing the hardware and making all cable connections.
• Running the creator scripts to create the configuration files for the bridge.
• Using the
• Adding information about the bridge to the ReadiVoice database so that
This section describes only the last of these tasks. The prerequisite installation
and configuration tasks are covered in the appropriate installation manual for
the system.
This manual includes information about adding bridges for reference
purposes; you shouldn’t need it. When you buy a new bridge from Polycom,
a field engineer installs the bridge and configures your system.
To add a new bridge to the ReadiVoice system:
Contact your Polycom Global Services representative before making any changes
to your system’s bridge configuration.
vbootptool
bridge.
the ReadiVoice application is aware of its presence and able to use it.
shell script to configure VBootP to bootstrap the
1 In the System Administration navigation bar, click Bridges.
The Bridges page appears (Figure 2-3 on page 20).
2 In the Add Bridge section at the bottom, if the new bridge’s ID number
isn’t in the Bridges list, stop here.
The installation of the bridge and VBootP configuration with the
vbootptool
— Make sure that the
— Verify the VBootP configuration.
— Make sure the bridge is powered on and properly bootstrapped
fromVBootP.
3 In the Add Bridge section at the bottom, if the ID number for the new
bridge is in the Bridges list, select it.
18 Proprietary & Confidential
shell script are incomplete.
vbootptool
shell script was run.
Page 37

Administering the ReadiVoice System
4 In the Add Bridge section at the bottom, complete the following fields:
Reserve Ports — Enter the number of ports you want to reserve for
operator voice paths. These ports are not available for conferencing.
Trans DNIS Length — For IP systems, this is the number of digits in each
translation number. For PSTN systems, enter the number of DNIS (dialed
number identification service) digits the network delivers to the bridge. If
the network delivers non-delimited or single-delimited ANI/DNIS, the
ive.ini
that one.
Depending on the system’s translation number type (see “Changing
System Configuration Settings” on page 118), one of the following may
also apply:
— If Translation Number Type is set to Random Translation Number,
file also specifies a DNIS length, and the setting here must match
the number of digits must exactly equal the length of the translation
numbers (not including the prefix, if any) assigned to the bridge (see
“Working with Translation Numbers” on page 22). To change Trans
DNIS Length to a different length, remove the translation numbers
first.
— If Translation Number Type is set to Fixed Translation Number, the
number of digits must exactly equal the number of digits in each
subscriber’s
ExternalId
field. If you change Trans DNIS Length to a
different length, a warning message tells you that you must update
your subscribers’ external IDs.
— If Translation Number Type is set to Fixed Translation Number with
3-digit code, the number of digits must be exactly three more than the
number of digits in each subscriber’s
ExternalId
field. If you change
Trans DNIS Length to a different length, a warning message tells you
that you must update your subscribers’ external IDs.
Hrt Beat Interval — Enter the interval (in seconds) between heartbeat
messages from the bridge to the Conference Allocation and Control
System (CACS) server. The heartbeat message confirms that the bridge is
available and can communicate with the server. One second is generally
considered a reasonable interval.
Max Missed Hrt Beats — Enter the number of heartbeats that the CACS
can fail to receive before triggering an alarm. Eight is generally considered
a reasonable number.
Bridge Status — Select Busyout to hold the bridge back from use until
you’ve completed the bridge configuration.
5 Click Add Bridge.
The system provides a link to the Translation Numbers page.
6 Click the link, and then add translation numbers to the bridge as
described on page 23.
The system confirms that the translation numbers have been added.
Proprietary & Confidential 19
Page 38

ReadiVoice Administration & Maintenance Guide
7 In the navigation bar, click Bridges.
8 To make the bridge available for service, select In Service in its Bridge
Status field and click the Commit button (blue “c”).
The system confirms that the bridge’s status has been changed and
provides a link back to the Bridges page.
Figure 2-3 Bridges page
Modifying an Existing Bridge
1 In the System Administration navigation bar, click Bridges.
The Bridges page appears (Figure 2-3).
2 To change a bridge’s status from In Service to Busyout or vice versa,
select the status you want in the Bridge Status field.
3 To change a bridge’s number of reserved ports, DNIS length, or heartbeat
settings, edit the appropriate field.
If this is a routed system, you can’t change the DNIS length to something
different than the length of the bridge’s translation numbers. If you must
make this change, remove the translation numbers first (see “Changing
the Translation Numbers Assigned to a Bridge” on page 24).
20 Proprietary & Confidential
Page 39

Administering the ReadiVoice System
Caution!
Deleting a Bridge
The value in the Bridge ID field must be unique and must correspond to the bridge’s
appBridgeID value in the vbootp.db file. If the bridge was properly configured in
VBootP, its Bridge ID was set correctly when it was added to the ReadiVoice
database, and it shouldn’t be changed.
4 To save your changes, click the Commit button (blue “c”).
The system confirms that the bridge has been modified and provides a link
back to the Bridges page.
To change a bridge’s translation numbers, follow the procedure in “Changing
the Translation Numbers Assigned to a Bridge” on page 24.
Before deleting a bridge, remove its translation number assignments. Then
remove the bridge from any bridge groups to which it belongs.
To remove a bridge from the ReadiVoice application:
1 In the navigation bar, click Bridges.
The Bridges page appears (Figure 2-3 on page 20).
2 Find the bridge you want to delete and click its Delete button (red “–”).
If the bridge has IP addresses or translation numbers associated with it or
belongs to a bridge group, the system warns you of this and doesn’t delete
the bridge. Otherwise, it confirms deleting the bridge.
Proprietary & Confidential 21
Page 40

ReadiVoice Administration & Maintenance Guide
Working with Translation Numbers
A translation number is the telephone network’s translation of the dialed
telephone number into a number used to route the call:
• For a routed PSTN system, your carrier provides a block or blocks of
translation numbers. Depending on the translation number type (see
“Changing System Configuration Settings” on page 118), your system
may randomly choose a number from this block, or it may use a
subscriber-specific fixed translation number. In either case:
a When someone dials a ReadiVoice access number, the originating
switch queries the CACS, which determines who the subscriber is and
returns a translation number (including prefix) to tell the telephone
network how to route the call.
b When the switch routes the call to the bridge, it sends the translation
number, with or without prefix, as DNIS (dialed number
identification system) digits.
c The bridge sends the DNIS to the CACS, which uses the last
n
(where
is the Trans DNIS Length) to identify the conference.
n
digits
• For a non-routed system or an IP system, you must enter a block of
dummy translation numbers. The number of digits must be the number
specified on the Bridges page as Trans DNIS Length (see “Maintaining
Bridge Information” on page 18).
In either type of system, each conference requires one translation number for
each different access number used to reach the conference (see “Working with
Access Classes” on page 33).
The maximum number of conferences is always the number of ports divided
by three. Therefore, the maximum number of translation numbers a bridge
might need is the smaller of:
• The number of access classes times one-third the number of ports.
• The number of ports.
Table 2-1 shows the results of this calculation for 480-port and 4032-port
bridges.
Table 2-1 Maximum number of translation numbers needed per bridge
InnoVox 480 with 480 ports
(max. 160 conferences)
Access classes Translation numbers Access classes Translation numbers
1 160 1 1344
InnoVox 4000 with 4032 ports
(max. 1344 conferences)
2 320 2 2688
3+ 480 3+ 4032
22 Proprietary & Confidential
Page 41

Administering the ReadiVoice System
These numbers are the worst-case scenario: each conference contains three
lines, and each line used a different access nmber.
You may be able to reduce these numbers further, especially if most of your
subscribers use a single access number from your primary access class, and the
other access classes are used rarely. But, do so with caution. If a bridge runs
out of translation numbers, no more calls can connect to it, even though ports
are available.
Caution!
Don’t add or change translation number assignments while conferences are under
way! Perform the following procedures after operational hours.
Adding Translation Numbers to a Bridge
1 In the navigation bar, click Bridges.
The Bridges page appears (Figure 2-3 on page 20).
2 Find the bridge to which you want to assign translation numbers and
click its Translations link.
The Translation Numbers page appears (Figure 2-4). If there are no
translation numbers assigned to this bridge, the page contains only a blank
row with an Add button (green “+”) at the right.
Figure 2-4 Translation Numbers page
3 In the Prefix Number field, enter the prefix digits (the portion that the
switch strips off before sending DNIS digits) of the number block you’re
assigning. Enter only the digits (no punctuation).
In a non-routed or IP system, leave the prefix field blank.
4 In the Range Start field, enter the number that begins the block of
translation numbers. For instance, if your system receives only four DNIS
1000
digits from the switch, this might be
.
5 In the Range End field, enter the number that ends the block of
translation numbers. For instance, if your system receives only four DNIS
1479
digits from the switch, this might be
Proprietary & Confidential 23
.
Page 42

ReadiVoice Administration & Maintenance Guide
6 Click the Add button.
The system assigns the translation numbers to the bridge. For a large
block, this may take several minutes. When finished, it confirms that the
translation numbers have been added and provides a link back to the
Translation Numbers page.
7 Click the link to return to the Translation Numbers page.
The new row appears in the list. A blank row below lets you add
additional blocks of numbers.
Repeat the above procedure to add another block of numbers.
Changing the Translation Numbers Assigned to a Bridge
1 In the navigation bar, click Bridges.
The Bridges page appears (Figure 2-3 on page 20).
2 Find the bridge whose translation numbers you want to change and click
its Translations link.
The Translation Numbers page appears (Figure 2-4 on page 23). It
contains a row for each block of contiguous translation numbers assigned
to the bridge.
3 To change a block of translation numbers, edit the fields that need to be
changed and click the row’s Commit button (blue “c”).
The system implements the changes you made. Depending on the extent
of the change, this may take several minutes. When finished, it confirms
the change.
4 To remove a block of translation numbers, click the row’s Delete button
(red “–”).
The system confirms the change.
24 Proprietary & Confidential
Page 43

Administering the ReadiVoice System
Working with Bridge Groups and Routing Lists
Bridge groups and routing lists apply only to routed systems (PSTN or IP). If
you have a non-routed system, the access phone number determines which
bridge receives a call, and this section doesn’t apply to you.
In a routed system, bridge groups and routing lists control the routing of calls
among bridges. Each subscriber is assigned to a routing list (by default, the one
assigned to the number group, but provisioners can change this). The routing
list specifies which bridge or bridges the subscriber’s conferences can use and
the priority order of those bridges.
Setting up bridge routing involves:
• Setting up bridge groups, each containing one or more bridges.
• Setting up routing lists, each specifying the bridge groups to which calls
should be routed in order of preference.
Managing Bridge Groups
This section applies only to routed systems. In a routed system, if you add
bridges or change bridge assignments, you must make changes to your bridge
groups. By default, your system contains the bridge group All Bridges, which
includes all bridges. You can’t modify or delete this group. You can add other
groups and modify or delete them.
Adding a Bridge Group
1 In the navigation bar, click Bridge Groups.
The Bridge Groups page appears (Figure 2-5). It lists existing bridge
groups, starting with the default entry, All Bridges. A blank input field
and Add button (green “+”) let you add bridge groups. Check boxes below
each entry let you select which bridges are in each group.
2 Enter a name for the new group in the blank Bridge Group Name field.
3 Select the check box of each bridge you want to include in the group and
click the Add button.
The system confirms that the bridge group has been added and provides
a link back to the Bridge Groups page.
4 Click the link to reload the Bridge Groups page.
The new bridge group appears in the list.
Proprietary & Confidential 25
Page 44

ReadiVoice Administration & Maintenance Guide
Figure 2-5 Bridge Groups page (routed system only)
Repeat the above procedure to add another bridge group. When you’re
finished, make the necessary changes to the routing lists. See “Managing
Routing Lists” on page 27.
Modifying a Bridge Group
1 To change the bridges in the group, select or clear their check boxes.
2 To change the name of the group, edit its Bridge Group Name entry.
3 Click the entry’s Commit button (blue “c”).
The system confirms that the bridge group has been modified and
provides a link back to the Bridge Groups page.
4 Click the link to reload the Bridge Groups page.
Repeat the above procedure to modify another bridge group. When you’re
finished, make the necessary changes to the routing lists.
Deleting a Bridge Group
1 Click the bridge group’s Delete button.
The system confirms that the bridge group has been deleted and provides
a link back to the Bridge Groups page.
2 Click the link to reload the Bridge Groups page.
Repeat the above procedure to delete another bridge group. When you’re
finished, make the necessary changes to the routing lists.
When you delete a bridge group, the system doesn’t make its ID available for
reuse or renumber remaining groups. If you have four bridge groups and delete
the one whose ID is 3, the remaining bridge groups are 1, 2, and 4. The next
bridge group you add is assigned ID number 5. ID number 3 remains unused.
26 Proprietary & Confidential
Page 45

Managing Routing Lists
This section applies only to routed systems (PSTN or IP). In a routed system,
routing lists control how calls are routed to the bridges in your system. Each
routing list contains one or more bridge groups, listed in order of preference,
to which calls can be routed.
By default, your system contains the routing list Any Bridge, which contains
the default bridge group All Bridges. You can’t modify or delete this routing
list (but need not use it). If you have a routed system, you can add other
routing lists and modify or delete them.
Adding a Routing List
1 In the System Administration navigation bar, click Routing Lists.
Administering the ReadiVoice System
The Routing Lists page appears (Figure 2-6). It lists existing routing lists,
starting with the default entry, Any Bridge. A blank input field and Add
button (green “+”) let you add routing lists.
2 Enter a name for the new routing list in the blank Routing List Name
field and click the Add button.
The system confirms that the routing list has been added and provides a
link back to the Routing Lists page.
3 Click the link to reload the Routing Lists page.
The new routing list appears in the list. Initially, all new routing lists
contain a single bridge group, the default All Bridges group.
4 Modify the routing list to include the bridge groups you want in the
order you want them searched (see next procedure).
Repeat the above procedure to add another routing list.
Figure 2-6 Routing Lists page (routed system only)
Proprietary & Confidential 27
Page 46

ReadiVoice Administration & Maintenance Guide
Modifying a Routing List
1 On the Routing Lists page, find the entry you want to modify and click
its Edit Routing List button.
The Edit Routing List page appears (Figure 2-7). It lists the bridge groups
included in this routing list in order of priority. If you just created this
routing list, it contains only one bridge group entry, All Bridges, with its
Search Order field set to 1.
2 To change an existing entry, select a different bridge group from the
entry’s drop-down list. Then click its Commit button (blue “c”).
The system confirms that the routing list has been modified and provides
a link back to the Edit Routing List page.
No two entries can have the same priority (Search Order value). To
change the priority order of the bridge groups, change the Bridge Group
associated with each Search Order value, not vice versa. To avoid
confusion, it’s best to keep the Search Order values of the entries in the list
in sequential order.
3 Click the link to reload the Edit Routing List page.
4 To add another entry to the list, in the blank row at the bottom, select the
bridge group you want, enter the next priority number in the Search
Order field, and click the Add button (green “+”).
The system confirms that the bridge group has been added to the routing
list and provides a link back to the Edit Routing List page.
5 Click the link to reload the Edit Routing List page.
The new bridge group appears in the list.
6 To delete an entry from the list, click its Delete (red “–”) button.
The system confirms that the bridge group has been removed from the
routing list and provides a link back to the Edit Routing List page.
Figure 2-7 Edit Routing List page (routed system only)
28 Proprietary & Confidential
Page 47

Administering the ReadiVoice System
7 Click the link to reload the Edit Routing List page.
The bridge group entry you deleted is gone from the list.
The system doesn’t update the Search Order numbers of remaining
entries. If there were three bridge groups with priority numbers 1, 2, and
3, and you delete the second, the two remaining entries are numbered 1
and 3. Change the entry numbered 3 to 2 in order to maintain sequential
numbering and avoid possible confusion in the future.
Repeat the above procedure to modify another routing list.
Renaming a Routing List
1 On the Routing Lists page, find the entry you want to rename, edit its
Routing List Name field, and click its Commit button (blue “c”).
The system confirms that the routing list has been modified and provides
a link back to the Routing Lists page.
2 Click the link to reload the Routing Lists page.
The renamed routing list entry appears in the list.
Repeat the above procedure to rename another routing list.
Deleting a Routing List
1 On the Routing Lists page, find the entry you want to delete and click its
Delete button (red “–”).
The system confirms that the routing list has been deleted and provides a
link back to the Routing Lists page.
2 Click the link to reload the Routing Lists page.
The routing list entry you deleted is gone from the list.
Repeat the above procedure to delete another routing list.
Proprietary & Confidential 29
Page 48

ReadiVoice Administration & Maintenance Guide
Working with Number Groups
Number groups are logical groupings of telephone numbers used to control the
assignment of access phone numbers to subscribers. In a routed system, each
number group is associated with a routing list that controls the routing of calls
among bridges (see “Working with Bridge Groups and Routing Lists” on
page 25).
Each number group can have one or more subscriber groups associated with it.
Subscriber groups are logical groupings of related subscribers who share the
same customized user interface (for instance, a specific prompt set). When
someone signs up as a new subscriber, the ReadiVoice system automatically
assigns the subscriber an access phone number (or numbers) from the number
group associated with the subscriber group to which the new subscriber
belongs.
You can use a number group to reserve a specific access phone number (or
numbers) for a specific subscriber group (or groups). For instance, you may
have a subscriber group specifically for Acme Widgets Co. users. If you want
all Acme Widgets conferences to use the same access phone number,
888-555-1234, you can:
1 Create a number group called Acme Widgets.
2 Define the access phone number 888-555-1234 as a shared number
assigned to the Acme Widgets number group.
3 Assign the Acme Widgets number group to the Acme Widgets subscriber
group.
All access phone numbers must be assigned to a number group. One number
group, Default, exists automatically. If you don’t want to control which access
numbers are used by whom, you can assign all numbers to the Default number
group and use it for all subscriber groups.
30 Proprietary & Confidential
Page 49

Adding a Number Group
1 In the System Administration navigation bar, click Number Groups.
The Number Groups page appears (Figure 2-8).The list shows the existing
number groups. Below that, a blank input field and Add button (green
“+”) let you add number groups to the list.
2 In the blank Name field, enter a name for the number group you want to
create. The name may be up to 30 characters long and may contain spaces
and punctuation.
Figure 2-8 Number Groups page (routed system)
Administering the ReadiVoice System
3 If this is a routed system, choose the routing list to be used for this
number group.
4 Click the Add button.
The system confirms that the number group has been added and provides
a link back to the Number Groups page.
5 Click the link to reload the Number Groups page.
The new group appears in the list.
6 Add one or more access phone numbers to the number group. See
“Adding Access Phone Numbers” on page 36.
Repeat the above procedure to create additional number groups. To use a new
number group (and the access phone numbers in it), you must assign the
number group to one or more subscriber groups. See “Working with
Subscriber Groups” on page 46.
Proprietary & Confidential 31
Page 50

ReadiVoice Administration & Maintenance Guide
Modifying a Number Group
1 In the navigation bar, click Number Groups.
The Number Groups page appears, listing the available number groups.
2 To rename a number group, edit its name.
3 To change its routing list assignment, select the one you want in the
Routing List field.
4 Click the Commit button (blue “c”).
The system confirms that the number group has been modified and
provides a link back to the Number Groups page.
5 Click the link to reload the Number Groups page.
Repeat the above procedure to modify another number group.
Deleting a Number Group
You can delete a number group only if it has no associated subscriber group(s)
and no associated access phone numbers.
To delete a number group:
1 In the navigation bar, click Number Groups.
The Number Groups page appears, listing the available number groups.
2 Click the Delete button (red “–”) by the number group you want to
remove.
The system confirms that the number group has been deleted.
When you delete a number group, the system doesn’t make its ID
available for reuse or renumber remaining groups. If you have four
number groups and delete the one whose ID is 3, the remaining groups are
1, 2, and 4. The next number group you add is assigned ID number 5. ID
number 3 remains unused.
Repeat the above procedure to delete another number group.
32 Proprietary & Confidential
Page 51

Working with Access Classes
Access classes are logical groupings of access phone numbers you can use to
group numbers by carrier, kind of number (such as toll-free), or other criteria.
You can create as many classes as you want. A subscriber can have one access
phone number from each access class, so multiple classes let you offer
subscribers multiple access numbers.
All access phone numbers belong to an access class. One class, LOCAL, exists
automatically. You can rename it if you want. If you don’t want to categorize
access numbers by carrier or other criteria and you don’t want to offer multiple
access numbers to subscribers, you can assign all numbers to one class.
Adding an Access Class
1 In the System Administration navigation bar, click Access Classes.
The Access Classes page appears (Figure 2-9). The list shows the existing
access classes. Below that, a blank input field and Add button (green “+”)
let you add access classes to the list.
Administering the ReadiVoice System
2 In the blank Name field, enter a name for the access class. It may be up to
30 characters long and may contain spaces and punctuation.
3 Click the Add button.
The system confirms that the access class has been added and provides a
link back to the Access Classes page.
4 Click the link to reload the Access Classes page.
The new access class appears in the list.
Repeat the above procedure to create more access classes. Then, assign
access phone numbers to the classes. See “Working with Access Phone
Numbers” on page 35.
Figure 2-9 Access Classes page
Proprietary & Confidential 33
Page 52

ReadiVoice Administration & Maintenance Guide
Renaming an Access Class
1 In the navigation bar, click Access Classes.
The Access Classes page appears, listing the available access classes.
2 Find the class you want to rename and type the new name into its New
Name field.
3 Click its Commit button (blue “c”).
The system confirms that the access class has been modified and provides
a link back to the Access Classes page.
4 Click the link to reload the Access Classes page.
The new class appears in the list.
Repeat the above procedure to rename another access class.
Deleting an Access Class
You can’t delete an access class if it contains access phone numbers. First,
reassign those numbers to another class. You can do this only if the access
numbers have no subscribers associated with them. See “Changing an Access
Phone Number’s Access Class” on page 40.
To delete an access class:
1 In the navigation bar, click Access Classes.
The Access Classes page appears, listing the available access classes.
2 Click the Delete button (red “–”) by the access class you want to remove.
If the class has access numbers in it, the system displays an error message.
Otherwise, it confirms that the access class has been deleted and provides
a link back to the Access Classes page.
3 Click the link to reload the Access Classes page.
When you delete an access class, the system doesn’t make its ID available
for reuse or renumber the remaining classes. If you have four access
classes and delete the one whose ID is 3, the remaining classes are 1, 2, and
4. The next access class you add is assigned ID number 5. ID number 3
remains unused.
Repeat the above procedure to delete another access class.
34 Proprietary & Confidential
Page 53

Working with Access Phone Numbers
Access phone numbers are the telephone numbers (or, for IP systems, SIP
addresses) that customers dial to reach your ReadiVoice system. They’re often
toll-free numbers, and your carrier usually tells you which numbers to use. In
the ReadiVoice system, access numbers have several characteristics:
Access Type. A routed system can have two access types:
Private — A private number is assigned to only one subscriber. Since the
access phone number uniquely identifies a subscriber’s conference, no
access code is needed.
Shared — A shared number is assigned to multiple subscribers. Each
subscriber receives a unique access code that identifies the subscriber’s
conferences. Callers must enter the correct access code to join a conference.
For a non-routed PSTN system, all access phone numbers must be either
private or shared; you can’t mix the two. For an IP system, access numbers
are shared.
Number Group. Each access phone number belongs to one number group,
which can be associated with one or more subscriber groups. The access phone
number is available in subscriber groups that use its number group.
Administering the ReadiVoice System
Access Class. Each access phone number belongs to an access class. Multiple
classes let you offer subscribers multiple access numbers, one from each class.
You can create classes for specific kinds of numbers, such as local or toll-free.
Hidden Number (if enabled; see “Changing System Configuration Settings”
on page 118). If the network maps the numbers that callers dial to different
numbers for routing, the system must link the routing number (hidden
number) with the dialed number.
You can:
• Add access phone numbers.
• In a non-routed system, move access numbers from one bridge to another.
• Globally reassign subscribers from one access number to another.
• Change the access class of an access phone number (if no subscribers are
using it).
• Change the hidden number associated with an access phone number (if
hidden number mapping is enabled).
• Delete an access phone number (if no subscribers are using it).
You can’t change the access type or number group of an existing access
number. To change a number from private to shared or switch it to a different
number group, delete the number and then add it back.
Proprietary & Confidential 35
Page 54

ReadiVoice Administration & Maintenance Guide
Adding Access Phone Numbers
To put the new access phone numbers into a new number group or access
class, create the number group or access class first. See “Adding a Number
Group” on page 31 or “Adding an Access Class” on page 33.
To add an access phone number:
1 In the System Administration navigation bar, click Access Numbers.
The Access Phone Numbers page appears (Figure 2-10). The Search panel
is at the top. Below it is the Add panel.
2 In the Add panel, enter the access number you want to add. Enter only
the digits, with no dashes or spaces.
3 If your system uses hidden numbers, enter the new number’s hidden
number. Enter only the digits, with no dashes or spaces.
4 Set the new access number’s Number Group and Access Class fields.
5 Click the Add button (green “+”).
The system confirms that the access phone number has been added and
provides a link back to the Access Phone Numbers page.
6 Click the link to reload the Access Phone Numbers page.
Repeat the above procedure to add another access phone number.
Figure 2-10 Access Phone Numbers page
36 Proprietary & Confidential
Page 55

Moving Fixed Access Numbers to Another Bridge
In non-routed systems, access numbers are assigned to specific bridges. If
necessary, you can move access numbers from one bridge to another. For
example, you may want to move some access numbers from an overloaded
bridge to another bridge that’s less loaded.
To move access numbers to a different bridge:
1 In the navigation bar, click Access Numbers.
The Access Phone Numbers page appears (Figure 2-10).
2 In the Search panel, enter criteria to retrieve the access numbers you want
to move. Then click the Search button.
Administering the ReadiVoice System
You can use the asterisk (
to retrieve all numbers from 800-333-1100 to 800-333-1199.
The access numbers that match your search criteria appear at the bottom
of the page in the Numbers panel (Figure 2-11).
3 Carefully check the list of access numbers retrieved. If the list contains the
numbers you want to move and only those numbers, continue. Otherwise,
repeat 2 using different search criteria until you’ve retrieved the correct
set of numbers.
4 In the Move panel, select the bridge to which you want to move the
access numbers. Then click the Move button.
The system prompts you to confirm the move and reminds you to make
the telephone network changes needed to implement the move.
5 Click OK.
The system confirms that the access numbers have been moved and
provides a link back to the Access Phone Numbers page.
6 Click the link to reload the Access Phone Numbers page.
Repeat the above procedure to move additional blocks of access numbers.
When you’re finished changing bridge assignments, make the necessary
changes to switches or other network elements in order to correctly route calls
dialed to these access numbers.
*
) as a wild card. For instance, enter
80033311*
Proprietary & Confidential 37
Page 56

ReadiVoice Administration & Maintenance Guide
Figure 2-11 Access Phone Numbers page after search
Reassigning an Access Phone Number’s Subscribers
You can globally reassign subscribers from one access number to another. For
instance, if several subscribers are assigned to the shared access number
888-555-1000, and you need to reassign them to 888-555-2000, you can make
this change all at once without having to re-provision each individual
subscriber.
You can:
• Reassign subscribers to a different existing access phone number. The
number must be in the same number group and access class.
• Reassign subscribers to a new access phone number, adding it to the
ReadiVoice system in the process.
You must, of course, notify the reassigned subscribers of the change. If you
add a new access phone number to the system, you must also ensure that the
telephone network routes that number to the system properly.
38 Proprietary & Confidential
Page 57

Administering the ReadiVoice System
To reassign subscribers to a different access phone number:
1 In the navigation bar, click Access Numbers.
The Access Phone Numbers page appears (Figure 2-10).
2 In the Search panel, enter criteria to retrieve the access number whose
subscribers you want to reassign. Then click the Search button.
The access numbers that match your search criteria appear at the bottom
of the page in the Numbers panel (Figure 2-11).
3 In the Numbers panel, find the access number whose subscribers you
want to reassign and click its Change button (blue “c”).
The Modify Existing Access Phone Number page appears (Figure 2-12).
4 In the New Access Phone Number field, enter the number you want to
assign to the subscribers. Enter only the digits, with no dashes or spaces.
If this is an existing access number, it must be in the same number group
and access class as the access number it’s replacing.
5 If you’re creating a new access phone number for these subscribers and
your system uses hidden numbers, enter the access number’s hidden
number in the New Hidden Phone Number field.
6 Click Commit New Access Number.
If you entered a new number, the ReadiVoice system adds it to the
database, copying the access type, number group, and access class from
the existing number. It confirms that all the existing number’s subscribers
have been reassigned to the access phone number you entered and
provides a link back to the Access Phone Numbers page.
7 Click the link to reload the Access Phone Numbers page.
Repeat the above procedure to reassign another access phone number’s
subscribers.
Figure 2-12 Modify Existing Access Phone Number page
Proprietary & Confidential 39
Page 58

ReadiVoice Administration & Maintenance Guide
Changing an Access Phone Number’s Access Class
You can’t change an access phone number’s access class if subscribers are
assigned to it. First, reassign the subscribers to another access number. See
“Reassigning an Access Phone Number’s Subscribers” on page 38.
To change an access number’s access class:
1 In the navigation bar, click Access Numbers.
The Access Phone Numbers page appears (Figure 2-10).
2 In the Search panel, enter criteria to retrieve the access number whose
access class you want to change. Then click the Search button.
The access numbers that match your search criteria appear at the bottom
of the page in the Numbers panel (Figure 2-11).
3 Confirm that the access number you want to change is listed and has no
subscribers assigned to it (Used is set to No).
If the Used field is set to Yes, click that word to see a list of the number’s
subscribers (Figure 2-13). You can reassign them with the procedure on
page 40 or, if there are only one or two, open and edit them manually.
4 Click the Change button (blue “c”) of the number you want to change.
The Modify Existing Access Phone Number page appears (Figure 2-12).
5 In the Existing Access Class list, select the class to which you want to
assign this access number. Then click Commit New Access Class.
The system confirms that the access class has been changed and provides
a link back to the Access Phone Numbers page.
6 Click the link to reload the Access Phone Numbers page.
Repeat the above procedure to change another access phone number.
Figure 2-13 Checking an Access Phone Number’s subscribers
40 Proprietary & Confidential
Page 59

Changing Hidden Numbers
This section doesn’t apply to IP systems, which don’t use hidden numbers.
If your system uses hidden numbers, you can use the Modify Existing Access
Phone Number page to change the hidden number associated with an access
number. Do this only if the routing number associated with the access number
is changed in the network.
To change an access phone number’s hidden number:
1 In the navigation bar, click Access Numbers.
The Access Phone Numbers page appears (Figure 2-10).
2 In the Search panel, enter criteria to retrieve the access number whose
hidden number you want to change. Then click the Search button.
The access numbers that match your search criteria appear at the bottom
of the page in the Numbers panel (Figure 2-11).
3 Find the access number whose hidden number you want to change and
click its Change button (blue “c”).
Administering the ReadiVoice System
The Modify Existing Access Phone Number page appears (Figure 2-12).
4 In the New Hidden Phone Number field, enter the new hidden number
to associate with this access phone number. Enter only the digits, with no
dashes or spaces. The hidden number must be unique (that is, not already
assigned to another access phone number).
5 Click Commit New Hidden Number.
The system confirms that the hidden number has been changed and
provides a link back to the Access Phone Numbers page.
6 Click the link to reload the Access Phone Numbers page.
Repeat the above procedure to change another access phone number’s hidden
number.
Proprietary & Confidential 41
Page 60

ReadiVoice Administration & Maintenance Guide
Deleting an Access Phone Number
Before you delete an access phone number, keep the following points in mind:
• Access phone number changes require telephone network changes to
ensure that calls are routed properly.
• You can’t delete an access phone number that has subscribers assigned to
it. First, reassign the subscribers to another access number. See
“Reassigning an Access Phone Number’s Subscribers” on page 38.
To delete an access phone number:
1 In the navigation bar, click Access Numbers.
The Access Phone Numbers page appears (Figure 2-10 on page 36).
2 In the Search panel, enter criteria to retrieve the access number that you
want to delete. Then click the Search button.
The access numbers that match your search criteria appear at the bottom
of the page in the Numbers panel (Figure 2-11).
3 Confirm that the access number you want to delete is listed and has no
subscribers assigned to it (Used is set to No).
If the Used field is set to Yes, click that word to see a list of the number’s
subscribers (Figure 2-13). You can reassign them with the procedure on
page 40 or, if there are only one or two, open and edit them manually.
4 Click the Delete button (red “–”) of the number you want to delete.
The system confirms that the number has been deleted and provides a link
back to the Access Phone Numbers page.
5 Click the link to reload the Access Phone Numbers page.
Repeat the above procedure to delete another access phone number.
42 Proprietary & Confidential
Page 61

Working with Multiple Providers
You can configure ReadiVoice for access by multiple application service
providers (ASPs). For instance, your company can enter into a relationship with
Acme Conferencing, allowing Acme to sell services on your ReadiVoice
system, using their own custom interfaces (such as the Moderator interface
and voice prompts). To enable such a relationship, you configure Acme as a
provider in your ReadiVoice system, permitting their users to connect to it.
Adding a Provider
1 In the navigation bar, click Application Providers.
The Application Providers page appears (Figure 2-14), listing any
providers already defined in the system.
Figure 2-14 Application Providers page
Administering the ReadiVoice System
2 Click Add Provider.
The Add Provider page appears (Figure 2-15 on page 45).
3 Enter the data for the provider. See Table 2-2 for field descriptions.
4 Click Create Provider.
The system confirms that the provider has been added and provides a link
back to the Application Providers page.
5 Click the link to reload the Application Providers page.
Repeat the above procedure to add another provider.
Table 2-2 Provider Information fields
Field Description
Provider Name Enter a login name for the provider. The maximum length is 30
characters. Required.
Password Enter a password for the provider. The maximum length is 30
characters. Required.
Expiration Date Select the expiration month and date and enter a four-digit year.
Required.
Proprietary & Confidential 43
Page 62

ReadiVoice Administration & Maintenance Guide
Table 2-2 Provider Information fields (continued)
Field Description
Allowed IP Enter a specific IP or an IP mask that defines valid IP addresses from
API Access Define which APIs the provider can access by entering the sum of the
which this provider can connect. For instance, if you enter
192.168.56.255, all IP addresses in the 192.168.56 subnet are valid.
authorized APIs’ values. Required.
The API Values are:
1
Moderator API
2
Operator API
4
Call Router API
8
Provisioning API
16
CDR API
For instance, to authorize access to the Moderator and Operator APIs
only, enter 3. To authorize access to the Moderator, Operator, and
Provisioning APIs, enter 11.
Currently, only the Moderator API can be used.
Company Name Enter the provider’s company name. The maximum length is 30
characters.
Contact Person Enter the name of the person responsible for this account. The
maximum length is 30 characters.
Phone Enter a phone number for the contact person. The maximum length is
30 characters.
E-Mail Enter an email address for the contact person. The maximum length is
50 characters.
Note Enter any additional information about the provider that you need. The
maximum length is 256 characters.
44 Proprietary & Confidential
Page 63

Figure 2-15 Add Provider page
Administering the ReadiVoice System
Editing a Provider Account
1 In the navigation bar, click Application Providers.
The Application Providers page appears (Figure 2-14).
2 Find the provider that you want to edit and click its Edit button (purple
“e”).
The Add Provider page appears (Figure 2-15).
3 Modify the data as necessary. See Table 2-2 for field descriptions.
4 Click Create Provider.
The system confirms that the provider has been modified and provides a
link back to the Application Providers page.
5 Click the link to reload the Application Providers page.
Repeat the above procedure to modify another provider.
Proprietary & Confidential 45
Page 64

ReadiVoice Administration & Maintenance Guide
Deleting a Provider
You can’t delete a provider account to which subscribers are assigned.
To delete a provider account from the system:
1 In the navigation bar, click Application Providers.
The Application Providers page appears (Figure 2-14).
2 Find the provider you want to delete and click its Delete button (red “–”).
A dialog box asks you to confirm.
3 Click OK.
The system confirms that the provider has been deleted and provides a
link back to the Application Providers page.
4 Click the link to reload the Application Providers page.
Repeat the above procedure to delete another provider.
Working with Subscriber Groups
Subscriber groups are logical groupings of related subscribers who share the
same user interface (for instance, a specific prompt set). All subscribers are in
a group, so you must have at least one. Typically, you create more subscriber
groups as needed. For instance, you may create a subscriber group specifically
for Acme Widgets Co. users.
During ReadiVoice installation, a default subscriber group is automatically
created. Initial configuration of the system includes defining the initial value
settings for the default subscriber group.
A subscriber group’s settings are used as initial values for its new subscribers.
Therefore, the settings you make for a group are the defaults that provisioners
see when they add subscribers to the group.
After working with the subscriber group settings, you may realize that your
company doesn’t need or want to use all the available fields when
provisioning subscribers or modifying their accounts. See “Setting Up the
Provisioning Interface” on page 60.
When you create a new group, the system copies the settings from the existing
group of your choice to save you time.
Each subscriber group can have a group administrator, who is the internal user
authorized to modify the group and view its CDR and conference information.
You can’t directly create or delete group administrators as you do other
internal users. You can do so only as part of creating or editing the group. You
can, however, change the group administrator’s password directly on the
Passwords page. See “Changing an Internal User’s Password” on page 65.
46 Proprietary & Confidential
Page 65

The following sections describe how to create, edit, and delete a group. For
information about adding subscribers to a group, see the ReadiVoice
Provisioning Guide.
Adding a New Subscriber Group
Every subscriber group must be associated with a number group, which
controls the access numbers available to the subscriber group. If you want to
link the new subscriber group with its own number group, create the number
group first. See “Working with Number Groups” on page 30.
To add a new subscriber group:
1 In the System Administration navigation bar, click Subscriber Groups.
The Subscriber Group page appears (Figure 2-16). The List panel shows
the subscriber groups that exist.
2 In the Add panel, select an existing group from which to copy the initial
values and enter a name for the new group. The maximum length is 50
characters.
Administering the ReadiVoice System
3 Click the Add New Group button.
The system creates the new group, copying its initial values from the
existing group you selected, and opens the Edit Group page (Figure 2-17).
4 Edit the group information as described in “Editing a Subscriber Group,”
starting at 3.
Repeat the above procedure to add another subscriber group.
Figure 2-16 Subscriber Group page
Proprietary & Confidential 47
Page 66

ReadiVoice Administration & Maintenance Guide
Editing a Subscriber Group
1 In the navigation bar, click Subscriber Groups.
The Subscriber Group page appears.
2 Find the group that you want to edit and click its Edit Group button
(purple “e”).
The Edit Group page appears (Figure 2-17).
3 Enter or modify the data in the Group Information area. See Table 2-3 for
descriptions.
Figure 2-17 Edit Group page (top portion)
48 Proprietary & Confidential
Page 67

Administering the ReadiVoice System
Table 2-3 Group Information fields
a
Field
Group Name Leave the current name or change it if you wish. The maximum length is
Group Type Choose Personal or Corporate from the list. Personal is for billing each
Provider Name If your system has multiple providers, select the provider for this
Number Group Select the number group from which access phone numbers for this
Administrator Name Change the login name of the group administrator (the initial value is the
Description
50 characters.
participant individually. Corporate is for billing a company for the entire
conference. If you choose Corporate, you must complete the Company
Information and Billing Information sections.
subscriber group from the list. Otherwise, leave the default value of
NONE.
group are assigned.
group name). This is the person authorized to change group information
and view CDR (call detail record) and conference information for this
group. The maximum length is 30 characters.
Administrator
Password
Access Class Place a check next to the access class or classes that should be
Operator Notes Enter any message or operator script that you want displayed to
Subscriber User
Field A
Subscriber User
Field B
a. These are the default labels. All field labels that also appear on the New Subscriber page can be
customized.
Change the password for this group administrator (the initial value is the
group name). The maximum length is 30 characters.
selected by default for new subscribers in this group. A class typically
defines a type of access number, such as toll or toll-free.
operators when they view this group’s conferences. The maximum
length is 484 characters.
Optional field for additional subscriber group information, such as a key
to another database. Whether and how you use this field is entirely up to
your company. The ReadiVoice system doesn’t use it.
Second optional field for additional subscriber group information.
4 If Group Type is Corporate:
a Enter or modify the data in the Company Information fields. See
Table 2-4 for descriptions. All fields are required.
b Enter or modify the data in the Billing Information section. See
Table 2-5 for descriptions.
Figure 2-18 shows these two sections.
The ReadiVoice system doesn’t use any of the data in the Billing
Information section. These fields are provided for your company to use as
it wishes, and the descriptions here are just general guidelines.
Proprietary & Confidential 49
Page 68

ReadiVoice Administration & Maintenance Guide
Figure 2-18 Company and Billing sections of Edit Group page
Table 2-4 Company Information fields
Field Description
Company Name Enter the name of the company. The maximum length is 50 characters.
Phone Enter the company’s telephone number. The maximum length is 30
characters.
Fax Enter the company’s fax number. The maximum length is 30 characters.
Contact Name Enter the name of the person to contact at this company. The maximum
length is 50 characters.
Contact Phone Enter the contact person’s telephone number. The maximum length is
30 characters.
50 Proprietary & Confidential
Page 69

Administering the ReadiVoice System
Table 2-5 Billing Information fields
a
Field
Description
Billing Type Select Credit Card or Telephone Number to choose the billing method
for this group’s conferences.
Card Type For credit card billing, select the card type from the list.
Credit Card Number For credit card billing, enter the 16-digit card number.
Expiration Date For credit card billing, select the expiration month and enter the
four-digit year.
Billing Phone Enter the phone number to be billed or the phone number from the
Company Information section.
This field is required, even if Billing Type is not Telephone Number.
Billing Address Enter the billing address.
Billing User Field A Optional field for additional billing information, such as a key to another
database. Whether and how you use this field is entirely up to your
company.
Billing User Field B Second optional field for additional billing information.
a. These are the default labels. All field labels that also appear on the New Subscriber page can be
customized.
5 Configure the prompt settings in the Call Flow and Voice Prompt section
(Figure 2-19). Table 2-6 describes the settings.
Figure 2-19 Call Flow and Voice Prompt section of Edit Group page
Proprietary & Confidential 51
Page 70

ReadiVoice Administration & Maintenance Guide
Table 2-6 Call Flow and Voice Prompt fields and settings
Field/Settinga
Prompt for Menu Specifies whether subscribers can access the account options menu
Prompt for Subscriber Indicates whether the call flow includes a prompt for the subscriber to
Prompt for Security Specifies the setting for the conference security code prompt.
Description
when they dial into the system and identify themselves.
On — Subscribers in this group are given the opportunity to change the
account options. The account options menu enables subscribers to
make changes that affect all future conferences (including the one that a
subscriber is in the process of starting).
Off — Subscribers are not given the opportunity to access the account
options menu (but can still modify account options through the
Moderator interface).
enter his or her subscriber password.
On — Callers hear “If you are the subscriber, press star” (this is the
default wording). Use this setting unless all subscribers in this group
must have a two-password (shared or private) call flow.
Off — Callers hear “At any time during this message, please enter your
passcode followed by the pound key.” Use this setting if only
two-password call flows are possible.
If this is set to Off for a subscriber account with a traditional (one
password) call flow, the subscriber has no opportunity to identify him or
herself when dialing in and must use the Moderator to start conferences.
No Prompt — The conference security feature isn’t available.
Optional Prompt — Subscribers are given the option of setting up a
conference security code, which participants must know in order to join
the conference.
Mandatory Prompt — Subscribers are required to set up a conference
security passcode.
Prompt Set Specifies the voice prompt set for this subscriber group’s conferences.
a. These are the default labels. All field labels that also appear on the New Subscriber page can be customized.
6 In the Conference Options section (Figure 2-20), configure Account
Options and Roll Call Options. Each of the features has two settings:
Setting — Determines the feature’s default setting.
Subscriber Configurable — Determines whether subscribers can change
their account’s default setting later, using either the account options call
flow menu (if enabled) or the Moderator.
Table 2-7 on page 54 describes the settings. Remember, the group’s
settings are the initial settings for subscribers in the group, but
provisioners can modify them for specific subscribers.
7 Continue with the Conference Options section by setting the
Provisioning Options. See Table 2-7.
52 Proprietary & Confidential
Page 71

Administering the ReadiVoice System
8 If your system has any Application Control Mode (ACM) features
installed, place a check mark next to those that you wish to enable for this
subscriber group.
ACM applications must be both installed and activated to appear here.
Figure 2-20 Conference Options section of Edit Group page
Proprietary & Confidential 53
Page 72

ReadiVoice Administration & Maintenance Guide
Table 2-7 Conference Options
a
Field
Auto Continuation Setting:
Description
On — By default, conferences begin with continuation turned on (which
means that the conference continues until the last participant
disconnects).
Off — By default, conferences begin with continuation turned off (which
means that the conference ends when the subscriber disconnects).
Subscriber Configurable:
Yes — Subscribers can change the On/Off setting before a conference
begins through the account options menu (if available) or the Moderator
interface.
No — Subscribers can’t change the On/Off setting.
The Conference Continuation setting determines whether subscribers
can override the default continuation behavior for a specific conference.
If you set Subscriber Configurable to No and Conference
Continuation to No, then subscribers can neither change the default
behavior nor override it; the Auto Continuation Setting (On or Off)
governs all of a subscriber’s conferences. See “How Continuation
Settings Interact” on page 58.
Quick Start Setting:
On — By default, conferences start as soon as the first participant dials
in. Participants don’t wait on hold for the subscriber to arrive.
Off — By default, conferences start when the subscriber arrives.
Participants who dial in before the subscriber wait on music hold until
the subscriber arrives.
Subscriber Configurable:
Yes — Subscribers can change the On/Off setting before a conference
begins through the account options menu (if available) or the Moderator
interface.
No — Subscribers can’t change the On/Off setting.
Quick start conferences are considerably less secure than conferences
that don’t start until the subscriber enters the subscriber password.
Listen Only Entry Setting:
On — Conferences start in listen only mode. The subscriber is the only
conference participant who can speak to the conference; all other
participant lines are muted, and participants can’t unmute themselves.
Off — Conferences don’t start in listen only mode. All participants
(except those who are muted) can be heard.
Subscriber Configurable:
Yes
— Subscribers can change the On/Off setting for the account,
affecting all future conferences.
No — Subscribers can’t change the On/Off setting. But, they can still
use the Moderator interface or touchtone commands to turn listen only
mode on or off in the current conference.
54 Proprietary & Confidential
Page 73

Table 2-7 Conference Options (continued)
a
Field
Description
Waiting Room Setting:
Off — The waiting room isn’t available. If a subscriber locks a
conference, callers after that are told that the conference is locked and
are disconnected.
On — The waiting room is available. If a subscriber locks a conference,
callers after that must wait on music hold to be admitted. The subscriber
is notified when someone wants to enter the conference and can use
touchtone commands or the Moderator interface to speak with, admit, or
disconnect the waiting caller(s).
On w/Waiting Room on Entry — Conferences start locked with the
waiting room available. All callers must wait to be admitted by the
subscriber.
Subscriber Configurable:
Yes — Subscribers can change the default setting for their account,
affecting all future conferences.
No — Subscribers can’t change the default. If a subscriber locks the
current conference, the waiting room either is or isn’t available,
depending on the setting for this feature.
Administering the ReadiVoice System
Password Enable Determines whether subscribers can change their subscriber password
using the touchtone interface.
Name Record Setting:
On — The ReadiVoice system prompts participants to record their
names before placing them into conference. Conferees can request a
“roll call” of participants’ names during the conference. This feature must
be turned on if Entry/Exit Announcement is set to Name.
Off — The ReadiVoice system doesn’t record participants’ names. The
Entry/Exit Announcement setting can’t be Name.
Subscriber Configurable:
Yes — Subscribers can change the On/Off setting for the account,
affecting all future conferences.
No — Subscribers can’t change the On/Off setting.
Entry/Exit
Announcement
Setting:
Specifies whether the system signals the entry and exit of a participant
by playing a tone, the participant’s recorded name, or silence. If you
select Name, you must also turn on the Name Record feature.
Subscriber Configurable:
Yes — Subscribers can change the default setting for the account,
affecting all future conferences. If the announcement setting is Name,
and if the subscriber can turn off Name Record, then the subscriber
should be able to change the announcement setting, too.
No — Subscribers can’t change the default.
Proprietary & Confidential 55
Page 74

ReadiVoice Administration & Maintenance Guide
Table 2-7 Conference Options (continued)
a
Field
Description
Conference
Continuation
Determines whether subscribers can override their accounts’ default
continuation behavior (specified by the Auto Continuation settings) for
a specific conference during that conference (using either a touchtone
command or the Moderator interface).
Yes — Subscribers can turn continuation on or off during their
conferences. Doing so doesn’t change the default (Auto Continuation)
setting for the account; only the current conference is affected.
No — Subscribers can’t override the default continuation behavior
during their conferences. Once a conference has started, the account’s
Auto Continuation setting controls the continuation behavior.
If Conference Continuation is No and Auto Continuation isn’t
subscriber configurable, then the subscriber can neither change the
default behavior nor override it; the Auto Continuation Setting (On or
Off) governs all the subscriber’s conferences. See “How Continuation
Settings Interact” on page 58.
Dial Out Permission Determines whether a subscriber can dial out from his or her
conferences.
Dial Out Prefix Appears only if your system is configured for dial-out billing (see
“Configuring Dial-Out Billing” on page 126). Enables billing for dial-out
calls a subscriber makes. This field and Dial Out Postfix together can’t
exceed 24 characters.
This field has no effect if Dial Out Permission is set to No.
Dial Out Postfix Appears only if your system is configured for dial-out billing. Enables
billing for dial-out calls the subscriber makes. This field and Dial Out
Prefix together can’t exceed 24 characters.
This field has no effect if Dial Out Permission is set to No.
Recorder Dial Out Determines whether a subscriber can choose to record a conference.
Conference recording is available only if your system is configured
properly and can dial out to a recording service or device. See “Enabling
Conference Recording” on page 137 and ask your Polycom Global
Services representative about conference recording.
VIP Conference On
— Subscribers in this group have VIP Conference turned on by
default. VIP Conference subscribers are guaranteed access to the
number of ports specified in their subscriptions.
Polycom recommends selecting Off for this option. It’s best to grant VIP
status only to individual subscribers and only in limited numbers. VIP
subscribers have exclusive use of their ports at all times, permanently
removing those ports from the pool of available ports for non-VIP
conferences. Overuse of the VIP Conference option has a negative
impact on your system’s port utilization efficiency.
Off — Subscribers in this group have VIP Conference turned off by
default. This is the normal setting. Non-VIP subscribers’ ports come
from the general pool, and the full number specified in their
subscriptions is not guaranteed to be available at all times.
56 Proprietary & Confidential
Page 75

Field
Administering the ReadiVoice System
Table 2-7 Conference Options (continued)
a
Description
Conference Entry with
Count
Operator Request
Available
Conference
Termination Option
On — Upon entering the conference, participants hear a private
message telling them how many people, including themselves, are now
in the conference.
Off — Participants hear a message stating only that they’re being
placed into conference.
Specifies who may make operator requests from a subscriber’s
conferences: the subscriber only, the subscriber and participants, or
neither.
This setting doesn’t affect automatic operator requests resulting from a
caller’s failure to enter the correct password or conference security
code.
Specifies how the ReadiVoice system handles conferences that have
the minimum number of participants:
Off — The ReadiVoice system never terminates conferences.
On — After a configurable interval (set by Conference Termination
Time, below), the conference is referred to an operator for termination.
If no operator is available, the system plays a message to the
conference asking the participants to press a touchtone key to continue.
If there’s no response, the system terminates the conference.
On – w/ Oper Override — The system plays a message to the
conference asking the participants to press a touchtone key to continue.
If there’s no response, the system terminates the conference.
You can set the minimum number of participants for your system to one,
two, or three. See “Changing System Configuration Settings” on
page 118.
Conference
Termination Time
Specifies the time interval (in minutes) that governs the automatic
termination of conferences that have the minimum number of
participants. Has no effect if Conference Termination Option is set to
Off.
ACM Options Application Control Mode (ACM) enables an external application to
interact with callers or conference participants. The options or settings
that appear here, if any, depend on which ACM features and external
applications are installed in your system.
ACM and some sample ACM applications to demonstrate its use are
included in the ReadiVoice Software Development Kit (SDK).
a. These are the default labels. All field labels that also appear on the New Subscriber page can be customized
via the Quick Provisioning Setup page described in “Setting Up the Provisioning Interface” on page 60.
Proprietary & Confidential 57
Page 76

ReadiVoice Administration & Maintenance Guide
9 Click Commit Group.
The system either confirms that the group has been updated or tells you
which information is missing.
10 If the update failed, note what’s missing. Then click the link to return to
the Edit Group page, make the needed corrections, and click Commit
Group again.
Repeat the above procedure to edit another subscriber group.
How Continuation Settings Interact
Table 2-8 shows how Auto Continuation and Conference Continuation
interact to determine an account’s continuation behavior (whether a
conference continues after the subscriber leaves) and what control the
subscriber has over that behavior.
Table 2-8 Continuation settings at a glance
Auto Continuation
On
Off
Subscriber
Configurable
Yes
No
Yes
No
Conference
Continuation Effect Setting
Yes Continuation on. Subscriber can turn it off for the
current conference or for all future conferences.
Continuation on. Subscriber can turn it off for all future
No
Yes
No
Yes
No
Yes
conferences, but not for the conference currently under
way.
Continuation on. Subscriber can turn it off for the
conference currently under way, but not for all future
conferences.
Continuation on. Subscriber can’t turn it off at all. All of
the subscriber’s conferences are set to continue until
the last participant disconnects.
Continuation off. Subscriber can turn it on for the
conference currently under way or for all future
conferences.
Continuation off. Subscriber can turn it on for all future
conferences, but not for the conference currently under
way.
Continuation off. Subscriber can turn it on for the
conference currently under way, but not for all future
conferences.
Continuation off. Subscriber can’t turn it on at all. All of
No
58 Proprietary & Confidential
the subscriber’s conferences are set to end when the
subscriber disconnects.
Page 77

If they may do so, subscribers can change the continuation behavior of all
future conferences in two ways:
• By accessing the account options menu when dialing into the system
(available if Prompt for Menu is turned on).
• By logging into the Moderator and accessing its account options settings.
If they may do so, subscribers can change the continuation behavior of the
conference currently under way by entering the correct touchtone command
(the default is
Deleting a Subscriber Group
You can’t delete a group that has active subscribers. First, you must change the
subscribers to a different group. For instructions, see the ReadiVoice
Provisioning Guide. You can’t delete the last remaining subscriber group.
*8
Administering the ReadiVoice System
).
Caution!
Be sure you want to permanently remove all information about a group before you
delete it.
To delete a subscriber group:
1 In the navigation bar, click Subscriber Groups.
The Subscriber Group page appears (Figure 2-16 on page 47).
2 Find the group you want to delete and click its Delete button (red “–”).
A dialog box asks you to confirm deleting the group.
3 Click OK.
The system confirms that the group has been deleted.
Repeat the above procedure to delete another subscriber group.
Proprietary & Confidential 59
Page 78

ReadiVoice Administration & Maintenance Guide
Setting Up the Provisioning Interface
After working with the subscriber group settings, you may realize that your
company doesn’t need or want to use all the available fields when
provisioning subscribers or modifying their accounts.
You can customize the Provisioning interface so that provisioners see only the
fields you want them to use. You can also change the field names to match
your company’s usage.
The Quick Provisioning Setup page (Figure 2-21 and Figure 2-22) lets you
decide what appears on the Add Subscriber and Edit Subscriber pages. You
can:
• Hide fields and settings that your company doesn’t need.
A few fields are required by the system. They don’t have check boxes by
them, so you can’t turn them off (but you can rename them). You probably
want to require at least some subscriber and billing information.
Other fields may be necessary because of your system configuration (such
as Subscriber External ID) or to implement certain features (such as Dial
Out Prefix and Dial Out Postfix).
Caution!
• Change the names of fields and settings.
When renaming fields and settings, keep in mind that space is limited.
Check your changes to make sure they display properly.
If you rename fields and settings that apply to subscriber groups, those
changes also appear on the Edit Group page.
To customize what appears in the Provisioning interface:
1 In the System Administration navigation bar, click Quick Provisioning
Setup.
The Quick Provisioning Setup page appears.
2 To disable a field or setting (removing it from the Provisioning interface),
click its check box to clear it. To re-enable a field or setting, click its check
box again to select it.
Some ReadiVoice system configurations may require that certain fields and settings
be available in Provisioning even though the Quick Provisioning Setup page allows
you to leave them out. Be sure you know which fields are needed for your system
configuration.
3 To change how a field or setting is labeled in the Provisioning interface,
edit the name shown in its text box.
60 Proprietary & Confidential
Page 79

Administering the ReadiVoice System
4 When you’re finished making changes, click the Update Quick
Provisioning Settings button.
The system confirms the provisioning setup changes and provides a link
back to the System Administration page.
5 Test the changes you’ve made:
— Go to the Provisioning interface and add a test subscriber. Verify that
the Add Subscriber page looks the way it should.
— Start a conference as the test subscriber and verify that all the features
you want to support are available and operational.
Repeat this procedure if you need to make additional changes.
Figure 2-21 Quick Provisioning Setup page (top)
Proprietary & Confidential 61
Page 80

ReadiVoice Administration & Maintenance Guide
Figure 2-22 Quick Provisioning Setup page (bottom)
62 Proprietary & Confidential
Page 81

Managing System Access
The ReadiVoice system supports several kinds of users with different roles
and responsibilities. To give internal users (not subscribers) access to the
system, you create entries for them on the Passwords page, assigning each a
user name and password.
The user type (operator, provisioner, or administrator) controls which
functions a user may access. A group provisioner is assigned to a single
subscriber group and can add, change, or delete only subscribers within that
group. A group operator is assigned to one or more subscriber groups and can
monitor conferences and answer requests only from conferences within those
subscriber groups.
Similarly, a group administrator can edit only a specific subscriber group and
view only the CDRs from that group.
You can’t add or delete group administrators directly. Instead, you do so when
creating or editing the subscriber group. See “Working with Subscriber
Groups” on page 46. You can, however, change a group administrator’s
password using the procedure described here.
Administering the ReadiVoice System
The sections that follow describe how to add and delete internal users and
change their passwords.
Adding an Internal User
1 In the System Administration navigation bar, click Passwords.
Caution!
This page shows actual passwords, not asterisks, for all ReadiVoice users. Don’t
display it unless the monitor is secure from unauthorized personnel. Don’t walk
away from the monitor with this page displayed.
2 In the User Name field of the blank row, enter the login name for the new
3 In the Password field, enter the new user’s password. The maximum
The Passwords page appears (Figure 2-23). It lists the authorized users of
the ReadiVoice system, showing the password, user type, and, if
applicable, group for each. A blank row at the end of the list allows you to
add a new user.
user. The maximum length is 30 characters.
length is 20 characters.
Proprietary & Confidential 63
Page 82

ReadiVoice Administration & Maintenance Guide
Figure 2-23 Passwords page
4 In the User Type list, select the user type.
The user types are operator, provisioner, group operator, group
provisioner, and system administrator.
5 If the new user is a group provisioner or group operator, select from the
Group list the subscriber group to which this user has access.
For a group operator, you can add or change subscriber groups later (see
step 8). For a group provisioner, the group selected here is the only one to
which the provisioner has access and it can’t be changed.
6 Click the Add button.
The system confirms that the user has been added and provides a link for
returning to the Passwords page.
7 Click the link to reload the Passwords page.
The new entry appears at the end of the list, above the blank row.
8 If the new user is a group operator and you want to add more subscriber
groups, click the new entry’s Register Groups link.
The Operator Registered Subscriber Groups page appears (Figure 2-24).
64 Proprietary & Confidential
Page 83

Administering the ReadiVoice System
Figure 2-24 Operator Registered Subscriber Groups page
9 Use the Add and Remove buttons to move selected groups into or out of
this operator’s Registered Subscriber Groups list.
10 When you’re finished setting up this group operator, click Passwords in
the navigation bar to return to the Passwords page.
Repeat the above procedure to add another user.
Changing an Internal User’s Password
1 In the navigation bar, click Passwords.
The Passwords page appears (Figure 2-23). It lists the authorized users of
the system, showing the password, user type, and, if applicable, group for
each. Only the password can be modified.
To change a user’s login name, user type, or group, delete the existing
entry and add a new one. The Passwords page also lists the Telnet login
for the system. You can change the password for this login, but can’t delete
it.
2 Locate the user whose password you want to change.
3 Replace or edit the existing password and click the Commit button (blue
“c”).
The system confirms that the password has been modified and provides a
link for returning to the Passwords page.
4 Click the link to reload the Passwords page.
The user you modified has a new password.
Repeat the above procedure to change another password.
Proprietary & Confidential 65
Page 84

ReadiVoice Administration & Maintenance Guide
Deleting an Internal User
1 In the navigation bar, click Passwords.
The Passwords page appears (Figure 2-23).
2 Locate the entry for the user you want to remove and click its Delete
button (red “–”).
The system confirms that the user has been deleted and provides a link for
returning to the Passwords page.
3 Click the link to reload the Passwords page.
The entry you deleted is gone from the list.
Repeat the above procedure to delete another user.
Defining Invalid Subscriber Passwords
As a security feature, the ReadiVoice system lets you specify certain number
combinations as not valid subscriber passwords. For instance, you can
disallow combinations such as 1111 and 1234.
The ReadiVoice system stores the invalid combinations in the invalid
subscriber password table. You can add entries to and delete entries from this
table. Adding entries has no effect on subscribers currently using the entries.
It only prevents these entries from being chosen in the future.
Adding Entries to the List of Invalid Subscriber Passwords
1 In the System Administration navigation bar, click Invalid Passwords.
The Invalid Subscriber Password Table page appears (Figure 2-25).
2 In the Enter a Password to Add to the List field, type the number you
want to invalidate as a subscriber password.
3 Click the Add button (green “+”).
The system confirms that the entry has been added and provides a link for
returning to the Invalid Subscriber Password Table page.
4 Click the link to reload the Invalid Subscriber Password Table page.
The entry you added appears in the list.
Repeat the above procedure to add another invalid password entry.
66 Proprietary & Confidential
Page 85

Administering the ReadiVoice System
Deleting Entries from the List of Invalid Subscriber Passwords
1 In the navigation bar, click Invalid Subscriber Passwords.
The Invalid Subscriber Password Table page appears (Figure 2-25).
2 Scroll through the list of invalid subscriber passwords and select the
number you want to delete.
3 Click the Delete button (red “–”).
The system confirms that the entry has been deleted and provides a link
for returning to the Invalid Subscriber Password Table page.
4 Click the link to reload the Invalid Subscriber Password Table page.
The entry you deleted is gone from the list.
Repeat the above procedure to delete another entry.
Figure 2-25 Invalid Subscriber Password Table page
Proprietary & Confidential 67
Page 86

ReadiVoice Administration & Maintenance Guide
68 Proprietary & Confidential
Page 87

Monitoring the ReadiVoice System
This chapter describes the ReadiVoice system monitoring functions that you
can access with your browser. You can view the overall status of your system,
usage levels, bridge and span status, operator data, and conference data.
3
Accessing the Monitoring Tools
You can access the ReadiVoice system monitoring tools from any computer
that can connect to the ReadiVoice system’s Web server and has a compatible
Web browser (Microsoft Internet Explorer, version 5.5 or later).
Some functions also require a Java plug-in (Java Runtime Engine, or JRE). If
you don’t have the necessary plug-in, your browser should ask you if you
want to download and install it. You must do so to use those functions.
Polycom has tested these Java applets with the Sun Microsystems Java
Runtime Engine (JRE) 1.3 on Microsoft Windows 2000.
These applets should work on other platforms and operating systems and with
newer versions of the JRE, but that depends on proper implementation by the
operating system and Java virtual machine. Polycom hasn’t tested other
possible combinations and can’t be responsible for implementation or
compatibility issues beyond our control.
Access to the monitoring tools is restricted to authorized users. You must
know the correct user name and password.
To access ReadiVoice system monitoring tools:
1 Point your browser to the ReadiVoice home page for your system (for
example, http://rvoice.com/index2.html).
The ReadiVoice internal home page appears (Figure 3-1). The navigation
bar is on the right.
2 Select the link for the information you want to see:
— Click Show System Status to see information about disk usage and
running processes on your CACS server.
Proprietary & Confidential 69
Page 88

ReadiVoice Administration & Maintenance Guide
— Click Show Conference Status to see information about current
— Click Show Conference Report to view call detail record (CDR) data
— Click Show CDR Data to view CDR data sorted by conference.
— Click Operator Statistics to view data taken from requests for
— Click SNMP Monitor to view system statistics in real time.
— Click Channel State Monitor to see real-time display of the lines in
— Click Show Critical Logs to check for critical events in the bridge log
If you aren’t already logged in as a system administrator, the login dialog
box appears.
3 Enter a user name and password authorized for administrative access.
Then click OK.
conferences.
for completed conferences sorted by subscriber.
operator assistance, or to view statistics calculated from the data.
use on each bridge (not available in an IP system).
files (described in Chapter 6, “Diagnostics and Troubleshooting,” on
page 145).
Figure 3-1 ReadiVoice internal user home page
70 Proprietary & Confidential
Page 89

Checking System Status
The System Status page (Figure 3-2) appears when you click the Show System
Status link in the navigation bar.
The System Disk Usage and Informix Disk Usage panels show disk usage
statistics for your CACS server’s Solaris partitions and Informix chunks. For
each partition or chunk, they show:
KB Size — The total size of the partition or chunk in kilobytes.
KB Left — The amount of free space in kilobytes.
Capacity — The percentage of the total size that is used.
The Process Status panel shows the status (running or not running) and CPU
time of the ReadiVoice server processes. The processes listed depend on
whether this is a PSTN or IP system and how it’s configured. See “Stopping
and Restarting ReadiVoice Processes” on page 111.
Monitoring the ReadiVoice System
Caution!
ReadiVoice behavior is unpredictable unless all server processes are running.
Figure 3-2 System Status page
Proprietary & Confidential 71
Page 90

ReadiVoice Administration & Maintenance Guide
Viewing Conferencing Information
The Conference Information links in the navigation bar let you look at:
• Information about the conferences currently running.
• Summary CDR data, with one entry per subscriber, for a time period you
choose (up to one month).
• Summary CDR data, with one entry per conference.
• Detailed CDR data for a specific conference.
Call detail records (CDRs) are used for billing and provide detailed
information about a conference, its participants, and all features used and
events associated with it. If you’re a system administrator, you can look at any
CDR data in the database; if you’re a group administrator or group
provisioner, you can look only at the CDR data for your subscriber group.
For descriptions of the CDR data, see Appendix B.
Current Conferences Information
The Conference Status page appears when you click the Show Conference
Status link in the navigation bar. It provides an overview of the current
conferencing activity on the system.
The Conference Status page shows:
• At the top, summary information about all currently running conferences.
• Below the summary table, status information for each running conference,
showing details about each line in the conference.
Figure 3-3 Conference Status page
72 Proprietary & Confidential
Page 91

CDR Data by Subscriber
When you click the Show Conference Report link in the navigation bar, the
CDR Data page displays CDR data by subscriber. Each entry in the
Conference Report panel shows the aggregate conferencing data for one
subscriber.
When the page first appears, it shows the subscriber data for the current date.
To see subscriber data for a different date or range of dates, change Begin
Date, End Date, or both, and click Search.
For each subscriber listed, the report shows:
• Subscriber ID and name.
• Total number of port minutes.
• Number of dial-outs and dial-out minutes.
• Number of times each billable feature was used.
To see more detail for a subscriber, click that subscriber’s ID in the list. The
system displays summary CDR data for the subscriber’s conferences, with one
entry per conference. This is the same display that you get by clicking Show
CDR Data and then searching for that subscriber ID and date range. See the
next section.
Monitoring the ReadiVoice System
Figure 3-4 Viewing CDR data by subscriber
Proprietary & Confidential 73
Page 92

ReadiVoice Administration & Maintenance Guide
CDR Data by Conference
When you click the Show CDR Data link in the navigation bar, the CDR Data
page presents an expanded search panel (Figure 3-5), where you can specify
various criteria, such as subscriber ID or name, and set a date range.
When you click Search, the system retrieves data for the conferences within
your date range that match your search criteria. Each entry in the Conference
Report panel shows the data for one conference. Figure 3-5 shows the results
of a search for a specific subscriber ID.
If the date range includes today, the list may include conferences that are
currently running or whose CDRs haven’t been fully processed yet; these
records will be incomplete.
For each listed conference, the Conference Report panel shows:
• Conference and subscriber IDs.
• Bridge ID and card number on which conference ran.
• Subscriber’s name.
• Start time and duration (or Incomplete if the conference is still running).
• Number of participants (or N/A if the conference is still running).
To see details for a specific conference, click its conference ID. The CDR Data
page displays detailed CDR data for the conference. See the next section.
74 Proprietary & Confidential
Page 93

Figure 3-5 Retrieving CDR data by conference
Monitoring the ReadiVoice System
Proprietary & Confidential 75
Page 94

ReadiVoice Administration & Maintenance Guide
Detailed CDR Data for One Conference
While viewing CDR data by conference, click a conference ID for more
information about that conference. The CDR Data page displays detailed CDR
data for the conference (Figure 3-6). The Conference Report panel at the top
contains information about the conference and its participants. The
Participant Features panel contains records of billable feature usage. For
descriptions of the features that may be listed, see Table B-3, “Feature
Information (cdr_post_state)” on page 258.
If the conference is still running or its CDRs haven’t been fully processed yet,
these records will be incomplete.
If you have a non-routed system using private (not shared) access numbers,
and you’re using hidden numbers, then the Conference Report panel shows
the hidden numbers instead of the DNIS numbers.
Figure 3-6 Viewing detailed CDR data for a conference
76 Proprietary & Confidential
Page 95

Viewing Operator Information
The Operator Statistics page appears when you click the Operator Statistics
link in the navigation bar of the ReadiVoice internal user home page. From
here, you can:
• Click View Requests in the navigation bar to see records of operator
requests (for all operators, a specific operator, or a specific subscriber).
Follow the procedure in “Viewing Operator Request Records” on page 77.
• Click View Statistics in the navigation bar to see operator request
statistics (for all operators, a specific operator, or a specific subscriber).
Follow the procedure in “Viewing Operator Request Statistics” on
page 79.
Operator request data is available only if operator data logging is enabled on
the System Configuration page (see “Changing System Configuration
Settings” on page 118). If it is, the ReadiVoice system creates an operator log
file each night at midnight containing all the operator request records for the
preceding day.
Monitoring the ReadiVoice System
The Operator Statistics pages let you retrieve and view data from these log
files The operator logs are deleted after 31 days, so you can see operator
request data for up to a month.
Viewing Operator Request Records
1 In the Operator Statistics page navigation bar, click View Requests.
The Requests page appears (Figure 3-7). It provides you with three scope
options in the navigation bar (For All Operators, For Specific Operator,
and For Specific Subscriber).
2 In the navigation bar, click the link that corresponds with the scope of the
records you want to retrieve.
The Requests Search page displays search fields that vary slightly
depending on the choice you made. Figure 3-8 shows the search fields that
appear when you choose For Specific Subscriber.
3 If you chose For Specific Operator or For Specific Subscriber, select the
operator from the list or enter the subscriber’s ID (if you don’t know the
subscriber’s ID, click the Search link to its right to search for the
subscriber).
4 If you chose For All Operators, select the number of records you want to
see per page.
Proprietary & Confidential 77
Page 96

ReadiVoice Administration & Maintenance Guide
Figure 3-7 The Operator Statistics Requests page
Figure 3-8 Searching for operator requests by subscriber
5 Set the Begin Date and End Date fields by doing one of the following:
— Click in the field and edit the date.
— Click the field’s calendar icon and click a date in the calendar that
appears.
Regardless of which dates you choose, records are only available for the
past 31 days and aren’t available for the current day (the system collects
the day’s data at midnight).
6 Click the Search button.
The ReadiVoice system displays the answered requests matching your
search criteria. For each request, it shows:
— Type of operator request (private or conference).
— Date and time the request was made.
— Operator ID of the operator who answered the request.
— How long it took an operator to answer the request.
78 Proprietary & Confidential
Page 97

Monitoring the ReadiVoice System
— How long the operator spent on the request (talking with the
subscriber or conference).
— Subscriber ID for the conference in question. Click the ID to retrieve a
conference report for that subscriber.
— Conference ID of the conference. Click the ID to retrieve a detailed
report for that conference.
Figure 3-9 Results of operator request search
Viewing Operator Request Statistics
1 In the Operator Statistics page navigation bar, click View Statistics.
The Statistics page appears. It looks similar to the Requests page
(Figure 3-7) and has the same three options in the navigation bar (For All
Operators, For Specific Operator, and For Specific Subscriber).
2 In the navigation bar, click the link that corresponds with the statistics
you want to generate.
The Statistics Search page displays search fields that vary slightly
depending on the choice you made. Figure 3-10 shows the search fields
that appear when you choose For All Operators.
3 If you chose For Specific Operator or For Specific Subscriber, select the
operator from the list or enter the subscriber’s ID (if you don’t know the
subscriber’s ID, click the Search link to its right to search for the
subscriber).
Proprietary & Confidential 79
Page 98

ReadiVoice Administration & Maintenance Guide
Figure 3-10 Generating statistics for all operators
4 Set the Begin Date and End Date fields by doing one of the following:
— Click in the field and edit the date.
— Click the field’s calendar icon and click a date in the calendar that
appears.
Regardless of which dates you choose, records are only available for the
past 31 days and aren’t available for the current day (the system collects
the day’s data at midnight).
5 Click the Search button.
The ReadiVoice system displays operator request statistics for the
operator, subscriber, and/or time period matching your search criteria
(Figure 3-11). It shows:
— Minimum, maximum, and average wait for request to be answered.
— Minimum, maximum, and average time spent on a request.
— Sample sizes (number of requests included in statistics).
If you requested statistics for all operators, it also shows:
— Minimum, maximum, and average wait for canceled requests.
— Maximum number of requests in the queue at any one time.
80 Proprietary & Confidential
Page 99

Monitoring the ReadiVoice System
Figure 3-11 Results of generating statistics for all operators
Using the SNMP Monitor
The ReadiVoice system supports the Simple Network Management Protocol
(SNMP). SNMP lets you monitor the ReadiVoice system with standard
network administration tools, such as HP Openview from Hewlett Packard or
similar tools from companies such as SUN or IBM.
documents the system and bridge SNMP events. “Enabling SNMP Logging”
on page 141 describes SNMP logging, which writes SNMP data to log files on
an ongoing basis.
But, if you just want to check system statistics in real time, you can use SNMP
Monitor. SNMP Monitor is a Java applet that you run from your browser. It
provides a quick and convenient way to monitor the contents of the SNMP
Management Information Base (MIB).
To run SNMP Monitor:
1 On the ReadiVoice home page, click the SNMP Monitor link.
The Java applet loads, which may take a few moments. Then, the SNMP
Monitor window appears. The Perfmeter tab is selected, and it starts
graphing selected MIB data over time, both system-level and for each
individual bridge. See Figure 3-12.
Although the SNMP Monitor applet opens in its own window, your
browser must remain active and pointed to the Monitor host page. If you
close your browser or navigate away from the host page, SNMP Monitor
closes.
Proprietary & Confidential 81
Page 100

ReadiVoice Administration & Maintenance Guide
Figure 3-12 Perfmeter tab of SNMP Monitor window
2 Point your mouse pointer at a specific data point on a graph.
A small window displays the MIB data value and time for that point on
the graph.
3 To customize which MIB elements are monitored, select Setup from the
Configuration menu.
The SNMP Monitor Properties dialog box opens (Figure 3-13).
82 Proprietary & Confidential
 Loading...