

Page 1

Polycom® Recording Studio™
(PRS) 2000 Appliance
Administrator Guide
1.0 | April 2010 | 3725-78400-004B
Page 2

Trademark Information
Polycom®, the Triangles logo, ReadiManager®, SoundPoint®, SoundStation®, ViaVideo®, VoiceStation®,
Vortex®, and VSX® are registered trademarks of Polycom, Inc. Convene™ , Global Management System™,
iPower™, MGC™, People+Content™, People On Content™, Polycom Conference Suite™, Polycom Converged
Management Application™ (CMA™), Polycom Distributed Media Application™ (DMA™), Polycom HD Voice™,
Polycom PathNavigator™, Polycom VideoPlus™, Polycom VoicePlus™, PVX™, RAS™, ReadiConvene™, RMX
2000™, RSS™, V2iU™, VBP™, VS4000™, and VTX™ are trademarks of Polycom, Inc.
All other trademarks are the property of their respective owners.
Patent Information
The accompanying product is protected by one or more U.S. and foreign patents and/or pending patent
applications held by Polycom, Inc.
© 2010 Polycom, Inc. All rights reserved.
Polycom, Inc.
4750 Willow Road
Pleasanton, CA 94588-2708
USA
No part of this document may be reproduced or transmitted in any form or by any means, electronic or
mechanical, for any purpose, without the express written permission of Polycom, Inc. Under the law, reproducing
includes translating into another language or format.
As between the parties, Polycom, Inc., retains title to and ownership of all proprietary rights with respect to the
software contained within its products. The software is protected by United States copyright laws and international
treaty provision. Therefore, you must treat the software like any other copyrighted material (e.g., a book or sound
recording).
Every effort has been made to ensure that the information in this manual is accurate. Polycom, Inc., is not
responsible for printing or clerical errors. Information in this document is subject to change without notice.
ii
Page 3

Contents
1 About the Polycom PRS 2000
2 Polycom Recording Studio Software
Contents
About the Polycom Recording Studio . . . . . . . . . . . . . . . . . . . . . . . . . . . . . . . 1
Hardware Specifications . . . . . . . . . . . . . . . . . . . . . . . . . . . . . . . . . . . . . . . . . . . 2
About the Polycom Recording Studio Software . . . . . . . . . . . . . . . . . . . . . . . 5
Beginning a New Session . . . . . . . . . . . . . . . . . . . . . . . . . . . . . . . . . . . . . . . . . . 6
Getting Started . . . . . . . . . . . . . . . . . . . . . . . . . . . . . . . . . . . . . . . . . . . . 6
Using the Session Properties . . . . . . . . . . . . . . . . . . . . . . . . . . . . . . . . . . . . . . . 6
Metadata . . . . . . . . . . . . . . . . . . . . . . . . . . . . . . . . . . . . . . . . . . . . . . . . . . . . 6
Inputs . . . . . . . . . . . . . . . . . . . . . . . . . . . . . . . . . . . . . . . . . . . . . . . . . . . . . . . 7
Outputs . . . . . . . . . . . . . . . . . . . . . . . . . . . . . . . . . . . . . . . . . . . . . . . . . . . . . 8
Image . . . . . . . . . . . . . . . . . . . . . . . . . . . . . . . . . . . . . . . . . . . . . . . . . . . 10
Windows Media . . . . . . . . . . . . . . . . . . . . . . . . . . . . . . . . . . . . . . . . . 11
Raw . . . . . . . . . . . . . . . . . . . . . . . . . . . . . . . . . . . . . . . . . . . . . . . . . . . . 12
MP3 . . . . . . . . . . . . . . . . . . . . . . . . . . . . . . . . . . . . . . . . . . . . . . . . . . . . 12
H.264 . . . . . . . . . . . . . . . . . . . . . . . . . . . . . . . . . . . . . . . . . . . . . . . . . . . 13
Configuring the Polycom Rich Experience Player Output . . . . . . 13
Capturing Your Experience . . . . . . . . . . . . . . . . . . . . . . . . . . . . . . . . . . . . . . . 16
Starting Capture and Preview . . . . . . . . . . . . . . . . . . . . . . . . . . . . . . . . . 17
Creating an Output . . . . . . . . . . . . . . . . . . . . . . . . . . . . . . . . . . . . . . . 17
Settings and Mix Templates . . . . . . . . . . . . . . . . . . . . . . . . . . . . . . . . . . . 21
Selected Input Settings . . . . . . . . . . . . . . . . . . . . . . . . . . . . . . . . . . . . 21
Background . . . . . . . . . . . . . . . . . . . . . . . . . . . . . . . . . . . . . . . . . . . . . 22
Mix Templates . . . . . . . . . . . . . . . . . . . . . . . . . . . . . . . . . . . . . . . . . . . 23
Outputs Settings . . . . . . . . . . . . . . . . . . . . . . . . . . . . . . . . . . . . . . . . . . . . . 24
Image . . . . . . . . . . . . . . . . . . . . . . . . . . . . . . . . . . . . . . . . . . . . . . . . . . . 24
Note about Session Configuration Files . . . . . . . . . . . . . . . . . . . . . . 25
Events . . . . . . . . . . . . . . . . . . . . . . . . . . . . . . . . . . . . . . . . . . . . . . . . . . . . . . 26
Types of Event . . . . . . . . . . . . . . . . . . . . . . . . . . . . . . . . . . . . . . . . . . . . . . . 27
Chapters . . . . . . . . . . . . . . . . . . . . . . . . . . . . . . . . . . . . . . . . . . . . . . . . 27
Caption . . . . . . . . . . . . . . . . . . . . . . . . . . . . . . . . . . . . . . . . . . . . . . . . . 28
Search . . . . . . . . . . . . . . . . . . . . . . . . . . . . . . . . . . . . . . . . . . . . . . . . . . 28
URL . . . . . . . . . . . . . . . . . . . . . . . . . . . . . . . . . . . . . . . . . . . . . . . . . . . . 28
Mark In/Mark Out . . . . . . . . . . . . . . . . . . . . . . . . . . . . . . . . . . . . . . . 28
Notes . . . . . . . . . . . . . . . . . . . . . . . . . . . . . . . . . . . . . . . . . . . . . . . . . . . 29
Custom . . . . . . . . . . . . . . . . . . . . . . . . . . . . . . . . . . . . . . . . . . . . . . . . . 29
Polycom, Inc. iii
Page 4

Polycom PRS 2000 Administrator Guide
Recording Your Capture . . . . . . . . . . . . . . . . . . . . . . . . . . . . . . . . . . . . . . . . . . 31
Using Expression Encoder . . . . . . . . . . . . . . . . . . . . . . . . . . . . . . . . . . . . . . . . 32
3 Polycom Recording Studio Touch
About the Polycom PRS 2000 Touch Interface . . . . . . . . . . . . . . . . . . . . . . . 33
How to Use Polycom PRS 2000 Touch . . . . . . . . . . . . . . . . . . . . . . . . . . . . . . 33
4 Polycom Recording Studio iPhone Demo
About the iPhone Demo . . . . . . . . . . . . . . . . . . . . . . . . . . . . . . . . . . . . . . . . . . 37
Using the iPhone Demo Application . . . . . . . . . . . . . . . . . . . . . . . . . . . . . . . 37
Presets . . . . . . . . . . . . . . . . . . . . . . . . . . . . . . . . . . . . . . . . . . . . . . . . . . . . . . 29
Getting Started . . . . . . . . . . . . . . . . . . . . . . . . . . . . . . . . . . . . . . . . . . . . . . 33
Presets . . . . . . . . . . . . . . . . . . . . . . . . . . . . . . . . . . . . . . . . . . . . . . . . . . . . . . 34
Recording . . . . . . . . . . . . . . . . . . . . . . . . . . . . . . . . . . . . . . . . . . . . . . . . . . . 35
A Polycom VMC 1000 Integration
Polycom VMC 1000 Integration . . . . . . . . . . . . . . . . . . . . . . . . . . . . . . . . . . . . 41
Polycom PRS 2000 to VMC 1000 Port Requirements . . . . . . . . . . . . . . 41
Polycom PRS 2000 Configuration . . . . . . . . . . . . . . . . . . . . . . . . . . . . . . 42
Live Broadcast Settings . . . . . . . . . . . . . . . . . . . . . . . . . . . . . . . . . . . . 44
Configuring the PRS 2000 as an Encoder in the VMC 1000 . . . . . . . . . . . . . 45
Uploading PRS 2000 Archive . . . . . . . . . . . . . . . . . . . . . . . . . . . . . . . 46
B Expression Encoder Guidelines
Expression Encoder Tips . . . . . . . . . . . . . . . . . . . . . . . . . . . . . . . . . . . . . . . . . 47
Editing The Metadata . . . . . . . . . . . . . . . . . . . . . . . . . . . . . . . . . . . . . 47
Using the Mark in/Mark Out Feature in Expression Encoder . . . 47
Silverlight Recording Layout . . . . . . . . . . . . . . . . . . . . . . . . . . . . . . . . . . . . . . 50
iv Polycom, Inc.
Page 5

About this Guide
This introduction provides a brief overview of the Polycom PRS 2000
Administrator Guide, describes the conventions used in this manual, and
explains how to get additional information or support.
Purpose
Documentation
The Polycom PRS 2000 Administrator Guide describes how to configure and use
the Polycom PRS 2000 appliance to capture, archive, and publish live video,
audio, and presentation content.
The Polycom PRS 2000 Administrator Guide is part of the Polycom PRS 2000 PRS
2000 documentation set, which includes:
• Polycom PRS 2000 Administrator Guide - This document.
• Polycom PRS 2000 Getting Started Guide - Describes set-up and installation
of the Polycom PRS 2000 appliance.
• Polycom PRS 2000 Release Notes - Describes the product release. This
document also identifies known problems and their workarounds,
information not covered in the manuals or that has been modified since
publication, as well as problems that have been fixed since previous
releases.
Polycom, Inc. v
Page 6

Polycom PRS 2000 Administrator Guide Customer Support
Audience
This guide is primarily for Polycom PRS 2000:
• Administrators - Responsible for configuring and managing the Polycom
appliance. You should have a working knowledge of capture basics, video
peripheral ports and communications, network protocols, media
streaming and editing. You should also be familiar with Web
fundamentals, such as URLs and HTML.
Customer Support
Recognizing that technology alone cannot solve today’s complex challenges,
Polycom Global Services provides the industry’s best technical support staff
and programs to let you concentrate on the task at hand. Polycomusers can
select from a variety of support solutions to obtain the level of support that
best meets their needs.
Before contacting your Polycom Global Services representative for technical
assistance, gather as much information as possible about your situation. Any
information you can provide helps us assess the problem and develop an
appropriate solution.
Polycom Global Services Telephone
If you have comments or questions about Polycom or if you need technical
assistance, contact:
• Polycom Global Services in U.S.A. 800-827-7782
• Denver metro or outside U.S.A. +1-303-223-5223
vi Polycom, Inc.
Page 7

About the Polycom PRS 2000
This chapter introduces the Polycom PRS 2000 and outlines the hardware
specifications for the appliance. This chapter includes the following sections:
• About the Polycom Recording Studio
• Hardware Specifications
1
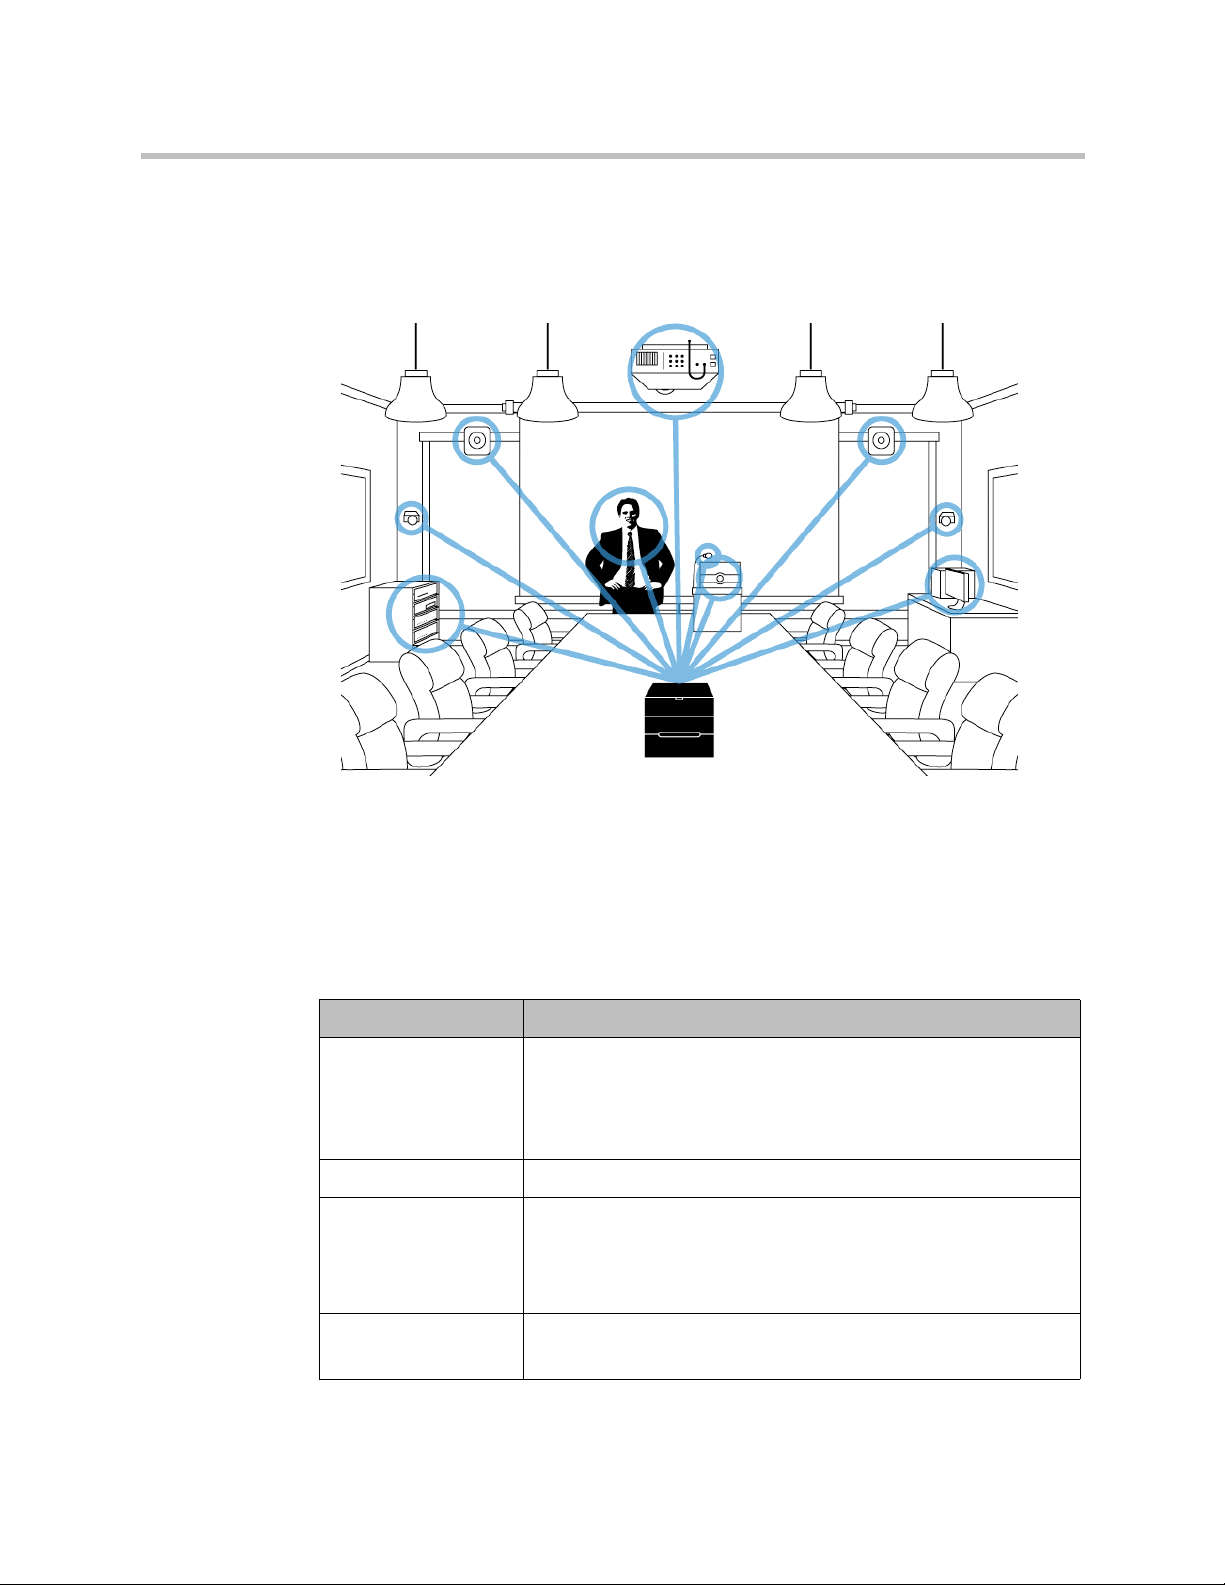
About the Polycom Recording Studio
The Polycom Recording Studio (PRS) 2000 is a powerful presentation
recording integrated hardware and software appliance that will enhance the
effectiveness and reach of any educational, corporate, or public event
communication by capturing and streaming real-time rich media
presentations with DVD quality video and high fidelity sound.
The Polycom PRS 2000 appliance is ideal for use by enterprises, educational
institutions, government organizations, and training groups.
Organizations can deploy the Polycom PRS 2000 appliance in meeting and
conference rooms or bring it to off-site events to record and stream live and on
demand executive briefings, training sessions, product demonstrations, global
announcements, marketing communications, and more.
The Polycom PRS 2000 appliance accepts and synchronizes feeds from any
A/V equipment available, including microphones, cameras, VCR/DVD
players, document cameras, and other video conferencing equipment.
Polycom, Inc. 1
Page 8
Polycom PRS 2000 Administrator Guide Hardware Specifications
The appliance can capture a computer screen output as a video stream,
allowing the presenter to demonstrate any application on their computer.
Unique to the Polycom PRS 2000 appliance is its ability to perform text
recognition on the RGB source for automatic text extraction and slide
detection.
Hardware Specifications
The following hardware specifications apply to the Polycom Recording
Studio:
Typ e Specifications
Video Input Analog RGB & DVI up to 1280 x 1024
Any combination of 3 of the following inputs:
• 2 S-Video
• 4 Composite video via RCA
Video Output Dual DVI-I (VGA with adapter)
Audio Input 1 balanced with Preamplifier and Phantom Power for Microphone
via XLR connectors
2 Stereo unbalanced via 2 RCA connectors
1 Stereo balanced with attenuator via 2 XLR connectors
Audio Output 1 Stereo balanced via 2 XLR connectors
1 Headphone
2 Polycom, Inc.
Page 9

Hardware Specifications About the Polycom PRS 2000
Typ e Specifications
Connectivity 2 USB 2.0 ports (front)
6 USB 2.0 ports (back)
Firewire/IEEE 1394 port (for storage extension)
Storage 500 GB
Optical Drive 16x DVD/CD R/RW
Dimensions W x L x H = 8.7 in. x 12.8 in x 8.3 in (220mm x 325mm x 210mm)
Polycom, Inc. 3
Page 10

Polycom PRS 2000 Administrator Guide Hardware Specifications
4 Polycom, Inc.
Page 11

2
Polycom Recording Studio Software
This chapter explains the use of the Polycom Recording Studio software,
particularly the Operator Interface:
• About the Polycom Recording Studio Software
• Beginning a New Session
• Using the Session Properties
• Capturing Your Experience
• Recording Your Capture
• Using Expression Encoder
About the Polycom Recording Studio Software
The Polycom PRS 2000 Software is Polycom's presentation capture software
which runs on the Polycom PRS 2000 appliance. The Polycom PRS 2000
Software consists of two interfaces; the Operator Interface and the Touch
Interface.
The Operator Interface, covered in this chapter, is used to create mixes for
different output experiences and to define presets that will be used for
recording a presentation. Different configurations can be saved for each
individual presenter or situation.
The Touch Interface, covered in the next chapter, is a simplified interface
designed for the presenter. It provides all the functionality required for a
presenter to create a recording and to switch among various views using the
presets created within the Operator Interface.
Polycom, Inc. 5
Page 12
Polycom PRS 2000 Administrator Guide Beginning a New Session
Beginning a New Session
Getting Started
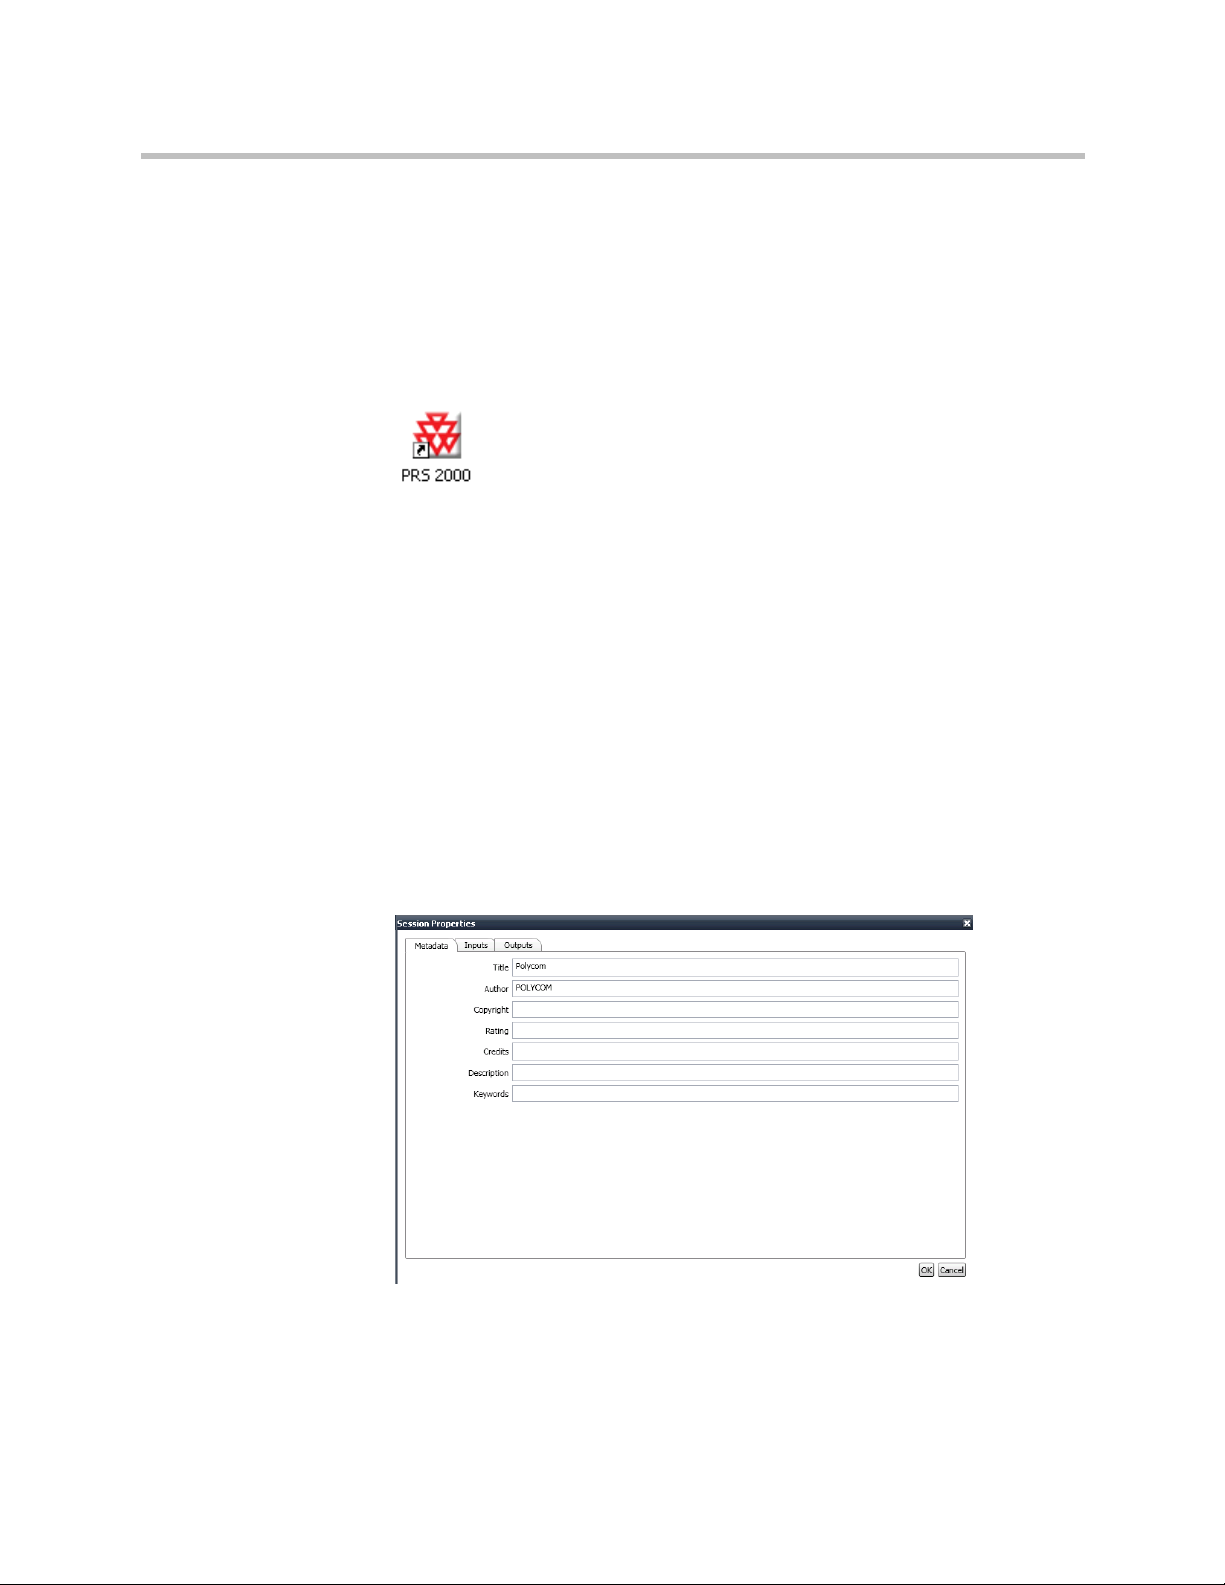
After the Polycom PRS 2000 hardware is configured, you can begin creating
mixes for your recordings. Launch the Polycom PRS 2000 Operator Interface
by double-clicking the PRS 2000 shortcut on your Windows desktop.
Using the Session Properties
The Polycom PRS 2000 Operator Interface will launch and the Session
Properties window will appear. You must create a configuration prior to using
the Polycom PRS 2000. The Session Properties window includes tabs for
Metadata, Inputs, and Outputs.
Metadata
Metadata is the information about a Polycom PRS 2000 configuration. It
contains information describing a session's Title, Author, Copyright, Rating,
Credits, Description and Keywords. Metadata is used to facilitate the
understanding, characteristics, and management usage of data.
6 Polycom, Inc.
Page 13
Using the Session Properties Polycom Recording Studio Software
Inputs
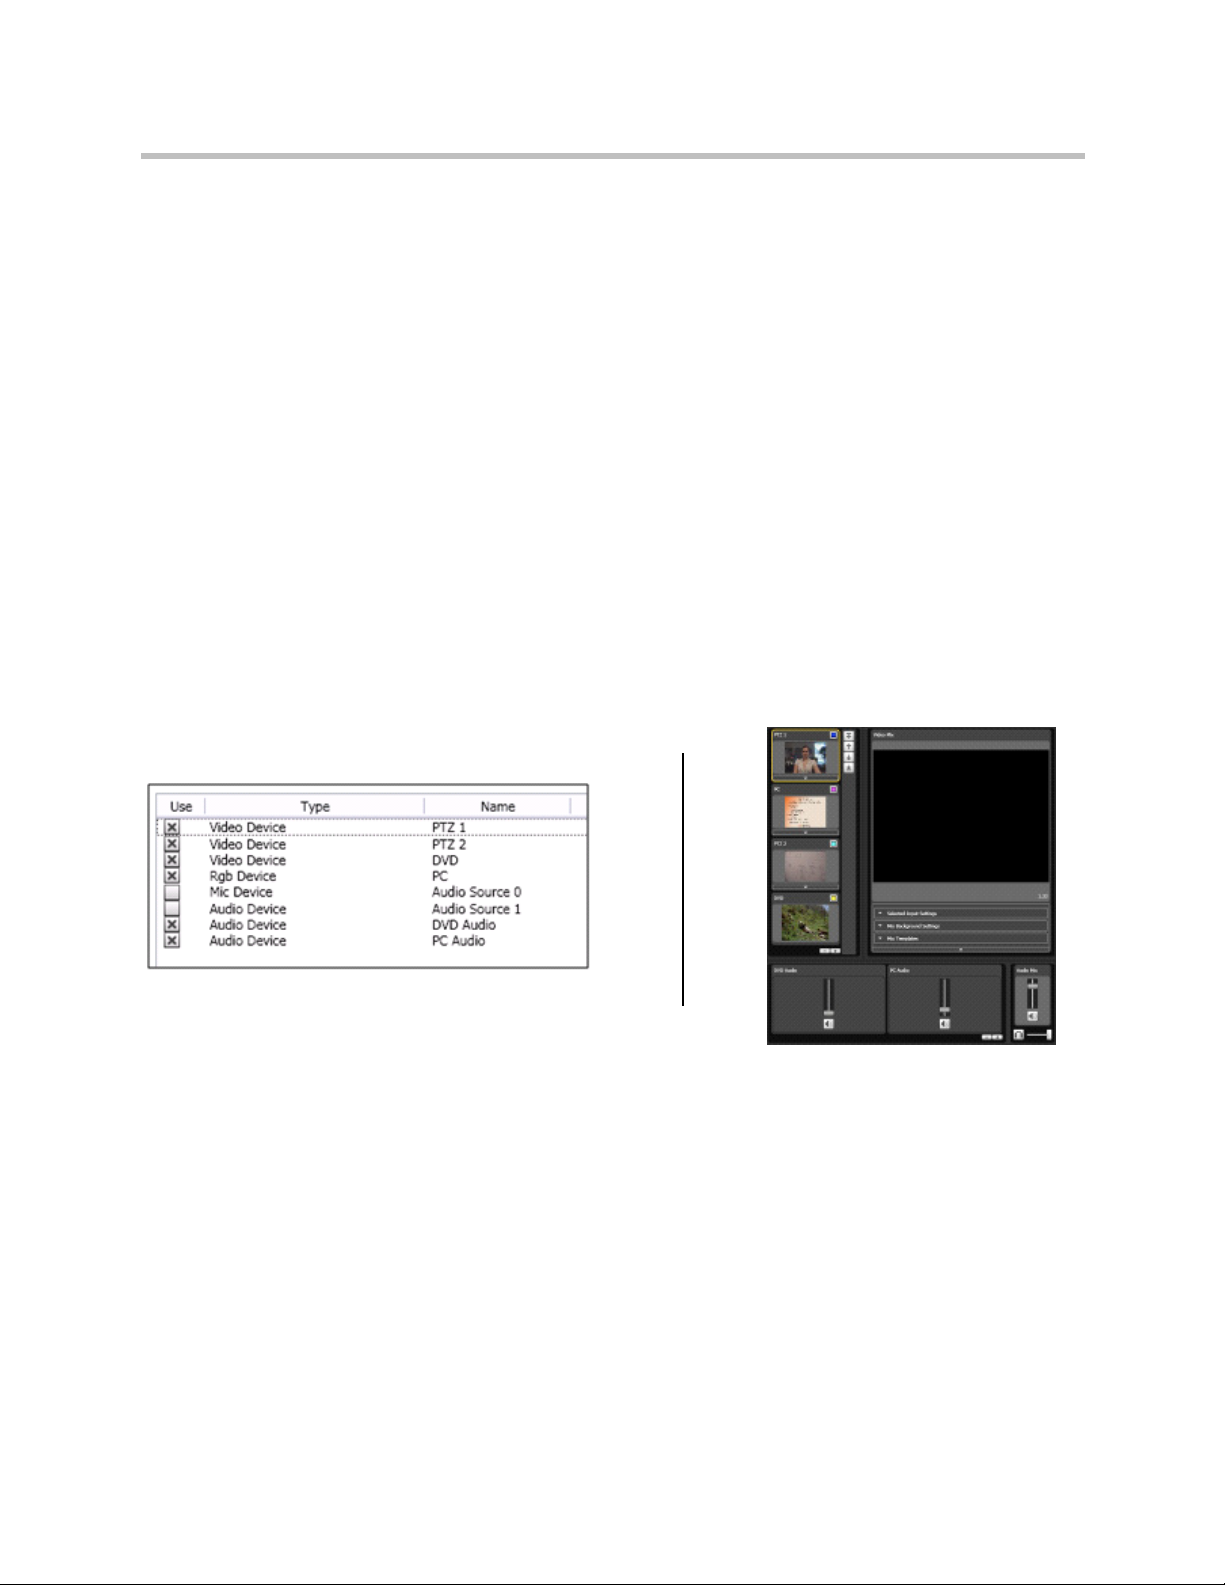
Any audio and video input devices connected to Polycom PRS 2000 appliance
are detected and displayed under the Inputs tab. Some typical inputs include:
• Presenter Laptop
• Microphone
• Pan-Tilt-Zoom (PTZ) Camera
• DVD Player
• Document Camera
By checking the devices under the Use column, selected devices will appear in
the Polycom PRS 2000 Operator Interface as available inputs that can be
captured in a presentation.
Examples
In the example below, we have a configuration type : 2 PTZ cameras, a DVD
player and a laptop. The Polycom PRS 2000 Operator Interface (right) displays
all four video inputs and both audio inputs.
Polycom, Inc. 7
Page 14
Polycom PRS 2000 Administrator Guide Using the Session Properties
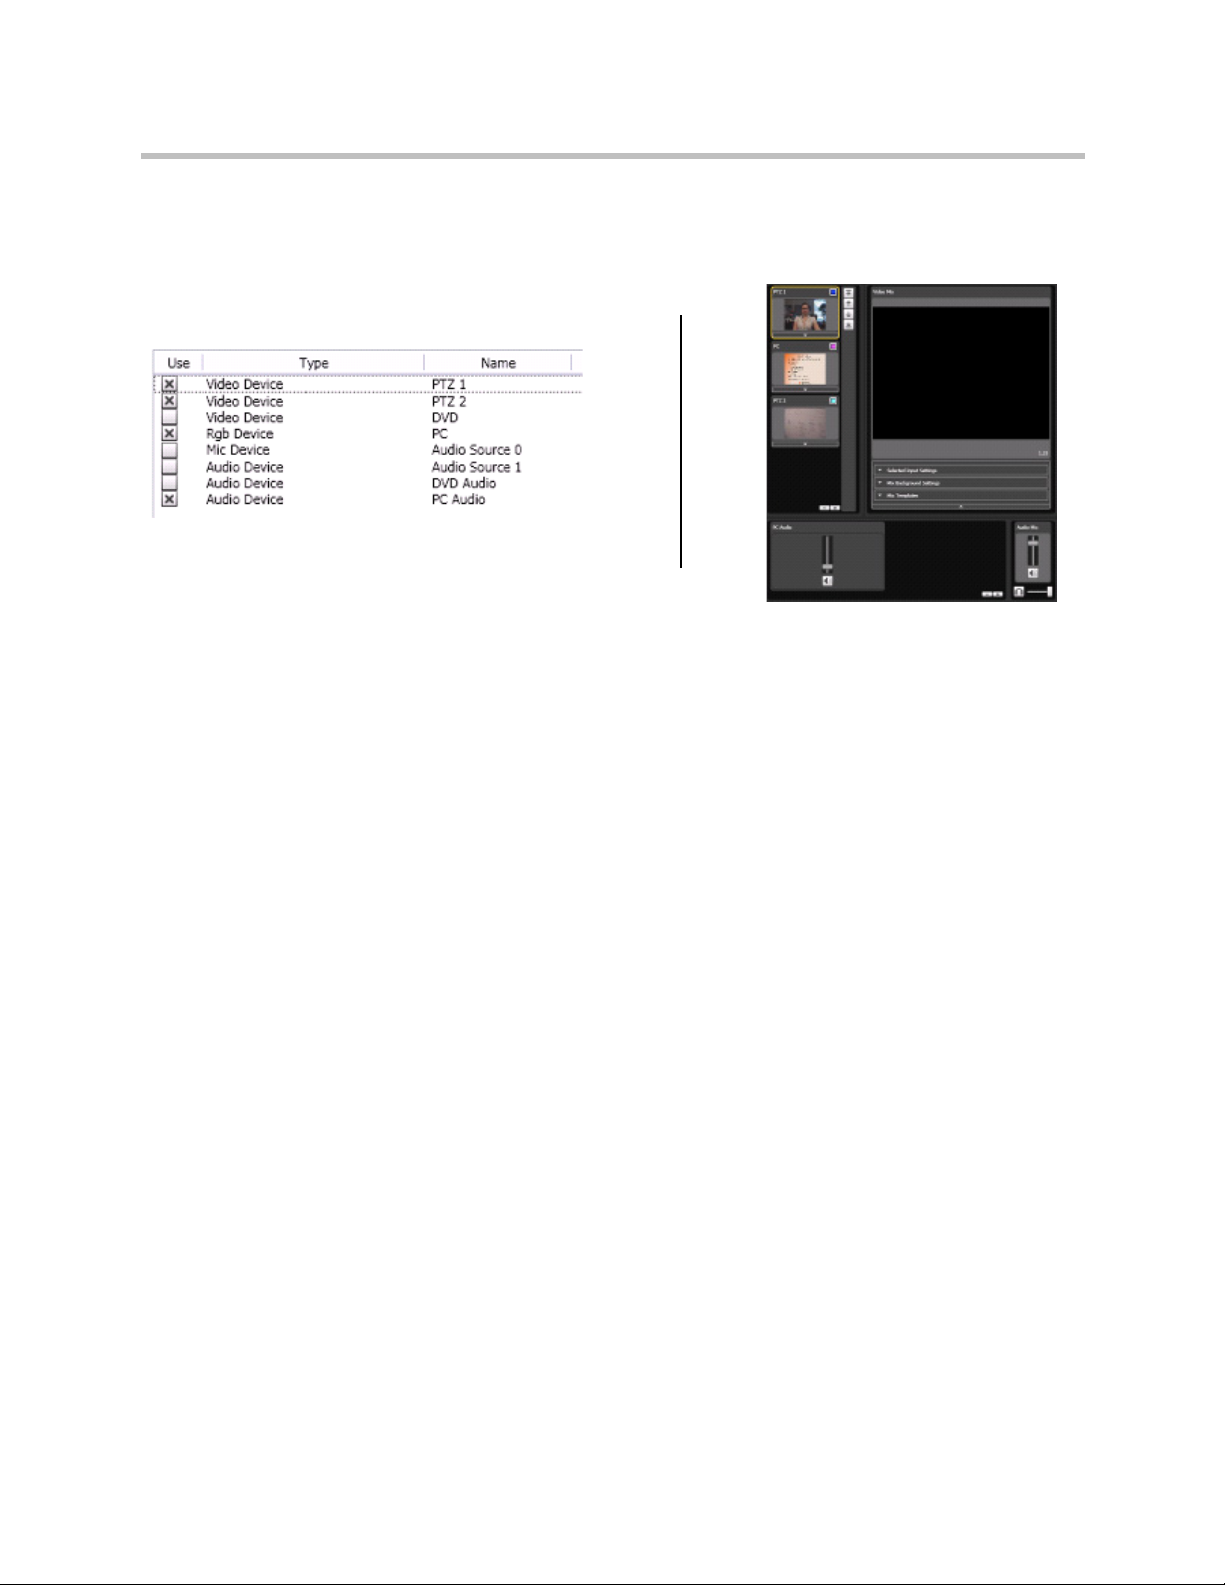
In the example below, the DVD video and DVD audio sources have been
removed. The Polycom Recording Studio Operator Interface (right) no longer
displays the DVD video or DVD audio as available inputs.
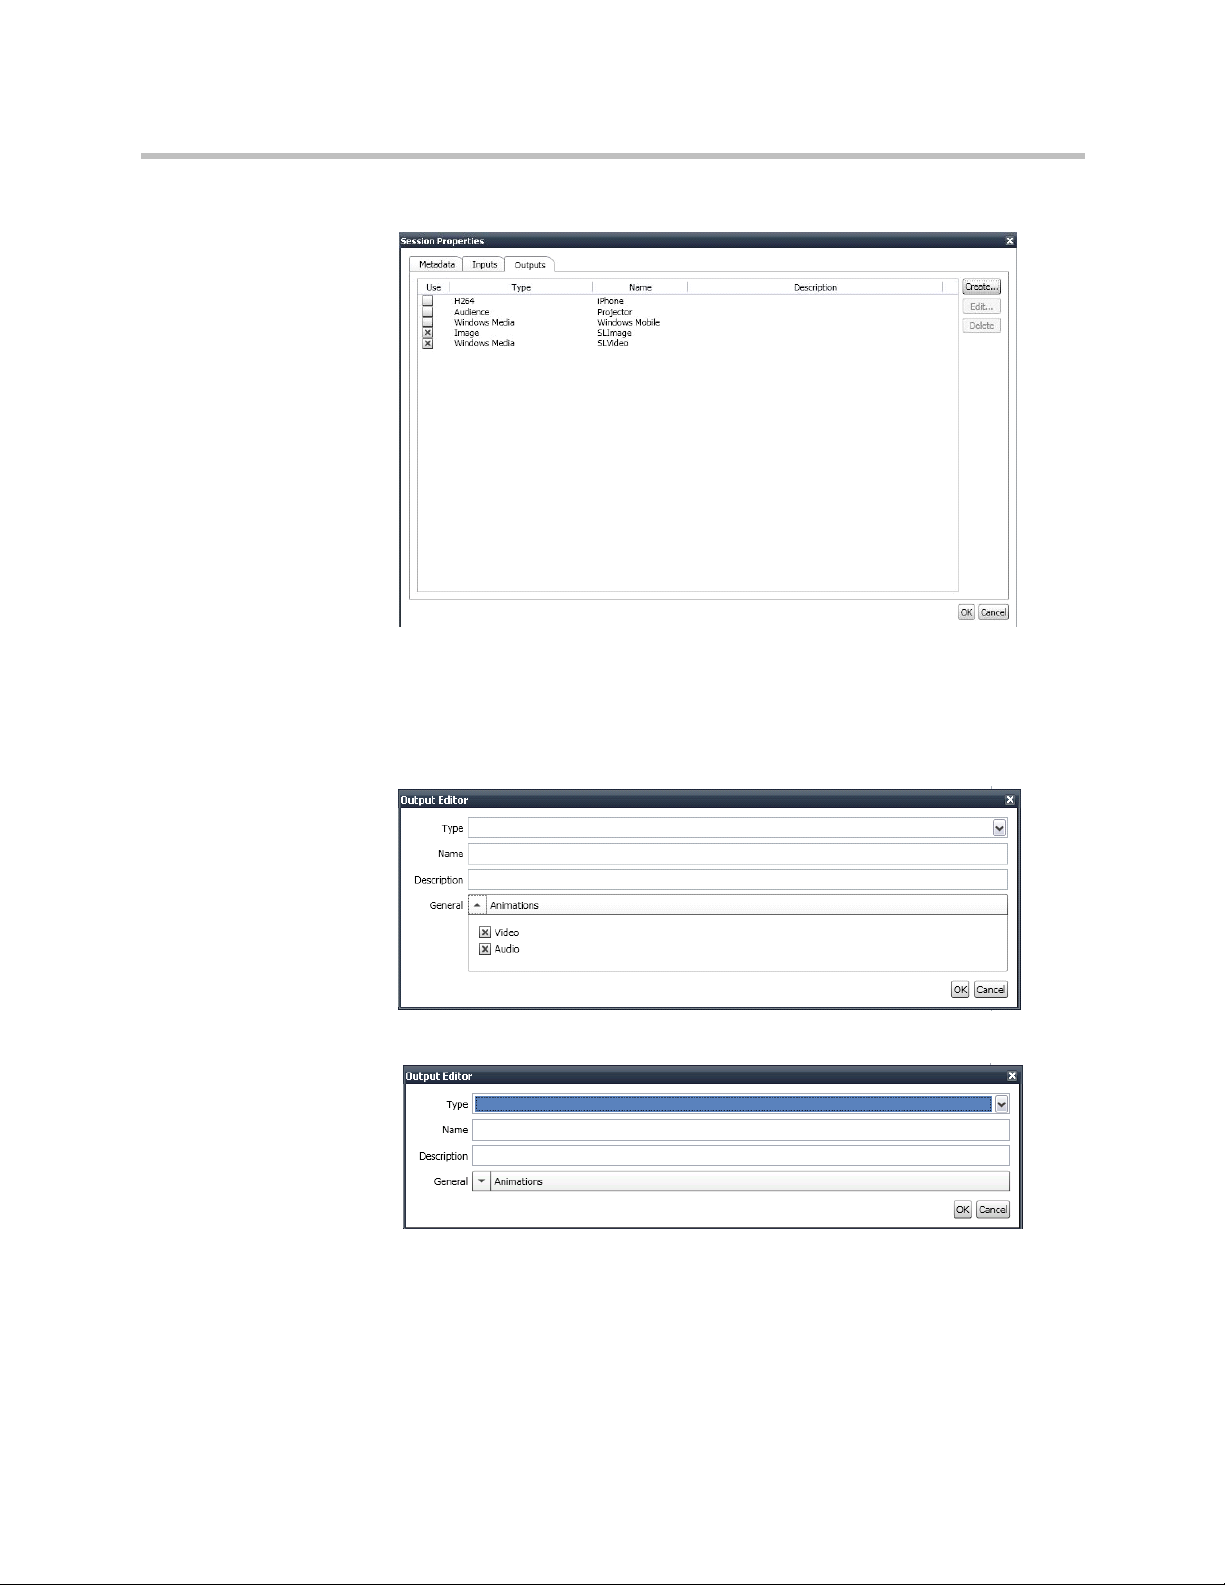
Outputs
Under the Outputs tab are the possible output Types. The selected outputs will
determine what experiences will be created for the end user when a recording
is completed (i.e. experiences for the web, Windows Mobile and iPhone). With
the Polycom PRS 2000 appliance, all output types are created simultaneously
and are available immediately after completing a recording.
In the example below, the selected output types are:
•H.264 for an iPhone experience or other experience on any
H.264-supported device or player. H.264 output is currently not
supported for streaming
• Windows Media for a Windows Mobile experience or Silverlight
experience for the web
• Image for screenshot capture for thumbnail generation
8 Polycom, Inc.
Page 15
Using the Session Properties Polycom Recording Studio Software
• Audience for the viewer experience, typically displayed from a projector
Creating Different Experiences with Polycom PRS 2000 Outputs
1 In the Output tab of the Session Properties window, click the button. The
following window will appear:
2 Select an output type from the Type dropdown menu.
3 In the Name field, enter a name for the output.
4 In the Description field, enter a brief description of the output.
Polycom, Inc. 9
Page 16
Polycom PRS 2000 Administrator Guide Using the Session Properties
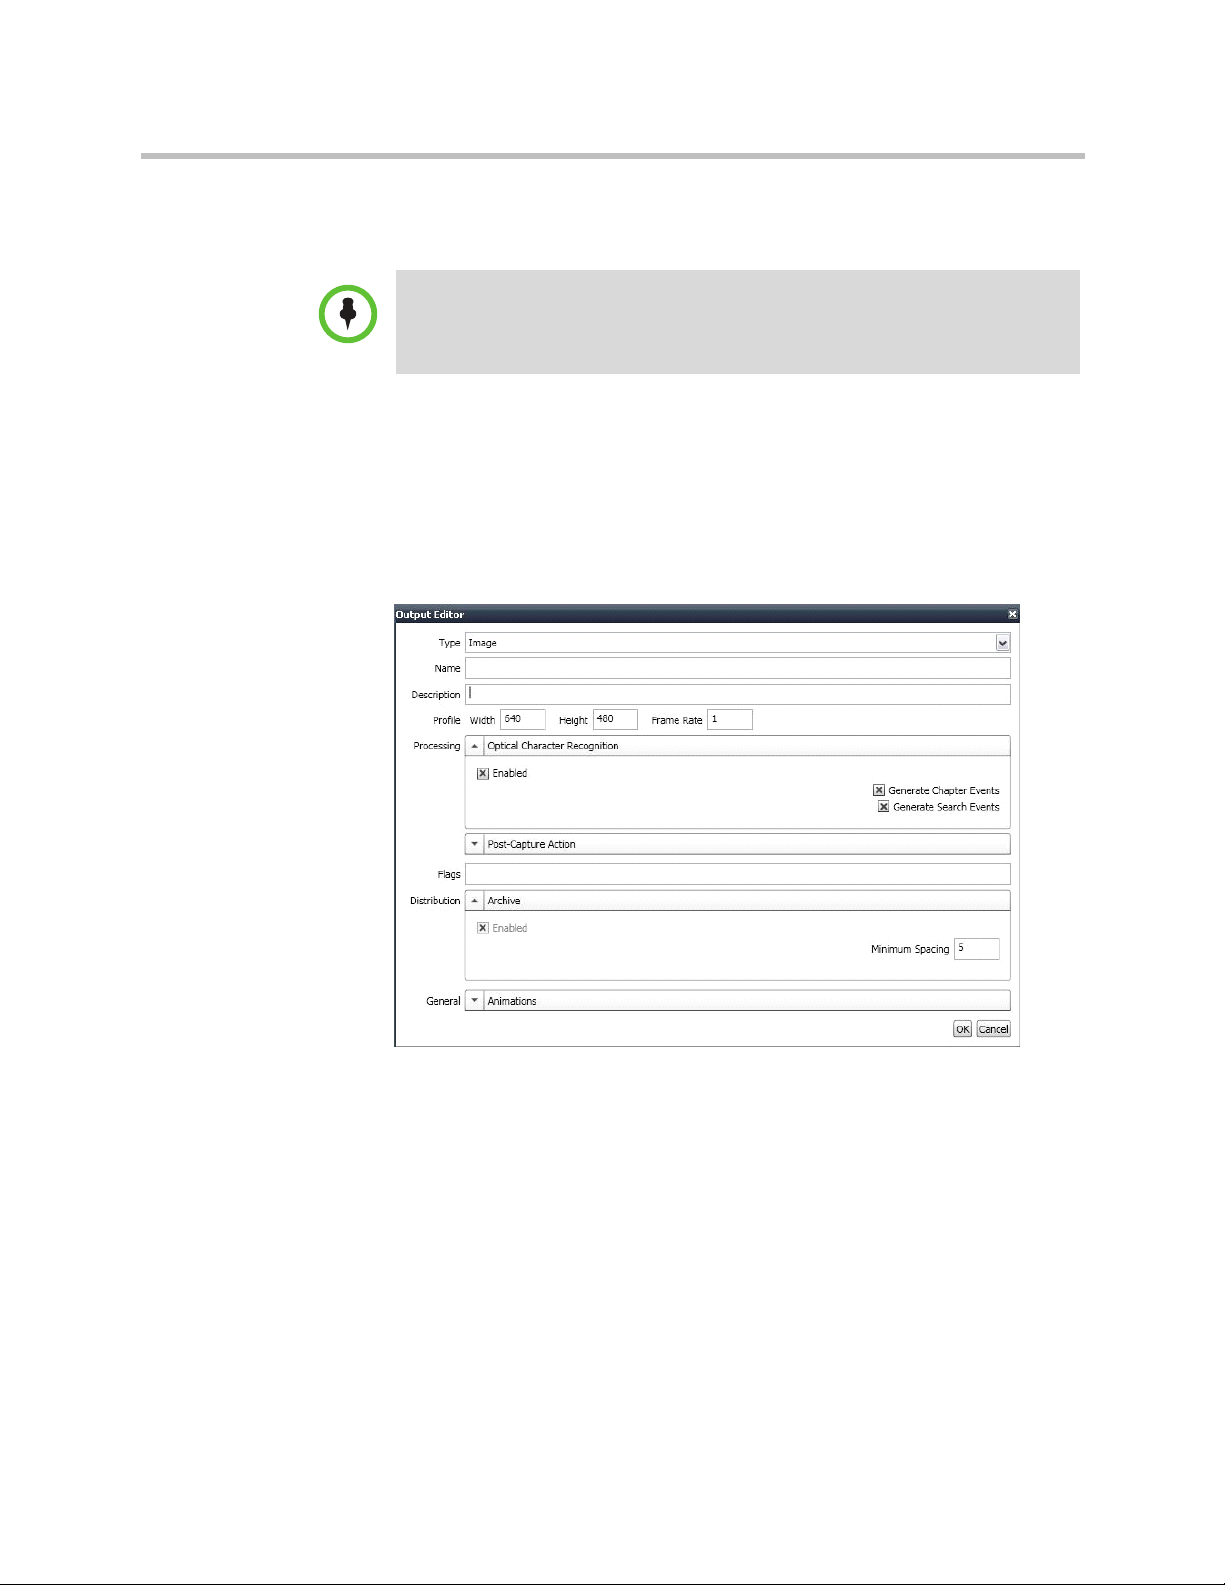
5 In the General section, specify whether Animations (fluid transitions
between audio and video) are on or off by checking the appropriate check
boxes.
NOTE: The options in steps 3 - 5 above (Name, Description and
General/Animations) are common to all output types in the Polycom PRS 2000
system. The following are configurable options specific to each individual output
type in the Polycom PRS 2000 system.
Image
The Image output type provides a library of snapshots taken during the
recording. You can specify the frequency the snapshots are taken (in seconds)
by entering a value in the Minimum Spacing field.
This type of output is used to provide thumbnail chapters for the Polycom
Rich Experience Player (see the paragraph below on Silverlight).
10 Polycom, Inc.
Page 17
Using the Session Properties Polycom Recording Studio Software
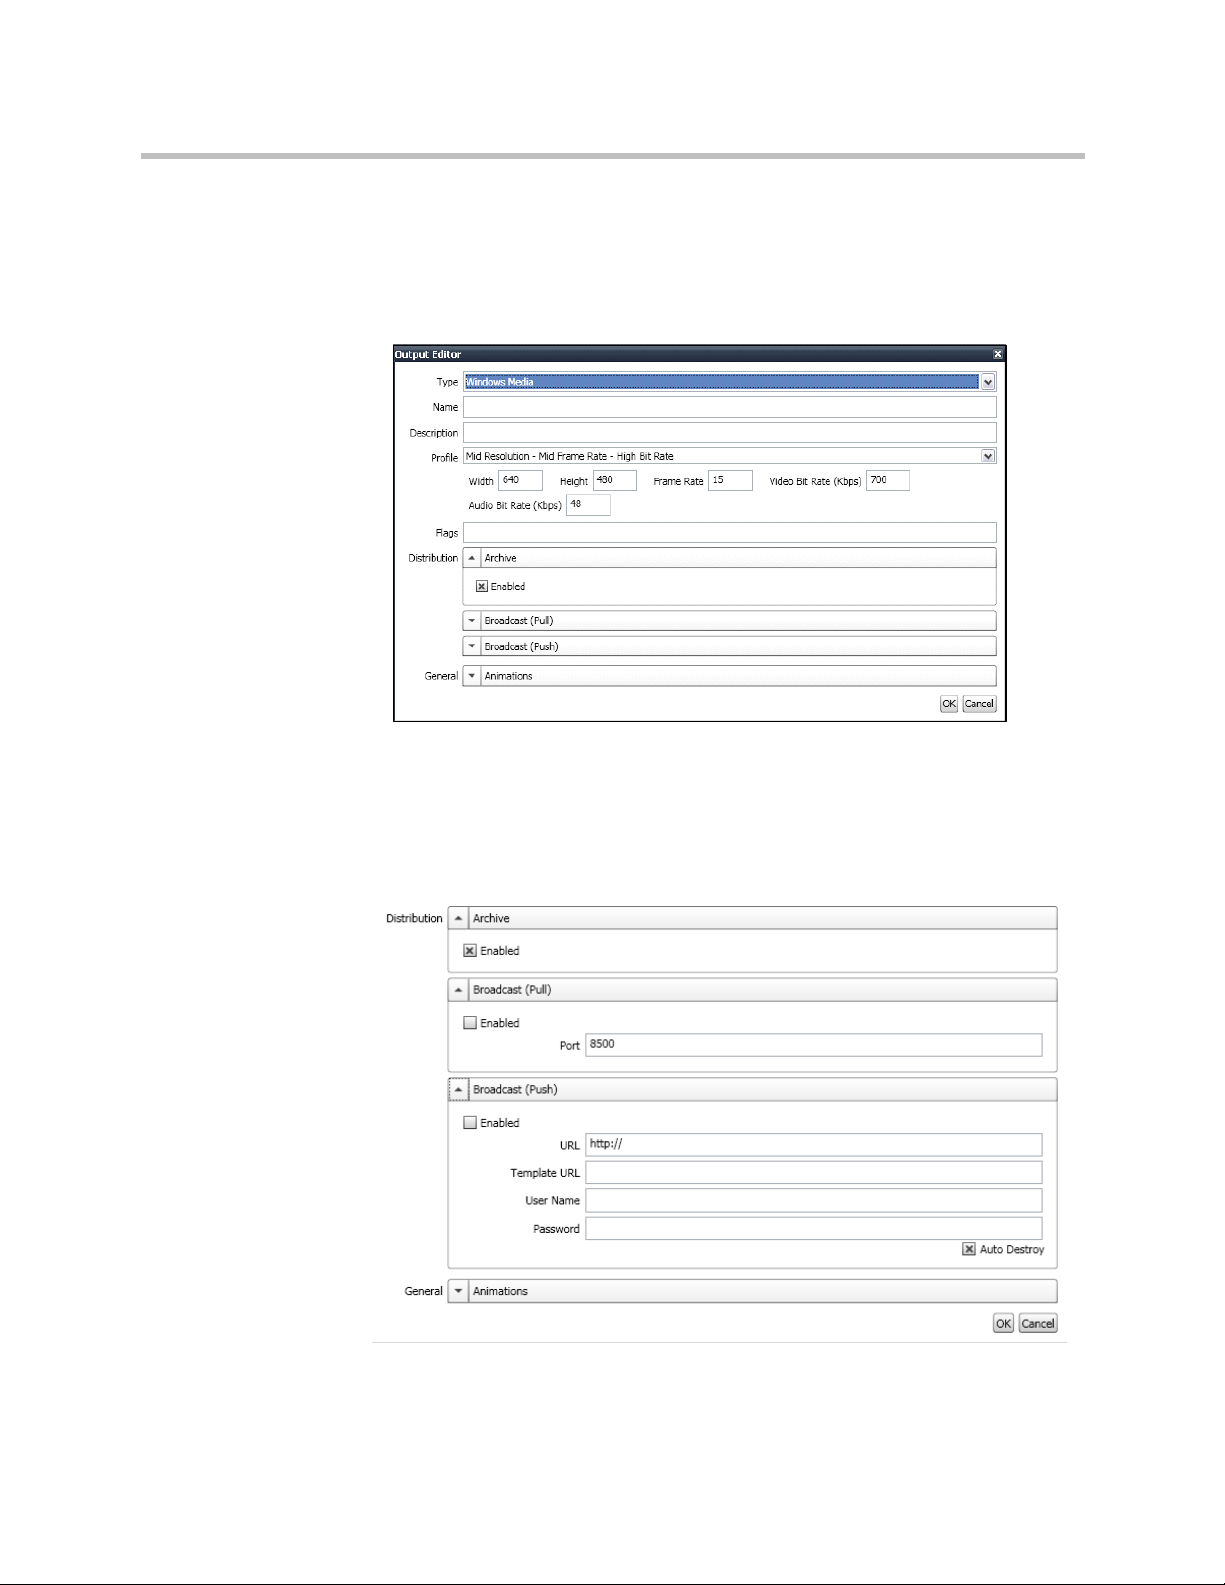
Windows Media
The Windows Media output type creates a recording viewable in any player
or device that supports Windows Media Video (.wmv) files. This includes
playback in Windows Media Player, a Windows Media Player embedded in a
web page, or Windows Mobile devices.
The Distribution section of the Windows Media output type configuration
allows users to dictate whether they want .wmv files archived and whether
they wish to enable Pull or Push broadcasting to or from the Windows Media
Server. Pull broadcasting requires that you provide your HTTP port. Any
computer with access to that port can then access the content. Push requires a
URL and template URL, as well as authorized user credentials for access.
Polycom, Inc. 11
Page 18

Polycom PRS 2000 Administrator Guide Using the Session Properties
Raw
The Raw output type is for archive-quality video. Raw files are uncompressed
and are larger in file size, but are uncompromised in quality.
MP3
The MP3 output type is an audio-only output type for playback on any device
that supports MP3s. This output type is ideal for podcasting a recording.
12 Polycom, Inc.
Page 19

Using the Session Properties Polycom Recording Studio Software
H.264
The H.264 output type creates a recording viewable in any player or device
that supports the H.264 codec. This includes playback for iPods and iPhones.
NOTE: The Audience output can be set to a maximum resolution of 1024 x 768
pixels.
Configuring the Polycom Rich Experience Player Output
The Polycom PRS 2000 appliance can output a customizable, rich experience
player which empowers the end-user to view the experience the way they
want to view it. Features of this output type include:
• Indexed, searchable chapters
• Chapter thumbnails
• Scalable and moveable video windows
• Scalable player to fit any user's desktop environment
To create a Polycom Rich Experience Player output type, follow the steps
below:
1 Create an output using the Image type.
Polycom, Inc. 13
Page 20

Polycom PRS 2000 Administrator Guide Using the Session Properties
2 Name it: SLImage.
Ensure that OCR, Generate Chapter Events and Generate Search Events
are all checked. You can also edit the resolution of your image in the
Profile properties.
NOTE: This Image output is essential for Optical Character Recognition (OCR).
The Polycom PRS 2000 appliance will scan and capture the characters displayed in
each image captured. The contents captured from each image will become
searchable keywords for the player.
3 Create a second output using the Windows Media type.
14 Polycom, Inc.
Page 21

Using the Session Properties Polycom Recording Studio Software
4 Name this second output: SLVideo. Note: archiving must be enabled.
5 Set the Post-Record action: Go to Tools > Options > Post-Record Action.
A sample batch file is provided to create Silverlight content and launch the
Polycom generic players called VodPlayer1 (Freestyle) or VodPlayer2
(Video & Slides). "Vod" stands for Video on demand.
These batch files can be found in
Recording Studio\Resources\Sample Actions
C:\Program Files\Polycom\Polycom
.
Polycom, Inc. 15
Page 22

Polycom PRS 2000 Administrator Guide Capturing Your Experience
6 Browse and select VodPlayer1 action batch file.
7 Click OK and you are now ready to play back your content with
VodPlayer1.
8 Click the Record button to start the Recording
9 After a recording has completed, a control screen will appear while the
Silverlight VoD is being created by Expression Encoder.
Viewing the Output
To view your Silverlight videos, simply browse to the directory of the
recordings:
C:\Archive\[Broadcast Date and Time]\Merger\Expression Encoder
Output
This folder will also open automatically upon completion of a recording.
NOTE: If you are not creating a Polycom Rich Experience output, ensure that None
is selected under Post-Record Action. If Run is selected and no Polycom Rich
Experience Player output type exists, the Polycom PRS 2000 Operator Interface
will display an error upon stopping a recording.
Capturing Your Experience
After all inputs have been selected and outputs have been created, you can
prepare your recording in the Polycom PRS 2000 Operator Interface.
16 Polycom, Inc.
Page 23

Capturing Your Experience Polycom Recording Studio Software
Starting Capture and Preview
Creating an Output
Follow the steps below to define the different outputs as you wish for them to
appear.
1 Drag and drop the Video Output format you want to create into the
Video Mix window.
Polycom, Inc. 17
Page 24

Polycom PRS 2000 Administrator Guide Capturing Your Experience
2 Drag and drop the Audio Output format you want to create into the
Audio Mix window. The format slider must be dragged directly to the
output slider.
You can use the Audio Mix window to mix multiple multiple audio
sources (e.g., microphone, iPod, XLR inputs). Use the headphone icon to
toggle the audio playback locally; use the mute icon to toggle audio for a
given input, output, or audio mix. Verify that the mute button is not
selected for the audio mix.
18 Polycom, Inc.
Page 25

Capturing Your Experience Polycom Recording Studio Software
3 To move a Video Input into the Video Mix window, click the input and
drag it to the Video Mix window.
To scale an input in the Video Mix, select the video window you wish to
scale then use the scroll button of your mouse.
4 Drag and Drop the Audio Input you want to put into the Audio Mix
window.
Polycom, Inc. 19
Page 26

Polycom PRS 2000 Administrator Guide Capturing Your Experience
5 Drag and drop the Video Mix you want to record in the Video Output
window.
Drag and drop the Audio Mix you want to put in the Audio Output
window.
Repeat the steps above for each output type you wish to build to define each
experience.
20 Polycom, Inc.
Page 27

Capturing Your Experience Polycom Recording Studio Software
Settings and Mix Templates
Selected Input Settings
To configure your input, you can also use the Selected Input Settings section
located beneath the Video Mix. If the section is minimized, click the bar at the
bottom of the Video Mix region.
This section allows you to make changes to the inputs’:
• Size
• Position
• Transparency
• Brightness and Contrast
• Border width and color
Mouse over each icon to learn its function.
Polycom, Inc. 21
Page 28

Polycom PRS 2000 Administrator Guide Capturing Your Experience
Background
You can specify a color or import an image for the background of a mix in the
Mix Background Settings section.
• Enter a background color hexadecimal code or browse to an image file to
import a background image.
22 Polycom, Inc.
Page 29

Capturing Your Experience Polycom Recording Studio Software
Mix Templates
After a mix is created, it can be saved as a template for future mixes.
Polycom, Inc. 23
Page 30

Polycom PRS 2000 Administrator Guide Capturing Your Experience
The colors correspond to the various inputs.
Outputs Settings
Image
An Image output type is used to capture snapshots of video when significant
change in the video stream takes place to mark a new chapter in the
presentation.
The sensitivity threshold can be adjusted to define the amount of change
required for a new snapshot to be taken.
24 Polycom, Inc.
Page 31

Capturing Your Experience Polycom Recording Studio Software
Note about Session Configuration Files
Users of the Polycom PRS 2000 appliance have the ability to create multiple
session configuration files. A session consists of the following high level
categories, Metadata, Inputs, Outputs, Presets and Video Mix.
Within the metadata category, the user has the ability to assign a title, author,
subject, etc. A user could select multiple session configurations with metadata
to correspond to different lecturers for their specific presentations. However,
a user of the system can modify the title, author, etc. with the same session
configuration.
Within the Input category, the user can select the specific video, VGA and
audio sources to have active for a given presentation/recording. The first is
where the Polycom PRS 2000 appliance is used as a mobile recording system
for different studios or rooms throughout an organization. In this use case,
different A/V equipment, cables, and VGA sources are typically deployed in
each room. By using different session configuration files which correspond to
the particular rooms, users can easily map the different audio video layouts to
simplify mobility.
For the Output category, the user can use session configuration files in a
multitude of ways. First, a user can specify different encoder outputs, which
not only include standard settings such as resolution and frame rate, but also
feature audio and video mixes. For example, the H.264 encode could be a mix
which features a full screen of Video Input 1 and Microphone 1, whereas the
Windows Media mix includes 3 video inputs and VGA as well as an audio mix
of 3 different audio inputs. The audio outputs could also be extended to
support multiple language inputs. Countless permutations exist of different
mixes that can be created using the Polycom PRS 2000 appliance.
Polycom, Inc. 25
Page 32

Polycom PRS 2000 Administrator Guide Capturing Your Experience
Presets were discussed in an earlier section. It should be noted however, that
presets map to configuration files. As such, a user can define different presets
lists for different configuration files. This capability is helpful in use cases
again where the system is mobile and different A/V equipment is available in
each room and studio.
Finally, the video mix also maintains its settings within the configuration files.
This includes saved templates, images used as backdrops, and video and
audio levels.
Events
Events can enhance a presentation with the ability to add meaningful data to
the presentation during a recording. A presenter can create a chapter point in
any part of a presentation, insert captions which will appear in the closed
captioning area of the interface, or insert search terms into any point in a
recording allowing the user to search on a keyword to locate a specific portion
of a presentation.
A Presenter can also add post-production Events to signify to the video editor,
including specific notes for the editor as well as segments of the video to be
removed via the Polycom PRS 2000 Mark In/Out feature.
The Events feature is only accessible in the Polycom PRS 2000 Operator
Interface and appears on the right window column under the Events tab.
NOTE: Polycom PRS 2000 Events are only used with the Polycom Rich Experience
player output type.
26 Polycom, Inc.
Page 33

Capturing Your Experience Polycom Recording Studio Software
To add an event:
1 Under the Cue pane, click on an Event button (Chapter, Caption, Search,
URL, Mark In, Mark Out, Note, Custom).
Types of Event
2 Enter the appropriate text in the field provided. This field can be edited
3 Specify a time for the event or click the clock button (at left) to
set the current time of the recording.
4 Click on the carat button (at left) to apply it to the timeline. The
Event should appear in the Monitor pane.
5 To remove an event, click on the O button in the Monitor pane and it will
come down into the Cue pane.
6 Click the X button (at left) to cancel the Event completely.
The following list describes each of the Events that can be added during a
recording:
Chapters
Chapters can be added to specify areas in a recording a presenter may wish to
identify as a key segment in a discussion. By adding a title, a chapter is created
with the title the presenter has specified. Note that these Chapters are created
in parallel with the chapters created by the Polycom PRS 2000 OCR.
Polycom, Inc. 27
Page 34

Polycom PRS 2000 Administrator Guide Capturing Your Experience
Usage example: A presenter may discuss a single image at length that
contains no recognizable text for OCR. The presenter could send Chapter
events during the discussion of that image to create chapters so the
audience can navigate to a specific portion of the discussion.
Caption
A Caption can be added to a recording by sending a Captions event. These
captions appear in the closed captioning area typically occupied with closed
captioning text that appear when the CC button in the Polycom Rich Media
Player is pushed.
Usage example: A presenter can take advantage of this feature by adding
captioning notes to display to the audience. This could be useful to display
text to highlight key concepts or to display a mathematical formula.
Search
Search terms can be added to a recording to make any segment of a
presentation searchable.
Usage example. A presenter with a speech-only discussion will not have
automatic chapter creation or searchable text. The presenter may wish to
insert searchable keywords pertaining to various segments of the
discussion so the viewer can search for that portion of the presentation.
URL
A URL event can be sent during the recording if a presenter wishes to add a
URL as a resource during a presentation.
Usage example: A presenter may have a web resource available not
available in a presentation slide. To make this URL available to the viewer,
the presenter can send a URL Event to provide a link of the online resource
to the viewer.
NOTE: To use the URL Event requires a custom script to be written to launch a
browser window.
Mark In/Mark Out
The Mark In and Mark Out events are used for post production of a recording.
Sending these events during a recording will mark the timeline with "In" and
"Out" and is viewable in Microsoft's Expression Encoder. If the presentation
requires editing, an editor can view the timeline for these "In" and "Out" marks
and remove portions of the video accordingly.
28 Polycom, Inc.
Page 35

Capturing Your Experience Polycom Recording Studio Software
Usage example: A presenter can start a recording as the audience is being
seated and may only want to keep his or her speaking portions of the
recording. The presenter can then Mark In at the moment the actual
presentation is started and Mark Out during intermission or at the end of
the presentation. The presenter can Mark In and Out as many times as
needed to produce a single video without intermissions or other irrelevant
events.
NOTE: For detailed instructions on how to use the Mark In/Mark Out feature, please
see “Using the Mark in/Mark Out Feature in Expression Encoder” on page 47.
Notes
The Note event is used to provide notes for a video editor for post production
of a recording if any is required. The note will appear within Microsoft
Expression Encoder's Script Commands pane.
Presets
Usage example: The presenter can send a Note event during a recording
to flag a segment of the video to a post-production editor. This note can
specify details about a part of a recording that the presenter would like an
editor to review and edit in Expression Encoder 2.
Custom
The Custom event is a used to add a custom script into the timeline which can
be used to launch an event.
Usage example: With a Custom script event embedded into the video
timeline, a script can be written to "listen" for custom scripts to run a
command at strategic times to launch a survey window, for example.
Presets can be made from any mix you define. Multiple combinations of
elements including visual layout, audio tracks, volume levels, aspect ratio,
PTZ settings, output size and bit rate can be defined.
Polycom, Inc. 29
Page 36

Polycom PRS 2000 Administrator Guide Capturing Your Experience
To use a preset:
Drag and Drop the Video and Audio Outputs you want to put into the Preset:
To create a new preset:
1 Click on +PRESET.
2 Enter a name.
3 Enter a description.
30 Polycom, Inc.
Page 37

Recording Your Capture Polycom Recording Studio Software
Recording Your Capture
After all outputs are defined, you can start a recording:
1 To start a recording, click the Record button.
2 During the recording the Record button flashes in red.
3 To stop your recording, click on the Record button once more. An
Explorer window will appear. Each output of your recording will be
contained in a separate directory.
Each recording is created in a directory named with the recording's
date/time stamp. Within this folder are each of the outputs defined in the
Session Properties. For example, if a recording session includes an output
labeled "Audio Only," a folder named "Audio Only" is created within the
date/time stamped directory.
NOTE: When using the Polycom VMC 1000 to start a live recording, do not stop
recording locally on the Polycom Recording Studio. For more information on using
the PRS 2000 as an encoder in the VMC 1000 platform, consult the Appendix.
Sample contents include:
• iPod
— Video File (.mpeg4)
— Manifest
• Image
— Images files (.jpeg)
— Manifest
• Silverlight
— Video File (.wmv)
— Manifest
— Expression Encoder Job (.xej)
— Silverlight player
Polycom, Inc. 31
Page 38

Polycom PRS 2000 Administrator Guide Using Expression Encoder
Using Expression Encoder
To open your recording in Expression Encoder 2, double-click on the .xej file
in the output folder.
The Appendix contains additional information on how to use Expression
Encoder 2. For more information, visit:
http://www.microsoft.com/downloads.
NOTE: The Evaluation Copy of Expression Encoder 2 provided with the Polycom
Recording Studio can continue to be used indefinitely. After 30 days, a dialog may
appear; this dialog can be disregarded.
32 Polycom, Inc.
Page 39

Polycom Recording Studio Touch
This chapter explains the use of the Polycom Recording Studio Touch
interface:
• About the Polycom PRS 2000 Touch Interface
• How to Use Polycom PRS 2000 Touch
3
About the Polycom PRS 2000 Touch Interface
Polycom PRS 2000 Touch is a simplified interface which includes only the
functionality a presenter requires to start a recording and switch among
defined presets created in the Polycom PRS 2000 Operator Interface.
Polycom PRS 2000 Touch was designed for the presenter and enables the
presenter to easily create a recording without having to configure and manage
audio and video presets.
.
NOTE: Using Polycom PRS 2000 Touch requires presentation configurations to
have been previously made in the Polycom PRS 2000 Operator Interface.
How to Use Polycom PRS 2000 Touch
Getting Started
1 Double-click the Polycom PRS 2000 Touch shortcut on your desktop to
launch the application.
Polycom, Inc. 33
Page 40

Polycom PRS 2000 Administrator Guide How to Use Polycom PRS 2000 Touch
2 Select a configuration.
Presets
Any presets created in the Polycom PRS 2000 Operator Interface will appear in
the Polycom PRS 2000 Touch interface. Each preset contains the functionality
defined in the Polycom PRS 2000 Operator Interface when they were created.
34 Polycom, Inc.
Page 41

How to Use Polycom PRS 2000 Touch Polycom Recording Studio Touch
Recording
To begin a recording, click on the Record button.
The Record button flashes in red to indicate that a recording is in process.
While the recording is in process, the presenter can deliver a presentation as
he or she normally would. The presets can be selected during the recording to
switch among the audio and video outputs and to change the position of
cameras.
To stop a recording, simply click the Record button once more.
Polycom, Inc. 35
Page 42

Polycom PRS 2000 Administrator Guide How to Use Polycom PRS 2000 Touch
36 Polycom, Inc.
Page 43

Polycom Recording Studio iPhone Demo
This chapter explains the use of the Polycom Recording Studio iPhone Demo
tool:
• About the iPhone Demo
4
• Setting Up the iPhone Demo
• Using the iPhone Demo Application
About the iPhone Demo
The Polycom Recording Studio now includes an iPhone Demo that allows
administrators to control the Polycom PRS 2000 through the iPhone. The
iPhone Demo provides remote access for starting and stopping recordings;
reviewing recent video content in iPhone format; and access to and
administration of the full PRS archive.
The iPhone Demo is designed and supported for the Apple iPhone, but will
function on any internet-enabled mobile device that supports H.264 video
playback.
Using the iPhone Demo Application
The PRS 2000 iPhone Demo application can be accessed via a webbrowser at
the PRS’ IP address.
1 Launch the web browser on your mobile device.
Polycom, Inc. 37
Page 44

Polycom PRS 2000 Administrator Guide Using the iPhone Demo Application
2 The iPhone Demo application can be accessed through a web browser at
the PRS appliance’s IP address on port 81, following the convention
http://ApplianceIP:81.
For example, if the IP address of the PRS is 1.1.1.1, the application can be
accessed at http://1.1.1.1:81.
3 The iPhone Demo landing page should now appear.
38 Polycom, Inc.
Page 45

Using the iPhone Demo Application Polycom Recording Studio iPhone Demo
To make a recording:
1 Click Remote to launch the control interface..
2 A list of presets, defined in the PRS 2000 Operator Interface, will appear
as part of the remote control interface.
NOTE: Clicking a preset in this interface will change only the Silverlight SLVideo
output. H.264 output configuration is uniquely defined in the Operator Interface and
cannot be changed via the iPhone Demo Application.
3 Click Start to start recording on the PRS 2000 appliance.
4 Click Stop to stop recording. The recording will automatically save and
archive.
Polycom, Inc. 39
Page 46

Polycom PRS 2000 Administrator Guide Using the iPhone Demo Application
5 To view the recording in H.264 format, navigate to the iPhone demo
application landing page and click Last Recording. The recording will
then play.
6 Click Archive to view the C:\Archive directory of the Polycom PRS 2000
Appliance. The archives of the PRS, including iPhone content, can be
accessed and viewed (if the mobile device supports the content format)
through this menu.
40 Polycom, Inc.
Page 47

Polycom VMC 1000 Integration
This appendix explains the use of the Polycom PRS 2000 as an encoder for the
Polycom VMC 1000 appliance. This appendix contains the following sections:
• Polycom VMC 1000 Integration
• Configuring the PRS 2000 as an Encoder in the VMC 1000
A
Polycom VMC 1000 Integration
The Polycom Recording Studio can act as an encoder for the Polycom Video
Media Center 1000 versions 2.0 and higher. For more detailed information on
the Polycom VMC 1000 2.0, please consult the Polycom VMC 1000
Administrator Guide.
Polycom PRS 2000 to VMC 1000 Port Requirements
On VMC 1000
The VMC 1000 uses port 80 to communicate with the Web service installed on
the PRS 2000. It can be changed in encoder configuration. The Web Service
uses port 8099 to communicate with the PRS 2000. The encoder profile port is
used as a broadcast port.
• Encoder communication port: 80
• Encoder Profile Port: any value other than 8099
On PRS 2000
• Remote control port: 8099
VMC to Akamai communication port
• Communication port from PRS 2000 Encoder to Akamai: 80
Polycom, Inc. 41
Page 48

Polycom PRS 2000 Administrator Guide Polycom VMC 1000 Integration
Encoder Archive from PRS 2000 to VMC
• Communication port from PRS 2000 Encoder to Akamai: 80
• For archiving: 80
Polycom PRS 2000 Configuration
Set ASP.NET version for the Default Web Site to 2.0.x:
1 Click on Start button.
2 Select Administrative Tools > Internet Information Services (IIS)
Manager from Windows menu.
3 Select [Your Computer Name] (local computer) > Web Sites on the
manager's right pane.
4 Locate Default Web Site in the list and click with right button on it.
5 Select Properties in context menu.
6 Click on ASP.NET tab in Default Web Site Properties dialog.
7 Select ASP.NET version from the combo box.
Enable remote control in PRS 2000:
1 Start Polycom Recording Studio application.
2 Select Tools > Options.
3 Click on Remote Control tab in Options dialog.
42 Polycom, Inc.
Page 49

Polycom VMC 1000 Integration Polycom VMC 1000 Integration
4 Check Enabled checkbox.
5 Type 8099 in Port input box.
6 Click OK.
Set up PRS 2000 folder:
1 Right click on PRS 2000 folder in Windows Explorer.
2 Select Properties from context menu.
3 Click on Security tab in PRS 2000 Properties dialog.
4 Click on Add... Button.
5 Type ASPNET in "Enter the object names to select" input box in Select
Users or Groups dialog.
6 Click on Check Names button.
7 Click on OK button.
Set archive to PRS 2000 folder:
1 Start Polycom Recording Studio Application.
2 Select Tools > Options menu.
3 Click on Archive tab in Options dialog.
4 Browse to PRS 2000 folder.
5 Click OK.
Polycom, Inc. 43
Page 50

Polycom PRS 2000 Administrator Guide Polycom VMC 1000 Integration
Live Broadcast Settings
When using the Polycom Recording Studio for a live broadcast, special input,
and output configuration is required.
1 Within the Polycom Recording Studio, navigate to Session > Properties.
Click the Inputs tab.
2 To successfully conduct a live broadcast, any one input must be left
unselected.
3 Click the Outputs tab.
4 SLVideo and SLImage must be selected. All other outputs are optional.
5 Navigate to Options > Sessions.
44 Polycom, Inc.
Page 51

Configuring the PRS 2000 as an Encoder in the VMC 1000 Polycom VMC 1000 Integration
6 Select Run for the Post-Record Action.
Configuring the PRS 2000 as an Encoder in the VMC 1000
In order to use the Polycom Recording Studio as an encoder in the Polycom
VMC 1000, you must first configure a PRS 2000 encoder in the Polycom VMC
administrative interface.
To add a PRS 2000 encoder:
1 Log into the Polycom VMC 1000 Administrative Portal.
2 Navigate to Resources > Encoders.
3 Click the Add button.
4 From the context menu, choose Polycom Recording Studio.
5 Enter the Polycom Recording Studio device specifications. The
communication port must have a value of 80.
6 Select Add under Encoder Profile.
7 Specify a name and optional description.
8 Select Enable Archiving.
9 Provide an Encoder Output Port. This value must not be 8099.
10 Provide a public URL, if necessary, and specify video size, frame rate,
video bit rate, and audio bit rate.
11 Click Save.
Polycom, Inc. 45
Page 52

Polycom PRS 2000 Administrator Guide Configuring the PRS 2000 as an Encoder in the VMC 1000
Uploading PRS 2000 Archive
To upload a PRS 2000 archive to the VMC:
1 Find the output of the Polycom Rich Experience Player on the Recording
Studio appliance under
time]\Merger\Expression Encoder Output
2 Save the content of the folder in zip file.
3 Open the Polycom VMC 1000 Administrative Interface.
4 Navigate to Programming > Content. Select Add Item.
5 From the context menu that appears, choose Complex Presentation.
6 Upload the archive zip file.
7 Provide the program specifications and click Save. The archive should
now reside in the Content Repository, where it can be made viewable as
a Program.
C:\Archive\[broadcast date and
.
46 Polycom, Inc.
Page 53

Expression Encoder Guidelines
This appendix provides guidelines for the use of Expression Encoder tool. This
appendix contains the following sections:
• Expression Encoder Tips
• Silverlight Recording Layout
B
Expression Encoder Tips
Editing The Metadata
In order to change the values of the Metadata of a recording in Expression
Encoder, here are the steps you'll have to follow:
1 Open the folder of your recording.
2 Open the folder named Merger.
3 Double click on the file named
4 Expression Encoder opens. On the right of the screen you'll find a box
"Scripts Commands".
5 Modify the values of the metadata you want to edit.
6 Once you finished editing the metadata, re-encode your recording.
7 Open the Expression Encoder Output folder (this folder is in the Merger
folder). Delete the file named
SLVideo_media.wmv into media.wmv.
Using the Mark in/Mark Out Feature in Expression Encoder
expression_encoder_job.xej.
media.wmv and rename the file named
Using the Mark In and Mark Out Events requires modifications to the timeline
in Expression Encoder. The steps below illustrate how to use the Mark In and
Mark Out points to create a video for the Polycom Rich Experience Player to
include only the portions of the video the presenter has specified. This process
can be handled by someone with basic video editing knowledge.
Polycom, Inc. 47
Page 54

Polycom PRS 2000 Administrator Guide Expression Encoder Tips
Note: When using the Mark In and Mark Out feature, the presenter should
"Mark In" to signify the start of the presentation video. The Mark In and Mark
Out feature is only available for Polycom Rich Experience Player playback. All
other output types will play the entire duration of the presentation.
1 Locate and launch the .
xej (Expression Encoder) file in the directory
containing the Polycom Rich Experience Player output files.
2 To view the cut points where the Mark In and Mark Out points are, go to
Timeline > Show Cuts.
3 You should now see the timeline divided into red and blue color-coded
"cuts." The blue areas indicate the areas within each Mark In and Mark
Out pair. These are the areas we wish to be viewable in the Polycom Rich
Experience Player.
4 In the timeline, select the start time for the trim. Right click and select
Mark In. The area in the timeline before this marker will turn red.
48 Polycom, Inc.
Page 55

Expression Encoder Tips Expression Encoder Guidelines
5 Select the end time for the trim in the timeline. Right-click and select
Mark Out.
6 Drag all of the ‘SUBVIDEO’ markers onto the area delimited by the
markers (the blue area).
Polycom, Inc. 49
Page 56

Polycom PRS 2000 Administrator Guide Expression Encoder Tips
7 In the right-hand menu, select the Enhance tab. Copy the start time of the
trimmed section to the clipboard (C
Paste the start time in a safe field and add one millisecond to the value.
Copy this new value to the clipboard.
TRL+C).
NOTE: The precision for the time is intended to ensure a correct display in the
Silverlight player(s).
50 Polycom, Inc.
Page 57

Silverlight Recording Layout Expression Encoder Guidelines
8 In the right-hand menu, select the Metadata tab. Copy the start time for
all ‘ATTR’ script commands accessible under Script Commands and
press Enter to validate.
9 If you have changed the name of the recording from the default
timestamp convention:
a Navigate to the Output tab.
b Click the ... (browse) button in the Job Output section.
c Verify that the output folder corresponds to the Merger folder of the
recording.
10 Navigate to File > Save Job.
11 Click the Encode button. Wait for completion.
12 To verify the timeline modifications were successful, open player.htm to
launch the Polycom Rich Experience Player.
Silverlight Recording Layout
The Polycom PRS 2000 device has as an option two of its outputs entitled
"SLVideo" and "SLImage," both of which are used by the system to generate a
Silverlight VoD presentation package after a recording is complete.
Using the inherent capabilities of the Polycom PRS 2000 device, multiple video
and VGA inputs are detected and extracted automatically for the purpose of
rendering the Silverlight package.
Polycom, Inc. 51
Page 58

Polycom PRS 2000 Administrator Guide Silverlight Recording Layout
The Expression Encoder output folder contains the Windows Media file,
HTML, corresponding snapshots to timestamps, and the XAP file. The
Silverlight VoD will also seamlessly render chapter titles from OCR (Optical
Character Recognition), thumbnails corresponding with screenshots,
metadata, and other information. See the diagram below for more
information.
NOTE: Outputs designated for Silverlight must conform to the provided naming
designation, specifically "SLVideo" for the media output and "SLImage" for image
snapshots.
1 Video Input One: Controls available to the viewer are: rendering the
window transparent, resizing, toggling full screen on/off, and
completely closing the window.
2 Video Input Two: Same controls available as above.
3 Other Player Controls:
a Expose Title, Author, and Description as an overlay.
b Overlay OCR chapters as URLs with assigned timestamps.
Navigate directly to the point of time by selecting a URL.
c Overlay screen capture snapshots as URLs with assigned
timestamps. Navigate directly to the point of time by
selecting a URL.
52 Polycom, Inc.
Page 59

Silverlight Recording Layout Expression Encoder Guidelines
d Expose Closed Captions if provided.
e Search OCR within player which will expose URLs for
easy navigation to timestamps within recording.
f Enable full-screen mode.
4 If the viewer has disabled or exited one of the other video inputs in the
Silverlight VoD, these controls will allow you to restore the video input
or restore the whole configuration back to default.
As referenced earlier, two Silverlight VoD Players, or recording layouts, are
provided on default with the Polycom PRS 2000: VoDPlayer1 (Freestyle) or
VoDPlayer2 (Video & Slides).
Polycom, Inc. 53
Page 60

Polycom PRS 2000 Administrator Guide Silverlight Recording Layout
1 If creating a new output profile in the video mix, the video input borders
must not overlap with other images or the boundaries of the total mix
profile itself. Otherwise the Silverlight VoD will not capture the
coordinates of the video inputs and will render a recording incorrectly.
54 Polycom, Inc.
 Loading...