

Polycom 19317, SoundPoint IP 450, SoundPoint IP 550, SoundPoint IP 560, SoundPoint IP 650 Mounting Instructions
...Page 1
Quick Tip 19317
Wallmount Instructions for SoundPoint® IP Phones
This quick tip provides step-by-step instructions for mounting your
SoundPoint IP phone to a wall.
Introduction
Instead of using your phone on a tabletop or desktop, you may wish to mount
your SoundPoint IP telephone to a wall.
Depending on which model you own, your SoundPoint IP phone can be
mounted to the wall in one of two ways:
• By using the reversible base stand/wallmount unit (included with
SoundPoint IP 32x/33x and 430 phones).
• By using the separate wallmount accessory available from your reseller
(for SoundPoint IP 450, 550, 560, 650, and 670 phones). For more
information on purchasing a separate wallmount accessory, contact your
reseller.
Wall anchors and applicable tools are required for wallmount installation.
These are not included with your SoundPoint IP telephone, or separate
wallmount accessory.
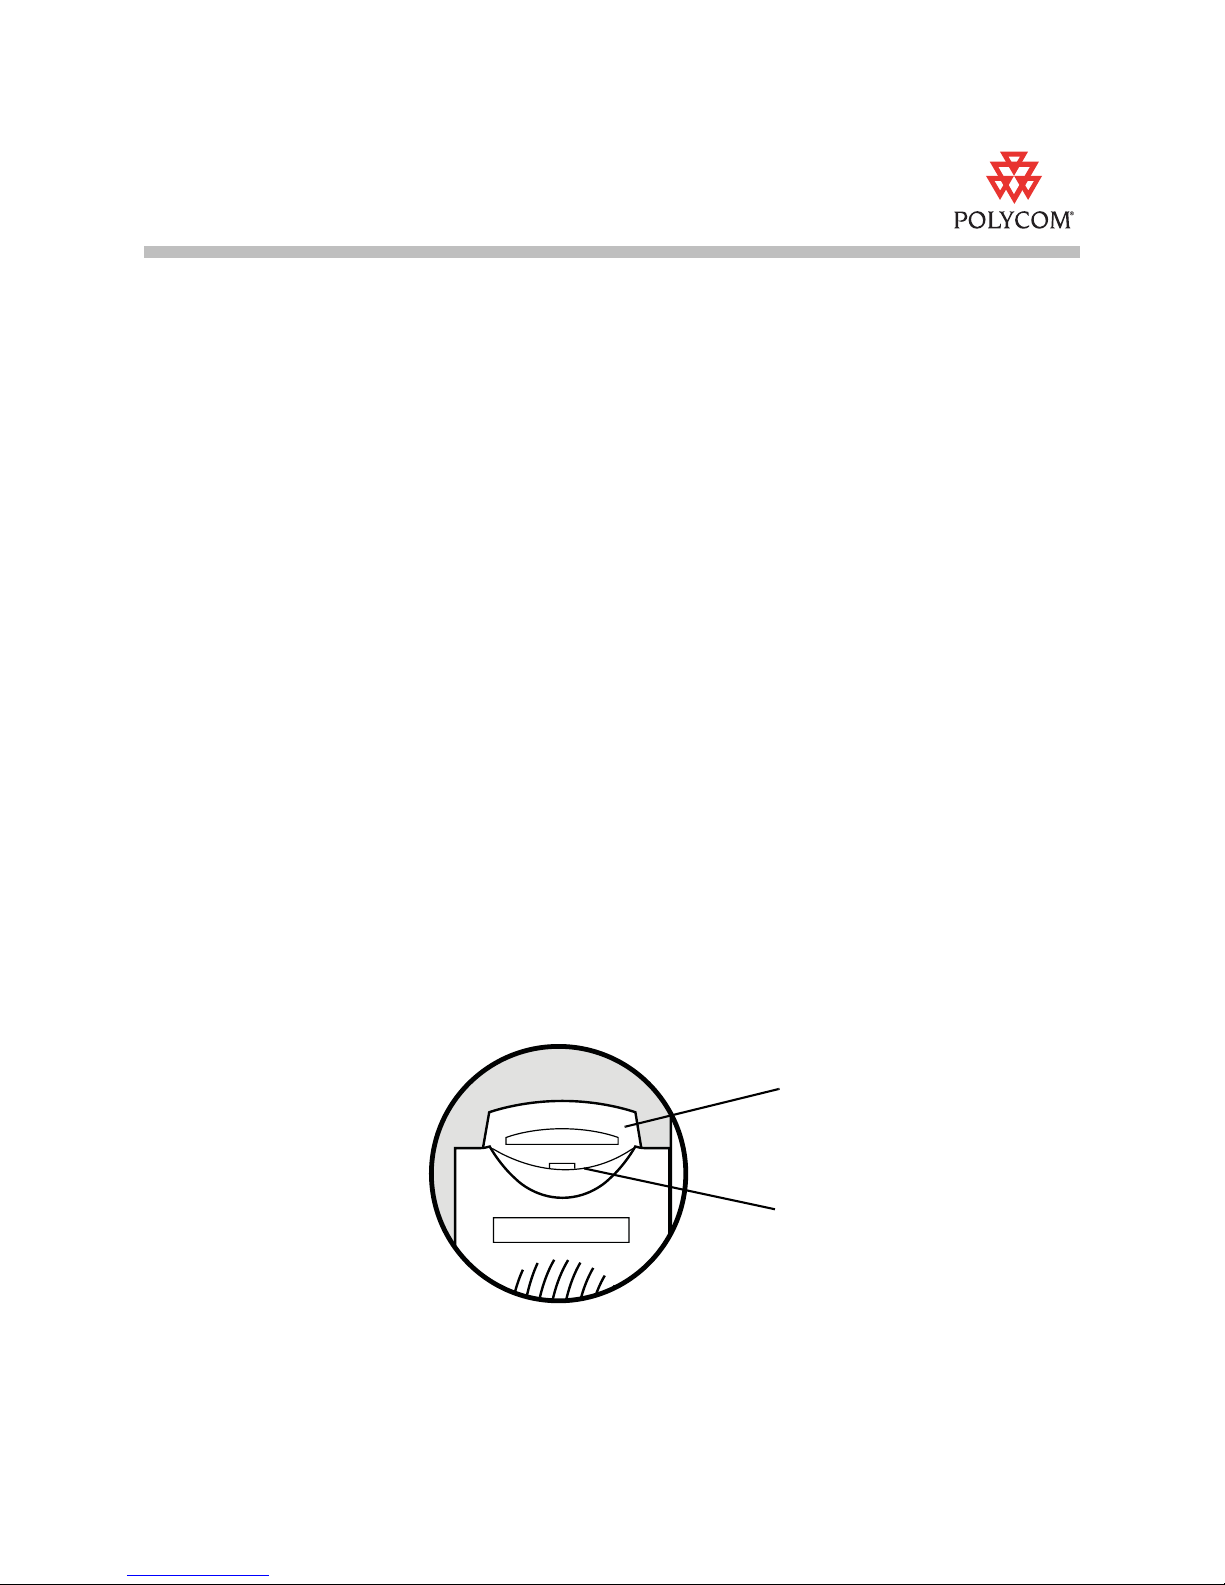
Repositioning the Hookswitch Tab
Regardless of which model you have, your SoundPoint IP phone comes
equipped with a reversible hookswitch tab. This tab allows the handset to stay
on-hook when the phone is mounted vertically.
Hookswitch
Hookswitch Tab
(front view)
Your SoundPoint IP phone is packaged with the hookswitch tab in
“deskmount” position. Before your phone can be mounted to the wall, the
hookswitch tab must be set to the “wallmount” position.
<August, 2009>
3725-17479-001 Rev. B
Page 2
Quick Tip
SoundPoint ® IP Family
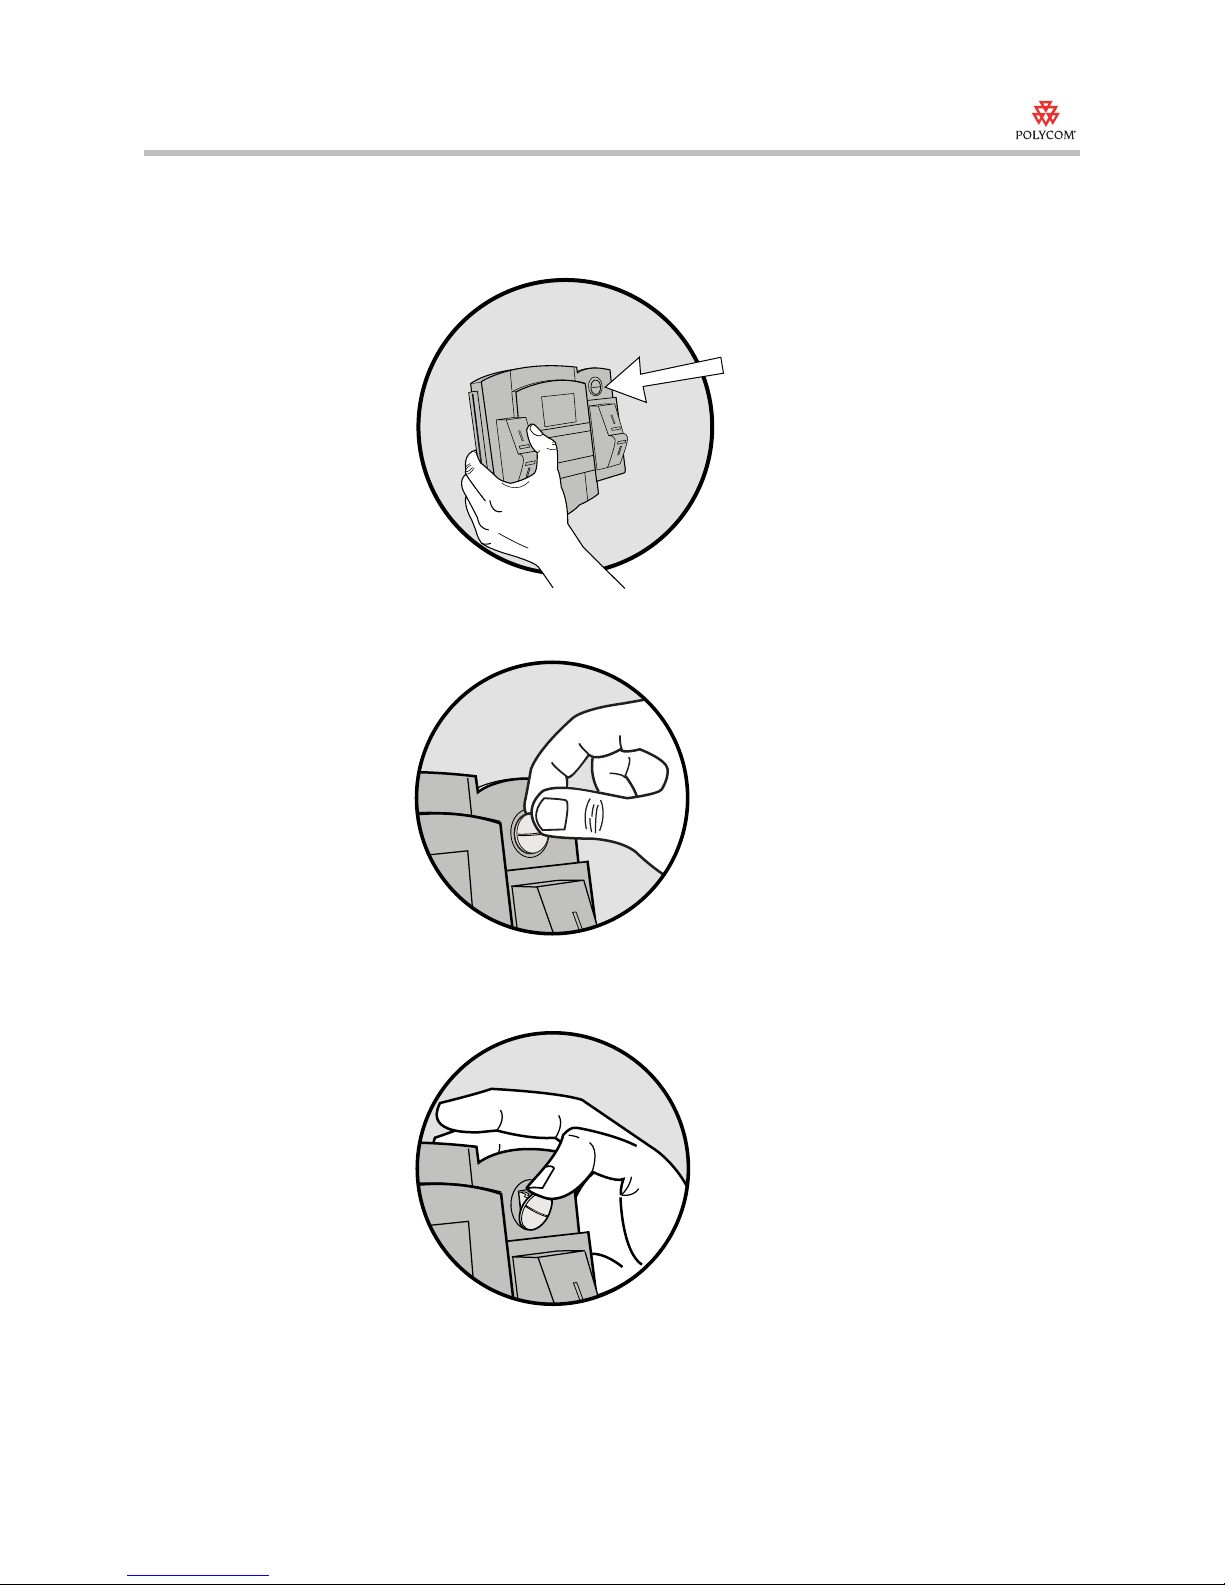
To reposition the hookswitch tab for wallmount use:
1. Locate the hookswitch tab on the back of the phone (see below).
2. Using your thumb or forefinger, push the tab downward.
3. Using your thumb or forefinger, bring the tab out.
2
Page 3
Quick Tip
SoundPoint ® IP Family
• The hookswitch tab is now unlocked.
4. Remove the hookswitch tab, as shown below.
3
Page 4

Quick Tip
SoundPoint ® IP Family
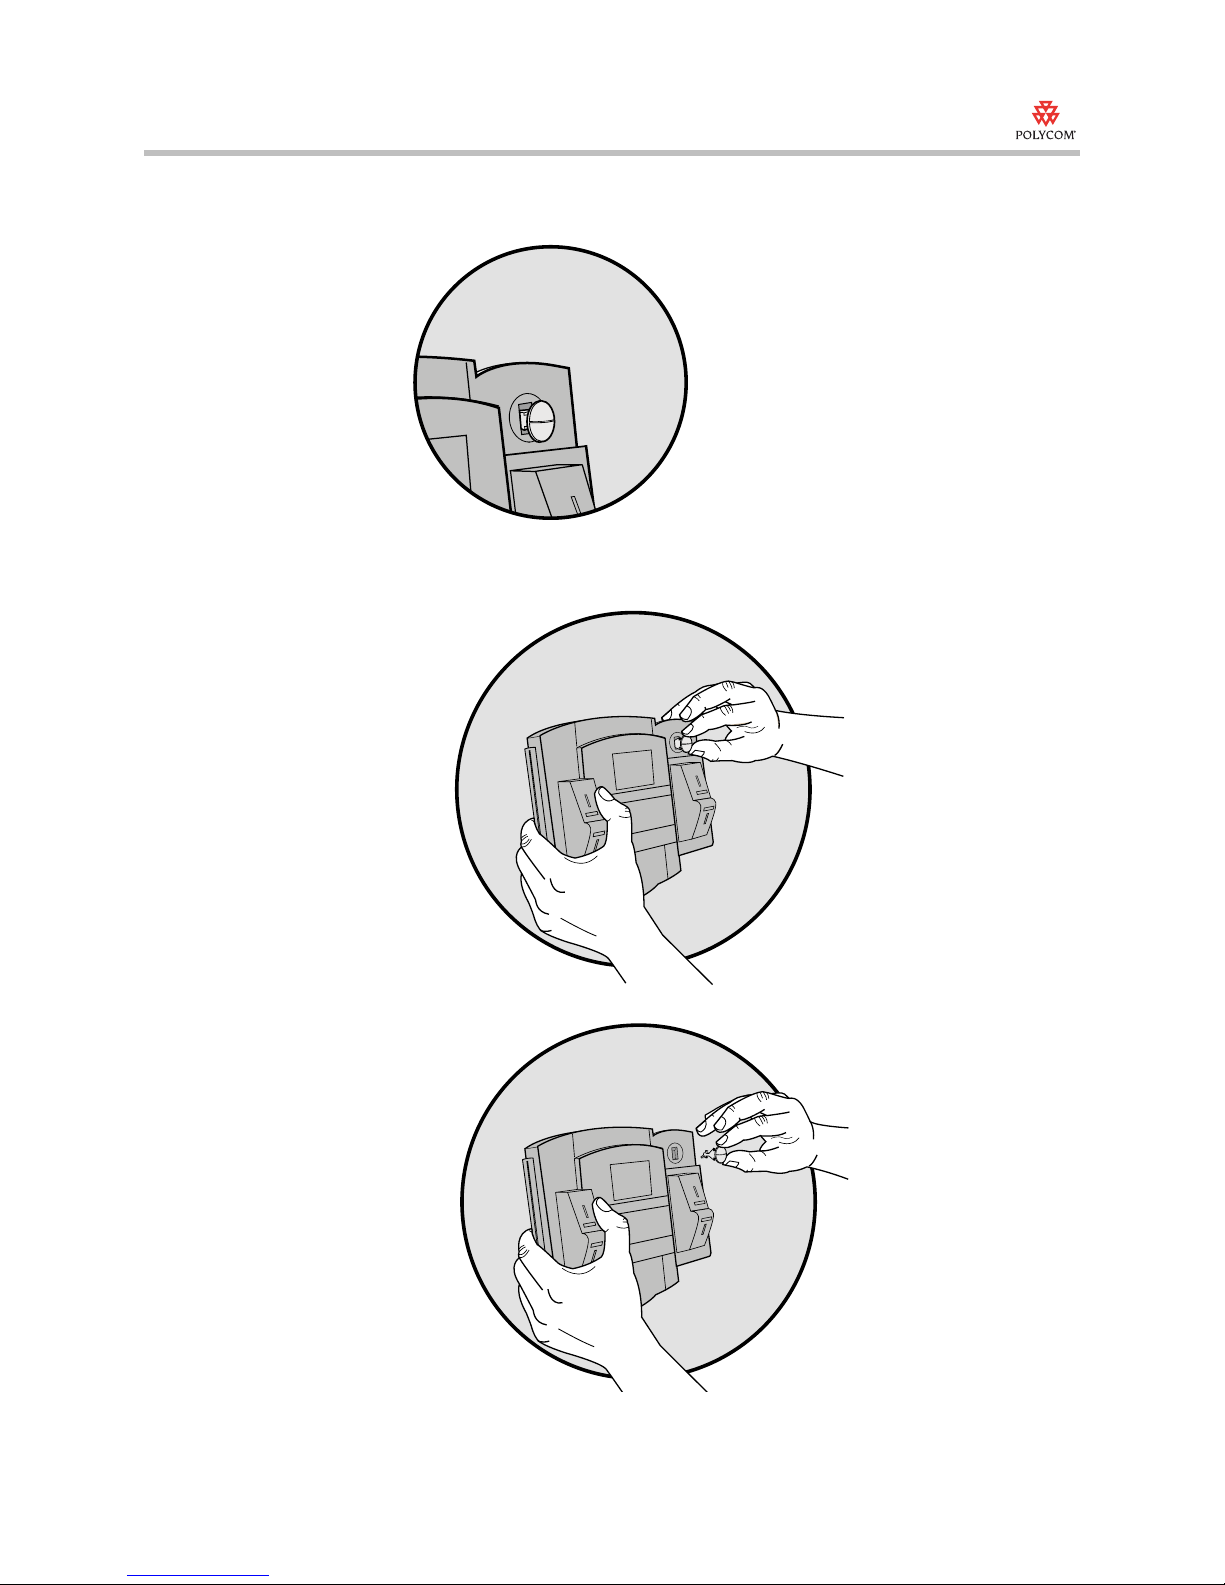
5. Rotate the hookswitch tab so that the outermost extension is pointing up
(as shown below).
6. Re-insert the hookswitch tab, and then push it into a locked position,
using your thumb. The hookswitch tab is now in “wallmount” position.
4
Page 5

Quick Tip
SoundPoint ® IP Family
Attaching the Reversible Base Stand/Wallmount Unit
The reversible base stand unit (shown below) can be used either for
desktop/tabletop use, or for wallmount use.
The reversible base stand is included with the following SoundPoint IP
telephones:
• SoundPoint IP 32x/33x
• SoundPoint IP 430
If your phone is not included in the above list, see “Attaching the Separate
Wallmount Accessory”, in the next section.
If you are not sure which SoundPoint IP model you are using, check the back
of the phone for the model label, or contact your reseller.
To install the reversible base stand/wallmount unit:
1. Using wall anchors (not provided), attach the base stand unit to the wall,
with the mounting tab facing up, as shown.
Mounting Tab
Wall Anchor Insertion
Points
Wall Anchor Insertion
Points
2. Attach all applicable cords and cables to your SoundPoint IP telephone.
For more information about attaching cords and cables, see your
SoundPoint IP telephone’s Quick Start Guide or User Guide.
5
Page 6

Quick Tip
SoundPoint ® IP Family
3. Snap your SoundPoint IP telephone into place.
Attaching the Separate Wallmount Accessory
The separate wallmount accessory (shown below) can be used only for
wallmount usage, and is available from your reseller.
The separate wallmount accessory is available for the following SoundPoint IP
telephones:
• SoundPoint IP 450
• SoundPoint IP 550
• SoundPoint IP 560
• SoundPoint IP 650
• SoundPoint IP 670
If your phone is not included in the above list, see “Attaching the Reversible
base Stand/Wallmount Unit”, in the previous section.
6
Page 7

Quick Tip
SoundPoint ® IP Family
If you are not sure which SoundPoint IP model you are using, check the back
of the phone for the model label, or contact your reseller.
To install the separate wallmount accessory:
1. Using wall anchors (not provided), attach the wallmount accessory to the
wall, as shown.
2. Attach all applicable cords and cables to your SoundPoint IP telephone.
For more information about attaching cords and cables, see your
Wall Anchor Insertion
Points
SoundPoint IP telephone’s Quick Start Guide or User Guide.
3. Snap your SoundPoint IP telephone into place.
Trademark Information
Polycom®, SoundPoint®, and the Polycom logo design are registered
trademarks of Polycom, Inc. in the U.S. and various countries. All other
trademarks are the property of their respective companies.
7
 Loading...