

Page 1

User Guide for the
Polycom
®
VVX® 1500
Business Media Phone
UC Software Release 3.3.1 | September, 2010 | 1725-16843-001 Rev.D
Page 2

Trademark Information
POLYCOM®, the Polycom “Triangles” logo and the names and marks associated with Polycom’s products are
trademarks and/or service marks of Polycom, Inc. and are registered and/or common law marks in the United States
and various other countries. All other trademarks are property of their respective owners. No portion hereof may be
reproduced or transmitted in any form or by any means, for any purpose other than the recipient’s personal use, without
the express written permission of Polycom.
Patent Information
The accompanying product is protected by one or more U.S. and foreign patents and/or pending patent applications
held by Polycom, Inc.
Disclaimer
Some countries, states, or provinces do not allow the exclusion or limitation of implied warranties or the limitation of
incidental or consequential damages for certain products supplied to consumers, or the limitation of liability for personal
injury, so the above limitations and exclusions may be limited in their application to you. When the implied warranties
are not allowed to be excluded in their entirety, they will be limited to the duration of the applicable written warranty. This
warranty gives you specific legal rights which may vary depending on local law.
Copyright Notice
Portions of the software contained in this product are:
Copyright © 1998, 1999, 2000 Thai Open Source Software Center Ltd. and Clark Cooper
Copyright © 1998 by the Massachusetts Institute of Technology
Copyright © 1998-2003 The OpenSSL Project
Copyright © 1995-1998 Eric Young (eay@cryptsoft.com). All rights reserved
Copyright © 1995-2002 Jean-Loup Gailly and Mark Adler
Copyright © 1996-2004, Daniel Stenberg, <daniel@haxx.se>
Permission is hereby granted, free of charge, to any person obtaining a copy of this software and associated
documentation files (the “Software”), to deal in the Software without restriction, including without limitation the rights to
use, copy, modify, merge, publish, distribute, sublicense, and/or sell copies of the Software, and to permit persons to
whom the Software is furnished to do so, subject to the following conditions:
The above copyright notice and this permission notice shall be include d in all copies or substantial portions of the
Software.
THE SOFTWARE IS PROVIDED “AS IS”, WITHOUT WARRANTY OF ANY KIND, EXPRESS OR IMPLIED,
INCLUDING BUT NOT LIMITED TO THE WARRANTIES OF MERCHANTABILITY, FITNESS FOR A PARTICULAR
PURPOSE AND NONINFRINGEMENT. IN NO EVENT SHALL THE AUTHORS OR COPYRIGHT HOLDERS BE
LIABLE FOR ANY CLAIM, DAMAGES OR OTHER LIABILITY, WHETHER IN AN ACTION OF CONTRACT, TORT OR
OTHERWISE, ARISING FROM, OUT OF OR IN CONNECTION WITH THE SOFTWARE OR THE USE OR OTHER
DEALINGS IN THE SOFTWARE.
© 2010 Polycom, Inc. All rights reserved.
Polycom, Inc.
4750 Willow Road
Pleasanton, CA 94588-2708
USA
No part of this document may be reproduced or transmitted in any form or by any means, electronic or mechanical, for
any purpose, without the express written permission of Polycom, Inc. Under the law, reproducing includes translating
into another language or format.
As between the parties, Polycom, Inc., retains title to and ownership of all proprietary rights with respect to the software
contained within its products. The software is protected by United States copyright laws and international treaty
provision. Therefore, you must treat the software like any other copyrighted material (e.g., a book or sound recording).
Every effort has been made to ensure that the information in this manual is accurate. Polycom, Inc., is not responsible
for printing or clerical errors. Information in this document is subject to change without notice.
ii
Page 3

Contents
1 Getting Started with Your Phone . . . . . . . . . . . . . . . . . . . . . 1
Changes to this Guide . . . . . . . . . . . . . . . . . . . . . . . . . . . . . . . . . . . . . . . . . . . . . 2
Introducing Phone Components . . . . . . . . . . . . . . . . . . . . . . . . . . . . . . . . . . . . 3
Understanding the Phone Keypad . . . . . . . . . . . . . . . . . . . . . . . . . . . . . . . . . . 4
What Displays on the Touch Screen? . . . . . . . . . . . . . . . . . . . . . . . . . . . . . . . . 5
Phone Icons . . . . . . . . . . . . . . . . . . . . . . . . . . . . . . . . . . . . . . . . . . . . . . . . . . 9
Navigating Menus, Lists, and Fields . . . . . . . . . . . . . . . . . . . . . . . . . . . . . . . 12
Entering Data and Editing Fields . . . . . . . . . . . . . . . . . . . . . . . . . . . . . . . . . . 14
Using the Touch Screen Keyboard . . . . . . . . . . . . . . . . . . . . . . . . . . . . . . 15
Using the Dialpad Keys on the Phone Console . . . . . . . . . . . . . . . . . . . 18
Tips for When You’re in Video Calls . . . . . . . . . . . . . . . . . . . . . . . . . . . . . . . 20
Cleaning the Touch Screen . . . . . . . . . . . . . . . . . . . . . . . . . . . . . . . . . . . . . . . . 20
Registering the Phone . . . . . . . . . . . . . . . . . . . . . . . . . . . . . . . . . . . . . . . . . . . . 21
2 Using the Basic Features of Your Phone . . . . . . . . . . . . . . . 23
Calling and Answering . . . . . . . . . . . . . . . . . . . . . . . . . . . . . . . . . . . . . . . . . . . 24
Answering Calls . . . . . . . . . . . . . . . . . . . . . . . . . . . . . . . . . . . . . . . . . . . . . 25
Answering When Not in Another Call . . . . . . . . . . . . . . . . . . . . . . 26
Answering When in Another Call . . . . . . . . . . . . . . . . . . . . . . . . . . 27
Answering on a Shared Line . . . . . . . . . . . . . . . . . . . . . . . . . . . . . . . 28
Answering Calls Automatically . . . . . . . . . . . . . . . . . . . . . . . . . . . . 29
Placing Calls . . . . . . . . . . . . . . . . . . . . . . . . . . . . . . . . . . . . . . . . . . . . . . . . 30
Calling by Dialing Numbers, URLs, or IP Addresses . . . . . . . . . . 31
Calling from Lists, Directories, and Keys . . . . . . . . . . . . . . . . . . . . 34
Calling Using the H.323 Protocol . . . . . . . . . . . . . . . . . . . . . . . . . . . 37
Ending Calls . . . . . . . . . . . . . . . . . . . . . . . . . . . . . . . . . . . . . . . . . . . . . . . . 39
Using a Headset . . . . . . . . . . . . . . . . . . . . . . . . . . . . . . . . . . . . . . . . . . . . . 39
Enabling Headset Memory Mode . . . . . . . . . . . . . . . . . . . . . . . . . . . 39
Using Electronic Hookswitch . . . . . . . . . . . . . . . . . . . . . . . . . . . . . . 40
While Your Phone Rings . . . . . . . . . . . . . . . . . . . . . . . . . . . . . . . . . . . . . . . . . . 41
Ignoring or Silencing Incoming Calls . . . . . . . . . . . . . . . . . . . . . . . . . . . 41
Rejecting Incoming Calls . . . . . . . . . . . . . . . . . . . . . . . . . . . . . . . . . . . . . . 41
Forwarding Calls While Your Phone Rings . . . . . . . . . . . . . . . . . . . . . . 42
During Calls . . . . . . . . . . . . . . . . . . . . . . . . . . . . . . . . . . . . . . . . . . . . . . . . . . . . 42
Holding and Resuming Calls . . . . . . . . . . . . . . . . . . . . . . . . . . . . . . . . . . 43
Transferring Calls . . . . . . . . . . . . . . . . . . . . . . . . . . . . . . . . . . . . . . . . . . . . 45
Polycom, Inc. iii
Page 4

User Guide for the Polycom VVX 1500 Business Media Phone
Setting Up Conference Calls . . . . . . . . . . . . . . . . . . . . . . . . . . . . . . . . . . . 46
Hosting Conference Calls . . . . . . . . . . . . . . . . . . . . . . . . . . . . . . . . . . 47
Holding and Resuming Conference Calls . . . . . . . . . . . . . . . . . . . . 49
Ending Conference Calls . . . . . . . . . . . . . . . . . . . . . . . . . . . . . . . . . . 50
Splitting Conference Calls into Two Calls on Hold . . . . . . . . . . . . 50
Managing Conference Call Participants . . . . . . . . . . . . . . . . . . . . . 50
Handling Video During Conference Calls . . . . . . . . . . . . . . . . . . . 53
Customizing Video During Calls . . . . . . . . . . . . . . . . . . . . . . . . . . . . . . . 53
Changing the Way Calls are Answered . . . . . . . . . . . . . . . . . . . . . . . . . . . . . 55
Forwarding All Calls to Another Party . . . . . . . . . . . . . . . . . . . . . . . . . . 55
Rejecting Calls from a Contact . . . . . . . . . . . . . . . . . . . . . . . . . . . . . . . . . 58
Diverting Calls from a Contact to Another Party . . . . . . . . . . . . . . . . . 58
Temporarily Refusing All Calls (Do Not Disturb) . . . . . . . . . . . . . . . . . 59
Multiple Lines and Do Not Disturb . . . . . . . . . . . . . . . . . . . . . . . . . 60
Working with Call Lists . . . . . . . . . . . . . . . . . . . . . . . . . . . . . . . . . . . . . . . . . . 62
Viewing Call Lists . . . . . . . . . . . . . . . . . . . . . . . . . . . . . . . . . . . . . . . . . . . . 63
Managing Call Lists . . . . . . . . . . . . . . . . . . . . . . . . . . . . . . . . . . . . . . . . . . 64
Working with Contact Directory . . . . . . . . . . . . . . . . . . . . . . . . . . . . . . . . . . . 65
Searching Your Local Contact Directory . . . . . . . . . . . . . . . . . . . . . . . . . 65
Adding Contacts to Your Local Contact Directory . . . . . . . . . . . . . . . . 66
Updating Your Local Contact Directory . . . . . . . . . . . . . . . . . . . . . . . . . 69
Deleting Contacts from Your Local Contact Directory . . . . . . . . . . . . . 70
Working with Corporate Directory . . . . . . . . . . . . . . . . . . . . . . . . . . . . . . . . . 70
Searching Corporate Directory . . . . . . . . . . . . . . . . . . . . . . . . . . . . . . . . . 70
Adding Corporate Directory Contacts to Your Local
Contact Directory . . . . . . . . . . . . . . . . . . . . . . . . . . . . . . . . . . . . . . . . . . . . 71
Saving Corporate Directory Search Results . . . . . . . . . . . . . . . . . . . . . . 72
Controlling What is Heard . . . . . . . . . . . . . . . . . . . . . . . . . . . . . . . . . . . . . . . . 73
Changing the Ring Tone . . . . . . . . . . . . . . . . . . . . . . . . . . . . . . . . . . . . . . 73
Changing the Speaker Volume . . . . . . . . . . . . . . . . . . . . . . . . . . . . . . . . . 74
Changing the Ringer Volume . . . . . . . . . . . . . . . . . . . . . . . . . . . . . . . . . . 74
Muting the Microphone . . . . . . . . . . . . . . . . . . . . . . . . . . . . . . . . . . . . . . . 75
Choosing Where You Hear Sound Effects . . . . . . . . . . . . . . . . . . . . . . . 75
Managing Speed Dials . . . . . . . . . . . . . . . . . . . . . . . . . . . . . . . . . . . . . . . . . . . 76
Adding Speed Dial Keys . . . . . . . . . . . . . . . . . . . . . . . . . . . . . . . . . . . . . . 77
Updating Speed Dial Keys . . . . . . . . . . . . . . . . . . . . . . . . . . . . . . . . . . . . 77
Accessing Voice and Video Mail . . . . . . . . . . . . . . . . . . . . . . . . . . . . . . . . . . . 78
Working with Multiple and Shared Lines . . . . . . . . . . . . . . . . . . . . . . . . . . . 79
Supporting Multiple Lines . . . . . . . . . . . . . . . . . . . . . . . . . . . . . . . . . . . . 79
Supporting Multiple Line Keys Per Line . . . . . . . . . . . . . . . . . . . . . . . . 80
Supporting Shared Lines . . . . . . . . . . . . . . . . . . . . . . . . . . . . . . . . . . . . . . 81
iv Polycom, Inc.
Page 5

Locking and Unlocking the Phone . . . . . . . . . . . . . . . . . . . . . . . . . . . . . . . . . 81
About Your User Password . . . . . . . . . . . . . . . . . . . . . . . . . . . . . . . . . . . 82
Changing Your User Password . . . . . . . . . . . . . . . . . . . . . . . . . . . . . 82
Locking and Unlocking Your Phone . . . . . . . . . . . . . . . . . . . . . . . . . . . . 83
Calling and Answering from a Locked Phone . . . . . . . . . . . . . . . . . . . . 84
3 Using the Advanced Features of Your Phone . . . . . . . . . . . 87
Using Instant Messaging . . . . . . . . . . . . . . . . . . . . . . . . . . . . . . . . . . . . . . . . . 87
Using Buddy Status Lists . . . . . . . . . . . . . . . . . . . . . . . . . . . . . . . . . . . . . . . . . 91
Updating Your Presence Settings . . . . . . . . . . . . . . . . . . . . . . . . . . . . . . . 91
Managing Buddies . . . . . . . . . . . . . . . . . . . . . . . . . . . . . . . . . . . . . . . . . . . 93
Updating Your Buddy Status List . . . . . . . . . . . . . . . . . . . . . . . . . . . 93
Blocking and Unblocking Contacts from Viewing Your Status . . 94
Monitoring Buddies . . . . . . . . . . . . . . . . . . . . . . . . . . . . . . . . . . . . . . . . . . 94
Integrating with Microsoft Live Communications Server 2005 . . . . . . 96
Working with a Polycom CMA System . . . . . . . . . . . . . . . . . . . . . . . . . . . . . 97
Searching and Dialing from the CMA Directory . . . . . . . . . . . . . . . . . . 98
Using Buddy Status Lists with a CMA System . . . . . . . . . . . . . . . . . . . 99
Inviting People in the CMA Directory to Your
Buddy Status List . . . . . . . . . . . . . . . . . . . . . . . . . . . . . . . . . . . . . . . 100
Removing Buddies from Your Buddy Status List . . . . . . . . . . . . 102
Seeing Who’s Available . . . . . . . . . . . . . . . . . . . . . . . . . . . . . . . . . . 102
Choosing How You Accept Invitations . . . . . . . . . . . . . . . . . . . . . 105
Accepting and Rejecting Invitations . . . . . . . . . . . . . . . . . . . . . . . . 106
Updating Your Status . . . . . . . . . . . . . . . . . . . . . . . . . . . . . . . . . . . . 107
Dialing Buddies . . . . . . . . . . . . . . . . . . . . . . . . . . . . . . . . . . . . . . . . . 109
About Your Login Credentials . . . . . . . . . . . . . . . . . . . . . . . . . . . . . . . . 110
Using the Busy Lamp Field . . . . . . . . . . . . . . . . . . . . . . . . . . . . . . . . . . . . . . 111
Recording Calls and Conferences . . . . . . . . . . . . . . . . . . . . . . . . . . . . . . . . . 112
Recording Calls . . . . . . . . . . . . . . . . . . . . . . . . . . . . . . . . . . . . . . . . . . . . . 115
Recording Conferences . . . . . . . . . . . . . . . . . . . . . . . . . . . . . . . . . . . . . . 117
Pausing and Resuming Recording . . . . . . . . . . . . . . . . . . . . . . . . . . . . . 117
Playing Back Recorded Calls . . . . . . . . . . . . . . . . . . . . . . . . . . . . . . . . . . . . . 118
Browsing Recorded Calls . . . . . . . . . . . . . . . . . . . . . . . . . . . . . . . . . . . . 119
Playing Back Recorded Calls . . . . . . . . . . . . . . . . . . . . . . . . . . . . . . . . . 120
Answering a Call While Playing Back Recorded Calls . . . . . . . . . . . . 121
Using the Browser . . . . . . . . . . . . . . . . . . . . . . . . . . . . . . . . . . . . . . . . . . . . . . 122
Using Navigation Soft Keys . . . . . . . . . . . . . . . . . . . . . . . . . . . . . . . . . . 123
Using Editing Soft Keys . . . . . . . . . . . . . . . . . . . . . . . . . . . . . . . . . . . . . . 124
Updating Your Phone’s Configuration . . . . . . . . . . . . . . . . . . . . . . . . . . . . 125
Restarting Your Phone . . . . . . . . . . . . . . . . . . . . . . . . . . . . . . . . . . . . . . . . . . 125
Polycom, Inc. v
Page 6

User Guide for the Polycom VVX 1500 Business Media Phone
4 Customizing the Phone Display . . . . . . . . . . . . . . . . . . . . 127
Changing the Language . . . . . . . . . . . . . . . . . . . . . . . . . . . . . . . . . . . . . . . . . 127
Changing the Time and Date Display . . . . . . . . . . . . . . . . . . . . . . . . . . . . . 128
Changing the Brightness of the Touch Screen . . . . . . . . . . . . . . . . . . . . . . . 129
Changing the Background Picture . . . . . . . . . . . . . . . . . . . . . . . . . . . . . . . . 130
Using One of Your Own Pictures as the Background Picture . . . . . . 132
Displaying Screen Savers . . . . . . . . . . . . . . . . . . . . . . . . . . . . . . . . . . . . . . . . 133
Setting Up Screen Savers . . . . . . . . . . . . . . . . . . . . . . . . . . . . . . . . . . . . . 133
Stopping and Disabling Screen Savers . . . . . . . . . . . . . . . . . . . . . . . . . 135
Using Your Phone as a Picture Frame . . . . . . . . . . . . . . . . . . . . . . . . . . . . . 135
Changing When and How Video Displays . . . . . . . . . . . . . . . . . . . . . . . . . 137
Enabling or Disabling Video . . . . . . . . . . . . . . . . . . . . . . . . . . . . . . . . . . 137
Starting and Stopping Near-Site Video During a Call . . . . . . . . . 139
Enabling or Disabling Near-Site Video for All Calls . . . . . . . . . . 139
Changing the Clarity of Near-Site Video . . . . . . . . . . . . . . . . . . . . . . . 141
Changing How You View All Video Calls . . . . . . . . . . . . . . . . . . . . . . 142
Displaying Incoming Video Calls in a Large Window . . . . . . . . 143
Changing How Non-PIP Video Displays . . . . . . . . . . . . . . . . . . . 144
Changing How the PIP Displays . . . . . . . . . . . . . . . . . . . . . . . . . . 145
Setting the Call Rate for Video Calls . . . . . . . . . . . . . . . . . . . . . . . . . . . 148
Changing Power Saving Settings . . . . . . . . . . . . . . . . . . . . . . . . . . . . . . . . . 148
Changing Your Office Hours . . . . . . . . . . . . . . . . . . . . . . . . . . . . . . . . . 149
Changing Timeouts . . . . . . . . . . . . . . . . . . . . . . . . . . . . . . . . . . . . . . . . . 150
Changing User Detection Settings . . . . . . . . . . . . . . . . . . . . . . . . . . . . . 151
Safety Notices . . . . . . . . . . . . . . . . . . . . . Safety Notices – 153
Appendix: VVX 1500 Menu System . . . . . . . . Appendix – 159
®
End-User License Agreement for Polycom
vi Polycom, Inc.
Software
Page 7

Getting Started with Your Phone
1
Note
This chapter includes overview information that you may find helpful when
you’re just starting to learn about your Polycom
phone or when you have experience, but you need a quick refresher.
Your phone can be customized to show only those options used in you r
organization. Therefore, there may be options covered in this guide that you cannot
access on your phone. To find out more about these options, please talk to your
system administrator.
The topics include:
• “Changes to this Guide” on page 2
• “Introducing Phone Components” on page 3
• “Understanding the Phone Keypad” on page 4
• “What Displays on the Touch Screen?” on page 5
• “Navigating Menus, Lists, and Fields” on page 12
• “Entering Data and Editing Fields” on page 14
• “Tips for When You’re in Video Calls” on page 20
• “Cleaning the Touch Screen” on page 20
• “Registering the Phone” on page 21
®
VVX® 1500 business media
Polycom, Inc. 1
Page 8

User Guide for the Polycom VVX 1500 Business Media Phone Changes to this Guide
Changes to this Guide
The following sections have been added to this edition:
• “Choosing Where You Hear Sound Effects” on page 75.
• “Calling and Answering from a Locked Phone” on page 84.
• “Using Buddy Status Lists with a CMA System” on page 99.
• “Updating Your Phone’s Configuration” on page 125.
• “Appendix: Polycom VVX 1500 Business Media Phone Menu System” on
page 159.
The following sections have significant updates in this edition:
• “Phone Icons” on page 9. Several icons that display on the touch screen are
new or updated.
• “Navigating Menus, Lists, and Fields” on page 12. You can now navigate
the touch screen by pressing the touch screen with your finger and
dragging your finger up or down (arrow soft keys no longer display on the
touch screen).
• “Recording Calls and Conferences” on page 112. The recording icons that
display on the touch screen have been updated.
• “Using the Browser” on page 122. When you’re in the browser, you can
scroll by pressing the touch screen with your finger and dragging your
finger up or down, or to the right or left (arrow soft keys no longer display
on the touch screen). In addition, the toolbar that displays when you’re in
the browser now auto-hides.
• “Changing the Time and Date Display” on page 128. The way the time and
date display has been updated.
2 Polycom, Inc.
Page 9

1
2
3
4
5
6
7
2
Introducing Phone Components Getting Started with Your Phone
Introducing Phone Components
The following figure shows the phone’s primary hardware features.
Feature Description
1 Handset and Cord Provides audio output for calls that use the handset.
2 Speakerphone Provides ringer and hands-free (speakerphone) audio output.
3 Headset Connector Allows you to connect a headset to the phone.
4 USB Connector Allows you to connect a USB flash drive to display pictures on your phone,
5 LED Indicator The LED flashes red to indicate the following:
6 Privacy Shutter Adjuster Opens and closes the privacy shutter.
7 Camera Provides near-site video.
Polycom, Inc. 3
and to record and play back calls.
• The software is booting
• A message is waiting
• The phone is in power-saving mode (slow-flashing red)
Note: The camera barrel is located directly behind the camera lens. It
adjusts the camera angle.
Page 10
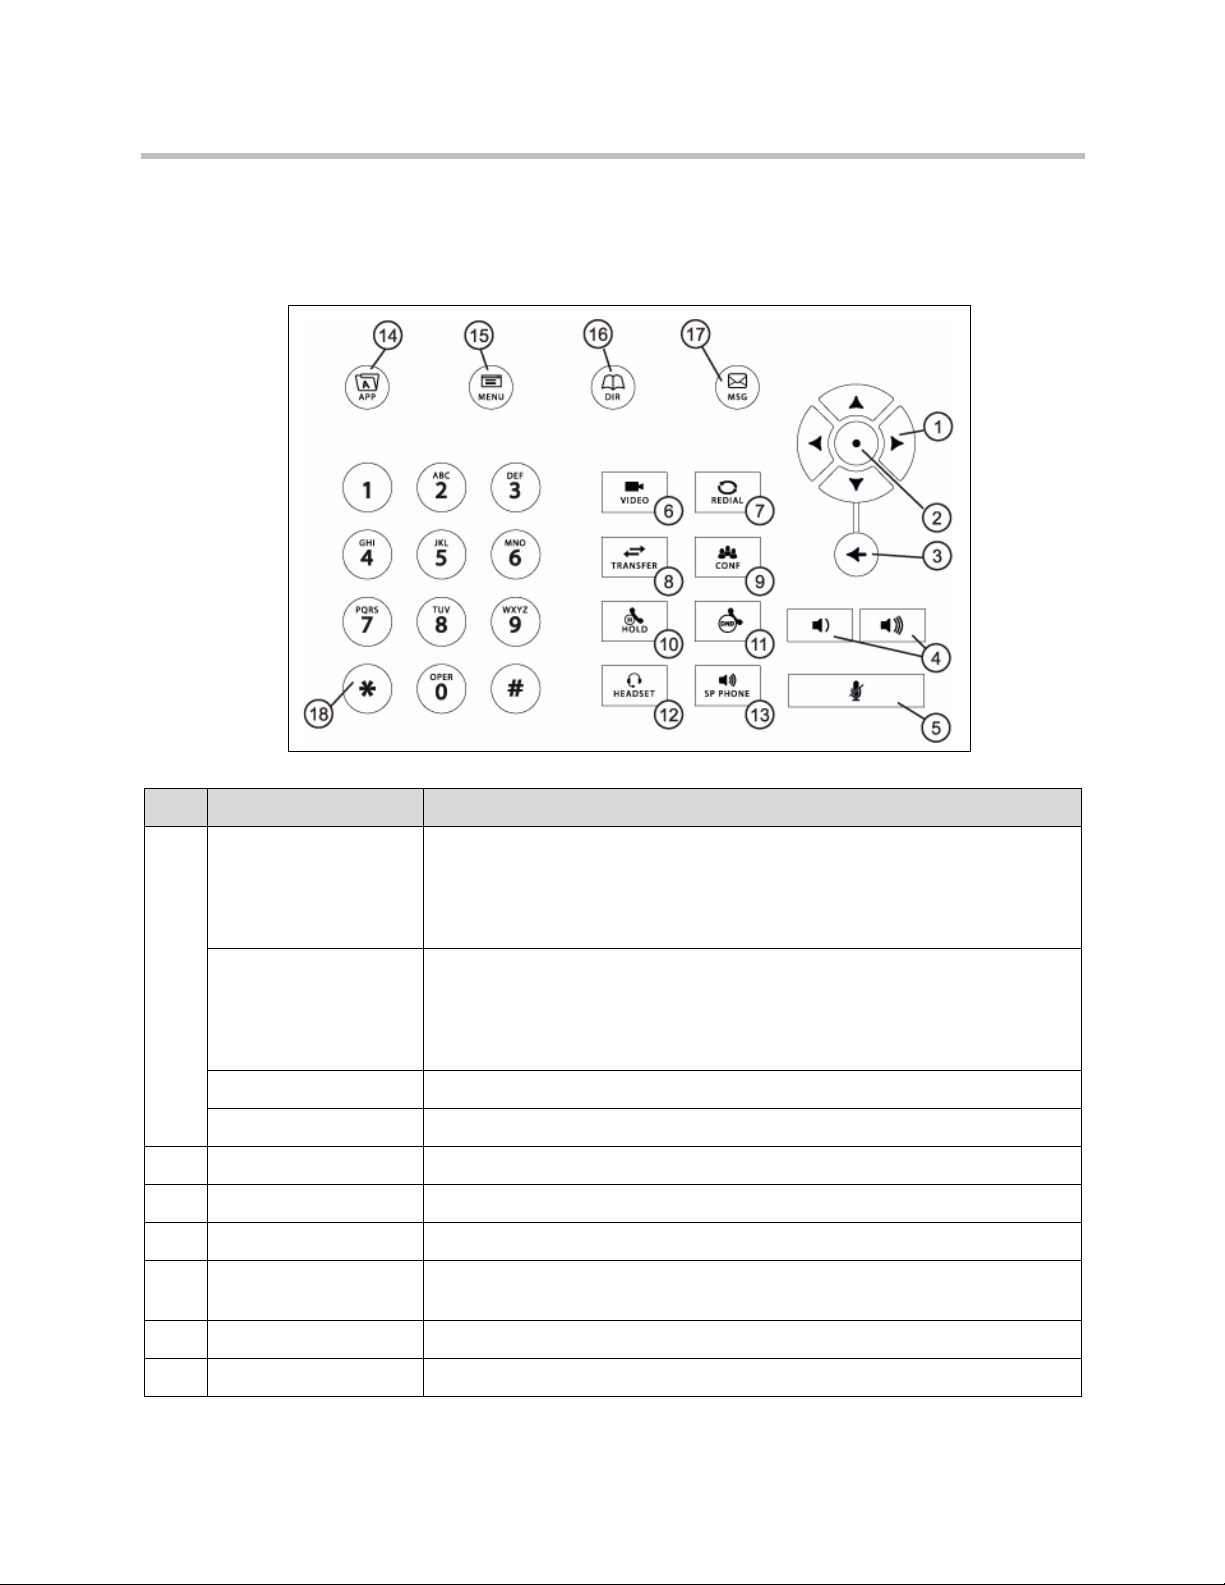
User Guide for the Polycom VVX 1500 Business Media Phone Understanding the Phone Keypad
Understanding the Phone Keypad
The following figure shows the keys on the phone console.
Key Description
1 Arrow Keys Allow you to:
• Scroll through lists.
• Highlight items before you select them.
• Scroll through active and inactive calls.
Left and Right Arrow
Keys
Left Arrow Key Returns to the previous menu.
Right Arrow Key Selects a highlighted item.
2 Select Key Selects a highlighted item.
3 Delete Key Deletes displayed data.
4 Volume Keys Adjusts the volume of the handset, headset, speaker, and ringer.
5 Mute Key Mutes audio transmission locally during calls and conferences. The key glows
6 Video Key Controls the size, position, and transmission of video images.
7 Redial Key Dials the most recently dialed party.
Allow you to:
• Enable and disable fields.
• Scroll through values for a field.
• Position the cursor within text you’re updating.
red when activated.
4 Polycom, Inc.
Page 11

What Displays on the Touch Screen? Getting Started with Your Phone
Key Description
8 Transfer Key Transfers the current call to another party.
9 Conference Key Allows connection with another party for a conference.
10 Hold Key Holds an active call or resumes a held call.
11 Do Not Disturb Key Cancels ringing and directs incoming calls to your mailbox. The key glows red
when activated.
12 Headset Key Allows you to place and receive calls through an optionally connected headset.
The key glows green when headset mode is selected.
13 Speakerphone Key Allows for hands-free communication during calls. The key glows green when
speakerphone mode is selected.
14 Applications Key Allows you to access the Web browser.
15 Menu Key Allows you to access local (your phone) and global (your organization) features.
16 Directories Key Allows you to access directories (Contact, Corporate, and CMA) and call lists.
17 Messages Key Allows you to access and manage instant, voice, and video messages.
18 Dialpad Keys Provide the 10 digits, alphabetic characters, and special characters available in
context-sensitive applications.
What Displays on the Touch Screen?
Your phone displays video in two windows: a small picture-in-picture (PIP)
window located on the top-right of the touch screen, and a larger window
centered in the middle of the touch screen. By default, the near site displays in
the PIP, and the far site displays in the window in the center of the touch
screen. Information about the call, such as the phone number of the party with
whom you’re talking and the duration of the call, appears next to the far site
when it is displayed in the window in the center of the touch screen.
Polycom, Inc. 5
Page 12

User Guide for the Polycom VVX 1500 Business Media Phone What Displays on the Touch Screen?
The following figure is an example of what displays on the touch screen
during a call.
Feature Description
1 Status bar Displays the time and date, the phone’s number, messages, and icons.
The time and date and phone’s number display on the far-right of the status bar,
next to the PIP. If there are messages to display (for example, recording,
flash drive, or status information), the messages scroll under the time, along
with the phone number.
6 Polycom, Inc.
Page 13
What Displays on the Touch Screen? Getting Started with Your Phone
Feature Description
1Status bar
(continued)
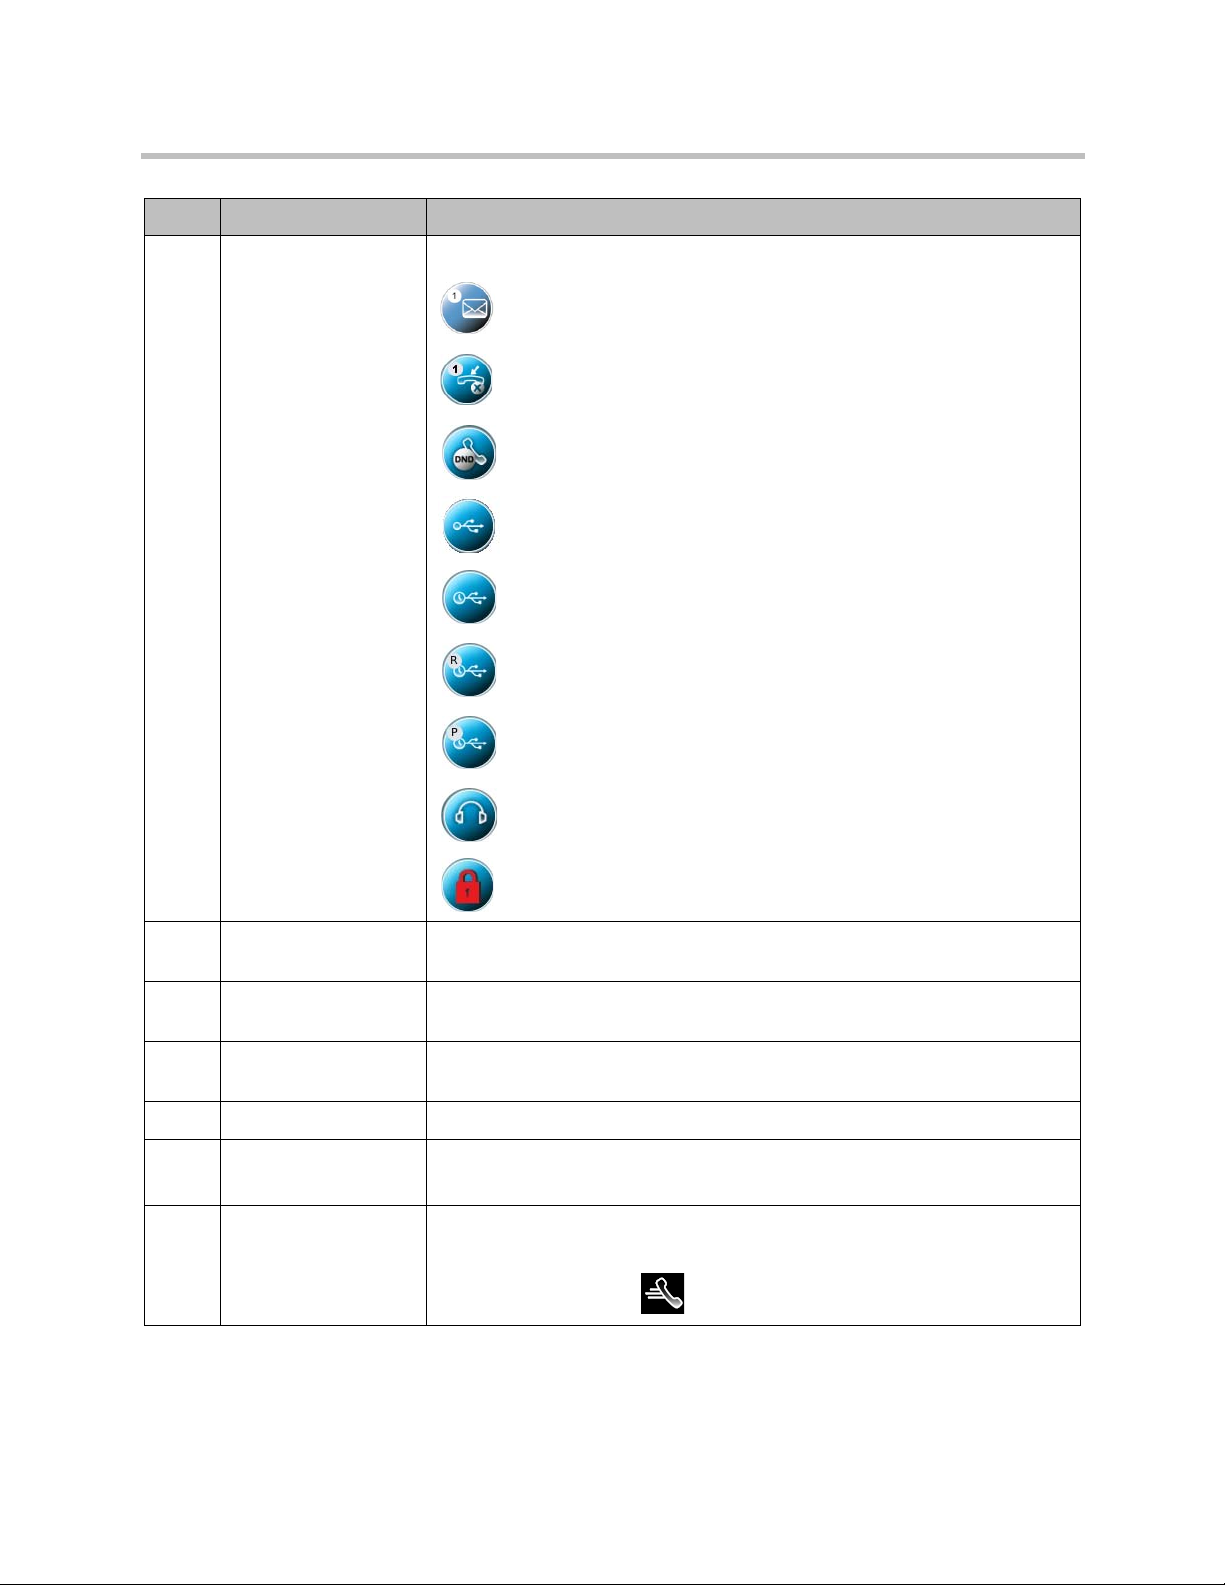
Icons display along the far-left of the status bar. The following icons can display:
—Messages waiting
—Missed calls
—Do Not Disturb enabled
—USB flash drive attached and idle
—USB flash drive attached and playing back
—USB flash drive attached and recording
—USB flash drive attached and recording paused
—Headset attached
—Login credentials locked
2 Active call window Displays the active call. During a video call, the active call window can display
the near site or the far site.
3 Inactive call group Displays calls on hold, as well as incoming calls that are not immediately
answered.
4 Soft keys Keys on the touch screen that you can tap to access phone functions. The keys
are automatically labeled to identify their context-sensitive functions.
5 Menu key Opens the Main Menu.
6 Line Keys and
Speed Dial Keys
7 Speed Dial Keys Use these keys to activate up to five speed dials that can be assigned to your
Polycom, Inc. 7
See Line Key in this table.
See Speed Dial Keys in this table.
phone. Use a Speed Dial Key to quickly dial a contact.
Speed Dial Keys display
.
Page 14

User Guide for the Polycom VVX 1500 Business Media Phone What Displays on the Touch Screen?
Feature Description
8 Line Key
status indicator
9 Line Key Use these keys to activate up to six lines that can be assigned to your phone.
A Line Key can have one of the following status indicators:
• Solid green—A dial tone is available, dialing is in progress, or a call is active.
• Flashing green—An incoming call. Or, the far site has placed a call on hold.
• Solid red—A remote shared line is active, or the buddy associated with the
Speed Dial Key has a status that is either Busy, Offline, or Do Not Disturb.
• Flashing red—Y ou have placed a call (one or more) on hold (on a private or
shared line), or the buddy associated with the Speed Dial Key has a status
that is Be Right Back, Away, or Out to Lunch.
When the phone is idle, Line Keys display one of the following:
—Registered, private lines
—Registered, shared lines
—Unregistered lines
—Lines that have the Always call forwarding type enabled
—Lines that have Do Not Disturb enabled
Line keys are either blue or green:
• Green—Indicates that the Line Key has an active call or an incoming call. A
green Line Key is associated with the calls that currently display on the
touch screen (active or inactive).
• Blue—Indicates that the Line Key doesn’t have an active call, or has an
incoming call that has been minimized and placed in the inactive call group.
The calls associated with a blue Line Key don’t currently display on the
touch screen.
10 Picture-in-Picture
window (PIP)
8 Polycom, Inc.
The small window in the corner of the touch screen that displays video. By
default, the PIP displays the near site. During a call, you can tap the PIP to
toggle it to display the near site or the far site.
Page 15
What Displays on the Touch Screen? Getting Started with Your Phone
Phone Icons
The following table describes the icons that display on the touch screen.
Call counters only display when the icon appears next to the Line Key.
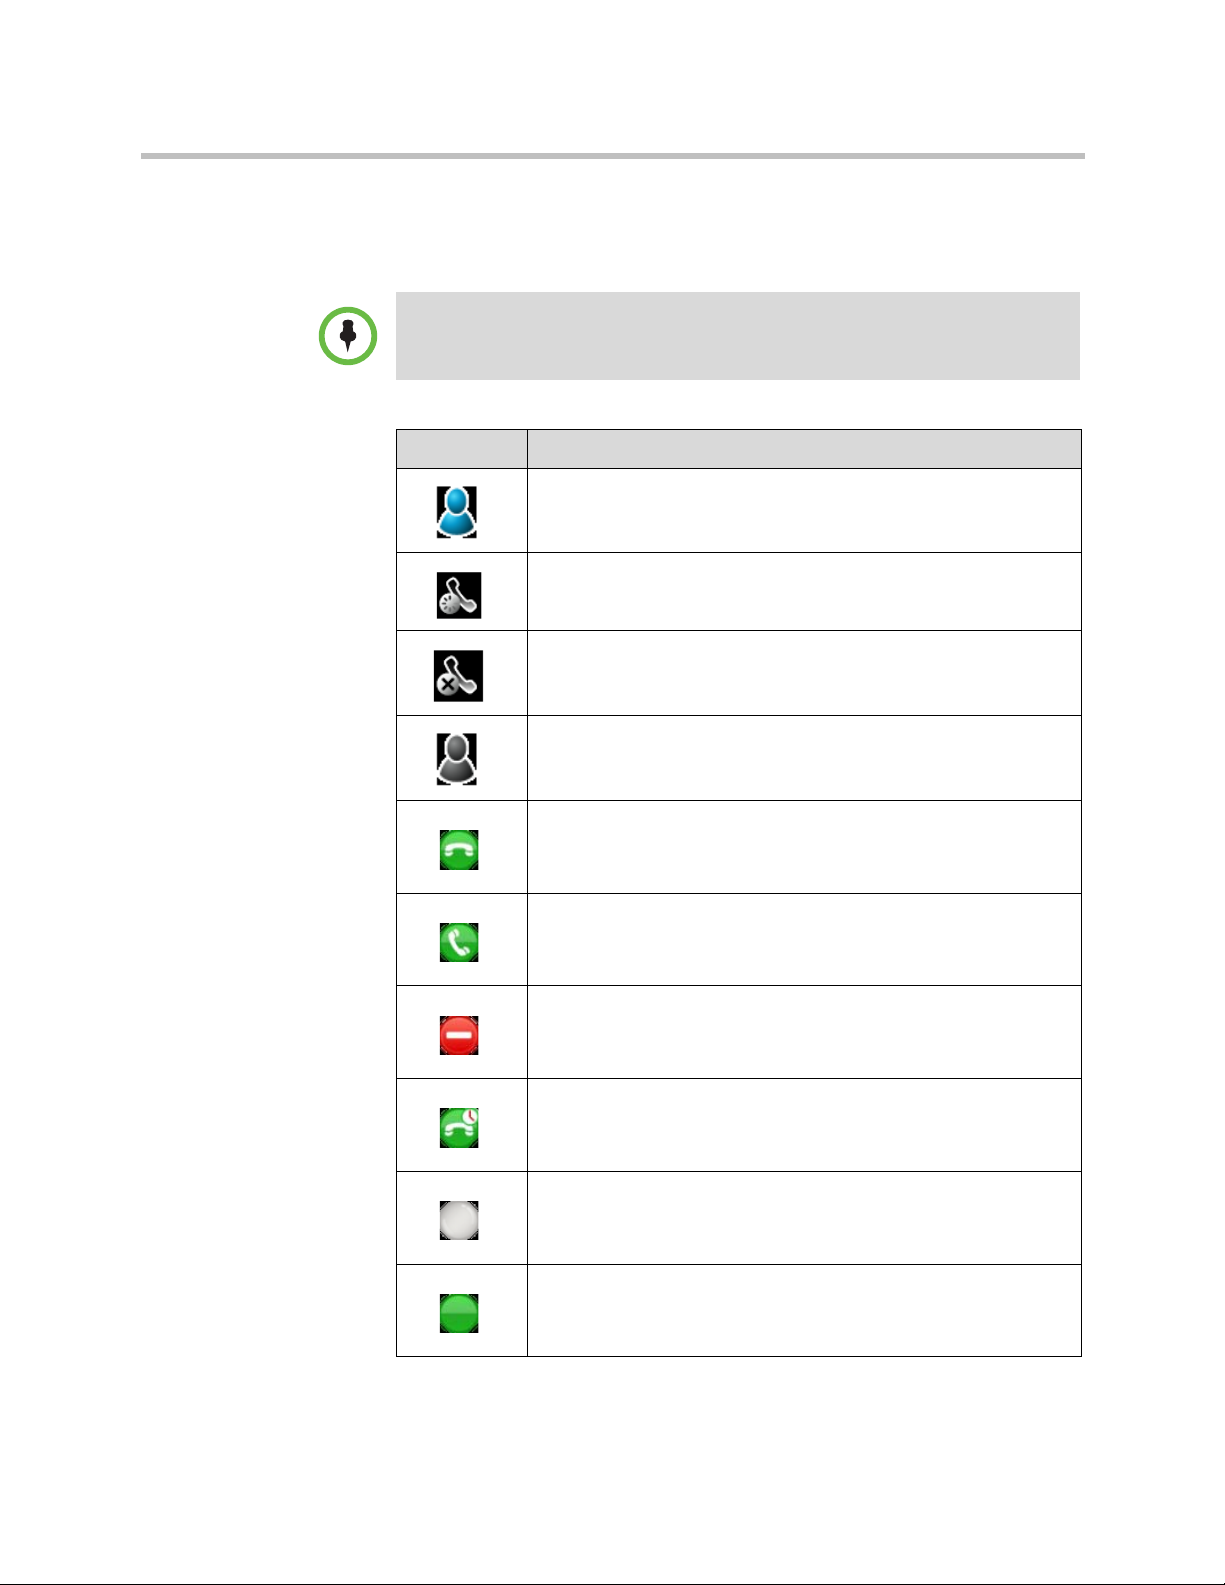
Icon Description
Buddy Status (Online)
Busy Lamp Field (BLF) indicator (line is idle)
Buddy Status (Busy, Do Not Disturb)
Buddy Status (Be Right Back, Away, Out to Lunch)
Buddy Status (Offline)
Busy Lamp Field (BLF) indicator (line is busy)
Buddy Status when provisioned by a Polycom Converged
Management Application™ (CMA™) system
(Available for a call)
Buddy Status when provisioned by a Polycom CMA system
(On the phone, but available for a call)
Buddy Status when provisioned by a Polycom CMA system
(In a call or not accepting calls)
Buddy Status when provisioned by a Polycom CMA system
(Available for a call, but currently idle or away)
Buddy Status when provisioned by a Polycom CMA system
(Not available for a call)
Buddy Status when provisioned by a Polycom CMA system
(Invited to join your Buddy Status list. No status information is yet
available.)
Polycom, Inc. 9
Page 16

User Guide for the Polycom VVX 1500 Business Media Phone What Displays on the Touch Screen?
Icon Description
Call (audio-only)
Call with Polycom HD Voice
Call (video)
Call (video) with Polycom HD Voice
Call on hold (private line)
Call on hold (shared line)
Call without Polycom HD Voice (private line)
Call (shared line)
Conference call
Do Not Disturb enabled
Forward (Always)
Headset attached
Line (registered, private)
Line (registered, shared)
10 Polycom, Inc.
Page 17

What Displays on the Touch Screen? Getting Started with Your Phone
Icon Description
Line (unregistered)
Login credentials locked
Message waiting indicators
Missed calls indicator
Mute applied
Speed Dial Key
USB device attached and idle
USB device attached and playing back
USB device attached and recording
USB device attached and recording paused
Video stopped
Video stopped and audio muted
Polycom, Inc. 11
Page 18

User Guide for the Polycom VVX 1500 Business Media Phone Navigating Menus, Lists, and Fields
Navigating Menus, Lists, and Fields
To navigate menus, lists, and fields, you can:
• Tap the soft keys on the touch screen
• Tap the menu items, fields, and arrows on the touch screen
• Press the area of the touch screen where a list displays, and then drag your
finger up or down
• Press the keys on the phone console
To operate your phone, follow these tips:
After 40 seconds of inactivity, the menu system automatically exits to the idle
screen unless an edit session is in progress.
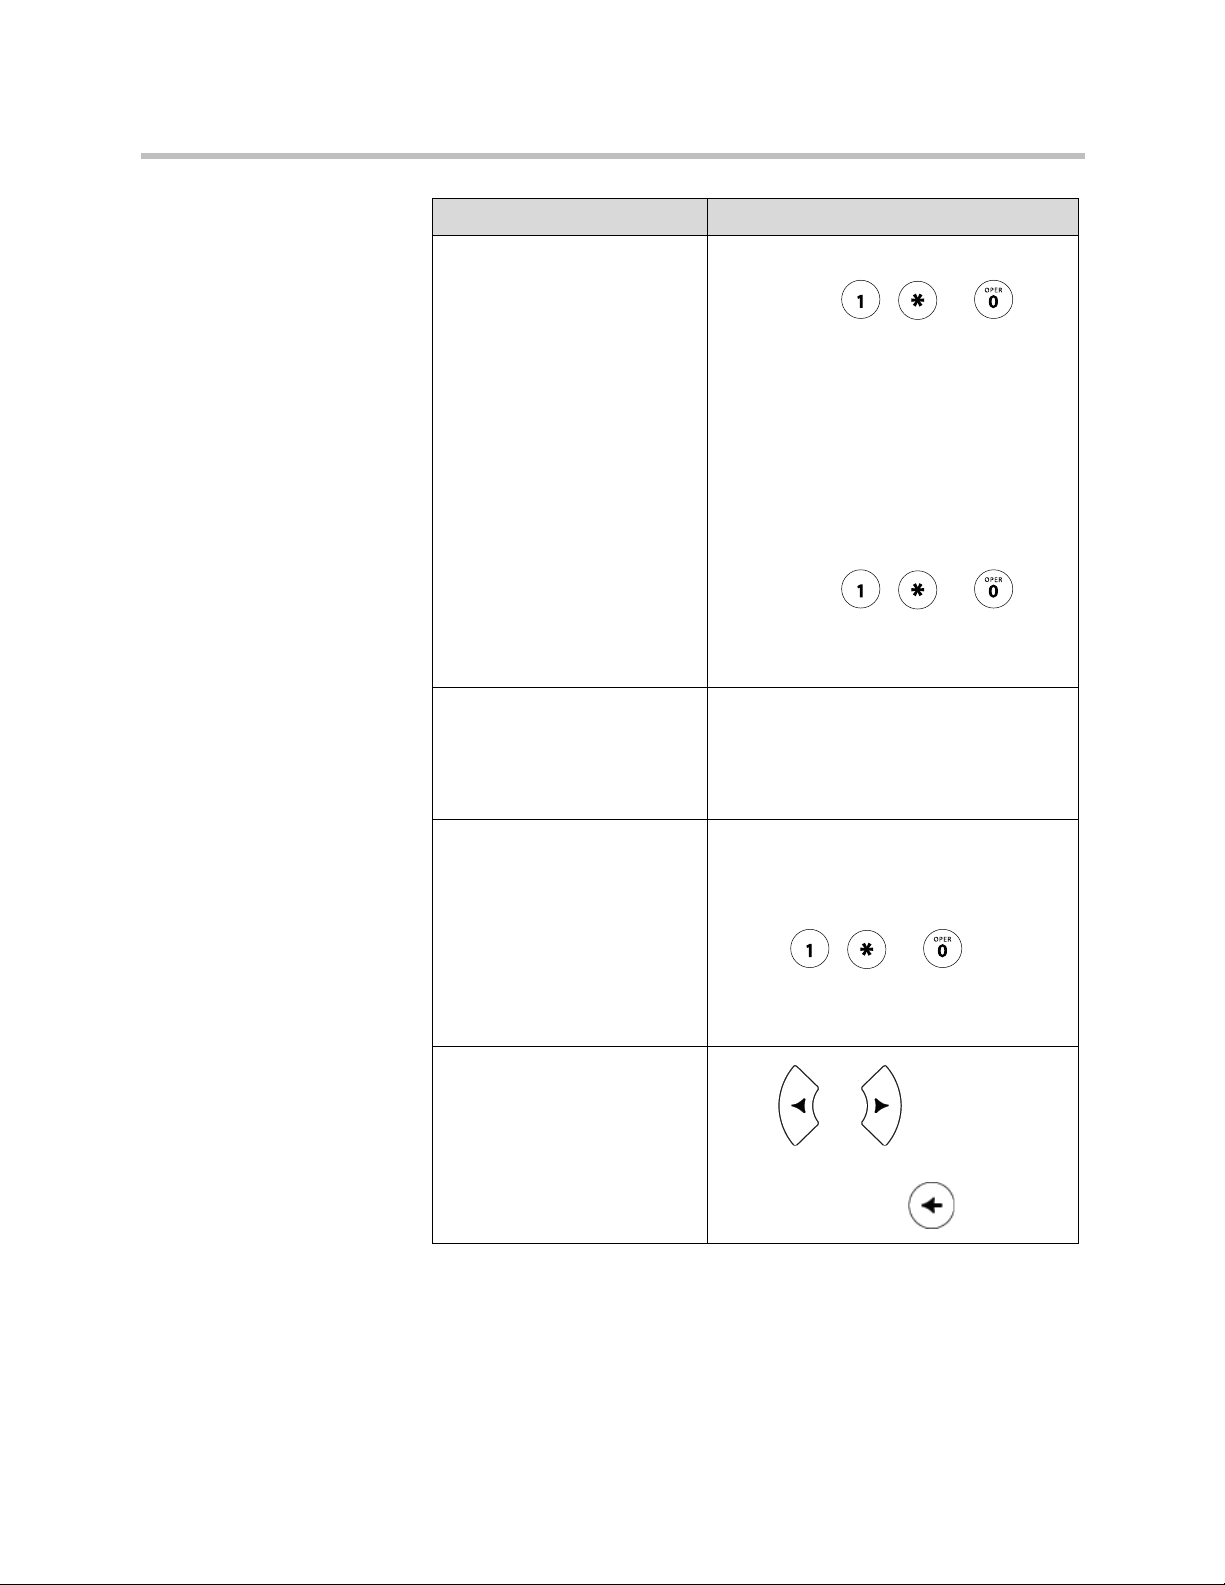
If you want to ... Then do this ...
Enter the Main Menu
Tap or press .
Return to the idle screen
Tap or press .
Return to the previous menu
Tap the Back soft key or press .
12 Polycom, Inc.
Page 19

Navigating Menus, Lists, and Fields Getting Started with Your Phone
If you want to ... Then do this ...
Scroll through items Do one of the following:
• Press the area of the touch screen where the
list displays, and then drag your finger up (to
move down the list) or down (to move up the
list).
• Press the area of the touch screen above the
blue scrolling indicator bar, and then drag your
finger up (to move up the list). Or, press the
area of the touch screen below the blue
scrolling indicator bar, and then drag your
finger down (to move down the list).
(The location of the scrolling indicator bar is
shown in the figure below.)
• Tap (to scroll one-by-one) or press (to scroll
continuously) or .
(If you’re in Corporate Directory, you can also tap
Scroll through items
page-by-page
Go to the top or bottom of a
list
or press or .)
As you scroll, a scrolling indicator bar to the right of
the list shows your position in the list:
Press (to Page Up) or (to Page
Down).
(If you’re in Corporate Directory, you can also tap
or press or .)
Press the area of the touch screen above or below
the scrolling indicator bar.
Highlight items Scroll to the item by tapping (to scroll one-by-one)
or pressing (to scroll continuously)
or .
Polycom, Inc. 13
Page 20

User Guide for the Polycom VVX 1500 Business Media Phone Entering Data and Editing Fields
If you want to ... Then do this ...
Scroll through values for a
field
Select a value for a field From the drop-down list, tap the value.
Select an item Do one of the following:
Select a soft key Tap the soft key.
View additional soft keys Tap the More soft key.
Enable or disable fields Do one of the following:
Tap the field’s highlighted grey box. From the
drop-down list, tap (to scroll one -b y -o ne ) or press
(to scroll continuously) one of the scroll arrows.
• Tap the item.
• Scroll to the item using or
(so the item is highlighted), and
then tap the item, tap the Select soft key, or
press .
• Press the dialpad key that corresponds to the
item in the numbered list.
For example, if an item has a number next to
it, press the corresponding number on the
dialpad.
• Tap the field name, and then tap the field’s
highlighted box. From the drop-down list, tap
Enabled or Disabled.
• Scroll to the field using or
, and then press or to
toggle between Enabled or Disabled.
Entering Data and Editing Fields
You can enter data and edit fields in these two ways:
• Using a “keyboard” that displays on the touch screen.
• Using the dialpad keys on the phone console.
14 Polycom, Inc.
Page 21

Entering Data and Editing Fields Getting Started with Your Phone
Using the Touch Screen Keyboard
You can use the touch screen keyboard to quickly update field information.
To use the touch screen keyboard to update data:
1 To update a field, tap the field.
The keyboard icon, , displays next to the screen title.
The following figure shows the keyboard icon next to the screen title.
2 Tap .
The keyboard displays on the touch screen.
Polycom, Inc. 15
Page 22

User Guide for the Polycom VVX 1500 Business Media Phone Entering Data and Editing Fields
The following figure shows the keyboard that displays on the touch screen
when you update a directory entry.
3 Enter the information. Do the following:
If you want to ... Then do this ...
Enter uppercase (A) characters,
lowercase (a) characters, or a
combination of uppercase and
lowercase characters
1 If a keyboard with characters
2 Tap the abc, ABC, 123, or Abc
3 Using the keyboard on the touch
does not display, tap
(on the keyboard).
soft keys to toggle between
lowercase, uppercase, numeric,
and titlecase modes.
You can also tap or
to toggle between
entering characters in uppercase
mode or lowercase mode.
screen, tap the letter(s) you want.
16 Polycom, Inc.
Page 23

Entering Data and Editing Fields Getting Started with Your Phone
If you want to ... Then do this ...
Enter numbers 1 If a keyboard with numbers does
not display, tap .
2 Using the keyboard on the touch
screen, tap the number(s) you
want.
You can also tap the abc, ABC, 123,
or Abc soft keys to toggle between
lowercase, uppercase, numeric, and
titlecase modes.
Enter special characters 1 If a keyboard with special
characters does not display, tap
.
2 Using the keyboard on the touch
screen, tap the special
character(s) you want.
Enter text in a particular character
encoding
Enter a URL 1 Tap the URL soft key.
Delete data you entered
Delete an entire field of data Double-tap the field of data, so that
1 Tap the Latin, Katakana,
Unicode, Cyrillic or ASCII
soft key to select the encoding
you want. The touch screen’s
keyboard changes to display the
encoding you chose.
2 Using the keyboard on the touch
screen, tap the character(s) you
want.
2 Using the keyboard on the touch
screen, tap the character(s) you
want. To access numbers and
more special characters, tap
.
Tap .
the data is highlighted. Then, tap
.
4 To confirm the updates, tap .
Polycom, Inc. 17
Page 24

User Guide for the Polycom VVX 1500 Business Media Phone Entering Data and Editing Fields
Using the Dialpad Keys on the Phone Console
You can use the keys on your phone console to update field information.
To use the dialpad keys to enter or edit data:
1 Tap a field to select it.
2 Enter the information. Do the following:
If you want to ... Then do this ...
Enter only numbers (1),
uppercase (A) characters,
lowercase (a) characters, or
titlecase (Abc) characters
Do one of the following:
• Press a dialpad key one or more times
to enter the characters (in either
lowercase or uppercase mode) or
number that display on the dialpad key.
or
1 Tap the abc
to toggle between and select
uppercase (ABC soft key), numeric
(123 soft key), titlecase (Abc soft key),
and lowercase (abc soft key) modes.
The mode you select displays in the
screen title.
2 Press a dialpad key one or more times
to enter the characters or number that
display on the key.
For example:
If you’re in ABC mode:
— To enter “A,” press once.
— T o enter “B,” press two times
— To enter “C,” press three
soft key one or more times
quickly.
times quickly.
— T o enter “2,” press four times
quickly.
If you’re in 123 mode:
— To enter “2,” press .
18 Polycom, Inc.
Page 25
Entering Data and Editing Fields Getting Started with Your Phone
If you want to ... Then do this ...
Enter special characters Do one of the following:
• Press the , , or key
on the dialpad one or more times.
(Each key provides a different set of
special characters.)
or
1 Tap the ABC, Abc, or 123 soft key so
that you’re in either ABC, Abc, or abc
mode. (You can’t access special
characters when you’re in 123 mode.)
The mode you select displays in the
screen title.
2 Press the , , or key
on the dialpad one or more times
quickly. (Each key provides a different
set of special characters.)
Enter text in a a particular
character encoding
Enter a URL 1 Tap the URL soft key.
Delete text you entered
1 Tap the Latin, Katakana, Unicode,
Cyrillic, or ASCII soft key to select the
encoding you want.
2 Press a dialpad key one or more times
to enter the character you want.
2 Press a dialpad key one or more times
to enter the number or character you
want. T o enter special characters, press
the , , or key on the
dialpad one or more times quickly.
(Each key provides a different set of
special characters.)
Press or to position the
cursor to the right of the text you want to
delete, and then press .
3 Tap the Save soft key.
Polycom, Inc. 19
Page 26

User Guide for the Polycom VVX 1500 Business Media Phone Tips for When You’re in Video Calls
Tips for When You’re in Video Calls
Use these tips when you’re in a video call or conference:
• Check the near-site video to make sure it’s clear, bright, and sharp. For
information on adjusting camera settings, see “Changing the Clarity of
Near-Site Video” on page 141.
• Use the handset or a headset if you’re in an open environment.
• Be aware of latency when speaking.
• Avoid bright lights or windows behind you (backlight). If the camera faces
a window or bright lights, you may have to adjust the camera settings. To
adjust camera settings, see “Changing the Clarity of Near-Site Video” on
page 141.
• Avoid wearing bright colors, all-light or all-dark clothing, or “busy”
patterns (such as small checks or narrow stripes). Light pastels and muted
colors look the best on the screen.
• In a conference call, mute your microphone when you’re not speaking,
especially in noisy environments.
• Avoid tapping the microphone or rustling papers near the microphone.
• Make sure that you can see and hear the far-site participants.
• Speak in your normal voice without shouting.
• Use natural gestures when you speak.
For the top ten do’s and don’ts for when you’re in a conference call, see
Polycom Conference Call Etiquette, available from
http://www.polycom.com/global/documents/products/voice/conferencin
g_solutions/conference-call-etiquette.pdf.
Cleaning the Touch Screen
Periodically, you may need to clean the touch screen. Fingerprints tend to
show up more on a color display.
Before you clean the touch screen, disable the screen so you don’t activate
phone features while you wipe the glass. While the touch screen is disabled,
all soft keys are disabled. You can enable the touch screen again by pressing
any key on the phone console.
To answer a call while the touch screen is disabled, pick up the handset. Or, to
use the speakerphone, press , and then tap the Answer soft key.
20 Polycom, Inc.
Page 27

Registering the Phone Getting Started with Your Phone
To clean the touch screen:
1 Tap > Settings > Basic > Screen Clean.
The touch screen is disabled. The message “Touch screen is disabled. Press
any key to exit” displays.
2 Wipe the glass with a clean, lint-free cloth.
3 To enable the touch screen again, press any key on the phone console.
Registering the Phone
Generally, your phone will be deployed with multiple other phones. In this
case, your system administrator will configure the phone parameters
beforehand, so that after you set up your phone, the phone will be registered
and ready to use.
If your phone is not part of a large phone deployment, your phone may not be
registered after you set it up. Before you use your phone, you or your system
administrator will have to register it.
For detailed information on how to register your phone after you install it, see
Quick Tip 44011, Registering Standalone Polycom SoundPoint IP/SoundStation IP
and Polycom VVX 1500 Phones, available at
http://www.polycom.com/support/voice/soundpoint_ip/VoIP_Technical
_Bulletins_pub.html
Polycom, Inc. 21
Page 28

User Guide for the Polycom VVX 1500 Business Media Phone Registering the Phone
22 Polycom, Inc.
Page 29

Using the Basic Features of Your Phone
This chapter shows you how to use the basic features of your
Polycom VVX 1500 business media phone. The topics include:
• “Calling and Answering” on page 24
2
• “While Your Phone Rings” on page 41
• “During Calls” on page 42
• “Changing the Way Calls are Answered” on page 55
• “Working with Call Lists” on page 62
• “Working with Contact Directory” on page 65
• “Working with Corporate Directory” on page 70
• “Controlling What is Heard” on page 73
• “Managing Speed Dials” on page 76
• “Accessing Voice and Video Mail” on page 78
• “Working with Multiple and Shared Lines” on page 79
• “Locking and Unlocking the Phone” on page 81
Polycom, Inc. 23
Page 30
User Guide for the Polycom VVX 1500 Business Media Phone Calling and Answering
Calling and Answering
Your phone can exchange video with a video endpoint other than a Polycom VVX
1500 business media phone. For a list of compatible endpoints, see your
Note
system administrator.
At any time, only one active call can be in progress on your phone. The active
call is the one that has audio or video associated with it. There may be multiple
other calls on hold, or in an “Incoming call” or “Ringing” state.
Your phone can handle a maximum of 24 concurrent calls. At most, your
phone can handle one active call with 23 calls on hold, or 24 calls on hold.
Your phone displays all active incoming and outgoing calls in a large window
in the center of the touch screen. Inactive calls (calls on hold, or incoming calls
that you don’t immediately answer) for a particular Line Key display in a row
above the soft keys (the “inactive call group”).
The following figure shows one active call and two calls on hold for Line Key
2076.
Your phone distributes incoming calls for lines that have multiple Line Keys
evenly across all Line Keys.
The touch screen only displays calls for one Line Key at one time. The calls that
currently display on the touch screen are associated with the Line Key that is
green.
24 Polycom, Inc.
Page 31

Calling and Answering Using the Basic Features of Your Phone
To display and access the calls on another Line Key, tap that Line Key. When
you tap a Line Key, the first call on hold in the inactive call group for that
Line Key will automatically resume.
The number of calls associated with a Line Key is indicated by a counter (for
example, ), on the Line Key.
A Line Key will either be green or blue:
• Green—Indicates that the Line Key has an active call or an incoming call.
A green Line Key is associated with the calls that currently display on the
touch screen (active or inactive).
• Blue—Indicates that the Line Key doesn’t have an active call, or has an
incoming call that has been minimized and placed in the inactive call
group. The calls associated with a blue Line Key don’t currently display
on the touch screen.
Line Keys also have a status indicator (a vertical bar on the far-right of the
Line Key), . The status indicator can be:
Answering Calls
Note
• Solid green—A dial tone is available, dialing is in progress, or a call is
active.
• Flashing green—An incoming call.
• Solid red—A remote shared line is active.
• Flashing red—A call (one or more) is on hold.
This section explains the following:
• “Answering Calls” on page 25
• “Placing Calls” on page 30
• “Ending Calls” on page 39
• “Using a Headset” on page 39
If your phone is locked, see “Locking and Unlocking Your Phone” on page83 for
information on answering calls when your phone is locked.
By default, all incoming calls display in a window in the center of the
touch screen. The Line Key associated with the call glows green, and the
Line Key status indicator flashes green. After 10 seconds, the incoming call
window is minimized and placed at the bottom of the touch screen, above the
soft keys.
Polycom, Inc. 25
Page 32

User Guide for the Polycom VVX 1500 Business Media Phone Calling and Answering
In addition to the usual incoming call indicators (the incoming call window, green
Line Key, and flashing green status indicator), your system administrator can
enable your touch screen to flash bright orange when you have an incomin g call.
The touch screen will continue to flash until the incoming call window is minimized.
This section explains the following:
• “Answering When Not in Another Call” on page 26
• “Answering When in Another Call” on page 27
• “Answering on a Shared Line” on page 28
• “Answering Calls Automatically” on page 29
Answering When Not in Another Call
When you’re not in another call, you can answer a call in three ways:
• Using the handset
• Using the speakerphone
• Using the headset
In all cases, the active call displays on the touch screen, together with the call
duration and who the call is from.
The following figure shows an active video call.
26 Polycom, Inc.
Page 33

Calling and Answering Using the Basic Features of Your Phone
To answer a call using the handset:
>> Pick up the handset.
To answer a call using the speakerphone:
If your speakerphone doesn’t work, your system administrator may have disabled
the speakerphone on your phone. Handle calls using a handset or headset instead.
Note
If your system administrator disables the speakerphone on your phone, “Handsfree
mode disabled” appears on the touch screen after you press .
>> With the handset on-hook, do one of the following:
— Tap the incoming call window that displays in the middle of the touch
screen.
(After 10 seconds, the incoming call window is minimized and placed
in the inactive call group at the bottom of the touch screen, and you
have to tap the Answer soft key to answer it.)
— Tap the Answer soft key.
— Tap the green Line Key with the status indicator that is flashing green.
— Press .
To answer a call using the headset:
>> Do one of the following:
— Press .
or
— If Headset Memory Mode is activated, tap the Line Key with the status
indicator that is flashing green, or tap the Answer soft key.
Answering When in Another Call
If you have an active call and an incoming call arrives (on the same or a
different Line Key), the following happens:
• A call waiting tone beeps.
A “beep” is the default call waiting tone. Your system administrator can change the
tone to another sound, or make it silent.
Note
Polycom, Inc. 27
Page 34

User Guide for the Polycom VVX 1500 Business Media Phone Calling and Answering
• The status indicator on the Line Key associated with the incoming call
flashes green.
• The call counter for the Line Key associated with the incoming call
increments by one (showing the number of calls associated with the
Line Key, including the incoming call).
• Caller information for the incoming call displays in a window in the center
of the touch screen, and the Line Key associated with the incoming call
glows green. After ten seconds, the window is minimized and placed in
the inactive call group, and the Line Key associated with the call glows
blue (if there is an active call on another Line Key).
To answer an incoming call when you’re in another call:
>> Tap the Line Key with the status indicator that is flashing green, or tap the
Answer soft key. The original call is automatically placed on hold, and the
incoming call becomes the active call.
If you wait more than ten seconds, the incoming call window is minimized and
placed in the inactive call group (along the bottom of the touch screen), and the
Note
active call reappears in the window in the center of the touch screen. T o answer the
incoming call, tap the Line Key with the status indicator that is flashing green, or tap
the Hold soft key to place the active call on hold, and then tap the Answer soft key.
Note
Answering on a Shared Line
To answer an incoming call on a shared line:
>> Tap the Line Key with the status indicator that is flashing green, or tap the
Answer soft key.
After ten seconds, the incoming call window is minimized and placed in the inactive
call group (along the bottom of the touch screen). To answer the incoming call, tap
the Line Key with the status indicator that is flashing green, or tap the Hold soft key
to place an active call on hold, and then tap the Answer soft key.
If you place the call on hold, anyone on another phone configured to use the
same shared line can take the call by tapping the Line Key associated with the
held call (represented by a flashing red status indicator).
For more information about shared lines, including what you can and cannot
do with shared lines, see “Supporting Shared Lines” on page 81.
28 Polycom, Inc.
Page 35

Calling and Answering Using the Basic Features of Your Phone
Answering Calls Automatically
You can enable the phone to automatically answer a call, so you don’t have to
tap a soft key, Line Key, or other key to answer the call. If you enable this
feature, the call automatically directs to your speakerphone after a certain
number of rings. Your system administrator sets how many times your phone
rings before the call is auto-answered.
You can choose to mute the phone’s microphone (so the caller cannot hear
you), as well as mute video (so the caller cannot see you), when your phone
automatically answers calls. To unmute the call, press . To
transmit video, see “Customizing Video During Calls” on page 53.
If you enable auto answer and an incoming calls arrives (indicated by a
flashing green status indicator on the Line Key) while you’re already in a call,
the incoming call will be automatically answered if you end the current call or
place it on hold.
To enable your phone to automatically answer calls:
1 Tap > Settings > Basic > Preferences > Auto Answer.
2 From the auto Answer screen, do the following:
— To enable your phone to automatically answer SIP calls, tap
Auto Answer SIP Calls, and then tap the field’s highlighted grey box.
From the drop-down list, tap Yes. (The default setting is No.)
— To enable your phone to automatically answer all H.323 calls, tap
Auto Answer H.323 Calls, and then tap the field’s highlighted grey
box. From the drop-down list, tap Yes. (The default setting is No.)
(This field only displays if your phone supports the H.323 protocol.
For more information, see “Calling Using the H.323 Protocol” on
page 37.)
— To mute the microphone for all auto-answered calls (so that the
incoming caller cannot hear you), tap Microphone Mute, and then tap
the field’s highlighted grey box. From the drop-down list, tap Yes.
(The default setting is Yes.)
— To mute the video when video calls are auto-answered (so that the
incoming caller cannot see you), tap Video Mute, and then tap the
field’s highlighted grey box. From the drop-down list, tap Yes. (The
default setting is No.)
3 Tap the Save soft key.
4 Tap to return to the idle screen.
Polycom, Inc. 29
Page 36

User Guide for the Polycom VVX 1500 Business Media Phone Calling and Answering
Placing Calls
• If your phone is locked, see “Locking and Unlocking Your Phone” on page 83 for
information on placing calls when your phone is locked.
Note
• Your phone may be set up to handle both SIP and H.323 calls. For more
information, see “Calling Using the H.323 Protocol” on page 37.
You can place a call in various ways using your phone:
• Using the handset
• Using the speakerphone
• Using the headset
You can dial the number first, and then choose the method to speak to the
other party (handset, speakerphone, or headset), or choose the method first,
and then dial the number. You can also place a call by entering a URL or
IP address, by dialing from a list or directory, or using the Speed Dial Key or
Redial key.
During a call, you can alternate between handset, headset, or speakerphone
modes by picking up the handset, or pressing or . For
example, if you’re using the handset, you can switch to headset mode by
pressing , or switch to speakerphone mode by pressing .
Your phone monitors the duration of all calls through a local call timer. You
can view the call timer for the active call and for calls on hold.
30 Polycom, Inc.
Page 37

Calling and Answering Using the Basic Features of Your Phone
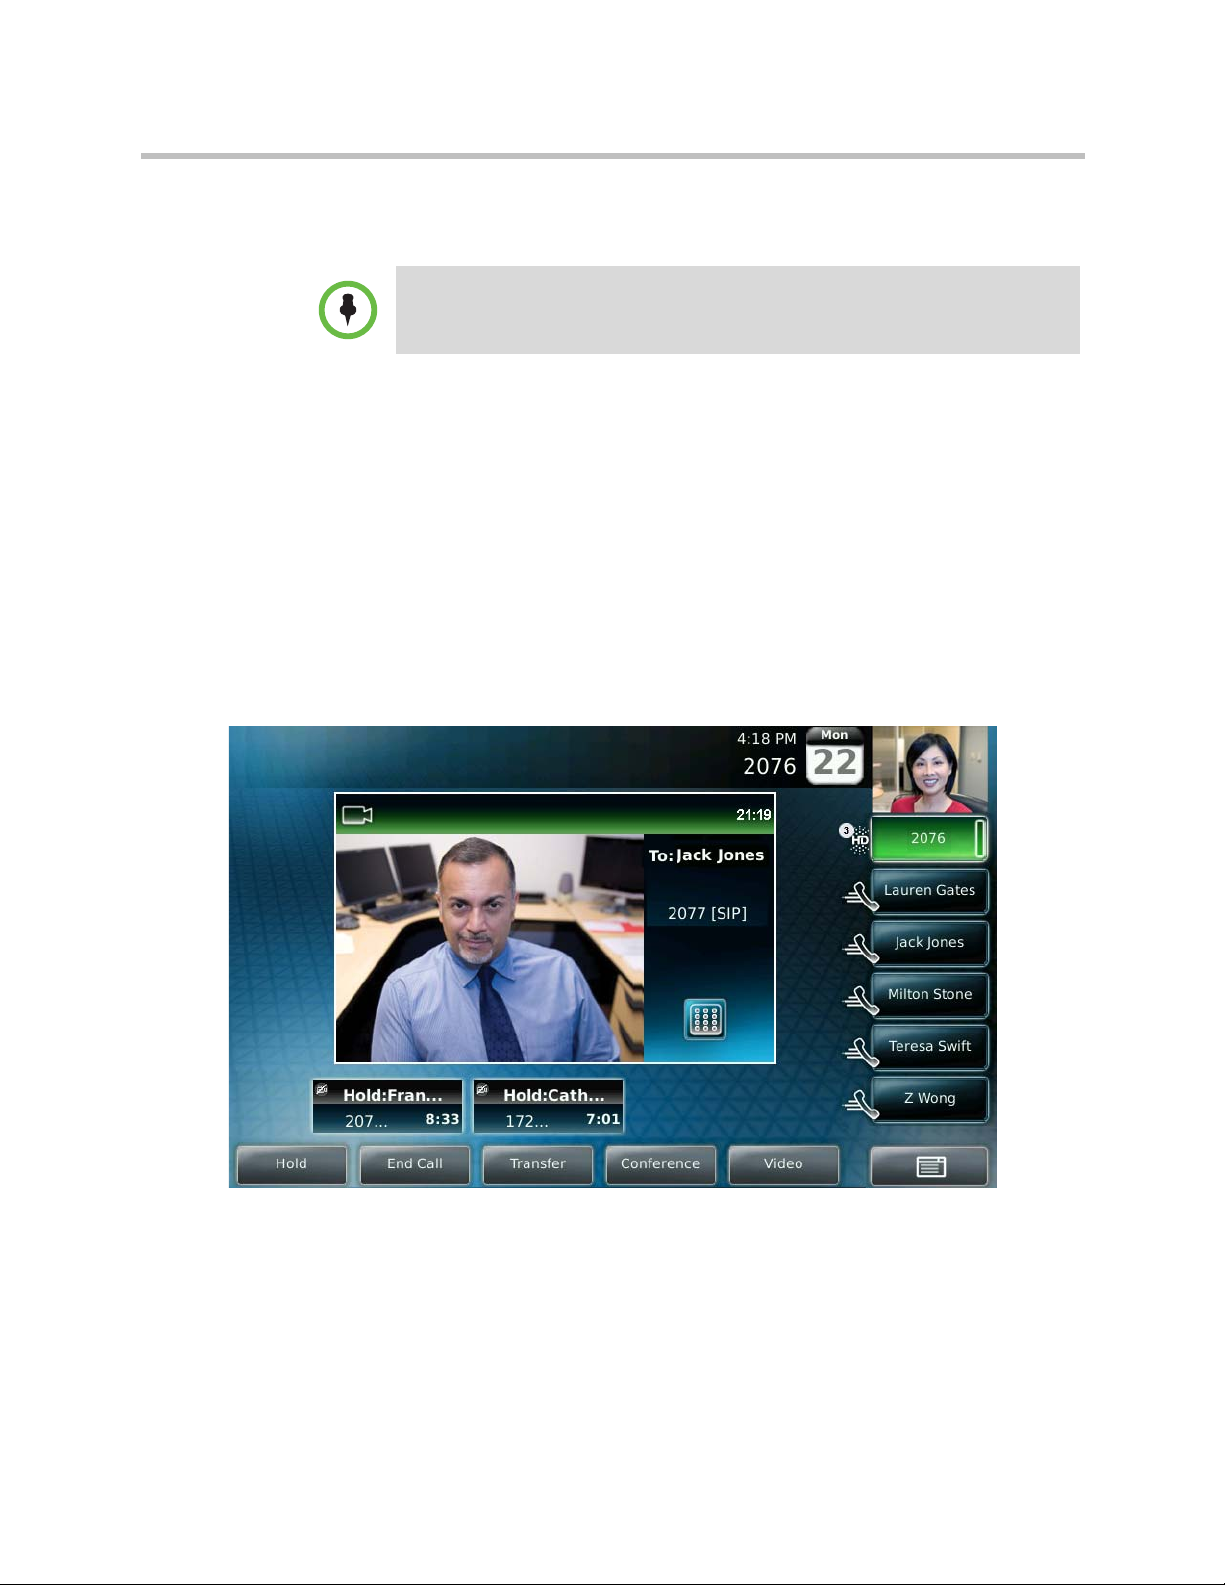
In the following figure, the active call to Jack Jones has lasted for 21 minutes,
19 seconds. The calls to Francois and Catherine have lasted for 8 minutes,
33 seconds and 7 minutes, 1 second respectively.
This section explains the following:
• “Calling by Dialing Numbers, URLs, or IP Addresses” on page 31.
• “Calling from Lists, Directories, and Keys” on page 34.
• “Calling Using the H.323 Protocol” on page 37
Calling by Dialing Numbers, URLs, or IP Addresses
You can dial numbers, URLs, or IP addresses using your handset,
speakerphone, or headset.
Calling Using the Handset
You can use the handset to dial a number, URL, or IP address.
Polycom, Inc. 31
Page 38

User Guide for the Polycom VVX 1500 Business Media Phone Calling and Answering
To dial a number using the handset:
>> Do one of the following:
— Pick up the handset, and then enter the phone number.
Your system administrator sets up your phone to automatically place the call after
you enter a certain number of digits. If your phone does not automatically place the
Note
call after you enter a phone number, tap the Send soft key.
If the call is placed before you enter all the digits, you have to place the call as
follows: enter the phone number, tap the Dial soft key, and then pick up the
handset.
or
— Enter the phone number, tap the Dial soft key, and then pick up the
handset.
To dial a URL or IP address using the handset:
Note
1 Pick up the handset.
2 Tap the URL soft key.
3 Enter the URL or IP address. (See “Entering Data and Editing Fields” on
page 14.)
4 Tap the Send soft key.
Calling Using the Speakerphone
You can use the speakerphone to dial a number, URL, or IP address.
If your speakerphone does not work, your system administrator may have disabled
the speakerphone on your phone. You must handle calls using the handset or a
headset.
If your system administrator disables the speakerphone on your phone, “Handsfree
mode disabled” appears on the touch screen after you press .
32 Polycom, Inc.
Page 39

Calling and Answering Using the Basic Features of Your Phone
To dial a number using the speakerphone:
>> With the handset on-hook, do one of the following:
— Tap the New Call soft key or the Line Key, or press to obtain
a dial tone. Then, enter the phone number.
Your system administrator sets up your phone to automatically place the call after
you enter a certain number of digits. If your phone does not automatically place the
Note
call after you enter a phone number, tap the Send soft key.
If the call is placed before you enter all the digits, you have to place the call as
follows: enter the phone number, and then tap the Dial soft key, the LIne Key, or
press
.
or
— Enter the phone number, and then tap the Dial soft key, the Line Key,
or press .
To dial a URL or IP address using the speakerphone:
1 Tap the New Call soft key or the Line Key, or press .
2 Tap the URL soft key.
3 Enter the URL or IP address. (See “Entering Data and Editing Fields” on
page 14.)
4 Tap the Send soft key.
Calling Using a Headset
You can use the headset to dial a number, URL, or IP address.
If you frequently use a headset and want to make it the default call path, see
“Enabling Headset Memory Mode” on page 39.
Note
Polycom, Inc. 33
Page 40

User Guide for the Polycom VVX 1500 Business Media Phone Calling and Answering
To dial a number using the headset:
>> With the optional headset connected, do one of the following:
— Tap the New Call soft key or the Line Key to obtain a dial tone. Then,
press , and then enter the phone number.
Your system administrator sets up your phone to automatically place the call after
you enter a certain number of digits. If your phone does not automatically place the
Note
call after you enter a phone number, tap the Send soft key.
If the call is placed before you enter all the digits, you have to place the call as
follows: enter the phone number, tap the Dial soft key, and then press
.
or
— Enter the phone number, tap the Dial soft key, and then press
.
To dial a URL or IP address using the headset:
1 Tap the New Call soft key or the Line Key to obtain a dial tone.
2 Press .
3 Tap the URL soft key.
4 Enter the URL or IP address. (See “Entering Data and Editing Fields” on
page 14.)
5 Tap the Send soft key.
Calling from Lists, Directories, and Keys
You can place calls from a call list (missed, placed, or received), directory (local
Contact Directory or Corporate Directory), or from a Speed Dial Key or list
using your handset, speakerphone, or headset.
34 Polycom, Inc.
Page 41

Calling and Answering Using the Basic Features of Your Phone
Calling from Call Lists
You can place calls from your missed, placed, and received call lists.
To place a call from a call list:
1 Display a call list. (See “Viewing Call Lists” on page 63.)
2 From the Received Calls, Missed Calls, or Placed Calls screen, press
or to scroll to the person you want to call, and then
tap the Dial soft key, pick up the handset, or press .
Calling from Directories
You can place calls from your local Contact Directory or Corporate Directory.
To place a call from the local Contact Directory:
Note
1 Tap > Features > Contact Directory.
2 From the Directory screen, tap the contact you want to call. Or, search for
the contact (see “Searching Your Local Contact Directory” on page 65).
3 To place the call, tap the Dial soft key, pick up the handset, or press
.
To place a call from the Corporate Directory:
1 Tap > Features > Corporate Directory.
The Corporate Directory search screen displays.
If you have enabled your phone to save the results of your last search (or
remember the last contact you selected), your previous search results (or the
contact), will display instead of a blank search screen. To enable this feature, see
“Saving Corporate Directory Search Results” on page 72.
2 Search for the contact you want to call (see “Searching Corporate
Directory” on page 70).
3 Press or to scroll to the contact, and then tap the Dial
soft key, pick up the handset, or press .
Polycom, Inc. 35
Page 42

User Guide for the Polycom VVX 1500 Business Media Phone Calling and Answering
Calling by Speed Dialing
A contact may not have a speed dial number. T o find out what a contact’s speed dial
index number is, or to assign or update a speed dial index number, see
Note
“Updating Your Local Contact Directory” on page 69.
You can quickly “speed dial” a contact by doing one of the following:
• Tapping the contact’s Speed Dial Key.
Not all contacts have a Speed Dial Key. For information on
Speed Dial Keys, see “Managing Speed Dials” on page 76.
• Placing a call from the Speed Dial Information screen.
To place a call using speed dial:
>> Do one of the following:
— Tap the contact’s Speed Dial Key.
In the following figure, Speed Dial Keys are assigned to Lauren
Gates, Jack Jones, Milton Stone, Teresa Swift, and Z Wong.
or
36 Polycom, Inc.
Page 43

Calling and Answering Using the Basic Features of Your Phone
— From the idle screen, press . From the Speed Dial
Information screen, scroll to the contact. Then, tap the contact, pick up
the handset, or press .
(During a call, you cannot access the Speed Dial Information screen
by pressing .)
or
— If the contact has a speed dial index numbe r that i s equa l to or less t han
99, enter the speed dial index number from the idle screen, and then
press (on the phone console). From the Speed Dial Information
screen, tap the Dial soft key, pick up the handset, or press .
The call is placed.
Calling by Redialling
To redial a number, press . A call to your last placed call is attempted.
Calling Using the H.323 Protocol
Handling calls that use the H.323 protocol is an optional feature that your system
administrator enables. Your system may not support it or have an H.323 license.
For more information, contact your system administrator.
If your phone supports the H.323 protocol, be aware of the following limitations:
• You cannot forward or transfer H.323 calls.
• You cannot set up forwarding for lines that just use the H.323 protocol.
• You cannot set up shared lines for lines that use the H.323 protocol.
• Y ou cannot place a call by just entering an H.323 name. To place a call using an
H.323 name, use URL-dialing mode and enter the following format for the URL:
<H.323 name>@<server name>
For example: VVX101@100.100.100.100
Your system administrator can set up your phone so that it can handle calls
that use either the SIP or H.323 protocol, or both protocols. Your phone may
be set up so that a line can handle one or both protocols.
If your phone can handle calls using both protocols, you may be able to choose
the protocol to use before you tap the Dial or Send soft key, or before a call is
automatically placed. You may also be able to choose to allow your phone to
automatically select the protocol to use.
Polycom, Inc. 37
Page 44

User Guide for the Polycom VVX 1500 Business Media Phone Calling and Answering
If your phone is set up to handle both protocols, you may be able to choose a
protocol before you place a call using one of the following methods:
• Soft key method
Soft keys display to allow you to choose the protocol. Tap the Use SIP,
Use H.323, or Use Auto soft key one or more times to toggle between
Use SIP (to place a SIP call), Use H.323 (to place an H.323 call), or
Use Auto (to allow your phone to automatically select the protocol to use).
The protocol you select displays in the title bar. Your phone will use the
selected protocol for all subsequent calls, unless you select a different
protocol.
• Dialog box method
A dialog box displays to allow you to choose the protocol. Tap Use SIP (to
place a SIP call) or Use H.323 (to place an H.323 call).
For dual-protocol phones, the protocol displays next to all call IDs, including
the call IDs for conference call participants and calls on hold. The following
figure shows a SIP call placed to Jack Jones.
When you place calls from call lists or directories, your phone will
automatically choose the protocol to use based on the information in the call
list or directory. When you set up a contact in your Local Contact Directory,
you can specify the protocol the contact uses to handle calls. This allows your
phone to automatically use the correct protocol when you dial the contact.
38 Polycom, Inc.
Page 45

Calling and Answering Using the Basic Features of Your Phone
Ending Calls
To end a call:
>> Do one of the following:
— Tap the End Call soft key.
— If you’re in handset mode, replace the handset.
— If you’re in speakerphone mode, press .
— If you’re in headset mode, press .
Y our system administrator may have set up your phone so that you can end calls by
tapping the Line Key. If your phone is set up to do this, you can end an active call by
Note
tapping the Line Key associated with the call.
Using a Headset
If you use a headset, you can set up your phone so that all calls use your
headset. You can also use the hookswitch button on your headset to place,
answer, and end calls.
Enabling Headset Memory Mode
For a list of supported headsets, see Technical Bulletin 37477, SoundPoint IP and
Polycom VVX 1500 Headset Compatibility List, at
http://www.polycom.com/support/voice/soundpoint_ip/VoIP_Technical_Bulletins_pu
b.html.
This feature is useful for permanent or full-time headset users. You can set up
your phone so that all incoming and outgoing calls use your headset. At any
time, you can switch to handset or speakerphone mode.
To use Headset Memory Mode, you must enable, and then activate,
Headset Memory Mode. If you switch to handset or speakerphone mode, you
deactivate Headset Memory Mode. To switch back to Headset Memory Mode,
you must activate it again.
Polycom, Inc. 39
Page 46

User Guide for the Polycom VVX 1500 Business Media Phone Calling and Answering
To enable Headset Memory Mode:
1 Tap > Settings > Basic > Preferences > Headset >
Headset Memory.
2 From the Headset Memory Mode screen, tap Enabled, and then tap the
Select soft key.
3 To activate Headset Memory Mode, press twice.
All calls will now go to your headset. If you tap the Line Key with the flashing
green status indicator or the Answer soft key to receive a call, the call will
connect to your headset automatically.
If you switch to the speakerphone or the handset, you deactivate
Headset Memory Mode (calls no longer automatically go to your headset,
unless you choose this mode). To have calls go to your headset again, activate
Headset Memory Mode by pressing twice.
Using Electronic Hookswitch
For information on supported headsets to provide electronic hookswitch features to
place, answer, and end calls, see Technical Bulletin 37477,
SoundPoint IP and Polycom VVX 1500 Headset Compatibility List, at
http://www.polycom.com/support/voice/soundpoint_ip/VoIP_Technical_Bulletins_pu
b.html.
If you use a headset that supports electronic hookswitch, you can place,
answer, and end calls by pressing the hookswitch button on your headset.
For detailed information about how to use electronic hookswitch, see
Technical Bulletin 35150, Using an Electronic Hookswitch with SoundPoint IP and
Polycom VVX 1500 Phones, at
http://www.polycom.com/support/voice/soundpoint_ip/VoIP_Technical
_Bulletins_pub.html.
40 Polycom, Inc.
Page 47

While Your Phone Rings Using the Basic Features of Your Phone
While Your Phone Rings
While your phone rings, you can do the following:
• Temporarily ignore the call before answering it. See “Ignoring or Silencing
Incoming Calls” on page 41.
• Terminate the call so you can’t answer it. See “Rejecting Incoming Calls”
on page 41.
• Forward the call to another party. See “Forwarding Calls While Your
Phone Rings” on page 42.
Ignoring or Silencing Incoming Calls
Ignore or silence a call to do the following:
• Minimize the incoming call window so it doesn’t display in the large
window in the center of the touch screen.
• Stop your phone from ringing.
When you ignore or silence a call, you stop your phone from ringing, but you
can still answer the call (the call’s visual notification will still display).
To ignore or silence a call:
>> While your phone rings, tap the Ignore soft key (for private lines) or the
The incoming call window is minimized and your phone stops ringing.
To answer an ignored or silenced call, tap the Answer soft key, or tap the
Line key with the flashing green status indicator.
To end an ignored call, tap the Reject soft key.
Rejecting Incoming Calls
Reject a call to stop your phone from ringing and end the call so you can’t
answer it. Calls you reject display in your Received Calls list. Rejecting calls is
not available for shared lines.
To reject a call:
>> While your phone rings, tap the Reject soft key.
Silence soft key (for shared lines).
The call ends.
Polycom, Inc. 41
Page 48

User Guide for the Polycom VVX 1500 Business Media Phone During Calls
Forwarding Calls While Your Phone Rings
Your company’s settings may override this feature. For more information, contact
your system administrator.
Call forwarding is not available on shared lines.
You cannot forward calls from endpoints that use the H.323 protocol. In addition,
you cannot set up forwarding for lines that only use the H.323 protocol.
You can manually forward a call to another number while your phone rings.
You can also set up your phone to forward all incoming calls to a third party
(see “Forwarding All Calls to Another Party” on page 55), or forward calls
from a certain contact to another party (see “Diverting Calls from a Contact to
Another Party” on page 58).
To forward an incoming call to another party:
1 While your phone rings, tap the Forward soft key.
During Calls
2 Enter the phone number to forward the incoming call to.
(Your phone displays the last number you forwarded calls to.)
3 Tap the Forward soft key.
The incoming call is forwarded to the other party. If call forwarding is
disabled, all future calls will not be forwarded and forwarding will remain
disabled.
When you’re in a call, you can do the following:
• Place the call on hold. See “Holding and Resuming Calls” on page 43.
• Transfer the call to another party. See “Transferring Calls” on page 45.
• Set up a conference call with the call you’re in and another party. See
“Setting Up Conference Calls” on page 46.
• Change the way you view video for the call. See “Customizing Video
During Calls” on page 53.
42 Polycom, Inc.
Page 49

During Calls Using the Basic Features of Your Phone
Holding and Resuming Calls
To place a call on hold, tap the Hold soft key or press during an
active call. When you place a call on hold, the following happens:
• The hold icon, , will display on the Line Key.
• The Line Key status indicator will flash red.
• The call’s window is minimized and placed in the inactive call group
(above the soft keys). The inactive call window displays “Hold.”
The following figure shows a call on hold. The hold icon, and the flashing red
status indicator, display on the Line Key.
Tap the Resume soft key, press again, or tap the Line Key, to retrieve
the call.
If you have more than one call on hold, tap the call you want to resume, and
then tap the Resume soft key. If you tap the Line Key, the first call in the
inactive call group for the Line Key will automatically resume.
The Hold feature typically generates music or a beeping tone. Therefore, avoid
placing a conference call on hold.
Note
Polycom, Inc. 43
If you’re in a conference and don’t want anyone to hear you, press
instead of placing the conference on hold.
Page 50

User Guide for the Polycom VVX 1500 Business Media Phone During Calls
Handling Multiple Calls on Hold
Your phone displays all calls for a Line Key by displaying multiple windows
on the screen. The phone only displays the calls for one Line Key at a time.
The active call (if any) displays in a window in the center of the touch screen.
Held calls or incoming calls display in minimized windows above the phone’s
soft keys (the “inactive call group”). The Line Key associated with the
displayed calls is green. The Line Key displays a counter showing the number
of calls for the Line Key. If all the calls for a Line Key are inactive, the status
indicator for the Line Key glows red. If the Line Key has an active call, the
status indicator glows green.
The following figure shows four calls on hold for Line Key 2076.
To select a call on hold, tap the call on hold. New soft keys will display that
apply to the selected call. To resume the call, tap the Resume soft key or press
.
If there are more than three calls on hold, tap or to display
additional calls on hold. You can also press or to select a call on
hold.
To access the calls on another Line Key, tap that Line Key. When you tap a
Line Key, the first call on hold in the inactive call group for that Line Key will
automatically resume.
44 Polycom, Inc.
Page 51

During Calls Using the Basic Features of Your Phone
Transferring Calls
You cannot transfer H.323 calls.
A call can be transferred in one of three ways:
• Consultative—The party to whom you want to transfer the call answers
their phone before you transfer the call or hang up. You can consult with
them before completing the transfer. You also have the option of
transferring the call before the party answers.
— See “Performing a Consultative Transfer” on page 45.
• Blind—The call is automatically transferred after you dial the number of
the party to whom you want to transfer the call. You don’t have the option
of talking to the party.
— See “Performing a Blind Transfer” on page 46.
• Attended—Conference call parties are automatically connected to each
other after you exit a conference.
— Set up a conference call and then end your participation. For more
information, see “Ending Conference Calls” on page 50.
By default, when you end a conference, the other conference call participants
remain connected. However, your system administrator may set up your phone so
that when you end a conference, all connections end.
Performing a Consultative Transfer
Perform a consultative transfer if you want to talk to the party to whom you’re
transferring the call. Or, you can choose not to talk to the party. In this case,
you wait for the party’s ring-back sound, and then transfer the call.
To perform a consultative transfer:
1 During a call, tap the Transfer soft key or press . The active call is
placed on hold.
2 From the Transfer to: screen, place a call to the party to whom you want
to transfer the call. See “Placing Calls” on page 30.
Polycom, Inc. 45
Page 52

User Guide for the Polycom VVX 1500 Business Media Phone During Calls
3 When you hear the ring-back sound, tap the Transfer soft key or press
. If you want to talk privately to the person to whom you’re
transferring the call before the transfer is complete, wait until the person
answers the call, talk to the person, and then tap the Transfer soft key or
press .
If you’re using a handset, the transfer can be completed by putting the
handset on the cradle.
You can cancel the transfer before the call connects by tapping the
Cancel soft key.
Performing a Blind Transfer
When you use a blind transfer, you transfer a call without speaking to the
party to whom you’re transferring the call. The call is automatically
transferred as soon as you dial the party’s number.
To perform a blind transfer:
1 During a call, tap the Transfer soft key or press .
2 From the Transfer to: screen, tap the Blind soft key.
3 From the Blind transfer to: screen, place a call to the party to whom you
want to transfer the call. See “Placing Calls” on page 30.
If you want to cancel the transfer (before the call is placed), and return to
the original call, tap the Cancel soft key.
The call automatically transfers to the party you specified.
Setting Up Conference Calls
By default, you can create a conference with two other parties. Depending on your
phone system, you may be able to host a conference with more than two parties.
For more information, see your system administrator.
You can create a conference with two other parties using the phone’s local
conference feature. During a conference call, your phone can exchange video
with only one conference participant (even if more than one participant can
send video). The participant with whom you exchange video depends on how
you set up the conference. You also have the option of choosing the participant
with whom to exchange video.
46 Polycom, Inc.
Page 53

During Calls Using the Basic Features of Your Phone
During a conference, you have access to the conference management feature.
This feature allows you to manage each participant in the conference call. You
can mute, hold, and remove individual participants, as well as choose the
conference participant with whom to exchange video. For more information,
see “Managing Conference Call Participants” on page 50.
This section provides the following instructions:
• “Hosting Conference Calls” on page 47
• “Holding and Resuming Conference Calls” on page 49
• “Ending Conference Calls” on page 50
• “Splitting Conference Calls into Two Calls on Hold” on page 50
• “Managing Conference Call Participants” on page 50
• “Handling Video During Conference Calls” on page 53
Hosting Conference Calls
Note
Note
Your system administrator configures the maximum number of parties allowed in a
conference call. The default value is three (including yourself).
You can set up a conference in one of two ways:
• Using the Conference soft key or . The participant with whom
you will exchange video is the participant you most recently added to the
conference (if the party can exchange video).
• Using the Join soft key, if you have an active call and one call on hold (on
the same or another Line Key). The participant with whom you will
exchange video is the party who was previously on hold (if the party can
exchange video).
If the site for which you view video changes to a different site after you set up a
conference, the message “Video can only be active with one party at a time”
displays.
To choose the participant with whom to exchange video, see “Managing
Conference Call Participants” on page 50.
Polycom, Inc. 47
Page 54

User Guide for the Polycom VVX 1500 Business Media Phone During Calls
To set up a conference call using the Conference soft key or dialpad key:
1 Call the first party. See “Placing Calls” on page 30.
2 Tap the Conference soft key or press to create a new call. The
active call is placed on hold.
The Conference with: screen displays.
3 Call the second party. See “Placing Calls” on page 30.
4 When the second party answers, tap the Conference soft key or press
again to join all parties in the conference.
If configured for single key-press conferences, you don’t need to tap the
Conference soft key again.
Note
If the second participant can exchange video, you will exchange video
with the second participant. If the second participant cannot exchange
video, but the first participant can, you will exchange video with the first
participant.
The Conference window displays.
48 Polycom, Inc.
Page 55

During Calls Using the Basic Features of Your Phone
To set up a conference call with an active call and a call on hold:
You can only set up a conference with an active call and a call on hold if you only
have one call on hold. If you have more than one call on hold, you have to set up a
Note
conference using the Conference key or soft key.
>> If you have an active call and a call on hold (either on the same Line Key
or a different Line Key), tap the Join soft key.
The Conference screen displays.
A conference is created with the active call, the call on hold, and yourself.
The conference call takes place on the Line Key from which you handled
the last active call.
If the participant who was previously on hold can exchange video, you
will exchange video with that participant. If the participant who was on
hold cannot exchange video, you will exchange video with the other
participant.
Holding and Resuming Conference Calls
When you place a conference call on hold, you place all other conference
participants on hold.
To place a specific participant on hold, see “Managing Conference Call
Participants” on page 50.
To place a conference call on hold:
>> During a conference call, tap the Hold soft key.
The other participants in the conference call are placed on hold. The
Conference window is minimized and placed in the inactive call group.
To resume the conference call, tap the Conference window to make sure it is
selected, and then tap the Resume soft key. To end the conference call and
place all other conference call participants on hold, tap the Split soft key.
Polycom, Inc. 49
Page 56

User Guide for the Polycom VVX 1500 Business Media Phone During Calls
Ending Conference Calls
You can end a conference, and your connection to the other participants, by
tapping the End Call soft key. By default, when you tap the End Call soft key,
the other participants remain connected.
• Your system administrator may have set up your phone so that you can end
active calls by tapping the Line Key. If your phone is set up to do this, you can
Note
end an active conference call by tapping the Line Key associated with the
conference call.
• Your system administrator may have set up your phone so that when you tap
the End Call soft key, all connections end.
• Conference call participants won’t remain connected if they can’t handle calls
using the same protocol.
To end a conference call:
>> During a conference call, tap the End Call soft key.
By default, the other parties remain connected.
Splitting Conference Calls into Two Calls on Hold
When a conference is established, a Split soft key is available. When you split
a conference, you end the conference and place all parties on hold. The
Split soft key is available during conference calls, and when a conference call
is on hold.
To split a conference call:
>> During a conference call, tap the Split soft key. (If a conference call is on
hold, tap the conference call window, and then tap the Split soft key.)
The conference ends, and all calls are split into individual calls and placed on
hold.
Managing Conference Call Participants
When you manage conference call participants, you can do the following:
• Mute a participant.
• Place a participant on hold.
• Remove a participant from the conference.
• Obtain information about a participant.
• Choose the participant with whom to exchange video.
50 Polycom, Inc.
Page 57

During Calls Using the Basic Features of Your Phone
To manage a participant, tap the window of the participant you want to
manage. The participant’s window will be highlighted, and the soft keys will
update to show Far Mute, Hold, Remove, Information, and Back.
The following figure shows the soft keys that display when you manage a
conference call participant (in this case, Jack Jones). If the participant you
tapped is not the participant with whom you’re exchanging video, the
Select Video soft key also displays.
To manage a conference call:
1 During a conference call, tap the window of the conference call
participant you want to manage.
The soft keys update so you can manage the participant.
You can access the following soft keys:
—Far Mute—Mutes the selected participant. The muted participant can
hear all participants, but no participant can hear the muted
participant.
— Select Video—Selects the conference call participant as the “active”
conference participant. This is the participant with whom you will
exchange video.
(The Select Video soft key does not display if you’re currently
exchanging video with the selected participant, or if the participant is
not calling from a video endpoint.)
Polycom, Inc. 51
Page 58

User Guide for the Polycom VVX 1500 Business Media Phone During Calls
—Hold—Places a selected conference participant on hold. The held
party cannot hear any participant, and no participant can hear the
held party.
— Remove—Removes the selected conference participant from the
conference, ends the conference call, and creates an active call between
you and the other participant.
— Information—Provides additional information about the selected
conference participant.
— Back—Displays the conference call soft keys again (Hold, End Call,
Manage, Split, Video).
2 Do one of the following:
— To mute the conference participant, tap the Far Mute soft key.
The muted party can hear all participants, but no participant can hear
the muted party. The far mute icon, , displays in the muted
party’s window.
(If you press instead of tapping the Far Mute soft
key, all other participants can hear each other, but they cannot hear
you. The red mute icon, , displays next to near-site video.)
To un-mute the muted party, tap the UnMute soft key.
— To select the conference participant as the “active” participant (the
participant with whom you will exchange video), tap the Select Video
soft key.
— To place the conference participant on hold, tap the Hold soft key.
The held party cannot hear any participant, and no participant can
hear the held party.
To return the participant to the conference, tap the Resume soft key.
(If the held party taps the Hold soft key or presses on their
phone, the participant will still be held within the conference even if
you tap the Resume soft key.)
To place a conference call on hold, see “Holding and Resuming
Conference Calls” on page 49.
— To remove the conference participant from the conference, tap the
Remove soft key.
52 Polycom, Inc.
Page 59

During Calls Using the Basic Features of Your Phone
Handling Video During Conference Calls
During a conference call that includes a video endpoint, you can tap the
Video soft key (if you aren’t managing a conference participant) or press
to display soft keys that allow you to start and stop near-site video,
display video on the full screen, or swap the windows that near-site and
far-site video display in. For more information, see “Customizing Video
During Calls” on page 53.
Customizing Video During Calls
In addition to customizing video during a call, you can set up your phone to handle
video for all calls in specific ways (for example, how to display all incoming video
calls, or how to stop the transmission of near-site video for all calls). For more
information, see “Changing When and How Video Displays” on page 137.
During a video call, you can:
• Start and stop the transmission of near-site video
• Swap the windows video displays in
• View video on the full screen
To handle video during a call:
1 During a video call, tap the Video soft key or press to display
the soft keys that allow you to access video features. (The Video soft key
is only available when a video call is active. If you press during
an audio-only call, the video soft keys will not display.)
The following video soft keys display:
— Stop Video/Start Video—Starts and stops the transmission of
near-site video. When you tap the Stop Video soft key, the far-site will
no longer see you, and the stop video icon, , displays next to the
near site, in either the PIP or in the larger window in the center of the
touch screen.
If you want, you can disable video across all calls, not just for the current call. For
information on disabling video for all calls, see “Enabling or Disabling Video” on
Note
Polycom, Inc. 53
page 137.
You cannot start and stop far-site video. If your phone receives far-site video, it will
always display it.
Page 60

User Guide for the Polycom VVX 1500 Business Media Phone During Calls
—Full Screen—Displays the video that is in the center of the screen on
the full screen. The PIP still displays in the corner, but the soft keys are
hidden. (Depending on the video endpoint, you may or may not see
the black bars.)
Note
Note
To display the site in the center of the touch screen and to access soft
keys again, tap the touch screen outside of the PIP. (If you tap the
PIP, you will just swap the windows the sites display in.)
You don’t have to access the video soft keys to display video on the full screen.
During a video call, tap the window in the center of the touch screen to display the
site on the full screen. To display the site in the center of the touch screen again, tap
the touch screen outside of the PIP.
—Swap—Switches the windows the sites display in. For example, the
site in the PIP will display in the window in the center of the touch
screen, and the site in the window in the center of the touch screen will
display in the PIP. When the near site displays in the window in the
center of the touch screen, “Local camera” displays next to it.
You don’t have to access the video soft keys to swap the windows the sites display
in. During a video call, tap the PIP to swap the windows the sites display in. To
swap windows again, tap the PIP again.
If you want, you can set up your phone to automatically display the far site on the
full screen. For more information, see “Changing How You View All Video Calls” on
page 142.
— Back—Displays the call soft keys again.
For more information on using video and updating video settings, see
“Changing When and How Video Displays” on page 137.
54 Polycom, Inc.
Page 61

Changing the Way Calls are Answered Using the Basic Features of Your Phone
Changing the Way Calls are Answered
You can change the way calls are answered by doing the following:
• “Forwarding All Calls to Another Party” on page 55
• “Rejecting Calls from a Contact” on page 58
• “Diverting Calls from a Contact to Another Party” on page 58
• “Temporarily Refusing All Calls (Do Not Disturb)” on page 59
Forwarding All Calls to Another Party
• Your company’s settings may override this feature. For more information,
contact your system administrator.
Note
• Call forwarding is not available on shared lines.
• Y ou cannot forward calls from endpoints that use the H.323 protocol. In addition,
you cannot set up forwarding for lines that only use the H.323 protocol.
You can set up your phone to forward all calls to another number. Your phone
will forward calls even if you enable the Do Not Disturb feature. (You can also
forward calls on a call-by-call basis. For more information, see “Forwarding
Calls While Your Phone Rings” on page 42.)
To forward all calls to another party:
1 Do one of the following:
— Tap > Features > Forward.
or
— From the idle screen, tap the Forward soft key.
If your phone is set up with a single line, the Forwarding Type Select
screen displays.
If your phone is set up with multiple lines, the Line Select screen displays.
Tap the line for which you want to forward calls. The Forwarding Type
Select screen displays.
2 From the Forwarding Type Select screen, tap the forwarding type you
want. The options are:
— Always—To forward all incoming calls.
—No Answer—To forward all unanswered incoming calls.
—Busy—To forward calls that arrive when you’re already in a call.
Polycom, Inc. 55
Page 62

User Guide for the Polycom VVX 1500 Business Media Phone Changing the Way Calls are Answered
3 Do one of the following:
— If you selected Always, enter a number to forward all future incoming
calls to.
— If you selected No Answer, do the following:
» In the Contact field, enter a number to forward all unanswered
incoming calls to.
» Tap the Forward After Rings field, and then enter how many
rings to wait before forwarding the call (one ring is approximately
six seconds). A value of 2 is recommended.
— If you selected Busy, enter a number to forward all future incoming
calls to when you’re already in another call.
Y ou can also enter a URL or an IP address. For more information on using a URL or
an IP address, see “Placing Calls” on page 30.
Note
4 Tap the Enable soft key to confirm call forwarding.
If you chose to always forward calls, the Line Key displays the forwarding
icon, , to indicate that the Always forwarding type is enabled. If you
enabled the Busy or No Answer forwarding type, the Line Key icon does not
change.
56 Polycom, Inc.
Page 63

Changing the Way Calls are Answered Using the Basic Features of Your Phone
The following figure shows Line 2076 with the Always forwarding type
enabled.
To disable call forwarding:
1 Do one of the following:
— Tap > Features > Forward.
or
— From the idle screen, tap the Forward soft key.
If your phone is set up with a single line, the Forwarding Type Select
screen displays.
If your phone is set up with multiple lines, the Line Select screen displays.
Tap the line for which you want to disable call forwarding. The
Forwarding Type Select screen displays.
2 From the Forwarding Type Select screen, tap the forwarding type you
want to change, and then tap the Disable soft key.
Polycom, Inc. 57
Page 64

User Guide for the Polycom VVX 1500 Business Media Phone Changing the Way Calls are Answered
Rejecting Calls from a Contact
You can send all incoming calls from a particular contact to your voice and
video mail system. (If you don’t have one set up, the call will still ring on your
phone.)
You can’t reject calls on shared lines. You can only silence them. For more
information, see “Supporting Shared Lines” on page 81.
Note
To send incoming calls from a contact to your mail system:
1 Tap > Features > Contact Directory.
2 From the Directory screen, tap the contact whose information you want
to update, and then tap the Edit soft key.
3 From the Edit Contact screen, tap the Auto Reject field, and then tap the
field’s highlighted grey box. From the drop-down list, tap Enabled.
4 Tap the Save soft key.
5 Tap to return to the idle screen.
Diverting Calls from a Contact to Another Party
You can transfer all incoming calls from a particular contact to a third party.
You cannot transfer calls from endpoints that use the H.323 protocol.
To divert incoming calls from a contact to a third party:
1 Tap > Features > Contact Directory.
2 From the Directory screen, tap the contact for whom you want to transfer
calls.
3 From the Edit Contact screen, do the following:
a Tap the Divert Contact field, and then enter the number of the party
to whom you want to divert the call.
b Tap the Auto Divert field, and then tap the field’s highlighted grey
box. From the drop-down list, tap Enabled.
4 Tap the Save soft key.
5 Tap to return to the idle screen.
58 Polycom, Inc.
Page 65

Changing the Way Calls are Answered Using the Basic Features of Your Phone
Tem por ari ly R efusin g Al l Calls (Do Not Disturb)
Do Not Disturb is an optional feature that your system administrator sets up. Your
system may not support it. For more information, contact your system administrator.
Note
You can prevent your phone from ringing and displaying an incoming call
window.
When you enable Do Not Disturb:
• The Do Not Disturb icon, , displays on the status bar and on each
Line Key.
• The “Do Not Disturb” message scrolls under the time.
• The Do Not Disturb key, , glows red.
• All calls you receive while Do Not Disturb is enabled will be logged in
your Missed Calls list (see “Viewing Call Lists” on page 63). Missed calls
will be identified by the missed call icon, , on the status bar. (If you
have chosen to forward your calls to another number, calls will be sent to
that number if you enable the Do Not Disturb feature.)
Enabling Do Not Disturb on shared lines disables ringing only. You will still see a
visual notification of the call and have the option to answer the call.
Polycom, Inc. 59
Page 66

User Guide for the Polycom VVX 1500 Business Media Phone Changing the Way Calls are Answered
The following figure shows the Do Not Disturb icon on the status bar and
Line Key, and the “Do Not Disturb” message that scrolls under the time.
Note
To enable Do Not Disturb:
>> Press .
To disable Do Not Disturb:
>> Tap or press .
Multiple Lines and Do Not Disturb
By default, the Do Not Disturb feature applies to all lines on your phone. For more
information, contact your system administrator.
Your system administrator can enable your phone so that you can enable
Do Not Disturb on a line-by-line basis. The Do Not Disturb icon, , will
display on each Line Key for which Do Not Disturb is enabled.
60 Polycom, Inc.
Page 67

Changing the Way Calls are Answered Using the Basic Features of Your Phone
To enable Do Not Disturb for a particular line:
1 Press .
You can automatically enable or disable Do Not Disturb for all lines. To
automatically enable Do Not Disturb for all lines, tap the Set All soft key. To
Note
automatically disable the feature for all lines, tap the Clear All soft key. After you
tap the Set All or Clear All soft key, the idle screen displays.
2 From the Line Select screen, tap the line for which you want to apply
Do Not Disturb.
3 From the Do Not Disturb screen, tap the Enable soft key.
The Do Not Disturb icon, , displays on each Line Key for the line you
selected.
The following figure shows Do Not Disturb enabled for one line only.
Polycom, Inc. 61
Page 68

User Guide for the Polycom VVX 1500 Business Media Phone Working with Call Lists
To disable Do Not Disturb for a particular line:
1 Tap or press .
You can automatically enable or disable Do Not Disturb for all lines. To
automatically enable Do Not Disturb for all lines, tap the Set All soft key. To
Note
automatically disable the feature for all lines, tap the Clear All soft key. After you
tap the Set All or Clear All soft key, the idle screen displays.
2 From the Line Select screen, tap the line for which you want to disable
Do Not Disturb.
3 From the Do Not Disturb screen, tap the Disable soft key.
Working with Call Lists
Your phone maintains lists of missed, received and placed calls. Each list can
hold up to 100 entries.
If you miss one or more calls, the status bar will display an icon, , with
a counter indicating the number of new missed calls you have. To view
information about the missed call(s), tap the icon on the touch screen, or
navigate (see “Viewing Call Lists” on page 63), to your Missed Calls list. After
you view the missed calls, the icon on the touch screen disappears.
The following figure shows the missed calls icon on the touch screen.
62 Polycom, Inc.
Page 69

Working with Call Lists Using the Basic Features of Your Phone
Viewing Call Lists
You can access any call list from the Call Lists menu, or you can quickly access
missed calls from the idle screen.
To view a call list:
>> Do one of the following:
— Tap > Features > Call Lists > Missed Calls,
Received Calls, or Placed Calls.
or
— From the idle screen, use these shortcuts:
To view this call list ... Do this ...
Received Calls
Missed Calls
Placed Calls
Press .
• Press .
or
• If you haven’t viewed the missed call yet,
tap the missed call icon, , that
displays on the status bar on the touch
screen.
Press .
Polycom, Inc. 63
Page 70

User Guide for the Polycom VVX 1500 Business Media Phone Working with Call Lists
Managing Call Lists
You can clear all the records in a call list, or just one record. You can also
choose a record in a list and return the call, store the call details in your local
Contact Directory, or view detailed information about the particular call.
To manage a call list:
1 Tap > Features > Call Lists.
2 From the Call Lists screen, do one of the following:
— To clear the records in a call list, tap Clear, and then tap either
Missed Calls, Received Calls or Placed Calls.
A message displays indicating that the call list is cleared. For
example, “Missed Calls Cleared!”
To automatically clear all calls in all call lists, you can restart the phone. See
“Restarting Your Phone” on page 125.
Note
— To view and manage the calls in a call list, tap either Missed Calls,
Received Calls or Placed Calls. Your call list information displays.
Press or to scroll to a call. You can do the following:
— To place the call, tap the Dial soft key.
— To edit the phone number (if necessary) before you place the call or
store the call details in your Contact Directory, tap the Edit soft key.
— To return to the Call Lists menu, tap the Back soft key.
— To remove the call from the list, tap the Clear soft key.
— To store the contact in your local Contact Directory, tap the Save soft
key.
— To view information about the call, such as the phone number, the
time and duration of the call, and the name of the caller, tap the
Information soft key.
3 Tap to return to the idle screen.
64 Polycom, Inc.
Page 71

Working with Contact Directory Using the Basic Features of Your Phone
Working with Contact Directory
You can store a large number of contacts in your phone’s local
Contact Directory. Contact your system administrator for the exact number.
With Contact Directory, you can do the following:
• Dial contacts. See “Calling from Directories” on page 35.
• Search for contacts. See “Searching Your Local Contact Directory” on
page 65.
If you can update Contact Directory, you can also do the following:
• Add contacts manually, from call lists, or from a Corporate Directory. See
“Adding Contacts to Your Local Contact Directory” on page 66
• Update contact information. See “Updating Your Local Contact
Directory” on page 69.
• Delete contacts. See “Deleting Contacts from Your Local Contact
Directory” on page 70.
Searching Your Local Contact Directory
Search for a contact by scrolling through the directory, or entering specific
search criteria.
To search for a contact:
1 Do one of the following:
— Tap > Features > Contact Directory.
or
— Press , and then tap Contact Directory.
2 From the Directory screen, tap the Search soft key. Then, enter the first
few characters of the contact’s first or last name, and then tap the Search
soft key again.
The screen displays a list of successful matches.
3 Tap to return to the idle screen.
If a protocol is specified for a contact, the protocol type will display in the directory.
For example, if Lauren Gates uses the SIP or H.323 protocol, the directory entry will
look like this: Lauren Gates (1951 SIP) or Lauren Gates (1951 H323).
Polycom, Inc. 65
Page 72

User Guide for the Polycom VVX 1500 Business Media Phone Working with Contact Directory
Adding Contacts to Your Local Contact Directory
You can add contacts to your local Contact Directory in the following ways:
• Manually (if you have permission to update your local Contact Directory).
See “Adding Contacts Manually” on page 66.
• From a call list. “Adding Contacts from Call Lists” on page 69.
• From a Corporate Directory (if this is set up on your phone). See “Adding
Corporate Directory Contacts to Your Local Contact Directory” on
page 71.
Adding Contacts Manually
You can update your local Contact Directory manually, instead of importing
contact information from a call list or a Corporate Directory.
To add a contact manually:
Note
1 Tap > Features > Contact Directory.
2 From the Directory screen, tap the Add soft key.
3 From the Add To Directory screen, enter the contact information:
Your phone may not display all the following fields. For more informa tion, see your
system administrator.
— (Optional.) In the First Name field, enter the first name of the contact
(see “Entering Data and Editing Fields” on page 14).
You can enter a maximum of 32 characters.
— (Optional.) Tap the Last Name field, and then enter the last name of
the contact (see “Entering Data and Editing Fields” on page 14).
You can enter a maximum of 32 characters.
— (Required.) Tap the Contact field, and then enter the contact’s phone
number.
You can enter a maximum of 128 characters. The phone number must
be unique, and must not already exist in the directory. If you save an
entry with a non-unique phone number, the entry will not be saved.
— (Optional.) Tap the Speed Dial Index field, and then update the speed
dial index number.
The speed dial index number is automatically assigned to the next
available index value. If you want, you can change the speed dial
index value. The speed dial index value can be any value between the
next available number and a maximum value of 9999.
66 Polycom, Inc.
Page 73

Working with Contact Directory Using the Basic Features of Your Phone
If you assign a speed dial index number that is already taken, the
message “Speed dial index already exists” displays.
Contacts with a speed dial index number can be automatically
assigned to a Speed Dial Key for one-touch dialing. For more
information, see “Managing Speed Dials” on page 76.
— (Optional.) Tap the Label field, and then enter a label for the contact.
You can enter a maximum of 32 symbols, letters, or numbers.
If you specify a label, the label will be the first item that displays for
the contact in the Contact Directory and on the Speed Dial
Information screen (before the contact’s first and last names, if
specified). The label will also display on the contact’s Speed Dial Key.
In the following figure, the label “Manager” has been assigned to
Lauren Gates. As a result, Lauren Gates’ Speed Dial Key displays
“Manager” instead of “Lauren Gates.”
— (Optional. This field only displays if your phone supports the H.323
protocol.) Tap the Protocol Type field, and then tap the field’s
highlighted grey box. From the drop-down list, tap SIP, H.323, or
Unspecified. (The default setting is Unspecified.)
If you select SIP, the phone will attempt to use the SIP protocol to
place calls to this contact. “SIP” will display next to the contact on the
Directory screen and Speed Dial Information screens.
If you select H.323, the phone will attempt to use the H.323 protocol
to place calls to this contact. “H323” will display next to the contact
on the Directory screen and Speed Dial Information screens.
If you select Unspecified, the phone will automatically choose the
protocol to use to place calls to this contact.
Polycom, Inc. 67
Page 74

User Guide for the Polycom VVX 1500 Business Media Phone Working with Contact Directory
— (Optional.) Tap the Ring Type field, and then tap the field’s
highlighted grey box. From the drop-down list, tap the ring type you
want to use for the contact.
— (Optional.) Tap the Divert Contact field, and then enter the phone
number of the third party to which you want this contact’s calls sent.
You can enter a maximum of 32 characters.
— (Optional.) Tap the Auto Reject field, and then tap the field’s
highlighted grey box. From the drop-down list, tap Enabled or
Disabled. (The default setting is Disabled.)
If you set the Auto Reject field to enabled, each time the contact calls,
the call will be directed to your mail system (if one is set up).
If you don’t have a mail system set up, enabling the Auto Reject field will have no
effect. Each time the contact calls, your phone will ring (unless you choose to divert
Note
the contact’s calls, or enable call forwarding or Do Not Disturb on your phone).
— (Optional.) Tap the Auto Divert field, and then tap the field’s
highlighted grey box. From the drop-down list, tap Enabled or
Disabled. (The default setting is Disabled.)
If you set the Auto Divert field to enabled, each time the contact calls,
the call will be directed to the third party you specified in the
Divert Contact field.
— (Optional.) Tap the Watch Buddy field, and then tap the field’s
highlighted grey box. From the drop-down list, tap Enabled or
Disabled. (The default setting is Disabled.)
If you set the Watch Buddy field to enabled, you can monitor the
contact’s status. For more information on monitoring status, see
“Using Buddy Status Lists” on page 91.
— (Optional.) Tap the Block Buddy field, and then tap the field’s
highlighted grey box. From the drop-down list, tap Enabled or
Disabled. (The default setting is Disabled.)
If you set the Block Buddy field to enabled, the contact cannot
monitor your status. For more information on monitoring status, see
“Using Buddy Status Lists” on page 91.
4 Tap the Save soft key.
5 Tap to return to the idle screen.
68 Polycom, Inc.
Page 75

Working with Contact Directory Using the Basic Features of Your Phone
Adding Contacts from Call Lists
You can save call information from a call list to your local Contact Directory.
The contact’s first and last names (if available) and contact number are saved.
To add a contact from a call list:
1 Display a call list. (See “Viewing Call Lists” on page 63.)
2 Press or to scroll to the call you want to save to your
local Contact Directory, and then tap the Save soft key.
The message “Saved” displays.
If the contact already exists in your local Contact Directory, “Contact
already exists” displays.
3 Tap to return to the idle screen.
You may want to go to the Contact Directory to see if the contact was saved
correctly and to add any missing contact information. To find a contact in your
Note
Contact Directory, see “Searching Your Local Contact Directory” on page65. To
update missing contact information, see “Adding Contacts Manually” on page 66
(step 3).
Updating Your Local Contact Directory
You can update information for contacts in your local Contact Directory.
To update a contact:
1 Tap > Features > Contact Directory.
2 From the Directory screen, tap the contact whose information you want
to update. Or, search for the contact (see “Searching Your Local Contact
Directory” on page 65).
3 Tap the Edit soft key.
4 From the Edit Contact screen, update the contact information.
For information on the fields you can update, see “Adding Contacts
Manually” on page 66 (step 3).
5 Tap the Save soft key.
6 Tap to return to the idle screen.
Polycom, Inc. 69
Page 76

User Guide for the Polycom VVX 1500 Business Media Phone Working with Corporate Directory
Deleting Contacts from Your Local Contact Directory
You can delete contacts from your local Contact Directory.
To delete a contact:
1 Tap > Features > Contact Directory.
2 From the Directory screen, tap the contact you want to delete. Or, search
for the contact (see “Searching Your Local Contact Directory” on
page 65).
3 Tap the Delete soft key.
The contact is deleted from the directory.
4 Tap to return to the idle screen.
Working with Corporate Directory
If your system administrator sets up Corporate Directory on your phone, you
may have read-only access to portions of your Corporate Directory. You
cannot update the contacts in your Corporate Directory. Your system
administrator determines which contacts you can see.
From Corporate Directory, you can do the following:
• Dial contacts. See “Calling from Directories” on page 35.
• Search for contacts. See “Searching Corporate Directory” on page 70.
• Add contacts to your local Contact Directory. See “Adding Corporate
Directory Contacts to Your Local Contact Directory” on page 71.
Searching Corporate Directory
When you access Corporate Directory, a search screen displays so you can
search for a specific contact. You can perform a quick search or an advanced
search.
Each time you access Corporate Directory, the search screen displays, unless you
enable your phone to remember the last search you performed or the last person
Note
you selected. To enable this feature, see “Saving Corporate Directory Search
Results” on page 72.
70 Polycom, Inc.
Page 77

Working with Corporate Directory Using the Basic Features of Your Phone
To search for a contact in the Corporate Directory:
1 Do one of the following:
— Tap > Features > Corporate Directory.
or
— Press , and then tap Corporate Directory.
The Corporate Directory search screen displays.
If you have enabled your phone to save the results of your last search (or
remember the last contact you selected), your previous search results (or the
Note
contact), will display instead of a blank search screen. To enable this feature, see
“Saving Corporate Directory Search Results” on page 72.
2 From the Corporate Directory search screen, perform a quick search or an
advanced search.
A quick search allows you to search using the contact’s last name (if the
directory is alphabetized by last name) or first name (if the directory is
alphabetized by first name). An advanced search uses any combination of
the contact’s first and last names, phone numbers, address, and title.
Do one of the following:
— To perform a quick search, in the Search box, enter the first few
characters of the contact’s first or last name (depending on how the
directory is organized), and then tap the Submit soft key. The screen
displays a list of contacts, starting with any successful matches.
or
— To perform an advanced search, tap the AdvFind soft key. From the
Advanced Find screen, enter your search criteria, and then tap the
Submit soft key. The screen displays any successful matches.
If you want to erase all your search criteria and enter new criteria before you submit
your search, tap the Clear soft key.
Note
3 Tap to return to the idle screen.
Adding Corporate Directory Contacts to Your Local Contact Directory
You can save any contact listed in your Corporate Directory to your local
Contact Directory. The contact’s first and last names (if available) and contact
number are saved.
Polycom, Inc. 71
Page 78

User Guide for the Polycom VVX 1500 Business Media Phone Working with Corporate Directory
To add a contact to your local Contact Directory:
1 Tap > Features > Corporate Directory.
The Corporate Directory search screen displays.
If you have enabled your phone to save the results of your last search (or
remember the last contact you selected), your previous search results (or the
Note
contact), will display instead of a blank search screen. To enable this feature, see
“Saving Corporate Directory Search Results” on page 72.
2 Search for the contact. (See “Searching Corporate Directory” on page 70.)
3 Tap the contact’s entry.
4 From the Contact screen, tap the Save soft key to save the contact to the
local Contact Directory.
“Saved” displays on the screen. Only the first name, last name, and phone
number are saved.
If the contact already exists in your local Contact Directory, “Contact
already exists” displays.
5 Tap to return to the idle screen.
You may want to go to the Contact Directory to see if the contact was saved
correctly and to add any missing contact information. To find a contact in your
Note
Contact Directory, see “Searching Your Local Contact Directory” on page65. To
update missing contact information, see “Adding Contacts Manually” on page 66
(step 3).
Saving Corporate Directory Search Results
You can enable your phone to save Corporate Directory search results, and to
remember the last person you viewed in the directory. Whenever you
re-display Corporate Directory, the results of your last search, or the last
person you selected, will display. If you don’t enable your phone to save
search results, each time you access Corporate Directory, a blank search screen
will display.
To save Corporate Directory search results:
1 Tap > Settings > Basic > Preferences >
Corporate Directory > View Persistency.
2 Tap Enabled, and then tap the Select soft key.
3 To save the new setting, tap the Back soft key.
72 Polycom, Inc.
Page 79

Controlling What is Heard Using the Basic Features of Your Phone
To view a blank search screen again:
1 Tap > Settings > Basic > Preferences >
Corporate Directory > View Persistency.
2 Tap Disabled, and then tap the Select soft key.
3 To save the new setting, tap the Back soft key.
Controlling What is Heard
You can change what you hear by doing the following:
• “Changing the Ring Tone” on page 73
• “Changing the Speaker Volume” on page 74
• “Changing the Ringer Volume” on page 74
• “Muting the Microphone” on page 75
• “Choosing Where You Hear Sound Effects” on page 75
Changing the Ring Tone
You can select from many different ring types to distinguish lines or to
distinguish your phone from your neighbor’s phone. You can also set
distinctive incoming ring tones for contacts in your local directory so you can
identify callers when your phone rings.
Changing the Ring Tone for Your Phone
You can choose a distinctive ring tone for your phone to identify it when it
rings. Or, you can choose distinctive ring tones for different lines on your
phone.
To select a ring tone for your phone or a specific line:
1 Tap > Settings > Basic > Ring Type.
The Ring Type screen displays.
(If multiple lines are configured on your phone, the Line Select screen
displays instead, and you have to select the line to which to apply the ring
type. Then, the Ring Type screen displays.)
2 From the Ring Type screen, tap the ring type you want, and then tap the
Select soft key. To hear the ring type before you change it, tap the
Play soft key.
The default ring type is Low Trill.
3 Tap to return to the idle screen.
Polycom, Inc. 73
Page 80

User Guide for the Polycom VVX 1500 Business Media Phone Controlling What is Heard
Setting Ring Tones for Contacts
Your company’s settings may override this feature. For more information, contact
your system administrator.
Note
You can set a distinctive ring tone for each contact in your Contact Directory
so you can distinguish callers.
To set a distinctive ring tone for a contact:
1 Tap > Features > Contact Directory.
2 From the Directory screen, tap the contact for whom you want to assign a
distinctive ring tone, and then tap the Edit soft key.
3 From the Edit Contact screen, tap the Ring Type field, and then tap the
field’s highlighted grey box. From the drop-down list, tap the ring type
you want to assign to the contact.
4 Tap the Save soft key.
5 Tap to return to the idle screen.
Changing the Speaker Volume
You can change the volume of what you hear during a call.
To adjust the speaker volume:
>> During a call, press either or to lower or raise the
speaker volume.
To conform to regulatory requirements, handset and headset volume will return to a
preset level after each call, but your system administrator can change this.
Speakerphone volume settings will be maintained across calls.
Changing the Ringer Volume
You can change the volume of your phone’s ring tone.
To adjust the ringer volume:
>> When your phone is idle, press either or to lower or
raise the ringer volume.
74 Polycom, Inc.
Page 81

Controlling What is Heard Using the Basic Features of Your Phone
Muting the Microphone
Mute the microphone so that the other party (or parties) cannot hear you.
Microphone Mute applies to all modes (handset, headset, and speakerphone).
You can still hear all other parties while mute is enabled.
To mute the microphone:
>> During a call (including a conference call), press .
The Mute key, , glows red, and displays next to
near-site video. The other party (or parties) cannot hear you.
To turn off Microphone Mute:
>> Press again.
The red light behind the Mute key, , turns off, and no
longer displays next to near-site video.The other party (or parties) can hear
you.
Choosing Where You Hear Sound Effects
You can choose whether you hear sound effects (all phone sounds except call
audio) from the handset, headset, or speaker. For example, you can configure
your phone to ring on your headset, instead of the speaker. By default, all
sound effects are heard from the speaker.
To choose where you hear sound effects:
1 Tap > Settings > Basic > Preferences > Audible Ringer.
2 From the Audible Ringer screen, select where you want to hear sound
effects:
— To hear sound effects only from the phone’s loudspeaker, select
Speaker.
— To hear sound effects only from the handset, select Handset.
— To hear sound effects only from the headset, select Headset.
— To hear sound effects only from the device you’re currently using to
hear call audio, select Active.
The default destination is Speaker.
3 Tap to return to the idle screen.
Polycom, Inc. 75
Page 82

User Guide for the Polycom VVX 1500 Business Media Phone Managing Speed Dials
Managing Speed Dials
You can associate contacts with Speed Dial Keys for single touch dialing of
frequently used numbers. Speed Dial Keys display .
The following figure shows a phone with two Line Keys (2076 and 1948), and
four Speed Dial Keys (assigned to Lauren Gates, Jack Jones, Milton Stone, and
Teresa Swift).
When a new entry is added to the Contact Directory, it is automatically
assigned a speed dial index number, as well as the next available position
under the Line Key(s). The phone populates all available positions with the
contacts that have the lowest speed dial index numbers.
Speed Dial Keys display consecutively according to the speed dial index
number (the lowest speed dial index number displays first). To re-order Speed
Dial Keys, see “Updating Speed Dial Keys” on page 77.
For information on assigning or updating speed dial index numbers, see
“Updating Your Local Contact Directory” on page 69. For information on
placing calls using speed dials, see “Calling by Speed Dialing” on page 36.
76 Polycom, Inc.
Page 83

Managing Speed Dials Using the Basic Features of Your Phone
Adding Speed Dial Keys
Each time you add a contact to your Contact Directory, a speed dial index
number is automatically assigned to the contact. If a position is available under
the Line Key(s), the contact is automatically assigned to it, and you can place
a call to the contact by tapping the Speed Dial Key.
To assign a new Speed Dial Key:
1 Tap > Features > Contact Directory.
2 Tap the Add soft key.
3 Add contact information for the new contact (see “Adding Contacts to
Your Local Contact Directory” on page 66).
The speed dial index can be any unused value between the next available
number and a maximum value of 9999. If you assign a speed dial index
number that is already taken, the message “Speed dial index already
exists” displays.
Polycom recommends that you assign speed dial index values consecutively.
For example, if you assign the third position to the speed dial index value “2,” assign
the fourth position to the speed dial index value “3.”
4 Tap the Save soft key.
5 Tap to return to the idle screen.
Updating Speed Dial Keys
Update a Speed Dial Key to remove or re-order the Speed Dial Keys on your
phone. You update a Speed Dial Key by updating a contact’s speed dial index
number. If you delete a speed dial index number for a contact, the contact’s
Speed Dial Key is replaced by the contact who has the closest speed dial index
number.
To update a speed dial index for an existing contact:
1 Tap > Features > Contact Directory.
2 From the Directory screen, tap the contact whose speed dial index you
want to update, and then tap the Edit soft key.
3 From the Edit Contact screen, tap the Speed Dial Index field, and then
enter or update the speed dial index number.
The speed dial index can be any value between the next available index
value and a maximum value of 9999.
4 Tap the Save soft key.
5 Tap to return to the idle screen.
Polycom, Inc. 77
Page 84

User Guide for the Polycom VVX 1500 Business Media Phone Accessing Voice and Video Mail
Accessing Voice and Video Mail
• Voice and video mail is an optional feature that your system administrator sets
up. Your system may not support it.
Note
• Screen options may vary with your application. Voice/video mail may be
accessible with a single key press.
You can access voice and video mail messages from your phone. Your mail is
saved in a centralized location.
Your phone may indicate mail by the following:
• An icon, , on the status bar. The icon has a counter indicating the
number of messages you haven’t heard yet.
• An icon, , next to the Line Key.
• A fast flashing LED indicator.
• An audible alert (if your phone is on-hook).
You can temporarily remove all message indicators by accessing the
Messages screen and tapping the Clear soft key. After a period of time (about
two hours), the message indicators will display again.
To access voice or video messages:
1 Do one of the following:
— To review new messages, tap > Message Center.
or
— To review old messages, tap > Features > Messages >
Message Center. Or, press , and then tap Message Center.
The Messages screen displays.
(If multiple lines are set up on your phone, the Line Select screen displays
instead, and you have to tap the line for which to listen to messages. Then,
the Messages screen displays.)
2 From the Messages screen, tap the Connect soft key, and then follow the
voice or visual prompts on the screen.
(If you want to temporarily clear all message indicators without listening
to your mail, tap the Clear soft key.)
3 Tap to return to the idle screen.
78 Polycom, Inc.
Page 85

Working with Multiple and Shared Lines Using the Basic Features of Your Phone
Working with Multiple and Shared Lines
Your system administrator can customize your phone so that you have more
than one Line Key. Your phone can also share a line with another phone.
Supporting Multiple Lines
Your phone can support up to six different lines. Lines are assigned to the
Line Keys on your phone. Typically, the top-most Line Key is reserved for the
principal directory number (DN) of the phone.
When the phone is idle, Line Keys can display the following icons. (For
information on icons that display when the phone has a call, see “Phone Icons”
on page 9.)
Line Key Icon Displays for ...
Registered, private lines.
Registered, shared lines.
Unregistered lines.
Lines that have the Always call forwarding type enabled.
Lines that have Do Not Disturb enabled.
Your phone can handle a maximum of 24 calls, distributed across all lines. If
your phone has two lines, and one line has 24 calls, your phone cannot accept
any other calls.
You can set up any available key (that is, one that is not assigned to a line) as
a Speed Dial Key. Speed Dial Keys display .
Polycom, Inc. 79
Page 86

User Guide for the Polycom VVX 1500 Business Media Phone Working with Multiple and Shared Lines
The following figure shows a phone set up with one phone line (2076). Since
one Line Key is taken, there are five keys available that you can assign as
Speed Dial Keys. In this example, five Speed Dial Keys are set up.
Supporting Multiple Line Keys Per Line
Your system administrator can assign each phone line to a single Line Key, or
to multiple Line Keys.
Incoming and outgoing calls for a phone line will be distributed evenly across
all Line Keys that are assigned to the phone line. For example, if you have two
Line Keys set up as 1952, and you have an active call for 1952 on the first
Line Key, an incoming call for 1952 will go to the second Line Key.
Your phone can be set up to have a combination of lines with a single Line Key
and lines with multiple Line Keys.
80 Polycom, Inc.
Page 87

Locking and Unlocking the Phone Using the Basic Features of Your Phone
Supporting Shared Lines
Shared lines is an optional feature and may not be supported on your particular
system. For more information, contact your system administrator.
Note
Call Forwarding is not available on shared lines.In addition, you cannot set up
shared lines for lines that use the H.323 protocol.
Note
Enabling Do Not Disturb on shared lines disables ringing only. You will still see a
visual notification of the call and have the option to answer the call.
Your system administrator can set up your phone to support shared lines. If
two phones share a line, an incoming call to that number will cause both
phones to ring. The call can be answered on either phone, but not on both.
Calls on shared lines can be transferred, placed on hold, or added to a
conference.
If you have an incoming call on a shared line, you can tap the Silence soft key
to stop your phone from ringing. The call’s visual notification will still display.
The following table shows the Line Key icons and status indicators that
display for shared lines.
Line Key Icon Shared Line Status Line Key Status Indicator
Idle (No indicator)
Active call Solid red
Call or calls on hold Flashing red
Locking and Unlocking the Phone
• Locking your phone is a feature that your system may not support. For more
information, see your system administrator.
Note
• Your system administrator can set up your phone to automatically lock if the
phone hasn’t been used for a certain period of time, as well as block the phone’s
browser while the phone is locked.
Polycom, Inc. 81
Page 88

User Guide for the Polycom VVX 1500 Business Media Phone Locking and Unlocking the Phone
Lock your phone to do the following:
• Prevent unauthorized outgoing calls.
• Allow only authorized people to answer calls.
• Prevent people from viewing or modifying phone displays or information
(for example, menus, directory lists, call records, and Speed Dial Keys).
When your phone is locked:
• You can only make an outgoing call to a number from a list of authorized
numbers.
• You have to enter a password to answer incoming calls.
• All keys and soft keys are disabled, except those that allow you to unlock
the phone, make an authorized call, redial a number, or view the browser
(if enabled).
You unlock the phone by entering your user password. If your phone restarts
for any reason while it is locked, it will be locked when the phone starts up
again (unless your phone is configured to start up unlocked).
When your phone is locked, the messages “The phone is locked” and
“Authorized calls only” scroll on the status bar. Messages that displayed
before the phone was locked don’t display.
About Your User Password
You are assigned a user password so you can answer calls from your locked
phone and unlock the phone. By default, your user password is 123. You can
change your user password at any time.
To change your user password, you need to enter the administrator password. For
more information, see your system administrator.
Note
Changing Your User Password
By default, your user password is 123. Change your user password so it’s
unique to your phone.
To change your user password:
1 Tap > Settings > Advanced.
2 From the Password screen, enter the administrator password, and then
tap the Enter soft key.
3 From the Advanced screen, select Change User Password.
4 From the Change User Password screen, enter your password
information, and then tap the Enter soft key.
82 Polycom, Inc.
Page 89

Locking and Unlocking the Phone Using the Basic Features of Your Phone
Locking and Unlocking Your Phone
You can choose how you want your phone to handle incoming calls when it is
locked. If you set up your phone to allow incoming calls when it is locked (the
default setting), incoming calls will ring on your phone, and you can answer
calls by entering your user password. If you set up your phone to ignore
incoming calls, Do Not Disturb will be applied to all lines on your phone, and
your phone will not ring.
To lock your phone:
1 Tap > Settings > Basic > Lock Phone.
2 From the Lock Phone screen, select how you want incoming calls handled
when your phone is locked.
— Allow ringing when locked—Select this option if you want your
phone to ring when you have an incoming call. If you choose this
option, you can answer a call by entering your password.
— DND when locked—Select this option if you don’t want your phone
to ring. You won’t have the option to answer incoming calls. All
incoming calls will go to your mail system (if enabled) and display in
your Missed Calls list.
Note
The default setting is Allow ringing when locked.
Enabling DND when locked on shared lines disables ringing only. You will still see
a visual notification of the call and have the option to answer it.
3 Tap the Lock soft key.
Your phone is locked.
Your phone may be set up so that you can quickly lock it by tapping the Lock soft
key from the idle screen. If you do this, however, you cannot choose how to handle
incoming calls. Your phone will use the default setting (Allow ringing when locked),
or the last setting you selected.
To unlock your phone:
1 From the idle screen, tap the Unlock soft key.
2 From the Unlock the Phone screen, enter your password, and then tap the
Enter soft key.
(For information on your user password, including what to do if you
forget your user password, see “About Your User Password” on page 82.)
The phone unlocks.
Polycom, Inc. 83
Page 90

User Guide for the Polycom VVX 1500 Business Media Phone Locking and Unlocking the Phone
Calling and Answering from a Locked Phone
From a locked phone, anyone can dial the standard emergency number (for
example, 911), and up to five authorized numbers that an administrator can set
up. You cannot call any other numbers from a locked phone.
If you set up your phone so you can answer incoming calls when your phone
is locked, you can answer calls by entering your user password.
To call an authorized number from a locked phone:
>> Do one of the following:
— Tap the New Call soft key. From the Place an Authorized Call screen,
select the number you want to call, and then tap the Dial soft key.
The following figure shows an example of the Place an Authorized
Call screen.
or
— Place a call to an authorized number by using the handset, headset, or
speakerphone. For information on using the handset, headset, or
speakerphone to place a call, see “Placing Calls” on page 30.
If you try to place a call to an unauthorized number, the message
“Unauthorized number” displays. (To view a list of authorized
numbers that you can call, tap the New Call soft key from the idle
screen when your phone is locked.)
The call is placed.
84 Polycom, Inc.
Page 91

Locking and Unlocking the Phone Using the Basic Features of Your Phone
To answer a call on a locked phone:
1 While the phone rings, tap the Answer soft key.
2 From the Answer the Call screen, enter your password, and then tap the
Enter soft key.
(If you press the Cancel soft key instead, the Answer the Call screen
disappears and the incoming call window displays again.)
(For information on your user password, including what to do if you
forget your user password, see “About Your User Password” on page 82.)
The call connects.
Polycom, Inc. 85
Page 92

User Guide for the Polycom VVX 1500 Business Media Phone Locking and Unlocking the Phone
86 Polycom, Inc.
Page 93

3
Using the Advanced Features of Your Phone
This chapter shows you how to use the advanced features of your
Polycom VVX 1500 business media phone. The topics include:
• “Using Instant Messaging” on page 87
• “Using Buddy Status Lists” on page 91
• “Working with a Polycom CMA System” on page 97
• “Using the Busy Lamp Field” on page 111
• “Recording Calls and Conferences” on page 112
• “Playing Back Recorded Calls” on page 118
• “Using the Browser” on page 122
• “Updating Your Phone’s Configuration” on page 125
• “Restarting Your Phone” on page 125
Using Instant Messaging
Instant messaging is an optional feature that your system administrator enables.
Your system may not support it.
Screen options may vary with your application.
You can send and receive instant messages using your phone. Instant
messaging is supported in real-time.
Polycom, Inc. 87
Page 94

User Guide for the Polycom VVX 1500 Business Media Phone Using Instant Messaging
Your phone may indicate instant messages by the following:
• An icon, , on the status bar. The icon has a counter indicating the
number of unviewed messages you have.
• An icon, , next to the Line Key.
• A fast flashing LED indicator.
• An audible alert (if your phone is on-hook).
Reading and Managing Instant Messages
Messages display in the order they are received (the first message received
displays first).
To read instant messages:
1 Do one of the following :
— Tap > Instant Messages.
— Tap > Features > Messages > Instant Messages.
— Press , and then tap Instant Messages.
The Instant Messages screen displays.
(If multiple lines are configured on your phone, the Line Select screen
displays instead, and you have to select the line to retrieve messages from.
Then, the Instant Messages screen displays.)
2 From the Instant Messages screen, you can do the following:
— To view a specific message, tap the Next or Previous soft key. The first
message received displays first.
— To create a new message, tap the New soft key (see “Sending Instant
Messages” on page 89).
— To reply to the message, tap the Reply soft key (see “Sending Instant
Messages” on page 89, step 3).
— To delete the message, tap the Delete soft key.
3 Tap to return to the idle screen.
88 Polycom, Inc.
Page 95

Using Instant Messaging Using the Advanced Features of Your Phone
Sending Instant Messages
When you send a message, you can either select a message from a preset list of
short messages (for example, “Call me“ and “Can’t chat now”), or you can use
the dialpad to enter a custom message.
To send an instant message:
• Screen options may vary with your application.
• Instant messaging may be accessible with a single key press. Contact your
system administrator about this option.
1 Do one of the following:
— Tap > Instant Messages.
— Tap > Features > Messages > Instant Messages.
— Press , and then tap Instant Messages.
The Instant Messages screen displays.
(If multiple lines are configured on your phone, the Line Select screen
displays instead, and you have to select the line to send the message from.
Then, the Instant Messages screen displays.)
2 From the Instant Messages screen, tap the New soft key, enter the phone
number, URL, or IP address to send the message to, and then tap the
Ok soft key.
Polycom, Inc. 89
Page 96

User Guide for the Polycom VVX 1500 Business Media Phone Using Instant Messaging
The phone number, URL, or IP address you entered displays on the
screen.
3 Do one of the following:
— To choose a pre-scripted message, tap the Select soft key. From the
Message Select screen, tap the message you want.
or
— To compose a custom message, tap the Edit soft key, and then enter
your message. (For information on entering data, see “Entering Data
and Editing Fields” on page 14.)
4 Tap the Send soft key.
5 Tap to return to the idle screen.
90 Polycom, Inc.
Page 97

Using Buddy Status Lists Using the Advanced Features of Your Phone
Using Buddy Status Lists
• Monitoring the status (presence) of contacts is an optional feature that your
system administrator enables. Your system may not support it. For more
information, contact your system administrator.
®
• If your phone is provisioned by a Polycom
Application™ (CMA™) system, your phone handles presence and Buddy
Status lists differently than what is described in this section. For information on
monitoring the status of CMA contacts, see “Using Buddy Status Lists with a
CMA System” on page 99.
A Buddy Status list is a list of users/devices whose status, or “presence,” you
can monitor. Users update their presence setting (for example, “Be right back,”
“Out to lunch,” or “Busy”), and you can view their status in real time from
your phone’s Buddy Status screen, or from the idle screen (if your buddy has
a Speed Dial Key on your phone). If you like, you can block others from
monitoring your status.
Converged Management
Your phone can “watch” the status of up to eight other phones. These phones
form your “Buddy Status list.” Your phone can be monitored by up to eight
other phones.
Depending on the types of phones you monitor, and how they are configured, you
may be able to monitor up to 48 buddies.
If your phone is configured to work with Microsoft Office Live
Communications Server 2005, the behavior of presence settings and
Buddy Status lists is different. For more information, see “Integrating with
Microsoft Live Communications Server 2005” on page 96, or contact your
system administrator.
Updating Your Presence Settings
Your presence setting indicates your status (either online, busy, be right back,
away, out to lunch, offline, or do not disturb). Update your presence setting so
that other users can monitor your status from their phones.
When you select a presence setting (other than online), the setting scrolls
under the time display on the status bar on your phone.
Polycom, Inc. 91
Page 98

User Guide for the Polycom VVX 1500 Business Media Phone Using Buddy Status Lists
To update your presence settings:
1 Do one of the following:
— From the idle screen, tap the My Status soft key.
or
— Tap > Features > Presence > My Status.
2 From the My Status screen, tap the status you want, and then tap the
Select soft key.
This affects information sent to phones watching you. Presence
information will also be sent to watching phones when you go off-hook or
enable Do Not Disturb.
3 Tap to return to the idle screen.
The status you selected displays on the status bar (unless you selected Online).
The following figure shows what the touch screen looks like when you assign
a presence status (in this case, “Busy”). If you assign the status “Online” (the
default status), the presence status doesn’t display on the screen.
92 Polycom, Inc.
Page 99

Using Buddy Status Lists Using the Advanced Features of Your Phone
Managing Buddies
Manage your buddies by selecting the contacts whose presence you want to
monitor. These contacts form your Buddy Status list. You add contacts to your
Buddy Status list from your local Contact Directory.
When you select a buddy, a Speed Dial Key is automatically assigned to the
buddy (if one is available), and the Speed Dial Key will display the buddy’s
status. If the contact you choose as a buddy already has a Speed Dial Key, the
contact’s Speed Dial Key will display the buddy’s status.
If your call server is Microsoft Live Communications Server 2005, see “Integrating
with Microsoft Live Communications Server 2005” on page 96.
Updating Your Buddy Status List
Update your Buddy Status list by updating the contacts in your local
Contact Directory.
To update your Buddy Status list:
1 Tap > Features > Contact Directory.
2 From the Directory screen, tap the contact you want to start or stop
monitoring, and then tap the Edit soft key.
3 From the Edit Contact screen, tap the Watch Buddy field, and then tap
the field’s highlighted grey box. From the drop-down list, tap Enabled or
Disabled.
When Watch Buddy is enabled, the contact is added to your Buddy Status
list and you can monitor the contact’s status.
When Watch Buddy is disabled, the contact is removed from your
Buddy Status list and you cannot monitor the contact’s status.
The default for Watch Buddy is Disabled.
4 Tap the Save soft key.
5 Tap to return to the idle screen.
If you enable the Watch Buddy setting for a contact, the contact will display in
your Buddy Status list, and on the idle screen (if your buddy has a Speed Dial
Key). To view your Buddy Status list, tap the Buddies soft key from the idle
screen.
Polycom, Inc. 93
Page 100

User Guide for the Polycom VVX 1500 Business Media Phone Using Buddy Status Lists
Blocking and Unblocking Contacts from Viewing Your Status
Block a contact in your Contact Directory if you don’t want the contact to view
your status. If you unblock a contact, the contact can add you to their
Buddy Status list and view your status.
To view a list of contacts that can and cannot monitor your status, do the following:
• To view contacts that cannot view your status, tap > Features >
Presence > Blocked List.
• To view contacts that can view your status, tap
Presence > Watcher List.
To block or unblock a contact from viewing your status:
1 Tap > Features > Contact Directory.
2 From the Directory screen, tap the contact you want to block or unblock.
3 From the Edit Contact screen, tap Block Buddy, and then tap the field’s
highlighted grey box. From the drop-down list, tap Enabled or Disabled.
> Features >
Monitoring Buddies
When Block Buddy is enabled, the contact cannot watch your status. The
contact will display in your Blocked List.
When Block Buddy is disabled, the contact can watch your status. The
contact will display in your Watcher List.
The default for Block Buddy is Disabled.
4 Tap the Save soft key.
5 Tap to return to the idle screen.
You can use your Blocked List to unblock a contact, rather than updating the
Contact Directory . Tap > Features > Presence > Blocked List. From
the Blocked List screen, tap the contact you want to unblock, and then tap the
Unblock soft key. The contact can now watch your phone, and will display in your
Watcher List.
You can monitor the status of all the contacts in your Buddy Status list from
the idle screen (if your buddy has a Speed Dial Key), or from the Buddy Status
list.
Monitoring Buddies from the Idle Screen
Your phone automatically assigns a buddy to a Speed Dial Key (if one is
available). The Speed Dial Key displays an icon and status indicator (a vertical
bar on the far-right of the key) that indicate the buddy’s status.
94 Polycom, Inc.
 Loading...