

Page 1
Deployment Guide for the Polycom® VVX™ C Business Media Phone for Cisco® Unified Communications Manager (SIP)
SIP 3.2.2 | July 2010 | 1725-16828-001 Rev. B1
Page 2

Trademark Information
POLYCOM®, the Polycom “Triangles” logo and the names and marks associated with Polycom’s products are
trademarks and/or service marks of Polycom, Inc. and are registered and/or common law marks in the United States
and various other countries. All other trademarks are property of their respective owners. No portion hereof may be
reproduced or transmitted in any form or by any means, for any purpose other than the recipient’s personal use, without
the express written permission of Polycom.
Patent Information
The accompanying product is protected by one or more U.S. and foreign patents and/or pending patent applications
held by Polycom, Inc.
Disclaimer
Some countries, states, or provinces do not allow the exclusion or limitation of implied warranties or the limitation of
incidental or consequential damages for certain products supplied to consumers, or the limitation of liability for personal
injury, so the above limitations and exclusions may be limited in their application to you. When the implied warranties
are not allowed to be excluded in their entirety, they will be limited to the duration of the applicable written warranty. This
warranty gives you specific legal rights which may vary depending on local law.
Copyright Notice
Portions of the software contained in this product are:
Copyright © 1998, 1999, 2000 Thai Open Source Software Center Ltd. and Clark Cooper
Copyright © 1998 by the Massachusetts Institute of Technology
Copyright © 1998-2003 The OpenSSL Project
Copyright © 1995-1998 Eric Young (eay@cryptsoft.com). All rights reserved
Copyright © 1995-2002 Jean-Loup Gailly and Mark Adler
Copyright © 1996-2004, Daniel Stenberg, <daniel@haxx.se>
Permission is hereby granted, free of charge, to any person obtaining a copy of this software and associated
documentation files (the “Software”), to deal in the Software without restriction, including without limitation the rights to
use, copy, modify, merge, publish, distribute, sublicense, and/or sell copies of the Software, and to permit persons to
whom the Software is furnished to do so, subject to the following conditions:
The above copyright notice and this permission notice shall be included in all copies or substantial portions of the
Software.
THE SOFTWARE IS PROVIDED “AS IS”, WITHOUT WARRANTY OF ANY KIND, EXPRESS OR IMPLIED,
INCLUDING BUT NOT LIMITED TO THE WARRANTIES OF MERCHANTABILITY, FITNESS FOR A PARTICULAR
PURPOSE AND NONINFRINGEMENT. IN NO EVENT SHALL THE AUTHORS OR COPYRIGHT HOLDERS BE
LIABLE FOR ANY CLAIM, DAMAGES OR OTHER LIABILITY, WHETHER IN AN ACTION OF CONTRACT, TORT OR
OTHERWISE, ARISING FROM, OUT OF OR IN CONNECTION WITH THE SOFTWARE OR THE USE OR OTHER
DEALINGS IN THE SOFTWARE.
© 2010 Polycom, Inc. All rights reserved.
Polycom, Inc.
4750 Willow Road
Pleasanton, CA 94588-2708
USA
No part of this document may be reproduced or transmitted in any form or by any means, electronic or mechanical, for
any purpose, without the express written permission of Polycom, Inc. Under the law, reproducing includes translating
into another language or format.
As between the parties, Polycom, Inc., retains title to and ownership of all proprietary rights with respect to the software
contained within its products. The software is protected by United States copyright laws and international treaty
provision. Therefore, you must treat the software like any other copyrighted material (e.g., a book or sound recording).
Every effort has been made to ensure that the information in this manual is accurate. Polycom, Inc., is not responsible
for printing or clerical errors. Information in this document is subject to change without notice.
ii
Page 3

About This Guide
This guide explains how to deploy the Polycom VVX 1500 C Business Media
Phone in a Cisco
environment, you will be able to conduct both voice and video calls.
In this guide, you will find everything you need to set up the Polycom VVX
1500 C phone in an environment running Cisco Unified Communications
Manager version 6 and 7. Be sure to verify that your network is prepared for
configuring the phone and Cisco Unified Communications Manager.
The following related documents for the Polycom VVX 1500 C phone are
available:
• Quick Start Guide, which describe how to assemble the phone
• Quick User Guide, which describe the most basic features available on the
phone
• User Guide, which describe the basic and advanced features available on
the phone
• SIP Administrator’s Guide, which describes how to configure, customize,
manage, and troubleshoot Polycom SoundPoint IP, SoundStation IP, and
VVX phone systems
• Technical Bulletins, which describe workarounds to existing issues and
provide expanded descriptions and examples
• Release Notes, which describe the new and changed features and fixed
problems in the latest version of the software
®
Unified Communications Manager environment. In this
For su pport or ser vice , pleas e con tact y our Po lyco m® re seller or go to Po lycom
Technical Support at http://www.polycom.com/support/voice/.
Polycom recommends that you record the phone model numbers, software
(both the bootROM and SIP), and partner platform for future reference.
Polycom VVX 1500 C MAC Address: ______________________________
BootROM version: ________________________________________________
SIP Application version: ___________________________________________
Partner Platform: _________________________________________________
iii
Page 4

Deployment Guide for the Polycom VVX 1500 C
iv
Page 5

Contents
About This Guide . . . . . . . . . . . . . . . . . . . . . . . . . . . . . . . . . iii
1 Overview . . . . . . . . . . . . . . . . . . . . . . . . . . . . . . . . . . . . . 1–1
2 Configuring Cisco Unified Communications Manager . . . . . 2–1
3 Setting Up the Polycom VVX 1500 C Phone . . . . . . . . . . . . 3–1
Supported Phone Features . . . . . . . . . . . . . . . . . . . . . . . . . . . . . . . . . . . 1–2
Unsupported Phone Features . . . . . . . . . . . . . . . . . . . . . . . . . . . . . . . . . 1–3
Unsupported Cisco Features . . . . . . . . . . . . . . . . . . . . . . . . . . . . . . . . . . 1–3
Topics Not Mentioned in This Guide . . . . . . . . . . . . . . . . . . . . . . . . . . 1–3
Changing Cisco Unified Communications Manager . . . . . . . . . . . . . . . . . 2–1
Changing the Network Configuration . . . . . . . . . . . . . . . . . . . . . . . . . . . . . 3–2
Setting Up the Provisioning Server . . . . . . . . . . . . . . . . . . . . . . . . . . . . . . . . 3–4
Configuring Your System . . . . . . . . . . . . . . . . . . . . . . . . . . . . . . . . . . . . . . . . 3–6
Local Digit Map . . . . . . . . . . . . . . . . . . . . . . . . . . . . . . . . . . . . . . . . . . . . 3–6
Call Transfer . . . . . . . . . . . . . . . . . . . . . . . . . . . . . . . . . . . . . . . . . . . . . . . 3–7
Call Log . . . . . . . . . . . . . . . . . . . . . . . . . . . . . . . . . . . . . . . . . . . . . . . . . . . 3–7
Recording and Playback of Audio Calls . . . . . . . . . . . . . . . . . . . . . . . . 3–7
Corporate Directory . . . . . . . . . . . . . . . . . . . . . . . . . . . . . . . . . . . . . . . . . 3–8
Digital Picture Frame . . . . . . . . . . . . . . . . . . . . . . . . . . . . . . . . . . . . . . . . 3–8
Server Redundancy . . . . . . . . . . . . . . . . . . . . . . . . . . . . . . . . . . . . . . . . . 3–8
Voice Mail Integration . . . . . . . . . . . . . . . . . . . . . . . . . . . . . . . . . . . . . . . 3–9
Shared Call Appearances . . . . . . . . . . . . . . . . . . . . . . . . . . . . . . . . . . . . 3–9
Deploying Phones From the Provisioning Server . . . . . . . . . . . . . . . . . . . 3–10
Upgrading the Phone’s Software . . . . . . . . . . . . . . . . . . . . . . . . . . . . . . . . 3–14
Locating the Latest Software . . . . . . . . . . . . . . . . . . . . . . . . . . . . . . . . . 3–14
Downloading New Software to the Phone . . . . . . . . . . . . . . . . . . . . . 3–15
v
Page 6

Deployment Guide for the Polycom VVX 1500 C
4 Troubleshooting the Polycom VVX 1500 C Phone . . . . . . . . 4–1
Calling . . . . . . . . . . . . . . . . . . . . . . . . . . . . . . . . . . . . . . . . . . . . . . . . . . . . . . . . 4–2
Polycom VVX 1500 C Display . . . . . . . . . . . . . . . . . . . . . . . . . . . . . . . . . . . . 4–2
Upgrading the Polycom VVX 1500 C Phone . . . . . . . . . . . . . . . . . . . . . . . . 4–2
A Configuration Files . . . . . . . . . . . . . . . . . . . . . . . . . . . . . .A–1
Master Configuration File . . . . . . . . . . . . . . . . . . . . . . . . . . . . . . . . . . . . . . A–2
Application Configuration File . . . . . . . . . . . . . . . . . . . . . . . . . . . . . . . . . . A–3
Dial Map <dialmap/> . . . . . . . . . . . . . . . . . . . . . . . . . . . . . . . . . . . . . . A–3
Feature <feature/> . . . . . . . . . . . . . . . . . . . . . . . . . . . . . . . . . . . . . . . . . A–4
DNS Cache <dns/> . . . . . . . . . . . . . . . . . . . . . . . . . . . . . . . . . . . . . . . . A–4
Per-Phone Configuration File . . . . . . . . . . . . . . . . . . . . . . . . . . . . . . . . . . . A–4
Registration <reg/> . . . . . . . . . . . . . . . . . . . . . . . . . . . . . . . . . . . . . . . . A–5
Messaging <msg/> . . . . . . . . . . . . . . . . . . . . . . . . . . . . . . . . . . . . . . . . A–6
User Preferences <up/> . . . . . . . . . . . . . . . . . . . . . . . . . . . . . . . . . . . . A–6
B Miscellaneous Administrative Tasks . . . . . . . . . . . . . . . . . . B–1
Modifying Phone’s Configuration Using the Web Interface . . . . . . . . . . . B–1
Index . . . . . . . . . . . . . . . . . . . . . . . . . . . . . . . . . . . . .Index–1
vi
Page 7

Overview
1
This guide provides information for system administrators who want to
deploy the Polycom VVX 1500 C Business Media Phone in a Cisco Unified
Communications Manager environment. It also describes how to upgrade the
phone’s software when it is connected in a Cisco Unified Communications
Manager environment. The phone must be running SIP application 3.1.3
(phone software) or later.
The Polycom VVX 1500 C phone is compatible with the following: Cisco
Unified Communications Manager versions 6 and 7.
The topics in this guide include:
• Configuring Cisco Unified Communications Manager to manage the
Polycom VVX 1500 C phone. Refer to Configuring Cisco Unified
Communications Manager on page 2-1.
Warning
• Setting up the Polycom VVX 1500 C phone and changing the configuration
files to work with Cisco Unified Communications Manager. Refer to
Setting Up the Polycom VVX 1500 C Phone on page 3-1.
T o upgrade a Polycom VVX 1500 C phones running SIP 3.1.2RevB or earlier to SIP
3.2.2, you must
the software. Refer to Upgrading the Phone’s Software on page 3-14.
To troubleshooting any issues with the phone, refer to Troubleshooting the
Polycom VVX 1500 C Phone on page 4-1.
The topics in this chapter include:
• Supported Phone Features
• Unsupported Phone Features
• Unsupported Cisco Features
• Topics Not Mentioned in This Guide
perform additional steps before rebooting the phone to download
1 - 1
Page 8

Deployment Guide for the Polycom VVX 1500 C
Polycom strongly recommends that you connect the Polycom VVX 1500 C to the
LAN using the included network cable. A LAN connection enables access to a
provisioning server as well as a time server.
A provisioning server facilitates software upgrades, configuration management, and
diagnostic logging, which is helpful if troubleshooting is required.
Access to a time server enables display of the current date and time on the phone's
display.
For more information, refer to Setting Up the Provisioning Server on page 3-4.
Supported Phone Features
The following features are supported on the Polycom VVX 1500 C:
• Six line appearances
• Place a call (to an extension or SIP URL)
• Hold/Resume
• Consultative and blind transfer
• Video on/off
• Call forward (all calls, no answer, and busy)
• Single-button voicemail dialing
• Message Waiting Indicator
• Shared line appearance (call forking - no busy lamp field)
• LDAP/Active Directory integration
• Local call directory
• Placed Call/Missed Call/Received Call lists
• Three-way audio conference with management options (join, split, mute
• Mid-call video/audio negotiation
• Electronic hookswitch with supported headsets
• Enhanced feature keys and configurable soft keys
• Audio call recording and playback (USB flash drive required)
• Digital picture frame (USB flash drive required)
• Server Redundancy
1 - 2
Page 9

Unsupported Phone Features
The following features are not supported on the Polycom VVX 1500 C (due to
proprietary Cisco extensions):
• Call Pickup
• Group Call Pickup
• Directed Call Pickup
• Call Park
• Presence and buddy lists
• Instant Messaging
• Automatic Call Distribution (ACD) Login/Logout
• Secure Real-Time Transport Protocol (SRTP)
• Last Call Return
• Barge-In
Overview
• Busy Lamp Field
Unsupported Cisco Features
The following Cisco features are not supported on the Polycom VVX 1500 C:
• Cisco XML Applications
• Cisco Phone directory
• Cisco ad-hoc conferencing
• Cisco TFTP software/configuration file download
Topics Not Mentioned in This Guide
The following topics are not covered in this guide:
• Configuration of the XHTML Microbrowser and the Polycom XML API
• Configuration of other SIP registrars or proxy servers
• Cisco Unified Presence
1 - 3
Page 10

Deployment Guide for the Polycom VVX 1500 C
1 - 4
Page 11

Configuring Cisco Unified Communications Manager
The Polycom VVX 1500 C phone, managed by Cisco Unified Communications
Manager, is designed to be used like a regular phone on a public switched
telephone network (PSTN).
This chapter provides basic instructions for setting up Cisco Unified
Communications Manager.
2
Changing Cisco Unified Communications Manager
The following settings must be verified or adjusted before connecting the
Polycom VVX 1500 C phone to Cisco Unified Communications Manager:
• Location settings should allow for video bandwidth.
• Region settings should allow for a minimum of 384k video bandwidth.
• Region settings should allow for an audio codec of G.722 for the best audio
experience.
• Each Polycom VVX 1500 C phone requires six Device License Units.
• The Polycom VVX 1500 C phone should be added to a device pool in
which the Media Resource Group List does not
Due to the nature of out-of-band DTMF signalling, Cisco Unified
Communications Manager will sometimes insert Media Termination
Point Resources (MTP) in a call. This will prevent video on the Polycom
VVX 1500 C from operating correctly. This is most common on H.323 and
SIP trunk calls. To prevent this from occurring, the MTP resources should
be removed from any Media Resource Groups and Media Resource Group
Lists that would be used in the trunked calls.
contain MTP resources.
2 - 1
Page 12
Deployment Guide for the Polycom VVX 1500 C
To add the Polycom VVX 1500 C to Cisco Unified Communications Manager:
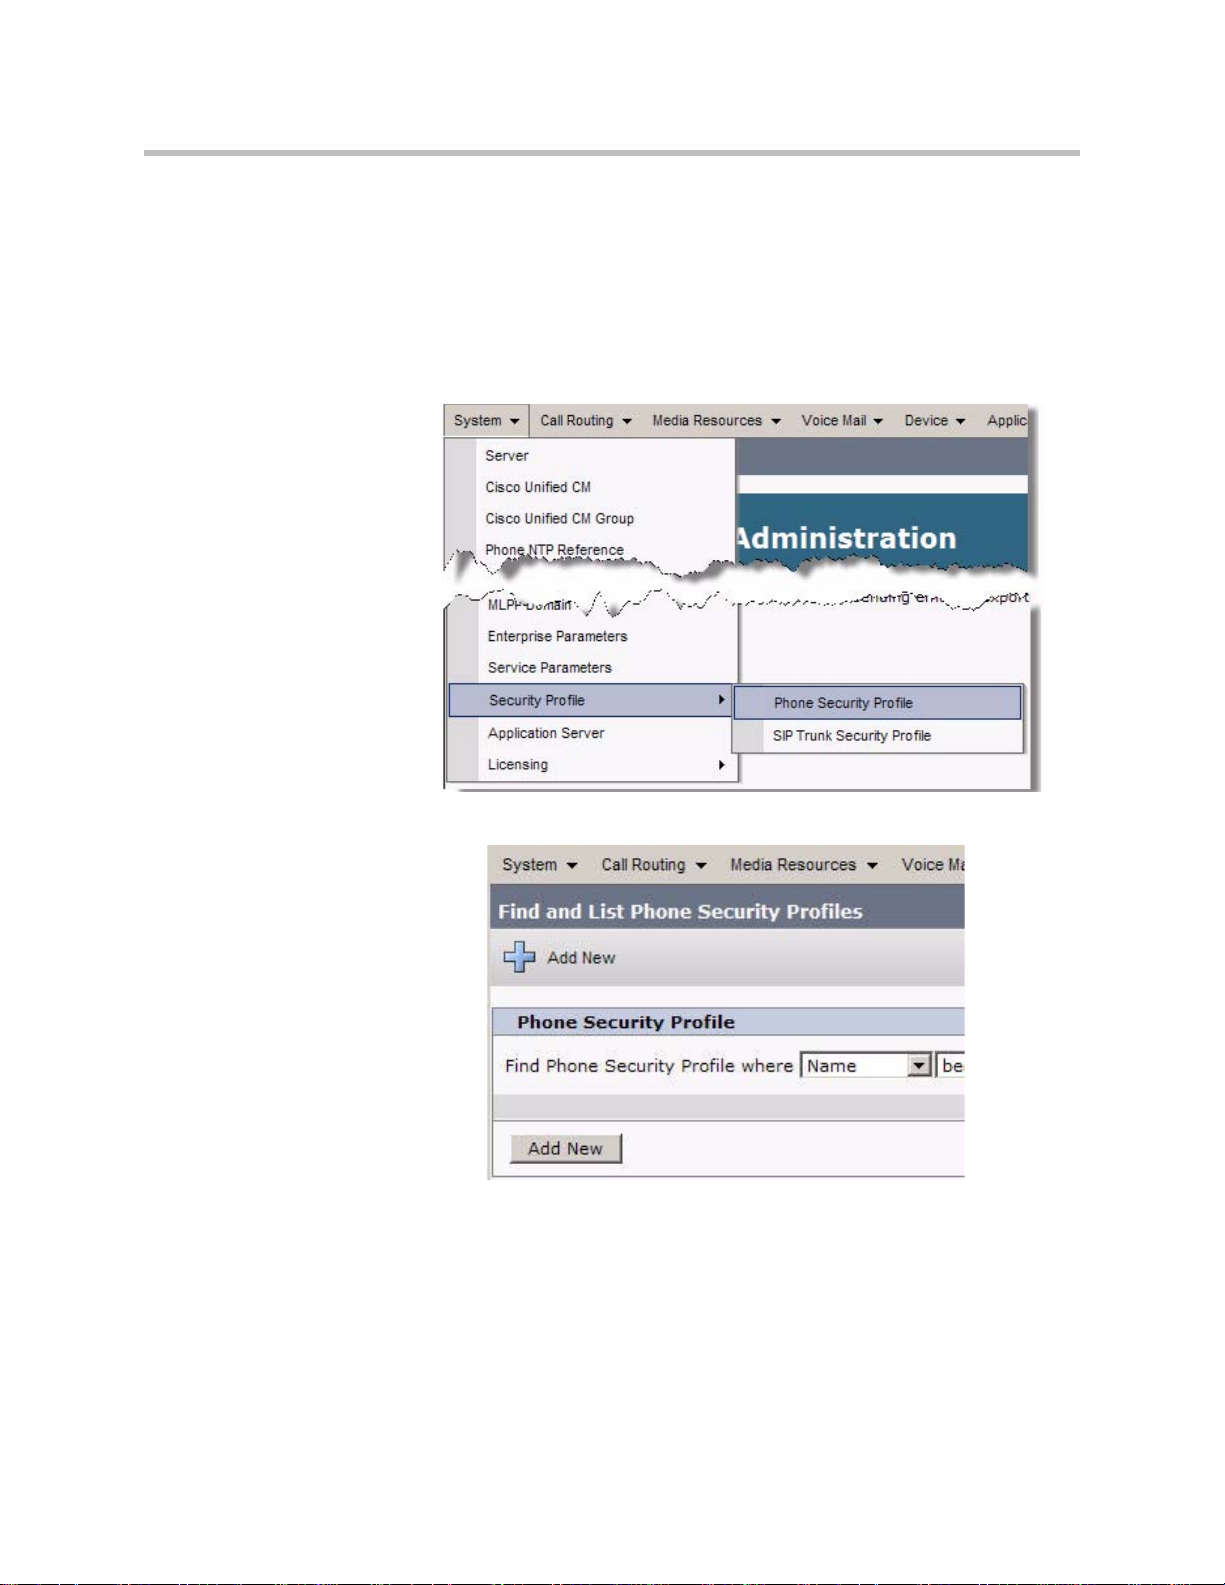
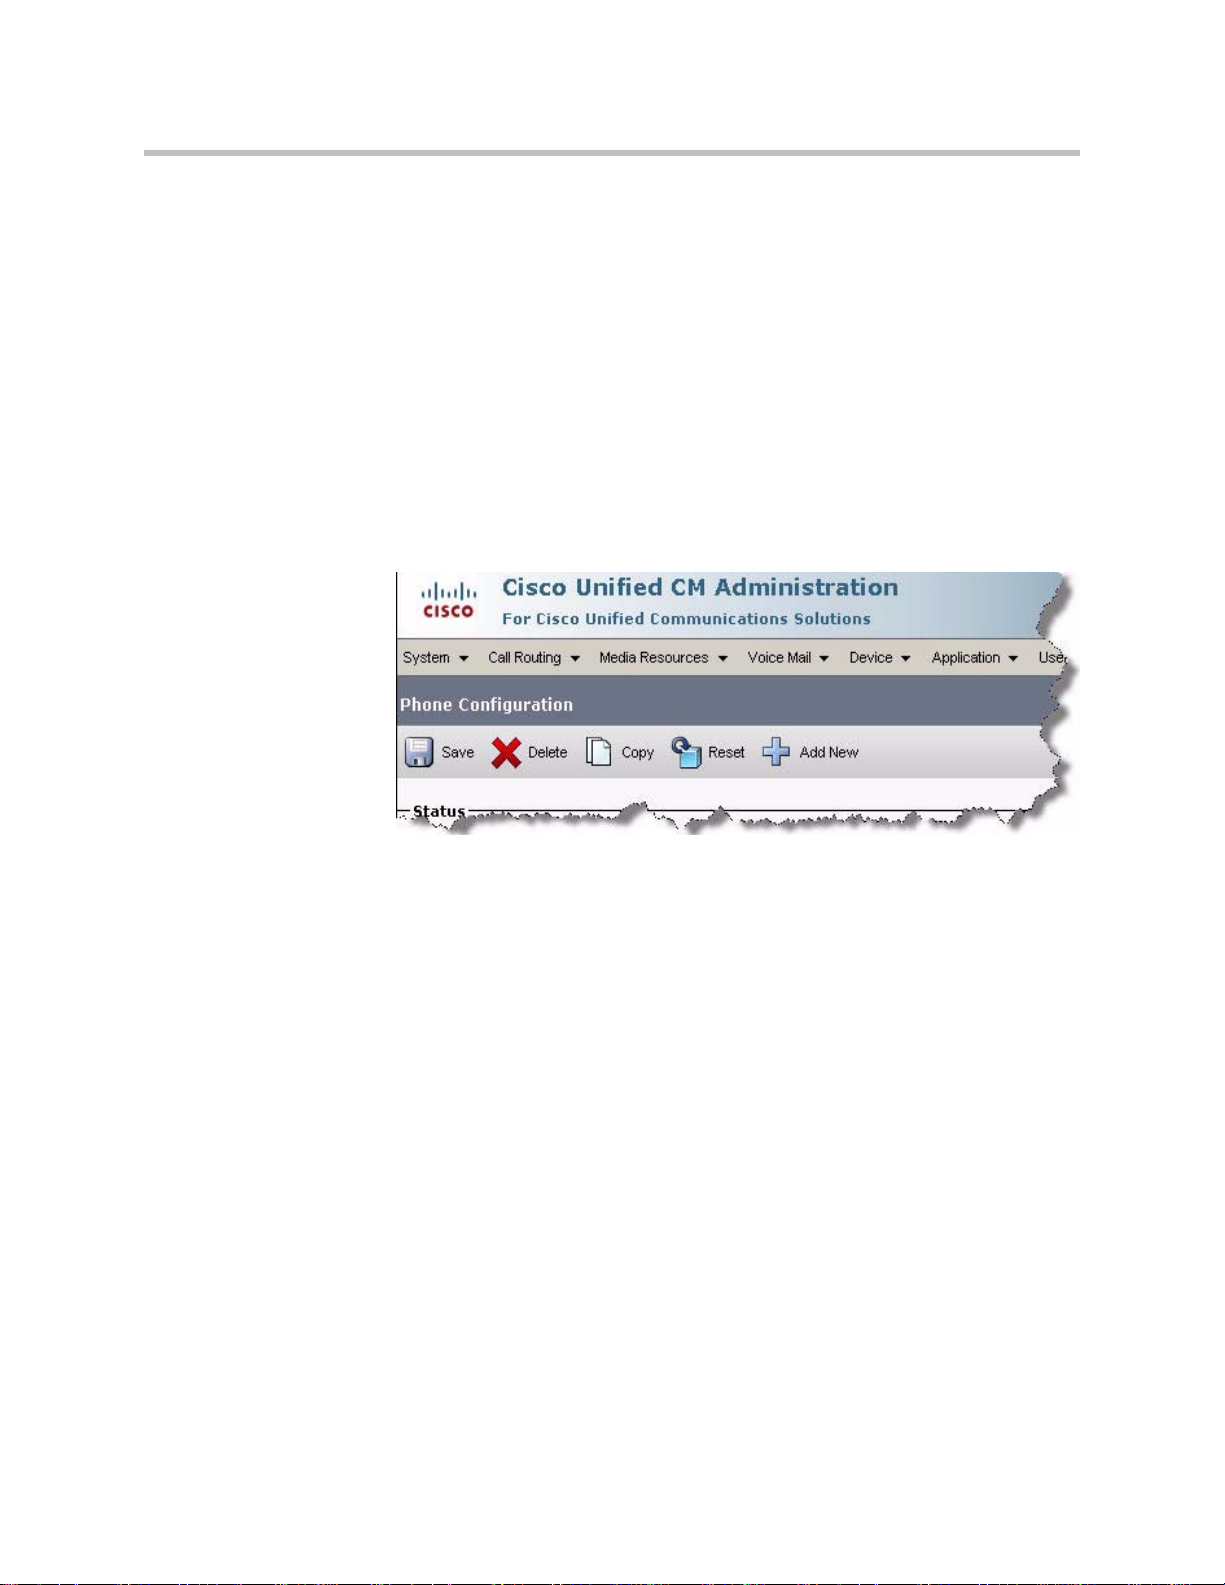
1. Open a Cisco Unified Communications Manager web administration
session.
You will prompted to enter your user name and password.
Part I: Phone Security Settings
2. Select System > Security Profile > Phone Security Profile >.
3. Select +Add New.
2 - 2
Page 13
Configuring Cisco Unified Communications Manager
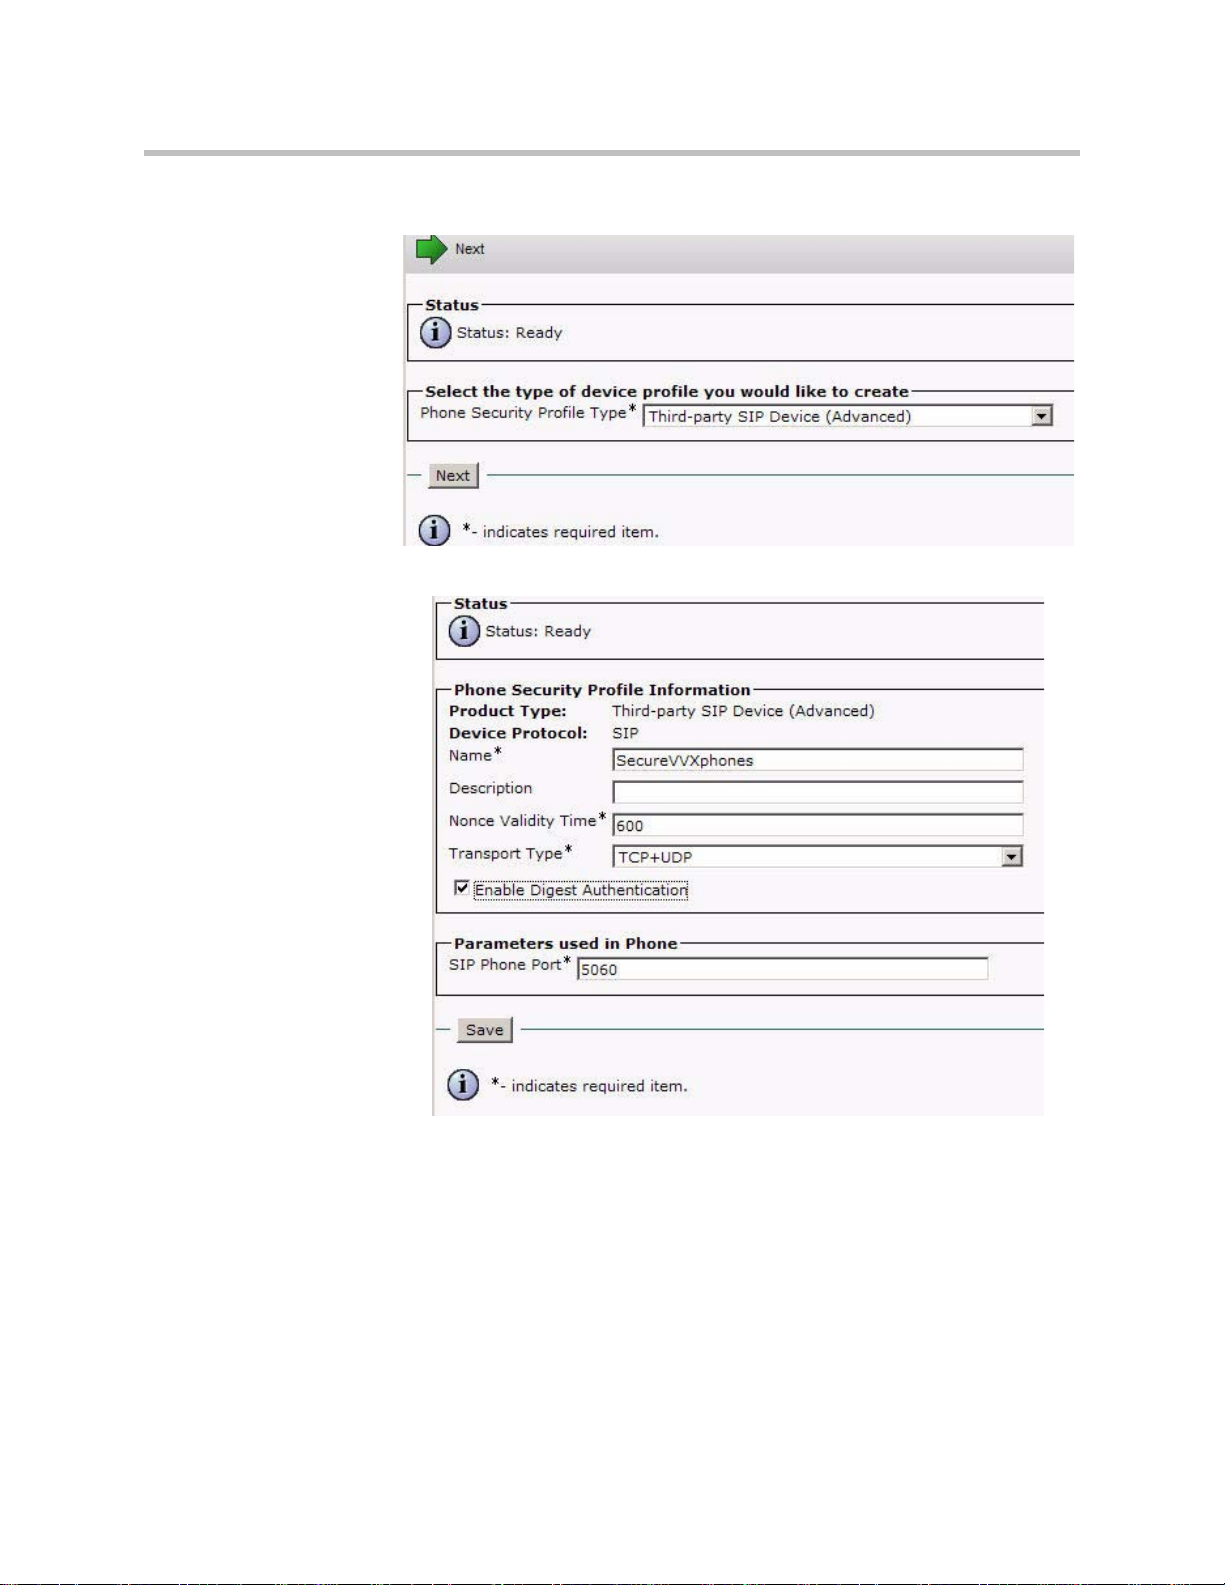
4. Select Third-party SIP Device (Advanced) and click Next.
5. In the Name text box, enter a profile name appropriate for the system.
6. Select the Enabled Digest Authentication check box.
7. Click the Save button.
In the status bar near the top of the page, “Update Successful” appears.
2 - 3
Page 14
Deployment Guide for the Polycom VVX 1500 C
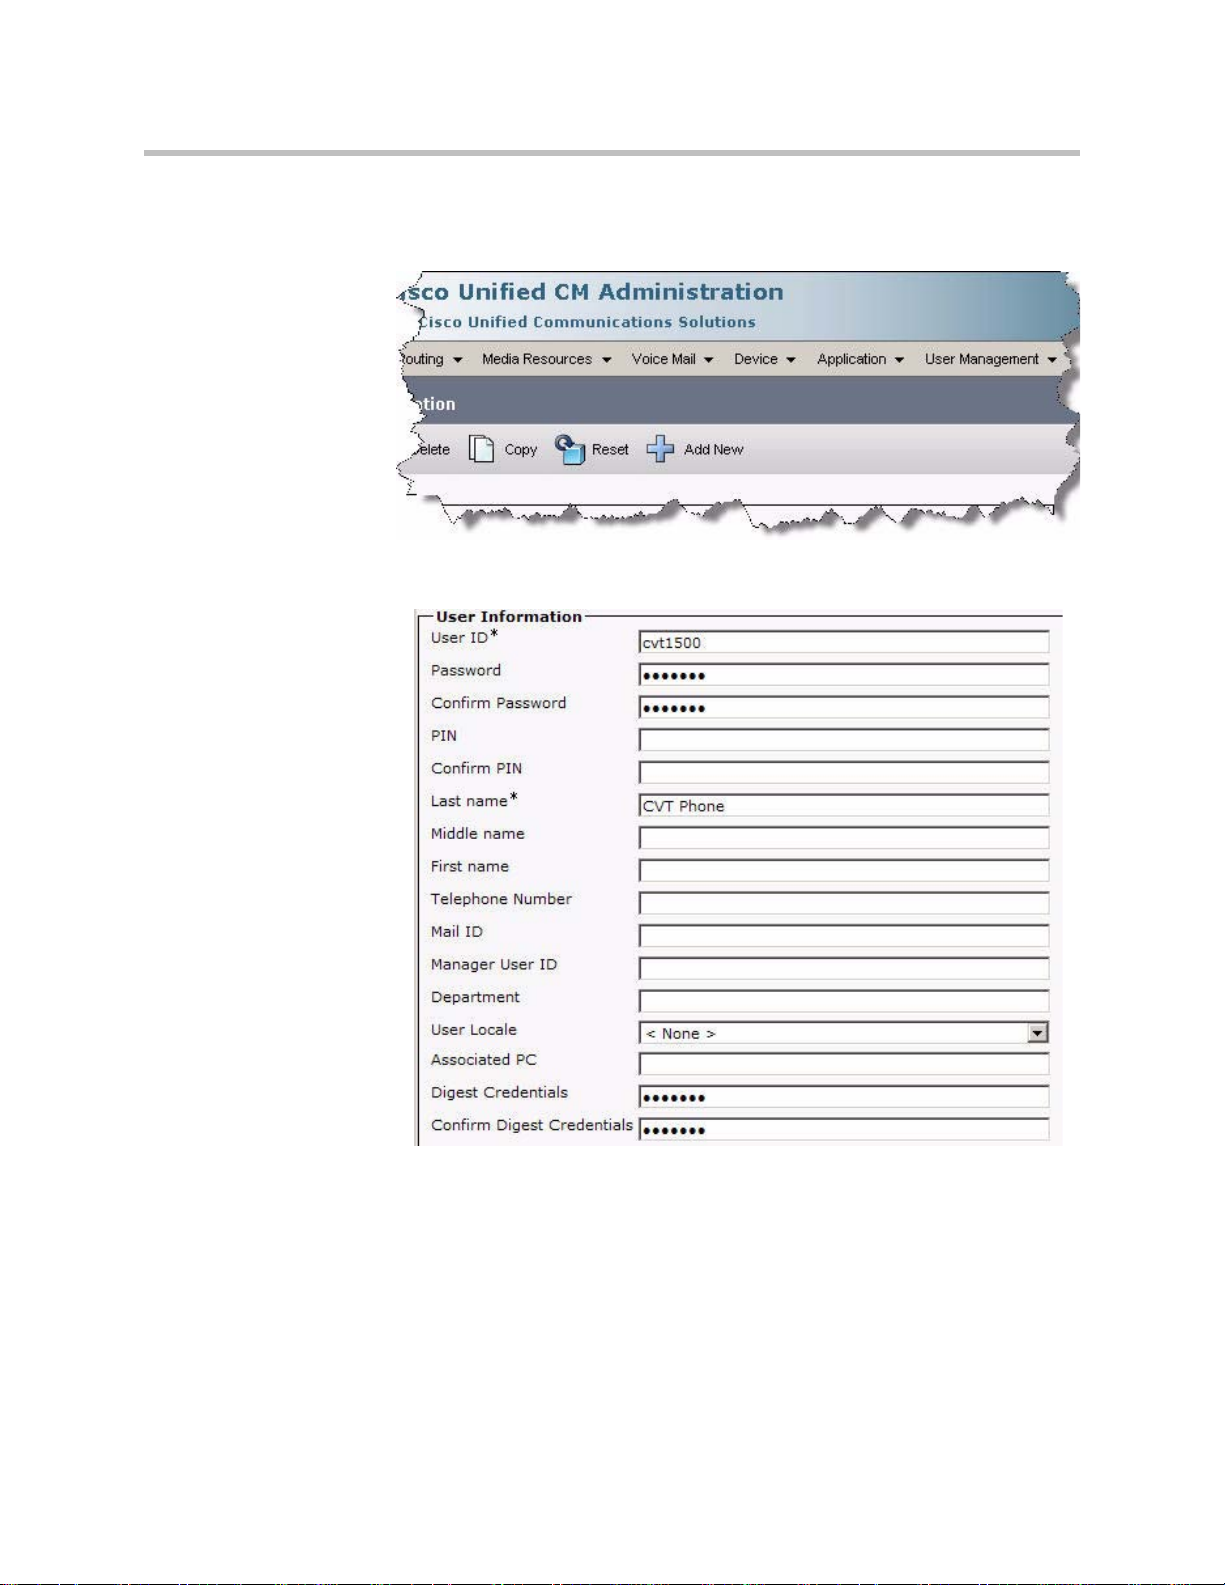
Part II: Adding a Phone User
8. Select User Management > End User > +Add New.
The following screen appears.
2 - 4
9. In the User ID text box, enter a user ID according to system and account
policies.
If you cannot add a user here, your system may be LDAP integrated, in
which case you can use an existing user ID (essentially associating the
phone to an existing user) or have your LDAP administrator create a new
user ID for this phone.
10. In the Last Name text box, enter a last name.
Page 15
Configuring Cisco Unified Communications Manager
11. In the Digest Credentials text box, enter the digital credentials for the
phone.
This is the same password that will be used in the phone’s configuration
file or to access the web interface. Refer to Deploying Phones From the
Provisioning Server on page 3-10 and Upgrading the Phone’s Software on
page 3-14.
12. In the Confirm Digest Credentials text box, enter the same value that
you entered in the previous step.
13. Click the Save button.
In the status bar near the top of the page, “Update Successful” appears.
Part III: Adding a Device Entry
14. Select Device > Phone > +Add New.
2 - 5
Page 16
Deployment Guide for the Polycom VVX 1500 C
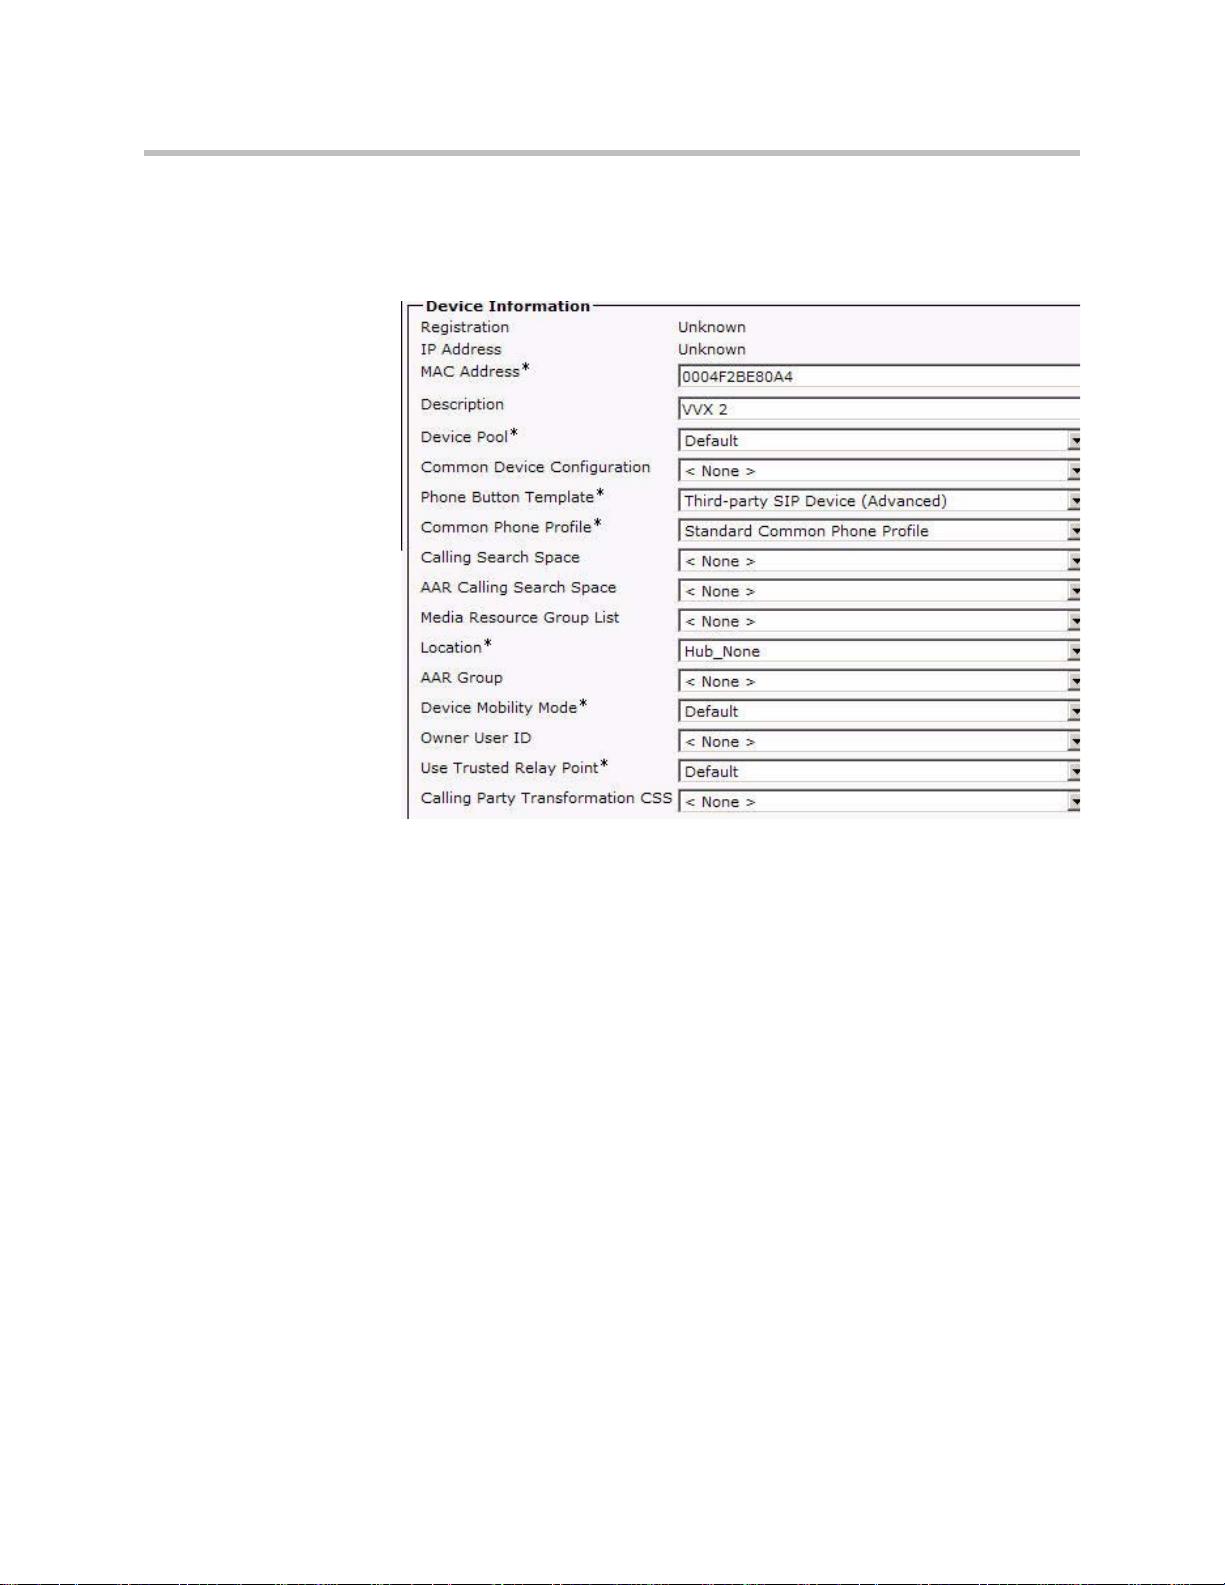
15. Select Third-party SIP Device (Advanced), then click Next.
The following screen appears. Note that the data shown in this section is
only an example.
16. In the MAC Address text box, enter the MAC Address of the phone.
17. (Optional) In the Description text box, enter a description.
18. From the Device Pool list, select the device pool appropriate for your
Cisco Unified Communications Manager system phones.
19. From the Phone Button Template list, select Third-party SIP Device
(Advanced).
20. (Optional) From the Calling Search Space list, select an appropriate
calling search space for the phone.
21. From the Location list, select an appropriate location for the phone.
2 - 6
Page 17

Configuring Cisco Unified Communications Manager
22. From the Device Security Profile list, select the profile created in step 5.
The following screen appears. Note that the data shown in this section is
only an example.
23. In the Digest User field, select the user created in step 8.
24. Click the Save button.
In the status bar near the top of the page, “Update Successful” appears.
25. Reset the Polycom VVX 1500 C in Cisco Unified Communications
Manager.
26. In the Association Information area on the left side of the window, click
on the Line [1] — Add a new DN link.
2 - 7
Page 18

Deployment Guide for the Polycom VVX 1500 C
27. In the Directory Number text box, enter an appropriate phone extension.
28. From the Route Partition list, select an appropriate route partition.
29. In the Alerting Name text box, enter an appropriate alerting name.
30. In the ASCII Alerting Name text box, enter an appropriate ASCII
alerting name.
31. Set the Voice Mail Profile according to the Cisco Unified
Communications Manager system requirements.
2 - 8
32. Set the Call Forward and Call Pickup Settings to appropriate values for
your system.
Page 19

Configuring Cisco Unified Communications Manager
33. In the Display (Internal Caller ID) text box, enter an appropriate caller
ID.
34. In the ASCII Display (Internal Caller ID) text box, enter an appropriate
caller ID.
35. In the Maximum Number of Calls text box, enter an appropriate value
for your system.
Currently the maximum supported value is 6.
36. In the Busy Trigger text box, enter an appropriate value for your system.
Currently the maximum supported value is 6.
37. Click the Save button.
In the status bar near the top of the page, “Update Successful” appears.
You have completed the configuration of Cisco Unified Communications
Manager.
2 - 9
Page 20

Deployment Guide for the Polycom VVX 1500 C
2 - 10
Page 21

3
Setting Up the Polycom VVX 1500 C Phone
The Polycom VVX 1500 C phone is designed to be used like a regular phone
on a public switched telephone network (PSTN). It is a business media phone
that combines advanced business telephony, one-touch video, real-time
presence, and integrated business applications into one seamless, lifelike
communications experience.
The phone provides a powerful, yet flexible IP communications solution,
delivering excellent video and voice quality. The high-resolution color graphic
display supplies content for call information, multiple languages, directory
access, and system status. The phone supports advanced functionality,
including multiple call and flexible line appearances, HTTPS secure
provisioning, custom ring tones, and local audio and video conferencing.
For the package parts list and instructions on how to assemble the phone, refer
to the Polycom VVX 1500 Quick Start Guide, which is in the phone package.
This chapter provides basic instructions for setting up the Polycom VVX 1500
C phones when managed by Cisco Unified Communications Manager:
• First you must change the network information that is currently on the
phone. Refer to Changing the Network Configuration on page 3-2.
• Upgrade the phone software before changing the configuration files and
deploying the phones.
Out of the box, the Polycom VVX 1500 C phone is running bootROM 4.2.1
and SIP software 3.2.2. As of this release, the SIP software and BootROM
are actually distributed as a single package. To determine the bootROM
version running on the phone, press the Menu key, select Settings >
Status > Platform > Phone, and then scroll down to BootROM. To
determine the SIP application version running on the phone, press the
Menu key, and then select Settings > Status > Platform > Application >
Main.
Refer to Upgrading the Phone’s Software on page 3-14.
3 - 1
Page 22

Deployment Guide for the Polycom VVX 1500 C
• If you choose to manage your phones through a provisioning server, you
need to:
— Set up a provisioning server and download the appropriate files. Refer
— Decide which features you want enabled and which you want
— Create configuration files to support the required features on the
• If you do not want to use a provisioning server, you can change some of
the phone’s configuration through a web interface. Refer to Modifying
Phone’s Configuration Using the Web Interface on page B-1.
For installation and maintenance of the Polycom VVX 1500 C phone, the use of a
provisioning server is strongly recommended. This allows for flexibility in installing,
upgrading, maintaining, and configuring the phone. Configuration, log, and directory
files are normally located on this server. Allowing the phone write access to the
server is encouraged.
The phone is designed such that, if it cannot locate a provisioning server when it
boots up, it will operate with internally saved parameters. This is useful for
occasions when the provisioning server is not available, but is not intended to be
used for long-term operation of the phones.
to Setting Up the Provisioning Server on page 3-4.
disabled. Refer to Configuring Your System on page 3-6.
phones. Refer to Deploying Phones From the Provisioning Server on
page 3-10.
Because of the large number of optional installations and configurations that
are available, this chapter focuses on one particular way that the SIP
application and the required external systems might initially be installed and
configured in your network.
For more information on configuring the Polycom VVX 1500 C phone, refer to
the latest SIP Administrator’s Guide, which is available at
http://www.polycom.com/support/voice/business_media_phones/vvx150
0c.html .
Changing the Network Configuration
The Polycom VVX 1500 C phone requires several options to be set at boot time
in order to automatically pull its configuration files from an FTP server.
Alternatively, DHCP option 66 (or a DHCP option above 128) may be used to
instruct the phone where to get its configuration and application files. The
default username and password for the phone is PlcmSpIp. These defaults can
be changed in the boot menu of the phone. Any username/password change
on the phone should also be made on the FTP server.
All of the required options may be set by DHCP or manually on the phone
itself. With these options set, the phone will boot and automatically configure
itself to access the FTP server and upload the appropriate configuration files.
3 - 2
Page 23

Setting Up the Polycom VVX 1500 C Phone
The following options are available to configure the phone via DHCP:
• Required Options
— Option 3 Router. The standard default router (most DHCP servers will
already have this value).
— Option 6 DNS Servers. The standard DNS server entries (most DHCP
servers will already have this value).
— Option 15 DNS Domain Name. The standard DNS domain name entry
(most DHCP servers will already have this value).
— Option 66 Boot Server Host Name. This value represents the IP
address (or DNS name) of the FTP server for the phones. A full URL
can be specified here. For example,
ftp://username:password@ftp.server.com/directory/ .
• Recommended Options
— Option 2 Time offset. This option determines the phone’s time zone,
the value (in hexadecimal) is calculated in the number of seconds from
GMT. For example, 14,400 seconds would be +4 hours and converted
to its long hexadecimal version it would be 00003840. Use a negative
nu mber t o conv ert fo r tim e valu es west of GM T. Exam ples for US t ime
zones can be found below:
Note
• Eastern Time (-5 GMT) = FFFFB9B0
• Central Time (-6 GMT) = FFFFABA0
• Mountain Time (-7 GMT) = FFFF9D90
• Pacific Time (-8 GMT) = FFFF8F80
— Option 42 NTP Servers. This value represents an SNTP capable server
address.
The factory administrator password on the phone is 456.
To manually set the DHCP options on the phone:
>>
On your phone, during the boot-up countdown sequence, do the
following:
a Press the Setup soft key.
b Enter the administrator password and press the OK soft key.
c Using the down arrow key, scroll down to DHCP Menu, then press
the Select soft key.
d Scroll down to Boot Server, then press the Edit soft key.
e Using the right arrow key, select Static, then press the OK soft key.
f Scroll down to BootSrv Type, then press the Edit soft key.
3 - 3
Page 24

Deployment Guide for the Polycom VVX 1500 C
g Using the right arrow key, select IP Address, then press the OK soft
h Press the Exit soft key.
i Scroll down to Server Menu, then press the Select soft key.
j Using the right arrow key, select FTP for the server type, then press
k Scroll down to Server Address, then press the Edit soft key.
l Enter IP address of the FTP server, then press the OK soft key.
m Scroll down to Server User, then press the Edit soft key.
n Enter user name of the FTP server, then press the OK soft key.
o Scroll down to Server Password, then press the Edit soft key.
p Enter password of the FTP server, then press the OK soft key.
q Press the Exit soft key twice.
r Scroll down Save & Reboot, then press the Select soft key.
key.
the OK soft key.
Your phone will reboot.
Note
You can also set up:
• SNTP address—The IP address of the SNTP server for time resolution
• GMT Offset—The time zone to be used by the phone
• DNS Server—The IP address of the DNS server if a name is used for the Server
Address in step k.
You can also control the switchport negotiation of th e LAN and PC ports under the
Ethernet Menu, which is at the bottom of the menu list. These may be set to one of
0 = Auto (default), 1 = 10HD, 2 = 10FD, 3 = 100HD, 4 = 100FD, or 5 = 1000FD. The
PC port can also be disabled (-1). Polycom recommends that you do not change
these values.
Setting Up the Provisioning Server
The protocol that will be used to transfer files from the provisioning server
depends on several factors including the phone model and whether the
bootROM or SIP application stage of provisioning is in progress. By default,
the phones are shipped with FTP enabled as the provisioning protocol.
You can use any computer on the network as the provisioning server
(providing the application image and configuration files for the Polycom VVX
1500 C phone).
3 - 4
Page 25

Setting Up the Polycom VVX 1500 C Phone
For organizational purposes, configuring a separate log file directory, override
directory, contact directory, and license directory is recommended, but not
required. The different directories can have different access permissions. For
example, for LOG, CONTACTS, and OVERRIDES, allow full access (read and
write) and for all others, read-only access.
Note
Note
The instructions below are written using FTP server as the provisioning server, but
they also apply to any TFTP or HTTP server.
The factory default username and password for the phone is PlcmSpIp.
To set up the provisioning server:
1. Create a directory to store the application image and the configuration
files.
For example, C:\test\VVX1500 .
2. Extract all files from the distribution zip file to the newly created
directory.
Maintain the same folder hierarchy.
The distribution zip file contains many files, but only the following are
required:
— 2345-17960-001.sip.ld
— phone1.cfg
—sip.cfg
— 000000000000.cfg
Refer to the SIP Release Notes for a detailed description of each file in the
distribution. The Release Notes can be found at
http://www.polycom.com/support/voice/business_media_phones/vv
x1500c.html .
3. Start the FTP server and configure it to accept requests from the phone.
In the FTP server software on a computer, create a unique user with names
and passwords. For example, username user with password password.
Refer to your server documentation to set up the server.
3 - 5
Page 26

Deployment Guide for the Polycom VVX 1500 C
Configuring Your System
After you set up your Polycom VVX 1500 C phones on the network, you can
allow users to place and answer calls using the default configuration,
however, you may require some basic changes to optimize your system for
best results.
This section provides information for making configuration changes for:
• Local Digit Map (or Dial Plan)
• Call Transfer
• Call Log
• Recording and Playback of Audio Calls
• Corporate Directory
• Digital Picture Frame
• Server Redundancy
• Voice Mail Integration
Local Digit Map
To troubleshoot any problems with your Polycom VVX 1500 C phones on the
network, refer to Troubleshooting the Polycom VVX 1500 C Phone on page
4-1.
The phone has a local digit map feature to automate the setup phase of
number-only calls. When properly configured, this feature eliminates the need
for using the Dial or Send soft key when making outgoing calls. As soon as a
digit pattern matching the digit map is found, the call setup process will
complete automatically. Digit maps do not apply to on-hook dialing.
For more information digit maps, refer to “Technical Bulletin 11572: Changes
to Local Digit Maps on Polycom VVX 1500 C Phones“ at
http://www.polycom.com/support/voice/soundpoint_ip/VoIP_Technical
_Bulletins_pub.html .
Configuration changes can be performed centrally at the provisioning server
or locally. For detailed information on configuration file settings, refer to Dial
Map <dialmap/> on page A-3.
3 - 6
Page 27

Call Transfer
Call Log
Setting Up the Polycom VVX 1500 C Phone
Call transfer enables the user (party A) to move an existing call (party B) into
a new call between party B and another user (party C) selected by party A. The
phone offers three types of transfers:
• Blind transfers—The call is transferred immediately to party C after party
A has finished dialing party C’s number. Party A does not hear ring-back.
• Attended transfers—Party A dials party C’s number and hears ring-back
and decides to complete the transfer before party C answers. This option
can be disabled.
• Consultative transfers—Party A dials party C’s number and talks
privately with party C after the call is answered, and then completes the
transfer or hangs up.
Configuration changes can be performed centrally at the provisioning server.
For detailed information on configuration file settings, refer to Feature
<feature/> on page A-4.
The call log is stored in volatile memory and is maintained automatically by
the phone in three separate lists: Missed Calls, Received Calls and Placed
Calls. The call lists can be cleared manually by the user and will be erased
when the phone is restarted.
Configuration changes can be performed centrally at the provisioning server.
For detailed information on configuration file settings, refer to Feature
<feature/> on page A-4.
Recording and Playback of Audio Calls
The Polycom VVX 1500 C phone has a functioning USB port that can be
configured to allow recording of audio calls on supported USB devices.
Note
Notify your users that they may be required by federal, state, and/or local laws to
notify some or all called parties when they are recording.
Playback of recorded files can occur on the phone as well as on other devices,
such as a Windows
Windows Media Player
Configuration changes can be performed centrally at the provisioning server.
For detailed information on configuration file settings, refer to Feature
<feature/> on page A-4.
®
or Apple® based computer using an application like
®
or Quicktime®.
3 - 7
Page 28

Deployment Guide for the Polycom VVX 1500 C
Corporate Directory
The Polycom VVX 1500 C phones can be configured to interface with a
corporate directory server that supports the Lightweight Directory Access
Protocol (LDAP) version 3. Both corporate directories that support server-side
sorting and those that do not are supported. In the latter case, the sorting is
performed on the phone.
The corporate directory LDAP server status can be reviewed through the
Status menu (Status > CD Server Status).
For detailed examples for all currently supported LDAP directories, refer to
“Technical Bulletin 41137: Best Practices When Using Corporate Directory on
Polycom VVX 1500 C Phones“ at
http://www.polycom.com/support/voice/soundpoint_ip/VoIP_Technical
_Bulletins_pub.html .
Configuration changes can be performed centrally at the provisioning server
or locally. For detailed information on configuration file settings, refer to
Feature <feature/> on page A-4.
Digital Picture Frame
Note
Server Redundancy
A slide show of multiple personal images stored on a USB flash drive can be
displayed on the Polycom VVX 1500 C phone during the idle mode. The
supported formats include JPEG, BMP, and PNG. The maximum image size is
9999x9999. A maximum of 1000 images can be displayed and these must be
stored in a directory of the USB flash drive that you create.
Although 9999x9999 images are supported, progressive/multiscan JPEG images
are not supported at this time no matter their resolution.
Configuration changes can be performed centrally at the provisioning server.
For detailed information on configuration file settings, refer to Feature
<feature/> on page A-4 and User Preferences <up/> on page A-6.
Server redundancy is often required in VoIP deployments to ensure continuity
of phone service for events where the call server needs to be taken offline for
maintenance, the server fails, or the connection between the phone and the
server fails.
3 - 8
Page 29

Setting Up the Polycom VVX 1500 C Phone
Note
Your SIP server provider should be consulted for recommended methods of
configuring phones and servers for fail-over configuration. Static DNS cache should
only be used when you cannot install the correct entries into the DNS server.
The use of the static DNS cache is required when connecting into a Cisco Unified
Communications Manager system. This is because Cisco Unified Communications
Manager does not support simultaneous registrations from a single device to
multiple subscribers in the Cisco Unified Communications Manager cluster. The
recommended DNS cache configuration would list two subscriber IP addresses,
then an SRST reference (if one is present). This causes the Polycom VVX 1500 C
phone to attempt registration to a single subscriber based on the order of the IP
Addresses listed in the DNS cache. If the first subscriber in the list is down, the
Polycom VVX 1500 C will try the second subscriber, and then third. If a subscriber
comes back online, the Polycom VVX 1500 C will attempt to re-register to that
subscriber.
For more information, refer to “Technical Bulletin 5844: SIP Server Fallback
Enhancements on Polycom VVX 1500 C Phones” at
http://www.polycom.com/support/voice/soundpoint_ip/VoIP_Technical
_Bulletins_pub.html .
Configuration changes can be performed centrally at the provisioning server.
For information on configuration file settings, refer to DNS Cache <dns/> on
page A-4 and Registration <reg/> on page A-5.
Voice Mail Integration
The phone is compatible with voice mail servers. The subscribe contact and
callback mode can be configured per user/registration on the phone. Voice
mail access can be configured to be through a single key press. A
message-waiting signal from a voice mail server triggers the message-waiting
indicator to flash and the call waiting audio tone is played through the active
audio path.
Configuration changes can be performed centrally at the provisioning server
or locally. For detailed information on configuration file settings, refer to
Messaging <msg/> on page A-6.
Shared Call Appearances
Calls and lines on multiple phones can be logically related to each other. A call
that is active on one phone will be presented visually to phones that share that
call appearance. Mutual exclusion features emulate traditional PBX or key
system privacy for shared calls. Incoming calls can be presented to multiple
phones simultaneously. Users at the different locations have the ability to
interrupt remote active calls.
This feature is dependent on support from a SIP server that binds the
appearances together logically and looks after the necessary state notifications
and performs an access control function.
3 - 9
Page 30

Deployment Guide for the Polycom VVX 1500 C
Configuration changes can be performed centrally at the provisioning server
or locally. For detailed information on configuration file settings, refer to
Registration <reg/> on page A-5.
Deploying Phones From the Provisioning Server
You will need to create two configuration files for each
phone—phone1[MACAddress].cfg and [MACAddress].cfg—and one
configuration file for all phones in your installation—sip[XXXX].cfg.
For more information on why to create another configuration file, refer to the
“Configuration File Management on Polycom VVX 1500 C Phones” white
paper at
http://www.polycom.com/global/documents/support/technical/products
/voice/white_paper_configuration_file_management_on_soundpoint_ip_ph
ones.pdf .
Note
Note
Use an XML editor to create/edit the configuration files. In this way, all configuration
files that you create will be valid XML files.
If the configuration files are not valid, they will not load on the phone. An error
message will be logged to the provisioning server.
For more detailed information on specific parameters in configuration files,
refer to Configuration Files on page A-1.
Deploy Polycom VVX 1500 C phones by:
1. Creating a Per-Phone Configuration File
2. Creating an Application Configuration File
3. Creating a Master Configuration File
4. Downloading the New Configuration
Creating a Per-Phone Configuration File
To create a per-phone configuration file:
Obtain the phone’s MAC address from the barcoded label on underside of phone or
on the outside of the shipping box.
3 - 10
1. Create a per-phone configuration file by using the phone1.cfg file from
the distribution as templates.
For example, create phone1_0004f2be80a4.cfg
Page 31

Setting Up the Polycom VVX 1500 C Phone
2. Add contents to the per-phone configuration file.
For example:
Creating an Application Configuration File
To create an application configuration file:
1. Create an application configuration file by using the sip.cfg file from the
distribution as templates.
For example, create sip_Executives.cfg
3 - 11
Page 32

Deployment Guide for the Polycom VVX 1500 C
2. Add contents to the application configuration file.
For example:
3 - 12
Creating a Master Configuration File
To create a master configuration file:
1. Create a master configuration file by using the 000000000000.cfg file from
the distribution as templates.
For example, create 0004f2be80a4.cfg
Page 33

Setting Up the Polycom VVX 1500 C Phone
2. Add contents to the master configuration file.
For example:
Warning
The order of the configuration files listed in CONFIG_FILES is significant:
• The files are processed in the order listed (left to right).
• The same parameters may be included in more than one file.
• The parameter found first in the list of files will be the one that is effective.
This provides a convenient means of overriding the behavior of one or more phones
without changing the baseline configuration files for an entire system.
Downloading the New Configuration
To download the new configuration to the phones:
1. To reboot the phones, press the Menu key, and select Settings >
Advanced > Reboot Phone...
When prompted, enter the administrator password and press the Enter
soft key.
The phone will reboot. The following messages will appear on the screen:
— Waiting for network to initialize
— Downloading new application
— Checking new application
— Saving new application
— Checking new application
3 - 13
Page 34

Deployment Guide for the Polycom VVX 1500 C
— Loading application
— Running <application filename>
— Welcome
The reboot process will take some time.
2. Ensure that the configuration process completed correctly.
For example, on the phone, press the Menu key, and then select Status >
Platform > Application to see the SIP application version and Status >
Platform > Configuration to see the configuration files downloaded to the
phone.
Monitor the provisioning server event log and the uploaded event log files
(if permitted). All configuration files used by the provisioning server are
logged.
You can now instruct your users to start making calls.
Upgrading the Phone’s Software
Warning
If you need to upgrade any Polycom VVX 1500 C phones running SIP 3.1.2RevB or
earlier to SIP 3.2.2, you must perform additional steps before rebooting the phone
to download the software. Refer to “Technical Bulletin 53522: Upgrading the
Polycom VVX 1500 C Phone to SIP 3.2.2” at
http://www.polycom.com/usa/en/support/voice/soundpoint_ip/VoIP_Technical_Bulle
tins_pub.html .
To upgrade the phone’s software, you will need to:
• Download the latest SIP application to the provisioning server from the
Polycom VVX C support page—where you downloaded this deployment
guide. Refer to Locating the Latest Software on page 3-14.
• Download the new SIP application to the phone. Refer to Downloading
New Software to the Phone on page 3-15.
For more information on upgrading the SIP application, refer to section
“Upgrading the SIP Application” in the latest SIP Administrator’s Guide at
http://www.polycom.com/support/voice/business_media_phones/vvx150
0c.html .
Locating the Latest Software
To determine the latest software version, go to the VoIP SIP Software Release
matrix on the Polycom Customer Support web site at
http://downloads.polycom.com/voice/voip/sip_sw_releases_matrix.html .
3 - 14
Page 35

Download the latest software and release notes from
http://www.polycom.com/support/voice/business_media_phones/vvx150
0c.html to the provisioning server.
Downloading New Software to the Phone
To download the new SIP application to the phone, you need to:
• Extract all files from the distribution zip file as you did in Setting Up the
Provisioning Server on page 3-4.
• Verify that the configuration files you create in Deploying Phones From
the Provisioning Server on page 3-10 will work with the new SIP
application. New and changed configuration parameters are described in
the Release Notes.
Following the instructions in Deploying Phones From the Provisioning
Server to download the new SIP application; you will not need to change
the master configuration files unless you change the names of the
per-phone or application configuration files.
Setting Up the Polycom VVX 1500 C Phone
3 - 15
Page 36

Deployment Guide for the Polycom VVX 1500 C
3 - 16
Page 37

Troubleshooting the Polycom VVX 1500 C Phone
This chapter contains general troubleshooting information to help you solve
any problems you might encounter when you use the Polycom VVX 1500 C
phone in a Cisco Unified Communications Manager environment. The phone
can provide feedback in the form of on-screen error messages, status
indicators, and log files for troubleshooting issues.
For detailed information on error messages, log files, testing the phone
hardware and phone issues—along with likely causes and corrective actions—
refer to the “Troubleshooting” chapter of the latest SIP Administrator’s Guide.
4
This chapter presents phone issues, likely causes, and corrective actions for the
Polycom VVX 1500 C phone in a Cisco Unified Communications Manager
environment. Issues are grouped as follows:
• Calling
• Polycom VVX 1500 C Display
• Upgrading the Polycom VVX 1500 C Phone
Review the latest Release Notes for the SIP application for known problems and
possible workarounds. For the latest Release Notes, go to
http://www.polycom.com/support/voice/business_media_phones/vvx150
0c.html .
4 - 1
Page 38

Deployment Guide for the Polycom VVX 1500 C
Calling
Symptom Problem Corrective Action
The line icon shows an
unregistered line icon.
Pressing the Conferencing soft
key or the CONF key does set up
a conference in all
circumstances.
The phone line is unregistered. Contact your system administrator.
Cicso ad-hoc conferecning is not
supported.
Contact your system administrator.
Polycom VVX 1500 C Display
Symptom Problem Corrective Action
The time and date are flashing. You have disconnected your
phone from the network/LAN or
there is no SNTP server
configured.
Do one of the following:
• Reconnect your phone to the network.
• Disable the time and date display on
the phone per the instructions below.
1. Press the Menu key, and then select
Settings > Basic > Preferences >
Time & Date.
The Time & Date screen displays.
Scroll to Disable, and then press
Select soft key.
2. Press the Menu key again to return to
the idle screen.
The idle screen no longer displays the
time and date.
Upgrading the Polycom VVX 1500 C Phone
Symptom Problem Corrective Action
You want to upgrade the
Polycom VVX 1500 C.
4 - 2
You must perform additional steps before
rebooting the phone to download the new
SIP software. Refer to “Technical
Bulletin 53522: Upgrading the Polycom
VVX 1500 Phone to SIP 3.2.2” at
http://www.polycom.com/usa/en/support/v
oice/soundpoint_ip/VoIP_Technical_Bullet
ins_pub.html .
Page 39

Configuration Files
This appendix provides detailed descriptions of certain configuration files
used by the SIP application running the Polycom VVX 1500 C phone.
This appendix contains information on:
• Master Configuration File (MAC-address.cfg or 000000000000.cfg)
• Application Configuration File (sip.cfg)
• Per-Phone Configuration File (phone1.cfg)
The application configuration files dictate the behavior of the phone once it is
running the executable specified in the master configuration file.
A
Caution
Note
For detailed information—including permitted values, default values, and a
brief description—on the complete set of configuration parameters available
to you in the configuration files, refer to the “Configuration Files” appendix of
the SIP Administrator’s Guide.
Configuration files should only be modified by a knowledgeable system
administrator. Applying incorrect parameters may render the phone unusable. The
configuration files which accompany a specific release of the SIP software must be
used together with that software. Failure to do this may render the phone unusable.
In the tables in the subsequent sections, “Null” should be interpreted as the empty
string, that is, attributeName=“” when the file is viewed in an XML editor.
To enter special characters in a configuration file, enter the appropriate sequence
using an XML editor:
• & as &
• ” as "
• ’ as '
• < as <
• > as >
A - 1
Page 40

Deployment Guide for the Polycom VVX 1500 C
Note
You can also make changes to the configuration files through the web interface to
the phone. Using your chosen browser, enter the phone’s IP address as the
browser address. For more information, refer to Modifying Phone’s Configuration
Using the Web Interface on page B-1.
Changes made through the web interface are written to the override file (highest
priority). These changes remain active until Setti ngs > Advanced > Admin
Settings> Reset to Default > Reset Local Config... is performed.
Master Configuration File
Master configuration files contain the following XML attributes:
• APP_FILE_PATH
• CONFIG_FILES
• MISC_FILES
• LOG_FILE_DIRECTORY
• CONTACTS_DIRECTORY
• OVERRIDES_DIRECTORY
• LICENSE_DIRECTORY
For example:
A - 2
Page 41

Application Configuration File
The configuration file sip.cfg contains SIP protocol and core configuration
settings that would typically apply to an entire installation and must be set
before the phones will be operational, unless changed through the local web
server interface or local menu settings on the phone.
The important parameters for the Polycom VVX 1500 C phone include:
• Dial Map <dialmap/>
• Feature <feature/>—To enable call lists, call recording, corporate
directory, and digital picture frame.
• DNS Cache <dns/>—To enable server redundancy.
Dial Map <dialmap/>
A digit map is defined either by a “string” or by a list of strings. Each string in
the list is an alternative numbering scheme, specified either as a set of digits or
timers, or as an expression over which the gateway will attempt to find a
shortest possible match.
Configuration Files
Note
Edit the digit map according to your Cisco Unified Communications Manager
call routing. For example:
where:
•x equals any digit (for example, 3xxx means match anything starting with
3 and is 4 digits long). The x is case sensitive.
•T refers to any standard number of digits according to the North American
Numbering Plan (NANP). The T is case sensitive.
•R (not shown) indicates that certain matched strings are replaced. For
example,
number. If a customer dials 914539400, the first 9 is removed when the call
is placed. For example,
numbers. If a customer dials 4539400, 604 is added to the front of the
number, so a call to 6044539400 is placed. The R is case sensitive.
A per-registration digit map is also supported.
R9RRxxxxxxx
means remove 9 at the beginning of the dialed
RR604Rxxxxxxx
means prepend 604 to all 7 digit
A - 3
Page 42
Deployment Guide for the Polycom VVX 1500 C
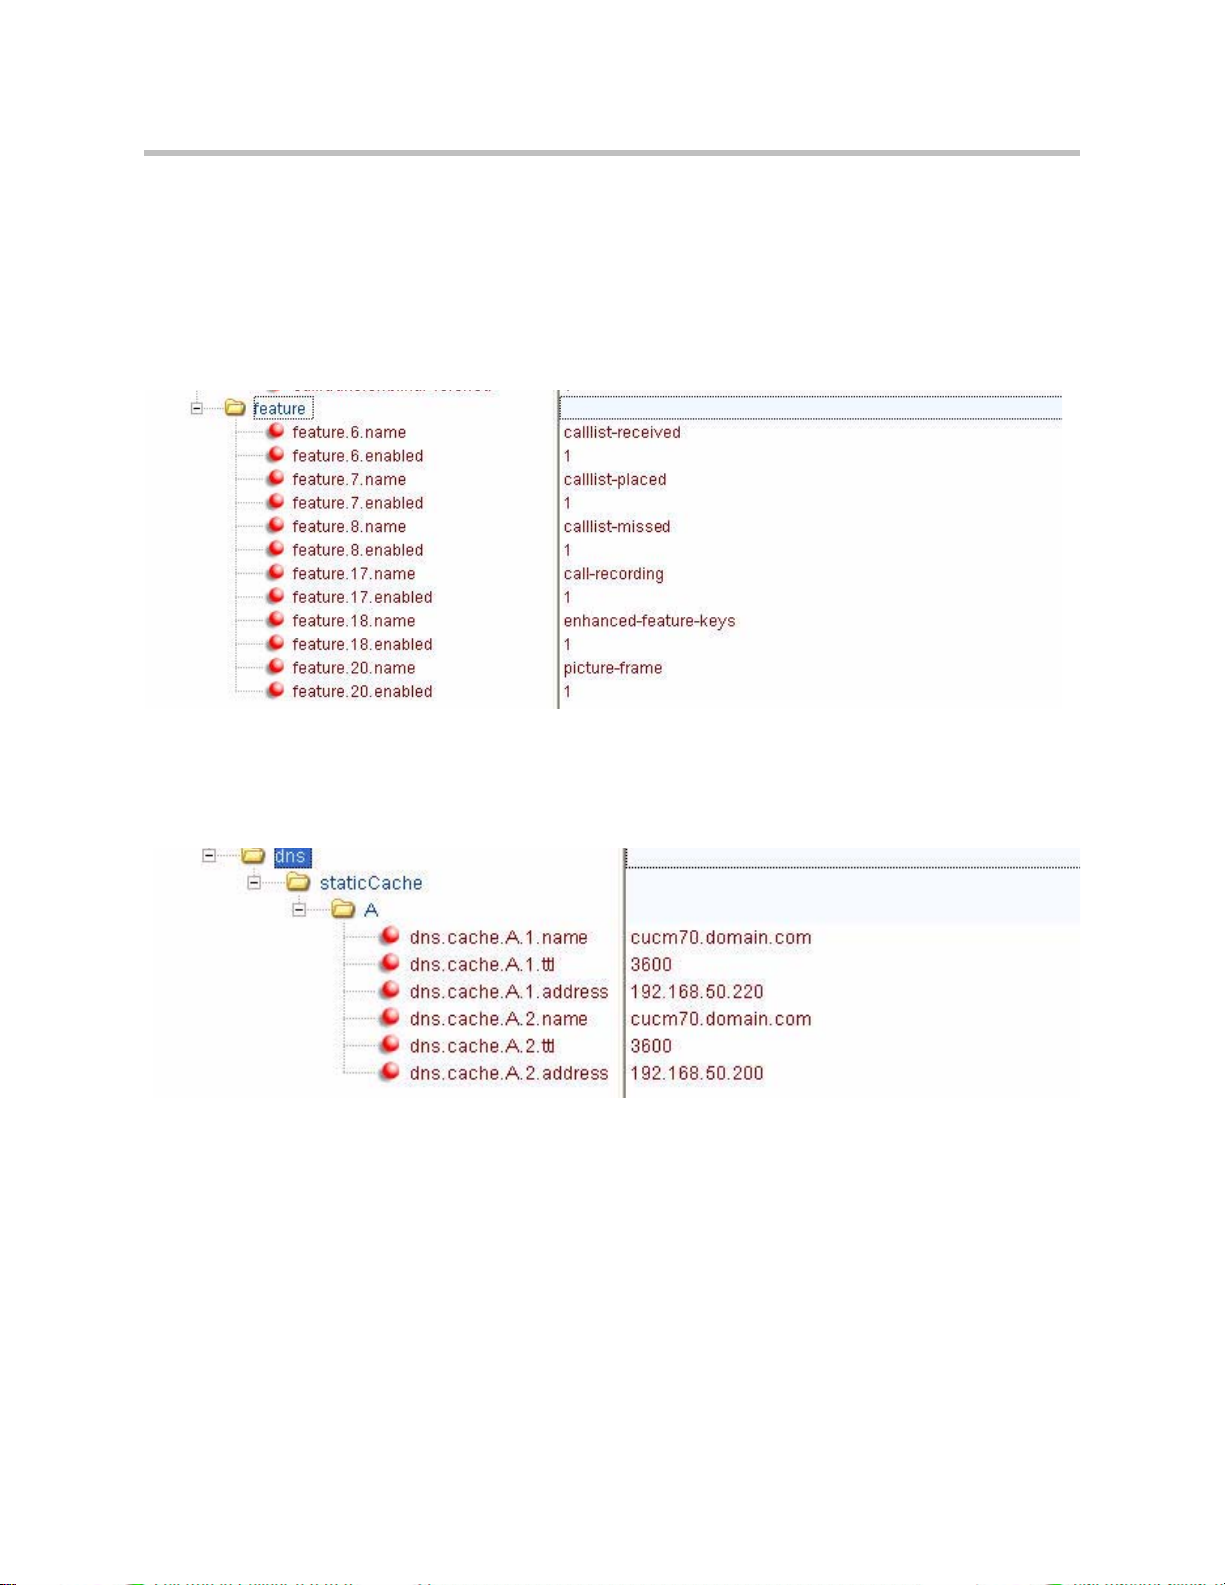
Feature <feature/>
The call list features are enabled by default as is the digital picture frame
feature. The call recording and corporate directory features are disabled by
default.
Set feature.x.enabled to 1 for those features that you want enabled. For
example:
DNS Cache <dns/>
Edit the
dns
parameter according to your network. For example:
Per-Phone Configuration File
This section covers the parameters in the per-phone example configuration file
phone1.cfg. This file would normally be used as a template for the per-phone
configuration files.
The important parameters for the Polycom VVX 1500 C phone include:
A - 4
• Registration <reg/>—To define the line appearances and, possibly,
shared line appearances
Page 43

Registration <reg/>
Configuration Files
• Messaging <msg/>—To select up single-press voice mail.
• User Preferences <up/>—To provide the location of the digital pictures
on the USB flash drive and to enable the screen saver feature.
The Polycom VVX 1500 C phone supports six registrations.
Note
To set up registered lines, edit the
reg
parameter to reflect the changes you
made when you configured Cisco Unified Communications Manager. For
example:
Fields are defined as follows:
•
address
(refer to Configuring Cisco Unified Communications Manager on page 2-1)
•
auth.userId
Communications Manager (case sensitive)
•
auth.password
Communications Manager (case sensitive)
•
server.1.address
Manager subscriber
•
label
The “1” above indicates which line appearance is being configured. In this case, it is
the first.
If you want to use server failover, the name entered in the DNS cache—refer to
DNS Cache <dns/> on page A-4—should be entered in the
reg.1.server.1.address
is the assigned extension in Cisco Unified Communications Manager
is the end user created for device in Cisco Unified
is the digest credentials from the user in Cisco Unified
is the IP Address of first Cisco Unified Communications
is the label that appears on the phone display’s line key
field instead of an IP Address.
A - 5
Page 44

Deployment Guide for the Polycom VVX 1500 C
To add a shared line—a line shared with other phones—edit the reg
parameter. For example:
Messaging <msg/>
Message-waiting indication is supported on a per-registration basis.
Edit the
Note
msg.mwi.1.callBackMode
Unified Communications Manager.
mail pilot number.
User Preferences <up/>
By default, the screen saver feature is disabled and the digital picture frame
feature looks for images stored in the root folder on the USB flash drive.
Edit the
location for images. For example:
msg
parameter to set the single-button voice mail feature. For example:
must be set to contact for proper operation with Cisco
msg.mwi.1.callBack
up
parameter to enable the screen saver feature and set another
must be set to the voice
A - 6
Page 45

Miscellaneous Administrative Tasks
This appendix provides information required by varied aspects of the Session
Initiation Protocol (SIP) application. This includes:
• Modifying Phone’s Configuration Using the Web Interface
Modifying Phone’s Configuration Using the Web Interface
You can make changes to the configuration files through the web interface to
the phone.
B
Note
Note
Blind transfer, call recording, picture frame, corporate directory (LDAP Integration),
and phone server redundancy cannot be enabled/disabled through the web
interface. You must make changes for these features through the configur ation
files. Refer to Deploying Phones From the Provisioning Server on page 3-10.
The factory default for the web interface is Polycom and 456 respectively (the
username is case sensitive). The factory default phone username and password for
the phone is PlcmSpIp.
To configure your phone through the web interface:
>>
Using your chosen browser, do the following:
a To get your phone’s IP address, press the Menu key, and then
selecting Status > Platform > Phone. Scroll down to see the IP
address.
B - 1
Page 46

Deployment Guide for the Polycom VVX 1500 C
b Enter your phone’s IP address as the browser address.
c To make changes to the phone’s dial paln, select SIP from the menu
A web page similar to the one shown below appears.
tab.
You will be prompted for the SIP username and password.
A web page similar to the one shown below appears.
B - 2
Page 47

Miscellaneous Administrative Tasks
d Select Local Settings.
A web page similar to the one shown below appears.
e Make the desired configuration changes.
For example, under Digitmap, set to a digit map appropriate to your
dial plan. For example, under Digitmap Timeout, set to an
appropriate value. For more information, refer to Dial Map
<dialmap/> on page A-3.
f Select the Submit button.
Your phone will reboot.
B - 3
Page 48

Deployment Guide for the Polycom VVX 1500 C
g After the reboot is complete, select General from the menu tab.
A web page similar to the one shown below appears.
h If you make any changes, scroll down to the bottom of the section.
i Select the Submit button.
Your phone will reboot.
j After the reboot is complete, select Lines from the menu tab.
A web page similar to the one shown below appears.
B - 4
Page 49

Miscellaneous Administrative Tasks
k Make the desired configuration changes.
For example, under Line 1, fill in the following fields under
Identification:
Address—Set to the assigned extension within CUCM.
Auth User ID—Set to the user ID created in step 9 of Changing Cisco
Unified Communications Manager on page 2-1.
Auth Password—Set to the digest credential created in step 11 of
Changing Cisco Unified Communications Manager on page 2-1.
Label—Set to what will appear on the phone for the selected line
appearance.
For example, under Line 1, fill in the following fields under Server 1:
Address—Enter the IP Address of the Cisco Unified Communications
Manager server to which the phone will register.
Port—Enter 5060.
Register—Enter 1.
l Select the Submit button.
Your phone will reboot.
B - 5
Page 50

Deployment Guide for the Polycom VVX 1500 C
B - 6
Page 51

Index
A
application configuration
DNS cache A–4
application configuration file A–3
creating 3–11
attended transfers 3–6
audio playback 3–7
audio recording 3–7
B
blind transfers 3–6
C
call handling configuration <call/> A–4
call log 3–7
call transfer 3–6
calling 4–1
Cisco Unified Communications Manager
changing 2–1
configuring 2–1
supported 1–1
configuration files A–1
consultative transfers 3–7
corporate directory 3–7
D
deploying phones 3–9
dial map <dialmap/> A–3
digital picture frame 3–8
DNS cache <dns/> A–4
downloading new configuration 3–13
downloading new software 3–14
F
feature A–4
L
local digit map 3–6
locating latest software 3–14
M
master configuration file A–2
creating 3–12
messaging A–6
N
network configuration
P
per-phone configuration file A–4
creating 3–10
phone software
latest 3–14
upgrading 3–14
Polycom VVX 1500 CVT
setting up 3–1
provisioning server 3–9
setting up 3–4
R
rebooting phones 3–13
recording and playback of audio calls 3–7
registration <reg/> A–5
S
server redundancy 3–8
setting up
network 2–1
shared call appearances 3–9
supported phone features 1–2
T
troubleshooting
calling issues 4–1
phone display issues 4–2
3–
2
Index – 1
Page 52

Deployment Guide for the Polycom VVX 1500 C
U
upgrading phone software 3–14
USB device 3–7
user preferences A–6
V
voice mail integration 3–9
W
web interface, modifying phone’s configuration
B–1
Index – 2
 Loading...