

Page 1

USER GUIDE 1.0.0 | February 2021 | 3725-69367-002A
Poly Studio P Series
(P5 and P15)
Getting Help
For more information about installing, configuring, and
administering Poly/Polycom products or services, go to
Polycom Support.
Plantronics, Inc. (Poly — formerly Plantronics and Polycom)
345 Encinal Street
Santa Cruz, California
95060
©
2021 Plantronics, Inc. All rights reserved. Poly
design, and the Poly logo are trademarks of Plantronics, Inc.
All other trademarks are the property of their respective
owners.
, the propeller
Page 2

Contents
Before You Begin................................................................................................2
Audience, Purpose, and Required Skills.............................................................................2
Related Poly and Partner Resources..................................................................................2
Privacy Policy........................................................................................................... 2
Getting Started................................................................................................... 3
Poly Studio P5 Hardware Overview.................................................................................... 3
Poly Studio P15 Hardware Overview.................................................................................. 4
Use the Poly Studio P Series Device Privacy Shutter.........................................................5
Computer and Cable Requirements....................................................................................6
LED Status Indicators......................................................................................................... 7
Basic Tips for Great Video Conferences.............................................................................7
Advanced Tips for Great Video Conferences......................................................................8
Accessibility Features......................................................................................................... 9
Users Who Are Deaf or Hard of Hearing..................................................................9
Users Who Are Blind, Have Low Vision, or Have Limited Vision............................. 9
Users with Limited Mobility.......................................................................................9
Using Your Poly Studio P Series Device........................................................ 11
Default Poly Studio P Series Device Features.................................................................. 11
Download and Install the Poly Lens Desktop App.............................................................11
Set Poly P Series Device as the Default Audio and Video Device....................................12
Restart Your Device.......................................................................................................... 12
Factory Reset Poly Studio P15......................................................................................... 12
Factory Restore Poly Studio P15...................................................................................... 13
Updating Firmware............................................................................................................13
1
Page 3

Before You Begin
Topics:
▪ Audience, Purpose, and Required Skills
▪ Related Poly and Partner Resources
This guide describes how to use the Poly Studio P5 webcam and Poly Studio P15 personal video bar.
Audience, Purpose, and Required Skills
This guide is intended for beginning users, as well as intermediate and advanced users, who want to
learn more about the features available with their Poly Studio P Series device.
You can use the features in this guide without having Lens Desktop installed on your connected
computer.
Related Poly and Partner Resources
See the following sites for information related to this product.
▪ The Poly Online Support Center is the entry point to online product, service, and solution support
information including Video Tutorials, Documents & Software, Knowledge Base, Community
Discussions, Poly University, and additional services.
▪ The Polycom Document Library provides support documentation for active products, services, and
solutions. The documentation displays in responsive HTML5 format so that you can easily access
and view installation, configuration, or administration content from any online device.
▪ The Poly Community provides access to the latest developer and support information. Create an
account to access Poly support personnel and participate in developer and support forums. You can
find the latest information on hardware, software, and partner solutions topics, share ideas, and
solve problems with your colleagues.
▪ The Poly Partners are industry leaders who natively integrate the Poly standards-based
RealPresence Platform with their customers’ current UC infrastructures, making it easy for you to
communicate face-to-face with the applications and devices you use every day.
▪ The Poly Services help your business succeed and get the most out of your investment through the
benefits of collaboration.
Privacy Policy
Poly products and services process customer data in a manner consistent with the Poly Privacy Policy
Please direct comments or questions to privacy@poly.com
.
2
Page 4
Getting Started
Topics:
▪ Poly Studio P5 Hardware Overview
▪ Poly Studio P15 Hardware Overview
▪ Use the Poly Studio P Series Device Privacy Shutter
▪ Computer and Cable Requirements
▪ LED Status Indicators
▪ Basic Tips for Great Video Conferences
▪ Advanced Tips for Great Video Conferences
▪ Accessibility Features
Before you use your device, familiarize yourself with its features.
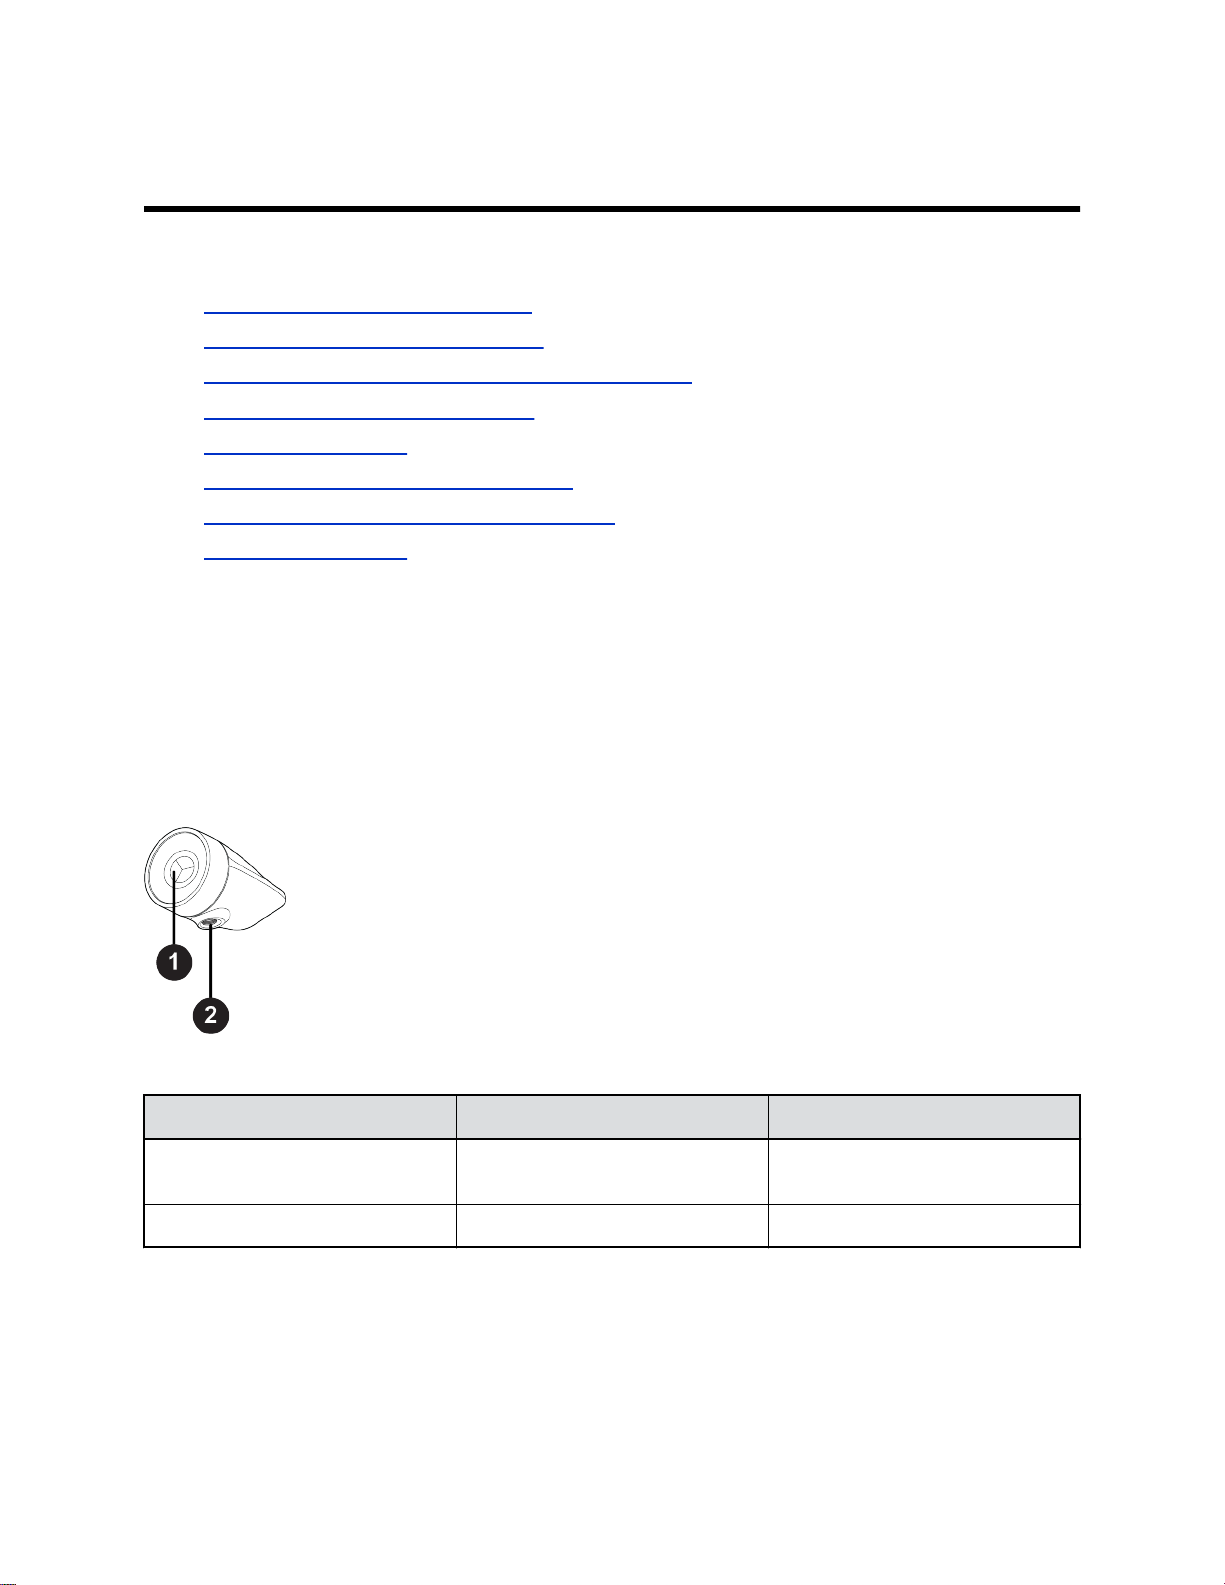
Poly Studio P5 Hardware Overview
The following figures display the hardware features on the Poly Studio P5 webcam. The table lists each
feature numbered in the figures.
Front View
Poly Studio P5 Feature Descriptions
Ref. Number Feature Feature Description
1 Camera Camera with a privacy shutter that
you can manually open or close
2 Clamp attachment point Attachment point for camera clamp
3
Page 5
System Port
Poly Studio P5 Port Description
Ref. Number Port Description
1 USB-A port
Getting Started
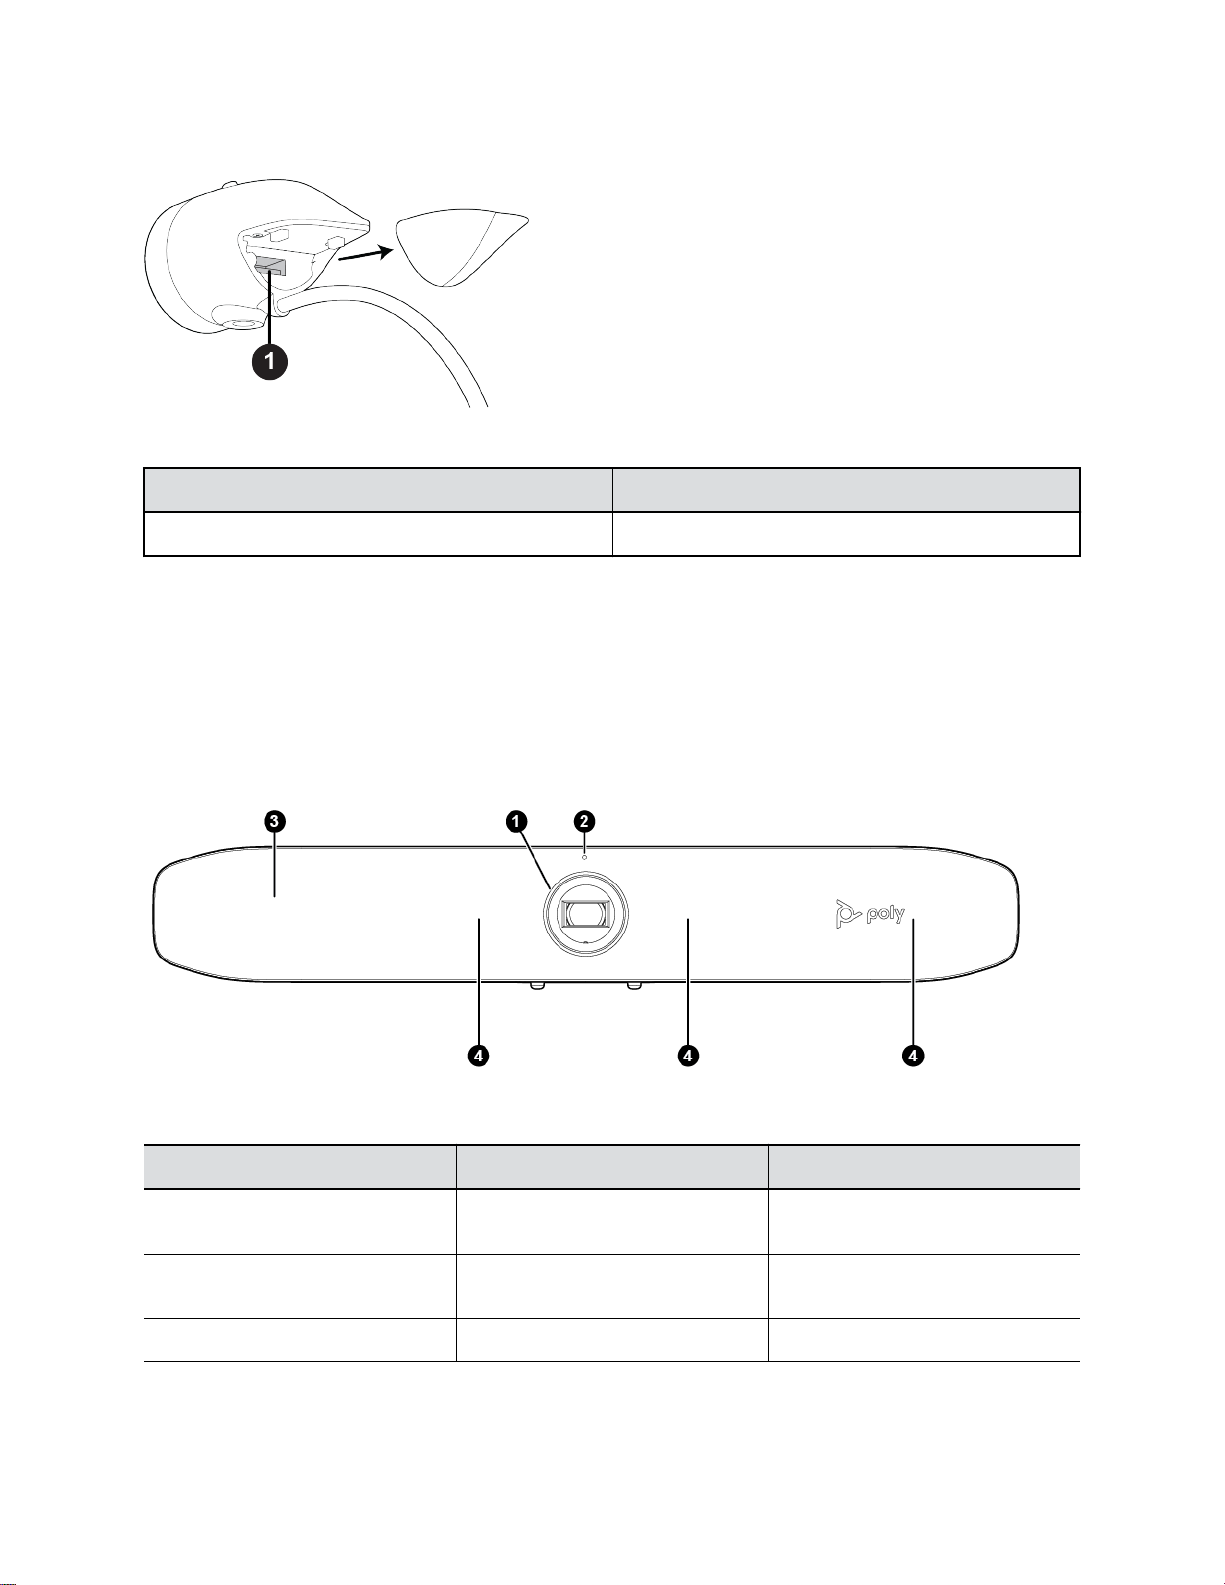
Poly Studio P15 Hardware Overview
The following figures display the hardware features on the Poly Studio P15 personal video bar. The table
lists each feature numbered in the figures.
Front View
Poly Studio P15 Feature Descriptions
Ref. Number Feature Feature Description
1 Camera Camera with a privacy shutter that
you can manually open or close
2 LED indicator Indicates the personal video bar
status
3 Speaker Audio output
4
Page 6

Getting Started
Ref. Number Feature Feature Description
4 Microphones Microphones that capture audio
System Ports
Poly Studio P15 Port Descriptions
Ref. Number Port Description
1 USB-A ports
2 Power
3 USB-C port (for connecting to your computer)
4 Factory reset pinhole
5 Security lock
Use the Poly Studio P Series Device Privacy Shutter
Your Poly Studio P Series device provides a built-in physical cover that blocks the camera lens to protect
your privacy.
Procedure
» Do one of the following:
▪ Rotate the privacy shutter ring counterclockwise to open the shutter.
▪ Rotate the privacy shutter ring clockwise to close the shutter.
5
Page 7

Figure 1: Poly Studio P5
Getting Started
Figure 2: Poly Studio P15
Computer and Cable Requirements
Make sure that your computer and USB cable meet the following requirements to use a Poly Studio P
series device as the camera and audio accessory.
Your computer must have one of the following operating systems:
▪ Windows 10
▪ macOS versions 10.15 and 11
The Poly Studio P Series devices only support the USB-C 3.0 cable that came with your system.
Note the following limitations with USB connections:
▪ Using a third-party USB-C to USB-C cable may affect device performance, or your device may not
work at all.
▪ Using a third-party USB-C to USB-A adapter may affect video quality.
▪ Connecting your device to a USB 2.1 or 2.0 port may prevent you from receiving full 4K video from
your Poly Studio P15 personal video bar.
6
Page 8

Getting Started
LED Status Indicators
Your device provides an LED above the camera to help you understand the device’s behaviors. The
following table lists each LED and its associated status.
Basic Poly Studio P5 and Poly Studio P15 LED Indicators Status
Indicator Status
Solid white Device is powered on, the shutter is open, and the device is idle
Pulsing white Boot initialization in progress
Solid green For video calls, camera is active (in use or displaying local video
preview out of a call), LED remains green when microphone is muted
Blinking green Blinks twice to indicate that audio is muted but the camera is still on
Pulsing amber Firmware update in progress
Solid red Video muted
Blinking green Muted microphone, but the device detects your voice after a pause
longer than 5 seconds
Basic Tips for Great Video Conferences
Use the following basic tips and guidelines to enhance or improve your experiences during video
conferences.
▪ Mount and position the camera so that your eyes are level with the top third of your screen and your
face appears in the middle area of the video stream.
▪ Avoid wearing bright colors, all-light or all-dark clothing, or very busy patterns like small checks or
narrow stripes. Light pastels and muted colors look the best on the screen.
▪ Preview your video stream before you join a meeting to make sure that you don’t have shadows on
your face and that your camera settings are configured correctly.
▪ Speak in your normal voice.
7
Page 9

Getting Started
Advanced Tips for Great Video Conferences
Use the following advanced tips and guidelines to enhance or improve your experiences during video
conferences.
Camera and People Positioning
▪ Try not to fidget too much, especially if you’re the only one on camera.
▪ Include all the people in the room (if possible), or introduce everyone in the room at the beginning of
a meeting.
▪ Keep the view focused on people and not the background or room furnishings.
▪ In a home office, position the camera to an appropriate angle and consider disabling the tracking
feature to avoid capturing potential distractions in your video (for example, other people, pets, or
TVs).
Clothing, Furnishings, and Backgrounds
▪ To avoid disruptions, exclude the following from the camera view: light sources, tables, chairs,
walls, busy decorations, and the floor.
▪ To avoid funny effects, wear clothes that contrast with the background instead of blending into it and
make sure nothing in the background seems to stick out of anyone’s head.
▪ Avoid glossy tabletops, strong colors, or bold wood grain in the room. The best table surface color is
a flat satin finish in neutral gray.
▪ A wall that’s painted light gray with a touch of blue works best as a background. Video conferencing
systems use a gray or blue reference image to process the video, so a background in that color
helps to enhance the video you send.
▪ Try to keep dry-erase whiteboards out of the camera field of view. Be aware that other people in the
meeting might see what’s written on the whiteboards.
Lighting
▪ Close any curtains, drapes, or blinds over your windows. Daylight is a variable light source and can
conflict with interior room lighting.
▪ Bright lighting increases the range of in-focus objects, but inappropriate direct lighting might make
you look harsh or somber. Poly recommends using indirect fluorescent lighting in a mid-range,
neutral color temperature (3600 K to 4500 K). You can find the color temperature of your lighting on
the packaging.
Audio and Noise
▪ Mute your audio when you’re silent or before you move your audio device.
▪ Keep your windows and doors closed to minimize unwanted noises.
8
Page 10

Getting Started
▪ Close any drapes or blinds over your windows. The glass from windowpanes can cause issues with
acoustics due to reflection.
▪ If you’re in an open or common area, consider using a headset with Active Noise Canceling (ANC)
to minimize distractions.
▪ Poly NoiseBlockAI helps the microphone eliminate unwanted noises while picking up your voice. If
you’re not using Poly NoiseBlock technology, consider these additional audio suggestions:
◦ Don’t obstruct your microphone with papers or other objects.
◦ Avoid tapping on the table or rustling papers.
Accessibility Features
Poly products include a number of features to accommodate users with disabilities.
Users Who Are Deaf or Hard of Hearing
Your device includes accessibility features for users who are deaf or hard of hearing to use the system.
The following table lists the accessibility features for users who are deaf or hard of hearing.
Accessibility Features for Users Who Are Deaf or Hard of Hearing
Accessibility Feature Description
Status indicator lights The device uses LEDs to indicate some statuses,
including if your microphone is muted
Users Who Are Blind, Have Low Vision, or Have Limited Vision
Your device includes accessibility features for users who are blind, have low vision, or have limited vision
to use the device.
The following table lists the accessibility features for users who are blind, have low vision, or have limited
vision.
Accessibility Features for Users Who Are Blind, Have Low Vision, or Have Limited Vision
Accessibility Feature Description
Mute and unmute tones On the Poly Studio P15, an audible tone plays when
you mute and unmute calls.
Power on and power off tones On the Poly Studio P15, an audible tone plays when
you power your device on and off.
Users with Limited Mobility
Your device includes accessibility features to enable users with limited mobility to use various device
features.
The following table lists the accessibility features for users with limited mobility.
9
Page 11

Getting Started
Accessibility Features for Users with Limited Mobility
Accessibility Feature Description
Built-in speaker and microphone Your device has an integrated speaker and microphone
that enable you to hear audio and speak without having
to use a headset.
Powerful sound detection The microphones pick up sound within 3.66 m (12 ft).
The device includes spatial audio detection to imitate
life-like presence and clarity when you move.
10
Page 12

Using Your Poly Studio P Series Device
Topics:
▪ Default Poly Studio P Series Device Features
▪ Download and Install the Poly Lens Desktop App
▪ Set Poly P Series Device as the Default Audio and Video Device
▪ Restart Your Device
▪ Factory Reset Poly Studio P15
▪ Factory Restore Poly Studio P15
▪ Updating Firmware
Connect your Poly Studio P Series device to your computer with the provided USB cable.
Once you plug in the device, you can start using the Poly Studio P Series webcam or personal video bar.
Default Poly Studio P Series Device Features
Several features are enabled by default on your device. You can only change or disable these features
using Poly Lens Desktop App.
Poly Studio P5 Features
The following features are enabled by default:
▪ Active Echo Cancellation
▪ Poly NoiseBlockAI
▪ Automatic camera framing
Poly Studio P15 Features
The following features are enabled by default:
▪ Active Echo Cancellation
▪ Poly NoiseBlockAI
▪ Automatic camera framing
▪ Camera tracking maximum zoom level (4x)
Download and Install the Poly Lens Desktop App
Download the Poly Lens Desktop App to access configuration settings and features for your Poly Studio
P Series devices.
See the Poly Lens Desktop App User Guide for information on using your device with Poly Lens Desktop.
11
Page 13

Using Your Poly Studio P Series Device
Procedure
1. Go to the Poly Lens App product page.
2. Select the applicable download for your operating system.
3. Follow the onscreen installation instructions.
Set Poly P Series Device as the Default Audio and Video Device
When you use the Poly Studio P Series webcam or personal video bar with a supported application for
video calls, you may need to set the device as the default audio and video device of your application.
The following is a general procedure that you can refer to. Your application may use different terms or
categories.
Procedure
1. Go to your software client’s Settings.
2. Find Audio Device and Video Device.
3. Choose your Poly Studio P Series device as the device for each category.
Related Links
Restart Your Device on page 12
Restart Your Device
If you encounter issues with your device, you can try restarting it.
Procedure
» Unplug the power cable from the device and plug the cable back in to your device.
The device powers off and restarts after you plug it back in. You may need to reselect the device
as the default audio and video device for your conferencing software.
Related Links
Set Poly P Series Device as the Default Audio and Video Device on page 12
Factory Reset Poly Studio P15
You can reset the Poly Studio P15 personal video bar to factory settings.
Warning: Your personal video bar erases all user data and settings.
Procedure
1. Unplug USB-C from Poly Studio P15.
2. Find the reset pinhole on the bottom of the device.
3. Use a paperclip to press and hold the reset button.
4. When the LED indicator turns amber, stop pressing the reset button.
12
Page 14

Using Your Poly Studio P Series Device
The factory reset is complete after the pulsing white LED turns off and an audible tone sounds.
5. Plug the USB-C cable back into your device.
Factory Restore Poly Studio P15
Factory restore the Poly Studio P15 personal video bar to resolve potential issues where your device has
become unresponsive.
Warning: A factory restore completely erases the system’s flash memory and restores it to the factory
software version.
Procedure
1. Unplug the power cable from your device.
2. On the bottom of the Poly Studio P15 insert a straightened paper clip through the factory restore
pinhole.
3. While continuing to hold the restore button, reconnect the power supply to turn the system on.
4. Continue to hold the restore button for 3 seconds.
The device LED pulses amber until the factory restore is complete.
Updating Firmware
Your device can automatically download firmware updates through Microsoft Windows updates, or
manually using the Poly Lens Desktop app.
Note: MacOS doesn’t support automatic updates.
For more information on updating your device, see the Poly Lens Desktop App User Guide.
13
 Loading...