

Page 1
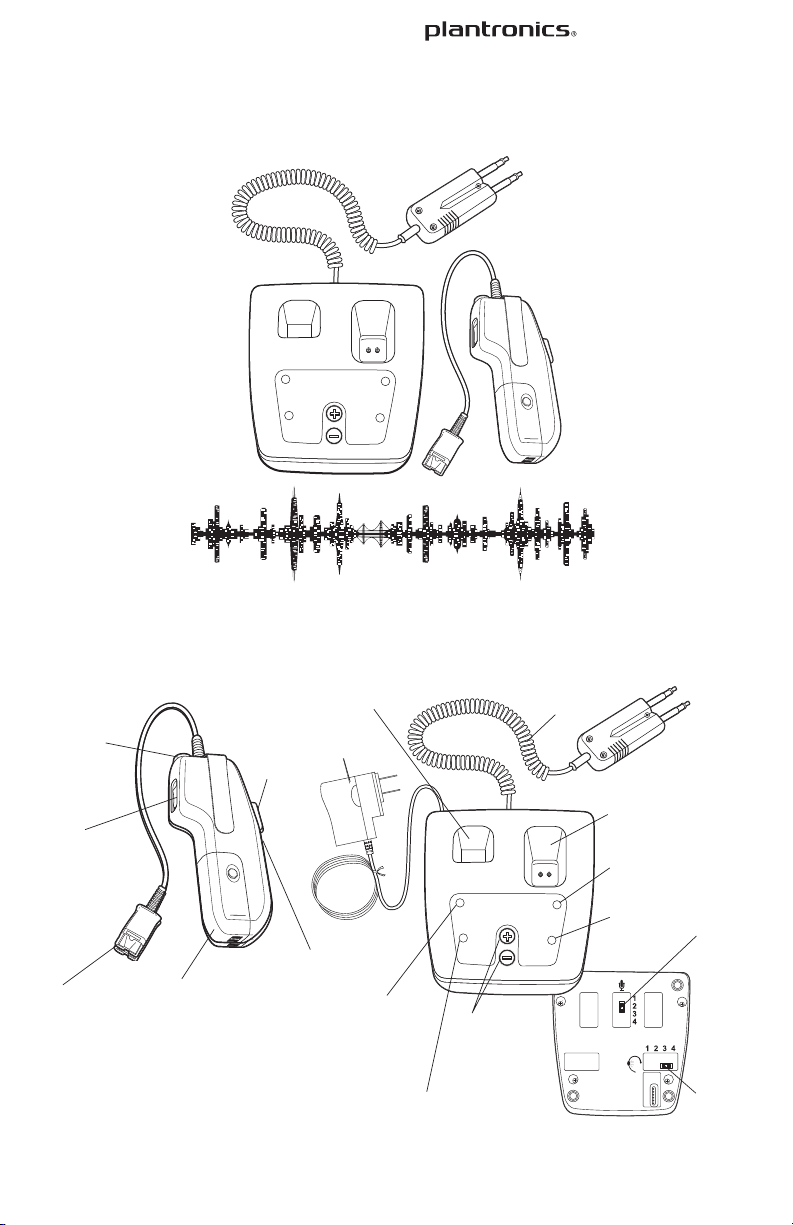
COMPONENTS OF MODEL CA12CD-S/A
USER GUIDE
REMOTE UNIT BASE UNIT
Quick Disconnect™
for Headset
Listen
Fine-Adjust
Switch
Audio Link
LED button
Push-to-
Talk
button
AC adapter
Charging well for
spare battery pack
Spare
battery pack
Charge LED
(orange)
Base Unit power
LED (green)
Momentary/
locking PTT
selector
(not shown;
see Fig. 1.7 and
Note 4.1)
Battery
Pack
See Note 3.1
Model CA12CD-S/A
. . . . . . . . . . . . . . . . . . . . . . . . . . . . . . . . . . . . . . . . . . . . . . . . . . . . . . . . . . . . . . . .
Push-to-Talk Headset Amplifier
Audio Link
LED button
Listen
Fine-Adjust
Switch
Quick Disconnect™
for Headset
SPARE
CHARGE
BASE
POWER
REMOTE
TALK
CHARGE
VOLUME
TALK
COMPONENTS OF MODEL CA12CD-S/A
Charging well for
spare battery pack
Battery
Pack
See Note 3.1
Push-toTalk
button
Momentary/
locking PTT
selector
(not shown;
see Fig. 1.7 and
Note 4.1)
AC adapter
Spare
battery pack
Charge LED
(orange)
Base Unit power
LED (green)
SPARE
CHARGE
BASE
POWER
Talk Volume
buttons
(fine-adjust) See
Note 4.1
REMOTE UNIT BASE UNIT
Console
Interface Cable
TALK
VOLUME
Charging well for
remote unit
Remote Unit
Battery Charge LED
(orange)
REMOTE
CHARGE
TALK
PTT LED
(green)
BOTTOM VIEW
OF BASE UNIT
Talk
Coarse-Adjust
Switch
Listen
Coarse-Adjust
Switch
Page 2

BASE
POWER
TALK
REMOTE UNIT BASE UNIT
The Base and the Remote are paired with each other at the factory
in a process called subscription. If you replace either one, you can
subscribe them as follows:
4.1 Press and hold the Subscription button on the back of the Base.
(Alternatively, you can hold both of the Talk Volume buttons on
the top of the Base down.)
a. The Base Power LED will begin blinking.
4.2 Hold the Remote’s Listen Volume Control in either the up or down
position.
a. The Remote’s Audio Link LED will turn on steadily (no flashing).
The Remote will subscribe to the Base, after which the Base
Power LED will return to the steadily-on state. The Remote’s
Audio Link LED will go out for a few seconds and then begin to
flash once per second, indicating that your CA12CD-S/A is now
ready to use.
Note 4.1: Remotes and Bases from different models and product
generations cannot be mixed. Please see Table 4.1.
Colour of
momentary/
locking selector
on Remote (see
Figure 1.7 for
location)
Black Black CA12CD,
White Black
Grey Grey CA12CD-S,
Purple Purple CA12CD-S/A,
buttons
(fine-adjust) See
Note 4.1
Charge LED
(orange)
Base Unit power
LED (green)
Note 4.1)
Setup and operation
Plug AC
Adapter
in here
Performance tips
Plug Console
Interface Cable
in here
Subscription
button
1.1 Plug the modular connector on the Console Interface Cable into the
modular jack on the back of the Base. Plug the other end into your
console.
1.2 Plug the AC adapter into a wall outlet, and plug the
power connector into the back of the Base. The
Base Power LED will turn on.
1.3 Slide the battery pack onto the Remote and snap it
into place without forcing it. The CA12CD-S/A will
take a few seconds to select the most reliable radio
channel, and then it will start to blink its Audio Link
LED at once per second, to indicate that it is ready
to use.
1.4 For first-time use, press the Audio Link button to
turn the audio link off, and place the Remote into its
charging well to charge the attached battery pack.
1.5 Place the spare battery pack into its charging well.
1.6 The Charge LEDs will flash until the battery packs
are fully charged, at which time the LEDs will
stop flashing and remain on. (It is okay to use the
Remote after only one hour of charging time if
desired.)
1.7 Press the PTT Button on the Remote to key up your
communications radio. The Talk LED on the Base will turn
onwhenever the PTT button is pressed.
BACK VIEW OF BASE UNIT 1.1, 1.2
Installing the battery pack
1.3
1.7 How to set the PTT button for locking or momentary operation
Locking
Locking operation
When the selector’s slot is aligned with the Remote’s centre-line,
the PTT button can be depressed momentarily or locked in the
ON position by first depressing then sliding the button down
toward the selector until the button locks into place.
Momentary operation
Turning the selector 90 degrees from the locking position will set
the PTT button for momentary operation.
Momentary
2.1 Careful setting of the audio levels, both in your communications
console and in the CA12CD-S/A, is essential for getting good audio
quality and avoiding echo. Please see the separate sheet, Audio
Settings Guide for the CA12CD-S/A, for detailed advice.
2.2 Operating other radio devices, such as DECT cordless handsets,
in the same frequency band as the CA12CD-S/A will reduce the
number of units that can be operated at one time, along with
reducing their maximum range. The CA12CD-S/A operates in the
DECT frequency band (1.88 to 1.90 GHz).
2.3 User density and range can vary widely due to such variables as
building layout and whether other devices are operating in the
same frequency band as the CA12CD-S/A.
In low-density installations (e.g., 5 units placed 10 feet apart), the
range can be greater than 100 feet. In high-density installations
(e.g., 30 units placed 18 inches apart), the range could decrease to
as little as 10 feet. In general, it is best to place them as far apart
from each other as possible.
2.4 Keep mobile phones at least 3 feet from both the Base and the
Remote when the Remote is not near the Base. When the Base and
Remote are near each other, mobile phones can be closer than 3
feet, but should never be placed right next to the Base orRemote.
2.5 Remove the battery pack and power cord from any unused units
to allow more radio spectrum for active units. This is especially
important where large numbers of them are in use.
Battery charging
and management
3.1 A new, fully charged battery pack will last for about 8 hours,
however, we recommend swapping the Remote’s battery pack
with a freshly charged battery pack from the Spare Charger about
every 4 hours. Doing so will help insure that mission-critical
communications are not interrupted by low batteries. Following
this recommendation will also maximise the battery’s service life.
3.2 Between battery swaps, we recommend placing the Remote in
its charging well whenever possible, and, if it is not being used,
turning the audio link off by pressing the Audio Link button.
3.3 If the Remote is left in the charging well with the link up, a new
charging cycle will typically begin about 3 hours after the first
charging cycle. Using the Remote at this time without installing a
freshly charged battery pack could result in reduced talk time.
3.4 A completely depleted battery pack requires about 4 hours to fully
charge.
3.5 The Remote will continue to draw a small amount of power from
the battery even after being turned off. If you need to store the
Remote, remove the battery pack so that it does not become
completely discharged while in storage.
Warning: Touching the battery-charging contacts or placing objects
other than the battery packs and Remote in the charging wells may
adversely affect the operation of the CA12CD-S/A.
Note 3.1: Rechargeable batteries of all types gradually age and lose
their ability to give and receive charge. Over time, this will result in
gradually decreasing talk times. In a typical 24/7 operation, where the
batteries are regularly being charged and discharged, werecommend
that you monitor their performance and replace them as needed.
Page 3

REMOTE
CHARGE
SPARE
CHARGE
BASE
POWER
TALK
TALK
VOLUME
Subscribing Remotes
Console
Interface Cable
Charging well for
remote unit
Remote Unit
Battery Charge LED
(orange)
PTT LED
(green)
Talk
Coarse-Adjust
Switch
Listen
Coarse-Adjust
Switch
BOTTOM VIEW
OF BASE UNIT
Talk Volume
buttons
(fine-adjust) See
Note 4.1
16. Never touch uninsulated telephone wires or terminals unless the
telephone line has been disconnected at the network interface.
17. Exercise caution when installing or modifying telephone lines.
18. This product is intended to be supplied by a Listed Class 2 Direct Plug-
In Power Unit, rated at an output voltage of 9 VDC at 500mA.
19. This product requires AC power in order to operate. In order to have
phone service during a power outage, have another headset available
that is powered only by the communications equipment.
20. Keep all product cords and cables away from operating machinery
BATTERY PACK PRECAUTIONS
CAUTION: To reduce the risk of fire or injury to persons, read and follow
these instructions.
• Use only the battery pack supplied with this product.
• Do not dispose of battery pack in a fire. The cells may explode. Checkwith
local codes for possible disposal instructions.
• Do not open or mutilate battery pack. Released electrolyte is corrosive
and may cause damage to eyes or skin and may be toxic if swallowed.
• Exercise care in handling the battery pack in order not to “short” the
battery contacts with conducting materials such as rings, bracelets, and
keys. The battery or conductor may overheat and cause burns.
• Charge the battery pack in accordance with instructions supplied with this
unit.
• Observe proper orientation between battery pack and charger contacts.
ATTENTION:
Interruption or termination of the communications link between
the Base and the Remote will occur under the following or similar
conditions:
1. Power outage
2. Moving the Remote out of range from the Base
3. Pressing the Audio Link button on the Remote while the audio link is
active
4. Disconnection of the Base’s power supply
5. Removal of the battery pack from the Remote
6. Low battery
7. Operation of other radio devices in the same frequency range (1.88
to 1.90 GHz for Europe and some other regions) as the CA12CD-S/A.
8. Too many CA12CD-S/As in the same location. 30 units can typically
be operated in the same location. However, this number can vary
depending on such factors as building layout and materials, physical
separation of units, and other radio devices operating nearby.
LIMITED WARRANTY
• This warranty covers defects in materials and workmanship of products
manufactured, sold or certified by Plantronics that were purchased and
used in the United States.
• The warranty lasts for one year from the date of purchase of the
products.
• This warranty extends to you only if you are the end user with the original
purchase receipt.
• We will, at our option, repair or replace the products that do not conform
to the specification. We may use functionally equivalent reconditioned,
refurbished, remanufactured, pre-owned or new products or parts.
• To obtain service in the U.S., contact Plantronics at 800-544-4660.
• THIS IS THE COMPLETE PLANTRONICS WARRANTY FOR THE PRODUCTS.
• This warranty gives you specific legal rights and you may also have other
rights depending on your location. Please contact your dealer or our
service centre for the full details of our limited warranty, including items
not covered by this limited warranty.
TECHNICAL ASSISTANCE
Visit our web site at www.plantronics.com/support for technical support
including frequently asked questions, compatibility and accessibility
information. The Plantronics Technical Assistance Center (TAC) is also
ready to assist you on 800-544-4660.
IMPORTANT SAFETY INSTRUCTIONS
When using your telephone equipment, basic safety precautions should
always be followed to reduce the risk of fire, electric shock and injury to
persons, including the following:
1. Read and understand all instructions.
2. Follow all warnings and instructions marked on the product. The
symbol identifies and alerts the user to the presence of important
operating and service instructions.
3. Unplug this product from the wall outlet before cleaning. Do not use
liquid cleaners or aerosol cleaners. Use a damp cloth for cleaning.
ERROR CONDITIONS
If you hear a… It means…
Triple beep Your Remote has lost its audio link with
the Base. Usually, this is due to being too
far away from the Base. (Note that a triple
beep while using the Talk or Listen fine
adjust controls indicates that the level isat
its nominal setting.)
Single beep every
10 seconds
Your battery is low and should be changed
or charged.
If you see… It means…
The Audio Link LED
flashing six times per
second
Your Remote is not subscribed to the Base.
See the instructions in the next section for
subscribing Bases and Remotes.
A Charge LED flashing
six times per second
Your battery should be replaced, or there
could be an object such as a coin or a
paperclip in the charging well.
and Bases
The Base and the Remote are paired with each other at the factory
in a process called subscription. If you replace either one, you can
subscribe them as follows:
4.1 Press and hold the Subscription button on the back of the Base.
(Alternatively, you can hold both of the Talk Volume buttons on
the top of the Base down.)
a. The Base Power LED will begin blinking.
4.2 Hold the Remote’s Listen Volume Control in either the up or down
position.
a. The Remote’s Audio Link LED will turn on steadily (no flashing).
The Remote will subscribe to the Base, after which the Base
Power LED will return to the steadily-on state. The Remote’s
Audio Link LED will go out for a few seconds and then begin to
flash once per second, indicating that your CA12CD-S/A is now
ready to use.
Note 4.1: Remotes and Bases from different models and product
generations cannot be mixed. Please see Table 4.1.
Colour of
momentary/
locking selector
on Remote (see
Figure 1.7 for
location)
Black Black CA12CD,
White Black
Grey Grey CA12CD-S,
Purple Purple CA12CD-S/A,
Table 4.1: Compatibility of Remotes and Bases
Colour of
Talk Volume
buttons on
Base
(check label
on bottom of
base to verify
model)
Model &
product
generation
st
gen.
1
CA12CD/A,
st
gen.
1
nd
gen.
2
nd
gen.
2
Primary
region of use
North America
Europe
North America
Europe
CONTROLS
Name Location Function(s)
Push-to-Talk (PTT)
button
Lockingmomentary
selector
Audio Link LED
button
Listen FineAdjust Switch
Listen CoarseAdjust Switch
Talk Volume
buttons
(fine-adjust)
Talk CoarseAdjust Switch
Subscription
button
LEDS
Name Location Function(s)
Audio Link (green) Top of
Power (green) Base 1) On continuously when the Base
Talk (green) Base On steadily (no flashing) when PTT
Charge (orange,
2 ea.)
Remote Keys up the communications radio.
Remote Enables or disables locking operation
of the PTT Switch.
Top of
Turns the audio link between the
Remote
Remote and the Base on and off.
Remote 1. Adjusts the Listen sensitivity in
2-dB steps.
2. Places the Remote into
Subscription Mode when pressed
and held in either the Up or Down
position.
Bottom
Adjusts the Listen sensitivity in 6-dB
of Base
steps.
Top of
1. Adjust the Talk sensitivity in 2-dB
Base
steps.
2 Set the Talk sensitivity to midrange
when both are pressed quickly at the
same time.
3. Place the Base into Subscription
Mode when both are pressed and
held at the same time.
Some versions of the CA12CD-S/A
donot have these buttons.
Bottom
Adjusts the Talk output for
of Base
carbon-, electret-, or dynamic-mic
applications. Carbon (Position 4)
isthe factory setting, and is suitable
for most applications.
Back of
Places the Base into Subscription
Base
Mode when pressed and held (this
is an alternative to pressing and
holding the Talk Volume buttons).
1) Flashes once per second to
Remote;
indicate an active audio link.
part
2) Glows steadily (no flashing) when
of the
the Remote is in Subscription Mode.
Audio
3) Flashes 6 times per second if the
Link LED
subscription is lost (see the next
Button
section for more information).
ispowered up.
2) Flashes once per second
when the Base is in Subscription
Mode.
button is depressed.
Base, 1
1) Flashes once per second while the
for each
battery is charging.
charging
2) On steadily when the battery
well
isfully charged.
3) Flashes six times per second to
indicate a fault condition (see the
next section for more information).
Page 4
16. Never touch uninsulated telephone wires or terminals unless the
telephone line has been disconnected at the network interface.
17. Exercise caution when installing or modifying telephone lines.
18. This product is intended to be supplied by a Listed Class 2 Direct Plug-
In Power Unit, rated at an output voltage of 9 VDC at 500mA.
19. This product requires AC power in order to operate. In order to have
phone service during a power outage, have another headset available
that is powered only by the communications equipment.
20. Keep all product cords and cables away from operating machinery
.
BATTERY PACK PRECAUTIONS
CAUTION: To reduce the risk of fire or injury to persons, read and follow
these instructions.
• Use only the battery pack supplied with this product.
• Do not dispose of battery pack in a fire. The cells may explode. Checkwith
local codes for possible disposal instructions.
• Do not open or mutilate battery pack. Released electrolyte is corrosive
and may cause damage to eyes or skin and may be toxic if swallowed.
• Exercise care in handling the battery pack in order not to “short” the
battery contacts with conducting materials such as rings, bracelets, and
keys. The battery or conductor may overheat and cause burns.
• Charge the battery pack in accordance with instructions supplied with this
unit.
• Observe proper orientation between battery pack and charger contacts.
any kind on the product.
AC Adapters
North America (shown):
64401-03
European Union and
United Kingdom:
38640-01 (not shown)
Australia: 66804-01
(not shown)
Remote
North America
201059-01
UPCS
(DECT 6.0)
Countries outside
North America
201059-02 (DECT)
Please note that the older spare
Remotes (PNs 80323-01 and
80323-02) will not work with the
• Do not open or mutilate battery pack. Released electrolyte is corrosive
and may cause damage to eyes or skin and may be toxic if swallowed.
• Exercise care in handling the battery pack in order not to “short” the
battery contacts with conducting materials such as rings, bracelets, and
keys. The battery or conductor may overheat and cause burns.
• Charge the battery pack in accordance with instructions supplied with this
unit.
• Observe proper orientation between battery pack and charger contacts.
Console Interface Cable 68331-01
SUPPLIES & ACCESSORIES
ATTENTION:
Interruption or termination of the communications link between
the Base and the Remote will occur under the following or similar
conditions:
1. Power outage
2. Moving the Remote out of range from the Base
3. Pressing the Audio Link button on the Remote while the audio link is
active
4. Disconnection of the Base’s power supply
5. Removal of the battery pack from the Remote
6. Low battery
7. Operation of other radio devices in the same frequency range (1.88
to 1.90 GHz for Europe and some other regions) as the CA12CD-S/A.
8. Too many CA12CD-S/As in the same location. 30 units can typically
be operated in the same location. However, this number can vary
depending on such factors as building layout and materials, physical
separation of units, and other radio devices operating nearby.
LIMITED WARRANTY
• This warranty covers defects in materials and workmanship of products
manufactured, sold or certified by Plantronics that were purchased and
used in the United States.
• The warranty lasts for one year from the date of purchase of the
products.
• This warranty extends to you only if you are the end user with the original
purchase receipt.
• We will, at our option, repair or replace the products that do not conform
to the specification. We may use functionally equivalent reconditioned,
refurbished, remanufactured, pre-owned or new products or parts.
• To obtain service in the U.S., contact Plantronics at 800-544-4660.
• THIS IS THE COMPLETE PLANTRONICS WARRANTY FOR THE PRODUCTS.
• This warranty gives you specific legal rights and you may also have other
rights depending on your location. Please contact your dealer or our
service centre for the full details of our limited warranty, including items
not covered by this limited warranty.
TECHNICAL ASSISTANCE
Visit our web site at www.plantronics.com/support for technical support
including frequently asked questions, compatibility and accessibility
information. The Plantronics Technical Assistance Center (TAC) is also
ready to assist you on 800-544-4660.
IMPORTANT SAFETY INSTRUCTIONS
When using your telephone equipment, basic safety precautions should
always be followed to reduce the risk of fire, electric shock and injury to
persons, including the following:
1. Read and understand all instructions.
2. Follow all warnings and instructions marked on the product. The
symbol identifies and alerts the user to the presence of important
operating and service instructions.
3. Unplug this product from the wall outlet before cleaning. Do not use
liquid cleaners or aerosol cleaners. Use a damp cloth for cleaning.
4. Do not locate Base Unit near water, for example, near a bath or sink, in
a wet basement, or near a swimming pool.
5. This product should never be placed near or over a radiator or heat
register. This product should not be placed in a built-in installation
unless proper ventilation is provided.
6. This product should be operated only from the type of power source
indicated on the marking label. If you are not sure of the type of power
supply to your home, consult your dealer or local power company.
7. Do not locate this product in an area where the power cord is likely to
be damaged by furniture or foot traffic.
8. Do not overload outlets and extension cords as this can result in the
risk of fire or electric shock.
9. Never push objects of any kind into this product through Base Unit
slots as they may touch dangerous voltage points or short out parts
that could result in a risk of fire or electric shock. Never spill liquid of
any kind on the product.
isspecifically designed for wet locations.
A Charge LED flashing
six times per second
Your battery should be replaced, or there
could be an object such as a coin or a
paperclip in the charging well.
16. Never touch uninsulated telephone wires or terminals unless the
• Observe proper orientation between battery pack and charger contacts.
AC Adapters
North America (shown):
64401-03
European Union and
United Kingdom:
38640-01 (not shown)
Australia: 66804-01
(not shown)
Console Interface Cable 68331-01
6-wire, modular-to-PJ7 cable assembly
Connectors other than the PJ7 are
available upon request
buttons
(fine-adjust)
Base
steps.
2 Set the Talk sensitivity to midrange
when both are pressed quickly at the
same time.
3. Place the Base into Subscription
Mode when both are pressed and
held at the same time.
Some versions of the CA12CD-S/A
donot have these buttons.
Talk Coarse-
Adjust Switch
Bottom
of Base
Adjusts the Talk output for
carbon-, electret-, or dynamic-mic
applications. Carbon (Position 4)
isthe factory setting, and is suitable
for most applications.
Subscription
button
Back of
Base
Places the Base into Subscription
Mode when pressed and held (this
is an alternative to pressing and
holding the Talk Volume buttons).
LEDS
Name Location Function(s)
Audio Link (green) Top of
Remote;
part
of the
Audio
Link LED
Button
1) Flashes once per second to
indicate an active audio link.
2) Glows steadily (no flashing) when
the Remote is in Subscription Mode.
3) Flashes 6 times per second if the
subscription is lost (see the next
section for more information).
Power (green) Base 1) On continuously when the Base
ispowered up.
2) Flashes once per second
when the Base is in Subscription
Mode.
Talk (green) Base On steadily (no flashing) when PTT
button is depressed.
Charge (orange,
2 ea.)
Base, 1
for each
charging
well
1) Flashes once per second while the
battery is charging.
2) On steadily when the battery
isfully charged.
3) Flashes six times per second to
indicate a fault condition (see the
next section for more information).
SUPPLIES & ACCESSORIES
the Base and the Remote will occur under the following or similar
conditions:
1. Power outage
2. Moving the Remote out of range from the Base
3. Pressing the Audio Link button on the Remote while the audio link is
active
4. Disconnection of the Base’s power supply
5. Removal of the battery pack from the Remote
6. Low battery
7. Operation of other radio devices in the same frequency range (1.88
to 1.90 GHz for Europe and some other regions) as the CA12CD-S/A.
8. Too many CA12CD-S/As in the same location. 30 units can typically
be operated in the same location. However, this number can vary
depending on such factors as building layout and materials, physical
separation of units, and other radio devices operating nearby.
LIMITED WARRANTY
• This warranty covers defects in materials and workmanship of products
manufactured, sold or certified by Plantronics that were purchased and
used in the United States.
• The warranty lasts for one year from the date of purchase of the
products.
• This warranty extends to you only if you are the end user with the original
purchase receipt.
• We will, at our option, repair or replace the products that do not conform
to the specification. We may use functionally equivalent reconditioned,
refurbished, remanufactured, pre-owned or new products or parts.
• To obtain service in the U.S., contact Plantronics at 800-544-4660.
• THIS IS THE COMPLETE PLANTRONICS WARRANTY FOR THE PRODUCTS.
• This warranty gives you specific legal rights and you may also have other
rights depending on your location. Please contact your dealer or our
service centre for the full details of our limited warranty, including items
not covered by this limited warranty.
TECHNICAL ASSISTANCE
Visit our web site at www.plantronics.com/support for technical support
including frequently asked questions, compatibility and accessibility
information. The Plantronics Technical Assistance Center (TAC) is also
ready to assist you on 800-544-4660.
IMPORTANT SAFETY INSTRUCTIONS
When using your telephone equipment, basic safety precautions should
always be followed to reduce the risk of fire, electric shock and injury to
persons, including the following:
1. Read and understand all instructions.
2. Follow all warnings and instructions marked on the product. The
symbol identifies and alerts the user to the presence of important
operating and service instructions.
3. Unplug this product from the wall outlet before cleaning. Do not use
liquid cleaners or aerosol cleaners. Use a damp cloth for cleaning.
4. Do not locate Base Unit near water, for example, near a bath or sink, in
a wet basement, or near a swimming pool.
5. This product should never be placed near or over a radiator or heat
register. This product should not be placed in a built-in installation
unless proper ventilation is provided.
6. This product should be operated only from the type of power source
indicated on the marking label. If you are not sure of the type of power
supply to your home, consult your dealer or local power company.
7. Do not locate this product in an area where the power cord is likely to
be damaged by furniture or foot traffic.
8. Do not overload outlets and extension cords as this can result in the
risk of fire or electric shock.
9. Never push objects of any kind into this product through Base Unit
slots as they may touch dangerous voltage points or short out parts
that could result in a risk of fire or electric shock. Never spill liquid of
any kind on the product.
10. To reduce the risk of electric shock, do not disassemble this product,
but take it to qualified service personnel when service or repair work is
required. Opening or removing covers may expose you to dangerous
voltages or other risks. Incorrect reassembly can cause electric shock
when the product is subsequently used.
11. Avoid using telephone equipment during an electrical storm.
Theremay be a remote risk of electric shock from lightning.
12. Do not use the telephone equipment to report a gas leak in the vicinity
of the leak.
13. Unplug this product from the wall outlet and refer servicing toqualified
service personnel under the following conditions:
a) When the power supply cord or plug is damaged or frayed.
b) If the product has been exposed to liquid.
c) If the product does not operate normally by following the operating
instructions. Adjust only those controls that are covered by the
operating instructions because improper adjustments of other
controls may result in damage and will often require extensive work by
a qualified technician to restore the product to normal operation.
d) If the product has been dropped or the Base Unit has been
damaged.
e) If the product exhibits a distinct change in performance.
14. Never install telephone wiring during a lightning storm.
15. Never install telephone jacks in wet locations unless the jack
isspecifically designed for wet locations.
ERROR CONDITIONS
If you hear a… It means…
Triple beep Your Remote has lost its audio link with
Single beep every
10 seconds
If you see… It means…
The Audio Link LED
flashing six times per
second
A Charge LED flashing
six times per second
ATTENTION:
Interruption or termination of the communications link between
the Base and the Remote will occur under the following or similar
conditions:
1. Power outage
2. Moving the Remote out of range from the Base
3. Pressing the Audio Link button on the Remote while the audio link is
active
4. Disconnection of the Base’s power supply
5. Removal of the battery pack from the Remote
6. Low battery
7. Operation of other radio devices in the same frequency range (1.88
to 1.90 GHz for Europe and some other regions) as the CA12CD-S/A.
8. Too many CA12CD-S/As in the same location. 30 units can typically
be operated in the same location. However, this number can vary
depending on such factors as building layout and materials, physical
separation of units, and other radio devices operating nearby.
LIMITED WARRANTY
• This warranty covers defects in materials and workmanship of products
manufactured, sold or certified by Plantronics that were purchased and
used in the United States.
• The warranty lasts for one year from the date of purchase of the
products.
• This warranty extends to you only if you are the end user with the original
purchase receipt.
• We will, at our option, repair or replace the products that do not conform
to the specification. We may use functionally equivalent reconditioned,
refurbished, remanufactured, pre-owned or new products or parts.
• To obtain service in the U.S., contact Plantronics at 800-544-4660.
• THIS IS THE COMPLETE PLANTRONICS WARRANTY FOR THE PRODUCTS.
• This warranty gives you specific legal rights and you may also have other
rights depending on your location. Please contact your dealer or our
service centre for the full details of our limited warranty, including items
not covered by this limited warranty.
TECHNICAL ASSISTANCE
Visit our web site at www.plantronics.com/support for technical support
including frequently asked questions, compatibility and accessibility
information. The Plantronics Technical Assistance Center (TAC) is also
ready to assist you on 800-544-4660.
IMPORTANT SAFETY INSTRUCTIONS
When using your telephone equipment, basic safety precautions should
always be followed to reduce the risk of fire, electric shock and injury to
persons, including the following:
1. Read and understand all instructions.
2. Follow all warnings and instructions marked on the product. The
symbol identifies and alerts the user to the presence of important
operating and service instructions.
3. Unplug this product from the wall outlet before cleaning. Do not use
liquid cleaners or aerosol cleaners. Use a damp cloth for cleaning.
4. Do not locate Base Unit near water, for example, near a bath or sink, in
a wet basement, or near a swimming pool.
5. This product should never be placed near or over a radiator or heat
register. This product should not be placed in a built-in installation
unless proper ventilation is provided.
6. This product should be operated only from the type of power source
indicated on the marking label. If you are not sure of the type of power
supply to your home, consult your dealer or local power company.
7. Do not locate this product in an area where the power cord is likely to
be damaged by furniture or foot traffic.
8. Do not overload outlets and extension cords as this can result in the
risk of fire or electric shock.
9. Never push objects of any kind into this product through Base Unit
slots as they may touch dangerous voltage points or short out parts
that could result in a risk of fire or electric shock. Never spill liquid of
the Base. Usually, this is due to being too
far away from the Base. (Note that a triple
beep while using the Talk or Listen fine
adjust controls indicates that the level isat
its nominal setting.)
Your battery is low and should be changed
or charged.
Your Remote is not subscribed to the Base.
See the instructions in the next section for
subscribing Bases and Remotes.
Your battery should be replaced, or there
could be an object such as a coin or a
paperclip in the charging well.
10. To reduce the risk of electric shock, do not disassemble this product,
but take it to qualified service personnel when service or repair work is
required. Opening or removing covers may expose you to dangerous
voltages or other risks. Incorrect reassembly can cause electric shock
when the product is subsequently used.
11. Avoid using telephone equipment during an electrical storm.
Theremay be a remote risk of electric shock from lightning.
12. Do not use the telephone equipment to report a gas leak in the vicinity
of the leak.
13. Unplug this product from the wall outlet and refer servicing toqualified
service personnel under the following conditions:
a) When the power supply cord or plug is damaged or frayed.
b) If the product has been exposed to liquid.
c) If the product does not operate normally by following the operating
instructions. Adjust only those controls that are covered by the
operating instructions because improper adjustments of other
controls may result in damage and will often require extensive work by
a qualified technician to restore the product to normal operation.
d) If the product has been dropped or the Base Unit has been
damaged.
e) If the product exhibits a distinct change in performance.
14. Never install telephone wiring during a lightning storm.
15. Never install telephone jacks in wet locations unless the jack
telephone line has been disconnected at the network interface.
17. Exercise caution when installing or modifying telephone lines.
18. This product is intended to be supplied by a Listed Class 2 Direct PlugIn Power Unit, rated at an output voltage of 9 VDC at 500mA.
19. This product requires AC power in order to operate. In order to have
phone service during a power outage, have another headset available
that is powered only by the communications equipment.
20. Keep all product cords and cables away from operating machinery
BATTERY PACK PRECAUTIONS
CAUTION: To reduce the risk of fire or injury to persons, read and follow
these instructions.
• Use only the battery pack supplied with this product.
• Do not dispose of battery pack in a fire. The cells may explode. Checkwith
local codes for possible disposal instructions.
• Do not open or mutilate battery pack. Released electrolyte is corrosive
and may cause damage to eyes or skin and may be toxic if swallowed.
• Exercise care in handling the battery pack in order not to “short” the
battery contacts with conducting materials such as rings, bracelets, and
keys. The battery or conductor may overheat and cause burns.
• Charge the battery pack in accordance with instructions supplied with this
unit.
• Observe proper orientation between battery pack and charger contacts.
SUPPLIES & ACCESSORIES
AC Adapters
North America (shown):
64401-03
European Union and
United Kingdom:
38640-01 (not shown)
Australia: 66804-01
(not shown)
Console Interface Cable 68331-01
6-wire, modular-to-PJ7 cable assembly
Connectors other than the PJ7 are
available upon request
Remote
North America
201059-01
UPCS
(DECT 6.0)
Countries outside
North America
201059-02 (DECT)
Please note that the older spare
Remotes (PNs 80323-01 and
80323-02) will not work with the
CA12CD-S/A
Battery Pack
80322-01
www.plantronics.com
© 2014 Plantronics, Inc. All rights reserved
Plantronics, the logo design and Sound Innovations
are trademarks or registered trademarks of Plantronics, Inc.
203209-01 (11.14)
.
 Loading...