

Page 1

Savi 7210/7220 Office
PLANTRONICS + POLYCOM. NOW TOGETHER AS
for desk phone
Page 2

Contents
DECT Information 3
DECT Enhanced Security 3
Overview 4
Headset overview 4
Base overview 5
Accessories 6
Hook up system 7
Desk phone setup details 7
Subscribe headset to base 10
Automatic secure subscription 10
Manual over-the-air subscription 10
Ending subscription 10
Fit and charge 11
Wear on the right or left 11
Charge your headset 11
Battery 11
System basics 12
Power on your headset 12
Adjust volume 12
Make, answer, end calls 12
More Features 14
Out of Range Warning Tones 14
Talk Time 14
Wideband/narrowband audio switch 14
Troubleshooting 15
Headset 15
Desk phone 16
Support 17
2
Page 3

DECT Information
DECT products should never be used outside the region in which they were originally purchased
and intended to be used.
The enclosed DECT 6.0 wireless product uses restricted wireless radio frequencies which vary by
country. DECT 6.0 devices are generally authorized for use in the US/Canada. Use of this DECT
6.0 product in unauthorized countries is a violation of law, may disrupt telecommunications
networks and devices, and can subject you to fines and penalties by regulatory agencies.
DECT Enhanced Security
Plantronics is a member of the DECT Forum and has fully adopted their recommendations for
enhancements to security within all DECT products.
Plantronics DECT-based products now fully incorporate the latest recommendations on Enhanced
Security from the DECT Forum and ETSI. These improvements cover registration, authentication,
authorization and encryption procedures. Plantronics DECT products are now secure against all
the known vulnerabilities that were highlighted by the public announcements of the Chaos
Council in 2009.
Plantronics DECT products have been tested against and passed the DECT Forum security
certification requirements and consequently have been granted 'DECT Forum security' logo
certification.
Plantronics products using the new enhanced version of DECT that includes these security
improvements are marked on the base with the DECT Forum security logo.
3
Page 4
:04
Subscribe
Overview
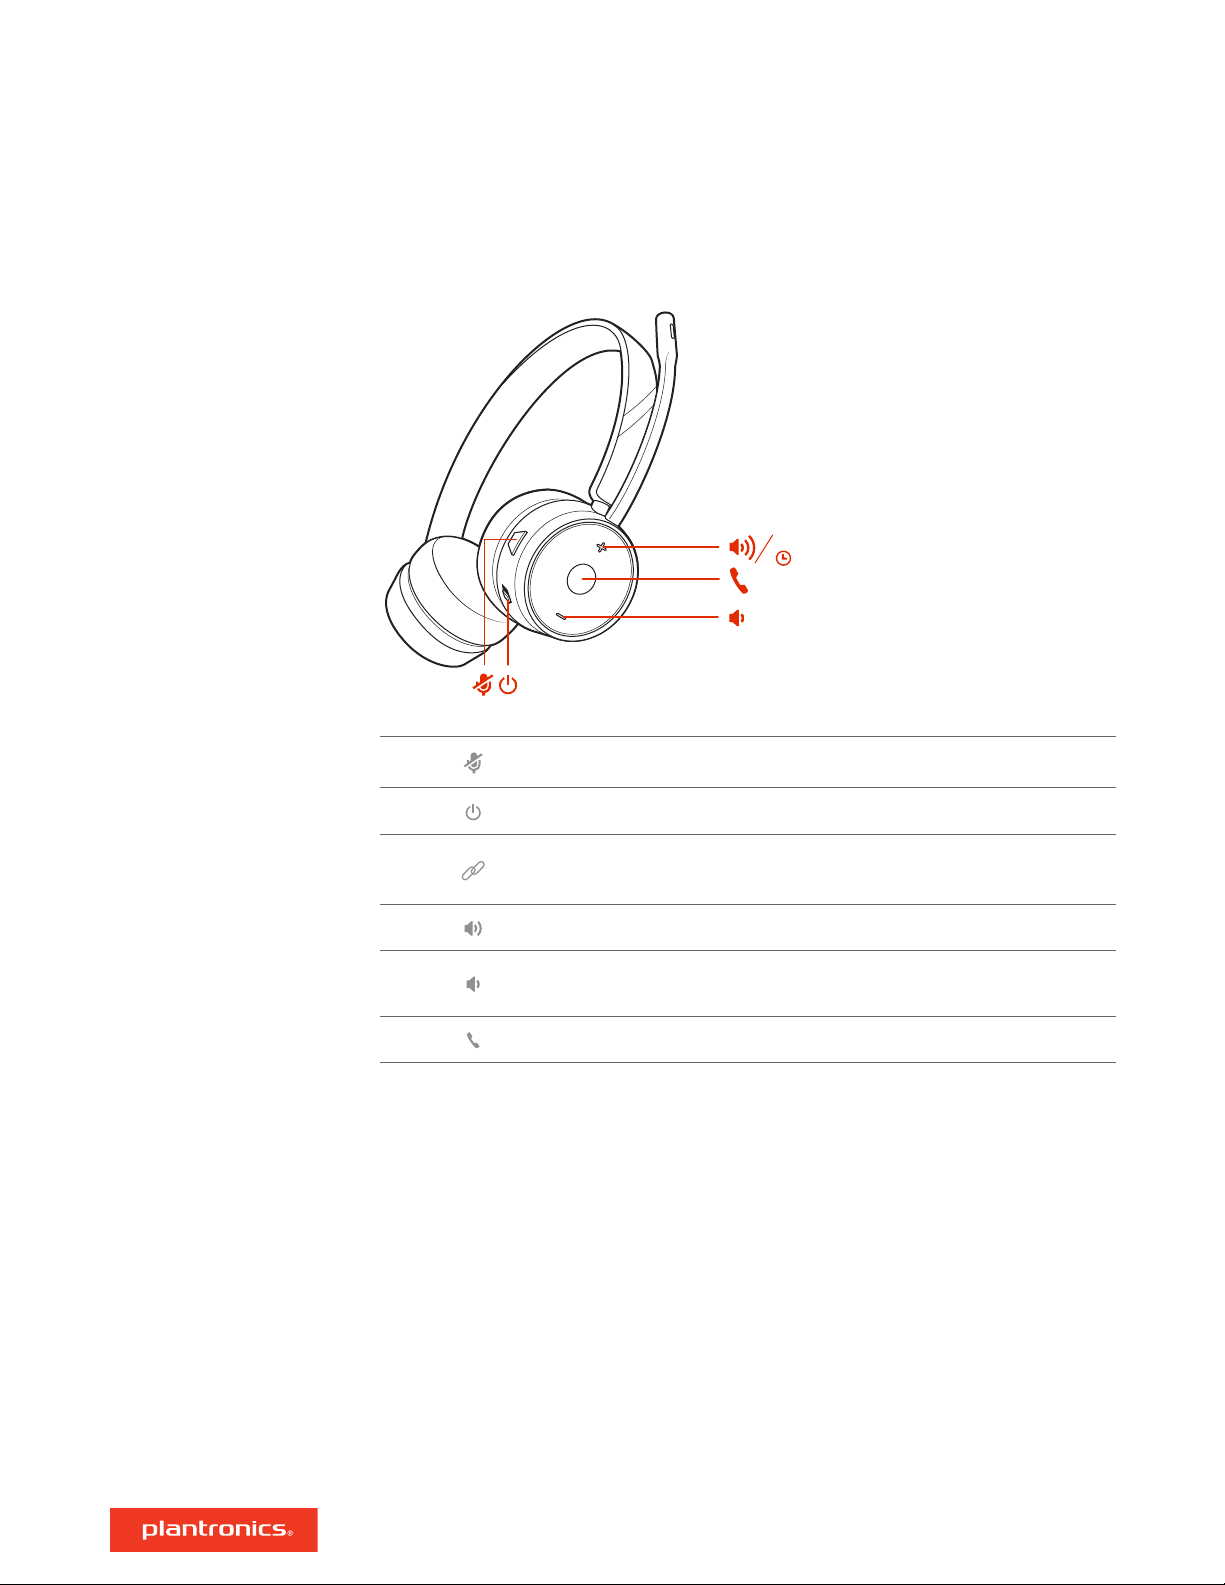
Headset overview
Mute/unmute
Power
Manual subscribe (connect)
Volume up
Volume down
Call
Be safe
Please read the safety guide for important safety, charging, battery and regulatory information
before using your new headset.
4
Page 5
1 2 3 4 5 6 7 8 9
12
10
11
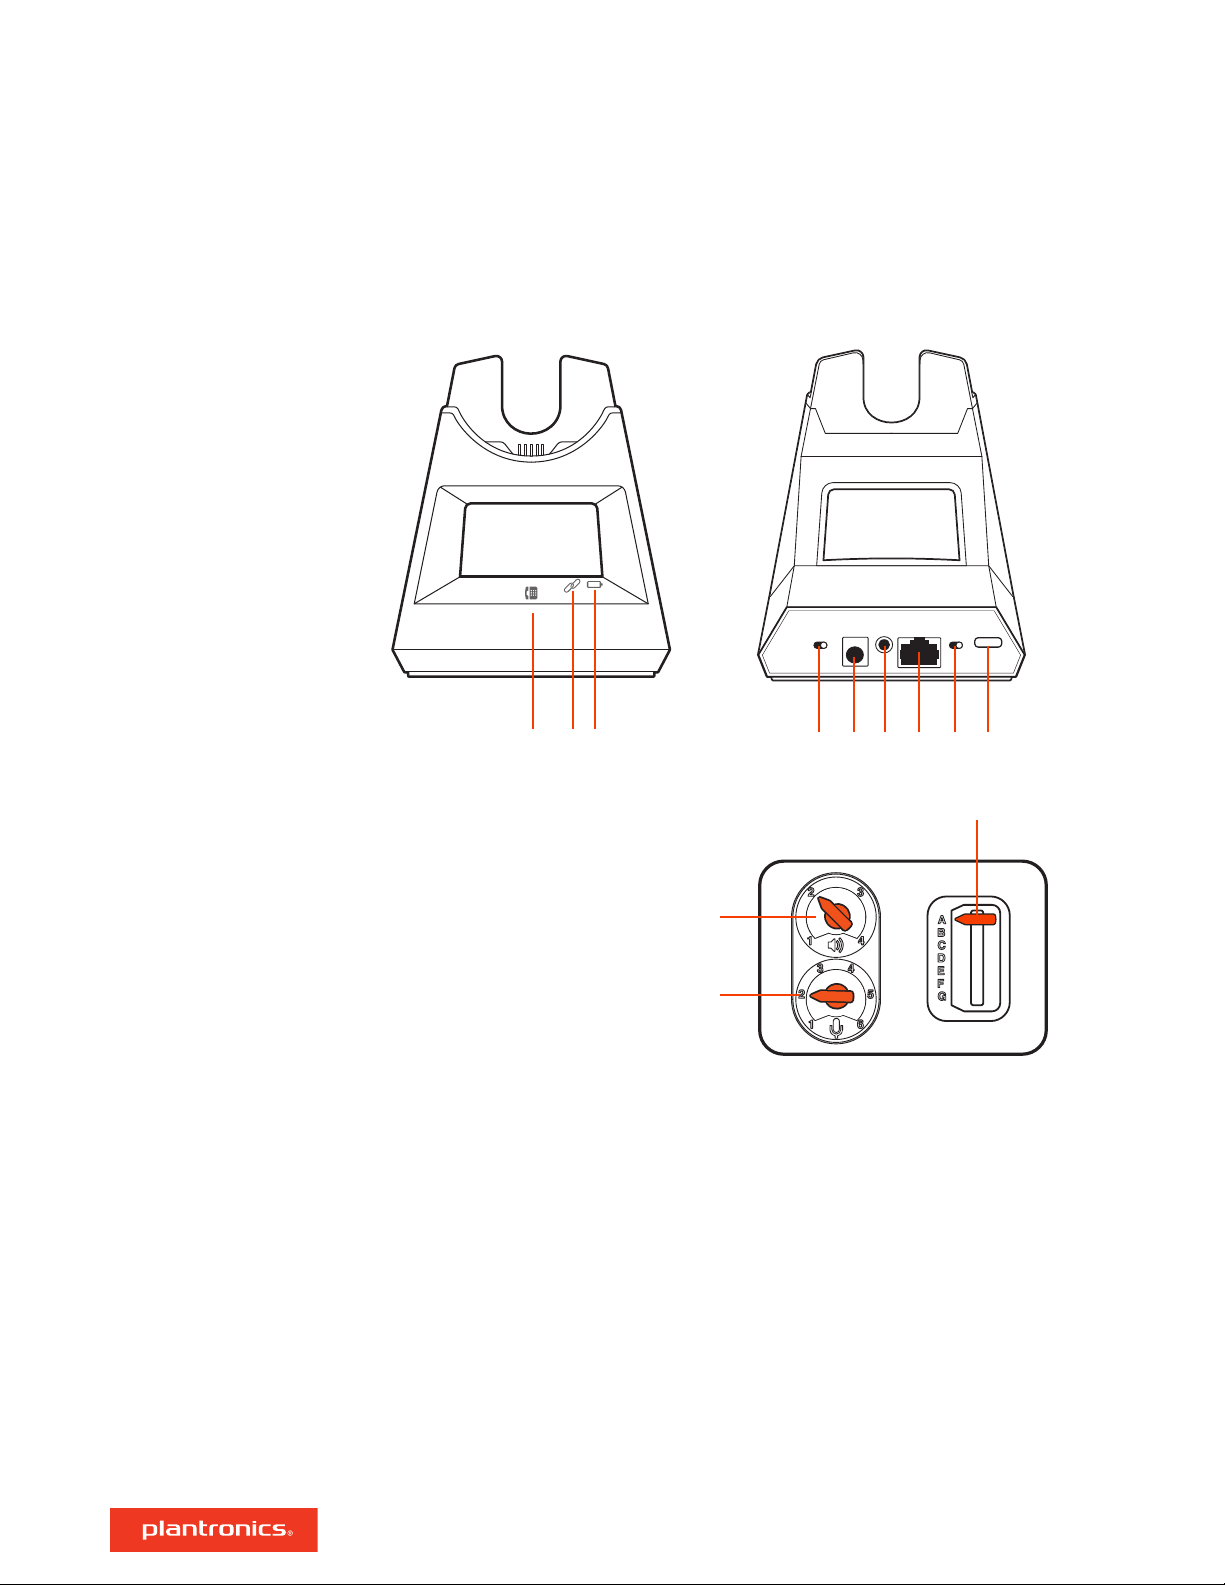
Base overview
Desk phone LED
1
Subscribe LED
2
Charging LED
3
Wideband/narrowband audio switch
4
Power jack
5
Handset lifter jack
6
Telephone interface cable jack
7
Auto answer
8
Subscription button
9
Desk phone listening volume
10
Desk phone speaking volume
11
Desk phone configuration switch
12
5
Page 6
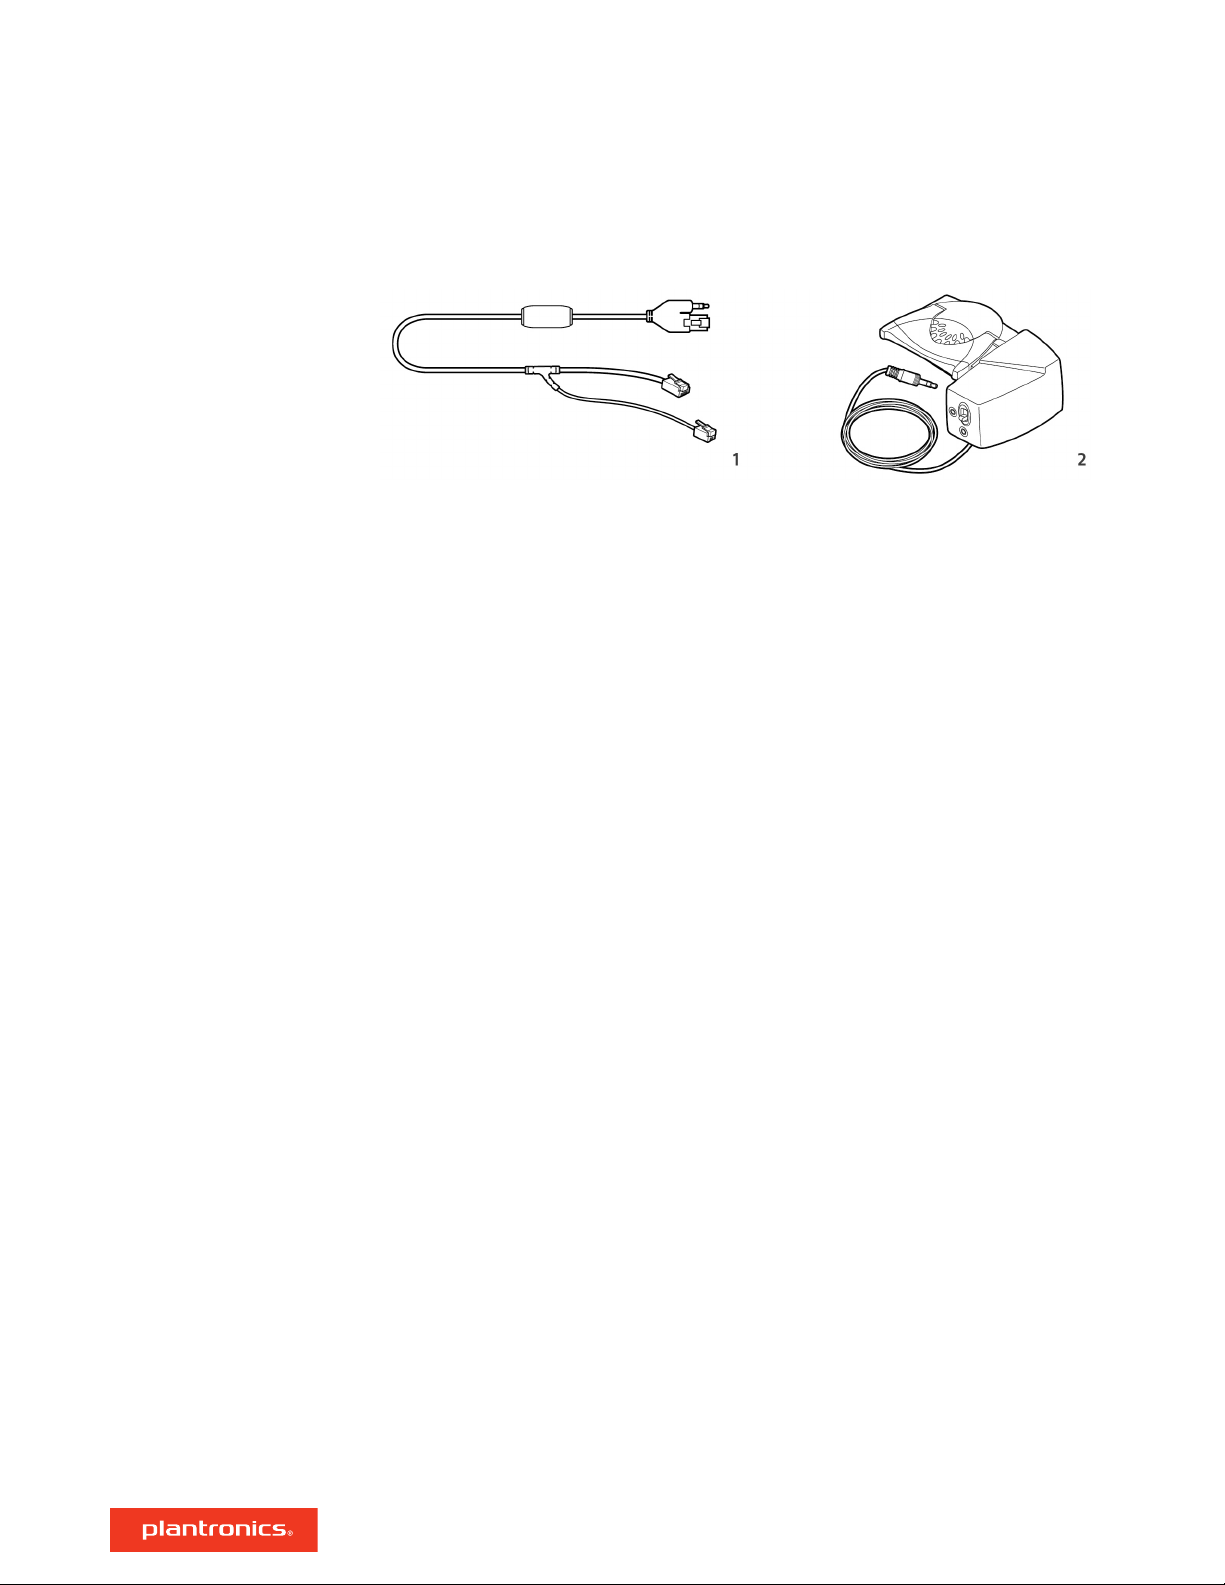
Accessories
1 Electronic hookswitch cable (EHS cable) Electronically and automatically answers/ends a desk
phone call. Enables remote call control with your headset.
2 HL10 lifter Automatically lifts handset and returns it to the cradle. Enables remote call control
with your headset.
6
Page 7

NO HEADSET PORT
OR
HEADSET PORT
Hook up system
Using the diagram, connect your headset system.
Desk phone setup details
NOTE Base configuration settings
Desk phone Setting (on bottom of base)
Most phones A
Cisco phones D
Cisco phones with EHS cable A
Choose a desk phone setup A, B, C or D and connect cables.
A Desk phone with dedicated headset port
USE
• Connect one end of the telephone interface cable to the back of the base
• Connect the other end of the telephone interface cable into the dedicated headset port on
the desk phone
IMPORTANT Cisco phones use configuration D on the bottom of the base. Most other phones use
default configuration A.
NOTE Use this setup if you are not using the HL10 lifter or EHS cable. In this configuration, press
both the headset button on your desk phone and the call control button on the headset to
answer or end calls.
7
Page 8

B Desk phone (standard)
USE
• Connect one end of the telephone interface cable to the back of the base
• Disconnect the handset coil cord from the base of the desk phone and re-connect it to the
telephone interface cable junction box
• Finally connect the remaining end of the telephone interface cable into the open handset port
on the desk phone
IMPORTANT Cisco phones use configuration D on the bottom of the base. Most other phones use
default configuration A.
NOTE Use this setup if you are not using the HL10 lifter or EHS cable and your desk phone does
not have a dedicated headset port. In this configuration, manually remove the handset on your
desk phone and press the call control button on the headset to answer or end calls.
C Desk phone + EHS cable (sold separately)
USE
IMPORTANT Use configuration A on the bottom of the base, which works for most phones
including Cisco phones.
D Desk phone + HL10 lifter (sold separately)
8
Page 9

USE
IMPORTANT Cisco phones use configuration D on the bottom of the base. Most other phones use
default configuration A.
9
Page 10

Subscribe headset to base
The headset and base that came in the box are subscribed (connected) to each other. However, if
you wish to use a new headset or need to restore subscription to your current headset, the units
can be subscribed to each other by the following two methods.
Automatic secure
subscription
Manual over-the-air
subscription
Ending subscription
With your system idle, docking a headset will automatically subscribe it to the base, making it the
primary headset. The base subscription LED will
solid green when the new subscription is established.
1 With your system idle and your headset undocked, press and hold the Subscription button on the
back of the base for 4 seconds. The subscription LED on the display panel will flash.
2 Press and hold the Volume up button on the headset for 4 seconds until the headset LED turns
solid green.
3 When the base subscription LED turns solid green and headset LED turns off, the headset and base
are subscribed to one another.
NOTE If the subscription process times out after 2 minutes or if the subscription process fails, try to
re-subscribe the headset again.
If the base is in subscription mode and you want to stop the base from searching for a headset,
press the subscription button again or place the headset in the charge cradle. The subscription
LED on the base stops
flashing and is solid green.
flash during subscription process and becomes
10
Page 11

Fit and charge
Wear on the right or left
Charge your headset
Battery
To position the microphone on the right or left side, rotate the microphone boom up and over.
Gently bend the boom so it is approximately 2 finger widths from the corner of your mouth.
Place the headset in the charge cradle. The charging LED flashes when charging the headset and
remains steady when the headset is fully charged. Charge for at least 20 minutes prior to the first
use.
This product has a replaceable battery. To ensure replacement batteries meet Plantronics high
quality standards and for optimal performance, only use replacement batteries provided by
Plantronics.
Low Battery Warning
If you are on a call and the headset battery is critically low, you will hear a repeated single low tone
every 15 seconds indicating that the battery is low. You should recharge the headset immediately
or swap out the low battery with a fully-charged battery.
If you are not on a call and press the call button, you will hear three low tones if the battery is
critically low. You should recharge the headset immediately or swap out the low battery with a
fully-charged battery.
11
Page 12

System basics
Power on your headset
Adjust volume
Make, answer, end calls
To turn on the headset, slide the Power button.
• Headset volume Fine-tune your headset volume by adjusting the headset's volume up (+) and
down (-) controls.
• Desk phone volume When you are on a call and your voice is too quiet/loud, adjust the speaking
volume on the bottom of the base. If your caller's voice is too loud/quiet on a desk phone call,
adjust the listening
Make a call (deskphone)
1 Tap the headset call button. The desk phone
hear a dial tone in your headset.
volume.
icon lights up on your base display. You should
NOTE Press your phone's Headset button or manually remove the handset if you don't have an
HL10 lifter or EHS cable.
TIP If you do not hear a dial tone, turn over the base and adjust the switch (A--G). “A” works for the
majority of desk phones."D" works for Cisco phones.
2 Dial from your desk phone.
End/take a call
To answer or end a call, tap the headset Call button.
NOTE If you don't have an HL10 lifter or EHS cable, press your phone's Headset button or remove
the handset when answering a call and hang up when ending a call.
Auto answer
Auto Answer automatically answers a call by lifting headset from the base and ends a call when
replacing the headset in the cradle. Slide the Auto Answer switch to the right to activate.
NOTE Auto answer/end capability requires an EHS cable or HL10 lifter.
Mute a call
Tap the Mute button to mute a call, you hear 3 quick tones. The corresponding base icon turns red.
Tap again to unmute.
Hold a call
To hold an active call, press the Volume Up or Down button for 4 seconds. Press the Call button to
resume a held call.
Switch between calls (flash)
To switch between calls, press the Volume Up or Down button for 4 seconds.
Set up a conference call
You can conference up to 3 additional headsets to a call in progress.
Join Savi headsets automatically (same headset type only)
1 While on a call, place the guest headset into the primary user's charge cradle.
The base subscription LED flashes.
2
The primary user hears a triple tone in their headset indicating a conference request. To accept the
request, press the primary user's headset Call button within 10 seconds.
3
If the process fails or times out because the guest's Call button is not pressed within 10 seconds,
the guest subscription is terminated and the guest hears an error tone.
Join Savi headsets manually
1
While on a call, press the primary user's base subscription button.
The base subscription LED flashes.
12
Page 13

2 Hold the guest headset's Volume up until the headset LED turns on.
3 The primary user hears a triple tone indicating a conference request. To accept the request, press
the primary user's headset Call button within 10 seconds.
4 If the process fails or times out because the guest's Call button is not pressed within 10 seconds,
the guest subscription is terminated and the guest hears an error tone.
NOTE Headsets in a conference have independent mute controls. The base only indicates the primary
user's mute state.
Exit a conference call
1 Guest headsets can remain as guests through multiple calls. To remove a guest headset, press the
guest headset's Call button or dock the primary user's headset in the charge cradle. The primary
user hears a single tone in their headset as each guest leaves the call.
NOTE The primary user may hear additional tones in their headset and see the base subscription LED
flash as guest headsets join the call. These indicate that a guest headset has a different firmware
version than the primary headset, but can still be used for conferencing.
13
Page 14

More Features
Out of Range Warning
Tones
Talk Time
Wideband/narrowband
audio switch
If you are on a call and go out of the operating range, you will hear three low tones. You will hear
a single mid tone when you are back in range.
If you stay out of range, active calls will be suspended. Calls will be re-established when you walk
back into range. If you remain out of range for more than 5 minutes, the system will drop the call.
If you are not on a call and go out of the operating range and press the call button, you will hear a
single tone for the button press and three low tones for the failure to make a link.
With a full charge, the headset provides up to 13 hours of talk time in narrowband mode.
Your headset system has wideband audio, which allows speech to sound clearer and more
natural. If your desk phone is capable of wideband audio, slide the Wideband-Narrowband switch
to the right for wideband mode.
NOTE Talk time will be reduced when operating in wideband mode.
Slide the switch
number of systems that can work in a small area.
to the left for narrowband for longer headset battery life or to increase the
14
Page 15

Troubleshooting
Headset
I can’t hear a dial tone in the
headset.
• Make sure your headset is charged.
• Make sure your headset is subscribed to base. See Subscribe
headset to base.
• Adjust the configuration switch (A--G) on the bottom of the base
until a dial tone is heard. The default A works for most phones.
ATTENTION Use configuration D for Cisco phones. Cisco phones
connected with EHS cable use configuration A.
• Make sure your desk phone is connected correctly to your base.
See Desk phone setup details.
• If your base is connected to your desk phone's dedicated headset
port, press the desk phone's headset button to hear a dial tone.
• If your base is connected to your desk phone's dedicated headset
port, press the desk phone's headset button and base's desk
phone button to hear a dial tone.
• If your base is connected to your handset port, manually remove
the handset to hear a dial tone (if you do not have an EHS cable or
HL10 lifter).
• Make sure your HL10 lifter is lifting the handset high enough to
operate the hookswitch; set to a higher setting if necessary.
• Adjust the headset's listening volume. See Adjust volume.
• If the volume is still too low, adjust the desk phone listening
volume on the base. See Adjust volume.
I hear static.
The sound is distorted.
I hear echo in the headset.
• Make sure there is at least 12 inches between your base and your
computer, and 6 inches between your base and your telephone. If
adjusting the distance doesn’t help, your headset is going out of
range, move closer to the base. See Position Your Base
.
• Lower the desk phone speaking volume and/or desk phone
listening volume on the base. For most telephones the correct
setting is position 2. See Adjust volume.
• If your desk phone has a volume control, lower until the distortion
disappears.
• If the distortion is still present, adjust the headset volume control
to lower the headset speaker volume. See Adjust volume.
• Make sure there is 12 inches between your base and your
computer, and 6 inches between your base and your telephone.
See Position Your Base.
• Lower the desk phone speaking volume and/or desk phone
listening volume on the base. For most telephones the correct
setting is position 2. See Adjust volume.
• If the audio level is too low in this position, increase the headset
volume. See Adjust volume.
• If your speaking volume is too low for your listener in this position,
adjust the position of the headset to make sure the microphone is
as close as possible to your mouth.
15
Page 16

People I talk to can hear a buzz in
the background.
• Move the base further away from your phone. See Position Your
Base.
• If the base power supply is plugged into a power strip, plug it into
the wall directly.
Desk phone
The handset lifter is installed but
does not lift the handset.
• Be sure the handset lifter power cord is firmly pushed into the
handset lifter jack on the base.
16
Page 17

Support
NEED MORE HELP?
plantronics.com/support
Plantronics, Inc.
345 Encinal Street
Santa Cruz, CA 95060
United States
©
2020 Plantronics, Inc. All rights reserved. Poly, the propeller design, and the Poly logo are
trademarks of Plantronics, Inc. DECT is a trademark of ETSI. All other trademarks are the
property of their respective owners. Manufactured by Plantronics, Inc.
215231-06 01.20
Plantronics B.V.
Scorpius 171
2132 LR Hoofddorp
Netherlands
17
 Loading...