

Page 1

EE 666600002222
FFFFEE
EE 666600003333
FFFFEE
R
Page 2
E
KH
B
A
C
SOIE-SILK-SEIDE-SEDA-SETA
LAINE-WOOL-WOLLE-LANA
SYNTHETIQUE-SYNTHETIC
SYNTHETISCH-SINTETICO
COTON-COTTON-BAUMWOLLE
ALGODON-COTONE
LIN-LINEN-LEINEN-LINO
D
G
-
+
LIN-LINEN-LEINEN-LINO
ALGODON-COTONE
COTON-COTTON-BAUMWOLLE
SYNTHETISCH-SINTETICO
SYNTHETIQUE-SYNTHETIC
LAINE-WOOL-WOLLE-LANA
+
SOIE-SILK-SEIDE-SEDA-SETA
-
Fig. 1
Fig. 2
Fig. 6
Fig. 7
Fig. 3
Fig. 4
Fig. 5
Fig. 8
Fig. 9
Fig. 10
Fig. 11
Page 3

EEEENNNNGGGGLLLLIIIISSSSHH
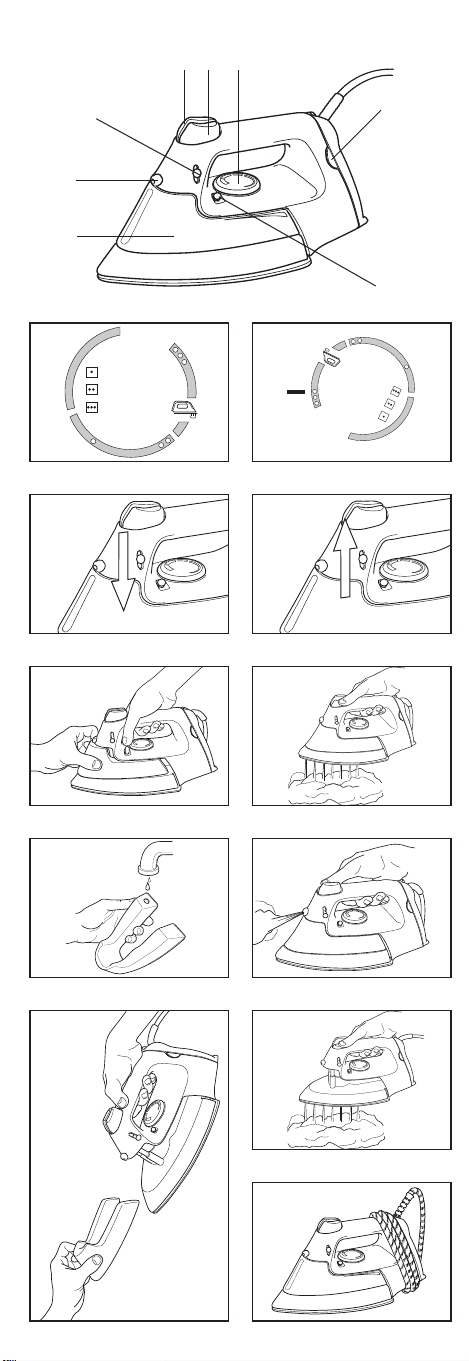
KEY
A) Removable tank
B) Water spray outlet
C) Steam control cursor
D) Thermostat pilot light
E) Thermostat control knob
F) Temperature level indicator (fig. 6)
G) Removable tank hook
H) Water spray button
K) "Shot of Steam" button
Polti S.p.A. reserves the right to make necessary technical and constructional alterations, without prior notice.
HH
IIIINNNNSSSSTTTTRRRRUUUUCCCCTTTTIIIIOOOONNNNSSSS FFFFOOOORRRR UUUUSSSSEE
Temperature Adjustment
• Before ironing, split your washing according to the
type of fabric and start by ironing items which require
a minimum temperature. Turn the thermostat according to the fabrics (fig. 1)
• - Low temperature (synthetics)
• • - Medium temperature (silk, wool)
• • • - High temperature (cotton, linen) - steam area
• For very delicate fabrics, it is advisable to perform a
trial on a piece of material not externally visible.
• In case of doubt on the type of fabric, commence
ironing by adjusting the thermostat to low temperature (•) and perform a trial on a non externally visible
piece of fabric. If the result is not satisfactory at this
temperature, continue by adjusting the thermostat to
medium temperature (• •).
• If your washing is composed of two types of fabrics,
(e.g. silk/wool), it is advisable to proceed at the lowest temperature.
Filling the tank
• The tank must be filled only when the power cord is
unplugged from the mains.
• Put the steam control cursor in the low position
(fig. 2)
• Unhook the water tank by the hook (G) (fig. 3).
• Remove the tank (A) from the iron and fill it under the
tap keeping it at 45° (fig.4)
• Hold the iron keeping the tip downwards. Put the tank
correctly back in its place (fig.5)
• After this operation the liquid level in the tank decreases because the water goes in the inside reserve
chamber. For longer ironing duration you can restore
the level in the tank by repeating the filling operation.
• During ironing, it will be possible to check the water
level through the transparent tank.
EE
Page 4

Steam Ironing
After filling the tank with water proceed as follows:
• turn the thermostat to the “steam” position (fig. 6).
• Insert the plug in an earthed socket. The thermostat
pilot light will switch on (D) and will remain on during
pre-heating time.
• Wait for the pilot light (D) to switch off. The iron has
reached the selected temperature and is ready for use.
• Adjust the desired intensity of steam by moving the
appropriate cursor (C) from the “0” position to the desired position (maximum steam output is obtained in
high position) (fig. 7).
• By placing the iron in a horizontal position steam output begins. Steam output is interrupted simply by
placing the iron in a vertical position or by moving the
steam cursor (C) to position “0”.
Using the “Shot of Steam” button
• To obtain “Super Steam” output (fig. 7-8), press button “K”.
Before pressing this button ensure the thermostat
control wheel (E) is within the steam area (fig. 6).
• With extra steam output, difficult creases can be removed easily. During extra steam output the steam
control cursor can be held in any position. To obtain a
better result, it is advisable to place the cursor in the
“closed” position. (0).
• For optimal performance with Shot of Steam, it is advisable to wait 4 seconds between each press.
Water spray
• By pressing the appropriate button (H), a water spray
is obtained over the fabrics to be ironed (fig. 9). In order to make use of this feature it is necessary to fill
the tank with water.
• The water spray helps you to dampen dry items and
to iron starched items. It is also useful for low temperature dry ironing.
• The water spray can be used both during steam ironing as well as during dry ironing.
Dry Ironing
• If water is present inside the iron, turn the cursor (C)
to the “0” position (fig. 2)
• Turn the thermostat (E) to the appropriate position for
the fabric to be ironed.
• Insert the plug in an earthed socket. A thermostat pilot light (D) will switch on.
• Wait until the pilot light (D) switches off and commence ironing.
Ironing without tank
• To make steam ironing easier in difficult to reach
places like shirt sleeves, pockets, trouser legs, it is
possible to use the iron without the tank, using the
steam output for about 5 minutes (fig. 10).
Page 5

CCCCLLLLEEEEAAAANNNNIIIINNNNGGGG AAAANNNNDDDD MMMMAAAAIIIINNNNTTTTEEEENNNNAAAANNNNCCCCEE
AAAAFFFFTTTTEEEERRRR IIIIRRRROOOONNNNIIIINNNNGG
After ironing, follow these procedures:
• Turn the steam control cursor to pos. "0"
• Unplug the appliance from the mains
• To empty the remaining water in the tank, keep the
point downwards and unhook the tank as described in
the "Filling the tank" paragraph.
• Unplug the iron and wipe the sole plate with a wet cotton cloth in order to clean any marks from the sole
plate. But do not rub too vigorously to avoid scratching the plate.
• To clean the iron outside, simply use a damp cloth.
Avoid using abrasive cloths or detergents which may
cause damage to the plastic surface.
• Store the iron in vertical position, out of children's
reach.
• When the iron is cold, rewind the cable around the cable-winder (fig.11)
GG
EE
PPPPRRRREEEECCCCAAAAUUUUTTTTIIIIOOOONNNNSS
• Read this manual carefully and store it for future use
• When the iron is used for the first time a light odour
and smoke may be noticed. This is due to the soleplate’s special cover and will disappear within seconds.
• Plug the iron exclusively in mains sockets equipped
with an earth.
• Do not leave the iron unattended whilst it is plugged
into the mains.
• Keep the iron out of children’s reach.
• Do not place the iron in water or in other liquids.
• Always handle the iron with care and warn others of
the potential dangers (e.g. steam or hot water output,
hot soleplate).
• Before filling the iron with water unplug it from the
mains.
• Do not unplug the iron by pulling the power cord.
• Only use cable extensions which are in perfect condition and equipped with an earth.
Never use the iron in the following circumstances:
• The iron or the power cord are damaged
• The iron has been dropped or has been knocked severely
• Water is leaking from the iron.
SS
Page 6

WWWWAAAARRRRNNNNIIIINNNNGGGGSS
• In case of malfunctioning or failure never attempt to disassemble the iron, but contact your nearest authorised
Polti Service Centre.
• In case of damage to the power cord. It should be replaced by an authorised Polti Service Centre.
• If you accidentally drop your iron, you should have it
checked by an authorized Polti Service Centre because some internal malfunctionings might have occured, limiting the safety of the product.
SS
GGGGUUUUAAAARRRRAAAANNNNTTTTEEEEEE
Caresse carries a 1 year guarantee from the date of purchase against manufacturing and material defects. The
guarantee is not valid in case of inappropriate use.
In case of failure or malfunctioning, contact the nearest
authorised Polti Service Centre immediately. Any mishandling of the appliance by unauthorised persons will automatically invalidate the guarantee.
• Polti S.p.A. declines any responsibility in case of accidents arising from use not complying with the instructions contained herein.
EE
 Loading...