

Page 1

®
R
Page 2
OFF
ON
S
JK
G
L
I
B
A
C
U R
T
6
Q
5
4
2
3
5
2A
1
Fig. A
D
H
Fig. 1
E
17
117
11
12
15
14
Fig. 2
F
119
9
108
1116
11
11
6
4
18
11
21
11
9
24
13
Fig. 3
19
20
22
23
➠
➠
➠
Fig. 4
Fig. 5
Fig. 6
Fig. 7
➠
➠
+
–
➠
➠
Vtt Eco Pro 3000 No-Volt - Cod. M0S06248 - Edizione 1I02
Page 3

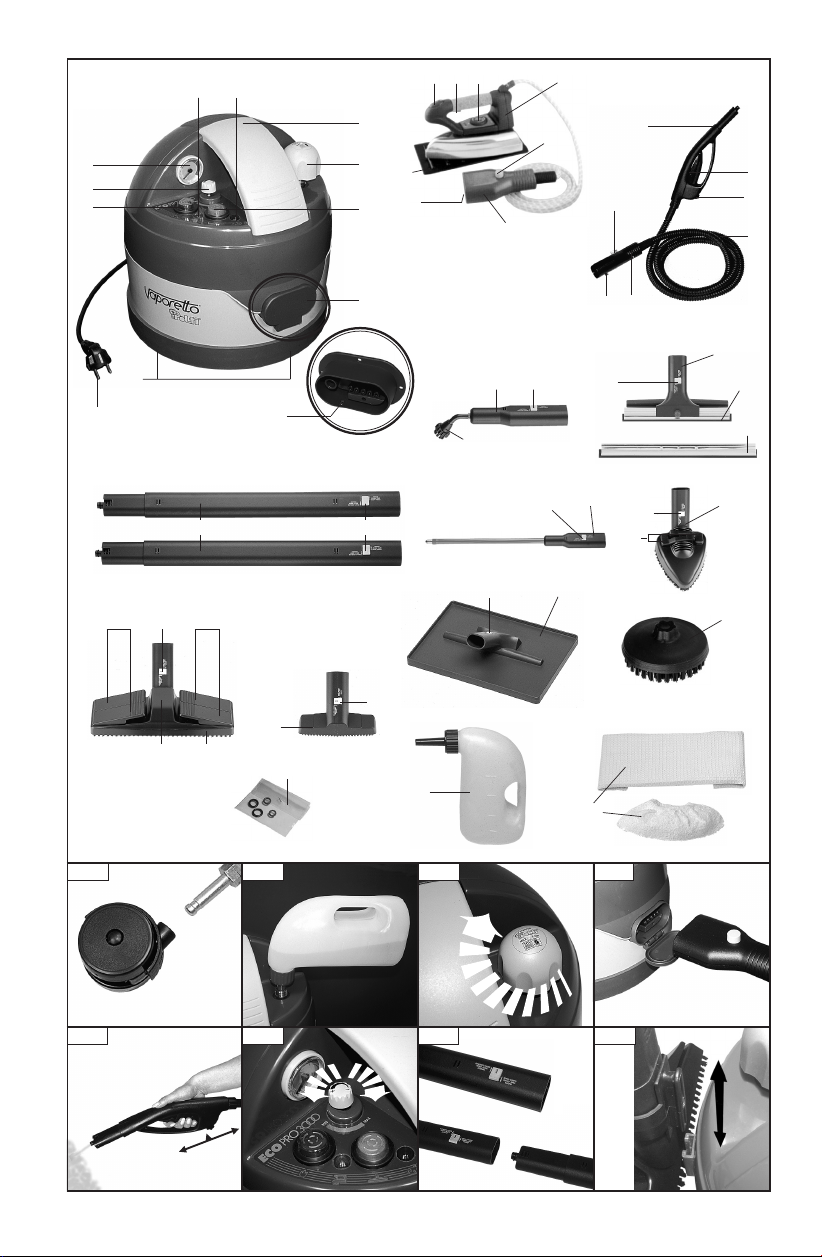
V APORETTO ECO PRO
GENERATOR
A) Patented Safety Cap
B) Main Generator on/off switch
C) Accessory on/off switch
D) Central connector block with splash proof cover
E) Lock-in aperture for central connector
F) Power supply cable
G) Carrying handle
H) Rotating wheel
I) Steam regulation control
J) “Water out” indicator light
K) “Pressure building” indicator light
L) Pressure gauge
ACCESSORIES
1) Flexible hose
2) Steam gun
2A) Safety switch
3) Steam request lever
4) Connector assembly
5) Press down connector button
6) Locking tab
7) Extension tubes
8) Large brush
9) Cloth retaining clips
10) Replaceable bristles plate
11) Accessories locking button
12) Small brush
13) Cotton cloths
14) Filler bottle
15) Spare washers for accessory connections
16) 120° nozzle
17) Small round brush for 120° nozzle
18) Window squeegee tool
19) Small blade for window tool
20) Large blade for window tool
21) High pressure lance
ACCESSORIES SOLD SEPARATELY
22) Triangular brush
23) Large round brush for 120° nozzle
24) Wallpaper stripper tool
Q) Iron
R) Steam request button
S) Temperature regulation control
T) Iron rest
U) Continuous steam jet button
Congratulations!
With your purchase of a Polti Ecological Cleaning System you have opted for perfect safety and ecological
cleaning:
• Just use normal tap water. Do not put any other cleaning substances in the generator tank.
• With the special No-Volt feature (exclusive Polti patent) there is absolutely no electrical cur-
rent in the hand gun which makes for absolute safety in use.
• This generator is equipped with the new Super Power feature. The maximum power is taken up
when the machine is being heated from cold to ensure more rapid heating of the water. Once a certain
level of temperature has been reached (level 1), a cut out comes into operation, reducing the electricity consumption. The sy-stem continues to heat using only the required amount of electricity to reach
operating temperature most efficiently (level 2).
Using the pressing iron
When the optional professional strength pressing iron is used with the machine, in order to optimise
electricity consumption and reduce the initial heating time of the water, the iron itself heats only to the
first pressure level.
Polti’s products are submitted to very strict testing. Vaporetto passed even the strictest Splash Proof
Testing.
VAPORETTO is built according to the IEC regulations, and is equipped with a safety valve, two safety thermostats and an additional protective thermostat which prevents operation of the machine when it is empty
and which maintains VAPORETTO in an absolutely safe condition at all times.
The accessories and all the components are manufactured with highest quality materials which are resistant
to the high temperatures attained in the operation of this machine.
• The patented Polti safety cap of the generator, which cannot be unscrewed whilst any
pressure remains in the system, offers the best protection in your daily homeworks.
Read these instructions carefully before use, and look out for the special safety tips for steam cleaning
and ironing.
Page 4

As the colours of the wires in the mains leads of this
appliance may not correspond with the coloured
markings identifying the terminals in your plug, proceed as follows:
The wire which is coloured green-and-yellow must be
connected to the terminal in the plug which is
marked with the letter “E” or by the earth symbol or
green-and-yellow.
The wire which is coloured blue must be connected
to the terminal which is marked with the letter “N” or
coloured black.
The wire which is coloured brown must be connected to the terminal which is marked with the letter “L”
or coloured red.
PPPPLLLLEEEEAAAASSSSEEEE RRRREEEEAAAADDDD TTTTHHHHEEEE FFFFOOOOLLLLLLLLOOOOWWWWIIIINNNNGG
GG
BBBBEEEEFFFFOOOORRRREEEE UUUUSSSSEE
EE
• Before using your VAPORETTO carefully read
these usage instructions.
• Before connecting VAPORETTO to the mains
make sure that the current is the same as that
indicated for the machine and that the plug is an
earthed plug.
•Do not put any detergent or chemical substance
in the tank.
Water by its nature contains magnesium, mineral salts and other deposits which in hard water
areas can contribute to limescale build up in the
tank. To avoid these problems, it is necessary
to swill out with tapwater and empty the generator tank after every 3 or 4 uses.In very hard water areas we recommend the use of our
KALSTOP FP 2003, a special natural-base decalcifier which inhibits and breaks down
limescale, making it easy to remove just by
swilling out the tank with a little tapwater. This is
a preventive against scale build-up and protects
the metal walls of the steam generator tank.
KALSTOP is available from Polti dealers or by
mail-order from your Polti Service Centre.
• Do not refill the tank while it is still hot, allow it to
cool down for a few minutes before refilling.
• When Refilling the generator tank, use HOT
rather than cold water, pour in gently at first and
keep your face away. Otherwise the still hot tank
walls can spit drops of very hot water or steam
spray.
•During filling and refilling we recommend you
disconnect the machine from the mains supply.
• Never empty VAPORETTO when the water inside
the generator tank is still hot.
• Do not place the appliance or any of the tools
whilst connected in water or in any other liquids.
• Do not touch the appliance with wet hands and
V APORETTO ECO PRO
This unit conforms with EC-directives
89/336 as amended by 93/68 (EMC) and
73/23 as amended by 93/68 (low voltage).
Polti S.p.A. reserves the right to change equipment
or accessory specification without prior notice.
FOR YOUR OWN SAFETY READ FOLLOWING
INSTRUCTIONS CAREFULLY BEFORE ATTEMPTING
TO CONNECT THIS UNIT TO THE MAINS.
MMMMAAAAIIIINNNNSSSS ((((AAAACCCC)))) OOOOPPPPEEEERRRRAAAATTTTIIIIOOOONN
NN
This unit is designed to operate on 240V, 50 Hz current only. Connecting it to other power sources may
damage the unit.
WARNING - This appliance must be earthed.
This appliance may be fitted with a non rewirable
plug, if it is necessary to change the fuse in a non
rewirable plug the fuse cover must be refitted. If the
fuse cover is lost or damaged, the plug must not be
used until a replacement, available from the appliance manufacturer, is obtained. It is important that
the colour of the replacement fuse cover corresponds with the colour marking on the base of the
plug.
If the plug requires to be changed because it is not
suitable for your socket, or becomes damaged, it
should be cut off and an appropriate plug fitted following the wiring instruction (below). The plug removed must be disposed of safely as insertion into
a 13A socket is likely to cause an electrical hazard.
IMPORTANT
These wires in this mains lead are coloured in accordance with the following code.
• Green-and-yellow: Earth • Blue: Neutral
• Brown: Live
GREEN
&
YELLOW
(Earth)
BLUE
(Neutral)
FUSE
(13 amp)
BROWN
(Live)
Page 5

V APORETTO ECO PRO
feet whilst the appliance is connected to the
mains.
• Never leave the appliance unattended whilst it is
connected to the mains.
• Do not allow VAPORETTO to be used by children
or by people who are not familiar with the usage
instructions.
• It is necessary to keep the unit in horizontal position during operation.
• When cleaning ovens, refrigerators and other
electrical appliances, ALWAYS clean with the
electricity supply switched off to the appliance
you are cleaning, and make sure you keep the
steam well away from the parts which will be live
when the appliance is re-connected.
• Do not leave the appliance exposed to wind or
rain.
• Do not lay the hot appliance on surfaces sensitive to heat.
• Do not use electric extension leads that are not
authorized by the manufacturer, as they may
cause damage or fire.
• In case of breakdown or malfunction switch off
the appliance and never attempt to disassemble
it, but refer to an authorized service center.
• In case of accidental fall of the appliance it is
necessary to have it checked by an authorized
service center as the internal safety features
may have been affected.
• Never direct the jet of steam towards small particles of debris without first protecting the
user’s eyes.
•We recommend that the appliance is disconnected from
the mains whenever it is not in use.
CCCCOOOORRRRRRRREEEECCCCTTTT UUUUSSSSEEEE OOOOFFFF TTTTHHHHEEEE PPPPRRRROOOODDDDUUUUCCCCTT
TT
This appliance is intended for use as a steam generator as described and in accordance with the instructions provided in this manual. Please read
these instructions carefully and keep them, as you
may find them useful in future.
IIIIMMMMPPPPOOOORRRRTTTTAAAANNNNTT
TT
Before leaving our factory all our products are
rigorously tested.
However, your VAPORETTO may contain some
residual water in the boiler.
SSSSEEEETTTT UUUUPP
PP
Before using VAPORETTO for the first time assemble
the pivoting wheels as indicated in the diagram A.
PPPPRRRREEEEPPPPAAAARRRRAAAATTTTIIIIOOOONNNN FFFFOOOORRRR UUUUSSSSEE
EE
1. Unscrew the patented safety cap (A) and fill the
generator with 2 litres of water, using the special anti-drop filler bottle (14) (Fig. 1).
Normal tapwater can be used. However, as
hard water by its nature contains limestone,
which may cause a build-up of limescale in the
tank, in hard water areas we recommend the
use of our natural-base decalcifier KALSTOP
FP 2003.
2. Carefully screw on the safety cap to hand tight
(Fig 2). Ensure the patented safety cap (A) is
fully and correctly screwed on, otherwise you
may experience steam escaping from around
the cap.
3. Connect the power supply cable (F) into an
earthed power supply of the correct voltage.
IIIINNNNSSSSTTTTRRRRUUUUCCCCTTTTIIIIOOOONNNNSSSS FFFFOOOORRRR UUUUSSSSEE
EE
1a. Press down the generator on/off switch (B)
and the accessories on/off switch (C) wich will
light up together with the pressure indicator
light (K).
2a. Open the cover of the central connector block
(D) and insert the central connector (4) pressing the connector button (5) and taking care
that the locking tab (6) is correctly positioned
in the lock-in aperture (E) on the block (Fig 3).
3a. Wait for the pressure warning light (K) (where
available) to go out. (Note: on some models
where there is no separate pressure indicator
light, instead wait for the light inside the generator on/off switch to go out).
VAPORETTO is now ready for use.
4a. The steam gun (2) is equipped with a safety
switch (2A) which prevents the accidental start
of the steam jet by children or people who do
not know how to operate the appliance. With
the switch 2A in the “OFF” position, the lever
controlling the steam jet is locked. Should the
hose be left unattended for a moment whilst
the appliance is connected to the mains, it is
recommended to put the safety switch in the
“OFF” position.
To start the steam jet, move the 2A switch
backwards (ON) and activate the steam request lever (fig.4). The first burst of steam may
contain some water droplets, due to imperfect
thermic stabilisation inside the flexible hose.
Never place your hands
inside the jet of steam.
Danger of burns!
Do not direct the steam
jet at people, animals or
debris.
Danger of burns!
Page 6

V APORETTO ECO PRO
We would therefore advise that the first jet of
steam is played onto an old cloth until a constant pressure of steam is obtained. Should the
hose be submitted to an excessive torsion during the use, the No-Volt device will stop the
steam flux. In order to restore the output, just
press the steam request lever.
Note: The pressure indicator light (K) may go on
and off from time to time during use of VAPORETTO.
This indicates the machine maintaining the correct
and constant pressure and is quite normal.
SSSSTTTTEEEEAAAAMMMM RRRREEEEGGGGUUUULLLLAAAATTTTIIIIOOOONNNN FFFFEEEEAAAATTTTUUUURRRREE
EE
Some VAPORETTO models come equipped with a
steam regulator control (I) (Fig 5). You can use this
control to increase the steam flow by turning in an
anti-clockwise direction. Turning the control in a
clockwise direction reduces the steam flow. Here
are some suggestions for the choice of steam flow
level:
Strong steam: For encrusted dirt, stains, sanitising,
grease
Normal steam: For carpets, rugs, glass, tiles etc.
Delicate steam: For vaporising plants and cleaning
delicate fabrics, upholstery, wallpaper etc. Please
read separate warning about use on draylon, velvet
and other delicate fabrics, or on sensitive wood surfaces.
CCCCOOOONNNNNNNNEEEECCCCTTTTIIIIOOOONNNN OOOOFFFF AAAACCCCCCCCEEEESSSSSSSSOOOORRRRIIIIEEEESS
SS
All the accessories of VAPORETTO can be connected to the handle or to the extension tube as per the
following instructions.
1b. Move the connector button (11) on the acces-
sory to the “open” position.
2b. Attach the required tool to the hand gun.
3b. Move the connector button (11) back to the po-
sition ‘closed’
4b. Check that the connector button has engaged
and the accessory is fully connected.
UUUUSSSSEEEE OOOOFFFF TTTTHHHHEEEE AAAACCCCCCCCEEEESSSSSSSSOOOORRRRIIIIEEEESS
SS
HHHHOOOOLLLLDDDDEEEERR
RR
The accessories holder place allows to fix the tube
with the brush mounted on it on the appliance body.
Reposition on the appliance body: make the groove
on the back of the brush slide into the guide of the
accessories holder on the appliance (Fig. 7).
PPPPAAAATTTTEEEENNNNTTTTEEEEDDDD SSSSAAAAFFFFEEEETTTTYYYY CCCCAAAAPPPP ////
’’’’WWWWAAAATTTTEEEERRRR OOOOUUUUTTTT’’
’’
All POLTI machines are equipped with the unique
Polti patented safety cap, which prevents opening of
the generator tank as long as there is any pressure
remaining inside the tank. This is an important and
indispensable safety device, and it is necessary to
follow certain procedures when re-filling the tank.
According to model, ‘water out’ is indicated by a
warning light (J), or by an audible alarm signal from
the machine, or on more basic models by the exhaustion of the steam output.
Whenever you have used up all the water in the tank,
follow the following procedures:
1c. Switch off the machine at the generator on/off
switch (B)
2c. Press the steam request lever (3) on the hand
gun (2) or, if using the iron, the steam request
button (R) on the iron (Q) so as to fully exhaust
the steam supply from the tank.
3c. Switch off the accessory on/off switch (C).
4c. Disconnect the power supply cable (F) from the
mains.
5c. Unscrew anti-clockwise the patented safety
cap (A)
6c. Wait for a few minutes to allow the generator
tank to cool down.
7c. When cool proceed to carefully refill the tank as
described in paragraph 1 of the section “Prepa-
ration for Use” in the instructions. If refilling the
generator when not completely cooled, we rec-
ommend that you carefully pour only very small
quantities of water at each pouring into the
tank, so as to avoid spitting from the tank and
cover exposed skin whilst filling.
UUUUSSSSEEEE OOOOFFFF TTTTHHHHEEEE PPPPRRRROOOOFFFFEEEESSSSSSSSIIIIOOOONNNNAAAALL
LL
SSSSTTTTRRRREEEENNNNGGGGTTTTHHHH PPPPRRRREEEESSSSSSSSIIIINNNNGGGG IIIIRRRROOOONNNN
(normally sold separately)
1d. Connect the connector block at the end of the
iron hose (4) to the generator as shown in point
2A of the section “Instruction for Use”.
2d. For all steam ironing, position the temperature
indicator dial (F) to the position “COTONE -
LINO”.
3d. Wait for a few minutes for the indicator (R) to
go out indicating that the sole plate of the iron
has reached the correct temperature.
4d. Press the steam request button on the iron (R)
to allow the steam to exit. Releasing this button
stops the steam flow. At first you may find that
the steam contains some water globules and
we recommend that the first jet of steam is
therefore played onto an old cloth, and is not
directed onto the garment to be ironed.
For dry ironing do not press the steam request
button (R).
5d. In order to have a continuous steam jet, move
Page 7

V APORETTO ECO PRO
the button (U) forwards. Steam will keep on
coming out, even releasing the button. To interrupt the outlet, move the button (U) backwards.
By turning the steam flow control knob (I) you
can vary the amount of steam according to the
type of textile to be ironed (more or less delicate). You can use this control to increase the
steam flow by turning in an anti-clockwise direction. Turning the control in clockwise direction
reduces the steam flow.
6d. The iron can also be used in a vertical position
e.g. for removing creases from curtain, clothing etc.
7d. For dry ironing, push the accessory on/off
switch (C), regulate the temperature of the iron
by turning the knob (S) to the required temperature for the fabric shown on the knob itself.
IMPORTANT
• Do not leave the iron unattended whilst connected to the mains.
•Iron only on heat resistant surfaces on and on
surfaces that allow the steam to escape e.g.
mesh ironing boards.
• If you accidentally drop your iron, you should
have it checked by an authorized Polti Service
Centre because some internal malfunctionings
might have occured, limiting the safety of the
product.
CCCCAAAAUUUUTTTTIIIIOOOONNNNSS
SS
• For cleaning leather, wood or delicate fabrics
especially dralon, velvet and other pile surfaces,
consult the manufacturers instructions. Clean
only by using the hand gun at a safe distance together with a soft cloth and always do a test on
a non visible part of the item first or on a sample. Allow the test area to dry completely before
observing results and effects on surface or
colour before proceeding to clean further areas,
ensuring that exactly the same distance and
technique are applied as for the test area. If in
doubt, and on sensitive surfaces like fabrics,
leather and wood it is always better to ask advice from your Steam Cleaner dealer.
• For cleaning wood surfaces (furniture, doors etc.)
take great care as too long an application of the
steam could alter the waxed appearance, the
shine or the colour of the surfaces cleaned. We
therefore recommend you apply the steam on
such surfaces only for brief periods or to clean
these surfaces using a cloth first held in the steam.
• Please pay particular attention while cleaning
brick floors: a too long application of steam
could damage wax, brightness or colour of
these surfaces.
• Delicate surfaces (e.g. synthetic materials, lacquered surfaces etc.) we recommend that the
small brush should always be covered with at
least two cloths to reduce the intensity of the
steam, and (on machines with steam variation
control) with the steam set at low level.
• If cleaning glass surfaces in particularly low
temperatures preheat the glass using the hand
gun from about 50 centimetres distance from
the surface to be cleaned.
• For care of your plants vaporise at a minimum
distance of 50 centimetres.
TTTTIIIIPPPPSSSS FFFFOOOORRRR BBBBEEEETTTTTTTTEEEERRRR UUUUNNNNIIIITT
TT
PPPPEEEERRRRFFFFOOOORRRRMMMMAAAANNNNCCCCEE
EE
STEAM GUN (2)
The steam gun can be used directly on all spots requiring a stronger, closer treatment without connecting the brushes. The more resistant the stain,
the closer you should hold the gun; the steam pressure and temperature being higher at the source.
You should however always wipe with a dry cloth (or
a slightly abrasive sponge-if the spot is a difficult
one to remove) after using the gun.
The steam gun is particularly efficient at:
-breaking down rug and carpet stains before they
are treated with the large brush;
- cleaning stainless steal surfaces, panes, mirrors,
enamelled surfaces;
- cleaning hard-to-reach corners, such as stairs,
window sills, door posts;
- cleaning window shutters, heaters, car interiors;
- spraying plants (from a distance);
-removing odours and creases from clothes.
To reach higher points, the steam gun can be connected to one or both extension tubes.
LARGE BRUSH (8)
Use the large brush (8) with one or two extension
tubes (7) on all large washable surfaces. To wash
floors, put a clean, dry kitchen cloth under the brush
and swing back and forth without applying any pressure. Use the other side of the cloth when the first
one is impregnated with dirt. Use the brush directly
without the cloth on particularly dirty or incrusted areas and in spaces between the tiles: swing the
brush sideways to detach the dirt. Highly obstinate
stains may require a steam gun treatment before
the brush and cloth are used (an old bath towel is an
ideal cloth) . The same procedures apply to ceilings
and vertical surfaces, like wallpaper: in this case the
cloth can easily be fastened around the brush and
held in place by the 4 clips (9) on the brush itself.
Smooth cotton cloths are suitable for the treatment
of glass surfaces: fasten the cloth around the brush
Page 8

V APORETTO ECO PRO
then pass it over the window pane (or mirror) to remove the greasy film. Finally, spray the surface with
the steam gun and wipe dry with a clean cloth. In
cold weather, window panes will require pre-heating
with the steam gun (from a distance of 10/15 cm),
prior to the actual cleaning with the brush. Vaporetto Ecological System is ideal for both synthetic and
wool rugs as well as for all types of carpets. Its use
will ensure total hygiene, revive colours and restore
the original brilliance of the pile. The treatment can
be repeated as frequently as you wish, with no damage whatsoever. Drying occurs practically at once.
Fold a cotton cloth over 2 or 3 times (according to
the length and resistance of the pile) and fasten it
onto the brush. Move the brush rapidly in all directions without applying any pressure. You should
avoid lingering in the same place, as this may soak
the area. Particularly dirty rugs may need several
treatments. Obstinate stains may require the use of
the steam gun prior to treatment.
HOW TO USE THE NON-DRIP BOTTLE (14)
Unscrew the cap and fill the bottle with water, put
the cap back on the neck of the bottle by inserting
first the small tube into the body and then screwing
tight.
Put the spout of the bottle close to the filling duct
and then insert it. When the level of water in the boiler reaches the tip of the spout, the water flow stops
automatically. You can then move the bottle back to
a vertical position.
Note: for products equipped with water level
display: fill until the water reaches the max.
level indicated).
SMALL BRUSH (12)
The small brush is designed to perform the same
operation as the large brush, only on smaller surfaces. It can be connected to the steam gun with
one or two extension tubes (7) .
For cleaning furniture spray the steam onto a dry cotton cloth then wipe with the cloth. The warm moist
cloth will pick up dirt and static, so that the furniture
remains cleaner longer thanks to the absence of
sticky film from chemical cleaning products.
120° STEAM NOZZLE (16)
The 120° nozzle (which can be connected directly
to the gun or together with the extension tubes) allows you to concentrate a powerful jet of steam to
otherwise inaccessible locations, such as radiators,
door posts, sills and shutters, as well as for sterilising toilet bowls.
WINDOW SQUEEGEE TOOL (18,19,20)
The Window Squeegee Tool allows you to clean ef-
fectively and rapidly all glass surfaces without using
detergents. Your glass wilI remain cleaner longer
thanks to the absence of layers of film normally left
behind by chemical cleaning products on which new
dust and grease can attach itself.
Cleaning glass is done in two stages:
- Spraying the steam onto the surface to be
cleaned to loosen the dirt (not touching with
blade).
-Pulling the blade straight down the window sur-
face from top to bottom without applying the
steam, to take away the dirt.
-To clean especially large glass surfaces, attach
the Window Squeegee Tool to the extension
tubes.
LONG STEAM LANCE (21)
This accessory allows you to reach the most inaccessible places. Ideal for cleaning large radiators or
shutters etc.
CCCCAAAARRRREEEE OOOOFFFF YYYYOOOOUUUURRRR VVVVAAAAPPPPOOOORRRREEEETTTTTTTTOO
OO
• Before attempting any maintenance operation,
be sure to always disconnect the appliance
from the mains
• Never use chemicals or detergents in the water
tank. It’s possible to use normal tap water. Anyway as water by its nature contains magnesium,
mineral salts and other deposits which in hard
water areas can contribute to limescale build up
in the tank, we advise the use of KALSTOP FP
2003, a special non-toxic, biodegradable organic product.
•We recommend that the bristles of the brushes
are allowed to cool down in their normal position after use, so as to avoid any mis-shaping.
• Check periodically the condition of the
coloured washer connections on the the
central connector (4). If necessary, replace the washers with the spare washers
supplied (15).
Make the same check also on the connection
washers of the extension tubes (7) and of the
steam gun (2).
•To clean the body of the appliance, simply use a
moist cloth. Do not use solvents or detergents
which may harm the body material.
WWWWAAAARRRRNNNNIIIINNNNGG
GG
• In the case of a breakdown or malfunction
do not attempt to repair the aplliance yourself but refer to your nearest authorised
service Centre.
Page 9

V APORETTO ECO PRO
• If repairs or replacement parts are required, use
only original Polti replacement parts.
• The appliance is fitted with a safety thermostat,
which should only be replaced by an authorised
technician.
• If it is necessary to replace the power supply cable, please refer to the nearest Poltiauthorised
service centre, since the use of a special tool is
necessary.
This appliance is built according to current regulations for recycling.
Do not throw the packing materials used to protect
the appliance during transportation, but take them
to relevant collecting centers.
POLTI DECLINES LIABILITY FOR ANY DAMAGE
OR ACCIDENT DERIVED FROM ANY USE OF
VAP0RETTO ECOLOGICAL SYSTEM WHICH IS
NOT IN CONFORMITY WITH THE INSTRUCTIONS CONTAINED IN THIS BOOKLET.
IIIINNNNCCCCRRRREEEEAAAASSSSEEEE TTTTHHHHEEEE VVVVEEEERRRRSSSSAAAATTTTIIIILLLLIIIITTTTYYYY OOOOFF
FF
VVVVAAAAPPPPOOOORRRREEEETTTTTTTTOOOO EEEEVVVVEEEENNNN FFFFUUUURRRRTTTTHHHHEEEERRRR WWWWIIIITTTTHH
HH
TTTTHHHHEEEE FFFFOOOOLLLLLLLLOOOOWWWWIIIINNNNGGGG OOOOPPPPTTTTIIIIOOOONNNNAAAALL
LL
AAAADDDDDDDDIIIITTTTIIIIOOOONNNNAAAALLLL AAAACCCCCCCCEEEESSSSSSSSOOOORRRRIIIIEEEESS
SS
IRON PROFESSIONAL
Professional iron. Stainless steal soleplate with 21
holes concentrated at the tip. Cork handle and ergonomic steam release button. Equipped with the
iron-rest mat.
PROFESSIONAL STRENGTH PRESSING IRON
MODEL INOX
Stainless steel soleplate with 11 holes concentrated
at the point. Indicator light to indicate selected temperature has been reached. Heat resistant iron rest.
TRIANGULAR BRUSH (22)
A new accessory whose shape allows access into
the most difficult corners.
LARGE BRUSH FOR 120° ACCESSORY (23)
A very useful new accessory which allows the 120°
steam nozzle to be used for cleaning larger surfaces.
WALLPAPER STRIPPER TOOL (24)
Specially designed for easy removal of wallpaper
without significant wetting.
 Loading...