

Page 1
R
Page 2
EEEENNNNGGGGLLLLIIIISSSSHH
HH
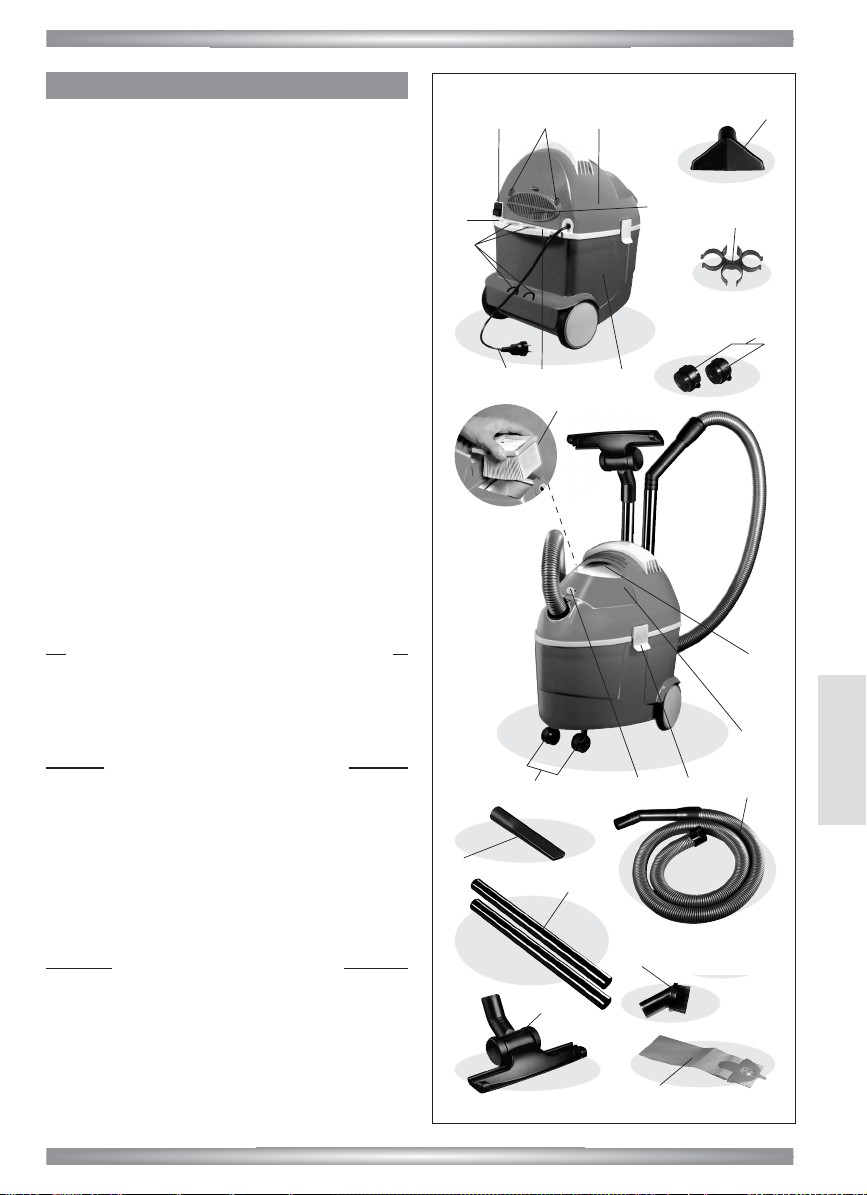
KEY
1. On/off switch with indicator light
2. Carrying handle
3. Pleated filter cover
3a. Opening lever of the pleated filter cover
3b. Pleated filter (note: dashed line)
4. Closing latches
5. Cable-winder
6. Cover with motor group
7. Cover grill for air outlet filter
8. Air outlet filter
9. Waste container
10. Accessories holder hook
11. Pivoting wheels
12. Power supply cable
13. Air outlet filter closures
ACCESSORIES
A. Extension tubes
B. Carpet sweeper / Liquid aspiration brush
D. Flexible hose with junction
E. Small brush
F. Lance for cleaning corners/skirting boards
G. Dust bag
H. Duster Brush
N. Accessories holder
Polti S.p.A. reserves the right to change equipment or
accessory specification without prior notice.
Before using Aspirapolti AS610, read these instructions
carefully.
CCCCOOOORRRRRRRREEEECCCCTTTT UUUUSSSSEEEE OOOOFFFF TTTTHHHHEEEE PPPPRRRROOOODDDDUUUUCCCCTT
TT
This appliance is intended for use as an aspirator for solids
and liquids according to the descriptions and instructions
in this manual. It is recommended to read these
instructions carefully and to keep them for future use.
PPPPRRRREEEEPPPPAAAARRRRAAAATTTTIIIIOOOONNNN FFFFOOOORRRR UUUUSSSSEEEE
• Before using the vacuum cleaner, fit the pivoting
wheels (11) (fig. 1)
• Insert the suction hose with junction (D) in the appli-
ance (fig. 2) until the clutch engages (I).
• Join the extension tubes (A) and attach them to the
flexible hose (D).
• Choose the required accessory and attach it to the
extension tubes (fig. 3).
FFFFOOOORRRR DDDDRRRRYYYY----VVVVAAAACCCCUUUUUUUUMMMMIIIINNNNGGGG
•Vacuum dry dirt preferably with the dust bag (G) fitted
(fig. 5).
•Prepare the appliance as described in the PREPARA-
TION FOR USE paragraph.
• Pull the closing latches (4) outwards and at the same
time lift the cover with motor group (6) upwards (fig.
6)
• Position the dust bag (G) by inserting the flange in the
2
EE
EE
NN
NN
GG
GG
LL
LL
II
II
SS
SS
HH
HH
ASPIRA AS 610
61
13
5
10
512 9
3b
11
F
A
B
7-8
3a
4
H
G
E
N
11
2
3
D
M
Page 3

two pins (L) as shown in fig. 5a
• Place the cover with motor group (6) on the waste
container (9) and close it with the two closing latches
(4).
• Unwind the supply cable (12) and connect it to the
mains.
• Push the switch (1) and start vacuum cleaning.
NOTE: Small pieces of dry dirt can be vacuumed even
without dust bag (G).
FFFFOOOORRRR LLLLIIIIQQQQUUUUIIIIDDDD VVVVAAAACCCCUUUUUUUUMMMMIIIINNNNGG
GG
•Prepare the appliance as described in the PREPARA-
TION FOR USE paragraph, then unwind the supply cable (12) and connect it to the mains.
• Push the switch (1) and start the vacuum cleaning
(fig. 4).
• DO NOT VACUUM LIQUIDS WITH THE DUST BAG FIT-
TED.
• After vacuuming cleaning liquids, check the float as
described in the General maintenance (control of the
float) paragraph.
GGGGEEEENNNNEEEERRRRAAAALLLL MMMMAAAAIIIINNNNTTTTEEEENNNNAAAANNNNCCCCEE
EE
Before maintenance, make sure that the supply cable is
not connected to the mains.
CCCCoooonnnnttttrrrroooollll ooooffff tttthhhheeee ffffllllooooaaaatt
tt
• After vacuum cleaning liquids, it is suggested to
empty the waste container (9).
• Pull the two closing latches (4) outwards and at the
same time lift the cover with motor group (6) (fig. 6)
• Empty the sucked up liquid from the waste container
(9).
• Check that the float (O) is not dirty and that it has no
obstructions, if necessary clean before operating (fig.
7).
RRRReeeeppppllllaaaacccciiiinnnngggg tttthhhheeee dddduuuusssstttt bbbbaaaagg
gg
The performance of the appliance depends on how full
the dust bag is. When the suction noticeably decreases,
it is necessary to replace the dust bag.
• Pull the two closing latches (4) outwards and in the
meantime lift the cover with motor group (6) (fig. 6).
• Remove the dust bag (G) from the two pins (L)
• Replace it with a new one by fitting it as explained in
the DRY-VACUUMING paragraph.
• Close by making the reverse operation.
RRRReeeeppppllllaaaacccciiiinnnngggg tttthhhheeee pppplllleeeeaaaatttteeeedddd ffffiiiilllltttteeeerr
rr
It is recommended to clean the filter every two times you
replace the dust bag or you empty the waste container.
It is recommended to replace the filter every five times
you replace the dust bag or you empty the waste container.
• Push the opening lever of the pleated filter cover (3a)
and then pull it upwards. In this way the pleated filter
cover (3) will unhook from the appliance (fig. 8).
• Lift out the pleated filter (3b) (fig. 9)
• Knock it and if the dirt is not easily removed, wash
3
EE
EE
NN
NN
GG
GG
LL
LL
II
II
SS
SS
HH
HH
ASPIRA AS 610
Fig. 2
Fig. 1
I
Fig. 4
Fig. 3
Fig. 5A
Fig. 5
Fig. 8
Fig. 6
Fig. 7
Fig. 10
Fig. 9
Fig. 11
Fig. 10bis
L
L
O
R
Page 4

the filter under running water and leave it to dry (fig.
10).
If water does not clean it, replace the filter.
• If the filter is damaged, replace it immediately so as
to avoid damage to the motor.
RRRReeeeppppllllaaaacccciiiinnnngggg tttthhhheeee ccccoooovvvveeeerrrr ggggrrrriiiillllllll ffffoooorrrr aaaaiiiirrrr oooouuuuttttlllleeeetttt ffffiiiilllltttteeeerr
rr
•Turn the two closures (13) towards the outside in or-
der to release the filter cover grill (fig. 11).
• Push the lever of the cover grill for air outlet filter (7)
(fig. 11 bis).
•Take out the filter, knock it, wash it with water and
leave to dry.
• Put the filter back in its correct position by leaning it
with the white side inside the filter grill facing outwards.
• If the air outlet filter is damaged, replace it.
TTTTRRRROOOOUUUUBBBBLLLLEEEESSSSHHHHOOOOOOOOTTTTIIIINNNNGG
GG
Trouble
• The vacuum cleaner switches off but the indicator
light is on
Cause
• The liquid level in the container is too high
Solution
• Push the switch (1), disconnect the supply cable from
the mains and empty the container.
Trouble
• The aspiration power decreases
Cause
• Pleated filter, nozzle, flexible hose or rigid suction
tube are obstructed.
• The dust bag or the waste container is full.
• The pleated filter is missing or it has been wrongly
placed
Solution
• Clean the filter and take out further obstructions in the
tubes
• Replace the dust bag or empty the waste container
• Place the flat pleated filter correctly
Trouble
• Dust leakage during vacuum cleaning
Cause
• The suction flexible hose is not connected correctly
• The pleated filter is missing, it has been wrongly
placed or it is damaged.
Solution
• Connect the flexible hose correctly
• Place the pleated filter correctly or change it
Trouble
• Water leak during the liquid vacuuming
Cause
• The float is blocked by the dirt.
• The float switch is broken
Solution
• Have it checked by the Authorized Service Centre.
PPPPRRRREEEECCCCAAAAUUUUTTTTIIIIOOOONNNNSS
SS
Attention! Do not use the appliance without reading
the instructions.
• In case of damage or malfunction do not attempt to
disassemble the appliance but contact the nearest
authorised Polti Service Centre.
• The mains the appliance is connected to must conform with regulations.
• The appliance must not be used by children or by any
others who may not know how to operate it .
• In order not to compromize the safety of the appliance, only use original spare parts and accessories,
approved by the manufacturer.
• Do not use the appliance if the supply cable or other
important parts of the unit are damaged.
• Never touch the plug with wet hands.
• Do not suck up acids or solvents that may cause serious damage to the appliance materials and especially
do not suck up explosive liquids, inflammable gases,
explosive powders, benzines, paints, fuel oil, which
may cause bursts if they come in contact with the internal parts of the appliance.
•You must not use the appliance in environments
where there is danger of bursting.
• Do not suck up objects in flames or incandescent
such as embers, ash and other materials while burning.
• This appliance is not suitable for the aspiration of any
powders which are harmful to health.
• Should there be a liquid or foam leak during aspiration, immediately switch off the appliance and carry
out the necessary maintenance.
• Cleaning of the appliance must not be done with a water hose or high pressure hose.
• Polti declines liability for any damage or acci-
dent derived from any use of ASPIRA POLTI
AS 610 which is not in conformity with the instructions contained in this booklet.
4
EE
EE
NN
NN
GG
GG
LL
LL
II
II
SS
SS
HH
HH
ASPIRA AS 610
Page 5

EEEELLLLEEEECCCCTTTTRRRRIIIICCCCAAAALLLL SSSSAAAAFFFFEEEETTTTYY
YY
No earth required.
Ensure the mains voltage suits your appliance.
Fitting the mains plug important
The wires in the mains lead are coloured in accordance
with the following code:
• Blue: Neutral
• Brown: Live
The wire which is coloured BLUE must be connected to
the Terminal which is marked with the letter “N” or
coloured BLACK.
The wire which is coloured BROWN must be connected
to the Terminal which is marked with the letter “L” or
coloured RED.
It is important that the outer sheath is clamped correctly
into the 3-pin plug.
If in doubt consuot your local Service Dealer or qualified
electrician before the machine is used.
A 13 AMP FUSE MUST BE FITTED TO THE MAINS PLUG.
BLACK
OR
BLUE
RED
OR
BROWN
L
E
N
F
U
S
E
5
EE
EE
NN
NN
GG
GG
LL
LL
II
II
SS
SS
HH
HH
ASPIRA AS 610
 Loading...