

Page 1

R
Page 2
E
12
13
2
4
3
11
10
1
14
F
B C
5
6
7
9
I
8
A
16a
16b
D
L
G
M
17
16
Page 3
8
9
17
I
B C
F
D
G
L
M
16
16a
16b
A
13
12
2
4
3
10
11
1
14
7
6
5
E
Fig. 1 Fig. 2
Fig. 3 Fig. 3bis
Y
Fig. 4 Fig. 5
Fig. 6
Fig. 7
Fig. 8
Fig. 10Fig. 9
Fig. 12
Fig. 14
Fig. 11Fig. 10bis
15
Fig. 13
Fig. 15
Page 4

EEEENNNNGGGGLLLLIIIISSSSHH
8
9
17
I
B C
F
D
G
L
M
16
16a
16b
A
13
12
2
4
3
10
11
1
14
7
6
5
E
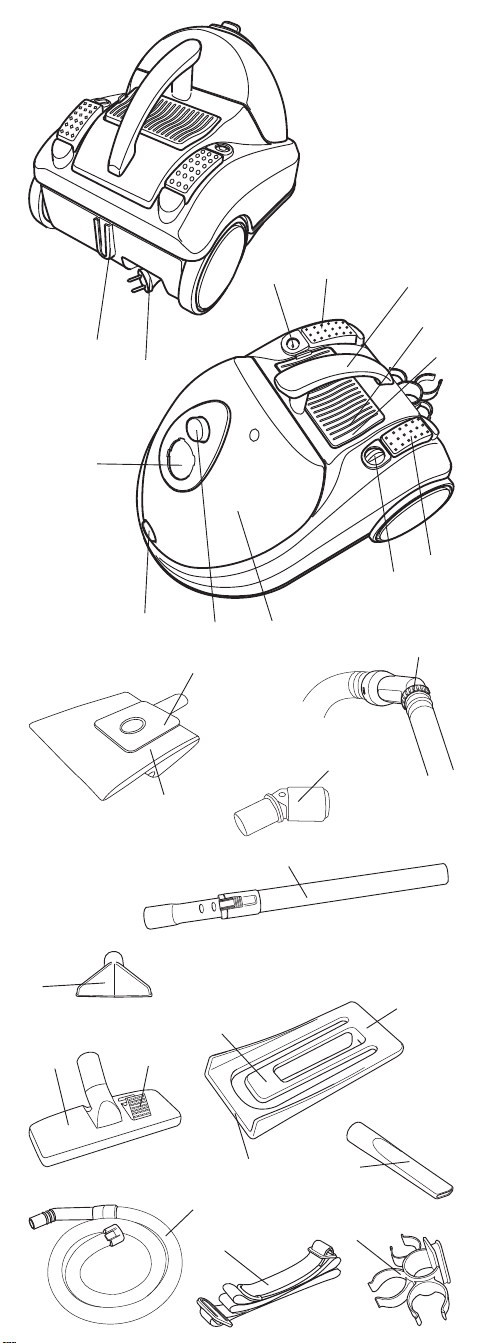
KEY
1. Mains ON/OFF switch
2. Button for cable winder
3. Handle
4. "Full bag" indicator light
5. Button for opening the dust bag
storage compartment
6. Button for unhooking the dust bag
7. Dust bag storage
compartment cover
8. Dust bag
9. Dust bag holder
10. Air outlet grill
11. Air outlet filter
12. Accessories storage hook
13. Supply cable plug
14. Electronic suction variator
15. Air inlet filter (Fig. 11)
16. Spring catch for the shoulde belt
17. Manual suction variator
A) Telescopic tube
B) Universal brush
C) Brush selector
D) Flexible hose
E) Joint
F) Small brush
G) Lance for cleaning corners/skirting boards
I) "Flexo" patented elbow
L) Shoulder belt
M) Accessories storage
Polti S.p.A. reserves the right to change equipment or accessory
specification without prior notice.
This appliance is intended for use as a vacuum for solids and dust
in accordance with the descriptions and instructions in this
manual.
ACCESSORIES
CCCCOOOORRRRRRRREEEECCCCTTTT UUUUSSSSEEEE OOOOFFFF TTTTHHHHIIIISSSS PPPPRRRROOOODDDDUUUUCCCCTT
HH
TT
PPPPRRRREEEEPPPPAAAARRRRAAAATTTTIIIIOOOONNNN FFFFOOOORRRR UUUUSSSSEE
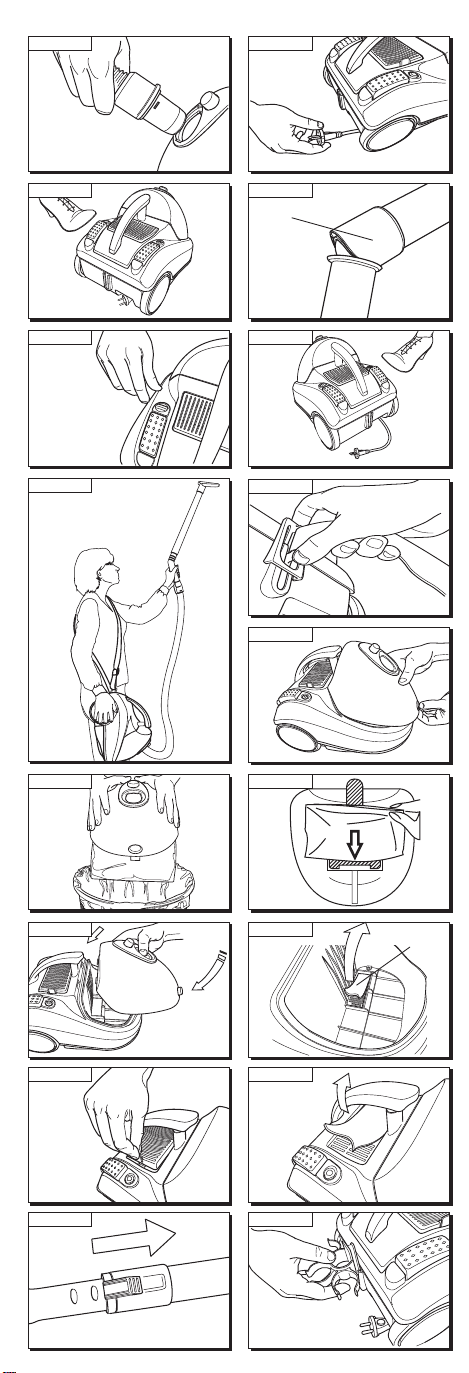
• Insert the aspiration mouth of the flexible hose (D) into the joint
(E) (fig.1) turning it until it connects.
• Lengthen the telescopic tube (A) and connect it to the flexible
hose (D).
• Choose the required accessory and connect it to the
telescopic tube.
• Unwind the supply cable (fig. 2) by pulling it by the plug (13)
and connect it to the mains.
• Push the mains ON/OFF switch (1) and start vacuum cleaning
(fig. 3).
UUUUSSSSIIIINNNNGGGG TTTTHHHHEEEE """"FFFFLLLLEEEEXXXXOOOO"""" JJJJOOOOIIIINNNNTTTT ((((IIII))
This special joint - Polti exclusive patent- allows to reach the most
difficult points without bending down.
Insert the Flexo joint between the handle and the telescopic tube
keeping the indentation on the front part of the handle.
To change the angle, turn the ring (Y) half way round.This way the
joint is showing and it will allow you to change the angle of
operation of the tube (fig.3bis).
When the operation is finished, put the joint back in its original
position and cover it with the ring to lock it in position.
EEEELLLLEEEECCCCTTTTRRRROOOONNNNIIIICCCC SSSSUUUUCCCCTTTTIIIIOOOONNNN VVVVAAAARRRRIIIIAAAATTTTOOOORRRR ((((11114444))
• The electronic suction variator (14) allows you to control the
suction power according to the surface to be cleaned.
• By turning the suction variator (14) clockwise towards +, the
power of the appliance will increase (fig. 4).
The minimum position is suggested for curtains.
The medium position is suggested for carpets and upholstery.
The maximum position is suggested for hard floors.
EE
))
))
Page 5

MMMMAAAANNNNUUUUAAAALLLL SSSSUUUUCCCCTTTTIIIIOOOONNNN VVVVAAAARRRRIIIIAAAATTTTOOOORRRR ((((11117777))
8
9
17
I
B C
F
D
G
L
M
16
16a
16b
A
13
12
2
4
3
10
11
1
14
7
6
5
E
BLACK
OR
BLUE
RED
OR
BROWN
L
E
N
F
U
S
E
This device placed on the handle allows you to promptly intervene
in case of accidental suction (ex. curtains). Turn the variator until
the hole on the handle is uncovered. To suck up again at maximum
power, turn the ring until the hole is covered.
))
AAAAUUUUTTTTOOOOMMMMAAAATTTTIIIICCCC CCCCAAAABBBBLLLLEEEE----WWWWIIIINNNNDDDDEEEERR
• Before storing the vacuum cleaner, rewind the power supply
cable by pushing the button (2) as shown in fig. 5.
UUUUSSSSEEEE OOOOFFFF TTTTHHHHEEEE SSSSHHHHOOOOUUUULLLLDDDDEEEERRRR BBBBEEEELLLLTT
The use of the shoulder belt allows to easily clean stairs, curtains
and other with both hands free.
Wear the shoulder belt as shown in fig. 6, this will avoid the
shoulder belt falling off the shoulder and consequent possible
damage to the appliance.
Lift the appliance holding it tightly by the handle. Introduce from
upwards the tongue (16a) of the spring catch (16) into the guide
of the accessories storage placed on the back of the appliance,
as shown in fig. 7. Make sure to push in until the safety closure is
locked.
Now you can start vacuum cleaning.
Note: this working position of the machine does not compromize
HOW TO REMOVE THE SHOULDER BELT
Put the appliance on a steady surface.
Using the groove (16b), lift the safety closure and slip it off
upwards.
its functioning.
GGGGEEEENNNNEEEERRRRAAAALLLL MMMMAAAAIIIINNNNTTTTEEEENNNNAAAANNNNCCCCEE
Before any kind of maintenance, make sure that the supply cable
is not connected to the mains.
ATTENTION! Push the button (6) only if you want to replace the
dust bag, as indicated in the "replacing the dust bag" paragraph.
REPLACING THE DUST BAG
When the dust bag is full, the indicator light (4) will light up. To
make the indicator light light up, the electric suction variator (14)
must be on the maximum position
Push the button (5) and at the same time lift the cover (7) as
shown in fig. 8.
Position the appliance over a dust bin, then push the button (6),
the dust bag is released from the holder and will fall into the dust
bin (fig. 9).
INSERTING A NEW DUST BAG
Insert the lower edge of the dust bag (8) cardboard support into
the guide and push, inserting the upper edge of the cardboard
support into the two upper guides.
Check that the hole of the bag corresponds to the one of the
mouth (fig. 10).
Put the cover back by first making the two hooks go into their
grooves, then push downwards until you hear the click (fig. 10
bis)
REPLACING THE AIR INLET FILTER (15)
Lift the cover as indicated in the "Replacing the dust bag"
paragraph.
Take out the air inlet filter and replace it with a new one (11).
If the air inlet filter is damaged, replace it.
Note: it is recommended to replace the filter every five times you
replace the dust bag.
REPLACING THE AIR OUTLET FILTER (11)
Push the lever placed on the air outlet grill (10) and lift it (fig.12).
Remove the filter and replace it with a new one (Fig. 13).
Put the air outlet grill back in its position.
If the filter is damaged, replace it.
Note: it is recommended to replace the filter every five times you
replace the dust bag.
RR
TT
EE
Page 6

UUUUSSSSEEEE OOOOFFFF TTTTHHHHEEEE TTTTEEEELLLLEEEESSSSCCCCOOOOPPPPIIIICCCC TTTTUUUUBBBBEE
8
9
17
I
B C
F
D
G
L
M
16
16a
16b
A
13
12
2
4
3
10
11
1
14
7
6
5
E
The tube is about 500 mm long and about 1000 mm. at its
maximum extension. To make it longer or shorter, move the lock
as shown in fig. 14 and extend or reduce at your convenience.
EE
UUUUSSSSEEEE OOOOFFFF TTTTHHHHEEEE AAAACCCCCCCCEEEESSSSSSSSOOOORRRRIIIIEEEESS
SSSSTTTTOOOORRRRAAAAGGGGEEEE ((((MMMM))
The accessories storage allows you to fix the accessories on the
appliance body or on the handle.
Installation on the handle: insert one of the rings of the
accessories holder on the handle. Repeat the same operation for
the accessories that you want to keep at hand.
Installation on the appliance body: make the groove of the
accessories holder run into the guide on the back of the
appliance, as shown in fig. 15.
UUUUSSSSEEEE OOOOFFFF TTTTHHHHEEEE UUUUNNNNIIIIVVVVEEEERRRRSSSSAAAALLLL BBBBRRRRUUUUSSSSHHHH ((((BBBB))
Insert the brush. If you move the selector on the brush (C) by
pressing with your foot, you can change the suction surface
without bending down. The position with the bristles outside is
recommended for all floors. The position without bristles is
recommended for carpets and rugs.
))
TTTTRRRROOOOUUUUBBBBLLLLEEEESSSSHHHHOOOOOOOOTTTTIIIINNNNGG
TROUBLE
• The suction power decreases
CAUSE
• The air inlet filter, the mouth, the flexible hose or the telescopic
tube are obstructed
• The dust bag is full.
SOLUTION
• Clean the filter and take out any obstructions in the tubes
• Replace the dust bag
TROUBLE
• Dust leakage during vacuum cleaning
CAUSE
• The suction flexible hose is not correctly connected
• The air inlet filter is missing or it has been wrongly placed
SOLUTION
• Connect the flexible hose correctly
• Place the air inlet filter correctly or replace it
SS
))
GG
PPPPRRRREEEECCCCAAAAUUUUTTTTIIIIOOOONNNNSS
Attention! Do not use the appliance without reading the
instructions.
• In case of damage or malfunction, do not attempt to
disassemble the appliance but contact the nearest Polti
Authorised Service Centre.
• Do not allow children to use the machine or any others who
may not know how to operate it.
• Do not touch the appliance with wet hands or feet, or with bare
feet, when it is plugged into the mains.
• In order not to compromize the safety of the appliance, only
use original spare parts and accessories, approved by the
manufacturer.
• Do not use the appliance if the supply cable or other important
parts of the unit are damaged.
• If the supply cable is damaged, it must be replaced by the
manufacturer or by its authorized Service Centre.
• Do not suck up acids or solvents, which may cause serious
damage to the appliance and especially do not suck up
explosive liquids, inflammable gases, explosive powders,
benzines, paints, fuel oil, which may cause explosions if they
come in contact with the sucked up air.
• Do not use the appliance outdoors or on wet surfaces or to
suck up liquids.
• Do not suck up hard or sharp objects, hot cinders or lit
cigarettes or similar.
• Do not use the appliance in environments where there is
danger of explosion.
• Do not suck up objects on fire or that are hot.
• Never immerse the appliance in water.
SS
Page 7

GGGGUUUUAAAARRRRAAAANNNNTTTTEEEEEE
8
9
17
I
B C
F
D
G
L
M
16
16a
16b
A
13
12
2
4
3
10
11
1
14
7
6
5
E
BLACK
OR
BLUE
RED
OR
BROWN
L
E
N
F
U
S
E
The Aspirapolti AS410 is guaranteed to the original purchaser for
one year from purchase date against manufacturing or raw
material defects.The guarantee is not valid if the appliance has
been misused in any way. In case of damage or malfunction,
contact the nearest Polti Authorized Service Centre. Unauthorised
alterations or repairs to the machine will automatically invalidate
this guarantee.
• Polti declines liability for any damage or accident
derived from any use of Aspirapolti AS 410 which is not
in conformity with the instructions contained in this
booklet.
AAAATTTTTTTTEEEENNNNTTTTIIIIOOOONN
The filters and the dust bags are sold by Polti authorized Service
Centres and by quality electrical retailers. We recommend to use
manufacturer's original spare parts only.
EE
NN
EEEELLLLEEEECCCCTTTTRRRRIIIICCCCAAAALLLL SSSSAAAAFFFFEEEETTTTYY
No earth required.
Ensure the mains voltage suits your appliance.
Fitting the mains plug important
The wires in the mains lead are coloured in accordance with the
following code:
• Blue: Neutral
• Brown: Live
The wire which is coloured BLUE must be connected to the Terminal which is marked with the letter “N” or coloured BLACK.
The wire which is coloured BROWN must be connected to the Terminal which is marked with the letter “L” or coloured RED.
It is important that the outer sheath is clamped correctly into the
3-pin plug.
If in doubt consuot your local Service Dealer or qualified electrician before the machine is used.
A 13 AMP FUSE MUST BE FITTED TO THE MAINS PLUG.
YY
 Loading...