

Page 1
AS 510
R
Page 2
EEEENNNNGGGGLLLLIIIISSSSHH
HH
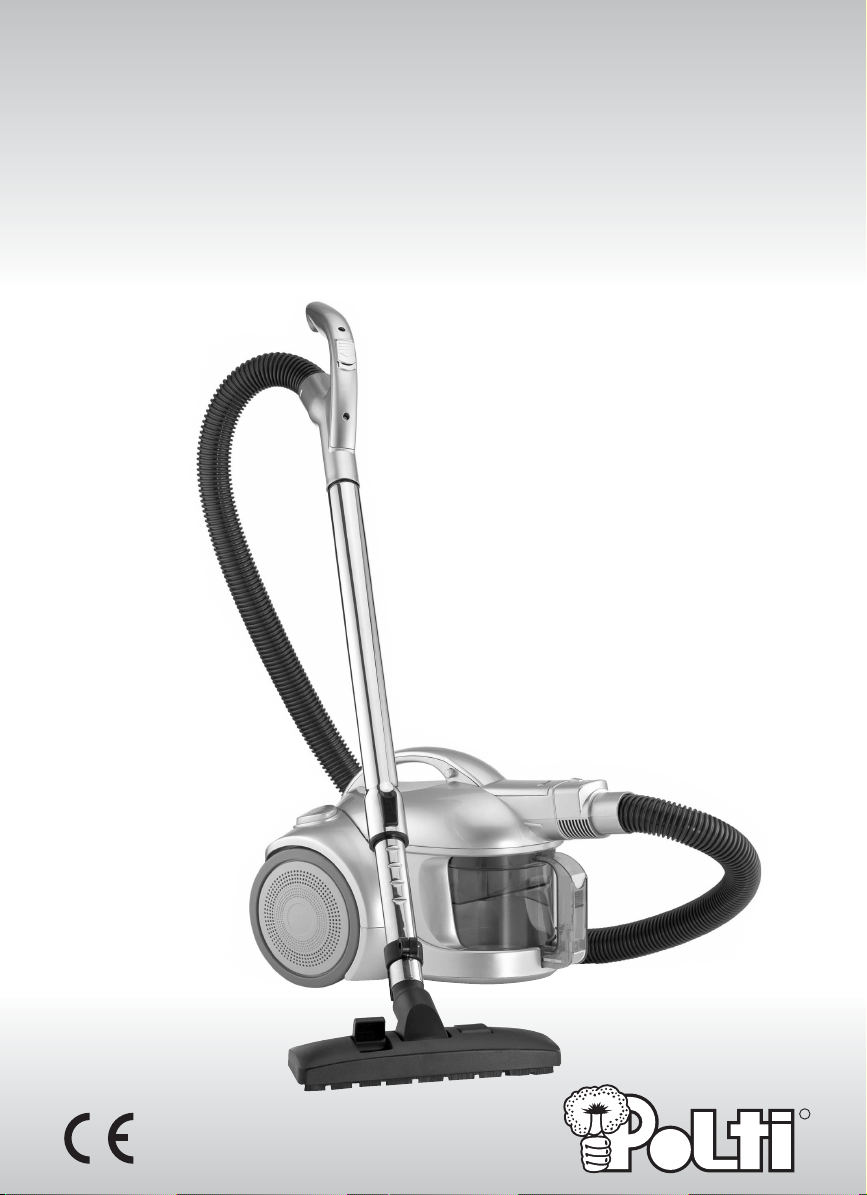
LEGEND
1) Dust container
2) Dust container handle
2a) Opening Button for dust container
3) Top lid
4) Top lid opening button
5) Connector hose
6) Carry handle
7) Switch ON/OFF
8) Cable winder button
9) Suction level control
10) Air filter outlet grille
11) Power Supply cable
TOOLS
A) Telescopic tube
A1) Telescopic tube locking
B) Universal Brush
B1) Brush selector
C) Hose handle
C1) Tube lock-in button
C2) Manual suction regulator
D) Hose
E) Small brush
E1) Bristle fitting for small brush
F) Lance for edge cleaning
POLTI S.p.A., in accordance with its policy of continuous
improvement, reserves the right to make any technical
and structural modifications without prior notice.
This unit conforms to EC-directives 89/336 as
amended by 93/68 (EMC) and 73/23 as
amended by 93/68 (low voltage).
PPPPRRRREEEECCCCAAAAUUUUTTTTIIIIOOOONNNNSS
SS
• Read these instructions carefully before using this appliance.
• Before connecting this appliance, make sure that the
mains voltage is the same as the voltage indicated on
the data label of the appliance and that the power outlet is connected to earth.
• Never touch the appliance with wet hands or feet with
the cable plugged into the mains.
• Never dip the appliance in water or other liquids.
• Never leave the appliance unattended with the cable
plugged into the mains.
• Never let children or people who are not familiar with
how the Lecologico works use it.
• If the appliance is left unused, always disconnect it
from the mains.
• Never attempt to take the appliance to pieces in the
event of failure or improper operation. Consult the
nearest Authorised Assistance Centre.
• The wiring system to which the appliance is connected must always comply with the laws in force.
• In order to avoid prejudicing the safety of the appliance, use only original spare parts and accessories
approved by the manufacturer.
EE
EE
NN
NN
GG
GG
LL
LL
II
II
SS
SS
HH
HH
AS510
Fig. 1 Fig. 2
Fig. 3 Fig. 4
Page 3

• Do not use the appliance if the power cable or other
important parts are damaged.
• If the supply cable needs replacing, please advise to
consult the nearest Authorised Assistance Centre, because a special tool is required.
• Do not vacuum liquids
• Do not use the appliance to suck up acids or solvents, as these might cause serious damage to the
appliance and above all do not suck in explosive dust
or liquids, as these could cause explosions on contact with the inside components of the appliance.
• Use of the appliance in places where there is a danger of explosions is prohibited.
• Do not suck up burning or incandescent objects such
as embers, ash or other material in which combustion
is taking place.
• Do not leave the appliance exposed to wind or rain.
• Do not use electric extension leads that are not authorized by the manufacturer, as they may cause
damage or fire.
• In case of accidental fall of the appliance, it is necessary to have it checked by an Authorized Assistance
Centre as the internal safety features may have been
affected.
CCCCOOOORRRRRRRREEEECCCCTTTT UUUUSSSSEEEE OOOOFFFF TTTTHHHHEEEE PPPPRRRROOOODDDDUUUUCCCCTT
TT
This appliance is intended for vacuuming solids in accordance with the descriptions and instructions provided in
this manual. Please read these instructions carefully and
keep them safely where you or other users can refer to
them: they may be useful in the future.
FFFFUUUUNNNNCCCCTTTTIIIIOOOONNNNIIIINNNNGG
GG
• Unroll the supply cable (11) till reaching the yellow
sign on the cable itself, by pulling it as shown in fig 1.
DO NOT under any circumstances unroll beyond the
red sign.
• Plug into a suitable power outlet.
• Push the switch (7), the appliance will start operating.
The ON/OFF switch (7) can also be operated by
touching it with your foot, so you do not have to
bend.
• It is possible to regulate suction power through
the slide control (9). Moving it to the right, the suction power increases, while moving to the left, the
suction power will decrease.
•We recommend minimum power for curtains, medium
low power for sofas, armchairs and cushions,
medium high for carpets and high for floors and hard
surfaces (ceramics, marble, etc.).
• Thanks to the manual suction regulator (C2), the suctioning power can be changed according to the cleaning task, and it allows to intervene promptly in case of
accidental suctioning (e.g. of curtains). We recommend an open regulator on curtains, carpets, sofas
and so on… Move the regulator backwards till uncovering the hole on the hose. To suction again at maximum power, move the regulator forward till covering
the hole.
•To end suctioning, press again the ON/OFF switch (7).
EEEEMMMMPPPPTTTTYYYYIIIINNNNGGGG AAAANNNNDDDD CCCCLLLLEEEEAAAANNNNIIIINNNNGGGG
OOOOFFFF TTTTHHHHEEEE DDDDUUUUSSSSTTTT CCCCOOOONNNNTTTTAAAAIIIINNNNEEEERR
RR
• Switch off the appliance (7). Disconnect the supply
cable (11) from the mains.
• Disconnect the flex hose (D) from the appliance, by
touching the button (C1) and pulling it.
• Push the top lid opening button (4) on the top lid (3).
• Lift the top lid (3).
• Remove the dust container (1) holding it by the handle
(2).
• Push the switch (2a) on the handle (2) in order to
open the container and get rid of the collected dirt
(Fig.2).
• ATTENTION: when pushing the switch (2a), the bot-
tom base of the container will open automatically, so
we recommend to empty the container on a rubbish
bin.
•We recommend to clean the container after each use.
• ATTENTION: DO NOT use the appliance without dust
container (1) and its filter.
UUUUSSSSIIIINNNNGGGG TTTTOOOOOOOOLLLLSS
SS
Tools may be connected directly to the hose (D) or to
the telescopic tube (A)
Using the telescopic tube (A)
The tube is about 50 cm long when closed, 79 cm when
extended to its greatest length. To increase or decrease
length, press the catch (A1) and extend or reduce
length as desired.
Using the universal brush (B)
Connect the brush to the telescopic tube. If you move
the selector on the brush (B1) and press with a foot, you
can change the suctioning surface without bending
down. The position with bristles extended is recommended for all non-carpeted floors. The position without
bristles is recommended for carpets.
Using the Small Brush (E)
Thanks to its soft bristles, the small brush is suitable for
dusting delicate surfaces like frames, books and so
on…
The small brush can be used with or without bristle fitting (E1). To separate the fitting from the brush just pull
it outwards (fig. 4)
Using the Lance for edge cleaning (F)
This lance is suitable for thorough cleaning of the most
difficult places, like skirting-boards, sofa gaps, armchairs, upholstered furniture, car seats.
Automatic Cable Winder
Before putting the vacuum cleaner away, rewind the
power cable by pressing the button (8), being careful to
accompany it during winding.
GGGGEEEENNNNEEEERRRRAAAALLLL MMMMAAAAIIIINNNNTTTTEEEENNNNAAAACCCCEE
EE
Always make sure the appliance is unplugged before
performing maintenance work of any kind.
EE
EE
NN
NN
GG
GG
LL
LL
II
II
SS
SS
HH
HH
AS510
Page 4

Replacement and cleaning of the container filter
• Remove the dust container (1) as described in the
paragraph “Emptying and cleaning of the dust container”.
• Remove the filter from the container as described in
figure 3.
• Rinse all elements under running water and let them
dry.
• Put all elements back in place.
Replacement and cleaning of the sponge filter.
• Open the outlet air filter grille (10) by moving the
lever on the grille.
• Separate the sponge filter from the grille.
• Rinse under running water.
• Let the filter dry and put it back in place on the grille.
• Replace the grille (10) in its location.
AAAATTTTTTTTEEEENNNNTTTTIIIIOOOONN
NN
• This appliance is built according to current regulations for recycling.
• Do not throw away the packing materials used to protect the appliance during transportation, but take
them to relevant collecting centres.
• Filters are sold in authorised assistance centres.
• Use only original Polti spare parts.
• Polti declines liability for any damage or acci-
dent derived from any use of this appliance
which is not in conformity with the instructions
contained in this booklet.
EEEELLLLEEEECCCCTTTTRRRRIIIICCCCAAAALLLLSSSSAAAAFFFFEEEETTTTYY
YY
No earth required.
Ensure the mains voltage suits your appliance.
Fitting the mains plug important
The wires in the mains lead are coloured in accordance with
the following code:
• Blue: Neutral
•Brown: Live
The wire which is coloured BLUE must be connected to the
Te rminal which is marked with the letter “N” or coloured
BLACK.
The wire which is coloured BROWN must be connected to
the Terminal which is marked with the letter “L” or coloured
RED.
It is important that the outer sheath is clamped correctly
into the 3-pin plug.
If in doubt consult your local Service Dealer or qualified
electrician before the machine is used.
A 13 AMP FUSE MUST BE FITTED TO THE MAINS PLUG.
BLACK
OR
BLUE
RED
OR
BROWN
L
E
N
F
U
S
E
AS510
 Loading...