

Page 1
Michelangelo
®
Page 2
AROMA MICHELANGELO - Edizione 1I06
13
15
14
1
10
11
12
2
3
4
5
6
7
8
9
d
b
a
c
9
16
17
18
19
20
22
26
25
24
23
21
Fig. A
Fig. B
Fig. C
12b
12a
12c
Page 3

AROMA MICHELANGELO
2
EE
EE
NN
NN
GG
GG
LL
LL
II
II
SS
SS
HH
HH
This unit conforms with EC-directives 89/336 as amended by 93/68 (EMC) and 73/23 as amended by 93/68 (low voltage).
Dear Customer,
Thank you for choosing this Polti product.
With this coffee machine, you will enjoy full taste and aroma right from the first cup and
make creamy cappuccino as well as tea and other hot drinks.
AROMA MICHELANGELO is made with top quality components to ensure quality and perfect safety.
Please read these instructions carefully before using AROMA MICHELANGELO.
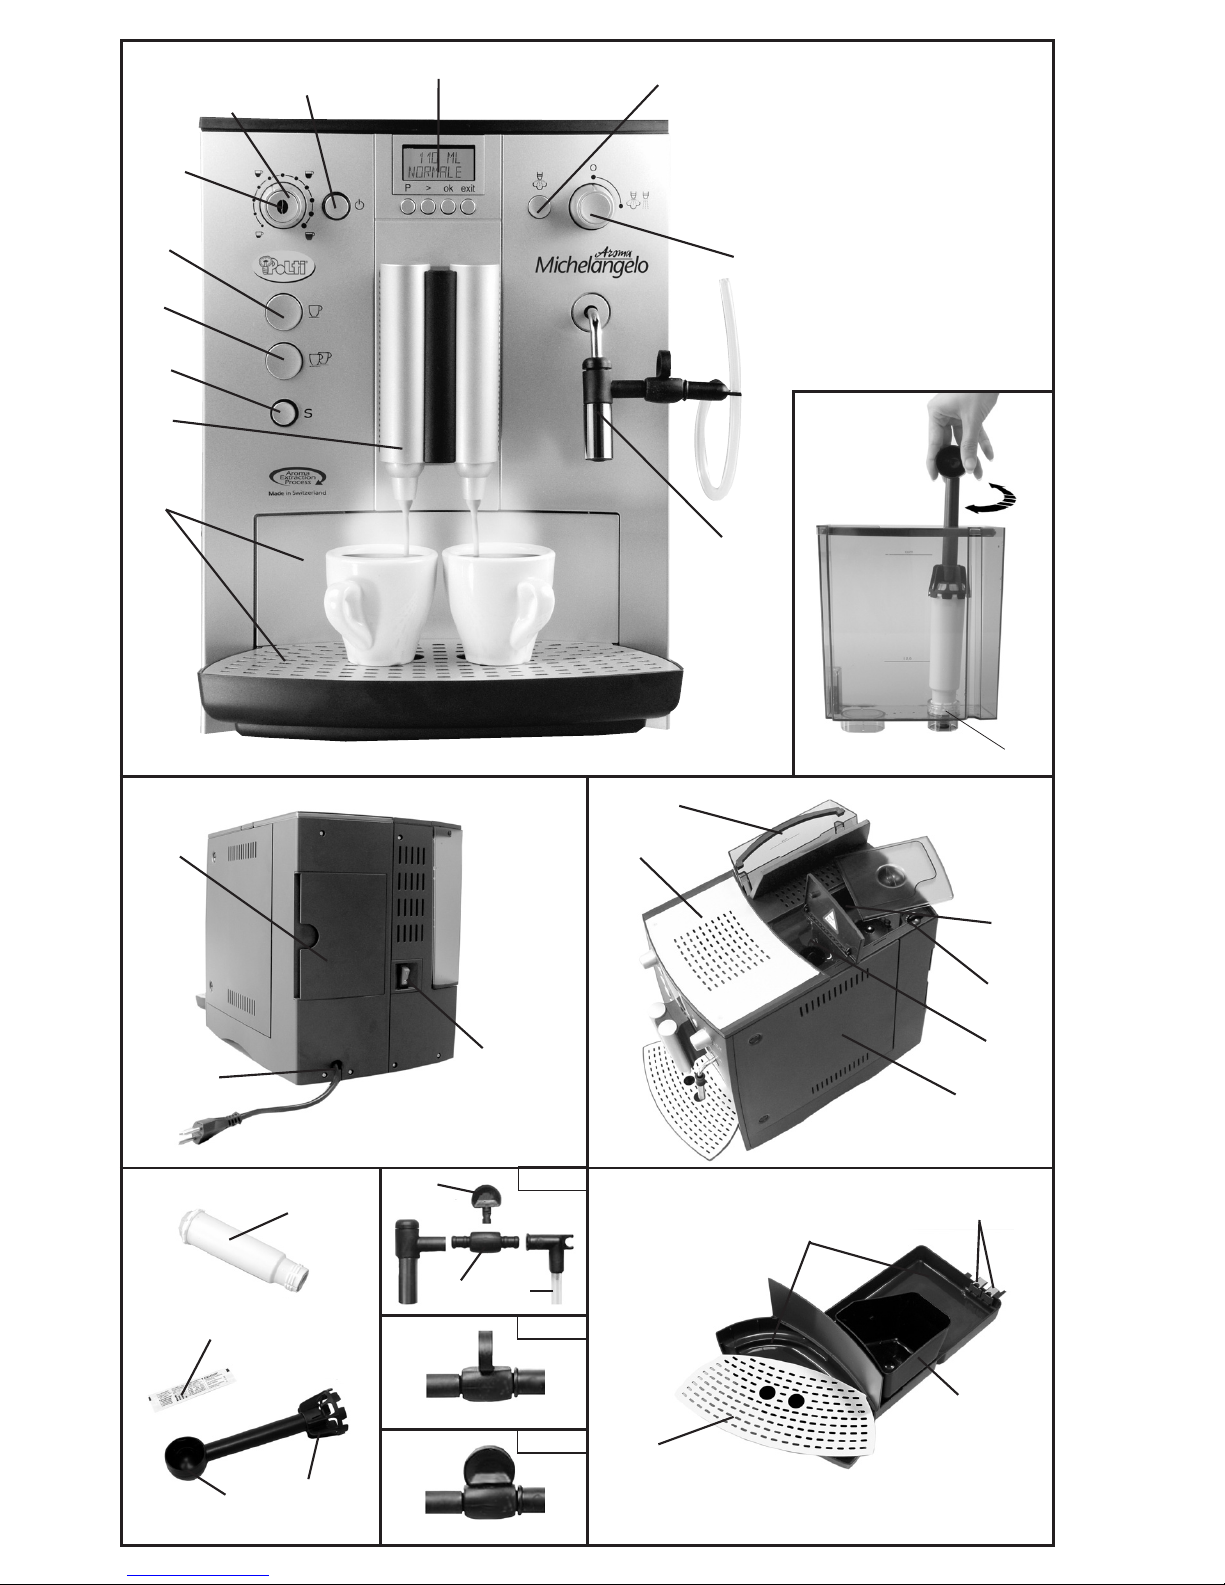
1. Display
2. On/off button
3. Knob for adjusting amount of water in cup
4. Coffee strength selector
5. 1 cup selector
6. 2 cup selector
7. S service button
8. Coffee dispensing nozzle with
adjustable height
9. Drip tray & grid
a. Grid
b. Drip tray
c. Coffee grounds container
d. Contacts
10. Steam preheating button
11. Steam/hot water knob
12. Steam nozzle with milk frothing accessory
12a. Intake valve
12b. Knob
12c. Intake tube
13. Document holder pocket
14. Power cord compartment
15. Power on/off switch
16. Cup shelf
17. Removable water reservoir
18. Coffee bean container
19. Grind knob
20. Ground coffee compartment
21. Portafilter
22. Door for accessing infusion unit
23. Ground coffee measuring scoop
24. Filter assembly accessory
25. Water softening filter
26. Litmus paper
POLTI S.p.A., in accordance with its policy of continuous improvement, reserves the right to make any
technical and structural modifications without prior notice.
MACHINE CONTROLS AND COMPONENTS
Page 4
AROMA MICHELANGELO
3
PPPPRRRREEEECCCCAAAAUUUUTTTTIIIIOOOONNNNSSSS
KEEP THESE INSTRUCTIONS
• Read these instructions for use carefully before
using the appliance.
• Use which does not comply with these instructions will invalidate the warranty.
• The wiring system to which the appliance is connected must always comply with the laws in force.
• Before connecting the appliance, make sure
that the mains voltage is the same as the voltage indicated on the data label of the appliance
and that the power outlet is connected to earth
• Always turn off the appliance at the on/off switch before unplugging it.
• If the appliance is left unused, always disconnect it from the mains. Never leave the appliance unattended with the cable plugged into the
mains.
• Always make sure the appliance is unplugged
before performing maintenance or cleaning of
any kind.
• Do not pull the power cord out of the socket,
but grasp the plug itself to avoid damage to the
socket.
• Do not allow the power cord to be twisted, crushed, stretched, or come into contact with
sharp or hot surfaces.
• Do not use the appliance if the power cable or
other important parts are damaged.
• Do not use electric extension leads that are not
authorized by the manufacturer, as they may
cause damage or fire.
• If it is necessary to replace the power supply cable, please refer to the nearest Polti
authorised service centre, since the use of a
special tool is necessary.
• Never touch the appliance with wet hands or
feet with the cable plugged into the mains.
• Do not use the appliance when barefoot.
• Do not use the appliance near a bathtub,
shower or container full of water
• Never immerse the appliance, the cable or the
plugs in water or any other liquid.
• Use of the appliance in places where there is a
danger of explosions is prohibited.
• Do not use the product with toxic substances.
• Do not lay the hot appliance on surfaces sensitive to heat.
• Do not leave the appliance exposed to wind or
rain.
• Do not place the appliance near a live element,
an electric stove or any other source of heat.
• Do not expose the appliance to extreme temperatures
• Never let children or people who are not familiar with how the appliance works use it.
• Do not press the buttons hard or with a pointed
object such as a pen.
• Always rest the appliance on a stable surface.
• In case of accidental fall of the appliance it is
necessary to have it checked by an authorized
Service Centre as the internal safety features
may have been affected.
• In case of breakdown or malfunction switch off
the appliance and never attempt to disassemble it, but refer to an authorized Service Centre.
• In order to avoid prejudicing the safety of the
appliance, use only original spare parts and accessories approved by the manufacturer.
• Do not wind the power cord around the appliance, especially when the appliance is still hot.
• Position the machine on a horizontal surface.
• Do not use lime scale removers which are not
authorised by the manufacturer.
• Check that there is water in the reservoir before turning on the machine.
• Always fill the water reservoir with cold clean
water. Do not use mineral water, distilled water,
milk or any other liquid.
• Do not use the appliance if the drip tray and the
grill are not in place.
• Do not wash coffee machine accessories in the
dishwasher.
• Do not direct the steam jet on electrical appliances.
• Let the appliance cool down before cleaning
the hot water nozzle.
• Never use beans treated with additives, such
as sugar or similar substances.
Do not direct the steam jet
at people, animals or debris.
Danger of burns!
Never place your hands
inside the jet of steam.
Danger of burns!
EE
EE
NN
NN
GG
GG
LL
LL
II
II
SS
SS
HH
HH
Page 5

AROMA MICHELANGELO
4
Important: Flipping the power switch (15)
while infusion is in progress may result in
damage to the appliance! Turn off the power
only when the on/off button (2) is set to off
(stand-by mode).
BURN HAZARD!
CCCCOOOORRRRRRRREEEECCCCTTTT UUUUSSSSEEEE OOOOFFFF TTTTHHHHEEEE PPPPRRRROOOODDDDUUUUCCCCTT
TT
This appliance is intended for home use in accordance with the descriptions and instructions contained in this manual. Please read the instructions
carefully and keep them, as they could be useful to
you in the future.
AAAATTTTTTTTEEEENNNNTTTTIIIIOOOONN
NN
• This appliance is built according to current regulations for recycling.
• Do not throw away the packing materials used
to protect the appliance during transportation,
but take them to relevant collecting centres.
• Use only original Polti spare parts.
• Polti declines liability for any damage or
accident derived from any use of this appliance which is not in conformity with the
instructions contained in this booklet.
IIIIMMMMPPPPOOOORRRRTTTTAAAANNNNTT
TT
All Polti products undergo strict controls before leaving the company
UUUUSSSSEEEEFFFFUUUULLLL IIIINNNNFFFFOOOORRRRMMMMAAAATTTTIIIIOOOONN
NN
CHOOSING COFFEE
•True espresso coffee is recognisable by its
dark colour, typical “crema” and rich flavour.
• The flavour and aroma of a coffee bean are the
result of a roasting process. Darker coffee
beans have been roasted for a longer time at a
higher temperature, and are more aromatic
than lighter coffee beans.
• There are many different types of coffee available on the market, containing blends of beans
roasted at different temperatures with different
types of aroma. There is also decaffeinated
coffee containing only 2% caffeine. Try using
different types of coffee with your espresso
machine to find the flavour and aroma that best
suits your taste.
• Ideally, coffee beans should be ground just before using them. Remember that your coffee
MUST BE GROUND FOR PUMP ESPRESSO MACHINES, which means it must be ground quite
finely.
• It is a good idea to keep ground coffee or coffee beans in the freezer in a hermetically
sealed container. Coffee easily absorbs
odours.
STARTING UP AND PREPARING THE MACHINE
• Carefully remove the machine and all accessories from the packaging.
• Open the lid, remove the water reservoir (17)
and rinse it with clean, cold water.
• Fill the reservoir no higher than the MAX mark,
place it back in the machine and close the lid.
• Check that the reservoir (17) is positioned correctly. Fill the reservoir with clean, cold water
only. Do not use sparkling water or any other
liquid.
Important: To prevent problems caused by lime
scale build-up, it is important to use the machine
with the water-softening filter (25). Alternatively,
you may also use lime scale remover tablets, as
described in the section on the “lime scale remover
programme”. If you decide to use the water-softening filter, follow the assembly instructions under the
heading “Filter assembly”.
• Open the lid of the coffee bean container (18),
fill it with coffee beans and close the lid again.
Do not use coffee beans which have been treated
with sugar or other additives during or after roasting, as they could damage the coffee grinder. Repair costs due to such damage will not be covered
by the warranty.
The steam/hot water knob (11) must be set to 0.
ASSEMBLING THE MILK FROTHING
ACCESSORY
Assemble all components of the milk frothing accessory as shown in fig. A, leaving no space between components. Take special care to ensure
that the seal on the knob (12b) is inserted all the
way into the valve (12a).
Filling the system
When you use the appliance for the first time, the
pipes inside the machine may not yet be filled with
water. The machine will signal this as follows:
• After turning the machine on with the on/off
button (2), FILL UP PIPE-SYS and TURN VALVE
will appear alternately on the display.
EE
EE
NN
NN
GG
GG
LL
LL
II
II
SS
SS
HH
HH
Page 6

AROMA MICHELANGELO
5
EE
EE
NN
NN
GG
GG
LL
LL
II
II
SS
SS
HH
HH
Place a dish underneath the outlet to collect
water.
•Turn the steam/hot water knob (11) to the
right. At this point the system will fill with water
and water may flow out of the nozzle (12).
• When the TURN VALVE command appears, you
may turn the knob (11) to the left again.
• When the machine has heated up, PLEASE
RINSE will appear on the display and the service button (7) will start flashing.
•Press the service button (7) to rinse out the system through the coffee dispensing nozzle (8).
• The machine is now ready for use.
RECOMMENDATION: Place a dish underneath the
outlet to collect water.
You may rinse out the machine at any time during
regular operation by letting clean water flow
through the coffee outlet (8), pressing the service
button (7).
Starting up the appliance
1a. Remove the power cord from the cord com-
partment (14) and plug it into a suitable outlet.
2a. Press the power switch (15). The on/off button
(2) will come on.
3a. Press the on/off button (2). SYS. IS HEATING
will appear on the display.
4a. When the machine has heated up, PLEASE
RINSE will appear on the display and the service button (7) will start flashing.
5a. Press the service button (7) to rinse the system
out through the coffee dispensing nozzle (8).
6a. The coffeemaking symbol will appear on the
display, indicating that the machine is ready for
use again.
Setting grind
Important: Grind may be adjusted only when the
coffee grinder is in use.
The coffee grinder may be adapted to suit the roast
of the coffee. We recommend the medium setting
for all roasts.
• Open the coffee bean container (18) lid
•With the coffee grinder in operation, turn the
knob (19) to the desired position. The smaller
the dot next to the knob, the finer the grind. Remember that:
– lightly roasted coffee requires a finer grind
– dark-roasted coffee requires a coarser grind
PPPPRRRREEEEPPPPAAAARRRRAAAATTTTIIIIOOOONN
NN
The machine is shipped ready to make its first cup
of coffee. But we recommend you re-programme
the main settings to suit your preferences. First of
all, follow the steps listed under the “Programming”
heading to adjust the filter and water hardness settings.
NOTE: When using the appliance for the first time,
or if the appliance has not been used for some
time, the first coffee you make will not have perfect
aroma and should be discarded.
Selecting coffee strength
You may set your preferred coffee strength to three
levels:
LIGHT = about 7 gr. ground coffee
(for caffelatte, cappuccino)
NORMAL = about 9 gr. ground coffee
(for Café crème)
STRONG = about 11 gr. ground coffee
(for Espresso, strong coffee)
As soon as the machine is ready for use, the factory setting will appear on the display.
It may be altered by repeatedly pressing the selector (4) until the desired strength appears on the display.
Selecting water quantity
Use the water quantity control knob (3) to determine the quantity of water:
• turn anti-clockwise to decrease water quantity.
• turn clockwise to increase water quantity.
Water quantity may be altered during the process.
The amount of water used to make coffee is shown
on the first line of the display.
RECOMMENDATION: To determine the ideal water quantity for your taste or cup size, proceed as
follows when making your first cup of coffee:
1. Set the water quantity adjustment knob (3) to
the following positions:
a. to the left for a cup of espresso.
b. all the way to the right for a larger cup.
2. Press the 1 cup selector (5). The machine will
start making coffee.
3. Just before you reach the desired quantity of
coffee, turn the water quantity control knob (3)
slowly to the left until the machine stops dispensing coffee.
4. Note the position shown on the dots appearing
on the water quantity adjustment knob (3).
MMMMAAAAKKKKIIIINNNNGGGG OOOONNNNEEEE CCCCUUUUPPPP OOOOFFFF CCCCOOOOFFFFFFFFEEEEEE
EE
Place a pre-heated cup underneath the coffee dispensing nozzle (8)
The height of the coffee dispensing nozzle (8) may
Page 7

AROMA MICHELANGELO
6
be adjusted precisely to suit the cup size.
• Set the desired coffee strength and water quantity.
•Press the 1 cup selector (5).
• At this point the machine will begin the infusion
procedure.
• The procedure may be interrupted at any time
by pressing the 1 cup (5) or 2 cup selector (6).
Important: If making coffee for the first time, the
grinding chamber is still empty. After you grind coffee for the first time, FILL BEANS may appear on
the display and the machine may not make coffee.
If this happens, press the selector (5) again to repeat the procedure.
MMMMAAAAKKKKIIIINNNNGGGG TTTTWWWWOOOO CCCCUUUUPPPPSSSS OOOOFFFF CCCCOOOOFFFFFFFFEEEEEE
EE
•Two grinds will automatically be performed to
make two cups of coffee.
• Place both cups under the coffee dispensing
nozzle (8).
• Set the desired coffee strength and water quantity for one cup.
•Press the 2 cup selector (6)
• At this point the machine begins the infusion
procedure and makes two cups of coffee in a
row
• The procedure may be interrupted at any time
by pressing the 1 cup (5) or 2 cup selector (6)
If the machine should run out of water or coffee
beans between the two cups, or if the trays need
emptying, a signal will appear and the second cup
of coffee will not be made. Follow the instructions
to top up the machine and press only the 1cup selector (5) to make the second cup of coffee.
UUUUSSSSIIIINNNNGGGG PPPPRRRREEEE----GGGGRRRROOOOUUUUNNNNDDDD CCCCOOOOFFFFFFFFEEEEEE
EE
• First turn the water quantity control knob (3) to
the desired quantity of water for one cup.
• Open the lid to access the ground coffee compartment (20); FILL POWDER appears on the
display.
• Fill with a level measuring scoop (23) of ground
coffee and close the lid. The words POWDER
READY will appear on the display.
• Place the cup under the coffee dispensing nozzle (8) and press the 1 cup button (5).
If you unintentionally open the ground coffee compartment and do not press the coffee button after
putting ground coffee into it, the machine will automatically perform a washing cycle through the coffee dispensing nozzle (8) one minute after the lid is
closed and will then be ready for use again.
Important: The filling compartment is not a storage compartment. Never put more than one portion into it and use only freshly ground or vacuumpacked coffee. Do not use instant coffee. You can
make instant coffee in the cup using the nozzle
(12).
HHHHEEEEAAAATTTTIIIINNNNGGGG WWWWAAAATTTTEEEERR
RR
Place a cup under the nozzle (12).
Turn the steam/HOT WATER knob (11) to the right.
When HOT WATER comes out of the nozzle, the
words HOT WATER appear on the display
Fill the cup up to the desired level and then set the
knob (11) to 0 again.
Be careful not to burn yourself: Hot water may
splash. The nozzle (12) reaches high temperatures
while in use. Let it cool down for a few minutes before touching it.
PPPPRRRROOOODDDDUUUUCCCCIIIINNNNGGGG SSSSTTTTEEEEAAAAMMMM ////
FFFFRRRROOOOTTTTHHHHIIIINNNNGGGG MMMMIIIILLLLKKKK
1. Press the steam preheat button (10). When the
system is ready, the words STEAM IS READY
and TURN VALVE will appear alternately on the
display
2. Immerse the nozzle (12) in the cup full of liquid
to be heated.
3. Turn the steam/hot water knob (11) to the
right. Important: A little water will come out before the steam.
4. Turn the knob (11) back to 0 to stop.
5. Press the steam preheat button (10) to restore
normal operation of the machine.
6. Steam may continue to be produced for maximum 2 minutes, after which the machine will
automatically stop the procedure. To continue
with the procedure, turn the knob (11) to the
right and go back to 0.
MMMMIIIILLLLKKKK FFFFRRRROOOOTTTTHHHHIIIINNNNGGGG AAAACCCCCCCCEEEESSSSSSSSOOOORRRRYY
YY
The milk frothing accessory is used to emulsify milk
taken up directly out of the container. It is a very
useful accessory for making cappuccino and coffee with steamed milk.
• Check that the accessory has been connected
up correctly, as described in the section on
“ASSEMBLING THE MILK FROTHING ACCESSORY”.
• Insert the intake tube (12c) in the container of
cold milk.
• Make espresso as described in the section
“MAKING ONE CUP OF COFFEE”
EE
EE
NN
NN
GG
GG
LL
LL
II
II
SS
SS
HH
HH
Page 8

AROMA MICHELANGELO
7
EE
EE
NN
NN
GG
GG
LL
LL
II
II
SS
SS
HH
HH
• Place the cup under the steam nozzle (12).
•Press the steam preheat button (10). When the
system is ready, the words STEAM IS READY
and TURN VALVE will appear alternately on the
display.
•Turn the steam/hot water knob (11) to the
right. Important: A little water will come out before the steam.
• When steam starts to come out, open the knob
(12b); this will allow milk to be taken up and
frothed directly in the cup.
• Use the intake knob (12b) to vary how wide the
valve opens and therefore the amount of milk
taken in. With the knob positioned as shown in
fig.C, that is, all the way open, milk is warm and
frothy; adjust the knob to an intermediate position for less froth and hotter milk. Position the
knob as shown in fig. B to close the valve.
• When this procedure has been completed, return the knob (12b) and the steam knob (11) to
their initial positions.
Warning – scalding steam hazard: The steam is
very hot! Grasp the nozzle by the black plastic part!
Residues left on the nozzle after frothing milk are
hard to remove when dry, so it is a good idea to
clean the whole assembly as soon as it cools down.
Eliminate milk residues in the hole through which
milk passes in the knob (12b) with a needle.
Important: after using the steam wand, it is important to rinse the machine through before making
coffee again to cool down the circuit, or the aroma
of the coffee will be spoiled. Place a container under the coffee dispensing nozzle (8) and press the
service button (7) or let a little hot water flow
through the nozzle (12).
PROGRAMMING
Use the following buttons under the display for programming:
P Programming mode
> selection button
ok confirmation button
exit interrupt or conclude programming
The machine allows you to set the following functions:
1. Filter
2. Water hardness
3. Temperature
4. Time (on time and off time)
5. Language
6. Statistics
1. FILTER
Filter assembly
The machine is supplied with a special filter accessory for the water reservoir. The filter is made of
resins and protects the machine from lime scale
deposits, filtering out any substances (such as
chlorine and metallic residues) that can alter the
flavour and aroma of coffee, while leaving the mineral content of the water unaltered. For the machine to recognise the presence of the filter, you
must set the filter setting to YES. The factory setting is no filter.
1b. Press the programming button P.
2b. Press the > button until PROGRAM FILTER ap-
pears on the display.
3b. Press ok.
4b. Press > until YES appears on the display.
5b. Confirm by pressing ok.
6b. The words FILTER CHANGE / TURN VALVE will
appear alternately on the display.
7b. Empty the water reservoir (17) and screw on
the filter using the filter assembly tool (24)
supplied with the portafilter (21).
8b. Fill the reservoir with cold water and put it
back inside the appliance..
9b. Place a recipient underneath the nozzle (12)
and turn the knob (11) to the right. The sys-
tem will perform a rinse cycle.
10b. Wait until water stops flowing out of the noz-
zle, then turn the knob (11) to the left again.
• The system quickly heats up and is ready
for use again.
• The service button (7) may carry on flashing. If this happens, press the button (7) to
conduct another short rinse cycle through
the coffee outlet (8).
IMPORTANT: The system must be programmed either for use of a water filter or for the hardness of
the water and therefore the manual lime scale removal cycle. You cannot use both of these settings
at the same time.
If you are using the filter on the machine and the
system is programmed to “YES”, water hardness
and manual lime scale programming cannot be displayed.
The filter loses its effectiveness after about 50
litres of water. Follow the instructions in the section
on “replacing the water filter” to replace it.
Important: If you have not used the machine very
much, you must replace the filter even if no indication appears on the display after a maximum of two
months (see the section on “manual filter replacement (25)”).
Page 9

AROMA MICHELANGELO
8
EE
EE
NN
NN
GG
GG
LL
LL
II
II
SS
SS
HH
HH
As a reminder, you may set the replacement date
on the wheel on the top of the filter.
For more thorough prevention of lime scale
build-up, you should run the “lime scale removal” programme at least once a year even
if you regularly use the resin-based filter.
Without filter
If you no longer want to use the filter, you must reprogramme the filter setting to “NO”.
This is important as you must use the lime
scale removal programme if you are not using
the filter.
1c. Press the programming button P.
2c. Press > until the words PROGRAM FILTER ap-
pear on the display.
3c. Press ok.
4c. Press > again until NO appears on the display.
5c. Confirm by pressing ok. The words PROGRAM
FILTER will appear on the display.
6c. From this position you may continue program-
ming or exit by pressing exit.
Don’t forget to programme water hardness when
not using the filter.
2. WATER HARDNESS
The frequency of lime scale removal depends on
the hardness of your local water supply. Set water
hardness correctly as soon as you begin using the
machine so that the system will be able to inform
you when the lime scale procedure is necessary.
First test the water using the litmus paper (26) supplied:
Fill a small container with tap water. Dip the litmus
paper into it and remove it immediately, then shake
it gently.
After about one minute you will be able to read the
results by counting the red dots.
Different levels are distributed as shown below:
–1 red dot =
1 -7° dH / 1 - 12.6°fH = LEVEL 1
–2 red dots =
8 -14° dH / 12.7 -25.2°fH = LEVEL 2
–3 red dots =
15-21° dH / 25.3-37.8°fH = LEVEL 3
–4 red dots = > 21° dH / > 37.8°fH
= LEVEL 4
When no red dots are visible, set on level 1.
The factory setting corresponds to LEVEL 3.
1d. Press the programming button P.
2d. Press > until PROGRAM W. HARD appears on
the display. (It will appear only if the filter is pro-
grammed to NO).
3d. Press ok.
4d. Press > again until the level of water hardness
determined in the litmus paper test appears on
the display.
5d. Confirm by pressing ok, and the words PRO-
GRAM W. HARD will appear on the display.
From this position you may continue programming
or exit by pressing exit.
3. TEMPERATURE
You may change coffee temperature to suit your
preferences, setting it to NORMAL, HIGH or MAXIMUM.
The factory setting is “High”.
1e. Press the programming button P.
2e. Press > until PROGRAM.TEMP. appears on the
display.
3e. Press ok.
4e. Press > again until the desired temperature lev-
el appears on the display.
5e. Confirm by pressing ok, and PROGRAM.TEMP.
will appear on the display.
6e. From this position you may continue program-
ming or exit by pressing exit.
4. TIME
You must programme the current time before you
can programme on time.
1f. Press the programming button P to go into Pro-
gramming mode.
2f. Press > until PROGRAM. TIMES appears on the
display.
3f. Press ok, and TIME SETTING will appear on the
display.
4f. Confirm by pressing ok. HOURS > 00:00 will
appear on the display. (the arrow will flash)
5f. Press > until the desired time appears.
6f. Confirm by pressing ok. The < arrow will start
flashing behind the minutes.
7f. Press > until the minutes are correct.
8f. Confirm by pressing ok, and TIME SETTING will
appear on the display.
9f. From this position you may continue program-
ming or exit by pressing exit.
Important: The time setting will be lost if you turn
Page 10

AROMA MICHELANGELO
9
EE
EE
NN
NN
GG
GG
LL
LL
II
II
SS
SS
HH
HH
off the power (15) or unplug the machine or if the
power goes out.
On time
This function is used to programme the time you
want the machine to come on.
You may use this function only if the current time
has been memorised.
10f. Press the programming button P to access
Programming mode.
11f. Press the > button until PROGRAM. TIMES
appears on the display.
12f. Press ok; TIME SETTING appears on the
display.
13f. Press > until UNIT ON AT appears on the dis-
play.
14f. Proceed as described in point 4f through
point 7f to set the hour and minutes.
15f. Confirm by pressing ok, and UNIT ON AT
will appear on the display.
16f. From this position you may continue pro-
gramming or exit by pressing exit.
On time will be retained in memory even if the power supply is interrupted or switched off.
Off time
This function is used to programme how much time
after the last cup of coffee is made the machine will
go into Stand-by mode. The factory setting is 5
hours.
17f. Press the programming button P to go into
Programming mode.
18f. Press > until PROGRAM. TIMES appears on
the display.
19f. Press ok, and TIME SETTING will appear on
the display.
20f. Press > until UNIT OFF AFTER appears on
the display.
21f. Press > until the number of hours (options
from 1 - 12 hours) after which you want the
machine to switch off appears on the display. If you do not want the machine to
switch off, select Never.
22f. Confirm your choice by pressing ok, and
UNIT OFF AFTER will appear on the display.
23f. From this position you may continue pro-
gramming or exit by pressing exit.
5. Language
You can choose among eight languages: German,
English, French, Italian, Spanish, Dutch, Russian
and Portuguese.
The factory setting is Italian.
•Press the programming button P to go into Programming mode.
•Press > until PROGRAM LANGUAGE appears
on the display.
•Press ok.
•Press > until the desired language appears.
• Confirm by pressing ok. PROGRAM LANGUAGE
will appear on the display.
•From this position you may continue programming or exit by pressing exit.
6. Statistics
This programming setting may be used to read the
frequency at which the following functions have
been set: 1 cup/ 2 cups/ Powder/ Total (number
of times making coffee) / Water / Steam / Cleaning
/ Lime scale removal / Filter changes.
•Press the programming button P to enter Programming mode.
•Press > until PROGRAM.STATIST appears on
the display.
•Press ok.
•Press > until the desired indication appears.
• Confirm by pressing ok. PROGRAM.STATIST
will appear on the display.
•From this position you may continue programming or exit by pressing exit.
CCCCAAAARRRREEEE AAAANNNNDDDD MMMMAAAAIIIINNNNTTTTEEEENNNNAAAANNNNCCCCEE
EE
Replacing the filter (25)
After filtering about 50 litres of water, the filter is
no longer effective. This is signalled on the display
by the instruction FILTER CHANGE and flashing of
the service button (7).
RECOMMENDATION: Press the service button only when you want to replace the filter.
You may continue making coffee, hot water and
steam, but we recommend you replace the filter
promptly.
1g. Empty the water reservoir (17) and replace the
filter.
2g. Press the service button (7) for about 2 sec-
onds. FILTER CHANGE / TURN VALVE will appear on the display.
3g. Fill the reservoir with cold water and put it back
in the machine.
4g. Place a recipient under the steam-hot water
nozzle (12) and turn the steam/hot water knob
(11) to the right. The system will perform a
rinse cycle.
Page 11

AROMA MICHELANGELO
10
5g. Wait until no more water flows out of the noz-
zle, and then turn the knob (11) toward the left.
6g. The system will rapidly heat up and the coffee-
making symbol will appear on the display, indicating that the machine is ready for use again.
Manual filter replacement (25)
Even if you make coffee infrequently, the filter must
be replaced at least every 2 months. No signal will
appear on the display, and the new filter must be replaced manually.
As a reminder, you may set the replacement date
on the wheel on the top of the filter.
1h. Empty the water reservoir (17) and replace the
filter.
2h. Fill the reservoir with cold water and put it back
in the machine.
3h. Press the programming button P.
4h. Press > until PROGRAM FILTER. appears on the
display.
5h. Press ok. The display will indicate MANUAL
RINSING.
6h. Confirm by pressing ok, and FILTER CHANGE
/TURN VALVE will appear alternately on the dis-
play.
7h. Proceed as described in point 4g. of the sec-
tion on “Replacing the filter (25)”.
Cleaning programme
The cleaning programme thoroughly cleans all dispensing assemblies, removing coffee residues and
oily deposits which can build up and block up the
machine. To run the programme, use the special
tablets available at your Authorised Polti Service
Centre or home delivered by calling 01249-
815511.
IMPORTANT: This programme is intended
solely for cleaning the coffee dispenser assembly. It is not a lime scale remover programme; do not get the tablets for these two
uses mixed up.
When the machine requires cleaning, the words
PLEASE CLEAN will appear on the display, alternately with the normal operation symbol, and the
service button (7) will flash.
RECOMMENDATION: Press the service button only when you want to perform the cleaning cycle.
You may continue making coffee, hot water and
steam, but we recommend you perform the cleaning cycle promptly.
Important: The cleaning programme cannot
be interrupted once it has started.
1i. Press the service button (7). EMPTY TRAYS
will appear on the display, alternating with
FILL WATER
2i. Remove the drip tray (9b) and the water reser-
voir (17) and clean them thoroughly.
3i. Fill the reservoir with cold water, and re-as-
semble the reservoir and trays on the machine.
4i. The machine will perform a brief washing cy-
cle, and the indications CLEANING TAB INTO
and POWDER SHAFT will appear alternately on
the display.
RECOMMENDATION: Place a dish of sufficient capacity (about 0.5 litres) under the coffee dispensing
nozzle (8).
5i. Put the cleaning tablet into the powdered cof-
fee compartment (20) and close the lid. The
service button (7) will flash and PRESS S KEY
will appear on the display.
Important: do not put the cleaning tablet in
the water reservoir (17).
6i. Press the service button (7).
7i. The machine begins the cleaning procedure.
8i. The cleaning procedure is automatic and
takes about 10 minutes. When the cycle has
been completed, EMPTY TRAYS will appear on
the display
9i. Empty the drip tray (9b) and put it back in po-
sition.
10i. If necessary, fill the water reservoir (17) with
cold water.
11i. The machine quickly heats up to the right tem-
perature and is ready for use again.
Manual cleaning
If necessary, you can run the cleaning programme
even if the alarm does not appear:
1h. Press the programming button P.
2h. Press > until PROGRAM CLEANING appears on
the display.
3h. Press ok. The display will indicate MANUAL
CLEANING.
4h. Confirm by pressing ok, and EMPTY TRAYS/
FILL WATER will appear alternately on the display.
5h. Proceed as described beginning in point 2i of
the “Cleaning programme” section.
If you unintentionally start up the cleaning programme, you can interrupt it at the beginning of the
EE
EE
NN
NN
GG
GG
LL
LL
II
II
SS
SS
HH
HH
Page 12

AROMA MICHELANGELO
11
cycle by pressing the On/Off button (2) for about 2
seconds.
Lime scale removal programme
If you do not use the special filter (25) regularly, it
is essential to remove lime scale in the appliance at
least once every two months regularly so as not to
compromise the functioning of the appliance with
time. To run the lime scale removal programme,
use the special Polti lime scale remover, available
at your Authorised Polti Service Centre.
NOTE: Never use sulphuric acid or any other product containing this acid, as it may compromise the
functioning of the appliance. Do not use vinegar or
vinegar-based products for lime scale removal. Do
not use any substance not authorised by the manufacturer; use only special Polti lime scale remover.
When the machine requires lime scale removal,
SYSTEM CALCIF. will appear on the display, alternately with the normal operation symbol, and the
service button (7) will flash.
RECOMMENDATION: Press the service button
before starting the lime scale removal procedure.
You may continue making coffee, hot water and
steam, but we recommend you run the lime scale
removal procedure promptly.
Important: - Do not interrupt the lime scale removal programme once it has started!
1m. Press the service button (7). EMPTY TRAYS
will appear on the display.
2m. Empty the drip tray (9b) and put it back in po-
sition. DESCAL IN TANK will appear on the
display.
3m. Remove the water reservoir (17) and put two
Polti lime scale remover tablets in it (following the manufacturer’s instructions) with the
corresponding quantity of water, up to the
0.5 litre mark.
Important: do not put lime scale removal
tablets into the ground coffee compartment
(20).
4m. Put the reservoir back into the appliance.
TURN VALVE will appear on the display.
5m. Place a recipient of sufficient size (about 1/2
litre) under the nozzle (12).
6m. Turn the steam/hot water knob (11) to the
right to open.
7m. The machine automatically removes lime
scale and the lime scale remover solution will
intermittently flow out of the nozzle (12)
(about 10 min.).
8m. When TURN VALVE appears on the display,
you can turn the knob to the left (11).
9m. At this point the lime scale removal solution
flows into the drip tray (about 15 Min.).
10m. When the lime scale remover solution has
flowed out of the outlet, EMPTY TRAYS appears on the display.
11m. Remove the drip tray (9b) and the water
reservoir (17) and empty them.
12m. FILL WATER appears on the display.
13m. Fill the reservoir (17) with cold water and put
the reservoir and drip tray back in position.
TURN VALVE will appear on the display.
14m. Turn the steam/hot water knob (11) to the
right to open.
15m. The system is once again washed intermit-
tently through the steam – nozzle (12) (about
5 minutes)
16m. When TURN VALVE appears, you can turn the
knob (11) to the left.
17m. The system is washed and water flows into
the drip tray (about 5 minutes).
18m. EMPTY TRAYS appears on the display when
washing has been completed.
19m. Empty the drip tray (9b) and reassemble it
on the machine.
20m. The system rapidly heats up to operating
temperature. The service button (7) flashes
and PLEASE RINSE appears on the display.
21m. Press the service button (7) to wash the sys-
tem out through the coffee dispensing nozzle
(8).
22m. The machine is now ready for use.
Manual lime scale removal
1n. Press the programming button P.
2n. Press > until DESCAL. appears on the display.
3n. Press ok. MAN. DESCALING appears on the
display.
4n. Confirm by pressing ok, and EMPTY TRAYS will
appear on the display..
5n. Proceed as described beginning in point 2m of
the “Lime scale removal programme” section.
If you unintentionally start up the lime scale removal
programme, you can interrupt the procedure at the
start of the cycle by pressing the On/Off button (2)
for about 2 seconds.
General cleaning
Never submerge the appliance in water.
Do not use abrasive cleaners.
• Clean the case inside and out using only a soft,
damp cloth.
• Empty the drip tray (9b) and the coffee
grounds container (9c) only when instructed to
do so on the display. Clean with warm, soapy
water occasionally.
EE
EE
NN
NN
GG
GG
LL
LL
II
II
SS
SS
HH
HH
Page 13

AROMA MICHELANGELO
12
• When cleaning the drip tray (9b), always remember to clean the contacts (9d) on the back
of the tray.
• Rinse out the water reservoir every day and fill
it with fresh cold water.
• Clean the hot water and steam nozzle with a
damp cloth after each use.
FOR YOUR OWN SAFETY READ FOLLOWING
INSTRUCTIONS CAREFULLY BEFORE ATTEMPTING
TO CONNECT THIS UNIT TO THE MAINS.
MMMMAAAAIIIINNNNSSSS ((((AAAACCCC)))) OOOOPPPPEEEERRRRAAAATTTTIIIIOOOONN
NN
This unit is designed to operate on 240V, 50 Hz current only. Connecting it to other power sources may
damage the unit.
WARNING - This appliance must be earthed.
This appliance may be fitted with a non rewirable
plug, if it is necessary to change the fuse in a non
rewirable plug the fuse cover must be refitted. If the
fuse cover is lost or damaged, the plug must not be
used until a replacement, available from the appliance manufacturer, is obtained. It is important that
the colour of the replacement fuse cover corresponds with the colour marking on the base of the
plug.
If the plug requires to be changed because it is not
suitable for your socket, or becomes damaged, it
should be cut off and an appropriate plug fitted following the wiring instruction (below). The plug removed must be disposed of safely as insertion into
a 13A socket is likely to cause an electrical hazard.
IMPORTANT
These wires in this mains lead are coloured in accordance with the following code.
• Green-and-yellow: Earth • Blue: Neutral
• Brown: Live
As the colours of the wires in the mains leads of this
appliance may not correspond with the coloured
markings identifying the terminals in your plug, proceed as follows:
The wire which is coloured green-and-yellow must be
connected to the terminal in the plug which is
marked with the letter “E” or by the earth symbol or
green-and-yellow.
The wire which is coloured blue must be connected
to the terminal which is marked with the letter “N” or
coloured black.
The wire which is coloured brown must be connected to the terminal which is marked with the letter “L”
or coloured red.
GREEN
&
YELLOW
(Earth)
BLUE
(Neutral)
FUSE
(13 amp)
BROWN
(Live)
EE
EE
NN
NN
GG
GG
LL
LL
II
II
SS
SS
HH
HH
Page 14

AROMA MICHELANGELO
13
EE
EE
NN
NN
GG
GG
LL
LL
II
II
SS
SS
HH
HH
SYMBOL MEANING WHAT TO DO
FILL UP PIPE-SYS – The water conveyance system has – Open hot water/steam knob (11).
not been filled.
FILL WATER – Water reservoir (17) is empty. – Fill with cold water.
–Water reservoir (17) has been – Install the water reservoir.
removed or is incorrectly installed
FILL BEANS – Out of coffee beans. – Fill the container (18)
with coffee beans.
Important: The words FILL BEANS will remain on the display until
you make coffee.
EMPTY TRAYS – The tray (9b) and/or coffee – Empty the tray and/or container.
grounds container (9c) is full.
TRAYS MISSING – The tray (9b) and/or coffee grounds – Insert the drip tray and
container (9c) is absent or has not coffee grounds container.
been installed correctly.
– The contacts (9d) on the drip tray – Clean the contacts.
are dirty.
SYSTEM TOO HOT – Overheated system – Cool down the system when
producing hot water.
PLEASE CLEAN – The machine needs cleaning. – Run the cleaning programme.
SYSTEM CALCIF.. – There are lime scale deposits
in the machine. – Run the lime scale removal
programme.
FILTER CHANGE – Filter has expired. – Replace filter.
CLOSE THE DOOR – The door of the boiler unit (22)–Close door.
is open.
MMMMEEEESSSSSSSSAAAAGGGGEEEESSSS FFFFRRRROOOOMMMM TTTTHHHHEEEE SSSSYYYYSSSSTTTTEEEEMM
MM
Page 15

AROMA MICHELANGELO
14
EE
EE
NN
NN
GG
GG
LL
LL
II
II
SS
SS
HH
HH
PROBLEM MEANING SOLUTION
The machine produces neither
hot water nor steam.
Insufficient froth.
– Nozzle (12) is blocked up.
– Unsuitable milk.
– Clean nozzle thoroughly.
– Use cold milk with a 15% fat
content.
The machine produces only a few
drops of coffee.
– You are using too fine a grind.
– You are using ground coffee
which is too finely ground.
– Change the fineness of the
grind
– Use more coarsely ground
coffee.
The coffee has no “cream”. – The type of coffee you are using
is not appropriate.
– Your coffee beans are not freshly
roasted.
– The grind you are using is not ap-
propriate for the type of coffee.
– Change the type of coffee
used.
– Use fresh coffee beans.
– Adjust the grind.
The grinding motor is very noisy. – Foreign body such as a pebble
in grinding motor.
– Contact the service centre.
You may continue using the
machine with ground coffee.
The lime scale removal programme doesn’t work.
– Filter programmed as “YES”. – Programme the filter as “NO”
ERROR 1 – The illuminated ring on the
“ON/OFF” button (2) is flashing.
– The appliance is too cold.
– Let the machine warm up at
room temperature for one or
two hours.
ERROR 5 – The illuminated ring on the
“ON/OFF” button (2) is flashing.
– The appliance has not heated
up to operating temperature.
– Let the machine warm up at
room temperature for one or
two hours.
ERROR 8 – The illuminated ring on the
“ON/OFF” button (2) is flashing.
– The boiler unit is obstructed or
incorrectly installed.
– Call our toll-free number
TTTTRRRROOOOUUUUBBBBLLLLEEEESSSSHHHHOOOOOOOOTTTTIIIINNNNGG
GG
Page 16

15
EE
EE
NN
NN
GG
GG
LL
LL
II
II
SS
SS
HH
HH
NOTE
 Loading...