

Polsen ULW-96 Product Manual

-96
96-CHANNEL
CAMERA-MOUNTABLE UHF
WIRELESS
SYSTEM
PRODUCT
MANUAL
THANK YOU FOR CHOOSING POLSEN.
The Polsen ULW-96 is our premier broadcast-quality camera-mountable UHF wireless system
designed for EFP (electronic eld production), ENG (electronic news gathering), and other
professional applications. It provides hands-free mobility where audio cables are not practical.
The ULW-96 is a robust, frequency-agile system with 96 channels to choose from to help avoid
interference. Up to eight systems can be used simultaneously in the same location. To ensure
extremely quiet and reliable operation, the internal electronic components are IECQ-certied to
meet international standards of quality.
The ULW-96 boasts professional features including a line input on the transmitter and a
headphone output on the receiver. There are three selectable output-levels to ensure proper gain-
staging and a headphone level control that allows real-time monitoring at comfortable volumes.
The 20 mW radio frequency (RF) output level enables an operating range of more than 250'
(optimum) with relatively low intermodulation potential. The ULW-96 offers outstanding exibility
for broadcast-quality wireless applications in the eld.
96-CHANNEL
CAMERA-MOUNTABLE
UHF WIRELESS SYSTEM
2
Please read and follow these instructions and keep this manual in a safe place.
ULW-96

CONTENTS
PRECAUTIONS
Introduction ........................................................................................................................... 2
Precautions ...........................................................................................................................3
Overview
Receiver ................................................................................................................... 4-5
Transmitter ............................................................................................................. 6-7
Handheld Transmitter / Accessories ............................................................. 8-9
Installing Batteries ...................................................................................................... 10-11
Operating Instructions ................................................................................................11-14
Mounting the ULW-96 ..............................................................................................15-16
Stage Direction and Talent Cueing ..............................................................................17
Using Multiple UHF Wireless Systems ...................................................................... 17
Troubleshooting ...........................................................................................................18-21
FCC Statement ...................................................................................................................21
Specications / Frequency Chart .........................................................................22-23
One-Year Limited Warranty ...........................................................................................24
• Exposure to high sound levels can cause
permanent hearing loss. Avoid listening at high
volumes for extended periods of time.
• Keep this product away from water and any
ammable gases or liquids.
• Handle this product with care.
• Clean this product with only a soft, dry cloth.
• Keep this product away from children.
• Use only parts provided by the manufacturer.
• To avoid damage to this product, be careful not
to overtighten or improperly thread any of the
threaded ttings.
• All photos are for illustrative purposes only.
3
33
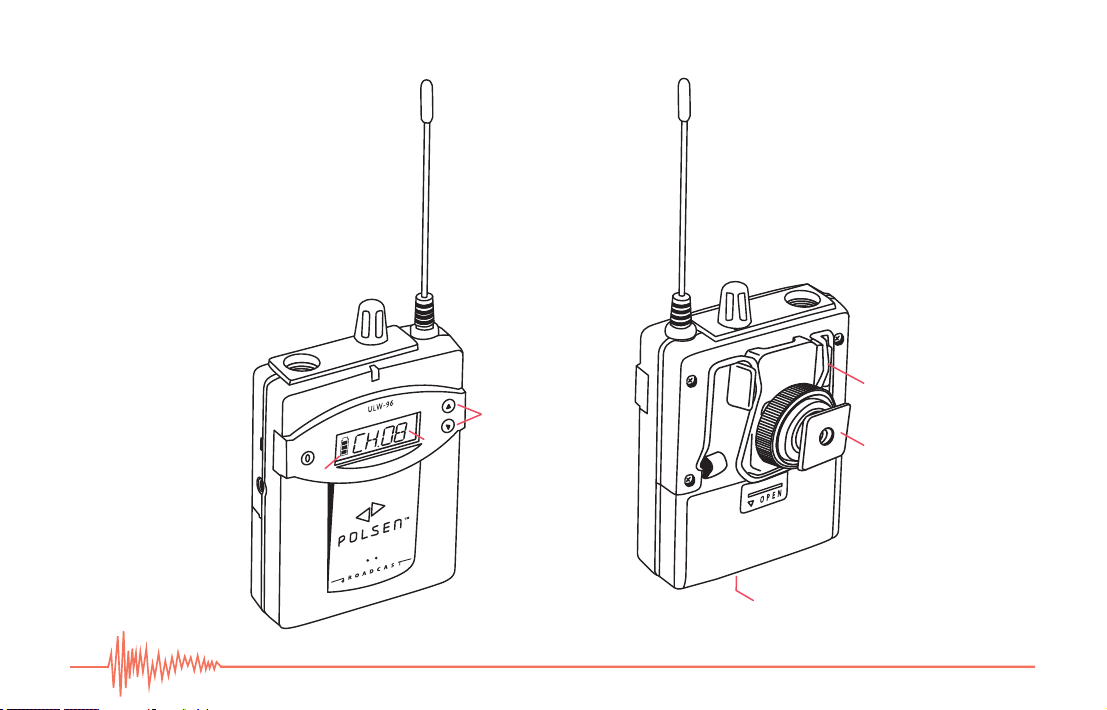
OVERVIEW
Receiver
1.
2.
3.
6.
8.
5.
4.
4
7.
9.
10.
11.
14.
15.
12.
13.

Receiver:
1. Antenna
2. Headphone-level control
Rotate knob clockwise to turn the unit on, and counterclockwise to
turn the unit off. You should feel it click when it turns on and off.
Rotate knob to adjust the volume of the headphones when you’re
monitoring the sound.
3. Headphone output
Plug your headphones into this jack to monitor the transmission in
real time without the latency that often occurs when monitoring via
a camera’s headphone output.
4. Audio output (selectable level)
This can be connected to your camera’s mic input, or to an audio
recorder for remote eld-recording.
5. Audio output-level switch (hi/mid/low)
Slide this switch to adjust the output level.
6. RF LED
The RF LED glows red while power is on and green when the unit is
receiving a strong RF signal.
7. Info button
Press and hold this button to display the transmission frequency on
the LCD.
8. LCD
The LCD will glow for a few seconds when the unit is turned on
and when the Set or Channel up/down buttons are pressed
(see 11. Channel up/down buttons).
9. Battery power icon
10. Channel (transmission frequency in MHz when Info button
is held down)
11. Channel up/down buttons
Press these buttons to change the channel. Press and hold to
rapidly change channels.
12. Two-way belt clip
13. Shoe adapter
14. Battery compartment
Accepts two AA batteries.
15. Charging contacts
For charging via the Polsen ULW-96-BBCH charger
(sold separately).
5
5
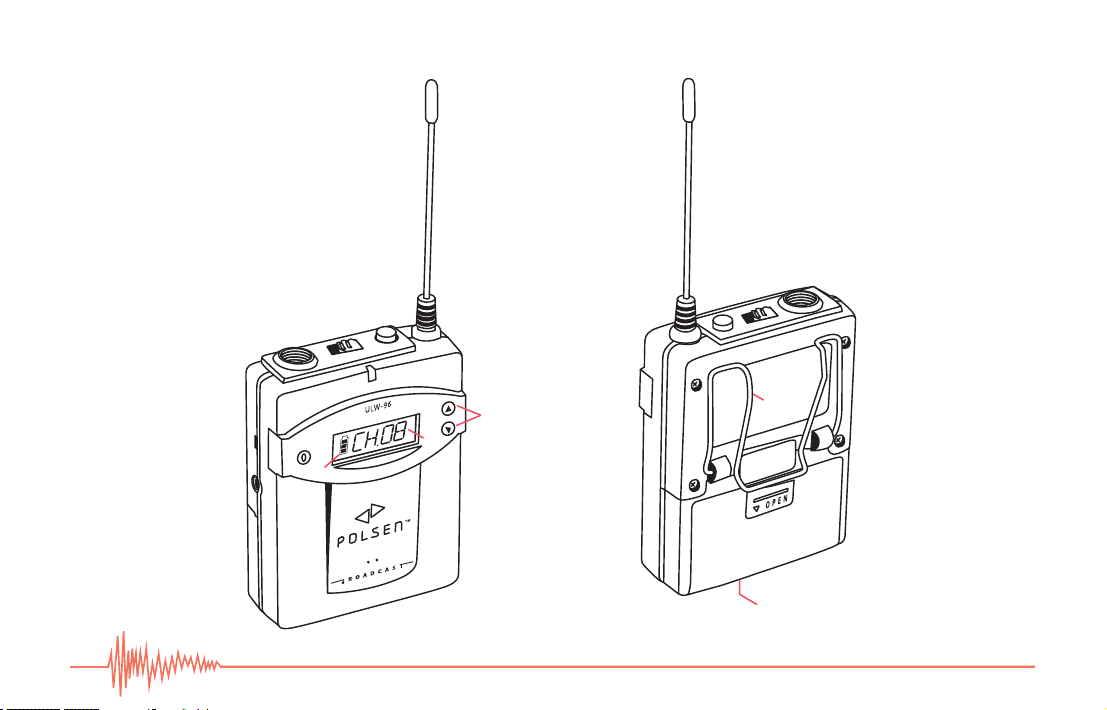
OVERVIEW
Transmitter
1.
2.
3.
4.
7.
5.
6.
9.
8.
10.
12.
11.
13.
14.
15.
6

Transmitter:
1. Antenna
2. Mute button
This two-position button mutes the microphone. When the button is in
down-position, the mute is active.
3. Power switch
Slide this switch to turn the transmitter on or off.
4. Microphone input
This is a mini XLR (TA-3) jack. Fully insert the microphone’s TA-3 plug
and make sure it clicks into place. To remove, press the button on the
connector to release the locking mechanism.
5. Sensitivity switch (hi/mid/low)
Slide the switch to adjust the microphone level.
6. Line input
7. Power LED
The Power LED glows red when the unit is on.
8. Set button
To change the channel, press and hold this button for approximately 3
seconds, until the channel number blinks. Then use the channel up/
down buttons to select a channel and press Set to conrm
(see 12. Channel up/down buttons).
9. LCD
The LCD will glow for a few seconds when the unit is turned
on or when the Set or Channel up/down buttons are
pressed (see 12. Channel up/down buttons).
10. Battery power icon
11. Channel (transmission frequency in MHz when channel
up/down buttons are held down)
12. Channel up/down buttons
Press and hold one of these buttons to display the
transmission frequency in MHz on the LCD.
After using the Set button to enable channel changing
(see 8. Set button), press these buttons to change the
channel. Press and hold to rapidly change channels.
13. Two-way belt clip
14. Battery compartment
Accepts two AA batteries.
15. Charging contacts
For charging via the Polsen ULW-96-BBCH charger
(sold separately).
7

OVERVIEW
10.
9.
Handheld Transmitter / Accessories
8.
5.
6.
7.
1.
2.
4.
3.
13.
12.
16.
17.
19.
8
11.
14.
18.
15.
 Loading...