

Page 1

TC610i
TC615i
Owner’s
TCi SERIES
Manual
mance
High Per
In-Wall Speakers
Haut-parleurs Haute
Performance encastrables « In Wall »
for
Page 2
PLACEMENT OPTIONS
Polk Audio TCi Series In-W
less placement options. But r
all Loudspeakers give you nearly end-
emember that placement choice for
your in-wall speakers bears careful consideration, as installation
requires that you cut a hole in your wall!
Fill a room with sound by installing in-wall speakers in nearly any
wall or ceiling location [figur
speakers have a wide dispersion patter
e 1]. Polk TC
i Series In-W
all Loud-
n and aimable tweeters
that allow you to focus their sound.
ADJUSTING THE TWEETER
Aiming the tweeter toward your listening position improves
imaging and detail. When using TC
i Series In-Wall Loudspeakers
as front/main home theater speakers [figure 2], aim the tweeter
toward your listening position. For rear/surround speakers
installed in walls or ceilings [figure 3], aim the tweeter toward
the nearest reflecting surface (an adjacent wall or ceiling) for
a more diffuse sound field (if you so desire; for more direct
sound, aim the tweeters at your listening position).
i model: Holding the edges of the tweeter carefully
TC615
between the thumbs and forefingers of both hands, rock the
tweeter slightly to aim it [figure 4]. TC610
i model: Grasping the
round tweeter with the tips of the fingers of one hand, pivot the
tweeter toward the direction you desire [figure 5]. Do not “turn”
the tweeter like a door knob.
i Series In-Wall Loudspeakers are not magnetically
Note: TC
shielded and should not be placed closer than 1’ (30cm) from a
television or video monitor. If you experience discoloration or
distortion, immediately move the speakers away from your TV.
OPTIONS DE PLACEMENT
Les haut-parleurs encastrables de la Série TCi vous permettent
des options de placement presqu’illimitées. Mais considérez
udicieusement ces options car vous devrez faire des trous
dans les murs ou dans les plafonds!
En installant des haut-parleurs TC
i dans un mur ou au plafond,
vous aurez du son haute performance sans encombrement dans
n’importe quelle pièce [figure 1]. Les haut-parleurs TC
i de Polk
ont une vaste dispersion et leurs tweeters orientables vous permettent de r
ecréer une scène sonore précise et bien localisée.
AJUSTEMENT DES TWEETERS
Lorsque vous utilisez les haut-parleurs TCi comme haut-parleurs
principaux/avant de cinéma maison [figure 2], orientez les tweeters vers votre position d’écoute afin d’obtenir une image sonore
précise et détaillée. Si les haut-parleurs sont utilisés comme
haut-parleurs arrière/ambiophoniques installés au mur ou au
plafond [figure 3], orientez les tweeters vers la surface réfléchissante la plus proche (mur adjacent ou plafond) si vous désirez
une ambiance sonore plus diffuse; si vous désirez des effets
plus directionnels orientez-les vers votre position d’écoute.
Modèle TC615
i model: tenant délicatement le cadre du tweeter
avec le pouce et l’index des deux mains, orientez-le avec soin
[figure 4]. Modèle TC610
i: tenant solidement le tweeter avec
le bout des doigts d’une main, pivotez-le vers dans la direction
désirée [figure 5]. Ne tournez jamais le tweeter comme une
poignée de porte.
Note: Les haut-parleurs TC
i ne sont pas blindés et ne devraient
pas être installés à moins de 30 cm (1 pi) d’un téléviseur ou d’un
écran vidéo. Si vous constatez de la distorsion ou de la décoloration vidéo, éloignez immédiatement le hautparleur de l’écran.
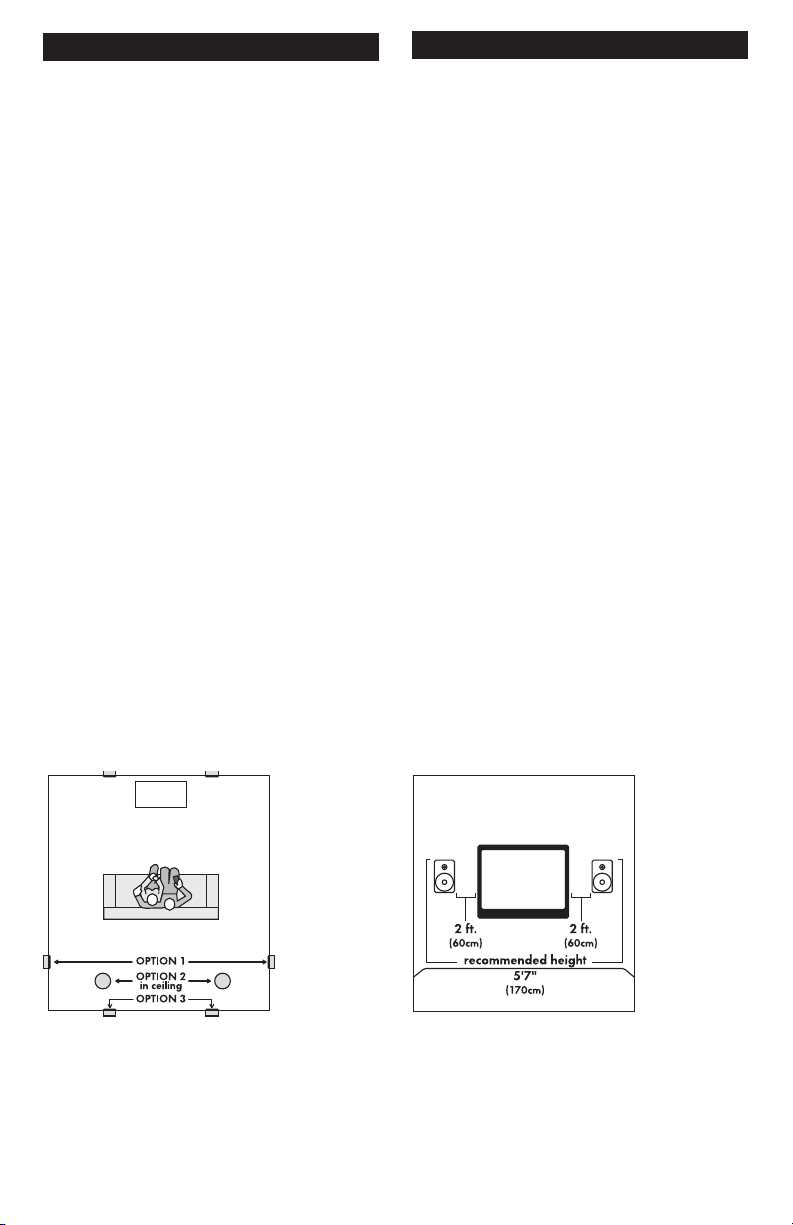
FIGURE 1
TC Series audio and A/V placement
options, in wall or ceiling.
Opciones de ubicación al ras de la pared o del cielor
para equipo audiovisual y de audio de la Serie TC.
Recommended measurements for HT front stage placement.
Platzierungsmöglichkeiten für TC-Systeme in Wand oder
Zimmerdecke (Audio und kombiniertes Audio/Video).
2
Get more information and exclusive accessories, visit www.polkaudio.com
raso
FIGURE 2
Recommended measurements
ont stage placement.
for HT fr
Medidas recomendadas para la ubicación
en el escenario del cine en casa.
Mesures recommandées pour l'installation
des haut-parleurs avant.
Empfohlene Abmessungen für die Platzier
in Heimtheatern (Frontbeschallung).
ung
Page 3
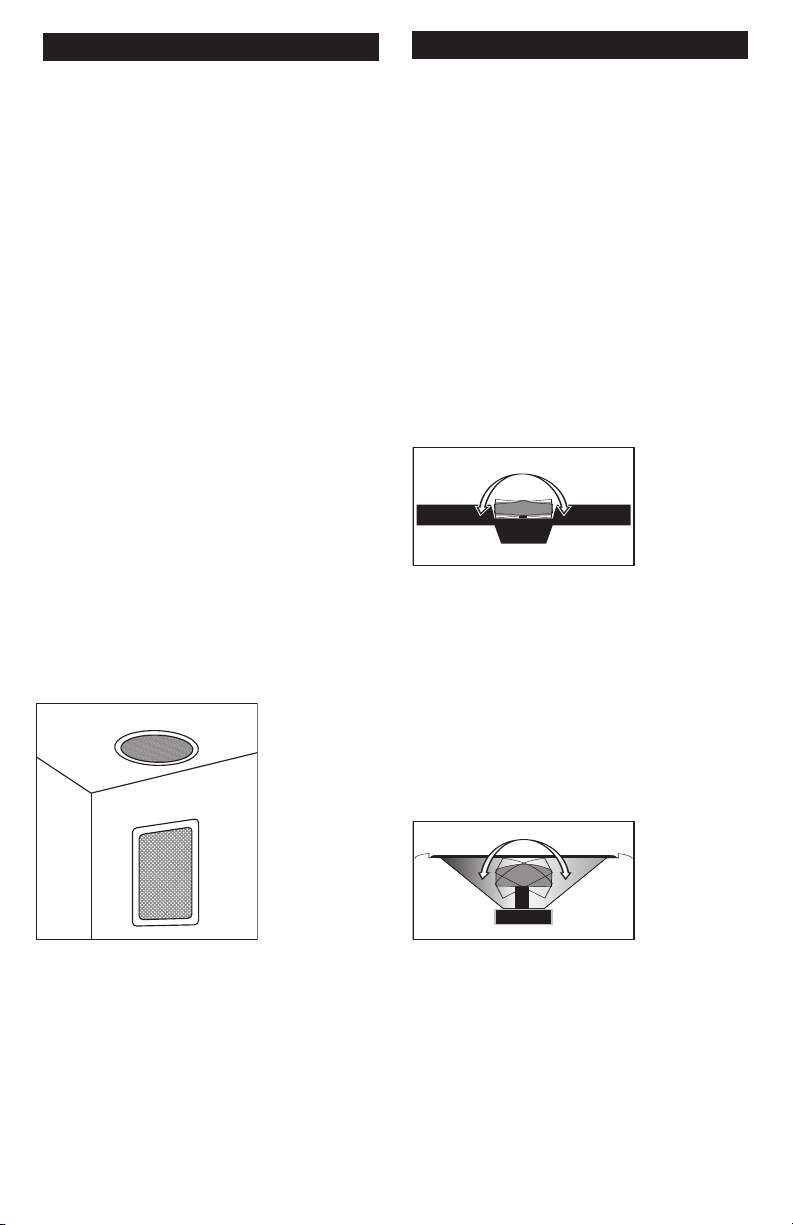
FIGURE 4
TC615i model: Holding the edges of the oblong
efully between the thumbs and for
tweeter car
of both hands, r
Modelos TC615i: Sujete cuidadosamente los bordes del
tweeter oblongo entre sus pulgares e índices y, con un
movimiento de vaivén, oriente cuidadosamente el tweeter.
TC615i: Pour orienter le tweeter
pouce et l'index des deux mains et basculez-le délicatement.
Modelle TC615i: Halten Sie die Kanten der rechteckigen
Hochtonlautspr
Zeigefinger. Rücken Sie den Lautsprecher leicht hin und
her, um ihn entsprechend auszurichten.
ock the tweeter slightly to aim it.
, tenez son r
echer vorsichtig zwischen Daumen und
efingers
ebord avec le
FIGURE 3
Examples of in-wall and in-ceiling placement. When used as rear/surrounds, aim tweeter toward the nearest reflecting surface (an adjacent
wall or ceiling) for a more diffuse sound field.
Ejemplos de ubicación al ras de la pared o del cielorraso. Cuando se use
como altavoz posterior o surround, oriente el tweeter hacia la superficie
reflectora más cercana (pared o cielorraso adyacente) para producir un
campo de sonido más difuso.
Exemples d'installations au mur et au plafond. Pour usage arrièreambiophonique, dirigez les tweeters vers la surface réfléchissante
la plus proche (mur ou plafond) si vous désirez une image
sonore plus diffuse.
Beispiele zur Platzierung in Wand und Zimmerdecke. Bei Verwendung
als Hintergrund-/Surround-System sollten die Hochtonlautsprecher zur
besseren Zerstreuung des Schallfelds in Richtung der nächstliegenden
reflektierenden Flächen positioniert werden (Wand oder Zimmerdecke).
FIGURE 5
TC610i model: Grasping the r
tips of the fingers of one hand, pivot the tweeter in the
ection you desir
dir
Modelo TC610i: Sujete el tweeter redondo con las
puntas de los dedos de una mano y luego oriéntelo
en la dirección deseada. No haga girar el tweeter
como si fuera el pomo de una puerta.
TC610i: Pour orienter le tweeter,tenez-le du bout des
doigts et faites-le pivoter dans la direction désirée. Ne
le tournez jamais comme une poignée de porte.
Modelle TC610i: Halten Sie den r
mit den Fingerspitzen einer Hand, während Sie ihn in die
gewünschte Richtung dr
nicht wie ein Türknauf gedr
ound tweeter with the
n tweeter like a door knob.
e. Do not tur
unden Hochtonlautspr
ehen. Der Hochtonlautspr
eht wer
den.
echer dar
For Customer Service, call 800-377-7655.
echer
f
3
Page 4
PAINTING YOUR TCi SERIES IN-WALL
LOUDSPEAKERS
You will need:
• Paint of your choice (to make the job easier
ecommend spray painting the grille).
we r
,
• A paperclip or corkscrew (for removing the paintable grille).
• Masking tape.
ts,
• Paint mask (to cover unpaintable par
supplied!).
PREPARING TO PAINT:
1. Separate the parts of the speaker. If the speaker is not yet
installed, the grille can be removed simply by pushing the
clamp screws forward to push the grille off the speaker from
the inside. If the speaker is already in the wall, carefully hook
the grille with a bent paper clip and pull it gently away from
the frame [figure 6].
2. When painting the frame of the speaker, use the supplied
paint masks to carefully mask off the front of the speakers to
protect the drivers and baffles while painting. You can do this
while the speaker is already installed in the wall (if, for instance, you’re repainting the room). If you do not have the paint
masks, carefully mask the speaker components using paper
and masking tape.
PEINTURE DE VOS HAUT
-PARLEURS TC
Vous aurez besoin de:
e de votre choix. Il est recommandé de
• Peintur
vaporiser la grille avec une peintur
e aérosol.
• Un trombone ou un tire-bouchon (pour
retirer la grille).
uban-cache.
• Du r
• Un cache-peinture (inclus) pour protéger
les pièces qu’il ne faut pas peindr
e.
PREPARATION A LA PEINTURE:
1. Séparez les divers éléments du haut-parleur. Si le haut-
parleur n’est pas encore installé, la grille peut être retirée
en poussant sur les vis des crampons pour éloigner la grille
du haut-parleur depuis l’intérieur. Si le haut-parleur est déjà
installé dans le mur, dégagez délicatement la grille à l’aide
d’un trombone plié. [figure 6].
2. Lorsque vous peignez le cadre du haut-parleur, utilisez le
cache-peinture inclus pour protéger les transducteurs et
l’écran acoustique. Vous pouvez peindre un haut-parleur
déjà installé dans un mur (p. ex. si vous repeignez la pièce);
si vous n’avez plus les cache-peinture originaux, masquez
bien les composants du haut-parleur avec du papier et
du ruban-cache.
i
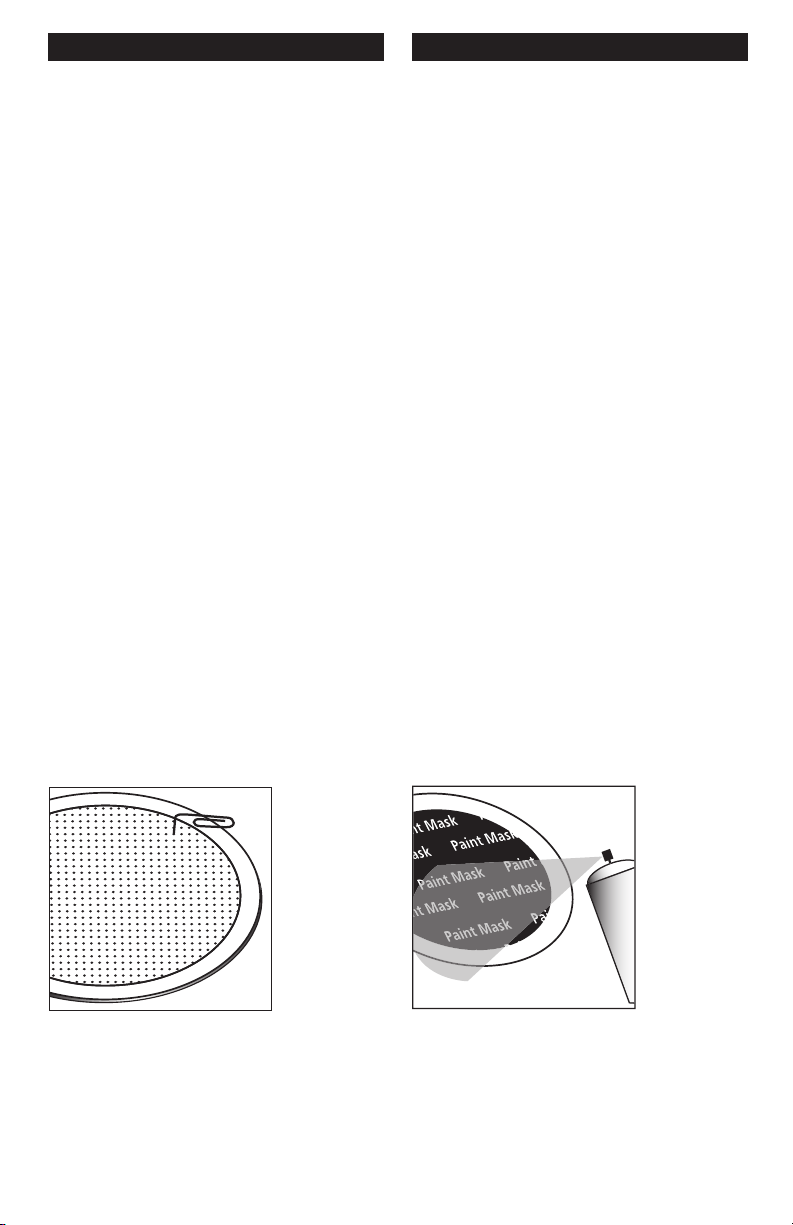
FIGURE 6
Use a paperclip to remove grille.
Use un sujetapapeles para quitar la rejilla.
Utilisez un trombone pour retirer la grille.
Entfernen Sie den Gitteraufsatz mit einer Büroklammer.
4
Get more information and exclusive accessories, visit www.polkaudio.com
FIGURE 7
Mask the drivers and baffles, then spray paint in thin coats.
Enmascare los excitadores y los bafles, luego
aplique manos delgadas de pintura aerosol.
Masquez les haut-parleurs et les écrans acoustiques
puis vaporisez la peinture en couches minces
Decken Sie die T
Spritzen Sie dann den Lack in dünnen Schichten auf.
reiber und Resonanzwände ab.
Page 5

PAINTING THE FRAME:
1. Apply paint to exposed (unmasked parts). Use two or more
thin coats. Spray painting is recommended [figure 7].
When the paint is completely dry,
2.
emove the masking material.
r
PEINTURE DU CADRE:
1. Appliquez deux minces couches de peinture (ou plus) aux
pièces non masquées. Il est r
e de peinture [figure 7].
cadr
ecommandé de vaporiser le
2. Lorsque la peinture est complètement
sèche, retirez les cache-peinture.
PAINTING THE GRILLE:
1. The grille of the TCi Series speaker features an even, protective powder coating. This powder coating is an ideal primer.
Grilles must be spray painted. Do not use a brush and paint.
2.
Thick, brushed paint may clog the grille holes.
3. TC615
i model: Before spray painting the grille, carefully
remove the grille’s fabric scrim by peeling it away from the
inside of the grille [figure 8]. Place this on a clean, flat surface
where it will not get wrinkled.
4. After removing the grille by carefully hooking it with a bent
paper clip and pulling it gently away from the frame, spray on
two thin coats of finish color. If you’re using a compressor and
spray gun, use the finest, most diffuse setting. Be careful not
to fill the holes in the grille with paint [figure 9].
PEINTURE DE LA GRILLE:
La grille des haut-parleurs de la Série TC
1.
e protectrice. Cette peinture constitue un apprêt idéal.
peintur
i est enduite d’une
2. Les grilles doivent être vaporisées de peinture. N’utilisez pas
de pinceau. La peinture plus épaisse appliquée au pinceau
pourrait boucher les trous.
3. Modèle TC615
i: avant de vaporiser la grille, retirez la toile
qui revêt l’intérieur de la grille [figure 8]; placez-la sur une
surface propre et plate pour qu’elle ne se froisse pas.
4. Après avoir dégagé la grille à l’aide d’un trombone plié
et l’avoir retirée du cadre, retirez sa toile de revêtement
intérieur puis vaporisez-la de deux minces couches de peinture de finition. Si vous utilisez un compresseur ou un pistolet
pulvérisateur, choisissez le réglage le plus fin, le plus diffus.
Assurez-vous de ne pas boucher les trous de la grille avec
la peinture [figure 9].
FIGURE 8
Peel away fabric grille scrim before painting grille.
Retire la gasa difusora de la rejilla antes de pintar la rejilla.
Avant de peinturer la grille, détachez et enlevez le tissu.
Ziehen Sie den Stofffilter vom Schutzgitter, bevor Sie das
Schutzgitter streichen.
FIGURE 9
Paint the grille. Use thin coats of spray paint.
Do not block grille holes with paint.
ejilla. Aplique manos delgadas de pintura aerosol. No blo-
Pinte la r
quee con pintura los agujeros de la rejilla.
Peinturez la grille. Appliquez des couches minces de peinture aérosol.
uez pas les tr
N'obstr
Streichen Sie den Gitteraufsatz. Verwenden Sie dazu dünne
Spritzlackschichten. Die Öffnungen des Gitteraufsatzes dürfen nicht
mit Farbe bzw
ous de la grille de peintur
. Lack blockiert werden.
e.
For Customer Service, call 800-377-7655.
5
Page 6

5. When the paint is completely dry, carefully reinstall the
TEMPLATE
POP-OUT AREA
TEMPLATE
grille by fitting it into its r
the frame. Star
ecess so that it is just resting on
ting with one corner, go around the speaker
and push the grille into the grille notch a little bit at a time.
Be gentle; the grille may be easily bent out of shape by
rough handling. You will feel a positive “snap” when it is
fully in place.
TC615
6.
i model: When the grille is dr
y, carefully press the
fabric scrim back into place on the inside of the grille. The
special fabric scrim hides the speaker’s drivers from view,
and will not interfere with the sound.
INSTALLATION
Out of the box and into the wall, that’s how easy it is to install
i Series In-Wall Loudspeakers.
Polk TC
If you intend to do the installation yourself we recommend that
you possess some skill in the proper use of hand and power
tools. You should have a thorough understanding of local building
and fire codes and a familiarity with the area behind the wall
or ceiling into which you plan to install your speakers. Install
speaker wires before installing speakers. Wire meeting appropriate building and fire codes must be used. Use at least 18 gauge
wire or heavier for the utmost in sound quality. Wiring is best
performed by an experienced professional. If you are in doubt
that you possess the necessary skills or tools, consult your
Polk Audio dealer, or a professional installer.
Lorsque la peinture est complètement sèche, réinstallez la
5.
grille en la posant d’abor
d délicatement sur le cadre. En commençant par un coin, poussez petit à petit la grille dans son
encoche tout autour du cadre. Soyez délicat, la grille peut
être facilement déformée. Vous sentirez la grille «cliquer»
en place.
Modèle TC615
6.
eplacez délicatement la toile de revêtement intérieur dans la
r
i: lorsque la grille est complètement sèche,
grille. Cette toile cache les composants et ne nuit pas au son.
INSTALLATION
L’installation des haut-parleurs Polk TCi Series «In-Wall» est très
facile, littéralement «de la boîte au mur». Si vous comptez faire
l’installation vous-même, vous devez posséder une certaine compétence dans l’utilisation d’outils manuels et électriques. Vous devez
bien connaître le code du bâtiment et le code des incendies. Vous
devez être familier avec l’espace qui se trouve derrière la surface
du mur ou du plafond où vous comptez installer les haut-parleurs.
Passez et fixez les câbles avant d’installer les haut-parleurs. Utilisez seulement des câbles conformes aux codes de bâtiment et des
incendies. Utilisez du fil de calibre 18 ou plus gros pour assurer un
rendement optimal. Le câblage devrait préférablement être confié
à un professionnel expérimenté. Si vous ne croyez pas être assez
habile ou ne possédez pas les outils nécessaires pour faire l’installation vous-même, consultez votre revendeur Polk ou un installateur professionnel.
b
FIGURE 10a
Round Template: Trace within the pop-out area.
Plantilla redonda: Marque dentro del área que
se va a desechar.
Gabarit rond: Tracez à l'intérieur du gabarit.
Runde Vorlage: Umranden Sie den inneren,
gestanzten Teil der Vorlage.
6
Get more information and exclusive accessories, visit www.polkaudio.com
FIGURE 10
Rectangular Template: Trace around the template.
Plantilla rectangular: Marque alrededor de la plantilla.
Gabarit rectangulaire: Tracez autour du gabarit.
Rechteckige Vorlage: Umranden Sie den äußeren
Rand der Vorlage mit einem
Page 7

YOU WILL NEED:
+
_
+
_
+
_
+
_
LEFT
AMP
RIGHT
• Pencil for marking the location of installation.
• Keyhole saw, utility knife or material—appropriate incising
implement for cutting drywall or other wall material.
• Level.
ewdriver, preferably powered, with Phillips head bit.
• Scr
• Power drill with appr
opriate bit (optional, for starting wall cut).
FOLLOW THESE EASY STEPS:
• Make sure the material into which you plan to mount the
speakers (plaster, drywall, paneling, stone, etc.) can support
the weight of the speakers (see specification page for the
weight of your model).
• Make sure the locations you select do not conceal studs, electrical wiring or plumbing. Prior to installation, hold the speaker
in your chosen location to make sure it safely clears obstacles
such as studs, corners, beams, lighting fixtures and door/window frames. Your cutout must be at least 1" (25mm) from
adjoining walls or ceiling, internal studs or plumbing.
• Using the template, trace the installation location with a pencil.
You can do this by holding the template in your preferred location and tracing around it (rectangle) or within the template
pop-out area (round). Use a level to make certain the template
is straight and plumb. This is the exact cutout size [figures
10a & 10b].
• Carefully cut the hole with the appropriate cutting tool for your
wall or ceiling material. Start the hole by drilling a hole on the
inside of the tracing (with the drill bit touching the line). Use
this hole to insert the saw or knife and begin cutting [figure 11].
VOUS AUREZ BESOIN DE:
• Un crayon pour marquer l’endroit de l’installation.
Une scie d’entrée, un couteau tout usage ou un outil permet-
•
tant de couper du placoplâtr
e ou autre matériau du mur.
• Un niveau.
• Un tournevis à tête Phillips (préférablement électrique).
Une perceuse électrique avec mèche appropriée
•
pour entamer l’embrasur
e (facultatif).
SUIVEZ CES SIMPLES ETAPES:
• Assurez-vous que le matériau dans lequel vous comptez installer vos haut-parleurs (plâtre, placoplâtre, lambris, pierre, etc.)
peut supporter le poids des haut-parleurs (voir la fiche technique pour le poids du modèle de vos haut-parleurs).
• Assurez-vous que l’endroit choisi pour l’installation murale
ne dissimule pas de montants ou de solives, de fils électriques
ou de plomberie. Avant son installation, tenez le haut-parleur
à l’endroit choisi pour vous assurer qu’il sera suffisamment
dégagé du plafond, des murs, des coins, des poutres, des luminaires et des cadres de portes et de fenêtres. L’embrasure doit
être à au moins 25 mm (1 pouce) du mur ou du plafond adjacent, d’un montant ou d'une solive, ou de plomberie.
• À l’aide du gabarit, tracez l’endroit de l’installation avec un
crayon. Vous pouvez accomplir cette besogne en tenant le
gabarit à l’endroit choisi et en traçant tout autour (modèles
rectangulaires) ou en tracant l’intérieur du gabarit (modèles
ronds). Utilisez un niveau pour vous assurer que le gabarit est
bien droit et de niveau. C’est la taille exacte de l’embrasure
[figures 10a et 10b].
FIGURE 11
Cut the hole with the appropriate tool.
Haga el corte con la herramienta apropiada.
Taillez l'ouverture avec l'outil approprié
Schneiden Sie die Öffnung mit dem
entsprechenden Werkzeug aus.
FIGURE 12
Hook up the speaker wires.
Conecte los cables de los altavoces.
Branchez les fils de haut-parleur.
Schließen Sie die Lautsprecherkabel an.
For Customer Service, call 800-377-7655.
7
Page 8

Once you have cut the hole, fish your previously positioned
•
wiring out of the hole and connect the speaker. Follow the
hookup directions included with your receiver. Strip 1/2 inch
(12 mm) of insulation from each of the two conductors of the
wire to expose the bare metal and twist each of the conductors into a single unfrayed strand (so you have two unfrayed
strands). Note that one of the ter
ed (+) and the other is black (-). Make certain that
speaker is r
minals on the rear of each
you connect the wire from the red terminal (+) of your amplifier
or receiver to the red terminal (+) on your speaker and the wire
from the black terminal (-) of your amplifier or receiver to the
minal (-) on your speaker. Most wire has some indica-
black ter
tor (such as color
-coding, ribbing or writing) on one of the two
conductors to help you maintain consistency [figure 12].
• To install the speaker, first carefully remove the grille using a
straightened paperclip or other pointed metal tool. Insert the
point into one of the grille perforations near a corner and lift
the grille free. Never use a knife or screwdriver to pry between
the grille and the speaker frame. This will damage your speaker.
• Loosen the rotating wall clamps by unscrewing them. Make
sure that the rotating wall clamps are flipped inwards so that
your speaker fits into your cutout without nicking your wall.
Then place the speaker carefully into the cutout [figure 13]. If
you have a level, use it to help you correctly align the speaker.
Tighten the wall clamp screws with a screwdriver. This will
rotate the wall clamps and secure the speaker to the wall.
Hint—on the TC615
i model, tighten the CENTER SCREWS
BEFORE TIGHTENING THE CORNERS FOR THE MOST FLUSH
FIT TO YOUR WALL.
CLAMP SCREWS
DO NOT OVERTIGHTEN THE WALL
[figure 14].
• Carefully reinstall the grille by fitting it into its recess so that
it is just resting on the frame. Starting with one corner, go
around the speaker and push the grille into the grille notch a
little bit at a time. Be gentle; the grille may be easily bent
out of shape by rough handling. You will feel a positive
“snap” when it is fully in place.
• Découpez soigneusement l’embrasure avec l’outil approprié au
matériau de votr
ou à l’intérieur du traçage (la mèche touchant le tra-çage).
tr
Utilisez ce tr
e mur ou plafond. Commencez en faisant un
ou pour insérer la scie ou le couteau et com-
mencer la coupe [figure 11].
• Une fois l’embrasure pratiquée, sortez-en le câble antérieurement installé et connectez-le au haut-parleur. Suivez les instructions de connexion four
nies avec votre récepteur. Retirez 12
mm (1/2 po) d’isolation de chacun des deux conducteurs pour
exposer les brins métalliques et tor
dez les brins de chaque
conducteur pour former deux torons non éraillés. Notez qu’une
des bornes à l’arrière de chaque haut-parleur est rouge (+) et
l'autre noire (-). Assurez-vous de bien raccorder le fil provenant de la borne rouge (+) de votre amplificateur/récepteur à
la borne rouge (+) de votre haut-parleur et le fil noir (-) provenant de la borne noire (-) de votre amplificateur/récepteur à la
borne noire (-) de votre haut-parleur. La polarité de la plupart
des fils à deux conducteurs est codée (couleur, nervure ou écriture) pour faciliter son identification [figure 12].
• Pour installer le haut-parleur, retirez délicatement la grille à
l’aide d’un trombone ou d’un outil pointu. Insérez la pointe
dans un des trous dans un coin de la grille et dégagez doucement la grille. N’utilisez jamais un couteau ou un tour-nevis
entre la grille et le cadre pour retirer la grille, cela pourrait
endommager votre haut-parleur.
FIGURE 13
Place the speaker carefully into the cutout.
Coloque cuidadosamente el altavoz en el agujero.
Placez délicatement le haut-parleur dans l'ouver
Platzieren Sie die Lautsprecher vorsichtig in der
ausgeschnittenen Öffnung.
8
Get more information and exclusive accessories, visit www.polkaudio.com
ture.
FIGURE 14
Tighten retaining wall clamps to engage wall. Use a #2
Phillips head scr
Apriete las prensas de retención de la pared para
enganchar el altavoz a la pared. Use un destornillador Phillips No. 2 o un destornillador eléctrico.
Reserrez les attaches murales pour fixer solidement l'unité
. Utilisez un tour
au mur
Ziehen Sie die Wandklemmen fest, um das System an der Wand
zu befestigen. Verwenden Sie dazu einen Kreuzschlitzschraubendreher (Nr. 2) oder einen Schraubendreher mit Motorantrieb.
ewdriver or a power
nevis ou une per
ewdriver.
ed scr
ceuse à tête Phillips no 2.
Page 9

Desserrez les crampons rotatifs en les dévissant. Assurez-vous
•
que les crampons r
otatifs sont dirigés vers l’intérieur de façon
à ce que votre haut-parleur puisse pénétrer l’embrasure sans
érafler le mur ou le plafond. Placez ensuite délicatement le
haut-parleur dans l’embrasure [figure 13]. Alignez correctement le haut-parleur à l’aide d’un niveau. Resserrez les vis
des crampons avec un tour
pons qui fixer
ont solidement votre haut-parleur au mur ou au
plafond. Conseil: pour le modèle TC615i
nevis; cela fera tourner les cram-
RESSERREZ LES VIS
DU MILIEU AVANT DE RESSERRER LES VIS DES COINS—LE
HAUT-PARLEUR SERA AINSI MIEUX AFFLEURE.
PAS TROP LES VIS DES CRAMPONS
Réinstallez soigneusement la grille en la posant d’abord déli-
•
NE SERREZ
[figure 14].
catement sur l’encoche du cadre. En commençant par un coin,
poussez petit à petit la grille dans son encoche tout autour du
cadre. Soyez délicat, la grille peut être facilement déformée.
Vous sentirez la grille «cliquer» en place.
Product Disposal - Certain international, national and/or local laws and/or regulations may apply regarding
the disposal of this product. For further detailed information, please contact the retailer where you purchased this product or the Polk Audio Importer/Distributor in your country. A listing of Polk Audio Importer/
Distributors can be found on the Polk Audio website www.polkaudio.com or by contacting Polk Audio at
5601 Metro Drive, Baltimore, Maryland 21215, USA— Phone: +1 410 358-3600.
Récupération du produit – Certaines lois ou certains règlements internationaux, nationaux et/ou régionaux
pourraient s’appliquer à la récupération de ce produit. Pour plus d’information, com-muniquez avec le
revendeur de ce produit ou avec l’import- ateur/ distrib-uteur de ce produit dans votre pays. Vous trouverez
la liste des importateurs/ distrib-uteurs des produits Polk Audio sur le site www.polkaudio.com ou en
communiquant avec Polk Audio : 5610 Metro Drive, Baltimore, Maryland 21215, USA – Tél.: +1 410 358-3600.
WARNING: LISTEN CAREFULLY
Polk Audio loudspeakers and subwoofers are capable of playing at extremely high volume levels, which could cause
serious or permanent hearing damage. Polk Audio, Inc. accepts no liability for hearing loss, bodily injury or property
damage resulting from the misuse of its products.
Keep these guidelines in mind and always use your own good judgment when controlling volume:
• You should limit prolonged exposure to volumes that exceed 85 decibels(dB).
• High volume in an automobile can hinder your ability to safely operate a vehicle.
• You are responsible for knowing the local laws governing acceptable mobile volume levels.
For more about safe volume levels, go to: www.polkaudio.com/education/article/SPL/.
Or refer to the Occupational Health and Safety Administration (OSHA) guidelines at:
www.osha.gov/dts/osta/otm/noise/standards_more.html.
AVERTISSEMENT: ECOUTEZ BIEN
Les haut-parleurs et subwoofers Polk Audio sont capables de générer des niveaux de pression sonores extrêmement
élevés pouvant causer des dommages auditifs graves ou per
de perte d’ouïe, de blessure ou de dommages matériaux causés par l’usage abusif de ses produits.
Tenez compte de recommandations suivantes et faites preuve de discernement lorsque vous contrôlez le volume:
• Limitez l’exposition prolongée à des niveaux sonores excédant 85 décibels (dB).
• Un volume sonore élevé dans une automobile peut nuir
• Vous êtes tenu de connaître les lois locales régissant le volume sonore mobile.
Pour plus d’information sur les niveaux sécuritaires de pression sonore visitez:
www.polkaudio.com/education/article/SPL/.
Ou référez-vous aux normes de la OSHA (Occupational Health and Safety Administration)
à l’adresse web: http://www.osha.gov/dts/osta/otm/noise/standards_more.html.
e à la conduite sécuritair
manents. Polk Audio Inc. ne peut êtr
e.
For Customer Service, call 800-377-7655.
e tenue r
esponsable
9
Page 10

SAFETY FIRST
When installing your TCi Series In-W
of the weight of your par
ticular model (see specification page
for the weight of your model) and the stur
all Loud-speakers, be aware
diness of the material
into which you are installing the speaker. Also be aware of any
concealed studs, electrical wiring or plumbing in the wall or ceiling into which you are installing the speakers. If you are not
sure of a safe way to install these speakers, consult a professional installer
building contractor
If you plan to install your TC
, your authorized Polk Audio dealer, or a
.
i Series speakers where water will
directly contact them, it is advisable to use a silicone sealant or
caulk between the frame of the speaker and the wall surface.
This seal should prevent water from getting behind the loudspeaker and possibly damaging the wall surface. Do not position
the speaker where water can pool on the surface of the woofer
cone or tweeter dome, as this will great decrease the speaker’s
useful life (and everything will sound—
glub! glub!—like it’s
coming from under water!).
SECURITE AVANT TOUT
Lorsque vous installez des haut-parleurs de la Série TCi «In-Wall,»
soyez conscient de leur poids spécifique (voir la fiche technique pour
le poids des différents modèles) et des tolérances de charge
portante du matériau sur lequel vous installez les haut-parleurs.
Assurez-vous également qu’il n’y a aucun montant, solive, fil
électrique ou plomberie de dissimulé dans le mur ou plafond.
Si vous avez des doutes sur la méthode d’install-ation sécuritaire
de ces haut-parleurs, consultez votre revendeur Polk, un installateur
professionnel ou un entrepreneur en bâtiment.
Si vous comptez installer vos haut-parleurs TC
i dans un endroit où
ils pourraient entrer en contact avec de l’eau, il est recommandé
d’utiliser un scellant ou mastic de silicone entre le cadre du hautparleur et la surface du mur. Ce scellant devrait prévenir l’infiltration d’eau à l’arrière du haut-parleur (ce qui pourrait possiblement
endommager la surface du mur).N’installez pas le haut-parleur dans
un endroit où de l’eau pourrait s’accumuler sur la surface du woofer
ou du tweeter—cela pourrait sérieusement réduire la vie utile
du haut-parleur.
SPECIFICATIONS/FICHE TECHNIQUE
TC615
i
Frequency Response 32Hz-20kHz
Réponse en fréquences
Recommended Power
Puissance r
ecommandée
Impedance Compatible with 8 Ohm amplifiers
Impédance Compatible avec amplificateurs 8 Ohm
Efficiency (dB 1W/1m) 89dB
Impedance/Impédance
Drive Unit Complement
T
ransducteurs
Mid-Bass/Méd./graves 1–6 1/2" (16.5cm) mineral filled
Tweeter 3/4" (1.9cm) metal dome in swivel mount
Cutout Dimensions 7 1/4" x 10 5/8"
Dimensions de l’embrasure 18.4cm x 27.0cm
Overall Dimensions 8 11/16" x 12 1/6" x 2 7/8"
Dimensions hors-tout 29.7cm x 30.9cm x 7.3cm
Depth assum. 1/2" drywall 2 3/8" (6.0cm)
Profondeur av. placoplâtre 1/2"
Shipping Weight Each 4 LBS- 3.63 Kg
Poids à l’expédition ch.
20-100Wrms
polypropylene cone, rubber suspension
1–6 1/2" (16,5cm) cône en polypropylène à charge minérale, suspension
en caoutchouc
3/4" (1.9cm) dôme métallique
sur montant pivotant
TC610i
Frequency Response 40Hz-20kHz
Réponse en fréquences
Recommended Power 20-100Wrms
Puissance recommandée
Impedance Compatible with 8 Ohm amplifiers
Impédance Compatible avec amplificateurs 8 Ohm
Efficiency (dB 1W/1m) 89dB
Impedance/Impédance
Drive Unit Complement
Transducteurs
Mid-Bass/Méd./graves 1–6 1/2" (16.5cm) mineral filled
Tweeter 3/4" (1.9cm) metal dome
Cutout Dimensions 7 5/8"
Dimensions de l’embrasure 19.4cm diameter
Overall Dimensions 9" x 3 5/16" D
Dimensions hors-tout
Depth assum. 1/2" dr
ofondeur av
Pr
Shipping Weight Each 2 1/4 LBS- 2.5 Kg
Poids à l’expédition ch.
ywall
. placoplâtr
polypropylene cone, rubber suspension
1–6 1/2" (16,5cm) cône en polypropylène à charge minérale, suspension
en caoutchouc
in ball and socket
3/4" (1.9cm) dôme métallique
sur montant pivotant
22.9cm x 8.4cm
2 13/16" (7.1cm)
e 1/2"
“Polk Audio” is a trademark of Britannia Investment Corporation.
«Polk Audio» est une mar
10
Get more information and exclusive accessories, visit www.polkaudio.com
que de commerce de la Britannia Investment Corporation.
Page 11

POLK AUDIO LIMITED WARRANTY
Polk Audio, Inc., warrants to the original retail purchaser only. This warranty will
terminate automatically prior to its stated expiration if the original retail purchaser
sells or transfers the Product to any other party.
Polk Audio, Inc., warrants, to the original retail purchaser only, that the LOUDSPEAKER(S), PASSIVE CROSSOVER COMPONENT(S) and ENCLOSURE on this Polk
Audio Loudspeaker Product will be free from defects in material and workmanship
for a period of five (5) years fr
Audio Authorized Dealer.
Furthermore, Polk Audio, Inc., warrants, to the original retail purchaser only, that
any AMPLIFIER OR OTHER ELECTRONIC COMPONENT that may be included in this
Polk Audio Loudspeaker Product will be free from defects in material and workmanship for a period of three (3) years from the date of original retail purchase
from a Polk Audio Authorized Dealer.
To allow Polk Audio to offer the best possible warranty service, please register
your new product online at: www.polkaudio.com/registration or call Polk customer
service 800-377-7655 in the USA and Canada (outside the USA: 410-358-3600)
within ten (10) days of the date of original purchase. Be sure to keep your
original purchase receipt.
Defective Products must be shipped, together with proof of purchase, prepaid
insured to the Polk Audio Authorized Dealer from whom you purchased the Product,
or to the Factory at 2550 Britannia Boulevard, Suite A, San Diego, California 92154.
Products must be shipped in the original shipping container or its equivalent; in any
case the risk of loss or damage in transit is to be borne by you. If upon examination
at the Factory or Polk Audio Authorized Dealer it is determined that the unit was
defective in materials or workmanship at any time during this Warranty period, Polk
Audio or the Polk Audio Authorized Dealer will, at its option, repair or replace this
Product at no additional charge, except as set forth below. All replaced parts and
om the date of original retail purchase from a Polk
Products become the property of Polk Audio. Products replaced or repaired under
this warranty will be returned to you, within a reasonable time, freight prepaid.
This warranty does not include service or parts to repair damage caused by accident, disaster, misuse, abuse, negligence, inadequate packing or shipping procedures, commercial use, voltage inputs in excess of the rated maximum of the unit,
cosmetic appearance of cabinetry not directly attributable to defect in materials or
workmanship, or ser
authorized or approved by Polk Audio. This warranty shall terminate if the Serial
number on the Product has been removed, tampered with or defaced.
This warranty is in lieu of all other expressed Warranties. If this Product is defective in materials or workmanship as warranted above, your sole remedy shall be
repair or replacement as provided above. In no event will Polk Audio, Inc. be liable
to you for any incidental or consequential damages arising out of the use or inability to use the Product, even if Polk Audio, Inc. or a Polk Audio Authorized Dealer
has been advised of the possibility of such damages, or for any claim by any other
party. Some states do not allow the exclusion or limitation of consequential
damages, so the above limitation and exclusion may not apply to you.
All implied warranties on this Product are limited to the duration of this expressed
Warranty. Some states do not allow limitation on how long an implied Warranty
lasts, so the above limitations may not apply to you. This Warranty gives you specific legal rights, and you also may have other rights which vary from state to state.
This Warranty applies only to Products purchased in Canada, the United States
of America, its possessions, and U.S. and NATO armed forces exchanges and
audio clubs.
The Warranty terms and conditions applicable to Products purchased in other countries are available from the Polk Audio Authorized Distributors in such countries.
GARANTIE LIMITÉE DE POLK AUDIO
La garantie de Polk Audio, Inc., n’est valide que pour l’acheteur au détail original.
La garantie sera automatiquement annulée avant sa date d’expiration spécifiée
si l’acheteur original vend ou transfère le produit à tout autre parti.
Polk Audio, Inc., garantit - à l’acheteur au détail original seulement - que le ou les
HAUT-PARLEUR(S), COMPOSANTE(S) DE FILTRE PASSIF et CAISSON(S) de ce produit Polk Audio seront exempts de tout défaut attribuable aux pièces d’origine et
à la main d’oeuvre pour une période de cinq (5) ans à partir de la date de l’achat
au détail original chez un revendeur agréé Polk Audio.
En outre, Polk Audio, Inc., garantit - à l’acheteur au détail original seulement - que
TOUT AMPLIFICATEUR OU TOUT AUTRE COMPOSANTE ÉLECTRONIQUE qui pourrait faire partie ce produit Polk Audio sera exempt de tout défaut attribuable aux
pièces d’origine et à la main d’oeuvre pour une période de cinq (3) ans à partir
de la date de l’achat au détail original chez un revendeur agréé Polk Audio.
Pour permettre à Polk Audio de vous offrir le meilleur service de garantie possible,
veuillez enregistrer votre nouveau produit en ligne à l’adresse web:
www.polkaudio.com/registration - ou contactez le Service à la Clientèle de Polk
au 800-377-7655 aux États-Unis et au Canada (à l’extérieur des É.U.:410-358-3600)
dans les dix (10) jours suivant la date de l’achat original. Assurez-vous de conserver
votre reçu d’achat original.
Les produits défectueux doivent être expédiés, avec une preuve d’achat, francs
de port et assurés, au revendeur agréé Polk Audio de qui vous avez acheté le
produit, ou à l’usine Polk Audio, 2550 Britannia Boulevard, Suite A, San Diego,
California 92154.
Les produits doivent être expédiés dans leur carton d’expédition original ou dans
un contenant équivalent. Le propriétaire doit assumer tout risque de perte ou de
dommage en transit.
Si, suite à l’examen du produit à l’usine Polk ou chez le marchand agréé Polk Audio,
il est déterminé que la défectuosité est imputable aux matériaux d’origine ou à
la main d’oeuvre au cours de la période de la garantie spécifiée, Polk Audio ou
le revendeur Polk Audio, à sa guise, réparera ou remplacera le produit sans frais
additionnels et selon les conditions décrites ci-dessous.
Toute pièce ou produit remplacé devient la propriété de Polk Audio. Les pr
réparés ou remplacés sous la garantie vous seront expédiés francs de port dans
un délai raisonnable.
Cette garantie n’inclut pas le service ou les pièces nécessaires à la réparation des
dommages provoqués par accident, désastre, abus, négligence, mode d'expédition
ou emballage inadéquat, utilisation commerciale, tensions supérieures au maximum prescrit pour l’unité, aspect visuel du meuble non directement attribuable à
un défaut de pièces d’origine ou de main d’oeuvre, ou par le service, la réparation,
ou toute modification du produit qui n’a pas été autorisé ou approuvé par Polk
Audio. Cette garantie sera annulée si le numéro de série sur le produit a été
enlevé, altéré ou falsifié.
Cette garantie prend préséance sur toutes autres garanties énoncées. Si la
défectuosité de ce produit est imputable aux pièces d’origine ou à la main d’oeuvre selon les conditions de la garantie exprimées ci-dessus, votre seul recourt
sera la réparation ou le remplacement selon les conditions décrites ci-dessus.
Dans aucun cas Polk Audio, Inc. pourra-t-elle être tenue responsable pour tout
dommage accessoire ou indirect causé par l’utilisation ou par l’incapacité
d’utilisation du produit, même si Polk Audio, Inc. ou un revendeur agréé Polk
Audio, a été avisé de la possibilité de tel dommage, ou pour toute réclamation
par tout autre parti.
Certains états ne permettant pas l’exclusion ou la limitation des dommages
indirects, les limitations et exclusions exprimées ci-dessus pourraient ne pas
s’appliquer dans votre cas.
Toutes les garanties tacites sur ce produit sont limitées à la durée de la garantie
énoncée. Certains états ne permettant pas la limitation de la durée d’une garantie
tacite, les limitations ci-dessus pourraient ne pas s’appliquer dans votre cas. Cette
garantie vous accorde des droits légaux spécifiques; vous pourriez également avoir
d’autres droits qui pourraient varier d’état en état.
Cette garantie s’applique seulement aux produits achetés au Canada, aux
États-Unis d’Amérique et ses possessions, et dans les clubs audio et d’échange
des forces armées des É.U. et de l’OTAN. Les modalités et les conditions de
garantie applicables aux produits achetés dans d’autres pays sont disponibles
chez les distributeurs agréés Polk Audio établis dans ces pays.anada, the United
States of America, its possessions, and U.S. and NATO armed forces exchanges
and audio clubs.
oduits
The Warranty terms and conditions applicable to Products purchased in other countries are available from the Polk Audio Authorized Distributors in such countries.
vice, repair, or modification of the Product which has not been
For Customer Service, call 800-377-7655.
11
Page 12

BALTIMORE, MARYLAND 21215, USA,
5601 METRO DRIVE,
800-377-7655, F
www.polkaudio.com
AX: 410-764-5266
 Loading...