

Page 1
Custom Installation Guide
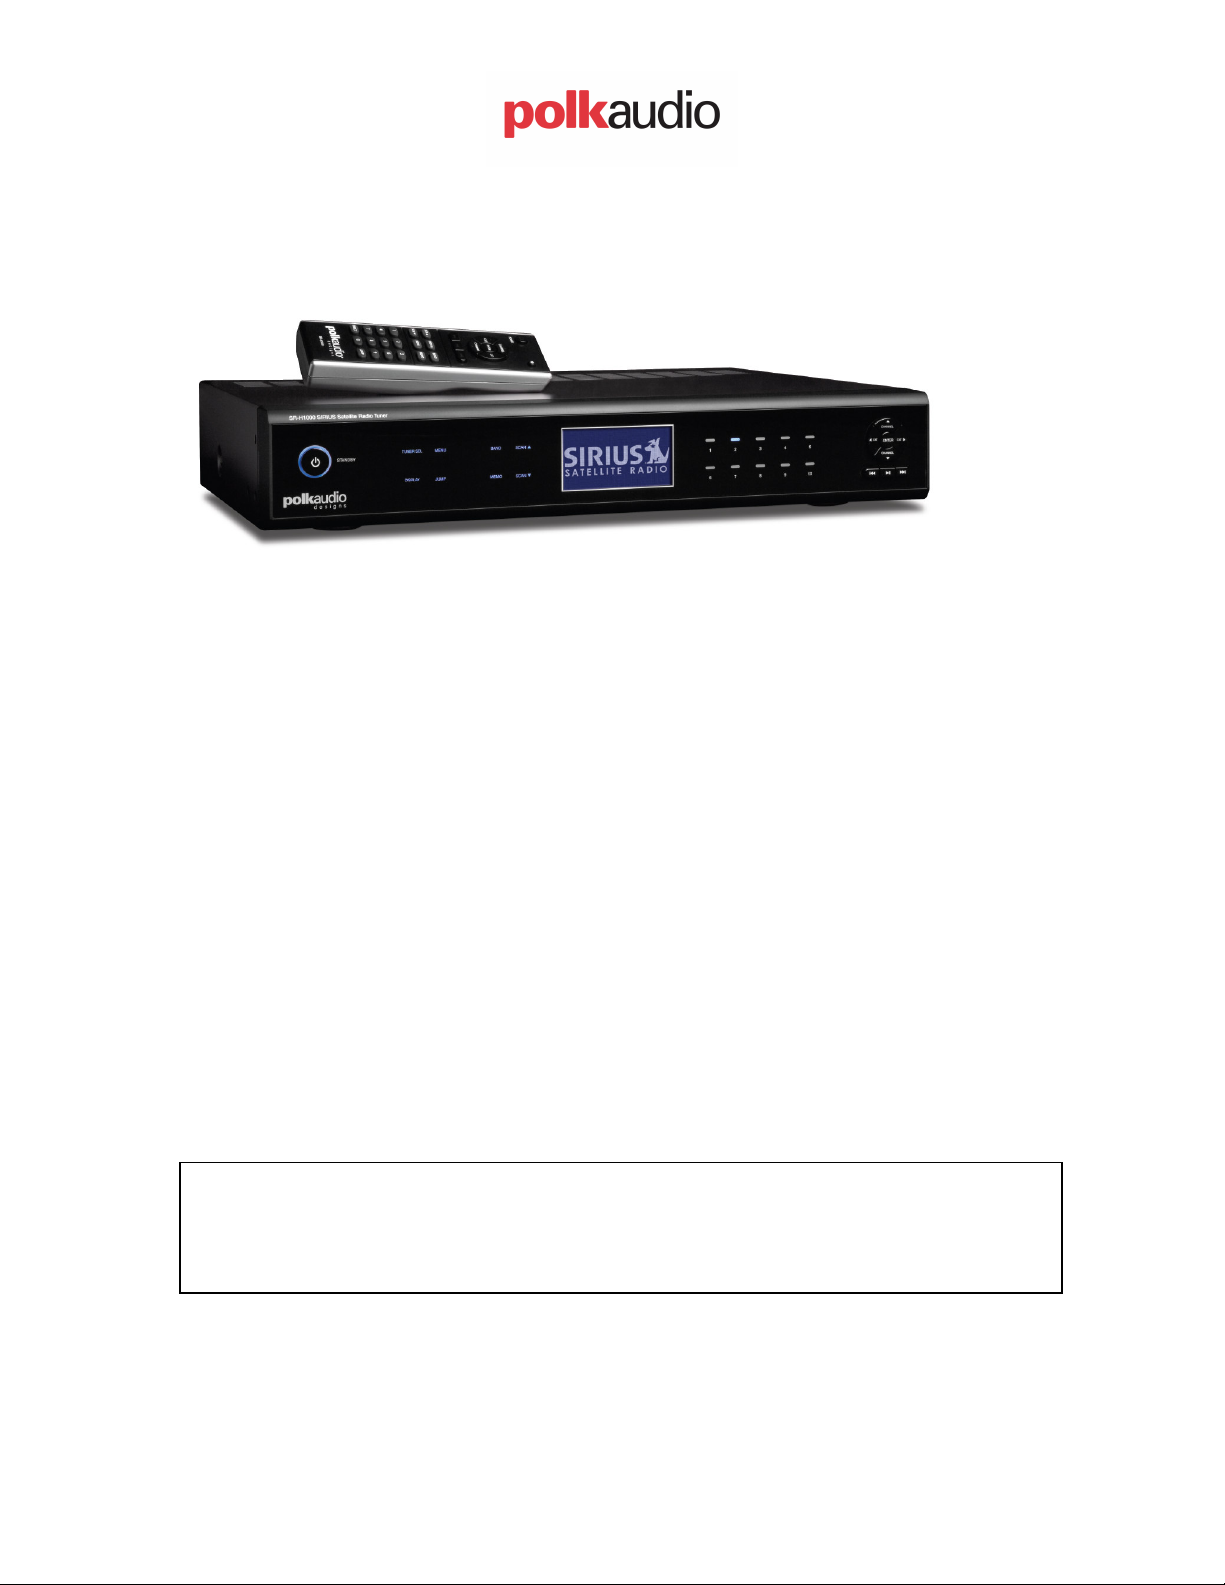
Polk Audio Designs SR-H1000 Sirius Home Tuner
Table of Contents:
I. Antenna Installation Options …………………………………….2-3
II. Accessories for Installations …………………………………….4-6
III. IR Codes & Remote Control …………………………………….. 7
IV. 12 Volt Trigger ………………………………………………….. 8
SSP and RS-232 Programming ………………………………….. 9
V.
This guide is provided as an aid to custom installation and home automation
professionals who are integrating the Polk Audio Designs SR-H1000 Tuner into an
automated entertainment system. No other use of the information provided in this
document is authorized.
SR-H1000 CI Guide Page 1 2/28/2008
Revision 1.0
Page 2
Antenna Installation Options:
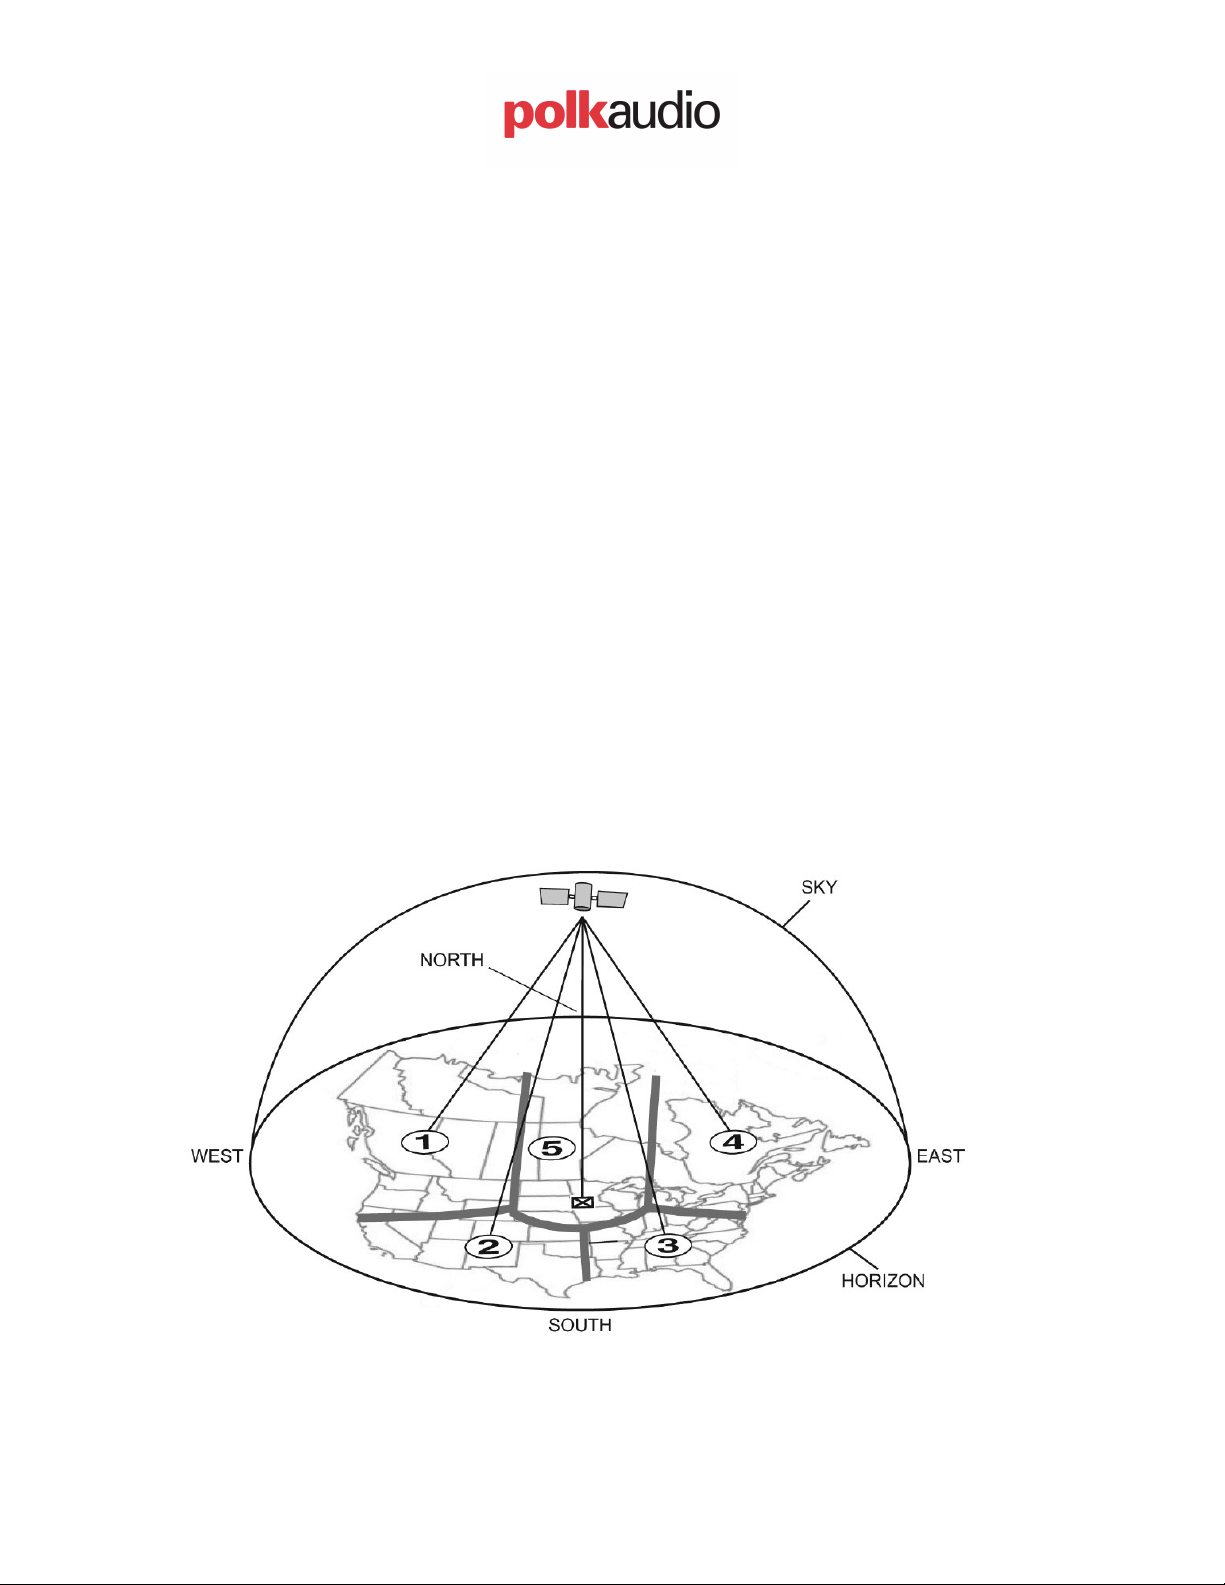
Antenna Placement
Consult the map for the direction in which to point the antenna. Aim the portion of
the antenna with the logo on it toward the location indicated by the X on the map. To
ensure strong reception in your home, observe the following antenna placement
considerations:
1. BEST Reception can be achieved by placing the antenna outside on the roof. The
antenna is waterproof. This position will afford the best view of the sky for best
reception. When placed in this location, an antenna extension cable may be required.
2. BETTER Reception can be achieved by placing the antenna outside a window, or
by mounting it to the side of the house. In either case, try to achieve the best possible
clear view of the sky.
3. GOOD Reception can be achieved by placing your antenna in or near a window,
since terrestrial transmitters are used in major metropolitan areas to boost signal
strength. In these cases, the antenna can be placed inside the home. Try to achieve a
clear unobstructed view of the sky.
Area 1: Aim East, Northeast, or Southeast
Area 2: Aim North or Northeast
Area 3: Aim North or Northwest
Area 4: Aim West, Northwest or Southwest
Area 5: Aim Straight Up
SR-H1000 CI Guide Page 2 2/28/2008
Revision 1.0
Page 3

4. Turn the Tuner on and listen for audio. If no audio is heard, aim the antenna in
different directions until audio output is heard. This is the desired antenna aiming
position.
5. After determining the optimum antenna aiming position, turn the Tuner off,
disconnect the power adapter from the wall outlet receptacle, and disconnect the
antenna cable.
6. Plan the routing of the antenna cable to the Tuner. Be sure you avoid any
obstructions that could crimp, kink, or twist the cable. Use protective grommets
wherever rough openings are encountered.
Note: Do not cut the antenna cable. Do not cut the antenna cable and
attempt to splice it or attach alternative connectors or cable. The cable and
connectors used in your SR-H1000
the factory to ensure that they will work with Sirius’s unique frequency
band. Your High-Gain Home Antenna comes with 20-feet of cable. If that
is not sufficient to locate the antenna where there is a strong signal, please
see the section below on extension Cables.
7. If the antenna is mounted outside, route the cable from the antenna position to the
interior of the home, working the cable through the basement, under a window sill,
etc., and make adjustments and take up slack whenever necessary.
8. Plug the antenna cable into the ANTENNA connector on the back of the Receiver.
9. Plug the tuner into a 110VAC wall receptacle. The front panel STANDBY LED
will light red.
10. You are now ready to activate and enjoy SIRIUS programming within your home.
Testing Antenna Signal Strength
The stronger the signal strength, the less likely it is that you will experience
an interruption of the audio. In the menu options of the Tuner, there is an antenna
aiming display which shows two bar graphs indicating signal strength. This can be a
useful tool for positioning the antenna in an optimal location for maximum signal
reception.
are specifically chosen and attached at
SR-H1000 CI Guide Page 3 2/28/2008
Revision 1.0
Page 4
I. Accessories
A. Extension Cables:
http://www.directedsirius.com/products/Product.aspx?ProductID=4040
http://www.directedsirius.com/products/Product.aspx?ProductID=3160
B. Prewire installation:
Prewire installation can be accomplished by using the
Cable (p/n 14230) or SIRIUS 20’ Extension Cable (p/n 14130) to route from
the Tuner location to the desired antenna location. The Antenna that comes
with your SR-H1000 tuner has 21-feet of cable and up to two 50’ extension
cables can be used for a total antenna cable length of 121-feet. (seems
redundant)
For installations that require cables longer than 120-feet, there are a number of
distribution systems available from Directed and others.
http://www.directedsirius.com/products/homesignaldistributionkits.aspx
(these pages all link to our store & will also to other e-tailers – would rather
link there than to Sirius web store).
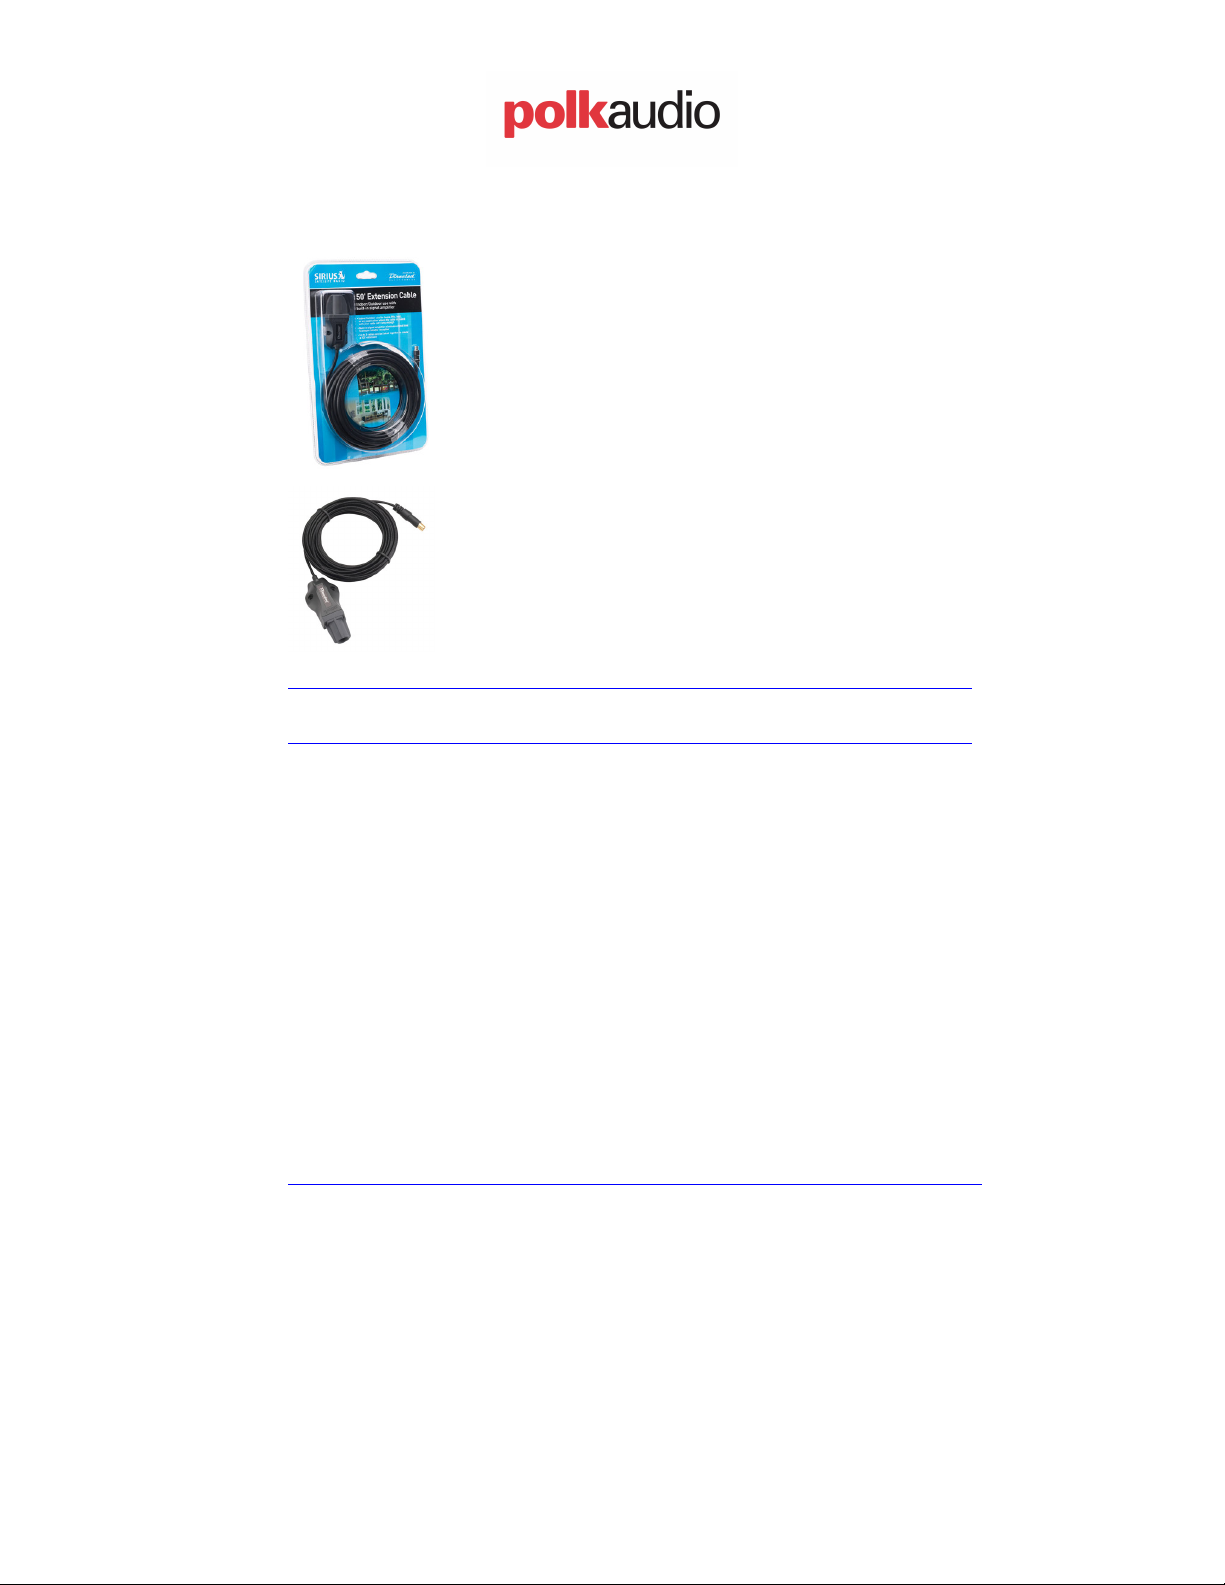
Your SIRIUS Indoor/Outdoor Antenna comes with 21-feet
of cable. If that is not sufficient to locate the antenna where
there is a strong signal, purchase an extension such as the
SIRIUS 50’ Extension Cable (p/n 14230) or SIRIUS 20’
Extension Cable (p/n 14130) from a local or on-line
Authorized SIRIUS Retailer. Up to two 50’ extensions can
be used together for a total of 121-feet of cable. The 20’
extension cable should not be extended further.
Both extension cables are weather resistant and have built in
signal amplifiers to match the input gain with the Polk Audio
Designs SR-H1000 tuner.
SIRIUS 50’ Extension
SR-H1000 CI Guide Page 4 2/28/2008
Revision 1.0
Page 5

C. Outdoor Antenna:
The weatherproof outdoor SIRIUS antenna provides highquality signal to your home or commercial installations. The
antenna and mast feature a durable UV weather coating, and
can be mounted on a mast (including existing satellite TV dish
pole), on the roof, or on the wall. This antenna is great for
locations where reception is blocked by low-lying obstructions
http://www.directedsirius.com/products/Product.aspx?ProductI
D=4030
D. Antenna Repeater
Enjoy SIRIUS radio throughout your home
without the need to run antenna wires. SIRIUS
Echo Signal Repeater system allows you to
locate the SIRIUS antenna where it has be best
view of the sky, and wirelessly redirect the
signal to the rest of the house. Connect the
SIRIUS antenna to the Echo transmitter and use
one or multiple Echo antennas to receive the
signal at the desired locations through-out the
house. Broadcasts in the 900mHz band.
http://www.directedsirius.com/products/echo.aspx
SR-H1000 CI Guide Page 5 2/28/2008
Revision 1.0
Page 6

E. Satellite TV distribution system
If you have satellite TV (DirecTV or Dish Network),
this handy combiner/splitter package from SIRIUS (p/n
14255) runs both signals into your house using a single
cable, simplifying your installation. The kit comes with
an outdoor, weatherproof SIRIUS antenna with Fconnector and a short F- to SMB adapter harness. You
will need to make your own RG6/F cabling, or buy premade RG6/F cables to connect the SIRIUS antenna to
the combiner, and to run from the splitter to the adapter
harness.
http://www.directedsirius.com/products/Product.aspx?ProductID=4085
F. CATV distribution system:
The SIRIUS CATV Home Distribution
Kit (p/n 14250) lets you send a SIRIUS
satellite radio signal to any room in your
home with a cable TV outlet. The kit
includes an all-weather outdoor antenna,
2 diplexer signal splitters, and the
necessary adapter to supply signal
to a SIRIUS satellite radio.As with the
Satellite TV Distribution System above,
RG6/F cabling must be added to
complete the antenna/combiner
installation.
http://www.directedsirius.com/products/Product.aspx?ProductID=4080
SR-H1000 CI Guide Page 6 2/28/2008
Revision 1.0
Page 7

SR-H1000 CI Guide Page 7 2/28/2008
Revision 1.0
Page 8

IR Codes & Remote Controls:
CODES:
The following IR codes are accepted by the Polk Audio Designs SR-H1000 Tuner:
SR-H1000 CI Guide Page 8 2/28/2008
Revision 1.0
Page 9

II. 12 Volt Trigger:
The 12V Trigger Input allows your 12V-trigger-capable preamp or receiver to force the
SR-H1000 Tuner to go from STANDBY mode (power button illuminated, front panel
display off) into ON mode (power button not illuminated, front panel display on) or vice
versa without the need to press the POWER button. To disable the 12V Trigger Input
feature, simply do not connect anything to the 12V Trigger Input jack on the rear panel of
the Tuner. To enable this feature, connect a 1/8" mono plug cable (tip +/ barrel - ) from
your preamp or receiver's 12V Trigger Output to your SR-H1000 Tuner's 12V Trigger
Input jack on the rear panel. So long as the Tuner stays plugged into an active AC outlet,
your SR-H1000 Tuner is ready to respond to power mode changes sent from your preamp
or receiver.
SR-H1000 CI Guide Page 9 2/28/2008
Revision 1.0
Page 10

III. Control features:
The SR-H1000 has two unique ports on the rear panel that allow the tuner to control a
2nd tuner and allow control systems to operate the SR-H1000 and the 2nd tuner*.
These ports are labeled as RS-232 and SSP.
SSP port:
The SSP port is a connection for a 2nd tuner to be operated by the SR-H1000 in a similar
manor to how a “Sirius Ready” receiver operates an outboard Sirius tuner. The SCH1
Sirius Connect Home Tuner (pictured below) is the tuner to be used to obtain the 2nd
tuner source.
Alternatively, the second tuner can be a Dock and Play radio docked in the SIRIUS
Universal Home Connect dock (p/n SUHC1). The dock is similar to the universal home
dock but connects to the host A/V system with SIRIUS SSP cable. This allows use of a
transportable radio for the second tuner source (provided it has the SIRIUS Universal
Docking Connector) that can also be taken out of the home and used in a vehicle or other
applications.
RS-232 Overview:
The RS-232 port allows communication with the SR-H1000. All commands that are
present on the front panel or the remote control of the SR-H1000 are available via the
RS-232 port. In addition, the display data that is shown on the LCD display (or video
output) is available over the RS-232 port.
Entering RS232 Operation mode
1) You must use a Null-Modem cable to connect to the RS-232 port.
2) Place the SR-H1000 into "Pass-through" mode by
Model#: SC-H1
Sportster 5 in SUHC1 dock
a) Enter the Menu and select Sirius ID
b) Press BAND, DISPLAY, then press and hold 6 (you will see the diagnostic
page)
c) Press BAND
SR-H1000 CI Guide Page 10 2/28/2008
Revision 1.0
Page 11

The tuner will only stay in "Pass-through" mode until the power is cycled, a power cycle
will exit this mode.
When the tuner is in RS232 Operation mode, the front panel controls & display are
disabled and only communication over the RS-232 interface is possible.
If the control system you are working with (Crestron, Niles, AMX, Russound, etc) has
firmware with the Sirius SSP protocol (the firmware that enables a device to be “Sirius
Ready”) then it can control the SR-H1000 with the same command sets. If the
manufacturer of the control system you are using has not made arrangements with Sirius
to provide the SSP protocol, they will need to contact Sirius directly and sign a nondisclosure agreement.
SR-H1000 CI Guide Page 11 2/28/2008
Revision 1.0
 Loading...