

Page 1
Cutsheet for LCi-RTSC & LCi-RTSFX
High Performance In-Wall Reference Theater
Center Channel and Surround Loudspeakers
The LCi-RTSFX speaker features an integrated "perfect volume" performance enclosure to ensure superb performance every time.
Because the RTSFX performance enclosure is the same size as the cutout, the speaker installs easily in a post construction project.
The RTS C requires a larger cutout because of its separate performance enclosure. An available Stud-Lock Mounting System
the RTS
vibration. Both the RTS C and RTSFX are THX
dynamic range. The same driver technologies found in Polk Audio's highly acclaimed LC
FX and sold separately) creates a rigid platform, increasing bass performance, clarity and reducing unwanted structure borne
®
Ultra2-certified, so you're assured of consistent sonic performance and exceptional
i Series of freestanding and built-in speakers
are used in the LCi-RTS Series.
LCi-RTSC
Hardware (included)
• One LCi-RTSC Speaker
• Enclosure
• Paint Mask
• Two Grilles (one perforated, one cloth)
• Logo Badge
i-RTSC Manual
• LC
• Registration Card
• 4 Mounting Brackets
• 16 Scr
ews
• 16 Washers
Overall
Height
8-15/16"
(22.6cm)
Overall Width
15-5/8" (39.7cm)
T
M
(for
Overall Depth
3-3/8" (8.57cm)
Important Note:
If anything is missing or damaged, or if your LCi-RTSC
speaker fails to operate, notify Polk Audio Installer
Support Services immediately at 800-377-7655.
Hours: Mon.-Fri., 9am-5:30pm EST.
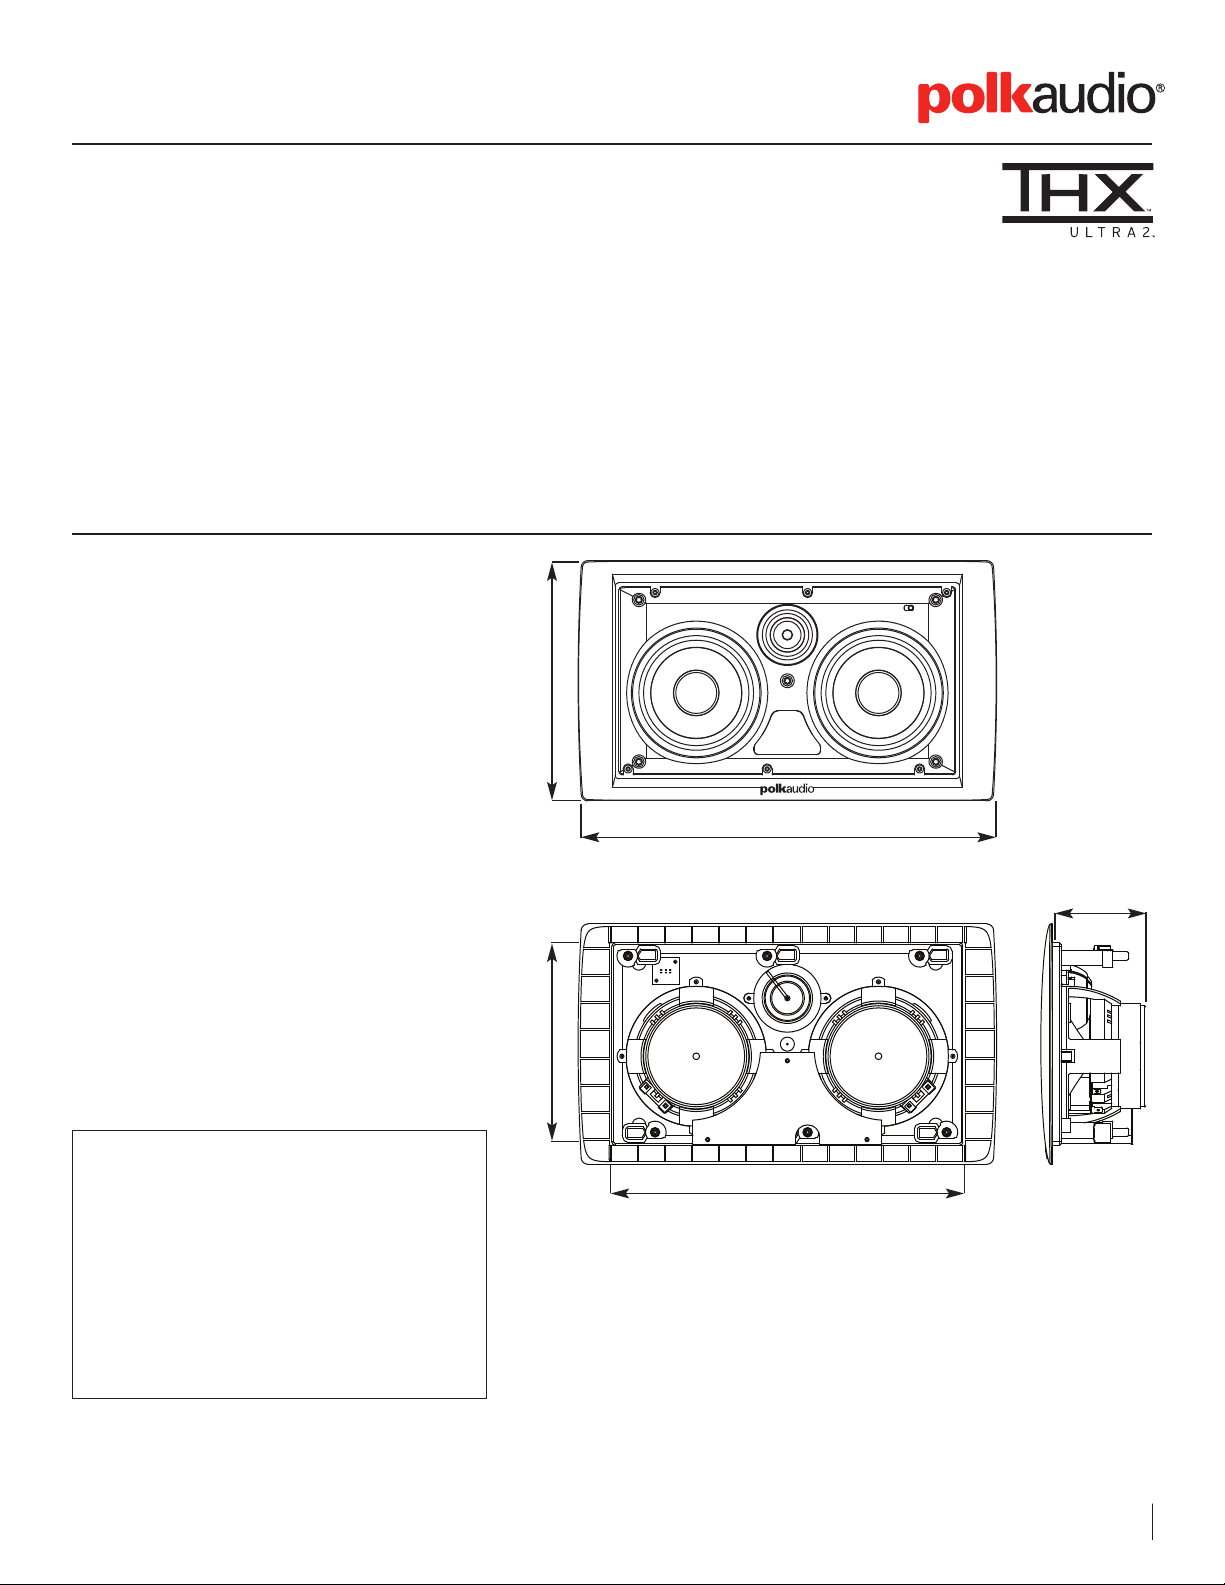
LCi-RTSC Dimensions
Overall Height 8-15/16" (22.6cm)
Overall Width 15-5/8" (39.7cm)
Cutout Height 7-5/8" (19.5cm)
Cutout Width 13-1/8" (33.34cm)
Overall Depth 3-3/8" (8.57cm)
Mounting Depth 2-7/8" (7.3cm)
with 1/2" of drywall
Available Finish: Paintable White
Cutout
Height
7-5/8"
(19.5cm)
.PolkAudio.com
www
Cutout Width
13-1/8" (33.34cm)
/ 800.377.7655 (USA & Canada) / 410.358.3600 (W
Mounting Depth
(Assumes 1/2"
[12.7mm] drywall)
2-7/8" (7.3cm)
orldwide)
1
Page 2
LCi-RTSC
Note: The RTSC speaker is designed to be used as a THX
center channel speaker. It mounts between studs that are
16" OC (on center).
®
RTSC ENCLOSURE
The enclosure must be used for the RTSC to perform to THX
certified standards.
REMOVING THE CLOTH GRILLE
The RTSC’s cloth grille fits tightly to the speaker Baffle.
If you use the cloth grille, take special car
e when removing it.
Important Note: Never use any tool, such as a paperclip,
to remove the grille, as this could tear the cloth.
Instead, use your hands (after you’ve washed them), grasping
the grille frame near two of its mounting cups and pulling the
frame firmly away from the baffle.
WIRE RECOMMENDATIONS
Runs Gauge
Lengths up to 25' 18 or 16
Lengths gr
eater than 25' 16 or 14
but less than 50'
Lengths greater than 50' 14 or 12
but less than 75'
Lengths greater than 75' 12
®
Overall
Height
24-1/4"
(61.6cm)
Overall Width
14" (35.56cm)
Depth measured
from the back of the
enclosure to the front
3-3/8" (8.57cm)
SPECIFICATIONS
TS
LCi-R
C
Product Weight: 8.75 lbs. (3.97kg)
(not including Performance Enclosur
PERFORMANCE
POWER HANDLING (WATTS/CHANNEL) 10-250W CONTINUOUS
IMPEDANCE (NOMINAL) 4 OHMS
FREQUENCY RESPONSE (OVERALL) 50HZ–27KHZ
THX SPEC 80HZ–26KHZ
EFFICIENCY (2.83V@1M) 92dB
WEIGHT
SPEAKER 8.75 LBS (3.97KG)
PERFORMANCE ENCLOSURE
e)
9.25 LBS (4.25KG)
Mount Performance Enclosure using included
hardware. Run wire from any direction and
plug the hole to maintain an air
eb Addr
W
ess:
tight seal.
For more information on the LCi-RTSC, log onto
www.polkaudio.com/downloads/manuals/
home/LCi-RTSC_manual.pdf
2 Polk Audio Custom
Install Pr
oduct: Model Number
DRIVER COMPLEMENT
MIDBASS 2-5 1/4" (13.34CM)
TED POLYPROPYLENE
AERA
DYNAMIC BALANCE™DRIVERS
TWEETER 1-1" (2.54CM)
AIMABLE RING RADIATOR TWEETER
CONNECTIONS
SPEAKER WIRE
MAXIMUM WIRE SIZE ACCOMMODATED 12 AWG
MINIMUM RECOMMENDED
INPUT CONNECTORS HEAVY-DUTY SPRING LOADED
PUSH TERMINALS
18 AWG
Page 3

LCi-RTSFX
Hardware (included)
• One Set of LCi-RTSFX Speakers
• Speaker Mounting Template
• Paint Mask
• Four Grilles (two perforated, two cloth)
• Logo Badge
•LC
i-RTSFX Manual
• Registration Card
• Two STL105 Stud-Lock Brackets
Important Note: If anything is missing or damaged,
or if your LCi-RTSFX speaker fails to operate, notify
Polk Audio Installer Support Services immediately
at 800-377-7655. Hours: Mon.-Fri., 9am-5:30pm EST.
Overall
Height
21-7/8"
(55.56cm)
Overall Width
12" (30.48cm)
Overall Depth
4-1/4" (10.8cm)
TS
LCi-R
Overall Height
Overall W
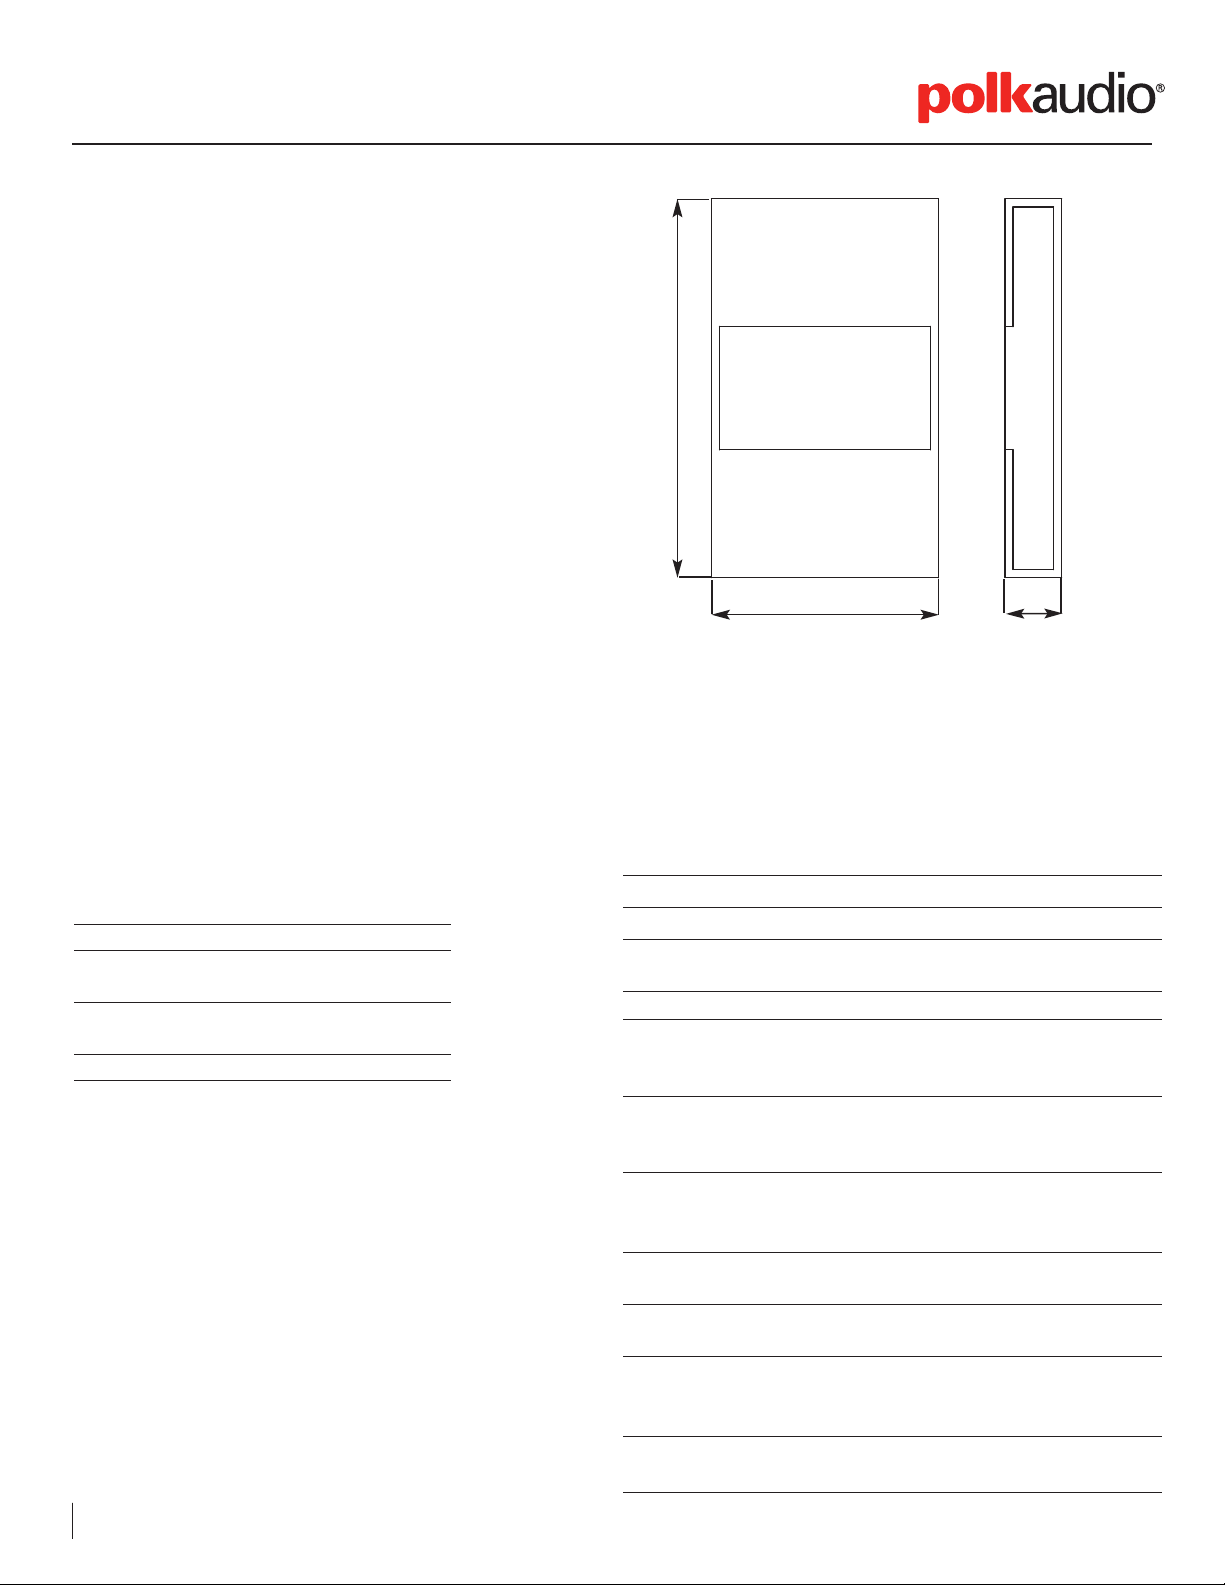
FX Dimensions
idth
21-7/8" (55.56cm)
12" (30.48cm)
Cutout Height 20-1/4" (51.44cm)
Cutout Width 10-3/4" (27.31cm)
Overall Depth
4-1/4" (10.8cm)
Mounting Depth 3-3/4" (9.53cm)
with 1/2" of drywall
Available Finish: Paintable White
Cutout
Height
20-1/4"
(51.44cm)
Cutout Width
10-3/4" (27.31cm)
Mounting Depth
(Assumes 1/2"
[12.7mm] drywall)
3-3/4" (9.53cm)
.PolkAudio.com
www
/ 800.377.7655 (USA & Canada) / 410.358.3600 (W
orldwide)
3
Page 4

Stud-Lock Mounting System
™
(RTSFX only)
Installation:
Lock Mounting System
See the instructions included with each Stud-
™
.
Important Note: For new construction: If you are using a preconstruction bracket, always install it first before installing the
™
Stud-Lock Mounting System
.
If you are installing a pre-construction bracket (PBC) and a StudLock Mounting System (STL105) together, be aware that the
speaker’s enclosure can catch on the edge of the pre-construction bracket. Push the bottom of the loudspeaker enclosure up
and over The protruding edge of the pre-construction bracket.
This will fully seat The loudspeaker in the wall.
Important Notes:
If you are using a Pre-Construction Bracket, always
install the Pre-Construction Bracket before installing the
Stud-Lock Mounting System
™
. Be sure to clear the PreConstruction Bracket wire guide when installing the
Stud-Lock Mounting System
Drywall shown cut away for clarity.
™
.
STL105
Center the bracket vertically in
the cutout. The lip of the Stud-
ock bracket and the cutout
L
hould align.
s
SPECIFICA
TIONS
LCi-RTSFX
Installed W
(not including Stud-Lock Mounting System
PERFORMANCE
POWER HANDLING (WATTS/CHANNEL) 10-250W CONTINUOUS
IMPEDANCE (NOMINAL) 4 OHMS
FREQUENCY RESPONSE (OVERALL)
THX SPEC 80HZ-26KHZ
EFFICIENCY (2.83V@1M) 88dB
SPEAKER WEIGHT (INSTALLED) 10.75 LBS (4.88KG)
DRIVER COMPLEMENT
MIDBASS 2-5 1/4" (13.34CM)
TWEETER
eight: 10.75 lbs. (4.88kg)
™
)
50HZ–27KHZ
AERATED POLYPROPYLENE
DYNAMIC BALANCE™DRIVERS
1-1" (2.54CM)
RING RADIATOR TWEETER
CONNECTIONS
SPEAKER WIRE
MAXIMUM WIRE SIZE ACCOMMODATED 12 AWG
WG
MINIMUM RECOMMENDED
INPUT CONNECTORS HEAVY-DUTY SPRING LOADED
PUSH TERMINALS
eb Addr
W
ess:
18 A
For more information on the LCi-RTSFX, log onto
www.polkaudio.com/downloads/manuals/
home/LCi-R
TSFX_manual.pdf
4 Polk Audio Custom
Install Pr
oduct: Model Number
Page 5

REMOVING THE CLOTH GRILLE
The RTSFX’s cloth grille fits tightly to the speaker Baffle.
If you use the cloth grille, take special care when removing it.
Important Note: Never use any tool, such as a paperclip,
to remove the grille, as this could tear the cloth.
Instead, use your hands (after you’ve washed them), grasping
the grille frame near two of its mounting cups and pulling the
frame firmly away from the baffle.
Left
Subwoofer
C
enter
R
ight
LCi-RTSF
SETTING RECOMMENDATIONS
RTSFX In-wall Surround Location
Surround speakers located close, straight to the sides
of your listening area, and approximately six feet off
the floor
Surround speakers located behind your listening area
and approximately six feet off the floor
The “Solid” setting is required for THX®Ultra2 Systems.
X
Image Setting
Recommendation
Diffuse
Solid
ROOM ENVIRONMENT CONTROLS
Tweeter Switch (RTSC/RTSFX)
If your listening room is very reflective, with smooth sheetrock walls, hardwood floors, and non-cushioned furniture,
the sound will be overly “bright” and unnatural. Engaging
the tweeter attenuation feature a Tweeter attenuation fea-
e. Selecting the “cut” setting compensates for the ef
tur
fect
of reflectivity in a hard room. Tweeter attenuation flattens
room response, without hindering higher frequency response,
for warmer, more realistic sound and more accurate imaging.
Wall Distance Switch (RTSFX)
In-wall and in-ceiling loudspeakers excel when placed mor
than 2'(60cm) fr
om side walls. If position limitations demand
e
that in-wall loudspeakers be installed closer than 2'(60cm)
om side walls, the pr
fr
oximity of the sur
face can r
esult in
a response “bump” between 50 and 200Hz. This can cause
in-wall speakers to sound “boomy.” The Wall Distance Switch
flattens response and tunes out “boominess” without sacrificing deep bass response, for more lifelike sound.
RTSFX
Surround Left
Surround Back RightSurround Back Left
TS
R
FX
urround Right
S
If placement is closer than 2' to a wall: Engage the Wall
Distance Switch (“Wall Dist.”) to match the <2' setting.
Recommended speaker distance from side walls is 2 feet
(60cm).
RTSC/RTSFX THX®Ultra2-certified Performance
For THX®Ultra2-certified performance, use the cloth grille; set
the Tweeter Switch (RTSc/RTS
the RTS
two feet (>2) position
FX, set the Wall Distance Switch to the greater than
.
FX) to the “normal” position; on
If you have questions, please contact your Authorized
Polk Audio Dealer or Customer Service at 1-800-377-7655
Monday thr
ough Friday 9am-6pm EST
.
.PolkAudio.com
www
/ 800.377.7655 (USA & Canada) / 410.358.3600 (W
orldwide)
5
 Loading...