

Page 1

User’s Guide
12-1685
Introduction
HD Radio™ stations offer digital-quality sound, simultaneous data transmission, and multiple channels of programming,
all from their familiar location on the radio dial. The HDX3™ provides rich, lifelike sound and simple operation in a
compact stereo system. Its smooth, natural response and room-filling sound enhance audio fidelity on both AM and
FM bands.
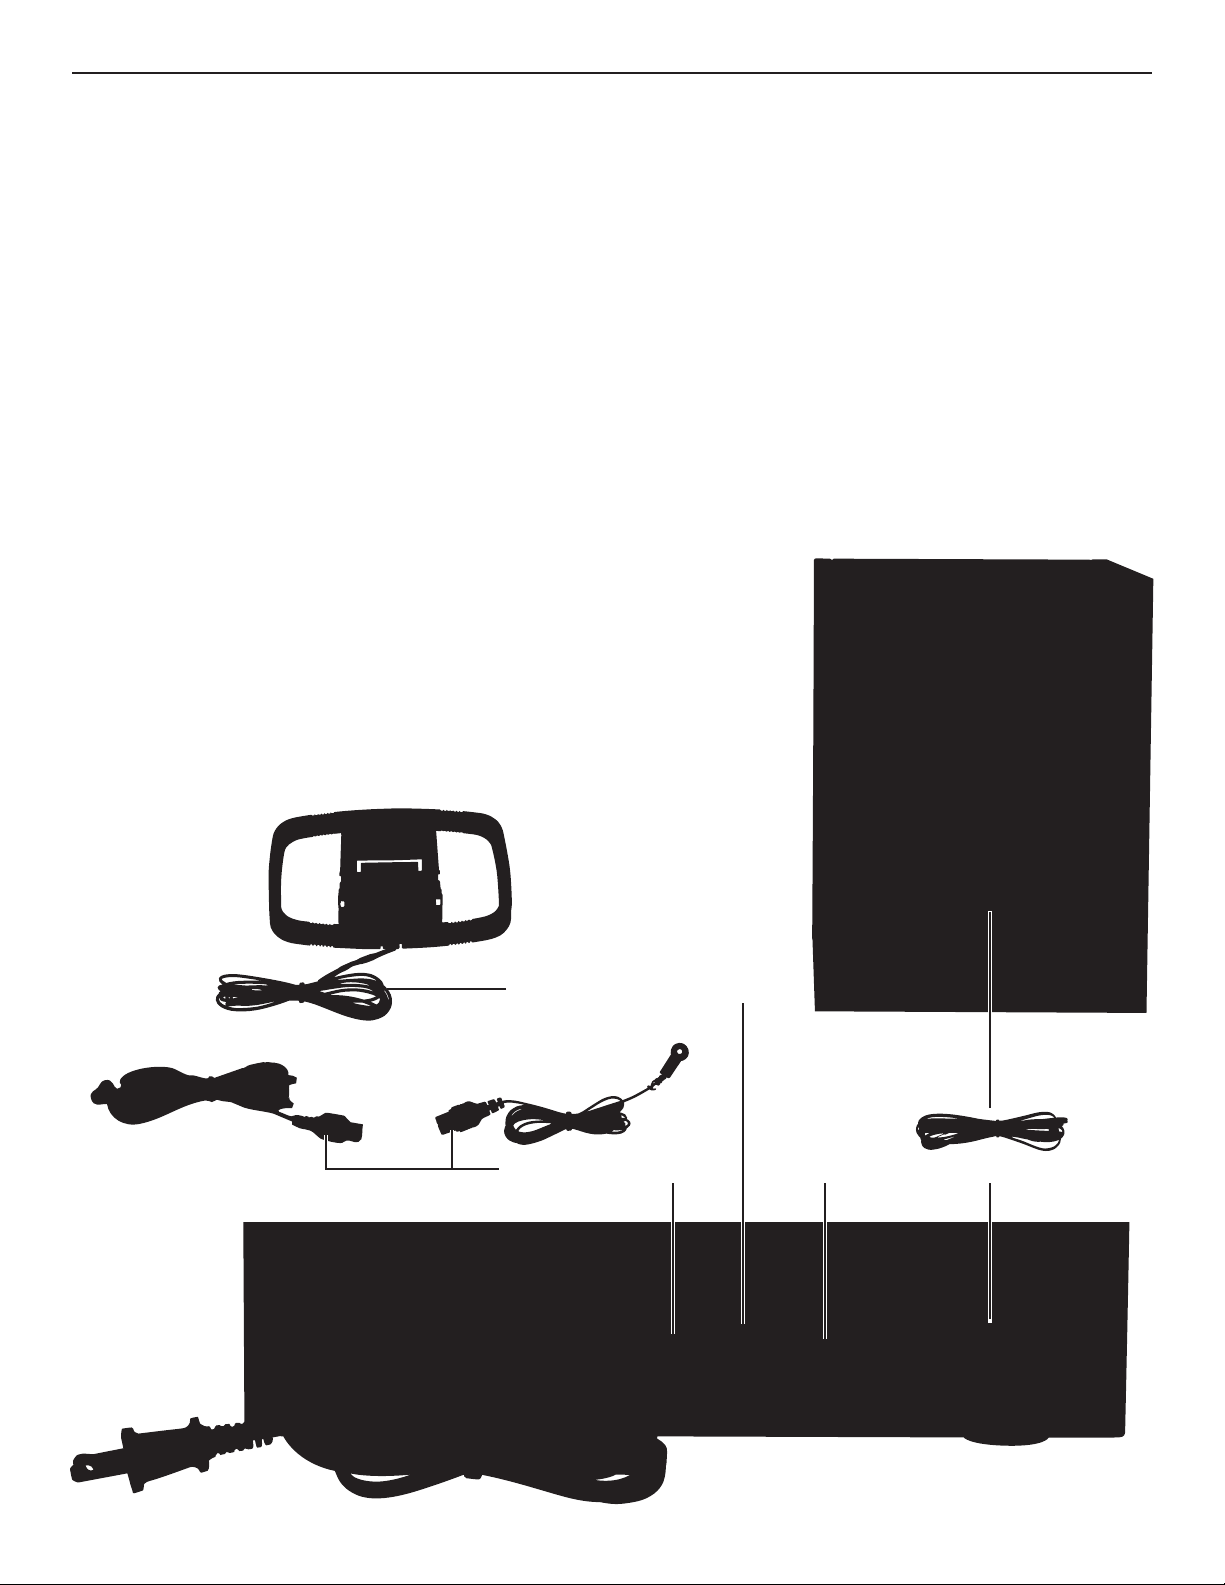
What’s In The Box?
HDX3 console
¤
Speak
¤
¤
¤
¤
¤
¤
¤
¤
¤
ers (2)
Speaker cables (2)
AM Antenna
FM Antennas (2)
Remote Control
Who Is Polk Audio
The acoustic system of the HDX3 was designed for maximum performance by Polk Audio, an award-winning
designer and manufacturer of high-performance audio products for over 30 years. Polk Audio holds over 50 patents
for advances in audio design and technology. Polk’s products include loudspeakers and electronic components for
home, auto and marine applications, including the first XM satellite radio home component tuner, the world’s first
audiophile-grade active IP-addressable loudspeaker, the first THX Ultra2 Certified in-ceiling loudspeaker, and the
first entertainment system to include HD Radio technology, satellite radio capability and a DVD player. For more
information please visit www.polkaudio.com.
HD Radio Technology & Multicasting
The single largest technological advancement in radio in more than 45 years, HD Radio technology is the new standard
for digital AM and FM radio in the US and around the world. HD Radio technology transforms your radio listening
experience in exciting new ways, offering you the quality, choice and interactive data services that are fast becoming
a new information and entertainment standard.
Multicasting, which is the ability to broadcast multiple program streams over a single FM frequency (97.7-2, 97.7-3,
etc.), greatly increases the amount and diversity of content you can access. HD Radio technology offers:
St
atic-free, crystal-clear reception
CD-quality sound on FM Digital; FM-stereo quality sound on AM
Stations stay in their well-known, traditional place on the radio dial
A variety of “data services” ranging from text-based information (artist name, song title, weather alerts, school
closings and more) to live traffic reports, all of which would scroll across your receiver display.
To find HD Radio stations in your area, please visit www.hdradio.com.
HD Radio™ Technology Manufactured Under License From iBiquity Digital Corporation. iBiquity Digital, the HD Radio logo, and the HD
logo are registered trademarks of iBiquity Digital Corporation. HD Radio™ is a trademark of iBiquity Digital Corporation U.S. and Foreign
Patents.
Polk Audio is a Directed Electronics company which trades on NASDAQ under the symbol DEIX. Investor information can be found at
http://investor.directed.com. Polk Audio is a registered trademark of Polk Audio, Inc. HDX3 is a trademark of Polk Audio, Inc.
Page 2
Setting Up Your HDX3
1. Connect The FM Antenna
To attach either of the provided FM antennas, connect it to the 75 ohm port and position for best reception. For optimal FM reception, use the
T-shaped dipole. Position its “arms” laterally or vertically for best reception of your favorite stations. The black wire antenna may be adequate for
receiving strong stations in urban areas, while the dipole will provide better reception of weak stations from more rural locations.
Note For Cable Radio
The HDX3 can accept cable FM programming. Contact your cable TV provider for assistance connecting your radio to a cable FM feed. The cable
installation must be able to filter re-emission of the RF spectrum so that only the FM band, and not the cable TV signal, is transmitted to the radio.
2.
Connect The AM Antenna
Connect the AM antenna wires, matching the color to the AM antenna terminals and position the antenna for best reception.
3.
Connect The Speakers
Connect the speaker wires to the + / - terminals on the speakers and on the HDX3 console (RED to RED and BLACK to BLACK). For best stereo
reproduction, each speaker should be approximately the same distance away from the primary listening position, and this distance should be
approximately equal to the separation between the two speakers. Finally, for best bass performance place the speakers at least 1” (25 mm) from a
back wall.
Note
To avoid blocking the cooling vents on the sides of the HDX3 console, place the speakers at least 1” away from the console sides.
4. Connect The Power Supply
Plug the power-supply cord into a wall outlet.
5. Connect
To connect the HDX3 to another audio device, connect a stereo cable (not supplied) to the LINE
OUT (VAR) port. The HDX3 volume controls also control the volume for playback, so this full-range
output can be used with a subwoofer or a full-range speaker system.
6. Connect
Turn down the volume level on both the device you are connecting and the HDX3, and plug the
device into the AUX port on the front of the HDX3. Start with the volume in the 12 o’clock position.
Connecting Headphones
Connect the headphones into the stereo minijack on the front of the console.
Note
The headphone jack can be used as a stereo output jack.
When you connect headphones, the speakers are muted.
To An Audio System (Optional)
An Auxiliary Device (MP3 Player) (Optional)
AM Antenna Terminals
FM Antenna Port
Speaker TerminalsLine Out
Page 3

Play
Pause
Preset Store
Repeat / Random
Preset+
Fast-Forward
Next Track
TUN+
Console Controls
The buttons on the HDX3 console are multi-functional. The labels on
the buttons indicate CD functions and the labels below the buttons
indicate radio functions.
EQ
Push to set EQ from
Normal, Classic,
Rock, Jazz, Speech.
EQ settings are not
available when using
headphones.
Remote Control
Before using the remote control for the first time, pull out the plastic tab
from the battery compartment.
The buttons on your remote control correspond to the controls on the HDX3
console with the addition of a MUTE button, CLOCK button, and numbered
buttons for access to preset radio stations.
To replace the remote control battery (CR2025), press the battery release
and slide the battery compartment open.
Cautions:
Danger of explosion if battery is incorrectly replaced.
¤
Replace only with the same or equivalent type.
¤
Stop
Preset-
Rewind
Previous Track
TUN-
CD Tray
Volume / Mode
CD Eject
Headphones (output)
Power
AUX (input)
Power
Repeat /Random
Press to access
custom playback
options: Repeat 1,
Repeat All,
and Random.
Battery
Release
Mute
The HDX3 console
remains muted until
you press MUTE
again or adjust
the volume.
1-6
Press to access
preset stations.
Page 4

Tuning A Station
1. Press the Volume/Mode knob on the HDX3 console or MODE on the
remote control to select either an AM or FM mode.
2. Use the tuner buttons on the HDX3 console or on the remote control
to select a station.
3. To search for a station, press and hold the tuner buttons. When the
HDX3 recognizes an HD Radio channel, the HD Radio logo appears.
HD Radio Multicast Channels (FM Only)
In addition to digital-quality sound, some HD Radio broadcasters offer
multiple programs simultaneously using multicast channels on their
existing frequency.
If the station offers multicast programming, “-1” appears next to the
station frequency. Use the tuner buttons to select multicast channels.
Tuning up the frequency band will take you to that radio station’s next
subchannel, which would have a “-2” after its frequency.
Audio Delay In HD Radio Systems
Digital systems inherently produce an audio delay. The HDX3 uses
a station’s analog signal to tune the station. After approximately 5
seconds, the analog audio blends to digital. The blend is typically
smooth, but if the station has not implemented their HD Radio
broadcast correctly, you may experience a skip. This is not a problem
with your radio. It is a broadcast implementation issue, which the
station should correct over time.
Only the main channel contains an analog signal. If you tune directly to
a station’s multicast channel, the audio will delay for approximately 5
seconds. This is normal operation.
Note
HD Radio broadcasts in the AM band may terminate at night due to
FCC regulations.
Saving Stations Into Preset Memory
The HDX3 provides 6 preset channels for each AM and FM band
(AM1, AM2, FM1, FM2) for 24 total presets.
1
. Manually tune the station.
2. Press PRESET STORE on the HDX3 console or on the remote control.
3. On the remote control, press the number button to select a preset
location. On the HDX3 console, press PRESET+ / PRESET- to select
a preset location.
4. Press PRESET STORE again.
Recalling Stations From Memory
1
. Press the Volume/Mode knob on the HDX3 console or MODE
on the remote control to select either an AM or FM mode.
2. On the remote control, press the number button to recall the preset
station. On the HDX3 console, press PRESET+ / PRESET-
to recall the preset station.
Playing CDs
1. Turn on the HDX3.
2. Press the Volume/Mode knob on the HDX3 console or MODE on the
remote control to select CD mode.
3. Press the CD Eject button. The CD tray opens.
4. Load the CD in the CD tray and press the CD Eject button again.
The CD tray closes.
5. Press PLAY. Use the controls on the HDX3 console
or on the remote control.
6. (Optional) Press the Repeat / Random button to access custom
playback options: Repeat 1, Repeat All, and Random.
FAQ
Why does my audio quality change after a few seconds on some
HD Radio stations?
HD Radio stations blend analog signals to digital HD Radio signals.
The blend is typically smooth, but in some cases, the audio quality
can take a few seconds to reach enhanced digital levels. This is not
an issue with your HD Radio receiver.
What can I do if I my audio is not clear or I don’t hear any audio?
If your radio audio isn’t clear or you don’t hear any audio, you may be
experiencing one of the following conditions:
Check all connections, including power and antenna.
¤
Is the radio muted? If so, unmute the radio or turn up the volume.
¤
Setting The Clock
1. Press and hold CLOCK on the remote control for 2 seconds.The clock
display changes to the date over the time and then enters clock set
mode with the month flashing.
2. Use the tuner buttons on the remote control to set the month,
then press CLOCK. The date flashes.
3. Use the tuner buttons to set the date, then press CLOCK.
The year flashes.
4. Use the tuner buttons to set the year, then press CLOCK.
The hour flashes.
5. Use the tuner buttons to set the hour, then press CLOCK.
The minute flashes.
6. Use the tuner buttons to set the minute, then press CLOCK.
The AM/PM setting flashes.
7. Use the tuner buttons to set the AM/PM setting.
8. Press and hold CLOCK. The clock displays the new date and time.
Is the radio in AUX mode? If so, your auxiliary device may not
¤
be sending audio signals or may not be correctly connected.
¤
Is anything plugged into the headphone jack? If so, unplug it.
Is the signal too weak? If so, tune to a stronger station or reposition
¤
your radio and/or antenna.
¤
If you are using an antenna other than the one supplied, make sure
the antenna supports FM reception. If the antenna uses an FM trap,
make sure the FM trap is off.
Note
If you are using an amplified antenna with adjustable gain,
turn down the gain all the way and adjust slowly upward.
Page 5

Important Safety Instructions—
Read Before Operating Equipment
This product was designed and manufactured to meet strict quality
and safety standards. There are, however, some installation and
operation precautions of which you should be particularly aware.
1. Read Instructions. Read all the safety and operating instructions
before operating the system.
2. Retain Instructions. Retain the safety and operating instructions
for future reference.
3. Heed Warnings. Adhere to all warnings on the appliances and in
the operating instructions.
4. Follow Instructions. Follow all operating and use instructions.
5. Cleaning. Unplug the product before cleaning. Do not use liquid
cleaners or aerosol cleaners. Use a damp cloth for cleaning.
6. Attachments. Do not use attachments not recommended by the
product manufacturer as they may cause hazards.
7. Water and Moisture. Do not use this product near water —
for example, near a bath tub, wash bowl, kitchen sink, or laundry tub,
in a wet basement, or near a swimming pool.
8. Accessories. Do not place this product on an unstable cart, stand,
tripod, bracket, or table. The product may fall, causing serious injury
to a child or adult, and serious damage. Use only with a cart, stand,
tripod, bracket, or table recommended by the manufacturer, or sold
with the product. Any mounting should follow the manufacturer’s
instructions, using mounting accessories recommended by the
manufacturer.
9. Carts and Stands. This product should be used only with a cart or
stand that is recommended by the manufacturer. Move an appliance
and cart combination with care. Quick stops, excessive force, and
uneven surfaces may cause the combination to overturn.
10. Ventilation. Slots and openings in the cabinet provide ventilation,
ensure reliable operation, and protect it from overheating. Do not
block or cover these openings. The openings should never be blocked
by placing the products on a bed, sofa, rug, or other similar surface.
This product should never be placed near or over a radiator or heat
register. This product should not be placed in a built-in installation such
as a bookcase or rack unless proper ventilation is provided or
the manufacturer’s instructions have been adhered to.
11. Power Sources. This product should be operated only from the type
of power source indicated on the marking labels. If you are not sure
of the type of power supply to your home, consult your appliance
dealer or local power company.
12. Grounding or Polarization. This product is equipped with polarized
alternating-current line plugs (plugs having one blade wider than
the other). This plug will fit into the power outlet only one way. This
is a safety feature. If you are unable to insert the plug fully into the
outlet, try reversing the plug. If the plug still does not fit, contact an
electrician to replace your obsolete outlet. Do not defeat the safety
purpose of the polarized plug.
13. Power Cord Protection. The power-supply cord should be routed so
that it is not likely to be walked on or pinched by items placed upon
or against it, paying particular attention to cords at plugs, convenience
receptacles, and the point where they exit from the appliances.
14. Lightning. For added protection during a lightning storm, or when
left un-attended and unused for long periods of time, unplug it from
the wall outlet and disconnect the antenna or cable system. This will
prevent damage to the product due to lightning and power-line surges.
15. Power Lines. An outside antenna system should not be located near
overhead power lines or other electric light or power circuits, or where
it can fall into such power lines or circuits. When installing an outside
antenna system, extreme care should be taken to keep from touching
such power lines or circuits as contact with them might be fatal.
16. Overloading. Do not overload wall outlets and extension cords
as this can result in a risk of fire or electric shock.
17. Object and Liquid Entry. Never push objects of any kind into this
product through openings, as they may touch dangerous voltage points
or short out parts that could result in a fire or electric shock. Never spill
liquid of any kind on this audio/video product.
18. Servicing. Do not attempt to service this product yourself, as opening
or removing covers may expose you to dangerous voltage or other
hazards. Refer all servicing to qualified service personnel. Unplug
this product from wall outlets and refer servicing to qualified service
personnel under the following conditions:
a.
When the power supply cord or plug is damaged.
b. If liquid has been spilled, or objects have fallen into the product.
c. If the product has been exposed to rain or water.
d. If the product does not operate normally by following the operating
instructions. Adjust only those controls that are covered by the
operating instructions, as an improper adjustment of other controls
may result in damage and will often require extensive work by a
qualified technician to restore the product to its normal operation.
e. If the product has been dropped or the cabinet has been damaged.
f. When the product exhibits a distinct change in performance—this
indicates a need for service.
19. Replacement Parts. When replacement parts are required, be sure
the service technician has used replacement parts specified by the
manufacturer or that the parts have the same characteristics as the
original part. Unauthorized substitutions may result in fire, electric
shock or other hazards.
20. Safety Check. Upon completion of any service or repairs to this
product, ask the service technician to perform safety checks to
determine that the product is in proper operating condition.
21. Indoor Use. This product is not intended for use outdoors.
22. Product Disposal. Certain international, national and/or local laws
and/or regulations may apply regarding the disposal of this product.
For further detailed information, please contact the retailer where you
purchased this product.
Page 6

Limited One Year Warranty
Polk Audio, Inc., warrants to the original retail purchaser
only. This warranty will terminate automatically prior to
its stated expiration if the original retail purchaser sells
or transfers the Product to any other party.
Polk Audio, Inc., warrants, to the original retail purchaser
only, that this
HDX3
will be free from defects in material
and workmanship for a period of one (1) year from the
date of original retail purchase from a Polk Audio Authorized
Dealer. To allow Polk Audio to offer the best possible warranty service, please register your new product online at:
www.polkaudio.com/registration or call Polk customer
service 800-377-7655 in the USA within ten (10) days of
the date of original purchase. Be sure to keep your original
purchase receipt.
Defective Products must be shipped, together with proof
of purchase, prepaid insured to the Polk Audio Authorized
Dealer from whom you purchased the Product, or to the
Factory at: 2550 Britannia Boulevard, Suite A, San Diego,
California 92154. Products must be shipped in the original
shipping container or its equivalent; in any case the risk
of loss or damage in transit is to be borne by you. If upon
examination at the Factory or Polk Audio Authorized Dealer
it is determined that the unit was defective in materials
or workmanship at any time during this Warranty period,
Polk Audio or the Polk Audio Authorized Dealer will, at
its option, repair or replace this Product at no additional
charge, except as set forth below.
All replaced parts and Products become the property
of Polk Audio. Products replaced or repaired under this
warranty will be returned to you, within a reasonable
time, freight prepaid.
This warranty does not include service or parts to repair
damage caused by accident, disaster, misuse, abuse, negligence, inadequate packing or shipping procedures, commercial use, voltage inputs in excess of the rated maximum
of the unit, cosmetic appearance of cabinetry not directly
attributable to defect in materials or workmanship, or service, repair, or modification of the Product which has not
been authorized or approved by Polk Audio. This warranty
shall terminate if the Serial number on the Product has
been removed, tampered with or defaced.
This warranty is in lieu of all other expressed Warranties.
If this Product is defective in materials or workmanship as
warranted above, your sole remedy shall be repair or replacement as provided above. In no event will Polk Audio,
Inc. be liable to you for any incidental or consequential damages arising out of the use or inability to use the Product,
even if Polk Audio, Inc. or a Polk Audio Authorized Dealer
has been advised of the possibility of such damages, or
for any claim by any other party. Some states do not allow
the exclusion or limitation of consequential damages, so
the above limitation and exclusion may not apply to you.
All implied warranties on this Product are limited to the
duration of this expressed Warranty. Some states do not
allow limitation on how long an implied Warranty lasts, so
the above limitations may not apply to you. This Warranty
gives you specific legal rights, and you also may have other
rights which vary from state to state.
This Warranty applies only to Products purchased in
Canada, the United States of America, its possessions, and
U.S. and NATO armed forces exchanges and audio clubs.
The Warranty terms and conditions applicable to Products
purchased in other countries are available from the
Polk Audio Authorized Distributors in such countries.
Polk Audio Customer Service 800-377-7655 (Outside US & Canada 410-358-3600) M-F, 9AM-6PM EST, polkcs@polkaudio.com For more info visit www.polkaudio.com
CAUTION!
THIS PRODUCT UTILIZES A LASER. USE OF CONTROLS OR ADJUSTMENTS OR PERFORMANCE
OF PROCEDURES OTHER THAN THOSE SPECIFIED HEREIN MAY RESULT IN HAZARDOUS
RADIATION EXPOSURE. DO NOT OPEN THE COVER AND DO NOT REPAIR YOURSELF.
REFER SERVICING TO QUALIFIED SERVICE PERSONNEL.
IMPORTANT FOR LASER PRODUCTS
1. CLASS 1 LASER PRODUCT
2. DANGER: Visible and invisible laser radiation when open and interlock failed or defeated.
Avoid direct exposure to beam.
3. CAUTION: Do not open the top cover. There are no user serviceable parts inside the Unit;
leave all servicing to qualified service personnel.
 Loading...