

Page 1

FX SERIES
FX300i
FX500i
Instruction
Manual
5601 METRO DRIVE,
BALTIMORE, MARYLAND 21215, USA,
800-377-7655, FAX: 410-764-5266
http://www.polkaudio.com
RM0445-1
Page 2

ENGLISH ESPAÑOL
2
For more information visit our web site at http://www.polkaudio.com
1
FRANÇAIS DEUTSCH
A WORD FROM MATTHEW POLK
Dear Music Lover,
Thank you for purchasing Polk Audio
®
speakers. Designing and building speakers
is more than just a business for the people
of Polk Audio—it is our passion. We are
all dedicated to your complete satisfaction
and delight.
Your new Polk™speakers include the latest
loudspeaker technology to assure
outstanding performance and unmatched
quality. Please take a moment to read
through this manual for information on
getting the greatest enjoyment from these
fine instruments.
We make a wide variety of main, center, rear
channel, powered subwoofer, and accessory
speakers so you can assemble a complete
and well matched high-performance
surround sound system. If you would like
more information on building the Polk system
of your dreams, consult your Polk Audio
dealer or call our Customer Service
Department. In North America call
(800) 377-7655, Monday through Friday,
9:00am through 6:00pm Eastern time.
Sincerely,
Matthew S. Polk
Chairman and Co-Founder
P.S.: A wealth of information can also be
found on our award-winning web site:
www.polkaudio.com.
UN MOT DE MATTHEW POLK
Cher mélomane,
Merci d’avoir acheté des haut-parleurs Polk
Audio. Chez Polk Audio, la création et la fabrication de haut-parleurs est plus qu’une industrie—c’est une passion. Nous sommes tous
dévoués à votre entière satisfaction et à votre
plus grand plaisir.
Vos nouveaux haut-parleurs Polk utilisent la
plus récente technologie en matière de
haut-parleurs, vous assurant une performance exceptionnelle et une qualité inégalée.
Pour tirer le plus grand plaisir de ces instruments perfectionnés, veuillez lire attentivement ce manuel.
Nous fabriquons un large éventail de hautparleurs principaux, centraux, arrière, complémentaires et de subwoofers amplifiés pour
que vous puissiez assembler un système
ambiophonique (“surround sound”) de haute
performance complet et bien agencé. Si vous
voulez plus de renseignements sur le système
Polk de vos rêves, consultez votre dépositaire
Polk Audio ou appelez notre département de
Service à la Clientèle en Amérique du Nord,
composez le (410) 764-5264, du lundi au
vendredi, de 9h00 à 18h00, heure de l’Est.
Bien à vous,
Matthew S. Polk
Président et co-fondateur
P.S.: Vous trouverez aussi une abondance d’informations sur notre site Web primé:
www.polkaudio.com.
EIN WORT VON MATTHEW POLK
Lieber Musikfreund,
Recht herzlichen Dank, dass Sie Polk Audio
Lautsprecher gekauft haben. Der Entwurf
und die Herstellung von Lautsprechern ist
mehr als nur einfach ein Geschäft für die
Leute hier bei Polk Audio—es ist unsere
Leidenschaft. Wir arbeiten pflichtbewusst,
dass Sie vollkommen zufrieden sind und Ihre
Freude daran haben.
Ihre neuen Polk Lautsprecher wurden nach
der neuesten Lautsprecher-Technologie
gebaut, damit Ihnen Spitzenleistung und
einzigartige Qualität sicher sind. Bitte
nehmen Sie sich einen Moment Zeit, um
dieses Informationsbuch durchzulesen,
damit Sie den grösstmöglichen Genuss an
diesen wunderbaren Geräten haben.
Wir stellen eine breite Palette von
Haupt-, Mittel-, Hinterkanal- angetriebenen
Subwoofer- und Zusatz-Lautsprechern her,
damit Sie ein komplettes und gut zusammen
passendes “Surround Sound” System der
Spitzenleistung zusammenstellen können.
Falls Sie mehr Information über die
Herstellung des Polk Systems Ihrer Träume
möchten, wenden Sie sich an Ihren Polk
Audio Händler oder rufen Sie unsere
Kundenabteilung unter der Rufnummer
0681-9979288.
Mit freundlichen Grüssen!
Matthew S. Polk
Vorsitzender und Mitbegründer
P.S.: Eine Fülle von Informationen halten wir
auch auf unserer mehrfach ausgezeichneten
Website: www.polkaudio.com für Sie bereit.
UNAS PALABRAS DE MATTHEW POLK
Estimado amante de la música,
Gracias por adquirir las bocinas de Polk
Audio. El diseñar y fabricar bocinas, más
que un negocio es un verdadero placer. En
Polk Audio nos dedicamos a brindarle
completa satisfacción.
Sus nuevas bocinas Polk incorporan la más
reciente tecnología en matera de bocinas, que
le garantiza a usted un rendimiento sobresaliente y una calidad inigualable. Sírvase
tomar unos momentos para leer este manual,
a fin de informarse de cómo disfrutarse al
máximo estos finos instrumentos.
Fabricamos un gran surtido de bocinas principales, de centro, de canal trasero, subwoofers
de potencia y otras bocinas complementarias,
de manera que usted pueda montar todo un
sistema de sonido circundante, balanceado y
de alto rendimiento. Si usted quisiera recibir
más información acerca de como construir el
sistema Polk de sus sueños, consulte a su
representante de Polk Audio, o llame a nuestro departamento de servicio al cliente, en
América del Norte, comuníquese al (410) 7645213, entre las 09:00 y 18:00, hora del Este,
de lunes a viernes.
Atentamente,
Matthew S. Polk
Presidente de la Junta Directiva y Co-Fundador
P.D.: Encuentre abundante e útil
información en nuestro sitio del Internet:
www.polkaudio.com.
Page 3
For more information visit our web site at http://www.polkaudio.com
32
ENGLISH ESPAÑOL FRANÇAIS DEUTSCH
PRODUCT FEATURES
The Polk Audio FX Series was designed
to set a new standard for unmatched value,
performance and satisfaction of surround
channel performance for today’s demanding
Home Theater systems. When any of the
FX Series products are used in conjunction
with matched Polk speakers for front, center
and subwoofer output you’ll have a complete
home theater system capable of exciting
spine tingling performance.
Below are some of the features of the FX
Series that are important in achieving the
design goals of spectacular performance
and ease of use. Many of these design
elements were developed for our state
of the art Signature Reference Theater
®
(SRT®) system.
GETTING STARTED
Please inspect each loudspeaker carefully.
Notify your Polk dealer if you notice any
damage. Keep the carton and packing material. They will do the best job of protecting
your speakers if they need to be transported.
Each carton should contain the following
items:
• One Pair (2) FX Series loudspeaker
• Eight (8) adhesive rubber pads
• Template for wall mounting
• Two (2) wall mounting screws
CARACTERISTIQUES DU PRODUIT
La Série Audio FX de Polk établit de nouvelles normes de performance, de valeur et
de satisfaction en matière d’enceintes ambiophoniques conçues pour les systèmes perfectionnés de cinéma maison d’aujourd’hui.
Lorsque vous utilisez des composantes de
la Série FX avec des enceintes Polk assorties
pour les canaux avant, central et d’extrèmesgraves, vous obtenez un système complet
de cinéma maison dont la performance est
exceptionnelle.
Voici quelques-unes des caractéristiques
qui permettent à la Série FX d’atteindre
un niveau de performance spectaculaire
tout en étant facile à utiliser. Plusieurs
d’entre elles ont été développées pour
notre système haut de gamme Signature
Reference Theater (SRT).
COMMENÇONS
Examinez chaque haut-parleur au cours du
déballage et informez le fournisseur Polk en
cas de dommage. Conservez le carton ainsi
que les accessoires d’emballage. Le carton
d’origine et les accessoires d’emballage
protègeront au mieux vos haut-parleurs
en cas de transport. Conservez la boîte
et les accessoires d’emballage, ils offrent
la meilleure protection à vos enceintes en
cas de déménagement.
• Une paire (2) d’enceintes Série FX
• Huit (8) coussinets autocollants
en caoutchouc
•Gabarit pour Montage au Mur
• Deux (2) vis à placoplâtre
BESONDERHEITEN DES PRODUKTS
In Sachen Leistung, Wertigkeit und Anspruch
definiert die FX-Serie von Polk neue
Maßstäbe für den Surroundklang moderner
und anspruchsvoller Heimkinosysteme.
Durch den Einsatz eines Produktes der
FX-Serie zusammen mit weiteren, abgestimmten Polk-Lautsprechern (Front, Center
und Subwoofer) erleben Sie das ultimative
Heimkino, das Ihnen wahre Schauer über
den Rücken jagen wird.
Nachstehend einige der Leistungsmerkmale
der FX-Serie, die dem System zu seiner
spektakulären Leistung bei gleichzeitiger
Bedienerfreundlichkeit verhelfen. Die
überwiegende Zahl dieser Merkmale wurde
eigens für unser technisch ausgereiftes
teures Signature Reference Theatre
(SRT-System) entwickelt.
FANGEN WIR AN!
Bitte überprüfen Sie jeden Lautsprecher
während des Auspackens und
benachrichtigen Sie Ihren Polk Händler
wenn Sie irgendwelche Schäden bemerken.
Heben Sie außerdem den Karton und das
Verpackungsmaterial auf. Der OriginalKarton und das Verpackungsmaterial
schützen Ihre Lautsprecher am besten
wenn Sie sie transportieren müssen. Bitte
heften Sie hier Ihre Quittung für spätere
Bezugnahme fest. Sie ist für Reparaturen
unter Garantie möglicherweise notwendig.
Sie ist für Reparaturen unter Garantie
möglicherweise notwendig.
•Ein Paar (2) FX Lautsprecher
•Acht (8) selbstklebende Gummipads
•Schablone für Wandbefestigung
•2 Schrauben zur Wandbefestigung
FIGURE 1
OR
CARACTERISTICAS DEL PRODUCTO
La Serie FX de Polk Audio fue diseñada con
el objeto de fijar un nuevo estándar en lo que
se refiere a valor sin par, sonido y satisfacción
derivada del rendimiento de los sistemas exigentes de Teatro en El Hogar de hoy en día.
Cuando cualquier producto de la Serie FX se
usa en combinación con la bocinas parejas
Polk para las salidas delantera, del centro y
del subwoofer, usted tendrá un sistema completo de teatro en el hogar capaz de producir un
sonido real que le hará vibrar de emoción.
A continuación se enumeran algunas de las
características de la Serie FX qie tienen importancia para cumplir con las metas de diseño de
sonido espectacular y facilidad de uso. Muchos
de estos elementos de diseño fueron desarrollados como componentes para nuestro sistema
Signature Reference Theater (SRT), con
un precio de que aprovecha la más reciente
tecnología de punta.
EMPECEMOS
Por favor inspeccione el altoparlante al momento de desempacar y notifique a Polk si nota
cualquier tipo de daño. Del mismo modo, guarde
la caja y el material de empaque en caso de que
se requiera transportar el altoparlante. Cada
caja debe contener los siguientes artículos:
• Un Par (2) bocinas Serie FX
• Ocho (8) almohadillas adhesivas de caucho
•Patron para la Instalacion en la Pared
• Dos (2) tornillos de muro en seco
Page 4

For more information visit our web site at http://www.polkaudio.com
5
ENGLISH ESPAÑOL
FRANÇAIS
DEUTSCH
4
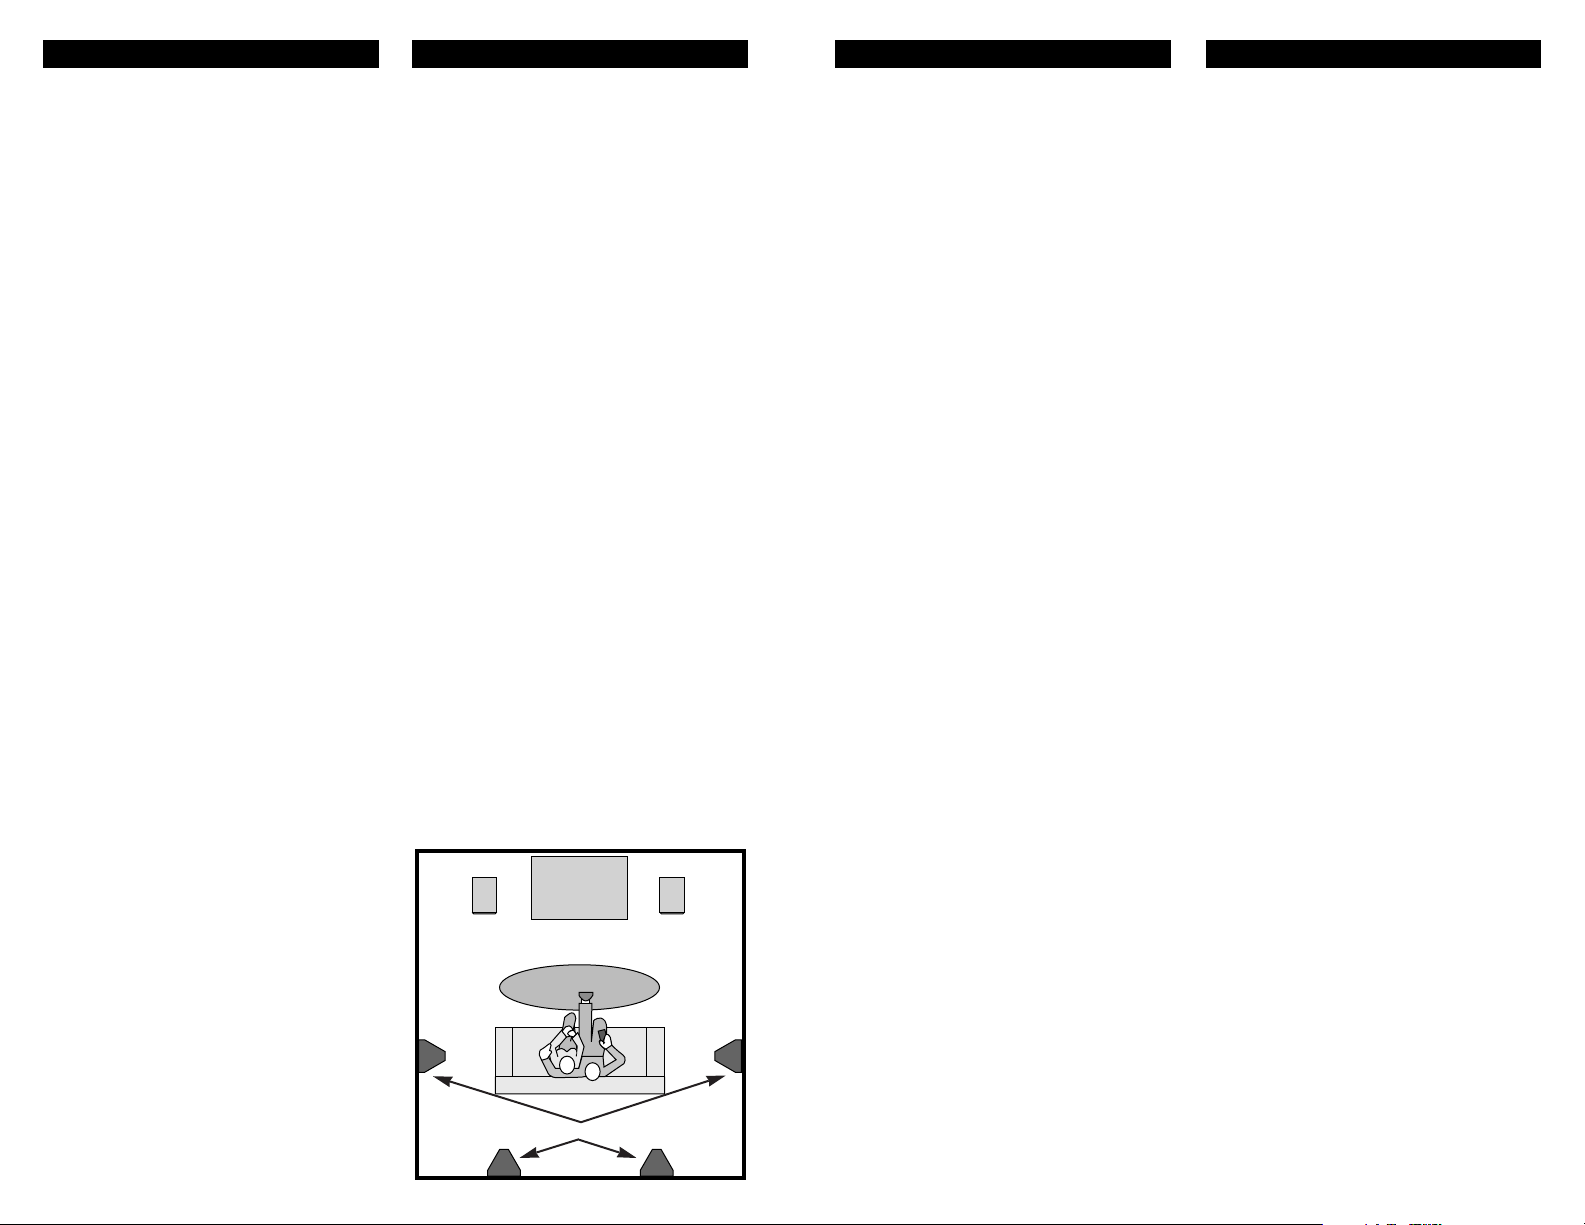
SPEAKER PLACEMENT
Here are some recommendations
to review before you determine
the permanent installation (Figure 1).
PLAZIERUNG DER LAUTSPRECHER
Nachfolgend einige Hinweise, die Ihnen
die Entscheidung über die Plazierung der
Lautsprecher erleichtern sollen (Abb. 2).
EMPLACEMENT DES ENCEINTES
Voici quelques recommandations à considérer
avant de faire l’installation permanente de
votre système (figure 1).
COLOCACIÓN DE LAS BOCINAS
He aquí algunas recomendaciones que
conviene revisar antes de determinar
la instalación permanente (Figura 1).
Location
Dipole Mode
Directly to either
side or slightly
behind listener,
on-wall
As above but
placed on a stand
or cabinet 3ft or
more in height
As above but on a
bookshelf with at
least 8" clearance
front and back
Behind and to the
sides of the listener, on-wall
Bipole Mode
Directly to either
side or slightly
behind listener,
on-wall
Behind and to the
sides of the listener, on-wall
As above but
placed on a stand
or cabinet 3ft or
more in height
As above but
on a bookshelf
with at least
8"clearance front
and back
Sound
diffuse rear
soundfield, lean
timbral balance,
convincing front
to rear image flow
slightly leaner
balance
richer midrange
balance with
some additional
sonic coloration
depending on
shelf
more diffuse rear
soundfield, lean
timbral balance,
less specific rear
images
very specific rear
and side images,
can limit surround-soundstage
more specific rear
and side images,
richer midrange
balance, good
front to rear
image flow
slightly leaner
balance
richer midrange
balance with
some additional
sonic coloration
depending on
shelf
Recommendation
Highly
Recommended
Recommended
Recommended
Recommended
Okay
Recommended
Recommended
Recommended
Situación
Operación
Dipolo
Directamente por
ambos costados o
un poco detrás
del oyente, sobre
la pared,
Así como indicado
anteriormente,
pero colocado
sobre un estante
o gabinete de 3
pies de altura o
más
Así como indicado
anteriormente,
pero colocado
sobre un librero
con por lo menos
8 pulgadas de
espacio libre por
delante y por
detrás
Detrás y a los
lados del oyente.
Sobre la pared
Operación
Bipolo
Directamente por
ambos costados o
un poco detrás
del oyente, sobre
la pared
Detrás y a los
lados del oyente,
sobre la pared
Así como indicado
anteriormente,
pero colocado
sobre un estante
o gabinete de 3
pies de altura o
más
Así como indicado
anteriormente,
pero colocado
sobre un librero
con por lo menos
8 pulgadas de
espacio libre por
delante y por
detrás
Sonido
campo trasero de
sonido difuso,
timbre sintonizado delgado, convincente flujo de
imagen desde
enfrente hacia
atrás
Equilibrio un poco
más delgado.
equilibrio más
lleno del registro
mediano con algo
de coloración
sónica adicional
según la repisa..
campo trasero de
sonido más difuso, timbre sintonizado delgado
imágenes
traseras y laterales menos
específicas
imágenes
traseras y laterales muy
específicas puede
limitar el escenario del sonido
circundante
imágenes
traseras y laterales más
específicas,
sonido más lleno
equilibrio del registro mediano,
buen flujo de imagen desde
enfrente hacia
atrás
Equilibrio un poco
más delgado.
equilibrio más
lleno del registro
mediano con algo
de coloración
sónica adicional
según la repisa.
Recomendación
Altamente
recomendada
Recomendada
Recomendada
Recomendada
OK
Recomendada
Recomendada
Recomendada
Emplacement
Mode Dipôle
De chaque côté
ou légèrement
derrière le point
d’écoute, au mur.
Comme ci-dessus
mais sur un
piédestal ou un
meuble de 1 m ou
plus de hauteur.
Comme ci-dessus
mais sur une
étagère, avec au
moins 20 cm de
dégagement avant
et arrière
Derrière et de
chaque côté du
point d’écoute, au
mu
Mode bipôle
De chaque côté
ou légèrement
derrière le point
d’écoute, au mur
Derrière et de
chaque côté du
point d’écoute, au
mu
Comme ci-dessus
mais sur un
piédestal ou un
meuble de 1 m ou
plus de hauteur
Comme ci-dessus
mais sur une
étagère avec au
moins 20 cm de
dégagement avant
et arrière
Son
Champ arrière
diffus, timbre
tonal restreint,
cohérence
avant/arrière.
Sonorité un peu
plus restreinte
Équilibre plus
riche des médiums, plus ou
moins de coloration selon l’étagère.
Champ arrière
plus diffus, timbre
restreint, image
arrière moins distincte
Images arrière et
latérales très distinctes. Ceci peut
limiter le
déploiement de
l’ambiophonie
Images arrière et
latérales plus
précises, équilibre plus riche des
médiums, bonne
cohérence
avant/arrière
Timbre un peu
plus restreint
Équilibre des
médiums plus
riche, plus ou
moins de coloration selon l’étagère
Recommandation
Fortement
Recommandé
Recommandé
Recommandé
Recommandé
Acceptable
Recommandé
Recommandé
Recommandé
Plazierung
Dipol-Modus
Entweder seitlich
oder knapp hinter
dem Hörplatz an
der Wand
Wie oben, aber
auf einem mindestens 1 m
hohen Ständer
oder
Schrankelement
Wie oben, aber in
einem Regal mit
mindestens 20 cm
Abstand vorne
und hinten.
Hinter oder
seitlich vom
Hörplatz an der
Wand
Bipol-Modus
Direkt neben
oder knapp hinter
dem Hörplatz an
der Wand
Neben oder hinter
dem Hörplatz an
der Wand
Wie oben, aber
auf einem mindestens 1 m
hohen Ständer
oder
Schrankelement
Wie oben, aber in
einem Regal mit
mindestens 20 cm
Abstand vorne
und hinten
Klang
diffuses Klangbild
hinten, zeitliche
Abstimmung,
überzeugender
Verlauf des
Klangbildes von
vorne nach hinten
Etwas weniger
ausgewogen
Reichere Mitten
mit etwas zusätzlichem Schall,
Klangfärbung
abhängig vom
Regal
Diffuseres
Klangbild hinten,
exakte zeitliche
Abstimmung,
Abbildung hinten
weniger detailliert
Sehr ausgeprägte
Abbildung hinten
und seitlich,
Limitierung des
Surroundklangs
möglich
Detaillierte
Abbildung hinten
und seitlich,
reiche Mitten,
guter Verlauf des
Klangbildes von
vorne nach hinten
Etwas weniger
ausgewogen
Reichere Mitten
mit etwas zusätzlichem Schall,
Klangfärbung
abhängig vom
Regal
Empfehlung
Sehr
empfehlenswert
Empfehlenswert
Empfehlenswert
Empfehlenswert
In Ordnung
Empfehlenswert
Empfehlenswert
Empfehlenswert
Page 5

For more information visit our web site at http://www.polkaudio.com
76
ENGLISH ESPAÑOL FRANÇAIS DEUTSCH
ONE FX SERIES SPEAKER IS A “LEFT”
CHANNEL SPEAKER AND THE OTHER
IS A “RIGHT”
The serial number label identifies which is
which (Figure 2). The “Left” speaker should
be placed on the left side of the room as you
face the front of the room. There are 2 grilles
on each speaker, however, there is one logo
on one of the grilles. This can be used to
confirm speaker orientation since the grille
with the logo should be placed so that it
faces the rear wall.
DIPOLE/BIPOLE SWITCH
For ultimate flexibility and ease of operation
the FX features a bipole/dipole switch
(Figure 3, 3A). This control can be used
once the speaker has been installed and
should be set according to placement
and personal preference (See section
on speaker placement and Figure 1).
UNA BOCINA SERIE FX C ONSTA DE UN A
BOCINA PARA EL CANAL IZQUIERDO
Y OTRA PARA EL CANAL DERECHO.
La etiqueta que contiene el número de serie
identifica cual es cual (Figura 2). La bocina
para el canal izquierdo debe situarse por
el lado izquierdo de la habitación al estar
viendo hacia el frente de la habitación. Cada
bocina tiene dos rejillas, una de las cuales
lleva un logotipo. El mismo se puede usar
para confirmar la orientación de la bocina
porque la rejilla que tiene el logotipo debe
situarse de manera que esté viendo hacia
la pared trasera.
INTERRUPTOR DIPOLO/BIPOLO
Para lograr la máxima flexibilidad y facilidad
de operación, el modelo FX cuenta con un
Interruptor Dipolo/Bipolo (Figura 3, 3A).
Este control puede usarse después de instalada la bocina y debe fijarse de acuerdo a la
colocación de la bocina y al gusto personal
(Vea la sección sobre colocación de bocinas
la Figura 1).
UNE ENCEINTES SÉRIE FX EST
COMPOSÉ D’UNE ENCEINTE
“
DROITE
”
ET D’UNE ENCEINTE “GAUCHE”
Le numéro de série les identifie (fig.2). En
regardant vers le devant de la pièce, placez
l’enceinte “gauche” du côté gauche de la
pièce. Chaque enceinte est munie de deux
grilles, dont l’une est dotée d’un logo. Cette
caractéristique permet de déterminer l’orientation des enceintes puisque la grille dotée
du logo doit faire face au mur arrière.
COMMUTATEUR DIPÔLE/BIPÔLE
Pour une souplesse exceptionnelle et un
réglage des plus simples, les FX sont munies
d’un commutateur Dipôle/Bipôle (figure 3,
3A). Ce commutateur peut être utilisé
lorsque les enceintes ont été installées
et réglées selon leur emplacement et
vos préférences sonores (Voir la section
traitant de l’emplacement des enceintes
et la figure 1).
EIN FX LAUTSPRECHER IST EIN
“LINKER” KANAL LAUTSPRECHER
|UND DER ANDERE IST EIN “RECHTER”
Aufschluß darüber, ob es sich um den rechten oder linken Satelliten handelt, gibt die
aufgeklebte Seriennummer (Abb. 2). Der
linke Satellit sollte auf der linken Seite des
Raumes plaziert werden (Raum von vorne
betrachtet). Jeder Lautsprecher ist mit 2
Abdeckgrills versehen, auf einem der Grills
ist ein Logo angebracht, das der Orientierung
dienen kann. Der mit dem Logo versehene
Grill sollte zur hinteren Wand zeigen.
DIPOL/BIPOL-UMSCHALTER
Der FX Dipol/Bipol-Umschalter an der
der hinteren Wand zugerichteten Seite
des Lautsprechers (Abb. 3, 3A) sorgt für
Bedienerfre-undlichkeit und Flexibilität.
Diese Funktion kann betätigt werden, nachdem der Lautsprecher montiert wurde und
hängt von dessen Position und dem persönlichen Hörgeschmack ab (s. den Abschnitt
über die Plazierung des Lautsprechers
und Abb. 1).
Compatible with 8 ohm outputs.
Use with amplifiers rated from
10 to150 watts/channel.
Refer to owner’s manual for
complete hook-up instructions
and placement guidelines.
f/x500 Surround Loudspeaker (Left)
Compatible with 8
Use with amplifier
10 to150 watts/ch
Refer to owner’s m
complete hook-up
and placement gu
FIGURE 2
FIGURE 3 (FX300i) FIGURE 3A (FX500i)
BIPOLE
DIPOLE
B
IP
O
L
E
D
IP
O
L
E
RIGHT SPEAKER
BIPOLE DIPOLE
Page 6

For more information visit our web site at http://www.polkaudio.com
98
ENGLISH ESPAÑOL FRANÇAIS DEUTSCH
WALL MOUNTING
Each FX has an attached keyhole slot bracket to mount it to a wall. Follow the steps
below to safely secure the speaker. In the
speaker carton you’ll find a template to help
mark the correct screw locations. LIFTING
THE SPEAKER SAFELY ONTO THE WALL IS
A TWO PERSON JOB SO BE PREPARED.
Wall installation of the FX speakers requires
basic skills in using tools such as a drill and
screwdriver. If you are in doubt that you
possess the necessary skills or tools, consult
your Polk dealer or a professional installer.
1. Make sure the locations you select do not
conceal electrical wiring or plumbing.
2. Attach the supplied rubber pads to
the rear of the speaker (Figure 4).
3. Hold the speaker in the chosen location
to make sure it clears the ceiling, adjacent walls, corners, beams, lighting fixtures and door/window frames. Center
the speaker over a wall stud. Make a
mark on the wall where the left and
top sides of the speaker will be located.
4. Align the left and upper edges of the
template with the previously drawn
lines. Use tape or push pins to hold
the template in place; use a spirit level
tool or plumb bob to make sure the
template is level.
5. Mark the screw location with a sharp
pencil, piercing the paper template to
mark on the wall.
6. If you are certain that there is a
INSTALLATION MURALE
Chaque FX est munie d’un support permettant de la fixer au mur. Suivez les étapes
ci-dessous pour la fixer de façon sécuritaire.
Vous trouverez dans l’emballage des
enceintes un gabarit qui vous aidera à marquer correctement l’emplacement des vis.
L’INSTALLATION MURALE SÉCURITAIRE DES
ENCEINTES REQUIERT DEUX PERSONNES.
Pour faire l’installation murale des FX vous
aurez besoin d’une perceuse et d’un
tournevis. Si vous doutez de vos compétences techniques ou ne possédez pas les
outils nécessaires, consultez votre détaillant
Polk ou un installateur professionnel.
1. Assurez-vous que l’emplacement choisi
ne dissimule pas de fils électriques ou
de plomberie.
2. Fixez les coussinets de caoutchouc
à l’arrière de l’enceinte (fig.4).
3. Positionnez l’enceinte à l’endroit choisi
et assurez-vous d’un dégagement suffisant du plafond, des murs, des coins,
des poutres, des luminaires et des
cadres de portes et de fenêtres. Centrez
l’enceinte sur un montant de mur. Tirez
un trait sur le mur pour marquer les
côtés gauche et supérieur de l’enceinte
dans sa position définitive.
4. Alignez les côtés gauche et supérieur
du gabarit avec les traits tirés au
mur. Utilisez du ruban adhésif ou des
punaises pour tenir le gabarit en place.
Utilisez un niveau ou un plomb pour
vérifier le niveau du gabarit.
WANDBEFESTIGUNG
Jeder FX verfügt über zwei fest mit
dem Gehäuse verbundene Wandhalterungen.
Für eine sichere Montage befolgen Sie bitte
nachstehende Hinweise. Eine Schablone,
mit deren Hilfe die Position der Bohrlöcher
markiert werden kann, liegt dieser
Verpackung bei. GEHEN SIE DAVON AUS,
DASS SIE FÜR DIE MONTAGE DES LAUTSPRECHERS DIE HILFE EINER ZWEITEN
PERSON BENÖTIGEN.
Für die Montage des FX benötigen
Sie Bohrmaschine und Schraubenzieher.
1. Stellen Sie sicher, daß sich hinter der
Stelle, an der Sie die Lautsprecher
befestigen möchten, keine Wasseroder elektrischen Leitungen befinden.
2. Bringen Sie die mitgelieferten
Gummipads an der Rückseite des
Lautsprechergehäuses an (Abbildung 4).
3. Stellen Sie vor dem Bohren sicher, daß
der Lautsprecher nicht an die Decke,
eine angrenzende Wand, Ecken,
Leuchten, Tür- oder Fensterrahmen
anstößt. Markieren Sie entlang der
rechten und linken Gehäuseecken
die Position an der Wand.
4. Halten Sie die Schablone nun an die
zuvor angezeichnete Stelle der Wand,
an der Sie den Lautsprecher befestigen
möchten. Befestigen Sie die Schablone
mit Klebestreifen oder Stecknadeln,
verwenden Sie eine Wasserwaage,
um sicherzugehen, daß die Schablone
genau waagerecht angebracht ist.
INSTALACIÓN SOBRE LA PARED
El modelo FX viene equipado con un brazo
integrado con una ranura de bocallave para
su instalación sobre la pared. Siga los pasos
descritos a continuación para montar la bocina sobre la pared con seguridad. Adentro de
la caja de la bocina usted encontrará una
plantilla que le ayudará a marcar los lugares
correctos para los tornillos. ¡ADVERTENCIA!:
SE REQUIERE DE DOS PERSONAS PARA
LEVANTAR LA BOCINA Y MONTARLA SOBRE
LA PARED CON SEGURIDAD.
Para la instalación de las bocinas FX sobre
la pared se necesita contar con la habilidad
básica de usar herramientas tales como el
taladro y el atornillador. Si usted cree que
no cuenta con la habilidad necesaria o con
las herramientas, consulte a
su tienda Polk o a un instalador profesional.
1. Cerciórese de que los lugares
seleccionados no cubran alambrado
eléctrico o tubería de plomería.
2. Fije la almohadillas de caucho
suministradas con el equipo a la
parte trasera de la bocina (Figura 4).
3. Sostenga la bocina en el lugar seleccionado para cerciorarse de que no
tope con el cielo raso, las paredes
adyacentes, las esquinas, las vigas, los
artefactos de alumbrado y los marcos
de las puertas y/o las ventanas. Centre
la bocina en una viga de la pared.
Ponga una marca en la pared en el
lugar donde el lado izquierdo y la parte
Compatible with 8 ohm outputs.
Use with amplifiers rated from
10 to150 watts/channel.
Refer to owner’s manual for
complete hook-up instructions
and placement guidelines.
f/x500 Surround Loudspeaker (Left)
ATTACH RUBBER PADS HERE
FIGURE 4
Page 7

For more information visit our web site at http://www.polkaudio.com
1110
ENGLISH ESPAÑOL FRANÇAIS DEUTSCH
stud behind the wall surface, drive a
#7 x 2 1/2" screw (provided) through
the wall and into the stud at the
marked location.
7. Let the screw protrude 3/8" to 1/2"
from the wall. If there is no stud behind
the chosen location, install a wall
anchor capable of supporting at least
25 lbs. (not supplied) into the wall by
following wall anchor manufacturer’s
instructions.
8. Attach wires to speaker terminals.
9. Lift the speaker and locate so that
the screw head passes through the
large center hole of the keyhole slot.
10. Let the speaker slide straight down,
allowing the screw head to slip behind
the smaller end of the keyhole slot.
11. Push the speaker gently along the
bottom and top side, to insure that
keyhole bracket is engaged. If not,
repeat steps 9-10.
superior de la bocina se van a colocar.
4. Alinee los bordes izquierdo y superior
de la plantilla con las líneas previamente trazadas. Use cinta o tachuelas
para fijar la plantilla; use un nivel de
burbuja o plomo para cerciorarse de
que la plantilla esté nivelada.
5. Marque el lugar para el tornillo con un
lápiz puntiagudo, penetrando el papel
de la plantilla para marcar el lugar en
la pared.
6. Cuando esté usted seguro de que hay una
viga detrás del lugar marcado en la
superficie de la pared, atornille el tornillo
#7 x 2 1/2 pulgada (provisto) a través de
la pared en la viga en el lugar marcado.
7. Deje que el tornillo sobresalga de la
pared entre 3/8 de pulgada y media
pulgada. Si no hay ninguna viga detrás
del lugar seleccionado, instale una
ancla de pared con capacidad para
soportar por lo menos 25 libras (no
suministrada) en la pared siguiendo
las instrucciones del fabricante de
dicha ancla de pared.
8. Conecte los alambres a los bornes de
la bocina.
9. Levante la bocina y sitúela de manera
que la cabeza de tornillo pase a través
de la apertura grande del centro de la
ranura de bocallave.
10. Deje que la bocina se deslice verticalmente, de manera que las cabezas de
tornillo se quede por detrás del extremo chico de la ranura de bocallave.
11. Jale la bocina suavemente arriba y
abajo, a fin de cerciorarse de que el
brazo con ranura de bocallave esté
enganchado. En caso negativo, repita
los pasos 9 y 10.
5. Marquez l’emplacement de la vis à
l’aide d’un crayon aiguisé, en perçant
le gabarit pour marquer le mur.
6. Après vous être assuré qu’il y a un
montant derrière la surface du mur,
vissez une vis no.#7 x 6,3cm (fournie)
à travers le mur et dans le montant à
l’endroit marqué.
7. Laissez les vis dépasser du mur de 1
à 1,25cm. S’il n’y a pas de montant à
l’endroit choisi, utilisez des chevilles
ou des attaches (non fournies) capables
de supporter un poids d’au moins 12 kg
et fixez-les au mur selon les indications
du fabricant. Utilisez toujours deux
attaches et deux vis par enceinte.
8. Branchez les fils aux bornes
de l’enceinte.
9. Levez l’enceinte et glissez son support
sur la vis jusqu’à ce que la tête de la
vis pénètre la partie évasée de la fente
du support.
10. Laisser l’enceinte glisser vers le bas,
permettant à la tête de la vis de glisser
sous la partie plus mince de la fente.
11. Appuyez légèrement sur le bas et le
dessus de l’enceinte pour vous assurer
que la tête de vis est bien engagée et
retenue par le support. Si elle ne l’est
pas, répétez les étapes 9 et 10.
5. Richten Sie die linke und obere Kante
der Schablone entlang der bereits
angezeichneten Linie aus. Markieren
Sie das Bohrloch mit einem spitzen
Bleistift, indem Sie die Schablone
durchbohren. Für eine sichere
Befestigung sollten Sie einen Dübel
(nicht im Lieferumfang enthalten)
in der Wand anbringen.
6. Die Schraube sollte ca. 10-12 mm
aus der Wand herausragen.
7. Befestigen Sie die Kabel an den
Lautsprecherterminals.
8. Halten Sie den Lautsprecher so, daß
der Schraubenkopf durch die mittlere
große Öffnung des Schlitzes paßt.
9. Lassen Sie den Lautsprecher vorsichtig
nach unten gleiten, bis das obere,
schmale Ende des Schlitzes am
Schraubenkopf anliegt.
10. Bewegen Sie den Lautsprecher vorsichtig hin und her, um sicherzugehen,
daß er sicher an der Klammer befestigt
ist. Falls nicht, wiederholen Sie die
Schritte 9-10.
Page 8

For more information visit our web site at http://www.polkaudio.com
1312
ENGLISH ESPAÑOL FRANÇAIS DEUTSCHESPAÑOL
CONNECTING THE SPEAKERS
TO THE SYSTEM
Use two conductor 16 gauge or thicker
speaker wires. Measure enough wire to
reach from your receiver or amp to each
speaker. Keep in mind the extra length
needed for running the wire around doors.
Leave yourself about 12" of extra slack to
allow moving the speakers or receiver
without having to disconnect the wires.
Note that one of the terminals on the rear of
the speaker is marked red (+) and the other
black (-). Make certain that you connect the
wire from the red (+) terminal of your
amplifier to the red (+) terminal on your
speaker, and the wire from the black (-)
terminal of the amplifier to the black (-)
terminal on your speaker (Figure 5). Most
wire has some indication (such as color
coding, ribbing, or writing) on one of the two
conductors to help maintain consistency.
Strip 1/2 inch of insulation from each of the
two conductors on both ends to expose the
bare wire. Twist the exposed wire of each
conductor to form two unfrayed strands
(Figure 6). Connect two conductors to the
receiver or amp (refer to the owner’s manual
supplied with your electronics for assistance
with proper hookup).
CONECTANDO LOS ALTOPARLANTES
AL SISTEMA
Utilice dos cables para altoparlantes de
calibre 16 o más gruesos. Mida la suficiente
cantidad de cable para alcanzar desde su
amplificador o receptor hasta cada uno de
los altoparlantes. No se olvide considerar el
cable adicional que se necesita para rodear
las puertas y ventanas. Deje aproximadamente 12 pulgadas(30cm) adicionales para
poder mover los altoparlantes o el receptor
sin tener que desconectar los cables.
Observe que una de las terminales en la
parte posterior del altoparlante es roja e
identificada como (+) y la otra es negra (-).
Asegúrese de conectar el cable de la terminal roja (+) de su amplificador a la terminal
roja (+) de su altoparlante, y el cable de la
terminal negra (-) de su amplificador, a la
terminal negra (-) de su altoparlante (Figura
5). La mayoría de los cables tienen algún
método de identificación (codificado por
colores, estrías o letras) en uno de los
conductores, lo cual le ayudará a mantener
consistencia.
Pele 1/2 pulgada del material aislante de los
extremos de cada uno de los conductores
para exponer el alambre. Tuerza el alambre
expuesto hasta que queden dos hebras
enteras (Figura 6). Conecte los dos conductores al receptor o amplificador (consulte
con el manual de propietario de su equipo
electrónico para obtener ayuda con
la conexión).
CONNECTER LES HAUT-PARLEURS
AU SYSTÈME
Employez du câble à deux conducteurs de
section supérieure ou égale à #16. Prévoyez
assez de câble pour aller de votre récepteur
ou amplificateur jusqu’à chaque haut-parleur. Gardez en tête qu’il vous faudra une
longueur supplémentaire pour contourner
les portes. Octroyez à peu près 12"(30cm)
de câble en plus pour vous permettre de
changer les haut-parleurs ou le récepteur
de place sans déconnecter les câbles.
Notez qu’un des pôles à l’arrière du
haut-parleur est rouge (+) et l’autre noir (-).
Assurez-vous de relier le câble du pôle rouge
(+) de votre amplificateur au pôle rouge (+)
de votre haut-parleur et le câble du pôle noir
(-) de l’amplificateur au pôle noir (-) de votre
haut-parleur (Figure 5). La plupart des
câbles portent une indication (couleur,
nervure ou lettre)sur l’un des deux
conducteurs pour faciliter l’installation.
Dénudez chaque conducteur sur 1/2 pouce
de façon à mettre le câble à nu, ceci aux
deux extrémités. Tordez le câble nu de
chaque conducteur pour former deux bouts
non-éffilés (figure 6). Reliez deux conducteurs au récepteur ou à l’amplificateur
(voir manuel de l’acheteur fourni avec
votre matériel électronique pour le raccord
à votre appareil).
BEFESTIGUNG DER LAUTSPRECHER
MIT DEM SYSTEM
Benutzen Sie zwei Leitungsdrähte 16er
Stärke oder dickeren Lautsprecherdraht.
Messen Sie genug Draht, damit er von
Ihrem Empfänger oder Verstärker zu jedem
Lautsprecher reicht. Denken Sie daran,
dass Sie extra Länge benötigen, um den
Draht um Türen und Fenster zu leiten.
Lassen Sie etwa 30cm extra Draht übrig,
damit Sie die Lautsprecher oder den
Empfänger hin- und herschieben können
ohne die Drähte abschrauben zu müssen.
Auf der Rückseite des Lautsprechers können
Sie sehen, dass eine Klemme mit Rot (+)
und die andere mit schwarz (-) markiert ist.
Überprüfen Sie, dass der Draht von der roten
(+) Klemme Ihres Verstärkers zur roten (+)
Klemme Ihres Lautsprechers geht, und dass
der Draht von der schwarzen (-) Klemme
ihres Verstärkers zur schwarzen (-) Klemme
Ihres Lautsprechers geht (Bild 5). Die
meisten Drähte zeigen auf irgendeine
Weise (wie zum Beispiel durch Farbangabe,
mit Rippen oder Beschriftung) an, um
welchen Draht es sich handelt, um
konsequent zu bleiben.
Entfernen Sie etwa 1,3 cm Isolierung von
jedem der zwei Leitungsdrähte an beiden
Enden, damit die nackten Drähte zum
Vorschein kommen. Drehen Sie die freigelegten
Drähte jedes Leitungsdrahtes, um zwei feste
Bündel herzustellen (Bild 6). Verbinden Sie
zwei Leitungsdrähte mit dem Empfänger
oder Verstärker (Wenden Sie sich an das
Bedienungshandbuch, dass Ihren Geräten
beilag, um die richtige Befestigung
festzustellen).
Compatible with 8 ohm outputs.
Use with amplifiers rated from
10 to150 watts/channel.
Refer to owner’s manual for
complete hook-up instructions
and placement guidelines.
Compatible with 8 o
Use with amplifiers
10 to
150 watts/cha
Refer to owner’s ma
complete hook-up i
and placement guid
f/x500 Surround Loudspeaker (Left)
POWER AMPLIFIER
REAR
R L
- +-
+
FIGURE 5
Page 9

For more information visit our web site at http://www.polkaudio.com
1514
ENGLISH ESPAÑOL FRANÇAIS DEUTSCH
AMPLIFIER POWER REQUIREMENTS
Your speakers will work well with a variety
of electronic components. As little as 10
watts per channel will deliver adequate
listening levels in most rooms. If you have
a large room or intend to play your system
at loud listening levels, more power is
necessary to achieve the best performance.
Consult your Polk Audio dealer for
specific recommendations.
DOLBY®AC-3®SETTINGS
If you are using a Dolby AC-3 surround
processor, use the “Small” setting for
the rear channel speaker operation. See
the instruction manual of your receiver
or processor for more detail.
SAFE LIMITS OF OPERATION
Your Polk loudspeakers are made with the
highest quality materials for years of trouble
free performance. However, damage to
loudspeakers can occur when an amplifier,
regardless of its wattage, is made to play at
higher listening levels than its power can
clearly produce (usually beyond the “1 to 2
O’clock” position on the volume control). This
results in very high levels of audible distortion, originating in the amplifier, which adds
a harsh, gritty sound to the music. Contrary
to popular belief, a speaker is more likely to
be damaged by trying to get too much volume
from a low powered amp or receiver than
from a high powered one.
POTENCIA DEL
AMPLIFICADOR REQUERIDA
Sus altoparlantes funcionarán bien con una
variedad de componentes electrónicos. Con
apenas 10 watts por canal obtendrá un nivel
de audición adecuado para la mayoría de las
habitaciones. Si usted tiene una habitación
grande o planea tener un nivel elevado de
audición, se necesitará de mayor potencia
para lograr el mejor rendimiento. Consulte
con su distribuidor de productos Polk para
obtener recomendaciones específicas.
AJUSTES DEL DOLBY AC-3
Si usted está utilizando un procesador
de sonido circundante Dolby AC-3, utilice
la posición de ajuste “pequeña” para el
funcionamiento del altoparlante del canal
posterior. Vea el manual de instrucciones
de su receptor o procesador para
mayores detalles.
¿CUÁLES SON LÍMITES DE
FUNCIONAMIENTO SEGURO?
Sus altoparlantes de la serie RT están hechos
con los materiales de la más alta calidad
que le darán muchos añosde rendimiento
sin problemas. Sin embargo, los altoparlantes
se pueden dañar si es que se exige a un
amplificador, sin importar su tamaño, que
reproduzca sonidos a un nivel de audición más
elevado del que su potencia puede producir
claramente. (Usualmente más allá de la
posición de “1 o 2 en punto” en el control de
volumen). Esta situación produce niveles
muy elevados de distorsión audible que son
PUISSANCE D’AMPLIFICATEUR
Vos haut-parleurs pourront fonctionner
correctement avec un nombre d’appareils
électroniques. Une puissance limitée à
10 watts par canal sera suffisante pour la
diffusion de niveaux d’écoute corrects dans
la plupart des pièces. Si les dimensions de
votre pièce sont inhabituelles, ou si vous
projetez d’employer votre système à un
niveau d’écoute élevé, plus de puissance
sera souhaitable pour une performance
optimale. Consultez votre fournisseur Polk
Audio si vous désirez des recommandations
plus précises.
REGLAGE DU DOLBY AC-3
Si vous êtes équipé en Dolby AC-3 ambiant
(“surround”), réglez le haut-parleur canal
arrière en position “petit”. Pour plus de
détails, voir le manuel d’instructions de votre
récepteur ou processeur.
QUELLES SONT LES LIMITES DE
SÉCURITÉ DE FONCTIONNEMENT?
Vos haut-parleurs de série RT sont fabriqués
avec les matériaux de la plus haute qualité
pour assurer sans problème aucun de
longues années d’écoute. Il est toutefois
possible que les haut-parleurs soient endommagés si un amplificateur, quelque soit sa
puissance, fonctionne à des niveaux d’écoute
supérieurs à ceux qu’il fournit normalement
(en général au-delà des positions de montre
“1”et “2” sur le contrôle de volume). Il en
3LEISTUNGSERFORDERNISSE
DES VERSTÄRKERS
Ihre Lautsprecher werden mit vielen
elektronischen Komponenten gut
zusammenarbeiten. Mit nur 10 Watt
pro Kanal erhalten Sie ausreichende
Hör-Lautstärken in den meisten Räumen.
Wenn Sie ein grosses Zimmer haben oder
beabsichtigen, Ihr System sehr laut zu
spielen, brauchen Sie mehr Leistung, um
das beste Ergebnis zu erhalten. Wenden
Sie sich an Ihren Polk Händler für
genaue Empfehlungen.
DOLBY AC-3 EINSTELLUNGEN
Wenn Sie einen Dolby AC-3 Surround
Prozessor benutzen, benutzen Sie die
Einstellung “Small” für die Bedienung
der hinteren Kanal-Lautsprecher. Wenden
Sie sich an das Bedienungshandbuch
Ihres Empfängers oder Prozessors für
weitere Details.
WAS SIND DIE SICHEREN
BEDIENUNGSGRENZEN?
Ihre Lautsprecher der RT Serie wurden mit
den besten Qulitätsmaterialien hergestellt, um
Ihnen über Jahre hinaus problemlose Leistung
zu liefern. Schaden an den Lautsprechern kann
dennoch eintreten, wenn ein Verstärker, ganz
gleich welcher Wattzahl, bei höheren
Spielhöhen spielen soll als seine Stärke klar
leisten kann (meistens mehr als die “1 bis 2
Uhr” Stelle auf dem Lautsprecherknopf). Das
Resultat besteht aus sehr hohe Höhen mit hörbarer Verzerrung, die im Verstärker beginnt,
Loosen hex nut
Desenrosque parcialmente
la tuerca hexagonal
Desserrer l’écrou
Sechskantmutter lösen
Insert speaker wire
through hole
Inserte el alambre para la
bocina en el orificio
Insérer le fil du haut-parleur
dans le trou
Lautsprecher-Draht durch
das Loch schieben
Tighten hex nut
Enrosque la tuerca de nuevo
Serrer l’écrou
Sechskantmutter festschrauben
Do not insert insulated
section of speaker wire
No inserte alambre con
material aislante
Ne pas insérer la partie
isolée du fil du haut-parleur
Isolation des LautsprecherDrahtes nicht in das Loch
schieben
FIGURE 6
USING 5-WAY BINDING POSTS
EL USO DE POSTES DE
CONEXIÓN DE CINCO POSI-
CIONES
UTILISATION DES BORNIERS
“CINQ FAÇONS”
GEBRAUCH VON FÜNFER-
VERBINDUNGSBOLZEN
Page 10

For more information visit our web site at http://www.polkaudio.com
16 17
ENGLISH ESPAÑOL FRANÇAIS DEUTSCH
MAINTAINING THE APPEARANCE
OF FX SPEAKERS
Your new speaker cabinet is made of a
rugged material that can be dusted or
cleaned with a moist cloth. Avoid harsh
detergents and cleaning fluids. They can
permanently damage your speaker’s finish.
Vacuum the grilles to remove dust.
WHO DO I CONTACT IF I NEED
TECHNICAL ASSISTANCE OR SERVICE?
Our customer service representatives are
happy to answer your questions and provide
fast, friendly service. In North America call
(800) 377-7655, Monday through Friday,
9:00am through 6:00pm Eastern time. Or
you can E-Mail us at our Internet service
address: polkcs@polkaudio.com.
WHAT IF I WANT TO PUT TOGETHER
A COMPLETE POLK HOME
THEATER SYSTEM?
Polk offers matching center and front
channel systems so you can assemble an
incredible sounding surround sound system.
If you would like more information on building the home theater system of your dreams,
consult your Polk Audio dealer or call us
directly at 1-800-377-7655. Or you can
E-Mail us at our Internet service address:
polkcs@polkaudio.com.
originados por el amplificador. Contrariamente
a lo que la gente piensa, un altoparlante tiene
más probabilidades de ser dañado al tratar de
obtener demasiado volumen de un amplificador
pequeño, que por un amplificador o receptor
de alta potencia.
MANTENIENDO LA APARIENCIA DE
LOS ALTOPARLANTES FX
El gabinete de su nuevo altoparlante está
hecho de un material resistente que puede
ser desempolvado o limpiado con un pedazo
de tela húmeda. Evite utilizar fluidos
limpiadores o detergentes fuertes, porque
pueden opacar permanentemente el
acabado de su altoparlante. Si las rejillas
están polvorientas, podría limpiarlas con
la aspiradora.
¿CON QUIÉN ME PONGO EN
CONTACTO SI NECESITO ASISTENCIA
TÉCNICA O SERVICIO?
Nuestros representantes de atención
al cliente podrán atenderle con rapidez.
En América del Norte, comuníquese al
(410)764-5213, entre las 09:00 y 18:00,
hora del Este, de lunes a viernes. O envíenos
su mensaje por correo electrónico a nuestra
dirección de servicio en el Internet:
polkcs@polkaudio.com.
¿QUÉ HAGO SI DESEO CONECTAR
UN SISTEMA COMPLETO POLK
DE TEATRO EN EL HOGAR?
Polk le ofrece sistemas de canal central y
posterior que son el perfecto complemento
para que usted pueda instalar un sistema
de increíble sonido circundante. Si desea
mayor información acerca de cómo armar
el sistema de sus sueños para un teatro
en el hogar, consulte con un distribuidor
de productos Polk o llámenos directamente
al (410)764-5213. O envíenos su mensaje
por correo electrónico a nuestra dirección
de servicio en el Internet:
polkcs@polkaudio.com.
résulte une forte distorsion sonore émise par
l’amplificateur qui surimpose à la musique
un son dur et grésillant.Contrairement à
l’opinion courante, un ampli ou récepteur
de faible puissance auquel vous demanderez
de fournir trop de volume risquera plus d’endommager votre haut-parleur qu’un ampli ou
récepteur de puissance plus élevée auquel
vous demanderez de fournir le même volume.
ENTRETENIR LES HAUT-PARLEURS FX
Le matériau de fabrication de votre coffre de
haut-parleur est solide et peut être essuyé
ou nettoyé à l’aide d’un linge humide. Evitez
les détergents forts et les liquides de
nettoyage qui pourraient affecter le brillant
de façon permanente. Les grilles peuvent
être nettoyées à l’aspirateur pour enlever
la poussière.
QUI PUIS-JE CONTACTER SI
J’AI BESOIN D’AIDE TECHNIQUE
OU DE SERVICE?
Le service clientèle de Polk Audio est ouvert
de 9 heures à 17 heures Eastern Time au (410)
358-3600 du lundi au vendredi. N’hésitez pas
à nous contacter pour toutes questions concernant votre système de haut-parleurs.
ET SI JE VEUX CRÉER UN SYSTÈME
POLK DE CINÉMA INTÉGRAL CHEZ MOI?
Polk offre des systèmes de canal central
et arrière qui se complémentent pour créer
un système incroyable de “surround sound”.
Si vous voulez plus d’informations sur
l’installation de vos rêves du système
cinéma chez soi, consultez votre
fournisseur Polk Audio ou appelez nous
directement au (410) 358-3600. N’hésitez
pas à nous contacter pour toutes questions
concernant votre système de haut-parleurs.
was der Musik einen harschen kratzigen Klang
gibt. Obwohl es nicht angenommen wird, so
kann doch ein Lautsprecher eher durch den
Versuch, zuviel Lautstärke von einem wenig
starken Verstärker zu fordern als von einem
zu starken Verstärker beschädigt werden.
SO BLEIBEN IHRE FX
LAUTSPRECHER WEITERHIN SCHÖN
Ihr neues Lautsprechergehäuse besteht aus
einem robusten Material, das abgestaubt oder
mit einem feuchten Tuch abgewischt werden
kann. Vermeiden Sie starke Reinigungsmittel
oder flüssige Putzmittel, denn Sie können
dem Gehäuse Ihrer Lautsprecher nicht
wieder gutzumachenden Schaden zufügen.
Um Staub aus dem Gitter zu entfernen,
benutzen Sie einen Staubsauger.
AN WEN WENDE ICH MICH, WENN
ICH TECHNISCHE HILFE ODER
WARTUNG BENÖTIGE?
Unseren Kundenservice erreichen Sie
unter der Rufnummer 0681-9979288.
UND WENN ICH EIN KOMPLETTES
POLK HEIMTHEATER-SYSTEM
ZUSAMMENBAUEN MÖCHTE?
Polk bietet einen passenden
Centerlautsprecher und Frontkanäle an, so
daß Sie sich ein unglaublich leistungsfähiges
Surroundsystem zusammenstellen können.
Weitere Informationen über das
Surroundsystem Ihrer Träume hält Ihr
Polk-Händler für Sie bereit. Gerne können
Sie uns auch direkt ansprechen, Tel.
49/(0)681/9979288. Oder Sie schicken
uns ein e-mail an unsere InternetServiceadresse: polkcs@polkaudio.com
Page 11

19
For more information visit our web site at http://www.polkaudio.com
18
FRANÇAIS DEUTSCH
CARACTERISTIQUES
FX300i
Haut-Parleur Complément:
2 - 3/4" (19mm) Dynamic Balance tweeter à dôme
1 - 5 1/4" (133mm) transducteurs Dynamic Balance
Réponse en fréquence effective:
50Hz-22kHz
Limites -3dB:
55Hz-20kHz
Séparation de fréquences Topologie:
Filtre passe-bas 1è ordre à 2.5kHz
Filtre passe-haut 1è ordre à 2.5kHz
Amplification recommandée:
10-150 watts/canal
Efficacité (1M, 1 Watt):
89 dB
Finis disponibles:
noir ou blanc
Dimensions:
9 "Hx 12"L x 8 1/2"P
22.9cmH x 30.5cmL x 21.6cmP
incluant l’épaisseur des supports muraux
Poids:
25lbs • 11.4kg
SPEZIFIKATIONEN
FX300i
Bestückung:
2 x 1" (25 mm) Dynamic Balance Dome Tweeter
1 x 6 1/2" (165 mm) Dynamic Balance Töner
Frequenzgang über alles:
50Hz-22kHz
Frequenzgang -3dB:
55Hz-20kHz
Topologie/Spezifikationen Frequenzweiche:
Mittel-/Hochtonmodul:
Tiefpassfilter 1. Ordnung 2.5kHz;
Hochpassfilter 1. Ordnung 2.5 kHz.
Empfohlene Verstärkerleistung:
10-150 Watts/Kanal
Empfindlichkeit (1 M, 1 Watt):
89 dB
Gehäuseoberflächen:
schwarz oder weiß
Gehäuseabmessungen:
9 "Hx 12"W x 8 1/2"D
22.9cmH x 30.5cmW x 21.6cmD
einschließlich Wandbefestigungsklammern
Gewicht incl. Verpackung:
25lbs • 11.4kg
ENGLISH ESPAÑOL
SPECIFICATIONS
FX300i
Driver Complement:
2 - 3/4" (19mm) Dynamic Balance dome tweeters
1 - 5 1/4" (133mm) Dynamic Balance driver
Overall Frequency Response:
50Hz-22kHz
-3dB Limits:
55Hz-20kHz
Crossover Topology:
1st Order Low Pass Filter @2.5 kHz
1st Order High Pass Filter @2.5 kHz
Recommended Amplification:
10-150 watts/channel
Efficiency (1M, 1Watt):
89 dB
Available Finishes:
black or white
Dimensions:
9 "W x 12"H x 8 1/2"D
22.9cmW x 30.5cmH x 21.6cmD
Includes depth of wall mount brackets
Shipping Weight:
25lbs • 11.4kg (pr)
ESPECIFICACIONES
FX300i
Complemento del Driver:
2 - 3/4" (19mm) tweeters de cúpula
Dynamic Balance
1 - 5 1/4" (133mm) Dynamic Balance driver
Respuesta Total de Frecuencias:
50Hz-22kHz
-3dB Límites:
55Hz-20kHz
Topología de Crossover:
1o Orden Filtro de Paso Bajo @2.5 kHz
1o Orden Filtro de Paso Alto @2.5 kHz
Amplificación Recomendada:
10-150 watts/canal
Eficiencia (1M, 1 Watt):
89 dB
Acabados Disponibles:
negro o blanco
Dimensiones:
9 "Al x 12"An x 8 1/2"P
22.9cmAl x 30.5cmAn x 21.6cmP
Incluye la profundidad de los brazos
para instalación sobre la pared
Peso de Embarque:
25lbs • 11.4kg
• Note: Specifications are subject to change without notice. • Nota: Las especificiones estan sujetas a cambios
sin previo aviso.
• Note: Les caractéristiques sont sujettes à changement
sans notification.
• Hinweis: Spezifikationen können ohne Vorankündigung
geändert werden.
FX500i
Driver Complement:
2 - 1" (25mm) Dynamic Balance
Tri-laminate dome tweeters
1 - 6 1/2" (165mm) Dynamic Balance driver
Overall Frequency Response:
40Hz-26kHz
-3dB Limits:
50Hz-25kHz
Crossover Topology:
2nd Order Low Pass Filter @1.5 kHz
2nd Order High Pass Filter @1.5 kHz
Recommended Amplification:
10-150 watts/channel
Efficiency (1M, 1Watt):
90 dB
Available Finishes:
black or white
Dimensions:
9 7/8"W x 15 1/4"H x 9 1/2"D
25.1cmW x 38.7cmH x 24.1cm D
Includes depth of wall mount brackets
Shipping Weight:
39lbs • 17.7kgs (pr)
FX500i
Complemento del Driver:
2 - 1" (25mm) tweeters de cúpula
tri-laminado Dynamic Balance
1 - 6 1/2" (165mm) driver Dynamic Balance
Respuesta Total de Frecuencias:
40Hz-26kHz
-3dB Límites:
50Hz-25kHz
Topología de Crossover:
2o Orden Filtro de Paso Bajo @1.5 kHz
2o Orden Filtro de Paso Alto @1.5 kHz
Amplificación Recomendada:
10-150 watts/canal
Eficiencia (1M, 1 Watt):
90 dB
Acabados Disponibles:
negro o blanco
Dimensiones:
9 7/8"Al x 15 1/4"An x 9 1/2"P
25.1cmAl x 38.7cmAn x 24.1cmP
Incluye la profundidad de los brazos
para instalación sobre la pared
Peso de Embarque:
39lbs • 17.7kgs
FX500i
Haut-Parleur Complément:
2 - 1" (25mm) Dynamic Balance
tweeter à dôme tri-feuilleté
1 - 6 1/2" (165mm) transducteur Dynamic Balance
Réponse en fréquence effective:
40Hz-26kHz
Limites -3dB:
50Hz-25kHz
Séparation de fréquences Topologie:
Filtre passe-bas 2è ordre à 1.5kHz
Filtre passe-haut 2è ordre à 1.5kHz
Amplification recommandée:
10-150 watts/canal
Efficacité (1M, 1 Watt):
90 dB
Finis disponibles:
noir ou blanc
Dimensions:
9 7/8"H x 15 1/4"L x 9 1/2"P
25.1cmH x 38.7cmL x 24.1cmP
incluant l’épaisseur des supports muraux
Poids:
39lbs • 17.7kgs
FX500i
Bestückung:
2 - 1" (25mm) Dynamic Balance Dome Tweeter
1 - 6 1/2" (165mm) Dynamic Balance Töner
Frequenzgang über alles:
40Hz-26 kHz
Frequenzgang -3dB:
50Hz-25kHz
Topologie/Spezifikationen Frequenzweiche:
Mittel-/Hochtonmodul:
Tiefpassfilter 2. Ordnung 1.5kHz;
Hochpassfilter 2. Ordnung 1.5 kHz.
Empfohlene Verstärkerleistung:
10-150 Watts/Kanal
Empfindlichkeit (1 M, 1 Watt):
90 dB
Gehäuseoberflächen:
schwarz oder weiß
Gehäuseabmessungen:
9 7/8"H x 15 1/4"W x 9 1/2"D
25.1cmH x 38.7cmW x 24.1cmD
einschließlich Wandbefestigungsklammern
Gewicht incl. Verpackung:
39lbs • 17.7kgs
Page 12

For more information visit our web site at http://www.polkaudio.com
2120
POLK AUDIO LIMITED WARRANTY
“Polk Audio,” “Polk,” “The Speaker Specialists” and “Dynamic Balance” are trademarks of
Britannia Investment Corporation used under license by Polk Audio Incorporated.
Dolby, Pro Logic, Dolby Digital and AC-3 are trademarks of Dolby Laboratories Licensing Corp.
Polk Audio, Inc. warrants to the original purchaser only that this Polk Audio Loudspeaker
Product (the “Product”) will be free from
defects in materials and workmanship for a
period of five (5) years from the date of original retail purchase from a Polk Audio
Authorized Dealer. However, this Warranty
will automatically terminate prior to the expiration of the five (5) years if the original
retail purchaser sells or otherwise transfers
the Product to any other party. The original
retail purchaser shall hereinafter be referred
to as “you.” To allow Polk Audio to offer the
best possible warranty service, please fill out
the Product Registration Card(s) and send it
to the Factory, at the address provided on the
Product Cards(s) within ten (10) days of the
date of purchase.
Defective Products must be shipped, together
with proof of purchase, prepaid insured to the
Polk Audio Authorized Dealer from whom you
purchased the Product, or to the Factory at
2550 Britannia Boulevard, Suite D, San
Diego, California 92154. Products must be
shipped in the original shipping container or
its equivalent; in any case the risk of loss or
damage in transit is to be borne by you. If
upon examination at the Factory or Polk
Audio Authorized Dealer it is determined that
the unit was defective in materials or workmanship at any time during this Warranty
period, Polk Audio or the Polk Audio
Authorized Dealer will, at its option, repair or
replace this Product at no additional charge,
except as set forth below. All replaced parts
and Products become the property of Polk
Audio. Products replaced or repaired under
this warranty will be returned to you, within a
reasonable time, freight prepaid.
This warranty does not include service or
parts to repair damage caused by accident,
disaster, misuse, abuse, negligence, inade-
quate packing or shipping procedures, commercial use, voltage inputs in excess of the
rated maximum of the unit, cosmetic appearance of cabinetry not directly attributable to
defect in materials or workmanship, or service, repair, or modification of the Product
which has not been authorized or approved by
Polk Audio. This warranty shall terminate if
the Serial number on the Product has been
removed, tampered with or defaced.
This warranty is in lieu of all other expressed
Warranties. If this Product is defective in
materials or workmanship as warranted
above, your sole remedy shall be repair or
replacement as provided above. In no event
will Polk Audio, Inc. be liable to you for any
incidental or consequential damages arising
out of the use or inability to use the Product,
even if Polk Audio, Inc. or a Polk Audio
Authorized Dealer has been advised of the
possibility of such damages, or for any claim
by any other party. Some states do not allow
the exclusion or limitation of consequential
damages, so the above limitation and exclusion may not apply to you.
All implied warranties on this Product are
limited to the duration of this expressed
Warranty. Some states do not allow limitation
on how long an implied Warranty lasts, so the
above limitations may not apply to you. This
Warranty gives you specific legal rights, and
you also may have other rights which vary
from state to state.
This Warranty applies only to Products purchased in the United States of America, its
possessions, and U.S. and NATO armed forces
exchanges and audio clubs. The Warranty
terms and conditions applicable to Products
purchased in other countries are available
from the Polk Audio Authorized Distributors in
such countries.
 Loading...