

Polk Audio EX3550, EX3560 Owner's Manual

EX3 Series
Tweeter &
Component
Speaker Systems

2
Contact Polk Customer Service: 800-377-7655 polkcs@polkaud~o corn
GETTING STARTED
Please inspect each loudspeaker carefully. Notify your Polk Audio dealer if you notice any damage or
missing items. Keep the carton and packing material. They will do the best job of protecting your
speakers if they need to be transported. Check that you have the following model-specific parts:
EX3550 and EX3560 Models:
.
.
.
.
.
.
.
‘0
.
.
.
.
.
.
.
.
2 Mid-Woofers
2 Mid-Woofer Grilles
2 EX3500 Tweeters With Wires Attached
2 Crossover Networks
2 Flush Mount Tweeter Cups
2 Flush Mount Cup Clamps
2 Straight Surface Mount Tweeter Cups
2 Angled Surface Mount Tweeter Cups
Speaker Wires With Fast-on Connectors Attached
2 Machine Screws For Flush Mount Installation
16
Sheet Metal Screws For Surface Mount Tweeter Installation (4),
Crossover Mounting (4) &Driver Mounting (8).
12 Speed Nuts (8 Driver Mount, 4 Surface Mount)
2 Elliptical Lens Assemblies
2 Tweeter Grilles
Driver Mounting Template (Separate Sheet)
Registration Card
EX3500:
l
2 RX3500 Tweeters With Crossover&Wires & Connectors Attached
l
2 Flush Mount Tweeter Cups
l
2 Flush Mount Cup Clamps
l
2 Straight Surface Mount Tweeter Cups
l
2 Angled Surface Mount Tweeter Cups
l
2 Machine Screws For Flush Mount Installation
l
4 Sheet Metal Screws For Surface Mount Installation
l
4 Speed Nuts For Surface Mount Installation
l
2 Elliptical Lens Assemblies
l
2 Tweeter Grilles
l
Registration Card
For more info and accessories, visit www.polkaudio.com
3
.
Phillips head screwdriver
.
Flat blade screwdriver or putty knife
.
Door panel pry-tool (available at most auto parts supply stores)
.
Electric drill
.
~16” and IL” drill bits
.
Hole saw of appropriate diameter for the speaker size (for “new location” and
flush mount tweeter installation only)
.
Indelible ink marker for marking the cutout (for “new location” installation only)
.
Metal file
.
Solderless, crimp-on connectors and a crimping tool
.
Safety glasses
.
Wire strippers and cutters
NOTE: For EX3500 installation, please jump to page 8 now.
Installing car speakers is a serious project. If you have any doubts about your ability to execute any
of the installation steps found in this manual, save yourself a lot of grief and contact a professional
installer. Your Polk Audio dealer is a good place to find one. If you intend to do the installation
yourself we assume you possess some skill in the proper use of hand and power tools. No matter
how much installation experience you have, we recommend that you.
l
Read this manual thoroughly before you begin
0 Plan your installation carefully
l
Allow enough time to complete the installation without rushing
l
Take steps to protect your car and upholstery from unwanted scratches and punctures
NECESSARY TOOLS
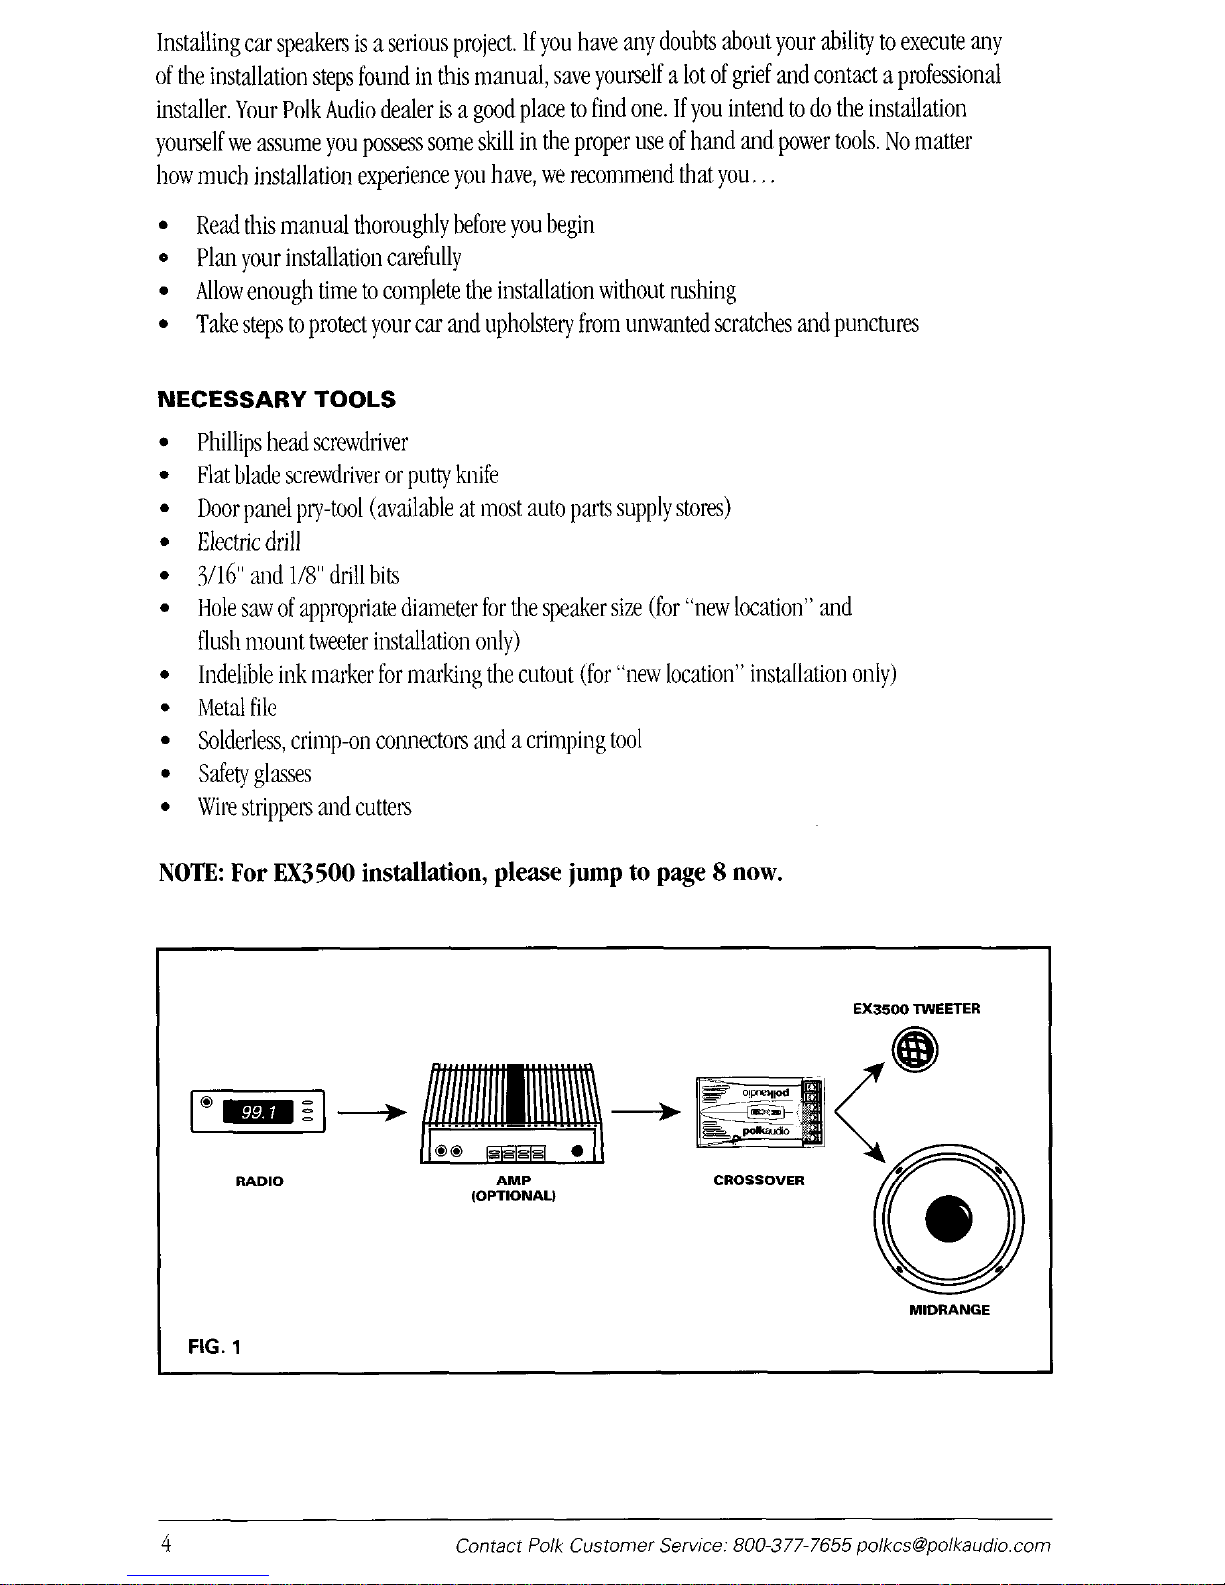
FIG. 1
4
Contact Polk Customer Serwce: 800-377-7655 polkcs@poikaudio.com
INSTALLING EX3 SERIES COMPONENTS
EX3 Series Crossovers
You will need to make wiring connections from your amp or radio to the crossovers and from the
crossovers to your mid/woofers and tweeters
[figure 11.
Choose crossover box locations that are
convenient for making these connections. We do not recommend placing the crossover
inside of door panels due to the increased potential for water damage and
interference with internal door and window mechanisms.
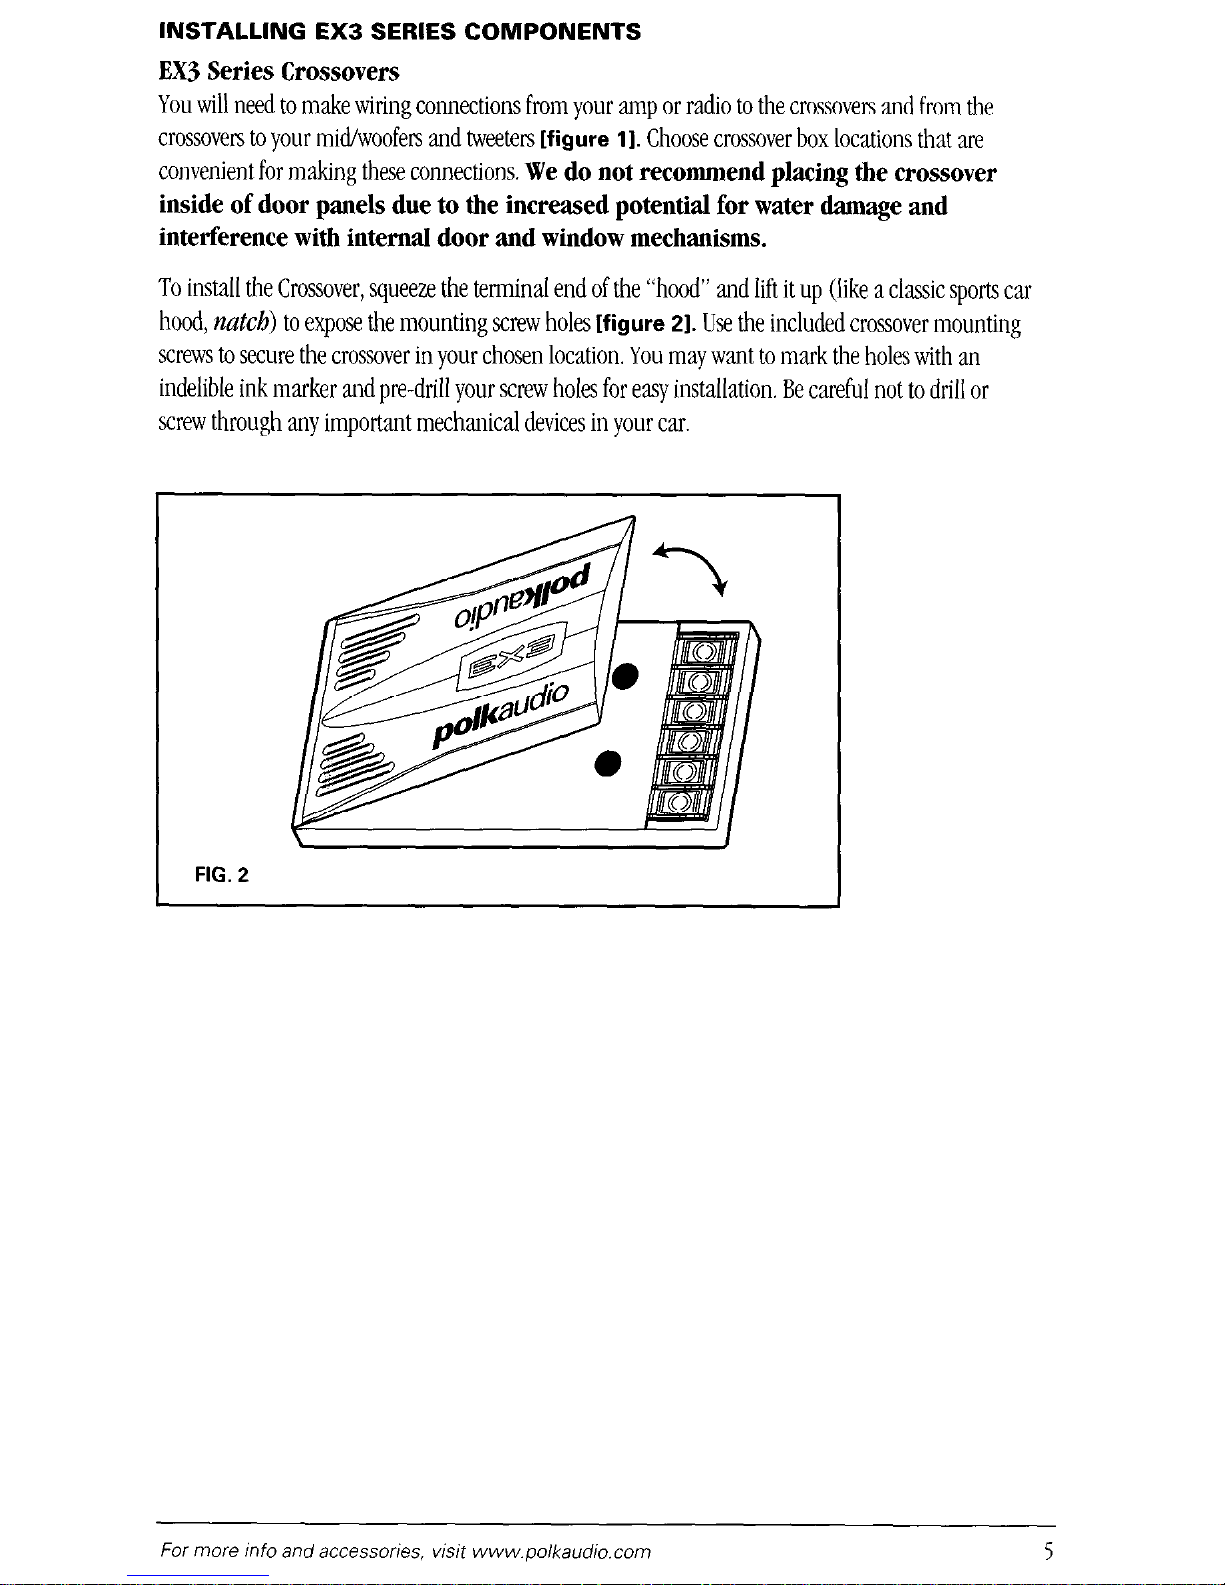
To install the Crossover, squeeze the terminal end of the “hood” and lift it up (like a classic sports car
hood, nut&) to expose the mounting screw holes
[figure 21.
Use the included crossover mounting
screws to secure the crossover in your chosen location. You may want to mark the holes with an
indelible ink marker and pre-drill your screw holes for easy installation. Be careful not to drill or
screw through any important mechanical devices in your car.
FIG. 2
For more Info and accessories, visit www.polkaudio.com
5
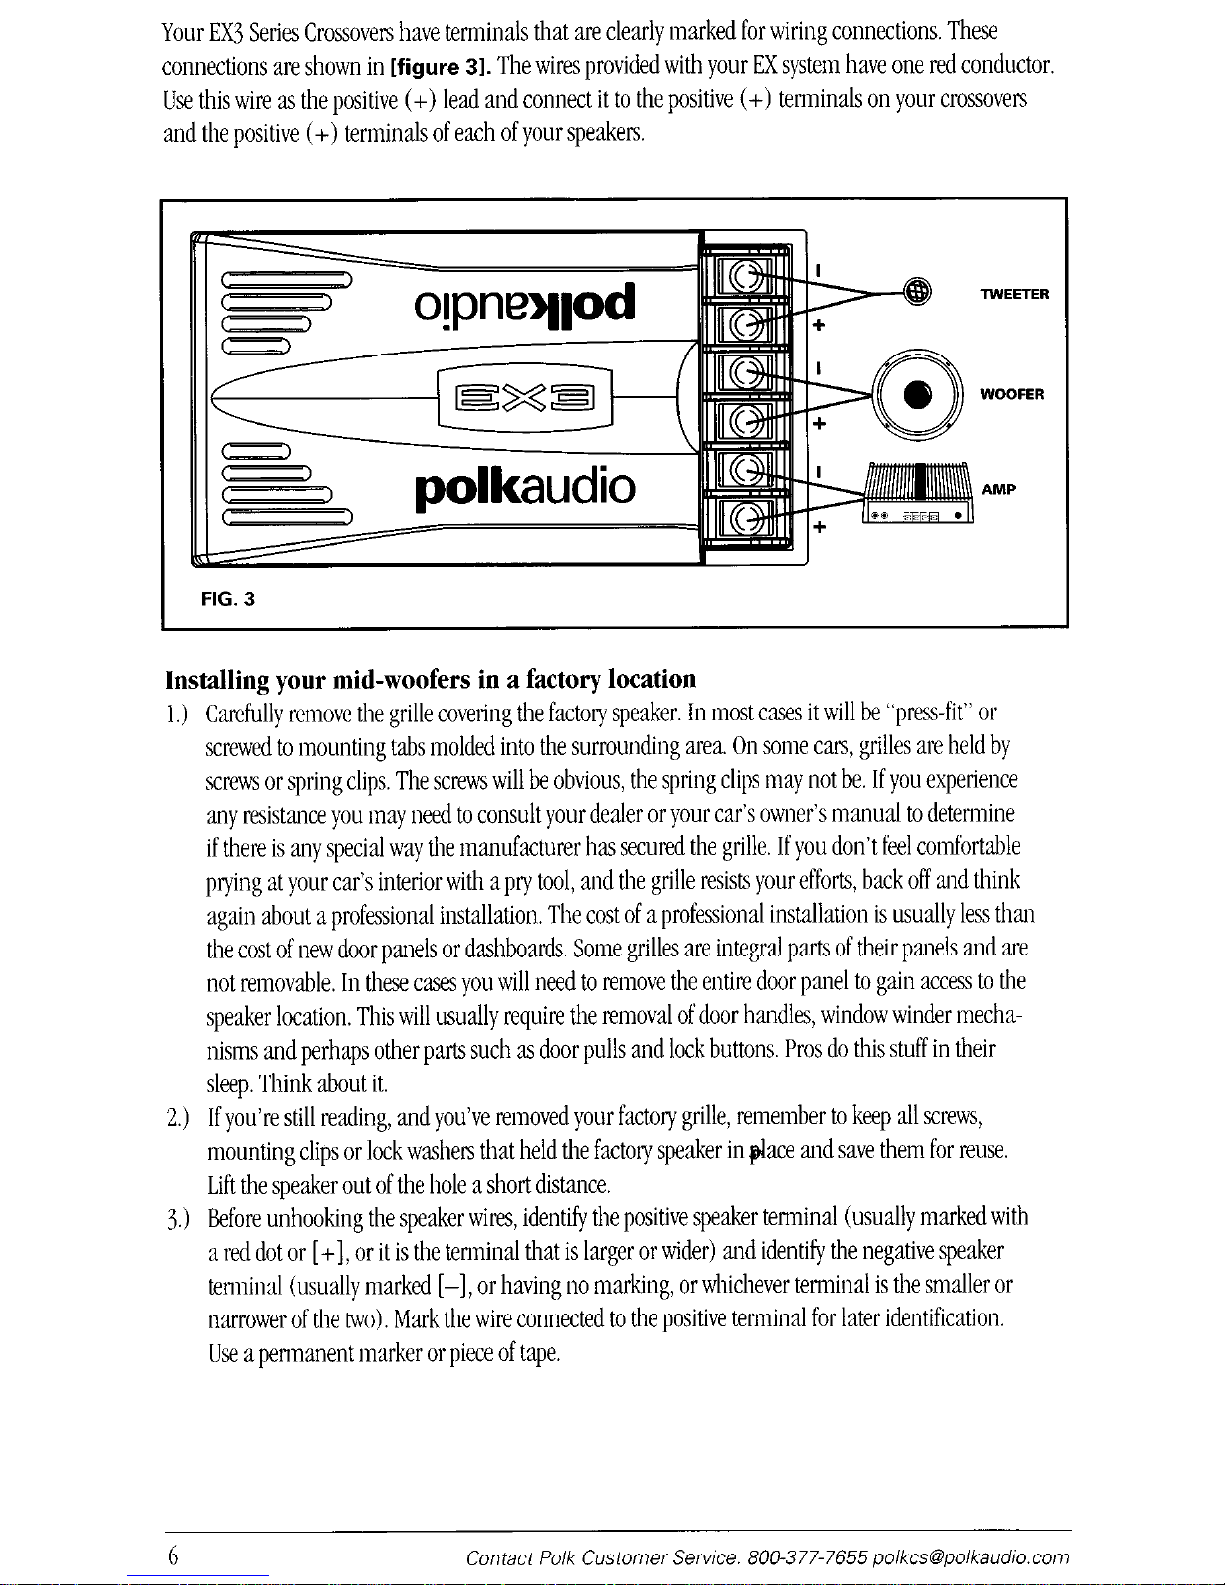
Your EX3 Series Crossovers have terminals that are clearly marked for wiring connections. These
connections are shown in
[figure
31. The wires provided with your EX system have one red conductor.
Use this wire as the positive (+) lead and connect it to the positive (+) terminals on your crossovers
and the positive (+) terminals of each of your speakers.
FIG. 3
Installing your mid-woofers in a factory location
1.) Carefully remove the grille covering the factory speaker. In most cases it will be “press-fit” or
screwed to mounting tabs molded into the surrounding area. On some cats, grilles are held by
screws or spring clips. The screws will be obvious, the spring clips may not be. If you experience
any resistance you may need to consult your dealer or your car’s owner’s manual to determine
if there is any special way the manufacturer has secured the grille. If you don’t feel comfortable
ptying at your car’s interior with a pry tool, and the grille resists your efforts, back off and think
again about a professional installation, The cost of a professional installation is usually less than
the cost of new door panels or dashboards. Some grilles are integral parts of their panels and are
not removable. In these cases you will need to remove the entire door panel to gain access to the
speaker location. This will usually require the removal of door handles, window winder mechanisms and perhaps other parts such as door pulls and lock buttons. Pros do this stuff in their
sleep. Think about it.
2.) If you’re still reading, and you’ve removed your factory grille, remember to keep all screws,
mounting clips or lock washers that held the factory speaker in @ace and save them for reuse.
Lift the speaker out of the hole a short distance.
3.) Before unhooking the speaker wires, identify the positive speaker tenninal (usually marked with
a red dot or [ +], or it is the tenninal that is larger or wider) and identify the negative speaker
terminal (usually marked [-I, or having no marking, or whichever terminal is the smaller or
narrower of the two). Mark the wire connected to the positive tenninal for later identification.
Use a pennanent marker or piece of tape.
6
Contact Polk Customer Service: 800-377-7655 polkcs@polkaudIo.com
4.) Disconnect the factory speaker. After disconnecting the factory speaker, connect the wires to your
new Polk Audio speaker, hooking up the positive [+] wire to the wider of the two EX3 terminals
and the negative [-] to the narrower EX3 terminal.
5.) Mount your EX3 Loudspeaker using the mounting hardware you saved from Step 2.
6.)
Remount the factory grille cover.
7.) Repeat Steps
1-6
for the other speaker(s).
Installing your mid-woofers in a “New Location”
Factory locations uncool? Pick a new location. Be sure to take into account both your vehicle’s design
and your sonic goals. Before you begin, read all of these steps. If you have any doubts about your ability
to execute any of these steps, save yourself a lot of grief and contact a professional installer. Your Polk
Audio dealer is a good place to find one.
1.)
Using the door panel ply-tool, carefully remove any door panels, kick panels, molded parts or fabric
coverings to expose the surface that will need to be cut to install the new speaker.
2.) Check the dimensions around and behind the installation area for fit. This includes any moving
parts behind the speaker (move the windows up and down) or the sides of the speaker (open and
close doors).
3.) Locate the template over the desired location. Draw the inside circle and mark at least two opposing
screw locations.
4.) Cut the circle with the appropriate tool. Drill pilot holes for the screw locations. File the edges
of any bare metal surfaces until smooth, then coat with primer to prevent rust.
5.) When primer is dry, slip mounting clips over the screw holes.
For more Info and accessories, wsit www.polkaudncom
7
 Loading...