

Page 1

INSTRUCTION
MANUAL
DVD PLAYER
DP-1
Page 2

2
1. Read the Owner’s Manual
After unpacking this product, read the owner’s manual carefully, and follow all the operating and other instructions.
2. Power Sources
This product should be operated only from the type of power
source indicated on the marking label. If you are not sure of
the type of power supply in your home, consult your product
dealer or local Power Company. For products intended to
operate from battery power, or other sources, refer to the
operating instructions.
3. Grounding or Polarization
This product is equipped with a polarized alternating current
line plug (a plug having one blade wider than the other is).
This plug will fit into the power outlet only one way. This is a
safety feature. If you are unable to insert the plug fully into
the outlet, try reversing the plug. If the plug should still fail
to fit, contact your electrician to replace your obsolete outlet. Do not defeat the safety purpose of the polarized plug.
4. Ventilation
Slots and openings in the cabinet are provided for ventilation
and to ensure reliable operation of the product and to protect it from overheating. These openings must not be blocked
or covered. The openings should never be blocked by placing
the product on a bed, sofa, rug or other similar surface. This
product should not be placed in a built-in installation such as
a bookcase or rack unless proper ventilation is provided or
the manufacturer’s instructions have been adhered to.
5. Heat
The product should be situated away from heat sources such
as radiators, heat registers, stoves, or other products
(including amplifiers) that produce heat.
6. Water and Moisture
Do not use this product near water-for example, near a bathtub, wash bowl, kitchen sink or laundry tub; in a wet basement; or near a swimming pool and other bodies of water.
7. Cleaning
Unplug this product from the wall outlet before cleaning. Do
not use liquid cleaners or aerosol cleaners. Use a damp cloth
for cleaning.
8. Power-Cord Protection
Power-supply cords should be routed so that they are not
likely to be walked on or pinched by items placed upon or
against them, playing particular attention to cords at plugs,
convenience receptacles, and the point where they exit from
the product.
9. Overloading
Do not overload wall outlets, extension cords, or integral
convenience receptacles as this can result in a risk of fire
or electric shock.
10. Lightning
For added protection of this product during storms, or when
it is left unattended and unused for long periods of time,
unplug it from the wall outlet. This will prevent damage
to the product due to lightning and power-line surges.
11. Object and Liquid Entry
Never push objects of any kind into this product through
openings as they may touch dangerous voltage points or
short-out parts that could result in a fire or electric shock.
Never spill liquid of any kind on the product.
12. Attachments
Do not use attachments not recommended by the product
manufacturer as they may cause hazards.
13. Accessories
Do not place this product on an unstable cart, stand, tripod,
bracket, or table. The product may fall, causing serious
injury to a child or adult and serious damage to the product.
Use only with a cart, stand, tripod, bracket, or table recommended by the manufacturer, or sold with the product. Any
mounting of the product should follow the manufacturer’s
instructions, and should use a mounting accessory recommended by the manufacturer. A product and cart combina-
tion should be moved with care. Quick stops, excessive force,
and uneven surfaces may cause the product and cart combination to overturn.
14. Disc Tray
Keep your fingers well clear of the disc tray as it is closing.
It may cause serious personal injury.
15. Burden
Do not place a heavy object on or step on the product. The
object may fall, causing serious personal injury and serious
damage to the product.
16. Connecting
When you connect the product to other equipment, turn off
the power and unplug all of the equipment from the wall outlet. Failure to do so may cause an electric shock and serious
personal injury. Read the owner’s manual of the other equipment carefully and follow the instructions when making any
connections.
17. Sound Volume
Reduce the volume to the minimum level before you turn
on the product. Otherwise, sudden high volume sound may
cause hearing or speaker damage.
18. Sound Distortion
Do not allow the product to output distorted sound for a
longtime. It may cause speaker overheating and/or a fire.
19. Headphones
When you use the headphones, keep the volume at a moderate level. If you use the headphones continuously with high
volume sound, it may cause hearing damage.
20. Laser Beam
Do not look into the opening of the disc tray or ventilation
opening of the product to see the source of the laser beam.
It may cause sight damage.
21. Disc
Do not use a cracked, deformed, or repaired disc. These
discs are easily broken and may cause serious personal
injury and product malfunction.
22. Damage Requiring Service
Unplug this product from the wall outlet and refer servicing
to qualified service personnel under the following conditions:
a) When the power-supply cord or plug is damaged.
b) If liquid has been spilled, or objects have fallen into the
product.
c) If the product has been exposed to rain or water.
d) If the product does not operate normally by following the
operating instructions. Adjust only those controls that
are covered by the operating instructions as an improper
adjustment of other controls may result in damage and
will often require extensive work by a qualified technician
to restore the product to its normal operation.
e) If the product has been dropped or damaged in any way.
f) When the product exhibits a distinct change in perfor-
mance—this indicates a need for service.
23. Servicing
Do not attempt to service this product yourself as opening or
removing covers may expose you to dangerous voltage or other
hazards. Refer all servicing to qualified service personnel.
24. Replacement Parts
When replacement parts are required, be sure the service
technician has used replacement parts specified by the manufacturer or have the same characteristics as the original
part. Unauthorized substitutions may result in fire, electric
shock, or other hazards.
25. Safety Check
Upon completion of any service or repairs to this product,
ask the service technician to perform safety checks to determine that the product is in proper operating condition.
INTRODUCTION
About This Player and Manual
The Polk Audio DP-1 CD/DVD player and DR-3 Unified
Remote Control may be used with any home theater audio
component but were designed specifically to be used with
Polk Audio Digital Solution home theater systems. We wrote
this manual assuming that you are using this DVD player
with a Polk Audio Digital Solution system. If you are not, this
manual should be adequate to show you how to operate the
DP-1 player with other components.
CAUTION:
This Digital Video Disc Player employs a Laser System.
To ensure proper use of this product please read this owner’s
manual carefully and retain for future reference, should
the unit require maintenance, contact an authorized service
location—see the service procedure.
Use of controls, adjustments or the performance of procedures other than those specified may result in hazardous
radiation exposure.
To prevent direct exposure to laser beam, do not try to open
the enclosure. Laser radiation is visible when the enclosure
is open. DO NOT STARE INTO THE LASER BEAM.
FCC NOTICE:
This equipment has been tested and found to comply with the
limits for a Class B digital device, pursuant to part 15 of the
FCC Rules. These limits are designed to provide reasonable
protection against harmful interference in a residential
installation.
This equipment generates, uses, and can radiate radio frequency energy and, if not installed and used in accordance
with the instructions, may cause harmful interference to
radio communications.
However, there is no guarantee that interference will not
occur in a particular installation.
If this equipment does cause harmful interference to radio or
television reception, which can be determined by turning the
equipment off and on, the user is encouraged to try to correct
the interference by one or more of the following measures:
• Reorient or relocate the receiving antenna.
• Increase the separation between the equipment
and receiver.
• Connect the equipment into an outlet on a circuit
different from that to which the receiver is connected.
• Consult the dealer or an experienced radio/TV
technician for help.
FCC WARNING:
Changes or modifications not expressly approved by the party
responsible for compliance could void the user’s authority to
operate the equipment.
INDUSTRY CANADA REQUIREMENT:
This Class B digital apparatus meets all requirements of the
Canadian Interference-Causing Equipment Regulations.
Cet appareil numéruque de la classe B respecte toutes les
exigences du Règlement sur le matériel brouilleur du Canada.
NOTE TO CATV SYSTEM INSTALLER:
This reminder is provided to call the CATV (Cable-TV) system
installer’s attention to Article 820-40 of the NEC, that provides guidelines for proper grounding and, in particular, specified that the cable ground shall be connected to the grounding system of the building, as close to the point of cable entry
as practical.
IMPORTANT SAFETY INSTRUCTIONS
CAUTION: PLEASE READ AND OBSERVE ALL WARNINGS AND INSTRUCTIONS IN THIS OWNER’S MANUAL AND THOSE MARKED ON
THE UNIT. RETAIN THIS BOOKLET FOR FUTURE REFERENCE.
This set has been designed and manufactured to assure personal safety. Improper use can result in electric shock or fire
hazard. The safeguards incorporated in this unit will protect you if you observe the following procedures for installation,
use and servicing. This unit is fully transistorized and does not contain any parts that can be repaired by the user.
DO NOT REMOVE THE CABINET COVER, OR YOU MAY BE EXPOSED TO DANGEROUS VOLTAGE.
REFER SERVICING TO A QUALIFIED SERVICE PERSONNEL ONLY.
2
Page 3
www.polkaudio.com
3
Handling Your CD/DVD Player
•When shipping the DVD player, always use the original shipping
carton and packing materials. For maximum protection, repack the
unit as it was originally packed at the factory.
•Do not use volatile liquids, such as insect spray, near the DVD player.
Do not leave rubber or plastic products in contact with the DVD player
for a long time. They will leave marks on the finish.
•The top and rear panels of the DVD player may become warm after
a long period of use. This is normal and not a malfunction.
Interference
•When you place this DVD player near a TV, radio, or VCR, the playback
picture may become poor and the sound may be distorted. Move the
DVD player away from the TV, radio, or VCR.
Cleaning Your CD/DVD Player
•Use a soft, dry cloth for cleaning.
•For stubborn dirt, soak the cloth in a weak detergent solution, wring
well and wipe. Use a dry cloth to wipe dry. Do not use any type of
solvent, such as thinner and benzene, as they may damage the surface
of the DVD player.
Warning: A qualified service technician should perform cleaning
and adjustment of lenses and/or other components of the playback
mechanism. The DVD player is a high technology, precision device.
If the optical pick-up lens and disc drive parts are dirty or worn,
the picture quality will be poor. To maintain high performance, we
recommend regular inspection and maintenance (cleaning or parts
replacement) every 1,000 hours of use depending on the operating
environment. For details, contact your nearest dealer.
Moisture and Condensation
Can Harm Your CD/DVD Player
Please read the following carefully.
Moisture condensation occurs, for example, when you pour a cold
drink into a glass on a warm day. Drops of water form on the outside
of the glass. In the same way, moisture may condense on the optical
pick-up lens inside this unit, one of the most crucial internal
parts of the DVD player.
Moisture condensation occurs during the following cases.
•When you bring the DVD player directly from a cold place
to a warm place.
•When you use the DVD player in a room where you just turned
on the heater, or a place where the cold wind from the air
conditioner directly hits the unit.
•In summer, when you use the DVD player in a hot and humid
place just after you move the unit from an air-conditioned room.
•When you use the DVD player in a humid place.
Do not use the DVD player when moisture
condensation may occur.
If you use the DVD player in such a situation, it may damage discs
and internal parts. Let the DVD player sit in a warm dry room for
two or three hours. The DVD player will warm up and the moisture
will evaporate. Keep the DVD player connected to the wall outlet
and moisture condensation will seldom occur
The Care and Feeding of DVD Discs
Handling Discs
•Do not touch the playback side of the disc.
•Do not attach paper or tape to discs.
Cleaning Discs
•Always keep the disc clean.
•Fingerprints and dust on the disc may cause poor picture and sound.
Wipe the disc from the center outward with a soft cloth.
•If you cannot wipe off the dust with a soft cloth, wipe the disc lightly
from center outward with a slightly moistened soft cloth and finish
with a dry cloth.
•Do not use any type of solvents such as thinner, benzene,
commercially available cleaners or anti-static spray for vinyl LPs;
they may damage the disc. Steel wool isn’t a good idea either.
Weird Stuff About DVDs
•Not all DVD discs are the same in how they function and some may
have functions that are not explained in this manual. If you run into
such a disc, follow the instructions displayed on the TV screen or DVD
package. Be flexible and patient.
•The “NOT PERMITTED” icon will appear when you try to select
a function or feature that is not available or permitted on that specific
DVD video disc. For example, if you press the “Angle” button on the
remote and that DVD was not produced with multiple camera angles,
the icon will appear on your TV screen.
On Storing Discs
•Do not store discs in a place subject to direct sunlight
or near heat sources.
•Do not store discs in places subject to moisture and
dust such as a bathroom or near a humidifier.
•Store discs vertically in a case. Stacking or placing
objects on discs outside of their case may cause warping.
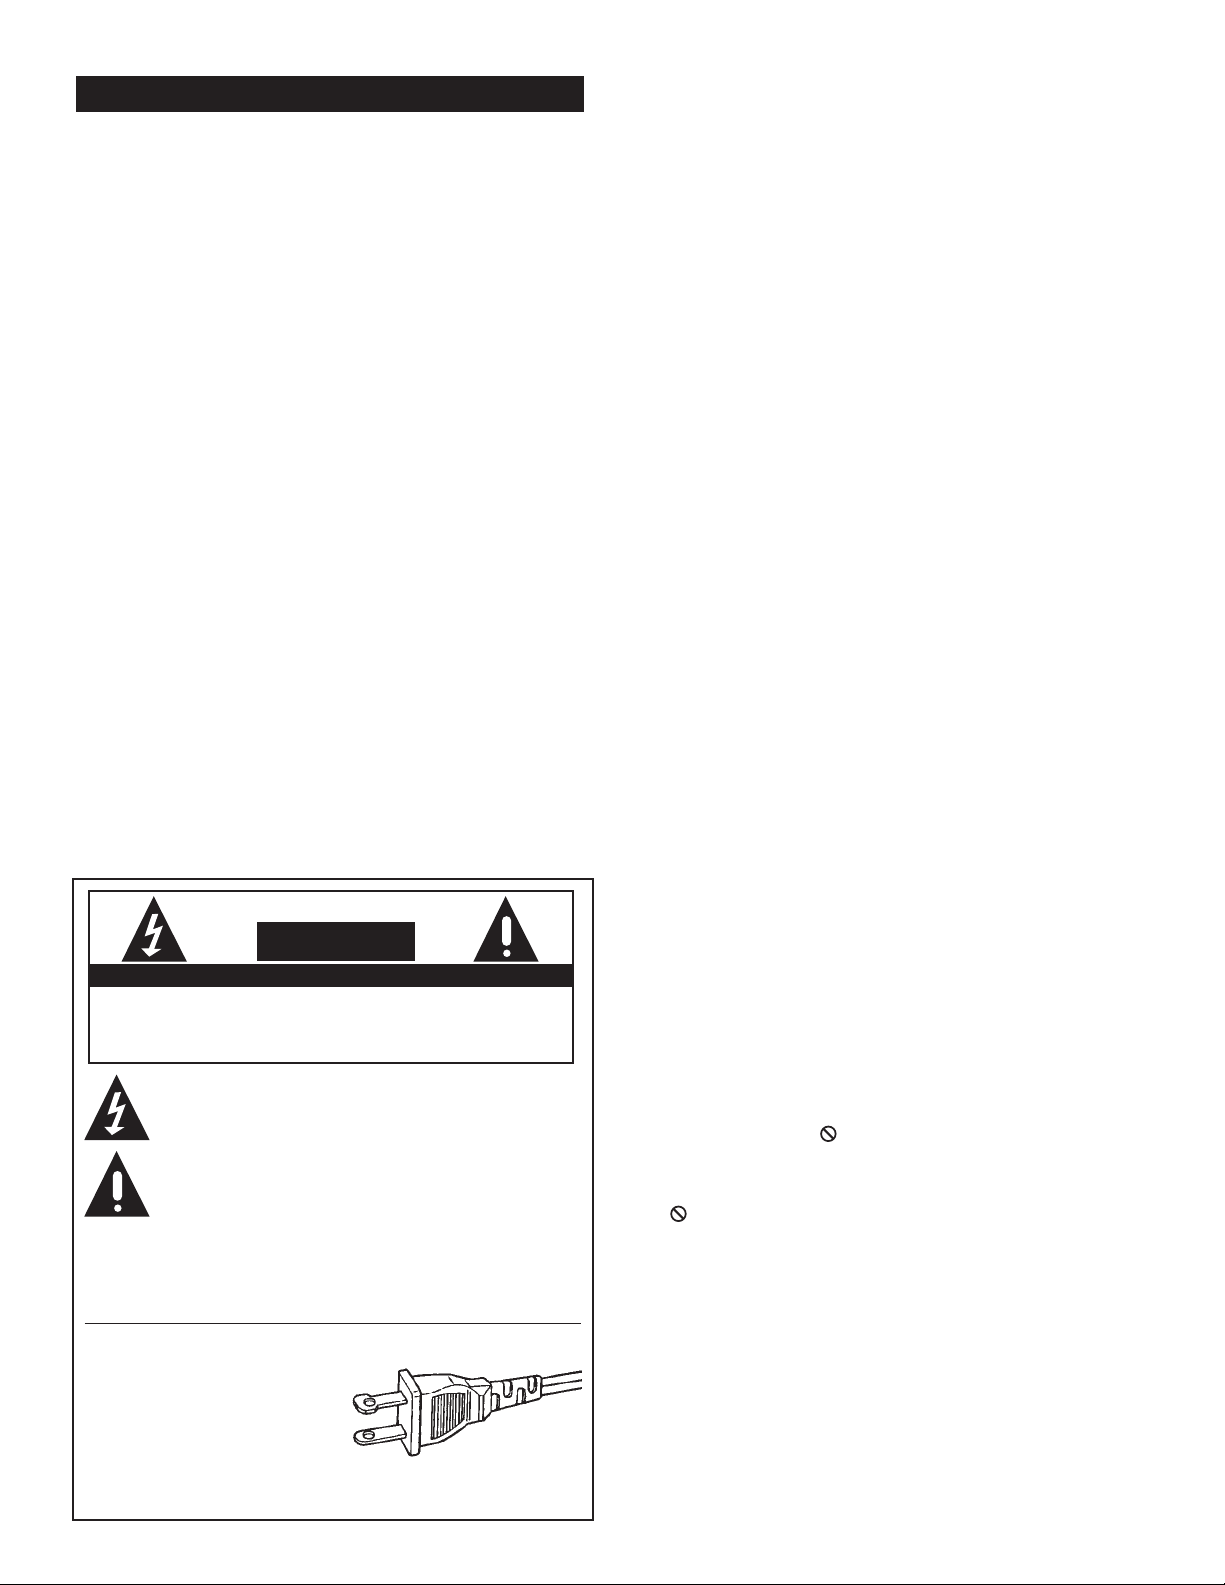
PRECAUTIONS
WARNING
TO REDUCE THE RISK OF FIRE OR ELECTRIC SHOCK, DO NOT EXPOSE THIS APPLIANCE TO RAIN OR MOIS-
TURE. NO USER SERVICEABLE PARTS INSIDE. REFER SERVICING TO QUALIFIED SERVICE PERSONNEL.
CAUTION
RISK OF ELECTRIC SHOCK
DO NOT OPEN
AVIS: RISQUE DE CHOC ÉLECTRIQUE. NE PAS OUVRIR.
The lightning flash with arrowhead symbol, within an equilateral triangle, is
intended to alert the user to the pressence of uninsulated “dangerous voltage” within the product’s enclosure that may be of sufficient magnitude to
constitue a risk of electric shock to persons.
The exclamation point within an equilateral triangle is intended to alert the
user to the presence of important operating and maintenance (servicing)
instructions in the literature accompanying the appliance.
WARNING
TO REDUCE THE RISK OF ELECTRIC SHOCK,
DO NOT EXPOSE THIS APPLIANCE TO RAIN OR MOISTURE.
CAUTION: TO PREVENT ELECTRIC
SHOCK, MATCH WIDE BLADE OF
PLUG TO WIDE SLOT, FULLY INSERT.
ATTENTION: POUR ÉVITER LES
CHOCS ÉLECTRIQUES INTRODUIRE
LA LAME LA PLUS LARGE DE LA
FICHE DANS LA BORNE CORRESPONDANTE DE LA PRISE ET POUSSER JUSQU’AU FOND.
Page 4
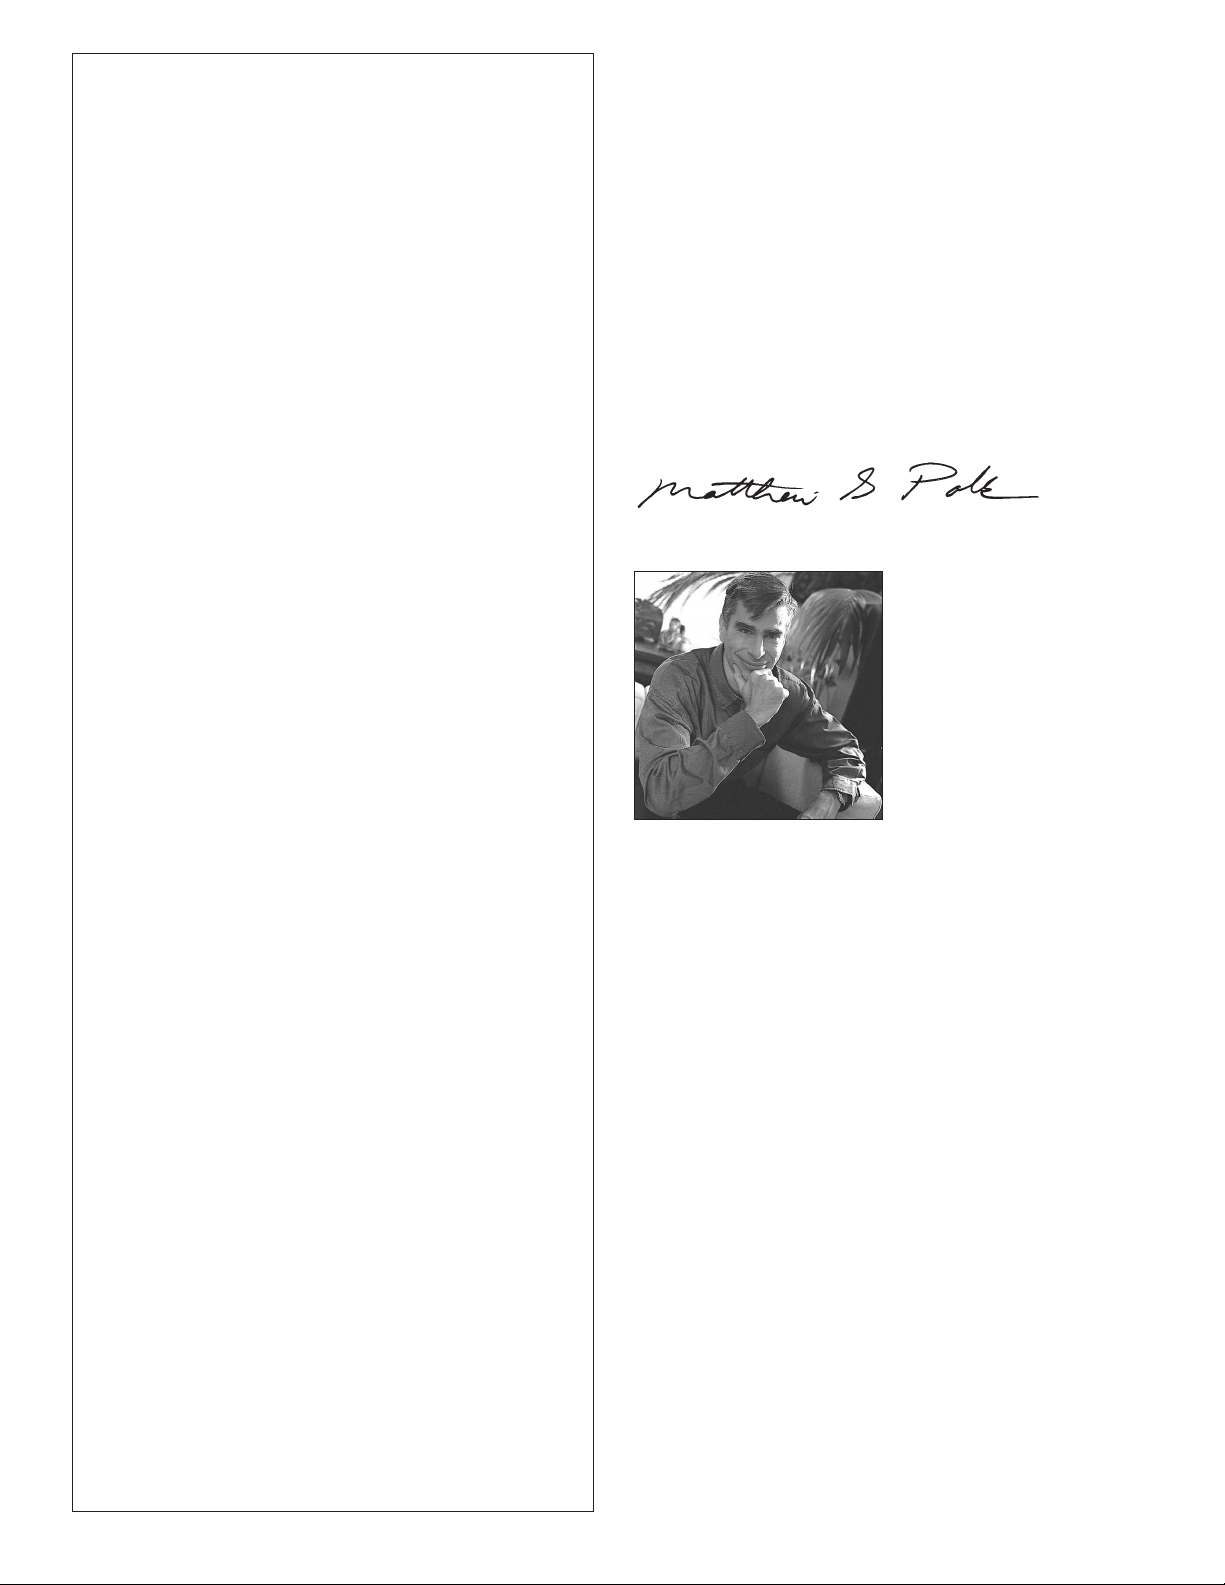
Table of Contents
Safety Warnings......................................................................2-3
Carton Contents ........................................................................5
Basic Setup................................................................................5
Remote Controls........................................................................6
DR-3 Remote Guided Tour ....................................................7-9
DP-1 Setup Menus ............................................................10-12
DP-1 Operation ......................................................................13
Playing a DVD ......................................................................13
Advanced DVD Operation ................................................14-15
Playing a CD ........................................................................16
Advanced CD Operation ..................................................16-17
Playing an MP3 CD ..............................................................18
Advanced MP3 Operation......................................................19
Troubleshooting Guide ......................................................20-21
Specs........................................................................................22
Warranty ..................................................................................23
A Word from Matthew Polk
Dear Home Entertainment Buff,
Thank you for purchasing the Polk Audio DP-1 CD/DVD player. While
we designed the DP-1 to be very easy to set up and use, please read
this manual thoroughly for information on getting the greatest enjoyment from your system. Designing high quality audio products is more
than just a business for the people of Polk Audio—it is our passion.
We are all dedicated to your complete satisfaction and delight.
Should you have any problem or question regarding this or any Polk
Audio product, consult your Polk Audio dealer or call our Customer
Service Department at 1-800-377-7655 from 9am to 6pm, Eastern
Time, Monday through Friday.
Happy Listening!
Matthew S. Polk
About Polk Audio—A History of Excellence
Polk Audio was founded in 1972 by Matthew Polk and George Klopfer.
Their dream was to make reasonably priced speakers that boasted the
performance of the world’s best speakers. Polk speakers have since
earned the praise of audio experts the world over, as well as dozens
of awards for innovative, high-quality design. Today, Polk Audio is
still headquartered in Baltimore, Maryland, and is one of the world’s
largest manufacturers of loudspeakers for home, office and car.
Polk’s research has yielded over 45 patents for advances in
loudspeaker performance and value. Polk Audio speakers are
sold in audio/video specialist retailers throughout the US, Canada
and over 50 other countries.
4
Page 5
Polk Customer Service (800) 377-7655
5
Carton Contents
The following items should be in the box with the DP-1 DVD player. If any
of these items are missing, contact your Polk Audio retailer or Polk Audio
Customer Service.
• DR-3 Unified Learning remote control
• DR-4 DVD-specific remote control
• 4 each AAA batteries (for DR-3 remote)
• 2 each AAA batteries (for DR-4 remote)
• Two-conductor signal cable for digital audio
and remote control extension interconnects
• Three-conductor analog audio/video cable
• DP-1 Owner’s Manual
• DR-3 Owner’s Manual
• Registration postcard
General Precautions
We know you are anxious to get your new toy all hooked up and working,
but really, it’s good to read these instructions, take your time and do things
right the first time.
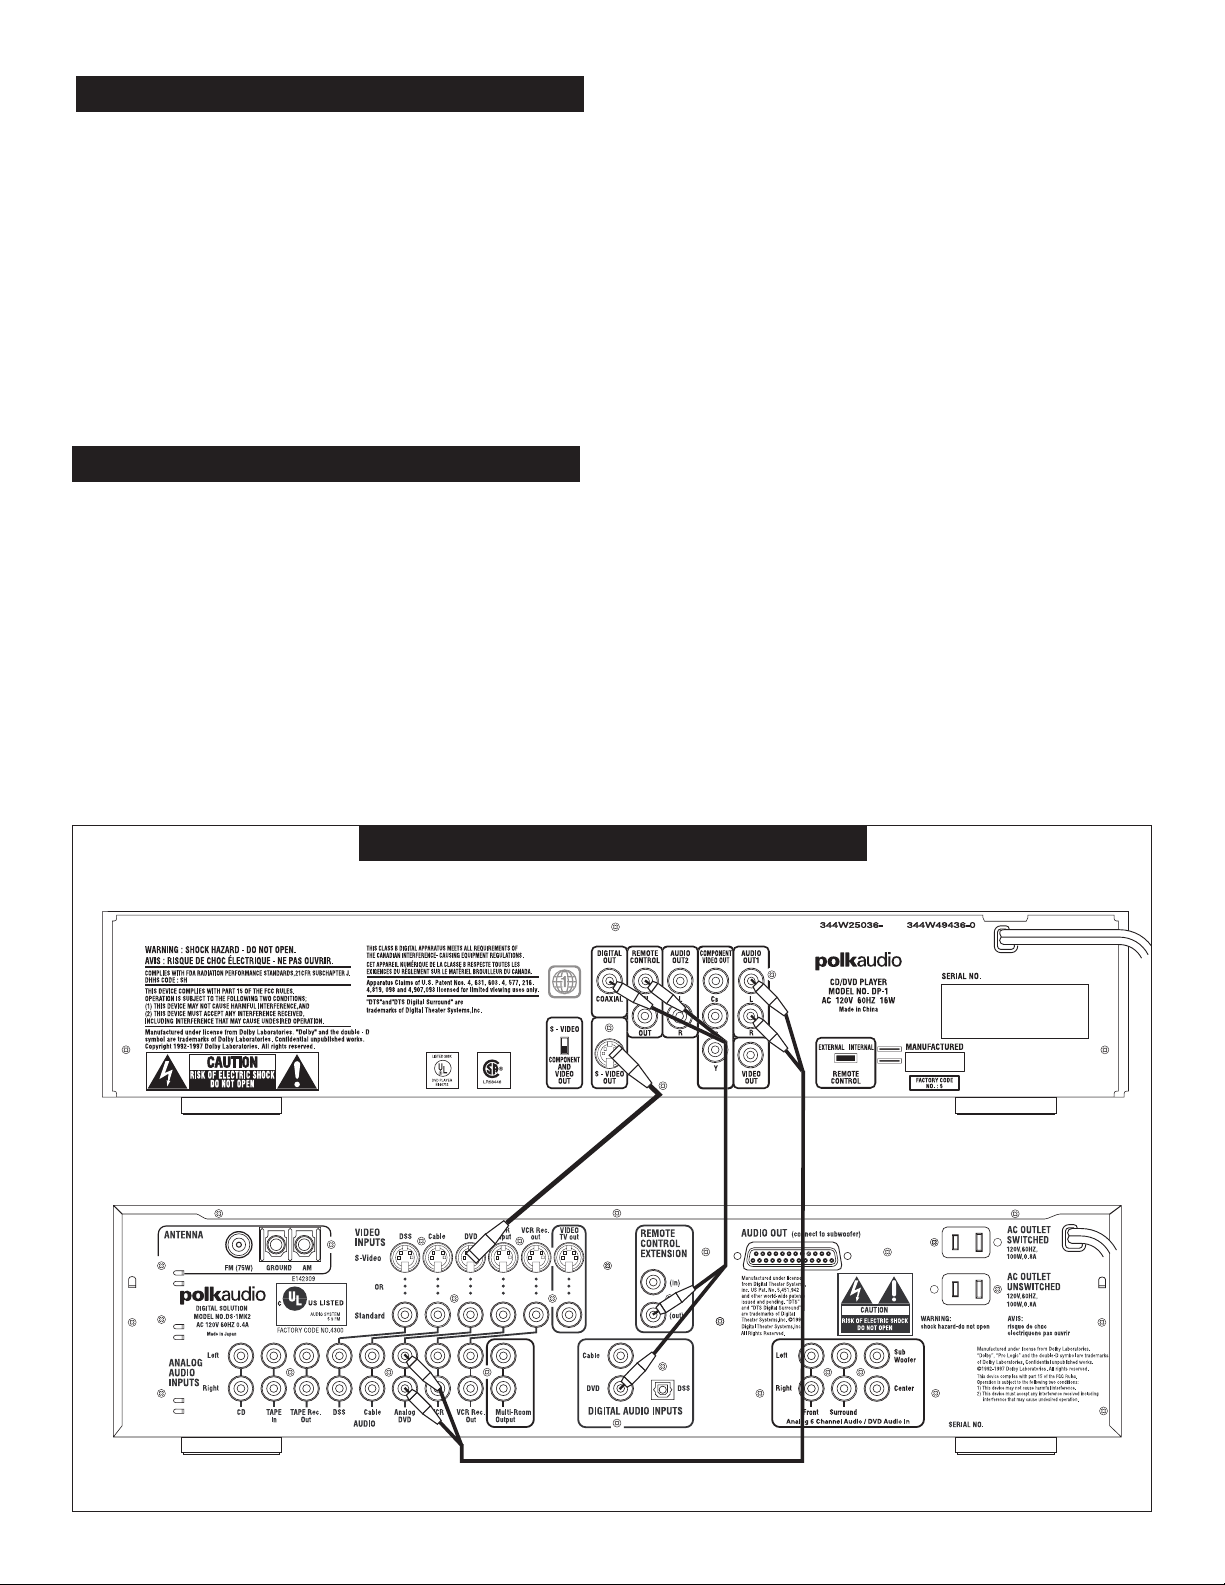
• Before you connect the DVD player to other equipment, be sure
to unplug all of the equipment in the system from the wall outlet.
• If you are using the DP-1 as both a DVD player and a CD player,
connect both the digital and analog outputs of the DP-1 as shown
in the illustration below.
Component Video Output Connections
If your TV has component video inputs you may want to connect the DP-1
CD/DVD player to those inputs. On the plus side, component video connections yield superior picture quality. On the downside, in order to watch a
DVD, you will have to select the DVD input on the Digital Solution
preamp/processor and select the component video input on your TV, rather
than have the simplicity of one-button audio/video switching.
S-Video Connection Precaution
If you use an S-Video cable to connect the video output of the DP-1 player
to the Digital Solution preamp/processor, you MUST use an S-Video cable
to connect the DS preamp/processor to the TV. You cannot mix S-Video and
standard coaxial (composite) video connections throughout the system and
expect to get a picture.
If you use the S-Video output to connect the DS Preamp/Processor to your
TV, switch the DP-1’s video output switch the to “S-Video” as shown in the
illustration. For all other types of video connections use the “Component
and Video Out” switch position.
Remote Control In/Out Connection
This feature is useful when either the DP-1 CD/DVD player or the
Digital Solution preamp/processor will be out of remote control range,
such as in cases where one of the two is hidden behind a cabinet door.
The Remote In/Out feature allows one component to “feed” the other the
remote control signals. If you have such a need, use the extra conductor
signal cable of the supplied two-conductor cable to connect the Remote
Control Extension Out jack of the Digital Solution preamp/processor to
the Remote Control In jack of the DP-1 CD/DVD player as shown in the
illustration below.
GETTING STARTED
DP-1 DVD PLAYER
PREAMP/PROCESSOR
BASIC SETUP
CONNECTING THE DP-1
Page 6
www.polkaudio.com
6
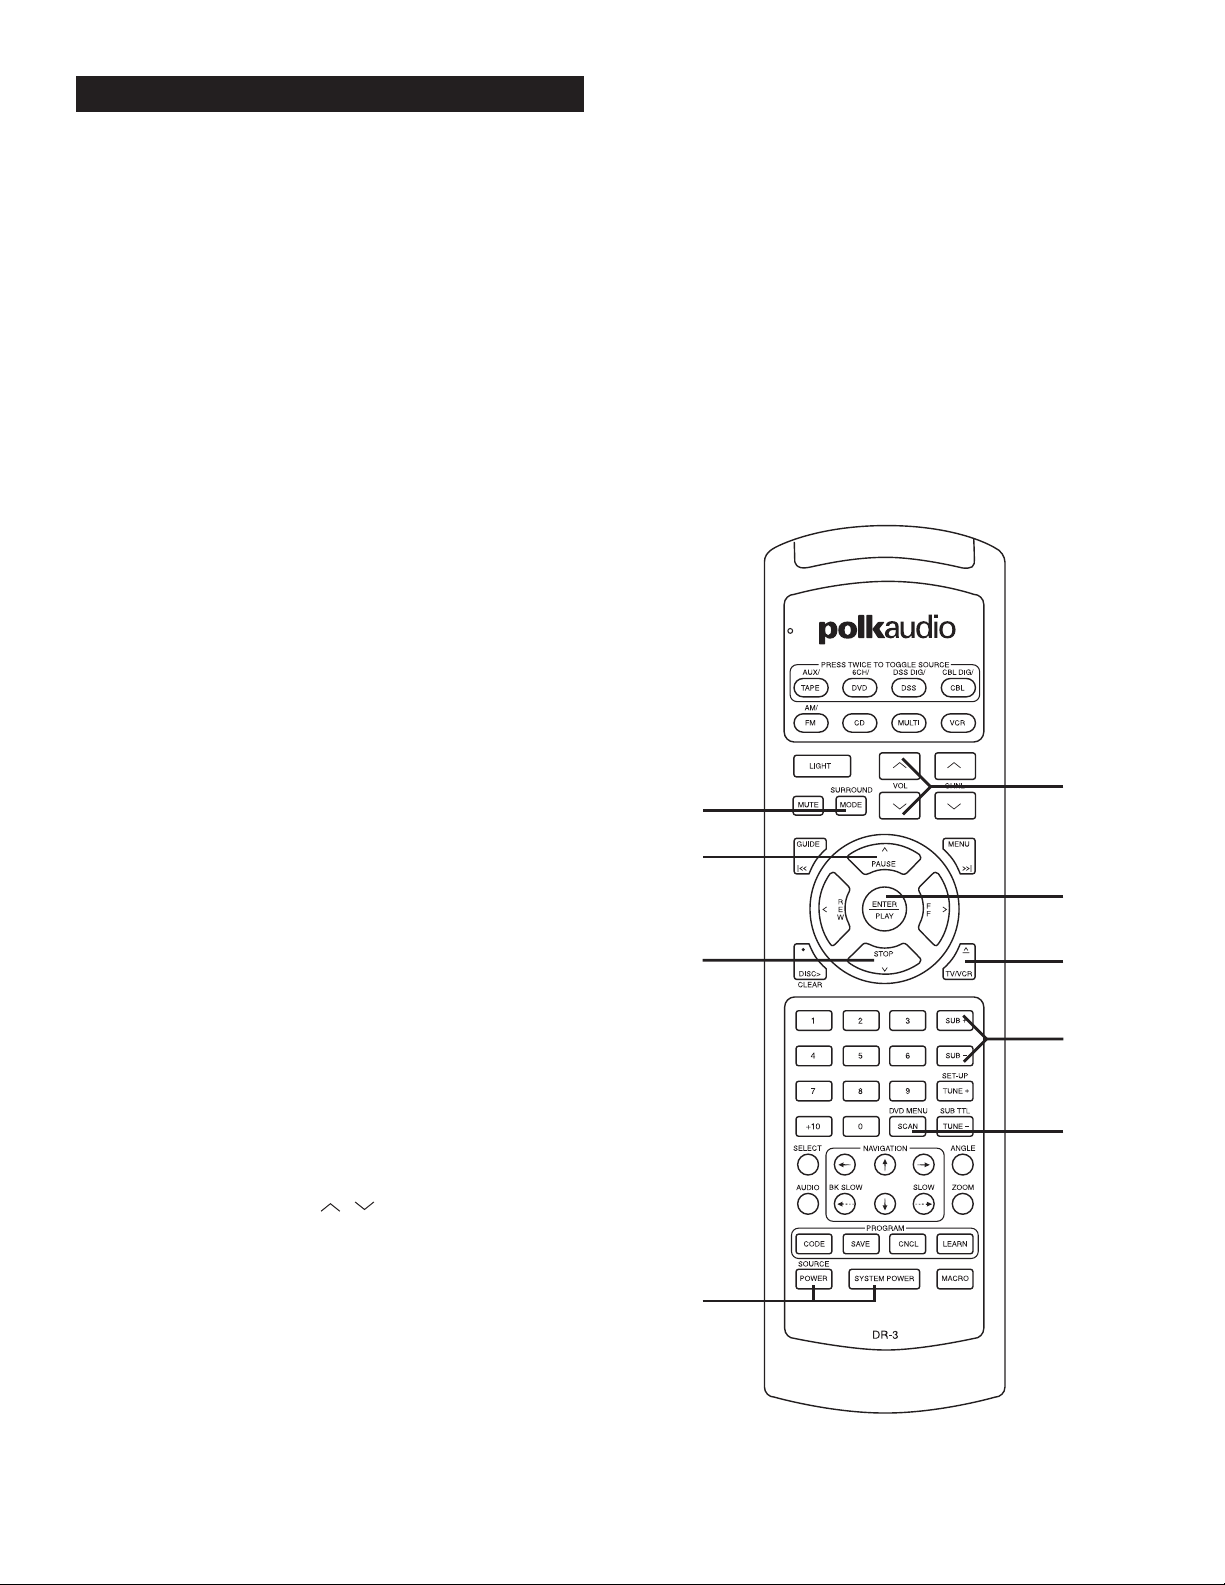
There are two remotes included with the DP-1 CD/DVD player. The
large, black DR-3 is a unified system programmable/learning remote
control that has been pre-programmed to operate the most-often used
functions of both the Digital Solution preamp/processor and the DP-1
CD/DVD player. You can also program it to operate other components in
your system to reduce “remote clutter” on your coffee table. (See the
separate DR-3 Owner’s Manual for instructions on how to program and
use this remote for other devices.)
As nifty as it may be, the DR-3 unified remote cannot duplicate every
function of the DP-1 CD/DVD player or Digital Solution preamp/
processor without it turning into a nightmare of tiny buttons. For
control of the rarely used functions of the CD/DVD player and Digital
Solution preamp/processor, you’ll have to use their dedicated remotes,
the smaller DR-4, DR-1, or DR-2 remotes. If you can’t find them, look
under the sofa cushions; they’re probably there.
Notes on Batteries
• Do not leave dead or exhausted batteries in the remote control.
• Do not use different types of batteries together, or mix old and new
batteries.
• If you do not use the remote control for a long period of time, remove
the batteries to avoid possible damage from battery corrosion.
• Replace the batteries with new ones if the remote control does not
function correctly or if the operating range becomes reduced.
• If the batteries leak, wipe the battery liquid from the battery
compartment being careful not to get any on you, then insert
new batteries.
REMOTE CONTROLS
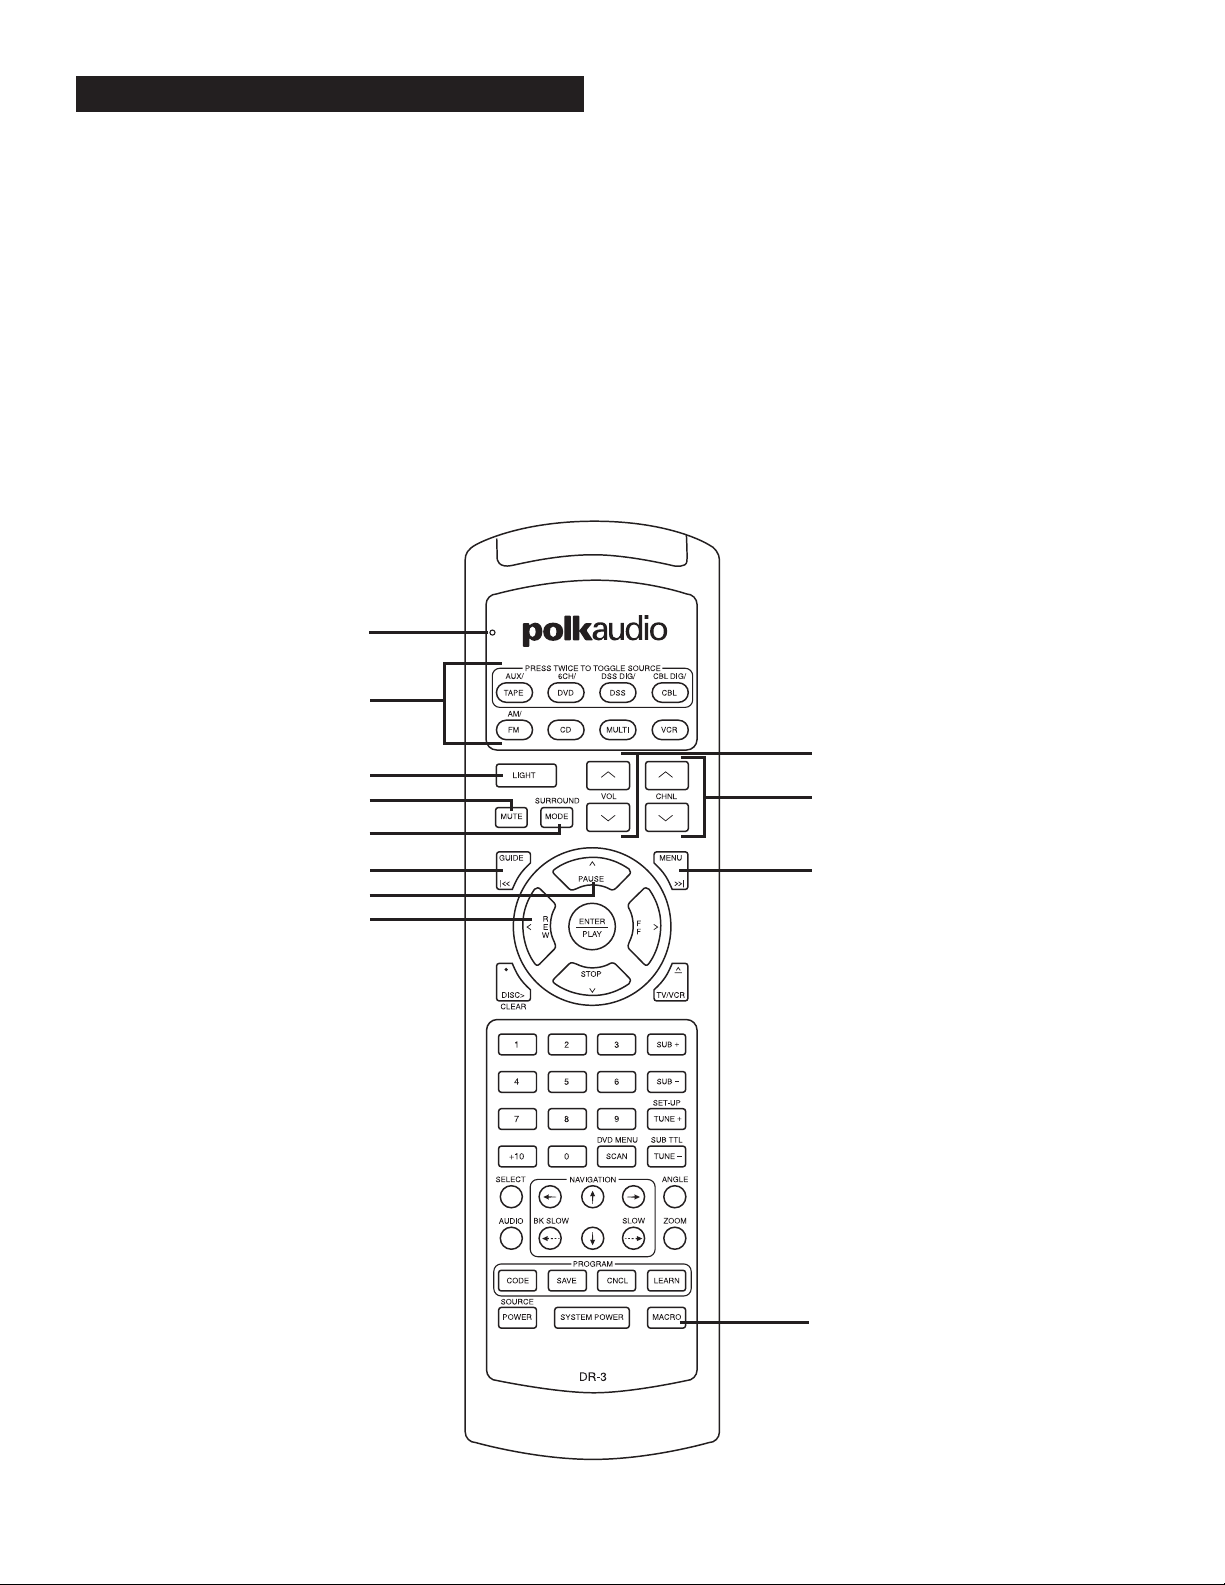
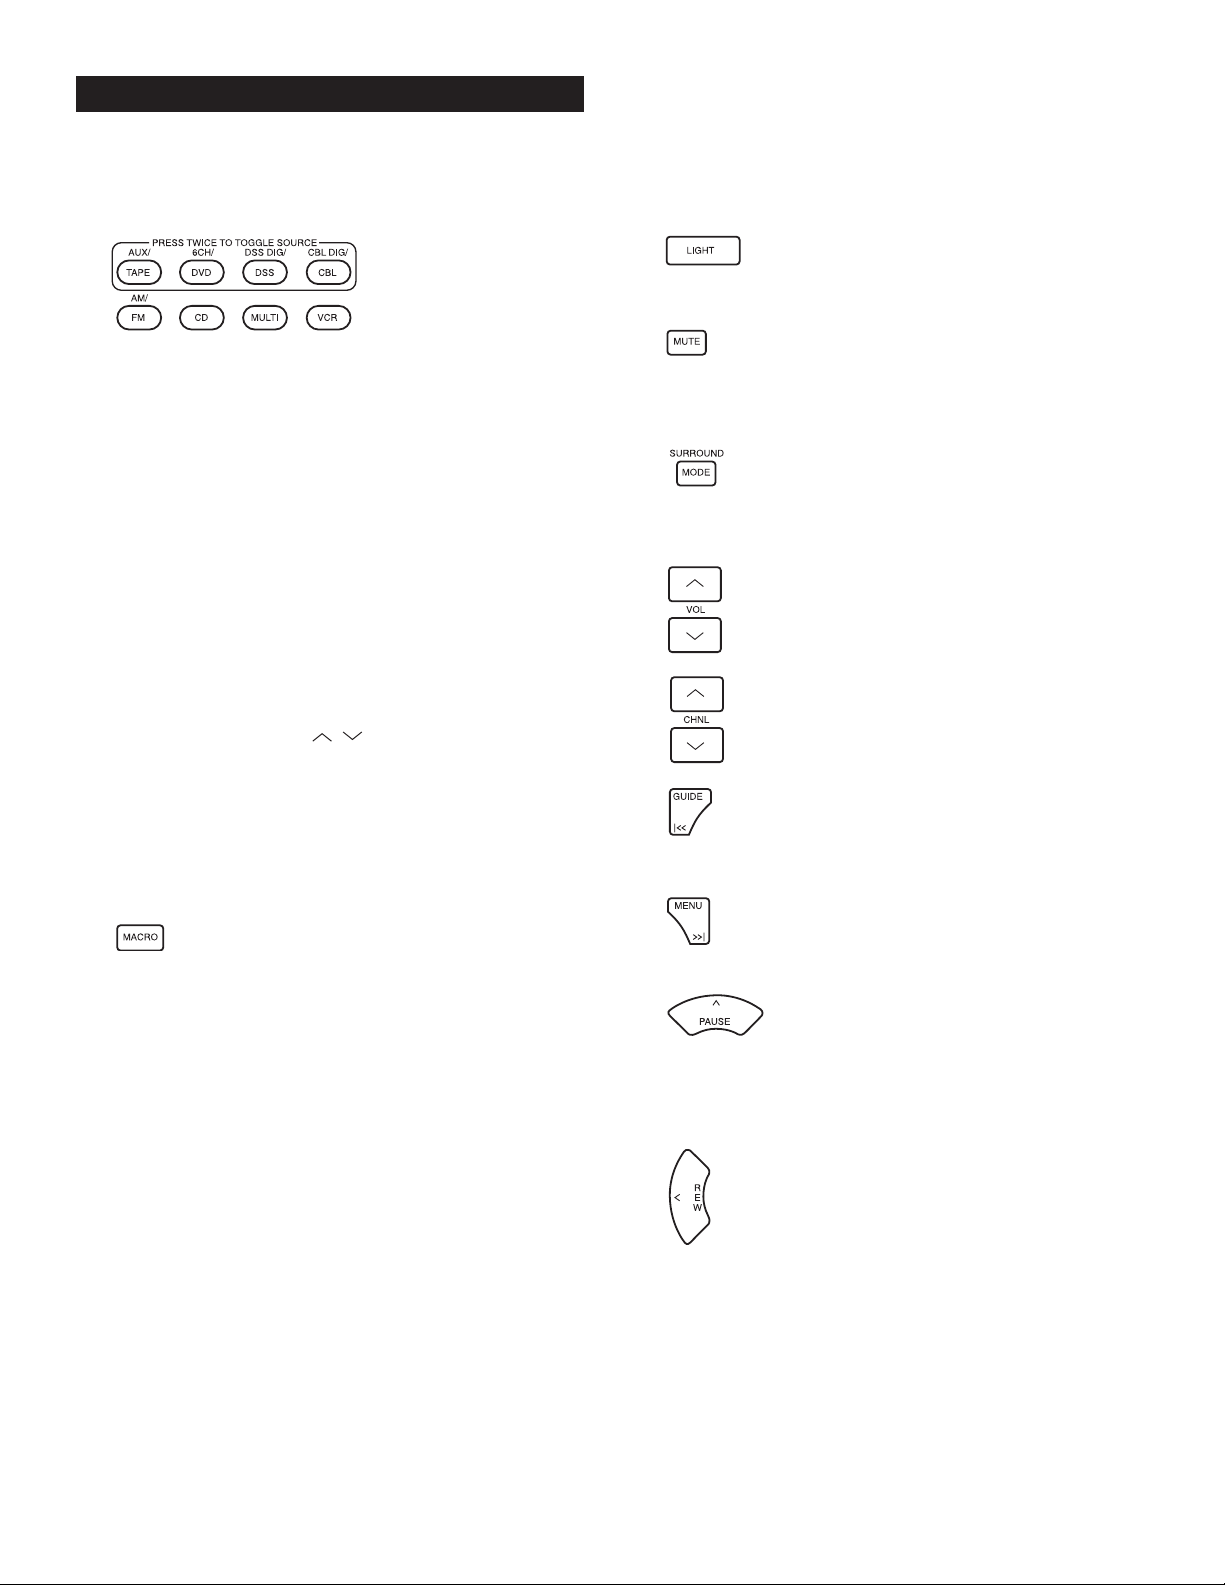
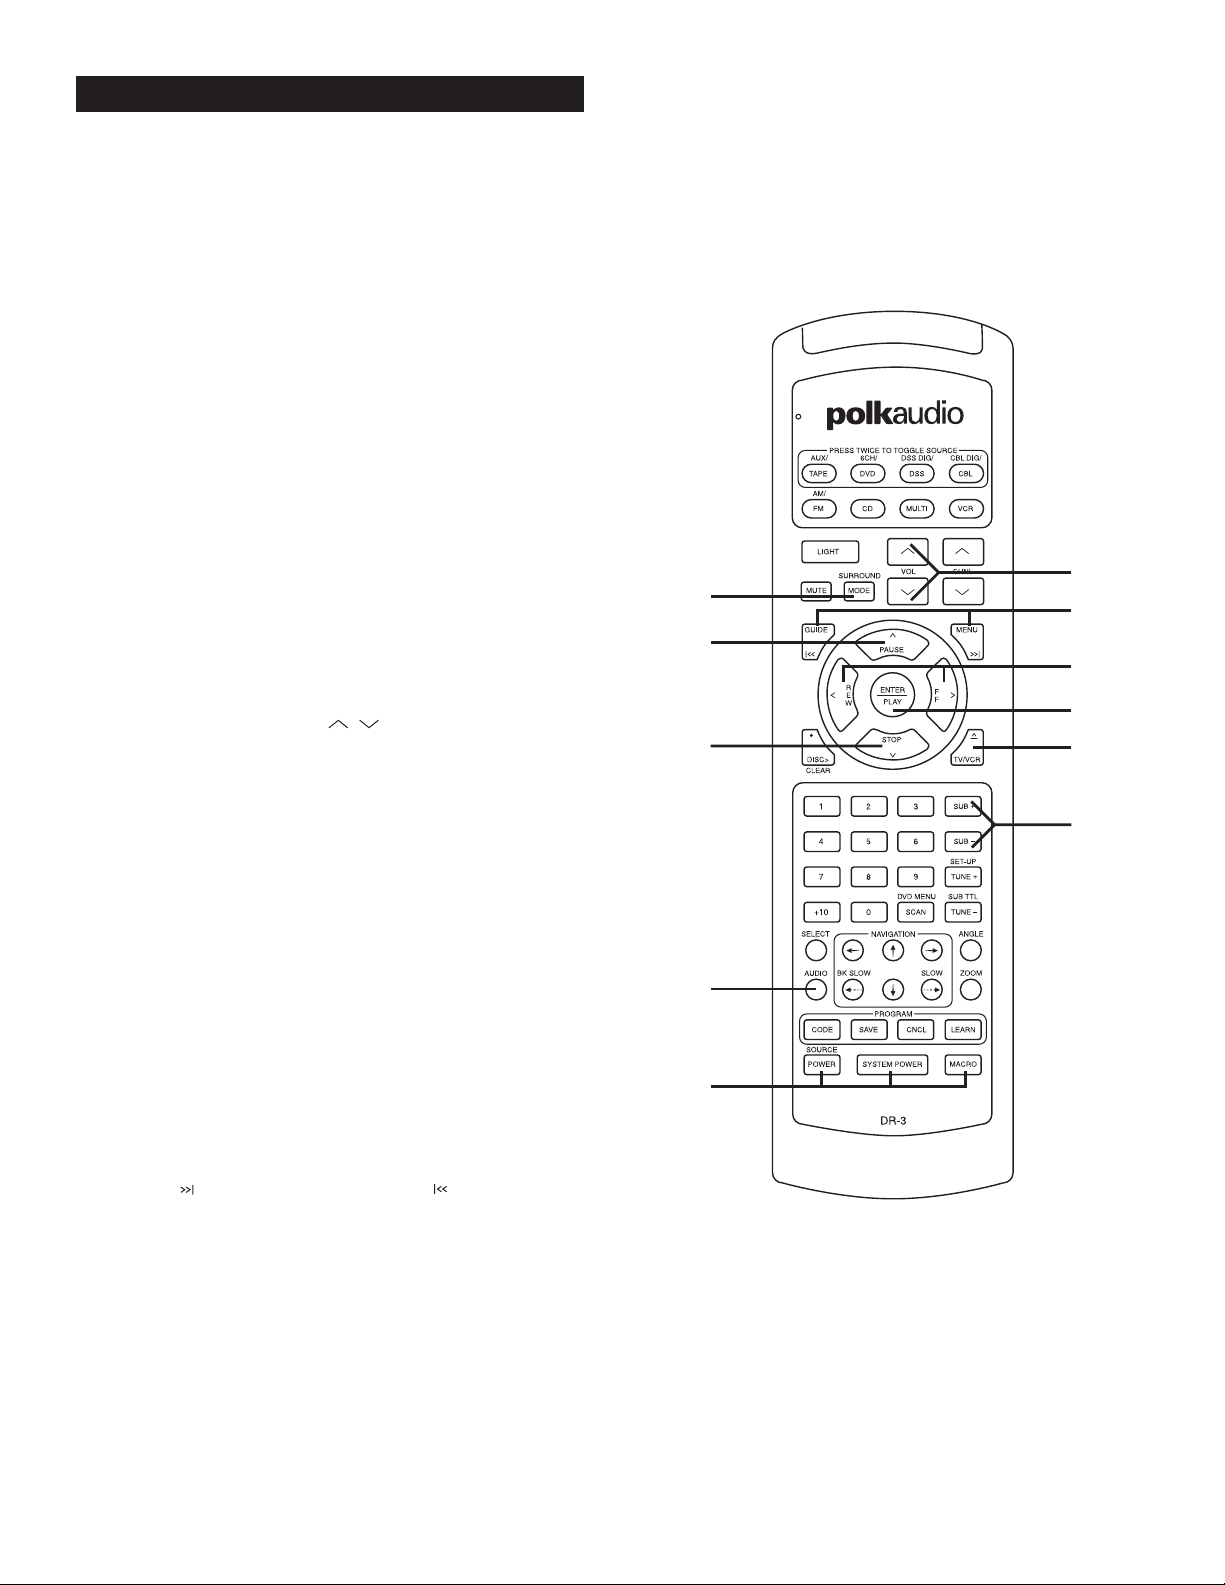
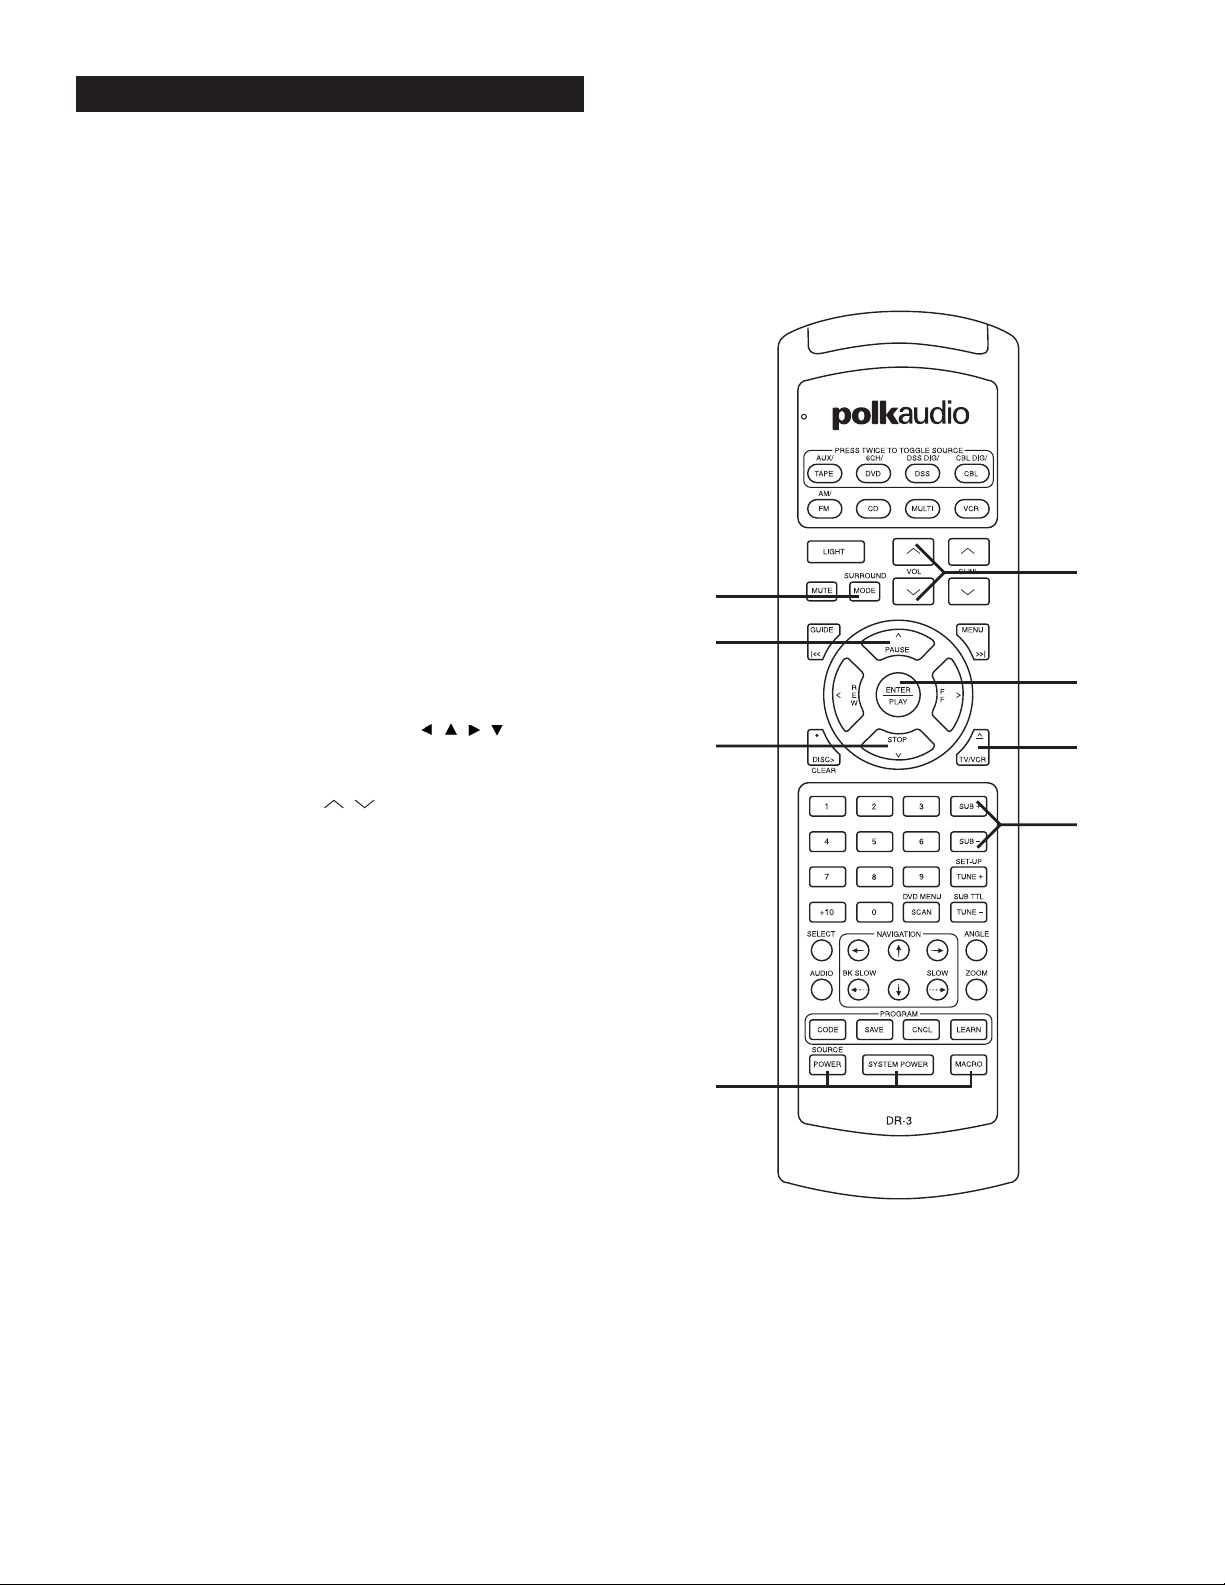
Status
Light
1
10
11
6
3
4
7
5
8
9
2
Page 7
Polk Customer Service (800) 377-7655
7
We will only describe here the DR-3 remote functions as they pertain to the
Polk Audio Digital Solution preamp/processor and DP-1 CD/DVD player. See
the separate DR-3 Owner’s Manual for instructions on how to program and
use this remote for other devices.
1. These buttons serve two
functions: to select the device
that the remote will control
and to change inputs on the
Digital Solution preamp/
processor. For example if you want to play the DVD player, push
the “DVD” button on the top row. The Digital Solution preamp/
processor will switch to the DVD input and the buttons on the
DR-3 remote will be set to operate the DP-1 CD/DVD player.
The top buttons bordered by the gold box are multi-function
buttons. That is, they can select more than one input. Press the
DVD/6CH button once and it selects the DVD input on the preamp/processor and allows the DR-3 to act as the remote for the
DP-1 CD/DVD player. Press it a second time and the DS preamp
switches to the 6CH Analog input for a DVD-Audio or multi-channel SACD player. What these buttons can’t do is select more than
one set of remote codes. You can program ONE device per Source
button. Don’t worry it isn’t very likely that you are going to have
both a digital and an analog cable tuner or two DVD players
hooked up to your system. Of course before the DR-3 can operate
any device other than the DS preamp/processor and DP-1
CD/DVD player, you have to insert the device’s remote codes into
the DR-3. (See the separate DR-3 Owner’s Manual for instructions on how to program and use this remote for other devices.)
IMPORTANT NOTE: The VOL , SURROUND MODE,
MUTE, SUB+ and SUB– buttons are permanently assigned to
Digital Solution preamp/processor functions. No matter what
other device you have selected on the DR-3 remote, you can
always adjust the DS system volume, subwoofer level, mute and
surround mode functions.
To switch the DR-3 remote to operate the Digital Solution’s radio
tuner, push the FM/AM button.
2. The Macro button allows you to program a string of
remote commands to accomplish with one push of a button a
series of operations that would normally take several button
pushes. We strongly recommend that you set the MACRO to turn
on and off the Digital Solution system and DP-1 player together.
Let’s do that now, shall we?
1. Press and hold the CODE button within the bordered
“program” button group until the status light at the top
left of the remote glows red.
2. Press the DVD Source/Device button.
The DVD button will light up.
3. Press the MACRO button. The status light and
the DVD Source/Device button will blink once.
4. Press the System Power button.
5. Press the DVD source button at
the top of the remote.
6. Press the red Source power button at the bottom left
of the remote.
7. Press the SAVE button to store the commands. The red
status light and the DVD Source button lights will blink
twice and then turn off to confirm the program.
The Macro button can be used to do a lot of other convenient and
nifty things. See the separate DR-3 remote Owner’s Manual for
full Macro programming instructions.
3. Back lights the remote buttons for 8 seconds so you
can operate the remote in the dark. The function of this button
does not change when you enter program codes for other devices.
4. Mutes the sound of the Digital Solution system. To disengage the mute function and go back to normal playback volume,
press the MUTE button again or press either of the VOLUME buttons. The function of this button does not change when you enter
program codes for other devices.
5. This button toggles between the various audio modes
of the Digital Solution system such as stereo, Dolby Pro-Logic,
5 Channel Surround, etc. The function of this button does not
change when you enter program codes for other devices.
6. These buttons control the volume of the Digital
Solution system. The function of these buttons
does not change when you enter program codes
for other devices.
7. With the Digital Solution system these buttons
step through the preset radio stations just like
the Radio Preset +/- rocker buttons on the DR-2
remote.
8. This button acts as a chapter skip button to move
you quickly back from the current DVD chapter to
the previous chapter or to skip backwards from track to track
on a CD.
9. This button acts as a chapter skip button to move
you quickly forward DVD chapters or to skip forward
from track to track on a CD.
10. This button acts as the pause/step frame
button for the DP-1 CD/DVD player. To return
to normal play, press the PLAY button. When the MULTI
source/device button gets pressed, enabling multi-zone remote
speaker use with the DS System, this button acts as the up arrow
navigation for the on-screen display for the Digital Solution preamp/processor.
11. Each time you depress this button, the Polk
DP-1 plays in reverse a little faster. The first
push plays the disc backwards at 2X normal
speed. The second push of the button increases the
reverse play speed to 4X normal speed and so on to a maximum
of 100X normal speed. To resume normal playing direction and
speed press the ENTER button. When the MULTI source/device
button gets pressed, enabling multi-zone remote speaker use with
the DS System, this button acts as the left arrow navigation for
the on screen display of the Digital Solution preamp/processor.
DR-3 REMOTE GUIDED TOUR
Page 8
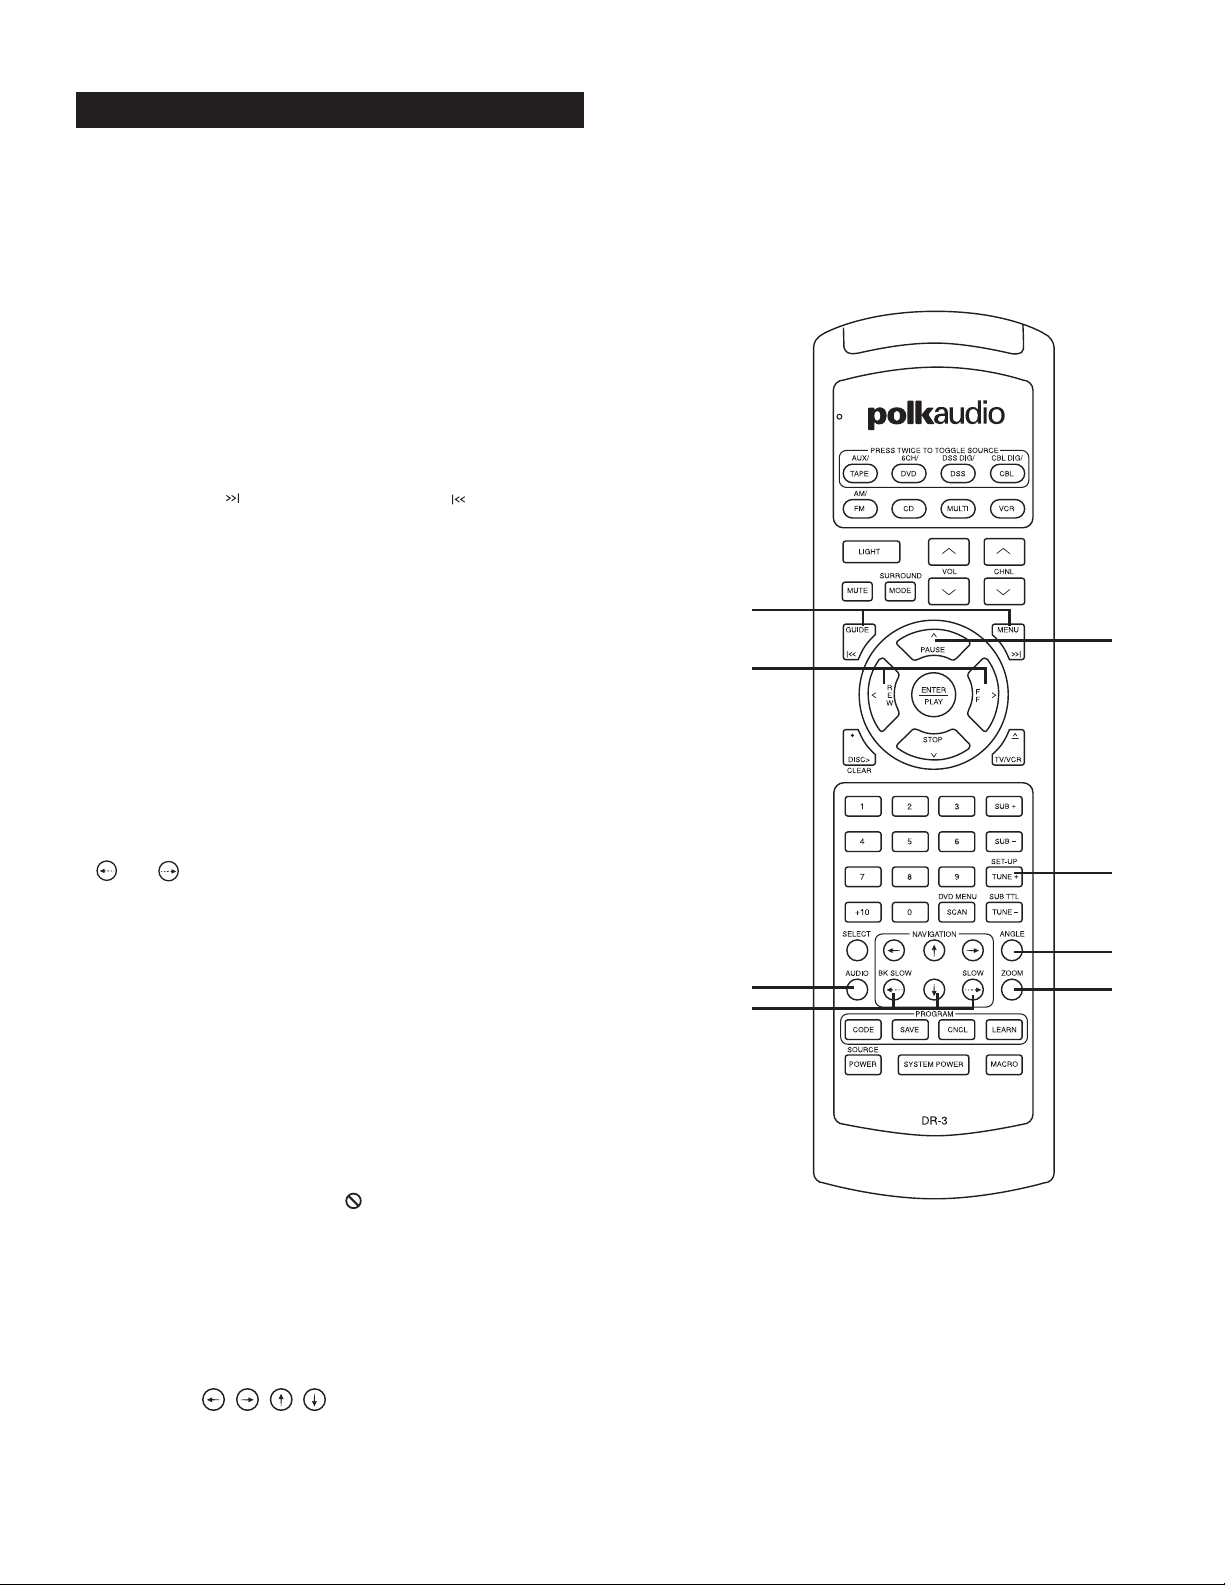
12. Use this button to put the CD/DVD player into
the play mode or use it to select a menu choice. When
the MULTI source/device button gets pressed, this button acts as
the Enter button for the on screen display (OSD) for the Digital
Solution preamp/processor.
13. Each time you depress this button, the Polk DP-1
fast-forwards a little faster. The first push fastforwards at 2X normal speed. The second push of the
button increases the play speed to 4X normal speed
and so on to a maximum of 100X normal speed. To resume normal playing speed, press the ENTER button. When the MULTI
source/device button gets pressed, this button acts as the right
arrow navigation for the on screen display of the Digital Solution
preamp/processor.
REMOTE CONTROLS
8
www.polkaudio.com
14
15
17
20
22
21
27
28
12
13
16
18
19
24
25
23
26
Page 9
14. Push this button once to pause playing the
DVD in the Polk DP-1 CD/DVD/MP3 player. Press
it a second time to totally stop the DVD. With a CD in the player,
this button simply stops the CD. When the MULTI source/device
button gets pressed, enabling multi-zone remote speaker use with
the DS System, this button acts as the down arrow navigation for
the on screen display (OSD) for the Digital Solution
preamp/processor.
15. This button acts as the Clear command for the
DP-1 CD/DVD player. This button has no function with
the Digital Solution preamp/processor.
16. This button opens and closes the disc drawer of
the Polk DP-1 CD/DVD player; it has no function with
the Digital Solution preamp/processor.
17. Numeric Keypad – Use the number buttons to directly access a
track or chapter of a disc. For example if you want to go directly
to track 8 of a CD, press 8 on the keypad. To get to tracks higher
than 9, use a two key combination. For example if you want to
listen to track 10, press 1 followed by the 0. To hear track 12,
press 1 followed by the 2. You have about two seconds between
key presses before the DR-3 accepts the digit. Press two-key
combos in quick succession, or the DR-3 will only recognize the
first number keyed. These buttons have no function with the Digital Solution preamp/processor.
18. These buttons raise and lower the volume of
the Digital Solution subwoofer just like the
SUBWOOFER +/- buttons on the Digital
Solution system remote.
19. When the remote is set to operate only the DS
preamp/processor (push the AM/FM button to do
this) these buttons manually tune the radio up (+)
or down (-) the radio dial just like the -RADIO TUNER+
rocker button on the Digital Solution system remote.
When the DR-3 remote is set to control the DP-1 player, the
Tune+/SETUP button acts to bring up the DP-1’s hardware Set Up
menu on your TV screen. The TUNE-/SUB TTL button allows you
to turn DVD subtitles on or off and switch between languages.
This feature may not work with all DVDs, particularly those with
no subtitles.
20. This button selects a choice on a menu such as the
set-up menu of the DP-1 or the chapter menu of
a DVD disc; it has no function with the Digital Solution
preamp/processor.
21. This button toggles through the available audio
tracks on a DVD. For example, if a DVD disc has
a 2 Channel audio track, a Dolby Digital 5.1 and a DTS 5.1 track,
each time you push this button, the next available audio track
will play. This eliminates the hassle of going back to the DVD’s
main menu to change the audio type. This feature may not work
with all DVDs (pity). This button has no function with the Digital
Solution preamp/processor.
22. These buttons allow you to move the
DVD cursor among set up menus to
select operations. For example if you
are looking at a DVD’s main title menu
and you want to move to the Scene
Selection menu, push the appropriate arrow button to move
the DVD cursor to the Scene Selection graphic on the TV
screen. This button has no function with the Digital Solution
preamp/processor.
23. Use these buttons to make the DVD
play at a slower than normal speed
either forward or backward. Press
the button once and the play speed
will be 1/16 normal speed. Press it
a second time and the DVD will play at 1/8 speed and so on down
to 1/2 speed. Press the PLAY/ENTER button to return to normal
playing speed and direction. This function does not work with
CD playback, only DVD. NOTE: the sound is muted during Slow
play operation.
24. Some DVDs offer multiple camera angles. With
such a disc, pressing this button toggles between the
available camera angle views. In most cases (particularly
movies) there is only one camera angle view on the disc and all
that happens when you press this button is the symbol will
appear on your TV screen.
25. The Zoom function allows you to enlarge the video
image and to move through the enlarged image. Press
ZOOM during normal playback or the Pause/Still mode to engage
the Zoom function. Each time you press the ZOOM button, the
magnification increases. There are a total of six magnification
steps. To return to a normal picture keep pressing the ZOOM button until the picture goes back to
normal or press the button.
If you want to move around the magnified image to focus in
on a particular detail, use the keys.
NOTE: The zoom feature does not work on subtitles and menu
screens.
26. These four buttons allow
you to program in the codes
for other remotes or “teach” the remote specific commands. See
the separate DR-3 remote manual for instructions on using these
buttons.
27. This button acts as the on/off button for the
other components in your system once you have entered their
remote codes into the DR-3. See the separate DR-3 remote manual for instructions to learn how to program the DR-3 to operate
other devices.
28. This button turns on and off the Digital
Solution system only. This function does not change when
you enter program codes for other devices
9
Polk Customer Service (800) 377-7655
Page 10
10
Your DP-1 player has been preset to work perfectly with your Polk
Audio Digital Solution system and a standard 4:3 aspect ratio TV. If you
have a 16:9 widescreen TV you will have to reset the TV Aspect Ratio in
the “Other” section of the DVD setup menu. No matter what gear you
have it is always a good idea to check all of these settings to make sure
they are correct.
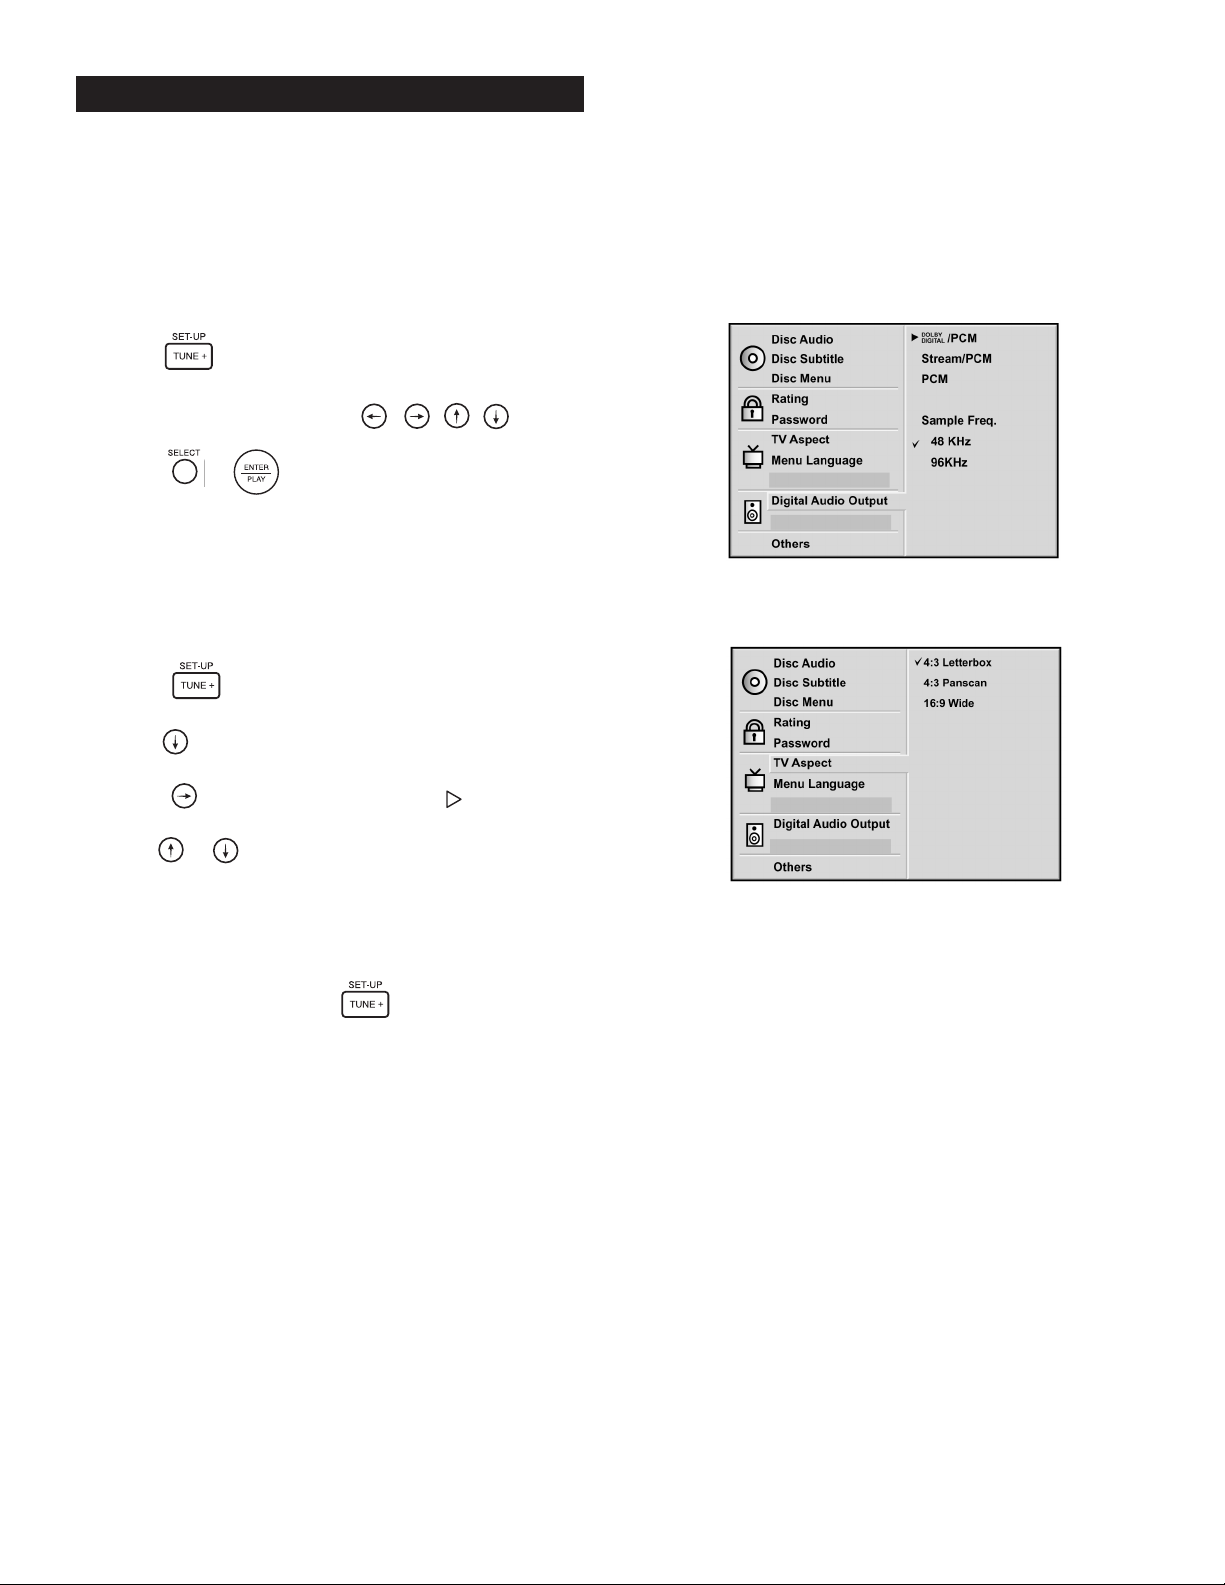
How to navigate and select choices
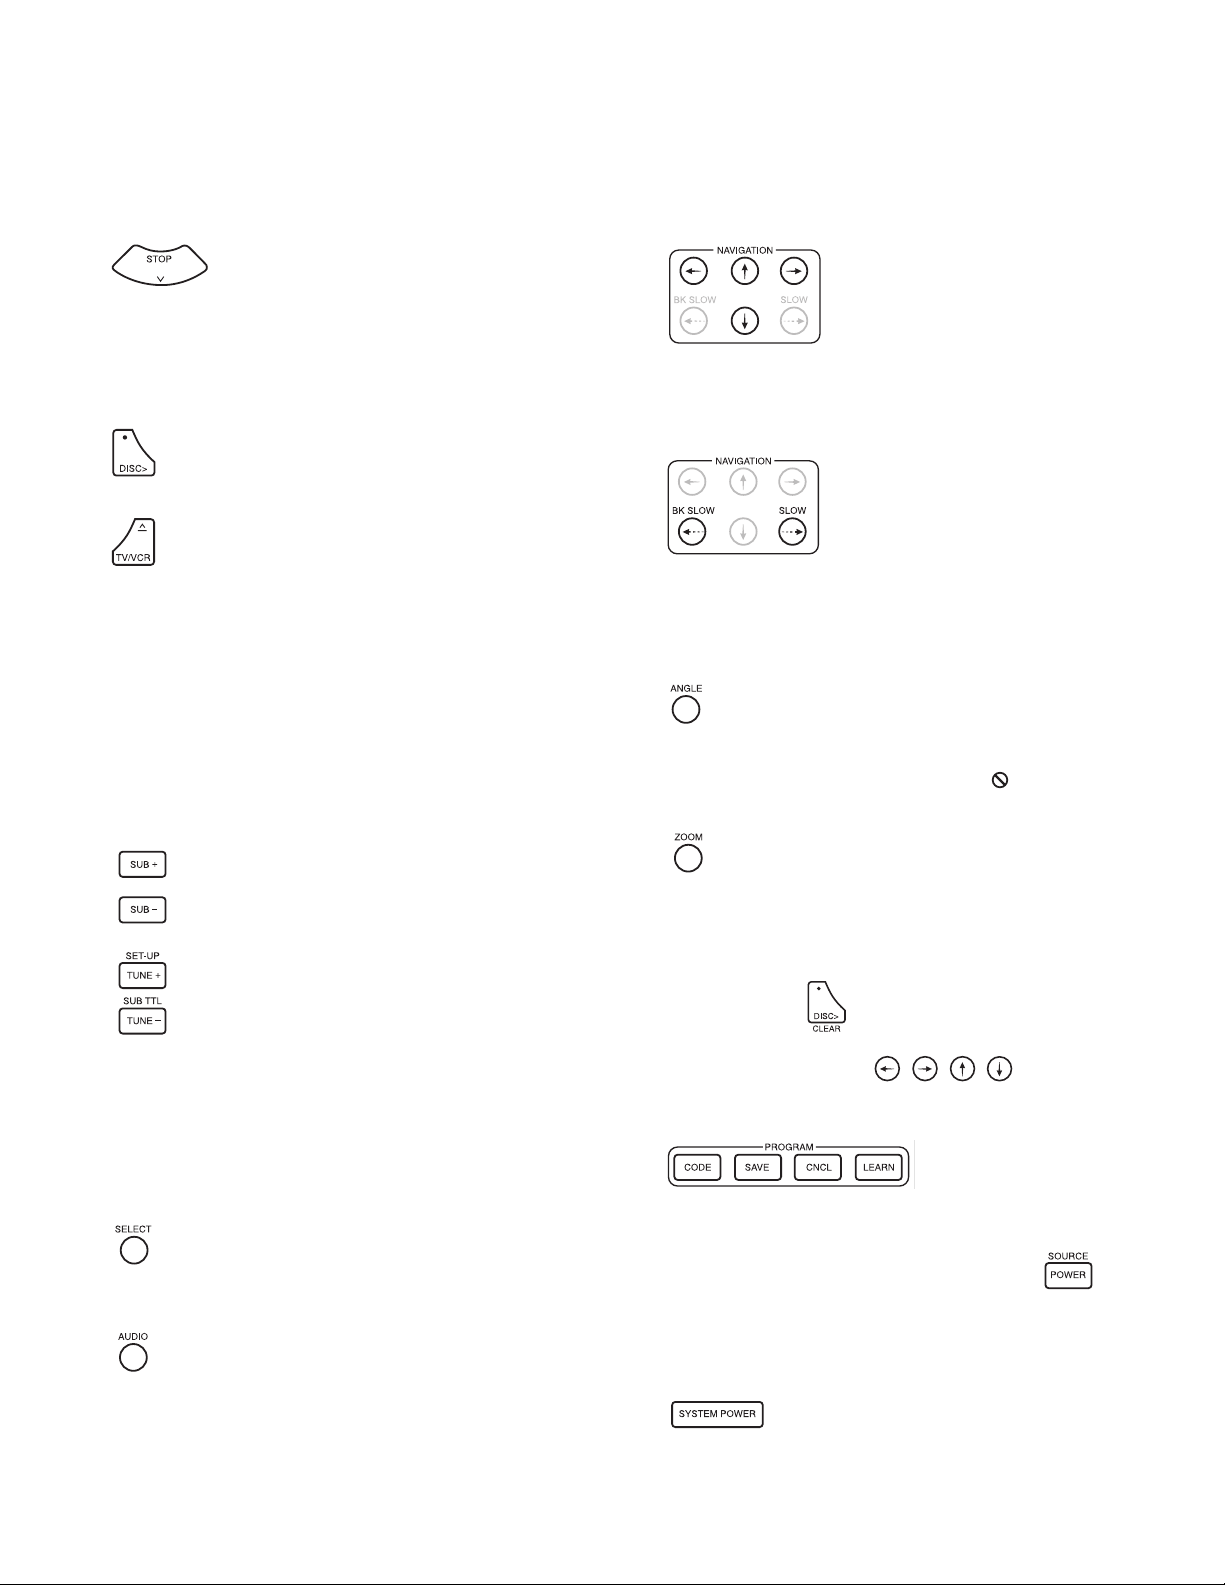
1. Press the button on either the DR-3 or DR-4 remotes.
The setup menu will appear on your TV screen (figure 1).
2. Use the navigation direction buttons to move
the cursor around the screen.
3. Press the or button to make a choice.
Setting TV Aspect Ratio
(required if using a 16:9 widescreen TV)
This feature adjusts the video output of the DVD player to match your
TV. If you have a standard 4:3 aspect ratio TV, the factory setting of “4:3
Letterbox” is right and you need not change this setting. If you have a
widescreen 16:9 TV, you need to change this setting to “16:9 Wide.”
1. Press the button on either the DR-3 or DR-4 remotes.
The setup menu will appear on your TV screen (figure 2).
2. Use the navigation button to move down
to “TV Aspect.”
3. Press the button and a white arrow cursor will appear next
to one of the choices.
4. Use the or navigation buttons to select the type of TV
you have as follows: If you have a standard format 4:3 TV, select
“4:3 Letterbox.” This setting allows widescreen DVDs to be viewed
in their proper aspect ratio.
If you have a 16:9 aspect ratio widescreen TV, select “16:9 Wide.”
5. Make your selection and press SELECT.
6. To exit the Setup menu, press the button on the remote.
DP-1 SET UP MENUS
Figure 1
Figure 2
www.polkaudio.com
Page 11
11
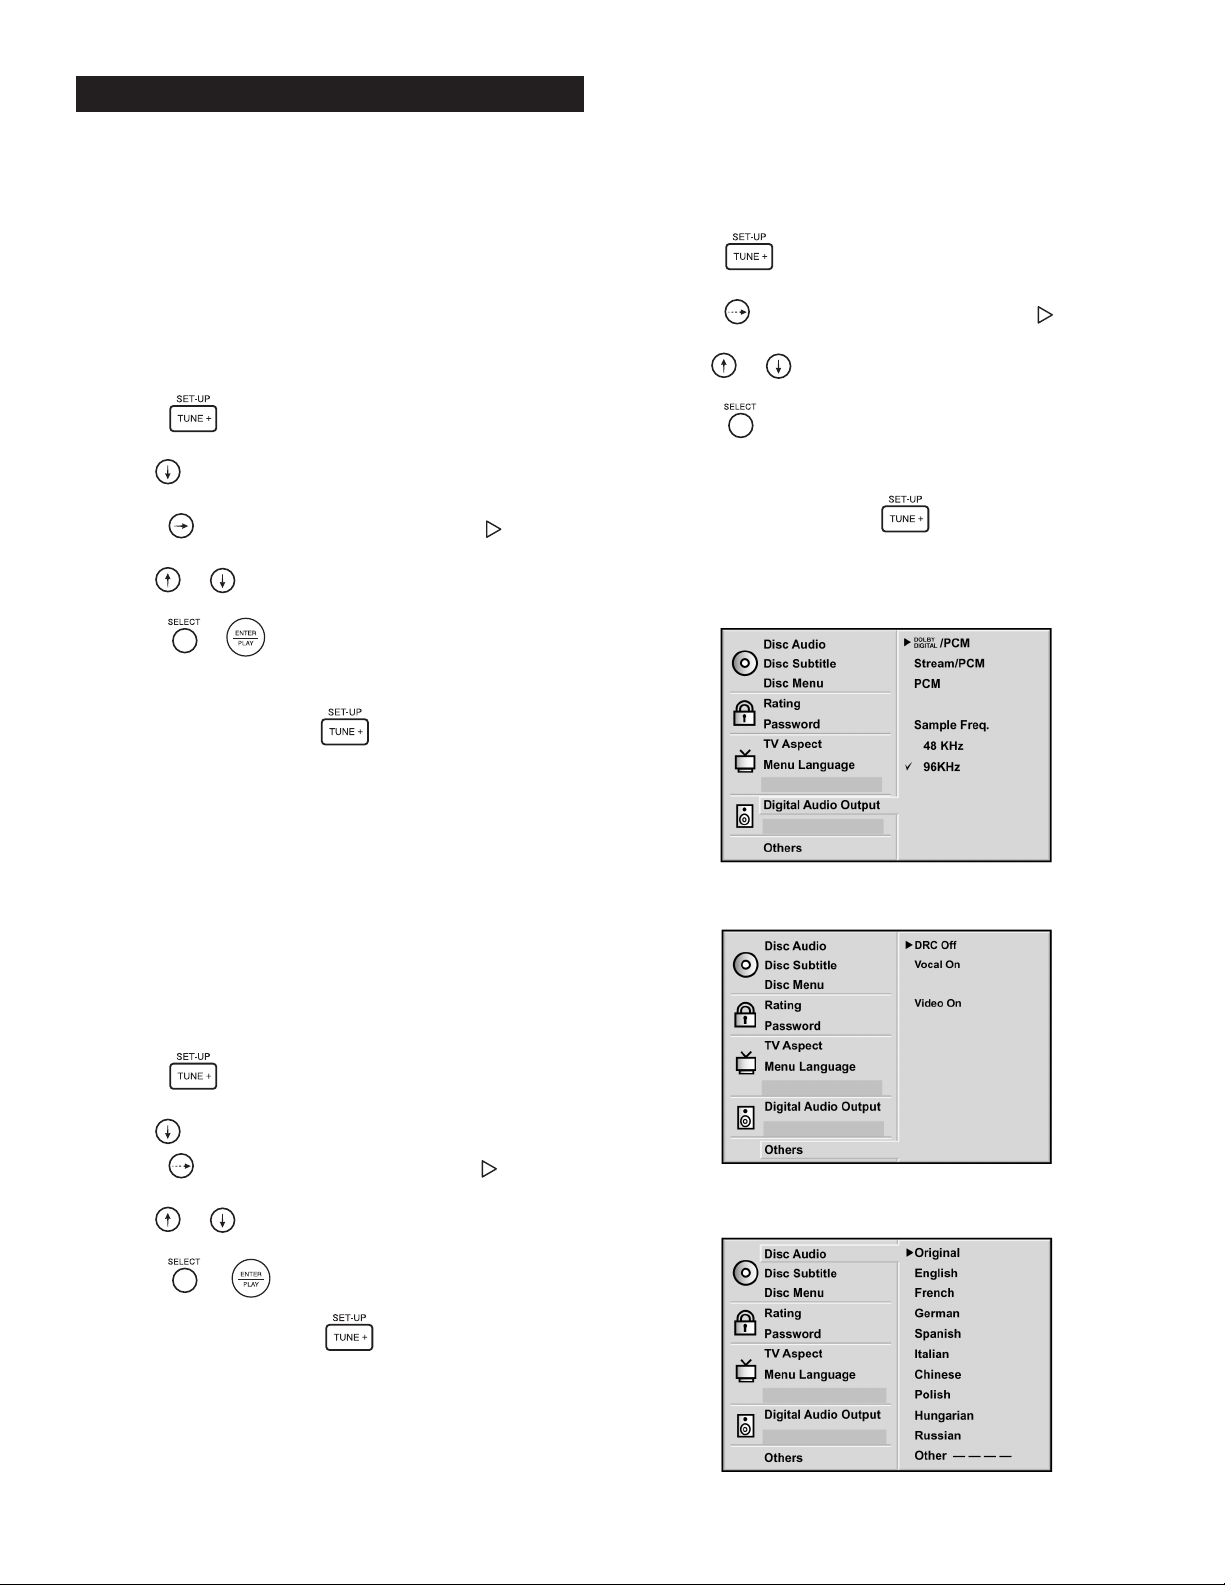
Setting Digital Audio Output Sample Frequency
The default setting of “48kHz” allows the DP-1 to work safely with all
digital processors and receivers. When this DVD player is connected to
the Polk Audio Digital Solution 7200 system (but NOT the RMDS-1
system), we recommend that you use the “96kHz” setting for the best
possible audio performance. If you are using some other surround
receiver or preamp/processor, see that unit’s manual to determine the
best settings. The first generation Polk Audio RMDS-1 system accepts
a 48kHz signal only. If you set this DVD player to the 96kHz setting and
connect it to a digital processor or receiver that does not have a 96kHz
input, a loud, nasty noise will come out of your speakers and possibly
damage them. To change the setting:
1. Press the button on either the DR-3 remote. The setup
menu will appear on your TV screen (figure 3).
2. Use the navigation button to move down to
“Digital Audio Output.”
3. Press the button and a solid white arrow cursor will
appear next to one of the selections.
4. Use the or navigation buttons to move the white cursor
to the setting you want to select (96kHz for the DS7200 system).
5. Press the or button. A black checkmark will appear next
to your selection.
6. Make your selection and press SELECT.
7. To exit the setup screen, press .
If you are using a surround receiver or preamp/processor other
than the Polk DS7200, see that unit’s manual to determine the
best settings. The first generation Polk Audio RMDS-1 system
accepts a 48kHz signal only. If you set this DVD player to the
96kHz setting and connect it to a digital processor or receiver
that does not have a 96kHz input, a loud, nasty noise will come
out of your speakers and possibly damage them.
Setting DRC
The factory default for “DRC” (Dynamic Range Control) is “Off.” When
using the DP-1 with the Digital Solution system, make sure this is set to
“Off.” Turn this function on only if you are using the DP-1 player with a
stereo or home theater audio system that has limited output capability.
To change the setting:
1. Press the button on either the DR-3 or DR-4 remotes.
The setup menu will appear on your TV screen (figure 4).
2. Use the navigation button to move down to “Others.”
3. Press the button and a solid white arrow cursor will appear
next to one of the selections.
4. Use the or navigation buttons to move the white cursor to
the setting you want to select.
5. Press the or button to toggle between “Off” and “On.”
Set to Off.
6. To exit the setup screen, press .
Menu Language Options
This menu block allows you to change the default language of the
audio track, subtitles and DVD menus. If your language of choice
(or necessity) is English, skip this part, cowboy.
1. Press the button on either the DR-3 or DR-4 remotes.
The setup menu will appear on your TV screen (figure 5).
2. Press the button and a solid white arrow cursor will
appear next to one of the language selections.
3. Use the or navigation buttons to move the white cursor
to the language you want to select.
4. Press the button. A black checkmark will appear next
to your selection.
5. Repeat these steps for the other language option screens.
6. To exit the setup screen, press .
DP-1 SET UP MENUS
Figure 3
Figure 4
Figure 5
Polk Customer Service (800) 377-7655
Page 12
12
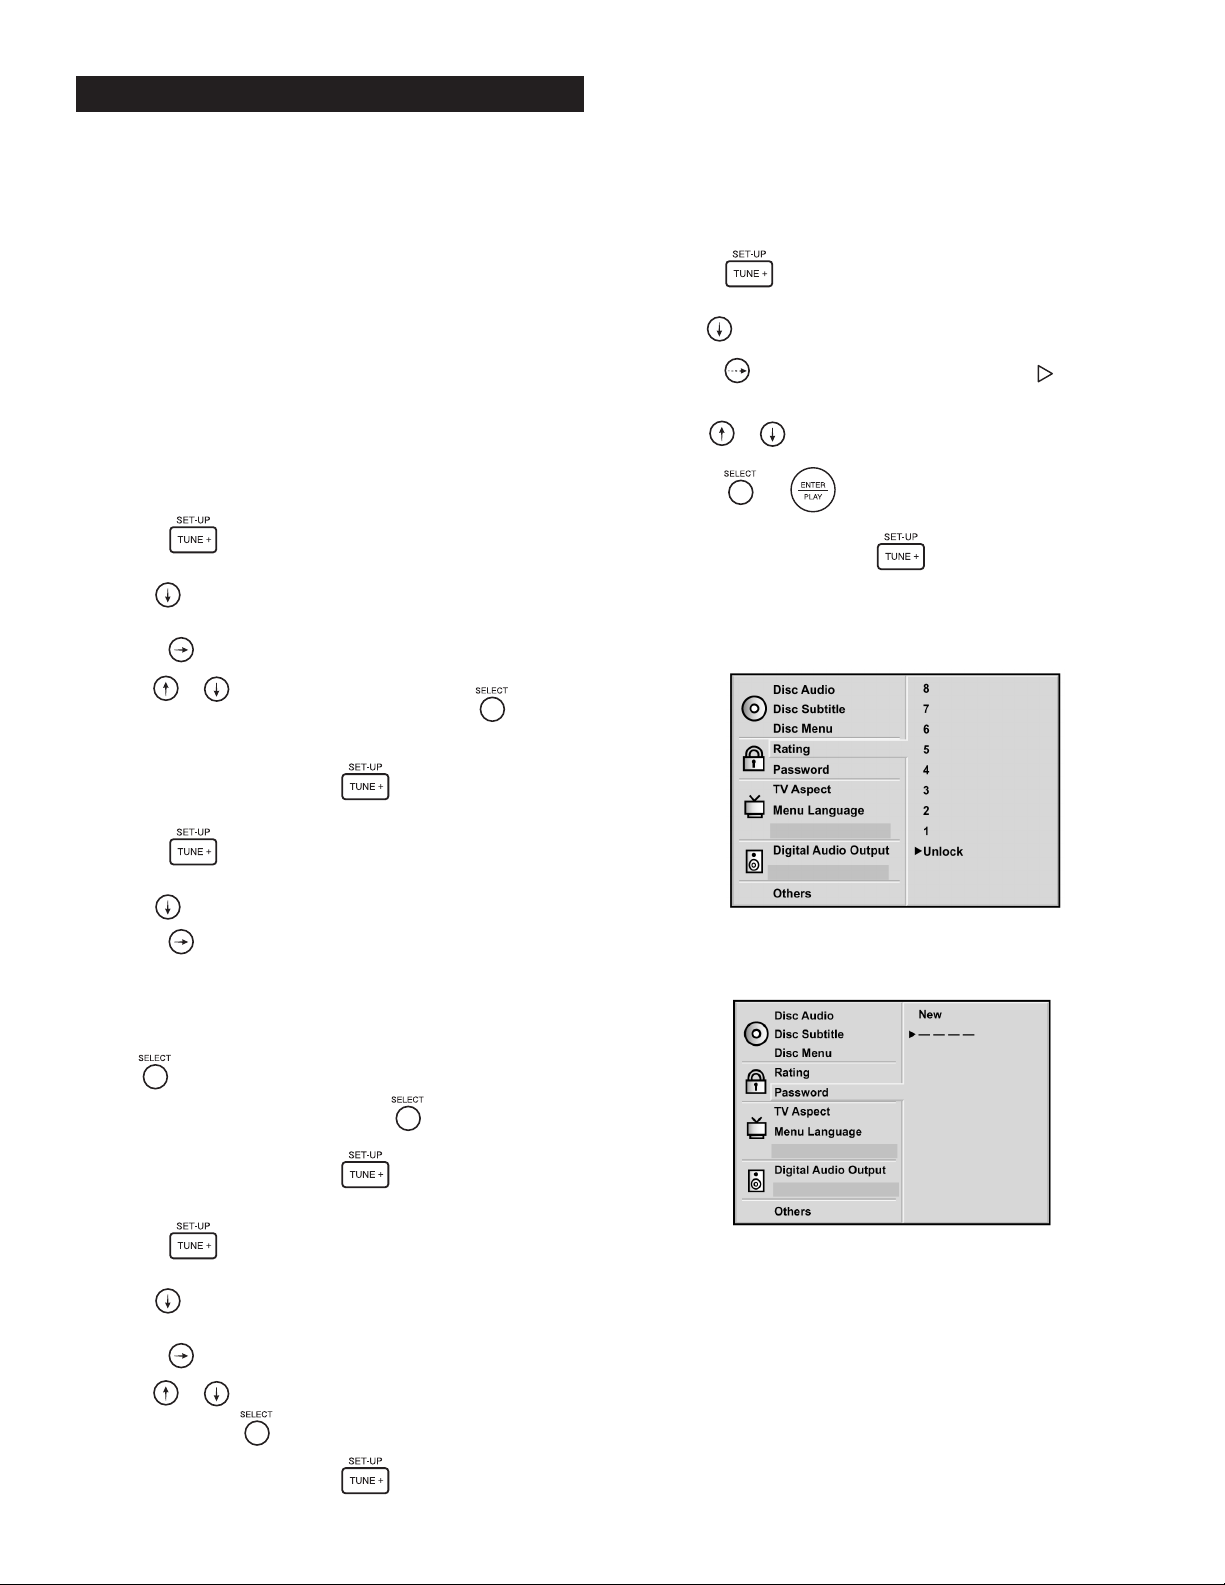
Parental Block/Password Menus (optional)
The Rating and Password menus are useful if you have children at
home and want to prevent them from viewing inappropriate DVDs.
Most DVD movies are age rated just like theatrical releases. The rating
numbers on this menu roughly correspond to USA movie industry
ratings like so:
NC-17 = 7 PG = 3 PG13 = 4
R = 6 G = 1
This feature selects the maximum allowable movie rating that can be
played. For example, when you select level 4, DVD discs rated higher
than level 4 (R and NC17) cannot be played until you unlock the feature.
To prevent your rascal kids from changing the rating block feature
themselves, you should enter a password to block access to the
Rating menu.
Setting a Rating
1. Press the button on the DR-3 remote.
The menu will appear on your TV screen (figure 6)
2. Use the navigation button to move the cursor down the
screen until “Rating” is highlighted in white.
3. Press the button and a white arrow cursor will appear.
4. Use the or navigation buttons to move the
5. “Blocked” will appear next to all of the blocked numeric ratings.
6. To exit the Setup menu, press the button on the remote.
Setting a Password
1. Press the button on the remote.
The menu will appear on your TV screen (figure 7).
2. Use the navigation button to move down to “Password.”
3. Press the button and a white arrow cursor will appear next to
the four dashes.
4. Use the numeric keypad to enter a four digit password. Asterisks
(****) instead of numbers appear on the screen in place of the
dashes. Use a number that you will definitely remember.
5. Press . “Verify” will appear on the screen.
6. Reenter your 4 digit password and press .
The Rating menu is now locked.
7. To exit the Setup menu, press the button on the remote.
Unlocking the Rating Block
1. Press the button on the DR-3 remote.
The menu will appear on your TV screen (figure 7).
2. Use the navigation button to move the cursor down the
screen until “Rating” is highlighted in white.
3. Press the button and a white arrow cursor will appear.
4. Use the or navigation buttons to move the white cursor to
“Unlock” and press .
5. To exit the Setup menu, press the button on the remote.
Video (Screen Saver)
When the DVD player is on and there is no DVD playing, a video screen
saver of a bouncing DVD Video logo will appear on your TV screen after
a couple of minutes. If you wish to disable it so that you can see the
pretty Polk Audio logo instead, follow the steps below.
1. Press the button on either the DR-3 or DR-4 remotes.
The setup menu will appear on your TV screen.
2. Use the navigation button to move down to “Others.”
3. Press the button and a solid white arrow cursor will
appear next to one of the selections.
4. Use the or navigation buttons to move the white
cursor to “Video”.
5. Press the or button to toggle between “Off” and “On.”
Set to Off.
6. To exit the setup screen, press .
Note: If you have this password protected, you will be prompted to
enter your four digit password, and press enter before the rating can be
changed. If after unlocking the Ratings Block feature a DVD disc will not
play and the words “Parent Control Limit” appear on the screen, turn
off and restart the DP-1 player.
DP-1 SET UP MENUS
Figure 7
white cursor to the desired rating number and press .
www.polkaudio.com
Figure 6
Page 13
13
Playing a DVD
1. Turning On the System. Press SYSTEM POWER on the bottom of
the DR-3 remote to turn on the Digital Solution system. Press the
DVD Source/Device button at the top of the remote and then press
the SOURCE POWER button back at the bottom. The CD/DVD player
will turn on and the power indicator light on the front will turn green.
After a few seconds delay, a cheery “HELLO” appears in the display
of the DVD player. Turn on your TV and select the video input that the
Digital Solution system is plugged into.
Note: You can make the turn-on procedure a lot simpler by setting up
a “Macro.” The DR-3 remote can be programmed to turn on all of the
audio and video components in your system with one button push.
See page 12 of the DR-3 Owner’s Manual for instructions on how to
set up a Macro.
2. Opening Disc Drawer. Press the OPEN button on the front panel of
the DVD player. Or, press the TV/VCR button on the DR-3 remote.
The disc tray opens. You can open the disc tray by pressing this
button even if the DVD player is in standby mode (off).
3. Inserting DVD disc. Place a disc on the disc tray with the playback
(unlabeled) side down. Place the disc in the guide on the disc tray.
If the disc is out of the guide, it may damage the disc and cause the
DVD player to malfunction. Do not place anything except 3" discs or
5" discs on the disc tray. Some DVDs are double sided, that is they
have program material on both sides of the disc. In some cases, one
side contains a 16:9 widescreen (letterbox) version and the other
side has a 4:3 (pan and scan) version. Note the printed ring around
the inside of the disc to determine which side is which.
4. Starting Play. Press ENTER/PLAY. The disc tray closes
automatically and playback begins. If the disc is upside down (and it
is a single sided disc), “NO DISC” or “DISC ERROR” appears on the
TV screen. Flip the disc.
5. Making Menu Selections. Most DVDs will automatically bring up
a title menu screen that allows you to select various features and
functions. If the title menu screen does not automatically appear and
you want to see it, press the DVD MENU button on the DR-3 remote.
You may need to use the DVD’s Menu in order to select the 5.1
Surround audio track on the disc. The DVD menu also allows you
to select the movie’s spoken and subtitle language and select a
particular chapter (scene). Many DVDs also have extras such as
director commentary, outtakes and cast and crew bios that can be
accessed through the title menu. Note: There are a very few DVD’s
with which this button will not work. If this is the case, pick up the
DR-4 remote and press the MENU button. The Earth will become
aligned with the rest of the planets and total harmony will exist
within your living room.
6. Playing the DVD. Select the Play Movie menu selection and press
the ENTER/PLAY button.
7. Setting Volume. Use the VOL buttons to set volume to
taste using the DR-3.
8. Setting Bass Level. Use the SUB+ and SUB- buttons to set bass
level to taste using the DR-3.
9. Choosing Dolby Pro Logic. If the DVD does not have a 5.1 digital
surround audio track, the audio will play in stereo (assuming it is not
a mono soundtrack). Press the SURROUND button to toggle between
Stereo (two speakers playing), Pro Logic (surround sound with all
speakers playing) and five channel surround (this is mainly a music
mode that has all speakers playing).
10. Pausing the DVD. To temporarily suspend play and view a still
picture, press the PAUSE button. The DVD player will display a still
picture. Or you can press the STOP button once. When you press
ENTER/PLAY the DVD will resume at the spot where you pressed
STOP. If you press STOP a second time the DVD will stop and will
re-start only at the beginning of the DVD.
11. Watch movie.
12. Eat popcorn.
13. Press STOP to stop the playback.
14. The DP-1 CD/DVD player will automatically shut off if left idle for10
minutes.
DVD OPERATION
Polk Customer Service (800) 377-7655
10
13
7
9
4
2
8
5
1
Page 14
14
1. Changing the Surround Audio Mode. If the DVD has a 5.1 surround
track but the DS preamp/processor does not indicate “3/2.1” in the
display, use the AUDIO button to toggle through the available audio
tracks on the DVD. Soundtracks on menus and extras are usually not
5.1, so wait until the movie is playing before changing audio tracks.
The AUDIO button may not change the audio track on some DVDs.
The alternate way of changing the audio track is to go to the DVD’s
title menu and select the Audio Setup function of the disc.
2. Changing Subtitles. If you want to change anything about the
subtitles (turn them on or off or change language) press the SUB TTL
button to toggle through the available choices. This button may
not work on some DVDs. The alternate way of changing the subtitle
operation is to go to the DVD’s title menu and select the Subtitles
function.
3. Selecting Chapters. If you want to skip to a different chapter on
a DVD, press the button to move forward, or to move back
track by track in the disc. You may also use the numeric keys to go
directly to a Chapter or Track. To get to tracks higher than 9, use a
two-key button combination. For example, if you want to listen to
track 10, press 1 followed by the 0. To hear track (or chapter) 12,
press 1 followed by the 2. You have about two seconds between key
presses before the DR-3 accepts the digit. Press two-key combos in quick
succession, or the DR-3 will only recognize the first number keyed. You
may also use the DVD’s title menu
to select a specific chapter.
4. Scan Forward/Scan Reverse. To move forward or backward at
higher than normal speed, use the FF > and < REW buttons. Each
time you press the button, the playing or reversing speed increases.
Press the PLAY button to resume normal playing speed and
direction. At speeds greater than normal play, audio is muted
and there is no sound.
5. Slow Motion. To view the video images in slow motion, press the
and buttons to make the DVD play at a slower than normal
speed either forward or backward. Press the button once and the
play speed will be 1/16 normal speed. Press it a second time and
the DVD will play at 1/8 speed and so on up to or down to 1/2 speed.
Press the PLAY/ENTER button to return to normal playing speed and
direction. This function does not work with CD playback, only DVD.
The sound is muted during slow play operation.
6. Frame by Frame Play. To watch a scene frame by frame, press the
PAUSE button. Every time you push it, the picture will advance by
one frame; a great feature for film students looking for edits and
mistakes. To return to normal play press the ENTER/PLAY button.
7. Changing Angles. Some DVDs offer multiple camera angles.
With such a disc, pressing the ANGLE button toggles between the
available camera angle views. In most cases (particularly movies),
there is only one camera angle view on the disc and all that happens
when you press this button is the “ ” symbol will appear on your
TV screen.
8. Zoom. Hey, this is a cool feature: Do you ever wish you could get
a closer look at some small detail in a movie, or fill the screen with
your favorite actor’s face? Push the ZOOM button and the picture
will be magnified. Every time you push the button the magnification
increases. On the seventh button push or when you or press the
• DISC >(CLEAR) button the picture returns to normal. If you
want to move around the magnified image to focus in on a particular
detail, use the keys. NOTE: The zoom feature
does not work on some DVDs, and never works on subtitles and
menu screens.
ADVANCED DVD OPERATION
www.polkaudio.com
3
6
4
2
77
1
8
5
Page 15
15
The following seldom-used advanced features can only be
accessed with the DR-4 remote control included with the DP-1.
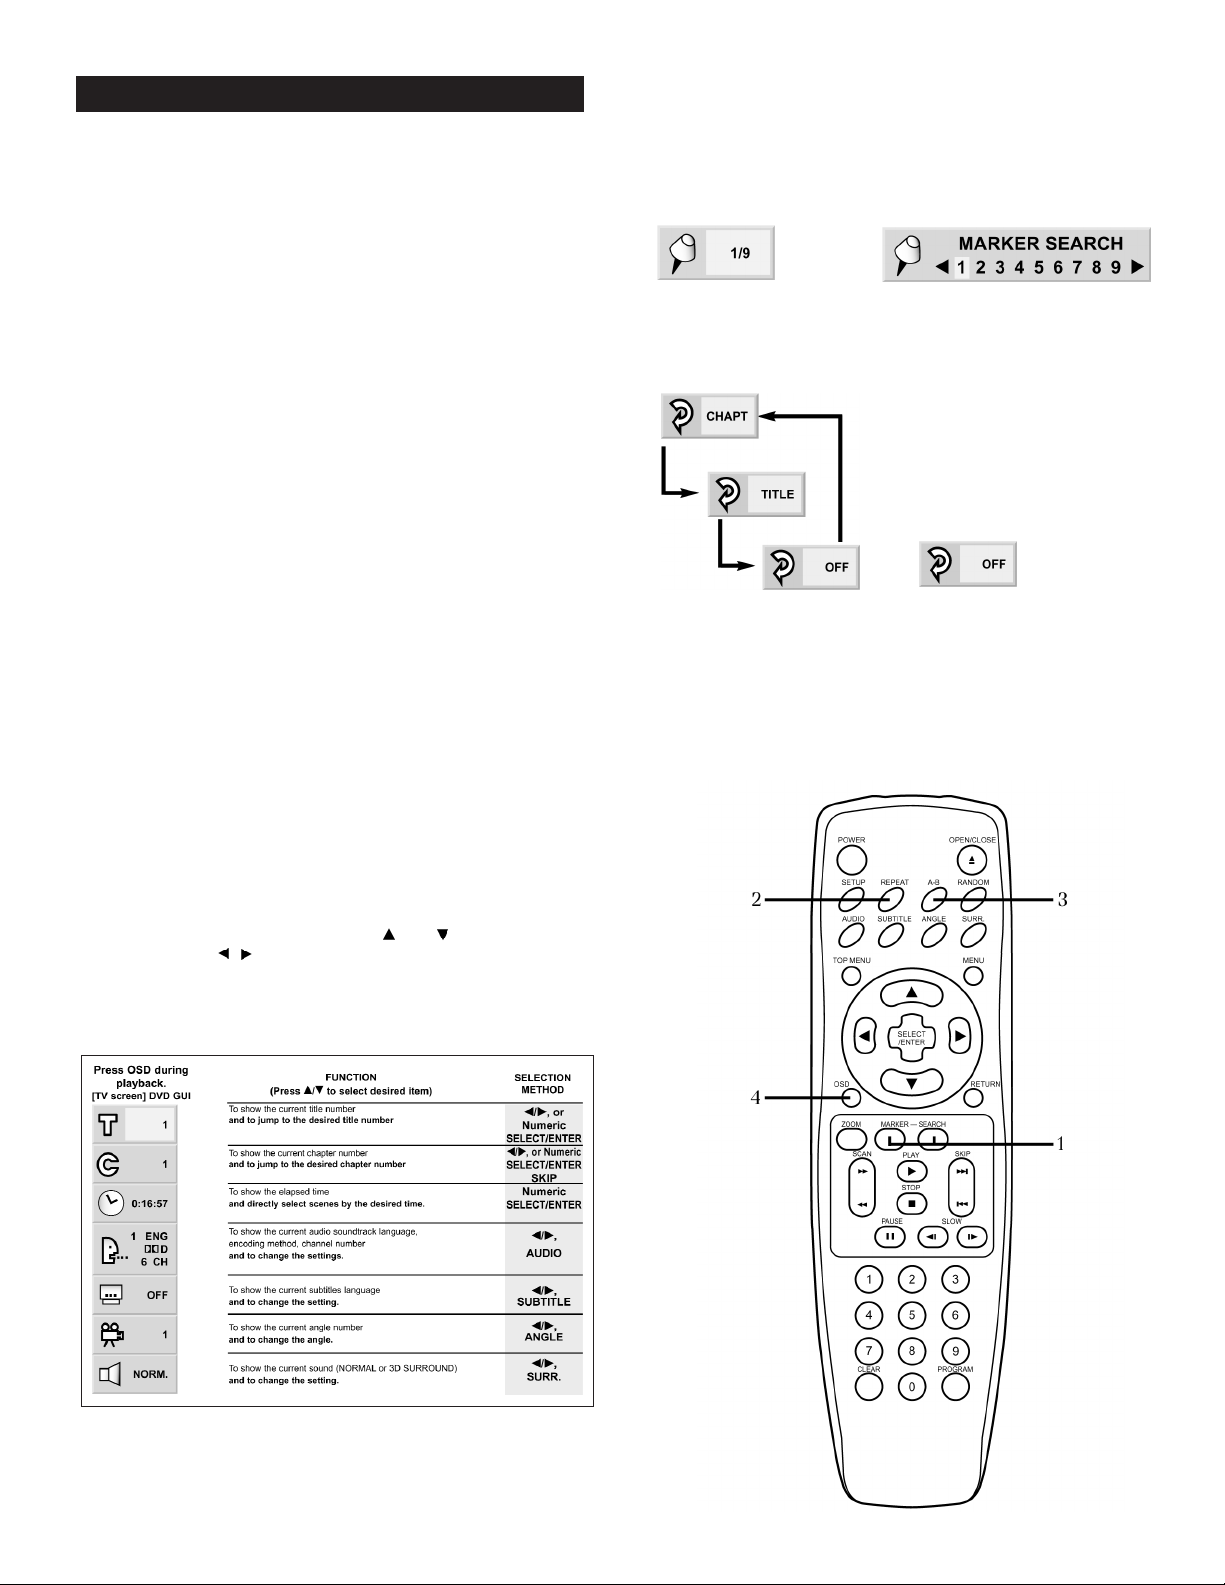
1. Using Markers and Search. Markers allow you to go quickly back to
a specific scene. Press the MARKER key at the beginning of a scene
you want to return to. The on-screen display (figure 8) indicates
which of the 9 available markers you have just used. At any time
while watching that DVD, press the SEARCH button to bring up the
Marker display (figure 9). Use the and navigation buttons to
select the marker you want to recall. Press SELECT/ENTER to recall
a marker or CLEAR to clear a marker. NOTE: The marker operation
works only with discs for which the elapsed playing time appears
in the display window during playback or stop. Some DVD subtitles
recorded around the marker may fail to appear. All the markers are
cleared when the power is turned off or the disc is removed. Markers
don’t work on the DVD title menu.
2. Repeat. Press the REPEAT button to repeat a chapter or title
of a DVD. Press the button once and CHART will appear on the TV
screen (figure 10). The current chapter will restart at the end of the
chapter over and over again until you turn off the feature. Press the
REPEAT button twice and TITLE will appear on the TV screen
indicating that the Title will restart ad infinitum until you turn it off
or shoot the DVD player, whichever comes first (hopefully the
former). Press the REPEAT button until OFF appears on the screen
indicating that this annoying and largely useless feature has been
mercifully turned off.
NOTE: The repeat function may not work with all DVDs.
3. A-B Repeat. Use this feature to repeat a specific segment of a movie
over and over and over again (a great feature for obsessive/
compulsives). Press the A-B button once at the start of the segment
you want to repeat. Press the button a second time to mark the end
of the segment. The segment will play over and over and over again.
Redrum. Redrum. To return to sanity and normal play press the A-B
button again and (figure 11) will appear on the screen.
NOTE: The A-B repeat function may not work with all DVDs.
4. Graphic User Interface (GUI) Menus. Press the OSD button during
DVD playback to display a GUI menu that shows the status of various
functions and features. You can use the and navigation buttons
to select and the buttons to make changes to these functions as
shown in the chart below.
▲
▲
ADVANCED DVD OPERATION
Figure 9
Figure 8
Figure 10
Figure 11
Graphic User Interface (GUI) MenusGraphic User Interface (GUI) Menus
Polk Customer Service (800) 377-7655
Page 16
16
Playing a CD
1. Turning On the System. Press SYSTEM POWER on the DR-3
remote to turn on the Digital Solution system. Press the DVD
Source/Device button and then press the SOURCE POWER button
(bottom, top, bottom). The CD/DVD player will turn on and the
power indicator light will turn green. After a few seconds delay,
a cheery “HELLO” appears in the display of the DVD player.
You can make the turn-on procedure a lot simpler by setting up a
“Macro.” The DR-3 remote can be programmed to turn on all of the
audio and video components in your system with one button push.
See page 12 of the DR-3 Owner’s Manual for instructions on how
to set up a Macro.
2. Opening Disc Drawer. Press the OPEN button on the front panel
of the CD/DVD player. Or, press ^ TV/VCR on the DR-3 remote. The
disc tray opens. You can open the disc tray by pressing this button
even if the CD/DVD player is in standby mode (off).
3. Inserting CD. Place a disc on the disc tray with the playback side
down. Place the disc in the guide on the disc tray. If the disc is out
of the guide, it may damage the disc and cause the DVD player to
malfunction. Do not place anything except 3" discs or 5" discs on
the disc tray.
4. Starting Play. Press ENTER/PLAY. The disc tray closes
automatically and playback begins. If the disc is upside down
“NO DISC” or “DISC ERROR” appears on the TV screen. Flip it.
5. Setting Volume. Use the VOL buttons to set volume
to taste using the DR-3.
6. Setting Bass Level. Use the SUB+ and SUB- buttons to set bass
level to taste using the DR-3.
7. Choosing Surround Mode. If you want to hear a stereo CD in
surround sound, press the SURROUND button to 5 Channel
Surround (surround sound with all speakers playing).
8. Pausing the CD. To temporarily suspend play, press the PAUSE
button. Press the ENTER/PLAY button to resume playing.
9. Listen to music.
10. Relax or dance.
11. Press STOP to stop the playback.
12. The DP-1 CD/DVD player will automatically shut off if left idle
for 10 minutes.
Advanced CD Operation
13. Selecting Tracks. If you want to skip to a different track on a CD,
press the button to move forward, or the button to move
back track by track in the disc. You may also use the numeric keys
to go directly to a track. To get to tracks higher than 9, use a two
button press combination. For example, if you want to listen to
track 10, press 1 followed by the 0. To hear track (or chapter) 12,
press 1 followed by the 2. You have about two seconds between key
presses before the DR-3 accepts the digit. Press two-key combos in
quick succession, or the DR-3 will only recognize the first number keyed.
14. Scan Forward/Scan Reverse. To move forward or backward
at higher than normal speed, use the FF > and < REW buttons.
Each time you press the button the playing or reversing speed
increases. Press the PLAY button to resume normal playing
speed and direction.
15. Audio. This button changes what part of the audio signal you are
listening to (i.e. left channel only, right channel only, or the full stereo
signal). Set it so that “STER” appears onscreen and leave it alone.
CD OPERATION
www.polkaudio.com
12
5
7
13
8
14
4
2
6
15
1
Page 17
17
Advanced CD Operation
The following seldom-used advanced features can only be accessed
with the DR-4 CD/DVD player-specific remote control. Turn on your
TV so you can see the indicators and menus for these functions.
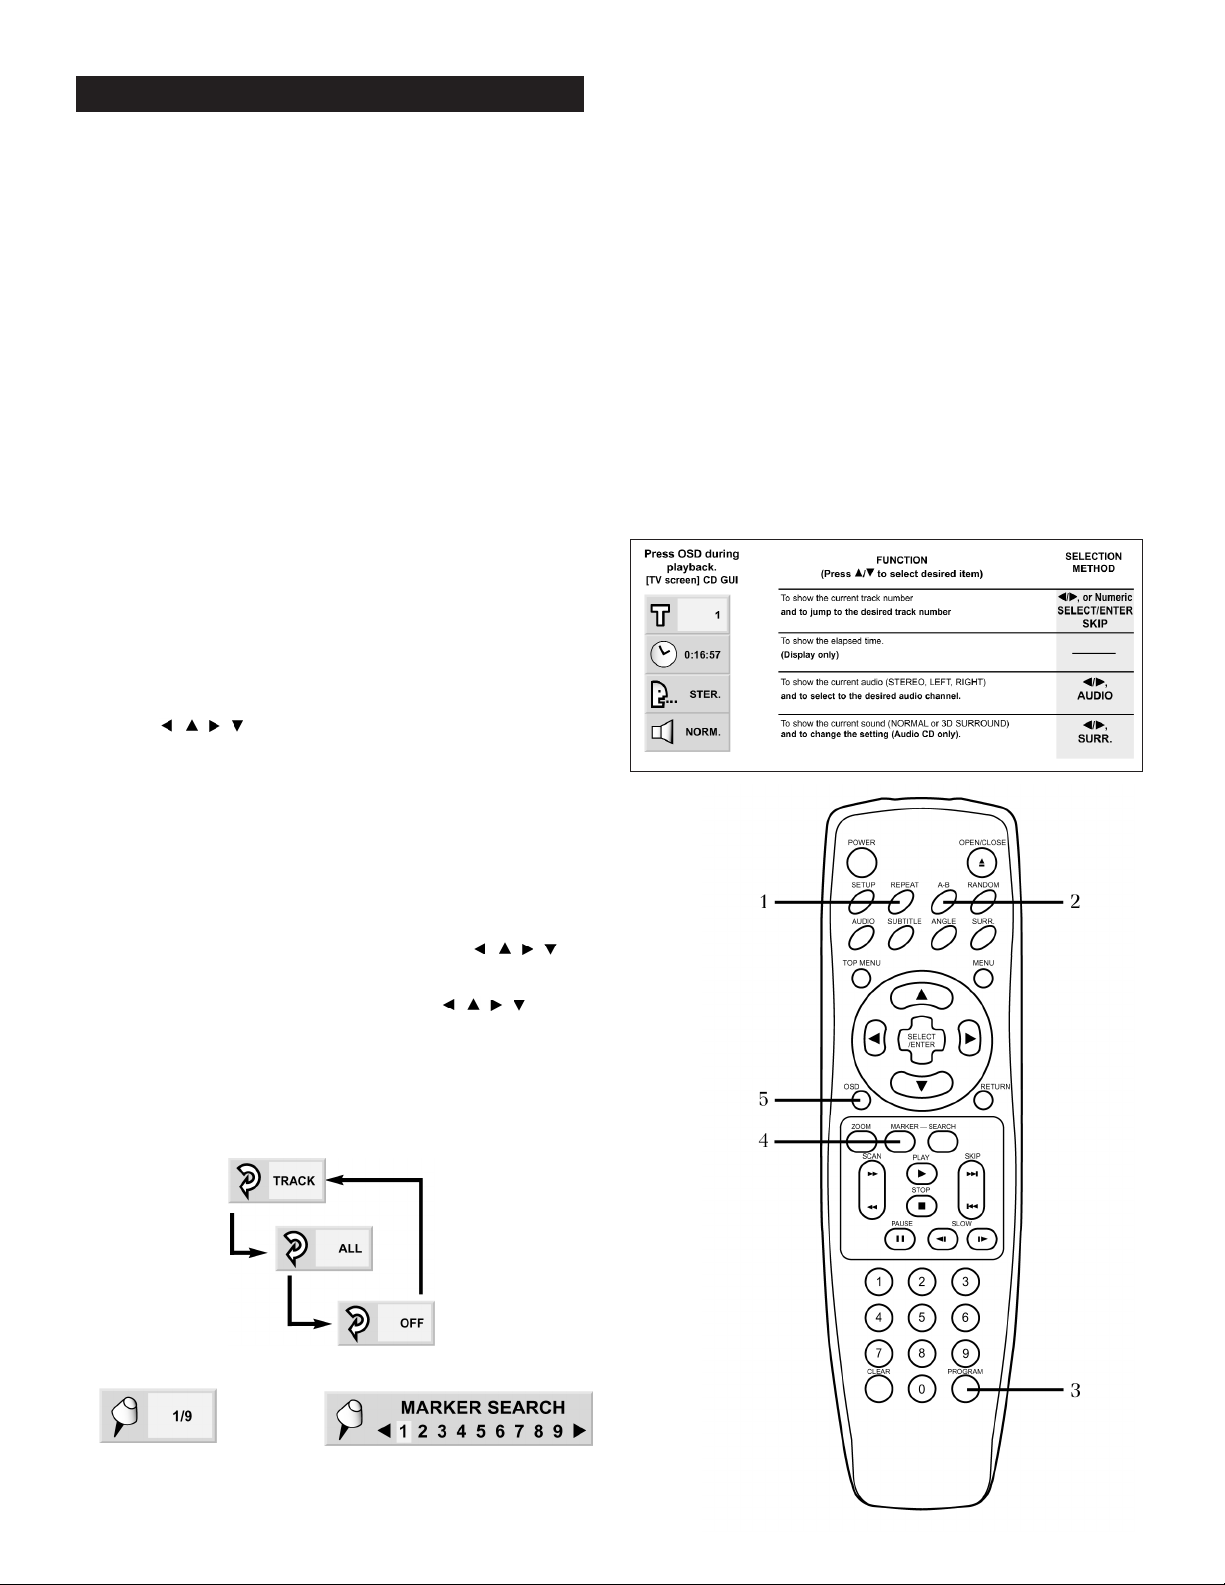
1. Repeat. Press the REPEAT button to repeat a specific track or
the entire CD (figure 12). Press the button once and “TRACK” will
appear on the TV screen. The current track will replay over and over
again until you turn off the feature. Press the REPEAT button twice
and “ALL” will appear on the TV screen indicating that the entire
CD will repeat ad infinitum until you turn it off or shoot the CD/DVD
player, whichever comes first. Press the button again and “OFF”
appears on the screen indicating that this feature has been
mercifully turned off.
2. A-B Repeat. Use this function to repeat a specific segment of an
audio track over and over and over again (a great feature for the
obsessed). Press the A-B button once at the start of the segment
you want to repeat. Press the button a second time to mark the end
of the segment. The segment will play over and over and over again.
Redrum. Redrum. To return to sanity and normal play press the A-B
button again and (picture OFF) will appear on the screen.
3. Program. This feature allows you to select the specific songs on a
CD you want to hear and the order in which you will hear them.
a. Press the PROGRAM button to reveal the Program
screen (figure 13).
b. Use to move between the track icons.
c. Use the numeric keypad to select the desired track number.
d. Repeat steps b and c to select and program another track.
Up to 20 tracks can be programmed.
e. Press PLAY or SELECT/ENTER to exit the screen and
start playing the CD tracks in the programmed order.
If you press PROGRAM to exit the screen, the selected
tracks are not memorized.
f. To clear the programmed tracks one by one use
to select the unwanted number and then press CLEAR.
g. To clear all the programmed tracks use the keys
to select “Clear All” and then press SELECT/ENTER.
h. Press PLAY or SELECT/ENTER to exit the screen. If you press
PROGRAM to exit the screen, the programs are not cleared.
(The programs are also cleared when the power is turned off
or the disc is removed.)
4. Markers and Search. Markers allow you to go quickly back to a
specific part of the song. Press the MARKER key at the beginning
of a music passage you want to return to. The on screen display
(figure 14) indicates which of the 9 available markers you have just
used. At any time while playing that CD, press the SEARCH button
to bring up the Marker display (figure 15). Use the < and >
navigation buttons to select the marker you want to recall. Press
SELECT/ENTER to recall a marker or CLEAR to clear a marker.
NOTE: All the markers are cleared when the power is turned off
or the disc is removed.
5. Graphic User Interface (GUI) Menus. Press the OSD button
during CD playback to display a GUI menu that shows the status of
various functions and features. You can use the and navigation
buttons to select and the buttons to make changes to these
functions as shown in the chart (figure 13).
▲
▲
▲
▲
CD OPERATION
Figure 15
Figure 14
Figure 12
Graphic User Interface (GUI) Menus
Polk Customer Service (800) 377-7655
Figure 13
Page 18
18
Playing an MP3 CD
1. Turning On the System. Press SYSTEM POWER on the DR-3
remote to turn on the Digital Solution system. Press the DVD
Source/Device button and then press the SOURCE POWER button.
The CD/DVD player will turn on and the power indicator light will
turn green. After a few seconds delay “HELLO” appears in the
display of the DVD player. Turn on your TV and select the video
input that the Digital Solution system is plugged into.
Note: You can make the turn-on procedure a lot simpler by setting
up a “Macro.” The DR-3 remote can be programmed to turn on all
of the audio and video components in your system with one button
push. See page 12 in the DR-3 manual for instructions on how to
set up a Macro.
2. Opening Disc Drawer. Press the OPEN button on the front panel
of the CD/DVD player. Or, press ^ TV/VCR on the DR-3 remote. The
disc tray opens. You can open the disc tray by pressing this button
even if the CD/DVD player is in standby mode (off).
3. Inserting an MP3 CD. Place a disc on the disc tray with the
playback side down. Place the disc in the guide on the disc tray.
If the disc is out of the guide, it may damage the disc and cause
the DVD player to malfunction. Do not place anything except 3"
discs or 5" discs on the disc tray.
4. Starting Play. Press ENTER/PLAY. The disc tray closes
automatically and the MP3 menu will appear on the TV screen.
If the disc is upside down “NO DISC” or “DISC ERROR” appears
on the TV screen. Flip the disc then use the navigation
buttons to select the MP3 file you want to play and then press
ENTER/PLAY.
5. Setting Volume. Use the VOL buttons to set volume to
taste using the DR-3.
6. Setting Bass Level. Use the SUB+ and SUB- buttons to set bass
level to taste using the DR-3.
7. Choosing Surround Mode. If you want to hear a stereo CD in
surround sound, use the SURROUND button to select 5 Channel
Surround (surround sound with all speakers playing).
8. Pausing the MP3 CD. To temporarily suspend play, press
the PAUSE button. Press the PAUSE or ENTER/PLAY button
to resume playing.
9. Listen to music.
10. Relax or dance.
11. Press STOP to stop the playback.
12. The DP-1 CD/DVD player will automatically shut off
if left idle for10 minutes.
MP-3 OPERATION
www.polkaudio.com
11
5
7
8
4
2
6
1
Page 19

19
Advanced MP3 Operation
The following seldom-used advanced features can only be accessed
with the DR-4 CD/DVD player-specific remote control. Turn on your
TV so you can see the indicators and menus for these functions.
13. Markers and Search. Markers allow you to go quickly back to a
specific part of the song. Press the MARKER key at the beginning
of a music passage you want
14. Selecting Tracks. If you want to skip to a different track, press the
>>| button to move forward, or the |<< button to move back file by
file on the disc. You may also use the arrow keys to navigate the
on-screen display (OSD) and select the file that you want to listen
to. Press the ENTER button when the desired file is highlighted.
Press OSD to move to the next page. Note: The SCAN/SEARCH
functions do not work for MP3 operation. Neither does the numeric
keypad, so don’t try it. Uh, uh, I said don’t try it! Too late, oh well.
See? Told ya.
15. Repeat. To play an MP3 file repeatedly press REPEAT once during
play and the current MP3 file will play repeatedly. If you press
REPEAT twice during play, the directory will play repeatedly. If
you press REPEAT three times, the repeat play will be cancelled.
MP3 NOTES:
The ability of this unit to play back MP3 and CD-R/RW discs is
highly dependent on the recording conditions. Failure to play a
self-recorded disc does not necessarily indicate a malfunction
of the DP-1 disc player.
• This unit can play up to 200 files per disc. A disc recorded with
more than 200 files cannot be played.
• The maximum allowable depth of a nested directory is 50.
• This player is compatible only with the ISO9660 disc format.
• This player will not play MP3 files recorded with software, such as
“Direct-CD,” that cannot create a FILE SYSTEM. We recommend
that you use “Easy-CD Creator,” which creates an ISO9660 file
system.
•A single session disc requires MP3 files in the first track. If there
is no MP3 file in the 1st track, it cannot playback MP3 files. If you
wish to playback MP3 files, format all the data in the disc or use
a new one.
• CD-R discs that contain files that are not MP3 files will not play.
However, CD-RW discs that contain a mix of MP3 and other files
will play successfully.
• If you select another file by pressing and during playback,
the file automatically plays after 5 seconds.
• If you select a directory by pressing during playback,
playback stops after 5 seconds.
MP-3 OPERATION
Polk Customer Service (800) 377-7655
Page 20

20
If This Happens:
The DVD player dosen’t turn on.
The power is on but the DVD player
doesn’t work.
The images on my TV look tall and thin
and stretched out when I play a DVD.
When I play a widescreen DVD on my
widescreen TV, I get a 4:3 (standard)
shape picture.
I don’t see any Graphic User Interface (GUI)
icons when I use the Marker, Program or
other CD player features.
I get sound but no picture when I
play a DVD.
The remote control does not work properly.
It’s Probable Cause…
The unit is not getting AC power.
DVD or CD disc is not inserted or is
inserted improperly.
An unplayable disc is in the machine.
The aspect ratio of the DP-1’s video output
is set to “Widescreen” and you don’t have
a widescreen TV
The aspect ratio of your TV is set wrong.
The aspect ratio of the DP-1’s video
output is set to “4:3” and you have
a 16:9 widescreen TV
The analog outputs are hooked up to an
input set that doesn’t have a video input or
the video output is not hooked up at all.
The video output of the DP-1 is not hooked up
to any video input or is hooked up to the wrong
video input on the DS preamp/processor.
You are using a mix of S-Video and Coaxial
video connectors.
You have selected the wrong video input
on your TV.
Weak batteries
Cures:
Make sure the power cord is securely
plugged into a live AC outlet.
Press the Power button on the DP-1’s faceplate. If it turns on, the problem lies with
the remote control or operator error.
Open the disc tray and make sure a DVD or
CD is inserted correctly in the tray and that
the label side is facing up.
Check that the DVD is a Region 1 DVD-Video
disc and not a DVD-Audio disc. This player
will not play most DVD-Audio discs nor a
DVD-Video disc made for any region other
than Region 1.
Go to page 10 of this manual and read the
instructions for how to reset the aspect
ratio. Select a 4:3 setting.
Check your TVs owner’s manual for proper
set up and use.
Go to page 10 of this manual and read the
instructions for how to reset the aspect
ratio. Select the “16:9 Wide” setting.
If you hooked up the stereo analog outputs
to the CD input, there is no way for the
video graphics to get to your TV. Use an
input set on the DS preamp/processor that
has a video jack. See the hookup illustration
on page 5 of this manual.
Uh, hook it up right already. See page 5 for
hookup directions.
Uh huh, that’s not allowed. You must use
EITHER S-Video OR Composite connectors
throughout the system. See page 5 for
video hookup directions.
If you connected the video output of the
DP-1 or DS system to Video 1 of your TV,
you must select the Video 1 input of your TV
in order to see a picture. Better go back and
read all of your manuals again.
Change the darn batteries already.
Troubleshooting Guide
www.polkaudio.com
Page 21

21
If This Happens:
The power is on but the machine will not
play a MP3 disc.
It’s Probable Cause…
The disc is not inserted properly
The disc is not an ISO9660 disc
The disc does not have an MP3 file in the
first track.
Cures:
Open the disc tray and make sure the CD is
inserted correctly in the tray and that the
label side is facing up.
The disc was probably made using a noncompatible software program, such as
Direct-CD. You’ll have to re-burn the disc
using a software program that will make
ISO9660 formatted discs. Check the
ReadMe file that comes with the computer
program to see how this is done.
The disc is a multi-session disc with the
first session not containing any MP3 files.
You'll have to make a new disc with a MP3
file in the first session. Check the ReadMe
file that comes with the computer program
to see how this is done.
Troubleshooting Guide
Polk Customer Service (800) 377-7655
Page 22

22
DVD Player
Power Supply
AC 120V, 60 Hz
Power Consumption
16 W
Weight
7.1 lbs. (3.2 kg)
External Dimensions (W x H x D)
17.3” x 3.5” x 10” (440 x 88 x 254 mm)
Signal System
NTSC
Laser
Semiconductor laser, wavelength 650 m (DVD), 780 mm (CD)
Frequency Range (audio)
DVD:fs = 96 kHz 4 Hz - 44 kHz
fs = 48 kHz 4 Hz - 22kHz
CD: 4 Hz - 20 kHz
Signal-to-Noise Ratio
More than 105 dB (EIAJ)
Dynamic Range (audio)
More than 100 dB (EIAJ)
Harmonic Distortion (audio)
0.003%
Wow and Flutter
Below measurable level (less than + 0.001% (W.PEAK)) (EIAJ)
Operating Conditions
Temperature: 41ºF - 95ºF, Operation Status: Horizontal
Outputs
Video Output
1.0V (p-p), 75Ω, negative sync., RCA jack x 1
S-Video Output
(Y) 1.0 V(p-p), 75Ω, negative sync. Mini DIN 4-pin x 1
(C) 0.286 V (p-p), 75Ω
Component Video Output
(Y) 1.0 V(p-p), 75Ω, negative sync. RCA jack x 1
(C
B)/(CR) 0.7 V (p-p), 75Ω
Audio Output (Digital Audio)
0.5 V (p-p), 75Ω, RCA jack x 1
Audio Output (Analog Audio)
2.0 Vms (1 kHz, 0 dB), 330 Ω, RCA jack (L, R) x 2
DP-1 SPECIFICATIONS
www.polkaudio.com
Polk Audio, Inc., warrants to the original purchaser only that the
DP-1 DVD Player (the “Product”) will be free from defects in material
and workmanship for a period of one (1) year from the date of original
retail purchase from a Polk Audio Authorized Dealer. However, this
Warranty will automatically terminate prior to the expiration if you sell
or otherwise transfer the Product to any other party. The original retail
purchaser shall hereinafter be referred to as “you.” To allow Polk Audio
to offer the best possible warranty service, please fill out the Product
Registration Card(s) and send it to the Factory, at the address provided
on the Product Cards(s) within ten (10) days of the date of purchase.
Defective Products must be shipped, together with proof of purchase,
prepaid insured to the Polk Audio Authorized Dealer from whom you
purchased the Product, or to the Factory at 2550 Britannia Boulevard,
Suite D, San Diego, California 92154. Products must be shipped in the
original shipping container or its equivalent; in any case the risk of loss
or damage in transit is to be borne by you. If upon examination at the
Factory or Polk Audio Authorized Dealer it is determined that the unit
was defective in materials or workmanship at any time during this
Warranty period, Polk Audio or the Polk Audio Authorized Dealer will, at
its option, repair or replace with new or reconditioned parts this Product
at no additional charge, except as set forth below. All replaced parts and
Products become the property of Polk Audio. Products replaced or
repaired
under this warranty will be returned to you, within a reasonable time,
freight prepaid.
This warranty does not include service or parts to repair damage caused
by accident, disaster, misuse, abuse, negligence, inadequate packing or
shipping procedures, commercial use, voltage inputs in excess of the
rated maximum of the unit, cosmetic appearance of cabinetry not
directly attributable to defect in materials or workmanship, or service,
repair, or modification of the Product which has not been authorized or
approved by Polk Audio. This warranty shall terminate if the Serial
number on the Product has been removed, tampered with or defaced.
This warranty is in lieu of all other expressed Warranties. If this Product
is defective in materials or workmanship as warranted above, your sole
remedy shall be repair or replacement as provided above. In no event
will Polk Audio, Inc. be liable to you for any incidental or consequential
damages arising out of the use or inability to use the Product, even if
Polk Audio, Inc. or a Polk Audio Authorized Dealer has been advised of
the possibility of such damages, or for any claim by any other party.
Some states do not allow the exclusion or limitation of consequential
damages, so the above limitation and exclusion may not apply to you.
All implied warranties on this Product are limited to the duration of this
expressed Warranty. Some states do not allow limitation on how long an
implied Warranty lasts, so the above limitations may not apply to you.
This Warranty gives you specific legal rights, and you also may have
other rights which vary from state to state.
This Warranty applies only to Products purchased in the United States
of America, its possessions, and U.S. and NATO armed forces exchanges
and audio clubs. The Warranty terms and conditions applicable to
Products purchased in other countries are available from the Polk
Audio Authorized Distributors in such countries.
“Polk Audio,” and “The Speaker Specialists” are trademarks of Britannia Investment
Corporation used under license by Polk Audio Incorporated.
POLK AUDIO LIMITED WARRANTY
Page 23

23
Polk Customer Service (800) 377-7655
Page 24

5601 METRO DRIVE,
BALTIMORE, MARYLAND 21215, USA,
410-764-5275, FAX: 410-764-5266
www.polkaudio.com
RM2069-1
Page 25

INSTRUCTION
MANUAL
UNIFIED LEARNING
REMOTE CONTROL
DR-3
Page 26

Table of Contents
DR-3 Remote Guided Tour ..................................................3 - 5
Button Function Chart ..............................................................6
Programming the Remote
Manual Three-Digit Code Method............................................7
Auto Search Method................................................................8
Finding the Three-Digit Code Number for a Device..................8
Teaching Method ....................................................................9
Erasing a Learned Command From a Button ........................10
Erase All Learned Commands in One Source/Device ............10
Erase All Learned Commands in All Device Modes................11
Restoring Factory Programming ..........................................11
Macro Operation
Programming the Macro Button............................................12
Erase a Macro Sequence ......................................................12
Macro Programming Example ..............................................13
Setup Codes Chart ..........................................................14 - 15
2
The Polk Audio DR-3 Unified Learning Remote was designed to operate
the Polk Audio Digital Solution home theater system and Polk Audio DP-1
CD/DVD player. It can also be programmed to operate most DVD and CD
players, TVs, Cable and DSS tuners as well as VCRs. By following the easy
steps in this manual, you can reduce or eliminate the need for having
several remote controls on your coffee table.
As nifty as it may be, the DR-3 unified remote cannot duplicate every
function of every remote control without turning it into a nightmare of
tiny buttons. For control of the rarely used functions of the Digital Solution
preamp/processor and the other equipment in your system, you’ll have
to use their dedicated remotes. If you can’t find them, look under the
sofa cushions; they’re probably there.
All of the buttons except for the CODE, SAVE, CNCL, LEARN, LIGHT,
MACRO, VOL UP, VOL DOWN, SURROUND MODE, MUTE, SYSTEM
POWER, SUB+, SUB- and the eight MODE buttons have “learn” functions
and can learn the commands of other remote control devices.
INTRODUCTION
Polk customer service (800) 377-7655
Polk Audio, Inc., warrants to the original purchaser only that the
DR-3 Remote Control (the “Product”) will be free from defects in material
and workmanship for a period of three (1) year from the date of original retail
purchase from a Polk Audio Authorized Dealer. However, this Warranty will
automatically terminate prior to the expiration if you sell or otherwise transfer
the Product to any other party. The original retail purchaser shall hereinafter
be referred to as “you.” To allow Polk Audio to offer the best possible warranty
service, please fill out the Product Registration Card(s) and send it to the
Factory, at the address provided on the Product Cards(s) within ten (10) days
of the date of purchase.
Defective Products must be shipped, together with proof of purchase, prepaid
insured to the Polk Audio Authorized Dealer from whom you purchased the
Product, or to the Factory at 2550 Britannia Boulevard, Suite D, San Diego,
California 92154. Products must be shipped in the original shipping container or
its equivalent; in any case the risk of loss or damage in transit is to be borne by
you. If upon examination at the Factory or Polk Audio Authorized Dealer it is
determined that the unit was defective in materials or workmanship at any time
during this Warranty period, Polk Audio or the Polk Audio Authorized Dealer will,
at its option, repair or replace with new or reconditioned parts this Product at
no additional charge, except as set forth below. All replaced parts and Products
become the property of Polk Audio. Products replaced or repaired under this
warranty will be returned to you, within a reasonable time, freight prepaid.
This warranty does not include service or parts to repair damage caused by
accident, disaster, misuse, abuse, negligence, inadequate packing or shipping
procedures, commercial use, voltage inputs in excess of the rated maximum of
the unit, cosmetic appearance of cabinetry not directly attributable to defect in
materials or workmanship, or service, repair, or modification of the Product
which has not been authorized or approved by Polk Audio. This warranty shall
terminate if the Serial
number on the Product has been removed, tampered with or defaced.
This warranty is in lieu of all other expressed Warranties. If this Product is
defective in materials or workmanship as warranted above, your sole remedy
shall be repair or replacement as provided above. In no event will Polk Audio,
Inc. be liable to you for any incidental or consequential damages arising out of
the use or inability to use the Product, even if Polk Audio, Inc. or a Polk Audio
Authorized Dealer has been advised of the possibility of such damages, or for
any claim by any other party. Some states do not allow the exclusion or
limitation of consequential damages, so the above limitation and exclusion
may not apply to you.
All implied warranties on this Product are limited to the duration of this
expressed Warranty. Some states do not allow limitation on how long an implied
Warranty lasts, so the above limitations may not apply to you. This Warranty
gives you specific legal rights, and you also may have other rights which vary
from state to state.
This Warranty applies only to Products purchased in the United States
of America, its possessions, and U.S. and NATO armed forces exchanges
and audio clubs. The Warranty terms and conditions applicable to Products
purchased in other countries are available from the Polk Audio Authorized
Distributors in such countries.
“Polk Audio,” and “The Speaker Specialists” are trademarks of Britannia Investment
Corporation used under license by Polk Audio Incorporated.
POLK AUDIO LIMITED WARRANTY
Page 27
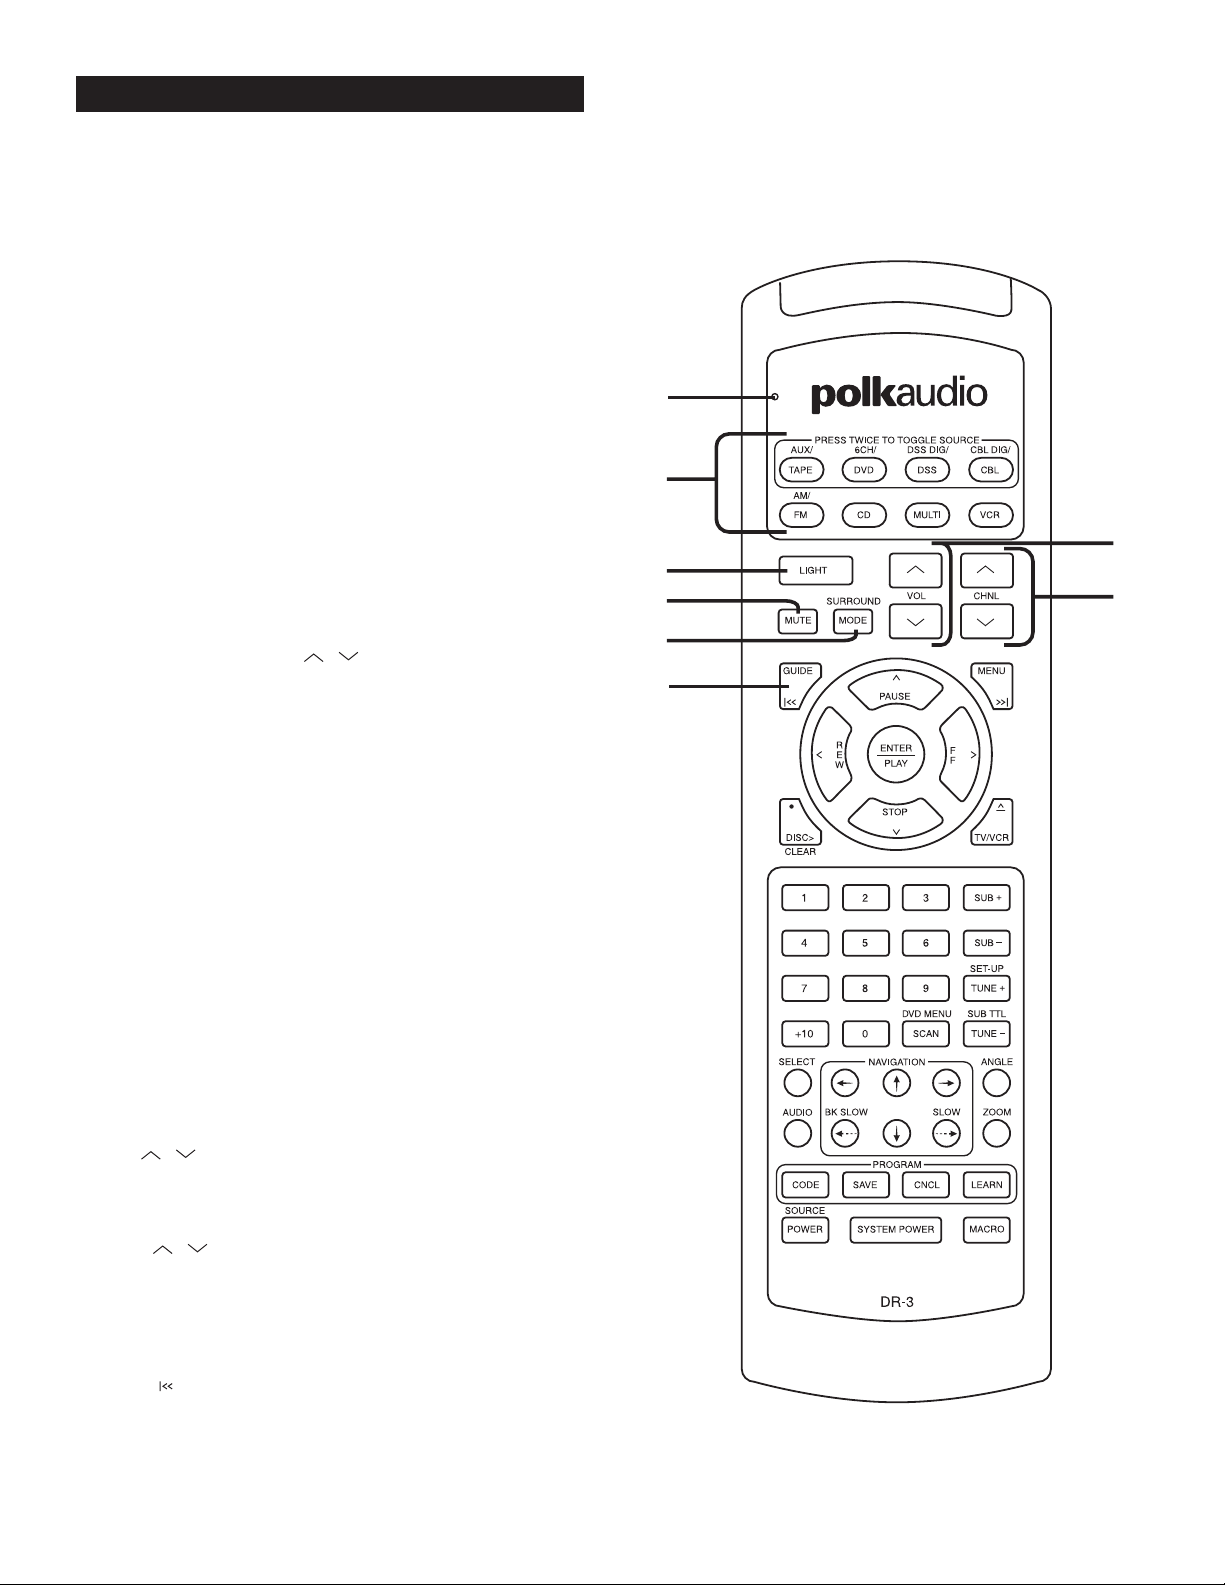
www.polkaudio.com
3
See the chart on page 6 for the functions of each button with
various device types.
1. Source/Device Area – These buttons serve two functions:
to select the device that the remote will control and to change
inputs on the Digital Solution preamp/processor. For example if
you want to play the DVD player, push the “DVD” button on the
top row. The Digital Solution preamp/processor will switch to the
DVD input (if it is on) and the buttons on the DR-3 remote will be
set to operate the DP-1 CD/DVD player.
The top buttons bordered by the gold box are multi-function
buttons. That is, they can select more than one input. Press the
DVD/6CH button once and it selects the DVD input on the preamp/processor and allows the DR-3 to act as the remote for the
DP-1 CD/DVD player. Press it a second time and the DS preamp
switches to the 6CH Analog input for a DVD-Audio or multi-channel SACD player. What these buttons can’t do is select more than
one set of remote codes. You can program ONE device per Source
button. Don’t worry, it isn’t very likely that you are going to have
both a digital and an analog cable tuner or two DVD players
hooked up to your system. Of course, before the DR-3 can operate
any device other than the DS preamp/processor and DP-1 CD/DVD
player, you have to insert the device’s remote codes into the DR-3.
(See page 7 for instructions on how to program and use this
remote for other devices.)
IMPORTANT NOTE: The VOL , SURROUND MODE,
MUTE, SUB+ and SUB– buttons are permanently assigned to
Digital Solution preamp/processor functions. No matter what
other device you have selected on the DR-3 remote, you can
always adjust the DS system volume, subwoofer level, mute
and surround mode functions.
2. LIGHT – Back lights the remote buttons for 8 seconds so you can
operate the remote in the dark. The function of this button does
not change when you enter program codes for other devices.
3. MUTE – Mutes the sound of the Digital Solution preamp/processor system. To disengage the mute function and go back to normal
playback volume, press the MUTE button again or press either of
the VOLUME buttons. The function of this button does not change
when you enter program codes for other devices.
4. SURROUND MODE – This button toggles between the various
audio modes of the Digital Solution system such as stereo, Dolby
Pro-Logic, 5 Channel Surround, etc. The function of this button
does not change when you enter program codes for other devices.
5. VOL – These buttons control the volume of the Digital
Solution preamp/processor. The functions of these buttons do not
change when you enter program codes for other devices.
6. CHNL – With the Digital Solution system these buttons
step through the preset radio stations just like the Radio Preset
+/- rocker buttons on the DR-2 remote (included with the DS
System). With other TV devices (TV, cable boxes, VCR, etc.)
these buttons act as channel up and down buttons.
7. GUIDE – With DVD and CD players this button acts as a
chapter skip button to skip back to previous DVD chapters or
CD tracks. With a TV it acts as the “Display” button to call up
the channel, time and other on-screen display data. With DSS,
cable boxes and TIVO-type devices it calls up the programming
guide screen.
DR-3 REMOTE GUIDED TOUR
1
2
3
4
5
6
7
Status
Light
Page 28

8. MENU – This button acts as a chapter skip button to skip
forward through DVD chapters or CD tracks. With TVs and other
video devices it calls up the device menu.
9. PAUSE –This button acts as the pause/step frame button for
the DP-1 CD/DVD player, VCRs, CD players and TIVO-type video
storage devices. To return to normal play, press the PLAY button.
With DSS and cable tuner boxes and the Multi-room function of
the Digital Solution system, it acts as the up arrow navigation
button for the on-screen display.
10. REW – With DVD, CD, VCR and TIVO-type players, this button
acts as a rewind or back button. For DSS, cable boxes, TVs and
the Multi-room function of the Digital Solution system, it acts as
the left navigation button for on-screen displays.
11.ENTER/PLAY – With DVD, CD, VCR and TIVO-type players, this
button acts as a Play button. With all devices it acts as the Enter
button to select items on an on-screen display.
12.FF – With DVD, CD, VCR and TIVO-type players, this button acts
as a fast-forward or forward button. For DSS, cable boxes, TVs
and the Multi-room function of the Digital Solution system, it acts
as the right navigation button for on-screen displays.
13.STOP – With DVD, CD, VCR and TIVO-type players, this button
acts as the Stop button. For DSS, cable boxes, TVs and the Multiroom function of the Digital Solution system, it acts as the Down
navigation button for on-screen displays.
14.•DISC /CLEAR – Acts as the Clear command for CD and DVD
players. Acts as the Record button for all recording devices such
as VCR, TIVO, etc. (The little red dot means “record”.) This button
has no function with the Digital Solution preamp/processor.
15.^
TV/VCR – This button opens and closes the disc drawer of CD
and DVD players. It acts as the (TV/VCR) input toggle switch on
TVs and VCRs and other video devices. It has no function with the
Digital Solution preamp/processor.
16.Numeric Keypad –Acts just like the number keypad on all other
devices. These buttons have no function with the Digital Solution
preamp/processor. The +10 button acts as the Previous Channel
function on cable boxes and TVs. With CD players it acts as the
Repeat button.
17.SUB+ and SUB- – These buttons raise and lower the volume of
the Digital Solution subwoofer just like the SUBWOOFER +/- buttons on the DR-1 & DR-2 remotes. The function of these buttons
does not change when you enter program codes for other devices.
18.Tune+/SET-UP – Acts as the manual “tune up the dial” control for
the radio of the Digital Solution system and calls up the Setup
menu of a DVD player. For the function on other devices see the
chart on page 6.
19.SCAN/DVD MENU – With the Digital Solution tuner this acts as
the Preset Scan button. With DVD players it calls up the DVD
software menu.
^
^
^
^
^
1
1
1
1
5
2
1
7
8
9
Polk customer service (800) 377-7655
4
9
0
3
4
6
8
1
1
1
1
1
1
Page 29

www.polkaudio.com
5
20.TUNE-/SUB TTL – Use to manually tune the radio on the Digital
Solution system. Acts as the Subtitle toggle switch on DVD players. For the function on other devices see the chart on page 6.
21.SELECT – This button selects a choice on a menu such as the
set up menu of a DVD player or the title menu of a DVD disc.
With DSS and cable boxes it acts to call up “Favorites.” It has
no function with the Digital Solution preamp/processor.
22.AUDIO – This button toggles through the available audio tracks
on a DVD. For example, if a DVD disc has a 2 Channel audio track,
a Dolby Digital 5.1 and a French language track, each time you
push this button, the next available audio track will play. This
eliminates the hassle of going back to the DVD’s main menu to
change the audio type. This feature may not work with all DVDs
and players.
23. NAVIGATION – These buttons allow you to
move among setup menus to select operations. For example if
you are looking at a DVD’s main title menu and you want to move
to the Scene Selection menu, push the appropriate arrow button
to move to the Scene Selection graphic on the TV screen.
24.BK SLOW
–
With most DVD players, use this button to
make the DVD play at a slower than normal speed backwards.
25.SLOW
–
With most DVD players, use this button to make
the DVD play at a slower than normal forward speed.
26.ANGLE – Acts to toggle between available camera angles on
selected DVDs. Acts as the “Live TV” button on TIVO-type boxes.
27.ZOOM – This button serves as the “Zoom” button with DVD
players that have a zoom feature.
28.Program Area –These four buttons allow you to program in the
codes for other remotes or “teach” the remote specific commands.
They cannot be reprogrammed for any other functions. See pages
7 - 11 for specific programming instructions.
29.SOURCE POWER – This button acts as the on/off button for the
other components in your system once you have entered their
remote codes into the DR-3. See pages 7 - 11 to learn how to program the DR-3 to operate other devices.
30.SYSTEM POWER – This button turns on and off the Digital
Solution system only. This function does not change when you
enter program codes for other devices
31.MACRO – The MACRO button can send out a sequence of up to
20 commands with one button press. It can be programmed for
up to eight Source buttons. This allows you to perform multi-step
operations with just one button-push. For example, you can program the MACRO button to turn on the TV, turn on the DS system,
turn on the DVD player, select the correct Video input, and open
the DVD drawer with the push of just one button. See pages 12 13 for Macro programming instructions.
2
2
2
2
2
8
0
6
7
1
5
3
2
1
2
3
2
4
2
2
2
9
0
3
Page 30

Polk customer service (800) 377-7655
6
Button Name FM/AM DVD/6CH DSS CBL/CBL DIG AUX/TAPE CD MULTI VCR
Polk DVD Others CBL TV
TAPE/AUX (Toggle)
DVD/6CH (Toggle)
DSS/DSS DIG (Toggle)
CBL/CBL DIG (Toggle)
FM/AM (Toggle)
CD
MULTI
VCR
LIGHT LIGHT LIGHT LIGHT LIGHT LIGHT LIGHT LIGHT LIGHT LIGHT LIGHT
MUTE MUTE MUTE MUTE MUTE MUTE MUTE MUTE MUTE MUTE MUTE
SURROUND MODE MODE MODE MODE MODE MODE MODE MODE MODE MODE MODE
VOL UP VOL UP VOL UP VOL UP VOL UP VOL UP VOL UP VOL UP VOL UP VOL UP VOL UP
VOL DN VOL DN VOL DN VOL DN VOL DN VOL DN VOL DN VOL DN VOL DN VOL DN VOL DN
CHNL UP PRESET UP CH + CH + CH + CH +
CHNL DN PRESET DN CH - CH - CH - CH -
UP/PAUSE PAUSE PAUSE UP UP UP PAUSE UP PAUSE
DOWN/STOP STOP STOP DOWN DOWN DOWN STOP DOWN STOP
RIGHT/FF SCAN + SCAN + RIGHT RIGHT RIGHT FF RIGHT FF
LEFT/REW SCAN - SCAN - LEFT LEFT LEFT REW LEFT REW
ENTER/PLAY PLAY PLAY SELECT SELECT SELECT PLAY ENTER PLAY
GUIDE/I<< SKIP - SKIP - GUIDE GUIDE DISPLAY SKIP -
MENU/>>I SKIP + SKIP + MENU MENU MENU SKIP +
REC/DISC> Clear Clear EXIT EXIT STD DISC > RECORD
/TV/VCR OPEN/CLOSE OPEN/CLOSE TV/DSS BYPASS TV/VCR OPEN/CLOSE VCR/TV
1 to 0 1 to 0 1 to 0 1 to 0 1 to 0 1 to 0 1 to 0
PLUS10 PRE-CH PRE-CH PRE-CH REPEAT
SCAN/DVD MENU PRE-SCAN TOP MENU MENU ENTER ENTER ENTER SCAN
SUB + SUB + SUB + SUB + SUB + SUB + SUB + SUB + SUB + SUB + SUB+
SUB - SUB - SUB - SUB - SUB - SUB - SUB - SUB - SUB - SUB - SUB-
TUNE +/SET-UP TUNE + SET-UP SET UP ALT Page+
TUNE -/SUB TTL TUNE - SUB TTL SUB TTL NEXT Page-
Select SELECT SELECT FAV FAV
LEFT LEFT LEFT INFO INFO
UP UP UP
RIGHT RIGHT RIGHT
ANGLE ANGLE ANGLE
AUDIO AUDIO PLAY MODE
BK SLOW BK SLOW RETURN
DOWN DOWN DOWN
SLOW SLOW SLOW
ZOOM ZOOM
CODE CODE CODE CODE CODE CODE CODE CODE CODE CODE CODE
SAVE SAVE SAVE SAVE SAVE SAVE SAVE SAVE SAVE SAVE SAVE
CNCL CNCL CNCL CNCL CNCL CNCL CNCL CNCL CNCL CNCL CNCL
LEARN LEARN LEARN LEARN LEARN LEARN LEARN LEARN LEARN LEARN LEARN
SYSTEM POWER POWER POWER POWER POWER POWER POWER POWER POWER POWER POWER
SOURCE POWER POWER POWER POWER POWER POWER POWER POWER POWER
MACRO MACRO MACRO MACRO MACRO MACRO MACRO MACRO MACRO MACRO MACRO
|
>
^
^
^
^
DR-3 FUNCTION LIST
Page 31

www.polkaudio.com
7
Manual Three-Digit Code Method
The DR-3 remote control can duplicate the remote functions of most
brands of audio/video equipment by simply entering in a three-digit
code number. When you enter in the code the DR-3 “learns” most or all
of the remote functions of that equipment so you don’t need to program
the DR-3 button by button. There are tables on pages 14 - 15 that list
the major audio/video brands and their three-digit remote codes.
Quick Instructions
1. Look up code number
2. Turn on equipment
3. Press and hold CODE until the Status Light glows red
4. Press Source/Device button
5. Enter code number
6. Press SAVE
Detailed Instructions
1. Look up the type and brand of equipment you wish to duplicate in
the tables that appear on pages 14 - 15 in this manual. For example, if you wish to program the DR-3 to operate a Panasonic VCR,
go to the VCR chart on page 15 and find the code(s) for Panasonic.
It might be a good idea to jot that number down on this page so you
have it handy as you move through the programming steps.
Note: If there is more than one three-digit number listed for your
brand, try one code number at a time until your equipment turns
off after the last step in the programming process. When your
equipment turns off, you have selected the right code. You can also
verify that you have programmed the correct three-digit number by
pressing the SOURCE POWER button. Your equipment should turn
On and Off.
2. Turn on the equipment you wish to program.
NOTE: From here on in you have 20 seconds to perform each step.
If the Source/Device button light goes off, you need to back up a
step and do it again. You can exit the set-up mode by pressing the
CNCL (cancel) button at any time in the process.
3. Press and hold the CODE button for two seconds. The red status
light at the top left of the remote will turn on.
4. Press the Source/Device button you wish to program (e.g. VCR,
DVD, etc.). The Source button will light up. In the case of the
Panasonic VCR example, you would push the VCR Source button.
5. Point the Polk DR-3 remote control toward the equipment and enter
the first listed three-digit code number of your brand of equipment.
The Status light and the Source/Device button will blink once for
each button pressed. The equipment will turn off when you enter
the correct three-digit number.
6. Press and hold the SA VEbutton for 2 seconds to store the threedigit number. The Status light and the Source/Device button light
will blink twice to confirm that the code has been stored, and then
turn off.
7. Try all the functions on the remote control.
NOTE: If any of the functions do not work as they should, repeat
the programming process using the next three-digit code number
assigned to your brand. If only one or two buttons don’t work right,
it may be easier to individually “teach” the DR-3 those commands
(see page 9) or use the Auto Search method (see page 8) rather
than trying all the three-digit codes.
PROGRAMMING THE REMOTE
4
5
3
6
Page 32
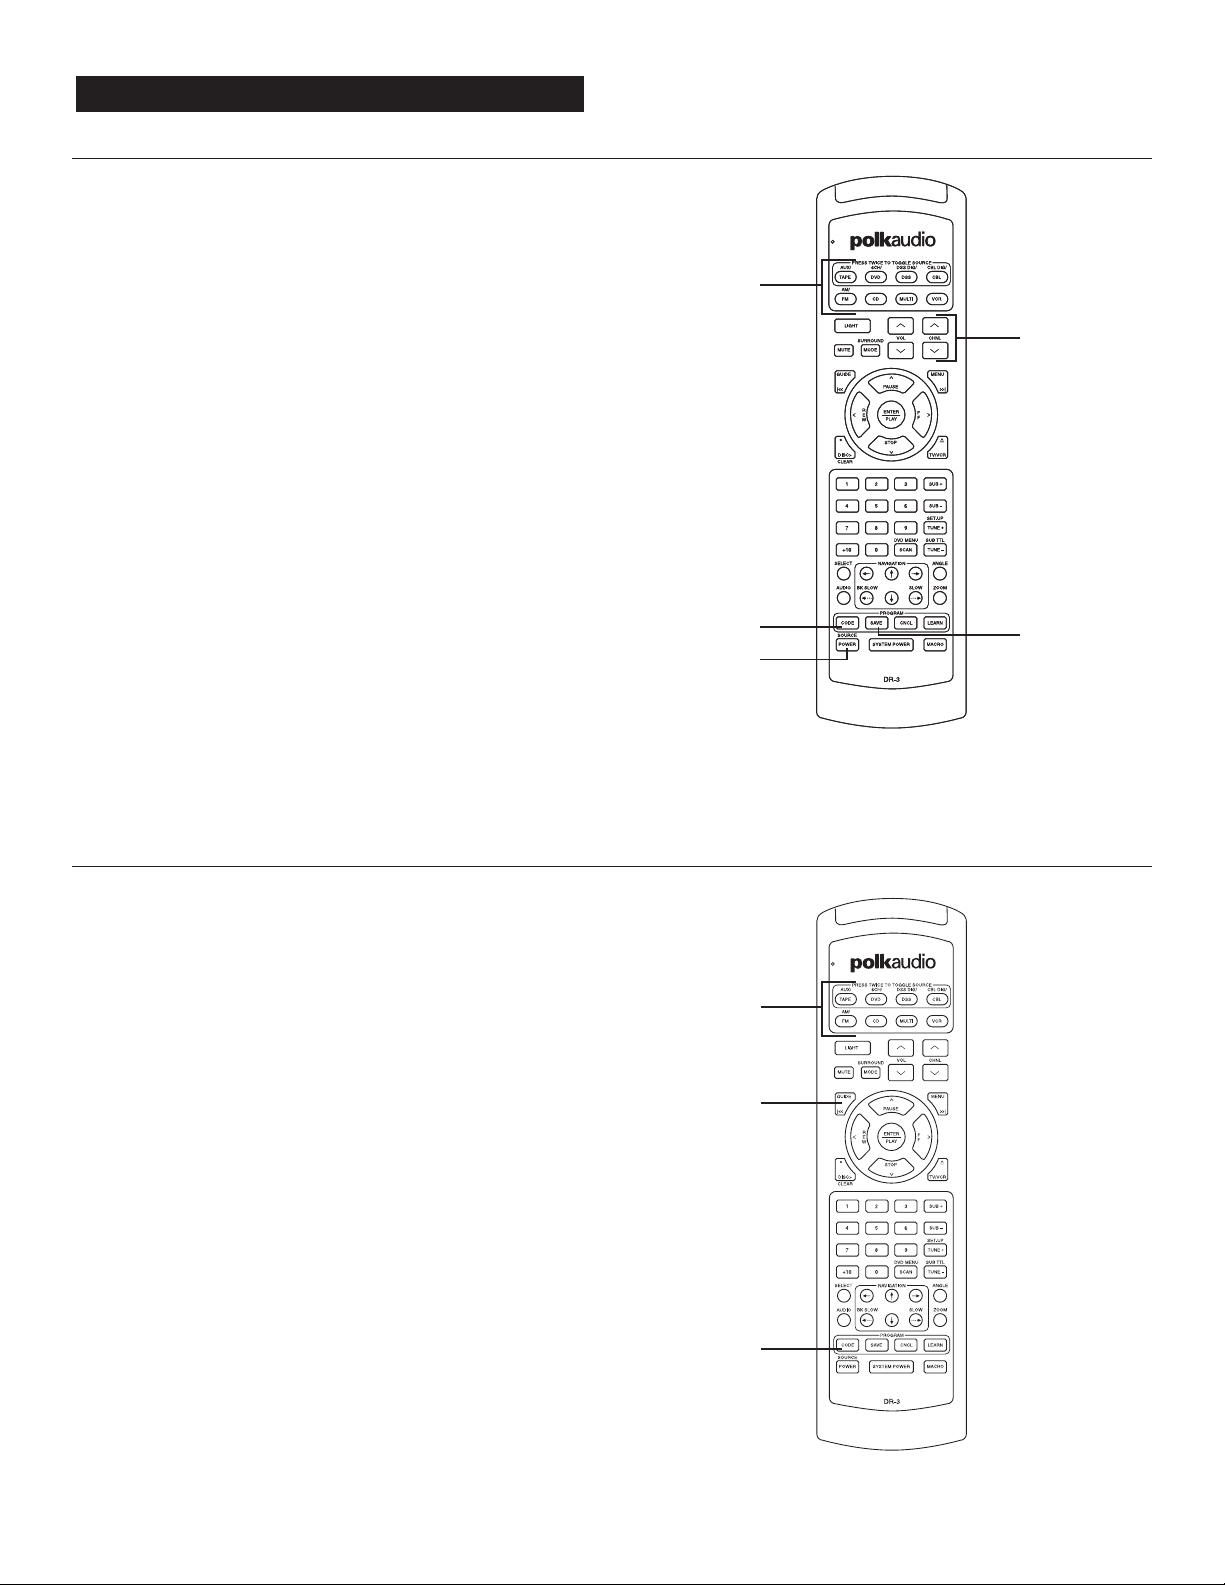
Polk customer service (800) 377-7655
8
Auto Search Method
If none of the three-digit code numbers assigned to your brand shut off
your equipment or if your brand of equipment is not listed in the code
tables, you can use the Auto Search Method to find the correct threedigit number for your equipment.
1. Turn on the equipment you wish to program.
NOTE: From here on in you have 20 seconds to perform each step.
If the Source/Device button light goes off, you need to back up a
step and do it again. You can exit the set-up mode by pressing the
CNCL (cancel) button at any time in the process.
2. Press and hold the CODE button for two seconds. The red status
light at the top left of the remote will turn on.
3. Press the Source/Device button you wish to program (e.g. VCR,
DVD, etc.). The Source/Device button light will turn on.
4. Press and hold the CH UP or CH DOWN button. The remote will
emit a series of Power On/OFF code signals that are stored in its
memory. Release the CHbutton as soon as the equipment turns off.
You can verify that you have chosen the correct code by pressing
the SOURCE POWER button, the device should turn On and Off.
The status light and the Source/Device button will blink.
5. Press and hold the SA VEbutton for two seconds to store the code.
The status light and the Source/Device button light will blink twice
and then turn off to confirm that the code has been stored.
Note: You can verify that you have chosen the correct code by pressing the SOURCE POWER button, the device should turn On and Off.
The status light and the Source/Device button will blink.
Finding the Three-Digit Code Number for a Device
If you are curious which three-digit code was auto-assigned to a given
Source button follow these steps:
1. Turn on the equipment you wish to operate.
2. Press and hold the CODE button for two seconds. The red status
light at the top left of the remote will turn on.
3. Press the Source/Device button for which you want to find the
three-digit number. The Sour ce/Devicebutton light will turn on.
4. Press the GUIDE button. The red status light and Source button
will blink indicating the number for each digit of the three-digit
code number. Each digit is separated by a 1 second “off” interval
of the light.
Example: One blink, LIGHT OFF, Three blinks, LIGHT OFF and
Eight blinks, indicates that the three-digit code number 138 is
stored in the remote for that device. Note: Ten blinks are equal
to the number 0.
PROGRAMMING THE REMOTE
3
2
4
4
5
3
2
4
3
2
4
4
5
Page 33
www.polkaudio.com
9
Teaching Method
From time to time the three-digit programming method doesn’t
automatically program in all of the commands of the original remote.
In such cases you can “teach” the DR-3 individual commands from
your original equipment remote control. New commands can be taught
to any button except the eight Source/Device buttons at the top of the
remote and the LIGHT, MACRO, LEARN, CODE, SAVE, CNCL, MUTE,
SURROUND MODE, VOL UP, VOL DOWN, SUB+, SUB– and SYSTEM
POWER buttons.
The remote control provides visual feedback via the status light that
is located at the top left of the remote control, and the Source/Device
buttons. The status light glows in three colors (red, orange and green).
These lights will assist you in programming in the learning section of
the remote control.
NOTE: You have 20 seconds to perform each step. If the source button
light goes off, you need to back up a step and do it again. You can exit
the learning mode by pressing the CNCL (cancel) button at any time in
the process.
Quick Instructions
Place the DR-3 remote and the original remote controls on a table
pointing toward each other as shown in the illustration.
1. Press LEARN for two seconds
2. Select device type with source buttons
3. Push button to be taught on the DR-3
4. Push and hold the button on other remote
5. Wait for green light
6. Release button & press/hold it again until green light blinks, release
7. Repeat steps 3 - 6 for other buttons
8. Press SAVE
Start from the beginning for each device.
Detailed Instructions
Place the DR-3 remote and the original remote controls on a table
pointing towards each other as shown in the illustration.
1. Press and hold the LEARN button on the DR-3 for two seconds.
The status light at the top left of the remote will glow orange.
2. Select the Source/Device mode in which you would like to teach
the new command. The Source/Device button will light up. For
example if you wanted to teach a command to the MENU button
in the DSS mode on the remote, you would select the DSS
Source/Device button and then continue the instructions below
to teach the new command to the MENU button.
3. Press the button on the DR-3 that is to be taught the new com-
mand. The orange status light will begin to flash continuously.
The Source/Device light will turn off.
4. On the source remote control (original equipment remote control),
press and hold the button for the command to be learned until the
status light on the DR-3 remote turns green.
5. Release the button on the source remote control.
6. Press the button on the source remote control once again to
verify that the new command has been learned correctly. The
status light on the DR-3 will flash green twice and then turn to
a steady orange color to indicate that the programming was
successful. The Source/Device button will light.
7. Repeat Steps 3 through 6 for any other buttons to be taught in
the device mode selected in Step 2.
8. Press and hold the SA VEbutton for two seconds to save the
programmed information. The orange status light flashes twice.
The Source/Device button light will turn off.
PROGRAMMING THE REMOTE
2
8
1
Page 34
Polk Customer Service (800) 377-7655
10
Erasing a Learned Command From a Button
NOTE: You have 20 seconds to perform each step. If the source button
light goes off, you need to back up a step and do it again. You can exit
by pressing the CNCL (cancel) button at any time in the process.
1. Press and hold the LEARN button for two seconds.
The status light at the top left of the remote will glow orange.
2. Press the Source/Device associated with the button you wish
to erase. The Source/Device button light will turn on.
3. Press the button that is to be erased. The orange status light will
flash continuously and the Source/Device button will turn off.
4. Press the LIGHT button. The status light will flash twice, then
turn to a steady orange. The Source/Device button will turn on.
5. Repeat from Step 3 for any other buttons to be erased in the
selected device mode.
6. To save your changes, press the SAVE button. The orange status
light will flash twice and then turn off. The Source/Device button
will turn off.
To Erase All the Learned Commands
in One Source/Device Mode:
NOTE: You have 20 seconds to perform each step. If the source button
light goes off, you need to back up a step and do it again. You can exit
by pressing the CNCL (cancel) button at any time in the process.
1. Press and hold the LEARN button for two seconds.
The status light at the top left of the remote will glow orange.
2. Press the Source/Device button you wish to erase.
The Source/Device button light will turn on.
3. Press and hold the LIGHT button for 5 seconds until the status
light flashes red five times and then flashes green twice and the
Source/Device button turns off. The status light will go to a constant
orange indicating that all the learned information on buttons in the
Source/Device mode have been erased. The Source/Device button
will turn on.
4. To save your changes, press the SAVE button. The orange status
light will flash twice and then turn off. The Source/Device button
will turn off.
PROGRAMMING THE REMOTE
2
3
4
1
2
4
6
1
Page 35

www.polkaudio.com
11
Erasing All the Learned Commands
in All Device Modes
This procedure will erase all the learned commands on all the buttons
in all eight Source/Device modes. Be really, really sure you want to do
this before following the steps below.
1. Press and hold the LEARN button for two seconds.
The Status light at the top left of the remote will glow orange.
2. Press and hold the LEARN button again for 10 seconds. The
Status light will flash red continuously. The status light will then
flash green once, orange once then turn off, indicating that all of
the learned commands in all of the Source/Device modes on the
remote control have been erased.
Restoring Factory Programming
If you want to restore the DR-3 to it’s original programming and operation, press the LIGHT and POWER buttons simultaneously for 10
seconds. The red status light will blink while the remote is resetting.
It will confirm the reset by blinking green and then orange.
PROGRAMMING THE REMOTE
,2
1
Page 36

Polk Customer Service (800) 377-7655
12
Programming the Macro Button
The MACRO button can send out a sequence of up to 20 commands
with one button press. It can be programmed for up to eight Source
button macros and perform multi-step operations with just one button
push. For example, you can program the MACRO button to turn on the
TV, turn on the DS system, turn on the DVD player, select the correct
Video input, and open DVD drawer with the push of one just button.
Each Source/Device button can have an associated Macro program.
That means you can set up as many as 8 Macros. You cannot set up
two different Macros for the same Source/Device button even though
the top row buttons can select two inputs. Let’s give you an example:
the 6CH/DVD Source/Device button can select either the 6 Channel
or the DVD input, but only 1 Macro.
Before you begin the Macro programming process, you first have to
program all of your system’s equipment into the DR-3 remote. Use
any of the methods described earlier in this manual to fully program
the DR-3 remote. It is a good idea to use your DR-3 remote for a few
days to familiarize yourself with its basic operation before setting
up MACRO operations.
Planning the sequence of commands is very important. For example,
some devices (especially TVs) will not accept other commands until
they are fully turned “on.” You may have to turn on all the devices
first, then give them other commands later in the sequence. You may
need to try different command sequences to get to the right result.
See the example on page 13 to get a feel for programming a Macro.
NOTE: You have 20 seconds to perform each step. If the Source button
light goes off, you need to back up a step and do it again. You can exit
the set-up mode by pressing the CNCL (cancel) button at any time in
the process.
1. Press and hold the CODE button for two seconds. The status light
at the top left of the remote will turn red.
2. Press the desired Source/Device button. The button will light up.
3. Press the MACRO button. The status light and the Source/Device
button will blink once.
4. Press up to 20 commands you would like to include in the macro
sequence starting with the Source button. Pressing a Source
button to change modes is counted as one command.
5. Press the SAVE button to store the commands. The red status light
and the Source button lights will blink twice and then turn off to
confirm the program.
To Erase a Macro Sequence:
Follow the above Steps 1, 2, 3 and 5 without going through Step 4.
MACRO OPERATION
2
5
1
3
Page 37
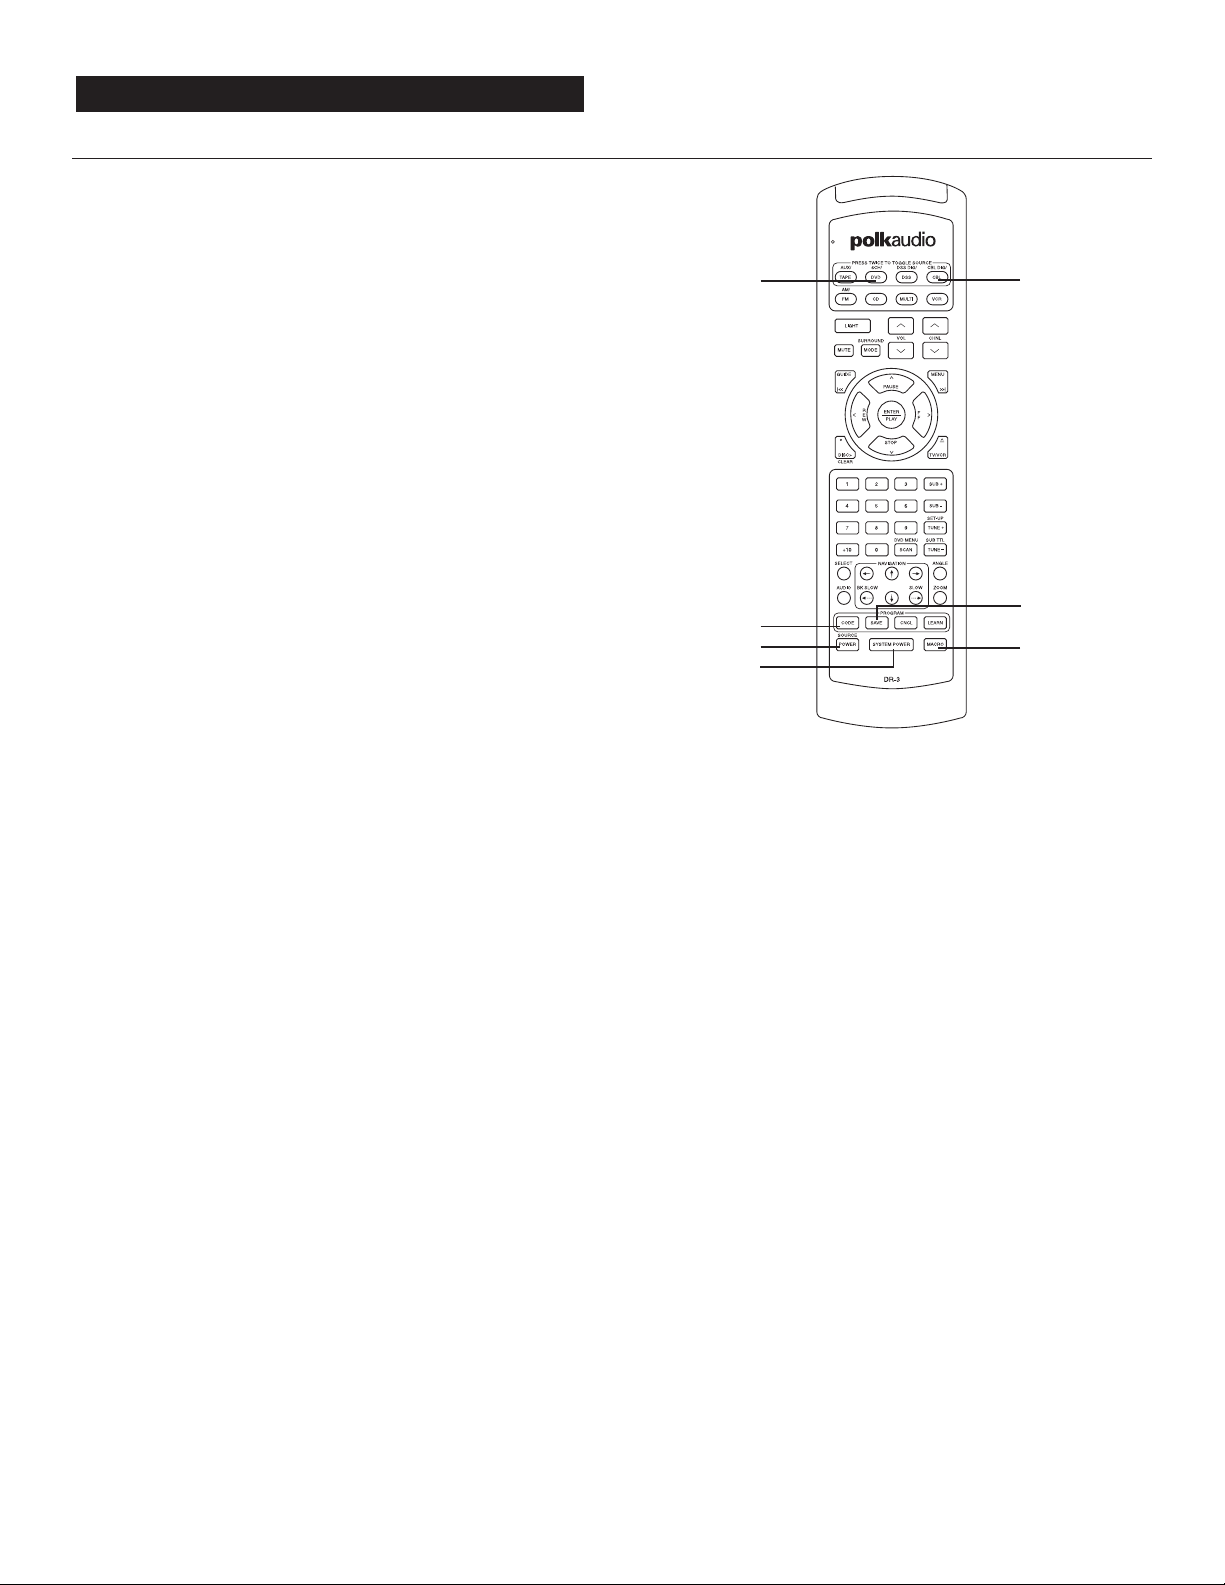
www.polkaudio.com
13
Macro Sequence Programming Example:
Confused? Don’t worry, it isn’t as bad as it looks. Let’s walk you
through a hypothetical Macro sequence to show you how it works.
In this example, we are programming the DVD source Macro button
to turn on the TV, the Digital Solution system and the DVD player as
well as select the DVD player as the source to view. In this case,
we are assuming that you have programmed the TV codes into the
CBL Source/Device.
1. Press and hold the CODE button for two seconds. The status light at
the top left of the remote will glow red.
2. Press the DVD Source button. The DVD Source button will light up.
3. Press the MACRO button. The red status light and the DVD button
lights will blink once.
4. Press the CBL Source button
5. Press the SOURCE POWER button to select the TV’s
power command.
6. Press the SYSTEM POWER button to select the Digital Solution’s
power command.
7. Press the DVD source button.
8. Press the SOURCE POWER button to select the DVD’s
power command
9. Press and hold the SAVE button until the red status light and the
Source button lights will blink twice and then turn off to confirm
the program.
In this example the sequence is important. The DVD turn-on command
should be the last command in the Macro string, so that the Digital
Solution system’s input is on.
Factory Reset
If you want to restore the DR-3 to it’s original programming and
operation, press the LIGHT and POWER buttons simultaneously
for 10 seconds. The red status light will blink while the remote is
resetting. It will confirm the reset by blinking green and then orange.
MACRO OPERATION
5
2
3
9
4
,7
1
,8
6
Page 38

Polk customer service (800) 377-7655
14
Manufacturer/Brand Set-Up Code Number
Tape/Aux
PHILIPS TIVO 001
SONY TIVO 002
DVD Player
GOLDSTAR 057 074 091
HARMAN KARDON 084
HITACHI 101
JVC 012
LG 057 074 091
MAGNA VOX 066 096
MARANTZ 083 095
MITSUBISHI 017
MYRYAD 102
NAD 088
NAKAMICHI 103
ONKYO 035 076
PANASONIC 021 042
PHILIPS 066 083 095
PIONEER 023 092 099 107 108
POLKAUDIO 001
PROCEED 086
PROSCAN 026 027
RCA 026 027
SAMSUNG 056 070
SHARP 094
SONY 033
TATUNG 102
THOMPSON 026 027
TOSHIBA 034 035
YAMAHA 042 089
ZENITH 057 074 091
DSS Player
ECHOSTAR 006
HITACHI 011 012
HUGHES 003 022 031
MITSUBISHI 003 022
PANASONIC 013
RCA 001 014 015
SONY 004
TOSHIBA 003 008
Cable (Cable)
GENERAL INSTRUMENT 201 230
HAMLIN 216 218 223
JERROLD 211 222 229
NSC 220 221
OAK 209 217 224 226 227 228
PANASONIC 213 215
PIONEER 208 231 232
REGENCY 219
SCIENTIFIC ATLANTA 202 206 212 214 233
TOCOM 203 210
ZENITH 204 207 225
Manufacturer/Brand Set-Up Code Number
Cable (TV)
SPECTRICON 112
SSS 004 043
SYL VANIA 001 003 059 060 063 064
164 160 127
SYMPHONICS 052
TANDY 081
TATUNG 056 062
TECHNICS 034 080
TECHWOOD 004
TEKNIKA 003 004 024 028 043
072 101 143
TELERENT 072
TERA 172
TMK 004
TOSHIBA 015 030 040 062 101
TOTEVISION 143
UNIVERSAL 008
VIDEO CONCEPTS 146
VIDIKRON 174
VIDTECH 004
VORK 004
WARDS 004 008 009 019 028
060 061 063 064 072 074 164
WESTING HOUSE 076
YAMAHA 001 004
YUPITERU 043
ZENITH 072 073 095 103
ZONDA 112
CD
CARVER 167 041 135 138 139 050 203
DENON 205 226
FISHER 016
H/K 047 033 208 046
JVC 136 163 004
KENWOOD 007 055 023 137 016
MARANTZ 044 041
MONDIAL 147
NAD 215 005 178
NAKAMICHI 218
NIKKO 046
ONKYO 038 168 030 062 169
PANASONIC 068 172
PHILIPS 041
PIONEER 010 020 174
RCA 017 021
REALISTIC 187
SANSUI 171
SHARP 051 173
SHERWOOD 166 096
SONY 225 097 126 133
TEAC 079 140
TECHNICS 068 008 172
VICTOR 004
YAMAHA 012 186 183 046
ZENITH 204 207 225
SETUP CODES
Page 39

www.polkaudio.com
15
Manufacturer/Brand Set-Up Code Number
VCR
AIW A 034 161
AKAI 043 046 124 142 146
AMPRO 072
ANAM 031 103
AUDIO DYNAMICS 012 023 043
BROKSONIC 035 037 129
CANON 028 031
CAPEHART 108
CRAIG 001 040 135
CUIRTIS MA THES 031 041
DAEWOO 117 005 116 010 017 108
DA YTRON 108
DBX 012 023 043
DYNATECH 034 053
ELECTROHOME 059
EMERSON 006 029 035 153 017 025 005
116 027 031 034 036 037 046
101 129 131 138"
FISHER 001 008 009 010
FUNAI 034
GE 031 063 072 107 109 144 147
GO VIDEO 132 136 151
GOLDSTAR 004 012 020 101 123
HARMAN KARDON 012 045
HITACHI 026 150 018 034 043 063 137
INSTANTREPLAY 031
JCL 031
JCPENNY 004 012 040 101
JENSEN 043
JVC 031 043 048 012 055 060 130
150 152
KENWOOD 014 034 048 047
LLOYD 034
LXI 034 001 004 009 017 101
MAGIN 040
MAGNA VOX 067 031 034 041 068 154 164
MARANTZ 067 069 012 031
MARTA 101
MATSUI 027
MEI 031
MEMOREX 040 101 001 010 014 031 034
053 072 134 139
MGA 045 046 059
MINOLTA 004 020
MITSUBISHI 059 061 004 020 046 051 142
MTC 034 040
MULTITECH 024 034
NEC 012 023 043 048
NORDMENDE 043
Manufacturer/Brand Set-Up Code Number
VCR
OPTONICA 053 054
PANASONIC 031 070 133 140
PENTAX 004 020 031 063
PHILCO 031 034 067
PHILIPS 031 067 034 054 101
PILOT 101
PIONEER 004 021 048
PORTLAND 108
PULSAR 072
QUARTZ 014
RADIO SHACK 101 123
RCA 144 147 107 109 031 004 020
034 040 041 140 158
REALISTIC 001 008 010 014 031 034 040
053 054 101
RICO 058
RUNCO 072
SALORA 014
SAMSUNG 017 040 107 109 113 115 124
SANSUI 043 048 135
SANYO 001 010 040 014 134
SCOTT 017 037 129 131
SEARS 017 081 001 004 008 009 010
014 020 101
SHARP 053 031 054 165
SHINTOM 024
SONY 056 057 058 001 009 031 052
053 155 002
SOUNDESIGN 034
STS 004
SYL VANIA 031 034 059 067
SYMPHONIC 034
TANDY 010 034
TATUNG 043
TEAC 034 043
TECHNICS 031 070
TEKNIKA 031 034 101
THOMAS 034
TMK 006
TOSHIBA 017 131 004 008 059
082 150 047
TOTEVISION 040 101
UNITECH 040
VECTOR RESEARCH 012
VICTOR 048
VIDEO CONCEPTS 012 034 046 141
VIDEOSONIC 040
WARDS 001 004 017 024 031 034 040
053 054 131
WESTINGHOUSE 005
YAMAHA 012 034 043
ZENITH 072 034 048 056 058 080
101 153
SETUP CODES
Page 40

Polk customer service (800) 377-7655
Manufacturer/Brand Set-Up Code
Tape/Aux
PHILIPS TIVO 001
SONY TIVO 002
DVD Player
ALPINE 098
APEX DIGITAL 087 111
DENON 007 080
GE 026 027
GOLDSTAR 057 074 091
HARMAN KARDON 084
HITACHI 101
JVC 012
LG 057 074 091
MAGNAVOX 066 096
MARANTZ 083 095
MITSUBISHI 017
MYRYAD 102
NAD 088
NAKAMICHI 103
ONKYO 035 076
PANASONIC 021 042
PHILIPS 066 083 095
PIONEER 023 092 099 107 108
POLKAUDIO 001
PROCEED 086
PROSCAN 026 027
RCA 026 027
SAMSUNG 056 070
SHARP 094
SONY 033
TATUNG 102
THOMPSON 026 027
TOSHIBA 034 035
YAMAHA 042 089
ZENITH 057 074 091
DSS
ECHOSTAR 006
HITACHI 011 012
HUGHES 003 022 031
MITSUBISHI 003 022
PANASONIC 013
RCA 001 014 015
SONY 004
TOSHIBA 003 008
Cable (Cable)
GENERAL INSTRUMENT 201 230
HAMLIN 216 218 223
JERROLD 211 222 229
NSC 220 221
OAK 209 217 224
226 227 228
PANASONIC 213 215
PIONEER 208 231 232
REGENCY 219
Manufacturer/Brand Set-Up Code
Cable (Cable)
SCIENTIFIC ATLANTA 202 206 212 214 233
TOCOM 203 210
ZENITH 204 207 225
Cable (TV)
A MARK 112
ADMIRAL 072 081 161
AKAI 001 146
AMPRO 073 167
ANAM 043 056 080 104 108
112 118 121
AOC 001 004 112
AUDIOVOX 076 103
CANDLE 001 003 004
CETRONIC 043
CITIZEN 001 003 004 101 143
CLASSIC 043
CONCERTO 004
CONTEC 043
CORONADO 143
CROWN 143
CURTIS MATHES 001 101 004 143
CXC 043
DAEWOO 076 103 004 114
127 143
DAYTRON 004 143
DYNASTY 043
DYNATECH 062
ELECTROHOME 024 143
EMERSON 028 048 043 155 005
096 076 001 004 143
153 154
FISHER 007 057
FUNAI 028 043
FUTURETECH 043
GE 160 161 144 004 130
073 008 034 056
074 155
GOLDSTAR 004 106 110 112 113
119 127 143
HALL MARK 004
HITACHI 163 007 004 010 011
012 023 075 143 158
INFINITY 164
JBL 164
JCP 001
JCPENNY 004 008 024 030 065
101 143 160
JVC 038 070 083 034
KENWOOD 001 070
KLOSS 059
KTV 043 143 154
LODGENET 072
LOGIK 072
LUXMAN 004
LXI 007 015 052 081
160 164
SETUP CODES
Manufacturer/Brand Set-Up Code
Cable (TV)
MAGNAVOX 164 059 001 003 004
022 060 061 063
064 127
MARANTZ 001 164
MATSUI 164
MEMOREX 007 072 004
MGA 001 004 024 042
MITSUBISHI 004 024 040 042 109
146 191
MTC 001 004 062 101
NAD 015 025
NEC 001 130 134 040 024
056 019
NIKEI 043
ONKING 043
ONWA 043
OPTONICA 019 081
PANASONIC 034 056 080 164
PHILCO 001 003 024 056 059
060 063 064 127 143
164 004
PHILIPS 164 093 038 005 001
003 004 059
PIONEER 025 135 004 018
023 176
PORTLAND 004 143
PROSCAN 144 160 161 167
PROTON 171 173 004 143
QUASAR 034 056
RADIO SHACK 004 019 127 143
RCA 160 161 065 156 144
001 004 023 024 056
074 152
REALISTIC 007 019
RUNCO 072 169
SAMPO 001 004
SAMSUNG 004 101 127 133
143 160
SANYO 007 057 082
SCOTT 004 028 043 048 143
SEARS 094 015 028 030 004
007 057 082 143 160
SHARP 019 081 028 014 004
022 143 175
SIGNATURE 072
SONY 070 085 139 126
SOUNDESIGN 028 004 003 043
SPECTRICON 112
SSS 004 043
SYLVANIA 001 003 059 060 063
064 164 160 127
SYMPHONICS 052
TANDY 081
TATUNG 056 062
TECHNICS 034 080
TECHWOOD 004
TEKNIKA 003 004 024 028 043
072 101 143
TELERENT 072
The Setup Code list in the DR-3 owner's manual is incomplete.
Use this remote code list for programming your Polk Audio DR-3 unified learning remote.
Page 41

www.polkaudio.com
SETUP CODES
Manufacturer/Brand Set-Up Code
Cable (TV) TERA 172
TMK 004
TOSHIBA 015 030 040 062 101
TOTEVISION 143
UNIVERSAL 008
VIDEO CONCEPTS 146
VIDIKRON 174
VIDTECH 004
VORK 004
WARDS 004 008 009 019 028
060 061 063 064 072
074 164
WESTING HOUSE 076
YAMAHA 001 004
YUPITERU 043
ZENITH 072 073 095 103
ZONDA 112
CD
ADCOM 062
AIWA 187 170 089
AKAI 202
AUDIO TECHNICA 046
CARVER 167 041 135 138 139
050 203
DENON 205 226
FISHER 016
H/K 047 033 208 046
JVC 136 163 004
KENWOOD 007 055 023 137 016
MARANTZ 044 041
MONDIAL 147
NAD 215 005 178
NAKAMICHI 218
NIKKO 046
ONKYO 038 168 030 062 169
PANASONIC 068 172
PHILIPS 041
PIONEER 010 020 174
RCA 017 021
REALISTIC 187
SANSUI 171
SHARP 051 173
SHERWOOD 166 096
SONY 225 097 126 133
TEAC 079 140
TECHNICS 068 008 172
VICTOR 004
YAMAHA 012 186 183 046
Manufacturer/Brand Set-Up Code
VCR
AIWA 034 161
AKAI 043 046 124 142 146
AMPRO 072
ANAM 031 103
AUDIO DYNAMICS 012 023 043
BROKSONIC 035 037 129
CANON 028 031
CAPEHART 108
CRAIG 001 040 135
CUIRTIS MATHES 031 041
DAEWOO 117 005 116 010
017 108
DAYTRON 108
DBX 012 023 043
DYNATECH 034 053
ELECTROHOME 059
EMERSON 006 029 035 153 017
025 005 116 027 031
034 036 037 046 101
129 131 138
FISHER 001 008 009 010
FUNAI 034
GE 031 063 072 107 109
144 147
GO VIDEO 132 136 151
GOLDSTAR 004 012 020 101 123
HARMAN KARDON 012 045
HITACHI 026 150 018 034 043
063 137
INSTANTREPLAY 031
JCL 031
JCPENNY 004 012 040 101
JENSEN 043
JVC 031 043 048 012 055
060 130 150 152
KENWOOD 014 034 048 047
LLOYD 034
LXI 034 001 004 009
017 101
MAGIN 040
MAGNAVOX 067 031 034 041 068
154 164
MARANTZ 067 069 012 031
MARTA 101
MATSUI 027
MEI 031
MEMOREX 040 101 001 010 014
031 034 053 072
134 139
MGA 045 046 059
MINOLTA 004 020
MITSUBISHI 059 061 004 020 046
051 142
MTC 034 040
MULTITECH 024 034
NEC 012 023 043 048
NORDMENDE 043
OPTONICA 053 054
Manufacturer/Brand Set-Up Code
VCR
PANASONIC 031 070 133 140
PENTAX 004 020 031 063
PHILCO 031 034 067
PHILIPS 031 067 034 054 101
PILOT 101
PIONEER 004 021 048
PORTLAND 108
PULSAR 072
QUARTZ 014
RADIO SHACK 101 123
RCA 144 147 107 109 031
004 020 034 040 041
140 158
REALISTIC 001 008 010 014 031
034 040 053 054 101
RICO 058
RUNCO 072
SALORA 014
SAMSUNG 017 040 107 109 113
115 124
SANSUI 043 048 135
SANYO 001 010 040 014 134
SCOTT 017 037 129 131
SEARS 017 081 001 004 008
009 010 014 020 101
SHARP 053 031 054 165
SHINTOM 024
SONY 056 057 058 001 009
031 052 053 155 002
SOUNDESIGN 034
STS 004
SYLVANIA 031 034 059 067
SYMPHONIC 034
TANDY 010 034
TATUNG 043
TEAC 034 043
TECHNICS 031 070
TEKNIKA 031 034 101
THOMAS 034
TMK 006
TOSHIBA 017 131 004 008 059
082 150 047
TOTEVISION 040 101
UNITECH 040
VECTOR RESEARCH 012
VICTOR 048
VIDEO CONCEPTS 012 034 046 141
VIDEOSONIC 040
WARDS 001 004 017 024 031
034 040 053 054 131
WESTINGHOUSE 005
YAMAHA 012 034 043
ZENITH 072 034 048 056 058
080 101 153
Page 42

5601 METRO DRIVE,
BALTIMORE, MARYLAND 21215, USA,
410-764-5275, FAX: 410-764-5266
www.polkaudio.com
RM2070-1
Page 43
Page 44

Page 45

Page 46

 Loading...