

Page 1

PLEASE READ THIS SECTION FIRST
If you intend to do the installation yourself we assume that you possess
some skill in the proper use of hand and power tools. You should have a
thorough understanding of local building and fire codes and a familiarity
with the area behind the wall or ceiling where the speakers will be
installed.
Wiring inside your walls or ceiling should be done before or in conjunction with installation of your in-wall speakers. Wire meeting appropriate
building and fire codes must be used. Use at least 18 gauge wire or
heavier. Wiring is best performed by a licensed professional.
OPTIONS
1.Your in-wall loudspeakers have been packaged with stylish metal
grilles. However, if a softer or warmer appearance is desired, white
cloth grilles are available for the AB555, AB755 and AB855 loudspeakers. In some installations you may find cloth grilles to be less
obtrusive on the design of your living space than paintable metal
grilles. Of course cloth grilles should be used with indoor installations only.
2.Outdoor all-weather grilles are available and required for outdoor
installations. Since the components and hardware used in the AB
Series of loudspeakers can withstand the elements for many years,
the purchase of outdoor grilles will allow the AB Series of loudspeakers to perform reliably in outdoor installations. The AB Loudspeakers
have 1) high efficiency to insure that the higher volumes necessary
for outdoor use can be achieved with even modest amplifiers, and 2)
high power handling to insure that they will perform reliably at the
high levels dictated by outdoor use. The AB loudspeakers are truly at
home indoors as well as out.
If you wish to order optional cloth grilles or outdoor grilles, please call
Polk Audio at 1-800-377-7655.
A WORD FROM MATTHEW POLK
Dear Music Lover,
Thank you for purchasing Polk Audio speakers. Designing and building
speakers is more than just a business for the people of Polk Audio –
it is our passion. We are all dedicated to your complete satisfaction
and delight.
Your new Polk speakers include the latest loudspeaker technology to
assure outstanding performance and unmatched quality. Please take a
moment to read through this manual for information on getting the
greatest enjoyment from these fine instruments.
We make a wide variety of main, center, rear channel, powered subwoofer, and accessory speakers so you can assemble a complete and
well matched high-performance surround sound system. If you would
like more information on building the Polk system of your dreams, consult your Polk Audio dealer or call our Customer Service Department. In
North America call (800) 377-7655, Monday through Friday, 9:00am
through 6:00pm Eastern time.
Sincerely,
Matthew S. Polk
Chairman and Co-Founder
P.S.: A wealth of information can also be found on our awardwinning web site: www.polkaudio.com.
AB SERIES
AB555
AB755
AB755c
AB855
Instruction
Manual
Page 2
WHERE SHOULD I LOCATE MY IN-WALL SPEAKERS?
Your new speakers are designed to offer years of listening enjoyment,
with many placement options available in walls or ceilings. Remember
that placement of your new speaker system bears careful consideration,
as the installation requires that you cut a hole in your wall.
1.If you would like to fill your room with sound, nearly any wall or ceiling location will be satisfactory, due to the superior dispersion of
your Polk speaker. Should you desire the most accurate stereo performance, observe the same guidelines as free standing speakers.
Your in-wall speakers should approximate an equilateral triangle
from your favorite listening position. But don’t hesitate to widen the
distance between the speakers to increase the listening “window” so
more people can enjoy the music!
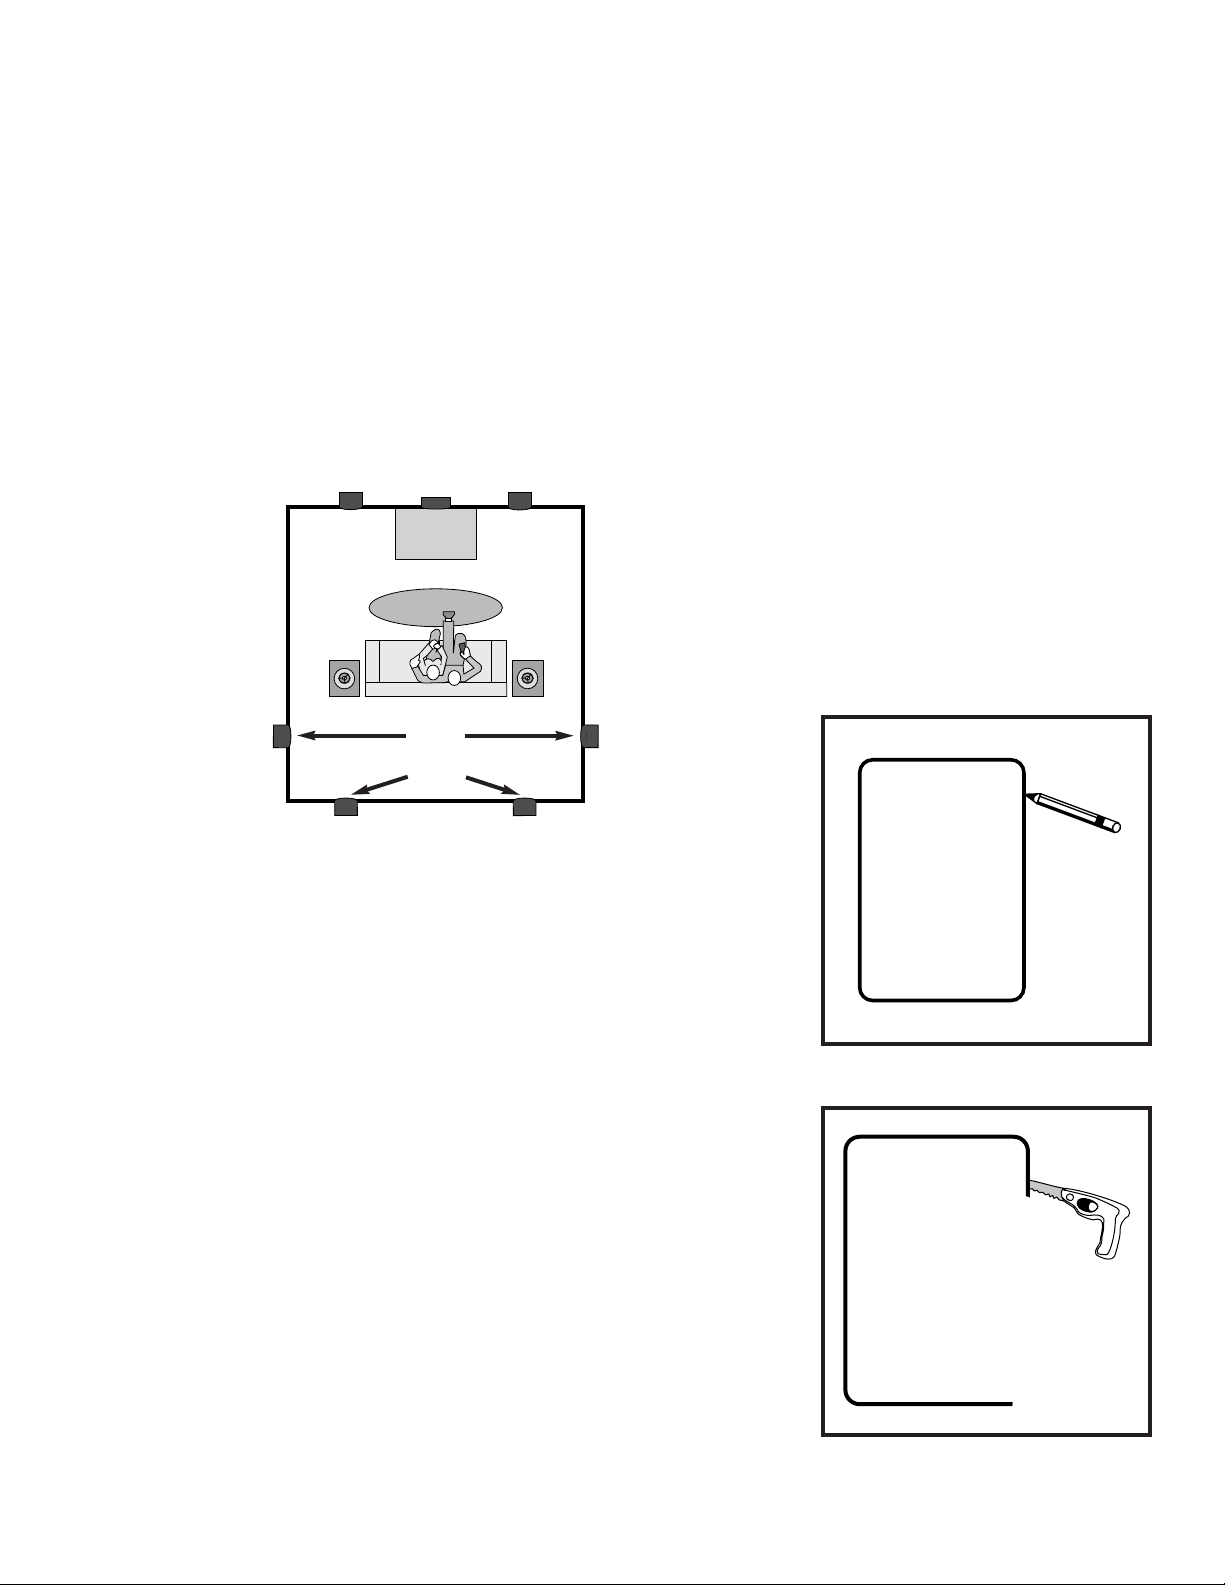
2.If your speakers are part of a combination audio/video system follow
the above guidelines for accurate stereo performance, with the TV
between the two speakers (see Fig 1).
3.If your speakers are used in an outdoor installation, the best location
is one that provides shelter from rain and other outdoor elements.
The most common and ideal location is high in a wall close to the
eaves of your house which also serves to reflect the sound towards
the listening area. If you position the AB loudspeakers where water
will directly contact them, it is advisable to use a sealant or caulk
between the frame of the loudspeaker and the wall surface. This seal
should prevent water from getting behind the loudspeaker and wall
surface. Do not position the loudspeakers where water can pool on
the surface of the woofer cone or tweeter dome. This will greatly
decrease your speaker’s useful life.
4.The most popular position for a center channel speaker is just above
the TV. This position assures that dialog and on-screen action appears
to come from the TV itself. It’s also fine to place the speaker underneath the TV as your furniture or design considerations may demand.
Your AB705c is magnetically shielded so you don’t have to worry about
color distortion when you place the speaker close to your TV.
HOW SHOULD I PAINT MY NEW SPEAKERS?
Your new speakers are packaged with the paint masks in place and they
should not be thrown away. Make sure that you paint the grille and
frame separately.
1.Grille: Be sure to remove the cloth scrim on the inside of the grille
before applying paint. Simply replace the scrim after the paint is
dry. Either hang the grille in free space or place it on paper before
painting. The grilles must be sprayed–do not use a brush or
roller–Spray two or more thin coats rather than one thick coat to
avoid clogging the perforations of your metal grilles, which can
impair performance. If you are using an interior paint, it should be
thinned before spraying. Water based dyes should be used to modify
the color of cloth grilles.
2.Frame: Paint masks have been provided to protect the speaker com-
ponents while the frame is being sprayed. Spray the frame in a similar fashion to the grille, using two or more thin coats. It’s OK to paint
the frame after the speaker has been installed in the wall.
WHAT TOOLS DO I NEED TO INSTALL MY SPEAKERS?
•Pencil for marking the cutout
•Keyhole saw or utility knife for drywall cutting
•Level (optional)
•Power screwdriver with phillips head
HOW DO I INSTALL MY SPEAKERS?
Your new speakers are ready to go into the wall or ceiling right out of
the box, making installation easy. Just follow these step-by-step
instructions.
STEP-BY-STEP INSTALLATION INSTRUCTIONS
1.The cutout must be at least 1" from adjoining walls, ceiling,
internal studs and pipes.
2.Hold the supplied template in your preferred location and trace
around it. This is the exact cutout size.
3.Cut the hole with the appropriate tool for your wall or ceiling
material
For more information visit our web site at http://www.polkaudio.com
FIG 2.
Trace around the template.
TEMPLATE
FIG 3.
Cut the hole with the appropriate tool.
OPTION 1
OR
OPTION2
FRONT
LEFT
CENTER
TV
FRONT
RIGHT
MAIN SPEAKERS
SURROUND SPEAKERS
FIG 1.
Audio or Audio/Video Placement
Options. Either position is satisfactory for surround sound use.
Page 3

4.Follow the hook-up directions included with your receiver. Strip
1/2 inch of insulation from each of the two conductors of the wire
to expose the bare metal and twist each into a single unfrayed
strand. Note that one of the terminals on the rear of each speaker
is red ( + ) and the other is black ( - ). Make certain that you connect the wire from the red terminal of your amplifier to the red
terminal on your speaker and the wire from the black terminal of
the amplifier to the black terminal on your speaker. Most wire
has some indication (such as color coding, ribbing, or writing) on
one of the two conductors to help you maintain consistency.
5.After insuring that the rotating wall clamps (4 in the case of the
AB555, 6 in the case of the AB755 and 8 in the case of the AB855)
are flipped inwards, place the speaker into the cutout. If you have a
level it can help you in correctly aligning the speaker to the wall.
Tighten the mounting screws using a power screwdriver. This will
rotate the wall clamps, securing the speaker to the wall (see Fig 6).
Hint – on the AB755 and AB855 tighten the center mounting screws
before the corners for the most flush fit to the wall.
Do Not Overtighten!
6.Install the grille on the speaker. (You should have already painted
both the grille and frame.) Should you ever need to remove the
grille do not use a knife to pry between the grille and speaker
frame. Instead, insert a pointed metal tool into one of the grille per-
forations near a corner and lift the grille free.
TECHNICAL ASSISTANCE OR SERVICE
If, after following the hook-up directions, you experience difficulty,
please double check all wire connections. Make sure that your electronic equipment is operating correctly by hooking up another speaker to the
speaker output. For example, if you are not getting sound from the left
channel speaker, connect the right channel speaker to the left output. If
you still get no sound from that side, the problem is in your amp, receiver or source electronics. Should you isolate the problem to the speaker,
contact the authorized Polk Audio dealer where you made your purchase. Authorized Polk Audio dealers are the best source for advice
and assistance.
Our customer service representatives are happy to answer your
questions and provide fast, friendly service. In North America call
(800) 377-7655, Monday through Friday, 9:00am through 6:00pm
Eastern time. Or you can E-Mail us at our Internet service address:
polkcs@polkaudio.com.
For more information visit our web site at http://www.polkaudio.com
FIG 4.
Hook up the speaker wires
R L
- +-
+
AMPLIFIER
CENTER
+
–
+
CENTER
CHANNEL
SPEAKER
+
+
RIGHT
FRONT OR SURROUND
SPEAKERS
+
+
LEFT
FRONT OR SURROUND
SPEAKERS
+
FIG 5.
Tighten rotating wall clamps to
engage wall
WALL CLAMP
Page 4

5601 Metro Drive
Baltimore, MD 21215 USA
(800) 377-7655
http://www.polkaudio.com
“Polk”, “Polk Audio”, “The Speaker Specialists” and “Dynamic Balance” are registered trademarks of Polk Investment Corporation used under license by Polk Audio Incorporated.
AB SPECIFICATIONS
RM0556-1
AB555
Driver Complement:
1 - 5 1/4"(13.3cm) Dynamic Balance
®
driver,
1 - 1/2"(1.2cm) dome tweeter
Overall Frequency Response:
67Hz - 20kHz
Impedance:
compatible with 8 ohm outputs
Recommended Amplification:
20 - 100 watts/channel
Efficiency (1M, 1Watt):
89dB
Available Finish:
matte white (paintable)
Overall Size:
10" x 6 3/4" (25.4cm x 17.2cm)
Shape:
rectangle
Mounting Depth:
3 1/4" (8.3cm)
Cutout Dimensions:
8 7/8" x 5 5/8" (22.2cm x 14.3cm)
AB755 & AB755c*
Driver Complement:
1 - 6 1/2"(16.5cm) Dynamic Balance driver,
1 - 1"(2.5cm) Tri-laminate dome tweeter
Overall Frequency Response:
32Hz - 26kHz
Impedance:
compatible with 8 ohm outputs
Recommended Amplification:
20 - 100 watts/channel
Efficiency (1M, 1Watt):
89dB
Available Finish:
matte white (paintable)
Overall Size:
11" x 7 1/2" (27.9cm x 19cm)
Shape:
rectangle
Mounting Depth:
3 1/4" (8.3cm)
Cutout Dimensions:
9 3/4" x 6 1/4" (24.6cm x 15.9cm)
AB855
Driver Complement:
2 - 6 1/2"(16.5cm) Dynamic Balance driver,
1 - 1"(2.5cm) Tri-laminate dome tweeter
Overall Frequency Response:
30Hz - 26kHz
Impedance:
compatible with 8 ohm outputs
Recommended Amplification:
20 - 150 watts/channel
Efficiency (1M, 1Watt):
89dB
Available Finish:
matte white (paintable)
Overall Size:
16 3/4" x 7 1/2" (42.6cm x 19cm)
Shape:
rectangle
Mounting Depth:
3 1/4" (8.3cm)
Cutout Dimensions:
15 1/2" x 6 1/4" (39.4cm x 15.9cm)
* Feature magnetically shielded components
Note:
Specifications are subject to change without notice.
POLK AUDIO LIMITED WARRANTY
Polk Audio, Inc. warrants to the original purchaser only that this Polk Audio Loudspeaker Product (the “Product”) will be free from defects in materials and workmanship
for a period of five (5) years from the date of original retail purchase from a Polk Audio Authorized Dealer. However, this Warranty will automatically terminate prior to
the expiration of the five (5) years if the original retail purchaser sells or otherwise transfers the Product to any other party. The original retail purchaser shall hereinafter be referred to as “you.” To allow Polk Audio to offer the best possible warranty service, please fill out the Product Registration Card(s) and send it to the Factory,
at the address provided on the Product Cards(s) within ten (10) days of the date of purchase.
Defective Products must be shipped, together with proof of purchase, prepaid insured to the Polk Audio Authorized Dealer from whom you purchased the Product, or to
the Factory at the address given on this manual. Products must be shipped in the original shipping container or its equivalent; in any case the risk of loss or damage in
transit is to be borne by you. If upon examination at the Factory or Polk Audio Authorized Dealer it is determined that the unit was defective in materials or workmanship
at any time during this Warranty period, Polk Audio or the Polk Audio Authorized Dealer will, at its option, repair or replace this Product at no additional charge, except
as set forth below. All replaced parts and Products become the property of Polk Audio. Products replaced or repaired under this warranty will be returned to you, within
a reasonable time, freight prepaid.
This warranty does not include service or parts to repair damage caused by accident, disaster, misuse, abuse, negligence, inadequate packing or shipping procedures,
commercial use, voltage inputs in excess of the rated maximum of the unit, cosmetic appearance of cabinetry not directly attributable to defect in materials or workmanship, or service, repair, or modification of the Product which has not been authorized or approved by Polk Audio. This warranty shall terminate if the Serial number on
the Product has been removed, tampered with or defaced.
This warranty is in lieu of all other expressed Warranties. If this Product is defective in materials or workmanship as warranted above, your sole remedy shall be repair
or replacement as provided above. In no event will Polk Audio, Inc. be liable to you for any incidental or consequential damages arising out of the use or inability to use
the Product, even if Polk Audio, Inc. or a Polk Audio Authorized Dealer has been advised of the possibility of such damages, or for any claim by any other party. Some
states do not allow the exclusion or limitation of consequential damages, so the above limitation and exclusion may not apply to you.
All implied warranties on this Product are limited to the duration of this expressed Warranty. Some states do not allow limitation on how long an implied Warranty lasts,
so the above limitations may not apply to you. This Warranty gives you specific legal rights, and you also may have other rights which vary from state to state.
This Warranty applies only to Products purchased in the United States of America, its possessions, and U.S. and NATO armed forces exchanges and audio
clubs. The Warranty terms and conditions applicable to Products purchased in other countries are available from the Polk Audio AuthorizedDistributors in
such countries.
 Loading...