

POLKABIKES Polka for Everybody, Polka for Ladies, Polka Pista, Polka City User Manual And Assembly Instructions
Page 1

1
User manual and assembly
instructions
Models: Polka for Everybody, Polka for Ladies, Polka Pista, Polka City
Page 2

2
Table of contents
Table of contents ........................................................................................................................................... 2
1. Package contents ................................................................................................................................... 2
2. Assembly................................................................................................................................................ 3
2.1. Assembly in bicycle service centre ................................................................................................ 3
2.2. Self-assembly ................................................................................................................................. 3
3. Legal regulations ................................................................................................................................... 7
4. Recommendations of manufacturer ..................................................................................................... 8
5. Where can you ride a bicycle .............................................................................................................. 11
6. Bicycle checks before riding ................................................................................................................ 12
6.1. Adjustment of saddle height ....................................................................................................... 14
6.2. Adjustment and operation of brakes .......................................................................................... 15
7. Contact details of manufacturer ......................................................................................................... 16
1. Package contents
In the case of shipping the bicycle by courier service, a package with the Polka Bikes should include:
a. complete bicycle with disassembled: front wheel, saddle post and saddle, handlebar and pedals,
b. front wheel,
c. pedals,
d. saddle post with saddle,
e. handlebar,
f. white reflectors,
g. red reflector,
h. warranty card.
i. For Polka City Duke – front basket in separate carton
In the case of collecting the bicycle from the authorized service center of Polka Bikes, the following
components should be attached to the complete bicycle:
a. warranty card,
b. rear reflex reflector,
Page 3

3
c. front reflex reflector.
2. Assembly
In the case of collection from the authorized service center of Polka Bikes Sp. z o.o., a bicycle does not
require to be assembled – it is ready to ride and the “0” inspection of the bicycle has been carried out.
In the case of shipping the bicycle by courier service, the Polka Bikes bicycles require a final assembly,
before they are ready to ride. You should not remove the protective covers before the assembly is
completed as it may cause the accidental damage to the lacquer coating.
2.1. Assembly in bicycle service center
Polka Bikes Sp. z o.o. recommends that the assembly of bicycle should be performed by the authorized
service center that will also conduct, as part of the assembly, the „0” inspection, which is a necessary
prerequisite for using the manufacturer’s warranty (see Warranty Terms and Conditions). The „0”
inspection entails low costs and short implementation time. Before performing the inspection, the
service center should be provided with the list of servicing activities recommended by Polka Bikes Sp. z
o.o. as part of the “0” inspection. The list is included in the Warranty Card, under “Certification of
performed periodic inspections“.
2.2. Self-assembly
The Polka Bikes bicycles may be self-assembled on your own responsibility. Any assembly errors and use
of unsuitable components may lead to serious falls! After the completion of assembly, and before the
beginning of its use, the “0” inspection should be performed immediately in any bicycle service center
selected by you. In the case of lack of the “0” inspection, Polka Bikes Sp. z o.o. does not guarantee the
proper functioning of the purchased bicycle and does not provide any warranty repairs. The „0”
inspection entails low costs and short implementation time. Before performing the inspection, the
service center should be provided with the list of servicing activities recommended by Polka Bikes Sp. z
o.o. as a part of the “0” inspection. The list is included in the Warranty Card, under “Certification of
performed periodic inspections“.
Self-assembly instructions
For self-assembly, the following tools are required:
a. Flat wrench of 15 mm
b. Allen key of 4 mm
c. Allen key of 5 mm
d. Allen key of 6 mm
e. Allen key of 8 mm
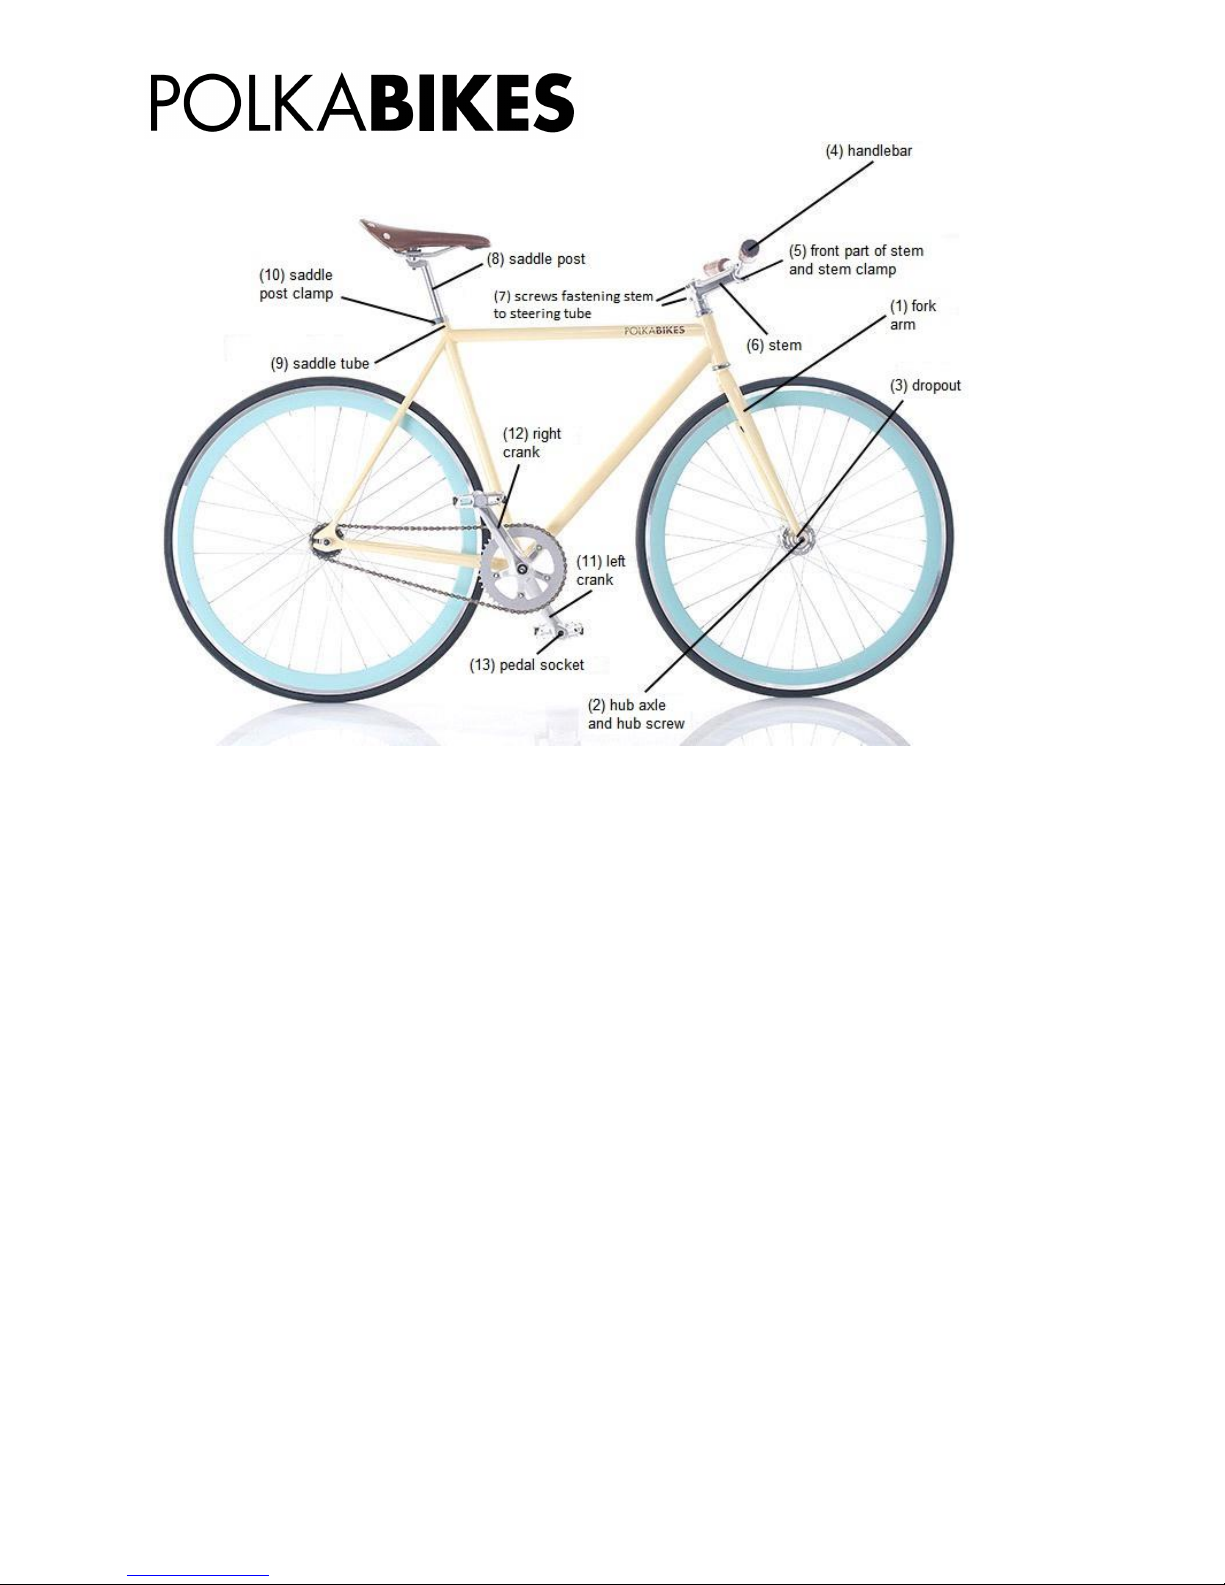
The following diagram allows to identify the individual components referred to later in this manual:
Page 4
4
In order to assemble a bicycle, the followings activities should be performed one after the other.
1. Assembly of front wheel (for Polka for Everybody, for Ladies, Pista)
A front wheel is delivered separated from the rest of bicycle. Place the front wheel between the
fork arms (1), place the hub axle (2) in the front fork dropouts (3) and tighten the hub screws (2)
with the flat wrench of 15 mm, by using torque value of 24-28 Nm.
Assembly of front wheel with fender and front basket (Polka City)
If you ordered Polka City in the Duke variant, you have received the front basket along with your
bicycle Below you will find assembly instructions.
A front wheel is delivered separated from the rest of bicycle. Place the front wheel between the
fork arms (1), place the hub axle (2) in the front fork dropouts (3) and tighten the hub screws (2)
with the flat wrench of 15 mm, by using torque value of 24-28 Nm.
Place the front wheel in the front fork dropouts (3) and set the bike in a stable position, e.g.
resting on the kickstand.
Remove completely nuts on the front axle hub by the dropouts of the front fork (3).
Install the two arms supporting the basket to the front brackets of the front basket:
• Insert the bolts through the small holes in the arms and fastening holders of the basket (1). Screw head
should be on the outside and the thread and nut on the wheel-side,
• Screw the nut on the bolt on the wheel-side and lock it with wrench 8,
Page 5

5
• Screw the screw with 4mm allen key with torque approx. 10 Nm, while holding the nut locked with
wrench.
Disconnect completely the front brake from the fork (1) using a 5mm allen key - unscrew the nut
protruding from the back of the fork, and then pull the brake mechanism to the front along with
the fastening bolt.
Take off the two spacer washers from the screw.
Place the supporting arms of the basket on the front hub axle (3) while holding the basket, and
then apply the nuts on the front axle hub and slightly tighten them by hand.
Put the screw that secures the front brake in turn by:
• The metal extension arm of the front basket,
• front fender holder,
• two nut spacers,
• the hole in the front fork.
Reinstall front brake (1). For this purpose, screw the nut on the back of the fork bolt that secures
the front brake, and then tighten it with a 5mm allen key to a torque of 12 Nm. The distance of
both the brake pads from the rim of the wheel should be equal.
Screw the nuts on the front axle hub with wrench 15 with a torque of 28 Nm.
Screw the two screws securing the metal frame of the front fender to the dropouts of the front
fork (3) with 4mm allen key.
Bend slightly the metal frame supporting front fender adjusting the position of front fender in a
way that the front wheel is positioned centrally in the fender.
If the installation of front basket is still troublesome, please refer to the front basket assembly
manual available on http://polkabikes.pl/basket_assembly.pdf
Assembly of front wheel with fender without the front basket (Polka City)
A front wheel is delivered separated from the rest of bicycle. Place the front wheel between the
fork arms (1), place the hub axle (2) in the front fork dropouts (3) and tighten the hub screws (2)
with the flat wrench of 15 mm, by using torque value of 24-28 Nm.
Place the front wheel in the front fork dropouts (3) and set the bike in a stable position, e.g.
resting on the kickstand.
Disconnect completely the front brake from the fork (1) using a 5mm allen key - unscrew the nut
protruding from the back of the fork, and then pull the brake mechanism to the front along with
the fastening bolt.
Put the screw that secures the front brake in turn by:
• front fender holder,
• two nut spacers,
• the hole in the front fork.
Page 6

6
Reinstall front brake (1). For this purpose, screw the nut on the back of the fork bolt that secures
the front brake, and then tighten it with a 5mm allen key to a torque of 12 Nm. The distance of
both the brake pads from the rim of the wheel should be equal.
Screw the nuts on the front axle hub with wrench 15 with a torque of 28 Nm.
Screw the two screws securing the metal frame of the front fender to the dropouts of the front
fork (3) with 4mm allen key.
Bend slightly the metal frame supporting front fender adjusting the position of front fender in a
way that the front wheel is positioned centrally in the fender.
3. Assembly of handlebar
For Polka for Everybody and for Ladies
A handlebar (4) is delivered separated from the rest of bicycle. Remove the front part of
handlebar stem (5). Place the handlebar (4) in the stem clamp at the proper angle (5) and screw
again the front part of handlebar stem (5) with the allen key of 4 mm, by using torque value of
12-14 Nm.
For Polka Pista and Polka City
Polka City for Him Polka City for Her Polka Pista
A handlebar (4) is delivered separated from the rest of bicycle. Place the stem in the steering
tube (14), position it parallel to the front wheel, and perpendicular to the axis of the hub (2)
adjust to the desired handlebar height and tighten the screw on the top of the stem (15) with
allen key 6 mm, by using torque value of 12-14 Nm.
3. Tightening a handlebar stem – Polka for Everybody, for Ladies
A stem (6) is delivered already assembled to the steering tube of front fork. Place it parallel to
the front wheel, and perpendicular to the hub axle of this wheel (2) and tighten the screws
fastening the stem to the steering tube (7) with the allen key of 4 mm, by using torque value of
12-14 Nm.
Page 7

7
4. Assembly of saddle post with a saddle
A saddle is delivered assembled to the stem (8). Place the stem (8) in the saddle tube (9), adjust
the saddle height by inserting the stem (8) to the proper depth and tighten the saddle post
clamp (10) with the allen key of 6mm, by using torque value of 16-18 Nm.
5. Assembly of pedals
The pedals are delivered separated from the rest of bicycle. Adjust the left pedal to the left crank
arm (11) and right pedal to the right crank arm (12), place it in a pedal socket (13) and tighten it
with the flat wrench of 15 mm, by using torque value of 6-9 Nm. The left and right pedals are not
marked, therefore in order to identify e.g. the left pedal, try to adjust first one of them and then
the other pedal to the left crank arm. The pedal matches the particular crank arm, if it can be
screwed into it.
6. Lights – Polka City
Front light Read light
To installed lights should be equipped with AAA batteries. In the case of the headlamp, release
the locking clip (1) located under the light, install the battery, and push back the cover of light in
place. In the case of the tail light, loosen the screw (1), remove the lights cover, install the
batteries, reinstall the light cover and and tighten the screw.
After the completion of assembly, the bicycle is to be equipped according to the bicycle equipment
required by the legal regulations applicable on the territory of the Republic of Poland.
3. Legal regulations
Pursuant to the legal regulations applicable on the territory of the Republic of Poland, in order to ride a
bicycle on the public roads, it has to be equipped with:
a. at the front – at least one white or selective yellow front position light.
b. at the back – at least one red reflex reflector of a shape other than triangle and at least one red
position light.
c. at least one properly functioning brake.
d. a bell or other warning signal with a non-shrill sound.
Page 8

8
In the case where a bicycle does not have one or more of the above-listed components, the bicycle user
should ensure that the bicycle equipment is complete.
4. Recommendations of manufacturer
Start using the bicycle only after you have received all of the documentation and read it
carefully.
In order for the bicycle to function properly, it is recommended that the „0” inspection is
performed and that such inspection is covered by the manufacturer’s warranty (read more in
Warranty Terms and Conditions).
The check of left and right crank arm clearances is recommended. Loosening of crank arm is a
natural, but rare phenomenon in the process of reaching full usability by the bicycle and it
particularly concerns the left crank arm. After having felt a clearance (which is characterized by
the gentle movement of crank arm with the pedal across the bicycle), tighten the crank – by
yourself or with the allen key of 8 mm or in any bicycle workshop.
NOTE: Ignoring the clearance on the crank causes an excessive wear of the bottom bracket axle
and crank arm and it eventually leads to unscrewing of crank with the pedal. The repair of
sub-assemblies damaged by using the bicycle with clearances on the crank is not covered by
the manufacturer’s warranty.
It is recommended that after the first month of normal bicycle use, the inspection is performed
to check whether the wheels have not become deformed. The wheel deformation may occur in
the first weeks of normal use and is a natural, but rare phenomenon in the process of reaching
full usability by the bicycle. The wheel straightening (in other words: centering) may be
performed in any bicycle service center for a small fee.
Note! Both the saddle and the handles are covered with protective covers (some models). This
cover wears off during the first few uses of bicycle, then the components achieve the intended
look.
The frame, fork and all other components should be checked on a regular basis by the
professional bicycle service in order to determine whether there is any wear and/or possible
damage (cracks, corrosion, damaged components). The check of bicycle condition is of
paramount value to ensure the absolute safety and prevention of accidents and bodily injuries,
as well as to extend the bicycle’s life cycle.
If you want to sell or give your bicycle to somebody as a present, you should also pass on this
user manual to the new owner.
Use the bicycle in accordance with its purpose. Using of bicycle contrary to its purpose may lead
to dangerous situations, falls and accidents.
The retrofitting of accessories and performance of conversions that are not permitted for your
bicycle, may cause the bicycle damage and impair its operational safety. This may lead to
dangerous situations during the ride, falls and accidents. Do not retrofit your bicycle and never
carry out any conversions by yourself. Always select the accessories and modification parts
together with the seller in the bicycle shop.
Page 9

9
The rider must be able to ride a bicycle, i.e. he/she must have the necessary basic knowledge
regarding the use of bicycle and the necessary feeling of balance to be able to steer and control a
bicycle. Use your bicycle only if you have acquired riding and braking skills, also at high speeds.
They rider must be able to get on a bicycle and get off it when a bicycle stops. This is particularly
the case where a saddle is ergonomically set up and the rider’s feet while sitting do not reach the
ground.
If the rider wants to ride on the public roads and streets, he/she must be physically and mentally
capable of using the bicycle in public road traffic.
Always use the bicycle as recommended in this user manual and any additional documentation
you may have.
Riding after consuming alcohol is dangerous and illegal.
Children should be transported in special seats.
It is recommended to regularly check the brakes, tires, rims, steering and braking systems.
The permitted total weight of bicycle, rider and luggage should not exceed 125 kg. The increased
loads impair the riding behavior of bicycle and cause the braking distance to extend. If you
overload your bicycle, its components may fail or even break. All these may lead to dangerous
situations during the ride, falls and accidents.
Load your bicycle in such a way that you always have enough room to move and can always
operate your bicycle safely when it is loaded.
Adapt your riding to the more difficult riding behavior of bicycle.
Do not use your bicycle for transporting goods, but only as an item of sports equipment and
for moving from one location to another.
Never use your bicycle with a bicycle trailer.
Children should only be transported in child seats. Install the child safety seats only on the
luggage racks that are suitable for this purpose.
Contact the seller in the bicycle shop concerning the selection and mounting of a child seat.
He/she will be pleased to advise you.
Transport your luggage only on the suitable carrier system.
It is recommended to use extreme caution on the downhill riding.
During the installation of bicycle accessories, it is recommended to follow the assembly manual
or contact the seller or the authorized service center for the advice.
Before you ride your bicycle, you should check every time whether your bicycle is ready to ride.
You should ensure every time that it is safe to operate. You should also consider the possibility
that your bicycle may have fallen over when it was not supervised or that strangers may have
Page 10

10
tampered with it.
Memorize the correct condition of your bicycle when it is new so that you can later more easily
recognize any deviations from the correct condition. Contact your seller in the bicycle shop
immediately if the inspection reveals any faults. Use you bicycle again only when it has been
made safe to operate.
During the ride, hold the handlebar with both hands. Hold the left handlebar grip firmly with
your left hand and the right handlebar grip with your right hand. During the ride, always sit on
the saddle. For riding, place your left foot on the left pedal and your right foot on the right pedal.
You should never ride against the flow of traffic.
Do not catch hold of a car or other vehicle.
Control your speed, avoid sudden braking. Your safety during the ride depends on your speed.
The higher your speed, the greater your risk! Always adapt your speed to your riding skills and
the road conditions.
Always comply with the provisions of the Highway Code applicable in your country.
The bicycle should never be ridden by two persons.
You should never ride at night or with poor visibility without lights. The bicycle user must be
visible for car drivers and motorcyclists. You should wear light clothing with reflective stripes,
switch on the front and rear lights.
Use extreme caution od riding when it is raining or when the ground is wet, as such conditions
may cause the braking distance to extend and the grip performance is significantly lowered.
It is recommended to wear a helmet and protectors during the ride. If you use your bicycle for
sports, you should wear appropriate protective equipment. You should wear appropriate
protective equipment and reinforced clothing, for example gloves and glasses.
Ride with foresight and defensively.
Be ready to brake at all times.
Ride in such a way that you have your bicycle constantly under control and can react correctly in
the event of a sudden, dangerous situation.
During the ride, wear only suitable clothing that does not hinder the operation of bicycle and
your sight. Remember that some items of your clothing and/or the use of a backpack may hinder
your mobility. Wear only tight-fitting legwear when riding. Loose items of clothing may become
tangled in the bicycle and lead to some serious falls.
In the dark and/or with poor visibility, wear clothing with reflective stripes and ride with the
lights on.
Keep your hands and other parts of your body away from rotating wheels and elements of drive
system. Ensure that your hands and other parts of your body cannot come into contact with the
Page 11

11
rotating wheels and elements of drive system.
Any fall, accident or other external forces may cause damage of bicycle components that are
important for safety. This may lead to dangerous situations during the ride, accidents and
material damage. Do not use your bicycle after a fall, accident or if it has been affected by
external forces. Contact your service workshop immediately after a fall or accident. Use your
bicycle only when it has been properly repaired by the service workshop.
A bike that is leaning against a house wall or garden fence may fall over when subjected to even
small force. This may cause injury to people and animals and damage other objects.
Park your bicycle only where it does not represent an obstacle or nuisance to other people and
where it will not damage other objects. Keep children and animals away from your parked
bicycle. Do not park your bicycle next to items that may be easily damaged, such as cars and
other similar items.
In the case of transporting the bicycles with the use of bicycle racks, the bicycle parts may be
damaged. The damage of these parts may lead to dangerous situations during the ride, accidents
and material damage. Transport this bicycle only inside other vehicles. Secure the bicycle, e.g.
with the use of tension belts, to prevent slipping. Protect your bicycle, e.g. by covering it, against
damage from sharp edges and other objects. No other items may be placed on the bicycle during
its transport. The bicycle must not be clamped into the car transport system (roof racks, rear and
interior carrying devices, etc.).
The frame strength has been tested for the rider of up to 80 kg, however using the bicycle by the
rider with heavier weight should not cause any problems, if he/she is using the bicycle in
accordance with this manual recommendations. It is recommended that persons with heavier
weight should check the frame strength before they start to use the bicycle according to their
own physical conditions.
5. Where can you ride a bicycle
If you overload your bicycle riding on the streets, roads and paths for which your bicycle is not suited, it
is possible that parts of your bicycle may break or fail. This may lead to dangerous situations during the
ride, falls and accidents. The Polka Bikes bicycles may be used only on the asphalt-covered roads, roads
for bicycles, roads for bicycles and pedestrians and other paved surfaces.
Polka Bikes Sp. z o.o. does not recommend performing jumps on the Polka Bikes bicycles and does not
guarantee the proper functioning of the bicycles during such performance and in the future.
Your safety on the roads, streets and terrain depends on your speed. The higher your speed, the greater
your risk!
Remember that all roads and streets may be damaged or have obstacles that can threaten your safety or
damage your bicycle. In such terrain ride particularly slowly and carefully. If necessary carry or push your
bicycle over such obstacles. Use your bicycle exclusively as a means of travel.
There is a danger of falling if you ride the bicycle in a sporty manner and at a high speed. Adapt the use
of your bicycle to your riding skills.
Page 12

12
6. Bicycle checks before riding
Check the tight fit and the position of wheels – shake both wheels strongly at right angles
perpendicular to the direction of travel – the wheels must not move in the mounting and the
quick-release lever on the hub axle must be closed. No cracking or grinding noises should be
heard.
Check the installation of wheels – the wheels must be installed centrally between the front and
rear fork arms of frame and the brake arms. No part of the wheel can touch the frame or other
bicycle parts.
Check the wheel rims for soiling, in particular for oil or grease – soiled rims must be cleaned
immediately.
Check the tires for signs of external damage, foreign bodies and wear – the tire rubber must have
its original profile over its whole surface, the tire fabric that is under the rubber layer must not
be visible, there must be no visible blisters or cracks. Remove any foreign bodies (thorns, small
stones, pieces of glass, etc.) by hand or carefully with a small screwdriver. Pay attention if air is
then leaking out. If air is leaking out, the inner tube has to be replaced.
Check if the tires are correctly fitted – lift the front wheel, turn the front wheel by hand. The
wheel must run smoothly. There must be no wobble or eccentricity. Check the back wheel in the
same way as the front wheel.
Check the position of valves – remove the valve nut. Check the valve position: The valves must be
pointing towards the middle of the wheel.
Check the air pressure – the low tire pressure may cause that the inner tube may move on the
rim and the valve may bend. The valve base may tear off during the ride, and this may result in a
sudden loss of pressure in the tire. The tire may come off the rim in the curves. The risk of
damage is increased.
Check whether there are any twigs or other similar objects in your wheels. Remove such objects
carefully.
Check whether your wheels have been damaged by any objects.
Check the headset – the headset is the mounting of the fork tube in the steering tube. Through
this mounting, the steering movements are transmitted to the front wheel fork.
Stand alongside your bicycle and hold the handlebar grips with your both hands. Apply the
front wheel brake and keep the brake applied. Push your bicycle forward and back with
short, sharp movements.
The headset must not exhibit any play.
No cracking must be heard or felt.
No crunching noise may be heard.
Page 13

13
Turn the handlebar several times to the left and right.
It must be possible to steer the front wheel easily in both directions without backlash.
The handlebar must not lock in any position.
If the check reveals any faults: Contact your seller in the bicycle shop.
Check the brakes – failing brakes always lead to dangerous situations, falls and accidents. A brake
malfunction always poses a life-threatening risk.
Check the brakes with particular care. Under no circumstances should you continue to use
your bicycle if it has any defects. Contact your service workshop if you discover any defects.
Pull on one or both brake levers completely with the bicycle at a standstill. The smallest
distance between the brake lever and the handlebar grip should be at least 10 mm. Try to
push the bicycle with both brakes applied. The wheels must remain locked.
When the brake levers are actuated, all the brake blocks must contact the rim flank with
practically their whole surface area. In no position, i.e. even when the brakes are actuated,
may the brake blocks touch the tires.
Check the brake blocks visually. The wear and tear of brake blocks may be easily assessed
with the use of wear indicator, i.e. special grooves on the blocks. If the surface of the brake
block is worn off in such a way that grooves have disappeared – it means that the block is to
be replaced. As the brake blocks wear off, the brake cables must be pulled up.
Check the brake position visually. The brake blocks must have the same distance to the rim
on both sides.
Check the brake cables and their clamping visually. The brake cables must not be damaged
or corroded.
Check the screw connections of the entire braking system visually. All the screws must be
tight.
Try to pull the brakes out of the shoes with your hands. It must not be possible to pull the
brakes out of the shoes by hand. A slight backlash is normal.
Check the wear of the brake blocks.
Check the chain and drive
Press the left-hand crank arm towards the chain stay – you should not feel any bearing
backlash, no cracking or grinding noises should be heard.
Check the chain for any damage. The chain must not be damaged at any point, e.g. by bent
chain links, protruding chain link pins or jammed and immobile chain links.
Check the lighting system. Any failure of the headlight and rear light may lead to dangerous
situations during the ride in the dark and/or with poor visibility. You may fail to see obstacles or
Page 14

14
be overlooked yourself by other road users. If you have battery or accumulator-powered lights
either on your bicycle or as an accessory, check whether these light up after you have switched
them on.
Check the remaining parts. Check your entire bicycle visually. There must not be any protruding
sharp-edged or pointed parts.
7.1. Adjustment of saddle height
Setting the saddle is the most significant adjustment that must be performed by the bicycle user. Such
adjustment must be performed by yourself after you purchase the bicycle. The proper adjustment has
impact on the comfort and the riding position, as well as on the pedaling power.
The incorrectly mounted saddle post may suddenly insert deeply into or slip out of the saddle tube. This
may lead to dangerous situations during the ride, falls and accidents. Perform this work only if you have
the required tools and the necessary technical skills.
The following diagram allows to identify the individual components referred to later in this manual:
The saddle height is adjusted by moving up and down the saddle post (8) from the saddle tube of the
frame (9). You should remember that the saddle post must be inserted at least 7 cm into the frame and
the saddle must be set on the symmetrical axis of the bicycle. If the insertion depth of the saddle post is
too small, it may be released from the frame during the ride and lead to dangerous situations, falls and
accidents. Furthermore, if the insertion depth of the saddle post is too small, this may cause damage to
the saddle post and frame. In order to check whether the saddle is correctly set, you should:
Page 15

15
1. Take a seat on your bicycle,
2. Put your foot on the pedal,
3. Set the crank (11 or 12) so that the pedal is in the position the nearest to the ground,
4. The leg should be slightly bent in the knee (approx. 10 degrees). If your leg is more/less bent,
you should:
a. get off your bicycle,
b. loosen the saddle post clamp (10),
c. slightly push out the saddle post from the saddle tube/slightly insert the saddle post into the
saddle tube,
d. tighten the saddle post clamp by using torque value of 16-18 Nm,
e. repeat the procedure from the point 1.
7.2. Adjustment and operation of brakes
You should check the wear of brake blocks. The wear and tear of brake blocks may be easily assessed
with the use of wear indicator, i.e. special grooves on the blocks. If the surface of the brake block is worn
off in such a way that grooves have disappeared – it means that the block is to be replaced. As the brake
blocks wear off, the brake cables must be pulled up.
In the braking system of Polka Bikes bicycles, the brake blocks are pressed against wheel rim by means of
metal arms. The distance between the blocks and the rim is adjusted by shortening or lengthening the
brake cable. The brake cable connects the lever on the handlebar with the arms to which it is screwed.
The brake cables must be replaced at least once a year or each time when any snags or cracks on their
surface are observed.
The correct setting of blocks, which ensures the most effective braking, is as follows: the blocks should
be placed almost parallel to the wheel rim, however in such a way that the back of the block, in
comparison with its front part, is approx. 2 mm away from the rim. Pay attention that the brake block
when the brakes are actuated, should not touch the tire and the brake blocks must contact the rim with
their whole surface area.
In the case where the brake arms do not rebound automatically, you should clean and lubricate the
mounting of arms to the fork or frame, possibly replace the cables or housings.
The brake lever should be at least 10 mm away from the handlebar grip with the brakes completely
clamped.
Familiarize yourself with the operation of brakes. Begin with slow riding and gentle pulling of brake lever.
Perform these braking exercises on the level surfaces without any road traffic.
Gradually and slowly increase the braking power and pull both brake levers simultaneously. The
brakes of your bicycle are very powerful. If you pull the brake lever too strongly, it is possible
Page 16

16
that the wheels will lock.
A blocking front wheel may cause a roll-over. A blocking rear wheel may cause a loss of control
over the bicycle.
7. Contact details of manufacturer
Polka Bikes spółka z ograniczoną odpowiedzialnością (limited liability company)
ul Sierakowska 6,
05-080 Izabelin
www.polkabikes.com
hello@polkabikes.com
The product has been designed and assembled in Poland.
 Loading...