


CD-SMF
IP Multimedia Phone for AndroidTM
User Guide

P a g e | 2
FCC Statement
This equipment has been tested and found to comply with the limits for
to part 15 of the FCC Rules. These limits are designed to provide reasonable protection against harmful
interference in a residential installation. This equipment generates, uses and can radiate radio frequency
energy and, if not installed and used in accordance with the instructions, may cause harmful interference
to radio communications. However, there is no guarantee that interference will not occur in a particular
installation.
If this equipment does cause harmful interference to radio or television reception, which can be determined
by turning the equipment off and on, the user is encouraged to try to correct the interference by one or more
the following measures:
• Reorient or relocate the receiving antenna.
• Increase the separation between the equipment and receiver.
• Connect the equipment into an outlet on a circuit different from that to which the receiver is connected.
• Consult the dealer or an experienced radio/TV technician for help.
of
The device complies with FCC radiation exposure limits set forth an uncontrolled environment and it also
complies with Part 15 of the FCC RF Rules. This equipment must be installed and operated in accordance
with provided instructions and the antenna(s) used for this transmitter must be installed to provide a
separation distance of at least 20 cm from all persons and must not be co-located or operating in conjunction
with any other antenna or transmitter. End-users and installers must be provided with antenna installation
instructions and consider removing the no-collocation statement.
This device complies with Part 15 of the FCC Rules. Operation is subject to the following two conditions:
(1) this device may not cause harmful interference, and (2) this device must accept any interference
received, including interference that may cause undesired operation.

P a g e | 3
EUT Feature
Tx/Rx Frequency
Range
2402~2480 MHz
2402~2480 MHz
2412~2472 MHz
5150~5250 MHz
5250~5350 MHz
5470~5725 MHz
Number of Channels
79
40 (37 hopping + 3
advertising channels)
13
UNII Band I:
802.11a/n-HT20-VHT20: 4 channels
802.11n/ ac -HT40-VHT40: 2 channels
802.11ac-VHT80:1 Channel
UNII Band II:
802.11a/n-HT20-VHT20: 4 channels
802.11n/ ac -HT40-VHT40: 2 channels
802.11ac-VHT80:1 Channel
UNII Band III:
802.11a/n-HT20-VHT20: 11 channels
802.11n/ac-HT40-VHT40: 5 channels
802.11ac-VHT80:2 Channels
Carrier Frequency of
Each Channel
f=2402+k MHz
(k=0,1,2….,78)
f=2402+k MHz
(k=0,2,4…,39)
-
-
Antenna Type/Gain
Internal PCB Antenna /
gain 4.0 dBi
Internal PCB Antenna
/ gain 4.0 dBi
Internal PCB Antenna /
gain 4.0 dBi
Internal PCB Antenna /
gain 5.0 dBi
Type of Modulation
Bluetooth BR 1Mbps: GFSK
Bluetooth EDR 2Mbps: π/4-
DQPSK
Bluetooth EDR 3Mbps:
8DPSK
Bluetooth LE: GFSK
802.11b: DSSS (DBPSK /
DQPSK / CCK)
802.11g/n: OFDM (BPSK /
QPSK / 16QAM / 64 QAM)
802.11a/n/ac: OFDM (BPSK / QPSK /
16QAM / 64QAM)
Operation
temperature
0 °C ~ +40 °C
Storage temperature
-10 °C ~ +60 °C
Humidity
10 ~ 90% non-condensing
Domestic use
Industrial use Class B
CE DECLARATION OF CONFORMITY
This transmitter complies with the essential requirements and provisions of
2015/35/EU and subsequent amendments, according to standards
Draft ETSI EN 301 489-1 V2.2.1;Draft ETSI EN 301 489-17 V3.2.0;
EN 55032:2015 /AC:2016;EN55035:2017;EN61000-3-3:2013;EN 61000-3-2:2014
ETSI EN 300 328 V2.1.1;ETSI EN 301 893 V2.1.1;EN 62311: 2008;EN 62368-1:2014

P a g e | 4
Caution: Exposure to Radio Frequency Radiation
This equipment complies with EU radiation exposure limits set forth for
equipment should be installed and operated with minimum distance of 20 cm between the radiator and your
body.
CE Authentication

P a g e | 5
WLAN
Standard
Frequency
EIRP Power (dBm)
Wi-Fi 2.4G
2.4~2.4835GHZ
18.70
Wi-Fi 5G
5.15~5.25GHz
22.06
5.25~5.35GHz
19.21
5.47~5.725GHz
18.24
Bluetooth
Bluetooth version
EIRP Power (dBm)
EDR
12.14
LE
8.42
RF Power and Power Adapter Statement
The power adapter is a power-off device.

P a g e | 6
GNU GPL INFORMATION
CD-SMF firmware contains third-party software licensed under the GNU General Public License (GPL).
Polestar uses software under the specific terms of the GPL. Please see the GNU General Public License
(GPL) for the exact terms and conditions of the license.

P a g e | 7
Table of Content
DOCUMENT PURPOSE ............................................................................................... 18
CHANGE LOG .............................................................................................................. 19
Firmware Version 1.0.3.29 ................................................................................................................... 19
Firmware Version 1.0.3.27 ................................................................................................................... 19
Firmware Version 1.0.3.25 ................................................................................................................... 19
Firmware Version 1.0.3.21 ................................................................................................................... 19
Firmware Version 1.0.3.19 ................................................................................................................... 19
Firmware Version 1.0.3.9 ..................................................................................................................... 19
Firmware Version 1.0.1.19 ................................................................................................................... 20
Firmware Version 1.0.1.14 ................................................................................................................... 20
WELCOME ................................................................................................................... 21
PRODUCT OVERVIEW ................................................................................................ 22
Feature Highlights ................................................................................................................................ 22
CD SMF Technical Specifications........................................................................................................ 22
GETTING STARTED .................................................................................................... 25
Equipment Packaging .......................................................................................................................... 25
Description of the CD-SMF .................................................................................................................. 26
Front View ..................................................................................................................................... 26
Back View ..................................................................................................................................... 27
Side View ...................................................................................................................................... 28
Connecting and Setting Up the CD-SMF ............................................................................................. 28
Using the Phone Stand ................................................................................................................. 28
Using the Slots for Wall Mounting ................................................................................................ 29
Connecting the CD-SMF ...................................................................................................................... 30
Cleaning the Phone ............................................................................................................................. 30

P a g e | 8
GETTING TO KNOW CD-SMF ..................................................................................... 31
Use the Touchscreen ........................................................................................................................... 31
Use the Desktop .................................................................................................................................. 33
Desktop Menu ............................................................................................................................... 33
Add Widget to Desktop ................................................................................................................. 34
Manage Desktop Items ................................................................................................................. 34
Set Wallpapers ............................................................................................................................. 37
Set Weather Widget ...................................................................................................................... 37
Set Programmable Key Widget .................................................................................................... 39
Programmable Key Indicators ...................................................................................................... 40
Manage Running Applications ...................................................................................................... 42
Idle Screen ........................................................................................................................................... 42
Switch Idle Screens ...................................................................................................................... 42
Set Up Idle Screen ........................................................................................................................ 43
Use the Status Bar ............................................................................................................................... 44
Notifications in Status Bar .................................................................................................................... 47
System Settings in Status Bar ...................................................................................................... 49
Use the CD-SMF Keys ......................................................................................................................... 50
Keypad Shortcut Functions........................................................................................................... 50
Use the On-Screen Keyboard .............................................................................................................. 51
Use the Message Waiting Indicator ..................................................................................................... 53
MAKE PHONE CALLS ................................................................................................. 54
Register SIP Accounts ......................................................................................................................... 54
Account Status .............................................................................................................................. 54
Configure SIP Account .................................................................................................................. 55
Dial a Number Directly ......................................................................................................................... 56
Redial ................................................................................................................................................... 57
Dial a Number via Contact ................................................................................................................... 57
Dial a Number via Call History ............................................................................................................. 57
Answer a Call ....................................................................................................................................... 58
Single Incoming Call ..................................................................................................................... 58
Multiple Calls/Call Waiting ............................................................................................................ 61
Call Progress Status ..................................................................................................................... 62
Call Hold............................................................................................................................................... 62

P a g e | 9
Call Recording ..................................................................................................................................... 63
MPK Monitoring ................................................................................................................................... 63
Mute ..................................................................................................................................................... 64
Turn on Video during Audio Call .......................................................................................................... 65
Switch Audio Channel During Call ....................................................................................................... 66
Call Transfer ......................................................................................................................................... 67
Blind Transfer ............................................................................................................................... 67
Attended Transfer ......................................................................................................................... 68
Transfer via MPKs ........................................................................................................................ 71
7-Way Conference ............................................................................................................................... 72
Initiate Conference ........................................................................................................................ 72
Remove Party from Conference ................................................................................................... 75
End Conference ............................................................................................................................ 75
Hold and Resume Conference ..................................................................................................... 76
Auto Conference Mode ................................................................................................................. 76
Multicast paging ................................................................................................................................... 76
Multicast Listening switch ............................................................................................................. 76
UCM Conference ................................................................................................................................. 77
Participate in UCM Conference Room ......................................................................................... 77
CCM: Conference Call Menu: ....................................................................................................... 78
Conference Call Operations ......................................................................................................... 78
CEI: Conference Event Indicator .................................................................................................. 80
Missed Call .......................................................................................................................................... 82
DND (Do Not Disturb) .......................................................................................................................... 82
Voicemail/Message Waiting Indication ................................................................................................ 83
Call Forward ......................................................................................................................................... 84
Call Features ........................................................................................................................................ 86
CONTACTS .................................................................................................................. 88
Local Contacts ..................................................................................................................................... 88
Add Single Contacts ............................................................................................................................ 88
Import/Export Contacts ........................................................................................................................ 89
Download Contacts .............................................................................................................................. 91
Search Contacts .................................................................................................................................. 91

P a g e | 10
Use Contacts ....................................................................................................................................... 92
Make a Call to Contacts ................................................................................................................ 92
Select Contacts ............................................................................................................................. 92
Add Contacts to Favorites ............................................................................................................ 93
Edit Contacts ................................................................................................................................ 94
Send Contacts to Desktop Shortcut ............................................................................................. 94
Share Contacts Via Bluetooth ...................................................................................................... 94
Add Contacts to Blacklist .............................................................................................................. 94
Add Group .................................................................................................................................... 95
Add contacts to Group .................................................................................................................. 95
Contacts Storage Status ............................................................................................................... 95
Diagnostics .................................................................................................................. 97
CD-SMF SETTINGS ..................................................................................................... 99
HARASSMENT INTERCEPTION ............................................................................... 101
Blocked Contacts ............................................................................................................................... 101
Block History ...................................................................................................................................... 101
Delete Block History ................................................................................................................... 101
Edit Blacklist ............................................................................................................................... 102
Intercept Anonymous calls ................................................................................................................. 103
CALL HISTORY .......................................................................................................... 104
Local Call History ............................................................................................................................... 104
Dial Out from Call History ........................................................................................................... 105
Call History Options .................................................................................................................... 105
Delete Call History ...................................................................................................................... 105
Call History Details ..................................................................................................................... 106
SMS ............................................................................................................................ 107
View SMS .......................................................................................................................................... 107
Create New SMS ............................................................................................................................... 108
Delete SMS ........................................................................................................................................ 108
Send SMS from Contact APP ............................................................................................................ 109
SMS Settings ..................................................................................................................................... 110
RECORDER ................................................................................................................ 111
Call Records ...................................................................................................................................... 111

P a g e | 11
Audio Records ................................................................................................................................... 111
Recorder Settings .............................................................................................................................. 113
Files operations .................................................................................................................................. 115
FILE MANAGER ......................................................................................................... 116
Files Operations ................................................................................................................................. 116
Copy and Paste Files .................................................................................................................. 116
Move Files .................................................................................................................................. 117
Send Files ................................................................................................................................... 118
Delete Files ................................................................................................................................. 118
Rename a File ............................................................................................................................ 119
File Categories ................................................................................................................................... 120
GS MARKET ............................................................................................................... 121
FTP SERVER .............................................................................................................. 122
CAMERA .................................................................................................................... 124
Take Picture ....................................................................................................................................... 124
Record Video ..................................................................................................................................... 124
Angle Adjustment ............................................................................................................................... 125
Gallery ................................................................................................................................................ 125
Screensaver ....................................................................................................................................... 128
BROWSER ................................................................................................................. 130
ACTION URL .............................................................................................................. 132
CONNECTING CD-SMF TO DOOR SYSTEMS.......................................................... 133
CONNECT TO NETWORK AND DEVICES ................................................................ 134
Ethernet ............................................................................................................................................. 134
WI-FI .................................................................................................................................................. 134
Turn On/Off Wi-Fi ....................................................................................................................... 134
Connect to Wi-Fi Networks ......................................................................................................... 134
Wi-Fi Settings Shortcut ............................................................................................................... 136
Bluetooth ............................................................................................................................................ 137
Turn On/Off Bluetooth................................................................................................................. 137

P a g e | 12
Change Bluetooth Device Name ................................................................................................ 138
Pair CD-SMF with a Bluetooth Device ........................................................................................ 138
Unpair a Bluetooth Device .......................................................................................................... 139
Bluetooth Settings Shortcut ........................................................................................................ 139
EHS Headset ..................................................................................................................................... 140
USB Headset ..................................................................................................................................... 141
USB .................................................................................................................................................... 143
MicroSD Card .................................................................................................................................... 143
EMERGENCY CALL ................................................................................................... 144
EXPERIENCING THE CD-SMF APPLICATION PHONE ........................................... 145
Table of Tables
Table 1: CD-SMF Features in a Glance ...................................................................................................... 22
Table 2: CD-SMF Technical Specifications ................................................................................................. 22
Table 3: Equipment Packaging ................................................................................................................... 25
Table 4: CD-SMF Front View ...................................................................................................................... 26
Table 5: CD-SMF Back View ...................................................................................................................... 27
Table 6: CD-SMF Side View ....................................................................................................................... 28
Table 7: Programmable Key Indicator......................................................................................................... 40
Table 8: CD-SMF Status Bar Notification Icons .......................................................................................... 47
Table 9: CD-SMF Keys ............................................................................................................................... 50
Table 10: CD-SMF MWI LED Status........................................................................................................... 53
Table 11: CD-SMF Feature Code ............................................................................................................... 86
Table of Figures
Figure 1: CD-SMF Package Content .......................................................................................................... 25
Figure 2: CD-SMF Front .............................................................................................................................. 26
Figure 3: CD-SMF Back View ..................................................................................................................... 27
Figure 4: CD-SMF Side View ...................................................................................................................... 28
Figure 5: Built in Stand and Mounting Slots on CD-SMF ............................................................................ 29
Figure 6: Tab on The Handset Cradle ......................................................................................................... 29
Figure 7: CD-SMF Back / Side View ........................................................................................................... 30
Figure 8: CD-SMF Default Home Screen .................................................................................................... 31

P a g e | 13
Figure 9: CD-SMF Onscreen Menu ............................................................................................................ 31
Figure 10: CD-SMF Finger Gestures on the Touch Screen ........................................................................ 32
Figure 11: CD-SMF Desktop Menu ............................................................................................................. 33
Figure 12: Add Widget to the Desktop ........................................................................................................ 34
Figure 13: Open Clock Widget .................................................................................................................... 35
Figure 14: Resize MPK Widget ................................................................................................................... 35
Figure 15: Move Clock Widget .................................................................................................................... 36
Figure 16 : Grouping apps in one folder ...................................................................................................... 36
Figure 17: CD-SMF Choose Wallpaper....................................................................................................... 37
Figure 18 : Accessing available Widgets ..................................................................................................... 38
Figure 19 : Minimized display of Weather App ............................................................................................ 38
Figure 20 : Weather application .................................................................................................................. 39
Figure 21: Programmable Key Widget ........................................................................................................ 39
Figure 22: Programmable Keys page ......................................................................................................... 40
Figure 23: CD-SMF Recent Applications .................................................................................................... 42
Figure 24: CD-SMF Switch Idle Screens .................................................................................................... 43
Figure 25: Set up Home Idle Screen ........................................................................................................... 43
Figure 26: Add an Idle Screen ..................................................................................................................... 44
Figure 27: Delete an Idle Screen ................................................................................................................ 44
Figure 28: CD-SMF Top Status Bar ............................................................................................................ 45
Figure 29: Status Bar - More Options ......................................................................................................... 45
Figure 30: CD-SMF Top Status Bar – Notification ...................................................................................... 46
Figure 31: CD-SMF Top status Bar - Get more information ........................................................................ 46
Figure 32: CD-SMF Top status Bar – Wi-Fi ................................................................................................ 47
Figure 33: System Settings in Status Bar ................................................................................................... 49
Figure 34: CD-SMF Keys ............................................................................................................................ 50
Figure 35: CD-SMF Onscreen Keyboard - English Keyboard .................................................................... 51
Figure 36: CD-SMF Onscreen Keyboard - Lowercase and Uppercase ...................................................... 52
Figure 37: English Keyboard - Number and Symbols ................................................................................. 52
Figure 38: English Keyboard - More Symbols ............................................................................................. 52
Figure 39: CD-SMF Account Widget ........................................................................................................... 54
Figure 40: CD-SMF Dial Screen ................................................................................................................. 55
Figure 41: Disable Video Call Feature on Dial Screen ............................................................................... 56
Figure 42: CD-SMF View Contacts ............................................................................................................. 57
Figure 43: CD-SMF Call History .................................................................................................................. 58
Figure 44: Choose Call mode from call history ........................................................................................... 58
Figure 45: Single Incoming Call – Audio ..................................................................................................... 59
Figure 46: Single Incoming Call – Video ..................................................................................................... 59
Figure 47: Single Incoming Call – Preview-1 .............................................................................................. 60
Figure 48: Single Incoming Call – Preview-2 .............................................................................................. 60
Figure 49: Single Incoming Call - Transfer -1 ............................................................................................. 61
Figure 50: Single incoming Call - Transfer - 2 ............................................................................................ 61
Figure 51: Call Waiting ................................................................................................................................ 62
Figure 52: Touch to Return to Call Screen ................................................................................................. 62

P a g e | 14
Figure 53: Call on Hold ............................................................................................................................... 63
Figure 54: CD-SMF Call Recording ............................................................................................................ 63
Figure 55: MPK button ................................................................................................................................ 64
Figure 56: MPK list ...................................................................................................................................... 64
Figure 57: CD-SMF Call Mute ..................................................................................................................... 65
Figure 58: Turn on Video During Audio Call ............................................................................................... 65
Figure 59: Accept Video During Audio Call ................................................................................................. 66
Figure 60: Switch Audio Channel during Call .............................................................................................. 67
Figure 61: Blind Transfer ............................................................................................................................. 68
Figure 62: Attended Transfer ...................................................................................................................... 69
Figure 63: Attended Transfer - Transferring ................................................................................................ 69
Figure 64: Attended Transfer – Split ........................................................................................................... 70
Figure 65: Attended Transfer ...................................................................................................................... 70
Figure 66: Transfer via MPK ....................................................................................................................... 71
Figure 67: MPK list ...................................................................................................................................... 71
Figure 68: Add Conference Members from Dial Screen ............................................................................. 72
Figure 69: Add Conference Members from Dial Screen 2 .......................................................................... 72
Figure 70: CD-SMF Conference Screen ..................................................................................................... 73
Figure 71: CD-SMF Conference - Add Existing Call to Conference ........................................................... 74
Figure 72: 3-Way Conference Call Established .......................................................................................... 74
Figure 73: Notification of joining the conference ......................................................................................... 74
Figure 74: Notification of exiting the conference ......................................................................................... 75
Figure 75: CD-SMF Conference - Remove Party from Conference ........................................................... 75
Figure 76: Multicast Paging ON .................................................................................................................. 77
Figure 77 : Join UCM conference room ...................................................................................................... 77
Figure 78: UCM conference Menu .............................................................................................................. 78
Figure 79 : Conference Menu Options ........................................................................................................ 78
Figure 80: Conference's members list ........................................................................................................ 79
Figure 81: Invite a Member ......................................................................................................................... 79
Figure 82: Conference Bridge ..................................................................................................................... 80
Figure 83: Member joined conference Event .............................................................................................. 81
Figure 84 : Member Left the conference room Event ................................................................................. 81
Figure 85: Invitation sent Event Notification ................................................................................................ 81
Figure 86: Missed Call Screen .................................................................................................................... 82
Figure 87: Enable/Disable DND .................................................................................................................. 83
Figure 88: Retrieve Voicemail ..................................................................................................................... 84
Figure 89: Unconditional Call Forward........................................................................................................ 84
Figure 90: Call Forward – Unconditional ..................................................................................................... 85
Figure 91: Call Forward - Time Based ........................................................................................................ 85
Figure 92: Call Forward - Busy/No Answer/DND ........................................................................................ 85
Figure 93: CD-SMF Contacts ...................................................................................................................... 88
Figure 94: CD-SMF Contacts - Add New Contact....................................................................................... 89
Figure 95: Add to Contacts from Dial Pad ................................................................................................... 89
Figure 96: CD-SMF Contacts - Import Contacts ......................................................................................... 90

P a g e | 15
Figure 97: CD-SMF Contacts - Export Contacts ......................................................................................... 90
Figure 98: CD-SMF Contacts - Download Contacts ................................................................................... 91
Figure 99: CD-SMF Contacts - Search Contacts ........................................................................................ 92
Figure 100: CD-SMF Contacts - Select Contacts ....................................................................................... 93
Figure 101: Add Contacts to Favorites ........................................................................................................ 93
Figure 102: CD-SMF Contacts - Add New Group ....................................................................................... 95
Figure 103: CD-SMF Contacts - Storage Status......................................................................................... 96
Figure 104: Port & Network Status ............................................................................................................. 97
Figure 105 : Account Status ........................................................................................................................ 97
Figure 106: Speaker Diagnosis ................................................................................................................... 98
Figure 107 : Microphone diagnosis ............................................................................................................. 98
Figure 108: CD-SMF Settings ..................................................................................................................... 99
Figure 109: List of blocked contacts ......................................................................................................... 101
Figure 110: Block History .......................................................................................................................... 101
Figure 111: CD-SMF Blacklist - Add Number to Blacklist ......................................................................... 102
Figure 112: Manually Add Number to Blacklist ......................................................................................... 102
Figure 113: Intercept Anonymous Calls .................................................................................................... 103
Figure 114: CD-SMF Call History.............................................................................................................. 104
Figure 115: CD-SMF Call History – Options ............................................................................................. 105
Figure 116: CD-SMF Call History - Details ............................................................................................... 106
Figure 117: CD-SMF SMS Message ........................................................................................................ 107
Figure 118: View SMS Dialog ................................................................................................................... 107
Figure 119: Create a New SMS ................................................................................................................ 108
Figure 120: Select contact ........................................................................................................................ 109
Figure 121: Click on Message icon ........................................................................................................... 109
Figure 122: Type then send Message ....................................................................................................... 109
Figure 123: SMS Settings ......................................................................................................................... 110
Figure 124: Recorder Application .............................................................................................................. 111
Figure 125: Recording Audio..................................................................................................................... 112
Figure 126 : Flag Mark .............................................................................................................................. 112
Figure 127: Recorded Files ....................................................................................................................... 112
Figure 128: Recorder Menu ...................................................................................................................... 113
Figure 129: Menu Options ......................................................................................................................... 113
Figure 130: Recorder Settings .................................................................................................................. 114
Figure 131: Set Password ......................................................................................................................... 114
Figure 132: Change Password .................................................................................................................. 114
Figure 133: Files operation ....................................................................................................................... 115
Figure 134: Export/Delete files .................................................................................................................. 115
Figure 135: CD-SMF File Manager – Copy File ........................................................................................ 116
Figure 136: Paste File ............................................................................................................................... 117
Figure 137: CD-SMF File Manager - Move ............................................................................................... 117
Figure 138: CD-SMF File Manager - Options ........................................................................................... 118
Figure 139: Delete File(s) via File Manager .............................................................................................. 119
Figure 140: Rename File ........................................................................................................................... 119

P a g e | 16
Figure 141: GS Market - Onscreen Menu ................................................................................................. 121
Figure 142: FTP Server – Start ................................................................................................................. 122
Figure 143: FTP Server – Stop ................................................................................................................. 123
Figure 144: FTP Server – Settings............................................................................................................ 123
Figure 145: CD-SMF Camera ................................................................................................................... 124
Figure 146: Recent pictures and videos page .......................................................................................... 125
Figure 147: Edit Picture ............................................................................................................................. 126
Figure 148: Access to the Gallery ............................................................................................................. 126
Figure 149: CD-SMF Gallery ..................................................................................................................... 127
Figure 150: CD-SMF Gallery - Picture Options ......................................................................................... 127
Figure 151: Screensaver settings ............................................................................................................. 128
Figure 152: Use Network Images ............................................................................................................. 129
Figure 153: Network Image Path .............................................................................................................. 129
Figure 154: CD-SMF Web Browser .......................................................................................................... 130
Figure 155: CD-SMF Browser Menu Options ........................................................................................... 130
Figure 156: Open New Window in Browser .............................................................................................. 131
Figure 157: CD-SMF Web Browser-Bookmarks ....................................................................................... 131
Figure 158: Incoming call from GDS3710 door system ............................................................................ 133
Figure 159: CD-SMF Connect to Wi-Fi ..................................................................................................... 135
Figure 160: CD-SMF Connect to Wi-Fi-Show Advanced Options ............................................................. 135
Figure 161: Wi-Fi - Add network ................................................................................................................ 136
Figure 162: Wi-Fi Settings Shortcut .......................................................................................................... 136
Figure 163: Wi-Fi Shortcut - Wi-Fi List ...................................................................................................... 137
Figure 164: CD-SMF Bluetooth - Paired Device ....................................................................................... 139
Figure 165: Bluetooth Settings Shortcut ................................................................................................... 139
Figure 166: Bluetooth Setting shortcut 2 ................................................................................................... 140
Figure 167: EHS headset .......................................................................................................................... 141
Figure 168: USB Headset Connected ....................................................................................................... 141
Figure 169: USB Headset Used for Call ................................................................................................... 142
Figure 170: Switch Between Speaker and USB mode ............................................................................. 142
Figure 171: USB Storage Device Connected to CD-SMF ........................................................................ 143
Figure 172: Emergency Access under CD-SMF Locked Screen...................................................................... 144
Figure 173: Emergency Dial Screen ......................................................................................................... 144

P a g e | 17
DOCUMENT PURPOSE
This document describes how to configure the CD-SMF via phone's LCD menu and web UI menu to fully
manipulate phone's features.
This guide covers following topics:
▪ Product Overview
▪ Getting started
▪ Getting to know CD-SMF
▪ Make phone calls
▪ Contacts
▪ CD-SMF Settings
▪ Harassment Interception
▪ Call history
▪ SMS
▪ Recorder
▪ File manager
▪ GS Market
▪ FTP Server
▪ Camera
▪ Browser
▪ Action URL
▪ Connect to network and devices
▪ Emergency call
▪ Experiencing the CD-SMF applications

P a g e | 18
CHANGE LOG
This section documents significant changes from previous versions of user guide for CD-SMF. Only major
new features or major document updates are listed here. Minor updates for corrections or editing are not
documented here.
Firmware Version 1.0.3.29
• No Major Change.
Firmware Version 1.0.3.27
• Added a “Mute” option to account ring tone list. [Account Ringtones]
Firmware Version 1.0.3.25
• Improved UI display of setting clock as screensaver. [Screensaver]
• Modified anonymous call to be unknown number in call logs. [CALL HISTORY]
• Added call types icon in Call History app to indicate audio or video calls. [CALL HISTORY]
• Moved rejected calls to incoming calls category in Call History app. [CALL HISTORY]
• Updated “No/Noise” button in Audio Diagnostics to 2 separate ones. [Diagnostics]
• Added multicast intercom global switch in LCD widget. [Multicast Listening switch]
• Updated button in attended transfer from “Blind” to “Transfer now”. [Attended Transfer]
• Supported selecting call mode when calling from history. [Dial a Number via Call History]
• Updated calling account display to Account Name instead of SIP Authentication ID. [Account Status]
• Added support that Apps can be grouped into folders on home screen. [Group Apps into folders on
home screen
• Supported switching cities from the weather widget directly. [Set Weather Widget]
Firmware Version 1.0.3.21
• No Major Change.
Firmware Version 1.0.3.19
• Added support for integrated call control features with GUV3000/3005. [USB Headset]
• Improved the LCD display format.
Firmware Version 1.0.3.9
• Added Berlin, Dublin time zone in Date & time settings.

P a g e | 19
• Improved the recording name format with timestamp.
• Added BS-history in Call History app.
• Improved some UI by position adjustment and adding prompts on LCD and web.
• Improved that device will present in low rate if there is negotiation in video presentation bitrate.

P a g e | 20
• Updated validation for automatic upgrade mode and related time settings.
• Hide video call button when video call is disabled.
• Updated mute icon position in call page to avoid misunderstanding.
• Updated the contact would be called using the first active account, not the last used account.
• Added a note for direct dial widget when there is no contact.
• Updated USB upgrade LED display to fast red flash. [CD-SMF MWI LED Status]
• Updated "São Paulo" time zone to UTC-3.
• Updated the attended transfer button to “Transfer now” during a call.
• Improved device audio quality during a call.
• Updated Chromium/integrated browser for integration with their webRTC app.
• Added Presentation app.
• Added Accessibility in Settings. The features originate from the Android system.
Firmware Version 1.0.1.19
• Supported sending messages from contact detail page by adding the SMS button. [SMS]
• Supported ability to query a LDAP contact in an emergency call.
• Improved that call forward has higher priority over DND.
Firmware Version 1.0.1.14
• This is the Initial Version.

P a g e | 21
WELCOME
Thank you for purchasing Polestar CD-SMF IP Multimedia Phone for AndroidTM. The CD-SMF IP Video
Phone for Android combines a 16-line IP video phone with a multi-platform video conferencing
the functionality of an Android tablet to offer an all-in-one communications solution. The phone
1280x800 capacitive touch screen IPS LCD, Mega pixel camera, dual Gigabit ports with PoE/PoE+, HD
audio and video, integrated Wi-Fi (Dual band 802.11a/b/g/n/ac) & Bluetooth 4.2+ EDR, rich
interfaces, and Android 7.1.1. By combining a state-of-the-art IP video phone, an advanced video
solution, and the functionality of a tablet, businesses throughout the world can now use the CD-SMF for all
communication and productivity needs.
solution and
features an 8”
peripheral
conferencing

P a g e | 22
CD-SMF
• 16 lines with up to 16 SIP accounts, up to 7-way audio conference
and 3-way 1080p 30fps HD video conference, phonebook with up to
2000 contacts, call history with up to 2000 records.
• Dual switched 10/100/1000Mbps network ports, Dual-band 2.4GHz &
5GHz Wi-Fi (802.11a/b/g/n/ac), PoE/PoE+, Bluetooth 4.2+EDR, USB,
SD, HDMI, EHS with Plantronics headsets support.
• 8" (1280x800) capacitive (5 points) touch screen IPS LCD, mega pixel
CMOS sensor camera with privacy shutter.
• HD wideband audio, full-duplex hands-free speakerphone with HD
acoustic chamber, advanced acoustic echo cancellation and excellent
double-talk performance.
• Runs the Android™ Operating System 7.1.1.
Protocols/Standards
SIP RFC3261, TCP/IP/UDP, RTP/RTCP, HTTP/HTTPS, ARP, ICMP, DNS (A
record, SRV, NAPTR), DHCP, PPPoE, SSH, TFTP, NTP, STUN, SIMPLE, LLDP-
MED, LDAP, TR-069, 802.1x, TLS, SRTP, IPv6, OpenVPN®.
Network Interfaces
Dual switched 10/ 100/ 1000 Mbps ports with integrated PoE/PoE+
Graphic Display
8" 1280×800 capacitive touch screen (5 points) IPS LCD
Camera
Tiltable 2 megapixel CMOS camera with privacy shutter, 1080p 30fps
Bluetooth
Yes, integrated Bluetooth 4.2 + EDR
PRODUCT OVERVIEW
Feature Highlights
The following tables contain the major features of the CD-SMF:
Table 1: CD-SMF Features in a Glance
CD-SMF Technical Specifications
The following table resumes all the technical specifications including the protocols / standards supported,
voice codecs, telephony features, languages and upgrade/provisioning settings for the phone CD-SMF.
Table 2: CD-SMF Technical Specifications

P a g e | 23
Wi-Fi
Yes, dual-band (2.4GHz & 5GHz) with 802.11a/b/g/n/ac and WMM
Auxiliary Ports
RJ9 headset jack (allowing EHS with Plantronics headsets), 3.5mm stereo headset
with microphone, USB 2.0 port, micro SD, HDMI-out (1.4 up to 1080p60fps), HDMI-
in (1.4 up to 1080p@60fps)
Feature Keys
2 function touch keys VOLUME +/-, 3 dedicated Android touch keys HOME,
MENU, and BACK
Voice Codec
G.711µ/a, G.722 (wide-band), G.726-32, iLBC, Opus, G.729A/B, in-band and out-
of-band DTMF (In audio, RFC2833, SIP INFO), VAD, CNG, AEC, PLC, AJB, AGC,
ANS
Video Codec and
Capabilities
H.264 BP/MP/HP, video resolution up to 1080p, frame rate up to 30 fps, bitrate up
to 4Mbps, 3-way video conference (1080p@30fps), BFCP, people video (up to
1080p@30fps) + content video (up to 1080p@15fps), anti-flickering, auto focus
and auto exposure, camera block
Telephony Features
Hold, transfer, forward (unconditional/no-answer/busy), call park/pickup, 7-way
audio conference (including the host), shared-call-appearance (SCA) / bridged-
line-appearance (BLA), virtual MPK, downloadable contacts (XML, LDAP, up to
2000 items), call record(local and server), call log (up to 2000 records), call waiting,
auto answer, XML customization of screen, click-to-dial, flexible dial plan, hot
desking, personalized music ringtones and music on hold, server redundancy
& fail-over
Sample
Applications
Local apps: Contacts, Call History, File Manager, Programmable Key, Settings,
Browser, Voicemail, Calculator, Clock, Recorder, FTP, Backup and Restore GS
Market BS XSI, etc.
Supports third-party Android apps including Skype, Google Hangouts, Skype for
Business, etc.
Android
Runs Android 7.1.1
Applications
Deployment
Supports Android 7.x compliant applications to be developed, downloaded and
embedded on the device with provisioning control
HD Audio
Yes, 2 omnidirectional microphones, HD handset and speakerphone with support
for wideband audio
Base Stand
Integrated stand with multiple adjustable angles
QoS
Layer 2 QoS (802.1Q, 802.1p) and Layer 3 (ToS, DiffServ, MPLS) QoS
Security
User and administrator level passwords, MD5 and MD5-sess based authentication,
256-bit AES encrypted configuration file, TLS, SRTP, HTTPS, 802.1x media
access control, Kensington Security Slot (Kensington Lock) support

P a g e | 24
Multi-language
English, German, Italian, French, Spanish, Portuguese, Russian, Croatian,
Chinese, Korean and Japanese
Upgrade/
Provisioning
Firmware upgrade via TFTP / HTTP / HTTPS or local HTTP upload, mass
provisioning using TR069 or AES encrypted XML configuration file
Power and Green
Energy Efficiency
Universal power adapter included: Input: 100-240VAC 50-60Hz; Output 12VDC
1.5A (18W)
Integrated PoE* 802.3af Class 3, PoE+ 802.3at, Class 4
*USB, HDMI-in and HDMI-out enabled only when power supply or PoE+ is used.
Physical
Dimension : 263mm (L) x 206mm (L) x 88.69mm (H)
Unit weight: 1.65kg
Package weight: 2.22kg
Temperature and
Humidity
Operation: 0°C to 40°C, Storage: -10°C to 60°C,
Humidity: 10% to 90% Non-condensing
Package Content
CD-SMF phone, handset with cord, base stand, universal power supply, network
cable, screen cleaning cloth, quick installation guide, brochure, GPL license
Compliance
FCC: Part 15 (CFR 47) Class B; UL 60950 (power adapter); Part68 (HAC)
CE: EN55022 Class B, EN55024, EN61000-3-2, EN61000-3-3, EN60950-1,
EN62479, RoHS
RCM: AS/ACIF S004; AS/NZS CISPR22/24; AS/NZS 60950; AS/NZS 4268

P a g e | 25
CD-SMF
• 1x CD-SMF Main Case.
• 1x Handset.
• 1x Phone Cord.
• 1x Ethernet Cable.
• 1x 12V Power Adapter.
• 1x Screen Cleaning Cloth.
• 1x Quick Installation Guide.
• 1x GPL License.
GETTING STARTED
This chapter provides basic installation instructions including the list of the packaging contents and also
information for obtaining the best performance with the CD-SMF.
Equipment Packaging
Table 3: Equipment Packaging
Figure 1: CD-SMF Package Content

P a g e | 26
Note: Check the package before installation. If you find anything missing, contact your system administrator.

P a g e | 27
Item
Name
Description
1
Front Camera
Mega pixel front camera. The angle can be adjusted, and the
camera can be blocked by scrolling up/down the wheel on the back
of the camera.
2
MWI LED Indicator
To indicate message status, call status and phone's system status
using the LED indicator.
3
LCD
8" (1280x800) capacitive (5 points) IPS LCD touch screen.
4
Back
Tap to go back to the previous menu.
5
Menu
Press MENU key to access phone’s display settings, edit widgets
and thread manager. Or press and hold on the MENU key for 2
seconds to enter managing application interface directly.
6
Home
Tap to go back to Home screen; or touch and press for about 2
seconds to take a screenshot of phone’s screen.
7
Volume Up
Tap to turn up the call volume and media volume.
8
Volume Down
Tap to turn down the call volume and media volume.
9
Handset
Off hook to use handset as the audio channel for calls and media.
Description of the CD-SMF
Front View
1
2
9
3
8 7 6 5 4
Figure 2: CD-SMF Front Table
4: CD-SMF Front View

P a g e | 28
Item
Name
Description
1
Camera Adjusting Wheel
Scroll up/down to adjust the camera angle.
2
Phone Stand (built-in)
Adjust the phone stand angle to place the phone on the desk.
3
Headset Port
RJ9 headset connector port (supporting EHS with
Plantronics headset).
4
Handset Port
RJ9 handset connector port.
5
LAN Port
10/100/1000Mbps RJ-45 port connecting to Ethernet.
PoE/PoE+ is supported.
6
PC Port
10/100/1000Mbps RJ-45 port connecting to PC.
7
Power Jack
12V DC Power connector port.
8
Side Connectors Cover
Open the cover for USB port, SD card slot, 3.5mm headset
port, HDMI-in and HDMI-out ports.
Back View
Figure 3: CD-SMF Back View
Table 5: CD-SMF Back View

P a g e | 29
Item
Name
Description
1
USB Port
USB devices can be connected via the USB port. For example,
connect a USB flash drive to save captured pictures.
2
SD Card Port
Connect SD storage device to the SD Card Slot.
3
HDMI Output Interface
Connect to HDMI input devices (e.g., TV)
4
3.5mm Headset Port
Connect 3.5mm headset.
5
HDMI Input Interface
Connect presentation device (e.g., a laptop).
Side View
Figure 4: CD-SMF Side View
Table 6: CD-SMF Side View
Connecting and Setting Up the CD-SMF
The CD-SMF can be installed on the desktop using the built-in stand or attached on the wall using the
slots for wall mounting.
Using the Phone Stand
The CD-SMF has a built-in phone stand. To set up the CD-SMF as your desk phone, follow the steps
below:
1.
Take the phone stand out on the back and adjust the angle to place the phone steady on the desk;
2.
Connect the handset and main phone case with the phone cord;

P a g e | 30
3.
Connect the LAN port of the phone to the RJ-45 socket of a hub/switch or a router (LAN side of the
router) using the Ethernet cable;

P a g e | 31
4.
Connect the 12V DC output plug to the power jack on the phone; plug the power adapter into an
electrical outlet. If PoE switch is used in step 3, this step could be skipped;
The LCD will display the booting up screen or firmware upgrading information. Before continuing, please
wait for the main screen display to show up.
Using the Slots for Wall Mounting
Figure 5: Built in Stand and Mounting Slots on CD-SMF
1.
Attach the wall mount to the slots on the back of the phone;
2.
Attach the phone to the wall via the wall mount hole;
3.
Pull out the tab from the handset cradle (see figure below);
4.
Rotate the tab and plug it back into the slot with the extension up to hold the handset while the
phone is mounted on the wall.
5.
Connect the handset and main phone case with the phone cord;
6.
Connect the LAN port of the phone to the RJ-45 socket of a hub/switch or a router (LAN side of the
router) using the Ethernet cable;
7.
Connect the 12V DC output plug to the power jack on the phone; plug the power adapter into an
electrical outlet. If PoE switch is used in step 3, this step could be skipped;
The LCD will display the booting up screen or firmware upgrading information. Before continuing,
please wait for the main screen display to show up.

P a g e | 32
Figure 6: Tab on The Handset Cradle

P a g e | 33
Connecting the CD-SMF
To setup your CD-SMF, please follow the steps below:
1.
Connect the handset and main phone case with the phone cord;
2.
Connect the LAN port of the phone to the RJ-45 socket of a hub/switch or a router (LAN side of the
router) using the Ethernet cable;
3.
Connect the 12V DC output plug to the power jack on the phone; plug the power adapter into an
electrical outlet. If PoE switch is used in step 2, this step could be skipped;
4.
The LCD will display booting up or firmware upgrading information. Before continuing, please wait
for the main screen display to show up;
5.
Using the web configuration interface or from the menu of the touch screen, you can further
configure network connection using static IP, DHCP etc.
Figure 7: CD-SMF Back / Side View
Note: USB, HDMI-in and HDMI-out will be disabled when using PoE, and enable if using power
supply or PoE+
Cleaning the Phone
For daily dust removal and fingerprint removal, please use the screen cleaning cloth in the factory package
to wipe the phone. For some special cases like medical environment, you can use medical alcohol or
isopropanol. The steps are as followed:
1.
Before cleaning the phone, stop using it and disconnect it from the power supply.
2.
Spray a small amount of disinfectant on screen, camera, handle and other places that are easily
touched by users.
3.
Wipe the phone with screen cleaning cloth.
4.
Power on until the disinfectant is completely volatilized.
Notes:

P a g e | 34
• Keep the power plug clean and dry, or may lead to electric shock or other perils.
• DO NOT use disinfectant too frequently.
• DO NOT use high degree or even pure disinfectant. It could damage the phone.

P a g e | 35
GETTING TO KNOW CD-SMF
Use the Touchscreen
When the phone boots up in HOME screen, the LCD will display as below. A registered account is shown
in the following figure and users might need register their own account to have the account status displayed.
Account information Widget. Up to 8
accounts/Programmable-keys can
be displayed.
The Status Bar shows time, network
connectivity, signal strength, notification
information etc...
Date and Time
Shortcut: Phone Dialer
Shortcut: Contacts
Shortcut: Conference
Shortcut: Call History
Figure 8: CD-SMF Default Home Screen

P a g e | 36
Swipe from right to left to show the application menu of the phone. the settings and applications installed
will be brought up as shown below.
Figure 9: CD-SMF Onscreen Menu

P a g e | 37
To fully manipulate the CD-SMF capacitive touch screen, use your fingers to operate the following on the
CD-SMF icons, buttons, menu items, onscreen keyboard etc.
• Tap
Slightly touch the screen with fingertip to initiate menu, options or applications. For example, to select
items on the screen (e.g., setting options, apps etc.); to press onscreen buttons (e.g., "End" or "Options"
softkey during the call); to type letters and symbols using the onscreen keyboard.
Figure 10: CD-SMF Finger Gestures on the Touch Screen
• Long Press
Touch the screen with fingertip and press for about 2 seconds without lifting your finger from the screen
till an action occurs. For example, long press on a picture to bring up selection option.
• Flick and Slide
Touch the screen with fingertip and slide over the screen. For example, user could slide up to scroll up
the page, slide down to open dropdown menu, slide left or slide right to delete an item from the list. If
your finger stays on the screen for too long, the item may be selected, and sliding won't occur.

P a g e | 38
• Press and Drag
Touch and press the item, then move it by dragging it up, down, left or right, without lifting your finger
from the screen.

P a g e | 39
• Zoom In/Zoom Out
Place two fingers on the screen, then pinch them together (zoom out) or spread them apart (zoom in).
• Double Tap
Quickly touch the screen twice with fingertip to switch between default display and zoomed-in display.
This is usually used when viewing photos or web pages.
Use the Desktop
Desktop Menu
When the CD-SMF is on idle screen, press the MENU key to bring up phone's menu. Users can
access the following in the desktop menu:
Figure 11: CD-SMF Desktop Menu
• Desktop page
Add, delete or edit desktop pages, set Home page and change the screen sequence.
• Wallpaper
Select wallpaper from Local gallery or from the available system Wallpapers
• Widgets

P a g e | 40
Add widgets to the desktop by touching and holding the widget from the widget menu.
• Management
Manage running applications on the CD-SMF. For more details, please refer to section [Manage
Running Applications].

P a g e | 41
Add Widget to Desktop
The CD-SMF provides widgets like account bar, clock, contacts etc. Users could conveniently add those
widgets to the desktop as preferred. To add a widget:
1.
Press the Menu key or long press on an empty space on the idle screen and select "Widgets".
2.
Different widgets will be displayed on the right side of the screen.
3.
Select and drag the widget to the desired spot to be placed on the desktop. Please make sure there is
enough space on the desktop. Otherwise, the widget won't be added.
Figure 12: Add Widget to the Desktop
Manage Desktop Items
On the CD-SMF desktop, users could tap on the desktop items to manage shortcuts and widgets. The
following operations can be done:
• Tap on the shortcut icon to open the application.
For example, tap on "File Manager" icon to access file manager application.
• Tap on the widget to open and edit it.
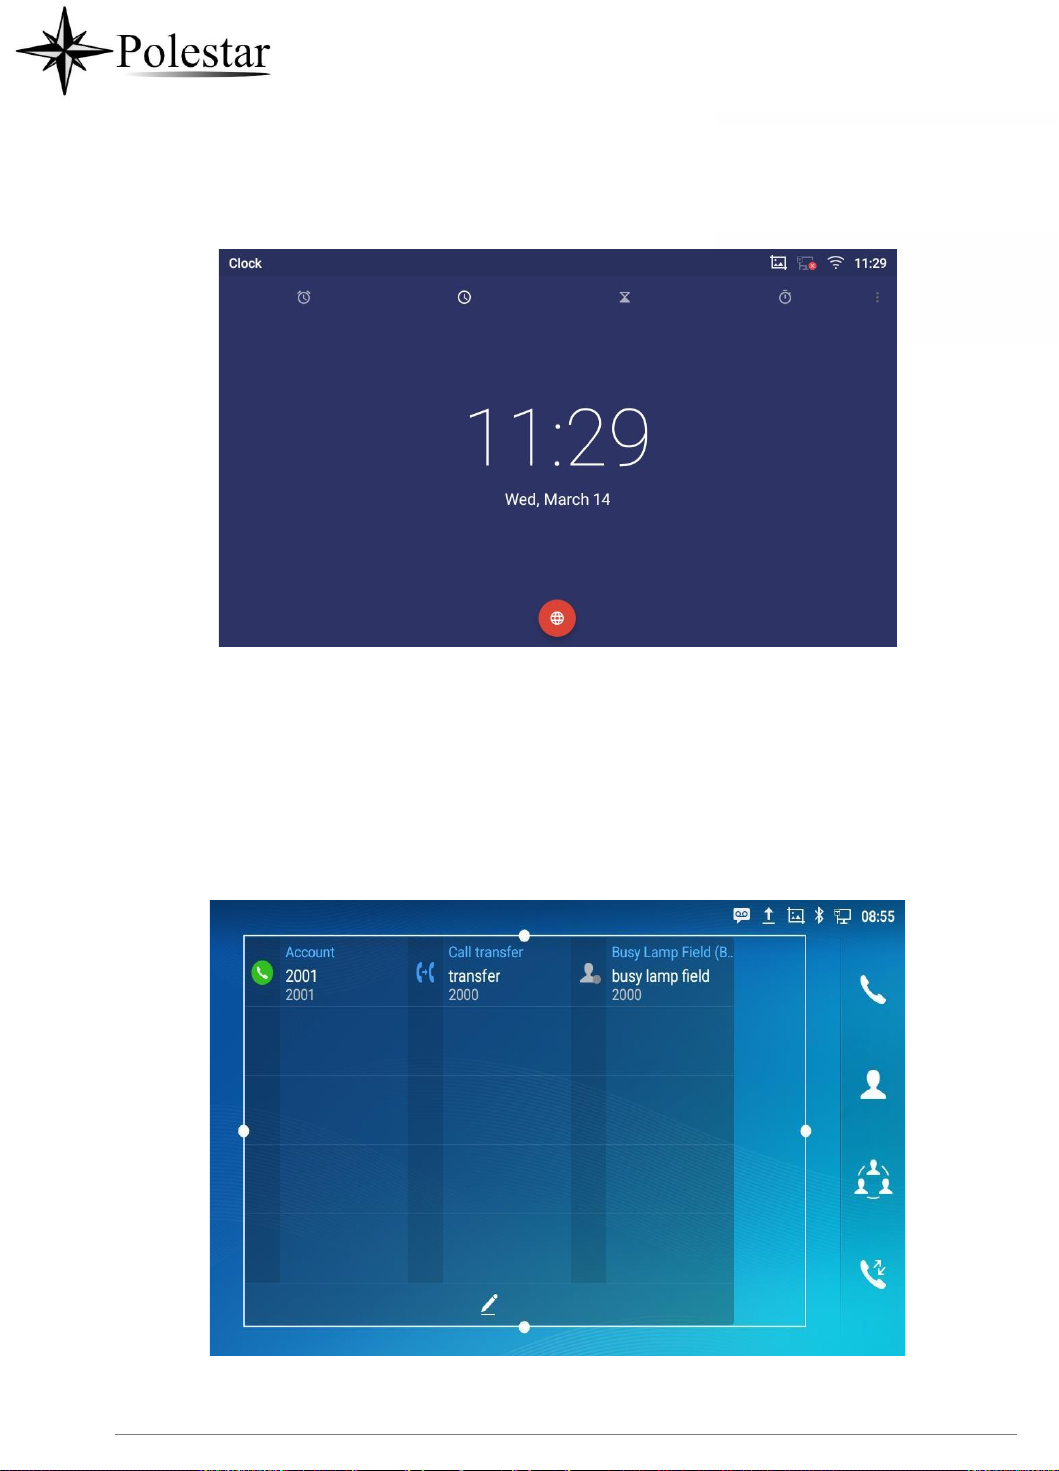
For example, tap on the digital clock on the desktop. The clock settings will be brought up for users to
set up timer, stopwatch or alarm.
P a g e | 42
Figure 13: Open Clock Widget
• Certain widgets such as the MPK Widget can be resized on the desktop.
To resize a widget, press and hold the widget for about 2 seconds. Then lift your finger from the screen.
will bring up the white frame as shown in the following figure. Touch and drag the border of the frame
to adjust the size.
This
Figure 14: Resize MPK Widget

P a g e | 43
• Move/delete Application/Widget
To move a shortcut/widget to a different spot on the desktop or to a different idle screen, touch and
press the item for about 1 seconds until a recycle bin icon shows up on the top of the screen.

P a g e | 44
Drag the item up/down/left/right to the destination spot on the screen. Lift your finger once done. To
delete the item/widget, press on it for about 1 seconds then move it to the recycle bin on the top of the
screen.
Figure 15: Move Clock Widget
• Group Apps into folders on home screen
To group different Apps in a folder, hold press on the app and drag it on top of the other app the folder will
be created with a dark background showing icons of the Apps added.

P a g e | 45
Figure 16 : Grouping apps in one folder
Tap the folder to display the Apps included, you can rename the folder by touching the upper box to
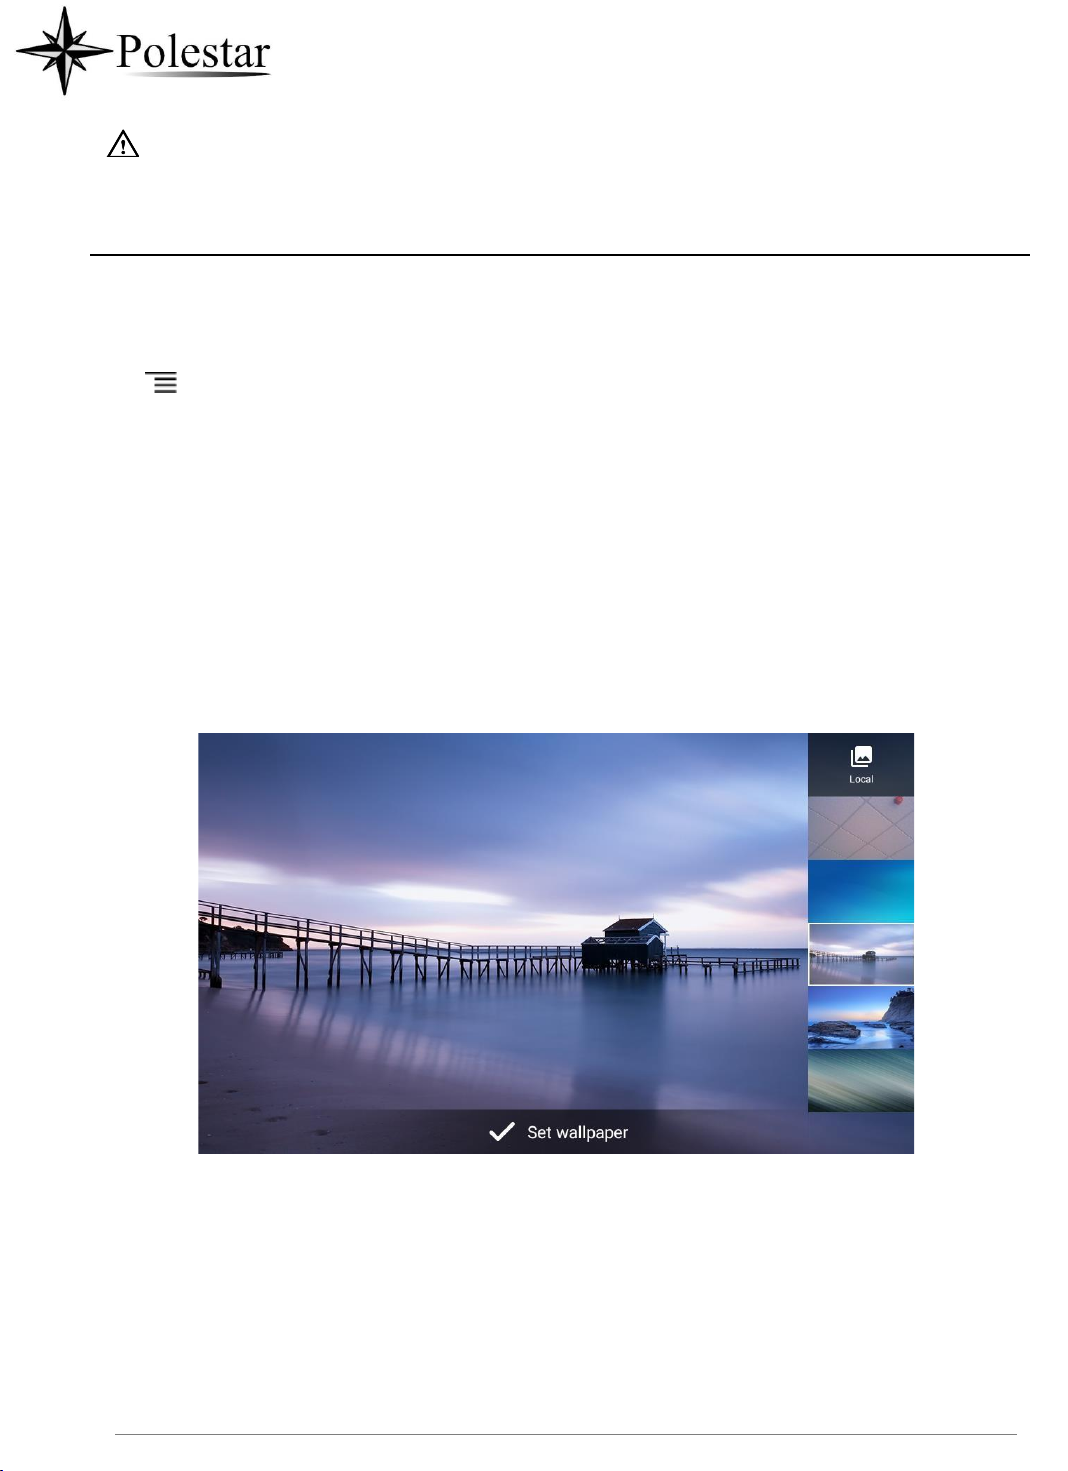
P a g e | 46
Note:
Deleting an application icon will systematically pop up a window asking the permission to uninstall the
application from the screen. Press ok to uninstall or press cancel to abort.
Set Wallpapers
On the CD-SMF desktop, touch and press on an empty spot for about 2 seconds or users could press menu
key and select "Wallpaper" to set up the wallpaper for the desktop. Users could select wallpaper from
different categories:
• Local
Open Gallery application and tap on the picture to preview. Touch and drag the picture to adjust the
frame that will be used as wallpaper. Then tap on "Set Wallpaper" to set the selected area of the picture
as wallpaper.
• Wallpapers
On the right side of the Wallpaper menu of the CD-SMF. Select the picture from the default wallpapers
available to preview and then tap on "Set wallpaper".
Figure 17: CD-SMF Choose Wallpaper
Set Weather Widget
On the CD-SMF desktop, touch and press on an empty spotz for about 2 seconds or users could press
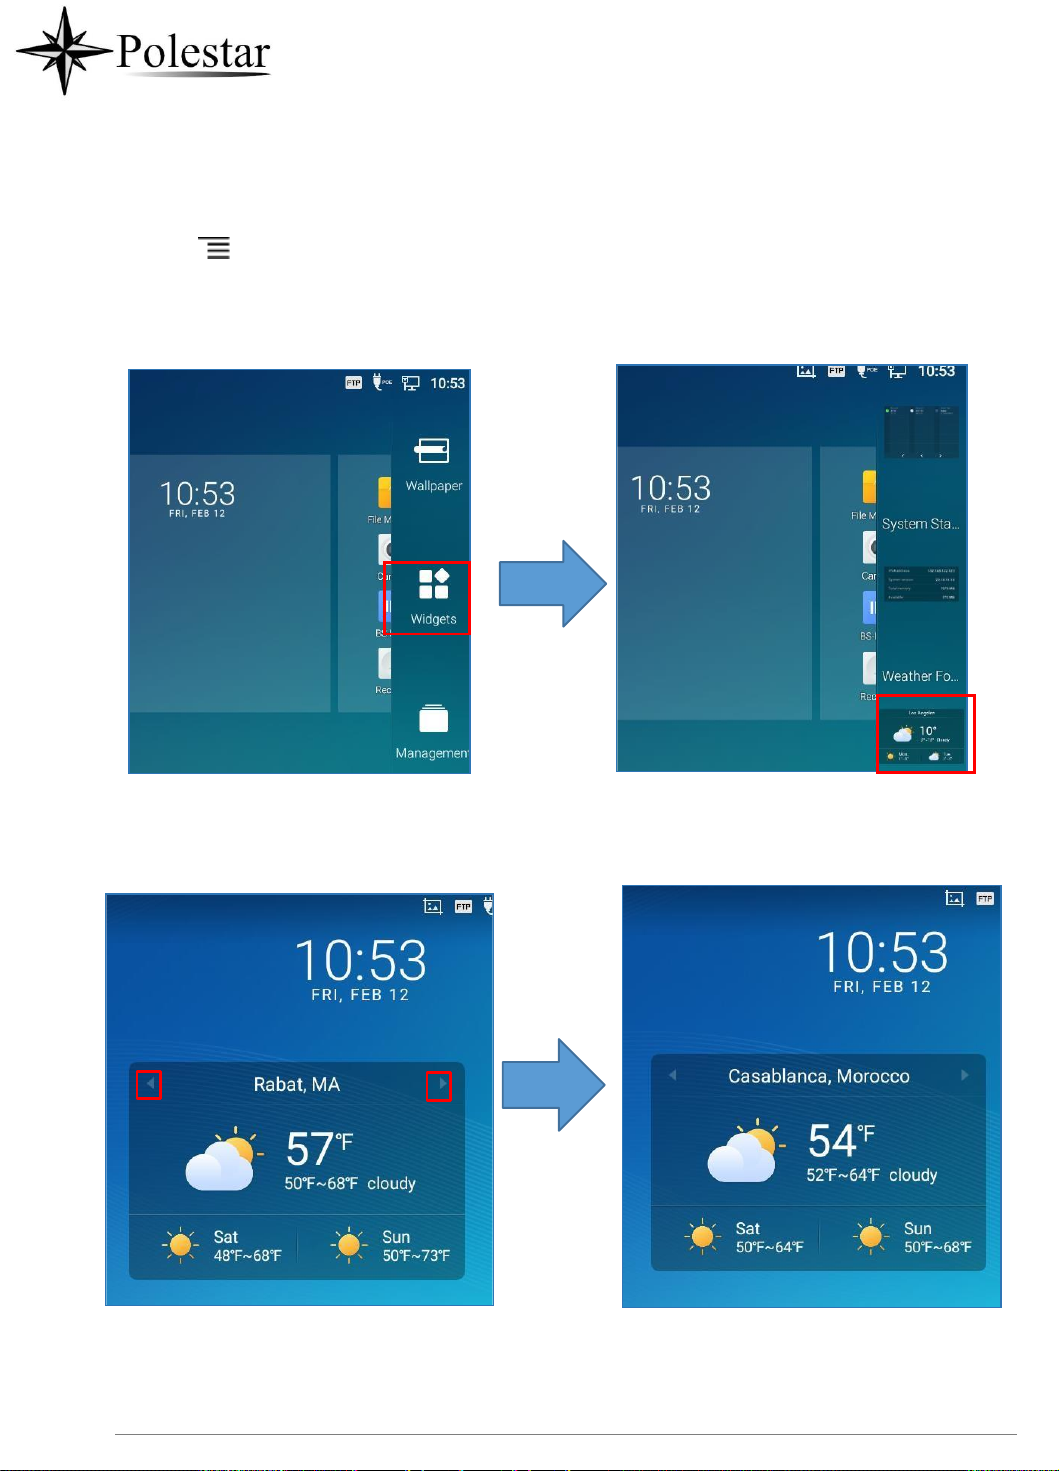
P a g e | 47
menu key and select Widgets to display available choices, Long press the Weather widget to add It
to the desktop.
Figure 18 : Accessing available Widgets
Figure 19 : Minimized display of Weather App
Use the Right/Left icons to switch between added cities on the minimized weather screen. Or when
maximized use swiping movement to change between cities.

P a g e | 48
Users can add new cities to the weather application by pressing on Add icon and then search for the
wanted city.
Figure 20 : Weather application
Set Programmable Key Widget
On the CD-SMF desktop, touch and press on an empty spot for about 2 seconds or press menu key
and select Widgets to display available choices, Long press the Programmable key widget to add It to the
desktop (users can choose from multiple sizes; 1xN, 2xN or 3xN).

P a g e | 49
Figure 21: Programmable Key Widget

P a g e | 50
Indicator
Status
Account Not Registered
Account Registered
Account Registering
Account Call Park
Dial Prefix
Speed Dial
Press the modify icon to show all the programmable key, then press the plus sign to add and
configure of those options (Speed dial, Busy lamp field, Call transfer, Intercom, Speed dial via active
account, Dial DTMF, Call park Multicast paging, Dial prefix, and Speed conference)
Figure 22: Programmable Keys page
Programmable Key Indicators
The following table shows the indicator status in different scenarios:
Table 7: Programmable Key Indicator

P a g e | 51
Transfer
Dial DTMF

P a g e | 52
Intercom
Multicast Paging
Speed Conference
BLF Offline
BLF Busy
BLF Online
Call Park Offline
Call Park Busy
Call Park Hold
Call Park Online
SCA Call Park Offline
SCA Call Park Busy
SCA Call Park Hold
SCA Call Park Online
SCA account
SCA Account Busy
SCA Account Hold
SCA Account Online
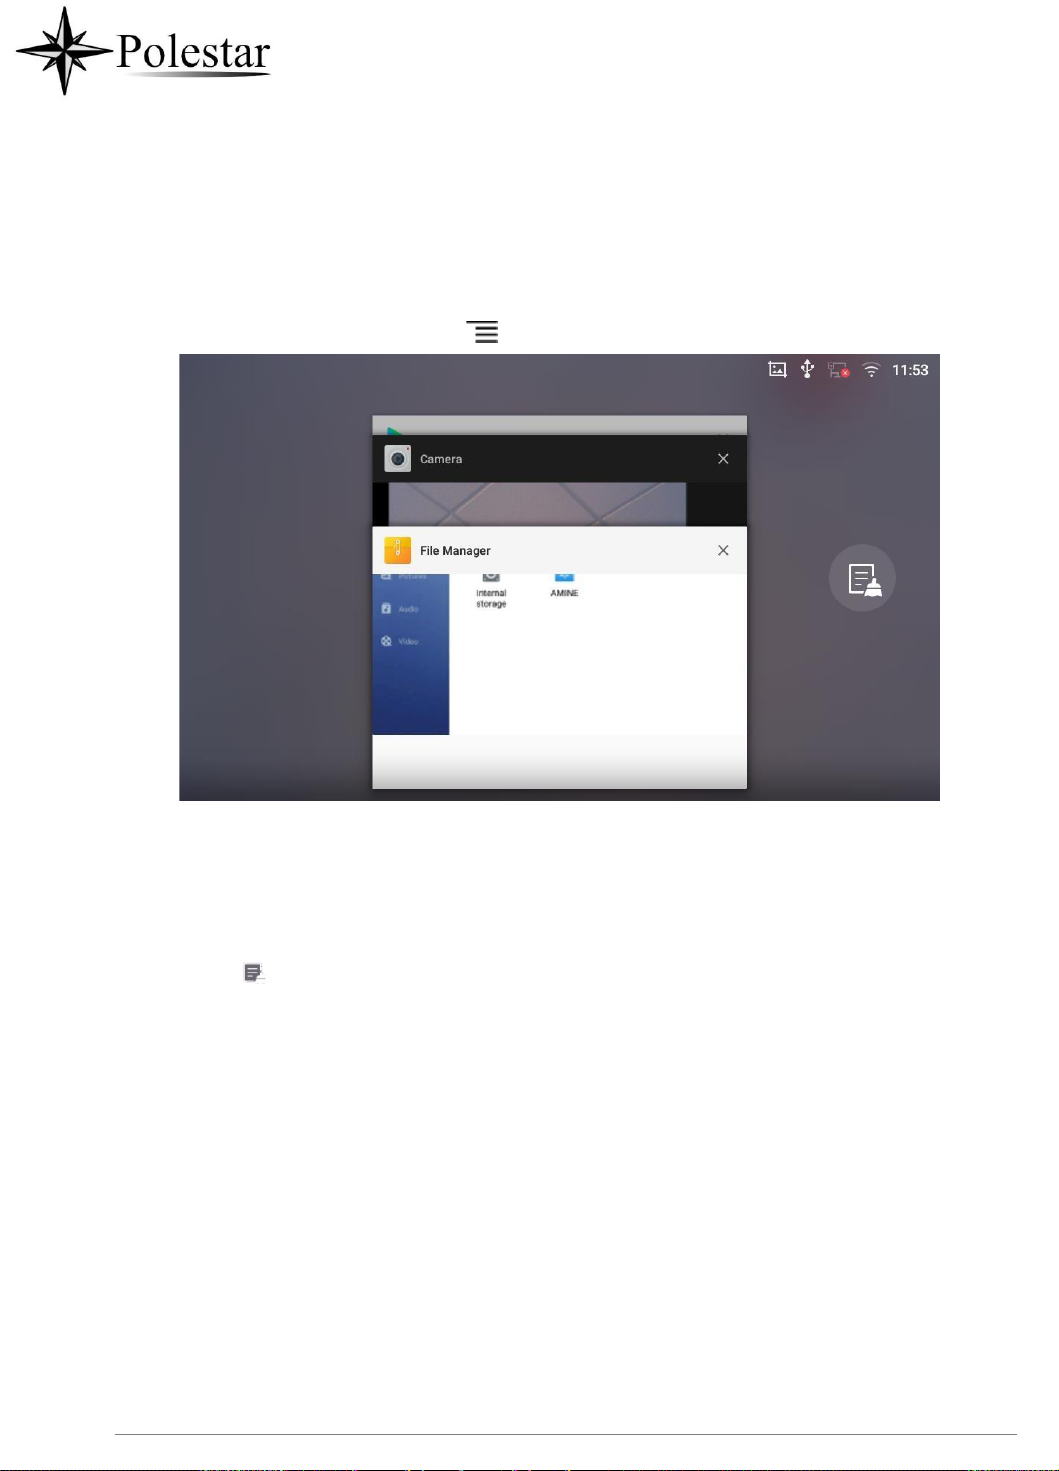
P a g e | 53
Manage Running Applications
On the CD-SMF desktop, press an empty spot for about 2 seconds then select “Management” or select
"Management" after pressing Menu button ..
Figure 23: CD-SMF Recent Applications
Users could use the thread manager to do the following:
• Slide the running thread to the left or right to stop the application.
• Tap on icon to delete all running threads.
• Tap on "Application" softkey to access application menu for advanced management options.
Idle Screen
Switch Idle Screens
The CD-SMF supports multiple idle screens by sliding the screen horizontally. On the CD-SMF screen,
slightly touch an empty area and slide to the left or right using your finger to switch between different idle
screens.
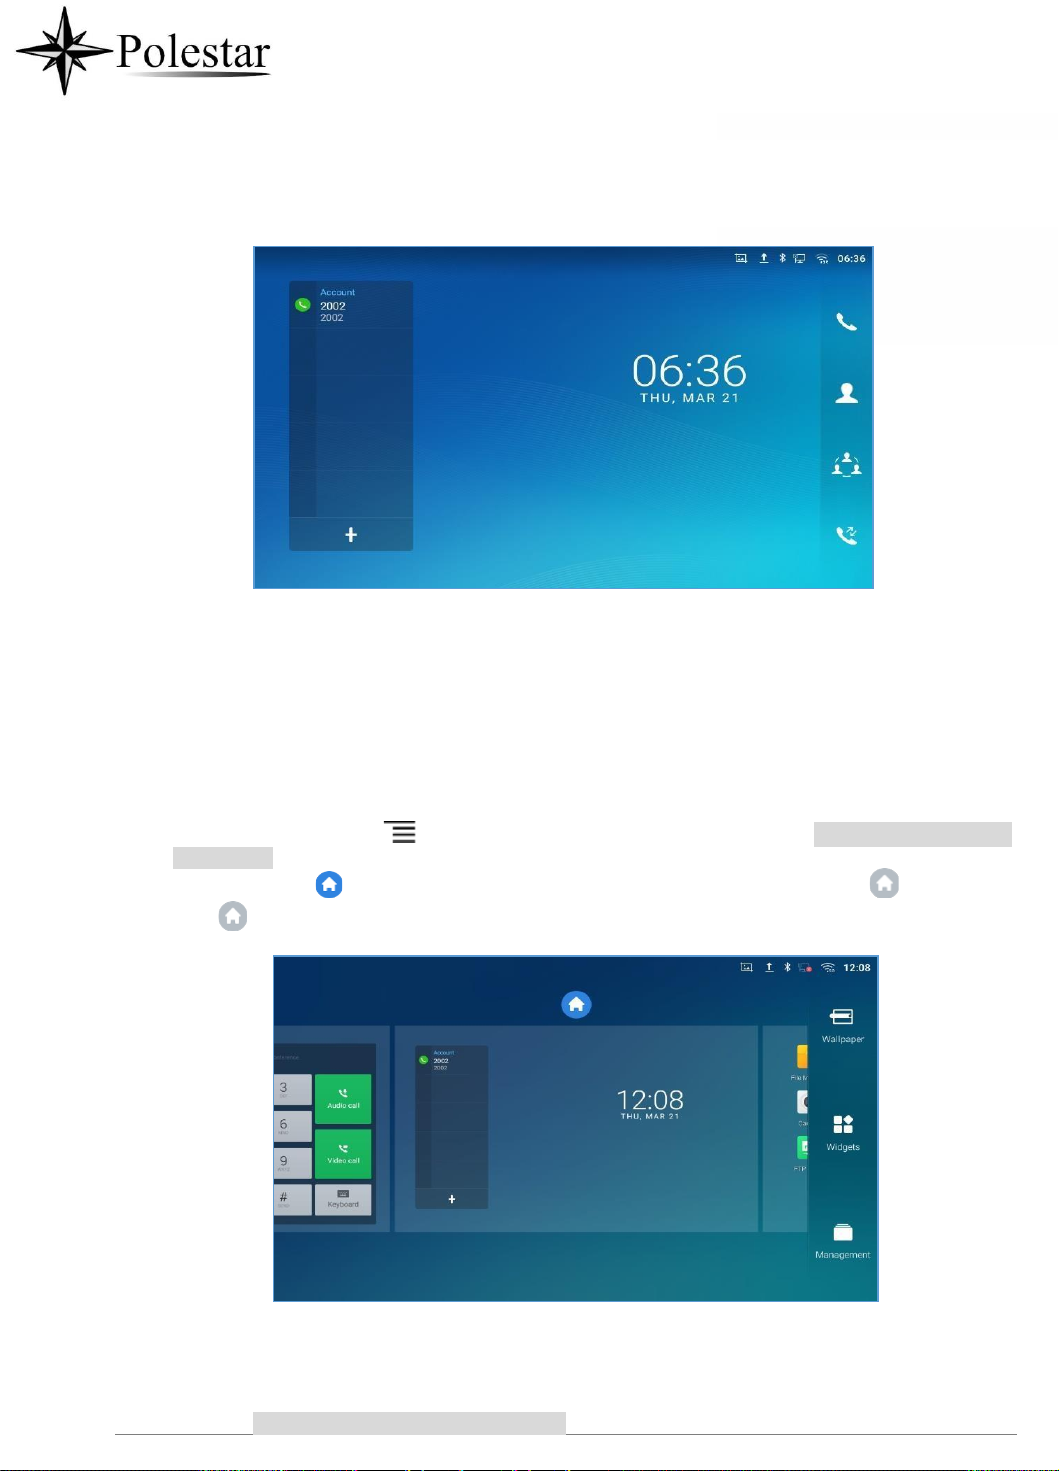
P a g e | 54
Figure 24: CD-SMF Switch Idle Screens
Set Up Idle Screen
• Set home screen
Follow the steps below to set up the HOME screen.
1.
CD-SMF is up and running on idle screen.
2.
Press the MENU button . This will zoom out all the screens as shown in [Figure 25: Set up Home
Idle Screen].
3.
The screen with displayed is the HOME screen. Others are shown with icon . Tap on the
icon
to select the corresponding screen as the new HOME screen.
Figure 25: Set up Home Idle Screen
• Add/Delete idle screen
As shown in [Figure 25: Set up Home Idle Screen], this section shows the available desktop screens.

P a g e | 55
Users could add or delete idle screen.
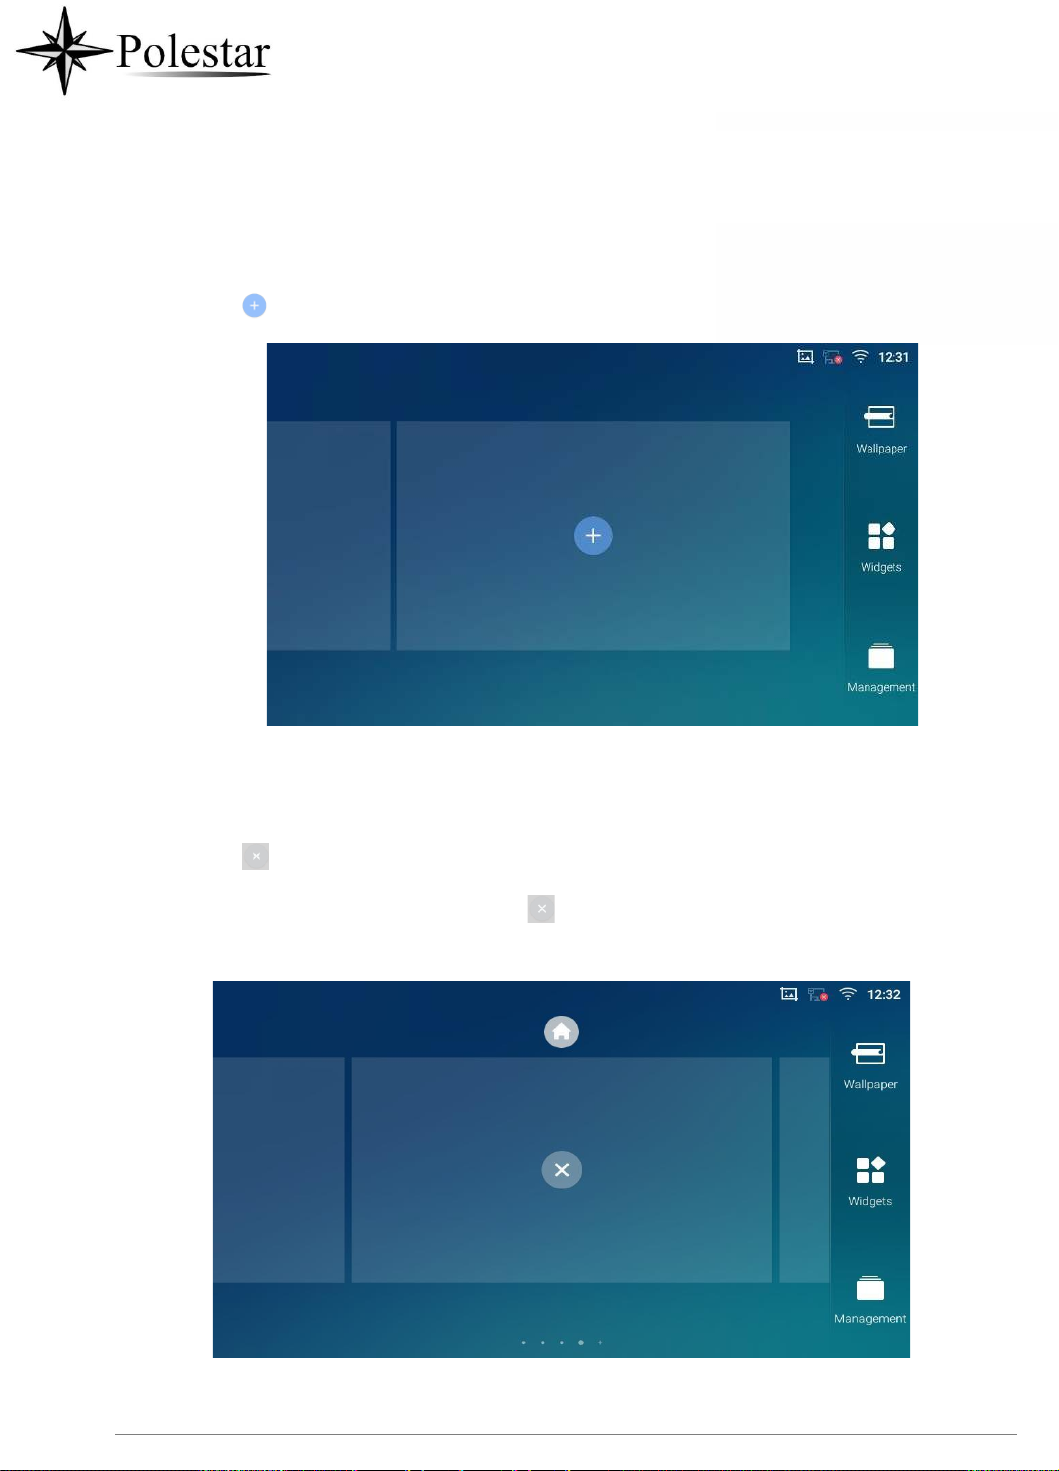
P a g e | 56
➢ Add idle screen.
Tap on to add a new idle screen.
➢ Delete idle screen.
Figure 26: Add an Idle Screen
Tap on to delet the Idle screen. Please make sure the apps, shortcuts or widgets on the idle
screen are removed first. Otherwise, the icon won't show for the idle screen.
Figure 27: Delete an Idle Screen

P a g e | 57
Use the Status Bar
The status bar on the top of the CD-SMF screen provides visual notifications for the system settings and
status, as well as quick access for important system settings. To access it, on the CD-SMF idle screen,
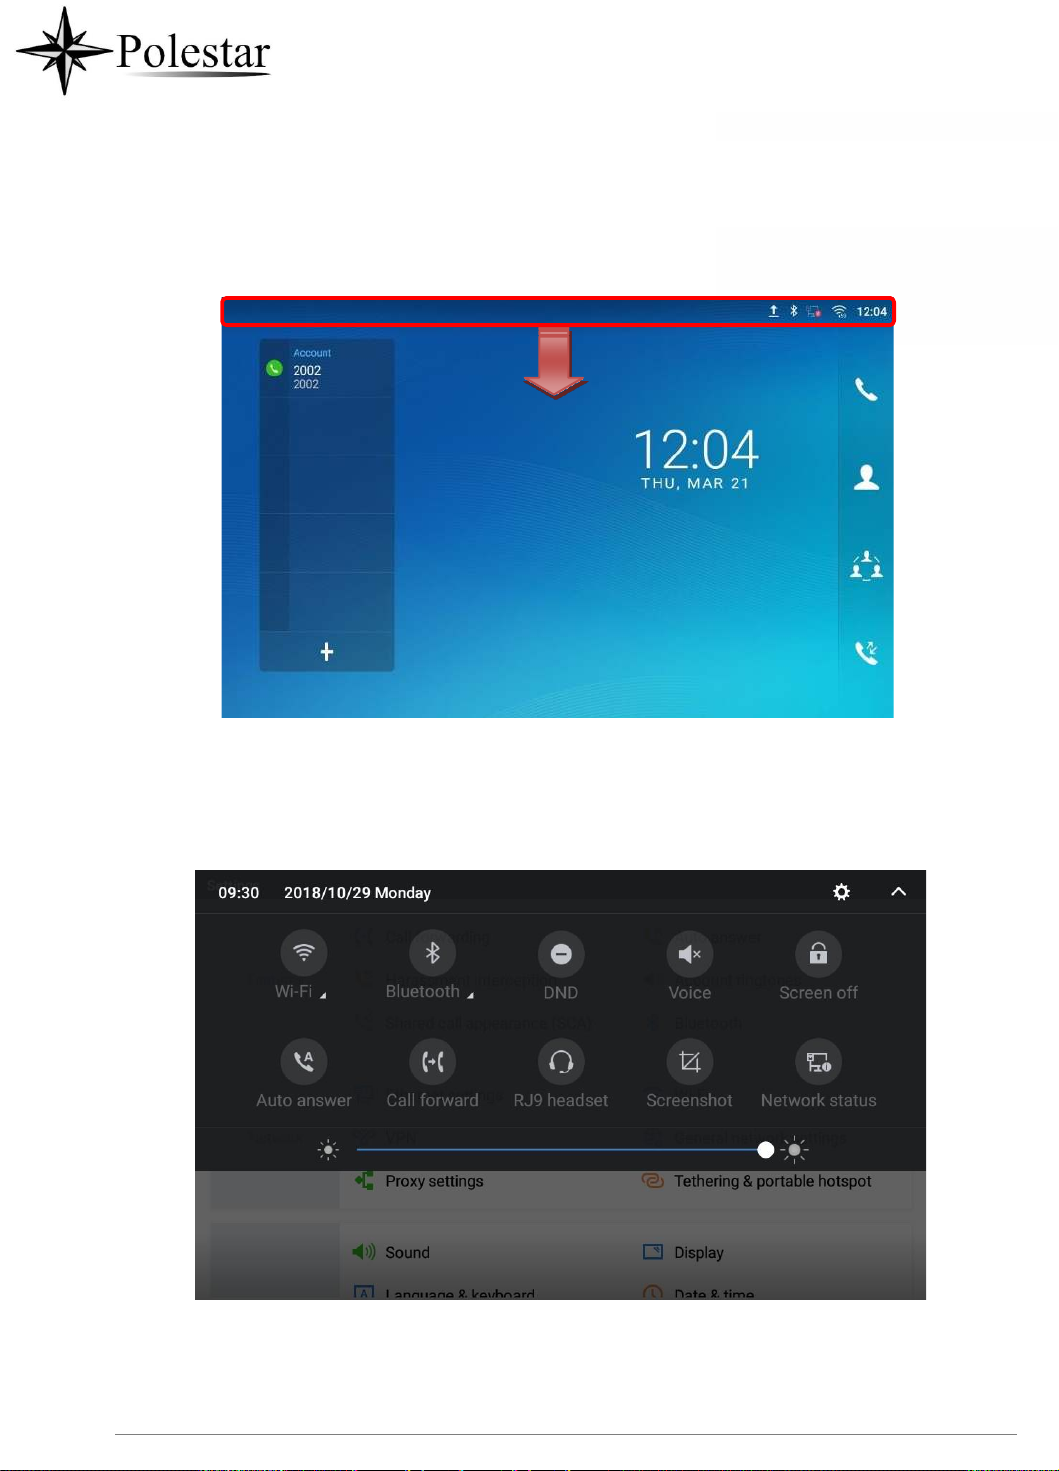
P a g e | 58
slowly slide down from the top to the bottom of the screen as the following figure shows.
For more options on the Status Bar (brightness, call forward, RJ9 headset…) users can pull down the status
bar twice, or once with two fingers.
Figure 28: CD-SMF Top Status Bar
Figure 29: Status Bar - More Options
The running process and notifications will show up in the list. For example, the following figures indicate
that there is a notification for an available Wi-Fi network.

P a g e | 59
Figure 30: CD-SMF Top Status Bar – Notification
• Tap on the notification message to view the details.
• Slide the notification message to the left or the right side to remove it.
For more information about specific features in the notification bars, you can press the bottom right of the
feature in question.
Figure 31: CD-SMF Top status Bar - Get more information
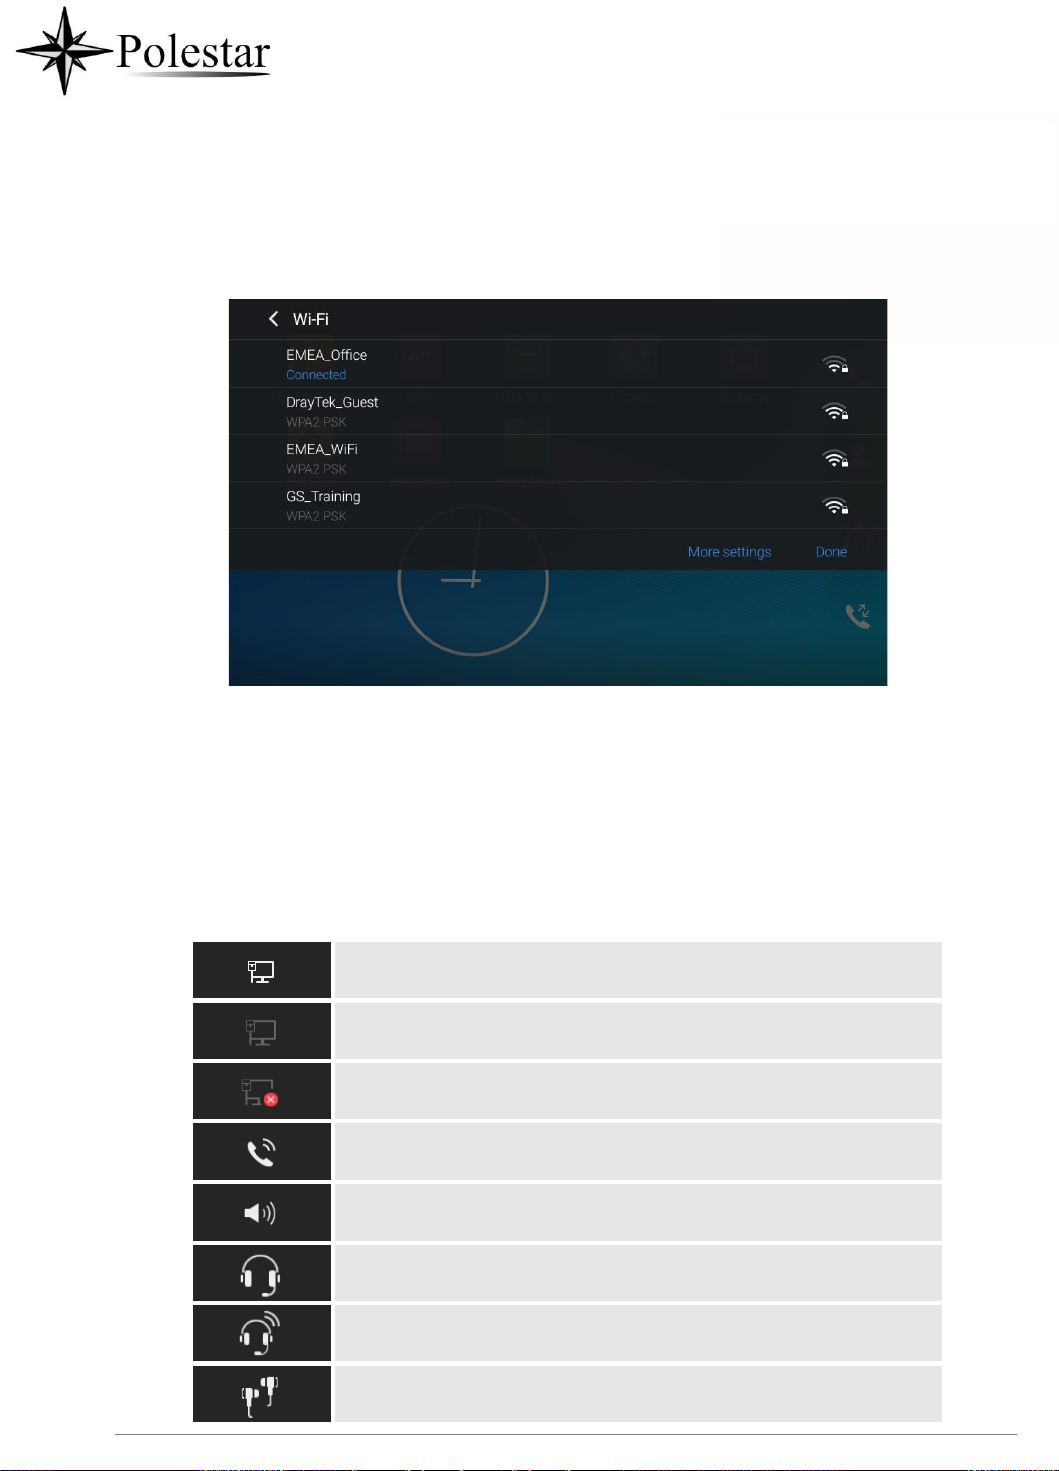
P a g e | 60
Network connected via Ethernet cable.
Trying to connect to the network via Ethernet cable.
Network disconnected via Ethernet cable.
Handset is off hook.
Speaker is being used. (x)
RJ9 headset is connected.
RJ9 headset is being used for calls.
3.5mm earphone is connected.
For example, you can see the available Wi-Fi Networks.
Figure 32: CD-SMF Top status Bar – Wi-Fi
Notifications in Status Bar
The following table describes the icons used on the status bar for notification purpose.
Table 8: CD-SMF Status Bar Notification Icons

P a g e | 61
3.5mm earphone is being used for calls.
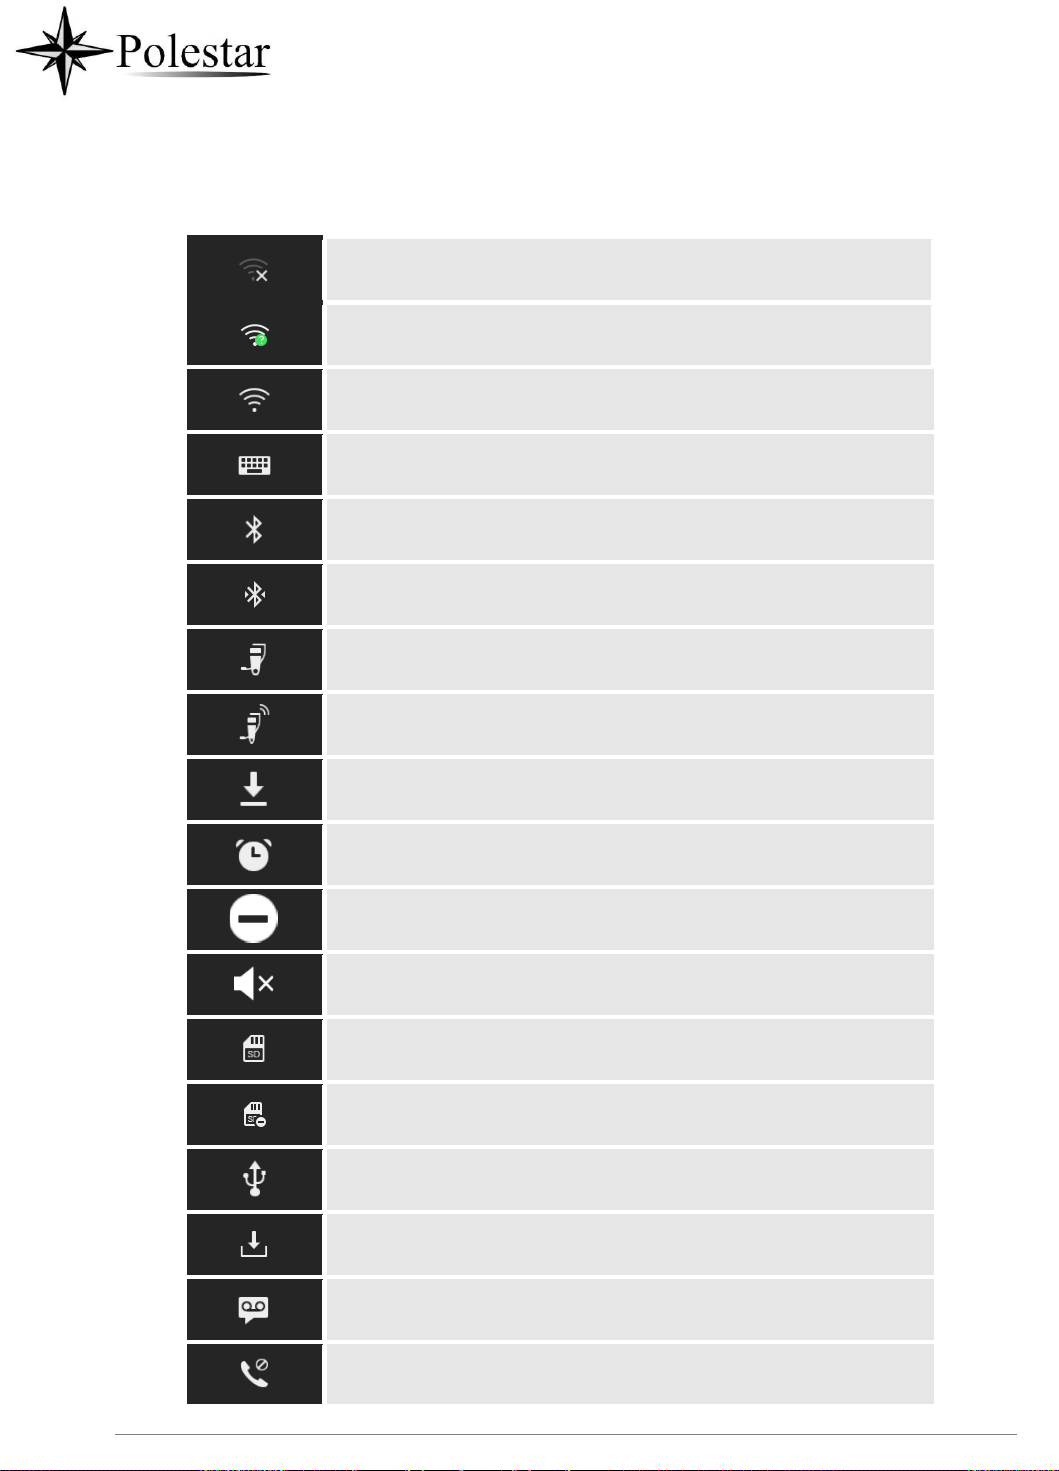
P a g e | 62
Wi-Fi is enabled and still not connected.
Wi-Fi network is available.
Wi-Fi is enabled and connected.
Onscreen keyboard is activated.
Bluetooth is enabled but not connected.
Bluetooth is enabled and connected.
Bluetooth headset is connected.
Bluetooth headset is being used for calls.
Downloading files via Bluetooth.
Alarm is set up and enabled.
DND is enabled.
Silent mode is enabled. When it's on, the incoming call/message
won't produce ring tone/notification tone from phone's speaker.
SD Card is inserted.
SD Card space full.
USB flash drive is inserted.
Downloading files via Internet connection.
Unread voicemail to be retrieved.
Incoming call from blacklist contact.

P a g e | 63
Camera is disabled.
Contact storage is full.

P a g e | 64
HDMI cable is connected to display device.
The phone is powered up using PoE.
Call forward is set up.
PPPoE is connected.
PPPoE is not connected.
Warning message.
System Settings in Status Bar
Slide down the top status bar and select System Settings. Users will see the following settings.
Turn on/off DND. When DND is
on, all the calls to the registered
accounts will be blocked.
Go to phone Settings
Show more options
Turn on/off Bluetooth.
Turn on/off Wi-Fi.
Turn on/off LCD display.
Turn on/off the voice of
the phone
Figure 33: System Settings in Status Bar

P a g e | 65
Volume Down
Tap to turn down the call volume and media volume.
Volume Up
Tap to turn up the call volume and media volume.
Home
Tap to go back to Home screen; or touch and press for about 2 seconds to
take a screenshot
Menu
Tap to view options for different screens or applications.
Back
Tap to go back to the previous menu.
Use the CD-SMF Keys
Figure 34: CD-SMF Keys
Table 9: CD-SMF Keys
Keypad Shortcut Functions
The CD-SMF supports keys shortcuts for certain special system functions.
• Screenshot
Press and hold the Home button for about 2 seconds to capture screenshot. The screenshot can
be accessed via File Manager→ Pictures. The screenshot picture size is 1280x800 pixels.
• Firmware upgrade via SD card
For users that could not use remote upgrade or could not access the phone's Web GUI to upload firmware,
upgrading via external SD card is an alternative. Follow the steps below to upgrade CD-SMF via SD card.
1.
Download the firmware file to PC and save it in SD card.
2.
Insert the SD card to CD-SMF.

P a g e | 66
3.
Power cycle the CD-SMF.

P a g e | 67
4.
Wait for the LED in the upper right of the phone to light up in Green, then about 2 seconds later press
the both keys (the first LCD key from the left : Volume Down) and (the third LCD key from
the left : Home) at the same time, it will go into the upgrading process.
5.
The CD-SMF will start upgrading and display the upgrading process in the screen.
6.
Wait until the upgrading is done.
7.
The CD-SMF will reboot itself.
8.
Check the firmware status and remove the SD card.
• Hard reset
For users that want to factory reset the device manually, hard reset is an alternative:
1.
Power cycle the CD-SMF.
2.
Wait for the LED in the upper right of the phone to light up in Green, then about 2 seconds, press the
both keys (the second LCD key from the left: Volume Up) and (the 4th LCD key from the left :
Menu) at the same time, it will go into the factory reset process.
3.
The LCD screen will display “Factory reset, please wait”.
4.
The CD-SMF will reboot with factory default settings.
Note:
Upgrading via USB storage device is not supported on the CD-SMF.
Use the On-Screen Keyboard
The CD-SMF onscreen keyboard can be activated by tapping on an input field.
• English Keyboard
This is the default keyboard on CD-SMF.

P a g e | 68
Figure 35: CD-SMF Onscreen Keyboard - English Keyboard
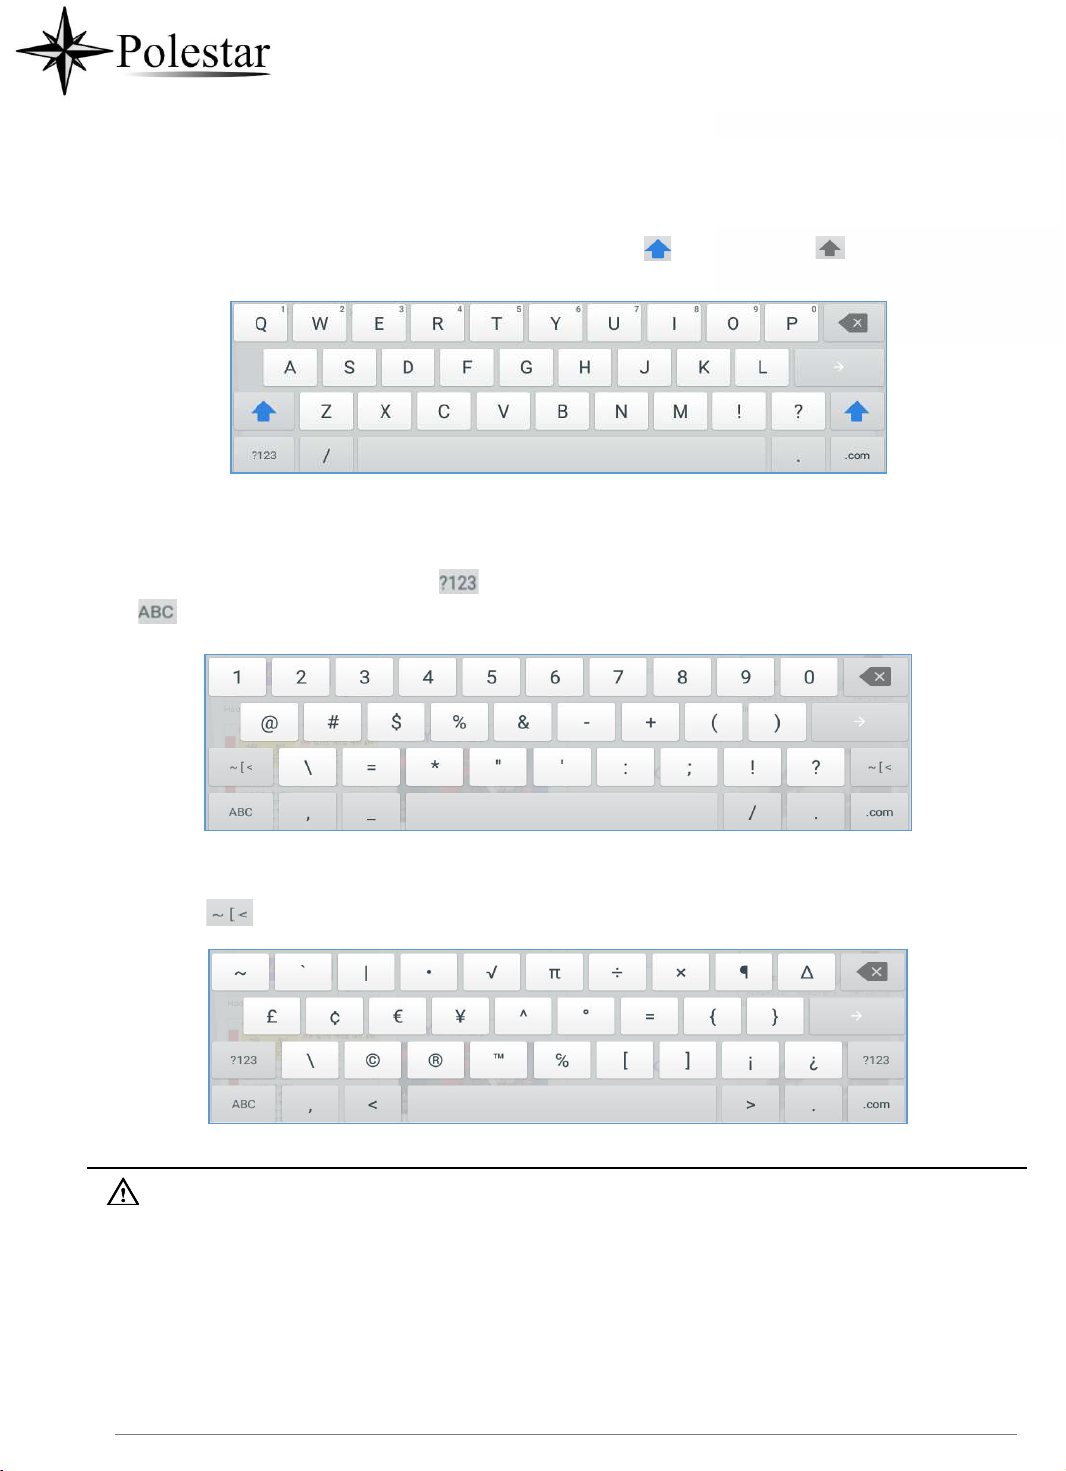
P a g e | 69
To switch input between lowercase and uppercase, tap on (lowercase) or (uppercase).
• Number and symbols
To input number and symbols, tap on the default keyboard to switch to number/symbols. Tap on
to switch back.
Figure 36: CD-SMF Onscreen Keyboard - Lowercase and Uppercase
Figure 37: English Keyboard - Number and Symbols
Tap on to access more symbols.
Figure 38: English Keyboard - More Symbols
Note:
• To configure keyboard and input methods options, please refer to the following steps:
1.
Go to Settings→Basic→Language & Keyboard→Virtual Keyboard
2.
Click on “+” to add more input method.
3.
Go to Settings→Language & Keyboard→Current Keyboard, and choose from the input
methods.
4.
After these steps, the method would change to the new one.

P a g e | 70
• Users could touch and press the key on the keyboard for about 2 seconds to input the alternative
character. For example, touch and press the "+" key for about 2 seconds can get the selection "±".
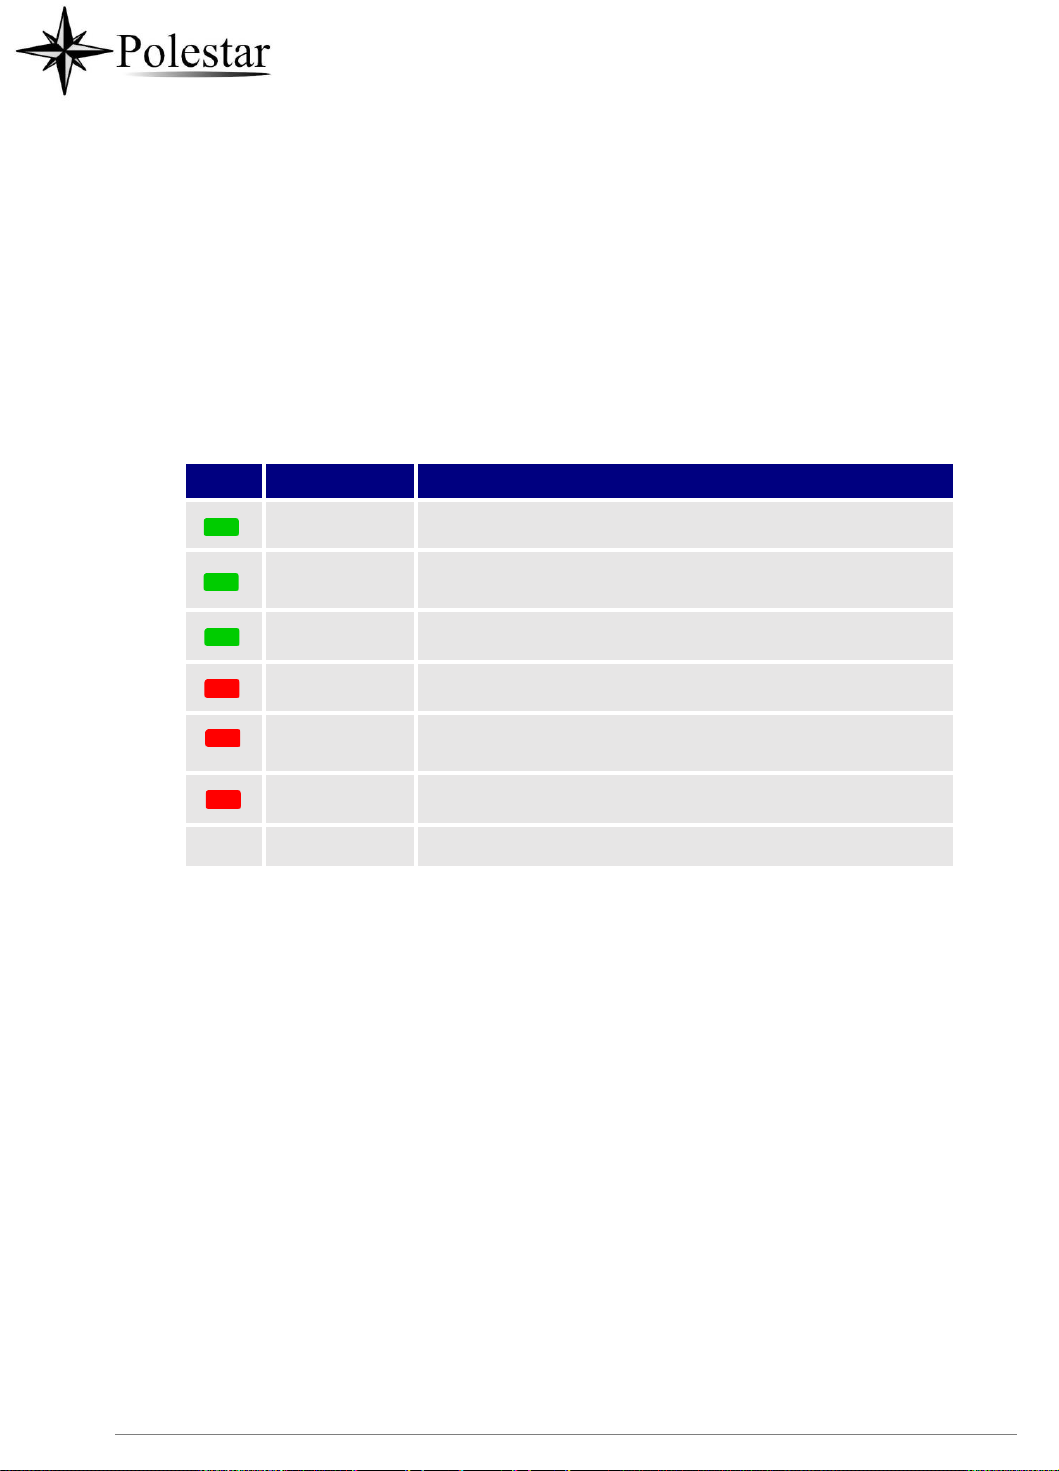
P a g e | 71
Color
LED Status
Description
Fast Flashing
Incoming call
Solid
Calling, Talking, Conferencing, Screensaver on when the
LCD is off
Slow Flashing
A call is on hold
Flashing
Missed call (s), New voicemail (s), New SIP Message (s)
Solid
High memory usage, Maximum contact storage, Network
disconnect
Fast Flashing
Upgrading/ USB upgrade
OFF
OFF
Normal
Use the Message Waiting Indicator
The CD-SMF message waiting indicator LED is on the upper right corner of the device. It could notify the
users with different messages and status of the phone. Please refer to the status description below. The
priority for the LED indicator is from high to low in the following table.
Table 10: CD-SMF MWI LED Status

P a g e | 72
MAKE PHONE CALLS
Register SIP Accounts
The CD-SMF supports up to 16 independent SIP accounts. Each account can have separate SIP servers,
usernames and NAT configurations.
Account Status
On the idle screen, the account widget shows the account name, and registration status.
• The following figure shows the account is successfully registered (account icon is green).
• If the account icon is grey, it's still trying to register or unable to register.

P a g e | 73
Figure 39: CD-SMF Account Widget
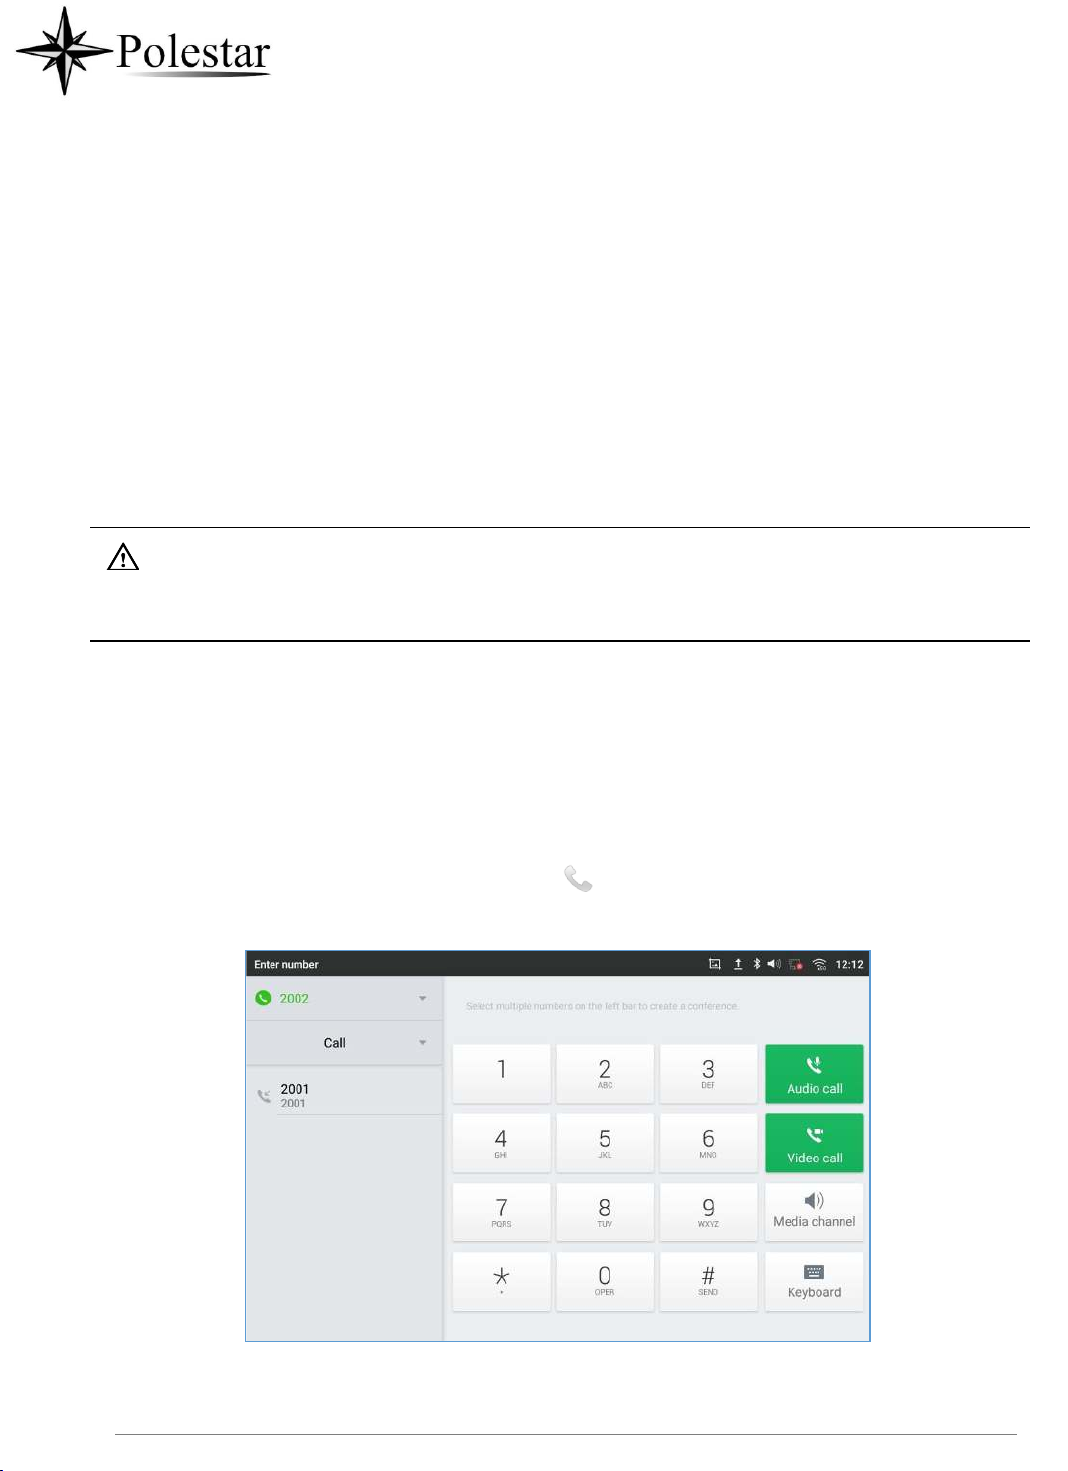
P a g e | 74
Configure SIP Account
To register a SIP account, users can access phone's LCD menu→Settings→Advanced →Account
Settings
Or users could log in the CD-SMF web GUI→Account →SIP page to fill in the necessary registration
information, i.e., Account active, Account name, SIP Server, SIP User ID, SIP Authentic ID, SIP Authentic
Password, etc. Once the correct information is entered and saved, the account registration status will show
on the main screen.
Note:
For web GUI login and configuration information, please refer to CD-SMF Administration Guide.
If the account is successfully registered, users could use one of the following ways to bring up dial screen
to start making calls.
• Take the handset off hook.
• Select an account from the account widget in the idle screen.
• On the shortcuts menu of the idle screen, tap on icon to open dial screen.
Figure 40: CD-SMF Dial Screen

P a g e | 75
Note: If Enable Video Call option is unchecked, the Video Call option on CD-SMF dial screen won’t be
available.

P a g e | 76
Figure 41: Disable Video Call Feature on Dial Screen
Dial a Number Directly
1.
Use the methods mentioned above to open dial screen [Figure 40: CD-SMF Dial Screen].
2.
Select the account to dial out on the left panel of the dial screen. The selected account will be displayed
in green
3.
Enter the digits to be dialed out using the keypad. If the digit matches call history, a list of numbers will
be displayed for users to select from.
4.
Tap on (audio call only) or (video call) to send the number. If no key is pressed, by default
the call will be automatically dialed out after 4 seconds timeout.
Note:
• By default, the "No Key Entry Timeout" is 4 seconds, meaning if no key is pressed after entering a
number, the call will be automatically sent out after the timeout. The timeout interval can be configured
under web GUI→Account→Call Settings.
• CD-SMF allows users to press # key as SEND key. This behavior can be disabled via option "Use # as
Dial Key" under web GUI→Account→Call Settings.
• When the user enters the digit on the dial screen, if there is digit matching call history, or contacts
name/number, the drop-down list will show the numbers. For example, if "John" is saved in the contacts,
entering 5 (JKL) 6 (MNO) 4 (GHI) 6 (MNO) will show call log with 5646 as the first four digits, as well
as John's number. Users could then directly select one of them from the list, instead of entering all the
digits.
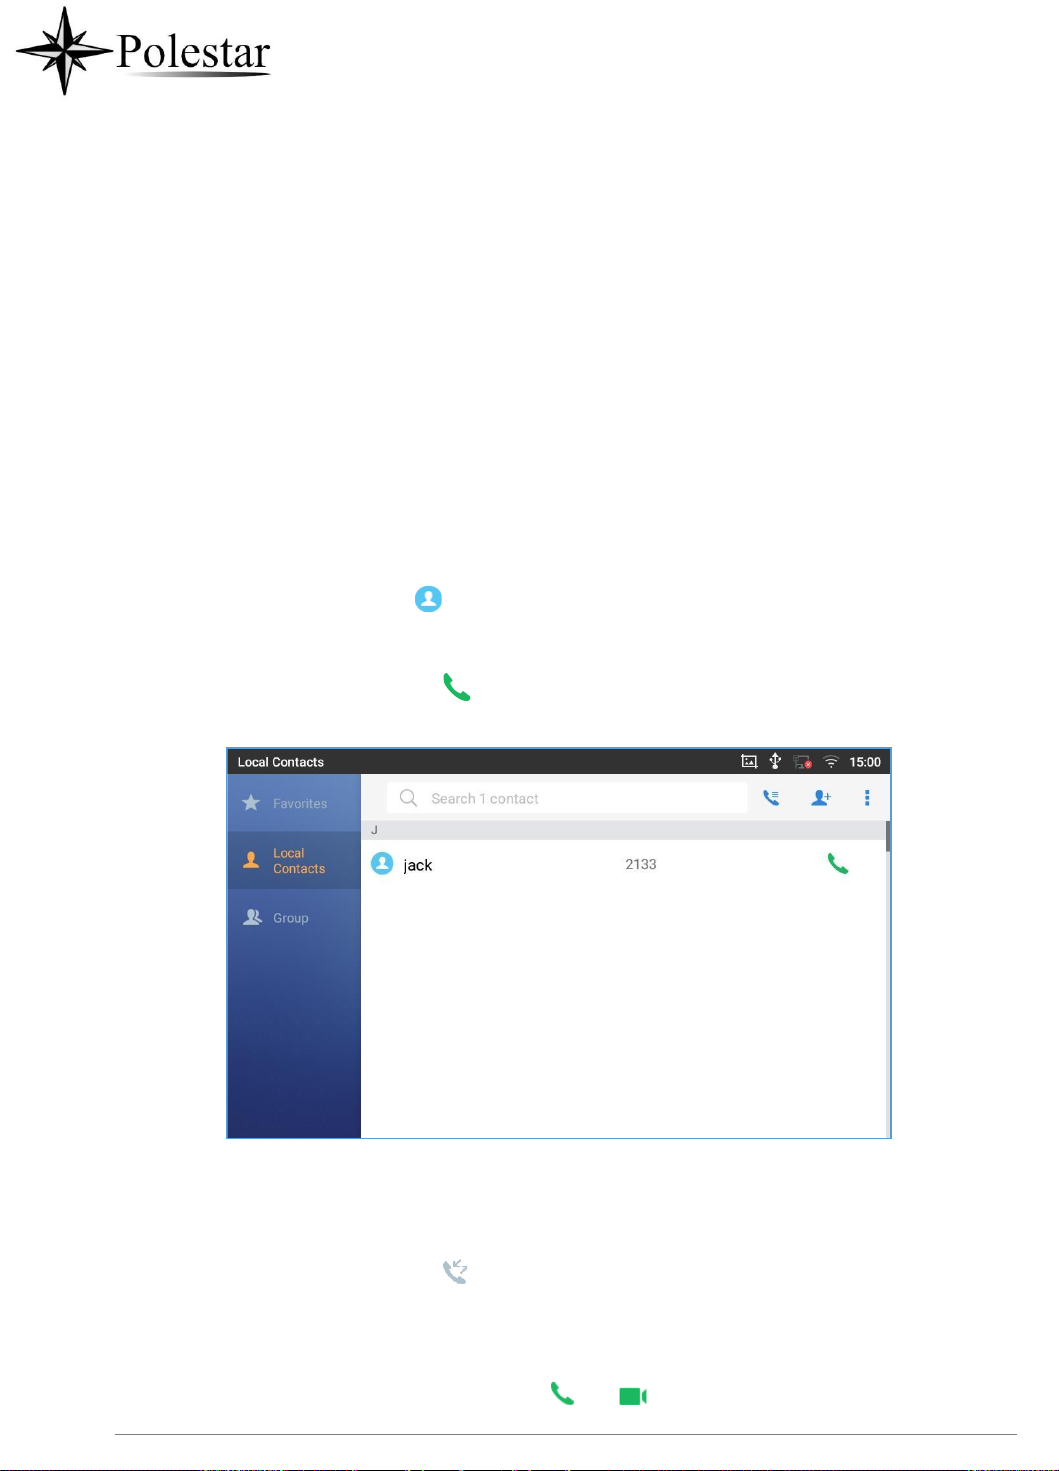
P a g e | 77
Redial
Users can dial out the last dialed number if there is dialed call log, using the same SIP account making the
call last time.
1.
Enter the dial screen.
2.
A list of dialed calls will be displayed on the left side of the dial pad. Tap on the number you would like
to call, the number will be added to the dialing field, press Audio call or Video call to redial.
Dial a Number via Contact
Follow the steps below to dial a number via Contact.
1.
Access Contacts by tapping on icon on the left side of the idle screen.
2.
Navigate in the contacts entries by sliding up/down on the screen.
3.
Tap on the dial icon for the contact .
Figure 42: CD-SMF View Contacts
Dial a Number via Call History
1.
Access Call History by tapping on icon on the bottom of the idle screen.
2.
The LCD will display all call history types: "All", "Missed", "Outgoing" and "Incoming" calls.
3.
Navigate in the call history list by selecting the call history category and sliding up/down on the screen.
4.
Tap on the entry to show more details or tap on or to dial out.

P a g e | 78
Note: The icon next each call indicates the Call Type with which the call was made, icon means this
was a Video call. And means it was an Audio call

P a g e | 79
Figure 43: CD-SMF Call History
In order to select which call mode to use when calling from Call History, access the call Details, then press
the icon with keypad to dial the number on the phone’s keypad directly and then select whether to use
Audio or Video Call to begin the call
Figure 44: Choose Call mode from call history
Answer a Call
Single Incoming Call
• When the phone is in idle and there is an incoming audio call, the phone will show the call screen as
below. Tap on "Answer" softkey to answer the call via speaker or pick up the handset the answer the

P a g e | 80
call.

P a g e | 81
Figure 45: Single Incoming Call – Audio
• When the phone is in idle and there is an incoming video call, the phone will show the call screen as
below. To answer the call with audio only, tap on "Audio" to answer the call via speaker. To answer the
call with both audio and video, tap on "Video". During video call or pick up the handset. the audio will
switch to handset if picking up the handset.
Note: Users could select the Video Display Mode on phone’s Web UI→Phone Settings→Video Settings.
Set the video display mode to "Original proportion", "Cut proportionally" or "Add black margin
proportionally".
If set to "Original proportion", the phone displays video in its original proportion. If the video display
proportion is different from the one of the phones, the phone will stretch or compress video to display it. If
set to "
Cut proportionally
", the phone will cut video to meet its own display proportion. If set to "
Add black
margin proportionally ", the phone will display video in its original proportion, if still exists spare space,
the phone will add black edge on it.

P a g e | 82
Figure 46: Single Incoming Call – Video
• If the phone set the “Preview” feature for the incoming call from Web UI, the phone will display one

P a g e | 83
more key “Preview” when there is an incoming video call. End users will preview the remote end without
answering the video call. After previewing, end user can tap on Answer key to answer the video call, or
“Reject” key to reject it. This feature should be supported by the SIP server. Please contact service
provider for more information.
Figure 47: Single Incoming Call – Preview-1
Figure 48: Single Incoming Call – Preview-2
Transfer Function for Incoming Call
• If the phone set the “Transfer” feature for the incoming call from Web UI, the phone will display one
more key “Transfer” when there is an incoming call. End users will have the possibility to transfer the
call without answering. After pressing “Transfer” button, end user can enter manually destination or

P a g e | 84
press “MPK” to select a destination. “Reject” key to reject it. This feature should be supported by the
SIP server. Please contact service provider for more information.

P a g e | 85
Figure 49: Single Incoming Call - Transfer -1
Figure 50: Single incoming Call - Transfer - 2
Multiple Calls/Call Waiting
1.
When there is another incoming call during active call, users will hear a call waiting tone, with the LCD
displaying the caller name and ID for the incoming call. In the prompt window, it shows new incoming

P a g e | 86
call from "Jack" with the caller number; the account bar in purple is the current active call with "1004".
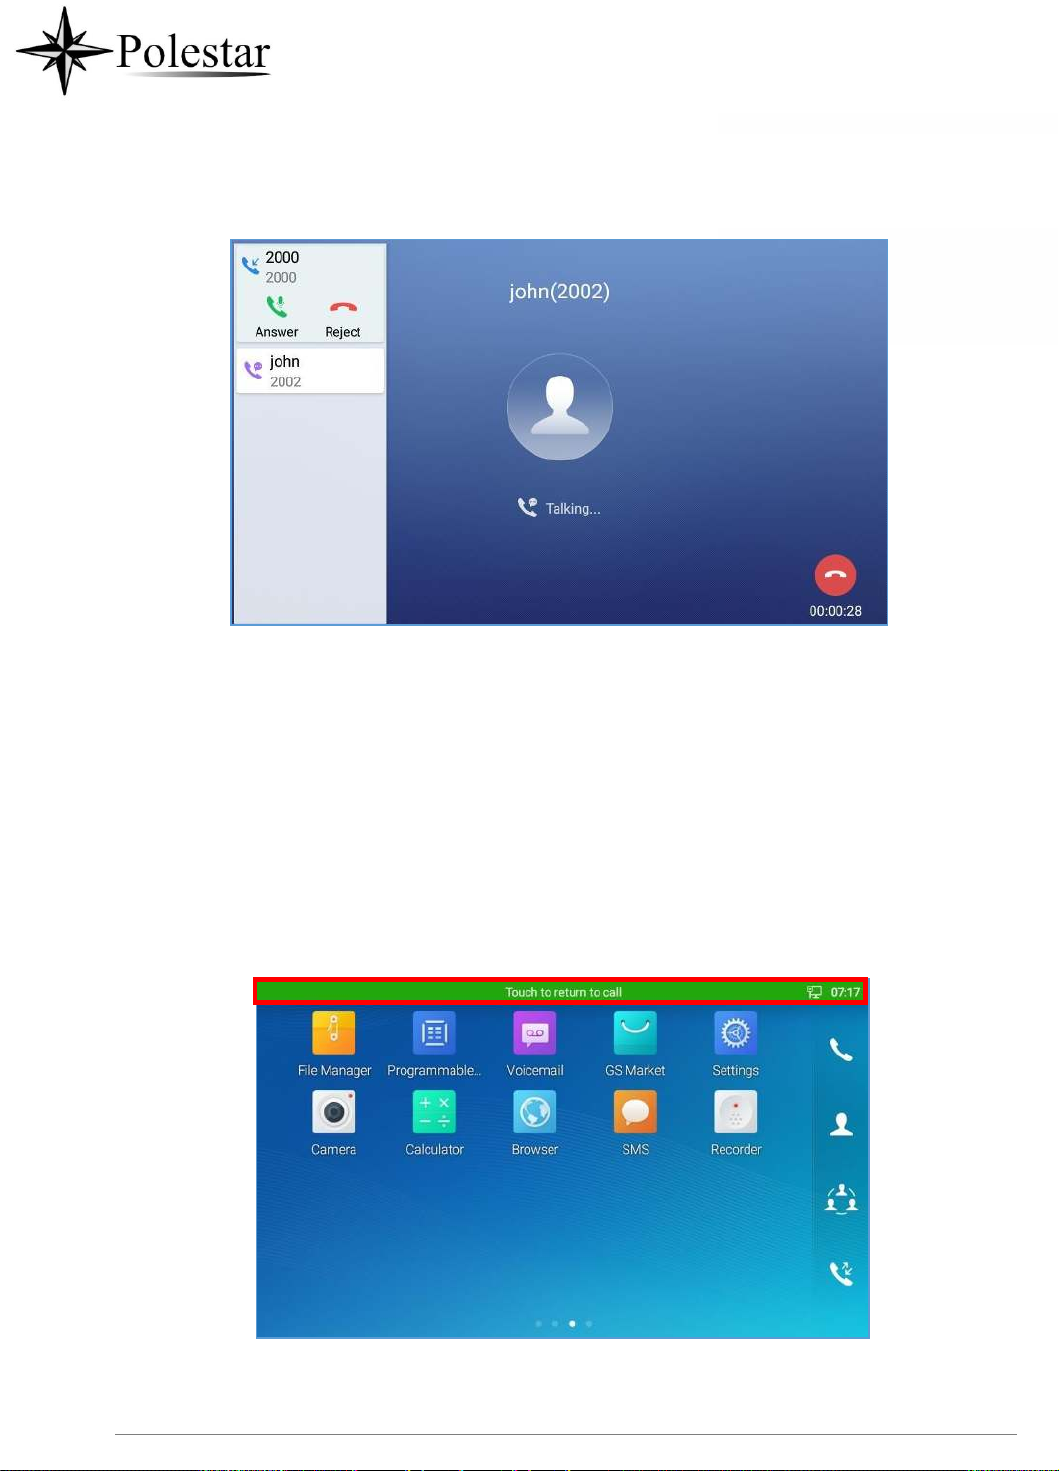
P a g e | 87
2.
Similar to single incoming call, if the incoming call is video call, users can choose to Audio Answer or
Figure 51: Call Waiting
to Video Answer
3.
Once the new call is answered, the current active call will be placed on hold. If the new call is rejected
by tapping on "Reject" softkey, the current active call will not be interrupted.
Call Progress Status
During an active call if Home Button is pressed, the phone will go back to the home screen and the call-in-
progress status will be shown on the CD-SMF status bar, once clicking the bar it will go back to call screen.
Figure 52: Touch to Return to Call Screen

P a g e | 88
Call Hold
During the active call, press HOLD softkey under “More” →”Hold”. The LCD screen will show as below. To

P a g e | 89
resume the call, press UNHOLD softkey on the bottom of the screen.
Figure 53: Call on Hold
Call Recording
1.
During the call, users could record the conversation to the phone by tapping on “Record”
2.
If need to stop the recording, tap on “Stop Recording”
3.
The recording files can be retrieved from the CD-SMF Recorder application
Figure 54: CD-SMF Call Recording

P a g e | 90
MPK Monitoring
During the call, users could view and monitor the programmable keys configured for the current Account:

P a g e | 91
1.
During the Call, press the MPK button as shown above.
2.
The list of MPK configured for the active account will be displayed.
Figure 55: MPK button
3.
Mute
Figure 56: MPK list
User can choose an MPK from the list as they see convenient

P a g e | 92
During an active call, press “Mute” to mute the call. The mute icon will be displayed under the Caller
Name and ID. Press “Unmute” to unmute the call.
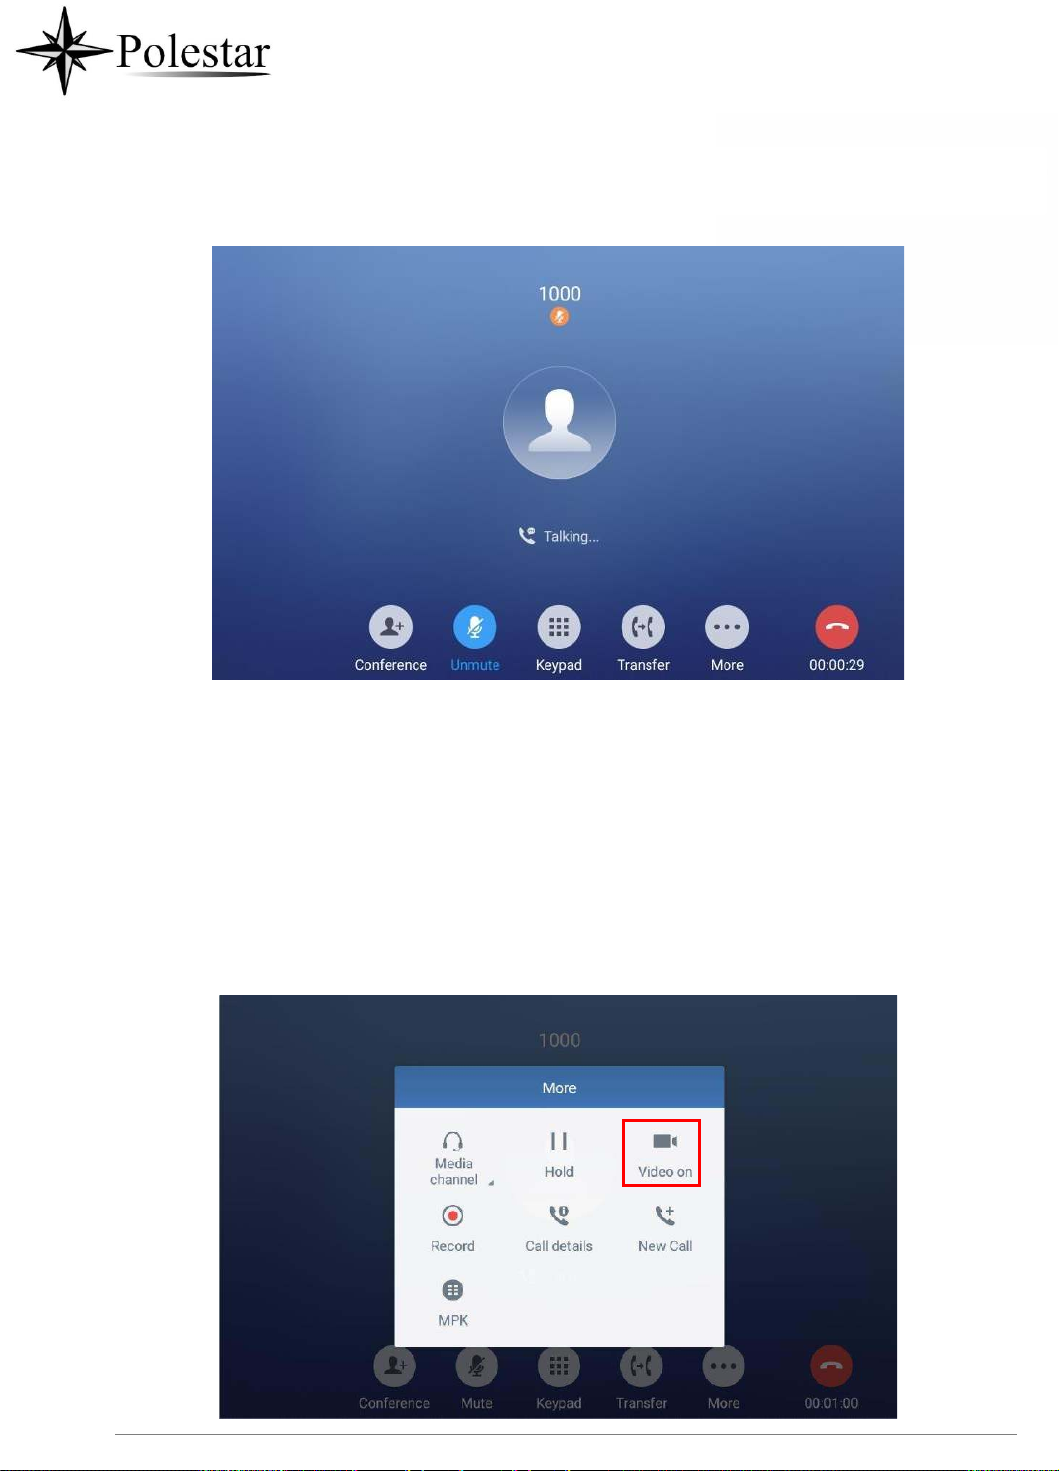
P a g e | 93
Figure 57: CD-SMF Call Mute
Turn on Video during Audio Call
Users could establish audio call first and then turn on video or accept video request during the call if the
other party supports video call as well.
• Turn on video during audio call
During an active audio call, on the call screen, tap on "More" and select "Video On", a video request
will be sent to the other party.
Figure 58: Turn on Video During Audio Call

P a g e | 94
• Accept video request
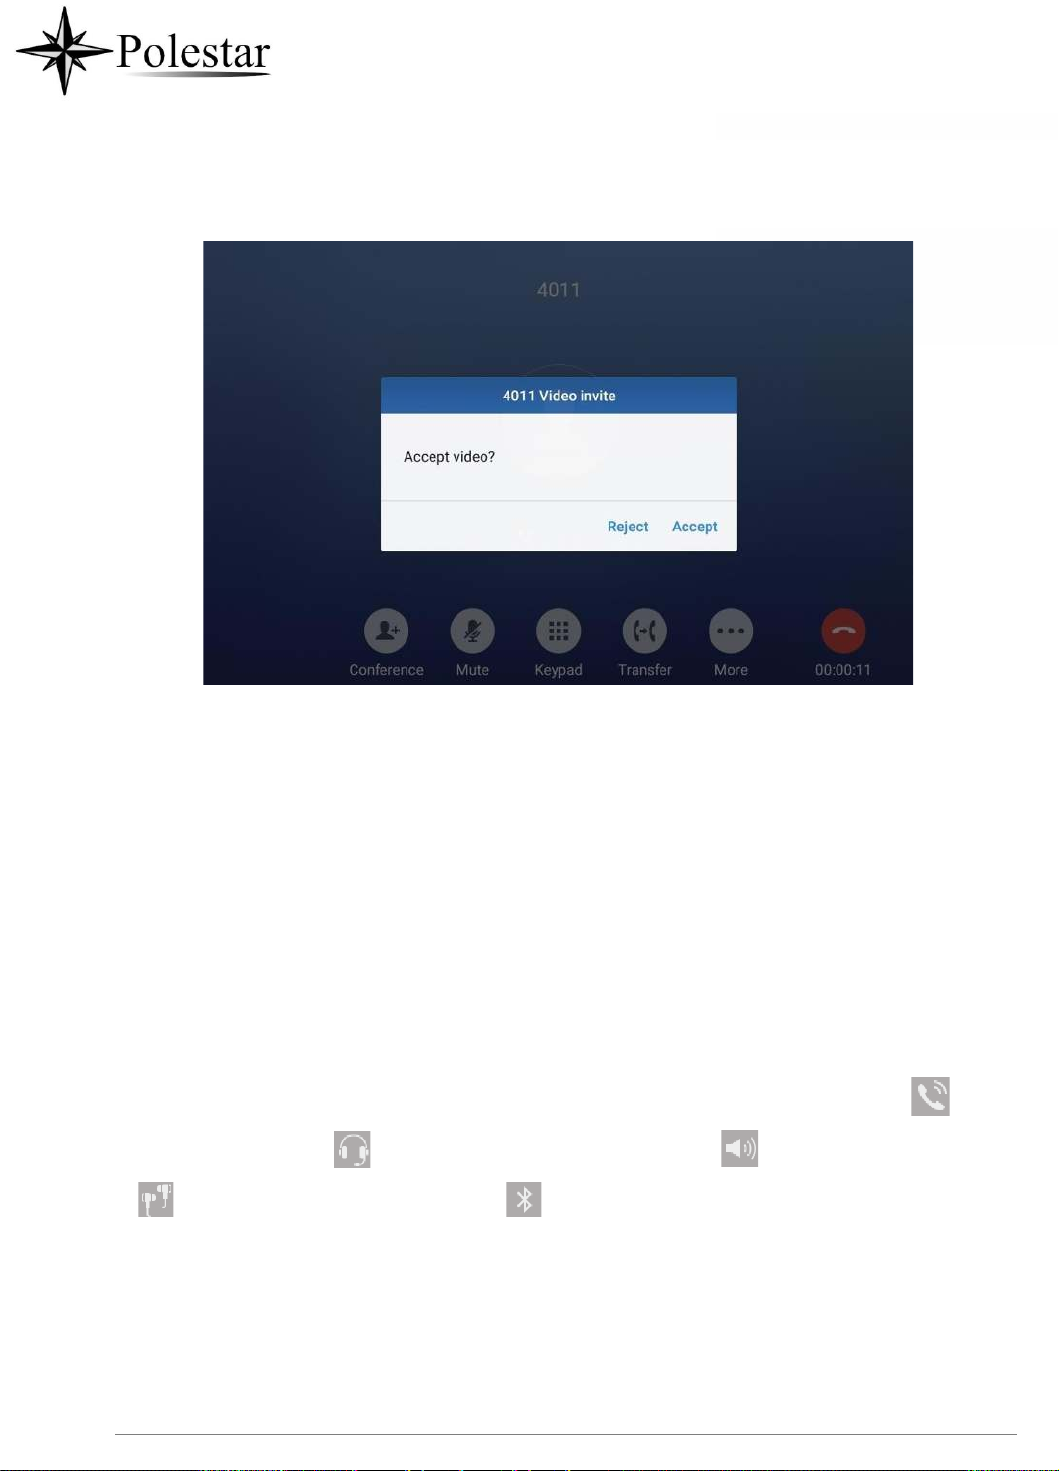
P a g e | 95
If the CD-SMF receives video request during the audio call, a message "Do you want to accept video?" will
be prompted. Select "Yes" to establish video during the call. If the Enable Video Call Feature is disabled
on CD-SMF, the “Video On” option on CD-SMF will be hidden during the audio call. However, if the CD-SMF
receives video request during the audio call, users could tap to accept the video request.
Figure 59: Accept Video During Audio Call
Switch Audio Channel During Call
• The CD-SMF allows users to switch among handset, speaker or headset (RJ9 headset, 3.5mm
earphone, Plantronics EHS headset and Bluetooth headset) when making calls.
• During a call, tap on the first softkey on the bottom to switch audio channel. Tap on icon to use
handset; tap the icon to switch to RJ9 headset; tap on icon to switch to speaker; tap on
to switch to 3.5mm earphone; tap on to switch to Bluetooth headset.
• If Bluetooth headset is connected, the audio will be automatically switched to Bluetooth headset once
the call is established.
• The status bar on the top or the screen shows the current audio channel being used during the call.

P a g e | 96
Figure 60: Switch Audio Channel during Call
Call Transfer
A call can be transferred to another party during the call. The CD-SMF supports blind transfer and attended
transfer.
Blind Transfer
1.
During the active call, tap on "More" softkey.
2.
Select "Transfer" to bring up the transfer screen.
3.
Select transfer mode as "Blind" by tapping on the highlight area in [Figure 61: Blind Transfer]. The default
transfer mode is "Blind".
4.
Enter the digits.
5.
Tap on "Transfer" softkey.
6.
The call will be transferred and CD-SMF will hang up the call.

P a g e | 97
Figure 61: Blind Transfer
Note:
• If wrong digits are entered, tap on to delete the digit one by one;
• If users would like to cancel the transfer, press button to go back to the previous talking
screen.
Attended Transfer
CD-SMF supports attended transfer:
1.
During the active call, tap on "More" softkey. Select "Transfer" to bring up transfer screen.
2.
Select transfer mode as "Attended" by tapping on the mode selection area (see figure below).
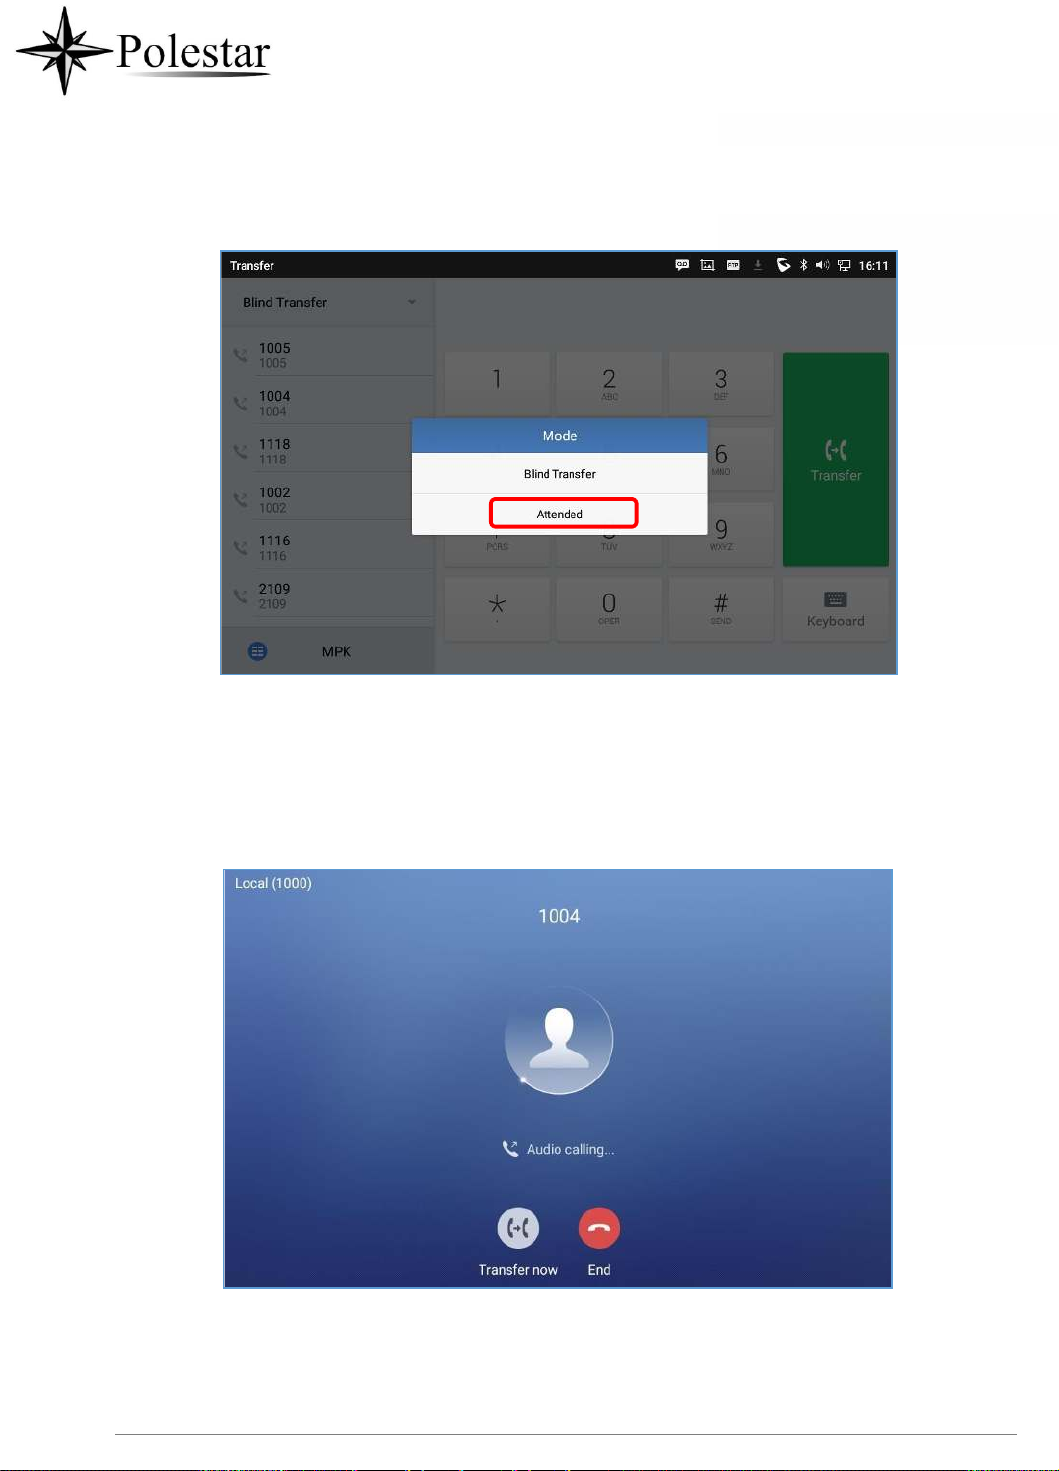
P a g e | 98
3.
Enter the transfer target number, and then press the "Send" soft key on the right.
4.
Before transfer target answers the call, CD-SMF hears the ringback tone, and the touch screen prompts
shown as below. Users could tap on "End" to cancel the transfer,or tap on “Transfer now” to complete
call transfer (Blindly).
Figure 62: Attended Transfer
Figure 63: Attended Transfer - Transferring
5.
After transfer target answers the call, the following screen will be shown up. If the user taps on Red
button, the call wil be not be transferred and the original call will be resumed. If the user taps on "Split"
soft key to separate the calls, the user will talk to the second established call while the first call is on

P a g e | 99
hold.If the user presses on “Transfer now” the call will be then transferred to the transfer destination.

P a g e | 100
Figure 64: Attended Transfer – Split
Besides attended transfers above, users could also consult the third party first before transferring the call.
1.
During the active call, tap More then New Call to make the second call. This will place the current
call on hold.
2.
The second call establishes after the call is answered.
3.
During the active call, tap on "More" softkey.
4.
Select "Transfer" to bring up transfer screen. The other call on hold will be displayed such as
.
5.
Select transfer mode as “Attended” in the transfer mode bar and tap on the call on hold such as
to transfer the call.
6.
The call will be transferred, and CD-SMF will hang up the call.
 Loading...