

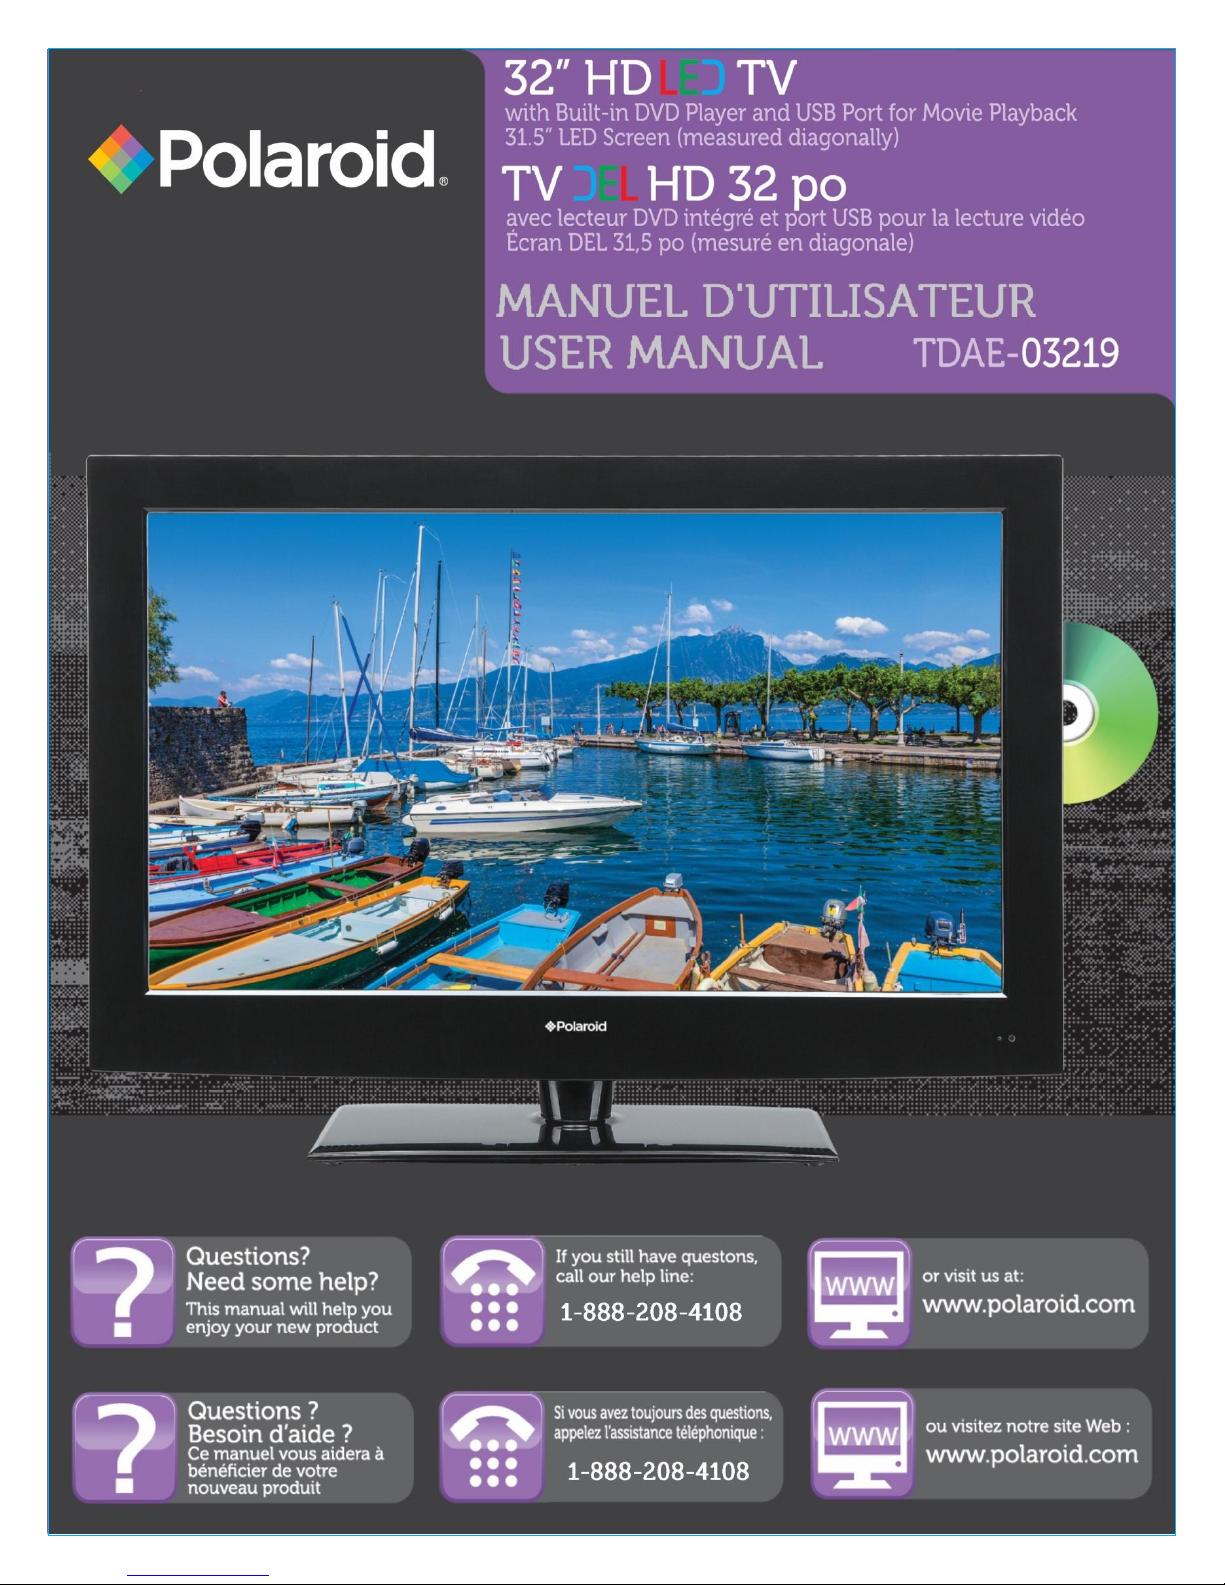
Page 1
Page 2
1
11Last Page
Page 3
2
21Last Page
Page 4

3
Safety Information
IMPORTANT SAFETY INSTRUCTIONS
1. READ INSTRUCTIONS- All the safety and operating instructions should be read before the product is
operated.
2. RETAIN INSTRUCTIONS- The safety and operating instructions should be retained for future
reference.
3. HEED WARNINGS- All warnings on the product and in the operating instructions should be adhered
to.
4. FOLLOW INSTRUCTIONS- All operating and use instructions should be followed.
5. CLEANING- Unplug this product from the wall outlet before cleaning; Do not use liquid cleaners or
aerosol cleaners. Use a damp Cloth for cleaning.
6. ATTACHMENTS- Do not use attachments not recommend by the product manufacturer as they may
cause hazards.
7. WATER AND MOISTURE- Do not use this product near water-for example, near a bath tub, wash
bowl, sink, or laundry tub; in a wet basement, or near a swimming pool, and the like.
8. ACCESSORIES- Do not place this product on an unstable cart, stand tripod, bracket, or table. The
product may fall, causing serious injury to a child or adult and serious damage to the product. Use
only with a cart, stand, tripod, bracket, or table recommended by the manufacturer, or sold with
the product. Any mounting of the product should follow the manufacturer’s instructions, and
should use a mounting accessory recommended by the manufacturer.
9. A product and cart combination should be moved with care. Quick stops, excessive force
and uneven surfaces may cause the appliance and cart combination to overturn.
10. VENTILATION- Slots and openings in the cabinet are provided for ventilation and to ensure
reliable operation of the product and to protect it from overheating, and these
openings must not be blocked or covered. The opening should never be blocked by
placing the product on a bed, sofa, rug, or other similar surfaces.
31Last Page
Page 5
4
Safety Information
This product should not be placed in a built-in installation such as a book case or rack unless proper
ventilation is provided or the manufacturer’s instructions have been adhered to.
11. POWER SOURCE- This product should be operated from the type of power source indicated on the
marking label. If you are not sure of the type of power supply to your home, consult your product
dealer or local power company. For product intended to operate from batter power, or other
sources, refer to operating instruction.
12. GROUND and POLARIZATION- This product may be equipped with a polarized alternating current
line plug (a plug having one blade wider than the other), this plug will fit into the power outlet only
one way. This is a safety feature. If you are unable to insert the plug fully into the outlet, try
reversing the plug. If the plug should still fail to fit, contact your electrician to replace your obsolete
outlet. Do not defeat the safety purpose of the polarized plug.
ALTERNATIVE WARNINGS- This product is equipped with a three-wire ground-type plug, a plug
having a third (grounding) pin. This plug will only fit into a grounding-type power outlet. This is a
safety feature. If you are unable to insert the plug into the outlet, contact your electrician to replace
your obsolete outlet. Do not defeat the safety purpose of the grounding-type plug.
13. POWER-CORD PROTECTION- Power supply cords should be routed so that they are not likely to be
walked on or pinched by items placed upon or against them, paying particular attention to cords at
plugs, convenience receptacles, and point where they exist from the product.
14. PROTECTIVE ATTACHEMENTS PLUG- The product is equipped with an attachment plug having
overload protection. This is a safety feature. See instruction Manual for replacement or resetting of
protective device. If replacement of the plug is required, be sure the service technician has used a
replacement plug specified by the manufacturer that has the same overload protection as the
original plug.
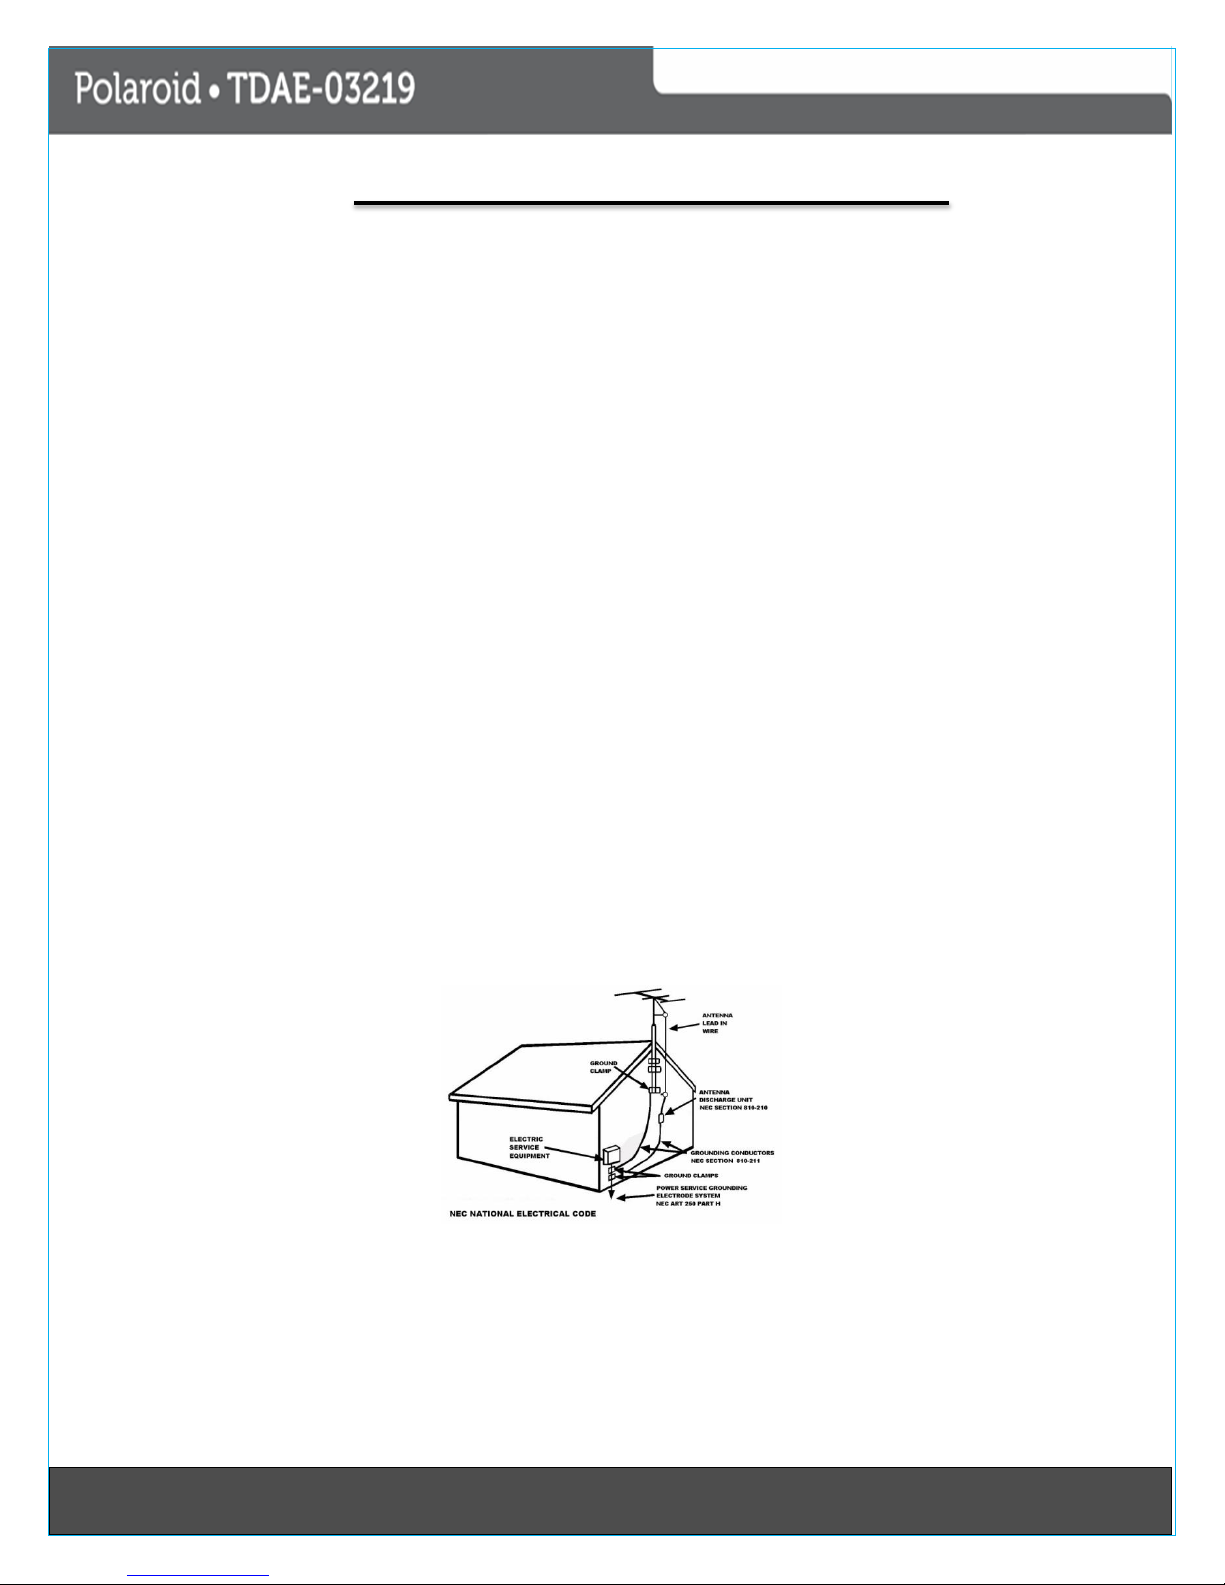
15. OUTDOOR ANTENNE PLUG- If an outside antenna is connected to the receiver, be sure the antenna
system is grounded so as to provide some protection against voltage surges and built-up static
charges. Article 810 of the National Electrical Code, ANSI/NFPA 70, provides information with
regards to proper grounding of the mast and supporting structure, grounding of the lead-in wire to
an antenna-discharge unit, size of grounding conductors, location of antenna-discharge unit,
connection to grounding electrodes and requirements for the grounding electrodes.
16. LIGHTING- For added protection this product during a lighting storm, or when it is left unattended
and unused for long periods of time, unplug it from the wall outlet and disconnect the antenna or
cable system. This will prevent damage to the product due to lighting and power-line surges.
41Last Page
Page 6

5
Safety Information
17. POWER LINES- An outside antenna system should not be located in the vicinity of overhead
18. OVERLOADING- Do not overload wall outlets, extension cords or Integral convenience
19. OBJECT AND LIQUID ENTRY- Never push objects of any kind into this product through
20. SERVICING- Do not Attempt to service this product yourself as opening or removing covers
21. DAMAGE REQUIRING SERVICE- Unplug this product from the wall outlet and refer servicing to
22. REPLACEMENT PARTS- When replacement parts are required, be sure the service
23. SAFETY CHECK- Upon completion of any service or repairs to this product, ask the
24. WALL OR CEILING MOUNTING- The product should be mounted to a wall or
25. HEAT- The product should be situated away from heat sources such as radiators,
power lines or other electric light or power circuits, or where it can fall into such power lines or
circuits. When installing an outside antenna system, extreme care should be taken to keep
from touching such power lines or circuits as contact with them might be fatal.
receptacles as this can result in a risk of fire or electrical shock.
openings as they may touch dangerous voltage points or short-out parts that could result in a
fire or electrical shock. Never spill liquid of any kind on the product.
may expose you to dangerous voltage or other hazards. Refer all serving to qualified service
personal.
qualified service personnel under the following conditions:
a) When the power-supply cord or plug is damaged
b) If liquid has been spilled, or objects have fallen into the product.
c) If the product has been exposed to rain or water.
d) If the product does not operate normally by following the operating
instructions, adjust only those controls that are covered by the operating
instructions as an improper adjustment of other controls may result in
damage and will often require extensive work by a qualified technician to
restore the product to its normal operation.
e) If the product has been dropped or damaged in any way, and.
f) When the product exhibits a distinct change in performance- this indicates a
need for service.
technician has used replacement parts specified by the manufacturer or have the
same characteristics as the original part. Unauthorized substitutions may result in
fire, electric shock, or other hazards.
service technician to perform safety checks to determine that the product is in
proper operating condition.
ceiling only as recommended by the manufacturer.
heat registers, stoves, or other products (including amplifiers) that produce heat.
WARNING: Changes or modifications to this unit not expressively approved by the party
responsible for compliance could void the user’s authority to operate the equipment.
51Last Page
Page 7
6
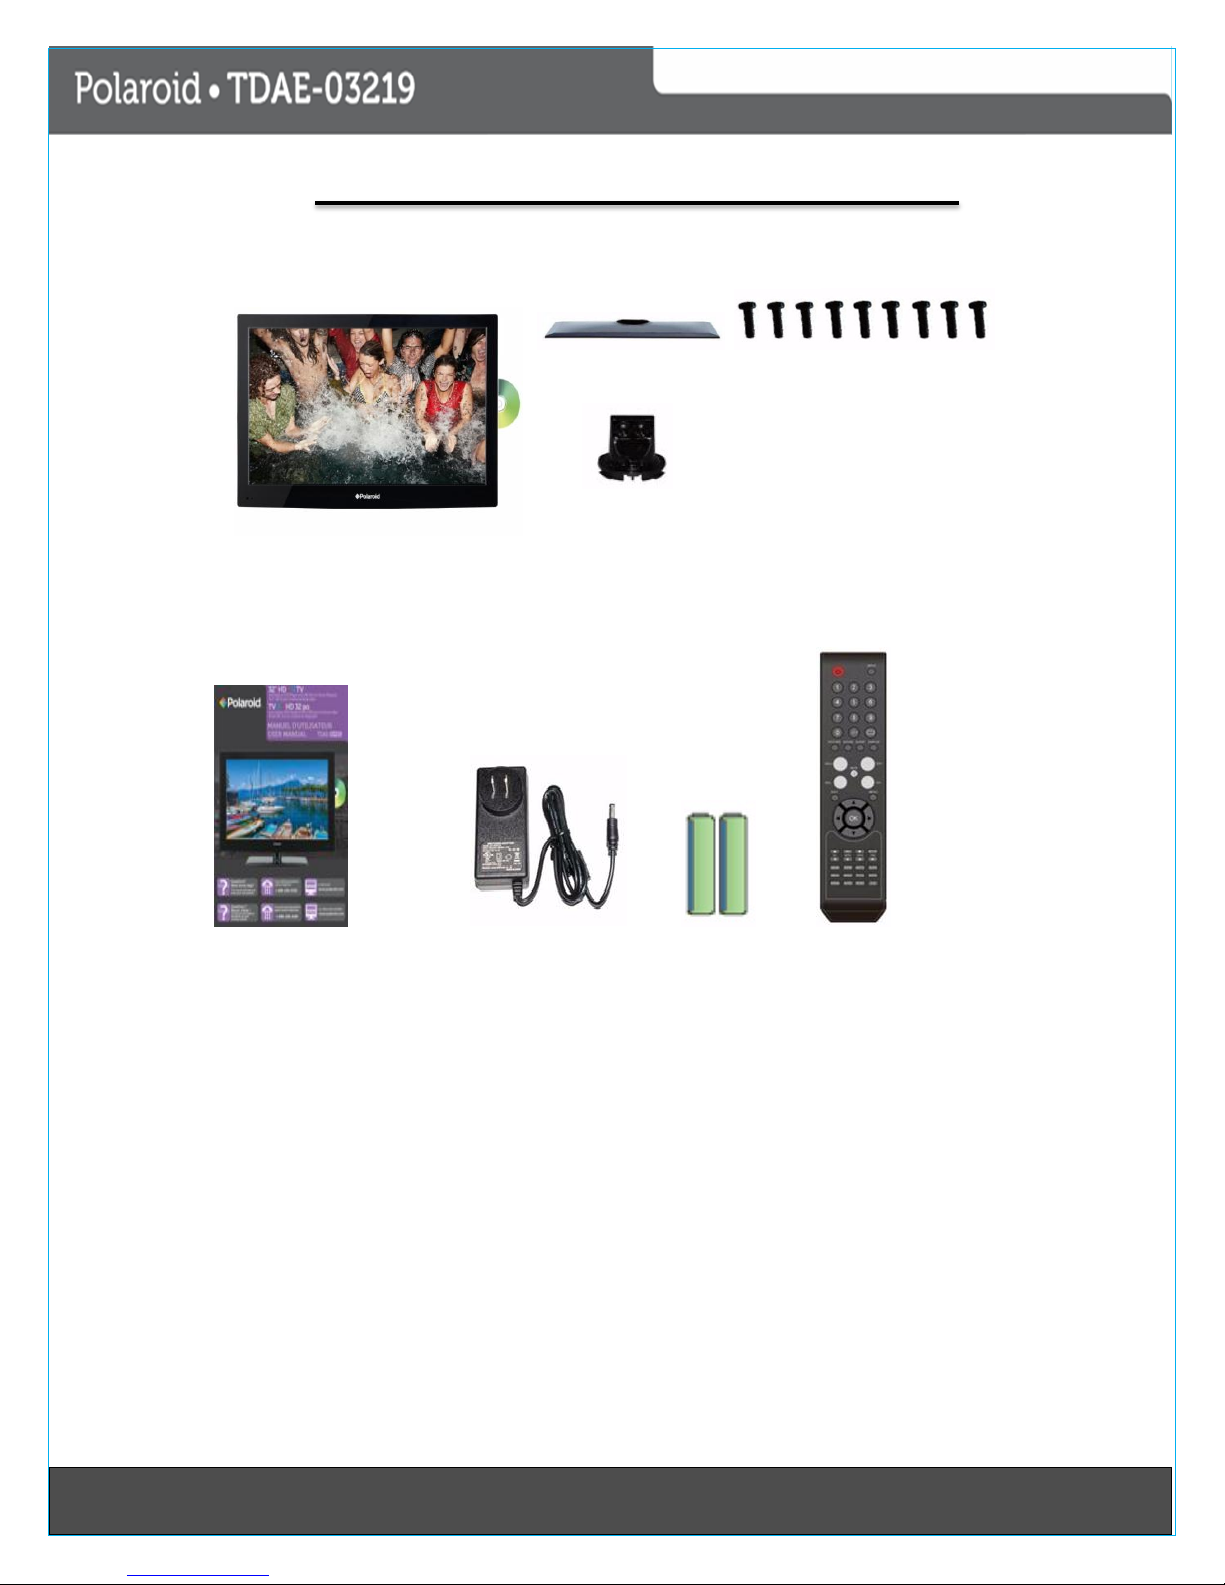
Contents
Unit and Accessories
TV Set
Stand Base Screws x9
Stand Neck
Manual Adaptor Batteries
Remote
Products and Features
• 32”(31.5 measured diagonally) wide screen TV
• 1366(H) x 768 (V) native resolution for Full-HD performance
• Integrated ATSC TV tuner for true digital connections
• HDMI® input for true digital connections
• VGA port for connection to PC
• Built-in DVD Player
HDMI is a trademark of HDMI licensing LLC in the United States and other countries.
61Last Page
Page 8

7
Location of Controls
Introduction
Front View
1. Speaker
2. Stand Base
3. Power indicator
4. Remote Sensor
Note : IR Infrared Receiver IR signals
from the remote control.
(Power on/Standby) LED Indicator:
Press Power to turn on and off.
Side View
1. DVD Slot
2. Input Button
3. Menu Button
4. Channel up button
5. Channel down button
6. Volume up button
7. Volume down button
8. Play button
9. Eject
10. Power Button
The effective receiving range for the signal is 5-8
meters from the remote control window and 300 to
the left or right side and 200 above or below the
remote window.
71Last Page
Page 9
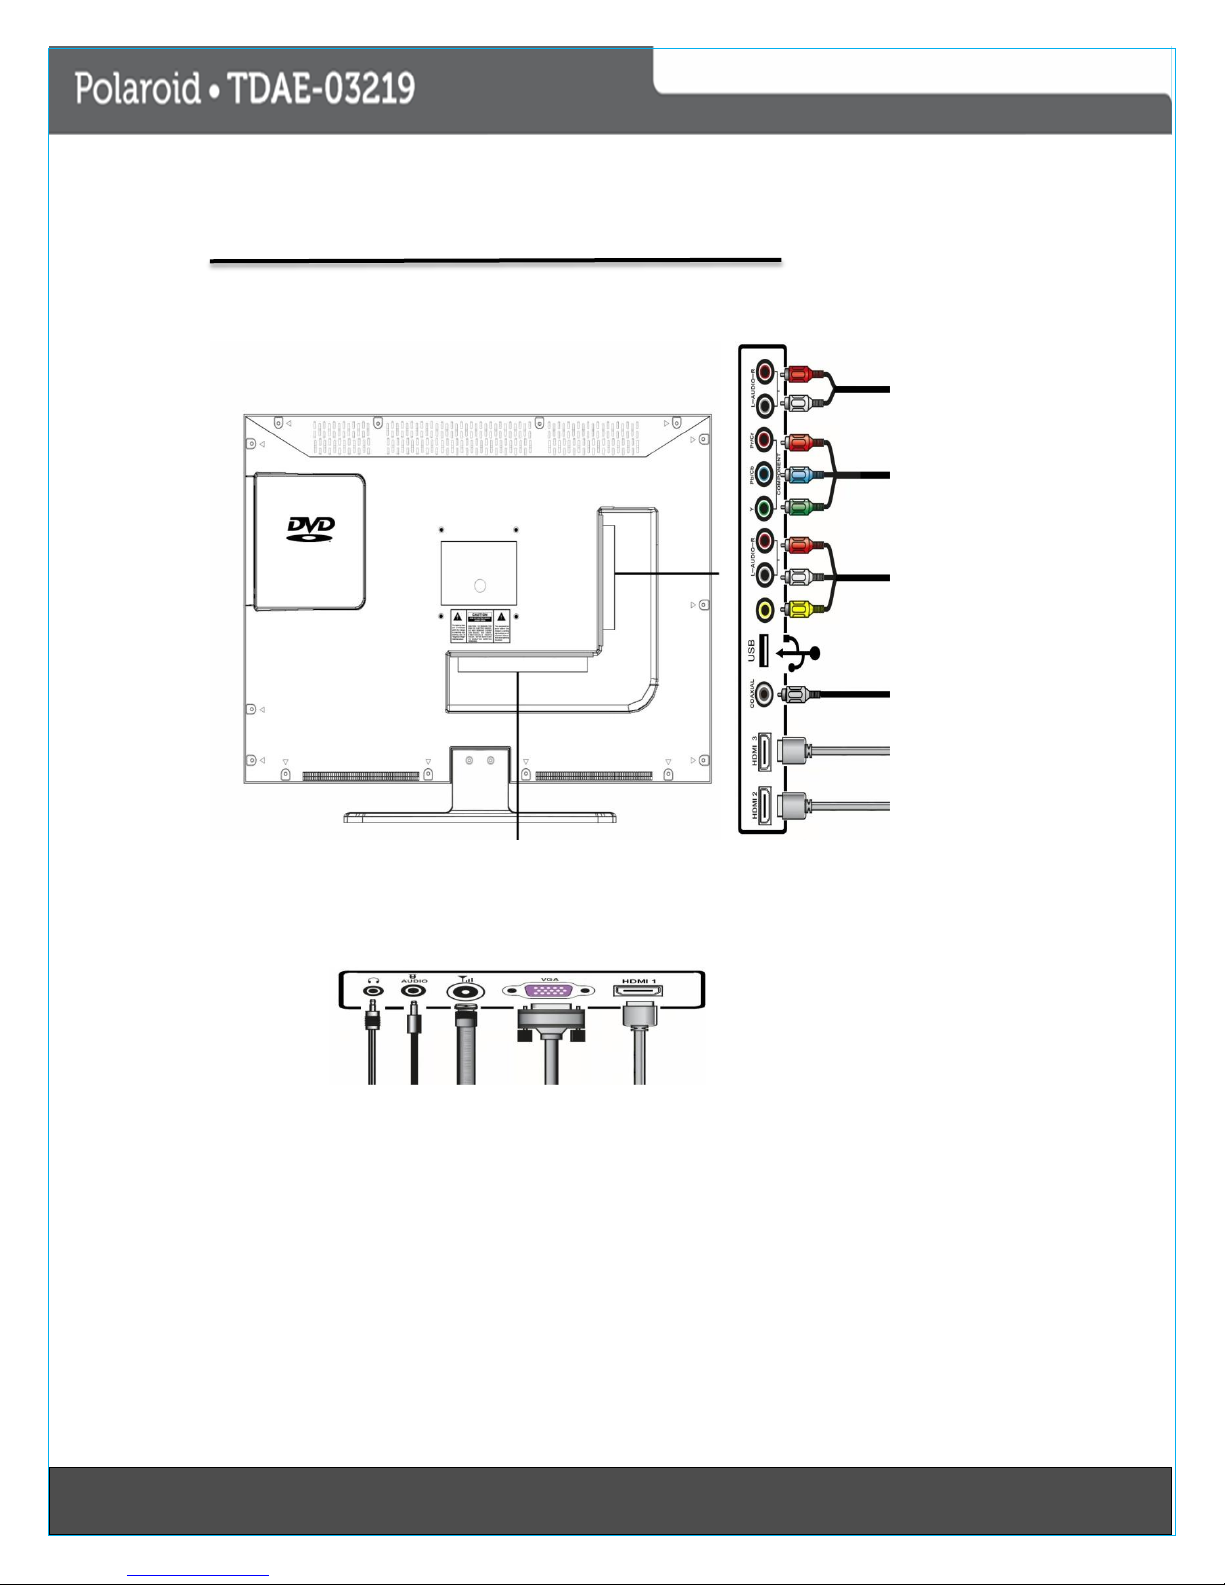
8
1 2 3 4 5
12
11
10
9
8
7
6
Rear View
Location of Controls
1. Headphone Jack 7. HDMI 3
2. PC Audio IN 8. Coaxial
3. 75 ohm Antenna Socket/Cable 9. USB Input
4. PC IN 10.Composite : Video Input
5. HDMI Input 1 11.Component Video Input
6. HMDI Input 2 12. L/R Audio Output
81Last Page
Page 10
9
Wall Mounting
A wall mount kit (purchased separately) would allow you to mount your TV on the wall. For detailed
information on installing the wall mount refer to the instructions provided by the wall mount manufacturer. It
is strongly recommended to contact a technician for professional assistance for wall mount installation
Polaroid is not responsible for any damage to the product or injury to yourself or others resulting from the
wall0mounting.
Dimension for Mounting Hole Pattern
400mm
200mm
This TV is compatible with a 400mm x 200 mm mounting hole pattern.
4 pcs screws are required for installing the wall mount bracket to your TV. Do not use screws that are longer
than 10 mm. Screws that are too long may cause damage to the inside of the TV set.
Do not fasten the screws too tight for this may damage the TV or cause the TV or cause the TV to fall,
resulting in personal injury.
Do not mount your TV at more than 15 degree tilt.
Always use two people to mount the TV to a wall.
Do not install your Wall Mount Kit while your TV is turned on. It may result in personal injury due to electric
shock.
91Last Page
Page 11

10
External Devise Connections
You can enjoy picture, sound and a PC monitor by connecting a DVD player, video game system or computer
to the input located on the rear of the LED TV set.
For the cable, use a commercially available audio/video cable.
For more information about external device connections, see the operation manuals of you external
devices.
Make sure that the corresponding cables are connected to each input. Connecting other cables may
result in a malfunction..
Component Input ( YPbPr): Picture can be displayed only when a 480i or 480p or greater signal is
received.
101Last Page
Page 12

11
Remote Control
1. Button
2. Numeric Buttons 14. Return
previous
3. Picture button 15. Display
Button
4. Sound Button 16. Sleep Set
5. Volume + 17. Channel +
6. Mute Button 18. Channel
7. Volume - 19. Menu
8. Exit button 20. Stop
9. OK or Enter button 21. Set Up
10. Numeric buttons
11. Play/Pause Button
12. Eject Button
13. Input
111Last Page
Page 13

12
DVD Remote Control
1. Play/Pause button 11. Stop Button
2. Eject Button 12. Setup Button
3. Fast Reverse 13. Next Chapter
4. Fast Forward 14. Previous Chapter
5. Language Button
6. Zoom 16. Subtitle
7. Menu 17. GOTO
8. Angle 18. Title
9. Program 19. A-B
10. Intro 20. Repeat
15. Slow
121Last Page
Page 14

13
Remote Control
Inserting Remote Control Batteries
On the Back of the remote, control, push down the catch on the battery compartment cover and lift to
remove it.
Insert the two AA batteries supplied, ensuring that you follow the polarity diagram inside the battery
compartment.
Remit the cover.
Battery Disposal
Please ensure batteries are disposed safely. Never dispose batteries in a fire or with house hold waste. Check
with your local authority for disposal regulations.
The batteries (battery pack or batteries installed) shall not be exposed to excessive heat such as sunshine,
fires or the like.
Caution
Do not attempt to recharge, short-circuit, disassemble heat or throw the batteries into the fire.
Placing with wrong or mixed polarities batteries will result in damage to the batteries and/or may
result in a malfunction of the unit.
Do not mix old and new batteries.
Dispose of batteries properly in accordance with local law.
Do not mix alkaline, standard (carbon-zinc), or rechargeable (nickel-cadmium) batteries.
131Last Page
Page 15

14
Using Remote Control
Changing Channels
Press the “CH /” buttons to change higher or lower stored main channels and sub-channels.
Press numeric button “0-9” and”•” button and press number “2” button.
Then hit the “ENTER” button to confirm.
To review the stored Channel
Press “CH-List” button to review the stored channels
To select the favorite Channel
Press “FAVORITE” button to enter to favorite channel list, to select the desired channel press the
“/” button then press the “ENTER” button.
To Change to Audio Channel
Press the “AUDIO” button to choose the desired audio channel, if the bilingual language is available
by the broadcasting station.
To Review the station information
Press the “INFO” button to review the station information.
To review the program information
Press the “GUIDE” button to enter the guide menu, and press the “/” button to see next page if
the contents of information is more than one page.
To change the screen aspect ratio
Press the “ZOOM” button to change the aspect ratio of picture size.
To return to the previous channel viewed
Press the “SWAP” button to review the previous channel.
To turn on or turn off the close captioning
Press the “CCD” button to turn ON or turn OFF close caption function.
To Change the picture effect
Press the “PP” button to select the picture effect.
There are four modes for picture with different effect.
User (The picture brightness/contrast/color/sharpness is preset by user)
Standard (Fixed mode for normal condition)
Dynamic (Fixed mode for day time with high brightness environment)
Mild (Fixed mode suitable for bedroom without light condition)
To Set the sleep time
Press the “SLEEP” button to select a predetermined time the TV will turn off. The sleep time can be
set to count down from 15 to 240 minutes.
To mute the sound
Press the “MUTE” button to mute the sound, press once again to resume the sound.
To select Input mode
Press the “INPUT” button to select source model.
AUTO POWER OFF
If no signal is continuously detected from the antenna or broadcasting for more than 10 minutes,
the TV will power-off automatically.
141Last Page
Page 16

15
Guide-This guide shows the keys (button) on the remote
control for selecting the items in the OSD menu
Operating Your TV
Once you have connected your TV to an antenna or cable system, plugged the TV in, and put batteries in the
remote, you are ready to use the TV. The first thing you should do is program your TV to memorize all of the
available channels in your area.
Basic Operation
Power on/off
1. Connect to the power supply with the power adaptor
2. To turn on the TV
Press power button on the TV or Remote Control
- To turn off TV
Press Power button on the TV or Remote Control
Input Source select
Press INPUT button on the TV set or remote control to display input source menu, and
use CH+/- on the TV set or / buttons on the remote control to select the input
source, press OK button on the remote control to enter.
Note: Before you select the input source, make sure the connections are prepared.
First Time installation
When you power ON the unit for the first time, the screen will show the initial setup dialog.
Initial setup menu:
Picture
Sound
Channel
Parental
Setup Press OK button
Other
Picture
Submenu (Picture menu for example)
Highlight the PICTURE and press the “ENTER” button to
access to the sub-menu.
Use the / button to select the main menu and press
OK to enter the submenu.
In the submenu use / button to select the function,
press the /button to adjust/setup or press to enter the submenu.
*(Press Menu Button to return to the upper menu
*(Press Exit button to exit the menu display)
151Last Page
Page 17

16
Picture Menu
Description
Picture Settings: Press button to enter the Picture Settings menu
Operating Your TV
Picture mode: Select between Dynamic, Standard, Movie, User and Power
Saving.
You may select the picture mode directly by pressing the PICTURE button on
the remote control.
Note: When selecting the “Power Saving” the machine is in energy-saving
status.
Brightness: Adjust brightness of the picture
Contrast: Control the difference between the bright and dark regions of the
screen picture.
Color: Adjust color of the picture.
Tint: Control the fresh tones to make them appear natural.
Sharpness: Set the amount of fine detail on the picture.
Screen Size: Select the display mode of the picture between Wide, Cinema,
Zoom, Normal and Just Scan.
PC Settings: If the Video input signal comes from your PC, you may adjust the vertical position, Horizontal
Position, Clock, and Phase or even perform an Auto adjustment.
Auto Adjust: Press OK button to setup the parameter of the screen
automatically.
Clock: Adjust the pixel clock frequency until the image size is
maximized for the screen.
H/V Position: Adjust the transverse/vertical position of the screen.
Phase: Adjust the phase of the ADC Sampling clock relative to the sync
signal until a stable image is obtained.
Reset: Press OK button to reset the settings.
Color Temp.: Select between Normal, Cool and Warm
161Last Page
Page 18

17
Operating Your TV
OSD Menu
1. Advanced Picture Settings: Press button to enter the Advanced Picture Settings.
Dynamic Contrast: Select the dynamic contrast mode
between Off, Low, Medium and High.
Film Mode: Activate or deactivate the Film Mode.
Noise Reduction: If the broadcast signal receiver is weak
you can select the DNR option to reduce the video noise
level between Off, Low, Medium, High.
MPEG Noise Reduction: Select the MPEG Noise
Reduction option to reduce the picture noise level
between Off, Low, Medium and High.
2. Sound Menu
Description
Sound Settings: Press to enter the Sound Setting
menu.
Sound Mode: Select your desired picture mode as follows:
Dynamic, Standard, Soft and User.
You may select the sound mode directly by pressing the
SOUND button on the remote control.
Bass: Low frequency intensity
Treble: High frequency intensity
Balance: Left and right stereo audio channels balance.
Surround Mode: Activate or deactivate the Surround
function.
AVL: Activate or deactivate the Auto Volume Limited function.
Analog Sound: Select the Analog Sound mode between Stereo, Mono and SAP.
Digital Sound: Select the Digital Sound Language.
Digital Audio Output: Select the Digital Audio Output mode between PCM, RAW and Off.
171Last Page
Page 19

18
Operating Your TV
Equalizer Settings: Press button to enter the
Equalizer Settings menu.
Use / button to select the mode between
User, Off, Rock, Pop, and Jazz.
You could press button to enter the item and
use the / buttons to adjust.
You could come back to the Mode selecting item
by pressing button.
3. Channel Menu
Description
Channel List: Display the channel list.
Favorite List: Display the favorite channel list.
Channel Settings: Press button to display the
Channel Settings menu.
Press /// button to select the item and press
OK button to change the settings.
Signal Type: Allows you to select between Air and
Cable.
Auto Channel Search: Press OK to start Auto Channel
Search.
If you select “Cable” as input signal in Antenna item,
you can press button to search the channels
automatically. The receivable channels will be stored
automatically. When searching channels, press
“MENU” to stop the search.
If you select “Air” as input signal in Antenna item, you can press button to search the channels
automatically. The receivable channels will be stored automatically. When searching channels press
“Menu” to stop. NOTE: It will take a while to auto scan NTSC or ATSC mode, please wait patiently.
181Last Page
Page 20

19
Operating your TV
Parental Control
You must enter the password to gain access to the Parental Control menu. The default password is 000. You
may modify the following options:
V-Chip: Press button to enter V-Chip menu.
Canada V-Chip: Press button to enter the Canada V-Chip
menu
Movie Rating
The Movie rating (MPAA) is used for original movies rated by the Motion Picture Association of
America (MPAA) as broadcasted on cable TV and not edited for television.
Use / button to select:
Rating Description
G General Audiences. Movie appropriate for all ages
PG Parental Guidance Suggested. May contain material not suitable for younger viewers
PG-13 Contain content that may not be appropriate for viewers under 13
R Restricted. Contains Adult content, no one under 17 without parent.
NC- 17 No one 17 and under admitted
X Adults only
191Last Page
Page 21

20
Rating
Description
TV-Y
All children
TV-Y7
Children over seven years of age
TV-G
General Audience
TV-PG
Parental guidance suggested
TV-14
Parents strongly cautioned
TVMA
Mature audience only
Rating
Description
FV
Fantasy violence
V
Violence
S
Sexual situations
L
Adult Language Sexually
suggestive dialog
D
Sexually suggestive dialog
Operating Your TV
TV Ratings: Use / buttons to select the desired rating & press button to block or unblock.
OSD Menu
Canada V-Chip: Press button to enter the Canada V-Chip menu.
English Rating: Select among C, C8+, G, PG, 14+ and 18+
French Rating: Select among G, 8ans+, 13ans+, 16ans+ and 18ans+.
Block Unrated Show: Activate or deactivate the Block Unrated Show function.
Downloadable Rating: Setting the Downloadable Rating in DTV mode when the program has the
rating information.
Clear Downloadable Data: Clear the downloadable data of the TV.
Note: The two operations above only valid when playing the downloadable data stream.
Source Lock: Invalidate the input source input you selected.
Changing password: To change the password, you must enter the
new password twice to confirm it. Note: Do not forget the
password.
Keypad Lock: Invalidate the buttons one the TV set.
Source Lock: Invalidate the source input you select.
201Last Page
Page 22

21
Operating your TV
5. Setup Menu
Description
.
Caption Display: Press button to enter the
“Close Caption” Menu.
Caption Display: Activate or Deactivate the
displaying.
Analog Caption Type: Allows you to select
the advanced selection among: Service 1,
Service 2, Service 3, Service 4, Service 5, and
Service 6.
Digital CC Preset: Select the Digital CC Preset
between Default and Custom.
Digital CC Style: Setting the Digital CC Style.
Menu Language: Select OSD menu language.
Clock: Press button to enter the Clock
menu.
Time Zone: Select the time zone for the TV.
Auto Clock: Activate or deactivate the Auto
Clock function.
Setup Time: Display the setup time of the
TV.
Day of Week: Display the day of the week.
Daylight Savings Time: Activate or
deactivate the Daylight Saving Time
function for the TV.
211Last Page
Page 23

22
Operating Your TV
6.
Blue Screen: Turn on/off the blue screen function when there is no signal.
No Signal Power Off: The TV will turn off automatically if there is no signal after 10 minutes.
Operation Power Off: The TV will turn off automatically if there is no operation on the TV after 3
hours.
All Reset: Reset all the settings.
Use the Electronic Program Guide (EPG)
Your TV has as Electronic Program Guide (EPG) that supplies information, such as program lists and
start/end times for programs. In addition, detailed information about the program is often
available in the EPG. (The availability and the amount of program details will vary depending on
the broadcaster.)
To use the EPG
In digital TV mode, select a channel you want to watch.
Press the “GUIDE” button on the remote control and the EPG menu will appear with the
currently active channel.
By repeatedly pressing the “/” button, the information for additional future program
will be displayed
Press the “/” button to select the previous or next program.
Press the “GUIDE” button one or more times to close the menu.
View channel information
Press the “INFO button once to display the information of the channel being viewed.
Press the “INFO” button again to display the contents of the channel being viewed.
Press the “INFO” button again to close the menu.
221Last Page
Page 24

23
DVD Operation
Basic Operation
Press the Power button on the TV or remote control, then press the INPUT button to select DVD mode. If
there is no disc in the DVD player the screen will show “NO DISC”. Insert the disc according to the picture next
to the disc slot. The player will automatically draw the disc into the player. To “EJECT” the disc, press the
EJECT button on the TV or the “” button on the remote
control.
1. After you’ve made all connection turn on your LCD TV.
2. Insert a DVD or CD disk in DVD slot with the disk label
facing the front of the TV.
3. A message will appear on the screen: “Would you like
to switch to DVD Source.
4. Press “ENTER” button on the remote control.
5. The DVD or CD should begin to play.
6. Use the DVD control buttons near the bottom of the
remote control disk playback.
7. Push the “EJECT” button on the remote control to eject the disk.
NOTE: The build-in DVD player is not compatible with Blu-Ray disks.
It is recommended to take the disk out after the disc is ejected, otherwise the same disc cannot
load onto disc slot by pressing the disc.
DVD Setup Mode
Set up Mode provides the menu for the configuration of general setup Page, Audio Setup
Page, Dolby Digital, Setup, preference Page.
Item selection in the Setup Menu is done by using the Navigation arrows, Setup button
and the OK button.
Press SETUP button first, enter into the SETUP MENU, then press the button, you can
enter into the next Sub-menu.
Press the Setup Button again to exit the Setup Menu.
General Operation
TV Display
4:3 pan scan-This is selected when the
DVD player is connected to a normal
TV. Wide-screen images are show on
the screen but with some parts cut
automatically.
4:3 Letter Box-This is selected when
the player is connected to a normal TV.
Wide-screen images are shown on the
screen with black belt on the top and
bottom.
Wide-This is selected when the player
is connected to a wide screen TV.
231Last Page
Page 25

24
DVD Operation
OSD Language
This is used to select the OSD language.
Screen Saver
Start the screen saver, the screen saver
image will appear when the player stops or
the picture is frozen for a few minutes. This
saver can keep the screen from being
damaged.
ON (Start the screen saver)
Off (Remove the screen saver)
Last Memory
You can set the last memory “on” and “off”
option.
If you select “ON”, the machine will shut
down the before the settings for memory,
re-boot the machine settings, Set near the
same time.
If you select “Off” every the machine
automatically switches back to the default
settings
On (Start the memory)
Off (Remove the memory)
241Last Page
Page 26

25
DVD Operation
Audio Setup
Speaker Setup
In the “Audio Setup page” press “” button to select “Speaker Setup” item; press “OK Enter” or “” button
to get into the “Speaker Setup Page”
Downmix
LT/RT
A disc recorded multi-channel soundtrack, the output signal will be incorporated to left and right channel/
Stereo
A Disc recorded multi-channel soundtrack; the output will be incorporated to stereo.
251Last Page
Page 27

26
DVD Operation
Dolby Digital Setup
Dynamic
This is used to set the compression ratio in order to control; the sound (volume) contrast.
You must press Stop twice to enter Preference Page or NO Disc.
TV Type
PAL
This is selected when the player is connected to a PAL System TV.
Multi
The player will set the TV system according to the disc in the tray.
NTSC
This is selected when the player is connected to a NTSC System TV.
261Last Page
Page 28

27
DVD Operation
Prefence Setup
Audio-If a language listed below is recorded on the
disc; you can play the sound in such language. If not,
the recorded language will be used.
Subtitle-If a language listed below is recorded on the
disc, you can set the subtitles to be displayed in such
language; if not, the recorded language will be used.
Disc Menu-If the language listed below is recorded on
the disc you can set the Menu to be display in such
language; If not, the recorded language will be used.
271Last Page
Page 29

28
Rating
Description
G
General Audience
PG
Parental guidance suggested. Some
material may not be suitable for children
PG-13
Parental guidance strongly suggested.
Some material may not be suitable for
children under 13 years of age.
R
Restricted guidance. Not suitable for
children 17 years of age unless
accompanied by a parent or guardian.
NC-17
Not suitable for children under 17 years of
age.
DVD Operation
Parental
When playing disc with parental lock function, you may select an Age Control Grade according to grade of
disc and your own preference. For example, if PG is selected, DVD Disc rated higher than PG grade cannot be
played.
User can change the password that is required when the user wants to change the Age Control Grade in the
Parental Locking Function. NOTE: (Default password is 123456)
Default
User can load the original factory setting by choosing REST and press the “OK” button.
281Last Page
Page 30

29
Trouble Shooting
Your television is designed to give you trouble-free performance for many years. If you have a
problem with your TV, try the solutions listed below.
There is no picture or sound or TV doesn’t turn on.
Make sure the TV is plugged in,
Make sure MUTE is not set on.
Make sure the POWER is on.
Make sure a headphone is not inserted,
If there is neither picture nor sound, unplug the TV for 30 seconds, then plug it in and try again.
There is no picture or sound on some UHF channels.
Try another station. If the other stations are OK it may be station problem.
Check that the antenna is connected and adjusted correctly, in good working order and has no broken
wires.
See if anything is interfering with the antenna signal.
The sound is OK but the picture is poor.
Try another station. If the other stations are OK it may be a station problem.
Check that the antenna is connected and adjusted correctly, in good working order and has no broken
wires.
There is poor reception on some channels.
Try another station. If the other stations are OK it may be a station problem.
Check that the antenna is connected and adjusted correctly, in good working order and has no broken
wires. Antenna not included.
The picture rolls, slants, shows lines, is grainy, has poor color, or has ghosts.
Try another station. If the other stations are OR it may be a station problem.
Check that the antenna is connected and adjusted correctly, in good working order and has no broken
wires.
See if anything is inferring with the antenna signal.
The remote control does not work.
Make sure the TV is plugged in.
Make sure there are fresh batteries in the remote control.
Make sure there is nothing blocking the remote control signal.
Lost the parental control password
In the password screen, enter the universal password”123456”. After the universal
password, you must create a new password.
291Last Page
Page 31

30
Keep it dry. If water should get on it, wipe it off
immediately. Water contains minerals that can
corrode electronic circuits.
Do not store in hot areas. High temperatures can
shorten the life of electronic devices, damage
batteries, and can even distort or melt certain plastics.
Do not drop your product. This will likely result in
failure to operate.
Do not use or store in areas with a high level of dirt or
dust. The electronic parts may be contaminated or
wear prematurely.
Do not use harsh chemicals or strong cleaning solvents
to clean your unit. Wipe it with a slightly moist cloth.
Make sure any batteries used are fresh and are of the
correct type. Old or almost-dead batteries are
dangerous.
A worn out battery can leak chemicals which will
damage the electronic circuits.
Care & Maintenance
This television receiver represents a fine example of electronic engineering and construction. As
such it should be treated with care. We offer the following suggestions so you will enjoy this
product for many years to come.
301Last Page
Page 32

31
Television System
NTSC
ATSC(8vsb terrestrial)
American TV Standard
ATSC compliant 8VSB
Channel Coverage
Terrestrial(analog)
Cable TV(analog)
Terrestrial(digital)
Cable TV(digital)
2-69
1-125
2-69
1-135
Antenna
75-ohm unbalanced antenna terminal for VHF/CAT/UHF
Audio-Audio Output
1 W + 1W
LCD Panel
Panel Size
Brightness
Contrast
Resolution
32 Inches(diagonal)
350 cd.m
2
3000:1
1366(H) x 768(V)
HDMI
Support format
Support definition
HDMI 1.1, HDMI 1.2, HDMI 1.3
480i, 480p, 720p, 1080i
General
AC Power Supply
Power Consumption
Remote Control Batteries
Dimensions(mm)w/stand
Dimensions(mm) without Stand
Net Weight
AC 120V ~60H
z
36W
AAA x 2
L810 x W70xH530(mm)
L810xW21.2xH560.5 (mm)
8.3 KG
DVD Loader
Slot-Load Type Vertical Play DVD
Mechanism.
Disc capacity
1(12cm disc only)
Optical disc support
DVD, DVD-Video, DVD+R/RW, DVD
R/-RW, VCD, CD CD-R/CD-RW
Video decoder
Video Playback format: MPEG-1,
MPEG-2, MPEG-4, ,MPG, .VOB, .AVI,
DVD-VIDEO, XVID (Resolution Frame
Rate:576P MAX)
Picture Format
Picture Playback : JPEG
Auido decoder
Audio Playback Format: MP3, AC3,
MP2, MPEG1, WMA, PCM,LPCM,
CDDA, OGG
USB Port
Video/Audio/Picture format is same
to DVD
Technical Specification
TV Section
Design and specifications are subject to change without notice.
311Last Page
 Loading...