

Page 1
20041118
7” Portable DVD Player
PDV-0707N
Operation Manual
Page 2

Contents
Important Safety Instructions ---------------------------------------------------------------------
Characteristic Features --------------------------------------------------------------------------
Parts Introduction ---------------------------------------------------------------------------------
Remote Control ------------------------------------------------------------------------------------
Connections ----------------------------------------------------------------------------------------
Playback Preparations---------------------------------------------------------------------------
■ Usage of Remote Control-------------------------------------------------------------------
■ Disc Formats Supported by this player -------------------------------------------------
■ Usage of Power Switching Adapter ------------------------------------------------------
Using a Car Adapter-------------------------------------------------------------------------------
Using Headphones--------------------------------------------------------------------------------
Play Operation -------------------------------------------------------------------------------------
System Setup---------------------------------------------------------------------------------------
Playback Functions-------------------------------------------------------------------------------
Care of Discs----------------------------------------------------------------------------------------
Special Features of Revolving TFT LCD Screen -----------------------------------------
Car Bag ---------------------------------------------------------------------------------------------
Troubleshooting ------------------------------------------------------------------------------------
Specifications --------------------------------------------------------------------------------------
3
6
7
9
12
12
13
14
15
15
15
16
18
21
24
25
26
27
28
- 2 -
Page 3
Important Safety Instructions
CAUTION: TO REDUCE THE RISK OF ELECTRIC SHOCK, DO NOT
REMOVE COVER (OR BACK). NO USER SERVICEABLE PARTS
INSIDE. REFER SERVICING TO QUALIFIED SERVICE PERSONNEL.
POWER SUPPLY:
Connect the supplied adapter to the side of the player jack marked with “DC9.5V In”
on the side of the player, then plug the two-prong end of the power cord to an
AC100-240V outlet. If you have difficulty inserting the plug, turn it over and reinsert it.
If the unit will not be used for a long time, disconnect the plug from the outlet.
NOTE:
Before plugging the power cord into an AC outlet, make sure that all the connections
have been made.
CAUTION: These servicing instructions are for use by qualified service personnel only.
To reduce the risk of electric shock, do not perform any servicing other than that
contained in the operating instructions unless you are qualified to do so. Refer to
service manual for servicing instructions.
The lightning flash with arrowhead symbol, within an equilateral triangle,
is intended to alert the user to the presence of uninsulated “dangerous
voltage” within the product’s enclosure that may be sufficient to constitute
a risk of electric shock to persons.
The exclamation point within an equilateral triangle is intended to alert the
user to the presence of important operating and maintenance (servicing)
instructions in the literature accompanying the appliance.
WARNING: TO REDUCE THE RISK OF FIRE OR ELECTRIC SHOCK,
DO NOT EXPOSE THIS APPLIANCE TO RAIN OR MOISTURE.
- 3 -
Page 4

Important Safety Instructions
p
1. Read these instructions.
2. Keep these instructions.
3. Heed all warnings.
4. Follow all instructions.
5. Do not use near water.
6. Clean only with dry cloth.
7.
Do not block any ventilation
openings. Maintain well ventilated conditions around the product. Do not put
product on bed, sofa or anything that blocks ventilation. Install in accordance
with the manufacturer’s instructions.
8. Do not install near any heat sources such as radiators, heat registers, stoves, or
other apparatus (including amplifiers) that produce heat.
9. Do not defeat the safety purpose of the polarized. A polarized plug has two blades
with one wider than the other. If the provided plug does not fit into your outlet,
consult an electrician for replacement of the obsolete outlet.
10. Protect the power cord from being walked on or pinched particularly at plugs,
convenience receptacles, and the point where they exit from the apparatus.
11. Only use attachments/accessories specified by the manufacturer.
12. Use only with the cart, stand, tripod, bracket, or table specified by the
manufacturer, or sold with the apparatus. When a cart is used, use caution when
moving the cart/apparatus combination to avoid injury from tip-over.
13. Unplug this apparatus during lightning storms or when unused for long periods of
time.
14. Refer all servicing to qualified service personnel. Servicing is required when the
apparatus has been damaged in any way, such as power-supply cord or plug is
damaged, liquid has been spilled or objects have fallen into the apparatus, the
apparatus has been exposed to rain or moisture, does not operate normally, or has
been dropped.
15. Apparatus shall not be exposed to dripping or splashing and no objects filled with
liquids, such as vases, shall be placed on the apparatus.
Copyright Protection
Unauthorized copying, broadcasting, public performance, and lending of disks are
prohibited. This product incorporates copyright protection technology that is
protected by method claims of certain U.S. patents and other intellectual property
rights owned by Macrovision Corporation and other rights owners. Use of this
copyright protection technology must be authorized by Macrovision Corporation,
and is intended for home and other limited viewing uses only unless otherwise
authorized by Macrovision Corporation. Reverse engineering or disassembly is
prohibited.
IMPORTANT FOR LASER PRODUCTS
1. CLASS 1 LASER PRODUCT
2. DANGER: Visible laser radiation when open and interlock failed or defeated.
Avoid direct exposure to beam.
3. CAUTION: Do not open the top cover. There are no user service-able
parts inside the unit. Leave all servicing to qualified service personnel.
This unit complies with FDA regulation for radiation control of laser
roducts.
- 4 -
Page 5

Pre c a uti o n s w i t h M o i s tu r e
Under the following circumstances, moisture may appear on the lens of the product,
which is the most sensitive part of the DVD player:
- The DVD player is suddenly moved from a cold place to a warm place.
- A room is heated while the DVD player starts operating, or the DVD is placed by
an air-conditioner.
- In the hot summer season, the DVD player is moved from an air-conditioned room
to a hot, damp place to be used.
- The DVD player is being operated in a damp place.
If moisture appears on the player, discontinue use.
If the player is operated under said conditions, or the disc is loaded, certain interior
components could be damaged. Take disc out, plug power in, switch power button
on the DVD player for two to three hours to dry.
- 5 -
Page 6

Cha r a cte r i sti c F ea t u r es
1. EXCELLENT SOUND
Dolby Digital delivers great sound.
2. H I GH R ES O L UT I O N place stopp
MPE G 2 decoding format achieves more
than 500 lines of horizontal resolution.
3. S PE C I A L F U NC T I O N S
Supports multi-angle, excessive language
caption.
4. COMPATIBILITY
Plays DVD, CD, and PICTURE CDs.
5. PARTICULAR PERFORMANCE
Multi-speed, fast forward, fast backward,
slow play and step playback, repeat
playback and programming playback.
6. SEARCH BY TIME
Search for a certain time on a disc.
DVD players and discs are coded by region. These regional codes must
match the discs they play. If the codes don’t match, the disc won’t play.
This player’s code is region 1.
7. LAST MEMORY PLAYBACK
Memorizes and continues playing from
ed.
8. ON-SCREEN DISPLAY
On-screen displays in your choice of
Englis
h/Spanish/French.
9. AUDIO OUT
Audio output terminal for connection to
audio amplifiers.
10. EARPHONE OUTPUT
Convenient for listening to movies or music
in private.
11. SWITCHING POWER ADAPTER
Automatically adapts to voltage
requirements in the U.S. and other
countries.
12. REVOLVING TFT LCD SCREEN
Adjust the screen for custom viewing by
revolving it horizontally about its axis, or
lay it flat with the screen facing up.
- 6 -
Page 7
Parts Introduction
DVD Player
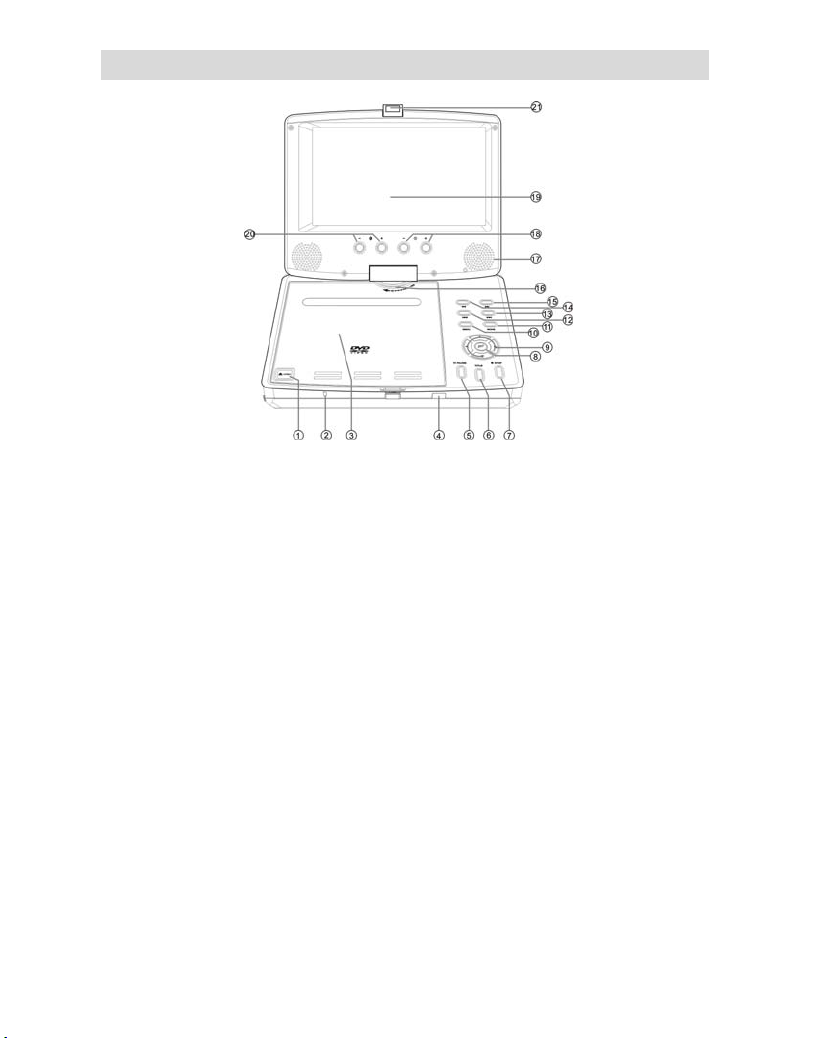
1. OPEN
Press to open the disc cover.
2. Power indicator
Lights green when the player is in
playback mode.
Lights red when the player is in standby
mode.
3. Disc cover
For disc to be put in.
4. Remote sensor
Receive the remote control signal for
operation.
5. PAUSE
Press to pause playback.
6. TITLE
Press to display titles if present on the
DVD disc.
7. STOP
Press to stop playback.
8. ENT
Press to confirm after selection.
9. Direction buttons
Press to select menu items or settings.
10. MENU
Press to display the disc menu on the
LCD screen in Play mode.
11. MODE
The player is with TFT display mode:
normal screen (4:3) and wide screen
(16:9).
12. PREV
Press to skip to previous chapter/track.
13. NEXT
Press to skip to next chapter/track.
REV
14.
Press to search backward.
FWD
15.
Press to search forward.
16. TFT LCD Screen can be rotated in
the degree of 180
- 7 -
Page 8
Parts Introduction
DVD Player continued
17. Speakers
For enjoying high quality stereo Music.
18. Bright up/down
Used to adjust the picture brightness.
19. TFT Liquid Crystal Display
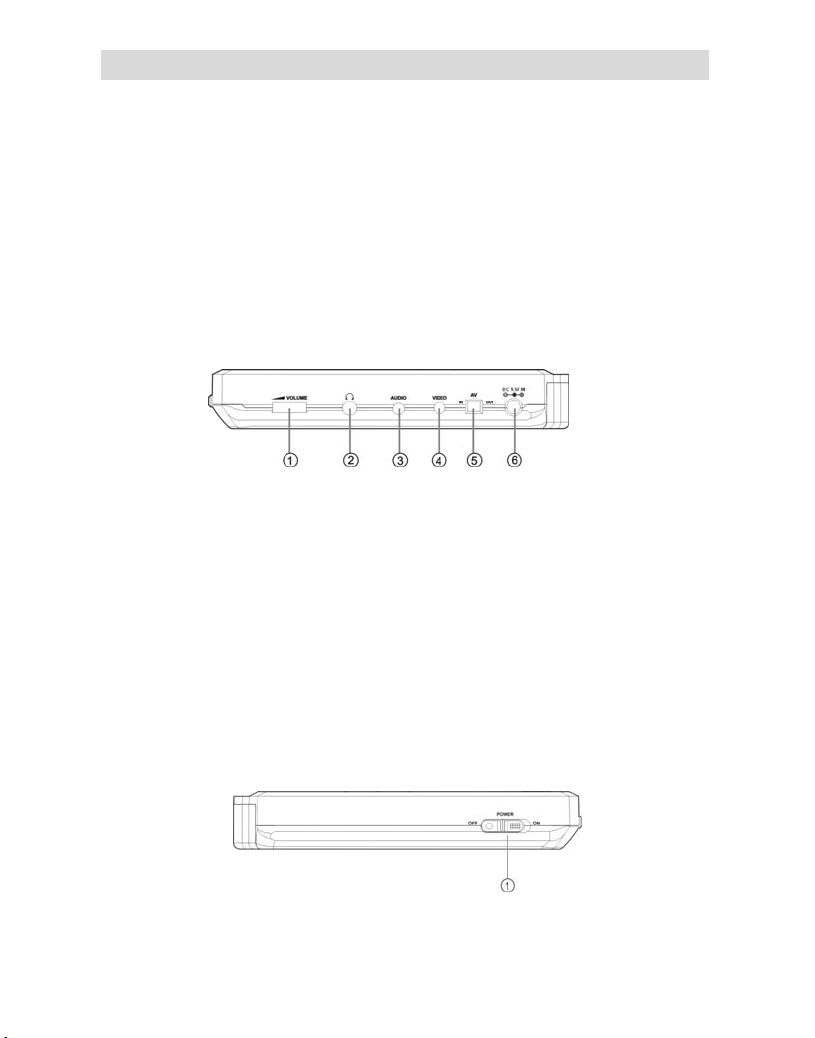
Right Side Of The Panel
20. Color up/down
Used to adjust the picture color.
21. Latch hook
1. Earphone volume adjusting knob
Used to adjust the earphone and
speaker volume.
2. Earphone jack
HI-FI earphone output, when
connecting this jack, speaker volume is
turned off.
3. Audio output/input jack
L eft Side Of The Panel
4. Video output/input jack
5. Switch position between AV ‘IN’
and A V ‘OUT’
Switch to IN, then the player is in audio
and video input mode.
Switch to OUT, and then the player is in
normal playback mode.
6. Direct current 9.5V input jack
1. Power switch
Used to turn on/off the power.
- 8 -
Page 9
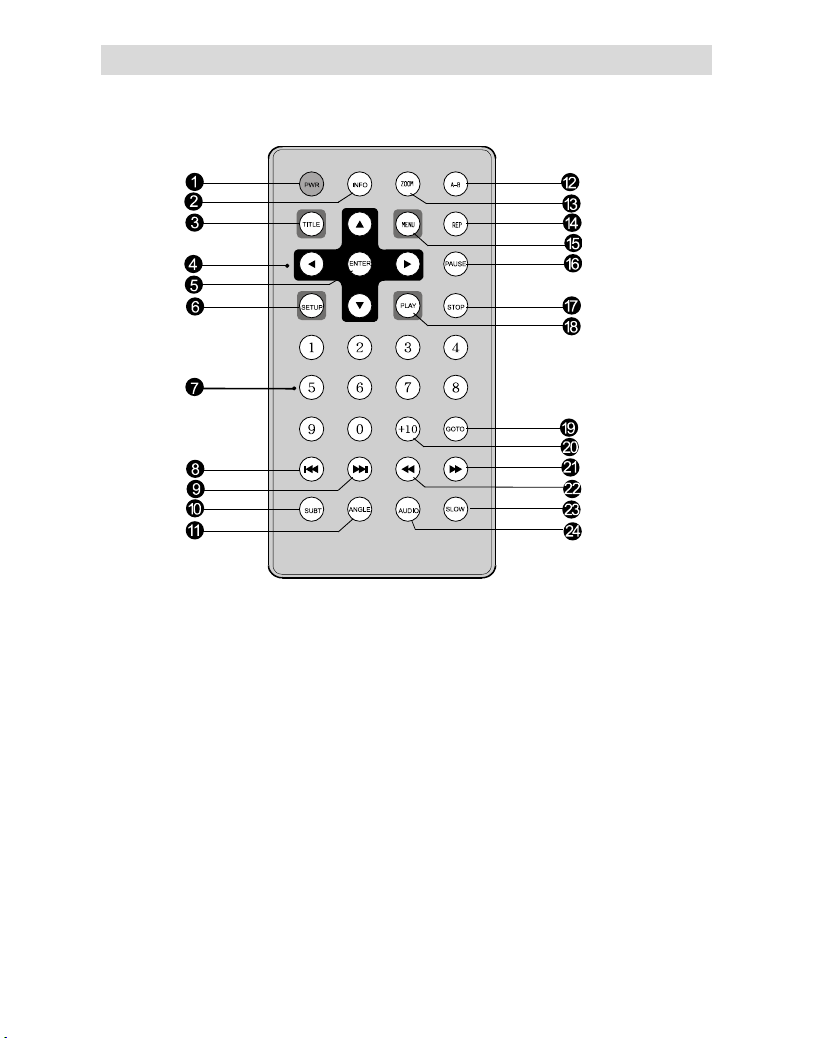
Rem o t e C o n tro l
1. PWR button
2. INFO button
3. TITLE button
Direction buttons
4.
-Press to turn the player on or off.
-Press for detailed information on the
disc playing.
-Press again to remove information from
screen.
-Press to display title menu if present
on the disc.
-Press to select random play when
playing a CD.
-Press to select menu items.
5. ENTER button
-Press to confirm the items or setting.
6. SETUP button
-Press to access the DVD player’s setup
menu.
7. 0-9 number buttons
-Select numbers by pressing these
buttons.
8.
PREV SKIP button
-Press to go to beginning of current
track. Press again quickly to go to
beginning of previous track.
- 9 -
Page 10

Rem o t e C o n tro l
NEXT SKIP button
9.
-Press to go to next chapter.
10. SUBT button
-When a DVD is playing, press to select
a subtitle language or to turn subtitles
off.
11. ANGLE button
-Press to access various camera angles
(if the DVD disc contains multiple camera
angles).
-B button
12. A
-Press to mark a segment to repeat
between A and B.
13. ZOOM button
-Press to cycle through zoom function.
14. REP button
-Press to repeat a chapter, track, title,
or all content.
15. MENU button
-Press to select the disc menu.
16. PAUSE button
-Press to pause playback.
-Press PLAY button to resume normal
playback.
17. STOP button
-Press once to stop playback and then
press PLAY button to resume normal
playback.
-Press the button twice to stop playback
completely.
18. PLAY button
-Press to begin playback.
19. GOTO button
-Press to select the desired disc starting
time, track or title.
20. +10 button
-Select numbers greater than 9 by
pressing the (+10) button first, then press
additional number buttons.
FWD SCAN button
21.
-Press to search forward.
REV SCAN button
22.
-Press to search backward.
23. SLOW button
-Press to activate slow forward or slow
rewind.
24. AUDIO button
-Press to access various audio languages
(if the DVD disc contains multiple audio
languages).
- 10 -
Page 11

Connections
Connecting to a TV
Audio/video connections
1. Always ensure that the DVD player, TV and any other electrical equipment you are
connecting the DVD player to is switched off and unplugged from the power supply.
2. The easiest way to connect the DVD player to a television is via the supplied Audio/Video
connections. Connect the audio/video cable from the DVD player to the TV’s audio/video
inputs:
Connecting to an Amplifier with Dolby Digital Decoder
The DVD player can be connected to an AV amplifier or Dolby digital decoder via the
Digital Optical output. Please refer to your Audio equipment’’s manual before connecting:
- 11 -
Page 12

Pla y b ack P r ep a r a tio n s
Using the Remote Control
1. Referring to the drawing above, remove the empty battery receptacle.
2. Prior to shipping, a separating film was applied to the battery. Remove this film.
3. Press the battery into the receptacle and insert the receptacle into the remote.
4. For best results, aim the remote directly at the player’s receiving window from a
range no greater than 15 feet, and at angles no greater than 60 degrees.
5. Under normal use the battery will last for one year.
6. Remove battery during storage
- 12 -
Page 13

Pla y b ack P r ep a r a tio n s
Disc Formats Supported by this Player
The unit can play discs bearing any of the following logos:
DISC LOGO DIAMETER
12cm
DVD
8cm
CD
The operating method of some DVD discs is specified by the software maker.
Please refer to the instruction manual of the disc.
12cm 74 min
8cm 20 min
About Disc Terms
- Title
Generally, pictures or music compressed on a DVD are divided into several sections,
“title”.
- Chapter
The smaller section unit of picture or music in a DVD under the title, usually one
title is comprised of one or more chapters and each of them is numbered for easy
searching. Some discs may not have a recording chapter.
- Tra c k
A segment of picture or music on a CD. Each track is numbered for searching.
PLAYBACK TIME/
PLAYABLE SIDES
133 min (SS-SL)
242 min (SS-DL)
266 min (DS-SL)
484 min (DS-DL)
41 min (SS-SL)
75 min ( SS-DL )
82 min (DS-SL)
150 min (DS-DL)
- 13 -
Page 14

Pla y b ack P r ep a r a tio n s
Usage of Switching Power Adapter
The player is supplied with a switching power adapter.
1. Connect AC adaptor to the side of the DVD player in the slot marked “Power In”.
2. Plug the two-prong end of the power cord to a grounded electrical socket.
Note: Turn player’s power off first and then unplug the power adaptor to prevent malfunction.
Pre-operation
1. Connect the power adaptor.
2. Lift the main cover up to open the player.
3. Switch “POWER” to the “ON” position.
4. Adjust the volume with the “VOLUME” adjust knob (also adjusts earphone volume).
Loading a disc
1. Press the OPEN button to open the disc cover.
2. Put disc into the tray with the printed side up.
3. Close the disc cover.
- 14 -
Page 15

Usi n g a C a r A d a p ter
You can use Car Adapter while in a vehicle:
Connecting the Car Adapter Power Plug into the unit’s
Power Jack and the other end to the Vehicle Cigarette
Lighter Socket:
Quick Tips
• Do not operate the unit or view video software while driving a vehicle.
• Place the unit in a secure position for viewing.
Using Headphones
Using Headphones while you are in a quiet area:
Connecting Headphone Connector into right side of the
unit’s Headphone Jack:
Quick Tips
• Excessive loud usage of headphones could damage your hearing
• Turn down the Volume before you connect the headphones, then raise the volume
to suit your level
• Sound from the unit’s external speaker will cease when headphones are connected
- 15 -
Page 16

Pla y Ope r a tio n
Please read these instructions carefully before using your player for the first time.
1. Turn on the player’s power by switching the POWER switch on the side of
the player to “ON”.
2. Press OPEN button on front panel to open the disc cover.
3. Remove the lens cover.
4. Load disc with the label facing up to prevent damage to the player or disc.
5. Close the disc cover. The player will automatically search for the disc and when
it finds it, play will begin.
Warning: Do not play poor quality discs to prevent damage to the lens.
Start Playback
1. Press the PLAY button on the remote control.
2. Press
3. Press ENTER or PLAY.
Pause
Press the PAUSE button on remote to pause.
Press the PLAY button to resume normal playback.
Zoom
Press the ZOOM button on remote to cycle through to different zoom settings.
Normal – 2x – 3x – 4x – 1/2 – 1/3 – 1/4.
While in zoom mode use direction keys to pan around to different positions on the
picture.
(direction button) or the number buttons to select a scene.
- 16 -
Page 17

Play Operation
T
Stop
During playback, press the STOP button on the remote control to stop playing.
Press the PLAY button again and the player will play from the point where it stopped.
Mode
During playback, press the mode button on the control panel to change the aspect
ratio on the screen.
itle Menu
1. Press the TITLE button on the remote control during payback. The title menu
will appear on the TFT screen.
2. Press (direction button) or the number buttons to select the title or
disc option you wish to play.
3. Press the PLAY button to start playback.
4. NOTE: Title and Menu are only available for DVD discs.
Previous and Next
1. Press the PREV button on the remote control, and playback will start from
the previous track.
2. Press the NEXT button on the remote control, and playback will start from
the next track.
- 17 -
Page 18

Sys t e m S e t up
GENERAL SET-UP
You can change the default settings to customize performance to your own preference.
1. Remove the disc from the DVD drive and press the ‘SETUP’ button on the remote
control, the settings menu will appear. It includes General Setup, Speaker Setup,
Dolby Digital Setup, Video Setup and Preference setup.
2. Press
3. All the items in the category will appear on the TV screen. Press the ‘ENTER’
Category
1. When you enter a category all the items under this category will appear, and
2. Press (right direction button on the remote control to select the correct category.
3. Press the direction button to select your preference. The item you select will
4. Press the ‘ENTER’ button to confirm.
5. Press (left direction button) to enter the other setup menu.
General Setup
1. TV Display
2. Angle Mark
(direction buttons) on the remote control to select a category.
button to confirm your selection.
the items placed in the middle (or highlighted) will be the current set up.
be highlighted.
Tthe general setup is shown as follows:
Select NORAML/PS when a 4:3 TV is connected.
Display images with marking bars above and below the picture.
Select WIDE when a 16:9 wide screen TV is connected.
If the scene was recorded from multiple angles, then you can easily change
he camera angle of the scene you are watching.
ON/OFF
With this switched on you will be notified if alternative viewing angles are available.
- 18 -
Page 19

Sys t e m S e t up
t
3. OSD Language
T
here are five kinds of different OSD languages for selection. You can select
i
t according to your preference.
4. SPDIF Output
This item is used to set the format of digital audio. ‘SPDIF OFF’ turns off the
digital audio; ‘SPDIF/RAW’ outputs the original. For example, if the disc being
played is Dolby Digital, then the digital audio output is also Dolby Digital.
5. Captions
Y
ou can choose captions on or off on screen during playback.
6. Screen Saver
W
hen activated the screen saver automatically works if there has been no operation
f
or a period of time.
Speaker Setup
1. Down Mix
Select “LT/RT” in DOWNMIX, then the player will output mixed audio in a way
prescribed by Dolby. Select “Stereo” and the player will output a stereo signal.
D
olby Digital Setup
1. Dual Mono
T
he function is used to set the output mode of channel left/right, stereo and
m
ixed sound.
2. Dynamic
Use this item to adjust linear dynamic compression rate
compression effects.
VUideo Setup
1. Sharpness
se this item to adjust sharpness setting.
o get different signal
- 19 -
Page 20

Sys t e m S e t up
A
y
Video Setup
2. Brightness
U se this item to adjust brightness level.
3. Contrast
Use this item to adjust contrast level.
Preference Page
1. Audio, Subtitle, Disc Menu
This setting allows you to hear or read subtitles of a DVD in your choice of English,
Spanish or French.
2. Default Reset
Use this function to reset all the settings.
3. Version
Displays software version information.
NOTE: this menu function is not available while a disc is playing.
udio
DVD discs contain up to 8 audio bit streams. For Example: English, French, etc.
To select the audio bit stream
control during playback. The DVD player will play the next audio bit stream every
time you press the AUDIO button in succession.
NOTE: This function is only available for discs that several audio bit streams have
been recorded onto.
ou prefer press the AUDIO button on the remote
- 20 -
Page 21

Playback Functions
t
t
Fast Forward & Rewind
Press the
Slow Forward & Rewind
Press the SLOW button to slow forward or rewind.
Repeat
1. Repeat a title, chapter or track. Press the REPEAT button on the remote control.
2. You can temporarily mark a section of a DVD that you would like to play repeatedly.
The DVD player will automatically return to point A and repeat playback of the
selected segment. (A-B). To resume normal playback press the A-B button again.
Subtitle
A DVD disc can be recorded with up to 32 subtitles.
Press the SUBTITLE button on the remote control and the mode of subtitles will
cycle as follows: SUBTITLE 1/N: Subtitle 1 appears on the screen. SUBTITLE 2/N:
Subtitle 2 appears on the screen.
SUBTITLE N/N: Subtitle N (N is the total number of subtitles that the current disc
contains) appears on the screen. SUBTITLE OFF: No subtitle.
NOTE: This function is available on DVD disc that recorded with multi-subtitles.
and buttons to fast forward or rewind.
Pressing the REPEAT button repeatedly will display a menu as follows: Chapter,
Title and All.
Do this by marking the start and end of
playback press the A-B button on the remote control at the beginning of the segment
(point A) you wish to play repeatedly. Press the A-B button again at the end of
the segment (point B).
he section using the A/B button. During
Angle
If the scene was recorded from multiple angles, you can easily change the camera
angle of the scene you are watching.
Press the ANGLE button on the remote control during playback. Playback will shift
o another angle. If the disc menu gives the options of angles items, you can switch
angles for viewing by pressing the number buttons on the remote control.
NOTE: This function is only available if a disc is a multi-angles recorded disc.
- 21 -
Page 22

Playback Functions
t
t
Search by time
You can use the GOTO button to search by time, namely to play from a specific
time.
During DVD playback, press the GOTO button once and TV screen will display the
itle or chapter, then you can use number buttons to select any one of them. Press
he GOTO button twice, then you can use number buttons to input the time you
desired (hour, minute, second), and the player will play from the inputted time.
NOTE: This function is only available for DVD discs.
Resume Playback
1. Press the STOP button to interrupt playback. The player memorizes the location
where playback was stopped.
2. Press the PLAY button to resume normal playback. The player resumes playback
from the location where playback was stopped. This function does not operate
if the disc is removed.
Pressing the STOP button twice or opening the disc tray disables this function.
Pressing the play button after this will resume play from the beginning of disc.
- 22 -
Page 23

Playback Functions
Playing a JPEG
JPEG is a common picture format that requires very little storage per image
with a low loss rate in resolution. Hundreds of pictures can be stored on a disc
in this format. In order to create digital albums from film pictures, have your film
developer make a ”PICTURE CD”, in JPEG format.
OPERATION
1. Normal Playback
Load a JPEG disc in. After reading the disc, OSD will display the menu (the left
side is the main menu and the right side is its submenu). Use the direction buttons
and ENTER button to choose items.
• Many discs have other items besides pictures.
• Use left/right button to move cursor to playback mode column, use
the up/down button to confirm.
2. Picture Rotation
Pictures can be flipped and rotated while they are displayed. Once another
picture is selected, rotating function will be turned off.
There are four rotational modes available. Use the direction buttons to choose:
▲UP Flip Vertical
▼DOWN Flip Horizontal
WLEFT Rotate Counter Clockwise
XRIGHT Rotate Clockwise
3. Zoom of Picture
ZOOM button is used to turn on/off zoom and move function.
When the zoom function is turned on, use the fast forward or reverse scan
button to zoom in and out. Use the direction buttons to pan around on the
image. Press the STOP button to activate preview mode. Press the MENU
button to return to the root menu.
Note: Due to the various ways JPEG discs are made, some images can only
be played normally with no rotate or zooming functions.
- 23 -
Page 24

Car e of D i s cs
How to hold discs
When loading or removing discs, do not
touch their playing surfaces.
Cleaning
Fingerprints or other dirt on the disc may
affect sound and picture quality.
To clean your discs, use a soft clean cloth
to wipe them. If necessary, moisten a soft
cloth with diluted neutral detergent to
remove heavy dirt or fingerprints.
Do not wipe in a circular direction (Concentric
scratches in the disc groove tend to cause
noise.)
Gently wipe from the inside to the outer
edge.
Cleaning Care
Use a soft, dry cloth for cleaning. For
stubborn dirt, soak the cloth in a mild
detergent solution. Use a dry cloth to wipe
the disc dry. Do not use any volatile agents
such as benzine or paint thinner, as they
may damage the surface of the disk.
Lens cleaner
The player’s pickup lens should not become
dirty under normal use, but if for some
reason it should malfunction due to dirt,
contact your nearest authorized service
center. Lens cleaners are commercially
available, but special care should be
exercised in their use since some may cause
damage to the lens.
- 24 -
Page 25

Special Features of Revolving LCD Screen
The revolving TFT LCD screen is one of the outstanding features about this product.
You are suggested to take the following steps for proper operation.
Pos A
Pos B
Pos C
Pos D
1. Open the screen cover to position (A) as
shown in left figure at which the screen is
vertical to the operation panel.
2. Revolving the screen horizontally about its
axis in the clockwise only. The maximum
revolving degree is 180 (position C) at which
you will hear a click and the screen faces
backward. If you want to return to initial
position (A) please revolve screen counter
clockwise until it clicks.
3. You can rotate the screen vertically from
position C to operation panel as indicated
in left fig.
4. The final rotating position (position D) at
which the screen facing upward and back to
operation panel.
5. Your Portable DVD Player includes a sturdy
carrying bag/mount for the ultimate in
portable convenience! The bag/mount is
easy to attach on fits on nearly any car or
truck headrest.
- 25 -
Page 26

Car Bag
Your Portable DVD Player includes a sturdy carrying bag/headrest mount for the
ultimate in portable convenience! The bag/mount is easy to attach and fits on nearly
any car or truck headrest (see photo above)
- 26 -
Page 27

Troubleshooting
SYMPTOM WHAT TO CHECK
-Make sure the disc cover is closed.
-Make sure the AV IN/OUT switch on the side of the
player is in the OUT position for standard play
-Make sure a disc is loaded.
The player cannot play.
There is no sound.
-Make sure the disc isn’t loaded upside down.
-Disc should be clean, not dirty or warped.
-Player’s region code should be the same as region
code of DVD disc.
-Has water condensation has occurred? If it has, remove
the disc and keep the player powered up for at least
two hours.
-Make sure system connection is correct.
-Make sure the speakers are turned on.
-Make sure the sound setup of DVD disc is correct.
-Is your disc dirty or warped? Clean or replace disc
There is no picture.
Poor AV performance. -Is your disc dirty or warped? Clean or replace disc.
Cannot continue to play and play
a section repeatedly.
The remote control does not work.
Others possibilities:
Static or other external interference may cause the player to function abnormally. In this circumstance
unplug the power-supply cord from the outlet and plug it in again to reset the player so that
normal operation can resume. If you are still having problems, then please disconnect the power
and consult your service center or a qualified technician.
-Make sure TV is on and in correct video mode.
-Make sure your system connection is correct.
-Make sure the player is not in A-B repeat status.
-Press A-B button to cancel it A-B repeat status.
-Is your disc dirty or warped? Clean or replace disc.
-Make sure there aren’t any obstructions between the
remote control and the player.
-Make sure you are pointing the remote control
at the player.
-Make sure battery is inserted correctly (check polarity).
-Replace weak batteries.
- 27 -
Page 28

Specifications
TFT screen size 7 inches
Laser Wavelength Wavelength: 780/650nm
Video System NTSC
Frequency Response 20Hz ~ 20kHz ±2.5dB
Audio Signal-to-noise Rate ≥ 85dB
Audio distortion + noise ≤ -70dB (1kHz)
Channel Separation ≥ 70dB (1kHz)
Dynamic Range ≥ 80dB (1kHz)
Audio Out Analog Audio Out Out Level: 2V ±
Video Out Video Out
Power AC100-240V~50/60Hz
Power Consumption 25W
Dimension w/o battery 7.7” x 5.7” x 1.1”
Weight 1.8 lbs
Compliance with FCC, FDA - cUL listed E209155
Out Level:1V
Unbalanced Negative
0.2
, Load: 10kΩ
1.0
± 0.2, Load:75Ω
P-P
DESIGN AND SPECIFICATIONS ARE SUBJECT TO CHANGE WITHOUT NOTICE
“Dolby” and the double-D symbol are trademarks of Dolby Laboratories. Confidential
Manufactured under license from Dolby Laboratories.
unpublished works.
©1992 -1997 Dolby Laboratories.
All rights reserved.
- 28 -
Page 29

A
For service, support and warranty information, visit
the US call 1-866-289-5168, in Canada call 1-866-301-7922 and in Mexico call
01-800-400-2443.
“Polaroid” is a registered trademark of Polaroid Corporation of Waltham, MA USA and
licensed for use on the PDV-0707N to Petters Consumer Brands, LLC.
www.polaroidelectronics.com or in
dd a battery to your portable DVD player for
added flexibility and enjoyment.
This allows you to take your DVD player
anywhere.
To order, call Polaroid Customer Care:
In the US: 1-866-289-5168
In Canada: 1-866-301-7922
In Mexico: 01-800-400-2443
- 29 -
 Loading...