

Page 1
mio
www.polaroid.com
1 Camera features
3 Attach strap
4 Load batteries
5 Load film pack
7 Remove empty film pack
8 Take photo
10 Take distance photo
11 Tips
Image too dark (p.11)
Image too light (p.11)
Image too dark due
to back lighting (p.12)
13 Precautions
16 One-year Limited Warranty
Register your mio (p.16)
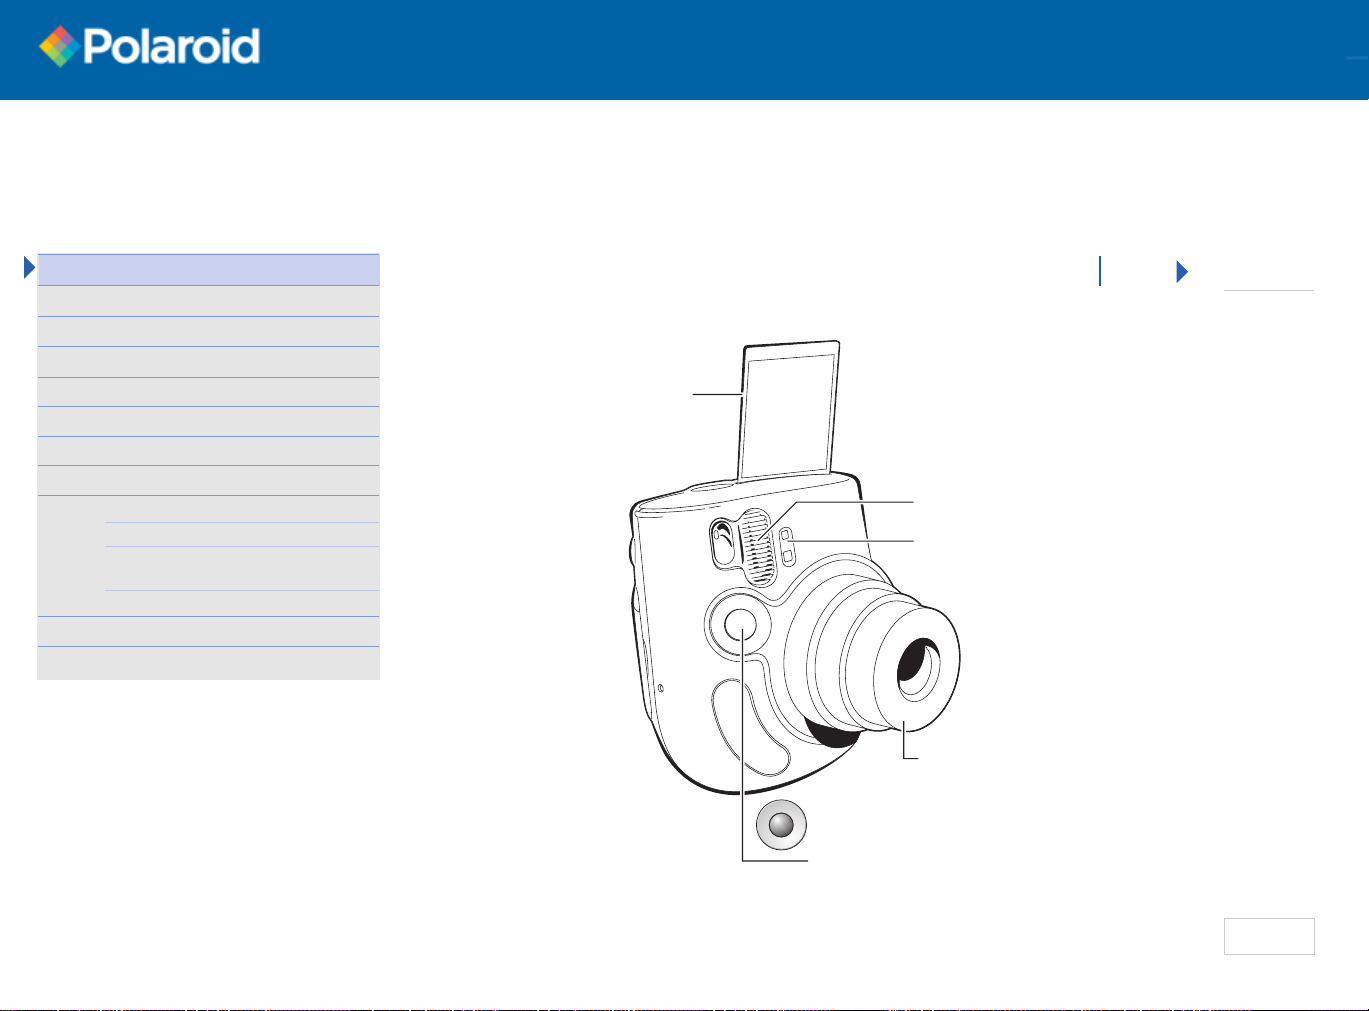
Camera features
Instant film
Flash
Auto range finder
Retractable lens
Next
1 of 2
Shutter button
page
1
Page 2
mio
www.polaroid.com
1 Camera features
3 Attach strap
4 Load batteries
5 Load film pack
7 Remove empty film pack
8 Take photo
10 Take distance photo
11 Tips
Image too dark (p.11)
Image too light (p.11)
Image too dark due
to back lighting (p.12)
13 Precautions
16 One-year Limited Warranty
Register your mio (p.16)
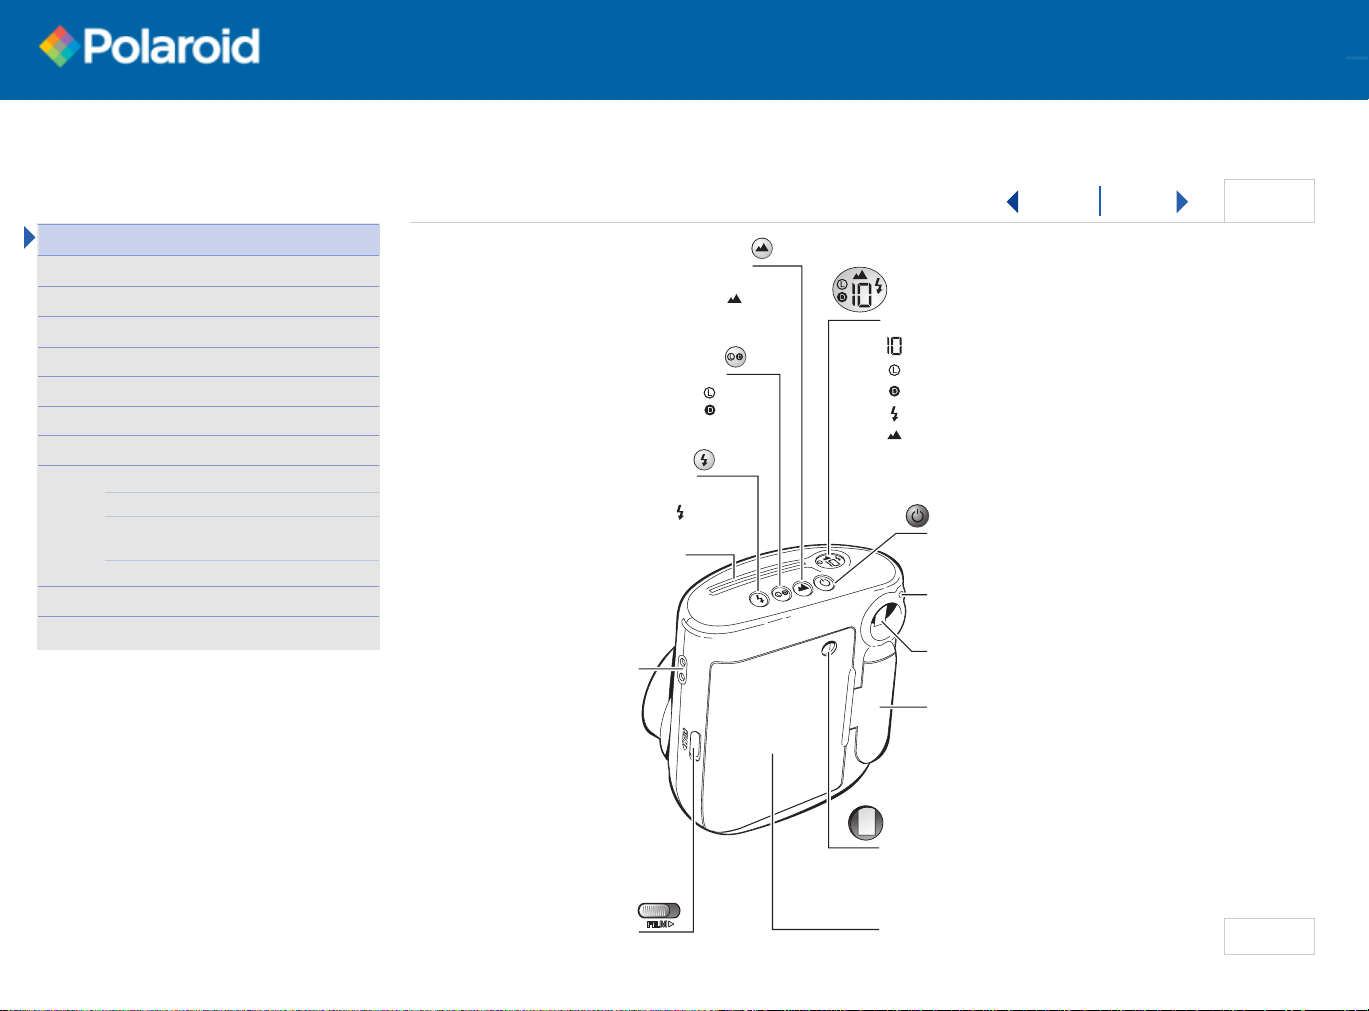
Camera features
Lighten/Darken button
Strap holes
Lens setting button
Normal: 2.5 - 10 ft (no icon)
Distance: 10 ft to
Press once to lighten ( )
Press twice to darken ( )
Flash button
Auto (no icon)
Fill flash ( )
Film exit slot
∞
( )
Status/film count LCD
Film counter
Lighten photo on
Darken photo on
Fill flash on
Distance setting on
Power button
Flash/function
indicator light
Viewfinder
Battery door
Back Next
2 of 2
Film door
lock
Film status window
yellow bar indicates
film pack is in camera
Film compartment
door
page
2
Page 3
mio
www.polaroid.com
1 Camera features
3 Attach strap
4 Load batteries
5 Load film pack
7 Remove empty film pack
8 Take photo
10 Take distance photo
11 Tips
Image too dark (p.11)
Image too light (p.11)
Image too dark due
to back lighting (p.12)
13 Precautions
16 One-year Limited Warranty
Register your mio (p.16)
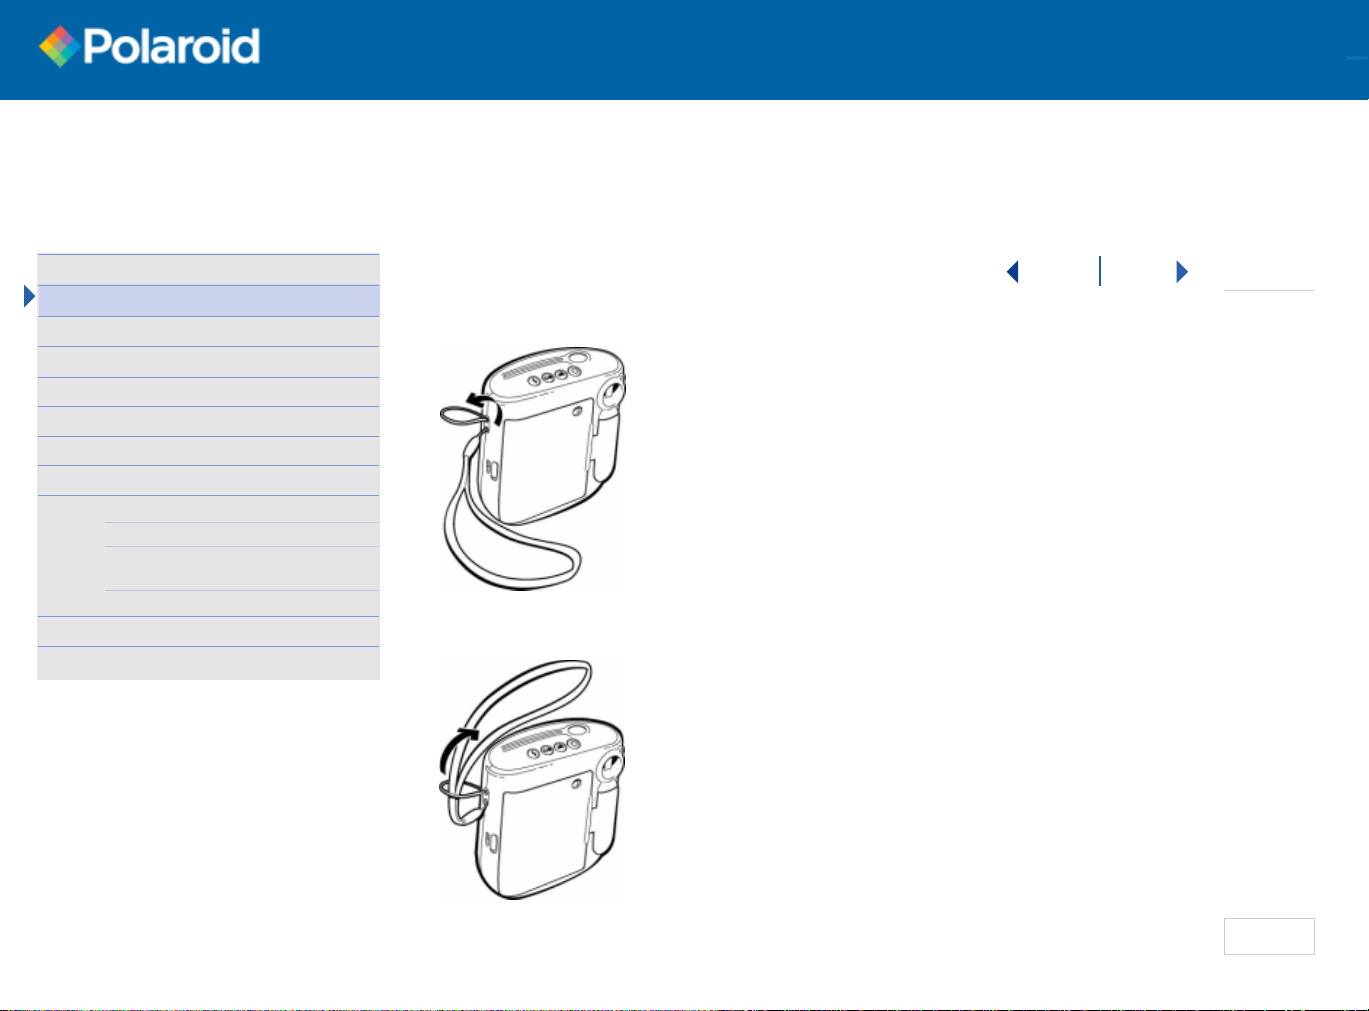
Attach strap
Push small loop through strap holes.
1
Pull wide end of strap through small loop.
2
Back Next
1 of 1
page
3
Page 4
mio
www.polaroid.com
1 Camera features
3 Attach strap
4 Load batteries
5 Load film pack
7 Remove empty film pack
8 Take photo
10 Take distance photo
11 Tips
Image too dark (p.11)
Image too light (p.11)
Image too dark due
to back lighting (p.12)
13 Precautions
16 One-year Limited Warranty
Register your mio (p.16)
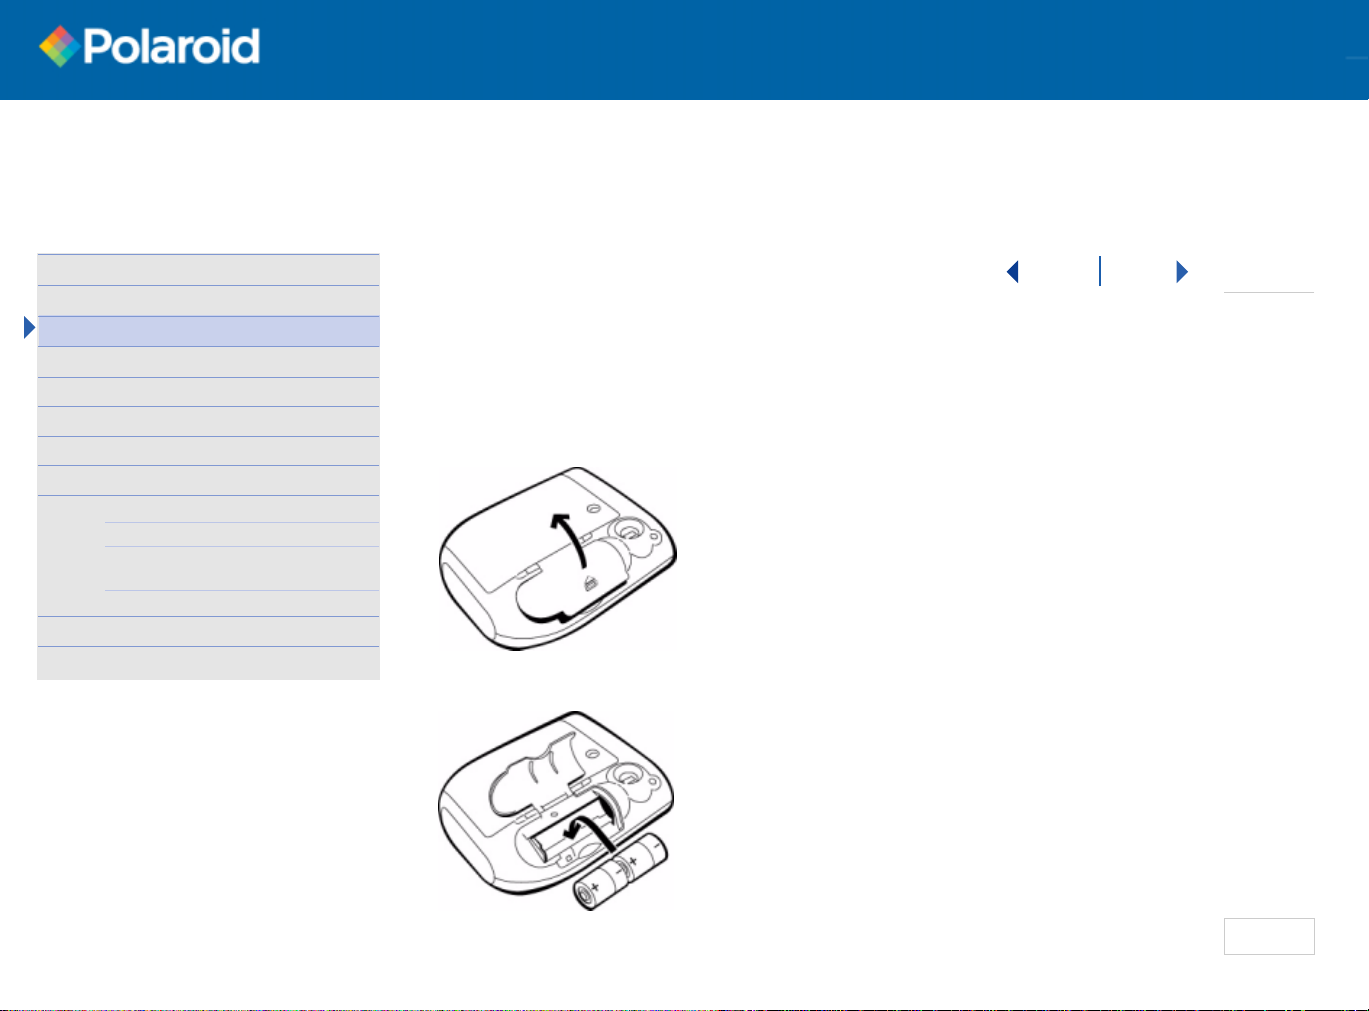
Load batteries
This camera uses two 3V CR2 batteries.
CAUTION:
Open the battery compartment door.
1
Insert batteries as shown.
2
DO NOT mix old or new batteries. DO NOT mix alkaline, standard
(carbon-zinc), or rechargeable (nickel-cadmium) batteries.
Back Next
1 of 1
page
4
Page 5
mio
www.polaroid.com
1 Camera features
3 Attach strap
4 Load batteries
5 Load film pack
7 Remove empty film pack
8 Take photo
10 Take distance photo
11 Tips
Image too dark (p.11)
Image too light (p.11)
Image too dark due
to back lighting (p.12)
13 Precautions
16 One-year Limited Warranty
Register your mio (p.16)
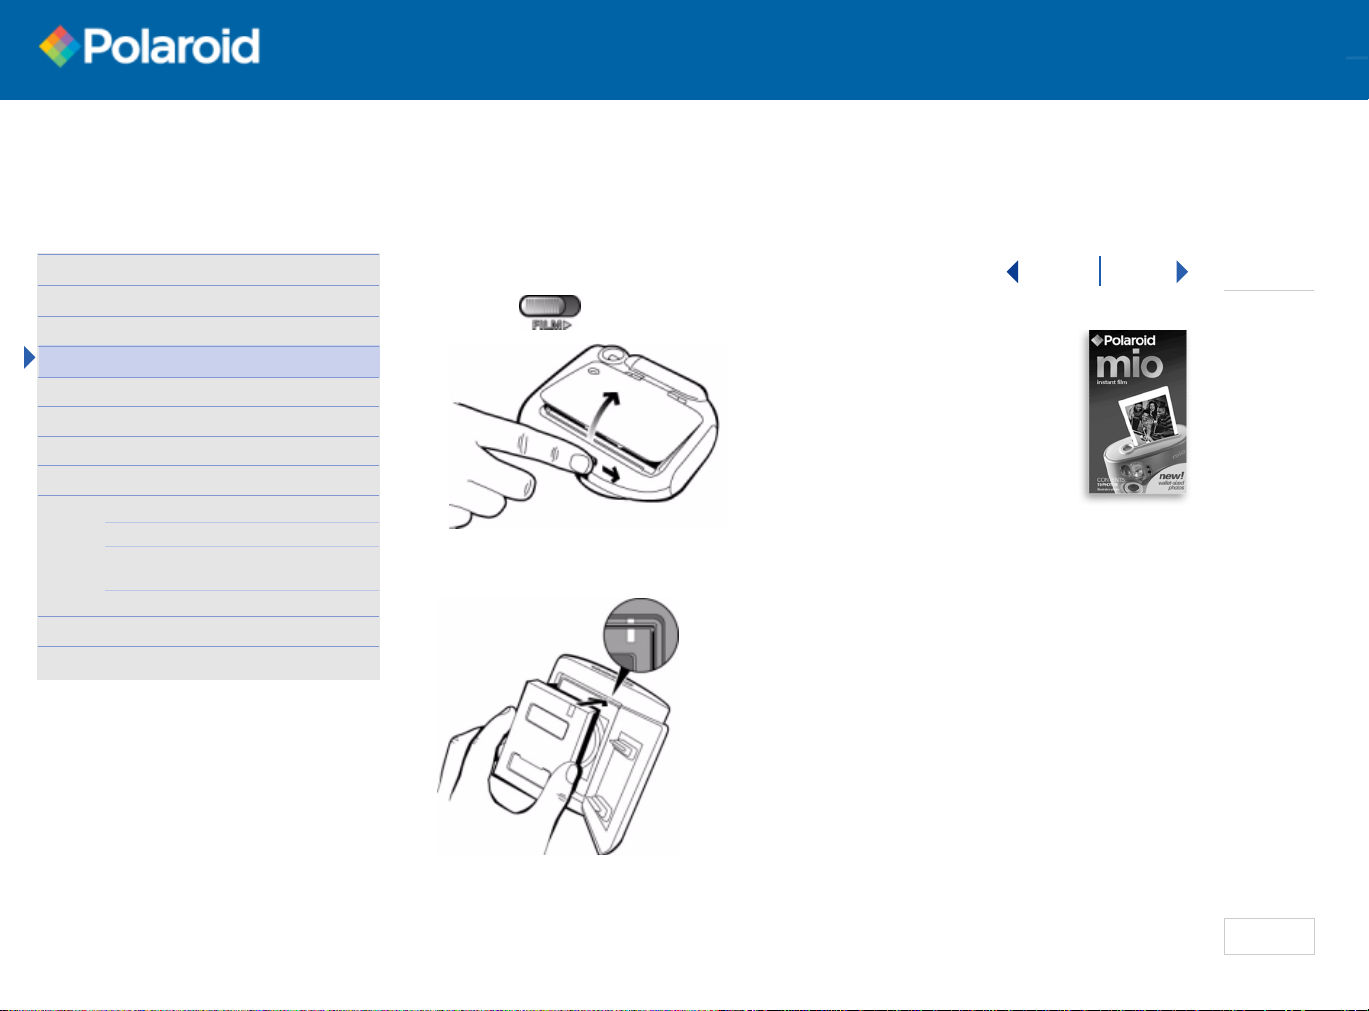
Load film pack
Unlock and open the film compartment door.
1
Insert the film pack.
2
Hold the film pack by the edges. Do not press
on the center of the film pack. Insert the film
pack so that the yellow mark on the film pack
aligns with the corresponding mark inside the
film compartment.
Close the film compartment door.
Back Next
1 of 2
Use with
Polaroid mio
instant film
page
5
Page 6

mio
www.polaroid.com
1 Camera features
3 Attach strap
4 Load batteries
5 Load film pack
7 Remove empty film pack
8 Take photo
10 Take distance photo
11 Tips
Image too dark (p.11)
Image too light (p.11)
Image too dark due
to back lighting (p.12)
13 Precautions
16 One-year Limited Warranty
Register your mio (p.16)
Load film pack
Press the Power button
3
4
Press the Shutter button
film cover.
When the film cover has been
.
to eject the
ejected, you are ready to take pictures.
Back Next
The camera lens extends; the flash/
function light blinks once. The status
LCD shows a dash.
2 of 2
CAUTION:
DO NOT pull on the
film cover.
The film counter on the status LCD
shows 10.
page
6
Page 7

mio
www.polaroid.com
1 Camera features
3 Attach strap
4 Load batteries
5 Load film pack
7 Remove empty film pack
8 Take photo
10 Take distance photo
11 Tips
Image too dark (p.11)
Image too light (p.11)
Image too dark due
to back lighting (p.12)
13 Precautions
16 One-year Limited Warranty
Register your mio (p.16)
Remove empty film pack
Back Next
When the film counter shows open film compartment door and remove
the empty film pack.
CAUTION:
DO NOT open film compartment door with film remaining in
film pack.
1 of 1
page
7
Page 8

mio
www.polaroid.com
1 Camera features
3 Attach strap
4 Load batteries
5 Load film pack
7 Remove empty film pack
8 Take photo
10 Take distance photo
11 Tips
Image too dark (p.11)
Image too light (p.11)
Image too dark due
to back lighting (p.12)
13 Precautions
16 One-year Limited Warranty
Register your mio (p.16)
Take photo
Press the Power button .
1
2
Aim
.
Stand between 2.5 feet
and 10 feet from your
subject. Frame your
subject in the viewfinder.
Back Next
The camera lens extends; the flash/
function light blinks once.
The status LCD shows the number of
photos remaining in the film pack.
1 of 2
page
8
Page 9

mio
www.polaroid.com
1 Camera features
3 Attach strap
4 Load batteries
5 Load film pack
7 Remove empty film pack
8 Take photo
10 Take distance photo
11 Tips
Image too dark (p.11)
Image too light (p.11)
Image too dark due
to back lighting (p.12)
13 Precautions
16 One-year Limited Warranty
Register your mio (p.16)
Take photo
Press the Shutter button
3
The photo ejects automatically.
CAUTION:
• For
• For
vertical
horizontal
DO NOT pull on the photo.
pictures, hold camera as shown.
pictures, hold camera as shown with flash on top.
to take the picture.
Back Next
1 of 2
page
9
Page 10

mio
www.polaroid.com
1 Camera features
3 Attach strap
4 Load batteries
5 Load film pack
7 Remove empty film pack
8 Take photo
10 Take distance photo
11 Tips
Image too dark (p.11)
Image too light (p.11)
Image too dark due
to back lighting (p.12)
13 Precautions
16 One-year Limited Warranty
Register your mio (p.16)
Take distance photo
Press the distance button
The distance symbol appears in the status LCD.
to adjust lens for pictures beyond 10 ft.
Back Next
1 of 1
page
10
Page 11

mio
www.polaroid.com
1 Camera features
3 Attach strap
4 Load batteries
5 Load film pack
7 Remove empty film pack
8 Take photo
10 Take distance photo
11 Tips
Image too dark (p.11)
Image too light (p.11)
Image too dark due
to back lighting (p.12)
13 Precautions
16 One-year Limited Warranty
Register your mio (p.16)
Tips
If image is too dark
symbol ( ) appears in the status LCD.
If image is too light
symbol ( ) appears in the status LCD.
, press the Lighten/Darken button once. The Lighten
, press the Lighten/Darken button twice. The Darken
Back Next
1 of 2
page
11
Page 12

mio
www.polaroid.com
1 Camera features
3 Attach strap
4 Load batteries
5 Load film pack
7 Remove empty film pack
8 Take photo
10 Take distance photo
11 Tips
Image too dark (p.11)
Image too light (p.11)
Image too dark due
to back lighting (p.12)
13 Precautions
16 One-year Limited Warranty
Register your mio (p.16)
Tips
If image is too dark due to back lighting
, press the Fill Flash button. The Fill
Flash symbol ( ) appears in the status LCD.
Back Next
2 of 2
page
12
Page 13

mio
www.polaroid.com
1 Camera features
3 Attach strap
4 Load batteries
5 Load film pack
7 Remove empty film pack
8 Take photo
10 Take distance photo
11 Tips
Image too dark (p.11)
Image too light (p.11)
Image too dark due
to back lighting (p.12)
13 Precautions
16 One-year Limited Warranty
Register your mio (p.16)
Precautions
•
DO NOT pull film from camera.
•
DO NOT lay camera down on extended lens.
lens will retract after 5 minutes.
Back Next
Camera will turn off and
1 of 3
page
13
Page 14

mio
www.polaroid.com
1 Camera features
3 Attach strap
4 Load batteries
5 Load film pack
7 Remove empty film pack
8 Take photo
10 Take distance photo
11 Tips
Image too dark (p.11)
Image too light (p.11)
Image too dark due
to back lighting (p.12)
13 Precautions
16 One-year Limited Warranty
Register your mio (p.16)
Precautions
•
DO NOT cut film.
•
DO NOT bend or fold developing film.
Back Next
2 of 3
page
14
Page 15

mio
www.polaroid.com
1 Camera features
3 Attach strap
4 Load batteries
5 Load film pack
7 Remove empty film pack
8 Take photo
10 Take distance photo
11 Tips
Image too dark (p.11)
Image too light (p.11)
Image too dark due
to back lighting (p.12)
13 Precautions
16 One-year Limited Warranty
Register your mio (p.16)
Precautions
Caution:
This camera is battery operated. To avoid electrical shock, do not
Back Next
expose to or immerse in water or other fluids, disassemble, or operate if
dropped or damaged. Contact a Polaroid Service Center for repair information.
Film Caution: This process uses a caustic paste. Avoid contacting skin, eyes
or mouth with the paste and keep it away from children and animals. If you
get some paste on your skin, wipe it off immediately and wash with water
to avoid an alkali burn. If eye or mouth contact occurs, quickly wash the
area with plenty of water and see a doctor. Do not cut or take apart photos.
Keep discarded materials away from children, animals, clothing, and furniture.
3 of 3
page
15
Page 16

www.polaroid.commio
Register
your mio now and
receive an additional
one-year limited
warranty
FREE!
1 Camera features
3 Attach strap
4 Load batteries
5 Load film pack
7 Remove empty film pack
8 Take photo
10 Take distance photo
11 Tips
Image too dark (p.11)
Image too light (p.11)
Image too dark due
to back lighting (p.12)
13 Precautions
16 One-year Limited Warranty
Register your mio (p.16)
One-year Limited Warranty
Back
Polaroid will, at our option, repair or replace any camera found defective in
manufacture within the warranty period. The warranty period is determined
by the date of camera purchase. Keep the receipt as proof of purchase. Otherwise, the warranty period is determined by the date of manufacture. To take
advantage of the warranty, the camera must be returned to, and repaired by,
one of the Polaroid Service Centers. This warranty does not apply to dam-
age caused by accident, misuse or tampering, and excludes all consequential
damages except in jurisdictions not allowing such exclusions or limitations.
For customer service or to
register your mio visit us online
at www
.polaroid.com/mio
or call 1-800-343-5000 from
anywhere in the U.S.A.
Film and accessories
also available.
©2001 Polaroid Corporation, Cambridge, MA 02139 U.S.A., owner of the trademarks
“Polaroid and Pixel Design” and “mio”. All rights reserved.
1 of 1
page 16
 Loading...