

Page 1
1 English
5 Français
9 Español
13 Português
17
Page 2
Limited warranty: Polaroid will, at our option, repair or replace any camera found defective in manufacture within the warranty
period (12 months). The warranty period is determined by the date of the camera purchase. Keep the receipt as proof of purchase. Otherwise the warranty is determined by the date of manufacture. This warranty does not apply to damage caused by
accident, misuse or tampering and excludes all consequential damages except in jurisdictions not allowing such exclusions or
limitations. Contact a Polaroid Service Center for Repair Information.
Garantie limitée :
présentant un défaut de fabrication et ce pendant toute la durée légale de la garantie (12 mois). La durée de la garantie est
déterminée par la date d'achat de l'appareil. Le reçu est votre preuve d'achat, con-servez-le. Sinon, la durée de la garantie est
déterminée en fonction de la date de fabrication.La durée de la garantie est déterminée par la date d'achat de l'appareil.Cette
garantie ne s'applique pas aux dommages résultant d'un accident, d'une mauvaise utilisation ou d'un mauvais usage, et exclut
tout dommage causé à un tiers sauf dans les pays où de telles exclusions ou limitations sont interdites. Pour de plus amples
informations sur les réparations, contactez le centre d’assistance à clientèle de Polaroid.
Garantía limitada: Polaroid dará la opción, dentro del período de garantía (12 meses), de reparar o reemplazar cualquier cámara
con defecto de fabricación. El período de garantía comienza en la fecha de la compra. Guarde el recibo como prueba de com-pra. En caso de no tener recibo, el período de garantía se determina por la fecha de fabricación. Esta garantía no se aplica para
daños causados por accidente, utilización o mal uso y excluye cualquier daño derivado, excepto en jurisdicciones que no permitan este tipo de exclusiones o limitaciones. Contacte con un centro de servicio de Polaroid para obtener información acerca de
la reparación.
Garantia limitada:
cação dentro do período de garantia (12 meses). O período de garantia será determinado pela data da aquisição da câmera.
Guarde a nota fiscal como prova de compra. Caso contrário, a garantia será determinada pela data de fabricação. Essa garantia
não se aplica a danos causados por acidente, uso incorreto ou má utilização do produto. Entre em contato com o Serviço de
Atendimento ao Consumidor Polaroid para obter informações sobre consertos.
Si cet appareil s'avère défectueux, Polaroid s'engage à réparer ou remplacer, à sa convenance, tout produit
A Polaroid poderá decidir entre consertar ou substituir qualquer câmera que apresentar defeitos de fabri-
Copyright 2000, Polaroid Corporation, Cambridge, MA 02139, U.S.A., owner of the trademarks ”Polaroid” and “ Miniportrait”.
All other product names may be the property of their respective owners. All rights reserved.
Copyright 2000 Polaroid Corporation, Cambridge, MA 02139, U.S.A., propriétaire des marques commerciales “ Polaroid ” et
“ Miniportrait ”. Tous les autres noms de produits sont la propriété de leurs détenteurs respectifs. Tous droits réservés.
Copyright 2000, Polaroid Corporation, Cambridge, MA 02139, E.U.A., propietaria de las marcas registradas ”Polaroid” y “ Miniportrait”.
Los demás nombres de productos pueden ser propiedad de sus respectivos propietarios. Reservados todos los derechos.
Copyright 2000, Polaroid Corporation, Cambridge, MA 02139, U.S.A., proprietária das marcas comerciais “Polaroid” e “Miniportrait”.
Todos os outros nomes de produtos podem pertencer aos seus respectivos proprietários. Todos os direitos reservados.
PW-70042M-0
Page 3
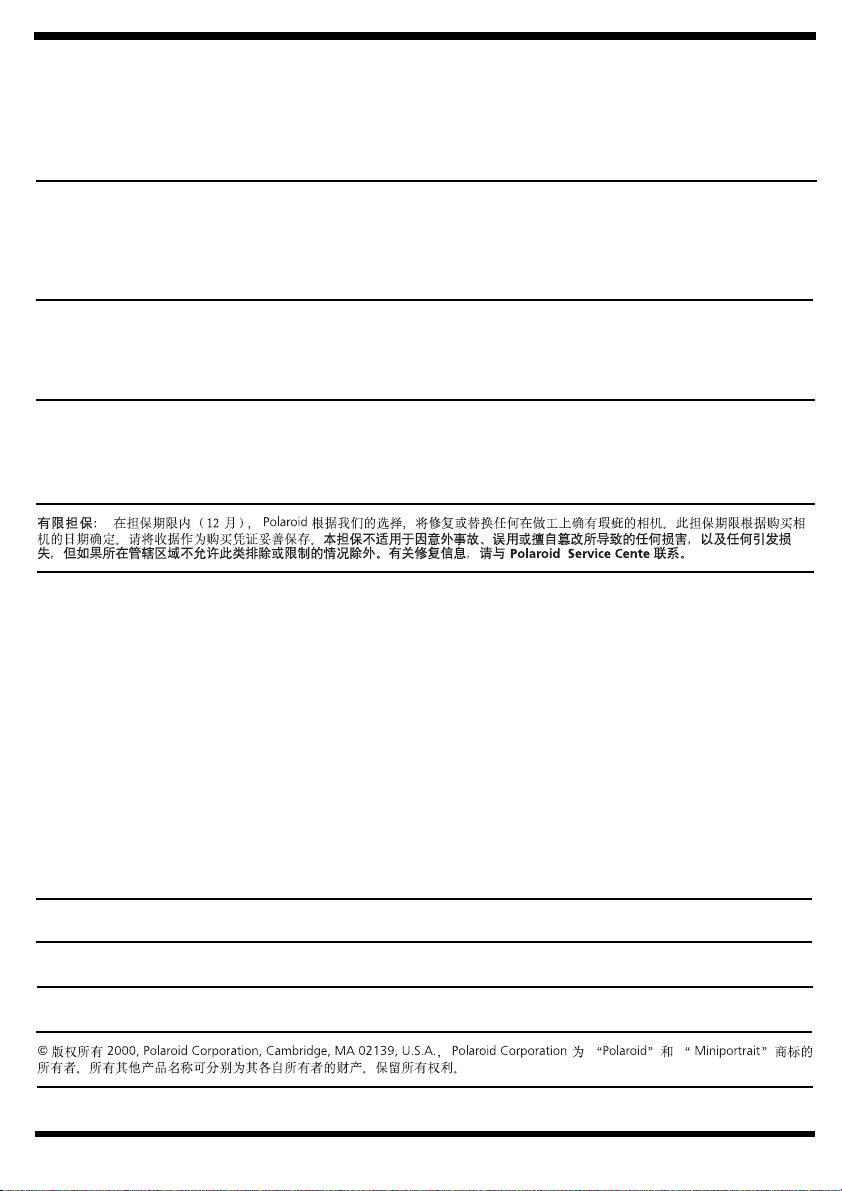
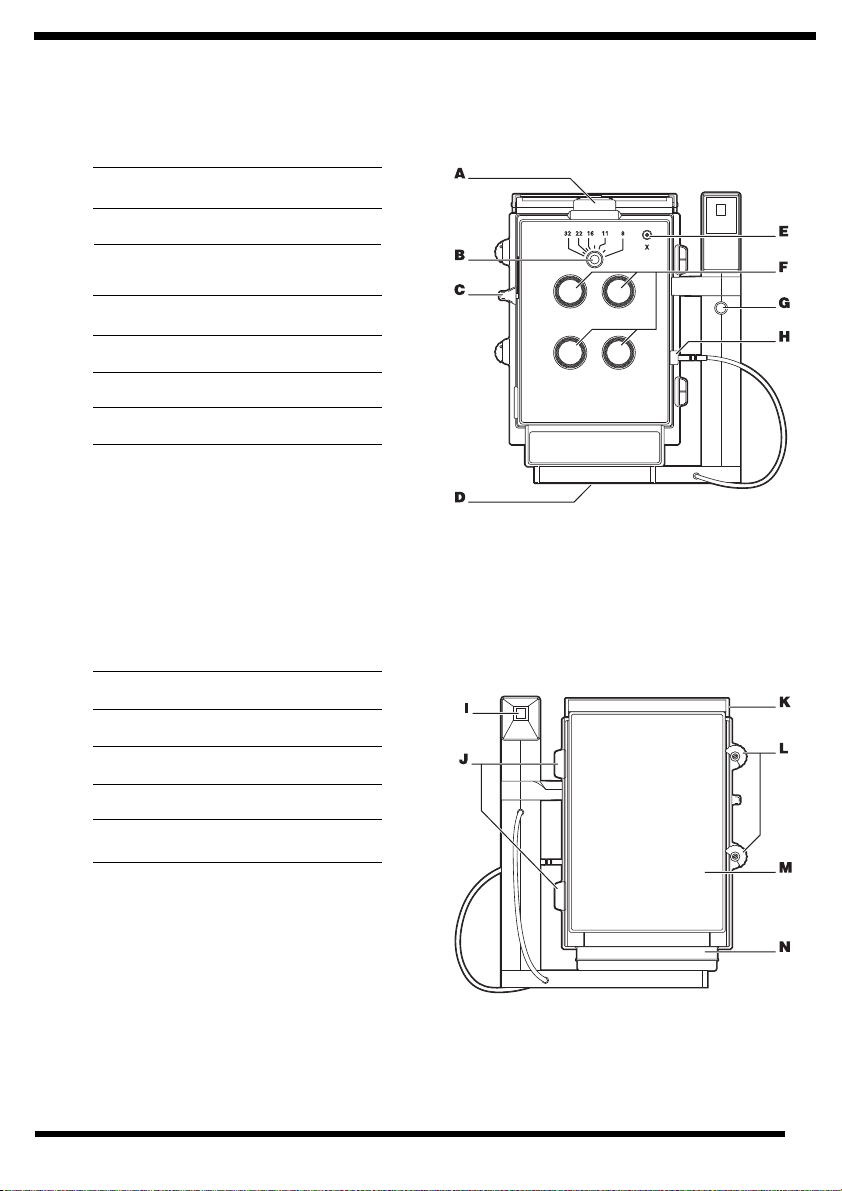
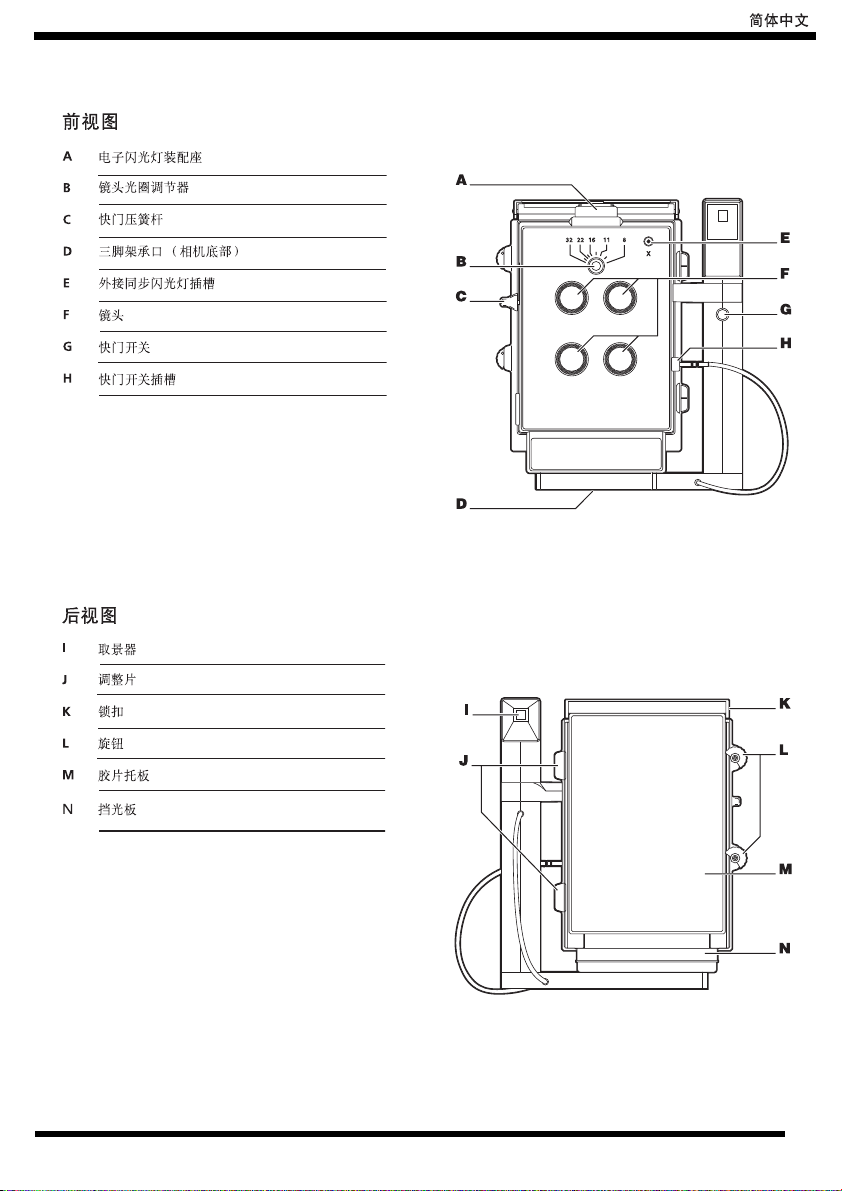
Front View
A Electronic-flash mount
B Lens aperture control
C Shutter-cocking lever
D Tripod socket (on bottom of camera)
E X-sync flash socket
F Lenses
G Shutter release
H Socket for shutter release
English
Rear View
I Viewfinder
JTabs
K Door latch
L Thumb wheels
M Film back
Dark slide
N
1
Page 4
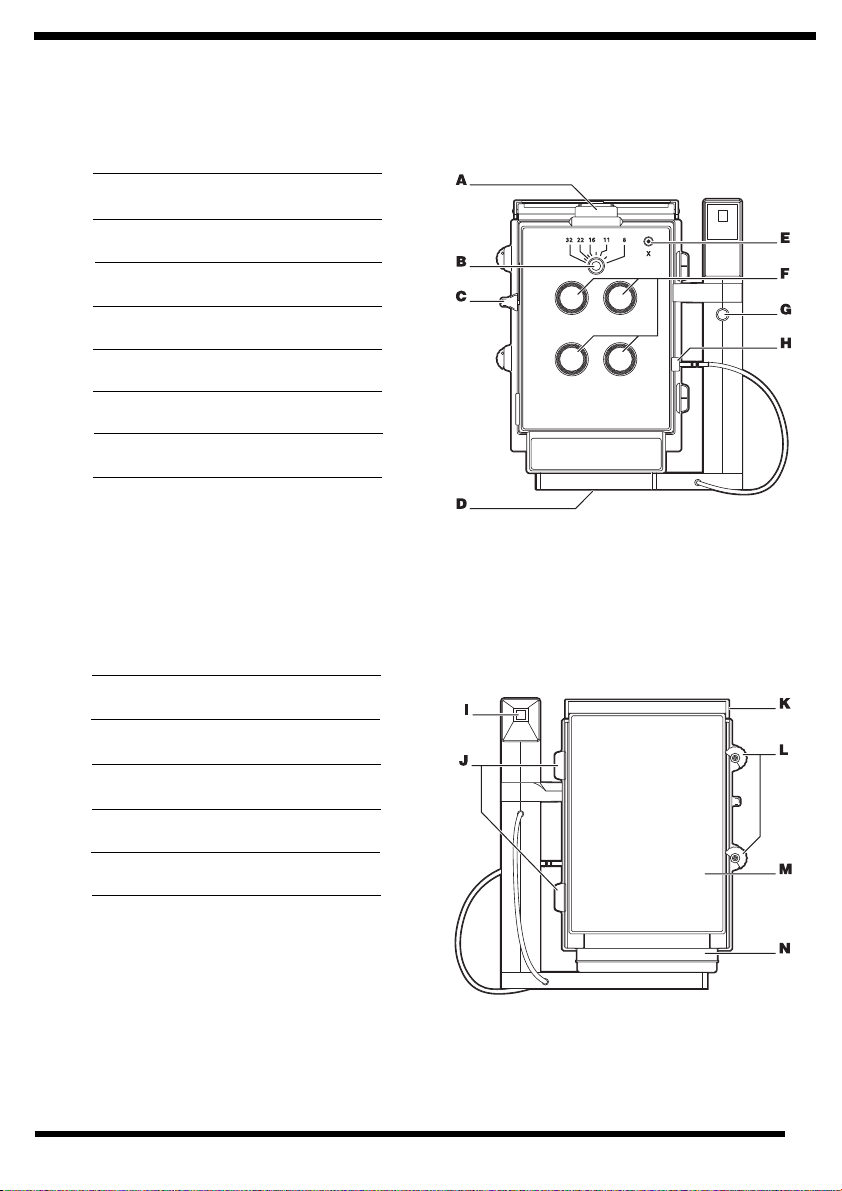
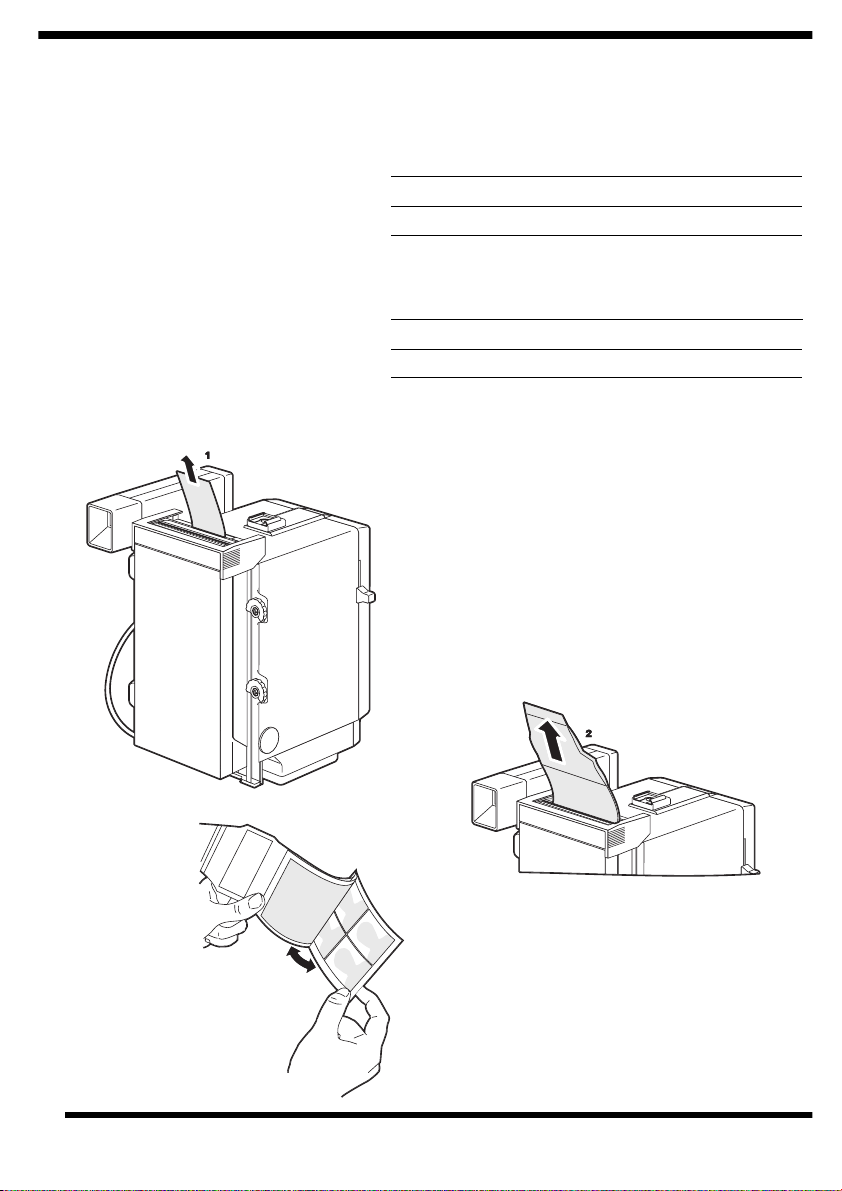
Loading Film
Use Polaroid 8.5 x 10.8 cm (3-1/4 x 4-1/4 in.)
pack films.
1. Grip the film pack holder door latch and lift
open.
Check that the film rollers are clean
(See Cleaning Film Rollers).
2. Open the film pack back.
3. Hold the film pack by its edges and slide it into
the holder.
4. Check that the white tabs are pointed up.
5. Close and latch the door with the black tab
sticking out.
6. Pull the black tab straight out of the holder. A
small white tab appears.
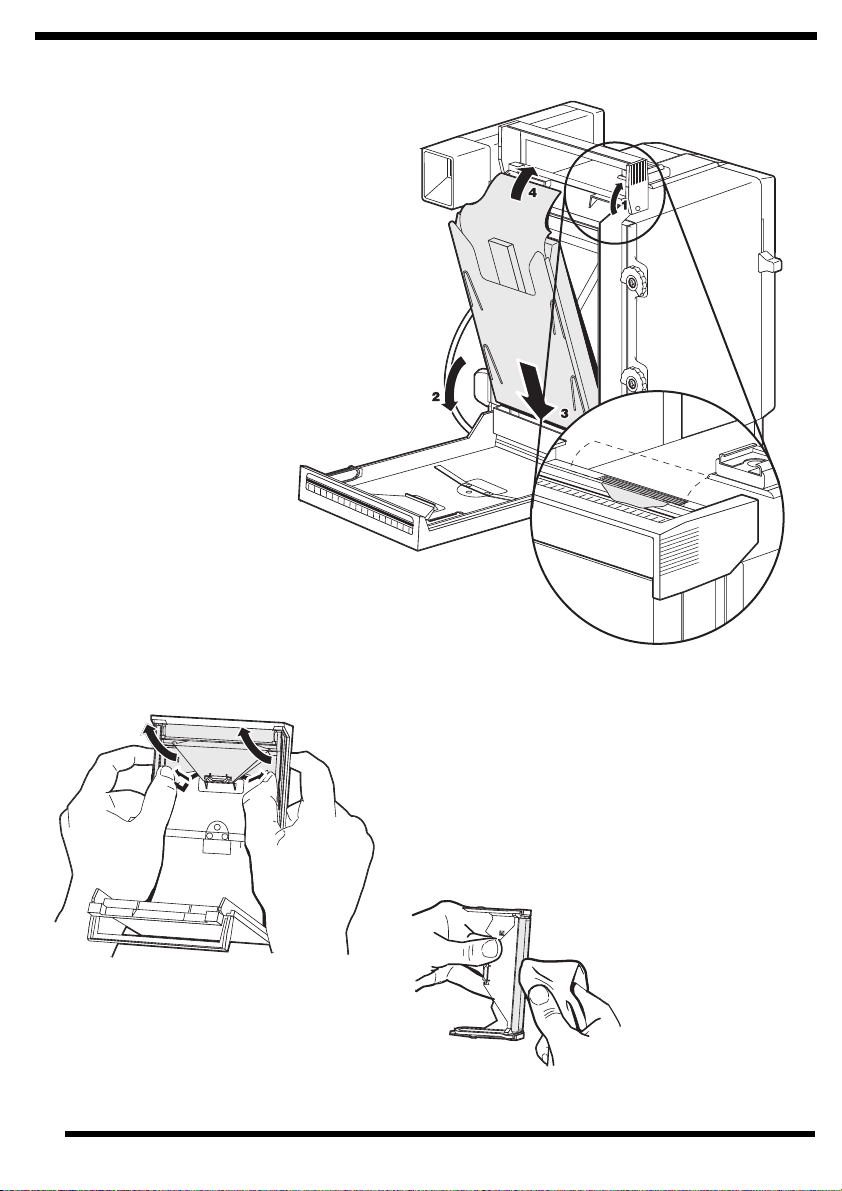
Cleaning Film Rollers
1. Remove the film rollers.
2. Clean both rollers with a damp, lint-free cloth.
Rotate both rollers as you clean them.
Never touch the rollers with anything hard or abrasive.
3. Dry the rollers with a lint-free cloth and replace them.
2
Page 5

Removing and Attaching the Film Back
To remove:
Rotate the thumbwheels (A) clockwise to
remove the film back.
To attach:
1. Align the left edge of the film back under the
two tabs on the camera.
2. Rotate the thumbwheels counterclockwise to
secure the back.
Taking Pictures
1. Mount the camera on a tripod.
2. Attach the electronic flash to the mount on top of
the camera. If using a separate flash, attach its cable
to the X-sync flash socket on the front of the camera.
Note: We recommend the use of Polaroid Flash
MP485 (part number 616593). Contact your dealer
for more information.
3. Attach a film back to the back of the camera and
remove the dark slide.
Note: For additional camera backs, order the
Pro Accessory Back (part number 624066).
Contact your dealer for more information
4. Position the camera 1.2 m (4 feet) from the subject.
5. Frame the subject in the viewfinder.
6. As a starting point, set the lens aperture
control to 16. If the picture is too light or too dark,
see the section Adjusting Exposure.
7. Lift the shutter-cocking lever up.
8. Press the shutter release to take the picture.
English
3
Page 6

Adjusting Exposure
If the picture is . . . Set the lens aperture to. . .
too dark a lower number
too lighta higher number
With Separate Flash Unit
To . . . Move the flash . . .
lighten picture closer to subject
darken picture away from subject
Processing Film
1. Pull the white tab straight out of the film
holder.
2. Grip the film tab firmly and pull straight out.
3. Wait for the length of time recommended on
the film box.
4. Separate the print from the negative.
4
Page 7
Vue avant
A Fixation du flash électronique
B Contrôle de l'ouverture du diaphragme
C Levier d'armement
D Filetage pour trépied (situé sous
l’appareil)
E Prise synchro flash
F Objectifs
G Déclencheur
H Filetage du déclencheur souple
Français
Vue arrière
I Viseur
J Languettes
K Loquet du compartiment
L Molettes
M Dos
N Volet anti-voile
5
Page 8

Chargement du film
Utilisez les films 8,5 x 10,8 cm (3-1/4 x 4-1/4 po.)
de Polaroid.
1. Ouvrez le compartiment du support de film
en soulevant le loquet.
Vérifiez que les rouleaux presseurs sont propres
(reportez-vous à la section Nettoyage des
rouleaux presseurs).
2. Ouvrez l’arrière du pack de film.
3. Manipulez le paquet de film en le tenant par les
bords et insérez-le dans le support.
4. Vérifiez que les languettes blanches sont
tournées vers le haut.
5. Refermez le compartiment et verrouillez-le à
l’aide du loquet en veillant bien à ce que la
languette noire dépasse.
6. Tirez sur la languette noire pour l’extraire du
support. Une petite languette blanche
apparaît.
Nettoyage des rouleaux presseurs
1. Retirez les rouleaux presseurs.
2. Nettoyez-les à l’aide d’un chiffon doux, propre et
légèrement humide tout en les faisant pivoter.
Ne mettez jamais les rouleaux presseurs en contact avec
des matériaux durs ou abrasifs.
3. Séchez les rouleaux presseurs à l’aide d’un chiffon doux
et propre, puis remettez-les en place.
6
Page 9

Retrait et installation du dos
Retrait :
Faites pivoter les molettes (A) dans le sens des
aiguilles d’une montre pour retirer le support
de film.
Installation :
1. Alignez le bord gauche du dos sous
les deux languettes de l’appareil photo.
2. Faites pivoter les languettes dans le sens
inverse des aiguilles d’une montre pour
verrouiller le support de film.
Prise de vues
1. Installez l’appareil sur un trépied.
2. Insérez le flash électronique dans l’emplacement
situé sur le dessus de l’appareil. Si vous utilisez un
flash indépendant, raccordez le câble à la prise de
synchro flash situé sur l’avant de l’appareil photo.
Remarque : Il est recommandé d’utiliser le flash
Polaroid MP485 (Référence 616593). Contactez votre
revendeur pour de plus amples informations.
3. Installez le support du film à l’arrière de l’appareil
photo et retirez le volet anti-voile.
Remarque : Pour utiliser des supports
supplémentaires, commandez le support
supplémentaire Pro (Référence 624066).
Contactez votre revendeur pour de plus amples
informations.
4. Placez l’appareil à 1,2 m (4 pieds) du sujet.
5. Cadrez votre sujet dans le viseur.
6. Commencez par régler le contrôle de l’ouverture du
diaphragme sur 16. Si l’image est trop claire ou
trop sombre, reportez-vous à la section Réglage de
l’exposition.
7. Armez le levier du déclencheur.
8. Appuyez sur le déclencheur pour prendre la photo.
Français
7
Page 10
Réglage de l’exposition
Qualité de l’image . . . Réglage de l’ouverture. . .
trop sombre sur une valeur inférieure
trop claire sur une valeur supérieure
Avec flash indépendant
Pour . . . Placez le flash . . .
éclaircir l’image plus près du sujet
assombrir l’image plus loin du sujet
Développement du film
1. Tirez sur la languette blanche pour extraire
l’image du support.
2. Tenez fermement la languette du film et tirez.
3. Attendez le temps nécessaire indiqué sur
l’emballage du film.
4. Détachez l’épreuve du négatif.
8
Page 11

Vista frontal
A Flash electrónico incorporado
B Control de apertura de la lente
C Palanca de carga del disparador
D Entrada para trípode (en la parte
inferior de la cámara
E Enchufe para cable X-sync del flash
F Lentes
G Disparador
H Tuerca para el disparador
Español
Vista posterior
IVisor
J Pestañas
K Seguro de la puerta del respaldo
L Seguros para fijar el respaldo
M Respaldo para película
N Cortina
9
Page 12

Carga de la película
Utilice paquetes de película Polaroid
de 8,5 x 10,8 cm.
1. Sujete el seguro de la puerta del respaldo de
la película y levántelo para abrirla.
Compruebe que los rodillos de película estén
limpios
(Consulte el apartado Limpieza de los rodillos de
película).
2. Abra el paquete de película.
3. Sujete el paquete por las esquinas y deslícelo
dentro del respaldo.
4. Compruebe que las pestañas blancas están
giradas hacia arriba.
5. Cierre y bloquee la puerta con la ficha negra
hacia afuera.
6. Saque la pestaña negra del respaldo. Aparecerá
una pequeña pestaña blanca.
10
Limpieza de los rodillos de película
1. Retire los rodillos de película.
2. Limpie los dos rodillos con una gamuza húmeda.
Gire los rodillos mientras los limpia.
No toque nunca los rodillos con un elemento fuerte o
abrasivo.
3. Seque los rodillos con una gamuza y vuelva a
instalarlos.
Page 13

Cómo retirar e instalar el respaldo
para película
Para retirarlo:
Gire los seguros (A) en el sentido de las
agujas del reloj para retirar el soporte.
Para instalar:
1. Alinee el extremo izquierdo del soporte bajo
las dos pestañas de la cámara.
2. Gire los seguros en sentido contrario a las agujas del reloj para fijarlo.
Realización de fotografías
1. Sitúe la cámara sobre un trípode.
2. Instale el flash electrónico en la cámara. Si va a utilizar un flash diferente, conecte el cable al enchufe
para cable X-sync del flash de la parte frontal de la
cámara.
Nota: Se recomienda el uso de Polaroid Flash MP485
(número de referencia 616593). Póngase en contacto
con su distribuidor para obtener más información.
3. Ponga un respaldo para película en la parte posterior
de la cámara y retire la tapa oscura.
Nota: Para conseguir otros respaldos para la cámara
solicite
Pro Accessory Back (número de referencia 624066).
Póngase en contacto con su distribuidor para
obtener más información
4. Sitúe la cámara a 1,2 m del objeto.
5. Encuadre el objeto en el visor.
6. Para empezar, defina el control de apertura de la
lente a 16. Si la imagen aparece demasiado oscura o
clara, consulte la sección Control de exposición.
7. Levante la palanca de carga del disparador.
8. Oprima el disparador para realizar la fotografía.
Español
11
Page 14

Control de exposición
Si la imagen está . . . Defina la apertura de la lente. . .
desmasiado oscura con un número menor
demasiado clara con un número mayor
Con una unidad de flash diferente
Para . . . Mueva el flash . . .
aclarar la imagen hacia el objeto
oscurecer la imagen lejos del objeto
Revelado de la película
1. Saque la pestaña blanca del respaldo de la
película.
2. Sujete bien la pestaña de la película y sáquela.
3. Espere el tiempo de revelado recomendado
en la caja de la película.
4. Separe la copia del negativo.
12
Page 15

Frente
A Conector do flash eletrônico
B Controle da abertura das lentes
C Trava do disparador
D Soquete do tripé (na parte de baixo da
câmera)
E Soquete de flash X-sync
F Lentes
G Disparador
H Soquete para o disparador
Português
Trás
IVisor
JAlças
K Trava da porta
L Parafusos de aperto manual
M Tampa do filme
N Placa deslizante escura
13
Page 16

Como colocar o filme
Use caixas de filme Polaroid de 8,5 x 10,8 cm
(3-1/4 x 4-1/4 pol.)
1. Segure a trava da tampa de filmes e levante-a.
Certifique-se de que os rolos de filme estejam
limpos.
(Consulte a seção Como limpar os rolos de
filme).
2. Abra a parte de trás da caixa de filmes.
3. Segure o filme pelas bordas e deslize-o até o
compartimento.
4. Certifique-se de que as alças brancas estejam
apontadas para cima.
5. Feche e trave a porta deixando a alça preta
para fora.
6. Puxe a alça preta diretamente para fora
do compartimento. Uma
pequena alça branca
ficará à vista.
14
Como limpar os rolos de filmes
1. Remova os rolos de filmes.
2. Limpe ambos os rolos com um pano úmido sem
felpas.
Gire ambos os rolos ao limpá-los.
Nunca toque os rolos com objetos rígidos ou
abrasivos.
3. Seque os rolos com um pano sem felpas e recoloqueos novamente.
Page 17

Como remover e recolocar a tampa do
filme
Para remover:
Gire os parafusos de aperto manual (A) no
sentido horário para remover a tampa do
filme.
Para recolocar:
1. Alinhe a borda esquerda da tampa do filme,
abaixo das duas alças da câmera.
2. Gire os parafusos de aperto manual no sentido
anti-horário para fixar a tampa.
Como fotografar
1. Monte a câmera no tripé.
2. Acople o flash eletrônico na parte superior da
câmera. Se estiver usando um outro flash, conecte o
cabo ao soquete de flash X-sync que se encontra na
frente da câmera.
Obs.: Recomendamos o uso do Flash Polaroid MP485.
Entre em contato com Serviço de Atendimento ao
Consumidor Polaroid para obter informações adicionais.
3. Coloque a tampa do filme na parte de trás da câmera
e remova a placa deslizante escura.
Obs.: Para adquirir tampas adicionais para a câmera,
solicite a Tampa Pro Accessory.
Entre em contato com o Serviço de Atendimento ao
Consumidor Polaroid para obter informações adicionais.
4. Posicione a câmera a 1,2 m (4 pés) do objeto.
5. Enquadre o objeto no visor.
6. Inicialmente, configure o controle de abertura das
lentes na posição 16. Se as fotos estiverem muito
claras ou muito escuras, consulte a seção Como
ajustar a exposição.
7. Levante a trava do disparador.
8. Pressione o disparador para fotografar.
Português
15
Page 18

Como ajustar a exposição
Se a foto estiver . . . Defina a abertura das lentes em. . .
muito escura um número menor
muito clara um número maior
Com uma outra unidade de flash
Para . . . Mova o flash . . .
clarear a foto mais perto do objeto
escurecer a foto mais afastado do objeto
Como revelar o filme
1. Puxe a alça branca diretamente para fora do
compartimento do filme.
2. Segure com firmeza a alça do filme e puxe-a
diretamente para fora.
3. Aguarde o tempo recomendado na caixa do
filme.
4. Separe a foto do negativo.
16
Page 19
17
Page 20

18
Page 21

19
Page 22

20
Page 23
Polaroid Service Centers
Argentina
Polaroid Argentina
Av. L.N. Alem 986 Tel: 541 312 7061
Piso 6
1001 Buenos Aires
Argentina
Brazil
Polaroid do Brasil Ltda. SAC: 0800 111367
Av. Tambore 1180 - Módulo A5 - Tamboré
CEP 06460-000 Barueri/SP
Brasil
China
Colombia
Polaroid Colombia Tel: 571-629-2479
Calle 114 No. 9-45 Oficina 512
Torre B, Edificio Teleport
Santa Fe de Bogota, D.C.
Colombia
Hong Kong
Polaroid Far East Ltd Tel: 852-2894-0371
32/F Windsor House
311 Gloucester Road
Causeway Bay
Hong Kong
Malaysia
Polaroid Malaysia Ltd. Tel: 603-7877-8577
No. 8 Jalan 51A/227
46100 Petaling Jaya
Selangor
Malaysia
Republic of South Africa
Midsouth Tel: 2711-314-3800
Unit F
Alphen West
George Street
Midrand
Johannesburg
South Africa
Romania
ILS Holding Ltd Tel: 401-310-3657
Piata Walter Maracineanu 1
Sector 1 Bucharest
Romania
Russia
Polaroid Moscow Office Tel: 7501-725-2726
Leningradsky Prospect, 37A/14
Moscow, 125167
Russia
Singapore
Polaroid Singapore Pte Ltd Tel: 65-272-2030
435, Orchard Road
#21-01/02/03, Wisma Atria
Singapore 238877
Turkey
Darfilm SA Tel: 90-212-293-7500
Yenicarsi Han 40
Galatasaay
Istanbul
Turkey
UAE
Polaroid Dubai Office Tel: 971-481-6879
Jebel Ali Free Zone
PO Box 16806
Dubai
UAE
Mexico
Polaroid de Mexico SA de CV Tel: 525-703-1111
Paseo de la Reforma 195-3er-Piso
Col Cuauhtemoc
06500 Mexico D.F.
lada sin costo del interior: 1-800-707-2777
Peru
Polaroid del Peru Tel: 511-411-3997
Los Ficus 323 San Isidro
Apartado Postal 18-0606
Lima
Peru
 Loading...