

Page 1

User Guide
(ENGLISH VERSION)
MicroCam
Page 2
1 2
a
b
c
d
h
g
f
e
3
i
46
k
5
l
m
j
Am
OI
331 337 339
+
–
o
n
Page 3

789
10 11 12
13 14 15
16
+
1
x 4.0 x 2.0 x 1.0 x .50 x .25
39
–
Page 4
17 18
abc
19
d
e
f
g
h
m
i
j
n
20
k
q
r
l
6
4
OFF
3.5
2
p o
21 22 23
Page 5

English 3
Introduction
The Polaroid MicroCam is designed to
provide instant photographic capability to
a wide variety of light microscopes. The
camera is simple to operate, and is easily
attached to the microscope’s viewing
tube, in place of the eyepiece. (Note: The
camera also can be attached to the
phototube, if preferred.)
The camera can make automatic
exposures ranging from 1/60 sec. to 16
minutes; it also can be set for manual
operation to make longer exposures. A
display on the control panel shows the
camera status, and alerts you if the
camera is out of film or if the illumination
is too bright or too dim for an automatic
exposure.
The camera uses Polaroid color and
black & white AutoFilms. After exposure,
the camera ejects the print, which
develops automatically in normal room
lighting. The pictures are fully developed
in four to five minutes.
Free technical assistance
If you need additional information or
assistance, call toll-free at 1-800-225-1618,
Mon.-Fri., 8AM to 8PM (Eastern time). Or,
write to the Polaroid Resource Center,
784 Memorial Drive, Cambridge, MA,
02139.
If outside the U.S.A., contact the
nearest Polaroid Office (addresses on
back page).
1
⁄
2
Page 6

4 English
The numbers throughout the text refer to
the illustrations at the back of the book.
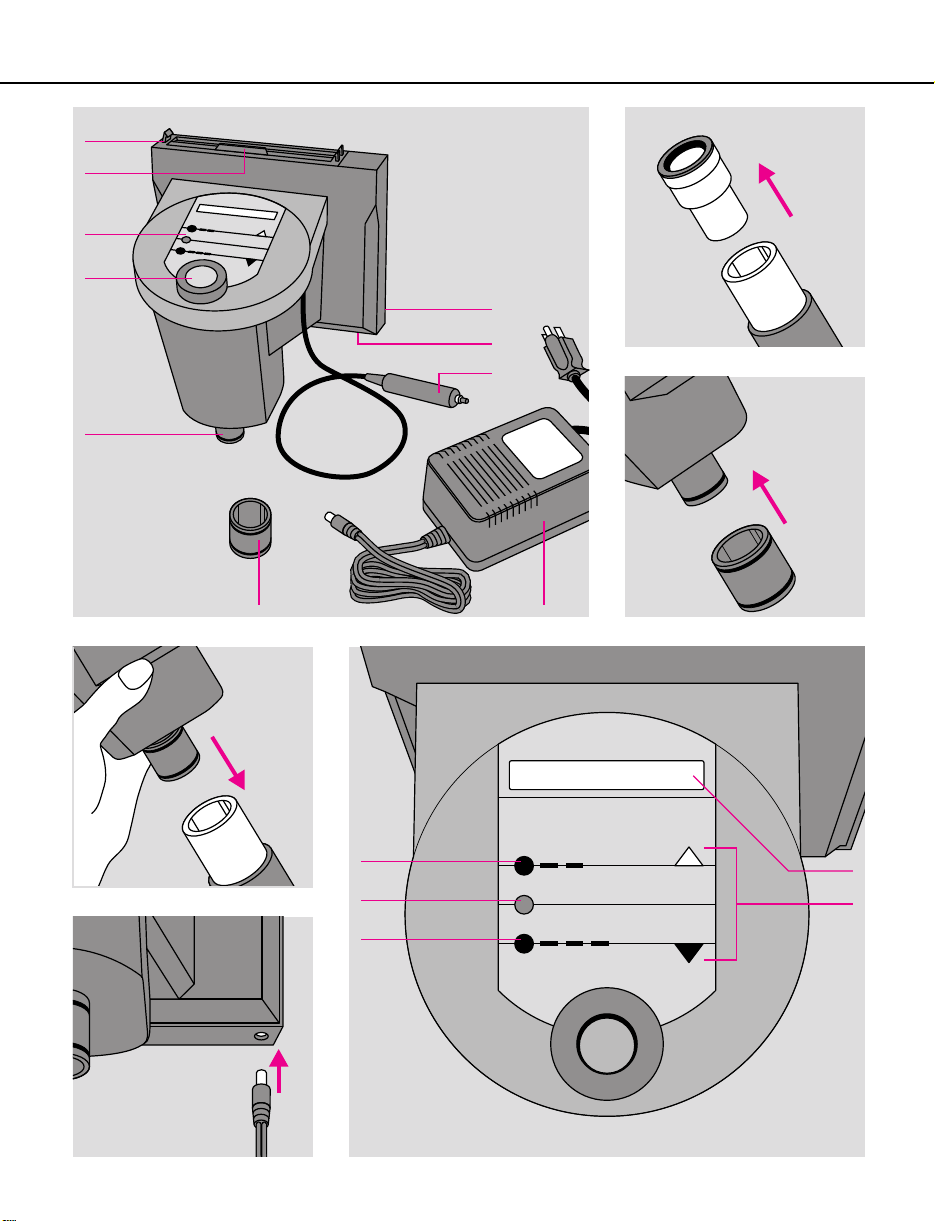
The camera (Illustration 1)
a Film holder
b Film door latch
c Control panel
d Viewfinder
e Microscope fitting
f Remote shutter button
g Socket for power supply
h Film counter (on back of film holder)
i Adapter for 29mm microscope tube
The camera fits microscope photo or
viewing tubes with a diameter of 22.5mm;
the adapter enables the camera to be
attached to a 29mm tube.
j Power supply
This provides power for the exposure
system and film processing rollers. The
camera requires a 12V 1.2 amp power
supply. Insufficient power may cause the
developer rollers to turn too slowly
(resulting in photographs with uneven
density or incomplete images); this also
may cause the display and/or exposure
system to function erratically. Too much
power can damage the camera.
The camera is shipped with either a
120V, 60 Hz power supply (PID 618091),
or a 100-240V, 50/60 Hz power supply
(PID 618089). Replacement power
supplies also are available: 120V, 60 Hz
(PID 618092); 100-240V, 50/60 Hz (PID
618090).
The microscope
Good photomicrographs are dependent
on good microscopy. Unless the
microscope is properly adjusted to
provide a good visual image, you cannot
produce a good photomicrograph. You
should be fully familiar with your
microscope, and how to adjust it for
photography. See pages 9-12 for basic
microscope information.
Attach the camera to the microscope
The camera should be attached to the
stationary (non-adjustable) viewing tube
or to the photo tube, if preferred.
1 Remove the eyepiece from the
microscope viewing tube (2).
2 If necessary, attach the 29mm adapter;
slide the adapter all the way over the
camera’s microscope fitting (3), then
screw it on.
3 Orient the camera as shown (4), and
insert the fitting into the microscope tube.
Check that the camera is firmly seated.
If the camera rotates on the tube,
tighten the thumbscrew to hold it in
position.
4 Plug the power supply into an appro-
priate electrical outlet and then into the
camera (5).
Page 7

English 5
The control panel (6)
k Automatic/manual selector: Press to
highlight the desired mode (Automatic/
manual).
ON/OFF switch (O/l).
l
m Film selector: Press repeatedly to high-
light the correct film type (331/337/339).
n Lighten/Darken control: This control is
used to adjust the exposure before
rephotographing the same subject. Press
the white arrow ∆ to increase exposure
(lighten pictures), or the black arrow ▼ to
decrease exposure (darken pictures).
When both arrows are pressed
simultaneously, the exposure returns to
“normal” (x1.0). This control is not used
in the manual mode.
o Display: Shows the exposure setting and
messages, as described below.
Exposure settings
When the shutter button is pressed, the
display shows the exposure time and the
Lighten/Darken setting:
12.0
12 seconds. The L/D control is set at
“normal” (no adjustment).
15.0
been increased to 15 seconds; the white
arrow ∆ was pressed to multiply the time
by 1.3.
×
×
1.0
1.3
This sample shows
an exposure time of
In this sample, the
exposure time has
Messages
The camera will “beep” and display a
message if it cannot operate:
339=0
< 1/60
bright for an automatic exposure.
> 16:30
dim for an automatic exposure.
*..*..*..*..*..*..*
operation. Check that the power supply
cord is properly connected; have the line
voltage tested.
no power to the camera. Check that the
power supply is connected and that the
camera is turned on. (The electrical outlet
or power supply may need service.)
■ ■ ■ ■ ■ ■ ■
about five seconds, then turn it on again.
Note:
The camera is shipped with the
display set to show information in
“symbols.” It can be changed to a
“word” display (in any of several
languages) as follows:
Turn the camera on. Press and hold
the mode (
(331/337/339) buttons simultaneously.
The current language will be
displayed. Press the white arrow ∆
repeatedly until the desired language
appears in the display. Release the
mode and film type buttons.
A/m) and film type
The film pack is
empty.
The microscope
illumination is too
The microscope
illumination is too
The voltage is too low
for proper camera
A blank display
indicates that there is
“System error”: Turn
the camera off, wait
Page 8

6 English
Load the film
1 Release the latch to open the film door
(7). Check that the steel developer rollers
are clean before loading the film. Clean
the rollers with a soft, lint-free cloth
dampened with water, if necessary (8).
Rotate both rollers as you clean and
inspect them. Never scrape the rollers
with anything metallic, nor with your
fingernail. Do not use cleaning solvents.
2 Hold the film pack by the edges as shown
(9), and insert it into the film holder. Then
push the pack all the way in. (The pack
will fit only one way; do not attempt to
force it into the film holder.)
3 Close the door (10). The display will show
↑ ■ ↑
Press the remote
shutter button (11) to
eject the dark slide. As the dark slide (or a
picture) is ejected, it is covered briefly by
a black shade that prevents light from
affecting the image as it starts to develop.
The shade also holds the picture in the
slot. Do not tamper with this delicate
shade. After the dark slide (or picture) has
been ejected, grasp a corner and remove
it from the slot (12). The shade will snap
back inside.
After the dark sli de has been ejected,
the film counter will show “1", indicating
that the first frame is ready for exposure.
When the film pack is empty, a white dot
will appear (13), and
will be displayed.
To remove an empty film pack
339=0
Release the latch and open the door.
Grasp the tab on the end of the film pack
and pull out the empty pack (14).
Polaroid AutoFilms
Type Film speed Description
339 ISO640/29° Color print film; ideal for photographing
specimens where color is needed to
provide information.
331 ISO400/27° Panchromatic, medium-contrast B&W
print film; well-suited for situations where
filtration for contrast enhancement is
useful.
337 ISO3200/36° High-speed panchromatic, medium-
contrast B&W print film; ideal for low
light situations and subjects that require
filtration for contrast enhancement.
Each film pack contains 10 sheets of self-developing film.
1
Sheet size is 4
⁄2 x 41⁄4 in. (11,4 x 10,8cm) ; im age area is 4 x 3 in. (10, 2 x 7,6cm).
Note: Black & white films produce a reversed (mirror) image.
Page 9

English 7
Operation
1 Place the specimen on the microscope
focusing stage, and focus and frame the
image.
2 Adjust the microscope illumination for
photography; Koehler illumination is
recommended for compound
microscopes. If you are using neutral
density filters over the light source when
viewing, remove them before taking
pictures. Check that the light is turned up
to the brightest setting, often called
“photo” or “overvoltage.” (This setting is
not suitable for viewing; overuse will
shorten the bulb life.)
3 Attach the camera to the microscope and
look through the camera viewfinder.
Observe the crosshair in the center of the
viewfinder while using the microscope
focusing knobs to refocus the specimen if
necessary.
Note:
If you wear glasses to correct for
distance, you should wear them when
using the microscope camera.
4 Check the camera control settings and
adjust as needed.
5 Press the shutter button (11). The display
will show the exposure time for a few
seconds, then the camera will begin the
exposure. (The display will “count-down”
during the exposure).
6 After the exposure is complete the
camera will eject the developing picture.
Handle the picture by its wide border. Do
not bend or squeeze the picture while it
develops, and never cut pictures or take
them apart. See
Allow pictures to develop for 4-5
minutes before judging the exposure or
color balance.
If the camera is unused for more than 15
minutes it turns off automatically.
Lighten/darken control (15)
A picture that is too light is overexposed;
use a shorter exposure time. If the
camera is set for
the Darken arrow ▼ to decrease the
exposure time.
If a pic ture is too da rk, it is
underexposed; use a longer exposure
time. Press the Lighten arrow ∆ to
increase the time.
The picture series (16) shows a normal
exposure (x1.0), and the results of
adjusting the exposure time by a factor of
x4.0, x2.0, x.50 and x.25.
Caution
.
Automatic mode, press
Page 10

8 English
Exposure too short or too long
The camera will make aut omat ic exposures
as short as 1/60 second. If the microscope
illumination is too bright, the camera will
“beep” and the display will show:
< 1/60
Place a neutral
density filter over the
microscope illuminator to increase the
exposure time. Do not turn the light
down, as this will cause a color shift with
color film.
Automatic exposures can be as long as
1
16
⁄2 minutes. If the light is too dim, the
camera will “beep” and show:
Check that the light is
> 16:30
turned up to the
brightest setting, and that the neutral
density filter (if used) has been removed.
If there still is not enough light, you must
make a
Manual operation
manual exposure.
Set the camera for manual mode. Press
the shutter button to start the exposure,
and watch the display as it shows the
elapsed time. Press the button a second
time to end the exposure.
Special exposure techniques
Exposure meter
The camera has a built-in exposure meter
that is used in
Automatic mode. When
you press the shutter button, the meter
measures the light from the specimen,
calculates the exposure time and then
displays the time for a few seconds
before beginning the exposure. You can
cancel the exposure before it starts by
pressing the shutter button a second
time, and use the exposure indicated
when making manual exposures.
Reciprocity correction
When set for Automatic mode, the
camera will automatically adjust the
exposure time to compensate for
reciprocity failure. With Type 339 color
film, it also adjusts the filtration. The
camera contains a built-in color
conversion filter that moves into position
when needed. The filter adjusts the color
temperature of the tungsten/halogen
microscope illuminator (2800-3400°K) to
more closely match the color balance of
the film (5500°K). Additional
light-balancing filtration will not be
necessary for most situations.
Page 11

English 9
Xenon lighting
If using a Xenon (daylight) microscope
illuminator with color film, set the camera
for Type 331 black & white film, to
remove the built-in filter. Then press the
black arrow ▼ to decrease the exposure
by × .66 to compensate for the difference
in film speed.
Dark-field illumination
The camera’s automatic exposure system
may produce incorrectly exposed pictures
when dark-field illumination is used. The
built-in exposure meter can be used to
determine the correct exposure as
follows:
• Set the microscope for bright-field
illumination.
• Set the camera for
take a meter reading as described above.
• Re-set the microscope for dark-field
illumination, and the camera for
mode.
• Use the exposure time indicated by the
camera’s meter to make a manual
exposure.
Automatic mode, and
manual
Microscope information
Because of the great variety of
microscopes that are compatible with the
MicroCam, this booklet cannot provide
specific details for all equipment. You
should refer to the instructional material
provided with your microscope, or
contact the supplier for more information.
One of the most important microscope
adjustments for photography is the
illumination. The microscope illumination
must meet specific criteria: The beam of
light must be correctly concentrated and
adjusted to provide even illumination
over the entire picture area, as the
camera cannot compensate for uneven
lighting.
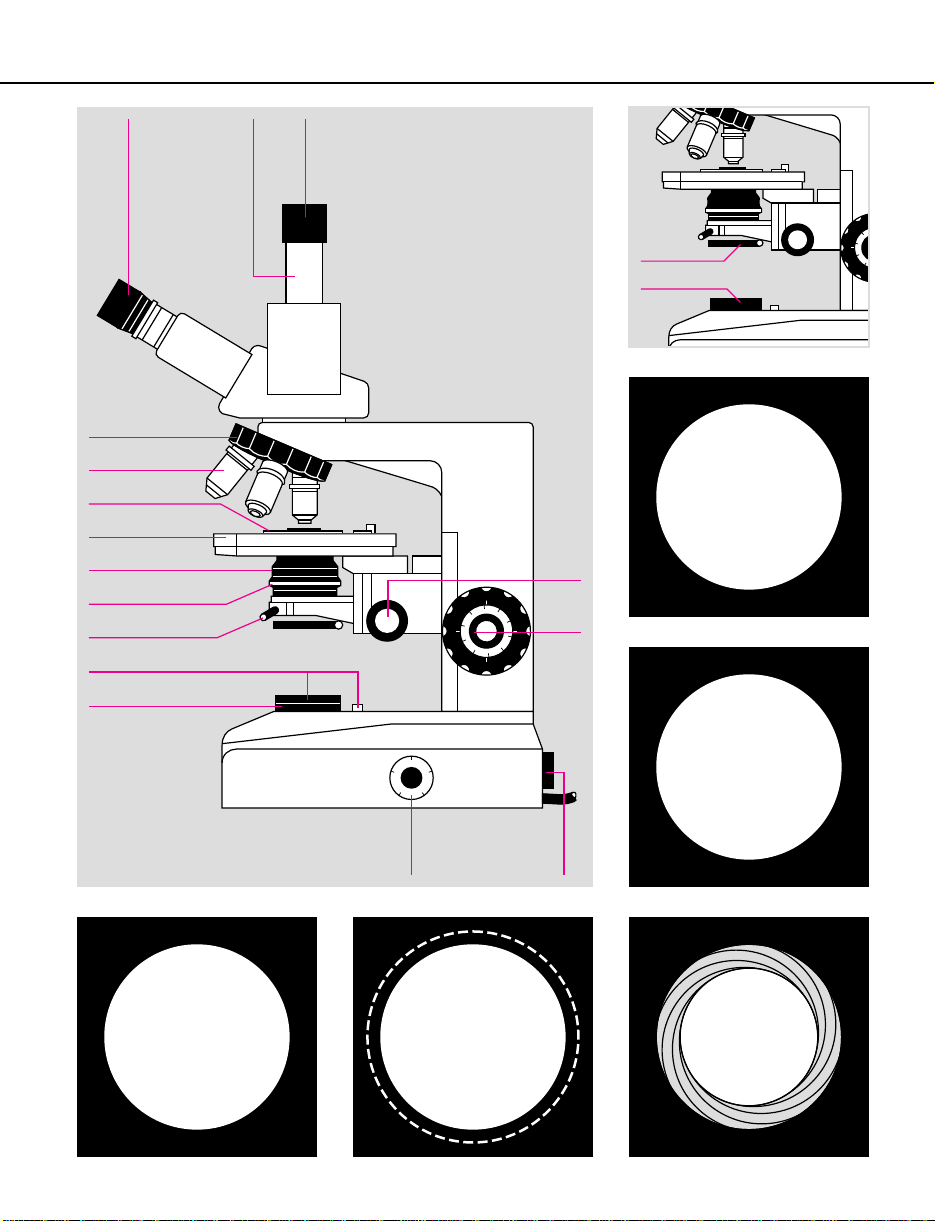
Please refer to the “universal”
microscope illustration (17) for the
location of microscope controls.
Note:
Some older microscopes utilize
optics in the eyepiece to correct for
chromatic aberration. An adapter will be
required to produce optimum resolution
with the MicroCam. (Contact Polaroid
Technical Assistance for information.)
Magnification
The final magnification of the print is
approximately ten times the magnification power of the microscope’s
objective lens. If the exact magnification
must be verified, include a scale in the
photograph.
Page 12

10 English
Microscope parts (17)
a Phototube eyepiece
b Phototube
c Viewing eyepiece
d Revolving nosepiece
e Objective lens
f Specimen
g Specimen stage
h Substage condenser
i Aperture diaphragm adjustment
j Condenser centering screws
k Field diaphragm adjustment
l Field diaphragm
m Condenser focusing knob
n Coarse and fine focusing knobs
o Lamp
p Lamp voltage control
Filter placement
Filters should be placed in the filter
holder (18-q) if the microscope has one.
Alternatively, they can be placed where
the light exits from the microscope base
(18-r). If the latter location is used, be
sure the filters are clean and undamaged.
The nearer they are to the field
diaphragm, the more likely any blemishes
on the filter will be focused with the
specimen.
The addition of cert ain color filters may
change the effective focus of the
microscope (depending on the optical
characteristics of the objective lens). After
adding filters, re-focus the image before
taking pictures.
Koehler illumination
Most modern compound microscopes are
designed for Koehler illumination, which
is ideal for photomicrography. This
technique involves proper alignment of
the light source, alignment and focus of
the substage condenser (17-h) and field
diaphragm (17-l), and adjustment of the
aperture diaphragm (17-i). Koehler
illumination provides even lighting and,
in addition, enables the objective lens to
produce optimum resolution.
Alignment and focus of the substage
condenser and the field diaphragm
1 Place a specimen on the stage and focus
it accurately. Slowly close the aperture
diaphragm of the substage condenser to
a point where you see a distinct reduction
in brightness through the eyepiece. (See
also
Adjusting the aperture diaphragm.)
2 Close the field diaphragm to its smallest
setting. Viewing through the eyepiece,
raise or lower the substage condenser
until the edge of the field diaphragm is
sharply focused with the specimen image
(19).
3 Open the field diaphragm to about 3/4 of
the visual field and refocus the edge of
the diaphragm, as above (20).
Page 13

English 11
4 Align the substage condenser by
centering the image of the field
diaphragm, using the condenser’s radial
centering screws (21). If necessary,
refocus the condenser once again, to
keep the field diaphragm in sharp focus
with the specimen image.
5 Open the field diaphragm until it is just
outside the field of view or, for
photography, until it is just beyond the
area of the film format (22). Do not open
it any farther, since this could cause flare
and a loss in contrast.
Adjusting the aperture diaphragm
The simplest method of adjustment is to
close the aperture only far enough to
notice a loss of brightness. A more
precise method of adjustment is to
remove the eyepiece (or camera) and
look down the tube. The correct setting
will generally be such that the circle of
light within the diaphragm blades has a
diameter about 2/3 to 3/4 that of the entire
light disc (23).
The proper setti ng i s critical for good
photomicrographs; the diaphragm should
be closed down sufficiently to provide the
desired image contrast, but not so far as
to cause unwanted diffraction patterns
that result in a loss of detail.
The light that forms the microscope
image may be either direct (absorbed) or
deflected (refracted/diffracted). The aperture diaphragm controls the “mix” of
direct and deflected light. The correct setting is somewhat dependent on the type
of specimen, and how that specimen uses
direct and deflected light. For example:
• A diatom uses mainly deflected light, and
not much direct light. The aperture
diaphragm should be closed down to
about 25%, to produce the best image.
• Stained tissue uses both direct and
deflected light; an aperture diaphragm of
50% to 90% will produce a good image.
• A stained blood smear uses mainly direct
light, very little deflected light. An
aperture diaphragm setting anywhere
between 25% and 90% will produce a
good image.
Page 14

12 English
Possible problems and causes
Vignetting (dark corners of print):
The
microscope may not be adjusted for
Koehler illumination; the field diaphragm
may not be opened far enough to fill the
field of view.
Image sharp only in center:
May be due
to incorrect objective lens for
photomicrography. Check that the
microscope has a flat-field (also called
“plan” or “plano”) objective.
Also may be caused by chromatic
aberration. If using an older microscope
that has a correction for chromatic
aberration in the eyepiece, contact
Polaroid Technical Assistance for
information about an adapter.
Hot spot (light) in picture:
May be
caused by a low-power objective lens or
the field not evenly covered by the light
cone. If possible, remove the front
element of the condenser. A diffuser in
front of the lamp (or over the field
diaphragm) may help. Also, check the
positioning of the lamp itself. Sometimes
a rotation or a slight change in position
will help uniformity.
This also may be caused by the
substage diaphragm not being closed
down. Close the diaphragm only until you
notice a change in brightness; further
closing will cause a loss of resolution.
Dirt on the condenser can also cause
“hot spots.”
Dirt
One of the most common causes of
picture defects is dirt—on the specimen,
microscope lenses or camera.
• Dirt on the microscope lenses is not
always readily diagnosed. Dirt on the
objective lens may result in an image that
is unsharp overall and lacking in contrast.
Dirt on the collector or condenser lenses
will usually appear as blurred spots or
specks. Dirt on the collector or field
lenses will become more or less sharp
with the specimen as the condenser is
focused. Clean each microscope lens as
recommended by the manufacturer.
• Dirt on the camera’s developer rollers will
produce a repeated pattern of spots or
bars across the image. Clean the rollers
with a soft, lint-free cloth, dampened with
water. Never use cleaning solvents.
• Dirt on the mirror inside the camera will
appear as well-defined spots on all prints
in approximately the same location. To
clean the mirror, open the camera and
remove the film pack. Carefully remove
specks with a clean, soft brush or cotton
swab, or use compressed air.
• Dirt or dust particles on the specimen
may either be in focus (and magnified)
with the specimen or produce
out-of-focus areas in the image. They are
easily located by moving the specimen
across the field of view; cleaning
techniques are dependent on the type of
specimen.
• Dirt on the camera lens will be visible
through the viewfinder; rotate the camera
slightly while looking through the
viewfinder. Dirt on the lens will move as
the camera is moved. This dirt will appear
on pictures as out-of-focus shadows.
Page 15

English 13
FCC Notice (U.S.A. only)
Warning:
uses, and can radiate radio frequency
energy and if not installed and used in
accordance with the instruction manual,
may cause interference to radio
communications.
It has been teste d and found to comply
with the limits for a Class A computing
device pursuant to Subpart J of Part 15 of
FCC Rules, which are designed to provide
reasonable protection against such
interference when operated in a
commercial environment.
Operation of this equipment in a
residential area is likely to cause
interference in which case the user, at
his/her own expense, will be required to
take whatever measures may be required
to correct the interference.
DOC Notice (Canada)
This Digital Apparatus does not exceed
the Class A limits for Radio Frequency
noise from Digital Apparatus set out in
the Radio Interference Regulations of the
Canadian Department of Commerce.
This equipment generates,
Caution
Do not cut or take apart pictures or film; a
small amount of caustic paste may
appear. Avoid contact and keep from
children and animals. If contact is made
with paste, wipe off immediately and
wash with water to avoid an alkali burn.
Warranty
Your Polaroid MicroCam has been
thoroughly tested and inspected before
shipment. All parts are guaranteed
against defects in materials and
workmanship for one full year from the
date of original purchase. During this
period, any such defects will be remedied
by Polaroid Corporation, without charge,
except for transportation costs. The
warranty excludes damage resulting from
normal wear, mishandling or accident,
and a charge will be made for such
repairs.
U.S.A. only:
consequential damages.
Outside U.S.A.:
affect your statutory rights.
Service
Before returning a camera for service,
contact Polaroid Technical Assistance or
the nearest Polaroid Office for shipping
and service information. The camera
should be packed in its original shipping
carton or other sturdy container, and
shipped, prepaid and insured, to the
nearest Polaroid Office (addresses at end
of book).
This warranty excludes
This warranty does not
Page 16

Polaroid Service Centers and Offices
California
Polaroid Corporation
3232 West MacArthur Boulevard
P.O. Box 25200
Santa Ana 92799-5200
Tel: (714) 641-1200
Georgia
Polaroid Corporation
5601 Fulton Industrial Blvd., S.W.
Atlanta 30378
Tel: (404) 346-1717
Illinois
Polaroid Corporation
2020 Swift Drive
Oak Brook 60521
Tel: (312) 954-1600
Massachusetts
Polaroid Corporation
Tel: Toll free 1-800-225-1618
New Jersey
Polaroid Corporation
P.O. Box 607
W-95 Century Road
Paramus 07652
Tel: (201) 265-6900
Australia
Polaroid Australia Pty. Ltd.
Parramatta Industrial Estate
Unit 4F, 6-8 Boundary Road
Northmead, N.S.W. 2152
Tel: 61-2-9507000
Mailing address:
P.O. Box 163
North Ryde, N.S.W. 2113
Belgique/België
Polaroid (Belgium) S.A.-N.V.
Rue Colonel Bourg 111
Kolonel Bourgstraat 111
1140 Bruxelles-Brussel
Tel: 02-736.10.00
Brasil
Polaroid do Brasil Ltda.
Av. Paulista, 1776/11ºAndar
01310-921, São Paulo, S.P.
Tel: (011) 285-6411
Endereço postal:
Caixa Postal 2908
01060-970 São Paulo, S.P.
Canada
Polaroid Canada, Inc.
350 Carlingview Drive
Rexdale, Ontario M9W 5G6
Tel: (416) 675-3680
Toll free: 800-268-6970
Danmark
Polaroid a. s.
Postboks 9
Blokken 75
3460 Birkerød
Tel: 42 81 75 00
Deutschland
Polaroid GmbH
Sprendlinger Landstrasse 109
6050 Offenbach 1
Tel: (069) 8404-1
España
Polaroid (España) S.A.
Paseo de la Castellana, 130
28046 Madrid
Tel: (1) 411 38 36
France
Polaroid (France) S.A.
4, rue J.P. Timbaud
B.P. 47
78391 Bois d’Arcy Cedex
Tel: (1) 30 85 60 60
Great Britain
Polaroid (U.K.) Ltd.
Ashley Road
St. Albans
Hertfordshire AL1 5PR
Tel: St. Albans (0727) 59191
Freefone 2122
Hong Kong
Polaroid (Far East) Ltd.
32nd Floor
Windsor House
311 Gloucester Road
Causeway Bay
Tel: 852-894-0333
Italia
Polaroid (Italia) S.p.A.
Via Piave 11
21051-Arcisate (Varese)
Tel: (0332) 47 00 31
Japan
Nippon Polaroid Kabushiki Kaisha
Mori Building, No. 30
2-2 Toranomon 3-chome
Minato-ku
Tokyo (105)
Tel: 813-438-8811
México
Polaroid de México S.A. de C.V.
Paseo de la Reforma No. 195-14
Col. Cuauhtemoc
06500 México, D.F.
Tel: 703-1111
Nederland
Polaroid Nederland B.V.
Zonnebaan 45
3606 CH Maarssenbroek
Tel: 030-43 56 44
Reparaties:
Polaroid (Europa) B.V.
24 Markt
7511 GB Enschede
New Zealand
Polaroid New Zealand Ltd.
Camera Services
24-26 Anzac Avenue
Auckland
Tel: (09) 377 3773
Mailing address:
P.O. Box 37-046
Parnell, Auckland 1
Norge
Polaroid (Norge) A/S
Industriveien 8B
Postboks 80
1473 Skårer
Tel: (02) 704710
Österreich
Polaroid Ges.m.b.H.
Postfach 66
Eitnergasse 5A
1233 Wien
Tel: (0222) 86 86 27
Portugal
Polaroid (España)
Sucursal em Portugal
Edificio Torre dos Moinhos
Avda. Helen Keller, 19-A
Lisboa
Tel: (01) 363 85 46
Puerto Rico
Polaroid Caribbean Corporation
Centro de Seguros
Ponce de Leon 701, Miramar
Santurce 00904
Tel: (809) 725-6240
Schweiz/Suisse/Svizzera
Polaroid A.G.
Hardturmstrasse 133
8037 Zürich
Tel: (01) 277 72 72
Suomi
Polaroid Oy
Sinikalliontie 10
02630 Espoo
Tel: 90-502 3533
Sverige
Polaroid AB
Ekholmsvägen 34
Box 34
127 24 Skärholmen
Tel: 08/710 0850
In addition to the Service Centers
listed here, there are approved
Service Centers within the United
States as well as in many other
countries. To locate the one closest
to you, contact the nearest Polaroid
Office, above.
 Loading...